

Aseptico ADC-10 User Manual
ADC-10
Portable Dental Stool
AseptiStool
OPERATION MANUAL &
PARTS LIST

ADC-10
!
SAFETY PRECAUTIONS
Aseptico accepts no liability for direct or consequential injury or damage resulting from improper use, arising in particular through the
non-obser vance of the operating instructions, or improper preparation
and maintenance of this product.
To prevent injury to people and damage to property, please
heed relevant warnings and remarks. They are marked as follows:
• WARNING: Serious injury or death may result if ignored.
• CAUTION: Damage to property or the environment may re-
sult if ignored.
• NOTE: Important additional information and hints.
s WARNING: Use for intended purposes only. Failure to observe
the operating instructions may result in the patient or user suffering serious injury or the product being damaged, possibly
beyond repair. Before using this product, make sure that you
have studied and understood the operating instructions.
s WARNING: To avoid tipping hazard, never sit on the edge of the
seat — always sit in the center of the seat.
Congratulations!
Your new Aseptico ADC-10 portable stool is the nest adjustable
gas-shock stool available to the dentistry and medical professions.
Features include:
• Quick setup and disassembly
• Stool seat height adjustable from 18” to 25.5” (45.7 to 64.8 cm)
• Quality vinyl covering
• Casters allow stool to be easily positioned
• Stool is designed for a 300 lb (136 kg) maximum load
• Stool weighs 19 lb (8.6 kg)
• Padded carrying case with handles
• Color Option: Gray, Blue, or Red
• Made in the USA
The ADC-10 portable stool is engineered to provide many years of
reliable service. Please read the instructions provided in this manual to ensure the optimum service from your Aseptico equipment.
STOOL SETUP
s WARNING: Always use the stool on a hard at surface.
s WARNING: The occupant’s feet must be resting rmly on the
oor when making height adjustments to the stool.
s CAUTION: Before using the Stool, ensure that the seat and base
latches have securely locked the seat, gas-cylinder, and base
components together.
s CAUTION: Do not disassemble or alter the gas-cylinder assem-
bly.
s CAUTION: All repairs are to be performed by authorized service
personnel only.
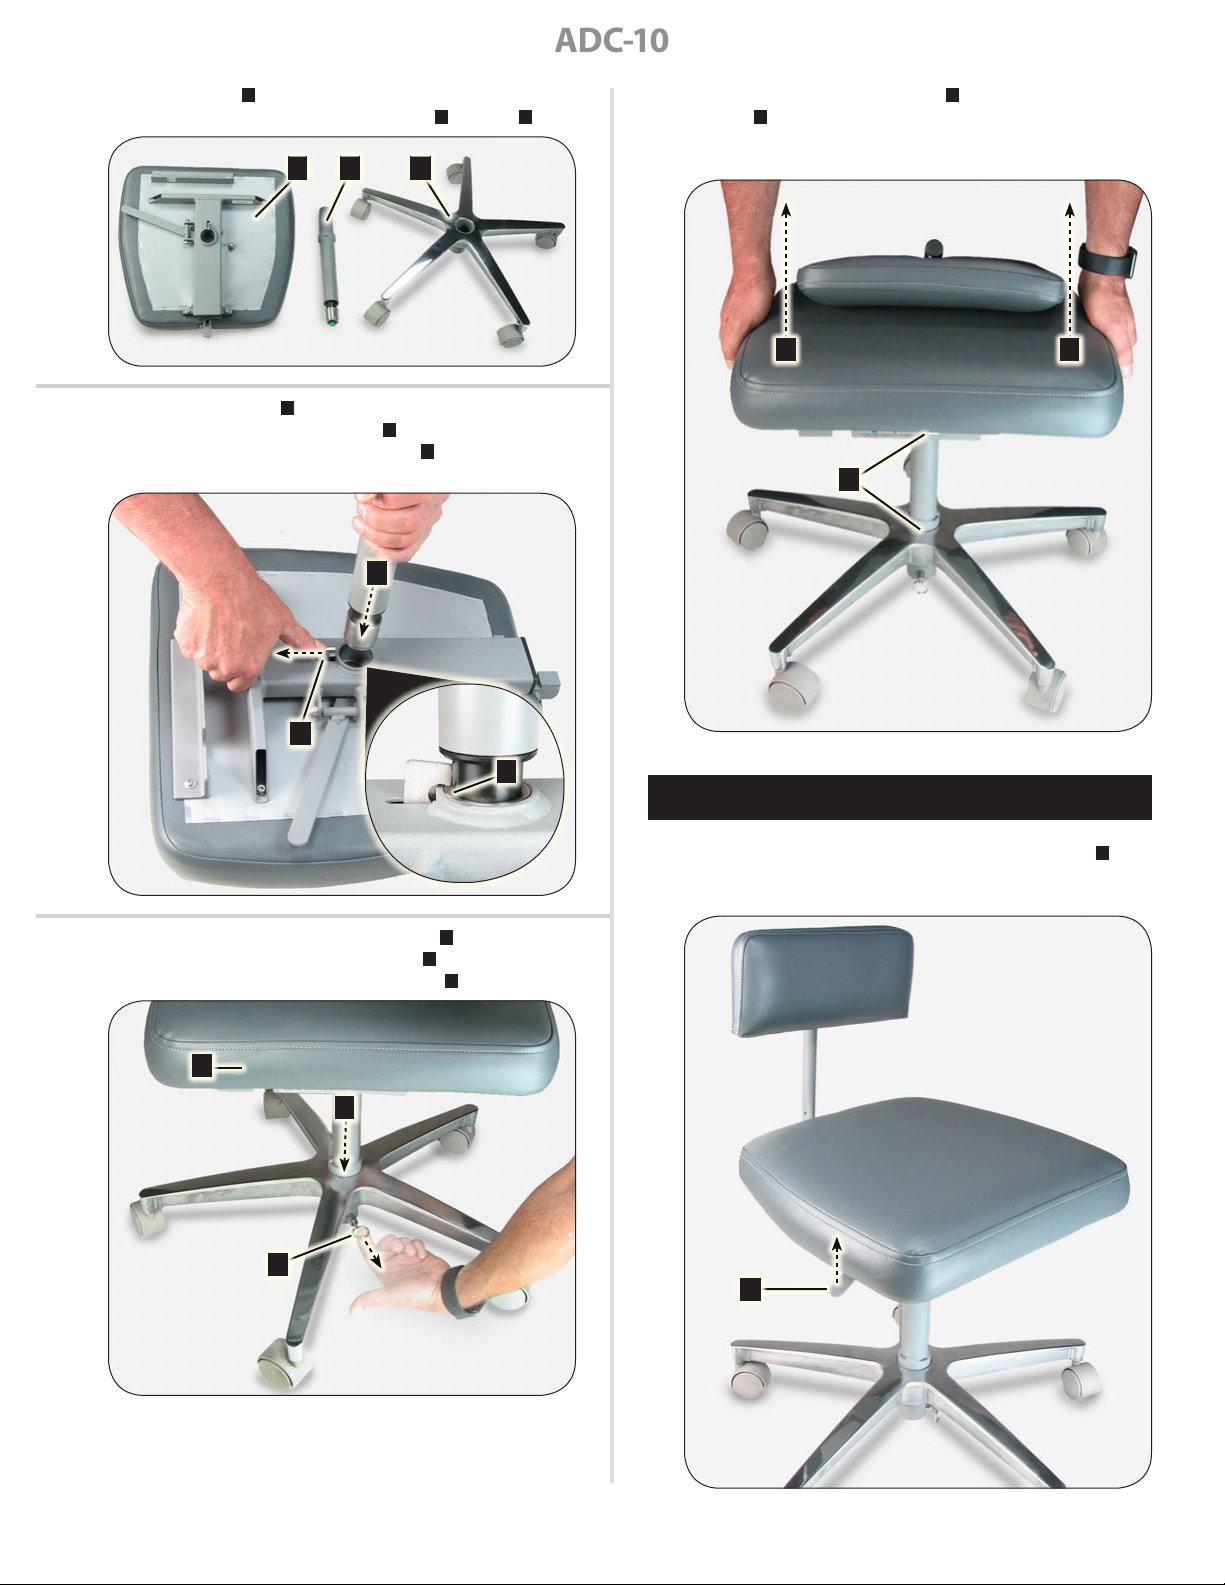
1. Unzip the padded carrying caseA. Place your hand under the
front end of the seat B while lifting to hold the gas-cylinder C
in place and keep it from falling and causing injury.
B
C
A
2. Turn over the seatA and lift the gas-cylinderB from its storage
bracketC, then remove the gas-cylinder from its vinyl pouch.
C B
A
2
ADC-10
3. Remove the base A from the padded carrying case and turn it
over on its wheels, next to the gas-cylinder B and seat C.
ABC
4. Hold open the latch A on the seat frame while inserting
the small end of the gas-cylinder B into the socket. Make
sure the latch fully engages with the lip C on the end of the
gas-cylinder.
B
6. Lift the stool up from the seat A to ensure that the gas
cylinder B is securely latched at both ends. If either end
separates, repeat steps 4-5 above to ensure both latches are
properly engaged.
A A
B
A
C
5. Turn over the seat / gas-cylinder assembly A so the cylinder
is pointing down. Pull and hold the latch B on the base while
inserting the bottom end of the gas-cylinder C into the socket.
A
C
B
SEAT HEIGHT ADJUSTMENT
1. To raise the seat, lift the height adjustment lever A with
no weight on the seat. To lower the seat, lift the height
adjustment lever while sitting on the seat.
A
3
 Loading...