

Page 1
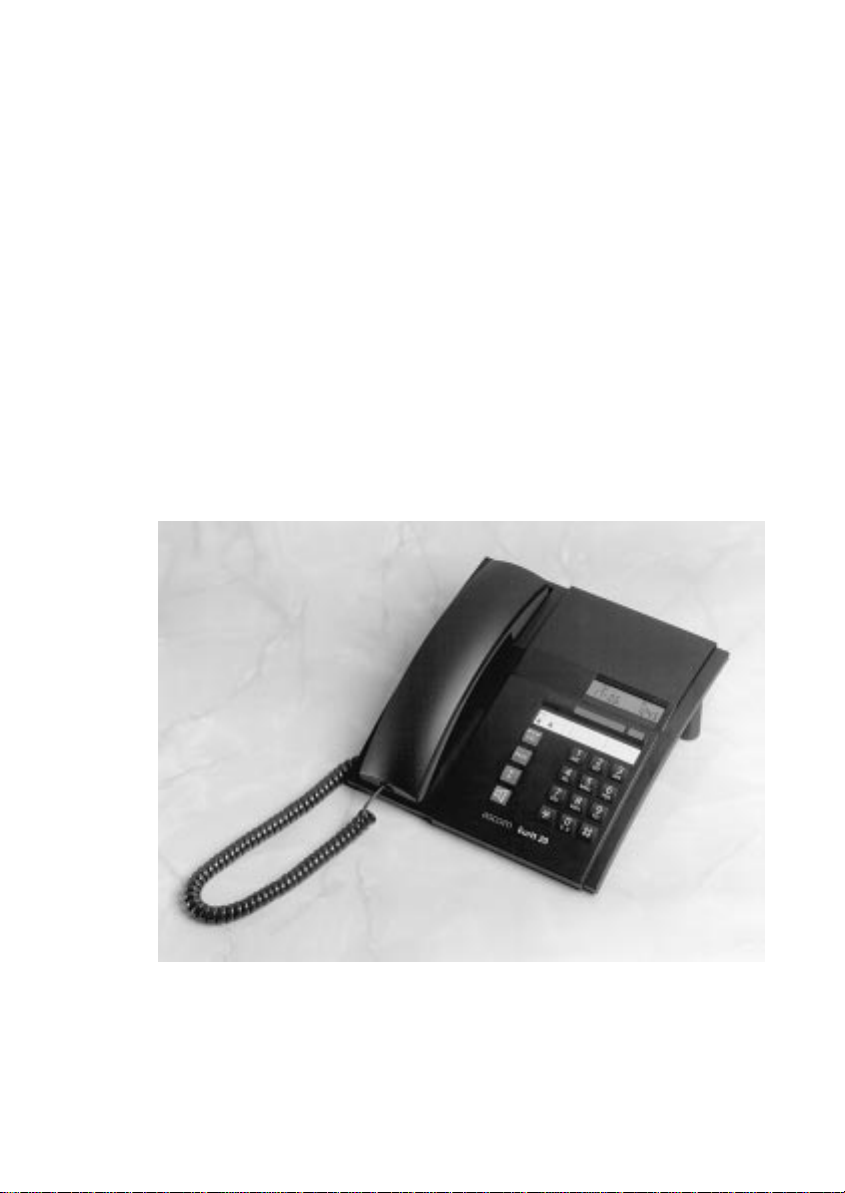
Operating Manual
ascom Eurit 20
Page 2
Operating and Display Elements
23
1
P
11
4
5
6
10
987
Page 3

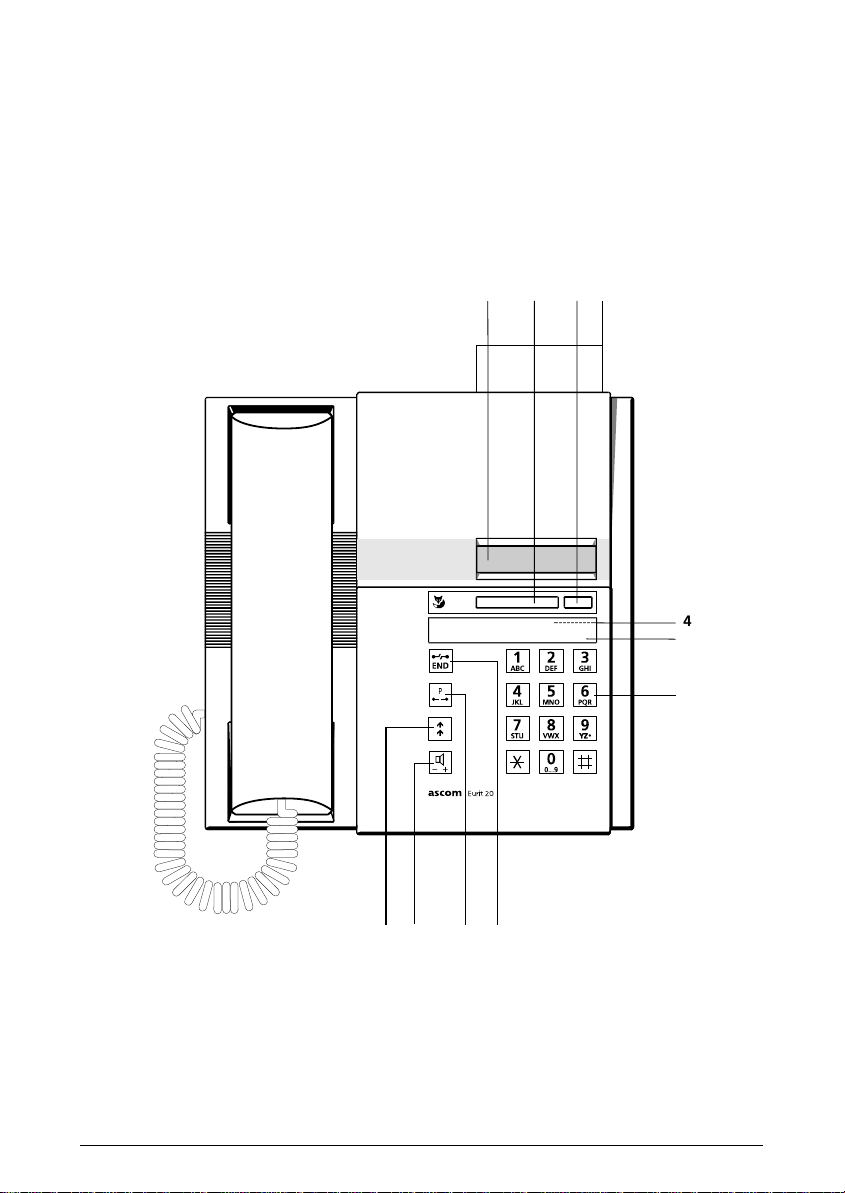
Operating and Display Elements
1 The display
Your telephone is equipped with a 12-character display
2 Foxkey (multi-function bar key)
Press the Foxkey briefly to switch to function mode
Press the Foxkey for 3 seconds to switch to programming mode
3 Memory key
Scrolls the list of callers, stores programmed procedures, speed-dialling
4 Emergency switch
Beneath the label
5 Inscription field
6Dial pad
For dialling telephone numbers (the letters have no function!)
7END key
Terminates a connection, aborts a function or terminates a programming procedure. Switches the set back to default mode
8 Parking key
Parks or retrieves a call
9 Loudspeaker key
Switches the loudspeaker on and off for listening by loudspeaker and hands-free
calling, sets volume in handset
10 Last number redial
Allows the last 9 dialled numbers to be retrieved
11 Quick-reference guide
1
Page 4

ascom Eurit 20
By purchasing an ascom Eurit 20 you have chosen a Swiss quality product. Thank you for
putting your trust in us.
ascom Eurit 20 is intended for connection to the public ISDN.
Please read this operating manual carefully to become fully acquainted with all the advantages of your new
Keep this manual in a safe place!
Important information on your ISDN connection
The number of features depends on the type of connection you have ordered.
For further details on the available ISDN services, contact your Telecom.
Contents
Principles of Operation ....................................................................................................... 4
The extended-feature functions ..........................................................................................4
Display symbols .................................................................................................................4
Making a call .......................................................................................................................5
Incoming calls ....................................................................................................................5
On-hook dialling................................................................................................................ 5
Dialling a number from the speed-dial memory ................................................................... 5
Dialling using the last number redial key ............................................................................. 5
Dialling a number from the caller list................................................................................... 5
Listening by loudspeaker .................................................................................................... 6
Setting the volume for the handset and loudspeaker during a call......................................... 6
Date and time ...................................................................................................................6
DTMF (Dual Tone Multi Frequency) dialling ......................................................................... 6
ascom Eurit 20.
Using the extended-feature functions ............................................................................... 7
Reject incoming calls..........................................................................................................7
Enquiry call, brokering, accepting a second call.................................................................... 7
Call transfer ......................................................................................................................8
Three-way conference call.................................................................................................. 8
2
Page 5

Activate/deactivate call forwarding ..................................................................................... 8
Malicious Call Identification (MCID) .................................................................................... 9
Calling Line Identification Restriction (CLIR).......................................................................... 9
Automatic ring-back if busy................................................................................................ 9
Activating/deactivating a direct call (baby call) ................................................................... 10
Call charge and duration display/Call charge total.............................................................. 10
Parking/retrieving a call .................................................................................................... 10
The extended-feature functions at a glance .................................................................... 11
Programming your telephone .......................................................................................... 12
Programming mode ......................................................................................................... 12
Setti n g t h e ti m e............................................................................................................... 12
Setti n g t h e d a te............................................................................................................... 13
Programming the speed-dialling memory.......................................................................... 13
Programming a direct-call number.................................................................................... 13
Programming a Multiple Subscriber Number (MSN A,B,C).................................................. 14
Programming a destination number.................................................................................. 14
Setting the ringing melody / volume ................................................................................. 15
Deleting the call charge total............................................................................................ 15
Programming the parking ID ............................................................................................ 15
Suppress call waiting........................................................................................................ 16
Programming the charging unit........................................................................................ 16
PBX Operation .................................................................................................................. 17
Programming the exchange access code........................................................................... 17
Enquiry call ...................................................................................................................... 17
Call transfer by replacing handset..................................................................................... 18
Installation ........................................................................................................................ 19
Contents of the p acket .................................................................................................... 19
Connecting the handset and the telephone ....................................................................... 19
Placing the telephone ...................................................................................................... 19
Important Information...................................................................................................... 20
Safety precautions ........................................................................................................... 20
Emergency operation....................................................................................................... 20
Service functions.............................................................................................................. 21
Troubleshooting .............................................................................................................. 21
Product conformity .......................................................................................................... 22
Guarantee.......................................................................................................................22
3
Page 6
Principles of Operation
The extended-feature functions
The Foxkey is used to call up and program extended-feature functions, making your telephone
very simple to operate.
The extended-feature functions are activated/deactivated by pressing the Foxkey followed by the
corresponding function number.
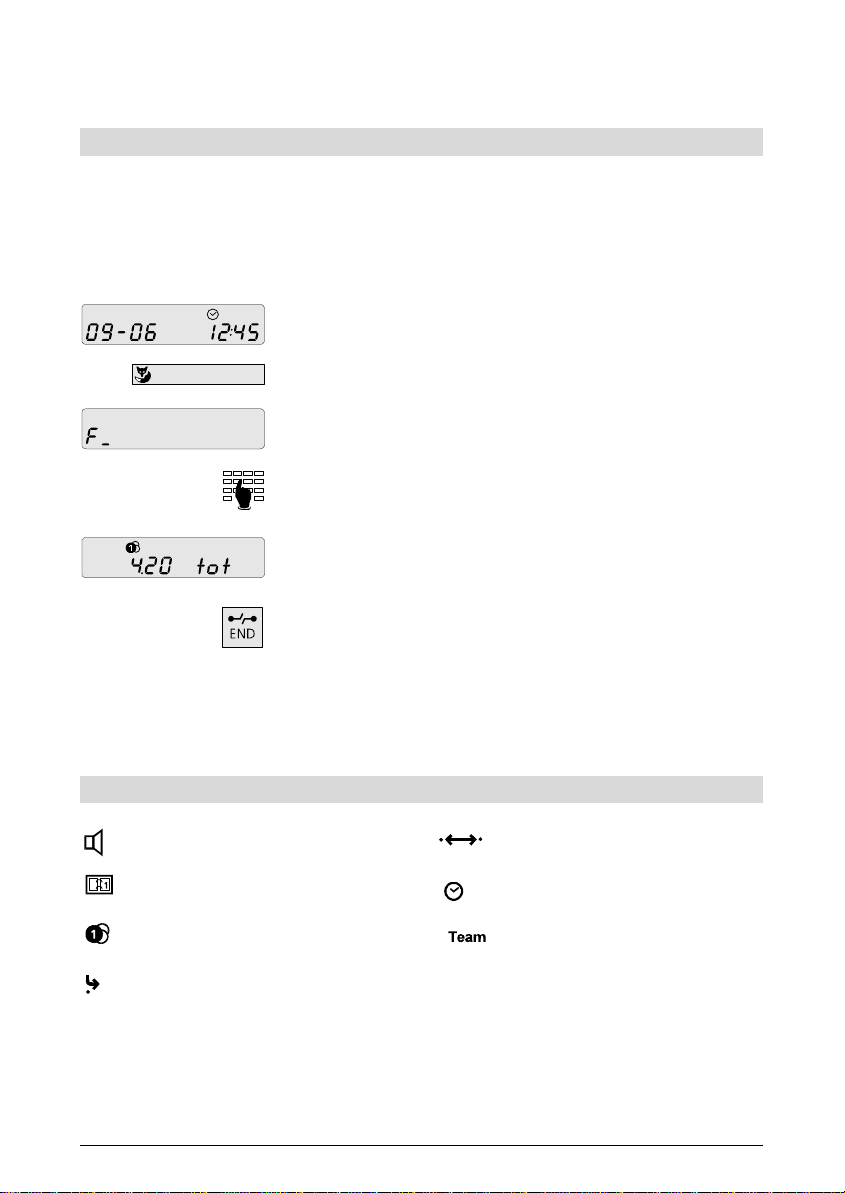
Example of activating a function:
Handset on-hook
Display in default mode, showing date and time
Press the Foxkey
The function mode is displayed
Enter the desired function number (e.g. “9”)
In this case, the charge tot al is displayed
Press the END key to return to default mode (date and time)
A detail description of all extended-feature functions is given in pages 7 to 11.
Display symbols
Loudspeaker key Ring-back
Date Time
Charge 3-way conference call
Call forwarding
4
Page 7
Making a call
Incoming calls
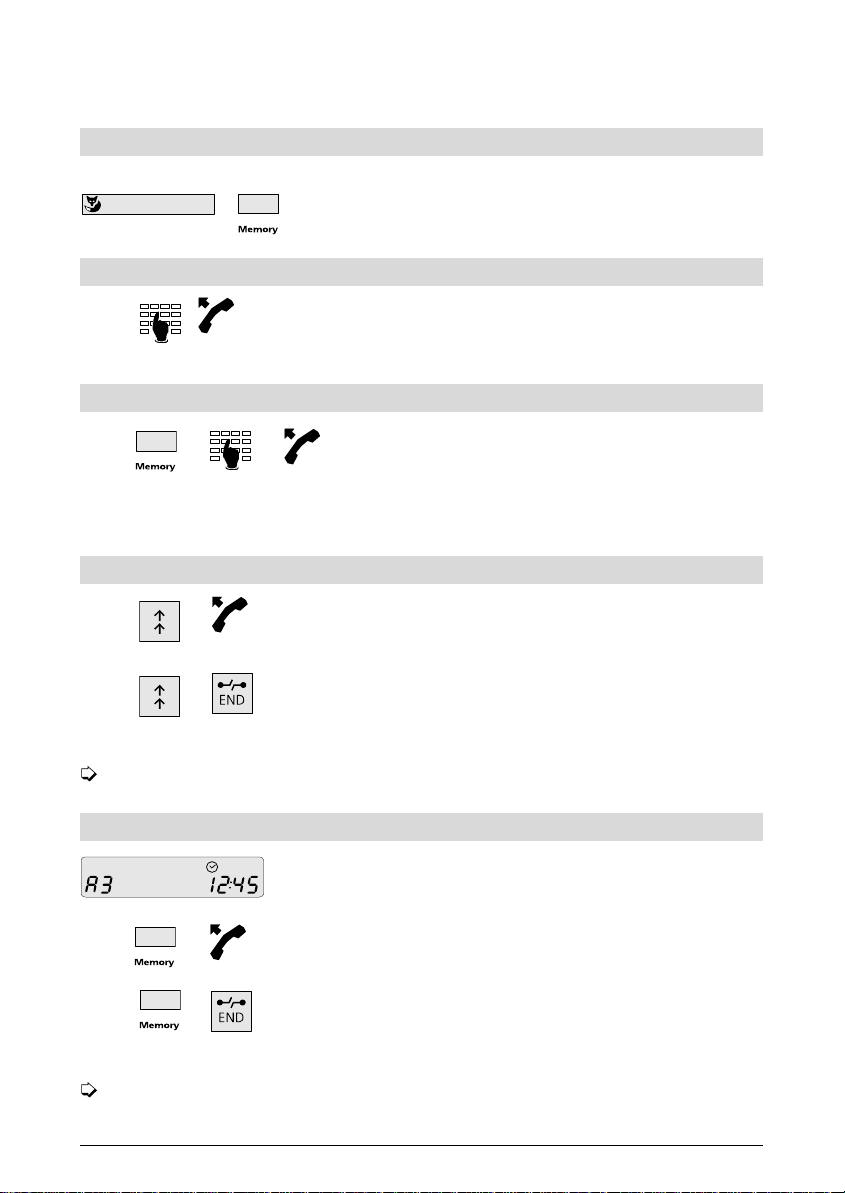
For incoming calls, the caller's number is displayed even before you lift the handset.
Long numbers can be scrolled by pressing the Foxkey
follo wed by the memory key.
On-hook dialling
Enter the number you wish to call, lift the handset or press
the loudspeaker key on ce th e co nn ec ti on has been es tablished.
Dialling a number fr om the speed-di al mem ory
Press the memory key followed by the number under which
the full telephone number is stored (0 to 9), lift the handset
or press the loudspeaker key.
See page 13 for instructions on how to programme your
speed-dial memory.
Dialling using the last number re dial key
Press the last number redial key, several times if necessary, to
retrieve one of the last 9 dialled numbers, lift the handset or
press the loudspeaker key.
To delete numbers from the last number redial memory,
press the last number redial key repeatedly until the number
to be deleted i s displayed . Pre s s the EN D key fo r 3 seconds to
delete the number.
Long telephone numbers can be scrolled by pressing the Foxkey.
Dialling a number from the caller list
The display indicates the number of unanswered calls
(maximum 20).
Press the memory key twice to show the number of the last
caller. Press again to show the next stored number, and so
on. Lift handset or press loudspeaker key.
To delete numbers from the caller list, press the memory key
until the number to be deleted is displ ayed. Then press the
END key for 3 seconds to delete the number.
Long telephone numbers can be scrolled by pressing the Foxkey.
5
Page 8
Making a call
Listening by loudspeaker
The loudspeaker allow s you to listen to the o ther p arty bo th thro ugh the hands et and the lo u dspeaker; thi s all o ws o ther p ers on s in the ro om to l i s ten -i n on you r call . However, sin ce th ere is no
hands-free microphone, you can only talk through the handset.
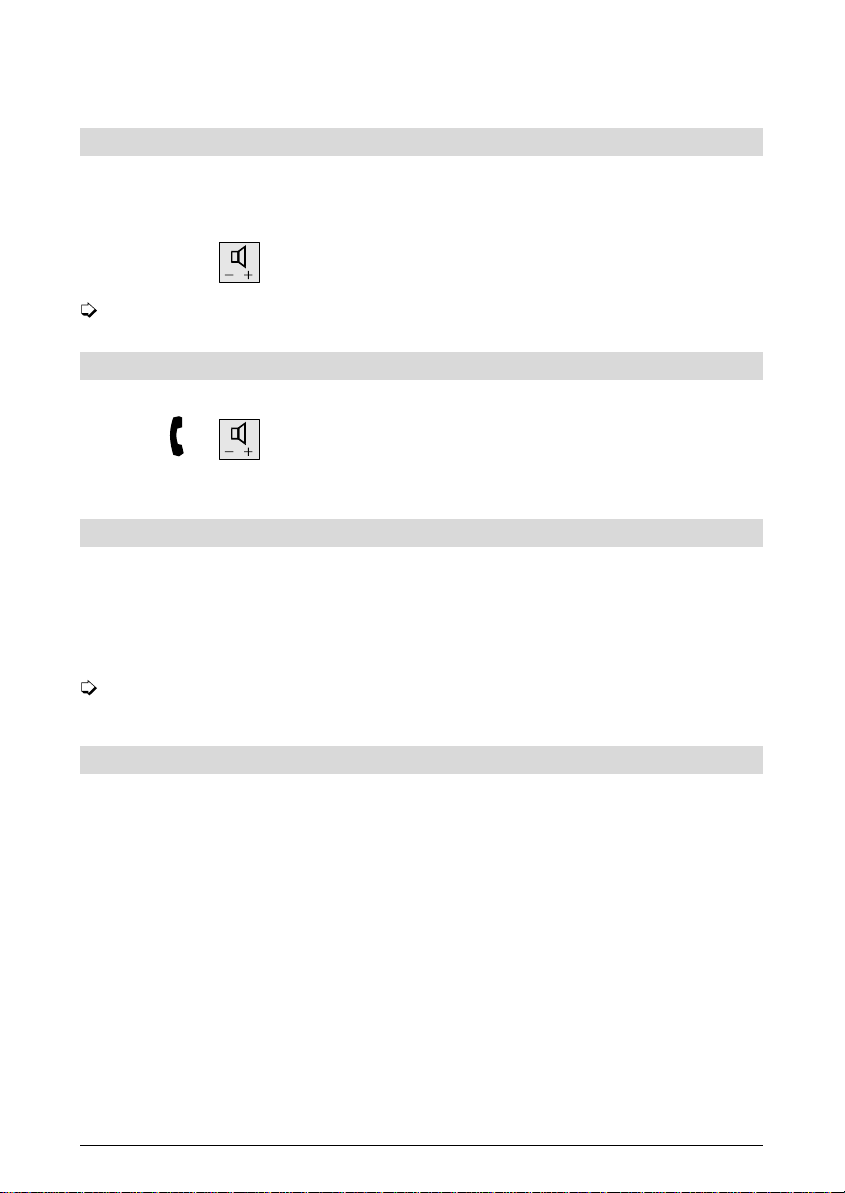
Press the loudspeaker key at any time during the call.
If you wish to continue the call over the handset only, press the loudspeaker key again.
Setting the volume for the handset and loudspeaker during a call
The volume for the handset and loudspeaker on your telephone is preset to “normal”. During a call, you can increase
the volume of the handset or the loudspeaker by dou bl eclicking on the loudspeaker key, and reset to normal volume
by double-clicking again.
Date and time
The date and the time are supplied automatically from the ISDN and do not have to be set manually.
When the telephone is first connected, or after a power cut, the time display blinks. As soon as you
make a call, the date and time are reset and the time display stops blinking. Any differences in the
displayed time and the system time are corrected every time a call is made.
For telephones connected to a PBX, it may be necessary to set the date and time manually (see pages 12 and 13).
DTMF (Dual Tone Multi Frequency) dialling
Once a connection has been established, certain functions can be activated using DTMF (e.g. remote control of an answering machine).
6
Page 9
Using the extended-feature functions
The user-friendly function mode of your telephone allows you to access the following extended
features.
The functions are activated or deactivated by pressing the Foxkey followed by the corresponding
number (see also page 4, Example of activating a function).
Reject incoming calls
The number of the calling party is displayed on your telephone. If you do not wish to answer an
incoming call, you can reject it and store the number in the caller list.
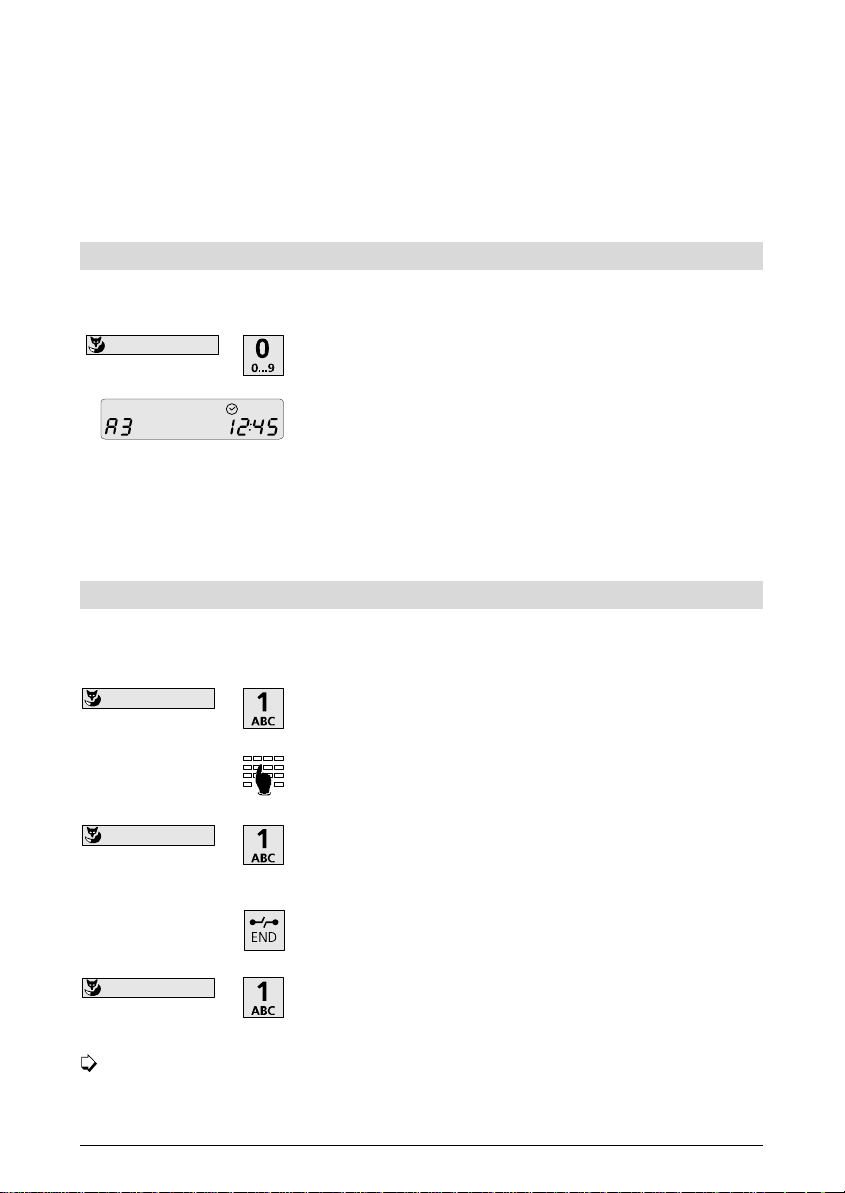
Press the Fo xkey fol lowed by “0 ”
Display: number of calls in caller list with time
If you are call ed while in the middle of another call, an acoustic signal is briefly heard and the
calling party’s number is displayed. You can also reject this call by pressing the Foxkey followed by
“0”.
Enquiry call, brokering, accepting a second call
You can call another party (enquiry call) without having to terminate the first call, and switch between the two cal l s (b ro kering).
While on one line, press the Foxkey follo wed by “1” to select
the second line.
Dial number for enquiry call
Press the Foxkey followed by “1” to switch between the two
calls. The display always shows the number of the active call.
Press the EN D key to termi n ate th e en quiry call .
Press the Foxk ey followed by “1” to retur n to t he fi rst ca l l .
Call waiting (value added service from your Telecom)
If a second caller attempts to call you while you are telephoning, you can accept the call
by pressing the Foxkey followed by “1”.
7
Page 10
Using the extended-feature functions
Call transfer
You have set up two calls and wish to connect the two parties with one another and hang up.
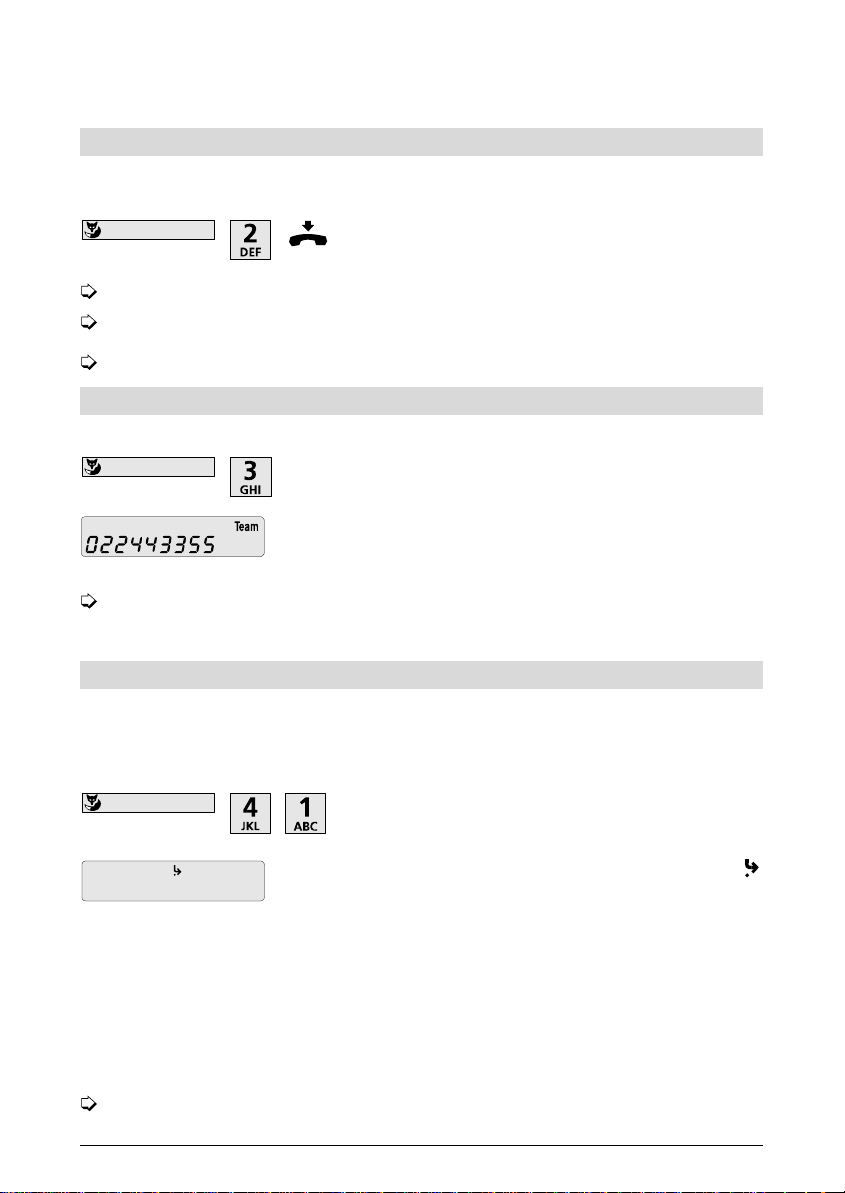
Press the Foxkey followed by “2” to connect the two parties.
Replace handset.
Your Telecom will provide information on the introduction date for this service.
Even after the cal l i s tra ns ferr ed, i t is c h arge d to th e origin al call ing par ty.
For call tran s fers i n PB Xs , see “PB X Op erati o n” , p . 18
Three-way conference call
If you are conducting two calls and wish to speak to both parties simultaneously:
Press the Fo xkey fol lowed by “3 ”
The “Team” s ymbol is d i sp l ay ed. You ha ve acti v ated a thr eeway conference call
Press the Fox ke y followed b y “3 ” ag ai n to t ermi na te the conf erence call. The two ca l l s
remain active and you can switch between them (brokering).
Activate/deactivate call forwarding
Supplem entary servi ce.
You can only forward incoming calls if the corresponding destination number has been program-
med (see p.14).
Press the Foxkey followed by “4”, followed by “1”, “2” or
“3” (call forwarding options).
"Processing" is displayed, followed shortly by the symbol
The call forwarding function is now activated.
Option 1 -> Unconditional
Call is forwarded immediately
Option 2 -> Busy
Calls is forwarded only if your telephone is busy
Option 3 -> Delayed
If you do not answer the call within 15 seconds of hearing the ringing signal,
the call is fo rwarded.
To deacti vate c all forwardin g, p res s t he Fox key fo l l owed by “4” an d “0 ”. Th e fu ncti o n i s
deactivated and the call forwarding symbol is no longer displayed.
8
Page 11
Using the extended-feature functions
Malicious Call Identification (MCID)
If you have subscribed to this service, you can have a malicious call registered while it is in progress
by pressing the Foxkey followed by “5”.
The exchange registers the numbers of the calling subscriber, together with the date and
time of the ca ll .
Calling Line Ident if i cat io n Res t rict i on (CLIR)
If you are a subscriber to this service, you can suppress display of your number on the called party’s
telephone before you dial their number, by pressing the Foxkey followed by “6”.
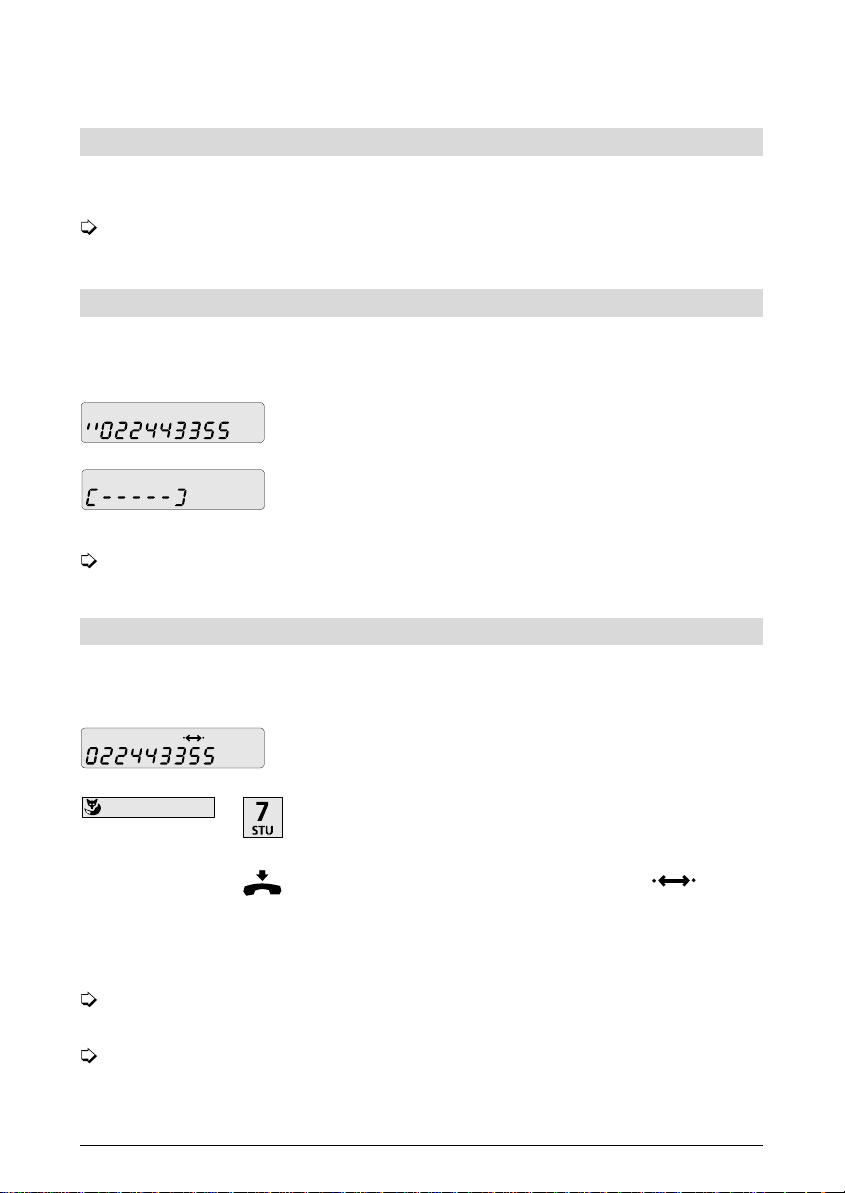
Displ ay for CLI R
If the calling party has suppressed his number, no
number is displayed (display blank)
Your number is suppressed only for the call you are about to make. Once the handset is
replaced, CL IR i s s wi tc hed off.
Automatic ring-back if busy
Automatic ring-back must be available for your connection and the called line must have an ISDN
connection.
You have dialled a number which is engaged, and want to call back as soon as the line is free.
Ring-back signal on the displ ay indi cates that you can use the
ring-back function.
Press the Fo xkey fol l o wed by “7” to act i vate autom a tic ringback.
Replace handset. Display shows the symbol
Your telephone rings as soon as the called party’s line is free.
Lift the hand s et wi thin 15 s eco nd s to a u tom at ic all y make the
connection.
If you lift the handset without opting for automatic ring-back, the ring-back signal disappears and the di s pl a y retu rns t o defau l t mo d e.
A ring-back remains active for around 40 minutes, after which it is automatically
cancelled by the exchange.
9
Page 12
Using the extended-feature functions
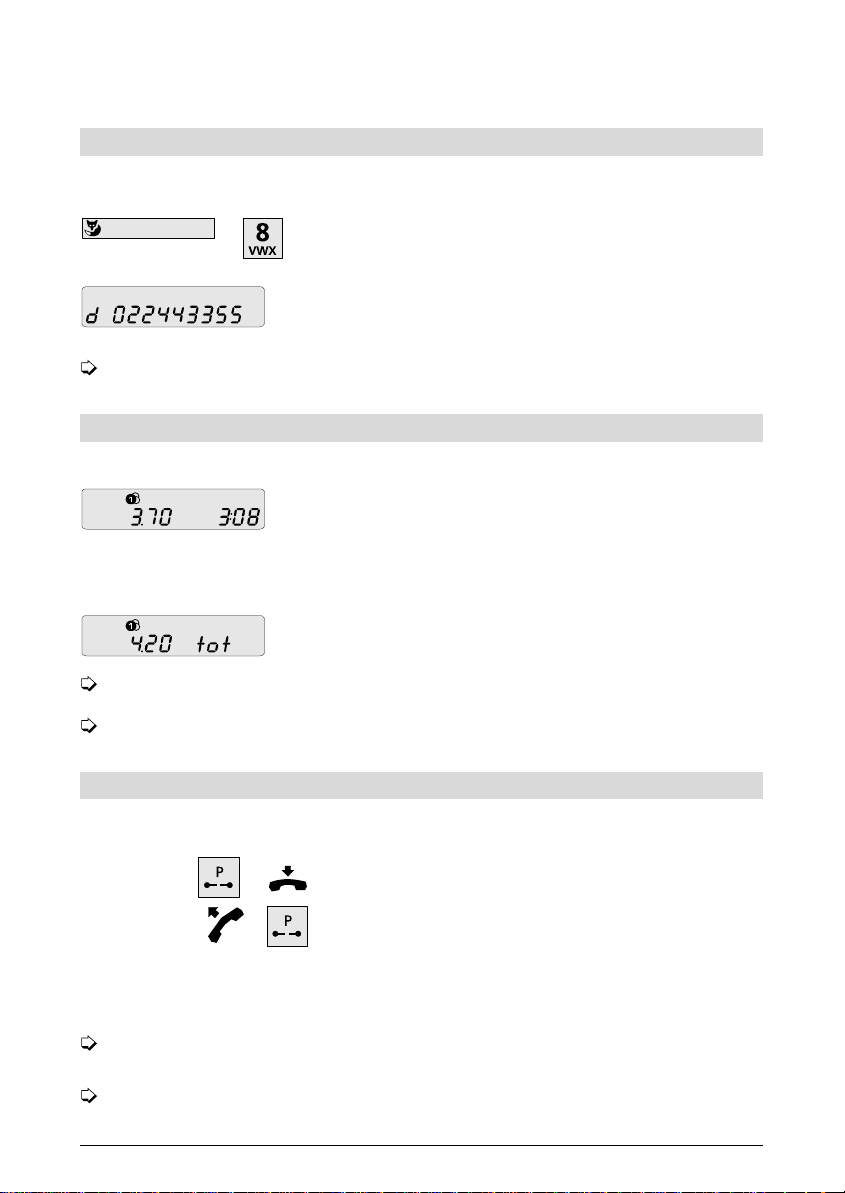
Activating/deactivating a direct call (baby call)
This function can only be activated if a direct call number has been programmed (see p.13). The
programm ed numb er is dial led i m mediately the handset is lifted and any key is pres sed.
Press the Foxkey followed by “8”. The telephone is set for
direct calling.
The preprogrammed direct-call number is displayed (even in
default mode).
The direct call remains active until you deactivate it by once more pressing the Foxkey
followed by “8”.
Call charge and duration display/Call charge total
For outgoing calls, the charge appears on the display during the call.
During the call (after around 8 seconds) the display indicates
the charge and d u rati o n of t h e active call, provided you are
a subscriber to this service.
After pressing the Foxkey followed by “9”, your display will indi cate the number you are calling.
After around 8 seconds the charge is automatically indicated.
You can display the call charge total in default mode by
pressing the Foxkey followed by “9”.
The "Display charge during (after) a call" service must be requested separately depending
on the type of connection.
Please no te th at for tech n i cal reaso n s the dis played call c harg es m ay di ffer from th e
amount invoiced by your telecoms company. The amount shown on your bill is binding.
Parking/retrieving a call
During a call, you can place it on hold, switch the handset to mute, or park the call in order to
continue it on another telephone.
During the call, press the park key and replace the handset.
The call is now parked.
Lift the han dset and p ress the p ark key a gai n t o ret ri eve the
parked cal l .
If you have programmed your own parking ID (see “Programming the parking ID”, p.15), your call
will be parked under this code. To retrieve the call, enter the parking ID again!
A call can be parked for a maximum of three minutes, after which time the connection is
automatica l l y cleared by th e exch a nge.
If for any reason the call cannot be parked, the message “Error” is displayed.
10
Page 13
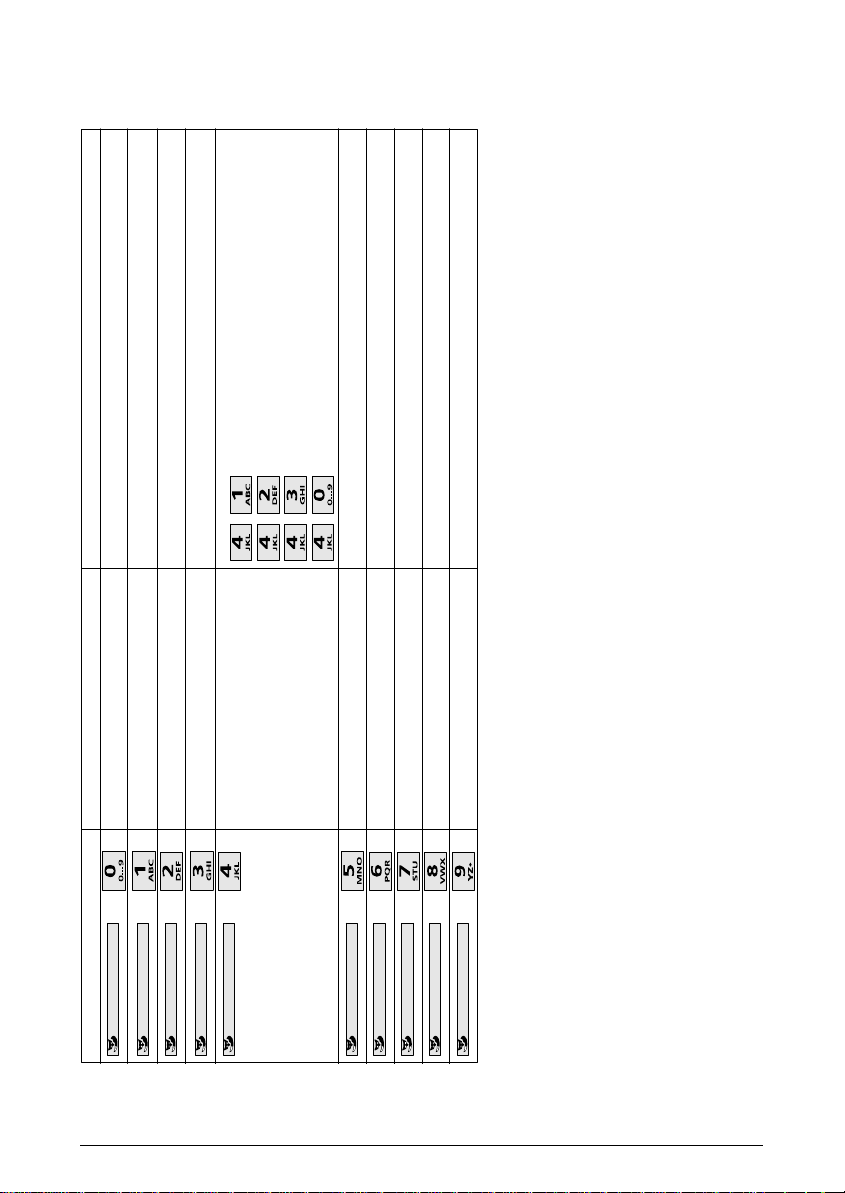
The extended-feature functions at a glance
Delayed
Busy
Unconditional
Establish a sec ond connection, switch between two
connections
Incoming calls are rejected and the numbers stored
in the caller list
Converse with two parties on separate lines
simultaneously
Forward a call to another telephone number
Connect tw o parties with eac h other
Deactivate
Dials a preprogrammed number as soon as the
Suppres ses your number at the c alled party’s end
Registers a malicious call with date and time of call
handset is lifted and any key is pressed
Rings back as soon as the called party’s line is free
Switches from charge to number display.
Displays call charge total in default mode
Enquiry call, brokering,
call waiting
Reject incoming calls
Description Function
Press
3-way conference call
Call forwarding
Call transfer
Calling line identificat ion
restriction (CLIR)
Malicious call identification
Automatic ring-back
Number disp lay /
call charge total
Direct call (baby call)
11
Page 14
Programming your telephone
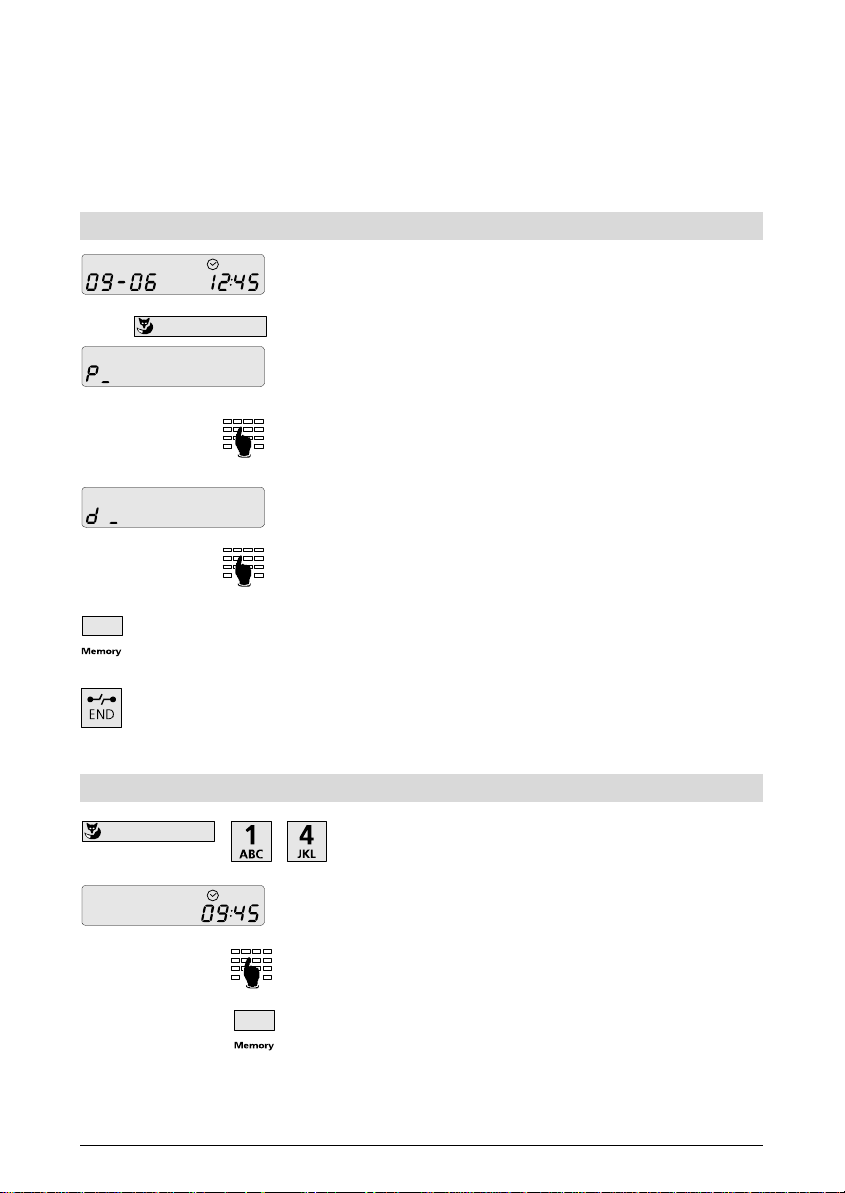
When programming leave the handset on the rest.
If you receive a call while programming, the programming procedure is automatically aborted.
Programming mode
Default display (date and time)
Press the Foxkey or memory key for 3 seconds to switch to
programming mode.
Enter the desired programming number (e.g. “8”).
The display switches to a prompt. In this example the prompt
asks you to enter the direct-call number.
Enter the desired direct-call number.
Programming is stored by
and the telephone switches to default mode (displaying date and time).
If you receive a call during programming or lift the handset (or press the loudspeaker
key) or pres s t he
default mode. If this happens you must restart programming.
Setting the time
pressing the memory key
END key, programming is aborted
Press the Foxkey for 3 seconds, followed by the numbers "1"
and "4".
Time is displayed.
Enter the correct time.
Press the memor y key to sto re the corrected t im e.
12
. This completes programming
and the telephone returns to
Page 15
Programming your telephone
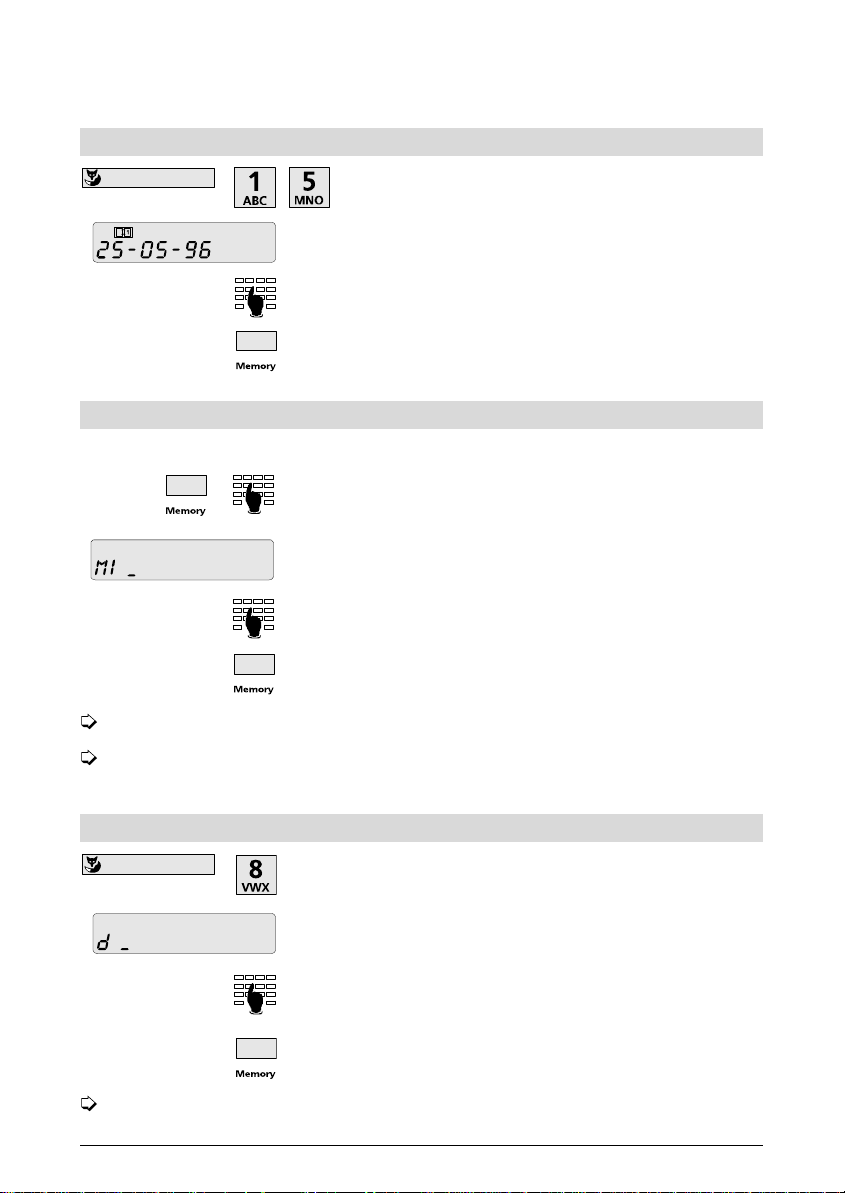
Setting the date
Press the Foxkey for 3 seconds, followed by the numbers "1"
and "5".
Date is displayed.
Enter the corr ect da te.
Press the m emor y key to s to re th e corrected date.
Programming the speed-dialling memory
You can program up to 10 frequently used numbers in the speed-dialling memory.
Press the mem ory key for 3 seconds and enter the code (one
digit) under which you wish to store the telephone number.
The display prompts you to enter the full number.
Enter the full number.
Use the Foxkey to delete a preprogrammed speed-dialling number digit by digit.
If you press the END key for 3 seconds, you have the option of deleting the
corresponding speed-dial memory.
Programmin g a direct-call number
Use the Foxkey to delete a preprogrammed direct-call number digit by digit.
Press the memory key to store the number.
Press the Foxkey for 3 seconds to switch to programming
mode, then press “8”.
“d” (for direct call) is displayed.
Enter the direct-call number.
Press the memory key to store the number.
13
Page 16
Programming your telephone
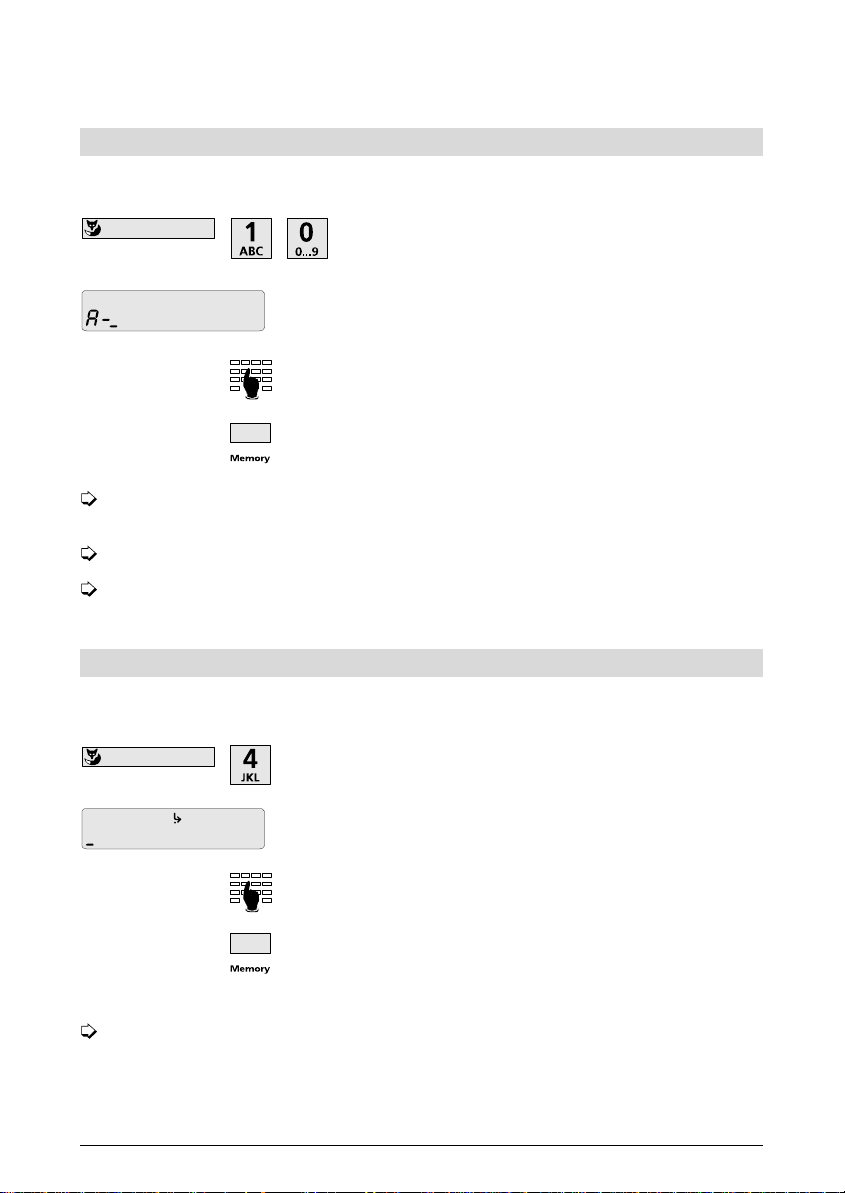
Programming a Multiple Subscriber Number (MSN A,B,C)
Every telephone set can be assigned up to three numbers, (MSN A, B and C) i.e. your telephone
will only ring if one of the programmed numbers has been dialled.
Press the Foxkey for 3 seconds followed by “1” and “0”.
The displ ay p ro m pts yo u to enter th e fi rs t MSN (MSN A).
Enter the desired number.
Press the mem ory key to s tor e the MSN .
MSN B (Foxkey followed by “11” ) and MSN C (Foxkey followed by “12”) are programmed in the same way.
If you wish your telephone to ring for all incoming calls , do not program any MSNs.
Use the Foxkey to delete a number digit by digit and then terminate the procedure using
the memory key.
Programming a destination number
You can only program a destination number if MSN A has been programmed. Call forwarding is
not possible for MSN B and MSN C.
Press the Foxkey for 3 seconds followed by “4”.
The call forwarding symbol is displayed.
Enter the destination number.
Press the memory key to store the destination number.
Use the Foxkey to delete a preprogrammed destination number digit by digit, and
terminate the procedure using the memory key.
14
Page 17
Programming your telephone
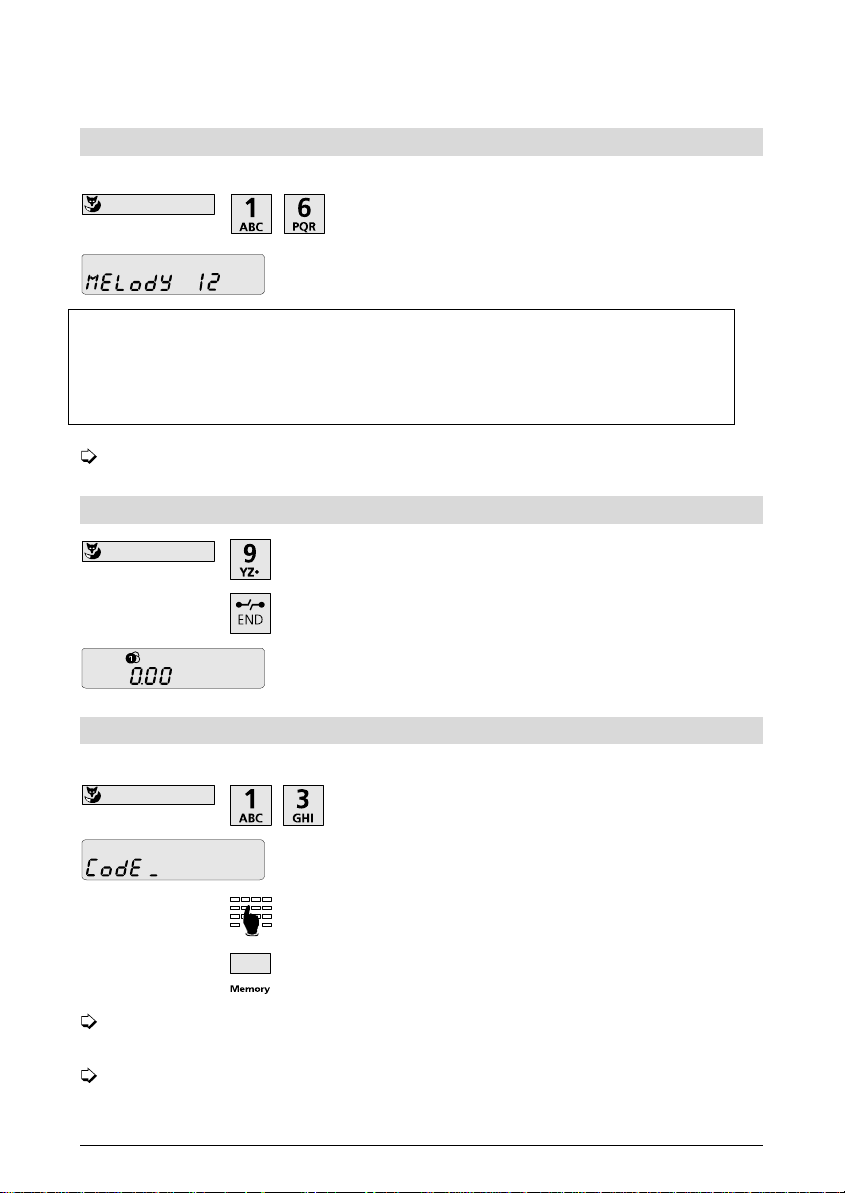
Setting the ringing mel ody / volume
You have a choice of four ringing melodies and three volume settings for your telephone.
Press the Foxkey for 3 seconds followed by “1” and “6”.
The display prompts you to define the desi red melody or
volume as follows:
Keys “1”, “2” or “3” -> Melody 1 with “1” = soft, “2” = medium, “3” = loud
Keys “4”, “5” or “6” -> Melody 2 with “4” = soft, “5” = medium, “6” = loud
Keys “7”, “8” or “9” -> Melody 3 with “7” = soft, “8” = medium, “9” = loud
Keys “*”, “0” or “#” -> Melody 4 with “*” = soft, “0” = medium, “#” = loud
Press the memory key to store the selected ringing melody and quit programming.
Deleting the call charge total
Press the Foxkey for 3 seconds followed by “9”, to display
the charge total.
Press the EN D key fo r 3 seconds.
The charge to ta l is deleted and the displ ay is reset to “0.00 ” .
Programming the parking ID
You wish to park th e cu rrent call with a def ined cal l ID an d r etri eve it el s ewh ere.
Press the Foxkey for 3 seconds followed by “1” and “3”.
The displ ay pro m pts yo u to enter th e parki ng ID .
Enter the parking ID.
Press the memory key to store the parking ID.
Use the Fo x key to del ete a pro grammed c all ID and then terminate th e procedu re using
the memory key.
Note that only one digit (0 to 9 or #) can be entered as the parking ID. If you have defined “#” as the p arking ID, the us er is alw ays re q u es ted to enter the parkin g ID (au to matic parking option no longer available).
15
Page 18
Programming your telephone
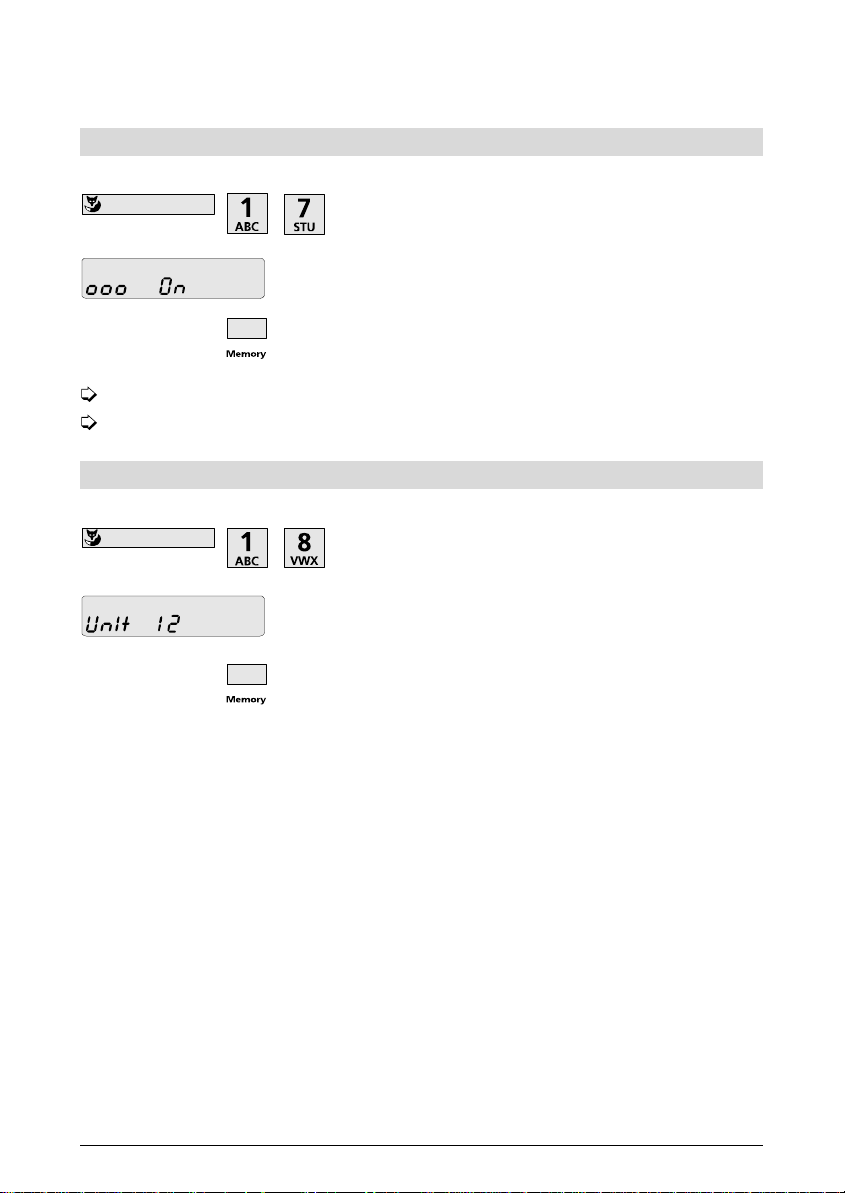
Suppress call waiting
To suppress the “call waiting” function:
“OFF” indicates that call waiting is suppressed
“ON” indicates that call waiting is enabled
Programming the charging unit
You wish to enter a new charging unit:
Press the Foxkey for 3 seconds followed by “1” and “7”
Press the Foxkey to disp lay “O FF”
Press the memory key to suppress call waitin g function
Press the Foxkey for 3 seconds followed by “1” and “8”.
Press the Foxkey to delete the old charging unit, and enter
the new charging unit.
Press the memo ry ke y to s tore th e new v al u e.
16
Page 19
PBX Operation
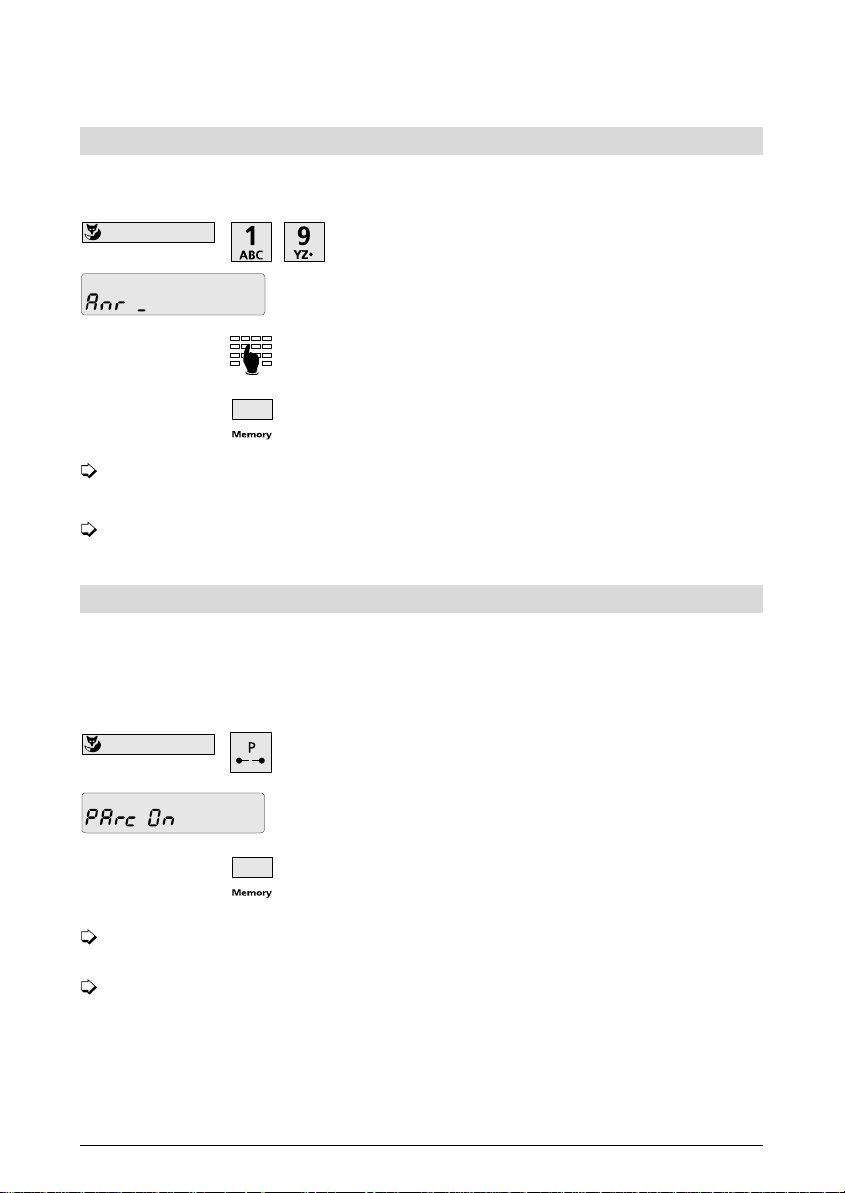
Programming the exchange access code
If the telephone is connected to a PBX the exchange access code may have to be programmed, for
instance to ensure correct dialling o f num bers from the caller list.
Press the Foxkey for 3 seconds, followed by numbers "1"
and "9".
The display prompts you to enter the exchange access code.
Enter the exchange access code.
Press the memor y key to s to r e.
Once you have programmed the exchange access code, numbers can be stored in the
speed-dial memory with prefix but without exchange access code.
The Foxkey allows you to delete a preprogrammed exchange access code and terminate
the procedure using the memory key.
Enquiry call
If the telephone is connected to a PBX it may be useful to configure the parking key as the enquiry
call key. Th e " Park/r etri ev e cal l" functi o n can then be c all ed up by pres s i ng t he Fox key follo wed by
"1".
This can be programmed as follows:
"Park On" mean s th at the p arking key i s pro gram m ed fo r th e "Park/ retrieve cal l "
function (ex-factory setting)
"Park Off" means that the parking key is programmed for the "Enquiry call" function
Press the Foxke y for 3 seco n ds , th en p res s t he parki ng key.
Press the Fox ke y. The display alternat es b e tween "Park O n"
and "Park OFF".
Press the memory key to store the d e si red setting.
17
Page 20
PBX Operation
Call transfer by replacing handset
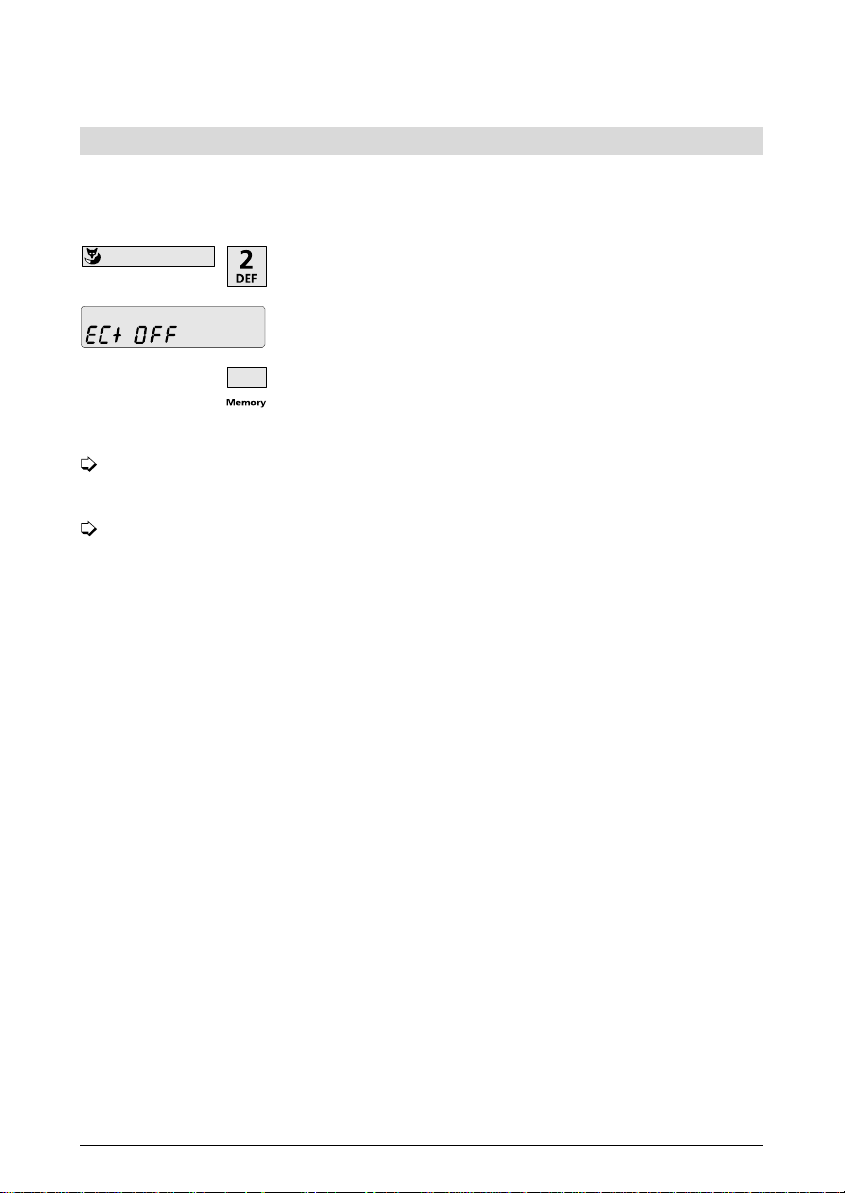
If the telephone is connected to a PBX you can transfer a call by replacing the handset. This
function is not supported by all PBXs.
To programme this function:
Press the Foxkey 3 seconds followed by "2".
Press the Fox ke y. The display alternat es b e tween "EC T O ff"
or ECT On".
Press the memory key to store the d e si red setting.
"ECT Off" means that the current call is disconnected when the handset is replaced. The
call on hold is signalled (ex-factory setting).
"ECT On" means that the call is transferred as soon as the handset is replaced.
18
Page 21
Installation
Contents of the packet
Telephone base unit
Handset, including connection cable
Telephone connection cable
Operating manual
Feet
Perspex c over
Pyramid (handset cradle for wall mounting)
Quick-re ference guide
Connecting the handset and the telephone
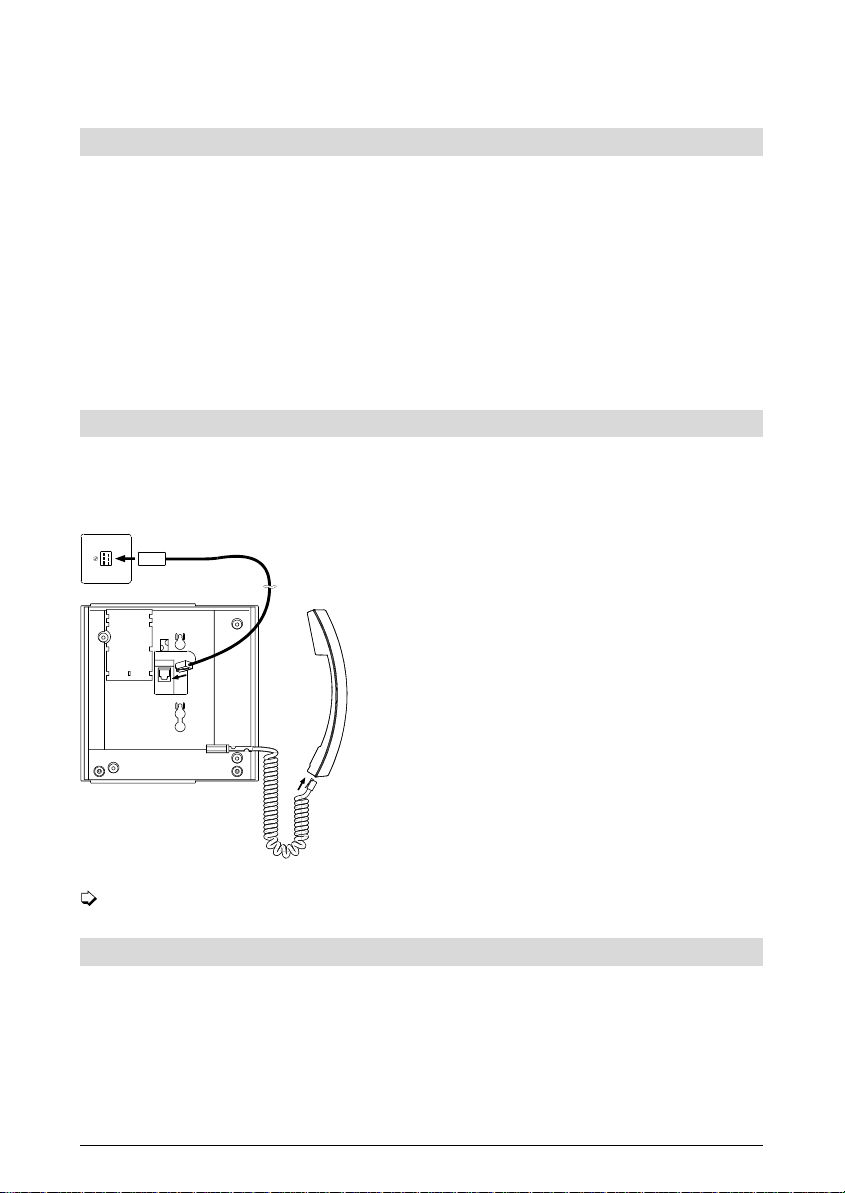
After unpacking the telephone, connect the handset to the base unit by plugging the handset
connection cable into the small socket on the base of the telephone. Give it a slight tug to check
that the plug has locked into place. Insert the other end in the handset.
Now connect the telephone by plugging the telephone cab l e in t o the l arger s o cke t on the b ase of
the telephone. Give the plug a slight tug to check
that it has lo c ked into place. Lead the cabl e
through the cable channel and plug the other end
into the telephone soc ket. Inser t the feet in the top
end of the telephone base unit.
To ensure stability, both feet must be mounted.
Placing the telephone
In view of the extensive range of surfacing m aterials u sed on furniture, i t is imp o ssib le to guaran t ee
that the base of the telephone (e.g. the feet) will not cause marks. We therefore recommend that
the phone be placed on a non-slip mat.
19
Page 22

Important Information
Safety precautions
- Please read this Operati ng Manual and keep it i n a safe place. I f you have any que st io ns, cons u lt
an expert. Have your telephone serviced by an expert; never open the telephone yourself.
- Do not touch the plug contacts with pointed or metallic objects. Place your telephone on a
non-slip mat.
- Do not expose your telephone to direct sunlight or other sources of direct heat.
- Do not install or use your telephone in rooms in which there is a risk of explosion.
- Protect your telephone from dampness, heavy dust and aggressive fluids and vapours.
- Do not expose your telephone to electromagnetic fields (electric motors, domestic appliances)
which might impair the speech quality.
- Avoid positioning the telephone directly next to a radio, TV or VCR.
- Plug the telephone connection cable only into the telephone socket designed for it. Under no
circumstances change the cable plugs.
- Never carry your telephone by the connection cable.
- Never use the telephone near water.
- Clean your telephone with a soft, slightly damp or antistatic cloth.
- Do not use cleansing agents or chemical substances to clean your telephone.
- Use your telephone only between temperatures of from +5˚ C up to approx. +35˚ C.
Emergency operation
If there is an outage of the local 230 V mains supply, the ISDN connection is powered directly from
the exchange (emergency operation). This remote power supply is only sufficient to power a single
telephone!
If several telephones are operated on the same connection, only one telephone may be authorized
for emergency operation. Otherwise, the ISDN connection will be powered down.
Emergency authorization is assigned by pressing (engaging) the switch behind the perspex cover of
the inscription field, and deactivated by pressing the nipple sideways (disengaging the switch).
The emergency telephone is fully-functioning in normal operation. In emergency
operation the display is switched off. Ringing volume is set to low. Outgoing calls must
be made by lifting the handset and dialling the number.
The emergency telephone should be clearly labelled as such by affixing a coloured
sticker.
20
Page 23
Important Information
Service functions
Displaying the software version
To check the software version for your telephone, press the Foxkey followed by “#” then “1”.
The softw are versi o n i s di s pl ay ed . Pr es s the EN D key to return
to default display mode.
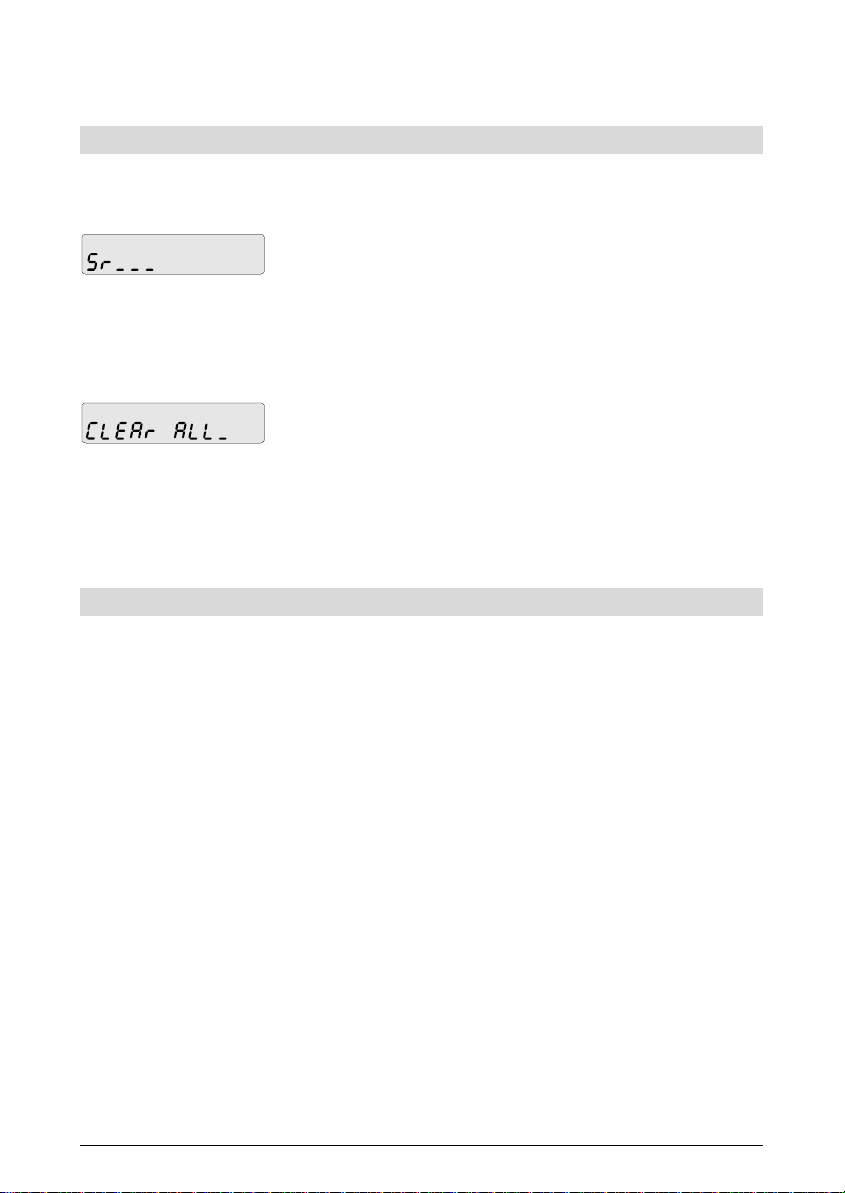
Resetting the telephone to ex-factory setting
To clear all programmed data in your telephone, press the Foxkey followed by “#” then “3”.
Display message for clearing all programmed data. Press the
memory key to initiate the clearing procedure. Once all data
have been cleared th e dis play returns to default mode (date
and time).
Note: This procedure also clears all numbers stored in the speed-dialling memory.
Troubleshooting
Handset off-hook, no dialling tone, display blank
Ensure that the telephone connection cable is correctly plugged into the telephone and the telephone socket.
Handset off-hook, busy tone only or no dialling tone
Unplug and re-insert the telephone connection cable .
Display blank
Your connection may be in emergency mode. Che ck the power at the mains socket.
Unplug and re-insert the telephone connection cable.
21
Page 24

Important Information
Product conformity
The
ascom Eurit 20 i s m anu fac tured in accord an ce wi th qua li ty co ntro l sys tem s a ccep ted by the
BZT.
ascom Eurit 20 is designed for connection to the public ISDN and meets the requirements de-
The
fined in the following standards or standardization documents:
I-CTR 3 (prTBR3, NET3)
CTR 8 (TBR 8)
BAPT 223 ZV 25
EN 50081-1
EN 50082-1
EN 60950
Guarantee
Your telephone is covered by a 12-month guarantee from the date of purchase. Keep the receipt
as proof of the purchase date. Within the guarantee period, Ascom will repair free of charge all
faults which are caused by faulty material or production errors and reserves the right to correct the
fault either by repairing the defective telephone or by replacing it.
This guarantee does not cover damage caused by incorrect use, wear and tear or attempts by third
parties to repair the unit. The guarantee does not cover material or defec t s which have only a minimal impact on the use or value of the telephone.
All claims under guarantee should be made with our appointed dealer from whom you purchased
the telephone.
22
Page 25
6
5
4
9
8
7
3
2
1
1
6
5
4
9
8
7
3
2
1
4
3
2
1
0
9
8
7
6
5
4
3
2
1
0
9
8
7
6
5
2
3
4
5
6
1
2
3
0
1
2
3
4
0
1
2
3
4
5
6
7
8
9
5
6
7
8
9
4
5
6
Page 26

Manufactured in Switzerland by:
Ascom Zelcom AG
P. O. Box 500
CH-8634 Hombrechtikon
Switzerland
216 024-00020 KD A00
PM000100\INT_E
 Loading...