

Page 1

About This Manual
Please read this manual thoroughly prior
to using your phone. This manual is
divided into the following sections.
Important Safety Information describes
safety factors for using electronic
products.
Guidelines for Safe and Efficient Use
describes important information for using
your phone.
Battery Information contains useful
information about rechargeable batteries.
Getting Started tells you what you need to
know to get your phone out of the box
and ready to make calls.
Learning About Your Phone describes the
parts of your phone to help you get
familiar with its operation.
Basic Operations gets you started using
your phone by describing operations such
as placing calls, answering calls, speed
dialing, volume control, and microphone
muting during a call.
Using Menus describes how to access and
navigate through menus.
Storing and Recalling Numbers In
Memory describes how to use the memory
features of your phone.
Menu Descriptions describes the menus
and settings available on your phone.
Problems You Can Solve provides an
easy-to-use troubleshooting table if you
should encounter problems using your
phone.
The following descriptions will help you
understand the information presented in
this manual.
Names of keys - Key names are shown
in Bold type. Some keys have more than
one function. When the name of a
multiple function key is used, the function
which is being referred to is shown in bold
type. For example, “To temporary mute
the warning beeps, press Mute button”.
Any text or numbers which represent
something shown on the phone display
use a typeface similar to that of the
phone display, Search, for example.
Soft Key Functions - The right and left
soft keys of your phone has multiple
functions depending on what menu state
its in. They are shown in “block” character, Menu for example.
Illustrations of phone displays in this
manual are examples which approximate
what is shown in the phone display. What
is actually shown in your phone display
may vary slightly from what is represented in the illustrations.
071702/R1
Page 2

2
Table of Contents
Table of Contents
About This Manual.................................................................. 1
Important Safety Information ................................................. 4
Guidelines for Safe and Efficient Use..................................... 5
WARRANTY NOTIFICATION.............................................................................. 7
New Batteries ........................................................................................................... 8
Battery Use and Care .............................................................................................. 8
Battery Charging Times .......................................................................................... 8
Battery Information................................................................. 8
Getting Started......................................................................... 9
Install the Battery .................................................................................................... 9
Charging the Battery ............................................................................................... 9
Charging a Battery Attached to the Phone.......................................................... 9
Attaching the Belt Clip to your Phone ............................................................... 10
Removing the Belt Clip from your Phone........................................................... 10
Learning About Your Phone ....................................................11
Display Indicators ................................................................................................. 12
Indicator Light Functions..................................................................................... 12
Key Functions........................................................................................................ 13
Turning Your Phone On ........................................................................................ 14
Turning Your Phone Off ........................................................................................ 14
Placing A Call ......................................................................................................... 14
Basic Operations ................................................................... 14
Increasing or Decreasing Speaker Volume During a Call ................................. 14
Reading a Message ............................................................................................... 14
Temporarily Muting the Ring Tone/Warning Beeps ........................................ 14
.................................................................................................................................. 14
Redialing the Last Number You Called ............................................................... 14
Pause Dialing.......................................................................................................... 15
Low Battery Power Alert ....................................................................................... 15
Recalling an Entry .................................................................................................. 15
Recalling an Entry (cont.) ..................................................................................... 16
Quick Entry Recall ................................................................................................. 16
Speed Dial............................................................................................................... 16
Alarm Button .......................................................................................................... 16
Summary of Basic Operations .............................................. 17
Using Menus .......................................................................... 18
Page 3

3
Table of Contents
Opening Menus ..................................................................................................... 18
Changing Settings ................................................................................................. 18
Example of Using Menus...................................................................................... 19
Menu Shortcuts ..................................................................................................... 19
Standby Mode ............................................................................................... 20
Menu Overview ..................................................................................................... 20
In Call Mode ................................................................................................... 20
Short Message Service(SMS) .............................................. 21
Reading a Text Message....................................................................................... 21
Dialing a Displayed Number ................................................................................ 21
Deleting a Text Message ...................................................................................... 21
Menu Descriptions ................................................................ 25
Messaging Menu ................................................................................................. 25
Phone Book Menu................................................................................................ 26
Prefix Editing........................................................................................................... 26
Storing an Entry ..................................................................................................... 27
Editing an Entry ..................................................................................................... 27
Deleting an Entry ................................................................................................... 28
Sound SetUp Menu............................................................................................... 29
.......................................................................................................................... 29
Settings Menu........................................................................................................ 30
In Call Menu ........................................................................................................... 31
Problems You Can Solve ........................................................ 32
Displayed Messages and Explanations ............................................................. 32
Problems and Possible Solutions ........................................................................ 32
Page 4

4
Some of the following information may
not apply to your particular product.
However, as with any electronic product,
you should observe safety precautions
during handling and use of the product.
♦ Save this manual. It contains
important safety information and
operating instructions.
♦ Before using this product, please
follow and adhere to all warnings,
safety and operating instructions
located on the product and in the
user guide. Save all instructions
for future reference.
♦ Do Not expose the product to water
or moisture; for example, a
swimming pool or damp basement.
♦ Do Not expose the product to
extreme temperatures such as those
found near a hot radiator, stove, or
in a car parked in the sun.
♦ Do Not expose the product to lit
candles, cigarettes, cigars, open
flames, etc.
♦ Do Not allow objects to fall on, or
liquids to spill into the product.
♦ Do Not use auxiliary equipment not
recommended by the manufacturer.
Using other equipment may result in
fire, electric shock, or injury, and
will void the warranty.
♦ Connect AC (power supply) only to
designated power sources as marked
on the product.
♦ To reduce the risk of damage,
remove the electrical cord from an
outlet by pulling the AC adapter
rather than thecord.
♦ Make sure the electric cord is located
so that it will not be stepped on,
tripped over, or otherwise subjected
to damage or stress.
♦ To reduce risk of electric shock,
unplug the unit from a power source
before attempting any cleaning.
Once unplugged, use a soft cloth.
♦ Danger - Never alter the AC cord or
plug. If the plug will not fit into the
outlet, have a proper outlet installed
by a qualified electrician. Improper
connection can result in risk of
electric shock.
♦ Do Not attempt to disassemble the
product. Doing so will void the
warranty. This product does not
contain consumer serviceable
components. Service should only be
performed by Authorized Service
Centers.
♦ Do Not allow children to play with
the product packaging material as
some materials may present a
choking hazard.
Important Safety Information
Important Safety Information
Page 5

5
Guidelines for Safe and Efficient Use
Important: Read This Information
Before Using Your 9p23 Portable
Telephone
The handheld portable wireless telephone
is one of the most innovative products
ever developed. With it, you can
maintain connectivity to traditional
telephone services while remaining mobile
around hospital, campus or office. For
the safe and efficient operation of your
phone, observe the guidelines in this
manual. Your wireless telephone is a radio
transmitter and receiver. When it is ON
it receives and sends out radio frequency
(RF) energy. The phone operates in the
frequency range of 1920 to 1930 MHz
and employs commonly used modulation
techniques.
Exposure to Radio Frequency Signals
(SAR)
Your wireless phone is a radio transmitter
and receiver. It is designed and manufactured not to exceed the emission limit for
exposure to radio frequency (RF) energy
set by the Federal Communications
Commission of the U.S. Government and
Canada. These limits are part of comprehensive guidelines and established
permitted levels of RF energy for the
general population. These guidelines are
based on the safety standards previously
set by both U.S. and international
standards bodies.
These standards include a substantial
safety margin designed to assure the safety
of all persons, regardless of age and
health.
The exposure standards for wireless
mobile phones employs a unit of measure
known as the Specific Absorption Rate, or
SAR. The SAR limit set by the FCC and
Canada is 1.6W/kg averaged over one
gram of tissue.
Guidelines for Safe and Efficient Use
Tests for SAR are conducted using
standard operating positions specified by
the FCC with the phone transmitting at
its highest certified power level in all
tested frequency bands. Although the SAR
is determined at the highest certified
power level, the actual SAR level of the
phone while operating can be well below
the maximum value. This is because the
phone is designed to operate at multiple
power levels.
Before a phone model is available for sale
to the public, it must be tested and
certified to the FCC that it does not
exceed the limit established by government-adopted requirement for safe
exposure. The tests are performed in
positions and locations(for example, at
the ear and worn on the body) as required
by the FCC for each model. The highest
SAR value for this phone when tested for
use at the ear is 0.076 W/kg, and when
worn on the body is 0.018 W/kg. (Body
worn measurements differ among phones
depending upon available accessories and
the FCC requirements.) While there may
be differences between the SAR levels of
various phones and at various positions,
they all meet the government requirement for safe exposure.
For body worn operation, to maintain
compliance with FCC RF exposure
guidelines, use only Ascom approved
accessories. When carrying the phone
while it is on, use only the specific Ascom
belt clip that has been tested for
compliance.
Use of non-Ascom-approved accessories
may violate the FCC RF exposure
guidelines and should be avoided.
The FCC has granted an equipment
authorization for this Ascom 9P23 phone
with all reported SAR levels evaluated as
in compliance with the FCC RF emissions
Page 6

6
Guidelines for Safe and Efficient Use
guidelines. SAR information is on this
9P23 phone is on file with the FCC and
can be found under the Display Grant
section of <http://www.fcc.gov/oet/fccid>
after searching on FCC ID O4M9P23."
Efficient Phone Operation
For your phone to operate at the lowest
power level, and maintain satisfactory call
quality:
♦ Hold the phone as you would any
other telephone. Speak directly into
the microphone.
Electronic Devices
Most modern electronic equipment (for
example, equipment in hospitals and cars)
is shielded from RF energy. However, RF
energy from wireless telephones may
affect some electronic equipment.
Children
Do not allow children to play with your
phone. It is not a toy. Children could
hurt themselves or others. Children could
also damage the phone. Product
packaging material is often small and may
present a choking hazard.
Potentially Explosive Atmospheres
Turn your phone OFF when in any area
with potentially explosive atmosphere. It
is rare, but your phone or its accessories
could generate sparks. Sparks in such
areas could cause an explosion or fire
resulting in bodily injury or even death.
Areas with a potentially explosive
atmosphere are often, but not always,
clearly marked. They include fueling
areas, (such as gas stations), below deck on
boats, fuel or chemical transfer or storage
facilities, and areas where the air contains
chemicals or particles (such as grain, dust,
or metal powders).
Do not transport or store flammable gas,
liquid, or explosives in any compartment
of your vehicle which contains your
phone and accessories.
In the U.S., vehicles powered by liquefied
petroleum gas (such as propane or butane)
must comply with the National Fire
Protection Standard (NFPA-58). For a
copy of this standard, contact the
National Fire Protection Association, One
Batterymarch Park, Quincy, Massachusetts 02269, Attention: Publication Sales
Division.
Operation Procedures
In the U.S., portable wireless telephones
are subject to the rules and regulations of
the FCC. Following these rules will help
to eliminate confusion, ensure the most
efficient use of the existing frequencies,
and result in a smoothly functioning radio
network. The following offenses are
punishable by fine, imprisonment, or both:
♦ Use of profane, indecent, or obscene
language.
♦ Transmission of a false distress signal
or call.
♦ Willful or malicious interference
with any other radio communica
tions.
♦ Refusal to yield a channel or radio
frequency when informed that it is
needed for an emergency call.
Emergency calls have priority over
all messages.
♦ Adjustment of the equipment by
anyone other than a qualified
licensed technician.
UTAM Requirements
Installation of this equipment is subject to
notification and coordination with
UTAM, Inc. Any relocation of this
equipment must be coordinated through,
and approved by UTAM. If there are any
interference problems, UTAM may be
contacted at 1-800-429-UTAM (1-800429-8826).
Page 7

7
FCC Requirements
This device complies with Part 15 of the
FCC Rules. Operation is subject to the
following two conditions: (1) this device
may not cause harmful interference, and
(2) this device must accept any interference received, including interference that
may cause undesired operation.
This equipment has been tested and found
to comply with the limits for a Class A
digital service, pursuant to Part 15 of the
FCC Rules. These limits are designed to
provide reasonable protection against
harmful interference when the equipment
is operated in a commercial environment.
This equipment generates, uses, and can
radiate radio frequency energy and, if not
installed and used in accordance with the
instruction manual, may cause harmful
interference to radio communications.
Operation of this equipment in a
residential area is likely to cause harmful
interference in which case the user will be
required to correct the interference at his
own expense.
IC Requirements
The term “IC:” before the radio
certification number only signifies that
Industry of Canada technical specifications were met.
WARRANTY
NOTIFICATION
Do not tamper with the Warranty
Seal on the back of your phone.
Tampering with this seal can void
your warranty. Do not attempt to
take your phone apart. Doing so will
void your warranty and your authority to operate the phone. Your phone
does not contain consumer serviceable components. Service should
only be performed by Authorized
Service Centers.
Guidelines for Safe and Efficient Use
Page 8

8
Battery Information
New Batteries
The battery packaged with your phone is
not fully charged. However, there may be
enough power to turn the phone on. To
get maximum battery capacity, you should
charge the battery before using it.
Battery Use and Care
A rechargeable battery has a long service
life, if treated properly.
♦ Do not leave a battery where it
could be subjected to extremely high
temperatures, such as inside a car on
a hot day. This could reduce the
battery’s capacity.
♦ Never let the metal contacts on the
battery touch another metal object.
This could short-circuit and damage
the battery.
♦ Do not attempt to take a battery
apart.
♦ Do not expose a battery to open
flame. This could cause the battery
to explode.
♦ Turn your phone OFF before
removing the battery.
♦ Use only Ascom provided adapters
supplied with your battery charger.
Using a different adapter could be
dangerous and voids the warranty.
Never charge a battery when the
ambient room temperature is above
104°F/40°C or below 41°F/5°C.
Battery Charging Times
The desktop and rack chargers charging
time are approximately 1-2 hours (900
mAh battery).
Battery Information
Page 9
9
Getting Started
Getting Started
Complete the following steps after you
have removed your phone and its
components from their packages:
• Attach the battery to your phone
• Charge the battery
• Attach the optional belt clip to your
phone
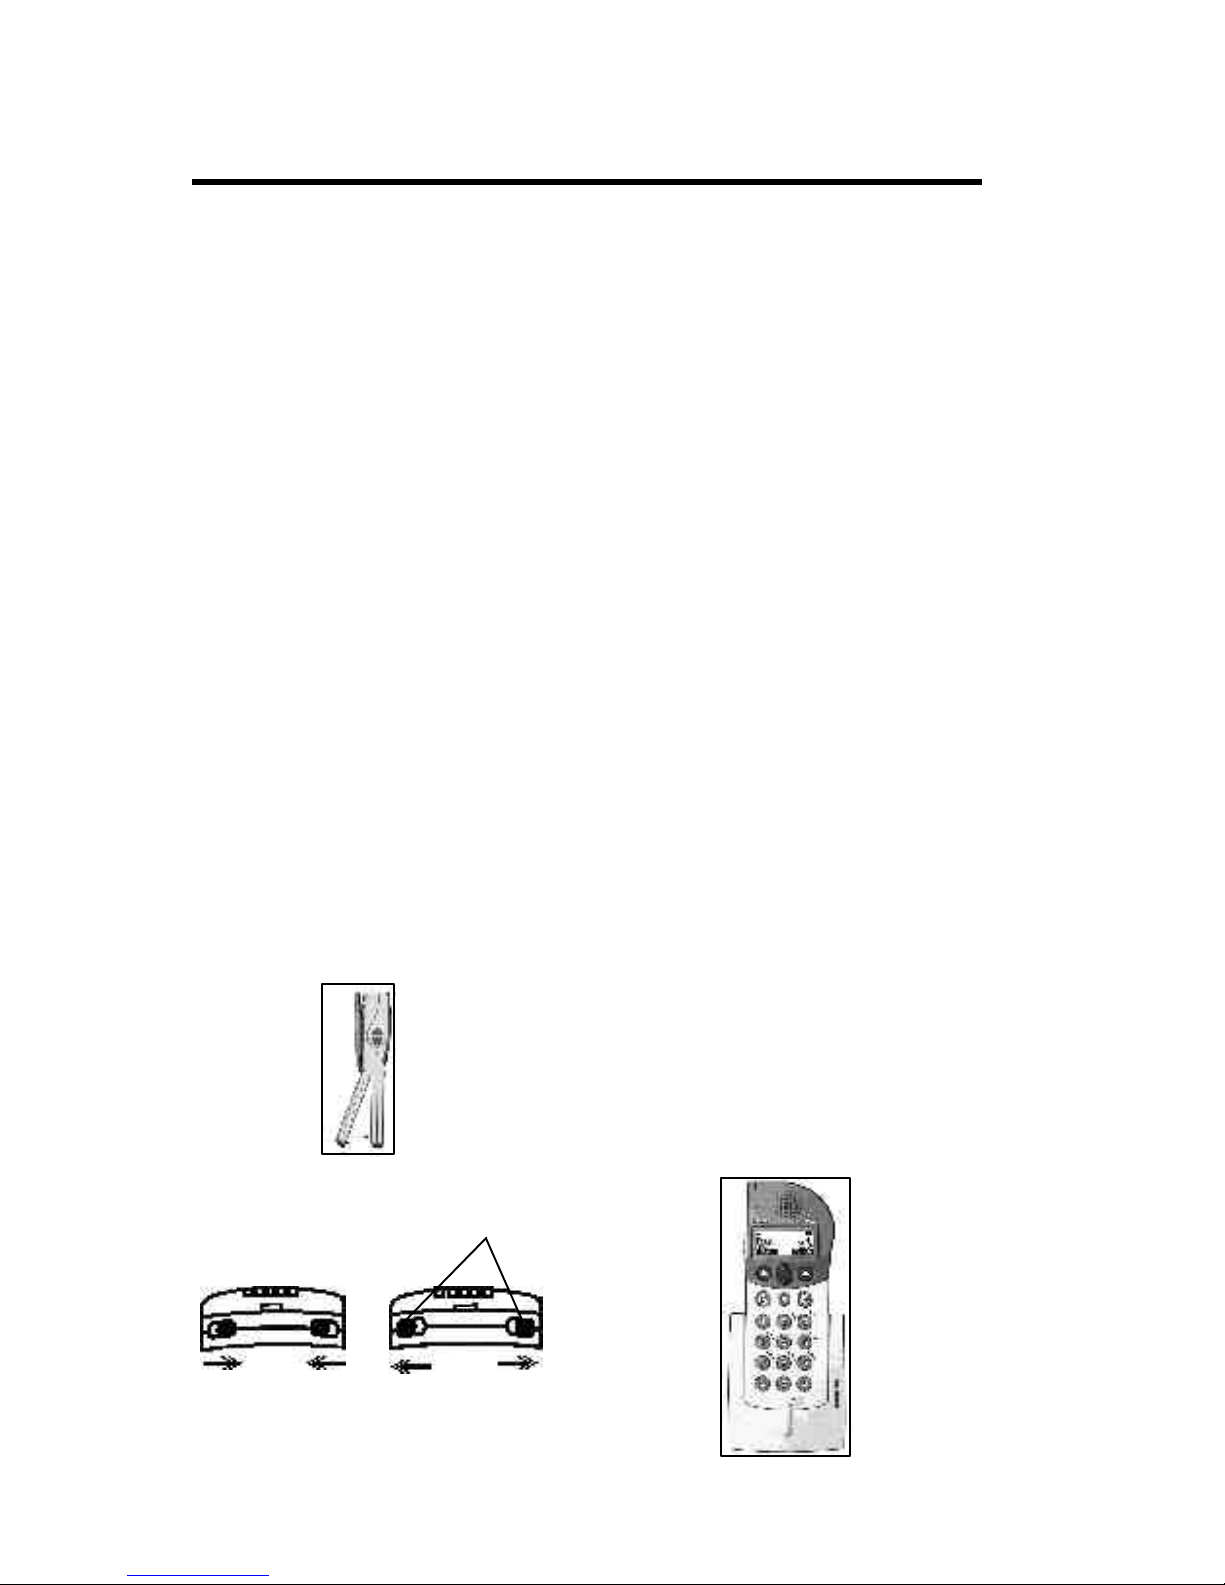
Install the Battery
1. Attach the battery to the back of the
phone by sliding the tabs
on the top of the battery into the
appropriate slots on the phone, then
press down firmly (see Figure 1.1).
2. While holding the battery firmly
against the phone, push the battery
lock tabs located on the bottom of
the phone outward to the “locked
position” (see Figure 1.2) to secure
the battery.
3. To remove the battery, push the
battery lock tabs inward, to the
“unlocked” position and pull the
battery off the phone.
Figure 1.1
Unlocked position
Figure 1.2
Battery lock tabs
Charging the Battery
The Desktop Charger will charge a
battery when attached to your phone as
well as support the charging of a single
battery pack by standing the battery pack
in the compartment of the desktop
charger.
Charging a Battery Attached
to your Phone
1. Plug the AC adapter into the
charger.
2. Plug the AC adapter into a wall
outlet.
3. Insert your phone into the
compartment of the desktop
charger as shown in Figure 2.1.
The light on the right side of the
desktop charger should be red
indicating that charging is
in progress.
4. When the indicator light turns
green, this indicates that the
battery is fully charged and
the handset is ready for use.
Note: A rack charger is also available
and its functionality is similar to the
desktop charger. For more information,
please refer to DCT1900 Technical
Product Manual (TPM).
Locked position
Figure 2.1
Page 10
10
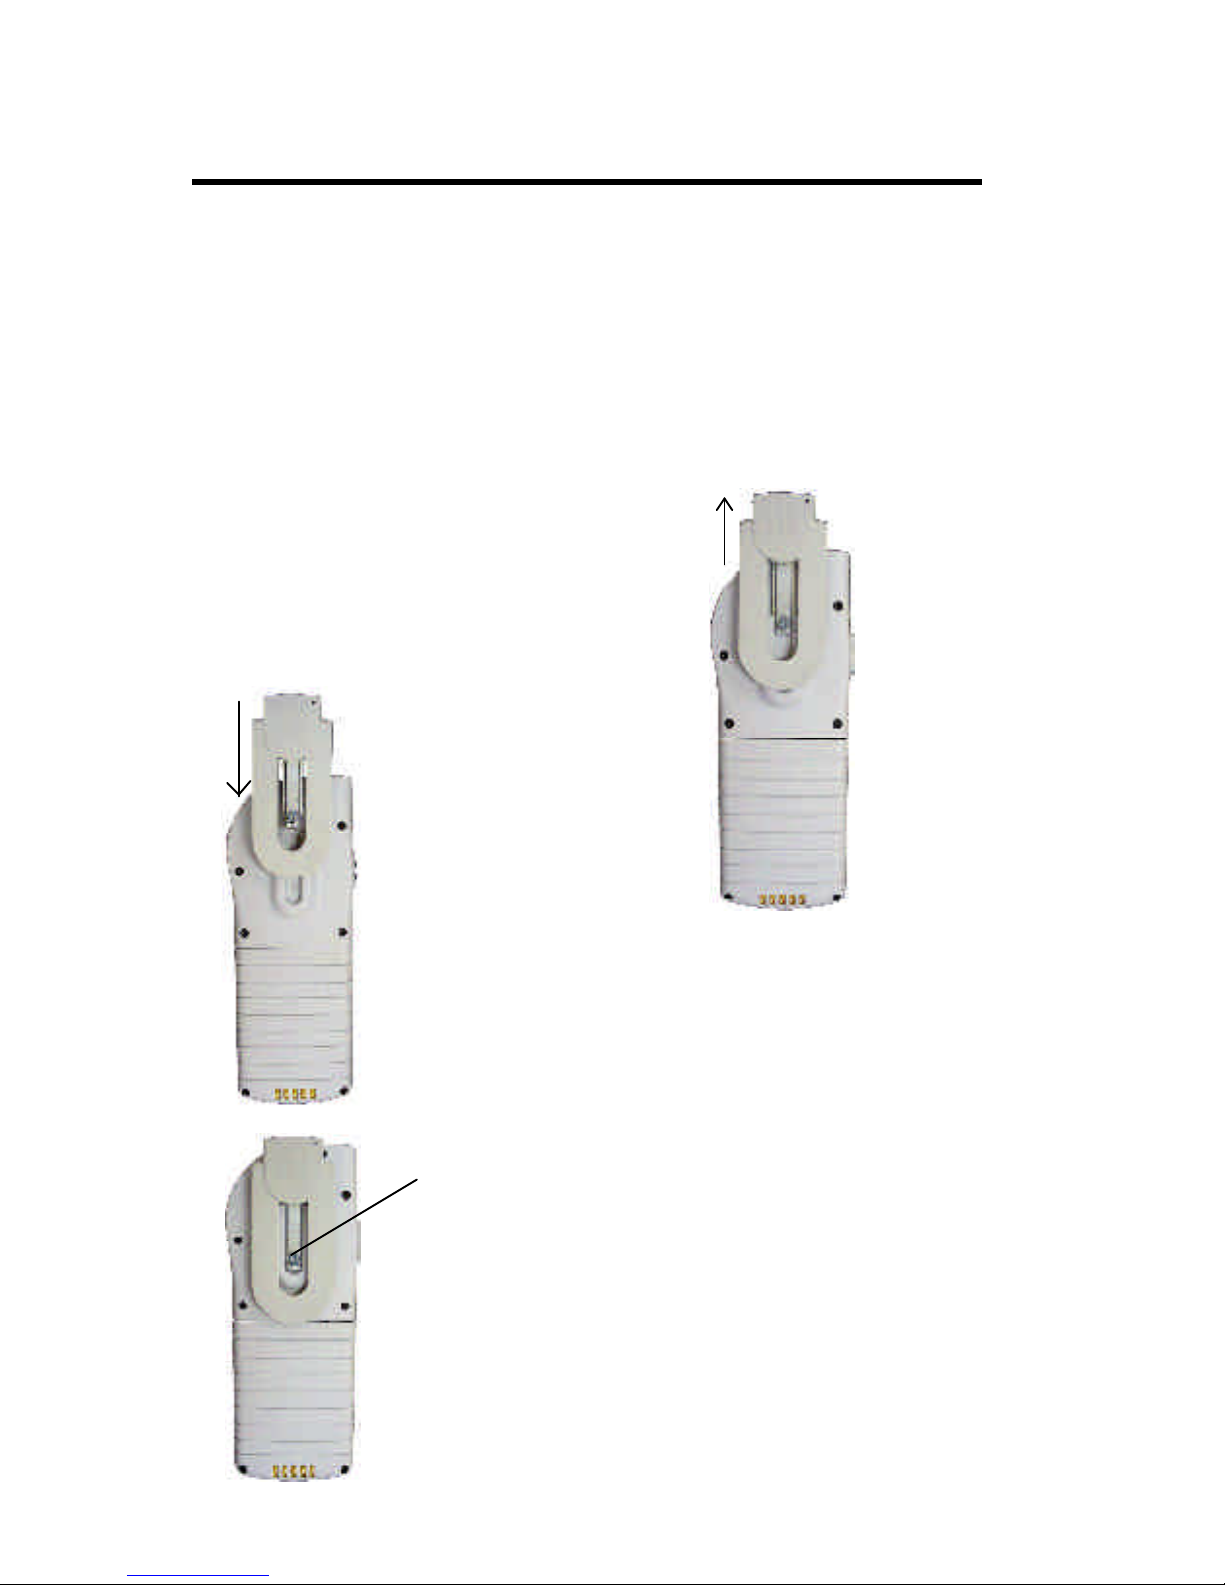
Attaching the Belt Clip to
your Phone
The phone is delivered with the standard
belt clip.
To attach the belt clip to your phone:
1. Slide the metal part of the clip into
the molded slot on the back of the
phone until it snaps into place. See
Figure 3.1.
2. Tighten the retention screw to
secure the belt clip onto your phone.
See Figure 3.2
Removing the Belt Clip from
your Phone
Getting Started
Retention Screw
Figure 3.1
Figure 3.2
1. Untighten the retention screw of
the belt clip from the phone (see
Figure 3.2).
2. Slide the metal clip upward in the
slot as shown in Figure 3.3.
Figure 3.3
Page 11

11
Learning About Your Phone
Learning About Your Phone
Indicator Light
Alarm Button
Earpiece
Display
Microphone
Volume
Control
Mute Button
Left Soft
key
Scroll Key
Speaker
Phone
Right Soft
key
Page 12

12
System Indicator shows whether the
phone is locked to a system (steady icon)
or not (icon blinks). The phone will only
lock to systems for which it has been
programmed.
Off Hook icon flashes when the phone is
connecting to the network (dialing) or
receiving a call and stays on during a call.
Warning Mute icon indicates when the
warning beeps have been temporarily
muted.
Ring Mute icon indicates when the ringer
has been turned off.
Warning Mute and Ring Mute icons
displayed together indicate the phone is in
silent mode.
Missed Calls icon indicates unanswered
calls.
Message icon indicates text message has
been received.
Voicemail icon indicates message is
waiting in the voicemail box.
Headset icon indicates when an optional
handsfree accessory is attached.
Battery Strength icon shows the
relative strength of your battery. A full
icon indicates a fully charged battery. A
blinking battery icon indicates a low
battery charge.
Multiple Line Appearance (MLA) icon
indicates the active line when your system
is configured for enhanced digital
integration. The MLA icon may appear as
a 1,2,3,or 4 depending on the system
configuration. A blinking MLA icon
indicates the line is on hold.
Keypad Lock icon indicates the keypad is
locked to prevent inadvertant key presses.
Battery Charging icon indicates when
the phone is receiving power from an
external source, such as a charger. A
blinking full battery icon indicates that
the charging is complete. The Battery
Charging icon appears in place of the
Battery Strength icon.
Indicator Light Functions
The color and state of the indicator light
on top of your phone shows the following
conditions:
Slow Flashing Red: A flashing red light
means one of the following: Low Battery,
No System, or No Access. See “Problems
You Can Solve”, page 31.
Rapid Flashing Red: Phone is receiving
a call.
Steady Green: Your phone is receiving
power from an external source, such as a
charger.
Slow Flashing Green: Phone is in
Standby mode (locked to a system),
ready to place and receive calls.
Learning About Your Phone
Ring Mute
Icon
Message
Icon
System
Indicator
Off Hook
Icon
Warning
Mute Icon
Battery
Strength
Icon
Display Indicators
Missed
Calls
Icon
Headset
Icon
MLA
Icon
Voicemail
Icon
Keylocked
Icon
Rapid Flashing Green: Phone is on
talk mode or in use.
Page 13

13
Key Functions
Learning About Your Phone
• Press and hold to turn your phone
ON.
• Press to place a call after you have
entered a phone number.
• Press to hear a dial tone before
dialing.
• Press to answer a call when your
phone is ringing.
• Press and hold to turn your phone
OFF.
• Press to end a call.
• Press to turn on the loudspeaker
functionality of your phone when in
ongoing call.
• Press twice to automatically dial the
defined number.
• Press to perform the function
indicated by the text on the screen
above the key.
Mute Button
• Press to temporarily mute the ringer.
• Press up arrow or down arrow to
scroll through phone menus.
on
• Press upper key to increase the
volume.
• Press lower key to decrease the
volume.
Alarm key
Mute Key
Left soft key
Right soft key
On/Talk Button
Off/End Call Button
Scroll key
Speaker Phone Enable
Key
Left/Right Soft Key
Volume Control
off
Alarm Button
Page 14

14
1. Press to answer the
call.
2. When you finish your conversation,
press to end the call.
Increasing or Decreasing
Speaker Volume During a
Call
To adjust the speaker volume during a call,
press the side keys on the phone. Once
the call is finished, the volume will return
to its’ menu setting.
Reading a Message
When your phone receives a message, the
ring melody sounds.
1. Press Read to read the message.
2. When you finish reading, press
Close.
Temporarily Muting the Ring
Tone/Warning Beeps
To temporarily mute the ring tone
without answering the call, press Decline.
You can still answer the call by subsequently pressing Accept.
To temporarily mute the warning beeps,
press the Mute button.
Redialing the Last Number
You Called
Your telephone stores the last 20 numbers
dialed. To view this list in the display,
press Up Arrow twice to enter the Redial
list. You can redial the number by pressing
.
If the list is empty, the phone will beep.
Turning Your Phone On
Press and hold until your phone beeps.
The display
and keypad
backlighting
come on for
about 30
seconds.
The display
should look similar to this illustration.
The system icon will be steady when the
phone is locked to the system. This
display represents Standby mode.
Turning Your Phone Off
Press and hold until your phone beeps
and the display goes blank.
Placing A Call
To place a call, the phone must be ON
and locked to a system.
1. Enter the phone number you wish to
call by pressing the numeric keys.
The number is shown in the
display.
If you
enter a
wrong
digit,
press up
scroll key to erase the digit.
2. Press
3. When you finish your conversation,
press to end the call.
Answering a Call
When your phone receives a call, the ring
melody sounds (unless you have disabled it
through the Sound Setup menu, see page
28) and the
indicator
light on top
of the phone
rapidly
flashes red.
Basic Operations
Basic Operations
on
off
on
off
on
off
on
Page 15

15
Basic Operations
Pause Dialing
Pause dialing lets you enter groups of
numbers with delays between each group.
This feature is useful when you need to
dial a phone number and then another
number, such as an access number for an
answering machine or voice mail system.
A pause suspends transmitting DTMF
tones for approximately two seconds
before sending the next series of tones.
You can enter a pause in a series of digits
by pressing the Down Arrow (it shows a
‘-’ in the display). For example, if your
office has a voice mail system that
requires you to dial a phone number
followed by your extension and an access
code, you could enter the following:
5551111Down Arrow 2222 Down
Arrow 33333 where 555-1111 is the
phone number to enter your voice mail
system, 2222 is your extension, and
33333 is your access code. When you
press , your phone dials the number and
then pauses. After two seconds, the
phone sends your extension. Finally the
phone automatically transmits your access
code approximately two seconds after
your extension.
Low Battery Power Alert
The Low Battery alert sounds when your
battery is reaching its lowest operational
power level. The words Battery Low flash
in the display, the Battery Icon blinks,
and the indicator light on top of your
phone flashes red. You can mute the
audible alert by pressing the Mute key;
the Warning Mute icon will appear.
Once the Battery Low alert begins, the
phone will shut OFF within 3 minutes.
NOTE: The following intructions assume
that the user has already established
Phone book entries. Additional instructions on creating phonebook entries can
be found in the phonebook menu
description found on Page 25.
Recalling an Entry
There are three options that can be used
to Search/Browse the handsets internal
phonebook:
1. Pressing Search from within the
standby mode.
2. Opening the Phone Book from the
main menu and selecting Search
from the list of sub-menu functions.
3. Pressing the Up Arrow from within
the standyby mode.
In order to find a specific entry from with
in the phonebook, enter the letters of
the name using the keypad. You can enter
just a few letters of the name or the
complete name. If you enter just a few
letters and press Confirm, the handset will
find the first name in memory that
begins with the letters you entered.
See the table below for information on
entering letters. You can view the rest of
the entries by pressing the Down Arrow
or Up Arrow key.
Press
this
key
Number of times the key is pressed
One
Five
FourThreeTwo
1
2
3
4
5
6
7
8
9
0
*
#
space & 1
A B C 2
D E
F 3
G H I 4
J
K
L 5
M N O 6
P
Q
R S
T U V 8
W X
Y Z
0
,
' " *
-
.
? #
7
9
Table 1
on
Page 16

16
Recalling an Entry (cont.)
If you do not know the name or if a name
is not associated with the number press
Browse . Upon doing so the first entry in
memory will be displayed. Use Down
Arrow or Up Arrow to scroll through the
entries.
Quick Entry Recall
You can recall a number without using the
menu by spelling out the name. When the
phone is in Standby mode, hold down
the key with the first letter of the name
you wish to recall. The top line displays
the first name which matches your entry.
The second line displays the letters you
are trying to match and the number.
Press more letter keys (you do not have
to hold the keys at this point) or use the
Down Arrow or Up Arrow keys to find
the name/number you want. Press to
call the displayed number.
NOTE: A specific telephone number or
speed dial number cannot be recalled
directly; you must enter a name or scroll
through the list.
Speed Dial
The Speed Dial feature lets you quickly
dial phone numbers. Any entry in
memory may be assigned a speed dial
number from 0 to 9. See page 26 for
information on storing numbers in
memory. To use the Speed Dial feature,
enter the speed dial number you want to
call. Press to recall the corresponding
memory entry. Press again to dial
the number in the display.
Alarm Button
The Alarm button allows you to call a
specifically defined number.
1. Press the alarm button located on
top of your phone once. The
display will prompt “**Alarm
Ready** Press again to confirm”.
2. Press the alarm button and your
phone will be in speaker phone mode
and will call the specifically defined
number programmed in your phone.
Basic Operations
on
on
on
Page 17

17
To Do This: Press:
Turn phone ON Hold
Turn phone OFF Hold
Make a call Predial number,
Answer a call
End a call
Temporarily mute the ringer Menu,
Temporarily mute warning beeps Menu,
Enter menu mode Down Arrow
Decrease speaker volume during a call Lower side volume key or Down
Arrow, select SpeakerVol. or
Attach Vol.
Increase speaker volume during a call Upper side volume key or Menu
Sound Setup,select SpeakerVol
Erase the last digit/letter entered Up Arrow
Scroll through menus or menu settings Up Arrow, Down Arrow
Call the number shown in the display
Recall a number from memory Up Arrow
Redial the last number dialed Up Arrow (twice),
To lock the keypad Down Arrow,
To unlock the keypad Down Arrow,
Summary of Basic Operations
on
off
on
on
off
on
on
Page 18

18
Using Menus
This section explains how to use your
phone’s menus. You should read this
section thoroughly and familiarize
yourself with the menus, how to navigate
through them, and how to change settings.
Those steps are described here. The
following sections describe each of the
menus and the settings available.
Your phone’s menus offer an easy way to:
• Store and recall numbers in memory
• Check voice mail
• Read text messages
• Set up call features
• Change ring tone and other sound
settings
• Change other settings for your
phone
Opening Menus
In order to navigate and modify the menu
settings, press the Menu soft-key within
standby mode, this will enter the handset
into the Menu Navigation mode. Within
the menu navigation mode users can scroll
through the main menu structure as well as
make changes to settings by entering into
the individual sub-menus.
Within the main menu structure, there are
4 main menu items:
• Messaging
• Phone Book
• Sound SetUp
• Settings
The main menu is a list of choices you
can make. Your phone has 4 main menus.
Each main menu contains numerous submenus that will allow you to check voice
mail, read text messages, change ring
tone, etc. You can navigate the main
menu and sub-menus by using the Up and
Down Arrows. They will scroll through
your choices accordingly.
Press Select to enter any of the submenus for a given main menu option.
Changing Settings
Open the menus as previously described,
then:
1. Press Down Arrow or Up Arrow to
scroll through the list until the menu
pointer < > encompases the setting
you want to change.
2. Pressing Select again will display the
choices available for the specific
setting shown in the sub-menu. The
currently active choice will blink in
the display. Some settings have a list
of choices, such as the Ring
Melodies setting in the Sound
Setup Menu.
3. Press Down Arrow or Up Arrow to
scroll through the list of choices
until the menu pointer is beside the
choice you want. If the setting has
only two choices, press either of
these keys to switch between the two
choices. The active choice is
blinking.
4a. If you want to exit the list of choices
without storing any changes made,
press Cancel. This will take you back
to the sub-menu selection menu.
4b. Otherwise press Confirm to store
the choice you selected. The
handset will display a confirmation
of the change on the display.
NOTE: If the menu is inactive for 30
seconds, it will return to Standby mode.
Using Menus
Page 19

19
Using Menus
Example of Using Menus
The following steps show how to change
the ringer volume of your phone.
1. Press Menu from the standby mode
to enter menu navigation mode.
2. Press the Down Arrow or Up
Arrow until the main menu displays
the Sound Setup option.
3. Press Select. The pointer [< >] is
beside the Sound Profiles
settings.
4. Press Select. Press the Down
Arrow or Up Arrow until the menu
pointer is beside Customize.
5. Press Select. Press the Down
Arrow or Up Arrow until the menu
pointer is beside Normal Profile.
6. Press Select. Press the Down
Arrow or Up Arrow until the menu
pointer is beside Ring Volume.
7. Press Select. A bar graph is shown
with the current volume blinking.
6. Press the Down Arrow or Up
Arrow until the ring volume is set
to the desired level. As you scroll
through the choices, the phone plays
the ring melody.
7. Press Confirm to store your choice.
The RingVolumes profile options
is shown.
8. Press to exit Menu Navigation
mode.
Menu Shortcuts
To quickly access menus, submenus and
settings choices you can press the Down
Arrow to open the main menu followed
by the number of the menu and the
number of the menu setting. For
example, you want to change the speaker
volume on your phone. If the Sound Set
up menu is number 3, and the speaker
volume setting is number 3, press the
Down Arrow, then 3 and 3 again to go
directly to the choices for Speaker
Volume.
off
Page 20

20
Using Menus
#
Only available when PBX functions have been configured.
Menu Overview
The following chart shows the menu hierarchy and settings for your phone.
*
Only available when the Handset is programmed for enhanced digital integration.
1 Messaging
1 • Text
2 • Voice Mail
3 • Options
1 • Voice Mail No.
2 • SMS Reminder
3 • SMS Autodelete
2 Phone Book
1 • Search
2 • Missed Calls
3 • Received No.
4 • Dialed No.
5 • Add Number
6 • Memory Monitor
3 Sound Set Up
1 • Sound Profiles
1 • Activate
1 • Normal Profile
2 • Meeting Profile
2 • Customize
1 • Normal Profile
• Ring Volume
• Key Sound
• Vibration
2 • Meeting Profile
2 • Ring Melodies
1 • InternCall
2 • ExternCall
3 • Callback
4 • Messages
5 • Voicemail
3 • SpeakerVol
3 • AttachVol
4 • Mic Gain
1 • Intern Mic
1 • Attach Mic
In Call Mode
• Options Soft Key
1 • Transfer
#
2 • Conference
#
3 • Hold
#
4 • Reconnect
#
NOTE: Depending on your current
telephone system, some In Call Menu
options may not be available.
Standby Mode
4 Settings
1 General
1 • Select Line*
2 • Contrast
3 • Backlight
4 • Date Mode
5 • Time Mode
6 • Select PUN
2 Custom
1 • Phone Name
2 • Alarm No.
Page 21

21
Your installation may support delivery of
short text messages to the phone. If you
receive a message, the Message ring
melody sounds and the Message icon
appears. When the phone is in Standby
mode, the Read Message? prompt appears
for a short time.
Reading a Text Message
1a. If the
Read Message?
prompt is
visible,
press
Read
.
The
oldest
unread
message is displayed.
1b.
If the prompt has timed out, open
the Messaging Menu and select
Text.
The
newest
message
is at the
top of
the list.
Select the message you wish
to read by pressing Down Arrow or
Up Arrow. Press Open to read the
selected message.
2. Scroll through the message
using the Down Arrow and
Up Arrow.
3. Press Back-Cancel-Back-Exit to
exit reading the message. If the read
prompt was used to begin reading the
message, the phone returns to
Standby mode. If there are more
unread messages the Read Message?
prompt re-occurs. If the Messaging
Menu was used to begin reading the
message, the list of messages
appears.
Short Message Service
Short Message Service(SMS)
Dialing a Displayed Number
If any numbers are in the message, they
are selected for callback.
1. Scroll past the selected numbers
using the Down Arrow and Up
Arrow. The side volume keys
may be used to scroll messages as
well.
2. To call a selected number, press
. If no number is visible
onscreen, pressing dials the
most recently selected number.
Deleting a Text Message
Once a message has been read it may be
deleted.
1. While reading the message, press
Options.
2. While viewing the list of messages,
select Delete and press Confirm.
Only 20 messages can be stored at
one time. If AutoDelete setting is OFF
and there is not enough room, the
Message icon will blink and the next
message will be rejected. If the
AutoDelete setting is ON (see Messaging Menu, page 24) and there is not
enough room, a new message will
automatically delete the oldest message
even if it is unread.
on
on
Page 22

22
Advanced Nurse Call System Integration
The 9p23 portable telephone can be
configured to integrate with a nurse call
system (NCS) for healthcare environments.
When the 9p23 portable telephone
receives a nurse call message, caregivers
can choose from different options
depending on the NCS and the way the
NCS is configured.
Receiving a Nurse Call Message
Type 1: No Call Back to Patient Station
Function
When the NCS does not support call back
to patient station, the 9p23 portable
telephone handles the nurse call as a
normal text message. When in standby
mode, the “Read Message?” prompt
appears briefly. Users can use the left
soft key to select while this prompt is
displayed. Please refer to page 20 for
additional information about managing
text messages to the 9p23 portable
telephone.
Type 2: Advanced Nurse Call System
Integration (ANCSI)
With ANCSI, the 9p23 portable
telephone allows call back to patient
station functionality. When the 9p23
portable telephone receives an Advanced
Nurse Call message, caregivers can follow
the options below:
Option 1: Press Call. This option will
enable the user to make a voice connection via the NCS intercom in the
patient’s room.
Once there is an established voice
connection to
the patient
room, the
caregiver can
assign predefined
services via
the NCS using the keypad numbers 1-6, or
end the call by pressing Release.
Option 2: The call can be escalated to the
pre-assigned secondary caregiver by
pressing Forward, when the primary
caregiver is unavailable or unable to
respond to the patient call.
Retreiving a Stored Nurse Call
Message
When unread nurse call messages are
stored in
the 9p23
portable
telephone,
the text
messsage
display
icon will appear.
When the <SMS Reminder> option is
on and configured according to user
preferences, the 9p23 portable phone can
indicate with an audible tone and will
display a reminder message.
Press Open. Users can then choose to
Call or Forward the stored nurse call
message.
Nurse Call Log
The 9p23 portable telephone memory
will store up to 20 nurse call messages.
When these messages are displayed, the
newest message is labeled “1”. Use the
scroll key to view additional stored
messages. The display will also indicate
the status of the message with the
letters C, D, R or N.
C=Called R=Read
D=Deferred N=new
Message Status Indicator
Memory
Position
Date of Message
Page 23

23
Enhanced Digital Integration
Phone Operation
Standby Mode
Your installation may support enhanced
features such as multiple line appearance
(MLA).
When in Standby mode, the MLA icon
appears in the top left hand section of the
display. This number indicates which line
will be active the next time the user goes
off hook.
Select Line
You can choose another line as the
selected line; the MLA icon in the top left
hand corner of the display will be updated
accordingly. The next call will then be
made on that line. To select another line,
open the Settings menu and select
General and Select Line. Use the Up
Arrow or Down Arrow to select line.
Once line is selected, press Connect.
Select Line Shortcut
During an active call, the user may access
another line by pressing Line and then use
the Up Arrow or Down Arrow to get
another line. Press or Connect to get
a dial tone.
Note: To access the In Call features such
as transfer, Conference, Hold, and
Reconnect, Callback and Cancel Clb,
please refer to page 30.
Call Waiting
Handling Multiple Calls - when one call is
active and another call is received by the
handset on another line, the user has the
choices of:
u Answering the incoming line by
pressing or Accept, the incoming call
will be answered and the original call will
be placed on hold.
u Muting the incoming line by pressing
or Decline, the audible new line
ringing signal will be muted and the
original call will be maintained. Once the
current call ends, the audible ringing and
visible alerting will resume.
off
on
You may review the state of all the lines
by using the scroll keys. When a ringing
call is displayed, it may be answered by
pressing or Accept. Selecting a nonringing line will access a new line and
generate new dial tone.
on
Answer a Call
When a call is received, you will be alerted
to the call with a ring, a display message,
the blinking offhook icon, and a fast
flashing red light indicator. If the user is
already in call, a beep will be audible in the
speech path with no audible ringing.
When a call is ringing you have four
options:
u Ignore the call
u Answer the call by pressing or
Accept
u Mute the call by pressing or
Decline
u Browse lines by using the Up
Arrows and Down Arrows
on
off
on
Page 24

24
Mobility Server (MS) Phone Operation
Message Waiting Indication
The handset is capable of displaying a
Message icon. In order for the Message
icon to automatically disappear after you
have listened to your messages, you must
access your voice mail through the
Mobility Server’s Personal Assistant
feature. (Please see your system
administrator for additional information
regarding using the Personal Assistant
feature.)
NOTE: If you do not access your voice
mail through the Personal Assistant feature
of the MS, the Message icon will not automatically disappear. Therefore, you must
manually remove the Message icon by
pressing #, 9,1, #, , then .
Standby Mode
Your installation may support enhanced
features such as multiple line appearance
(MLA).
When in Standby mode, the MLA icon
appears in the top left hand section of
the display. This number indicates which
line will be active the next time the user
goes off hook.
Select Line
You can choose another line as the
selected line; the MLA icon in the top
left hand corner of the display will be
updated accordingly. The next call will
then be made on that line. To select
another line, open the Settings Menu
and select General and Select Line.
Use the Up Arrow or Down Arrow to
select line. Once line is selected, press
Connect.
Select Line Shortcut
During an active call, the user may access
another line by pressing Line and then
use the Up Arrow or Down Arrow to get
another line. Press On or Connect to get
a dial tone.
Answer a Call
When a call is received, you will be alerted
to the call with a ring, a display message,
the blinking offhook icon, and a fast
flashing red light indicator. If the user is
already in call, a beep will be audible in the
speech path with no audible ringing.
When a call is ringing you have four
options:
u Ignore the call
u Answer the call by pressing or
Accept
u Mute the call by pressing or
Decline
u Browse lines by using the Up
Arrows and Down Arrows
You may review the state of all the lines
by using the scroll keys. When a ringing
call is displayed, it may be answered by
pressing or Accept. Selecting a nonringing line will access a new line and
generate new dial tone.
Call Waiting
Handling Multiple Calls - when one call is
active and another call is received by the
handset on another line, the user has the
choices of:
u Answering the incoming line by
pressing or Accept, the incoming call
will be answered and the original call will
be placed on hold.
u Refuse the incoming line by pressing
or Decline, the audible new call signal
will be refused, and the original call will be
maintained. Once the current call ends,
the audible ringing and visible alert will
resume.
on
off
on
on
on
on
off
Page 25

25
The Messaging menu organizes all of the
handsets messaging functionality including
SMS Text Messaging and Voice Mail
access.
The Text messaging sub-menu provides a
list of text messages previously received
by the handset. Each item within the list
identifies the index number of a specific
message, the time the message was
received, the current status of the
message, as well as the very beginning of
the message content. To read any of the
messages within the list, press Open .
Once a message has been read the status
indicator will change from ‘N’ representing a new message to ‘R’ indicating that
the message has been read. In the instance
where a number identified within the body
of the message was called the status
indicator would change to ‘C’ indicating
the entry was called.
The Voice Mail option allows for access
to a predefined Voice Mail number. (see
the Voice Mail access number setup in the
Options sub-menu section)
Voice Mail access can be established by
selecting Connect from within the Voice
Mail sub-menu upon establishing a Voice
Mail access number.
Messaging Menu
Menu Descriptions
Menu Descriptions
The Option sub-menu offers three setup
options allowing the user to modify and
access the handsets messaging functionality.
This setup option, stores the access
number neccesary to connect to any voice
mail system with dial-up access. Upon
entering a number, the number can be
stored by selecting Save.
The SMS Reminder offers several
intervals on which the ringer & reminder
will be repeated while a message remains
unread.
The SMS Autodelete allows you to
delete older messages upon receiving a
new message. When Autodelete is OFF
the maximum number of messages that
can be stored by the handset is 20, any
new messages received beyond 20 will be
rejected.
Text Messaging
Voice Mail
Options
Voice Mail No.
SMS Reminder
SMS Autodelete
Page 26

26
Phone Book Menu
The 9p23 handset offers an internal
phone book capable of storing individual
entries as well as recording previously
dialed and received numbers and logging
the caller ID information for inadvertently missed calls.
The Search function within the Phone
Book menu allows you to search for
specific names stored in the phone book.
Searching for specific entries involves
entering the letters of the name using the
keypad. You can enter just a few letters of
the name or the complete name. If you
enter just a few letters and press Confirm,
the handset will find the first name in
memory that begins with the letters you
entered. Browsing of the phonebook
entries is can be accomplished by pressing
Browse followed by scrolling through the
entries by using the UP and Down
Arrows.
The Missed Calls function allows you to
view a list of calls that were missed. If
your phone receives calls which are not
answered, the Missed Calls icon will
appear (when calling number delivery is
supported by your installation). Opening
the Missed Calls menu shows an index
number identifying the entry (up to 20
entries), the time/date the call was
received, and the phone number of the
caller. Use Up Arrow and Down Arrow
to scroll through the list. For an internal
extension, press to return the call. For
external calls, Prefix Editing can be used.
Search
Missed Calls
The Received No. sub-menu allows you
to view the last (20) numbers received and
answered by your handset. Opening the
Received No. menu shows an index
number identifying the entry (up to 20
entries), the time/date the call was
received, and the phone number of the
caller. Use the Up Arrow and Down
Arrow to scroll through the list. For an
internal extension, press to return the
call. For external calls, Prefix Editing
can be used.
The Dialed No sub-menu allows you to
view the last (20) numbers dialed from
your handset. Opening the Dialed No.
menu shows an index number identifying
the entry (up to 20 entries), the time/date
the call was received, and the phone
number of the caller. Use Up Arrow and
Down Arrow to scroll through the list.
For an internal extension, press to return
the call. For external calls, Prefix
Editing can be used.
Prefix Editing
The Missed Calls, Received No,
Dialed No and Redial lists support
prefix editing. You may add an external
dialing number to the front of any number
to dial an outside line. When you are done
editing, press to call the displayed
number or press Save to add to your
Phonebook.
Received No.
Dialed No.
on
on
on
on
Page 27

27
The Add Number function allows you
to enter new names and numbers. You
can store phone numbers and associated
names in your phone’s memory to use
for Recall dialing and Speed Dial. Each
number you store can be up to 24 digits
in length and any names you store can be
up to 12 characters in length. You can
view the percentage of memory used
through the Memory Monitor.
Storing an Entry
1. Open the Phone Book Menu.
2. Select Add Number .
3. Enter a name you want associated
with the telephone number you are
going to store. Table 1(page 14)
shows which keys and the number of
times to press them to enter letters.
4. Press Confirm to store the name.
5. Enter the phone number you want
to store.
6. Press Confirm.
7. Select the speed dial number or
select ‘-’ to store this entry without
a speed dial number. If the speed
dial number is in use, the number
will flash when selected indicating
you can overwrite the existing speed
dial setting.
8. Press Confirm to store the entry.
If the entry you create matches an
existing entry, the phone will beep.
If an entry cannot be stored, the phone
will beep and display Memory Full.
Phone Book Entry Shortcut
The phone must be on standby mode.
1. Enter the number and press Save.
2. Enter the name and press Confirm.
Editing an Entry
You can add to names or digits or delete
and replace letters and digits in entries
stored in memory. To do this:
1. Open the Phone Book menu and
select Search .
2. Enter a name to be recalled and press
Confirm to display the corresponding
entry. To scroll through the other
memory entries press the Down
Arrow or Up Arrow. Press Confirm
when the entry you want to change
is displayed.
3a. Press Option and select Edit.
3b. Entering a letter from the keypad
will add letters to the end of the
name.
3c. To replace letters within the name,
press the Up Arrow to erase the
letters you want to change and then
enter the new letters.
3d. Press Confirm to save changes or to
accept the current entry.
4a. Enter digits using the keypad will
add digits to the end of the number.
4b. To replace digits, press the up
arrow to erase the digits you want to
change and then enter the new digits.
4c. Press Confirm to save changes or to
accept the current entry.
5. Replacing speed dial number,
requires that you select a new number
and press Confirm to save the new
number.
Add Number
Page 28

28
Deleting an Entry
1. Open the Phone Book menu and
select Search.
2. Enter a name to be recalled and press
Confirm to display the correspond-
ing entry. To scroll through the
other memory entries press Down
Arrow or Up Arrow. Press Confirm
when the entry you want to change
is displayed.
3a. Press Option and select Delete. The
display will prompt “Delete Entry?”
Press Confirm to delete the entry.
NOTE: Fixed phonebook entries cannot
be edited or deleted and are designated by
the Locked soft key. Fixed phonebook
entries are only available when they are
configured in your phone. See your
system administrator.
The Memory Monitor function allows
you to see the percentage of the memory
used to store your entries. This percentage does not include fixed phonebook
entries.
Page 29

29
Menu Descriptions
Sound SetUp Menu
The Sound Setup menu organizes all of
the 9P23 handsets ability to customize
Ring, Melodies, Volumes and Options such
a vibrate as well as speaker volumes and
microphone gains.
The 9P23 handset offers you the ability
to individually set up two distinct Sound
Profiles. Each profile can be used to
customize the Ring Volume and Silent
Alert functionality. The two profiles are
labeled Normal and Meeting and can be
set-up based on the users preference.
Within the Sound Profiles sub-menu there
are two options:
Active Profile option allows you to
activate the Normal or Meeting profile
by selecting between the two options using
the Up down Arrow .
Customize Profile, allows you to
customize your Normal and Meeting
profiles settings including.
1. Ring Volume allows you to set
the level of the ring volume. Turn
the ringer off by setting the volume
to the lowest level.
2. Key Sound allows you to choose
whether the keys click when pressed
or remain silent.
3. Vibration allows you to enable or
disable the internal silent alert
option.
The Ring Melodies option allows you to
choose the pattern of tones played when
the phone rings. There are different
patterns for each call type. You may
assign each type a unique pattern or mute
the ring for that type. Each pattern is
demonstrated as you scroll through the
selections. Refer to the Appendix for
additional ring patterns that can be
programmed into your phone.
The SpeakerVol allows you to adjust the
volume of the earpiece. You can also
adjust the volume during a call by using
the side volume key.
The Attach Vol allows you to select the
volume of optional handsfree accessories.
The Mic Gain allows you to increase or
decrease the microphone sensitivity on
your handset as well as the microphone of
an attachment such as the headset.
Sound Profiles
Ring Melodies
Speaker Vol
Attach Vol
Microphone Gain (Mic Gain)
Page 30

30
Settings Menu
The Settings Menu organizes miscella-
neous settings for the handset. Within the
Settings main menu there are two submenus namely the General Menu and
Custom Menu.
The General Menu allows you to
customize general functionality of your
phone to your preferences.
The Select Line menu option allows you
to choose another line as the selected line.
The selected line identifies the line used
when you place the next call. To select a
line navigate between the available lines
using the up and down arrows and set the
line by using the Confirm softkey.
The Contrast menu option lets you
adjust the display contrast. The specific
contrast chosen can be save by pressing
the Confirm softkey.
The Backlight menu option allows you
control whether the backlight of the
display simply times out or if it never
turns on at all.
Date Mode allows you to display the
current date while the phone is in
Standby mode. The format selected is
used for all date displays.
Time Mode allows you to display the
current time while the phone is in
Standby mode. The format selected is
used for all time displays.
SelectPUN allows you to choose one of
eight possible extensions already
programmed into your phone. ‘A’ sets
the phone to automatically use the first
valid extension.
The Custom Menu allows you to
continue to customize peripheral features
such as the phone name and the alarm
number.
The Phone Name allows you to enter or
change the ID of your phone. When the
phone is in Standby mode, this label
appears on the lefts side of the phone
display next to the extension number.
The Alarm No menu option allows you
to program a number that will be dialed
when you press the alarm button on the
top of the handset.The number can be an
internal or external number.
Page 31

31
Menu Descriptions
In Call Menu
Standard System
Configuration
The In Call Menu lets you control
features during a call.
PBX Functs lets you use features
provided by your PBX (phone switch).
These functions are available only when
they are configured for your phone. See
your system administrator.
In Call Menu features are available only
during an active call. To access the In
Call Menu press Options and use the Up
Arrow and Down Arrow to scroll
through the menus.
Transfer allows you to place your
present call on hold, dial a second
number or recall one from your
phonebook, converse with the new
party and commit or cancel the
transfer.
Conference allows you to place your
present call on hold, dial another
number and conference the calls
together.
Hold places your call on hold.
Reconnect lets you reconnect to the
call on hold.
Callback allows your phone to
notify you when a called party is
free.
Cancel Callback disables the active
callback function.
SpeakerVol allows you to change the
earpiece or handsfree volume during a call.
Depending on your system configuration, either Standard or Enhanced Digital,
control of the In Call Menu features may vary. Based on your current telephone
system, some In Call Menu options may not be available. NOTE: If your system
configuration is for Mobility Server, please refer to page 24.
Enhanced Digital Integration
(EDI) Configuration
The EDI In Call Menu lets you use
features during a call the same way as with
the Standard System Configuration.
Since EDI may support up to four lines
and allows for each line to be placed on
hold, a blinking line appearance (1, 2, 3 or
4) on the bottom left of the display
indicates which line is on hold.
For additional information on EDI Phone
Operation, see page 23.
Page 32

32
Problems You Can Solve
Displayed Messages and
Explanations
The phone does not turn ON
• Recharge or replace the battery.
• Remove and reinsert the battery.
Phone is not ringing when a call is
received
• Check the Sound Setup Menu to
make sure the phone is not set for
Meeting Profile.
• Check the Ring Volume to make
sure it has not been set for the lowest
setting.
Phone becomes warm during long calls
• This is not a problem. Because of its
size, the phone may feel slightly
warm during extended calls.
Battery does not seem to charge to full
capacity
• Try a different battery.
Tones are not heard when pressing keys
during a call
• Key Sound is turned OFF by default.
If audible tones are required, make
sure Key Sound in the Sound
Profile Menu is turned ON. See
page 28.
Beeping is heard through the headset
when the battery is low
• The Battery Low alert indicates the
battery is reaching the end of its
charge. You should not attempt to
make calls in this state. Turn the
phone OFF and replace the battery.
Otherwise, the phone will shut off
automatically. The buzz should not
occur with an adequately charged
battery.
Problems and Possible
Solutions
Problems You Can Solve
If you need additional information or assistance,
or would like to purchase accessories:
• In the U.S.A., call 1-877-71 ASCOM (1-877-712-7266)
The signal is too weak to make a call.
Try again when
you are closer to
a base station or
turn the phone
OFF and ON. If
the problem
persists, notify
your system administrator.
Battery power is low. When the phone
shuts itself off,
replace the
battery with a
fully charged
one. Or use an
alternate power
source, such as a
rapid desk charger.
The phone does not recognize any base
station. Try
turning the
phone OFF and
ON. If the
problem
persists, notify
your system
administrator.
The text message memory is full and
AutoDelete is
turned OFF.
Delete some
messages
yourself or
turn
AutoDelete
ON. (See Messaging Menu, page 24.)
Page 33

33
Appendix
Default Melodies
Internal Call:
Fur Elise 2e2D2e2D2e2D2e2b2d2c3a7-
External Call:
piano concerto Tchaikovsky: 2G2f2D4C5f2D5F2f2c2C4A7-
Call Back Call:
House rhythm 1e3-1a1e1a1e3-1a1e1-2g2-
Message Call:
door bell 2a1-1e3-3b
Voice Mail:
short loop 1f1G1F1G1f1G1F1G
Some examples of Bell Sounds are:
twin tone 1 0e0c0e0c0e0c...
twin tone 2 0g0b0g0b0g0b...
rolling slow 2c2e2g2c2e2g...
rolling quick 0c0e0g0c0e0g...
loop up 0c0d0e0f0g0c0d0e0f0g
loop down 0g0f0e0d0c0g0f0e0d0c
Some examples of Melodies:
Rock’n Roll 2e2C2a2F2d2a2g2e2a2F2d2a
Blues Rhythm 3d4g3F3d5-3-3a3c3a3c3d3Toccata in D-minor (Bach) 0g0f5g4g0f0D0d0c4b5c
Nabucco (slave choir) 3F3e4d4a4d3d3c3e4g3g
Wein, Weib, und Gesang 2a3b3C4d3e3f4F3g2F2e3d3a
Nutcracker (Fairy dance) 2g2e3g3F3D3e4d4c2b2d3c4b
Program Your Own Ring Melody
 Loading...