

Page 1
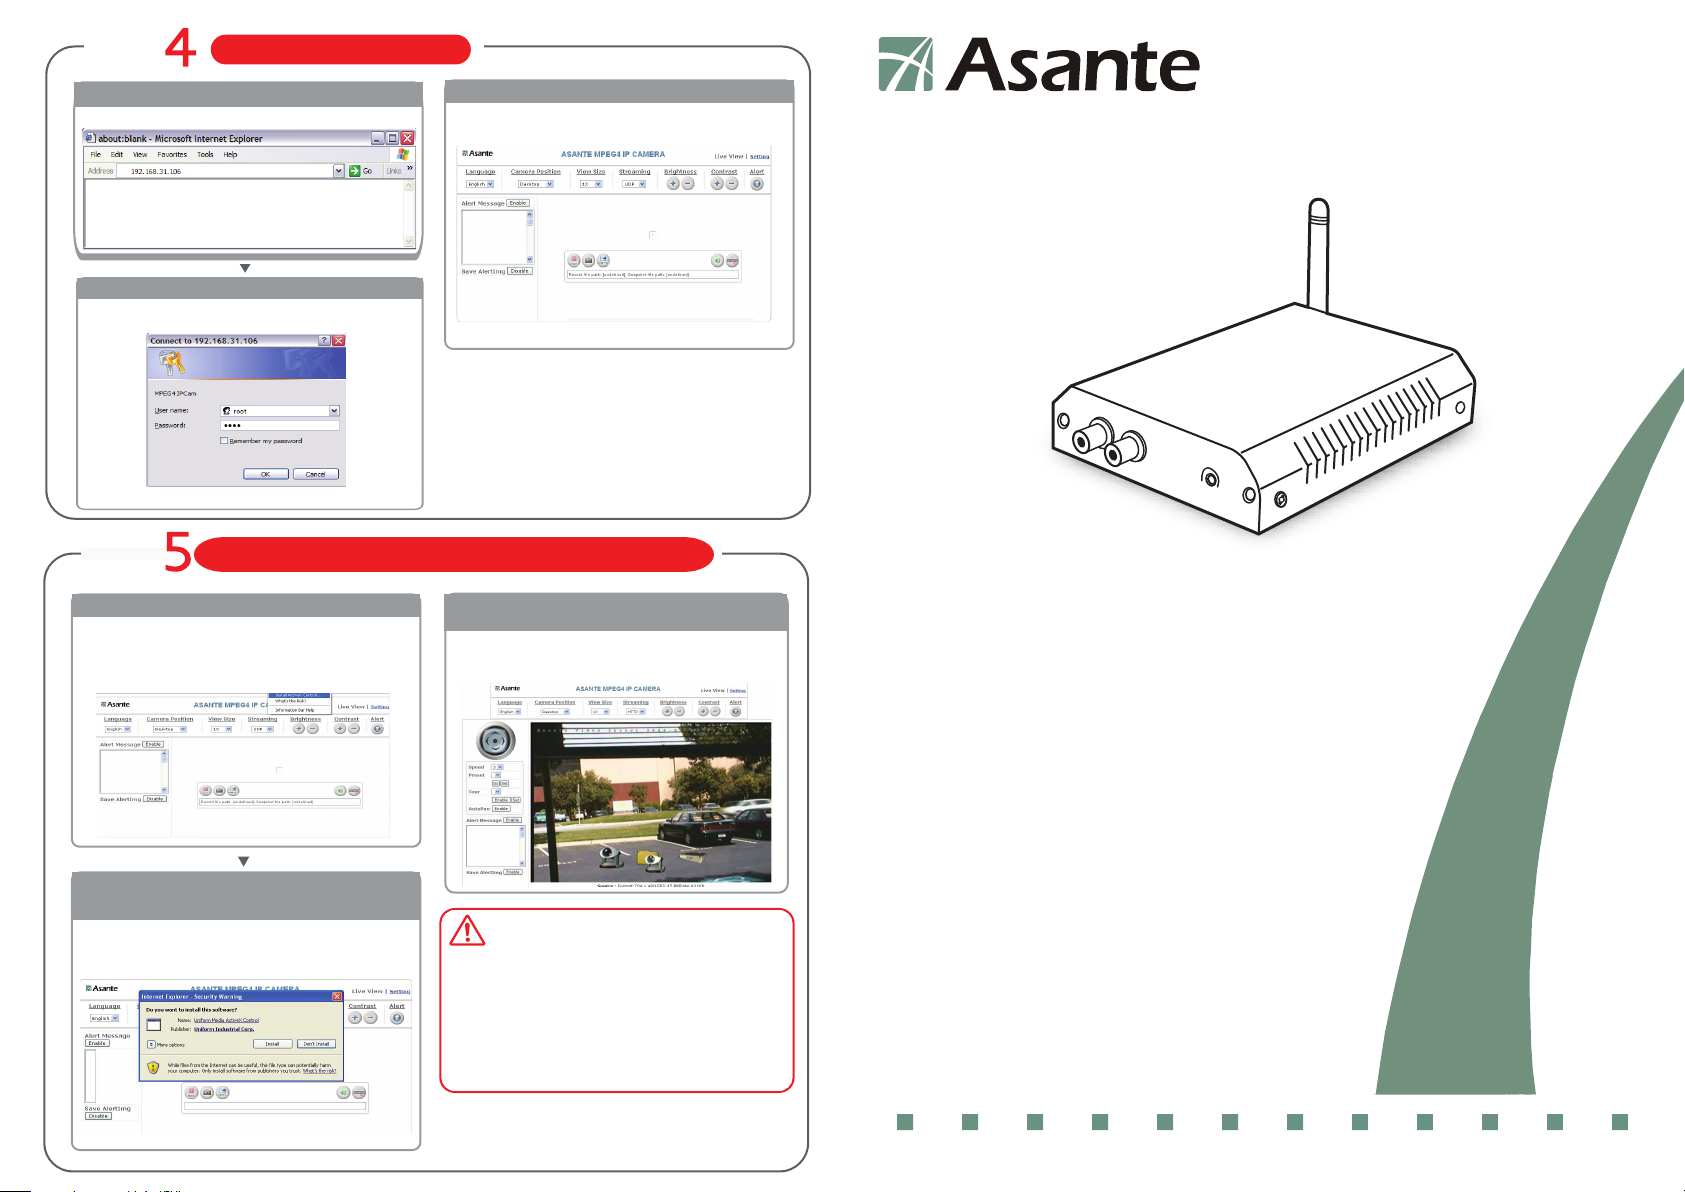
Step
Open A Microsoft Internet Exploer(IE) Window
1
Enter Camera IP address
Enter Login Window
2
Enter Username: “root”, Password: “root”
Enter the Main Page
Enter Home Camera Page
3
You Will Enter Home Page After Login
SecureNET
.
Step
Install ActiveX
1
When the username and password are confirmed, a
control setup screen pops up under the IE address
bar. Click “Install ActiveX Control” to install the
controls.
The security warning screen aps.
2
Click Install.
The ActiveX is powered by Uniform Technologies and
You need to press Install to enable media viewer on
your IE browser ActiveX plug-in.
Install Internet Explorer Plug-In Components
Network Camera Live & Control Page
3
3
When ActiveX Plug-In is installed then you can view
video image. If you can not see, please select
streaming mode to HTTP.
.
If No Video Image
You may need to check your PC environment including
(1) Window Firewall setting
(2) IE version should be 6.0 or above.
You may need to check router/firewall setting if you
view the video from the other side of router/firewall.
You may refer to user manual to learn this in depth.
NetServer 6001/P/W
Video Server
Quick Guide
Please refer to User Manual for detail operation.
©2007 Asante Networks Inc., All rights reserved. NetCam is a registered trademark of Asante Network, Inc.
www.asante.com
Page 2
Connection diagram
PTZ Surveillance
RS485
Wir eless netwo rking
Ala rm
Step
Start
1
Run the IP Finder.exe file from the CD.
Search the product on the network
2
Search for the product from your LAN. The factory
IP setting 192.168.0.20 appears on the screen.
IP Address settings
Submit the change
4
Click Submit to validate new settings.
4
Video in
AMP
Digital Video
Recorder
DVR
Step
Connec t RS-485 Cable
1.
Connect your analog camera using
RS-485 to this product.
AMP
MI C
Connect the product to the switch/hub and analog camera
Connect the video server using LAN.
POW ER
2.
Connect Video cable.
Ala rm i nput
Ala rm o utput
HUB
Inf rare d ind ucto r
Ala rm
WAN Inter net
3.
Connect your camera
to the power source
(as shown in the figure)
.
Changing the IP address, Netmask,
3
Default Gateway
When you find the camera, click it and the settings
appear on the right side. Change the settings for the
new network environment you need.
Step
Start
1
Bring Up Your IE browser
Check
2
Make sure that Level II, the commonly used default
security level, is set for the security.
Change the Internet Explorer settings
Confirmation
5
You may “search” again to confirm the change is
4
correct. After that, you can “exit”.
Select “medium” for security
3
6.
4.
Connect the product to the
power source.
5.
Connect the product to the
switch hub(a s shown in the figure)
6.
Connect the switch hub to your PC
(as shown in the f igure).
5.
If No Switch/Hub
Lin k
4.
.
You may connect Ethernet direct
from PC to product. However,
you will need to confirm your IP
address to the existing network.
You may also need a crossover
cable. It is highly recommended
that you have an IT professional
assist you.
Steps
Open the IE browser
Tools
Internet Options
Security
Custom Level
Note: This pr oduct s upports IE 6.0 o r above .
OK
4
Click OK to quit.
Page 3

Wireless Setting
Step
Relocate Camera and Final Test
Step
Start
1
After setting of Ethernet IP address, enter the
Wireless Setting page.
Search/Select Wireless AP
2
Camera will automatically scanned Wireless APs
when you enter the page, or you may press “scan”
again. Importantly, you need to ensure your
WLAN AP is shown and with encyption enable.
Wireless Setting
Wireless Setting Confirm
4
Refresh/reload page. After few seconds, you
should see the new wireless IP address.
Unplugged Ethernet
1
Unplug the RJ45 on both router and the
network camera so that you can start
to use wireless independently.
Relocate & Mount Device
2
Please mount the device to the preferred
location and power on the device.
.
Test & RUN
3
You may “Test” if it has been connected and
operated smoothly.
1) Set Up your PC on the same WLAN subnet.
2) Use IP Finder to identify the Network Camera.
3) Use IE brower to view the video
4) Check to make sure that wireless signal strength
is at least 50%.
5) Check to make sure that the Video Quality is set
lower than 1.5Mbps
6) View the video.
.
Setting the Network Paramaters
3
Select Infrastructure mode, auto and enter SSID,
Select WEP Encryption to be 64 bits or 128bits
depending on your wireless router/AP setting.
Enter the exact same KEY that your used for the
wireless router/AP. Select DHCP or enter static IP
address based on your network plan. Press “Save”.
Wireless Bandwidth
Primary time of WLAN or 802.11 b/g offers 11Mbps
or 54mbps share bandwidth. The WLAN bandiwdth is
much less than that offered by Ethernet switch which
can sustain multiple channels of milti-mega bits of
realtime stream data like video.
Due to the bandwidth limitation of WLAN, It is
HIGHLY recommended to set video Quality below
1.5Mbps and below.
If your signal strength from wireless router/AP is
below 50%, either you need to adjuest AP or
camera position or boost antenna power. Please
consult your network manager.
 Loading...