

Page 1

MacCon Family
ASANTÉ
Ethernet Network Cards
for the Macintosh
Installation Guide
Page 2

Asanté MacCon
Adapter Family
Installation Guide
Asanté Technologies, Inc.
821 Fox Lane
San Jose, CA 95131
October 1994
Part Number 06-00141-00 Rev. B
Printed in USA
Page 3

Copyright Notice
Copyright 1994 by Asanté Technologies, Inc.
All rights reserved. No part of this manual, or any associated artwork, software,
product design or design concept, may be copied, reproduced or stored, in whole or
in part, in any form or by any means mechanical, electronic, optical, photocopying,
recording or otherwise, including translation to another language or format, without
the express written consent of Asanté Technologies, Inc.
EtherTalk and Installer are copyrighted programs of Apple Computer, Inc., and are
licensed to Asanté Technologies, Inc. to distribute for use only in combination with
Asanté Ethernet interface products. EtherTalk shall not be copied onto another disk
or diskette (except for archive purposes) or into memory unless as par t of the
operation of Asanté Ethernet interface card products.
Trademarks
Asanté Technologies, MacCon-i, MacCon+, MacCon3, FriendlyNet, EN/SC and the
Connectivity Solution are trademarks of Asanté Technologies, Inc.
Apple, AppleTalk, EtherTalk, AppleShare, and Macintosh are registered trademarks of
Apple Computer, Inc.
Ethernet is a registered trademark of the Xerox Corporation, Inc.
FCC Information
This equipment is classified as a Class A computing device. Class A devices may be
used only in commercial, business, or industrial environments.
This equipment generates, uses and can radiate radio frequency energy. If this
equipment is not insulated properly in strict accordance with the instructions in this
manual, then it may cause interference in this electronic environment. This
equipment has been tested and found to comply with the limits for a Class A
computing device pursuant to Subpart J of Part 15 of FCC Rules, which are designed
to provide reasonable protection against radio frequency interference when operated
in a commercial environment.
Operation of this equipment in a residential area is likely to cause interference, in
which case, the user at his own risk and expense will be required to correct the
interference.
Asanté Warranty
This Asanté MacCon Ethernet interface card product has a limited lifetime warranty
which applies to the original purchaser of the product. Asanté Technologies, Inc.
warrants that this product will be free from defects in title, materials and
manufacturing workmanship. If the MacCon Ethernet interface card product is found
to be defective, then, as your sole remedy and as the manufacturer’s only obligation,
Asanté Technologies, Inc. will repair or replace the product provided that (1) you call
Asanté Technologies, Inc. for a Returned Merchandise Authorization (RMA) number,
that (2) you clearly write this RMA number on the outside of the package, and that
(3) you return it, postage prepaid, during the warranty period. This warranty is
exclusive and is limited to Asanté MacCon Ethernet network interface card products.
This limited lifetime warranty shall not apply to Asanté MacCon Ethernet interface
card products that have been subjected to abuse, misuse, abnormal electrical or
environmental conditions, or any condition other than what can be considered
normal use.
∆
Note: The warranty card must be filed with Asanté Technologies, Inc. within
30 days after date of purchase.
Page 4

Asanté Warranty Disclaimer
Asanté Technologies, Inc. makes no other warranties, express, implied or otherwise,
regarding Asanté Ethernet interface card products, and specifically disclaims any
warranty for merchantability or fitness for a particular purpose.
The exclusion of implied warranties is not permitted in some States and the
exclusions specified herein may not apply to you. This warranty provides you with
specific legal rights. There may be other rights that you have which vary from State
to State.
Apple Warranty Disclaimer
The following disclaimer is required by Apple Computer, Inc. It applies only to the
EtherTalk computer software from Apple enclosed with Asanté Ethernet interface
products. All Asanté software is covered by Asanté’s limited warranty.
APPLE COMPUTER, INC. (“APPLE”) MAKES NO WARRANTIES, EXPRESS OR IMPLIED,
INCLUDING WITHOUT LIMITATION THE IMPLIED WARRANTIES OF
MERCHANTABILITY AND FITNESS FOR USE FOR A PARTICULAR PURPOSE,
REGARDING THE APPLE SOFTWARE. APPLE DOES NOT WARRANT, GUARANTEE OR
MAKE ANY REPRESENTATIONS REGARDING THE USE OR THE RESULTS OF THE USE
OF THE APPLE SOFTWARE IN TERMS OF ITS CORRECTNESS, ACCURACY,
RELIABILITY, CURRENTNESS OR OTHERWISE. THE ENTIRE RISK AS TO THE RESULTS
AND PERFORMANCE OF THE APPLE SOFTWARE IS ASSUMED BY YOU. THE
EXCLUSION OF WARRANTIES IS NOT PERMITTED BY SOME STATES. THE ABOVE
EXCLUSION MAY NOT APPLY TO YOU.
IN NO EVENT WILL APPLE, ITS DIRECTORS, OFFICERS, EMPLOYEES OR AGENTS BE
LIABLE TO YOU FOR ANY CONSEQUENTIAL, INCIDENTAL OR INDIRECT DAMAGES
(INCLUDING DAMAGES FOR LOSS OF BUSINESS PROFITS, BUSINESS
INTERRUPTION, LOSS OF BUSINESS INFORMATION, AND THE LIKE) ARISING OUT
OF THE USE OR THE INABILITY TO USE THE APPLE SOFTWARE EVEN IF APPLE HAD
BEEN ADVISED OF THE POSSIBILITY OF SUCH DAMAGES. BECAUSE SOME STATES
DO NOT ALLOW THE EXCLUSION OR LIMITATION OF LIABILITY FOR
CONSEQUENTIAL OR INCIDENTAL DAMAGES, THE ABOVE MAY NOT APPLY TO YOU.
APPLE’S LIABILITY TO YOU FOR ACTUAL DAMAGES FROM ANY CAUSE
WHATSOEVER, AND REGARDLESS OF THE FORM OF THE ACTION (WHETHER IN
CONTRACT, TORT (INCLUDING NEGLIGENCE), PRODUCT LIABILITY OR
OTHERWISE) WILL BE LIMITED TO $50.
Limitation of Liability
The liability of Asante Technologies, Inc. arising from this warranty and sale shall be
limited to a refund of the purchase price. In no event shall Asante Technologies, Inc.
be liable for costs of procurement of substitute products or services, or for any lost
profits, or for any consequential, incidental, direct or indirect damages, however
caused and on any theory of liability, arising from this warranty and sale. These
limitations shall apply notwithstanding any failure of essential purpose of any remedy.
Page 5

Asking for assistance
To contact Asanté Technical Support:
Telephone
Fax
Fax-Back
Bulletin Board Service (BBS)
ARA BBSb (guest log in)
Applelink mailc/BBS
FTP Archive
Internet mail
a Please request catalog of contents.
b Download INDEX.TXT file for catalog of contents.
c When sending email, please include your full name, US mailing address,
a
b
b
b
c
phone number, product name and a problem description.
(800) 622-7464
(408) 435-0706
(408) 432-6018
(800) 741-8607
(408) 954-8607
(408) 432-1416
(408) 894-0765
ASANTE.TECH
ftp.asante.com
support@asante.com
Technical support hours
6:00 AM to 6:00 PM Pacific Standard Time USA, Monday–Friday
Tell us what you think
Asanté Technologies is interested in your comments/suggestions
about our manuals. If you take the time to make suggestions, we’ll
consider your suggestions for new manual releases.
Please read through this manual and think about these questions:
• What do you like best about this manual?
• What do you think is the least valuable or weakest part of
this manual?
• What is the most needed improvement you would make to
this manual?
Fax your comments and suggestions to:
Asanté Technical Publications at (408) 894-0363
E-mail them through Internet:
techpubs@asante.com
or
Page 6

Table of Contents
Asking for assistance i
Technical support hours i
Tell us what you think i
Introducing the
Asanté MacCon Cards 1-1
Summary of MacCon Card Features 1-2
The Math Co-processor Option 1-2
Asanté EtherTalk Installer Software 1-2
Installing Asanté MacCon Cards 2-1
Preparing for the Installation 2-1
Checking the Requirements 2-1
Observing the Safety Rules 2-2
The MacCon NuBus Card 2-3
Installing the MacCon NuBus Card 2-4
Installing the MacCon 610 Card 2-6
Installing a MacCon LC Card 2-9
Installing a MacCon LC Card in a Color Classic 2-10
Installing the MacCon3 IIsi and MacCon 30i Cards 2-13
Setting the Cable Type on the Daughter Card 2-13
Video Options 2-14
Setting the Slot Address for Two Cards 2-14
Installing the Math Co-processor 2-15
Installing in a Macintosh IIsi 2-16
Installing a MacCon3 IIsi and a Radius Pivot IIsi 2-18
Installing a MacCon Card in a Macintosh SE/30 2-19
Installing a MacCon+ SE Card in a Macintosh SE 2-21
Setting the Cable Type on the Daughter Card 2-21
Connecting the Macintosh to the Network 2-24
With 10BaseT cabling 2-24
Installing the EtherTalk Software 2-25
Two Types of Software Installations 2-25
About EtherTalk Phase 1 and Phase 2 2-26
Installation Procedures 2-26
Accessing Network Services 2-28
Asanté SNMP MacAgent 3-1
Introduction 3-1
TCP/IP Protocol Stack 3-1
IP Addressing 3-1
Requirements 3-2
AsantéView In-Band Network Management Software 3-2
i
Page 7

Accessing Asanté MacAgent MIB 3-2
Asanté SNMP MacAgent and the TCP/IP Protocol 3-2
Asanté SNMP MacAgent as a Network Diagnostic Tool 3-3
Installing SNMP MacAgent 3-3
Configuring MacTCP 3-4
Configuring SNMP MacAgent 3-5
Asanté SNMP Configuration Parameters 3-6
AsantéView Network Management Station 3-7
Other Network Management Software 3-8
Using TroubleShooter and ADLS Diagnostic Software 4-1
Running TroubleShooter Diagnostics 4-1
Changing from EtherTalk to LocalTalk 4-1
Starting TroubleShooter Diagnostics 4-2
Running other TroubleShooter tests 4-3
Running the Loopback test 4-4
Running the Bandwidth Utilization test 4-4
If a test fails 4-6
Quitting TroubleShooter and restarting network services 4-7
Running ADLS 4-7
Troubleshooting 5-1
Checking the Basics 5-1
Do You Have the Current Asanté Driver Software? 5-1
Running TroubleShooter 5-2
Other Tips 5-2
Installing the Math Co-processor Option 5-2
Macintosh IIsi with a PDS Slot 5-2
Questions and Answers to Common Problems 5-3
Technical Specifications A-1
MacCon Specifications A-1
Ethernet Address A-2
MacCon LEDs A-3
Ethernet Specifications A-3
Connector Pin-outs A-4
AAUI Connector A-4
RJ-45 Connector A-6
Index i
ii
Page 8

List of Figures
Figure 2-1 Selecting AUI, MacCon NuBus card 2-3
Figure 2-2 Disabling Link Integrity, MacCon-i NuBus card 2-4
Figure 2-3 Installing a MacCon 3 NuBus card 2-5
Figure 2-4 Installing MacCon NuBus card, Apple Centris 610 2-6
Figure 2-5 Selecting the AUI port, MacCon 610 card 2-7
Figure 2-6 Disabling link integrity, MacCon 610 card 2-7
Figure 2-7 The MacCon 610 card plugged into the expansion slot on the
motherboard 2-8
Figure 2-8 Disabling link integrity, LCIII card 2-9
Figure 2-9 The MacCon LC card plugged into the expansion slot on the
motherboard 2-10
Figure 2-10 The rear panel removed on the Color Classic 2-11
Figure 2-11 Installing the MacCon LC in the expansion slot in the Color
Classic 2-12
Figure 2-12 The MacCon3 IIsi controller card and daughter card installed
in a Macintosh IIsi 2-15
Figure 2-13 Removing the MacCon3 IIsi daughter card 2-17
Figure 2-14 Installing a MacCon3 IIsi card with a Radius card 2-17
Figure 2-15 Installing a MacCon+ 30i card in a Macintosh SE/30 2-19
Figure 2-16 Installing the MacCon SE daughter controller card and
daughter card 2-22
Figure 2-17 The Easy Install dialog box 2-27
Figure 2-18 Network control panel 2-28
Figure 2-19 An example of a user’s Chooser dialog box 2-29
iii
Page 9

Chapter 1
Introducing the
Asanté MacCon Cards
Thank you for purchasing a MacCon network interface card from
Asanté Technologies. Asanté’s MacCon cards enable you to connect
any Macintosh with an available expansion slot to a high speed Ethernet network.
The MacCon Family consists of the
MacCon
MacCon-i series, designed with advanced integration technology, is
available only for Macintosh systems with NuBus and LC PDS expansion slots.
The MacCon cards are described in the table below.
and
MacCon-i
Chapter 2
series. The
NuBus Macs
Centris 610 PDS,
Quadra 610, and
Centris 660 AV
Mac IIsi and
Mac SE/30
Mac LC PDS
Mac SE
10BaseT and Thick Thin and Thick
MacCon-i NB-10T
99-00198-01
MacCon+ IIET64
99-00102-10
MacCon+ 610ET
99-00162-01
MacCon+ 30iET64
99-00203-03
MacCon-i LC-10T
(10BaseT only)
99-00219-01
MacCon LC10TIII
(10BaseT only)
99-00093-01
MacCon+ SEET
99-00300-03
MacCon-i NB-TN
99-00197-01
MacCon+ IIET64
99-00101-02
MacCon+ 610E
99-00161-01
MacCon+ 30iE64
99-00204-02
MacCon-i LC-TN
(Thin only)
99-00218-01
MacCon LCTNIII
(Thin only)
99-00089-01
MacCon+ SEE
99-00300-02
10BaseT, Thin,
and Thick
MacCon3 NB
99-00301-02
MacCon-i NB-3
99-00196-01
MacCon3 610
99-00160-01
MacCon3 IIsi
99-00302-02
MacCon-i LC-TN/10T
(10BaseT and Thin)
99-00217-01
MacCon+ LCIII
(10BaseT and Thin)
99-00089-01
MacCon3 for SE
99-00302-04
1-1
Page 10

The term
MacCon cards
is used in this manual to refer to all cards in
the MacCon Family. When text applies only to a specific card, it is
identified by its name.
Summary of MacCon Card Features
Asanté MacCon cards offer the following features:
Support for all Macintosh computers with expansion slots
❏
Compatibility with Apple® System 7, and EtherTalk Phase 1™
❏
and Phase 2 ™
Compliance with the IEEE 802.3 standard for 10BaseT
❏
(Twisted-P air), Thin, and Thick Ethernet
Compatible with the following software environments: Apple-
❏
Share™, Novell NetWare™ for Macintosh, 3Com 3+Open™,
3Com 3+Share™, Sitka TOPS™, DEC Pathworks™, A/UX, and
other popular network software
Supports the following protocols: AppleTalk, TCP/IP, and
❏
DecNet
High performance true 32-bit internal data transfers with
❏
tuned drivers for optimal performance
Diagnostic software for help in identifying problems
❏
A PDS pass-through slot and a removable AUI port on the
❏
MacCon3 IIsi cards allowing you to install more than one PDS
card in a Macintosh IIsi
A socket for an additional Motorola 68882 math co-processor
❏
on the MacCon3 IIsi, 30i and LC cards
The Math Co-processor Option
An optional socket for a math co-processor is provided with the following MacCon cards: MacCon LC, MacCon IIsi, MacCon 30i. This
socket accepts the Motorola 68882 PLCC Math Co-Processor™. For
the correct math co-processor chip and installation procedure, check
your Macintosh documentation.
Asanté EtherTalk Installer Software
An Asanté EtherTalk Installer diskette is included with each Asanté
MacCon card. The diskette contains Asanté’s EtherTalk driver,
Asanté Network and Diagnostic Utility software and Apple networking software. Asanté’s EtherTalk device dr iver enables AppleTalk to
communicate with the Ethernet interface card.
1-2 Introducing the Asanté MacCon Cards
Page 11

Chapter 2
Chapter 2
Installing Asanté MacCon Cards
This chapter provides step-by-step instructions for installing Asanté
MacCon Ethernet network interface cards and EtherTalk software.
To install an Asanté MacCon Ether net card, you will perform the following operations:
❏
Prepare for the installation
❏
Install the MacCon card
❏
Connect the Macintosh to the network cable
❏
Terminate the cable where applicable
❏
Install the EtherTalk software
Preparing for the Installation
Before you open the anti-static bag containing the card, you must
prepare for the installation as described below.
Make sure you meet all the requirements and are aware of the safety
rules.
Checking the Requirements
Before you open the anti-static bag containing the Asanté MacCon
card, make sure you have the following:
The required software:
❏
Apple system software 6.0.8 or higher
A network operating system or a compatible system and appli-
cation software to run the network, provided by Apple or a
third-party vendor.
The EtherTalk Installer diskette provided by Asanté.
❏
2-1
Page 12

❏
The appropriate Asanté card and Ethernet hardware for your
cabling:
Cabling Requires Comments
10BaseT Hub and RJ-45
connector
Thin Pair of 50-ohm
terminator plugs
10BaseT-compliant hub
required
a
One plug for each end of
thin Ethernet cable
and BNC connector
Thick External media
adapter and DB-15
(AUI) connector
Connects Macintosh to a
drop cable. One for each
Macintosh connected to
the network
a. Asanté offers a full range of intelligent and non-intelligent 10BaseT-com-
pliant hubs.
Refer to Appendix B for detailed Ethernet specifications.
Observing the Safety Rules
Do not remove the network interface card from its anti-static bag
until you are ready to insert it into the expansion slot. The interface
cards are sensitive to static electricity and must be handled very carefully. Improper handling or installation can result in damage to your
card and/or your Macintosh.
Any damage you may cause to the computer or card will not be covered by the limited warranty.
Observe the following safety precautions during the installation:
❏
Consult your network administrator about the card installation before connecting to the network..
❏
Turn off the Macintosh and all peripherals connected to it.
❏
If you need to lay a Macintosh flat on its face, use an antistatic mat.
❏
When installing the MacCon+ SE or SE/30 card, be extremely
careful not to touch any part of the exposed circuitry. Some
circuit components retain a high voltage charge long after the
power is disconnected.
2-2 Installing Asanté MacCon Cards
Page 13
❏
Ground yourself by using an anti-static wrist strap. Attach it to
the chassis once you have opened the Macintosh, but before
handling the Asanté card or touching any component inside
the system.
❏
Handle the Asanté card by the edges and avoid touching the
connectors and chips.
❏
Keep the Asanté card in the anti-static bag until you are ready
to install it in the Macintosh.
The MacCon NuBus Card
If your Macintosh accepts NuBus expansion cards, you can use the
MacCon NuBus network interface card to connect the Macintosh to
an Ethernet network.
You install a MacCon NuBus card into an unused Nubus expansion
slot on the motherboard.
Refer to your computer’s User Guide for illustrated instructions on
how to open your Macintosh computer.
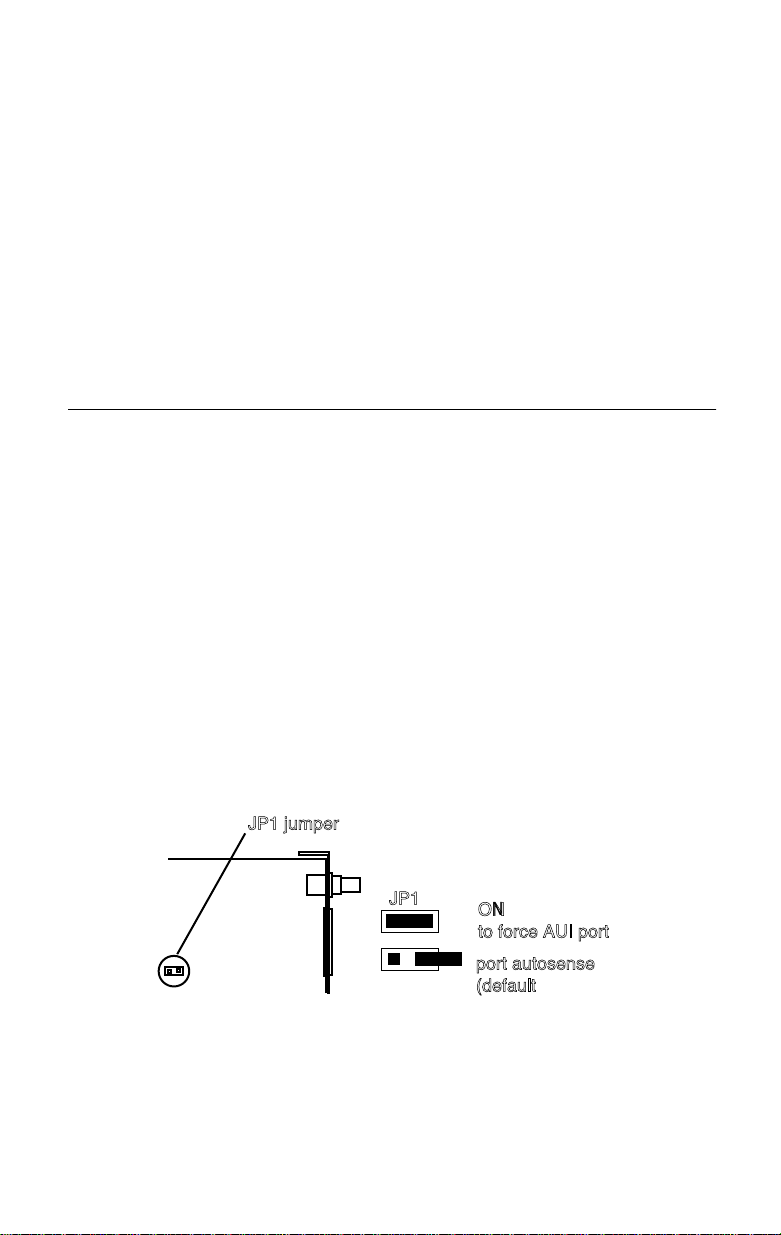
MacCon NuBus Card
∆
Note: If you are using
Thick
Ethernet (10Base5) cabling
and your network does not have 10Base5-compliant
Ethernet transceivers, you may need to force the card to
select the AUI port by setting the JP1 jumper ON as
shown in Figure 2-1.
JP1 jumper
JP1
Figure 2-1
Installing Asanté MacCon Cards 2-3
Selecting AUI, MacCon NuBus card
ON
to force AUI port
port autosense
(default)
Page 14
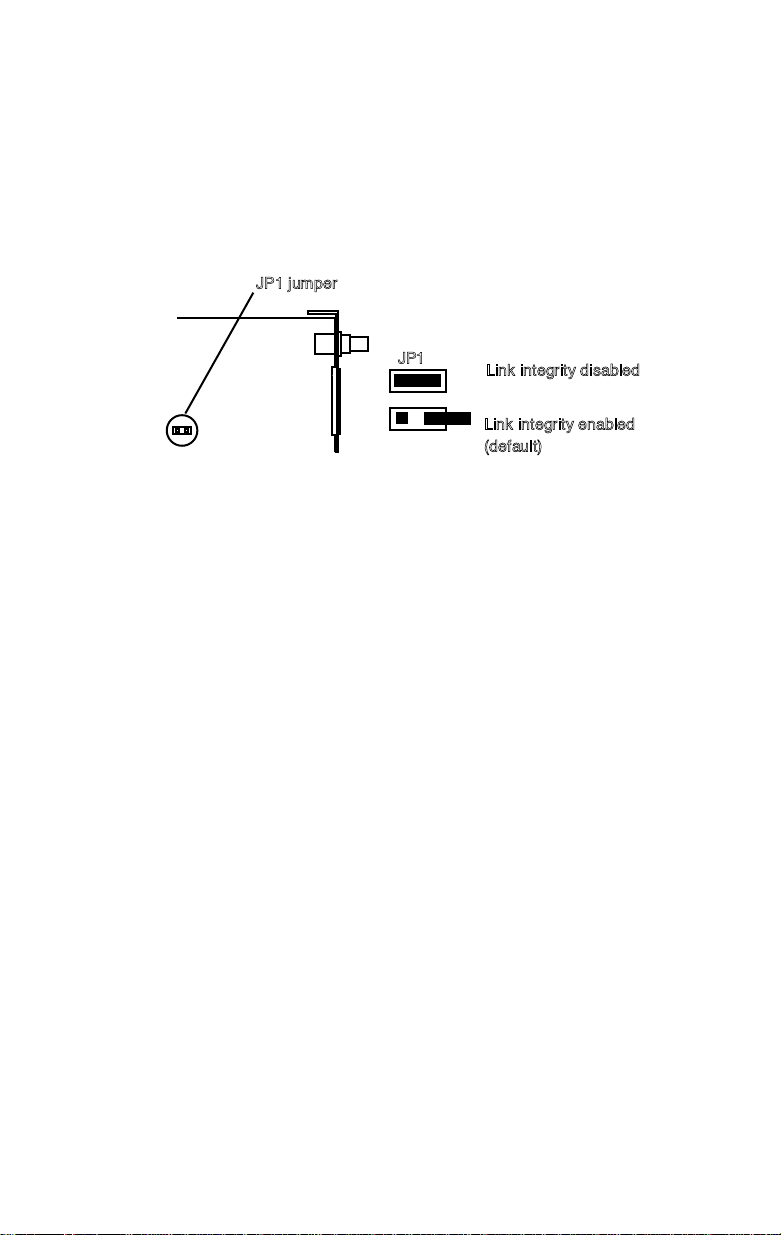
MacCon-i NuBus Card
∆
Note: If you wish to disable link integrity, use the JP1
jumper on the MacCon NuBus card, as shown in Figure 2-
2. (For example, hubs made before the 10BaseT specifications were published do not support link integrity.)
JP1 jumper
Figure 2-2
JP1
Disabling Link Integrity, MacCon-i NuBus card
Link integrity disabled
Link integrity enabled
(default)
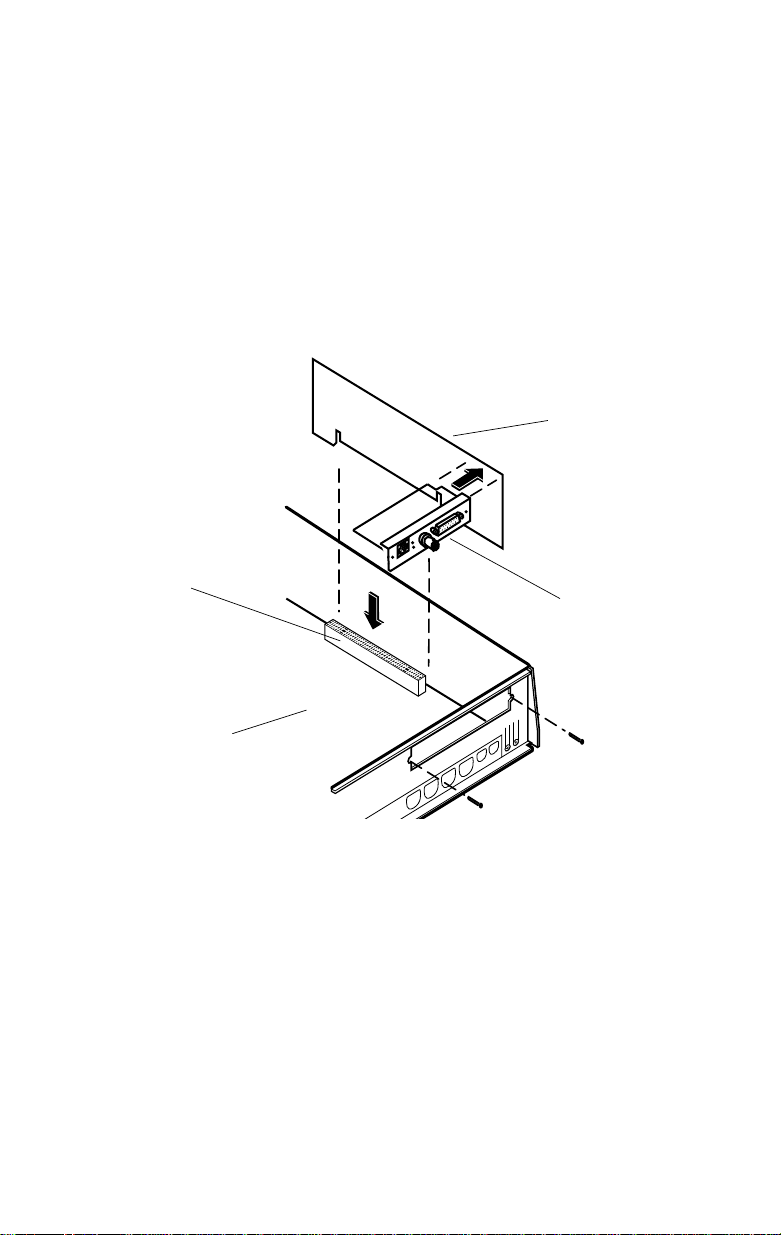
Installing the MacCon NuBus Card
1
Power down the Macintosh. Disconnect and remove the
power cable.
2
Open the Macintosh.
3
Remove the access port cover. Make sure you are grounded: check that your anti-static wrist strap is properly attached to your wrist and to the Macintosh chassis.
4
Plug the MacCon card into the NuBus expansion slot on
the motherboard:
— With the card’s Ethernet connectors facing the expan-
sion slot access port, carefully line up the card’s edge
connector with the expansion slot (see Figure 2-3).
2-4 Installing Asanté MacCon Cards
Page 15

Figure 2-3
— Gently press on the card until the connector is fully seat-
ed and the card is flush with the card holders at both
ends.
With a Centris 610
If you are installing a MacCon NuBus card in an Apple
Centris 610, you need to use the Apple Centris 610 NuBus
Adapter, which is not included with the MacCon NuBus card.
The Apple Centris NuBus Adapter part number is M1402LL/A.
— Slide the MacCon NuBus card into the Centris 610 Nu-
Bus Adapter.
— Plug the adapter into the NuBus expansion slot as shown
in Figure 2-4 on page 2-6.
5
Close the case.
6
Connect the Macintosh to the network as described in
"Connecting the Macintosh to the Network" on page 2-24.
Installing a MacCon 3 NuBus card
Installing Asanté MacCon Cards 2-5
Page 16

Expansion slot
Motherboard
Apple Centris 610
NuBus adapter
(M1402LL/A
)
Figure 2-4
Installing MacCon NuBus card, Apple Centris 610
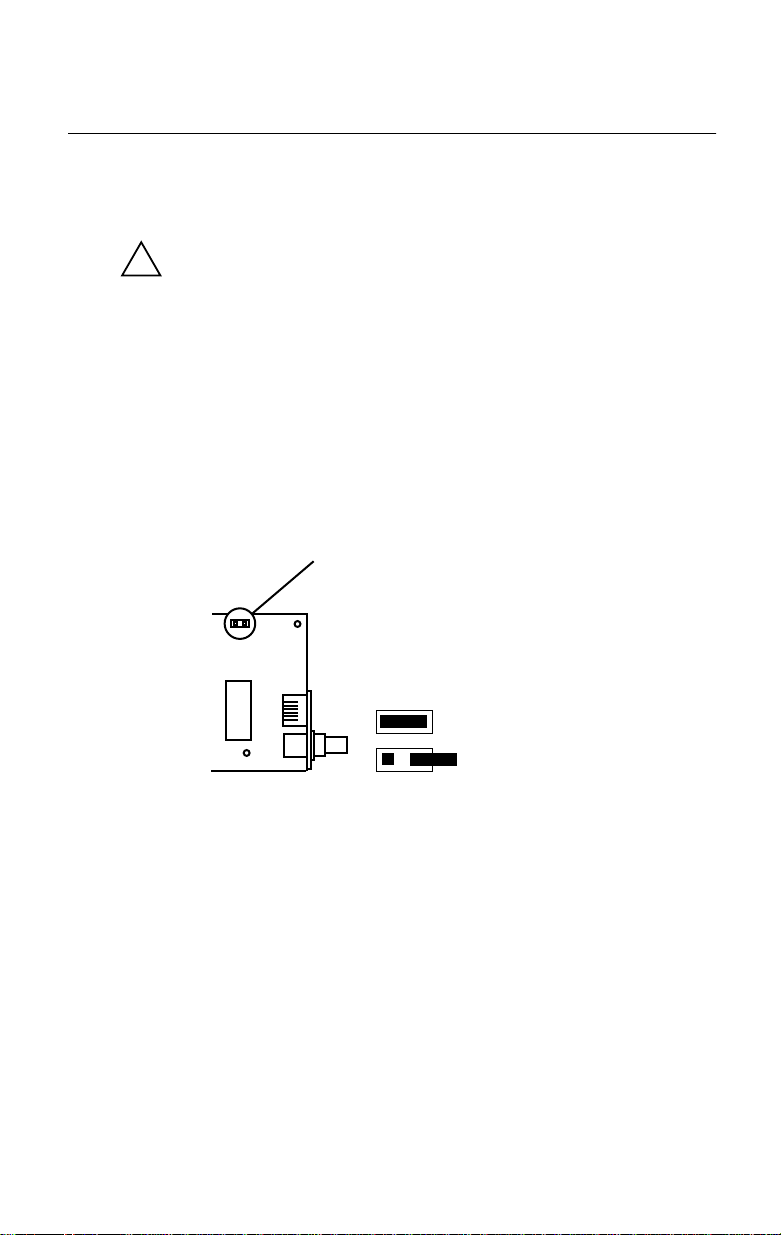
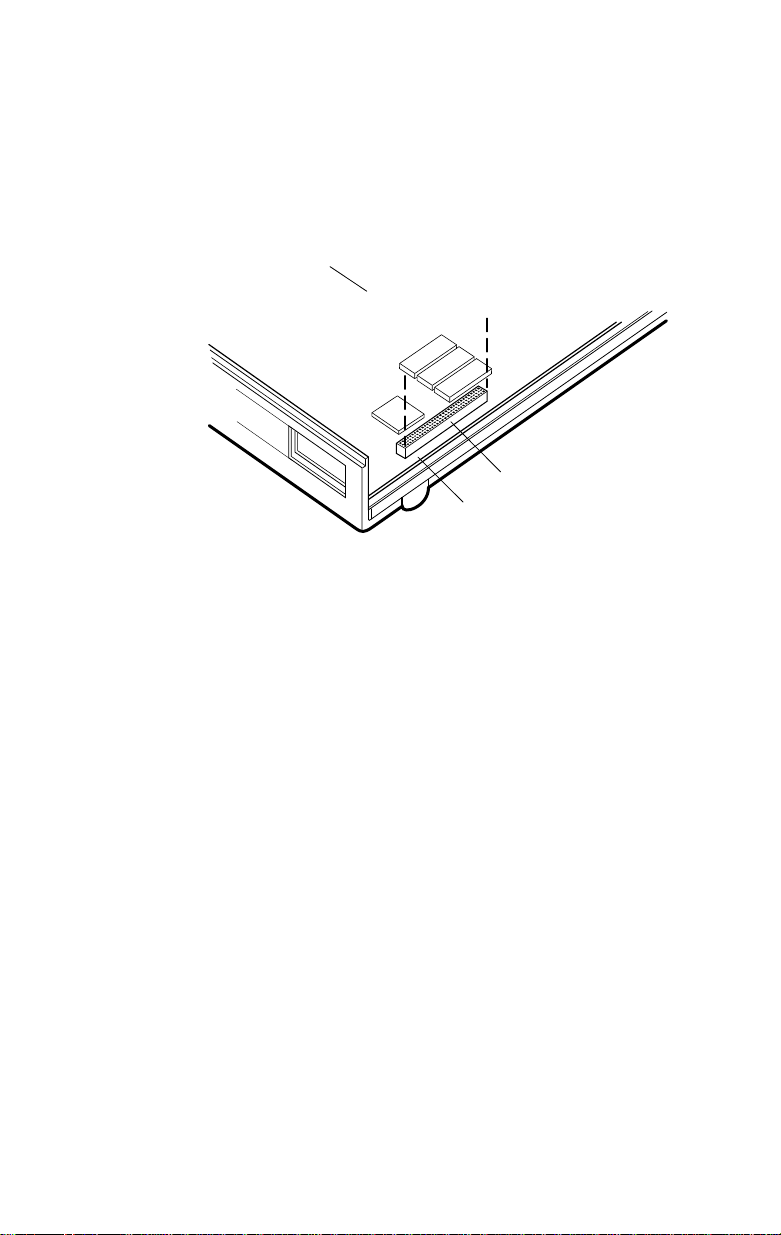
Installing the MacCon 610 Card
If you have a Macintosh Centris 610, you can use a MacCon 610 card
to connect to the Ethernet. Each card consists of two parts:
❏
The larger
controller
slot in the Macintosh.
❏
The smaller
daughter
access port to enable a connection to the Ethernet cable.
You connect the two cards before installing them.
To install the MacCon3 610, MacCon+ 610E, or MacCon+ 610ET
card in a Macintosh Centris 610, perform the following steps:
1
Set jumpers if needed (see the next two Notes and
Figures 2-5 and 2-6).
2-6 Installing Asanté MacCon Cards
card, which plugs into the expansion
card, which is mounted on the rear
Page 17

Note: In some cases with Thick Ethernet (10Base5) cabling
∆
when your network does not have 10Base5-compliant Ethernet
transceivers, you may need to force the NuBus card to select
the AUI port by setting the JP1 jumper ON as shown in
Figure 2-5.
Installing Asanté MacCon Cards 2-7
Page 18
3
Power down the Macintosh. Disconnect and remove the
power cable.
4
Open the Macintosh and remove the access port cover.
5
Make sure you are grounded: check that your anti-static
wrist strap is properly attached to your wrist and to the
Macintosh chassis.
6
Plug the controller card (with daughter card attached) into the expansion slot on the motherboard (see Figure 2-7).
MacCon Centris 610
controller card
Expansion slot
Motherboard
Figure 2-7
7
Align the chassis bracket with the access port on the back
cover.
8
Secure the daughter card to the chassis using the two
screws.
9
Close the case.
10
Connect the Macintosh to the network as described in
"Connecting the Macintosh to the Network" on page 2-24.
MacCon Centris 610
daughter card
The MacCon 610 card plugged into the expan-
sion slot on the motherboard
2-8 Installing Asanté MacCon Cards
Page 19
Installing a MacCon LC Card
!
If you have a Macintosh LC, LCII, or Color Classic computer, use the
MacCon LCIII or MacCon-i LC card to connect the Macintosh to the
Ethernet.
Caution
Only the LC and LCII computers can accept FPUs on the LC card. If
your Macintosh already has a math co-processor (or FPU), do not
install the Asanté math co-processor option with the card.
Refer to your Macintosh User’s Guide for illustrated instructions for
opening your computer.
∆
Note: LCIII card
Con LCIII card by setting the JP2 jumper as indicated in Figure
2-8. (For example, hubs made before the 10BaseT specifications were published do not support link integrity.)
Figure 2-8
To install the MacCon LC card into the expansion slot on the motherboard, perform the following steps:
1
Power down the Macintosh. Disconnect and remove the
power cable.
2
Open the Macintosh.
—You can disable link integrity on the Mac-
JP2–link integrity
JP2
disabled
enabled
Disabling link integrity, LCIII card
3
Make sure you are grounded: check that your anti-static
wrist strap is properly attached to your wrist and to the
Macintosh chassis.
4
Insert the card into the expansion slot.
Installing Asanté MacCon Cards 2-9
Page 20
With the card’ s components facing down, carefully angle its
external connector through the Ethernet port, then line up
its edge connector with the motherboard expansion slot.
5
Gently press on the card until the connector is fully seated
(see Figure 2-9).
MacCon+ LC card
Expansion slot
Motherboard
Figure 2-9
6
Connect the Macintosh to the network as described in
"Connecting the Macintosh to the Network" on page 2-24.
The MacCon LC card plugged into the expan-
sion slot on the motherboard
Installing a MacCon LC Card in a Color Classic
1
Power down the Macintosh Color Classic. Disconnect and
remove the power cable.
2-10 Installing Asanté MacCon Cards
Page 21

2
Remove the rear access panel case (see Figure 2-10).
I
O
Figure 2-10
3
Make sure you are grounded: check that your anti-static
wrist strap is properly attached to your wrist and to the
Macintosh chassis.
4
Slide out the motherboard.
5
Insert the card into the expansion slot.
The rear panel removed on the Color Classic
Installing Asanté MacCon Cards 2-11
Page 22

With the connectors facing down, carefully angle its external connector through the Ethernet port (see Figure 2-11).
MacCon+ LC card
Expansion slot
Motherboard
Figure 2-11
Installing the MacCon LC in the expansion slot
in the Color Classic
6
Plug the card’s edge connector into the expansion slot on
the motherboard.
7
Gently press on the card until the connector is fully inserted.
8 Slide the motherboard back into the Color Classic.
9 Secure the rear access panel case.
10Connect the Macintosh to the network as described in
"Connecting the Macintosh to the Network" on page 2-24.
2-12 Installing Asanté MacCon Cards
Page 23

Installing the MacCon3 IIsi and MacCon 30i Cards
If you have a Macintosh IIsi or a Macintosh SE/30, use a MacCon3 IIsi
or a MacCon+ 30i to connect to the Ethernet. (The cards are not
designed for a Macintosh SE.)
Each card consists of two parts:
❏ The larger controller card, which plugs into the expansion
slot in the Macintosh.
❏ The smaller daughter card, which is mounted on the rear
access port to enable a connection to the Ethernet cable.
You connect the two cards with a ribbon cable after installing them.
Setting the Cable Type on the Daughter Card
With the MacCon+ 30iET and MacCon+ 30iE, set the cable type by
pressing the switch in the lower left corner on the daughter card.
Select the switch position, as specified in the table below, by pressing the switch with a pointed tool. With the MacCon+ 30iET, select
TPL if your hub supports link integrity; select TPN if it does not.
MacCon+ 30iET MacCon+ 30iE
TPL
TPN
TK
TPL 10BaseT
Link integrity enabled
TPN 10BaseT
Link integrity not enabled
TK Thick
Switch
TN
TK
TN Thin
TK Thick
Switch
The MacCon3 card has autosensing ports and does not require a
switch to be set.
Installing Asanté MacCon Cards 2-13
Page 24

Video Options
Even though the Macintosh IIsi has only one expansion slot, you can
install both a MacCon3 IIsi card and the Radius video card. An external interface device is not needed and high performance is maintained. The following table shows which MacCon cards you can
install with the Radius and SuperMac video cards and which ports are
available for connecting to the Ethernet.
MacCon compatibility with third-party video cards
Video card Asanté card Ethernet ports available
Radius Pivot IIsi MacCon3 IIsi RJ-45 and BNC
SuperMac
Spectrum/8●24 PDQ
Spectrum/8●24 PDQ si
FriendlyNet IIsi AAUI with FriendlyNet
Media Adapter for
10BaseT/Thin/thick
Setting the Slot Address for Two Cards
Since the two cards cannot use the same slot address, change the slot
address for the Asanté card by setting the JP1 and JP2 jumpers on the
larger controller card. If you keep the default slot address of 9 for the
video card, you can set the Asanté card address to A, B, or E, as
shown in the following table.
JP1 and JP2
jumpers
Address Set Address Set
9
E
A
B
2-14 Installing Asanté MacCon Cards
Page 25

Installing the Math Co-processor
If your Macintosh, or the Radius card, already has a math co-processor, do not install the Asanté math co-processor option. It will cause
the Macintosh to fail at start up.
The following sections, starting on the next page, describe how to
install a MacCon card in a Macintosh IIsi and a Macintosh SE/30.
Instructions for installing a MacCon card together with a video card
are also included.
MacCon3 IIsi
controller card
MacCon3 IIsi
daughter card
Expansion slot
Motherboard
Figure 2-12 The MacCon3 IIsi controller card and daugh-
ter card installed in a Macintosh IIsi
∆ Note: In some cases with thick Ethernet (10Base5) cabling,
you may need to set the JP1 jumper ON (as shown below) to
force the daughter card to select the AUI port. This may be
necessary when your network does not have a 10Base5-compliant Ethernet transceiver.
Installing Asanté MacCon Cards 2-15
Page 26

Installing in a Macintosh IIsi
!
!
To install the MacCon+ 30 or a MacCon3 IIsi in a Macintosh IIsi, perform the following steps:
Caution
Be very careful when you open the case and work inside the Macintosh IIsi.
Refer to your Macintosh User’s Guide for an illustrated description of
how to open your computer.
1 Power down the Macintosh. Disconnect and remove the
power cable.
2 Open the Macintosh and remove the access port cover.
3 Make sure you are grounded: check that your anti-static
wrist strap is properly attached to your wrist and to the
Macintosh chassis.
4 Plug the controller card into the expansion slot on the
motherboard.
5 Install the daughter card:
— Remove the screws on the daughter card bracket.
— Align the bracket so that the daughter card extends
down from the access port and the external cable connectors protrude through the port.
— Secure the bracket with the screws.
6 Connect the controller card and daughter card:
— Attach the ribbon cable from the daughter card to the
controller card (see Figure 2-12).
Caution
Make sure the white dot on the ribbon cable aligns with the
white dot on the connector.
7 Close the Macintosh IIsi.
2-16 Installing Asanté MacCon Cards
Page 27

force AUI
ON
MacCon3 IIsi
daughter card
AUI part
removed
Figure 2-13
Removing the MacCon3 IIsi daughter card
Expansion slot
Motherboard
Figure 2-14 Installing a MacCon3 IIsi card with a Radius card
Installing Asanté MacCon Cards 2-17
Page 28

Installing a MacCon3 IIsi and a Radius Pivot IIsi
To install a MacCon3 IIsi card and a Radius Pivot IIsi card, perform the
first three steps on page 2-17, then perform the steps below.
!
Caution
Handle the Asanté cards and the video cards carefully so they remain
plugged together. Be car eful not to bend or twist the car ds, especially
when they are plugged together at right angles to each other.
1 Remove the AUI part of the Asanté daughter card by re-
moving the two screws beneath the AUI latch and gentl y removing the AUI part (see Figure 2-13).
2 Replace this part with the Radius video DB-15 cable, using
two screws to attach the cable.
∆ Note: Do not connect an AUI cable to this port. This is
now a video connector . Connecting a thick cable to this
port, renders the video card unusable.
3 Plug the assembled Asanté daughter card into the rear of
the chassis.
4 Since the two cards cannot use the same slot address, you
need to change the slot address for the Asanté card by setting the JP1 and JP2 jumpers on the Asanté controller
card. Refer to the instructions on page 2-14.
5 Plug the Radius video card into the expansion slot on the
motherboard.
6 Attach the MacCon3 IIsi controller card (at a right angle to
the video card) to the Radius pass-through PDS slot.
7 Attach the Radius video ribbon cable to the Radius card.
8 Connect the MacCon3 IIsi ribbon cable from the daughter
card to the controller card.
!
Caution
Make sure the white dot on the ribbon cable aligns with the
white dot on the connector. See the revised Release Note
for details.
9 Connect the Macintosh to the network as described on
page 2-24 in “Connecting the Macintosh to the network.”
2-18 Installing Asanté MacCon Cards
Page 29

Figure 2-15
Installing a MacCon+ 30i card in a Macintosh SE/30
Installing a MacCon Card in a Macintosh SE/30
Caution
Be very careful when you open the case and work inside the Macintosh SE/30. If you are unfamiliar with opening the machine, consult
Installing Asanté MacCon Cards 2-19
Page 30

3 Make sure you are grounded: check that your anti-static
wrist strap is properly attached to your wrist and to the
Macintosh chassis.
4 Disconnect the speaker, power supply, floppy drive, and
hard drive cables (see Figure 2-15 on page 2-19).
5 Slide the larger controller card into the expansion slot on
the motherboard:
— Line up the card’s edge connector with the expansion
slot on the motherboard. The card’s component side
should face the inside of the Macintosh.
— Gently press on the card until the connector is fully seated.
6 Attach the smaller MacCon+ daughter card to the interior
side of the SE/30 back:
— Remove the two screws from the bracket.
— Align the bracket so the daughter card extends down
from the access port and the external cable connector
sticks through the access port.
— Attach the card to the chassis brac ket that lines up with
the access port on the back cover.
— Secure the daughter card with printed circuit side facing
up, using the two screws.
7 Connect the ribbon cable to the controller card keeping it
as flat as possible. Make sure the white dot on the ribbon
cable aligns with the white dot on the connector.
8 Close the Macintosh SE/30:
— Place the Macintosh SE/30 face down.
— Fit the aluminum shield over the external device con-
nectors and around the bottom and sides of the motherboard.
— Fit the plastic case over the chassis and snap the case in-
to place. Screw the case shut.
9 Connect the Macintosh to the network as described on
page 2-24 in “Connecting the Macintosh to the network.”
2-20 Installing Asanté MacCon Cards
Page 31

Installing a MacCon+ SE Card in a Macintosh SE
The MacCon+ SE network interface card allows you to connect a
Macintosh SE to an Ethernet network.
The card consists of two parts.
❏ The larger controller card, which plugs into the expansion
slot in the Macintosh.
❏ The smaller daughter card, which is mounted on the rear
access port to enable a connection to the Ethernet cable.
You connect the two cards with a ribbon cable after installing them.
∆ Note: The MacCon3 IIsi or the MacCon 30i cards are not
designed for the Macintosh SE.
Setting the Cable Type on the Daughter Card
With the MacCon+ SEET and MacCon+ SEE, set the cable type by
pressing the switch on the daughter card (lower left corner). Select
the switch position, as specified in the table below, by pressing the
switch with a pointed tool. With the MacCon+ SEE only, select TPL if
your hub supports link integrity; select TPN if it does not.
MacCon + SEET MacCon+ SEE
TPL
TPN
TK
TPL 10BaseT
Link integrity enabled
TPN 10BaseT
Link integrity not enabled
TK Thick
Switch
TN
TK
TN Thin
TK Thick
Switch
The MacCon3 SE card has auto-sensing ports and does not require a
switch to be set.
Installing Asanté MacCon Cards 2-21
Page 32

To install the MacCon+ SE card in the Macintosh SE, perform the following steps:
MacCon+ SE
controller card
Expansion slot
Figure 2-16 Installing the MacCon SE daughter controller card
and daughter card
Caution
Be very careful opening and working inside the Macintosh SE.
Hard drive
Motherboard
1 Power down the Macintosh. Disconnect and remove the
power cable.
2 Lay the Macintosh SE flat on its face.
3 Open the case very carefully and remove the access port
cover.
4 Make sure you are grounded: check that your anti-static
wrist strap is properly attached to your wrist and to the
Macintosh chassis.
2-22 Installing Asanté MacCon Cards
Page 33

5 Take out the motherboard:
— Lift the grounding shield (padded aluminum sheet) cov-
ering the motherboard.
— Disconnect the power supply cable and the drive cables
on the component side of the motherboard.
!
Caution
Be careful not to pull the wires out; pull only on the connectors only, not on the bundled wires.
— Gently take out the motherboard and lay it down, com-
ponent side up.
— Remove the speaker wire connection to J11 (the speaker
wire) on the motherboard.
6 Plug the larger MacCon+ controller card into the expan-
sion slot on the motherboard:
— Plug the 96-pin edge connector on the controller card in-
to the expansion slot so that the card lies on top, parallel
to the motherboard (see Figure 2-16).
— Gently press on the card until the connector is fully seated.
— Snap the standoffs on the side of the card into place to
keep the card from touching the motherboard.
7 Attach the smaller MacCon+ daughter card to the back of
the Macintosh SE:
— Remove the two screws from the bracket on the daugh-
ter card.
— Attach the card to the chassis brac ket that lines up with
the expansion card connector access port on the back
cover of the Macintosh.
— Secure the daughter card, with the printed circuit side
facing up, to the chassis using the two screws.
— Re-attach the speaker wire (see Figure 2-16).
8 Route the ribbon cable from the smaller daughter card to
the larger controller card, keeping it flat at all times.
Installing Asanté MacCon Cards 2-23
Page 34

9 Place the motherboard (with the MacCon+ controller card
!
riding piggyback on it) back into the guides on the left
side of the chassis.
10 Reconnect the power supply and the disk drive cable on
the component side of the motherboard.
11 Plug the ribbon cable into the controller card’s receptacle.
Make sure the white dot on the ribbon cable aligns with
the white dot on the connector. (The blue wire is pin 1 on
both ends of the cable.)
12 Close the Macintosh SE:
— Place the Macintosh SE face down.
— Fit the aluminum shield over the external device con-
nectors and around the bottom and sides of the moth-
erboard.
— Fit the plastic case over the chassis and snap the case in-
to place. Screw the case shut.
Connecting the Macintosh to the Network
To connect the Macintosh to the Ethernet cable, perform the following steps:
With 10BaseT cabling
1 Plug the RJ-45 connector on one end of the 10BaseT cable
into the RJ-45 jack on the card. The RJ-45 connector’s plastic
tab snaps locked into the jack.
2 Plug the other end of the cable directly into a hub or plug
it into a 10BaseT wall jack. A green LED (link integrity)
light indicates a good connection to the hub.
∆ Note: Asanté offers a full range of intelligent and non-in-
telligent 10BaseT-compliant hubs.
With thin Ethernet cabling
Caution
Check with your network administrator before you disconnect the Ethernet cable. Network users must be warned if
you are bringing down the network.
2-24 Installing Asanté MacCon Cards
Page 35

1 Connect the “T” connector to the BNC port on the card. The
connector slips on, twists, and locks in place.
2 If the Macintosh is the last node, ter minate one end of the
“T” connector using a 50-ohm BNC terminator (for thin cable).
With thick Ethernet cabling
1 Connect a drop cable to the thick Ethernet cable:
2 Plug one end of the drop cable into the AUI port on the
card.
3 Plug the other end into the thick Ethernet transceiver.
Installing the EtherTalk Software
An EtherTalk Installer diskette is included with each Asanté MacCon
Ethernet adapter. This diskette contains Asanté’s EtherTalk driver,
AppleTalk, and other Apple system extensions. Asanté’s EtherTalk
device driver allows AppleTalk to communicate with the MacCon
adapter.
Two Types of Software Installations
Asanté provides two types of installations–an easy install or a cus-
tomize
to perform the customize install.
For detailed information about each installation, click the Help but-
ton to display a help screen.
Installing Asanté MacCon Cards 2-25
install. You should be experienced in network administration
Page 36

The following table explains which installation to choose:
Choose When
Easy Install
❏ You want to install the AppleTalk version on the
diskette and the Asanté Ethernet driver.
❏ Your network does not present any potential com-
patibility problems with the AppleTalk version on
the diskette.
❏ Y ou want access to EtherTalk Phase 2 network ser-
vices.
Customize
Install
❏ When your network has software that may con-
flict with the AppleTalk version on the Asanté diskette. You have the option to install only specific
parts of Apple network software or just the Asanté
driver software. Read the Read Me First file for
more information about special situations and
installation options.
❏ You want to install EtherTalk Phase 1 network ser-
vices.
About EtherTalk Phase 1 and Phase 2
EtherTalk Phase1 is limited to 255 devices and allows only one zone.
EtherTalk Phase 2 has virtually no limit (maximum—over 16 million
devices) and allows multiple zones. Phase 2 also of fers optimized
network performance.
The Easy Install automatically installs EtherTalk Phase 2, now used
by most networks. If your network requires the use of EtherTalk
Phase 1, choose the Customize install option.
Installation Procedures
Caution
Before you install Asanté’s EtherTalk software, disable all extensions
and virus detection programs. Then restart your Macintosh.
1 Before you install the EtherTalk software, read the Read Me
First file, which contains information about your installation
and helps you determine if you need to do a customized installation.
The installation instructions assume that you normally boot
from your hard disk.
2-26 Installing Asanté MacCon Cards
Page 37

2 Insert the Asanté EtherTalk Installer Disk.
3 Double-click the Installer icon and click OK when the In-
staller banner appears. The Easy Install dialog bo x appear s
(see Figure 2-17).
∆ Note: To properly install the EtherTalk Installer pro-
gram, you must double-click the Installer icon. Do not
drag the files from the diskette to the System Folder.
Figure 2-17 The Easy Install dialog box
4 To perform an Easy Install, click Install. The Installer pro-
gram examines your Macintosh and installs the appropriate EtherTalk driver and the current AppleTalk.
To perform a Customize install (only experienced Macintosh users should perform a customized installation):
— Click Customize. A dialog box appears with a list of soft-
ware options.
— Select the appropriate software options. Use Shift-click
to select multiple operations.
5 Click Restart when you are prompted to do so.
∆ Note: If other Macintoshes on the network have Asanté
EtherTalk drivers, we recommend that you upgrade all
drivers to the most recent version.
Installing Asanté MacCon Cards 2-27
Page 38

Accessing Network Services
To make the connection between your Macintosh and the Ethernet
network work, you need the following:
❏ AppleTalk must be active in the Chooser dialog box
❏ EtherTalk must be active in the Control Panel
Asanté EtherTalk driver software enables AppleTalk to interact with
the MacCon Ethernet adapter and make a connection.
1 Open the Network control panel.
The Network window contains two types of network icons, Built-in
LocalTalk
and EtherTalk (see Figure 2-18).
Figure 2-18 Network control panel
∆ Note: If you wish to access Phase 1 network services
(single arrow), click the Phase 1 icon. If you wish to ac-
cess Phase 2 network services, (double arrow), c lick the
Phase 2 icon. Click OK to confirm your selection. When
you double-click the Phase 2 icon, the default zone for
the node is displayed if you have a router. If you have
more than one network card installed, each card appears
as a separate icon, labeled b y a slot number.
2 Select EtherTalk.
Click on the EtherTalk icon in the network control panel.
3 Close the network control panel.
2-28 Installing Asanté MacCon Cards
Page 39

Your connection to Ethernet remains active until you
switch to LocalTalk, disconnect the cable, or remove the
Asanté interface card.
4 Select Chooser from the Apple menu.
The Chooser dialog box displays the icons for all available
device options and the AppleT alk zones y ou set up (see the
example in Figure 2-19).
Figure 2-19 An example of a user’s Chooser dialog box
5 Make sure AppleTalk is active.
Click the Active button if AppleTalk is not active.
Installing Asanté MacCon Cards 2-29
Page 40

Chapter 3
Asanté SNMP MacAgent
Introduction
Asanté SNMP MacAgent provides hardware and softw are information
from a Macintosh to an Asanté network management station running
AsantéView. It works in conjunction with Apple’s MacTCP software.
The SNMP MacAgent is a system extension under System 7 and an
INIT under System 6 and can be installed on any Macintosh on the
network.
Asanté SNMP MacAgent is tailored for Asanté adapter cards; therefore, it provides more extensive SNMP object information than for
non-Asanté cards.
Asanté SNMP MacAgent and MacTCP are included with your Asanté
EtherTalk Installer diskette.
Chapter 2
Note: MacTCP is Apple Computer’s TCP/IP software. It pro-
∆
vides the transport mechanism for accessing the information
provided by the Asanté SNMP MacAgent.
TCP/IP Protocol Stack
TCP/IP refers to a collection of network protocols that support host
to host communication. The TCP/IP protocol family is an industry standard developed by the United States Department of Defense.
IP Addressing
To connect to an IP network you must obtain an IP address, which
identifies an individual node in a TCP/IP network. IP addresses can be
officially assigned by the Internet committee for world-wide access
over the Internet, or by your network administrator for communication over a local TCP/IP network. It is the responsibility of the network
administrator to assign IP addresses. You must have an IP address
before you install SNMP MacAgent and MacTCP.
3-1
Page 41

Requirements
The requirements for Asanté SNMP Agent are
Workstation Network Management Station
SNMP MacAgent
and
MacTCP A generic SNMP Management console with MIB
AsantéView In-Band
or
compiler and/or MIB browser and Asanté SNMP
MacAgent MIB
AsantéView In-Band Network Management Software
AsantéView is powerful network management software used to manage Asanté intelligent Ethernet hubs and bridges. It allows network
managers to monitor Ethernet networks using the SNMP protocol.
AsantéView provides detailed information about Macintoshes that
have Asanté’s SNMP MacAgent installed as well as information about
other SNMP devices on the network. The SNMP MacAgent can be
accessed using AsantéView In-Band software. The term
network management packets travel over the same wire as other network traffic.
in-band
means
Accessing Asanté MacAgent MIB
If you don’t have AsantéView, it is still possible to manage the SNMP
MacAgent. You must obtain Asanté’s SNMP MacAgent MIB, a text file
available on Asanté’s FTP server via the Internet.
The file can be obtained from the /snmp directory using “anonymous”
as the log in to: ftp.asante.com. The SNMP MacAgent MIB text file is
also available via our Bulletin Board Service at (408) 432-1416.
Asanté SNMP MacAgent and the TCP/IP Protocol
The Asanté SNMP MacAgent loads into RAM when the Macintosh is
turned on. It uses the TCP/IP protocol, made available through
MacTCP, as a transpor t mechanism for the SNMP information.
When the Macintosh is polled by an AsantéView or Generic SNMP
management console, Asanté SNMP MacAgent forwards information
about the Macintosh’s network connection and other vital statistics.
3-2 Asanté SNMP MacAgent
Page 42

SNMP MacAgent forwards four types of information about the station:
❏
Station Profile, including station hardware components, system and memory
❏
Station Slot Table, identifying the network interface cards
installed
❏
Station Activity, transmission statistics for the network interface card
∆
Note: The Macintosh must be equipped with an Asanté
card and the Asanté EtherTalk driver to receive Station
Activity information.
❏
Station Applications, a listing of resident applications for software resource management
In addition, the SNMP MacAgent alerts the network management system when the station is restarted.
Asanté SNMP MacAgent as a Network Diagnostic Tool
Asanté’s SNMP MacAgent allows the network manager to quickly and
easily resolve problems on the network. It provides information about
the Macintosh configuration, operational statistics, and the applications installed on the Macintosh.
Installing SNMP MacAgent
To install and configure the Asanté SNMP MacAgent on the workstation, perform the following steps:
1
2
3
Asanté SNMP MacAgent 3-3
Quit all applications running on your Macintosh.
Insert the installation diskette. The Asanté EtherTalk
Installer window appears.
Double-click the Installer icon and click OK when the
“About” screen appears. The Easy Install dialog box
appears.
Page 43

4
Click
Customize
appears, shown in Figure 3-1.
. The Customize Install dialog box
Customize Install dialog box
Install
.
5
6
7
8
Figure 3-1
Select the SNMP MacAgent for the appropriate operating system.
Select MacTCP for the appropriate operating system.
Click
Restart.
Configuring MacTCP
To configure MacTCP, perform the following steps:
1
Select
Control Panels
from the Apple menu.
3-4 Asanté SNMP MacAgent
Page 44

2
Double-click the
tion screen appears, shown in Figure 3-2.
MacTCP
icon. The MacTCP Configura-
3
4
Figure 3-2
❖
Note: To configure MacTCP, see the MacTCP Administrator’s Guide. This guide is included with the AsantéView documentation.
Double-click
you to manually enter your IP address.
Note: If you have any questions about your MacTCP or
SNMP configuration, contact your network administrator. It is important that the network administrator be
aware of any changes on the IP network.
MacTCP Configuration screen
More
... and select
Manually
Configuring SNMP MacAgent
To configure SNMP MacAgent, perform the following steps:
1
Select
Control Panels
from the Apple menu.
. This allows
Asanté SNMP MacAgent 3-5
Page 45

2
Double-click the
SNMP MacAgent Configuration screen appears, shown
in Figure 3-3.
SNMP MacAgent
control panel. The
3
4
Figure 3-3
Enter the configuration parameters (see the next section
for parameter descriptions).
Restart.
Asanté SNMP MacAgent Configuration screen
Asanté SNMP Configuration Parameters
System Contact
The person who should be contacted regarding this workstation.
System Location
The physical location of the workstation.
System Name
A local alias describing this station.
Read-community
Enter public (default), allowing the Asanté networ k management station to query SNMP MacAgent and get information about the station.
W rite-community
Enter private (default). This allo ws the Asanté network management
station to query SNMP MacAgent remotely.
3-6 Asanté SNMP MacAgent
Page 46

Note: The defaults for Read-community and Write-commu-
∆
nity should be used unless you are told otherwise by your
network administrator.
Trap-community
Enter public. (Trap is the SNMP term for alarm or alert.) Public is
usually the default for the SNMP configuration. However, if there is
any question, please contact your network administrator. SNMP
MacAgent sends traps to the Asanté network management station for
two events: restarting your Macintosh and authentication violation.
Trap IP Address
The IP address to which the workstation sends traps. This is usually
the Asanté management station IP address.
Authentication Trap (On/Off)
This is ON by default. This station sends a tr ap to the Asanté management station if accessed by an SNMP management console with the
wrong read or write community string.
SNMP Agent (On/Off)
This is also ON by default. If SNMP Agent is OFF, the agent does not
send information to the Asanté management station.
AsantéView Network Management Station
The Asanté network management station should be running AsantéView or a Generic SNMP Management Console. Figure 3-4 shows a network map generated by AsantéView network management software.
Figure 3-4
Asanté SNMP MacAgent 3-7
AsantéView sample network map
Page 47

A Macintosh icon displayed on the map with an “A” indicates the
Asanté SNMP MacAgent is installed.
If a Macintosh has Asanté’s SNMP MacAgent installed, the Asanté network management station running AsantéView can display the following information:
❏
General Information (see Figure 3-5)
❏
Slot Configuration of Macintosh
❏
Statistics
❏
Applications installed
Figure 3-5
Sample SNMP MacAgent Station Information
Other Network Management Software
If you are using network management software other than AsantéView (for example, HP OpenView or SunNet Manager), use the
Asanté MacAgent MIB and follow the directions for loading and
browsing a MIB file in your network management software documentation.
∆
Note: You can obtain the SNMP MacAgent MIB text file (in
the /pub directory) by accessing Asanté’s FTP server via the
Internet using “anonymous” as the log in to: ftp.asante.com.
You can also obtain the file via our Bulletin Board Service
(BBS) at (408) 432-1416.
3-8 Asanté SNMP MacAgent
Page 48

Chapter 4
Chapter 2
Using TroubleShooter and ADLS
Diagnostic Software
The TroubleShooter and Asanté Driver Local Statistic (ADLS) programs
are included with the EtherTalk drivers on the Asanté EtherTalk
Installer diskette. The TroubleShooter program runs diagnostic tests
on the MacCon adapter to help you identify problems on the adapter.
The ADLS program provides configuration and Ethernet traffic information about your Macintosh and your Asanté MacCon adapter.
Running TroubleShooter Diagnostics
The TroubleShooter diagnostic program reinitializes and reconfigures
your Ethernet connection and sends out data through the Ethernet
port. Therefore, before you run TroubleShooter, you must:
• Save all open files and close all active applications
• Log out of any active network services
• Change from EtherTalk to LocalTalk
• Turn off virtual memory with System 7
• Restart your Macintosh with virus software, extensions,
and inits disabled
The following sections provide instructions for these operations.
Changing from EtherTalk to LocalTalk
1
Drag any remote volumes into the Trash.
2
Change from EtherTalk to LocalTalk by clicking the
LocalTalk icon in the network control panel.
3
Disable virus software, extensions, and inits.
4-1
Page 49

4
Restart the Macintosh.
Starting TroubleShooter Diagnostics
1
2
3
Insert the EtherTalk Installer diskette and open the diskette’s directory window.
Copy the TroubleShooter software to the desktop or a
folder, such as the Net Utils folder.
Double-click the TroubleShooter icon to start the program and click OK in the TroubleShooter window.
If you have not changed your EtherTalk connection to a
LocalTalk connection, TroubleShooter warns you to do
so by displaying the message shown in Figure 4-1.
Figure 4-1
Click
with the Shift key down. Run TroubleShooter again.
TroubleShooter warning message
Exit
, make the change, then restart the Macintosh
❖
Note: If you’re using MacTCP, it can activate the EtherTalk
driver regardless of whether you’re in EtherTalk or LocalTalk. You’ll get the TroubleShooter warning message even
though you’v e switc hed to LocalTalk and/or rebooted (that
is, rebooted without holding down the Shift key). Click
Exit, then restar t the Macintosh with the Shift key down.
Run Troub leShooter again.
4
4-2 Running Troub leShooter Diagnostics
Click OK in the TroubleShooter window.
TroubleShooter loads and
ing three default tests:
automatically
runs the follow-
Page 50

Memory Buffer Test
•
Writes to and reads from the packet buffer RAM to verify its addressability and operation.
Network Interface Controller Test
•
Writes to and reads from the controller register to verify its operation. Also issues a transmit command to verify the network interface controller’s integrity.
•
Ping-Pong Test
Transmits and receives special packets to verify com-
munication with other systems on the network.
If the Ping-Pong test fails, check your connectors and
cables.
Note: The Ping-Pong Test requires at least one other Mac-
❖
intosh in EtherTalk Phase 1 or Phase 2 on the network.
5
TroubleShooter opens the TroubleShooter window and
displays results from the following tests:
Ping-Pong Test Passed
E
Figure 4-2
TroubleShooter window
Running other TroubleShooter tests
The Loopback and Bandwidth Utilization tests are available in addition
to the three default tests for validating the MacCon adapter.
Using TroubleShooter and ADLS Diagnostic Software 4-3
Page 51

Running the Loopback test
The Loopback test verifies the operation of the major components of
the interface circuitry and the cable run to the hub by transmitting and
receiving special packets.
❖
Note: The Macintosh with the MacCon adapter installed
must be connected to a hub to run the Loopback test.
To run the Loopback test, perform the following steps:
1
2
3
If the tests are “passed” successfully, ever ything is operating properly.
If the Loopback test fails repeatedly, please call Technical Support.
Running the Bandwidth Utilization test
1
2
3
4
5
Click the Loopback test checkbox to select the test.
Click
TEST
to start the loopback test.
If the first test fails, click
Reconnect the Ethernet cable.
Click the Bandwidth Utilization checkbox to select the
test.
Click the
Data representing network activity is collected from the
network during the test.
To stop data acquisition, click
button to start the test.
TEST
REPEAT
STOP
.
or press any key.
4-4 Running other TroubleShooter tests
Page 52

The performance statistics are displayed in the TroubleShooter dialog box.
Figure 4-3
Bandwidth Utilization Test window
What the Bandwidth Utilization test displays
The Bandwidth Utilization test takes a “snap shot” of the network. The
test can be used in conjunction with other network analysis tools to
identify network problems. A number of network criteria are tested
and displayed in the window. The criteria are described briefly below:
• Good packets received
Total number of good packets (error-free) received from
the network by the adapter. This allows you to evaluate
activity on the network. Activity level can be used as a
benchmark to determine changes in network performance.
• Total bytes received
Total number of bytes received from the network by the
adapter. Good Packets received displays the total number
of packets, not the packet size. Total bytes received is more
specific giving the actual byte count.
• Number of reset byte count
This number increments by 1 after each 109 byte received
from the network by the adapter.
Using TroubleShooter and ADLS Diagnostic Software 4-5
Page 53

• CRC Error
Indicates the number of packets with CRC (Cyclic Redundancy Check) errors received from the network by the
adapter. When a packet is transmitted, a mathematical calculation is done on the header and data and is appended to
the end of the frame. The receiver of the packet performs
the same computation. If the computations are not equal,
the packet is discarded and a CRC error is issued.
• Frame Alignment Error
Number of misaligned packets received from the network
by the adapter. An Ethernet frame is misaligned if it does
not end in an 8 bit boundary.
• FIFO Overrun Error
This error occurs when FIFO (First In First Out) is disabled
causing an overflow during reception. The r eception of the
packet is aborted.
• Frame Lost Error
This error represents the number of lost frames received
from the network by the adapter.
• Receive Buffer Overwrite Error
This error occurs when the receive buffer is full due to
heavy network traffic.
• Sample Time
The time in seconds from test start to test completion.
• Bandwidth Utilization
Total bandwidth utilization of the network. If it is over
2 percent, it will effect the FIFO Overrun Error and Frame
Lost errors.
If a test fails
If a test fails, TroubleShooter displays an error message in the main
dialog box. The message generally consists of three parts:
• The name of the diagnostic test
• “Failed”
• A possible reason for the failure
Check the connections from your Macintosh to the Ethernet cable,
and repeat the tests.
4-6 Running other TroubleShooter tests
Page 54

If the test fails repeatedly, make a note of the error message, quit the
TroubleShooter diagnostics, and call Technical Support.
Quitting TroubleShooter and restarting
network services
To quit TroubleShooter, click the
dialog box or quit from the menu bar.
To restart network services, perform the following steps:
1
2
3
4
Activate AppleTalk in the Chooser.
Select EtherTalk in the Network control panel.
Restart the Macintosh.
Select the Chooser from the Apple menu, then select a
network resource such as AppleShare or another network service.
button in the TroubleShooter
QUIT
Running ADLS
The Asanté Driver Local Statistic (ADLS) program provides configuration information about your Macintosh and MacCon adapter, and displays statistics about Ethernet traffic through the MacCon adapter.
Make sure you have EtherTalk ena bled before running the ADLS program. To enable EtherTalk:
1
2
3
4
5
Using TroubleShooter and ADLS Diagnostic Software 4-7
Select Control Panels from the Apple menu.
Double-click the Network icon.
Select the EtherTalk icon.
Close the Network control panel.
Restart the Macintosh.
Page 55

To start the ADLS program, double-click its icon. Figure 4-4 shows an
example of the screen that appears.
1.3
0
Figure 4-4
Asanté Driver Local Statistic (ADLS) table
When the program opens, it automatically begins gathering statistics.
The screen displays the current time and the elapsed time (the time
since the ADLS program was opened).
The System Information and Card Information areas give configuration
information for the Macintosh, the MacCon adapter, and the Asanté
EtherTalk driver.
The Transmit Status and Receive Status areas display inf ormation about
Ethernet traffic through the MacCon adapter. The upper panes of the
Transmit Status and Receive Status areas show Simple Network Management Protocol (SNMP) information; the lower panes show information specific to the Asanté EtherTalk driver.
The
Start
Stop
Reset
Quit
❖
menu contains these commands:
File
-- Begin statistical tracking and display; used after selecting
-- Stop/pause statistical tracking and display
-- Set all counters back to zero
– Close the ADLS program
Note: The Switch Slot card and Switch to ENSC commands
Stop
are dimmed; the y are not applicable to the MacCon
adapter.
4-8 Running ADLS
Page 56

Chapter 5
Troubleshooting
This chapter addresses a few problems you may encounter when
installing or using an Asanté MacCon network interface card. If you
are unable to solve a problem after reading this chapter, please call
Asanté Tech Support for assistance at 800-622-7464 or 408-435-0706.
Checking the Basics
If you have a problem accessing a network node, check the basic
requirements listed in the following table:
Chapter 2
AppleTalk is active in the Chooser.
EtherTalk is selected in the Network Control Panel.
Make sure the same EtherTalk version (Phase 1 or Phase
2)
is on the Macintosh as is used by the network.
The AppleTalk zones are visible, when applicable.
The card is properly seated.
The cabling connections are secure.
The LEDs on the card indicate no problems.
Refer to Appendix A for information about the LEDs.
The Asanté EtherTalk driver is installed on the start-up
disk.
❑
❑
❑
❑
❑
❑
❑
Do You Have the Current Asanté Driver Softwar e?
Before calling Technical Support, please check that you have the latest Asanté Ethernet driver in use. If you do not have the latest version, we ask that you obtain it and load it. Asanté Technical Support
has found driver and operating system issues to be the #1 cause of
most network problems.
5-1
Page 57

To learn the latest version number:
❏
Call 800-622-7464 and press 4 for Technical Support
❏
Then press 1 for Software Update information
Y ou will obtain the current v ersion number as well as instructions for
downloading Asanté Ethernet drivers from Applelink or InterNet. If
you prefer a floppy disk be mailed to you, please leave a detailed message as instructed.
Running TroubleShooter
Run the Asanté TroubleShooter Diagnostics program to identify problems in the installation. Refer to Chapter 4 for more information.
Other Tips
Installing the Math Co-processor Option
!
Caution
If your Macintosh already has a math co-processor, do not install the
Asanté math co-processor option with the MacCon3 IIsi, MacCon
30iE, 30iET, or LC cards. It will cause the Macintosh to fail at start-up.
Math Co-processor Socket
The MacCon3 IIsi, MacCon 30i, FriendlyNet IIsi, MacCon
LCII, and LCIII cards of fer a socket for a math co-processor.
The Motorola MC68882 Co-processor can be used (case
design—type PLCC). Make sure you use the correct chip.
Macintosh IIsi with a PDS Slot
Use the MacCon3 IIsi or the MacCon 30i card rather than the NuBus
card. The cards are specifically designed for the Macintosh IIsi PDS
slot. A NuBus adapter is not required. If you install a NuBus card with
a NuBus adapter, it will result in a decrease in performance.
5-2 Troubleshooting
Page 58

Questions and Answers to Common Problems
Q
The AppleT alk zones are not in the Chooser and I can’t connect to my
remote file server. What’s wrong?
A
Q
A
Q
A
AppleTalk may not be active in the Chooser.
❏
EtherTalk may not be selected in the Network control panel.
❏
The Asanté EtherTalk driver may not be properly installed.
❏
I can’t access the network resources over our thin coaxial backbone.
Check to see if your Macintosh is the last node. If so, make sure the
T-connector on the Asanté Ethernet card is terminated with a 50 ohm
terminating resistor.
Why is the EtherTalk icon not in the Network control panel? I can’t
connect to the network.
The Asanté EtherT alk driver ma y not be installed or is not seen by
❏
the system.
Run the Asanté EtherTalk Installer again.
❏
Make sure the Asanté network interface card is firmly seated.
❏
With a Macintosh IIsi or SE/30 model, make sure the cable is
❏
properly installed (the white dot on the ribbon cable should be
aligned with the white dot on the connector). See the installation
procedure in Chapter 2.
Check the connector on the Asanté card for any bent pins.
❏
Q
Do I need to remove the LocalTalk connection before I use EtherTalk?
A
No.
Troubleshooting 5-3
Page 59

Q
After I restart my Macintosh, the LocalTalk icon is selected, instead of
the EtherTalk.
A
Make sure that:
❏
The Asanté EtherTalk driver is on the start-up disk or in the System folder.
❏
The Asanté card is properly seated.
❏
The network cable is properly connected.
If LocalT alk is still selected, install the Asanté EtherT alk software again.
Q
My system freezes intermittently when I access data on the remote file
server. Printing to remote printers is OK. What’s wrong?
A
Check the software version numbers on your Macintosh.
We recommend you have:
❏
Apple operating system 6.0.7 or later
❏
AppleTalk 57.04 or later
❏
Asanté EtherTalk 5.1 or later
❏
Mac TCP ver sion 1.1.1 if using Mac TCP
Upgrade your software if necessary . Remove old driver software by running the Installer, selecting the
Option
the
Try a known good location to connect to the network.
key (
Install
changes to
Customize
Remove
option, and holding down
). Then install ne w software.
Q
I can't see any other Macs on the network.
❏
A
5-4 Troubleshooting
Unmount all network file servers.
❏
Change to LocalTalk.
❏
If using system 7.0, turn off virtual memory and restart.
❏
Run the Asanté Troubleshooter program from the Asanté EtherTalk diskette.
❏
If the Ping-Pong test fails, check for faulty connectors, frayed or
broken cable.
Page 60

Appendix A
Chapter 2
23 2
Technical Specifications
MacCon Specifications
The specifications for the Asanté MacCon cards are given below.
Systems supported Macintosh SE, SE/30, IIsi, LC family, Color Classic,
Quadra, MacII (NuBus) family, Centris, and Performa computers with an available expansion slot
Standards supported IEEE 802.3 Ethernet specifications for thick
(10Base5), thin (10Base2), and Unshielded
Twisted-Pair (10BaseT) media; Phase 1 and Phase
2 EtherTalk. Register-level compatible with Apple
Computer’s Ethernet cards
Software supported AppleShare, Novell NetWare for Macintosh, 3Com
3+Open, 3Com 3+Share, Sitka TOPS, DEC Path-
works, A/UX and other popular network software
Protocols supported AFP, TCP/IP, DecNet, and LAT
Math co-processor Motorola 68882 PLCC math co-processor available
for MacCon IIsi, 30i, and LC cards
Address selection
(IIsi only)
Power requirements +5V @ 1300 mA max. (thin)
Operating temperature 0˚ to 50˚ C
Warranty 5 years
4 user-selectable slot addresses: 9, A, B and E
+5V @ 1000 mA max (UTP)
+12V @500 mA max (thick)
+5V @800 mA max. (LC Series)
Relative humidity: 10% - 90%, non-condensing
A-1
Page 61

Ethernet Address
Each Asanté card has a 6 byte Ethernet physical address beginning
with 00.00.94. In Figure A-1, an arrow points to the location of the
Ethernet address on each card.
You can also learn the Ethernet address using the Get Adapter Information option from the TroubleShooter File menu (see "Obtaining
System Configuration Information" on page 4-5). The Tr oubleShooter
application is available on the Installer diskette.
MacCon+ LCIII series
MacCon IIsi/30iE series
MacCon Nubus series
MacCon-i LC series
ID: 000094-40xxxx
MacCon Centris 610 series
MacCon-i Nubus series
Figure A-1
A-2 Technical Specifications
Location of Ethernet addresses on MacCon cards
Page 62

MacCon LEDs
The LEDs for the MacCon NuBus, LC, IIsi, and SE cards are described
below.
LED State Yellow Green
ON
OFF
Blinking
N/A Link Integrity enabled, Twisted pair
cabling used, link detected
Link Integrity disabled, Twisted pair
cabling used
No network
activity
Network traffic N/A
Li
n
k Integrity enabled, Twisted pair
cabling used, no link detected
Link Integrity enabled, thin or thick
cabling used
Ethernet Specifications
The table below lists the Ethernet specifications.
Parameter 10Base2 10Base5 10BaseT
Cable Thin Thick UTP
Impedance 50 ohms 50 ohms 100 ohms
Connector on cable BNC DB-15 RJ-45
Data transfer rate 10 Mbps 10 Mbps 10 Mbps
Topology Bus Bus Star
Segment length
(maximum)
Distance between
nodes (minimum)
Nodes per segment
(maximum)
Technical Specifications A-3
185 meters 500 meters 100 meters
0.5 meter 1 meter n/a
30 500 n/a
Page 63

You may find the following tips useful.
❏
10BaseT
The wiring normally called for in 10BaseT is 26 to 22 AWG,
which corresponds to the wire gauge of telephone twistedpair cables. You need two pairs of wiring for each node.
Before you think seriously about using your existing phone
wiring for an Ethernet network, be aware that older cabling
may not be of sufficient quality to support the full 100 meters
between a device and the hub.
❏
When wiring 10BaseT connections, take precautions against
splitting pairs. Be sure you maintain the same color mates for
each pair used within the cable. If you don’t follow a common color pairing, you can mix up the wires preventing the
Ethernet signal from being transmitted.
❏
Be sure to check any cabling you plan to use. Older cabling
may not be of adequate quality to support 100 meters
between a device and the hub.
❏
When subdividing cable segments, do not randomly pick any
length of cable. The IEEE recommends that Ethernet coaxial
cable be subdivided at lengths of 23.4 meters (76.8 feet), or
multiples of that length, in order to minimize internal signal
reflections. These reflections reduce the signal strength for
large networks. On small networks, such as those covering a
single floor of a building, these reflections probably wonnn’t
cause problems.
❏
You may want to install a wiring system in your building, or
you may already have one, that allows you to run a 10BaseT
cable to a wall jack.
Connector Pin-outs
AAUI Connector
The AAUI is a 14-pin connector used in the Apple Ethernet Cabling
System and the Asanté FriendlyNet system as a universal interface to
various external transceiver units (MAUs). The Asanté FriendlyNet
media adapters connect to the AAUI Ethernet port on the Macintosh
Quadras, Centr is 610 or Centris 650 with built-in Ethernet and LaserWriter IIg printers.
A-4 Technical Specifications
Page 64

Asanté FriendlyNet cards and Apple computer s and printers with
built-in Ethernet do not directly connect to the Ethernet cable;
instead, an external transceiver, like the Asanté FriendlyNet Media
adapter, is used. This approach lets you change network media by
only changing the external adapter instead of the card.
GND Circuit Signal name
09 TX+ Transmit +
10 TX– Transmit –
02 RX+ Receive +
03 RX– Receive –
05 CD+ Collision Detect +
06 CD– Collision Detect –
07 +5 V
04 GND
The following table describes the AUI connector pinouts.
Pin Circuit Signal name
03
10
11
05
12
04
07
15
08
02
09
01
06
13
14
Shell PG Protective Ground
DO+
DO–
DO S
DI+
DI–
DI S
CO+
CO–
COS
CI+
CI–
CI S
VC
VP
VS
Data Out + (transmit pair)
Data Out –
Data Out Shield
Data In + (transmit pair)
Data In –
Data In Shield
Control Out + (optional)
Control Out –
Control Out Shield
Control In + (optional)
Control In –
Control In shield
Voltage Common (power pair)
Voltage Plus
Voltage Shield
Technical Specifications A-5
Page 65

8157654321
14 13 12 11 10 9
Figure B-1
AUI connector pin number assignments
RJ-45 Connector
The RJ-45 connector’s pin numbers listed below are for an Asanté
10BaseT card positioned correctly with the notch on the 8 pin modular jack oriented down. Pin 1 is the left-most pin, and Pin 8 is the
right-most pin.
Pin Circuit Signal name Color code
1 TD+ Data Transmit + white-blue
2 TD– Data Transmit – blue-white
3 RD+ Data Receive + white-
orange
4 Not used
5 Not used
6 RD– Data Receive – orange-
white
7 Not used
8 Not used
1 2 3 4 5 6 7 8
white-blue
blue-white
Figure B-2
1
2
3
4
RJ-45 connector and biscuit block pin-outs
RJ-45
8
7
orange-white
6
5
white-orange
A-6 Technical Specifications
 Loading...