

Page 1
FriendlyNET® FM2017
SNMP/Web Managed Switch with Fiber Option
User’s Manual
Page 2

2
Page 3

Table Of Contents
Chapter 1. Introduction 5
Features 5
Ethernet Switching Technology 6
Management Methods 6
Chapter 2. Hardware Installation 7
Package Contents 7
Front Panel 7
Rear Panel 8
Mounting Configurations 8
Powering on the Switch 8
Optional FX100 Modules 8
Chapter 3. Network Application 11
Small Workgroup 11
Segment Bridge 11
VLAN Application 11
Chapter 4. Network Configuration 13
Connecting a Terminal or PC to the Console Port 13
Assigning IP Address 14
Secured IP 15
Chapter 5. Web-Based Management 17
System Login 17
Appendix A. Troubleshooting 23
Appendix B. Internet Explorer Setting 25
Appendix C. Specifications and Warranty Statement 27
3
Page 4

4
Page 5

Chapter 1. Introduction
Thank you for purchasing an Asanté FriendlyNET FM2017 SNMP/Web managed switch. This switch is
designed to build high-performance switched networks. It uses store-and-forward technology, providing low
latency for high-speed networking, and is targeted at workgroup, department or backbone computing
environments at small to medium enterprise businesses.
The switch features full plug-and-play installation. LED indicators provide for easy monitoring of switch
operation. The switch has 16 auto-sensing 10/100 BaseTX Fast Ethernet RJ-45 ports plus one extension
slot for an optional 1-port 100BaseFX fiber module, which makes it easy to connect to a remote site up to 2
Km (multi-mode) or 15-60 Km (single-mode) away. The following types of fiber connectors are available for
use with the FM2017: SC, SC single-mode, MT-RJ and VF-45.
The switch provides automatic MDI/MDIX crossover for each 10/100Mbps port. In general, MDI means
connecting to another hub or switch while MDIX means connecting to a workstation or PC.
means that you can connect to another switch or workstation without changing non-crossover or crossover
cabling.
There is a CPU module on the rear panel of the switch. It provides the function of Web-Based
Management, for ease of managing and configuring the FM2017. From cabinet management to port-level
control and monitoring, you can visually configure and manage your network via your web browser. The
switch can also be managed via third-party SNMP Management.
Features
The FriendlyNET FM2017 Fast Ethernet switch has the following features:
Compact size — designed for small to medium workgroups in space-limited areas; installs on
desktop, or in a standard 19-inch equipment rack
Plug-and-play installation
Provides 16 auto-negotiating 10/100Mbps RJ-45 ports
N-Way auto-negotiation on all ports automatically senses port speed (10/100Mbps) and negotiates
duplex mode (full-duplex or half-duplex)
Automatic MDI/MDIX crossover for each 10/100 port
Supports CPU expansion slot to upgrade SNMP function
Complies with IEEE 802.3 Ethernet, IEEE 802.3u Fast Ethernet and IEEE 802.3x flow control (in
full-duplex mode) standards
Provides power, 100M, full- or half-duplex, and link/activity LEDs to aid network diagnosis and
simple management
Ideal for deployment with high-speed servers, dedicated bandwidth (10Mbps or 100Mbps)
workgroups, or as a segmentation device for larger congested networks
8K-entry MAC address table and automatic address learning
4MB packet buffer sharing
Performs non-blocking data transfer at full wire speed
Intelligent Management Features
Web-based management
SNMP Network management
Supports up to 17 VLAN groups
MIB II (RFC1213) supported
Port Configuration management
Port Disable/Enable Setting
Auto-negotiation, 100M Full/half-duplex or 10M Full/half-duplex mode
Auto MDI/MDIX
5
Page 6

Ethernet Switching Technology
Ethernet switching technology has dramatically boosted the total bandwidth of a network, eliminating
congestion problems inherent with Carrier Sense Multiple Access with Collision Detection (CSMA/CD)
protocol, and has greatly reduced unnecessary transmissions.
This revolutionized networking in the following ways: First, by allowing two-way, simultaneous transmissions
over the same port (Full-duplex mode), which essentially doubled the network bandwidth; Second, by
reducing the collision domain to a single switch-port, which eliminated the need for carrier sensing; Third, by
using the store-and-forward technology’s approach of inspecting each packet to intercept corrupt or
redundant data, switching eliminated unnecessary transmission that slows the network; Finally, by
employing address learning, which replaced the inefficient receiving port.
Auto-negotiation regulates the speed and duplex of each port, based on the capability of both devices. Flowcontrol allows transmission from a 100Mbps node to a 10Mbps node without loss of data. Auto-negotiation
and flow-control may require disablement for some networking operations involving legacy equipment.
Disabling the auto-negotiation is accomplished by fixing the speed or duplex of a port.
Ethernet switching technology has supplied higher performance at costs lower than other solutions. Wider
bandwidth, no congestion, and the reduction in traffic is why switching is replacing expensive routers and
inefficient hubs as the ultimate networking solution. Switching brought a whole new way of thinking to
networking.
Management Methods
The FM2017 supports configuration and management via a Web-browser or via SNMP Management. For
more information on configuring and managing your switch, please see Chapters 4 and 5.
Console and Telnet Connection
Console Connection is done through the RS-232 Console Port. Managing the switch in this method requires
a direct connection to a PC, while Telnet management is done over the network. Once the switch is on the
network, you can use Telnet to Log in and change the configuration.
Web-Based Management
The switch provides an embedded HTML web site residing in flash memory. It offers advanced management
features and allow users to manage the switch from anywhere on the network through a standard browser
such as Microsoft Internet Explorer or Navigator. For more information, see Chapter 5. Web-Based
Management.
SNMP Network Management
SNMP (Simple Network Management Protocol) provides a means to monitor and control network devices
and report activity in each network device to manage configurations, performance, and security. This switch
provides up to 4 IP addresses for the access of trap managers. You can submit community strings on get-
community, set-community and trap-community to authorize management access.
6
Page 7
Chapter 2. Hardware Installation
This chapter describes the front and rear panels of the FM2017, and explains how to install, mount and
apply power to the switch.
Package Contents
The switch is shipped with the following items:
• Switch
• AC power cord
• Four (4) Rubber feet
• Rack mount Kit
• RS-232 cable
• User’s Manual (this document)
Compare the contents of your switch’s package against the items listed above. If any of the items is missing
or damaged, contact your dealer immediately for service.
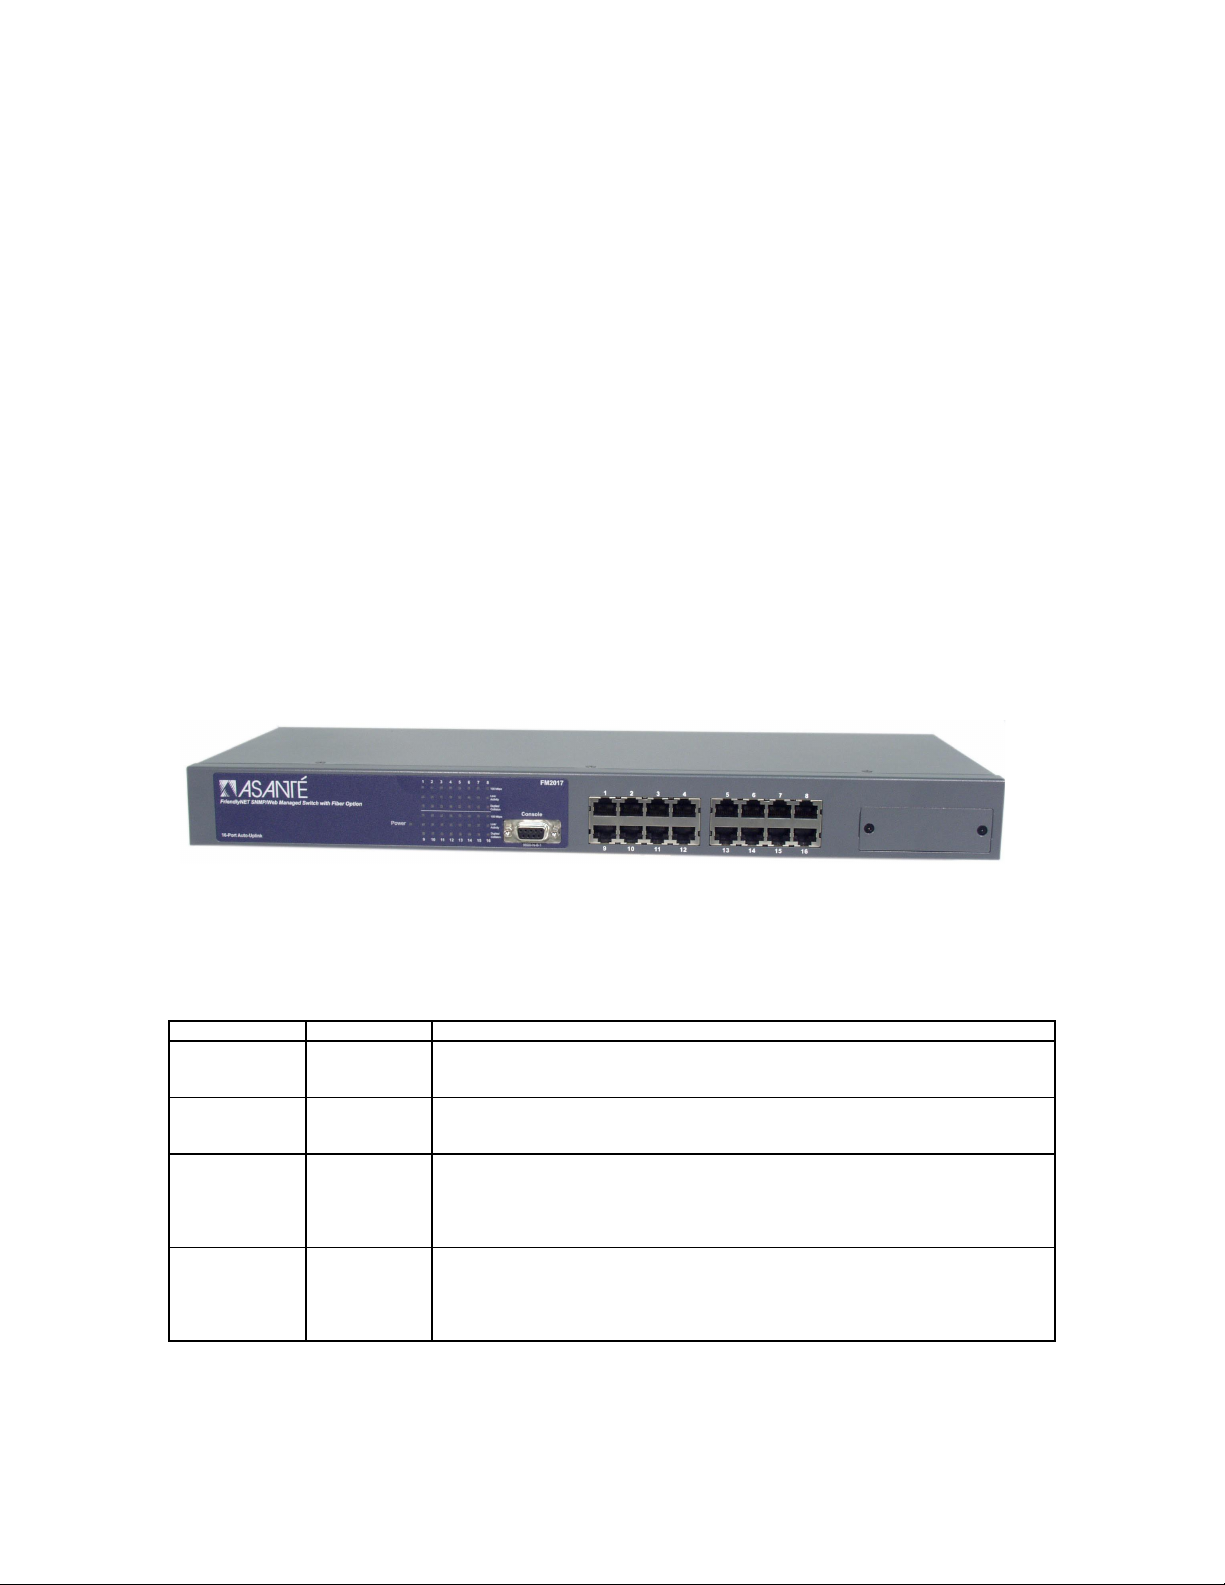
Front Panel
The front panel of the FM2017 contains the LED Indicators, the console port, the 16 10/100Mbps ports and
the 100FX module slot.
LED Indicators
The LED Indicators give real-time information of systematic operation status. The following table provides
descriptions of LED status and their meaning.
LED Status Description
Power Green
Off
100M Green
Off
Link/Activity Green
Blinking
Off
Full-Duplex Yellow
Blinking
Off
Power is on.
Power is not connected, or is turned off.
A valid 100Mbps link has been established on the port.
A 10Mbps link has been established on the port, or no device is detected.
A valid connection to another device has been established on the port.
Traffic is detected on the port (transmitting or receiving).
No device is attached.
The port is operating in full-duplex.
The port is operating in half-duplex.
No device is attached, or the port is in half-duplex mode.
7
Page 8
Rear Panel
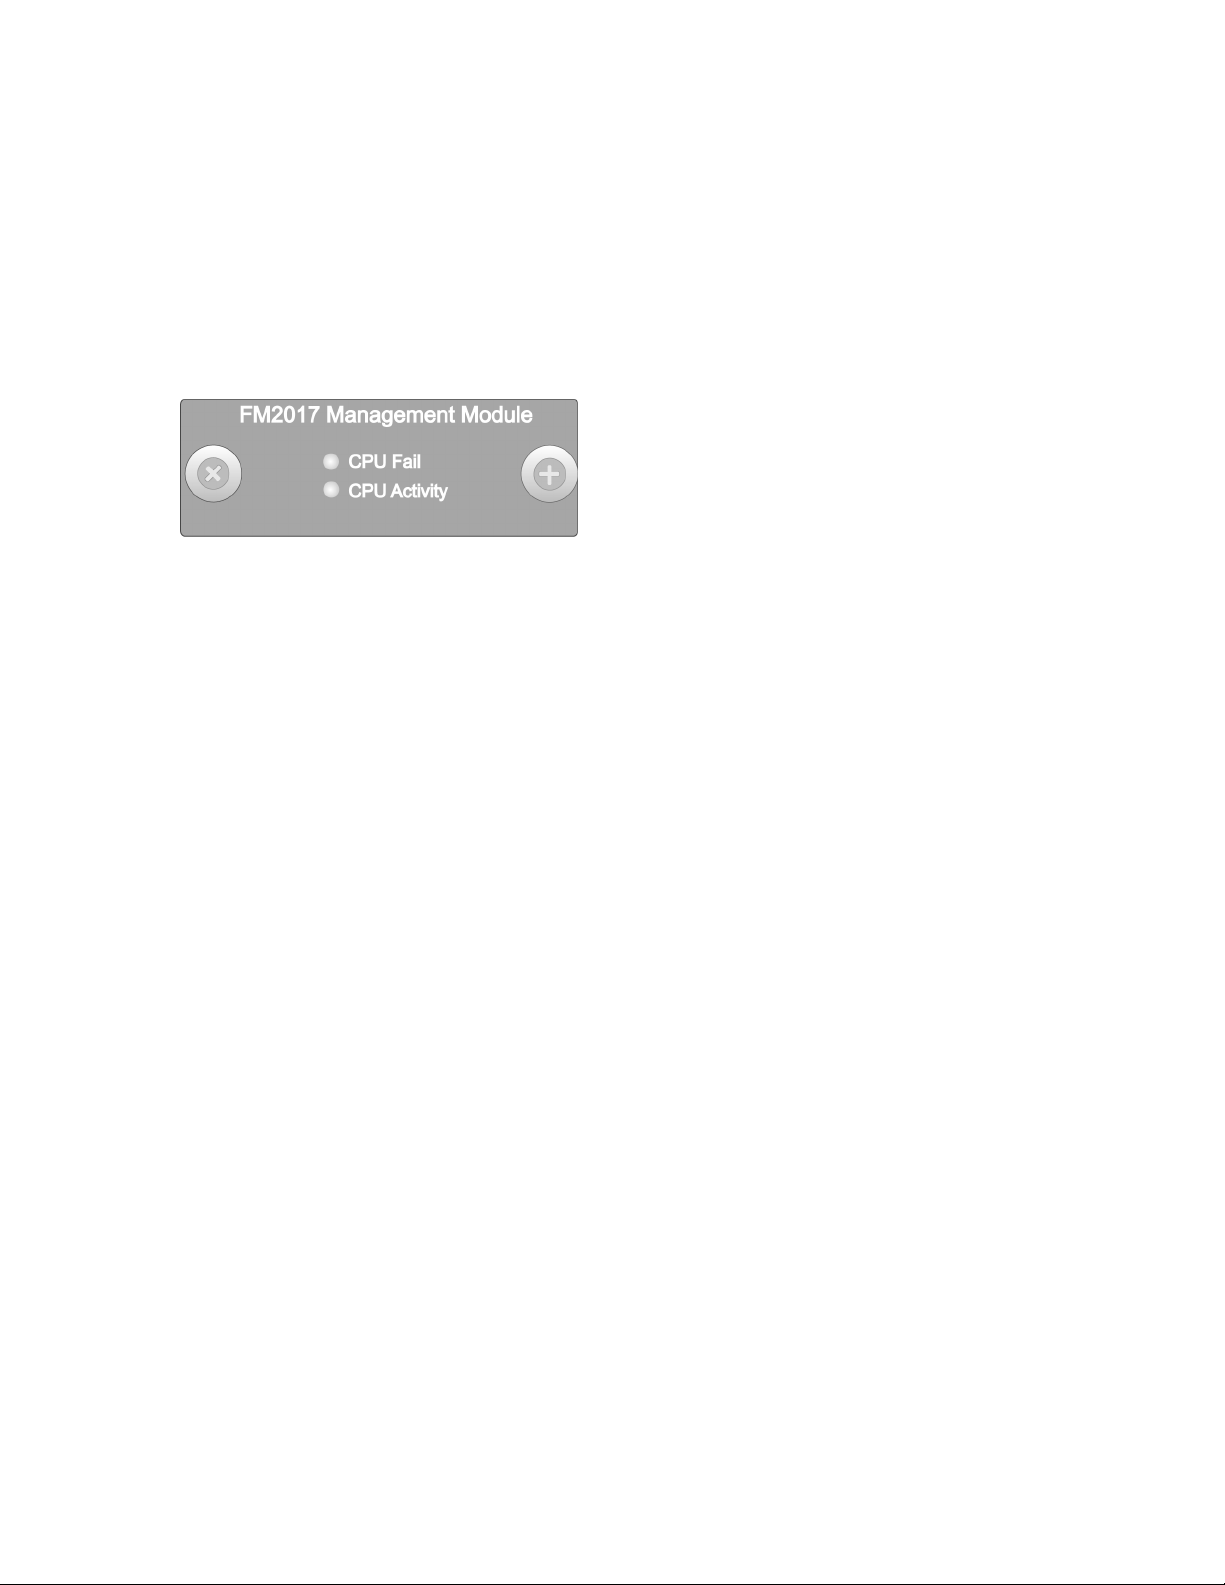
The rear panel contains the Network Management module and the 3-pronged power plug. The switch uses
AC in the range of 100-240V AC, 50-60Hz.
The Network Management module holds the Flash memory, and has two LEDs:
CPU Fail: The CPU Fail LED is lit when the switch’s self test and initialization are in progress, after
powering on or rebooting the switch
CPU Activity: The CPU Activity LED is lit when the switch is displaying network management
information
Mounting Configurations
This section describes how to mount the switch on a desktop or install it in an equipment rack.
Desktop Mounting
To mount the switch on a desktop or shelf:
1. Attach the four rubber feet (supplied) to the bottom of each corner on the switch.
2. Place the switch on a flat, stable, horizontal desktop or shelf. Make sure you allow enough
ventilation space between the switch and surrounding objects.
The switch is ready for power and network connections.
Rack Mounting
The switch can be mounted in a standard 19-inch equipment rack. This rack can be placed in a wiring closet
with other equipment (mounting kit supplied).
To install the switch in an equipment rack:
1. Attach mounting brackets on each side of the chassis.
2. Mount the switch in the equipment rack by screwing the mounting brackets to the equipment rack.
The rack mounting is complete. The switch is ready for network connections.
Powering on the Switch
The switch may be turned on with or without LAN segment cables connected.
To power on the switch:
1. Connect one end of the power cord (supplied) into the AC power connector on the back panel of
the switch.
2. Connect the power cord into the plug on the rear panel of the switch, and plug the other end into a
local power source outlet. The unit will power on.
Optional FX100 Modules
This section introduces the optional 100FX modules (sold separately) that can be installed on the front panel
of the switch. The following module models are available:
8
Page 9

FX100-MMC
•
FX100-SMC15
•
FX100-SMC30
•
FX100-SMC60
•
The FX100 modules are designed to extend the allowable distance between the switch and other network
devices. The maximum distance that can be achieved with fiber cabling is 2 kilometers (multi-mode fiber)
and up to 15, 30 or 60 kilometers (single-mode fiber).
Front Panels
The front panels of the FX100 modules consist of LED indicators, two thumbscrews, a DIP-switch for half
and full-duplex mode (full-duplex is the default) and one fiber port.
: Another DIP-switch is found on the module’s board to enable or disable Flow Control (enabled is the
Note
default).
Module LED Indicators
The LED indicators provide real-time information of systematic operation status. The following table provides
descriptions of LED indicators on the modules, and their meanings.
LED Status Description
TX Blinks
RX Blinks
Link Green
FullDuplex
Off
Off
Off
Yellow
Blinking Yellow
Off
The port is transmitting data.
No data is being transmitted.
The port is receiving data.
No data is being received.
A valid link has been established on the port.
No link has been established on the port.
The port is operating in full-duplex mode.
The port is operating in half-duplex.
No link has been established on the port, or the port is in
half-duplex mode.
Installing an FX100 Module
Follow the steps below to install the FX100 modules:
Important!
modules are NOT hot-swappable!
Before beginning the installation of a module, disconnect the power from the switch. The FX100
1. Unscrew the blank bracket from the front of the fiber port, using the thumbscrews, and set aside.
2. Align the bottom of the module with the guides on the inside of the port.
3. Slide the module into the port until it stops. Press firmly until you feel the module snap into place.
Never force, twist or bend the module.
4. Gently push the thumbscrews in and turn clockwise to tighten. Be careful not to over-tighten the
thumbscrews.
5. Power on the switch (it will automatically detect the FX100 module). Plug the fiber cable connector
into the FX100 module, and connect the other end into a network device. Check the LEDs to verify
that there is a link established on the port.
9
Page 10

10
Page 11

Chapter 3. Network Application
This section provides a few samples of network topology in which the switch can be used. In general, the
switch is designed to be used as a segment switch. That is, with its large address table (8000 MAC address)
and high performance, it is ideal for interconnecting networking segments.
You can use the switch to connect PCs, workstations, and servers to each other by connecting these
devices directly to the switch. The switch automatically learns nodes addresses, which are subsequently
used to filter and forward all traffic based on the destination address.
The switch can connect with another switch or hub to interconnect each of your small, switched workgroups
to form a larger switched network. Meanwhile, you can also use fiber ports to connect switches. The
distance between two switches via fiber cable can be up to 2 kilometers (multi-mode fiber) or 15~60
kilometers (single-mode fiber).
Small Workgroup
The switch can be used as a standalone switch to which personal computers, servers or printer servers are
directly connect to form a small workgroup.
Segment Bridge
For enterprise networks where large data broadcasts are constantly processed, this switch is an ideal
solution for department users to connect to the corporate backbone.
For example, two Ethernet switches, both with PCs and/or a print server, and a local server can all
connected to the FM2017. All of the devices in this configuration can communicate with each other through
the FM2017. Connecting a server to the switch allows other users to access that server’s data.
VLAN Application
A Virtual Local Area Network (VLAN) logically segments the physical LAN so that packets are switched only
between ports within the same VLAN group. This creates secure segments, as well as enables efficient
traffic separation, provides better bandwidth utilization and alleviates cabling issues.
You can group the switch ports into broadcast domains by assigning them to the same VLAN group to
increase network capacity and performance. Moreover, VLAN groups can be modified at any time to add,
move or change users without any re-cabling (for more information, see Chapter 5. Web-Based
Management).
11
Page 12

12
Page 13

Chapter 4. Network Configuration
This chapter explains how to configure console management via a direct connection to the console port of
the switch.
Console management involves the administration of the switch via a direct connection to the RS-232
console port. This port is a female DB-9 connector. From the main menu of the console program, the user
has access to manage the functions of the switch.
Connecting a Terminal or PC to the Console Port
The console configuration (out-of-band management) allows you to enable a user at a remote console
terminal to communicate with the switch as if the console terminal were directly connected to it.
Use the supplied RS-232 cable to connect a terminal or PC to the console port. The terminal or PC to be
connected must support the terminal emulation program.
After the connection between switch and PC is finished, turn on the PC and run a terminal emulation
program or Hyper Terminal to match the following default characteristics of the console port:
Baud Rate: 9600 bps
Data Bits: 8
Parity: None
Stop Bit: 1
Control flow: None
Note: When setting up the Hyper Terminal, set the Emulation Mode to “VT100”.
After you have finished setting the parameters, press OK and then press Enter. The Main Menu of the
console management program appears in the emulation program’s window.
13
Page 14

---<<Current configuration>>---------------------------[1.0(beta 2)]----
[MAC=00:00:94:D1:1C:22]
[IP=192.168.0.1] [mask=255.255.255.0] [broadcast=255.255.255.255]
[gateway=0.0.0.0]
------------------------------------------------------------------------
-
1. boot-method = [flash]
2. ip-address = [192.168.0.1]
3. subnet mask = [255.255.255.0]
4. broadcast = [255.255.255.255]
5. gateway = [0.0.0.0]
6. traps=[0.0.0.0] [0.0.0.0] [0.0.0.0] [0.0.0.0]
7. get-community = [public]
8. set-community = [private]
9. trap-community = [public]
A. sys-contact = [The contact person for this agent]
B. sys-name = [The administrative name of the agent]
C. sys-location = [The Physical location of the agent]
D. Telnet server = [on]
E. Http server = [on]
F. Telnet/Http username = [root]
G. Telnet/Http password = [enabled]
H. reboot I. logout J. ping K. help L. loaddefault
M. securedip = [0.0.0.0],[0.0.0.0],[0.0.0.0]
>>>>
Assigning IP Address
After you have attached a terminal or PC with emulation software, you are ready to make a connection using
a web browser. You first have to assign an IP address to the switch.
Once you have logged into the switch, you need to assign an IP address to the switch’s Ethernet Interfaces
so that you can connect to the switch using a web browser.
If you want to change from the default IP address (192.168.0.1), for example, there are three kinds of
commands to choose from. After the symbol
1. “ip-address xxx.xxx.xxx.xxx” (where the x’s represent an IP address from your network).
2. “2 xxx.xxx.xxx.xxx “.
3. “ip xxx.xxx.xxx.xxx“.
1. boot-method = [flash]
2. ip-address = [192.168.0.1]
3. subnet mask = [255.255.255.0]
4. broadcast = [255.255.255.255]
5. gateway = [0.0.0.0]
6. traps=[0.0.0.0] [0.0.0.0] [0.0.0.0] [0.0.0.0]
7. get-community = [public]
8. set-community = [private]
9. trap-community = [public]
A. sys-contact = [The contact person for this agent]
B. sys-name = [The administrative name of the agent]
C. sys-location = [The Physical location of the agent]
D. Telnet server = [on]
>>>>
, type in:
14
Page 15

E. Http server = [on]
F. Telnet/Http username = [root]
G. Telnet/Http password = [enabled]
H. reboot I. logout J. ping K. help L. loaddefault
M. securedip = [0.0.0.0],[0.0.0.0],[0.0.0.0]
>>>>
Press H to reboot the switch after making your change. Press
be displayed.
By the similar methods, you can configure the Subnet Mask (Default subnet mask is 255.255.255.0),
Broadcast (Default Broadcast is 255.255.255.255), and Default Gateway (Default Gateway is 0.0.0.0). The
gateway address is the router that can forward packets to the other IP networks.
After you finish configuring the above settings, you must execute H
Note:
Afterwards, you can use the
J (Ping)
command to check whether the network setting has finished or not.
twice, and the new IP address will now
Enter
(reboot)
command to take effect.
Secured IP
Secured IP can guard against unauthorized users gaining access to your network configurations. You can
allow up to three IP addresses to have access to the switch via telnet or a web browser.
The default Secured IP is 0.0.0.0 for all three entries, which means that no network security on IP was set
from original factory setting.
Type in “
IP (where the x’s stand for the desired IP address from your network). Then only the end station with IP
address that you set has access to the network management and configuration.
M 1 xxx.xxx.xxx.xxx
6. traps=[0.0.0.0] [0.0.0.0] [0.0.0.0] [0.0.0.0]
7. get-community = [public]
8. set-community = [private]
9. trap-community = [public]
A. sys-contact = [The contact person for this agent]
B. sys-name = [The administrative name of the agent]
C. sys-location = [The Physical location of the agent]
D. Telnet server = [on]
E. Http server = [on]
F. Telnet/Http username = [root]
G. Telnet/Http password = [enabled]
H. reboot I. logout J. ping K. help L. loaddefault
M. securedip = [0.0.0.0],[0.0.0.0],[0.0.0.0]
>>>> M 1 xxx.xxx.xxx.xxx
Repeat the process for the other two addresses, if desired.
” after the symbol >>>> and press
twice in order to set the first secured
Enter
15
Page 16

16
Page 17

Chapter 5. Web-Based Management
This section introduces the configuration and functions of the web-based management of switch.
The FM2017 provides an embedded HTML website residing in the CPU module. It offers management
features and allows users to manage the switch from anywhere on the network through a standard web
browser.
System Login
1. Launch your web browser.
2. Enter the IP address of the switch in the URL window (http://192.168.0.1). Then press Enter.
3. Then the following Welcome screen appears.
4. Click Login button, then the Password Dialogue Box appears.
5. Type in your User Name and Password (the default is “root” for both).
6. Press Enter or click OK. The System screen appears.
17
Page 18

Inside the System page, the following information about the switch is listed:
Network Setting
•
IP address: 192.168.0.1
•
Subnet Mask
•
Broadcast: 255.255.255.255
•
Default gateway
The configuration above is only a reference setting. If you want to reset or change the numbers, you can
click Agent Config to change or reset them.
System Group
•
SysDescription: Lists the switch name and firmware version number
•
SysUpTime
•
SysContact
•
SysName: Enter a name for the switch
•
SysLocation
Remember to click Apply after entering any new information.
: 255.255.255.0
: 0.0.0.0
: Lists the time elapsed since powering on the switch
: Enter the name of the person to contact if there are problems with the switch
: Enter the switch‘s location; for example, “MIS Department”
Statistics Screen
The Statistics page displays the detailed information on network traffic for each Ethernet port and the fiber
port.
18
Page 19

The data is automatically updated at regular intervals.
Port Config Screen
You can use the Port Config page to disable/enable each port. By default, all the ports are Enabled.
To disable or enable a port:
1. Select the drop-down menu in the Status column.
2. Choose the status you want for each Ethernet and Fiber port.
3. Remember to click
Speed Config Screen
In the Speed Config page, you can manually configure the speed and duplex of each port in order to match
any attached devices.
button after finishing your new settings.
Apply
19
Page 20

To set these parameters for a port:
1. Select the drop-down menu in Speed/Duplex column.
2. Select one of the following choices: Auto/flow control enabled, Auto/flow control disabled, 100BaseTx/Full Duplex, 100Base-Tx/Half Duplex, 10Base-T/Full Duplex or 10Base-T/Half Duplex.
3. Click Apply.
VLAN Screen
A VLAN (Virtual LAN) is a group of switch ports designated by the switch as belonging to the same
broadcast domain. This feature allows workgroups to be defined on the basis of their logical location instead
of their physical location, and does not require recalling.
VLANs also enable you to configure port-based VLANs to help isolate broadcast traffic and increase
security.
In this VLAN page, you can create VLAN groups by clicking the check boxes for each desired Port number
across from each Group number (by default, all ports are in VLAN Group 1). Click
the VLAN page for your configuration to take effect.
20
at the bottom of
Apply
Page 21

Agent Config Screen
In the Agent Config page, the switch’s current configurations are displayed. You can refer to the following
Agent Config page for your own setting.
Boot Method
There are three modes of Boot Method:
•
FLASH: Boot your system by flash settings. Flash memory resides in a chip and holds its content
without power. Software images can be stored, booted and rewritten as necessary
•
BOOTP: Boot your system from BOOTP server (Bootstrap Protocol). A TCP/IP protocol used by a
diskless workstation or network computer to obtain its IP address and other network information
such as server address and default gateway
•
: Boot your system from DHCP server (Dynamic Host Configuration Protocol). Software
DHCP
automatically assigns IP addresses to client stations logging onto a TCP/IP network
SNMP Management
You can manage the switch using a third-party SNMP (Simple Network Management Protocol) agent.
Access rights to the SNMP agent are controlled by community strings.
The switch provides up to 4 IP addresses for the access of trap managers. You can submit community
strings on GetCommunity, SetCommunity and TrapCommunity to authorize management access. The
default community strings for the above three items are all public. For security, you should change them to
prevent unauthorized access.
GetCommunity: (Read-only access) means that a member of community can view the information but
cannot make changes to the configuration.
SetCommunity: (Read/Write access) allows the member of the community to view and make changes to
the configuration.
TrapCommunity: (Read/Write access) allows a manager to receive trap events (alarms).
21
Page 22

Default Agent Configuration
The following are the default values of the Agent Config of the switch. You can change the information listed
by entering new information (for example, you can change the switch’s IP address by directly typing in a new
IP address).
Click Apply after entering the information.
•
Boot-Method: flash
•
IP address: 192.168.0.1
•
Submask: 255.255.255.0
•
Broadcast: 255.255.255.255
•
Gateway: 0.0.0.0
•
Trap1: 0.0.0.0
•
Trap2: 0.0.0.0
•
•
•
•
•
•
•
•
•
•
•
•
After you have finished entering the new settings for Boot-method, IP Address, Submask, Broadcast and
Gateway, remember to click Reboot Agent to have your changes take effect.
: 0.0.0.0
Trap3
: 0.0.0.0
Trap4
GetCommunity: public
SetCommunity
TrapCommunity
Telnet-Server: on
HTTP-Server: on
Telnet /Http-Username
Telnet /Http-Password
Secured_IP1: 0.0.0.0
Secured_IP2
Secured_IP3
: public
: public
: 0.0.0.0
: 0.0.0.0
: root
: root
22
Page 23

Appendix A. Troubleshooting
This section is intended to help you solve the most common problems on the switch. If you still are having
problems after reading through the information here, contact Asanté’s Technical Support for assistance.
Your switch can easily be monitored through the LED indicators to assist in identifying problems. Below are
listed common problems that you may encounter and where you can find possible solutions.
Incorrect Connections
When connecting to another switch or hub, you must use a crossover cable from an RJ-45 MDIX connector
on your switch to a MDIX connector on the other switch/hub. If you have a straight-through cable, the
connection will not work.
LAN adapters in end nodes are normally wired as MDI ports, as are some ports on switches or hubs. For
connections from the switch to these MDI ports, use a straight-through cable.
Faulty or Loose Cables
Look for loose or obviously faulty connections. If the cabling appears to be all right, make sure the
connections are snug. Finally, try the connection with a known working cable.
Non-Standard Cables
Non-standard and incorrectly wired cables can cause numerous network collisions and other network
problems, seriously impairing network performance. Asanté recommends UTP Category 5 or better UTP
cable for every network installation.
Improper Network Topologies
Make sure that a valid network topology is employed. Common topology faults include excessive cable
length, too many repeaters (hubs) between end nodes, and data path loops. Between any two nodes, there
should only be one active cabling path at any time. Data path loops will cause broadcast storms that will
severely impact network performance.
Cabling
RJ-45 ports: Use unshielded twisted-pair (UTP) or shield twisted-pair (STP) cable for RJ-45 connections:
Category 3, 4 or 5 cable for 10Mbps connections or Category 5 cable for 100Mbps connections. Also be
sure that the length of any twisted-pair connection does not exceed 100 meters (328 feet).
100Base-FX fiber port:
cable. You can connect two devices over a 2-kilometer distance. However, fiber single-mode connector type
must use 9/125 um single-mode fiber cable. You can connect two devices over a15~60-kilometer distance in
full-duplex operation.
Fiber multi-mode connector type must use 50/125 or 62.5/125 um multi-mode fiber
23
Page 24

24
Page 25

Appendix B. Internet Explorer Setting
If you are using Internet Explorer, you have to modify the browser setting to enable Java applets to use
network ports. We used Internet Explorer 5.0 for the following demonstration.
First, select ”Internet Optional..” under “Tools” of the function bar, then follow the step-by-step instructions
below.
1. Select the Security tab.
2. Click
3. Click Sites.
4. Add the IP address (http://192.168.0.1) of
5. Disable left-bottom box Require server
Trusted sites
the switch to the zone, and then click Add.
verification for all sites in this zone, then
click OK.
.
25
Page 26

6. Go back to Internet Options, then click Custom
.
Level
7. Scroll down to find Java.
8. Select Custom under Java and click Java Custom
Settings.
9. Select the Edit Permissions tab.
10. Select Enable under Unsigned Content, and then
press OK.
26
Page 27

Appendix C. Specifications and Warranty Statement
FriendlyNET FM2017 Specifications
Standards IEEE 802.3 10Base-T Ethernet
Protocol CSMA/CD
Maximum Forwarding Rate 14,880 pps per Ethernet port
LED Indicators Per Port: 10/100 UTP: 100M, LK/ACT, Full Duplex (3 LEDs)
Copper Network Cables 10Base-T: 2-pair UTP Category 3, 4 or 5 (100m max.)
Fiber Link Maximum Distance ST/SC/MT-RJ/VF-45 Multi-mode: Full-Duplex=2K, half-duplex=412
Interface One CPU expansion slot to upgrade SNMP function
Dimensions Switch: 440mm x 162mm x 44mm (L x W x H)
Operational Temperature
Storage Temperature
Operational Humidity 10% to 90% (non-condensing)
External Power Supply 100-240V AC, 50-60Hz
Power Consumption 25 Watts (max)
EMI FCC Class A, CE Mark
Safety UL, cUL
Limited Warranty 2 year Limited Warranty (see complete statement below)
FriendlyNET Limited 2-Year Warranty
Subject to the limitations and exclusions below, Asanté warrants to the original end user purchaser that the covered products will be free from defects in title, materials and manufacturing
workmanship for a period of two years from the date of purchase. This warranty excludes fans, power supplies, non-integrated software and accessories. Asanté warrants that the fans and power
supplies will be free from defects in title, materials and manufacturing workmanship for two years from date of purchase. Asanté warrants that non-integrated software included with its products will be
free from defects in title, materials, and workmanship for a period of 90 days from date of purchase, and the Company will support such software for the purpose for which it was intended for a period
of 90 days from the date of purchase. This warranty expressly excludes problems arising due to compatibility with other vendors’ products, or futur e compatibility due to third party software or driver
updates.
To take advantage of this warranty, you must contact Asanté for a return materials authorization (RMA) number. The RMA number must be clearly written on the outside of the returned package.
Product must be sent to Asanté postage paid. In the event of a defect, Asanté will repair or replace defective product or components with new, refurbished or equivalent product or components as
deemed appropriate by Asanté. The foregoing is your sole remedy, and Asanté's only obligation, with respect to any defect or non-conformity. Asanté mak es no warranty with res pect to accessories
(including but not limited to cables, brackets and fasteners) included with the covered product, nor to any discontinued product, i.e., product purchased more than thirty days after Asanté has
removed such product from its price list or discontinued shipments of such product.
This warranty is exclusive and is limited to the original end user purchaser only. This warranty shall not apply to secondhand products or to products that have been subjected to abuse, misuse,
abnormal electrical or environmental conditions, or any condition other than what can be considered normal use.
ASANTÉ MAKES NO OTHER WARR ANTIES, EXPRESS, IMPLIED OR OTHERWISE, REGARDING THE ASANTÉ PRODUCTS, EXCEPT TO THE EXTENT PROHIBITED BY
APPLICABLE LAW. ALL WARRANTIES OR CO NDITIONS OF MERCHANTABILITY OR FITNESS FOR A PARTICULAR PURPOSE ARE HER EBY DISCLAIMED. ASANTÉ'S LIABILITY
ARISING FROM OR RELATING TO THE PURCHASE, USE OR INABILITY TO USE THE PRODUCTS IS LIMITED TO A REFUND OF THE PURCHASE PRICE PAID. IN NO EVENT WILL
ASANTÉ BE LIABLE FOR INDIR ECT, SPECIAL, INCIDENTAL, OR CONSEQUENTIAL DAMAG ES FOR THE BREACH OF ANY EXPRESS OR IMPLIED WARR ANTY, INCLUDING
ECONOMIC LOSS, DAMAG E TO PROPERTY AND, TO THE EXTENT PER MITTED BY LAW, DAMAGES FOR PERSONAL INJURY, HOWEVER CAUSED AND ON AN Y THEORY OF
LIABILITY (INCLUD ING NEGLIGENCE). THESE LIMITATIONS SHALL APPLY EVEN IF ASANTÉ HAS BEEN ADVISED OF THE POSSIBILITY O F SUCH DAMAGES OR IF THIS
WARRANTY IS FOUND TO FAIL OF ITS ESSENTIAL PURPOSE.
Some jurisdictions do not allow the exclusion or limitation of incidental or consequential damages or limitations on how long an implied warranty lasts, so the above limitations or exclusions may not
apply to you. This warranty gives you specific legal rights, and you may have other rights, which vary from jurisdiction to jurisdiction.
IEEE 802.3u 100Base-TX Fast Ethernet
ANSI/IEEE 802.3 N-Way auto-negotiation
148,800 pps per Fast Ethernet port
100M Fiber: TX, RX, Link, Full Duplex (4 LEDs)
Per Unit: Power
EIA/TIA-568 100Ohm STP (100m)
100Base-TX: 2-pair UTP Category 5 or better (100m max.)
EIA/TIA-568 100-ohm STP (100m)
meters
SC Single-Mode: Full-Duplex= 60K, half-duplex=412 meters
100FX Module: 102mm x 71mm x 24mm (L x W x H)
0° to 45° C (32° to 113° F)
-40° to 70°C (-40° to 158° F)
Internal universal power supply
27
Page 28

FriendlyNET FM2017
SNMP/Web Managed Switch with Fiber Option
User’s Manual
Asanté Technologies, Inc.
821 Fox Lane
San Jose, CA 95131
USA
SALES
800-662-9686 Home/Office Solutions
800-303-9121 Enterprise Solutions
408-435-8388
TECHNICAL SUPPORT
801-566-8991: Worldwide
801-303-3787: FAX
www.asante.com
support@asante.com
Copyright 2002 Asanté Technologies, Inc. All rights reserved. No part of this document, or any associated artwork,
product design, or design concept may be copied or reproduced in whole or in part by any means without the express
written consent of Asanté Technologies, Inc. Asanté and FriendlyNET are registered trademarks and the Asanté logo is a
trademark of Asanté Technologies, Inc. All other brand names or product names are trademarks or registered trademarks
of their respective holders. All features and specifications are subject to change without prior notice.
06-00653-00 Rev. A
28
 Loading...