

Page 1

IntraSwitch™ 5308FL
User’s Manual
Asanté Technologies, Inc.
821 Fox Lane
San Jose, CA 95131
www.asante.com
1.800.662.9686
November 1997
Part Number: 06-00366-00 Rev. A
Page 2

Copyright 1997 by Asanté Technologies, Inc.
All rights reserved. No part of this manual, or any associated artwork, software, product,
design or design concept, may be copied, reproduced or stored, in whole or in part, in any
form or by any means mechanical, electronic, optical, photocopying, recording or otherwise, including translation to another language or format, without the express written consent of Asanté Technologies, Inc.
Printed in the United States of America.
Trademarks
Asanté and IntraSwitch are trademarks of Asanté Technologies, Inc. All other product
names are trademarks or registered trademarks of their respective companies.
FCC Information
This equipment has been tested and found to comply with the limits for a Class B digital
device, pursuant to Part 15 of the FCC Rules. These limits are designed to provide reasonable protection against harmful interference when the equipment is operated in a commercial environment. This equipment generates, uses, and can radiate radio frequency energy,
and, if not installed and used in accordance with the instruction manual, may cause harmful interference to radio communications. Operation of this equipment in a residential area
is likely to cause harmful interference, in which case you must correct the interference at
your own expense.
Product Warranty
This IntraSwitch 5308FL has a three-year warranty which applies to the original purchaser
of the product. Asanté Technologies, Inc. warrants that this product will be free from
defects in title, materials, and manufacturing workmanship during the warranty period. If
the IntraSwitch is found to be defective, then, as your sole remedy and as the manufacturer’s only responsibility, Asanté Technologies, Inc. will repair or replace the product provided that (1) you call Asanté Technologies, Inc. for a Returned Merchandise Authorization
(RMA) number, that (2) you clearly write the RMA number on the outside of the package,
and that (3) you return it, postage prepaid, during the warranty period. This warranty is
exclusive and is limited to the IntraSwitch 5308FL. This warranty shall not apply to
IntraSwitch products that have been subject to abuse, misuse, abnormal electrical or environmental conditions, or any condition other than what can be considered normal use.
Note: The warranty card must be filed with Asanté Technologies, Inc. within 30 days after
the date of purchase.
Warranty Disclaimers
Asanté Technologies, Inc. makes no other warranties, express, implied, or otherwise,
regarding the IntraSwitch 5308FL, and specifically disclaims any warranty for merchantability or fitness for a particular purpose.
The exclusion of implied warranties is not permitted in some states and exclusions specified herein may not apply to you. This warranty provides you with specific legal rights.
There may be other rights you have which vary from state to state.
Limitation of Liability
The liability of Asanté Technologies, Inc. arising from this warranty and sale shall be limited
to a refund of the purchase price. In no event shall Asanté Technologies, Inc. be liable for
costs of procurement or substitute products or services, or for any lost profits, or for any
consequential, incidental, direct damages, however caused and on any theory of liability,
arising form this warranty and sale. These limitations shall apply notwithstanding any failure of essential purpose of any limited remedy.
Page 3

Table of Contents
List of Figures.................................................................................. ix
List of Tables................................................................................... xi
About This Manual .............................................................xiii
About This Manual.........................................................................xvi
Chapter Contents....................................................................xvi
Document Conventions.........................................................xvii
Audience...............................................................................xviii
Introduction ....................................................................... 1-1
IntraSwitch 5308FL........................................................................1-2
IntraSwitch 5308FL Components ...........................................1-3
10/100TX Port..................................................................1-3
10Base-FL Ports.................................................................1-3
Management Connections................................................1-3
MII Expansion Slots..........................................................1-3
Redundant Power Supply Connector...............................1-3
Power Switch...................................................................1-3
Power Supply Connector.................................................1-4
Configuration/ Management...................................................1-5
Console/Telnet Management ...........................................1-5
Web Browser Management..............................................1-5
SNMP-Based Management ................................................1-5
Switching Capacity .................................................................1-6
Features...................................................................................1-7
Package Contents....................................................................1-8
Tools and Materials .................................................................1-9
Factory Defaults....................................................................1-11
Resets and Factory Default Settings ...............................1-12
Page iii
Page 4

Installation ........................................................................ 2-1
Installing the IntraSwitch...............................................................2-2
Installation Guidelines.............................................................2-2
Power Requirements........................................................2-2
Environmental Requirements...........................................2-2
Cooling and Airflow.........................................................2-2
Installation Overview..............................................................2-3
Rack Mounting/Desktop Placement .......................................2-4
Equipment Rack Installation ............................................2-4
Free-Standing Installation.................................................2-5
Installing MII Modules.............................................................2-6
Connecting Power..................................................................2-8
Connecting to the Network....................................................2-9
10Base-FL Ports.................................................................2-9
10/100TX Port..................................................................2-9
MII Ports.........................................................................2-10
10/100TX Module....................................................2-10
100Base-FX Module .................................................2-10
10Base-FL Module....................................................2-10
Cabling Scenarios Diagram............................................2-11
Setting up for Management...................................................2-12
BootP Configuration.......................................................2-12
Console Configuration ...................................................2-13
Page iv
LED Indicators .................................................................... 3-1
LED Indicators................................................................................3-2
Port LEDs.................................................................................3-3
Power LED ..............................................................................3-4
Diagnostic LEDs ......................................................................3-4
Setting Up For Management ........................................... 4-1
IntraSwitch 5308FL Management..................................................4-2
Page 5

Overview.................................................................................4-2
Management Scenarios.....................................................4-3
Out-of-Band Management........................................................4-4
In-Band Management...............................................................4-6
Console Management ....................................................... 5-1
Console Management.....................................................................5-2
Overview.................................................................................5-2
Configuration and Management Tasks....................................5-3
Local Management Interface...................................................5-5
Main Menu........................................................................5-5
Accessing a Submenu.......................................................5-5
Exiting a Submenu ...........................................................5-5
General Information Menu......................................................5-6
Configuration Menu................................................................5-7
Logging into the Configuration Menu..............................5-7
Configure System Administration Information...............5-10
Current Settings.......................................................5-10
Changing System Administration Information ........5-11
Configure TCP/IP Parameters ........................................5-12
Current Settings.......................................................5-12
Changing TCP/IP Information.................................5-13
Configure Bootstrap Parameters ....................................5-14
Current Settings.......................................................5-14
Executing Software Locally.....................................5-16
Loading Software Remotely.....................................5-16
Performing a Software Upgrade..............................5-17
Configure SNMP Parameters..........................................5-18
Current Settings.......................................................5-18
Setting Community Strings......................................5-20
Enabling Authentication Traps................................5-20
Adding a Trap Receiver Entry..................................5-21
Deleting a Trap Receiver Entry................................5-21
Configure Port Parameters.............................................5-22
Page v
Page 6

Current Settings.......................................................5-23
Enabling/Disabling a Port........................................5-24
Configuring Full Duplex..........................................5-24
Configuring Auto-Negotiation .................................5-25
Configure RMON Parameters.........................................5-26
Configure MAC Forwarding Table Parameters...............5-27
Current Setting........................................................5-27
Displaying the MAC Forwarding Table....................5-28
Finding an Entry in the MAC Forwarding Table......5-29
Setting the Age Out Timer.......................................5-29
Configure Spanning Tree Parameters.............................5-30
Current Settings.......................................................5-30
Enabling/Disabling Spanning Tree on ALL Ports.....5-32
Enabling/Disabling Spanning Tree on a Single Port 5-32
Set Web Server...............................................................5-34
Set Telnet Idle Time Out................................................5-35
Set Console Password.....................................................5-36
Reset EEPROM to Default...............................................5-37
Resetting the IntraSwitch 5308FL..................................5-38
Statistics Menu ......................................................................5-39
Status Monitoring and Statistics ..................................... 6-1
Monitoring the IntraSwitch 5308FL...............................................6-2
Viewing the Current Operating Information..........................6-2
Viewing Statistics....................................................................6-5
Selecting a Port.................................................................6-6
Monitoring Counters........................................................6-6
Resetting Statistics............................................................6-7
Stopping Statistics............................................................6-7
Exiting the Statistics Menu...............................................6-7
Counter Descriptions.......................................................6-7
Page vi
Advanced Management .................................................... 7-1
Advanced Management..................................................................7-2
Page 7

RMON Overview.....................................................................7-2
Benefits of RMON ...................................................................7-2
Configuring RMON Parameters...............................................7-3
RMON History Group.......................................................7-4
RMON Alarm Group.........................................................7-9
RMON Event Group.......................................................7-15
Troubleshooting.................................................................A-1
LED Indicators........................................................................ A-1
Supported MIBs..................................................................B-1
RMON (RFC 1757)..................................................................B-1
Statistics............................................................................B-1
History Group...................................................................B-2
Alarm Group.....................................................................B-2
Event Group.....................................................................B-3
MIB II (RFC 1213)...................................................................B-3
System Group...................................................................B-3
Interface Group................................................................B-3
Address Trans Group........................................................B-4
IP Group...........................................................................B-4
IP Address Table...............................................................B-4
IP Routing Table...............................................................B-4
IP Address Translation Table............................................B-4
ICMP Group .....................................................................B-4
TCP Group .......................................................................B-5
TCP Connection Table.....................................................B-5
UDP Group.......................................................................B-5
UDP Listener Table...........................................................B-5
SNMP Group.....................................................................B-5
Bridge MIB (1493)...................................................................B-6
Base Port...........................................................................B-6
Technical Specifications.................................................... C-1
Network Management Platforms Supported.......................... C-1
Page vii
Page 8

LEDs .......................................................................................C-1
Connectors............................................................................. C-1
Spanning Tree Support ..........................................................C-1
MAC Address Table Size......................................................... C-1
Dimensions ............................................................................ C-1
Weight.................................................................................... C-2
Power Specifications.............................................................. C-2
Environmental Specifications................................................. C-2
Standards Compliance............................................................ C-2
Mounting Options.................................................................. C-2
Redundant Power Supply....................................................... C-2
Console Management Menu.............................................D-1
Technical Support.............................................................. E-1
Index.............................................................................. Index-i
Page viii
Page 9

List of Figures
Figure 1-1 IntraSwitch 5308FL front panel.................................... 1-2
Figure 1-2 IntraSwitch 5308FL back panel.................................... 1-2
Figure 2-1 Mounting rack bracket on the IntraSwitch 5308FL...... 2-4
Figure 2-2 MII expansion slots....................................................... 2-6
Figure 2-3 Installing an MII expansion module............................. 2-7
Figure 2-4 Securing an MII expansion module.............................. 2-7
Figure 2-5 Connecting the power cord......................................... 2-8
Figure 2-6 IntraSwitch 5308FL cabling scenarios........................ 2-11
Figure 2-7 Connecting to the Console port................................. 2-13
Figure 2-8 Local Management Interface Main Menu.................... 2-14
Figure 3-1 IntraSwitch 5308FL LED panel..................................... 3-2
Figure 4-1 IntraSwitch 5308FL management options.................... 4-3
Figure 4-2 Connecting to the Console port................................... 4-4
Figure 4-3 Local Management Interface Main Menu...................... 4-5
Figure 5-1 Local Management Interface Main Menu...................... 5-5
Figure 5-2 General Information Menu........................................... 5-6
Figure 5-3 Configuration Menu...................................................... 5-7
Figure 5-4 System Administration Information Menu.................. 5-10
Figure 5-5 TCP/IP Parameter Menu............................................. 5-12
Figure 5-6 BootStrap Parameter Menu......................................... 5-14
Figure 5-7 SNMP Parameter Menu............................................... 5-18
Figure 5-8 Port Parameter Menu.................................................. 5-22
Figure 5-9 MAC Forwarding Table Parameters Menu.................. 5-27
Figure 5-10 MAC Forwarding Table............................................... 5-28
Figure 5-11 Spanning Tree Parameters Menu................................ 5-30
Figure 5-12 Spanning Tree Port Parameters Menu........................ 5-32
Figure 5-13 Set Web server command line.................................... 5-34
Figure 5-14 Set TelNet Idle Time Out command line.................... 5-35
Figure 5-15 Set Console Password command line......................... 5-36
Page ix
Page 10

Figure 5-16 Reset EEProm to Default command line.................... 5-37
Figure 6-1 General Information Menu........................................... 6-2
Figure 6-2 Statistics screen (page one of two).............................. 6-5
Figure 7-1 RMON Parameters Menu.............................................. 7-3
Figure 7-2 RMON History Group Menu ........................................ 7-4
Figure 7-3 Add RMON History Control Group entry..................... 7-5
Figure 7-4 Display RMON History Control Group entry............... 7-6
Figure 7-5 Display RMON History Statistic entry .......................... 7-7
Figure 7-6 RMON Alarm Group Menu........................................... 7-9
Figure 7-7 Add RMON Alarm Group entry.................................. 7-10
Figure 7-8 Object ID entry .......................................................... 7-11
Figure 7-9 Display RMON Alarm Group entry ............................ 7-13
Figure 7-10 RMON Event Group Menu......................................... 7-15
Figure 7-11 Add RMON Event Group entry .................................. 7-16
Figure 7-12 Display RMON Event Group entry............................. 7-17
Figure 7-13 Display RMON Event Group entry log....................... 7-18
Page x
Page 11

List of Tables
Table 1-1 Tools and Materials Required...........................................1-9
Table 1-2 Factory Default Configurations ......................................1-11
Table 2-1 Installation Overview.......................................................2-3
Table 2-2 10Base-FL Cable Guidelines..............................................2-9
Table 2-3 10/100TX Port Cable Guidelines......................................2-9
Table 2-4 10/100TX MII Module Cable Guidelines........................2-10
Table 2-5 100Base-FX MII Module Cable Guidelines......................2-10
Table 2-6 10Base-FL MII Module Cable Guidelines........................2-10
Table 3-1 Port LEDs..........................................................................3-3
Table 4-1 Management Options.......................................................4-2
Table 5-1 Configuration Tasks..........................................................5-3
Table 5-2 Management Tasks...........................................................5-3
Table 5-3 Configuration Menu Items ...............................................5-8
Table 5-4 System Administration Information Settings..................5-10
Table 5-5 TCP/IP Parameter Settings .............................................5-12
Table 5-6 Bootstrap Parameter Settings .........................................5-15
Table 5-7 SNMP Parameter Settings...............................................5-19
Table 5-8 Port Parameter Settings..................................................5-23
Table 5-9 MAC Forwarding Table Parameter Setting.....................5-28
Table 5-10 Spanning Tree Parameter Settings..................................5-31
Table 6-1 General Information Menu Parameters............................6-3
Table 6-2 Statistics Counters Descriptions.......................................6-7
Table A-1 Troubleshooting Tips...................................................... A-1
Page xi
Page 12

Page xii
Page 13

About This Manual
This section provides an overview of the IntraSwitch 5308FL
User’s Manual. It describes the manual’s chapters, document
conventions, and intended audience.
This chapter contains the following sections:
❏
Chapter contents — page xiv
❏
Document conventions — page xv
❏
Audience — page xvi
Page 14

About This Manual
About This Manual
Chapter
Contents
This manual is divided into the following chapters and
appendices.
Chapter/Appendix Description
1
Introduction Describes the IntraSwitch 5308FL, its
package contents, features, switching
capacity, and management options.
Installation Describes the steps required to install
2
LED Indicators Describes how to monitor the
3
4
Management Describes the different management
5
Console Management Describes how to manage the
the IntraSwitch 5308FL, connect it to
the network, and configure it for
management.
IntraSwitch 5308FL’s front panel LEDs.
options available with the IntraSwitch
5308FL and how to connect to the
IntraSwitch 5308FL using those
options.
IntraSwitch 5308FL using the Console
or Telnet Local Management Interface.
Page xiv
6
Status and Statistics Describes how to view the IntraSwitch
5308FL’s current operating information
and statistics.
Advanced
7
Management
Describes how to use RMON to
manage the IntraSwitch 5308FL.
Page 15

Document Conventions
Document
Conventions
Chapter/Appendix
Appendix A, “
Troubleshooting”
Appendix B, “Supported
MIBs”
Appendix C, “Technical
Specifications”
Appendix D, “Console
Management Menu”
Appendix E, “Technical
Support”
Description
Provides a list of troubleshooting tips
for isolating problems with the
IntraSwitch 5308FL or the network .
Describes the MIBs supported by the
IntraSwitch 5308FL.
Provides a list of the IntraSwitch
5308FL’s technical specifications.
Provides a one-page map of the
IntraSwitch 5308FL’s Local
Management Interface.
Describes how to contact Asanté
Technical Support.
This manual uses the following conventions to convey
instructions and information:
❏
Commands and key words are in
boldface
font.
∆
Note:
Noteworthy information, which contains
helpful suggestions or references to other sections in the manual, is in this format.
▲
Important!
Significant information that calls
attention to important features or instructions
is in this format.
Page xv
Page 16

About This Manual
Audience
This manual uses terms and concepts associated with Ethernet
networking and switches.
It is recommended that the user of this manual be familiar with
the basics of local area networks and Ethernet switches.
Page xvi
Page 17

1
Introduction
This chapter introduces the IntraSwitch 5308FL Ethernet
switch.
It provides an overview of the IntraSwitch 5308FL and
describes its features, management and configuration
capabilities, switching capacity, and factory default settings.
This chapter contains the following sections:
❏
IntraSwitch 5308FL — page 1-2
❏
IntraSwitch 5308FL Components —
page 1-3
❏
Configuration/Management — page 1-5
❏
Switching Capacity — page 1-6
❏
Features — page 1-7
❏
Package Contents — page 1-8
❏
Tools and Materials — page 1-9
❏
Factory Defaults — page 1-11
Page 18
Introduction
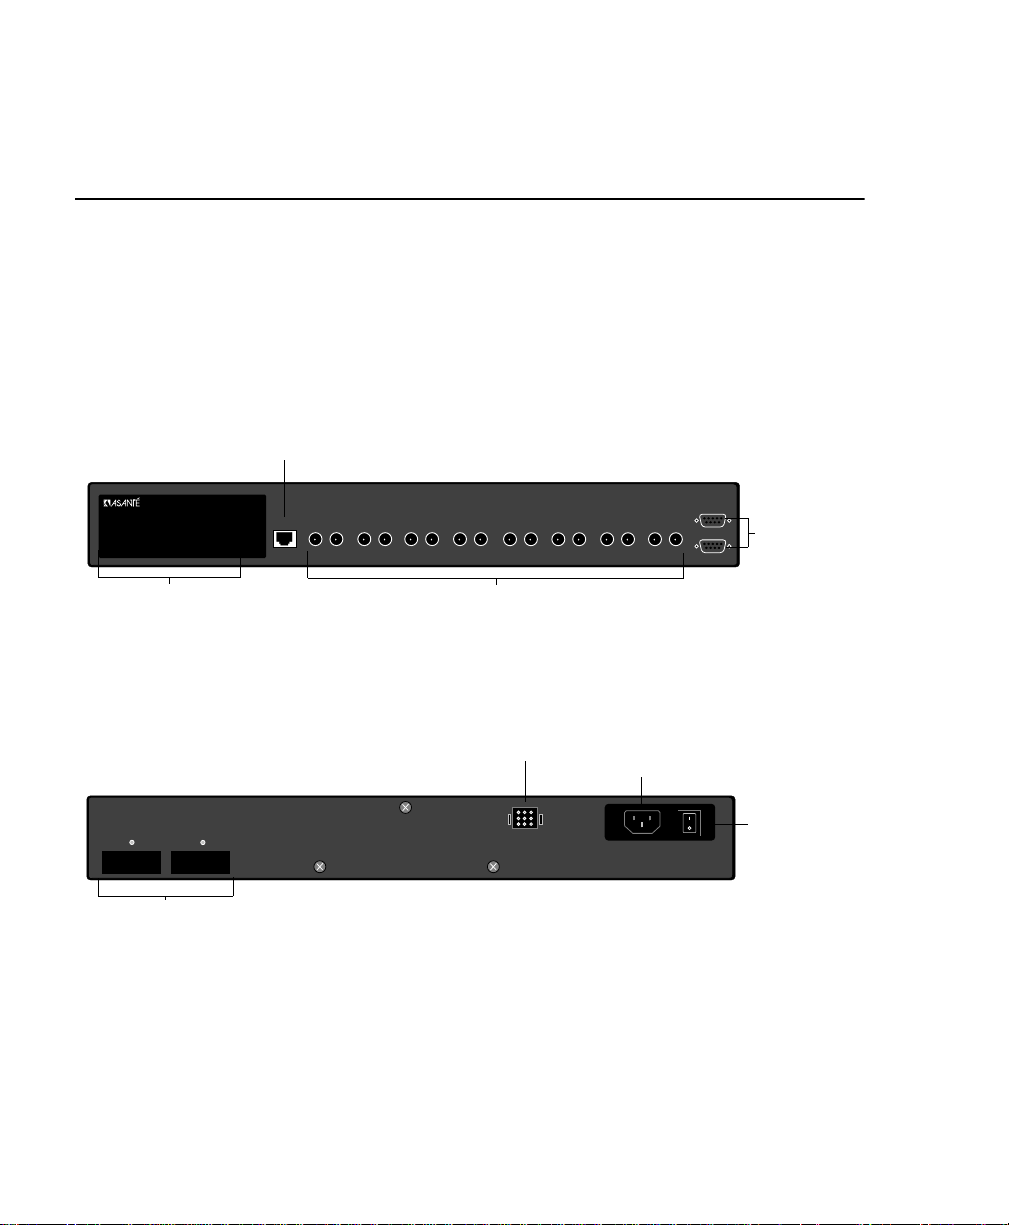
IntraSwitch 5308FL
The Asanté IntraSwitch 5308FL is a high-performance,
manageable Ethernet switch that offers eight 10Base-FL ports,
one 10/100TX port, and two optional Media Independent
Interface (MII) expansion slots.
The MII expansion slots allow for the addition of 10/100TX,
100Base-FX, or 10Base-FL connections. See page 2-6 for more
information.
1 Fixed 10/100TX Port
100 Mbps
Max Util
FDP / COL
Data
Link
10/100 1 2 3 4 5 6 7 8 MII 1 MII 2
IntraSwitch 5308FL
10/100
Comprehensive LEDs
MII 1 (Port 26) MII 2 (Port 27)
Media Independent Interface (MII)
Expansion Slots
1 2 3 4 5 6 7 8
8 Fixed 10Base-FL Ports with ST connectors
Figure 1-1 IntraSwitch 5308FL front panel
Redundant Power Supply
Connector
Redundant Power Supply
Power Connector
Figure 1-2 IntraSwitch 5308FL back panel
RS-232
Console
Management
Connections
Power
Switch
Page 1-2
Page 19

IntraSwitch 5308FL Components
IntraSwitch
5308FL
Components
10/100TX Port
The single auto-negotiating 10/100TX port allows for the
connection of a 10Base-T or 100Base-T (Fast Ethernet) device.
See “10/100TX Port” on page 2-9 for more information.
10Base-FL Ports
The eight 10Base-FL ports with
connection of 10Base-FL Ethernet devices. See “10Base-FL
Ports” on page 2-9 for more information.
ST
connectors allow for the
Management Connections
The
Console
the IntraSwitch 5308FL. See “Out-of-Band Management” on
page 4-4 for information.
port can be used for out-of-band management of
MII Expansion Slots
The two Media Independent Interface (MII) expansion slots
allow for the addition of various Asanté access modules,
including: 10/100TX, 100Base-FX, 10Base-FL, or BNC. See “MII
Ports” on page 2-6 for more information.
Redundant Power Supply Connector
The redundant power supply connector can be used to connect
to an Asanté external RPSU 6000 redundant power supply (sold
separately).
The RPSU 6000 provides the IntraSwitch 5308FL with power in
the event that the units’s main power connection fails.
For more information on the RPSU 6000, see the RPSU’s
Installation Guide. For part number information, see Appendix
C in this manual.
Power Switch
The power switch turns the IntraSwitch 5308FL on or off. See
“Connecting Power” on page 2-8 for instructions on powering
on the IntraSwitch 5308FL.
Page 1-3
Page 20

Introduction
Power Supply Connector
The 5-volt power supply connector provides the IntraSwitch
5308FL’s power connection. See Appendix C, “Technical
Specifications” for more information.
Page 1-4
Page 21

Configuration/ Management
Configuration/
Management
The IntraSwitch 5308FL can be managed through standard outof-band sessions through the unit’s Console port, via in-band
Telnet sessions, via any supported World Wide Web browser, or
via any SNMP-based management software program (such as
IntraSpection™ Web-based network management).
Console/Telnet Management
The SNMP (Simple Network Management Protocol) is used to
manage the IntraSwitch 5308FL. The SNMP agent supports
database objects that are defined in the following Management
Information Bases (MIBs):
MIB II (RFC 1213)
❏
❏ Bridge MIB (RFC 1493)
❏ RMON, 4 groups (RFC 1757)
The SNMP agent can be accessed via an out-of-band Console
connection or through in-band Telnet sessions. See Chapter 4,
“Setting Up For Management,” for information on connecting
via one of these two methods.
See Appendix B, “Supported MIBs” for more information on the
MIBs supported by the IntraSwitch.
Web Browser Management
The IntraSwitch 5308FL has an HTTP server which allows it to
be management via any supported World Wide Web browser.
See the “Manual Addendum: Web Browser Management”
included in this package for information on accessing and
managing the IntraSwitch 5308FL with a Web browser.
SNMP-Based Management
Any SNMP-based network management application, such as
IntraSpection™ Web-based network management software, can
be used to manage the IntraSwitch 5308FL. See “In-Band
Management” on page 4-7 for more information.
Page 1-5
Page 22

Introduction
Switching
Capacity
Each 10Base-FL port forwards Ethernet minimum-sized 64-byte
packets at the maximum attainable rate of 14,880 packets per
second (pps).
The 10/100 port can forward 64-byte packets at 148,000pps.
The IntraSwitch 5308FL fully supports the 802.1d transparent
Ethernet bridging standard. IEEE 802.1d compliance provides
automatic address learning, packet filtering, and the Spanning
Tree Protocol.
Page 1-6
Page 23

Features The IntraSwitch 5308FL has the following features:
❏ Eight 10Base-FL switched ports with ST connectors
❏ One fixed 10/100TX port with an RJ-45 connector
(supports NWay™ auto-negotiation)
❏ Two optional MII expansion slots for adding 10/
100TX, 100Base-FX, 10Base-FL, or BNC ports
❏ HTTP server (provides SNMP management via any
supported W orld Wide W eb browser)
❏ Telnet (in-band) and Console (out-of-band) manage-
ment
❏ 1024 MAC addresses
❏ Auto-negotiation on 10/100 port and 10/100 MII
expansion ports
❏ Full duplex support on all ports
❏ BootP support
❏ TFTP support for software upgrades
Features
❏ RMON support (4 groups)
❏ MIB II, Bridge MIB support
❏ IEEE 802.1d Spanning Tree support
❏ Store-and-forward switching mode
❏ Advanced diagnostic LEDs
Page 1-7
Page 24

Introduction
Package
Contents
The IntraSwitch 5308FL is shipped with the following items:
❏ (1) IntraSwitch 5308FL Ethernet switch
❏ (2) rack-mounting brackets
❏ (12) standard Phillips screws for attaching the brack-
ets to the IntraSwitch 5308FL and mounting it to an
equipment rack
❏ (1) power cord
❏ (1) User’s Manual (this book)
❏ (1) Quick Installation Guide
❏ (1) Manual Addendum: Web Browser Management
❏ (1) registration card
▲ Important! If you are missing any of the
above items, contact the dealer from whom you
purchased your IntraSwitch 5308FL.
Page 1-8
Page 25

Tools and Materials
Tools and
Materials
Some tools and materials that are not supplied with the
IntraSwitch 5308FL are needed to connect the unit to an
Ethernet network.
Table 1-1 lists the tools and materials required for connecting
devices to the IntraSwitch 5308FL’s ports, for installing an MII
module, and for rack-mounting the unit.
∆ Note: For specific instructions on connecting
network devices, see “Connecting to the Network”
on page 2-9.
Table 1-1 Tools and Materials Required
Action Tool/Material Required
Connecting 10Base-
FL ports
Connecting 10/
100TX port
Connecting 100BaseFX optional MII
expansion module
Dual 62.5/125 micron graded-index
multimode fiber optic cable fitted with an ST
connector.
Standard Category 5 UTP straight-through or
cross-over cable with RJ-45 connectors.
Dual 62.5/125 micron graded-index
multimode fiber optic cable fitted with an SC
connector.
Connecting 10/
100TX optional MII
expansion module
Connecting 10BaseFL port optional MII
expansion module
with SC or ST
connectors
Connecting to the
Console port
Standard Category 5 UTP straight-through or
cross-over cable with RJ-45 connectors.
Dual 62.5/125 micron graded-index
multimode fiber optic cable fitted with an SC
connector.
Dual 62.5/125 micron graded-index
multimode fiber optic cable fitted with a dual
ST connector.
Straight-through RS-232 cable with 9-pin
male D-subminiature connector.
Page 1-9
Page 26

Introduction
Action Tool/Material Required
Removing MII
expansion module’s
cover
Rack-mounting the
IntraSwitch 5308FL
Small Phillips screwdriver.
Phillips screwdriver (#2) for mounting the
two rack brackets on the unit.
Page 1-10
Page 27

Factory Defaults
Factory
Defaults
The IntraSwitch 5308FL is shipped with the following factory
default settings:
Table 1-2 Factory Default Configurations
Configuration Default Setting
IP address 0.0.0.0
▲ Important! The first IP address that is
assigned to the IntraSwitch 5308FL becomes
the new factory default setting.
Subnet Mask 0.0.0.0
▲ Important! The first subnet mask that is
assigned to the IntraSwitch 5308FL becomes
the new factory default setting.
Default Gateway 0.0.0.0
▲ Important! The first default gateway
address that is assigned to the IntraSwitch
5308FL becomes the new factory default
setting.
Switching Mode Store-and-forward
10Base-FL Ports Half Duplex
10/100TX Port Auto-Negotiation enabled; auto-negotiates to
10 or 100Mbps half duplex
MII Expansion Ports 100Base-FX module: half duplex
10/100TX module: auto-negotiates to 10 or
100Mbps half duplex
10Base-FL module: half duplex
Spanning Tree Enabled on ALL ports
Page 1-11
Page 28

Introduction
Resets and Factory Default Settings
When the IntraSwitch 5308FL is reset (its power is turned off
and then on), all settings are returned to the factory defaults
listed in Table 1-2 except for the IP Address, Subnet Mask, and
Default Gateway; these items revert to the first addresses
assigned to them.
Page 1-12
Page 29

2
Installation
This chapter explains how to install the IntraSwitch 5308FL in
an equipment rack, power it on, and connect it to your
network.
It also explains how to configure the IntraSwitch 5308FL for
management capabilities and install an MII expansion module.
This chapter contains the following sections:
❏ Installation Guidelines — page 2-2
❏ Installation Overview — page 2-3
❏ Rack Mounting/Desktop Placement —
page 2-4
❏ Installing MII Modules — page 2-6
❏ Connecting Power — page 2-8
❏ Connecting to the Network — page 2-9
❏ Setting up for Management — page 2-12
Page 30

Installation
Installing the IntraSwitch
Installation
Guidelines
Before installing the IntraSwitch 5308FL, carefully review the
following guidelines.
Power Requirements
The source electrical outlet should be installed near the
IntraSwitch 5308FL, be easily accessible, and be properly
grounded.
Make sure the power source adheres to the following
guidelines:
❏ Voltage range: 100 to 240 VAC
❏ Frequency range: 60/50 Hz
❏ Maximum current: 1.6 A
Environmental Requirements
The IntraSwitch 5308FL must be installed in a clean, dry, dustfree area with adequate air circulation to maintain the following
environmental limits:
❏ Temperature: 0° to 45° C
❏ Relative Humidity: 5% to 85% non-condensing
Avoid direct sunlight, heat sources, or areas with high levels of
electro-magnetic interference.
Page 2-2
Cooling and Airflow
The IntraSwitch 5308FL has two internal fans that cool the
interior by drawing air through vents on the sides and forcing
heated air out through holes in the rear.
▲ Important! Do not restrict air flow by cov ering
or obstructing air vents on the sides of the case.
Page 31

Installation Overview
Installation
Overview
Table 2-1 describes the steps needed to install the IntraSwitch
5308FL.
The steps that are optional are labeled “optional”; the steps that
are required are labeled “required.” The sections that follow
explain each step in detail.
To install the IntraSwitch 5308FL:
Table 2-1 Installation Overview
Step Action
1 (required) Open the box and check the contents.
See “Package Contents” on page 1-8 for a
complete list of the items included with your
IntraSwitch 5308FL.
2 (required)
3 (optional)
Install the IntraSwitch 5308FL in an equipment
rack or prepare it for desktop placement.
See “Rack Mounting/Desktop Placement” on
page 2-4.
Install MII module(s), if any.
See “Installing MII Modules” on page 2-6.
4 (required)
5 (required)
6 (optional)
Check the power connection.
See “Connecting Power” on page 2-8.
Connect the IntraSwitch 5308FL to the network.
See “Connecting to the Network” on page 2-9.
Configure the IntraSwitch 5308FL for
management capabilities.
See “Setting up for Management” on page 2-12.
Page 2-3
Page 32

Installation
Rack Mounting/
Desktop
Placement
Equipment Rack
Installation
IntraSwitch 5308FL
100 Mbps
Max Util
FDP / COL
Data
Link
10/100 1 2 3 4 5 6 7 8 MII 1 MII 2
10/100
1 2 3 4 5 6 7 8
The IntraSwitch 5308FL can be installed in a standard 19-inch
equipment racks. It can also be placed on a horizontal surface
with support capabilities of 11 pounds (5 kilograms).
To install the IntraSwitch 5308FL in an equipment rack:
▲ Important! Disconnect all cables from the
IntraSwitch 5308FL before continuing.
Place the IntraSwitch 5308FL on a stable, flat surface.
1
Locate a rack-mounting bracket (supplied) and
2
place it over the mounting holes on one side of
the unit, as shown in Figure 2-1.
RS-232
Console
Figure 2-1 Mounting rack bracket on the IntraSwitch 5308FL
Page 2-4
Insert four screws (supplied) into the holes and
3
tighten with a Phillips screwdriver.
Repeat the two previous steps for the unit’s
4
other side.
Place the IntraSwitch 5308FL in the equipment rack.
5
▲ Important! Make sure the IntraSwitch 5308FL
is supported until all four mounting screws for
each bracket are secured to the equipment rac k.
Page 33

Rack Mounting/Desktop Placement
Secure the rack brackets to the equipment rack
6
with mounting screws.
The IntraSwitch 5308FL is installed in an equipment
rack. Proceed to “Connecting Power” on page 2-8.
Free-Standing
Installation
The IntraSwitch 5308FL has four rubber feet applied to the
bottom of its chassis that enable desktop/free-standing
installation of the unit.
For desktop/free-standing installation:
❏ Place the IntraSwitch 5308FL on a horizontal
surface with a minimum area of 17.1” x 14.5”
and support capabilities of 11 pounds.
Proceed to “Connecting Power” on page 2-8.
Page 2-5
Page 34

Installation
Installing
MII Modules
The IntraSwitch 5308FL has two Media Independent Interface
(MII) expansion slots which allow for the addition of various
types of media access modules, including:
❏ 10/100Base-TX
❏ 100Base-FX
❏ 10Base-FL (ST connector)
The MII modules are sold separately and comply with IEEE
802.3 and 802.3u (10/100Base-T and 100Base-FX) specifications.
To install an MII module:
▲ Important! The MII modules are not hot-swap-
pable; you should not install and/or remove a module without turning the IntraSwitch 5308FL’s
power off.
Turn off the IntraSwitch 5308FL’s power.
1
Unscrew the metal cover from the front of an
2
MII expansion slot (located on the IntraSwitch
5308FL’s back panel) using a small Phillips
screwdriver. See Figure 2-2.
MII 1
MII 2
IntraSwitch 5308FL Back Panel
MII 1 (Port 26)
MII 2 (Port 27)
Page 2-6
Metal Covers
Figure 2-2 MII expansion slots
Align the bottom of an MII expansion module
3
with the rails on the inside of the expansion
slot.
Page 35

Installing MII Modules
Slide the MII module into the expansion slot
4
until it stops, then push the module in until it
seats with the connector. See Figure 2-3.
MII 1 (Port 26)
Figure 2-3 Installing an MII expansion module
Screw the module into place by tightening the
5
thumbscrew on the module’s cover.
MII 1 (Port 26)
Figure 2-4 Securing an MII expansion module
MII 2 (Port 27)
MII 2 (Port 27)
Connect the installed MII expansion module to
6
your network, following the cable guidelines
outlined in “MII Ports” on page 2-10.
For more information on MII expansion modules, refer to the “MII Expansion Modules Installation Guide” included with your module.
Page 2-7
Page 36

Installation
Connecting
Power
To connect power to the IntraSwitch 5308FL:
Plug one end of the supplied power cord into
1
the power connector on the back of the unit.
MII 1 (Port 26) MII 2 (Port 27)
Redundant Power Supply
Power Cord
Power Switch
Figure 2-5 Connecting the power cord to the IntraSwitch 5308FL
Plug the other end of the power cord into a
2
grounded AC outlet.
∆ Note: For more information about power
and environmental requirements, see A ppendix C,
“Technical Specifications.”
Turn theIntraSwitch 5308FL’s power switch to
3
the “on” position.
Make sure the IntraSwitch 5308FL’s front panel
LEDs blink and the POWER LED lights and
remains on.
Page 2-8
▲ Important! If the power does not come
on, refer to Appendix A, “Troubleshooting.”
Turn the IntraSwitch 5308FL’s power off.
4
The IntraSwitch 5308FL is ready be connected
to the network. Proceed to “Connecting to the
Network” on page 2-9.
Page 37

Connecting to the Network
Connecting to
the Network
To connect the IntraSwitch 5308FL to an Ethernet network:
Make sure the IntraSwitch 5308FL’s power is
1
off.
Connect network devices to the IntraSwitch
2
5308FL, following the cable guidelines outlined
in the tables below.
Power on the IntraSwitch 5308FL.
3
After the IntraSwitch 5308FL is connected to
the network and is powered on, it can be configured for management capabilities (see “Setting
up for Management” on page 2-12).
10Base-FL Ports Table 2-2 10Base-FL Cable Guidelines
Connecting To Cable Required
All Network
Devices
Dual 62.5/1265 micron graded-index multimode
fiber-optic cable with a dual ST connector.
10/100TX Port Table 2-3 10/100TX Port Cable Guidelines
Connecting To Cable Required
Network Station Category 5 UTP straight-through cable (100
meters maximum) with RJ-45 connectors.
Repeater/Hub Category 5, UTP cross-over cable (100 meters
maximum) with RJ-45 connectors.
Repeater/Hub’s
Uplink port
Category 5, UTP straight-through cable (100
meters maximum) with RJ-45 connectors.
Page 2-9
Page 38

Installation
MII Ports The MII expansion slots allow for the connection of 10/100TX,
100Base-FX, or 10Base-FL ports.
10/100TX Module Table 2-4 10/100TX MII Module Cable Guidelines
Connecting To Cable Required
Network Station Category 5 UTP cross-over cable (100 meters
maximum) with RJ-45 connectors.
Repeater/Hub Category 5, UTP straight-through cable (100
meters maximum) with RJ-45 connectors.
Repeater/Hub’s
Uplink port
Category 5, UTP cross-over cable (100 meters
maximum) with RJ-45 connectors.
100Base-FX Module Table 2-5 100Base-FX MII Module Cable Guidelines
Connecting To Cable Required
All network
devices
Dual 62.5/125 micron graded-index multimode
fiber-optic cable with an SC connector.
10Base-FL Module Table 2-6 10Base-FL MII Module Cable Guidelines
Connecting To Cable Required
ST Connector
All network
devices
Dual 62.5/125 micron graded-index multimode
fiber-optic cable with a dual ST connector.
Page 2-10
Page 39

Connecting to the Network
Cabling Scenarios
Diagram
100 Mbps
Max Util
FDP / COL
Data
Link
10/100 1 2 3 4 5 6 7 8 MII 1 MII 2
IntraSwitch 5308FL
straight-through cable
(100m max. length)
100Base-TX
Server
The following diagram illustrates some of the various cabling
scenarios available with the IntraSwitch 5308FL.
10/100 port: requires
Category 5 cable
10Base-FL ports: require dual 62.5/125 micron graded-index
multimode fiber-optic cables with dual ST connectors
10/100
1 2 3 4 5 6 7 8
Category 5
ST connector
(100m max. length)
Printer
ST connector
(100m max. length)
10Base-T
Workstation
Figure 2-6 IntraSwitch 5308FL cabling scenarios
RS-232
Console
ST connector
(100m max. length)
234
1
Partition
Col
91011
4
3
15678
2
12
Pwr
Link/Receive
Hub
678
5
100BASE-TX Ports
Remove Before Stacking
9
AsantéFAST 100 TX Hub
or
101112
Uplink
Page 2-11
Page 40

Installation
Setting up for
Management
BootP
Configuration
To use the IntraSwitch 5308FL as a managed switch, it must be
configured with an IP address. This can be accomplished in
one of two ways:
❏ automatically using BootP (default)
❏ manually via the Console port
The IntraSwitch 5308FL is shipped with BootP/TFTP support.
BootP allows the IntraSwitch 5308FL to be automatically
configured with an IP address when it is connected to the
network and is powered on, if your network contains a BootP
server configured with available, valid IP addresses.
▲ Important! BootP configuration only works if
the IntraSwitch 5308FL does not have an IP
address already assigned to it.
Make sure your network has a BootP server con-
1
figured with a valid IP address entry for the
IntraSwitch 5308FL.
When the IntraSwitch 5308FL is connected to
2
the network and is powered on, it automatically
transmits a BootP request across the network
(up to 5 times) until it receives a valid IP address
from the BootP server.
Page 2-12
After an IP address is received, the IntraSwitch
3
5308FL can be managed via in-band access.
See Chapter 4 for information on connecting to
the IntraSwitch 5308FL for management.
To verify that the IntraSwitch 5308FL received
an IP address, use a tool such as Ping1 to try and
access the IntraSwitch 5308FL; if you can access
the IntraSwitch 5308FL, it is properly configured with an IP address.
1. Ping (an acronym for packet internet groper) is an application that can be used to
test whether a remote device is properly connected to a network.
Page 41

Setting up for Management
Console
Configuration
IntraSwitch 5308FL
100 Mbps
Max Util
FDP / COL
Data
Link
10/100 1 2 3 4 5 6 7 8 MII 1 MII 2
To manually configure the IntraSwitch 5308FL with an IP
address via the unit’s Console port, use a VT100 terminal or a
VT100 terminal emulator running on a workstation or personal
computer (PC) to connect to the IntraSwitch 5308FL’s Local
Management Interface.
Using a straight-through RS-232 cable with a 9-pin
1
male D-subminiature plug at one end, connect a
terminal or workstation (PC) running a terminal
emulator to the Console port on the front of the
IntraSwitch 5308FL.
▲ Important! If you are using a Macintosh, you
need a special cable to connect to the
IntraSwitch 5308FL’s Console port. Contact
Asanté Technical Support (see Appendix E) for
assistance.
IntraSwitch 5308FL
10/100
1 2 3 4 5 6 7 8
Straight-Through
RS-232 Cable
RS-232
Console
Stand-Alone Terminal
or PC Running Terminal
Emulation Software
Console Port
(female; requires a male connector)
Figure 2-7 Connecting to the Console port
Make sure both units’ power is turned on.
2
If using a PC with a terminal emulator, make
sure it is configured with the following terminal
settings:
❏ Bits Per Second: 9600
❏ Data Bits: 8
❏ Parity: None
❏ Stop Bits: 1
❏ Flow Control: None
Page 2-13
Page 42

Installation
Once connected, the IntraSwitch 5308FL’s Local
3
Management Interface Main Menu appears on
the terminal screen, as shown in Figure 2-8.
Figure 2-8 Local Management Interface Main Menu
Type c to open the Configuration Menu.
4
The “Enter Password” prompt appears.
Type your password at the prompt.
5
▲ Important! The default password is
Asante. The password is case-sensitive.
For information on changing the password,
see “Set Console Password” on page 5-36.
Page 2-14
Type i to open the Config TCP/IP Parameters
6
Menu.
Type i to select the option “Set IP Address.”
7
Type the IP address to be assigned to the
8
IntraSwitch 5308FL at the prompt.
This address becomes the new factory default
setting.
▲ Important! Depending on your network
configuration, you may also need to set subnet mask and default router (gateway) information. See “Configure TCP/IP Parameters”
on page 5-12 for instructions.
Page 43

Setting up for Management
Press return.
9
Type q to return to the Configuration Menu.
10
The IntraSwitch 5308FL is configured with an IP
address and can now be managed via in-band
access. See Chapter 4 for information on management options.
Page 2-15
Page 44

Page 45

3
LED Indicators
This chapter describes the IntraSwitch 5308FL’s front panel
layout and explains how to interpret its LEDs.
This chapter contains the following sections:
❏ LED Indicators — page 3-2
❏ Port LEDs — page 3-3
❏ Power LED — page 3-4
❏ Diagnostic LEDs — page 3-4
Page 46

LED Indicators
LED Indicators
The IntraSwitch 5308FL has five rows of LEDs on its front panel
that convey the status of each 10Base-FL port as well as the
status of the 10/100TX port and MII expansion ports (if
installed). See Figure 3-1.
The five rows of port LEDs display:
❏ 100 Mbps operation
❏ Max Util (maximum utilization)
❏ FDP/COL (full duplex or collision)
❏ Data
❏ Link
Diagnostic LEDs (not labeled on the unit)
IntraSwitch 5308FL
Max Util
FDP / COL
Data
Link
10/100 1 2 3 4 5 6 7 8 MII 1 MII 2
Pwr100 Mbps
Power
LED
10/100
Uplink
Page 3-2
Port LEDs
Figure 3-1 IntraSwitch 5308FL LED panel
The IntraSwitch 5308FL also has four diagnostic LEDs. These
LEDs are not labeled on the unit’s front panel. They light when
the IntraSwitch 5308FL is first powered on or is reset.
▲ Important! The diagnostic LEDs are not
labeled on the IntraSwitch 5308FL’ s front panel.
See “Diagnostic LEDs” on page 3-4 for more information.
Page 47

Port LEDs
When the IntraSwitch 5308FL is first powered on, the port and
diagnostic LEDs blink. The green power light illuminates and
remains on, indicating electrical power to the unit.
Port LEDs The IntraSwitch 5308FL has five rows of LEDs. The following
table states their color and meaning:
Table 3-1 Port LEDs
LED Color Meaning
100Mbps
Max Util
FDP/Col
Data
Link
green
amber
amber
green
green
10/100TX port or an installed MII expansion port is
operating at 100Mbps speed.
Note:
These LEDs only function with ports capable of
operating at 100Mbps speed (i.e., the 10/100TX port or
an installed 10/100 MII module).
The corresponding port’s receive buffer is full
(maximum utilization).
Note:
It is normal to see these LEDs light when the
network is in a state of moderate-to-heavy activity.
Indicates full duplex mode on the corresponding port.
Indicates a collision at the switching port for those
ports operating in half duplex mode.
Note:
Full duplex means that a port can transmit and
receive at the same time.
Note:
Collision is indicated only on those ports
operating in half duplex mode.
Traffic activity is occurring on the port (transmit [TX]
or receive [RX]).
Note:
During heavy traffic periods, this LED may be lit
continuously.
A node or other network device is properly connected
to the corresponding port and is powered on.
Page 3-3
Page 48

LED Indicators
Power LED The green POWER light comes on and stays on when the
IntraSwitch 5308FL is receiving electrical power.
Diagnostic LEDs The IntraSwitch 5308FL’s four diagnostic LEDs (one orange,
three green) blink once when the IntraSwitch 5308FL is first
powered on or is reset.
▲ Important! If the diagnostic LEDs illuminate
for any length of time other than during a power
cycle, contact Asanté Technical support (see
Appendix A, “Technical Support”).
Page 3-4
Page 49

4
Setting Up For
Management
This chapter describes the different management options
available with the IntraSwitch 5308FL. It also explains how to
connect to the IntraSwitch 5308FL via those options.
This chapter contains the following sections:
❏ Overview — page 4-2
❏ Management Scenarios — page 4-3
❏ Out-of-Band Management — page 4-4
❏ In-Band Management — page 4-6
Page 50

Setting Up For Management
IntraSwitch 5308FL Management
Overview The IntraSwitch 5308FL can be managed using any of the fol-
lowing methods:
Table 4-1 Management Options
Method Type Description
Console out-of-band
management
Telnet
(one session)
World Wide
Web browser
SNMP-based
Network
Management
Software
in-band
management
in-band
management
in-band
management
local connection to the IntraSwitch
5308FL via the unit’s Console port
remote connection over the
network to the IntraSwitch 5308FL
via a terminal emulation program
remote connection to the
IntraSwitch 5308FL via a World
Wide Web browser
remote connection to the
IntraSwitch 5308FL via any SNMPbased network management
application such as IntraSpection
This chapter describes how to connect to the IntraSwitch
5308FL using either out-of-band or in-band management, as
illustrated in Figure 4-1.
For information on using each management method, refer to
the following:
❏ Console or Telnet management — see Chapter
5, “Console Management. ”
❏ W orld Wide W eb browser — see the “Manual
Addendum: Web Browser Management”
included in your package.
❏ SNMP-based Network Management Software —
see “SNMP-based Management Software” on
page 4-7.
Page 4-2
Page 51

Overview
h
Management
Scenarios
In-Band Management:
• Telnet to the IntraSwitch 5308FL
• Access the IntraSwitch 5308FL using
a supported World Wide Web browser
• Access the IntraSwitch 5308 FL using
any SNMP-based management software
application such as IntraSpection
The following diagram illustrates the management options
available with the IntraSwitch 5308FL.
IntraSwitch 5308FL
IntraSwitch 5308FL
100 Mbps
Max Util
FDP / COL
Data
Link
10/100 1 2 3 4 5 6 7 8 MII 1 MII 2
10/100
1 2 3 4 5 6 7 8
Workstation
Figure 4-1 IntraSwitch 5308FL management options
RS-232
Console
Stand-alone Terminal or PC
Out-of-Band Management:
• Direct connection to the IntraSwitc
5308FL's Console port
Page 4-3
Page 52

Setting Up For Management
Out-of-Band
Management
Out-of-band network management allows you to configure,
manage, and monitor the IntraSwitch 5308FL and each of its
ports. You can perform these functions via the following
method:
❏ By attaching a terminal (or a terminal emulator)
to the IntraSwitch 5308FL’s Console port and
using the menu-driven Local Management
Interface.
Out-of-band network management is guaranteed ev en when the
in-band Ethernet network is down.
T o access the IntraSwitch 5308FL’s Local Management Interface
using out-of-band management:
Connect a stand-alone terminal or a PC running a
1
terminal emulator directly to the IntraSwitch
5308FL’s Console port using a straight-through
RS-232 serial cable with a male connector.
▲ Important! If you are using a Macintosh, you
need a special cable to connect to the
IntraSwitch 5308FL’s Console port. Contact
Asanté Technical Support (Appendix E) for assistance.
Page 4-4
IntraSwitch 5308FL
100 Mbps
Max Util
FDP / COL
Data
Link
10/100 1 2 3 4 5 6 7 8 MII 1 MII 2
IntraSwitch 5308FL
10/100
1 2 3 4 5 6 7 8
Console Port
(female; requires a male connector)
RS-232
Console
Straight-Through
RS-232 Cable
Figure 4-2 Connecting to the Console port
Make sure both units’ power is turned on.
2
If using a PC with a terminal emulator, make
sure it is configured with the following terminal
settings:
Stand-Alone Terminal
or PC Running Terminal
Emulation Software
Page 53

Out-of-Band Management
❏ Bits Per Second: 9600
❏ Data Bits: 8
❏ Parity: None
❏ Stop Bits: 1
❏ Flow Control: None
Once connected, the Local Management Inter-
3
face Main Menu appears on the screen.
Figure 4-3 Local Management Interface Main Menu
See Chapter 5, “Console Management,” for information on using the Local Management Interface to manage the IntraSwitch 5308FL.
▲ Important: A password is needed to
access the Configuration Menu. The
default password is Asante. The password
is case-sensitive.
Page 4-5
Page 54

Setting Up For Management
In-Band
Management
In-band network management allows you to manage, control,
and monitor the IntraSwitch 5308FL and each of its ports over
the Ethernet network.
You can perform these functions by accessing the IntraSwitch
5308FL via one of the following methods:
❏ By connecting with a terminal emulation pro-
gram such as Telnet1 and using the Local Management Interface.
❏ By connecting with a supported World Wide
Web browser and using the Web Management
Interface.
❏ By connecting with any SNMP-based network
management application and using its interface.
To manage the IntraSwitch 5308FL via in-band management:
Make sure the network to which the IntraSwitc h
1
5308FL is connected is up and functioning.
Make sure the IntraSwitch 5308FL is powered
2
on and is configured with valid IP information.
See “Setting up for Management” on page 2-12
for instructions.
Page 4-6
Connect to the IntraSwitch 5308FL with a termi-
3
nal emulator, a supported World Wide Web
browser, or any SNMP-based network management application.
Terminal Emulator
See Chapter 5, “Console Management,” for information on managing the IntraSwitch 5308FL
with a terminal emulator.
1. Telnet is a common terminal emulation application used in TCP/IP networks for remote terminal access to network devices.
Page 55

In-Band Management
∆ Note: All management screens using a termi-
nal emulator are identical to those of the out-ofband Console interface.
World Wide Web Browser
See the “Manual Addendum: Web Browser Management” included in your package for information on managing the IntraSwitch 5308FL with a
Web browser.
SNMP-based Management Software
Refer to the software’s User’s Manual for information on managing the IntraSwitch 5308FL with
SNMP-based management software.
Page 4-7
Page 56

Page 57

5
Console
Management
This chapter describes how to manage the IntraSwitch 5308FL
using the out-of-band Console or in-band Telnet interface.
This chapter contains the following sections:
❏ Overview — page 5-2
❏ Configuration and Management Tasks —
page 5-3
❏ Local Management Interface — page 5-5
❏ General Information Menu — page 5-6
❏ Configuration Menu — page 5-7
❏ Statistics Menu — page 5-39
Page 58

Console Management
Console Management
Overview The IntraSwitch 5308FL’s Local Management Interface is a
menu-driven application that provides for management and
configuration of the IntraSwitch 5308FL and each of its ports.
The Local Management Interface can be accessed via two methods:
❏ Out-of-band connection to the Console port
❏ In-band connection via a terminal emulator such
as T elnet (one session)
∆ Note: See Chapter 4, “Setting Up For Man-
agement” for instructions on how to connect
to the Local Management Interface using one
of the two methods listed above.
This chapter describes each menu item within the Local
Management Interface as well as how to perform the
configuration and management tasks outlined in Tables 5-1 and
5-2.
Page 5-2
Page 59

Configuration and Management Tasks
Configuration
and
Management
Tasks
Table 5-1 Configuration Tasks
Configuration Task Page #
Logging into the Configuration Menu
Changing System Administration Information
Changing TCP/IP Information
Setting Community Strings
Table 5-2 Management Tasks
Management Task Page #
Performing a Software Upgrade
Enabling Authentication Traps
Adding a Trap Receiver
Deleting a Trap Receiver
Enabling or Disabling a Port
Configuring Full Duplex
page 5-7
page 5-11
page 5-13
page 5-20
page 5-17
page 5-20
page 5-21
page 5-21
page 5-24
page 5-24
Configuring Auto-Negotiation
Displaying the MAC Forwarding Table
Finding an Entry in the MAC Forwarding Table
Setting the Age-Out Timer
Enabling/Disabling Spanning Tree on ALL Ports
Enabling/Disabling Spanning Tree on a Single Port
Set Web Server Management
page 5-25
page 5-28
page 5-29
page 5-29
page 5-32
page 5-32
page 5-34
Page 5-3
Page 60

Console Management
Management Task Page #
Setting the Telnet Idle Time-Out Period
Changing the Console Password
Resetting the EEPROM
Resetting the IntraSwitch 5308FL
page 5-35
page 5-36
page 5-37
page 5-38
Page 5-4
Page 61

Local Management Interface
Local
Management
Interface
After you connect to the IntraSwitch 5308FL’s Local
Management Interface, the Main Menu appears, as shown in
Figure 5-1.
Main Menu
Figure 5-1 Local Management Interface Main Menu
From the Main Menu, you can access three submenus:
❏ General Information — page 5-6
❏ Configuration — page 5-7
❏ Statistics — page 5-38
If you are using Telnet, a fourth option will be available — Close
Connection. This option closes your remote connection to the
IntraSwitch 5308FL’s Local Management Interface.
Accessing a
Submenu
Exiting a
Submenu
To access a submenu, type the command letter of the
corresponding option (e.g., type g for General Information).
To exit a submenu, type q. To exit a command line (e.g., Set
Console Password in the Configuration Menu), press ctrl-c.
∆ Note: For a one-page map of the Main Menu
and its submenus, refer to Appendix D, “Console Management Menu.”
Page 5-5
Page 62

Console Management
General
Information
Menu
The General Information Menu displays the IntraSwitch
5308FL’s current operating information. This includes items
such as the IntraSwitch 5308FL’s software version, name, IP
address, and boot information.
∆ Note: The information displayed on this
screen is read-only.
Accessing the General Information Menu
❏ Type g from the Main Menu. A screen similar to
Figure 5-2 appears.
Figure 5-2 General Information Menu
Page 5-6
∆ Note: For a description of each parameter on
the General Information Menu, see “General
Information Menu Parameters” on page 6-3.
To exit the General Information Menu, press the space bar on
your keyboard.
Page 63

Logging into the Configuration Menu
Configuration
Menu
The Configuration Menu allows you to configure settings for
the IntraSwitch 5308FL. These settings include system
administration information, TCP/IP parameters, RMON
parameters, port parameters, and bootstrap parameters.
Logging into the Configuration Menu
From the Local Management Interface Main
1
Menu, type c.
Type your password at the “Enter Password”
2
prompt.
▲ Important! The default password is
Asante. The password is case-sensitive.
For information on changing passwords,
see “Set Console Password” on page 5-36.
The following Configuration Menu appears:
Figure 5-3 Configuration Menu
From this menu you can access configuration sub-
3
menus by typing the command letter of the corresponding menu option (e.g., type a for the Configure
System Administration Information Menu).
Table 5-4 provides a brief overview of each menu
item.
Page 5-7
Page 64

Console Management
Table 5-4 Configuration Menu Items
Menu Item Description
Config System
Administration
Information
Config TCP/IP
Parameters
Config Bootstrap
Parameters
Config SNMP
Parameters
Config Port Parameters
Config RMON
Parameters
Displays and allows you to change the
name, location, and contact information
for the IntraSwitch 5308FL.
See “Configure System Administration
Information” on page 5-10.
Displays and allows you to change the
information needed to access the
IntraSwitch 5308FL over the network (via
in-band management).
See “Configure TCP/IP Parameters” on
page 5-12.
Displays and allows you to change the
parameters used for downloading a new
version of software for the IntraSwitch
5308FL.
See “Configure BootStrap Parameters”
on page 5-14.
Displays and allows you to change the
IntraSwitch 5308FL’s SNMP (Simple
Network Management Protocol)
parameters; such as, read/write settings,
trap authentication, and trap receivers.
See “Configure SNMP Parameters” on
page 5-18.
Allows you to manually configure each of
the IntraSwitch 5308FL’s ports for speed,
connection, link mode, and autonegotiation.
See “Configure Port Parameters” on
page 5-22.
Displays and allows you to change the
IntraSwitch 5308FL’s RMON parameters.
See “Configure RMON Parameters” on
page 5-26.
Page 5-8
Page 65

Menu Item Description
Configuration Menu
Config MAC Forwarding
Table Parameters
Config Spanning Tree
Parameters
Set Web Server Allows you to enable or disable
Set Telnet Idle Time-out Allows you to set the amount of time a
Set Console Password
Displays the entries in the IntraSwitch
5308FL’s MAC Forwarding Table.
See “Configure MAC Forwarding Table
Parameters” on page 5-27.
Displays the IntraSwitch 5308FL’s
Spanning Tree parameters and allows
you to enable or disable the Spanning
Tree Protocol.
See “Configure Spanning Tree
Parameters” on page 5-30.
management via a World Wide Web
server.
See “Set Web Server” on page 5-34.
Telnet connection can remain idle and
still connected to the IntraSwitch 5308FL.
See “Set Telnet Idle Time-out” on page
5-35.
Allows you to change the password
needed to access the Local Management
Interface Configuration Menu.
See “Set Console Password” on page
5-36.
Reset EEPROM To
Default
Exit Configuration Menu Exits the Configuration Menu and
Allows you to reset the IntraSwitch
5308FL’s EEPROM to its factory default
settings.
See “Reset EEPROM” on page 5-37.
returns you to the Local Management
Interface Main Menu.
Page 5-9
Page 66

Console Management
Current Settings
Configure System Administration Information
This menu displays and allows you to change the IntraSwitch
5308FL’s name, location, and contact information.
To access the System Administration Information Menu, type a
from the Configuration Menu.
The following menu appears:
Figure 5-4 System Administration Information Menu
Current Settings
Table 5-5 explains each setting on the System
Administration Information Menu.
For information on using this menu, see:
❏ “Changing System Administration Informa-
tion” — page 5-11
Page 5-10
Table 5-5 System Administration Information Settings
Setting Description
Switch Name The name of the IntraSwitch 5308FL (up to 24
characters, including spaces).
Switch Location The location where the IntraSwitch 5308FL is
physically located (up to 24 characters,
including spaces).
Switch Contact The name of the person responsible for the
IntraSwitch 5308FL (up to 24 characters,
including spaces).
Page 67

Configure System Administration Information
Changing System Administration Information
To change the IntraSwitch 5308FL’s name, location, or
contact information:
Open the System Administration Information
1
Menu by typing a in the Configuration Menu.
Type the command letter of the option you
2
want to change.
For example, type n to set the switch name.
Type the information at the prompt.
3
See Table 5-5 for a description of each parameter.
▲ Important! Each parameter is limited to
64 characters (including spaces).
To cancel a selected option, press ctrl-c at
the command prompt.
Press return.
4
The IntraSwitch 5308FL’s system administration information is configured.
To quit and return to the Configuration
Menu, type q.
Page 5-11
Page 68

Console Management
Current Settings
Configure TCP/IP Parameters
This menu displays and allows you to change the information
needed to access the IntraSwitch 5308FL over the network (for
in-band management).
To access the TCP/IP Parameter Menu, type i from the
Configuration Menu. The following menu appears:
Figure 5-5 TCP/IP Parameter Menu
∆ Note: By default, each parameter is set to 0.0.0.0.
Current Settings
Table 5-6 explains each setting on the TCP/IP Parameter
Menu.
For information on using the menu, see:
❏ “Changing TCP/IP Information” — page 5-13
Page 5-12
Table 5-6 TCP/IP Parameter Settings
Setting Description
Switch IP Address The IntraSwitch 5308FL’ s IP (Internet Protocol)
Switch Subnet Mask The address of the subnet mask on which the
Switch Default
Gateway
address.
IntraSwitch 5308FL is located.
The address of the IntraSwitch 5308FL’s
default gateway.
Page 69

Configure TCP/IP Parameters
Changing TCP/IP Information
To change the IntraSwitch 5308FL’s IP address, subnet
mask, or default gateway information:
Open the TPC/IP Parameter Menu by typing i
1
in the Configuration Menu.
Type the command letter of the option you
2
want to change.
Type the new address at the prompt.
3
See Table 5-6 for a description of each parameter.
▲ Important! Follow the format: num-
ber.number.number. number.
To cancel a selected option, press ctrl-c at
the command prompt.
Press return.
4
The IntraSwitch 5308FL’ s TCP/IP information
is configured.
To quit and return to the Configuration
Menu, type q.
Page 5-13
Page 70

Console Management
Configure Bootstrap Parameters
This menu displays and allows you to change the bootstrap
parameters used for loading the IntraSwitch 5308FL’s software
at startup and for downloading a new version of software when
one is issued.
To access the Bootstrap Parameters Menu, type b from the
Configuration Menu. The following menu appears:
Current Settings
Figure 5-6 BootStrap Parameter Menu
▲ Important! The IntraSwitch 5308FL’s default
Load Mode setting is Local.
Normally, the bootstrap settings never need to
be changed except when downloading a new
version of the IntraSwitch 5308FL’s software.
Page 5-14
Current Settings
Table 5-7 explains each setting on the Bootstrap Parameter
Menu.
For information on using the menu, see:
❏ “Executing Software Locally” — page 5-16
❏ “Loading Software Remotely” — page 5-16
❏ “Performing a Software Upgrade” — page 5-
17
Page 71

Configure Bootstrap Parameters
Table 5-7 Bootstrap Parameter Settings
Setting Description
Set Load Mode to
Local
Set Load Mode to
Remote
Set Boot Mode to
Bootp-tftp
Set Boot Mode to TFTP Sets the IntraSwitch 5308FL to only download
Set Boot Server IP
Address
Set Boot File Name Sets the software image file name and
Executes the software image file from the
IntraSwitch 5308FL’s internal flash memory.
Important! This is the IntraSwitch 5308FL’s
default setting.
Loads a new software image file from a server
on the network.
Important! T o use this option, you must select
BootP-TFTP or TFTP as the Boot Mode.
Sets the IntraSwitch 5308FL to request an IP
address from a BootP server and download
the software image file through TFTP.
Important! T o use this option, the IntraSwitch
5308FL’s IP address must be set to 0.0.0.0 and
the Load Mode must be set to Remote.
the software image file through TFTP (an IP
address is not requested).
Important! T o use this option, the IntraSwitch
5308FL must already have an assigned IP
address and the Load Mode must be set to
Remote.
Sets the IP address of the remote server
providing BootP/TFTP capabilities on your
network.
network path.
Page 5-15
Page 72

Console Management
Executing Software Locally
To set the IntraSwitch 5308FL to boot (execute its
software) locally from its internal flash memory:
Make sure the IntraSwitch 5308FL is config-
1
ured with a valid IP address.
Open the Bootstrap Parameter Menu by typ-
2
ing b in the Configuration Menu.
Type l to set the Load Mode to Local.
3
The IntraSwitch 5308FL is set to load its software locally from its internal flash memory.
This occurs each time the IntraSwitch
5308FL is powered on or is reset.
Loading Software Remotely
To set the IntraSwitch 5308FL to boot (load its software)
over the network from a remote server:
Open the Bootstrap Parameter menu by typ-
1
ing b in the Configuration Menu.
Page 5-16
Type s to select the option Set Boot Server
2
IP Address.
Type the IP address of the remote boot
3
server containing the software image file for
the IntraSwitch 5308FL at the prompt, then
press return.
Type r to set the Load Mode to Remote.
4
Type f to select the option Set File Name.
5
Type the software image file’s name and net-
6
work path at the prompt, then press return.
The IntraSwitch 5308FL is set to download
its software remotely from the network.
Page 73

Configure Bootstrap Parameters
Performing a Software Upgrade
When Asanté issues a ne w version of the software image f or
the IntraSwitch 5308FL, you can obtain it from Asanté’s
World Wide Web site or by contacting Asanté’s Technical
Support (see Appendix A, “T echnical Support”).
The software file must be downloaded from a management
station on your network, such as AsantéView. These
instructions explain how to perform a software upgrade on
the IntraSwitch 5308FL from AsantéView.
To upgrade the IntraSwitch 5308FL’s software from
AsantéView:
Make sure the IntraSwitch 5308FL is config-
1
ured with an IP address.
Open the BootStrap Parameter Menu by typ-
2
ing b in the Configuration Menu.
Type r to set the Boot Load Mode to
3
Remote.
Type t to set the Boot Mode to TFTP.
4
Type s and set the Boot Server IP address.
5
Type f and set the name and network path
6
for the new software image file; for example:
c:\AV\ISwitch.cfg
Make sure the following two files are in the
7
Boot server’s directory:
ISwitch.cfg
5324.10x
Type q to return to the Configuration Menu.
8
Reset the IntraSwitch 5308FL by powering it
9
off and then on.
Page 5-17
Page 74

Console Management
Configure SNMP Parameters
This menu controls the IntraSwitch 5308FL’s SNMP (Simple
Network Management Protocol) parameters.
With these parameters, you can configure the IntraSwitch
5308FL’s read and write community strings, set the IntraSwitch
5308FL to generate authentication traps, and determine which
management stations on your network can receive traps.
To access the SNMP Parameter Menu, type n from the
Configuration Menu. The following menu appears:
Current Settings
Page 5-18
Figure 5-7 SNMP Parameter Menu
Current Settings
Table 5-8 explains each setting on the SNMP Parameter
Menu.
For information on using the menu, see:
❏ “Setting Community Strings” — page 5-20
❏ “Enabling Trap Authentication” — page 5-20
❏ “Adding a Trap Receiver” — page 5-21
❏ “Deleting a Trap Receiver” — page 5-21
Page 75

Configure SNMP Parameters
Table 5-8 SNMP Parameter Settings
Setting Description
SNMP Read
Community
SNMP Write
Community
Trap Authentication The status of the SNMP agent to generate
SNMP Trap Receivers The IP addresses of the network management
The IntraSwitch 5308FL’s SNMP read
community string.
The read community string is a single word
that defines access rights for reading SNMP
data objects.
The default setting is public.
The IntraSwitch 5308FL’s SNMP write
community string.
The write community string is a single word
that defines access rights for writing SNMP
data objects.
The default setting is private.
authentication traps.
Note:
An authentication trap occurs when a
network station with an invalid community
string attempts to access the IntraSwitch
5308FL.
The default setting is disabled.
stations that can receive traps. Normally,
these addresses are the same as your network
management software systems’ IP
address(es).
Important! A maximum of four traps
receivers is allowed.
Page 5-19
Page 76

Console Management
Setting Community Strings
To change the IntraSwitch 5308FL’s community strings:
Open the SNMP Parameter Menu by typing n
1
in the Configuration Menu.
Type r to change the read community string
2
or w to change the write community string.
Type a new community string at the prompt.
3
To cancel a selected option, press ctrl-c at
the command prompt.
Press return.
4
The IntraSwitch 5308FL’s community strings
are configured.
Enabling Authentication Traps
The IntraSwitch 5308FL can be set to generate
authentication traps.
Authentication traps are messages sent across the network
to an SNMP network management application (such as
AsantéView or IntraSpection). They occur when a network
management station with an invalid community string
attempts to access the IntraSwitch 5308FL.
To set the IntraSwitch 5308FL to generate authentication
traps:
Page 5-20
Open the SNMP Parameter Menu by typing n
1
on the Configuration Menu.
Type t on the SNMP Parameter Menu to tog-
2
gle trap authentication from disabled to
enabled.
Make sure there is a least one trap receiver
3
entry. (See “Adding a Trap Receiver Entry” on
page 5-21.)
Page 77

Configure SNMP Parameters
Adding a Trap Receiver Entry
Trap receivers are the management stations designated to
receive traps from the IntraSwitch 5308FL when they
occur.
∆ Note: The maximum number of trap receiv-
ers that can be added is four.
To add a trap receiver entry:
Open the SNMP Parameter Menu by typing n
1
in the Configuration Menu.
Type a to Add SNMP Trap Receiver Entry.
2
Type the IP address of the network manage-
3
ment station you want to receive traps.
▲ Important! Do not type an address of
0.0.0.0 or 255.255.255.255.
To cancel a selected option, press ctrl-c at
the command prompt.
Press return.
4
The trap receiver’s entry is added.
Deleting a Trap Receiver Entry
To delete a trap receiver entry:
Open the SNMP Parameter Menu by typing n
1
on the Configuration Menu.
Type d.
2
Type the IP address of the r eceiving netw or k
3
station entry to be deleted.
Press return.
4
The trap receiver’s entry is deleted.
Page 5-21
Page 78

Console Management
Current Settings
Configure Port Parameters
This menu allows you to manually configure each of the
IntraSwitch 5308FL’s ports for speed, connection, link mode,
and auto-negotiation.
The default parameters for each 10Base-FL port are:
❏ auto-negotiation — disabled
❏ port speed — 10Mbps
❏ link mode — half duplex
The default parameter for the 10/100TX port and the 10/100
MII expansion ports is:
❏ auto-negotiation — enabled (auto-negotiates to
10 or 100 half duplex)
To access the Port Parameter Menu, type p from the
Configuration Menu. The following menu appears:
Page 5-22
Figure 5-8 Port Parameter Menu
The Port Management menu displays statistics for one port at a
time. The current port for which statistics are displayed is
shown at the top of the screen (next to “Port Number:”).
❏ Ports 1 – 8 — each 10Base-FL port.
❏ Port 9 — the 10/100TX port.
❏ Ports 10 and 11 — the MII expansion ports (MII 1
and MII 2, respectively).
Page 79

Configure Port Parameters
Current Settings
Table 5-9 explains each setting on the Port Parameter
Menu. For information on using the Port Parameter Menu,
see:
❏ “Enabling/Disabling a Port” — page 5-24
❏ “Configuring Full Duplex” — page 5-24
❏ “Configuring Auto-Negotiation” — page 5-25
Table 5-9 Port Parameter Settings
Setting Description
Port Number The number of the port for which information is
Port Connection The administrative status of the port’s connection.
displayed.
❏ Enabled — the port is enabled and
can receive and forward packets.
❏ Disabled — the port is disabled and
cannot receive any packets (even if
the port’s Link Status is ON).
Link Status The status of the port.
❏ On — a network device is properly
connected to the selected port and is
powered on.
❏ Off — no network device is con-
nected to the port.
Port Auto-Negotiation
Ability
Port Speed Manually determines the speed of the selected port.
Link Mode The port’s link mode (half or full duplex).
The auto-negotiation ability of the selected port.
The 10Base-FL ports are only capable of
transmitting at 10Mbps; the 10/100TX port and
installed MII modules (except 10Base-FL) can be set
to transmit at 100Mbps.
▲ Important! If you manually change the speed on
a port, auto-negotiation for that port is
automatically disabled.
Page 5-23
Page 80

Console Management
Enabling/Disabling a Port
The enabling or disabling of a port is a manual operation
that can be used to isolate network devices possibly
causing problems on the network or to prevent
unauthorized use of a port or station.
To enable or disable a port:
Open the Port Parameter Menu by typing p
1
on the Configuration Menu.
Select the port to be enabled or disabled by
2
typing l and entering the port’s number.
∆ Note: The 10/100TX port is port number 9,
the MII ports (MII I and MII 2) are port numbers 10 and 11, respectively.
Type c to toggle the port’s connection to
3
enabled or disabled, as desired.
Configuring Full Duplex
Full duplex mode allows a port to transmit and receive at
the same time. You can set every port on the IntraSwitch
5308FL for full duplex operation.
Page 5-24
▲ Important! To operate in full duplex mode, the
device to which the port is connected must support and be configured for full duplex operation.
To configure a port for full duplex mode:
Open the Port Parameter Menu by typing p on the
1
Configuration Menu.
Select the port to be configured for full
2
duplex mode by typing l and entering the
port’s number.
∆ Note: The 10/100TX port is port number 9,
the MII ports (MII I and MII 2) are port numbers 10 and 11, respectively.
Page 81

Configure Port Parameters
Type f to toggle the port’s mode to half or
3
full duplex, as desired.
The port’s mode is displayed at the top of the
screen.
Configuring Auto-Negotiation
Auto-negotiation allows two devices on a common segment
to communicate their capabilities, allowing the devices to
determine their highest common speed and best
communication parameters.
Options Negotiated
❏ Ethernet type (100Base-TX Fast Ethernet or
10Base-T Ethernet)
❏ Duplex mode (half or full)
To configure the 10/100TX port or an installed 10/100 MII
module for auto-negotiation:
▲ Important! To configure a port for auto-
negotiation, both devices on either end must
support the auto-negotiation feature.
Open the Port Parameter Menu by typing p
1
on the Configuration Menu.
Select the port to be configured for full
2
duplex mode by typing l and entering the
port’s number.
∆ Note: The 10/100TX port is port number 9,
the MII ports (MII I and MII 2) are port numbers 10 and 11, respectively.
Type a to toggle the port’s auto-negotiation
3
status to enabled or disabled, as desired.
The auto-negotiation status is displayed at the
top of the screen.
Page 5-25
Page 82

Console Management
Configure RMON Parameters
This menu allows you to view and configure RMON (remote
monitoring) information.
∆ Note: RMON is a standard for monitoring and
reporting network activity using remote monitors. It allows a management system to remotely
monitor the switch for diagnostic purposes.
See Appendix B, “Supported MIBs” for a detailed
description of each group of RMON that is supported by the IntraSwitch 5308FL.
▲ Important! See Chapter 8, “Advanced Manage-
ment,” for information on using RMON with the
IntraSwitch 5308FL.
Page 5-26
Page 83

Configure MAC Forwarding Table Parameters
Configure MAC Forwarding Table Parameters
This menu allows you to view and search for addresses in the
IntraSwitch 5308FL’s MAC Forwarding Table.
The MAC Forwarding Table is a table of node addresses that the
IntraSwitch 5308FL automatically builds by listening to and
learning the information that is broadcast when a new node
logs on.
The IntraSwitch 5308FL checks the source and destination
addresses as packets pass through the unit and records the
information in the table. The IntraSwitch 5308FL uses the
information in this table to decide whether a frame should be
forwarded or filtered.
∆ Note: The IntraSwitch 5308FL’s MA C addr ess
table holds a maximum of 1024 entries.
To access the MAC Forwarding Table Parameters Menu, type f
from the Configuration Menu. The following menu appears:
Current Setting
Figure 5-9 MAC Forwarding Table Parameters Menu
Current Setting
Table 5-10 explains the setting on the MAC Forwarding
Table Parameter Menu.
Page 5-27
Page 84

Console Management
For information on using the MAC Forwarding Table
Parameter Menu, see:
❏ “Displaying the Forwarding Table” — page
5-28
❏ “Finding an Entry in the MAC Forwarding
Table” — page 5-29
❏ “Setting the Age Out Timer” — page 5-29
Table 5-10 MAC Forwarding Table Parameter Setting
Setting Description
Age Out Timer The number of seconds an address remains in the
Displaying the MAC Forwarding Table
Open the MAC Forwarding Table Menu by
1
typing f on the Configuration Menu.
Type n to display the Forwarding Table.
2
A screen similar to Figure 5-10 appears.
Figure 5-10 MAC Forwarding Table
The table displays 15 entries at a time.
table after it is learned by the IntraSwitch 5308FL.
Page 5-28
Page 85

Configure MAC Forwarding Table Parameters
Press any key on your keyboard to display
3
the next 15 entries.
Type q to exit the MAC Forwarding Table.
4
Finding an Entry in the MAC Forwarding Table
To find an entry in the table:
Open the MAC Forwarding Table Menu by
1
typing f on the Configuration Menu.
Type f to find an entry.
2
Enter the MAC address you want to locate at
3
the prompt.
Press return.
4
If the address is found within the table, it is
displayed along with the port number.
If the address is not found, the message “No
Such Entry” is displayed.
Setting the Age Out Timer
To set the MAC forwarding table’s age out timer:
Open the MAC Forwarding Table Menu by
1
typing f on the Configuration Menu.
Type s to set the timer.
2
Enter the number of seconds you want the
3
addresses to remain in the table.
∆ Note: The default is 300 seconds.
Press return.
4
The age out timer is set.
Page 5-29
Page 86

Console Management
Current Settings;
these values
cannot be
changed
Configure Spanning Tree Parameters
This menu allows you to view the IntraSwitch 5308FL’s
Spanning Tr ee parameters. It also allows you to enable or
disable Spanning Tree on all of the IntraSwitch 5308FL’s ports
or on a single port.
By default, the IntraSwitch 5308FL is shipped with Spanning
Tree enabled on all ports.
▲ Important! Do not change these parameters
unless you have experience and knowledge of
the IEEE 802.1d specification.
To access the Spanning Tree Parameter Menu, type s from the
Configuration Menu. The following menu appears:
Page 5-30
Figure 5-11 Spanning Tree Parameters Menu
Current Settings
Table 5-12 explains each setting on the Spanning Tree
Parameter Menu.
For information on using the menu, see:
❏ “Enabling/Disabling Spanning Tree on ALL
Ports” — page 5-32
❏ “Enabling/Disabling Spanning Tree on a
Port” — page 5-32
Page 87

Configure Spanning Tree Parameters
Table 5-12 Spanning Tree Parameter Settings
Setting Description
Switch ID The identification number of the IntraSwitch
Bridge Max Age The Maximum Age timer; determines how
Bridge Hello Time The Hello timer; controls the frequency at
Bridge Forward Delay The number of seconds a bridge must wait
5308FL. This value cannot be changed.
long the IntraSwitch 5308FL retains
information received from BPDU (bridging
Protocol Data Unit) packets.
The default value is 20 seconds. This value
cannot be changed.
which the IntraSwitch 5308FL sends a BPDU or
“hello” packet.
BPDU packets provide information to the
Spanning Tree bridges about the configuration
of the Spanning Tree network.
The default value is 2 seconds. (This causes
the switch to broadcast a BPDU packet every
two seconds.) This value cannot be changed.
before it changes a link from a listening state
to a learning state and before it changes the
link from a learning state to a forwarding state.
The default value is 15 seconds. (This means
that after a link [or the entire switch] goes
down and connectivity is re-established, the
switch waits approximately 30 seconds [twice
the default value] before it begins to forward
traffic again. This value cannot be changed.
Page 5-31
Page 88

Console Management
Enabling/Disabling Spanning Tree on ALL Ports
To enable or disable Spanning Tree on all ports:
Open the Spanning Tree Parameter Menu by
1
typing s on the Configuration Menu.
Type d to disable Spanning Tree on all ports;
2
type e to enable Spanning Tree on all ports.
To cancel the request, type ctrl-c.
Type a on the Spanning Tree Parameters
3
Menu to apply the configuration.
The Spanning Tree status is displayed at the
top of the menu next to STP Status
Enabling/Disabling Spanning Tree on a Single Port
To enable or disable Spanning Tree on an individual port:
Open the Spanning Tree Parameter Menu by
1
typing s on the Configuration Menu.
Page 5-32
Type c to open the Config STP Port Attributes
2
Menu.
Figure 5-12 is an example of the Spanning
Tree Port Parameter Menu.
Figure 5-12 Spanning Tree Port Parameters Menu
Page 89

Configure Spanning Tree Parameters
Select the port number you want to enable
3
or disable Spanning Tree on by typing l on
the Port Parameter Menu and entering the
port number at the prompt.
∆ Note: The 10/100TX port is port number 9,
the MII ports (MII I and MII 2) are port numbers 10 and 11, respectively.
Press return.
4
Type e to enable Spanning Tree on the port;
5
type d to disable Spanning Tree on the port.
Type q to exit this menu and return to the
6
Spanning Tree Parameter Menu.
Type a to apply the changes.
7
▲ Important! The change will not take
effect until Apply is selected from the Spanning Tree Parameter Menu.
Page 5-33
Page 90

Console Management
Set Web Server
This option allows you to enable or disable management of the
IntraSwitch 5308FL via a World Wide Web browser.
If this option is disabled, you cannot manage the IntraSwitch
5308FLvia a World W ide W eb browser.
∆ Note: This option’s default setting is
enabled.
To set Web server management:
Type w from the Configuration Menu.
1
The following two lines appear at the bottom of
the screen:
Figure 5-13 Set Web server command line
The IntraSwitch 5308FL’s current Web server
management status is displayed.
Page 5-34
Type y to disable Web server management; type
2
n to enable Web server management.
The IntraSwitch 5308FL’s Web server manage-
ment is set.
Page 91

Set Telnet Idle Time Out
Set Telnet Idle Time Out
This option sets the Telnet idle time-out period.
If a Telnet connection to the IntraSwitch 5308FL remains idle
for the number of specified time-out minutes, the remote Telnet
connection is automatically disabled.
To set the Telnet Idle Time Out period:
Type t from the Configuration Menu.
1
The following two lines appear at the bottom of
the screen:
Figure 5-14 Set TelNet Idle Time Out command line
The current idle time is displayed in minutes.
Enter the number of minutes for the time-out
2
period at the prompt.
∆ Note: The default and recommended time-
out period is 20 minutes.
To exit this option without making any
changes to the current idle time-out period,
press ctrl-c.
Press return.
3
The Telnet idle time out is configured.
Page 5-35
Page 92

Console Management
Set Console Password
This option sets the IntraSwitch 5308FL’s Console password.
The Console password is the password needed to access the
Configuration Menu.
∆ Note: The default password is Asante.
To change the Console password:
Type c from the Configuration Menu.
1
The following command line appears at the bottom of the screen:
Figure 5-15 Set Console Password command line
Type a new password at the “Enter New Pass-
2
word” prompt.
▲ Important! The password is case-sensi-
tive.
The password must be a minimum of one
character and a maximum of 20 characters
in length. The password takes any ASCII
code.
Page 5-36
Press return.
3
Type the new password again at the confirma-
4
tion password prompt.
Press return.
5
The Console password is changed.
Page 93

Reset EEPROM to Default
Reset EEPROM to Default
This option resets the IntraSwitch 5308FL’s values to the
factory default.
▲ Important! This procedure reverts all informa-
tion to the factory default settings except for
the IntraSwitch 5308FL’s IP address, subnet
mask, and default gateway.
See “Factory Defaults” on page 1-11 for a list of
all the IntraSwitch 5308FL’s factory default settings.
To reset the EEProm:
Type e from the Configuration Menu.
1
The following command line appears at the bottom of the Configuration Menu:
Figure 5-16 Reset EEProm to Default command line
Type y to reset the EEPROM to default or N to
2
cancel the reset.
Reset the IntraSwitch 5308FL by manually turn-
3
ing it off and then on again.
The IntraSwitch 5308FL’s EEPROM is reset.
Page 5-37
Page 94

Console Management
Resetting the IntraSwitch 5308FL
To reset the IntraSwitch 5308FL:
Turn the IntraSwitch 5308FL’s power switch to
1
the off position.
Turn the IntraSwitch 5308FL’s power switch to
2
the on position.
The IntraSwitch 5308FL is reset.
Page 5-38
Page 95

Statistics Menu
Statistics Menu The Statistics Menu displays current statistics for the
IntraSwitch 5308FL on a per-port basis.
Accessing the Statistics Menu
To access the Statistics Menu:
❏ Type s from the Local Management Interface
Main Menu.
▲ Important! See Chapter 7, “Status Monitor-
ing and Statistics” for information on using the
Statistics Menu.
Page 5-39
Page 96

Page 97

6
Status Monitoring
and Statistics
This chapter describes how to view the IntraSwitch 5308FL’s
current operating information and statistics via the out-of-band
Console or in-band Telnet interface.
This chapter contains the following sections:
❏ Viewing the Current Operating
Information — page 6-2
❏ Viewing Statistics — page 6-5
Page 98

Status Monitoring and Statistics
Monitoring the IntraSwitch 5308FL
Viewing the
Current
Operating
Information
The IntraSwitch 5308FL’ s current operating information can be
viewed by accessing the General Information Menu within the
Local Management Interface.
To view the IntraSwitch 5308FL’s current operating
information:
Access the IntraSwitch 5308FL’s Local Manage-
1
ment Interface.
∆ Note: See Chapter 4, “Setting Up For Man-
agement” for instructions on how to connect
to the Local Management Interface.
Type g in the Main Menu. A screen similar to
2
Figure 6-1 appears.
Page 6-2
Figure 6-1 General Information Menu
Table 6-1 describes each parameter.
T o exit the General Information Menu, press the
space bar on your keyboard.
Page 99

Viewing the Current Operating Information
Table 6-1 General Information Menu Parameters
Setting Description
Switch Name The name of the IntraSwitch 5308FL.
Switch Location The location of where the IntraSwitch
5308FL is physically located.
Switch Contact The name of the person responsible for
the IntraSwitch 5308FL.
ID/MAC Address The IntraSwitch 5308FL’s hardware
address.
IP Address The IntraSwitch 5308FL’s IP (Internet
Protocol) address.
Subnet Mask The address of the subnet to which the
IntraSwitch 5308FL belongs.
Default Router The IP address of the IntraSwitch
5308FL’s default gateway router.
Boot Load Mode The origin of the device boot image file
(a software file residing on hardware
required by the IntraSwitch 5308FL to
operate on the network).
Local — indicates the IntraSwitch
5308FL is set to load the image file from
its internal flash memory (default
setting).
Remote — indicates the IntraSwitch
5308FL is set to download the image file
from a remote boot server on the
network.
Page 6-3
Page 100

Status Monitoring and Statistics
Setting Description
Boot Mode The boot mode used for downloading a
Boot Server The remote boot server’s IP address.
Boot File Name The image file name and network path.
new version of software for the
IntraSwitch 5308FL.
BootP-TFTP — sets the IntraSwitch
5308FL to request an IP address from a
BootP server and download the image
file through TFTP.
TFTP — sets the IntraSwitch 5308FL to
only download the image file through
TFTP (does not request an IP address;
the IntraSwitch 5308FL must already be
configured with an IP address to use this
option).
Page 6-4
 Loading...