

Page 1

AsantéBridge 1012
Users’ Guide
Page 2

Information in this document is subject to change without notice and does not represent a commitment on the part of Asanté Technologies, In., No part of this manual, or any associated artwork, software, product design or design concept, may be copied, reproduced or stored, in whole or in part, in any form or by any means mechanical, electronic, optical, photocopying, recording or otherwise, including translation to another language or format, without the express written consent of Asset Technologies, Inc.
Unless otherwise noted, all names of companies, products, addresses, and persons contained herein are fictitious and are designed solely to document the use of an Asanté Technologies product.
Copyright 1992 by Asanté Technologies, inc. All rights reserved.
Printed in the United States of America.
Manual Reorder # 06-00012-00
Trademarks
Ante Technologies, AsantéView, and AsantéHub 1012 are trademarks of Asanté Technologies, Inc.
Microsoft, MS, MS-DOS, and Windows are registered trademarks of Microsoft, Inc.
386 and 486 are trademarks of Intel Corporation.
IBM is a registered trademark of International Business Machines Corporation.
SkyPager is a registered trademark of SkyTel Corporation
Macintosh, IIsi, IIci, LCII, SE, Quadra 700, Quadra 950, PowerBook, AdminTCP, and MacTCP are registered trademarks of Apple Corporation.
Hayes is a registered trademark of Hayes Modem Corporation.
All other product names are trademarks or registered trademarks of their respective companies.
Software License Agreement
This is a legal agreement between you (either an individual or an entity) and Asanté Technologies, Inc. By opening the sealed package(s) containing the software you are agreeing to be bound by the terms of this agreement.
If you do not agree to the terms of this agreement, promptly return the unopened software package(s) and the accompanying items (including written materials and binders or other container(s) to the place you obtained them for a full refund.
1. GRANT OF LICENSE. Asanté Technologies grants to you the right to use one copy of the enclosed Asanté Technologies software program (the “SOFTWARE” is in “use” on a computer when
it is loaded into temporary memory (i.e., RAM) or installed into permanent memory (e.g., hard disk, CD-ROM, or other storage device) of that computer. However, installation on a network
server for the sole purpose of distribution to one or more other computer(s) shall not constitute “use” for which a separate license is required.
2. COPYRIGHT. The SOFTWARE is owned by Asanté Technologies or its suppliers and is protected by United States copyright laws and international treaty provisions. Therefore, you must treat
the SOFTWARE like any other copyrighted material (e.g., a book or musical recording) except that you may either (a) make one copy of the SOFTWARE solely for backup or archival purposes,
or (b) transfer the SOFTWARE to a single hard disk provided you keep the original solely for backup or archival purposes. You may not copy the written materials accompanying the software.
3. OTHER RESTRICTIONS. You may not rent or lease the SOFTWARE, but you may transfer the SOFTWARE and accompanying written materials on a permanent basis provided you retain no
copies and the recipient agrees to the terms of this Agreement. You may not reverse engineer, decompile, or disassemble the SOFTWARE. If the SOFTWARE is an update or has been updated,
any transfer must include the most recent update and all prior versions.
4. DUAL MEDIA SOFTWARE. If the SOFTWARE package contains both 3.5" and 5.25" disks, then you may use only the disk appropriate for your single-user computer. You may not use the
other disks on another computer or load, rent, lease, or transfer them to another user except as part of the permanent transfer (as provided above) of all SOFTWARE and written materials.
LIMITED WARRANTY. Asanté Technologies warranties that (a) the SOFTWARE will perform substantially in accordance with the accompanying written materials for a period of ninety (90)
days from the date of receipt, and (b) any hardware accompanying the SOFTWARE will be free from defects in materials and workmanship under normal use and service for a period of one
(1) year from the date of receipt. Any implied warranties on the SOFTWARE and hardware are limited to ninety (90) days and one (1) year, respectively. Some states/countries do not allow
limitations of duration of an implied warranty, so the above limitation may not apply to you.
CUSTOMER REMEDIES. Asanté Technologies’ and its suppliers’ entire liability and your exclusive remedy shall be, at Asanté Technologies’ option, either (a) return of the price paid, or (b)
repair or replacement of the SOFTWARE or hardware that does not meet Asanté Technologies’ Limited Warranty and which is returned to Asanté Technologies with a copy of your receipt. This
Limited Warranty is void if failure of the SOFTWARE or hardware has resulted from accident, abuse, or misapplication. Any replacement SOFTWARE or hardware will be warranted for the
remainder of the original warranty period or thirty (30) days, whichever is longer. Outside the United States, these remedies are not available without proof of purchase from an authorized
non-U.S. source.
NO OTHER WARRANTIES. Asanté Technologies and its suppliers disclaim all other warranties, either express or implied, including, but not limited to, implied warranties of merchantability
and fitness for a particular purpose, with regard to the SOFTWARE, the accompanying written materials, and any accompanying hardware. This limited warranty gives you specific legal
rights. You may have others which vary from state/country to state/country.
NO LIABILITY FOR CONSEQUENTIAL DAMAGES. In no event shall Asanté Technologies or its suppliers be liable for any damages whatsoever (including, without limitation, dam ages for loss
of business profits, business interrupted, loss of business information, or any other pecuniary loss) arising out of the use of or inability to use this Asanté Technologies product, even if Asanté
Technologies has bee advised of the possibility of such damages. Because some states/countries do not allow the exclusion or limitation of liability for consequential or incidental damages,
the above limitation may not apply to you.
U. S. Government Restricted Rights
The SOFTWARE and documentation are provided with RESTRICTED RIGHTS. Use, duplication, or disclosure by the Government is a subject to restrictions as set forth in subparagraph
(c)(1)(ii) of the The Rights in Technical Data and Computer Software clause at DFARS 52.227-7013 or subparagraphs (c)(1) and (2) of the Commercial Computer Software—Restricted
Rights at 498 CFR 52.227-19, as applicable. Manufacturer is Asanté Technologies, Inc., 821 Fox Lane, San Jose, California 95131.
If you acquired this product in the United States, this Agreement is governed by the laws of the Sate of California.
Should you have any questions concerning this Agreement, or if you desire to contact Asanté Technologies for any reason, please contact your local Asanté Technologies subsidiary or sales
office, or write: Asanté Technologies, In., 821 Fox Lane, San Jose, California 95131.
Page 3

Tell Us What
You Think
There’s always room for improvement and Asanté Technologies is
always interested in your comments and suggestions about our
product documentation. If you take the time to make suggesstions, we will take the time to read and consider them for new
documentation releases.
Do us a favor and read through this Users’ Guide and think about
these questions:
What do you like best about this Guide?
1
2
3
What do you think is the least valuable or weakest
part of this Guide?
What is the most needed improvement you would
make to this Guide?
Think about your answers and then give us a ring.
You can fax your comments and suggestions to:
Asanté Technologies
Attn: Technical Publications
(408) 432-1117
or E-mail them through Internet to:
techpubs@asante.com
Page 4

Page 5

Table of Contents
Introduction i
About This Manual ii
Intended Audience iii
Conventions Used In This Manual iii
Tell Us What Your Think iv
Technical Support iv
Quick Start 1-1
Before You Start 1-2
Introducing the AsantéBridge 1-3
AsantéBridge Features 1-5
Quick View 1-6
AsantéBridge 1012 Front Panel 1-6
AsantéBridge 1012 Rear Panel 1-9
Interpreting LEDs 1-12
Installing the AsantéBridge 1012 1-13
Preparing for the Installation 1-13
What You’re Going to Do 1-14
Doing the Installation 1-14
The Next Step 1-21
Connecting to the Network 2-1
Before You Start 2-2
About Bridging 2-3
A Simple Transparent Bridge 2-4
A Spanning Tree 2-6
Using the 3in1 Port 2-8
Connecting to the BNC Port 2-8
Table of Contents
Page 6

Connecting to the AUI Port 2-10
Connecting to the RJ45 IN and Out Ports 2-12
Configuring a Redundant Link 2-14
Checking the Link 2-14
An Example Configuration 2-15
Setting Up Out-of-Band Links 2-17
Linking the Hubs Together 2-17
Connecting Your Asanté Management Station for Out-of-Band Management 2-18
Configuring Hub DIP Switches 2-20
Connecting a VT100 Terminal 2-21
Default Settings 2-22
AsantéBridge 1012 Local Management 3-1
Before you start 3-2
Bridge Diagnostics 3-3
Local Management Menu System 3-4
General Help Menu 3-6
Configuration Menu System 3-7
System Information Menu 3-9
Password Menu 3-10
SNMP Agent Parameters Menu System 3-11
Out-of-Band Parameters Menu 3-21
Bridge Parameters Menu System 3-23
Resetting the Bridge 3-36
Statistics Menu System 3-38
Support for Pre 10BaseT Devices A-1
Technical Specifications B-1
Pinouts and Cable Specifications C-1
Table of Contents
Page 7

List of Figures
Figure 1-1 The AsantéBridge 1012 page 1-3
Figure 1-2 Bridging between two segments page 1-4
Figure 1-3 AsantéBridge 1012 Front Panel page 1-6
Figure 1-4 AsantéBridge 1012 Front Panel page 1-8
Figure 1-5 AsantéBridge 1012 Rear Panel page 1-9
Figure 1-6 Interpreting LED Status Indicators page 1-12
Figure 1-7 Network Ready for Bridging page 1-13
Figure 1-8 Locating the AsantéBridge page 1-15
Figure 1-9 Rack-mounting the AsantéBridge page 1-16
Figure 1-10 Connecting to the External Port page 1-19
Figure 1-11 Single-Hub Host Connections Using RJ-45 Extension Cables page 1-20
Figure 2-1 A simple Ethernet network page 2-3
Figure 2-2 Bridging between segments page 2-4
Figure 2-3 Redundant bridging page 2-6
Figure 2-4 Interconnecting Hubs on Thin Ethernet Backbone page 2-9
Figure 2-5 Interconnecting using FOIRL (Fiber Optic Inter-Repeater Link) page 2-10
Figure 2-6 Interconnecting to Thick Ethernet Backbone page 2-11
Figure 2-7 Connecting an In-Band Daisychaining page 2-13
Figure 2-8 Redundant Links page 2-15
Figure 2-9 Out-of-Band Links page 2-17
Figure 2-10 Connecting the Asanté Management Station for Out-of-Band page 2-18
Figure 2-11 Connecting the AMS Link Extender page 2-19
Figure 2-12 Switch Settings Key page 2-20
Figure 2-13 Connecting the VT100 terminal page 2-21
Figure 3-1 AsantéBridge 1012 Diagnostics page 3-3
Figure 3-2 Local Management Main Menu page 3-4
Figure 3-3 Local Management Help Window page 3-6
Figure 3-4 Main Configuration Menu page 3-7
Figure 3-5 System Information Window page 3-9
Figure 3-6 Password Menu page 3-10
Figure 3-7 SNMP Agent Parameters Menu page 3-11
Figure 3-8 TCP/IP Parameters Menu page 3-12
Figure 3-9 Sofware Update Menu page 3-13
Figure 3-10 System Update Status Window page 3-16
Figure 3-11 SNMP Trap Receiver Table page 3-17
Figure 3-12 SNMP Community Name Table page 3-19
Figure 3-13 Out-of-Band Parameters Menu page 3-21
Figure 3-14 Bridge Parameters Menu page 3-23
Figure 3-15 Spanning Tree Bridge Parameters Menu page 3-24
Figure 3-16 Spanning Tree Port Setting Menu page 3-26
Figure 3-17 Bridge Forwarding Table page 3-27
List of Figures
Page 8

Figure 3-18 Editing the Forwarding Table page 3-31
Figure 3-19 Searching for an Address page 3-32
Figure 3-20 Bridge Filtering Table page 3-34
Figure 3-21 Resetting the Bridge page 3-36
Figure 3-23 Bridge Statistics page 3-38
Figure A-1 Dummy Entry page A-2
Figure B-1 Dummy Entry page B-3
Figure C-1 RJ-45 to RJ-21 Pinouts page C-2
Figure C-2 Single Device Link — Amphenol Connector to 8-Pin Modular Jack page C-3
Figure C-3 RJ-45 Wall Jack to Modular Jack Pinouts page C-4
Figure C-4 Crossover RJ-45 Cable page C-4
List of Figures
Page 9

Introduction
Page 10

Introduction
About This
Manual
This manual is divided into the following sections:
Introduction
The Introduction covers the intended audience, conventions
used in this manual, questions addressed to the reader concerning this guide, and technical support information.
Chapter 1 — Quick View
An introduction to the AsantéBridge and installations instructions.
Chapter 2 — Connecting to the Network
Suggestions for connecting the bridge to your network and
using the bridge for out-of-band management with AsantéView
2.2.
Chapter 3 — AsantéBridge 1012 Local Management
How to monitor, configure, and control your AsantéBridge
using the local management port and a VT100 terminal.
Page ii
Page 11

Intended Audience
Intended
Audience
Conventions
Used In This
Manual
This manual is intended for Ethernet local area network (LAN)
administrators. Although it assumes some familiarity with the use
of AsantéView 2.2 as a network management tool, the manual
attempts to present information in a form understandable by people who do not have an in-depth understanding of network technology.
Text that you are required to enter is generally displayed as
bolded:
This is text you should enter
When a procedure tells you to “enter
enter the text
exactly
as shown. If you are required to press
”, you should always
xyz
Enter
after entering the text, the procedure will tell you.
This kind of bolded text
is used when special emphasis is neces-
sary.
When certain information is noteworthy, it is presented in a spe-
cial format:
❖
Note: You must have AsantéView 2.2 In-Band to mange
the AsantéBridge 1012.
❖
When information is
especially
important, it is presented in the
following format:
❖
Important:
The software update function is complex and
should be understood before you attempt it. Please read
through the following description before you use this
command.
❖
Page iii
Page 12

Introduction
Tell Us What
You Think
There’s always room for improvement and Asanté Technologies is
always interested in your comments and suggestions about our
product documentation. This is especially true for a beta manual
like this one. Please take the time to review the manual as carefully as possible. We depend on your feedback to help us improve
both our product and this manual.
If you take the time to make suggestions, we will take the time
to read and consider them for new documentation releases.
Do us a favor and read through this Users’ Guide and think about
these questions:
1
2
3
What do you like best about this Guide?
What do you think is the least valuable or weakest part of
this Guide?
What is the most needed improvement you w ould make to
this Guide?
Technical
Support
Think about your answers and then fax your comments and suggestions to:
Asanté T echnologies
Attn: T echnical Publications
(408) 432-1117
or E-mail them through Internet to:
techpubs@asante.com
Asanté Technologies is committed to providing you with reliable
products and excellent technical support. Please contact us with
any questions, concerns, or suggestions. You can reach us by telephone, letter, or electronic mail, from 6:00 AM to 6:00 PM, PST, at:
Technical Support
Asanté T echnologies, Inc.
821 Fox Lane
San Jose, CA 95131
(800) 622-7464
AppleLink address: Asante.TECH
Internet address: support@Asante.com
Page iv
Page 13

1
Quick Start
• Before You Start on page 1-2
• Introducing the AsantéBridge on page 1-3
• Quick View on page 1-6
• Installing the AsantéBridge 1012
on page 1-13
Page 14

Chapter 1 — Quick Start
Before You
Start
This chapter is designed to get you up and running with the minimum possible effort.
Introducing the AsantéBridge
and acquaints you with its key features.
Quick View
AsantéBridge 1012, explaining the use and interpretation of all
controls, connectors, and LEDs.
Installing the AsantéBridge 1012
installation process. The AsantéBridge 1012 is designed as a “plug
and play” network device — just follow the simple instructions.
No specialized technical knowledge is necessary.
We recommend you read this chapter before you do the installation. In particular, you should go through the
after you unpack your new AsantéBridge to become familiar with
its controls and indicators.
After completing this simple installation, continue to the next
chapter, “Connecting to the Network”, which provides detailed
information on different ways to connect the AsantéBridge.
takes you on a tour of the front and rear panels of the
tells you how the bridge functions
guides you through a simple
Quick View
section
Page 1-2
Page 15
Introducing the AsantéBridge
Introducing
the
AsantéBridge
ASANTE
0000944007B3
The AsantéBridge 1012 is an AsantéHub 1012 that has a
ent two port bridge
Logically, the AsantéBridge looks like this:
Network Segment B
AsantéHub 1012
UTILIZATION
PWR CPU
1 3 5 10 20 30 50 65+ UPLINK
RESET
SNMP MSG
Late Collision
Misaligned CRC
Runts/Fragments
Short Event/Missing SFD
RJ45 10BaseT link to network
device on Network Segment A
Network Segment A
%
13510+
%
COLLISION
2 3 4 5 6 7 8 9 10 11 12
1
BRDG
LINK/RECEIVE
PARTITION
contained in the same chassis.
Connection between the bridge
external port AUI connector
and Network Segment B
Internal
Bridge
Internal connection between
the hub and the bridge hub port
1
234 5678 910 11 12
Transparent bridge
contained within the
AsantéHub chassis
10BASE-T PORTS
AsantéHub 1012
Connection between hub
3in1 Port on the back panel
and Network Segment A
transpar-
Figure 1-1 The AsantéBridge 1012
The bridge provides connections between two network segments: One segment is the 1012 hub itself, to which you can connect other hubs, another backbone, or other network devices.
The second segment is connected via an AUI connector on the
back of the AsantéBridge 1012 unit.
This gives you the AsantéHub 1012 as the connection point for
segment A (connected internally to the bridge hub port) and a
second AUI connector (the bridge external port) for segment B,
enabling you to connect a variety of different Ethernet devices.
Figure 1-2 shows a simple two segment network.
Page 1-3
Page 16
Chapter 1 — Quick Start
Thin Ethernet connected
to hub 3in1 port
Thin Ethernet connected
to hub 3in1 port
Thin Ethernet connected
to hub 3in1 port
AsantéHub 1012
ASANTE
RESET
0000944007B3
10BaseT to
network devices
AsantéHub 1012
Segment A 10Base5 backbone
AsantéBridge 1012
ASANTE
0000944007B3
Hub 3in1 Port connected to
the Segment B 10Base5 backbone
Segment B 10Base5 backbone
AsantéHub 1012
ASANTE
RESET
0000944007B3
10BaseT to
network devices
RESET
10BaseT to
network devices
(also on Segment B)
AsantéHub 1012
ASANTE
RESET
0000944007B3
AsantéHub 1012
Bridge External Port connected
to Segment A 10Base5 backbone
AsantéHub 1012
BRIDGE
10BaseT to
network devices
Segment A connected
to the AsantéBridge External
Port
Segment B connected
to the internal
AsantéBridge Hub Port
AsantéHub 1012
Thin Ethernet connected
to hub 3in1 port
AsantéHub 1012
ASANTE
RESET
0000944007B3
AsantéHub 1012
ASANTE
RESET
0000944007B3
AsantéHub 1012
AsantéHub 1012
AsantéHub 1012
10BaseT to
network devices
AsantéHub 1012
ASANTE
RESET
0000944007B3
10BaseT to
network devices
Figure 1-2 Bridging Between Two Segments
The bridge card provides bridging between segment A and segment B while the hub portion of the unit acts as a hub, connected
to the backbone on segment B. Any devices connected to the hub
are also part of segment B.
If the bridge is configured to block transmission of all packets
between segments, the hub is still active and continues to function independent of any bridge activities.
Page 1-4
Page 17

Introducing the AsantéBridge
AsantéBridge Features
❏ Fujitsu SPARClite RISC processor providing line-speed
forwarding of data
❏ Expandable memory and FLASH EPROM enable easy
upgrades to the bridge’s features and make the
AsantéBridge an “Applications Engine” for future internetworking technologies. This investment protection
guarantees that the AsantéBridge will be a valuable network addition for years to come.
❏ Controls and displays bridge parameters and statistics
via AsantéView In-Band, Out-of-Band, and VT100 terminal interface
❏ Supports the following:
❏ 4096 dynamically learned entries in the forwarding table
❏ 512 static entries in the forwarding table
❏ 10 address and packet type ranges in the filtering table
❏ Spanning Tree Algorithm 802.1d
❏ SNMP
❏ IETF defined MIB for bridge management
❏ SNMP MIB I and II
❏ Provides comprehensive LEDs for a at-a-glance monitor-
ing of bridge parameters
Based on Fujitsu’s powerful SPARClite RISC processor,
AsantéBridge 1012 forwards data at line speed, without interfering with or degrading network perf ormance of traffic crossing the
bridge. The high performance RISC processor with expandable
memory and FLASH EPROM make the AsantéBridge 1012 a powerful “Application Engine” for future internetworking technologies.
AsantéBridge 1012 also includes SNMP capabilities and is a complete plug-in replacement for users of the AsantéHub 1012’s current SNMP Module. The AsantéBridge option card is designed to fit
into the expansion slot of the AsantéHub 1012.
AsantéBridge 1012 reinforces Asanté’s commitment to standardsbased networking, supporting the following:
❏ IEEE 802.3 for Ethernet
❏ IETFdefined MIB for bridge management
❏ IEEE 802.1d bridge spanning tree algorithm
❏ SNMP MIB I and II for standards-based bridge and hub
management
❖ Note: AsantéView 2.2 In-Band is required to manage the
AsantéBridge 1012.
❖
Page 1-5
Page 18
Chapter 1 — Quick Start
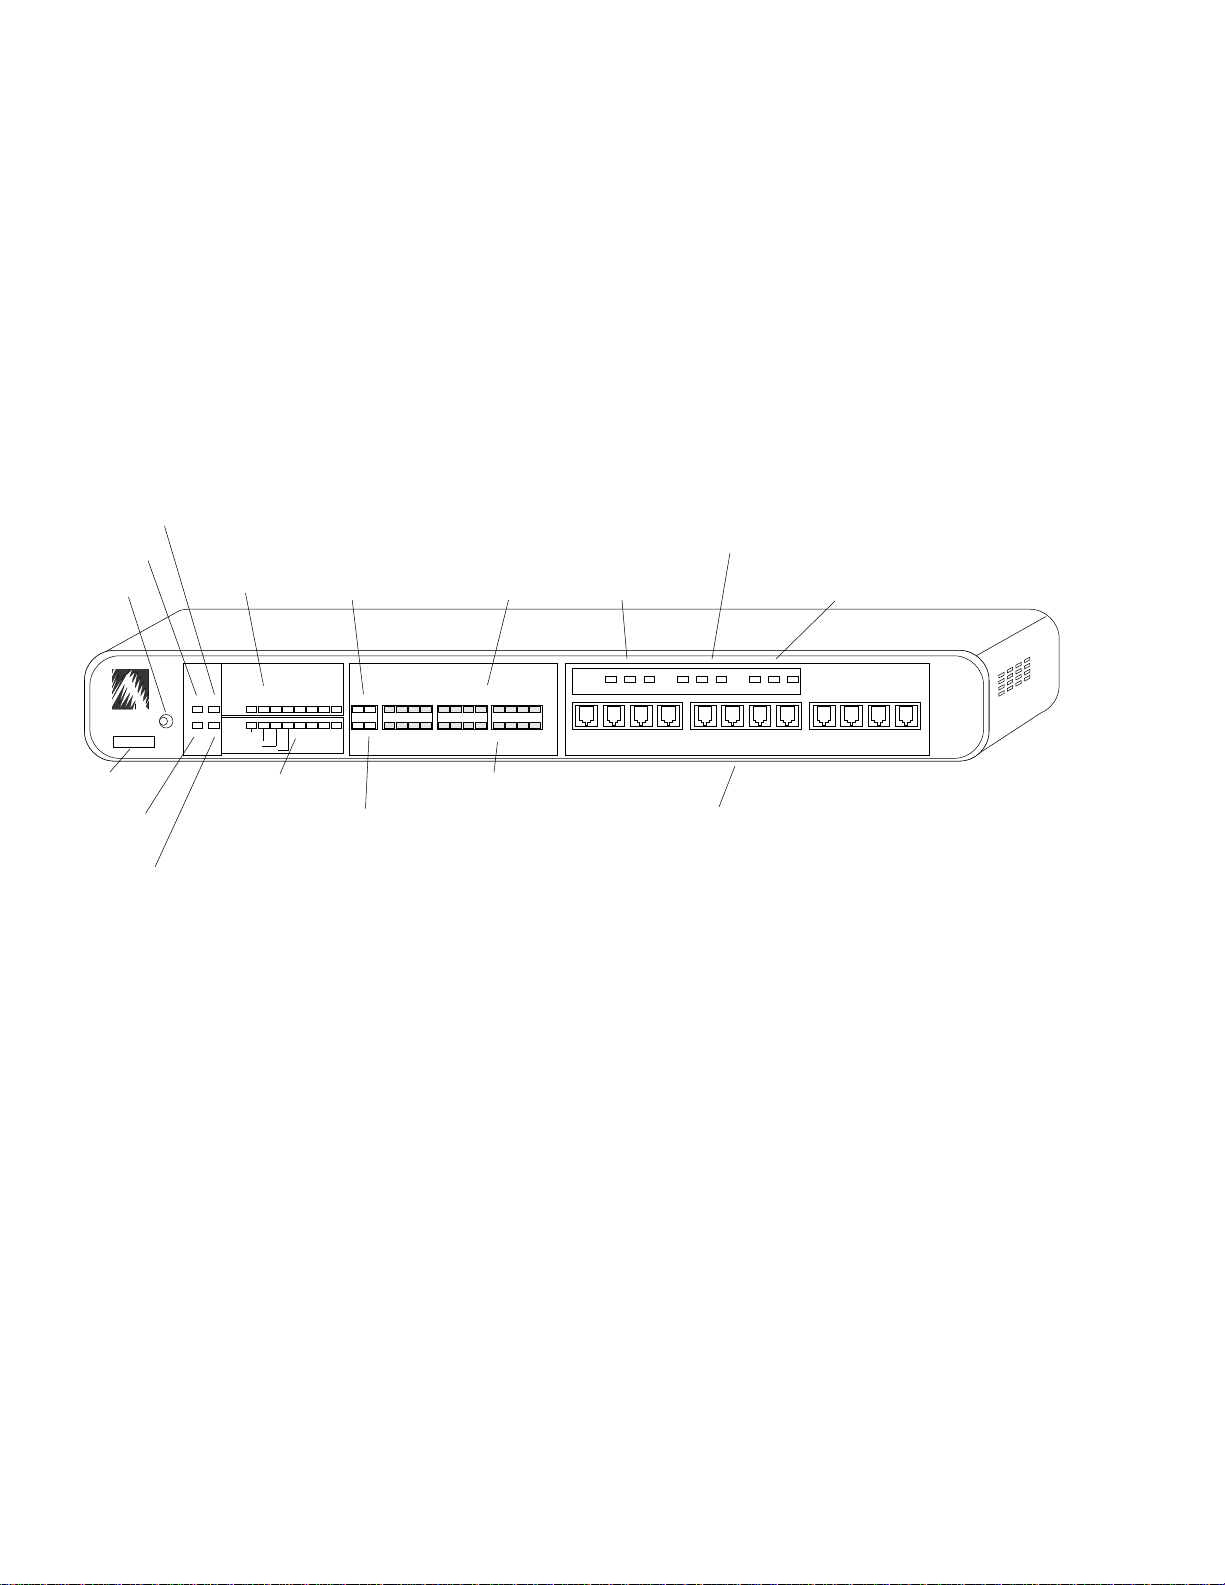
Quick View
AsantéBridge 1012
Front Panel
CPU Activity
LED
Power LED
PWR CPU
RESET
SNMP MSG
Hub Utilization
LEDs
UTILIZATION
1 3 5 10 20 30 50 65+ UPLINK
Late Collision
Misaligned CRC
Runts/Fragments
Short Event/Missing SFD
Reset
Button
ASANTE
0000944007B3
Uplink
Partition LED
%
13510+
%
COLLISION
Before you install the AsantéBridge 1012, you should become
familiar with both the front and rear panels. The following illustrations show the front and rear panels. Sit down in front of your
unit and find each of the items shown in the illustrations, then
locate the item in the following text.
Look at the AsantéBridge front panel as shown in Figure 1-3. All
controls and indicators are labeled with a brief definition.
Bridge Spanning Tree
Status LEDs
2 3 4 5 6 7 8 9 10 11 12
1
BRDG
LINK/RECEIVE
Port
Partition LEDs
PARTITION
Bridge External
Port Status LEDs
BRIDGE
EXT PORT HUB
1
234 5678 910 11 12
STATUS STANDBY ACTIVERCV FWD COL
10BASE-T PORTS
Bridge Hub
Port Status LEDs
RCV FWD COL
AsantéHub 1012
BRIDGE
Physical
Address
SNMP Agent
Activity
MSG LED
Hub Status LEDs
Bridge/Uplink Link/Receive LEDs
Port Link/Receive LEDs
RJ45 Port Connectors
Figure 1-3 AsantéBridge 1012 Front Panel
Physical Address
This is the physical address of this AsantéBridge 1012; preset at
the factory and cannot be modified.
Reset button
Allows you to reset all bridge and hub software. Any packets
currently buffered are lost. When the bridge resets, power on
diagnostics run automatically. The power LED goes off momentarily when the diagnostics run.
Power LED
Lights when the AsantéBridge 1012 is turned on.
CPU Activity LED
This LED flashes when bridge or hub activity occurs; if the LED
remains off, a hardware problem exists.
Page 1-6
Page 19

Quick View
SNMP LED
Flashes when the SNMP agent module is installed in the
AsantéBridge 1012.
MSG LED
If on, status messages are waiting; you must use AsantéView to
read them.
Hub Utilization LEDs
This top row of eight LEDs indicates an approximation of hub
segment (not bridge) bandwidth utilized at any given time.
Hub Status LEDs
This bottom row of eight LEDs provides warning and packet
collision data about the hub (not the bridge); the first four are
warning LEDs, the second four tell you the total percentage of
packet collisions occurring at any instant.
Uplink Partition LEDs
These two LEDs indicate partitioning of the SNMP ports,
respectively.
If the LED remains on— the port has been partitioned by a
user.
If the LED flashes — the port has been partitioned automati-
cally because more than 31 consecutive bad frames were
received on the port.
Bridge/Uplink Link/Receive LEDs
These LEDs indicate a connection and activity on either the
bridge local management port or uplink (3in1) port. These
LEDs flash when there is normal traffic on the ports.
Port Partition LEDs
These twelve LEDs indicate partitioning of the hub (not bridge)
10BaseT ports.
If the LED remains on— the port has been partitioned by a
user.
If the LED flashes — the port has been autopartitioned as a
result of some condition.
Port Link/Receive LEDs
These twelve LEDs indicate a connection on the respective
10BaseT port; if the LED is flashing, there is traffic on that port.
The faster the LEDs blink, the higher the traffic rate.
Page 1-7
Page 20
Chapter 1 — Quick Start
Bridge External Port Status LED
There are three separate LEDs:
RCV flashes when a packet is received on the external port.
FWD flashes when a packet is forwarded from the hub port to
the external port.
COL flashes when a packet collision is detected on the bridge
external port.
Bridge Spanning Tree Status LEDs
STATUS flashes when the bridge is still alive in the spanning
tree configuration.
STANDBY is on when the bridge is on standby or blocking in
the spanning tree.
ACTIVE is on when the bridge is the active or forwarding
bridge in the spanning tree.
Bridge Hub Port Status LEDs
There are three separate LEDs:
RCV flashes when a packet is received on the hub port
FWD flashes when a packet is forward from the e xternal port to
the hub port.
COL flashes when a packet collision is detected on the bridge
hub port.
CPU Activity
LED
Power LED
Reset
Button
ASANTE
0000944007B3
Physical
Address
SNMP Agent
Activity
MSG LED
PWR CPU
RESET
SNMP MSG
Hub Utilization
LEDs
UTILIZATION
1 3 5 10 20 30 50 65+ UPLINK
Late Collision
Misaligned CRC
Runts/Fragments
Short Event/Missing SFD
Hub Status LEDs
RJ45 Port Connectors
These are the twelve 10BaseT ports provided by the hub; each
port can be connected to an Ethernet device, including another
hub.
Uplink
Partition LED
%
BRDG
13510+
%
COLLISION
Bridge/Uplink Link/Receive LEDs
PARTITION
2 3 4 5 6 7 8 9 10 11 12
1
LINK/RECEIVE
Port Link/Receive LEDs
Bridge Spanning Tree
Status LEDs
Port
Partition LEDs
Bridge External
Port Status LEDs
BRIDGE
EXT PORT HUB
1
234 5678 910 11 12
STATUS STANDBY ACTIVERCV FWD COL
10BASE-T PORTS
RJ45 Port Connectors
Bridge Hub
Port Status LEDs
RCV FWD COL
Figure 1-4 AsantéBridge 1012 Front Panel
AsantéHub 1012
BRIDGE
Page 1-8
Page 21
Quick View
AsantéBridge 1012
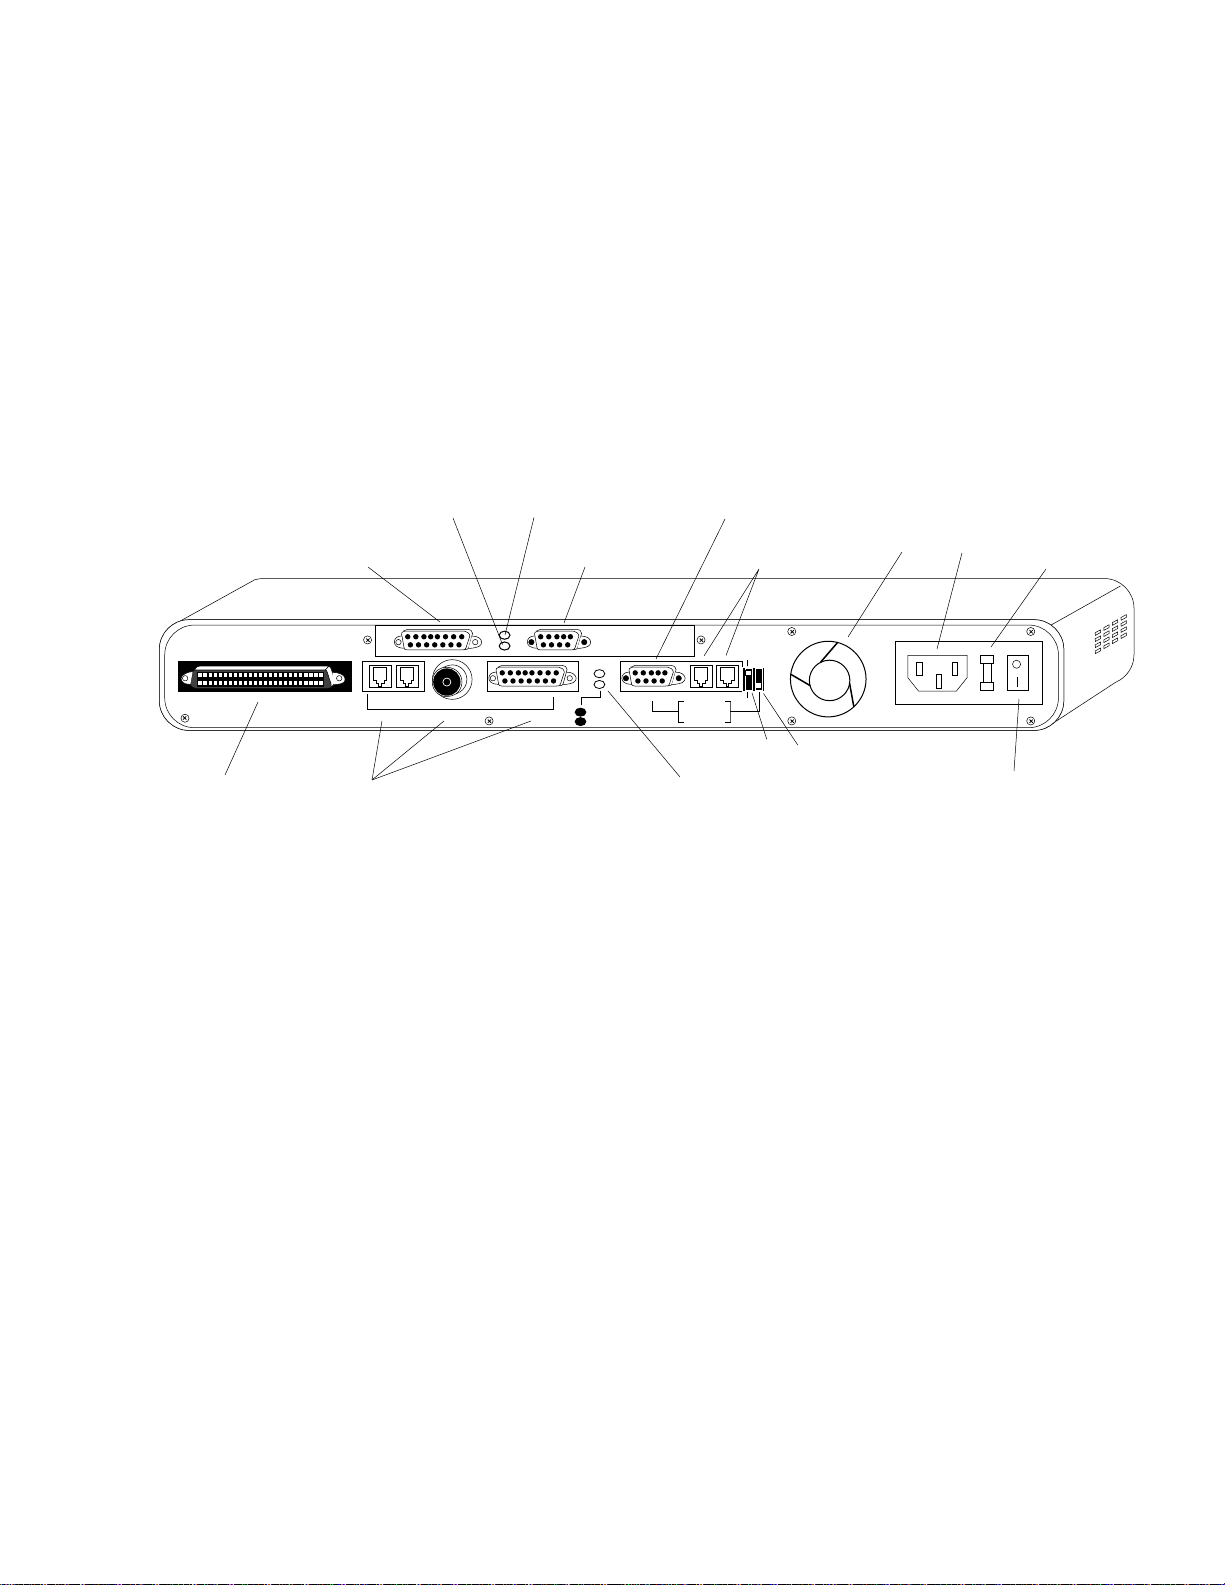
Rear Panel
Bridge External
Port Link/Receive LED
Bridge External
Port AUI Connector
RJ21 10 BASE-T PORTS
RJ21 Port Connector 3in1 Port:
IN or OUT
RJ45 In/Out
BNC
AUI
The AsantéBridge 1012 rear panel provides the following connectors:
❏ 50-pin T elco
❏ 3-in-1 Uplink (network)
❏ two LED status indicators for the uplink
❏ RS 232 port for PC or terminal connection
❏ dedicated AMS link
❏ external port for the bridge
Bridge/Hub
RS 232 Port
AMS Out-of-Band
Link Ports
THROUGH
AMS LINK
END
UP=PC
DOWN=TERMINAL
Through/End
DIP Switch
PC/Terminal
DIP Switch
Fan AC Power AC Line
2A/250V Slow Blow Fuse
Replace Only With Fuse of Same Rating
Spare Fuse in Fuse Holder
On/Off Switch
BNC
3-IN-1 UPLINK
Bridge External
Port Collision LED
Bridge VT100
Local Management Port
AUI
PARTITION
TRAFFIC
RS232
3in1 Port Partition
and Traffic LEDs
Fuse
Figure 1-5 AsantéBridge 1012 Rear Panel
RJ21 Port Connector
Used for linking the twelve hub 10BaseT ports directl y through
a telephone punchdown block; the RJ21 ports are in parallel to
the RJ45 ports on the front of the unit, but they cannot be used
simultaneously with the RJ45 ports. For example, if port 5 is
used on the front panel (RJ45), you cannot also use port 5 on
the RJ21 port.
3in1 Port
This is a single port with three different possible media options.
The port provides a network link between the hub (not the
bridge) and another hub or a network backbone. You can use
any one of the three types of connectors: AUI, BNC, or RJ45 In/
Out.
Page 1-9
Page 22

Chapter 1 — Quick Start
Bridge External Port AUI
This AUI port is the external port for the bridge (not the hub),
which is used to connect the bridge to a segment in your network. The actual connection should be made using a MAU with
the appropriate network media connector.
Bridge External Port Link/Receive LED
This LED is on when another network segment is connected to
the external bridge port via the AUI connector; flashes when
packets are received on the port.
Bridge External Port Collision LED
Flashes when a collision is detected on the bridge external
port.
Bridge VT100 Local Management Port
Connect a VT100 terminal or a Macintosh or PC running VT100
emulation software to this port (9600 baud only). All bridge
local management functions are controlled from this port using
the VT100.
Do not use AsantéView Out-of-Band with this port!
3in1 Port Partition and Traffic LEDs
The top LED is on when any one of the 3in1 ports (AUI, BNC,
RJ45) has been partitioned. The LED blinks if the port is autopartitioned.
The bottom LED is on when the 3in1 port is connected and
flashes when there is traffic on the port.
Bridge/Hub RS232 Port
This is an RS232 serial data port used to connect AsantéView
Out-of-Band only. This port cannot be used for any local management function.
AMS Out-of-Band Link Ports
Modular RJ45 jacks dedicated for use in daisychaining hubs
together for AsantéView out-of-band network management and
for connecting your AsantéView Management Station using the
AMS Link Extender cable.
Through/End DIP Switch
This DIP switch enables or disables termination for the out-ofband daisychain links.
How to set the switch
Choose either end hub on the daisychain.
Set the switch to the
DOWN position.
Page 1-10
Page 23

Quick View
Set the switch on all other hubs in the daisychain to the UP
position.
Only one hub at the end of the daisychain can have this
switch down. All others hubs in the chain must have it up.
PC/Terminal DIP Switch
This switch controls the configuration for the Bridge/Hub
RS232 port and the AMS out-of-band link ports. How you set the
switch depends on how y ou connect your Macintosh or PC running AsantéView Out-of-Band.
If you are running AsantéView Out-of-Band and your Asanté
Management Station is connected to the Bridge/Hub RS232
port, set this switch
hubs in the out-of-band daisychain must be set
If you want to use the Bridge/Hub RS232 port for local management, set this switch DOWN.
If you are running AsantéView Out-of-Band and your Asanté
Management Station is connected to the AMS Link port, set this
switch
DOWN on all hubs on the out-of-band daisychain.
UP. The PC/Terminal switches on all other
DOWN.
Fan
This is a small cooling fan for the AsantéBridge 1012. The fan
should turn on when the unit is powered on. Do not operate
the hub if the fan does not come on.
AC Power Connector
Plug the AC power cord into this connector.
AC Line Fuse
The AC fuse for the unit is behind this cover plate. You must
remove the plate to access and replace the fuse.
Included in each hub is a spare fuse. To access the spare fuse,
pry out the fuse holder with a flathead screwdriver. With some
units, this can take extra effort. The fuse holder slides straight
out from the back of the Hub. The spare fuse is in a small black
box inside the fuse holder. To open, push out from one end.
On/Off Switch
Turns the AsantéBridge 1012 on and off.
Page 1-11
Page 24
Chapter 1 — Quick Start
Interpreting LEDs
The AsantéBridge front panel LEDs provide status information on
both overall device utilization and for specific configuration and
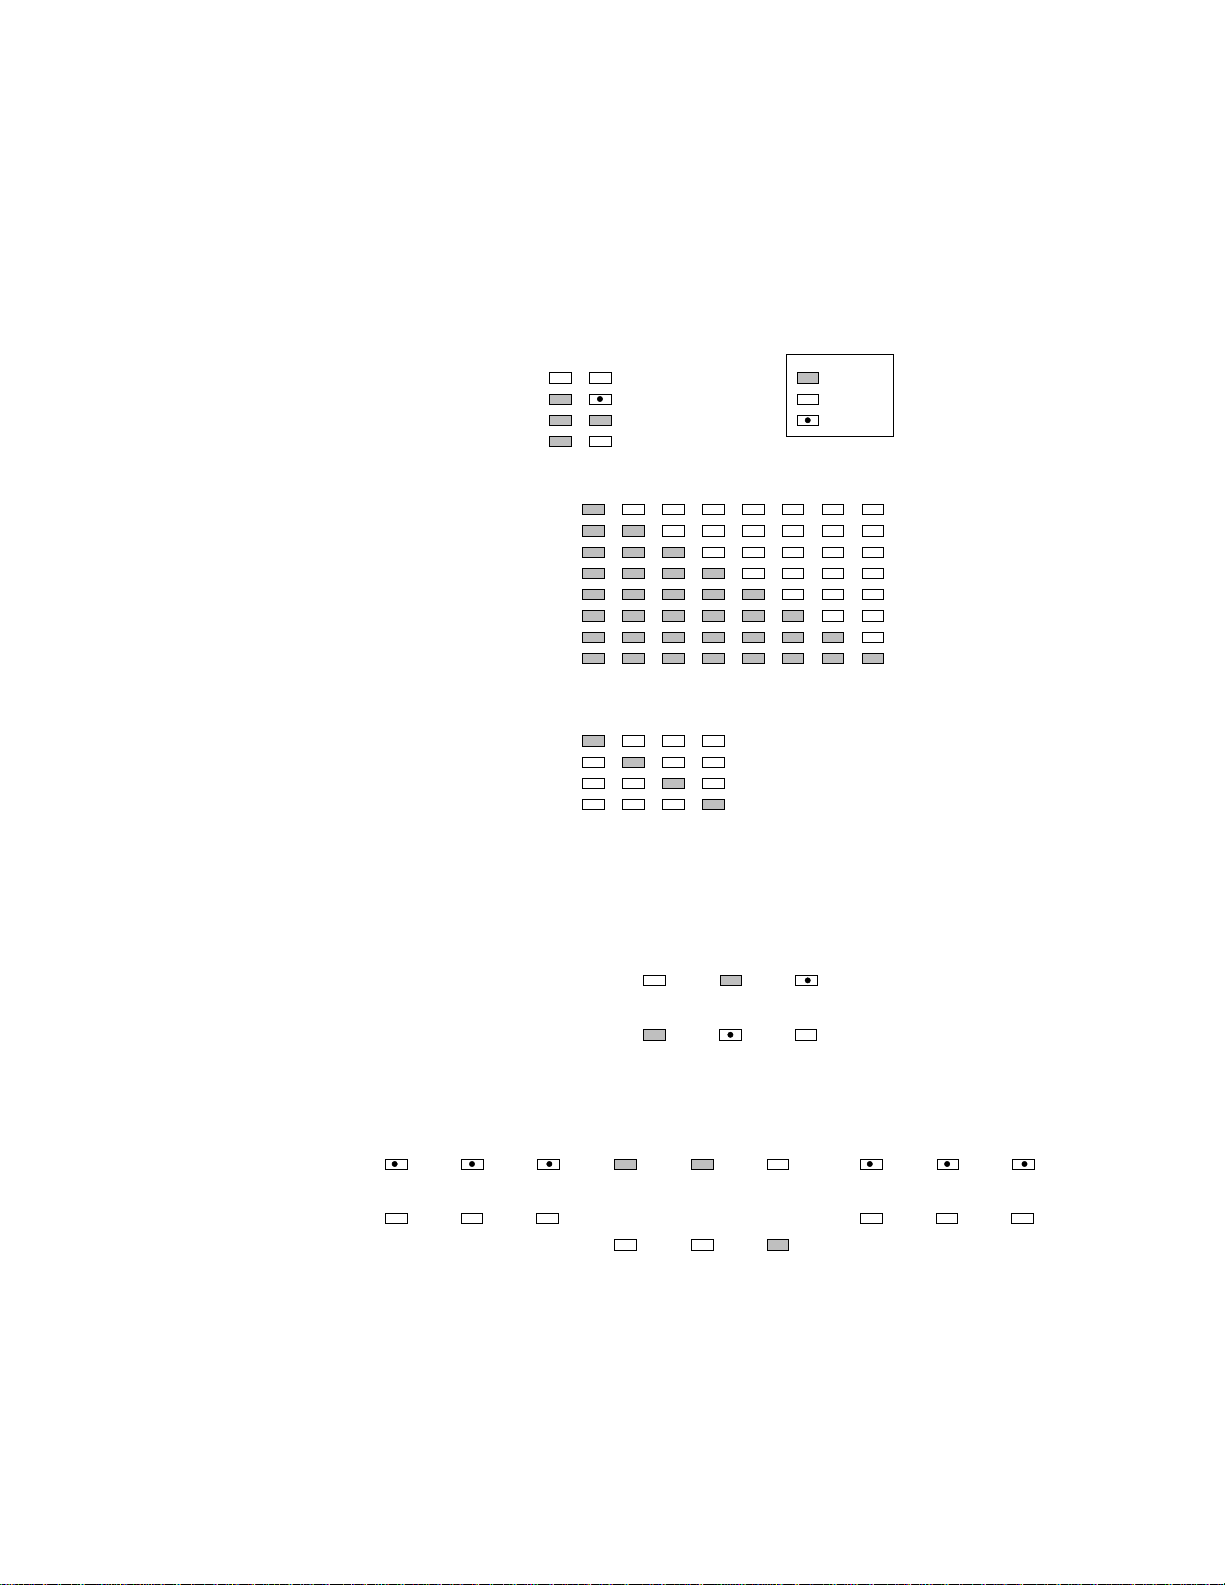
fault conditions. Figure 1-6 shows you how to interpret the display.
Power/CPU Status
PWR CPU
0-1%
+1-3%
+3-5%
+5-10%
+10-20%
+20-30%
+30-50%
+50-65% and over
Partition
Link/Receive
1
Link present = Physical link at port or Link Test disabled
Power Off, CPU Off
Power On, CPU Normal
Power On, CPU Failure
Power On, CPU Failure
Utilization LED Interpretation
1
3 5 10 20 30 50
Port
operator
partitioned
1
Link present
Traffic
1, 2
Warning LED Interpretation
1
Warnings may apply to any port on the hub.
Use the AsantéView Port Control command to isolate.
2
More than one warning type may be present.
Link/Partition LEDs
No
partition
Link present
No traffic
LED Key
ON
OFF
FLASHING
65+
Late Collision
Misaligned/CRC error
Runt/Fragmented packets
Short event/Missing SFG
Port
auto
partitioned
No link
Page 1-12
Bridge LEDs
No
HUB PORT
FWD COL
Forwarding
packets
No
traffic
RCV
Receiving
packets
No
traffic
EXT PORT
FWD COL
Forwarding
packets
No
traffic
Collisions
occurring
No
collisions
STATUS
Transmitting
configuration
data
Not transmitting
configuration
data
STANDBY
This bridge is on
standby in a
spanning tree
This bridge is
active in a
spanning tree
ACTIVE
RCV
Receiving
packets
traffic
Figure 1-6 Interpreting LED Status Indicators
See “AsantéBridge 1012 Front Panel” on page 1-6 for expanded
definitions for all LEDs on the AsantéBridge 1012 front panel.
Collisions
occurring
No
traffic
Page 25

Installing the AsantéBridge 1012
Installing the
AsantéBridge
1012
Preparing for the
Installation
This section tells you how to quickly install your new
AsantéBridge 1012 between two segments in a network and how
to connect other network devices to the RJ45 ports.
This is a very simple installation guide designed to get your
AsantéBridge up and running with minimum effort. For more
detailed information on different ways you can install your
AsantéBridge, please see the next chapter, “Connecting to the
Network.”
You need to make sure you have certain items ready before doing
the installation.
❏ A cabling scheme that creates two discrete network seg-
ments. Typically, you will have an Ethernet configuration
similar to the one shown here.
A
Future Segment A
Future bridging point
B
Future Segment B
Figure 1-7 Network Ready for Bridging
❏
Users must be warned that there will be a very short
Ethernet Backbone
interruption in network service (probably no more than
a few minutes). You may want to schedule this installation for a time when there is little network traffic.
❏ AnRJ45 extension cables long enough to reac h fr om the
AsantéBridge to the network nodes you w ant to connect
(to a maximum of 100 meters). You will also need an
extension cable to pretest the unit.
❏ Two male BNC connectors to be attached to the back-
bone at the bridging point.
❏ Two MAUs (Media Access Unit) with an AUI connector
on one side and a BNC connector on the other side.
Page 1-13
Page 26

Chapter 1 — Quick Start
❏ At least one device configured for connection to your
Ethernet. We recommend that you use a Macintosh or
PC with AsantéView 2.2 network management software
installed, although you can use any device that normally
connects to and communicates over your Ethernet network.
❏ An RJ45 extension cable to connect your network
device to the AsantéBridge 1012.
Tools
You need the appropriate tools for attaching BNC connectors to
Ethernet coaxial cable, and a small Phillips screwdriver to connect the MAUs.
Basic Installation
Procedures
Installing your AsantéBridge 1012 is a simple five step procedure:
❏ Unpack your AsantéBridge
❏ Physically position the unit, either on a desktop or with
a wall or rack mount
❏ Turn on the unit and pretest it
❏ Connect two network segments
❏ Connect two or more network devices to the bridge
Unpacking the AsantéBridge 1012
Your AsantéHub package includes:
❏ The AsantéBridge 1012
❏ AC power cable
❏ T w o (2) mounting br ac kets and f our (4) scr e ws for rack-
or wall-mounting
❏ Four (4) self-adhesive feet for desk-mounting
❏ AMS Link Extender cables for PC and Macintosh
❏ This installation guide
❏ The Asanté Introduction to Networking Manual
❏ Warranty card
Page 1-14
Please mail in the warranty card today. This guarantees that you
will receive notification of any future software or hardware
releases.
Page 27
Installing the AsantéBridge 1012
Positioning the AsantéBridge 1012
The AsantéBridge can be positioned on any flat surface (a desktop,
table, or other work surface), or it can be mounted on a wall or in
a rack. There are a few guidelines that should be followed:
❏ Place the unit within six feet of an AC outlet.
❏ The unit must be no more than 100 meters (328 feet)
away from the network devices to be connected via
RJ45 cables.
❏ Leave a two-inch clearance around the ventilation grills.
Normal office temperature and humidity generally suit
this type of equipment. For details, see Appendix B,
“Technical Specifications.”
❏ The location should not be near sources of electrical
interference, such as motors or heavy-current switches.
Air flow
2 in.
ASANTE
Power Cord
Maximum 6 ft
Air flow
STATUS STANDBYACTIVE
UTILIZATION
1 3 5 10 20 30 50 65+ UPLINK
Late Collision
Misaligned CRC
Runts/Fragments
Short Event/Missing SFD
%
13510+
%
COLLISION
PWR CPU
RESET
NMP MSG
2 3 4 5 6 7 8 9 10 11 12
1
SNMP
LINK/RECEIVE
PARTITION
RCV FWD COL
BRIDGE
50
1
234 5678 910 11 12
50
10BASE-T PORTS
RCV FWD COL
50
Asante´Hub 1012
BRIDGE
2 in.
No Electrical Interference
Device Connection
Maximum 100 meters
(328 ft.)
Figure 1-8 Locating the AsantéBridge
Page 1-15
Page 28
Chapter 1 — Quick Start
Placing the Bridge on a Desktop
Peel the protective strips from the self-adhesive feet and
1
apply the feet in the four corners of the base of the unit.
Place the unit on a flat, stable surface.
2
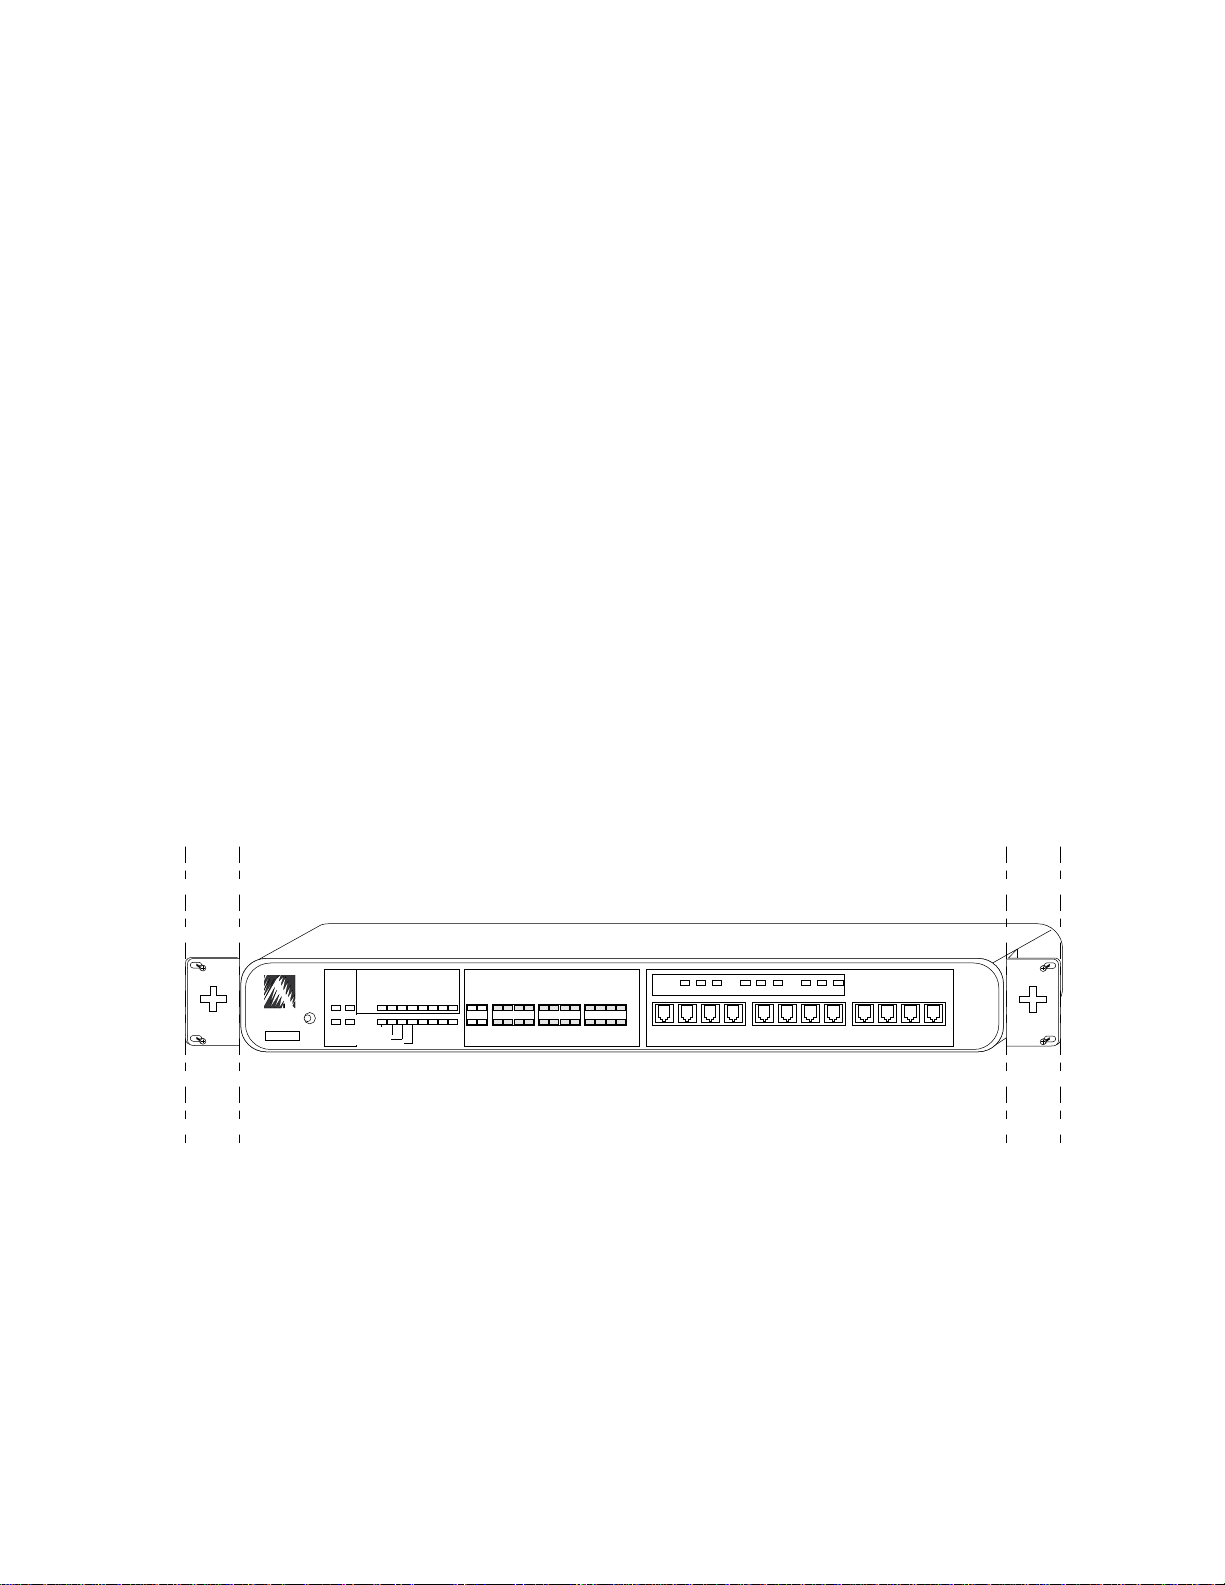
Wall or rack mounting the Bridge
1
Mark the desired location on the wall or rack (see Appendix B, “Technical Specifications” for unit physical dimensions).
ASANTE
2
vided, or wall using screws that are appropriate for the
type of wall on which you are mounting the AsantéBridge.
Place the unit on the brackets (get an assistant to hold it in
Fasten the brackets to the rack, using the hardware pro-
3
place if necessary), and fasten the hub to the brackets,
using the screws provided.
Wall- and rack-mounting positions are illustrated in the figure
below.
STATUS STANDBY ACTIVE
UTILIZATION
PWR CPU
RESET
NMP MSG
Late Collision
Misaligned CRC
Runts/Fragments
Short Event/Missing SFD
%
13510+
%
COLLISION
SNMP
1 3 5 10 20 30 50 65+ UPLINK
PARTITION
2 3 4 5 6 7 8 9 10 11 12
1
LINK/RECEIVE
RCV FWD COL
BRIDGE
50
1
234 5678 910 11 12
50
10BASE-T PORTS
RCV FWD COL
50
Asante´Hub 1012
BRIDGE
Page 1-16
Figure 1-9 Rack-mounting the AsantéBridge
❖
Note: To wall mount, rotate the mounting brackets 90°
and use the appropriate screws to fasten to the wall.
❖
Page 29

Installing the AsantéBridge 1012
Turning on and Pretesting the Bridge
If you are installing more than one unit, you may want to repeat
this procedure for each one bef or e making an y device or networ k
connections.
Turning on the Bridge
1
Attach the power cord to the soc ket on the rear panel, and
connect it to an AC outlet.
2
Turn on the power switch at the right rear panel.
Evaluating the self-test pattern
1
2
3
When you power up the AsantéBridge, it runs through a
hardware and software self-test. All LEDs light and turn off,
in groups of two or four, from right to left. This process
takes about two seconds.
If the unit does not pass the self-test, the LED displays stop
at the detected error condition/test sector.
If this occurs, reset the hub by depressing the recessed
reset button using any pen-like instrument. If the self-test
fails again, the unit has a hardware malfunction. In this
case, note which LEDs are lit during the pause, and call
Asanté T echnical Support.
After the self-test is passed, the LEDs assume normal status.
For a stand-alone hub, the PWR LED (green) is on and the
SNMP and CPU LED is blinking. See “AsantéBridge 1012
Front Panel” on page 1-6 for the location of these LEDs.
Pretesting the Link Connection
1
Connect an RJ-45 extension cable between front panel
port #1 and the Ethernet interface port on a device configured with Ethernet hardware and software. You can see the
front panel LEDs respond to the connection.
LINK/RECEIVE LED corresponding to port #1 turns
The
on. If the device is sending unacceptable packets, the Partition LED for that port may also blink, indicating that the
hub has autopartitioned the port. The PWR and SNMP and
CPU LEDs remain on and blink.
Page 1-17
Page 30

Chapter 1 — Quick Start
2
Connecting Two Segments to the AsantéBridge
If the LINK/RECEIVE LED does not come on, use a narrow
tool to reset the hub. (The Reset button is on the front
panel.) The AsantéBridge reruns all diagnostics, and you
should see the self-test LED display described in the previous step.
If the test continues to fail, you may have a problem with
the device connected to the AsantéBridge, the cabling
between the unit and the device, or possibly with the
AsantéBridge itself.
The AsantéBridge 1012 has two ports: an external port and the
hub port. As described earlier, the hub portion of the device is
actually the hub port. In this procedure, you connect one segment to the external port, and the other segment to the hub port.
❖ Important: Separating your network into two separate
segments causes an interruption in network service. Do
not do this without notifying your network administrator and warning network users that the network is going
down for a few minutes. We recommend that you schedule this activity for a time when network activity is at a
low level.
❖
Dividing the Network into Segments
As described earlier in this chapter (see page 1-13), you should
have already chosen the point in your backbone where you want
to separate the network into segments.
1
2
If you have not already done so, open the backbone at the
point where you want to bridge and prepare the Ethernet
cabling with male BNC connectors on each end.
Connect one cable to a MA U with an AUI connector on the
other end.
Page 1-18
Page 31

Installing the AsantéBridge 1012
3
RJ21 10 BASE-T PORTS
shown below.
Connect the remaining backbone cable to another MAU,
Connect the MAU to the AsantéBridge external port as
4
also with an AUI connector on the other end.
Alternatively, you can prepare the cable with a male BNC
connector.
External Port
THROUGH
AMS LINK
PARTITION
TRAFFIC
RS232
BNC
IN or OUT
3-IN-1 UPLINK
Figure 1-10 Connecting to the External Port
AUI
Hub Port
UP=PC
DOWN=TERMINAL
END
2A/250V Slow Blow Fuse
Replace Only With Fuse of Same Rating
Spare Fuse in Fuse Holder
5
which is actually the
hub 3in1 port. See Figure 1-10 on
page 1-19 for the location.
Power up the AsantéBridge.
Connect the second MAU to the AsantéBridge hub port,
6
The unit
automatically begins bridging between the two
segments, building a dynamic forwarding address table as
each device on both segments transmits. You do not need
to configure, program, or modify the AsantéBridge in any
way. All operation is completely automatic.
About Spanning Trees
Although this simple installation procedure does not describe a
spanning tree configuration, there is no difference. If you install
the AsantéBridg e in parallel with another bridge implementing the
IEEE 802.1d spanning tree algorithm, it will
automatically begin
to participate in the spanning tree algorithm. You do not need to
take any special steps to prepare or configure the bridge.
Page 1-19
Page 32

Chapter 1 — Quick Start
Connecting Devices to the AsantéBridge 1012
Now that you have pretested your AsantéBridge and have connected it into your network as a bridge, the last step is to connect
Ethernet devices to the hub portion of the unit.
The AsantéBridge provides two options for device connections:
❏ Twelve RJ-45 ports on the front panel, which connect
on a one-to-one basis to single devices, or
❏ The 50-pin RJ21 connector on the rear panel, which
connects to a Telco punchdown block typically located
in the wiring closet in your building.
If you want to install the hub in a wiring closet using the RJ21
connector to make host connections, see Appendix C, “Pinouts
and Cable Specifications”.
ASANTE
0000944007B3
What You Need
You need only the appropriate length straight-through RJ-45
extension cables. (If you want to build your own cables, see
Appendix C, “Pinouts and Cable Specifications” for details.)
Using the front panel RJ45 ports
Connect the RJ-45 extension cables between the front
1
panel ports of the hub and the network devices.
UTILIZATION
PWR CPU
RESET
SNMP MSG
Late Collision
Misaligned CRC
Runts/Fragments
Short Event/Missing SFD
%
13510+
%
COLLISION
BRDG
1 3 5 10 20 30 50 65+ UPLINK
PARTITION
2 3 4 5 6 7 8 9 10 11 12
1
LINK/RECEIVE
BRIDGE
1
STATUS STANDBY ACTIVERCV FWD COL
EXT PORT HUB
234 5678 910 11 12
To Network Devices
Figure 1-11 Single-Hub Host Connections Using RJ-45 Extension Cables
RCV FWD COL
10BASE-T PORTS
AsantéHub 1012
BRIDGE
Connect the other ends of the RJ45 extension cables to
2
individual Ethernet devices such as Macintoshes, PCs,
printers, or other devices equipped with an Ethernet interface.
Page 1-20
Page 33

Installing the AsantéBridge 1012
Using the rear panel RJ21 connector
You can also access the twelve hub ports through a Telco punchdown block connected to the RJ21 connector on the rear of the
AsantéBridge.
You can connect some devices to the front panel RJ45 ports and
some devices to the RJ21 port. The only restriction is that you cannot connect the same port in both places.
For example, you can connect devices to ports 1,3,5,7,9, and 11
using the front panel RJ45 ports, and ports 2,4,6,8,10, and 12 via
the Telco punchdown block connected to the RJ21 connector on
the rear hub panel.
However, you cannot, for example, connect ports 2,3,4, and 5 to
the front panel, and ports 2,3,4, and 5 using the RJ21 connector.
Configuration
Options
Now that you have completed a quick installation for your new
AsantéBridge 1012, you should explore different ways to configure it in your network and learn how to manage it, using either
AsantéView 2.2 network management software or a local management terminal.
For more information about configuring your new unit in your
network, see the next chapter, “Connecting to the Network”.
For information on AsantéBridge local management, see
“AsantéBridge Local Management”, also in this manual.
To learn about AsantéView 2.2, please read the AsantéView Users’
Guide.
Page 1-21
Page 34

Chapter 1 — Quick Start
Page 1-22
Page 35

2
Connecting to the Network
• Before You Start on page 2-2
• About Bridging on page 2-3
• Using the 3in1 Port on page 2-8
• Configuring a Redundant Link
on page 2-14
• Setting Up Out-of-Band Links
on page 2-17
• Connecting a VT100 Terminal
on page 2-21
• Default Settings on page 2-22
Page 36

Chapter 2 — Connecting to the Network
Before You
Start
This chapter provides detailed information about your
AsantéBridge and some pointers on different ways you can connect it to your network.
The chapter opens with
transparent learning bridges and how these features are implemented in the AsantéBridge 1012.
Using the 3in1 Port gives practical guidelines for connecting to
your network using any of three possible methods: AUI, BNC, or
an RJ45 In/Out link.
Configuring a Redundant Link describes how you can set up a
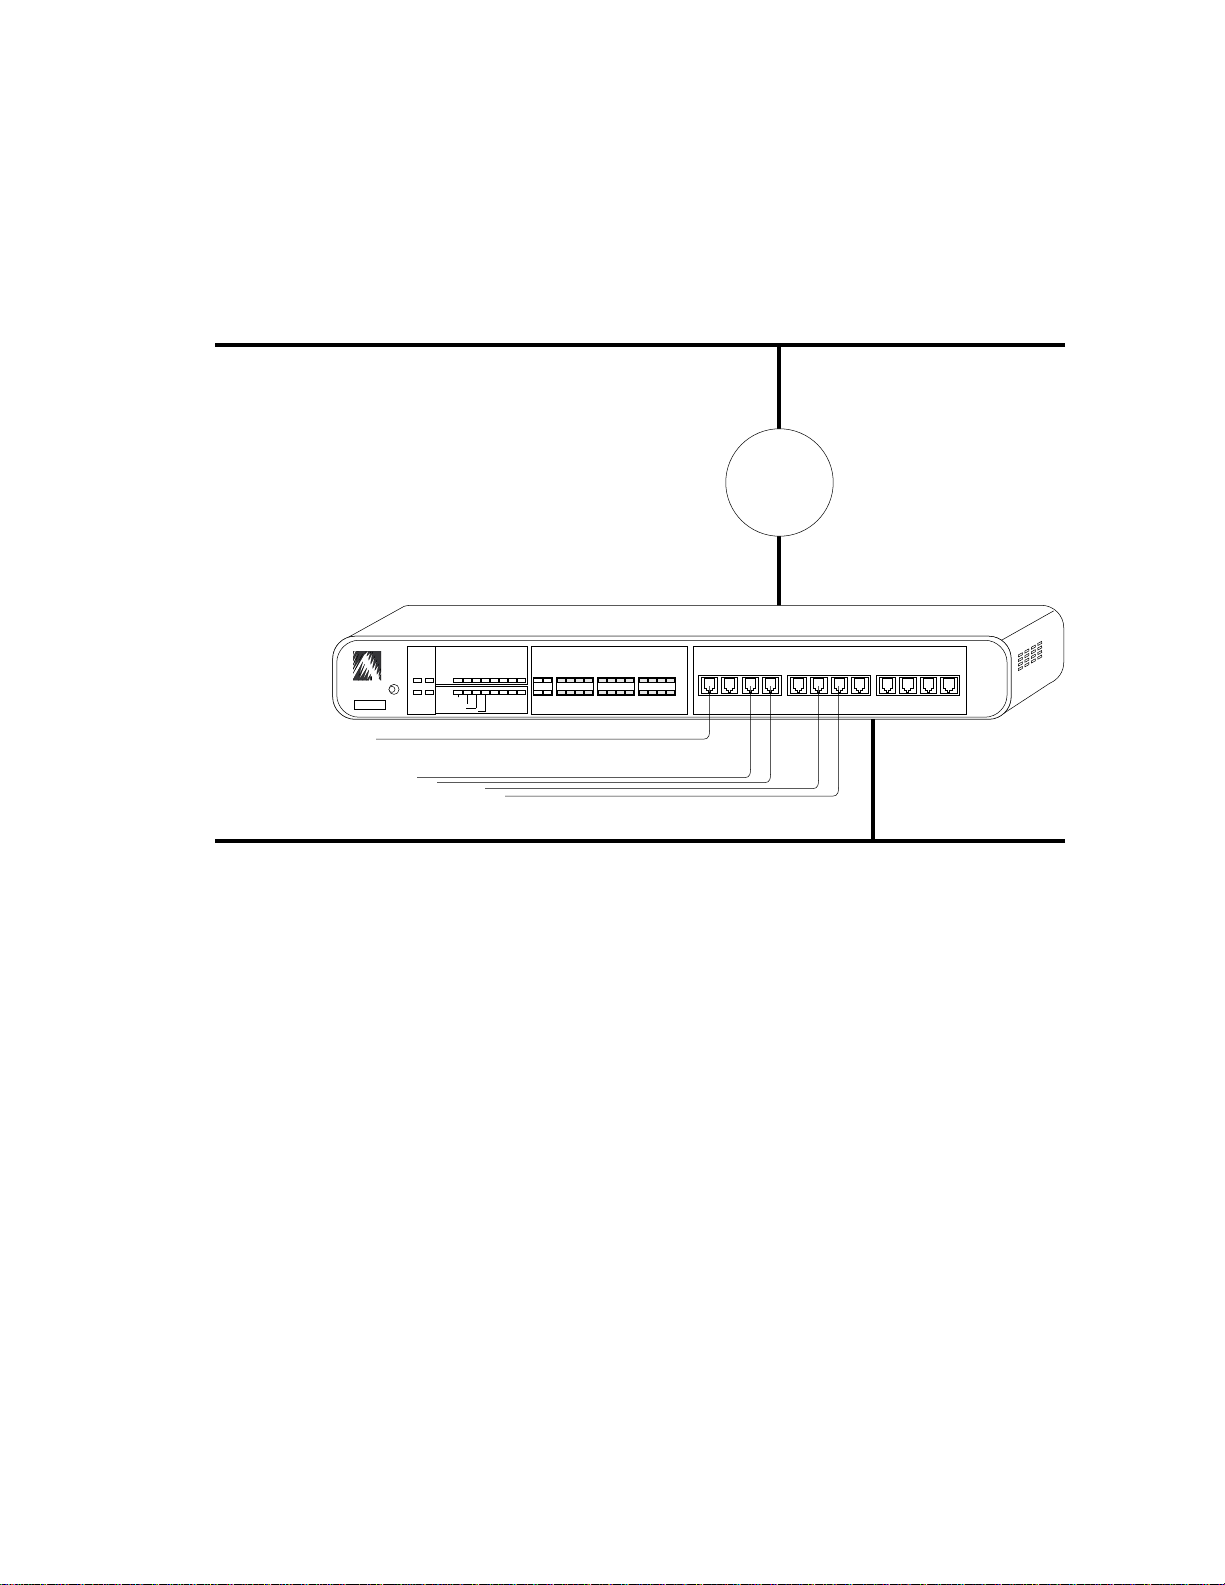
second, parallel, 3in1 port connection that automatically becomes
active if you lose your primary connection link.
Setting Up Out-of-Band Links tells you how to daisychain your
AsantéBridge for out-of-band management using AsantéView 2.2.
About Bridging, a short introduction to
Page 2-2
Page 37

About Bridging
About
Bridging
The AsantéBridge 1012 has combined the world of a transparent
learning bridge with the intelligence of the AsantéHub 1012. This
section gives you a brief introduction to bridging and how it is
implemented by your new AsantéBridge.
The purpose of any bridge is to provide a link between two discrete segments of a single network, enabling each segment to
function as an independent network, except when packets must
be sent from one segment to the other.
For example, let’s assume that we are starting with a simple Ethernet network comprising several AsantéHubs and various network
devices (PC, Macintoshes, and printers):
10Base2
connection to hub
3in1 Port
AsantéHub 1012
ASANTE
RESET
0000944007B3
10Base2
connection to hub
3in1 Port
AsantéHub 1012
10BaseT to
network devices
10Base2
connection to hub
3in1 Port
AsantéHub 1012
ASANTE
RESET
0000944007B3
10BaseT to
network devices
AsantéHub 1012
AsantéHub 1012
ASANTE
RESET
0000944007B3
AsantéHub 1012
10BaseT to
network devices
Figure 2-1 A simple Ethernet network
In this net, we are using just three hubs configured on a thick
Ethernet backbone. Expanding the net is relatively easy: we just
add more hubs on the backbone.
Page 2-3
Page 38

Chapter 2 — Connecting to the Network
A Simple
Transparent Bridge
The more hubs and users added, the more traffic occurs on the
backbone, until we eventually reach a point at which overall network performance begins to degrade. As a general rule, bridges
are typically required when users begin to complain that response
times are too great or file transfers are too slow. These symptoms
are usually seen when over all utilization e xceeds 40% on a regular
basis. Now it is time to split the net into two segments and add a
bridge between them. Logically, the net will look like this:
Thin Ethernet connected
to hub 3in1 port
Thin Ethernet connected
to hub 3in1 port
AsantéHub 1012
ASANTE
RESET
0000944007B3
10BaseT to
network devices
Thin Ethernet connected
to hub 3in1 port
AsantéHub 1012
ASANTE
RESET
0000944007B3
AsantéHub 1012
10BaseT to
network devices
AsantéHub 1012
ASANTE
RESET
0000944007B3
AsantéHub 1012
AsantéHub 1012
10BaseT to
network devices
Segment A 10Base5 backbone
Hub 3in1 Port connected to
the Segment B 10Base5 backbone
Segment B 10Base5 backbone
Thin Ethernet connected
to hub 3in1 port
AsantéHub 1012
ASANTE
RESET
0000944007B3
AsantéHub 1012
AsantéHub 1012
ASANTE
RESET
0000944007B3
10BaseT to
network devices
AsantéBridge 1012
ASANTE
RESET
0000944007B3
10BaseT to
network devices
(also on Segment B)
AsantéHub 1012
ASANTE
RESET
0000944007B3
10BaseT to
AsantéHub 1012
network devices
Bridge External Port connected
to Segment A 10Base5 backbone
Segment A connected
AsantéHub 1012
BRIDGE
to the AsantéBridge External
Port
Segment B connected
to the internal
AsantéBridge Hub Port
AsantéHub 1012
Page 2-4
Figure 2-2 Bridging between segments
Page 39

About Bridging
The transparent bridge shown here serves to isolate the two segments: Network traffic meant only for devices on segment A is limited to the backbone serving segment A. These packets are not
passed across the bridge. Traffic on segment B is also restricted to
that segment. Only packets originating on one segment that are
intended for devices on the other segment (A to B and B to A) are
passed across the bridge and carried by both backbones.
What traffic is actually passed across the bridge is largely configurable. The bridge can be left alone to “learn” what devices live on
each segment, or it can be manually set up to pass packets only to
certain addresses, or certain ranges of addresses can be arbitrarily
forwarded or blocked.
Page 2-5
Page 40

Chapter 2 — Connecting to the Network
A Spanning Tree
AsantéHub 1012
ASANTE
RESET
0000944007B3
Dividing your network into two segments reduces your overall
backbone traffic and improve network efficiency, but also introduces a certain element of risk: the bridge becomes the sole path
between the two segments. If the bridge fails for any reason,
devices on different segments will no longer be able to communicate with each other.
This may not seem serious, but consider the implication if your
database server is on one segment and must be accessed by
devices on the other segment. Suddenly the stakes are a little
higher. Fortunately, by simply installing an additional bridge
between the two segments, you can provide a high degree of
redundant protection. Such a network configuration would look
like this:
AsantéHub 1012 AsantéHub 1012
AsantéHub 1012
AsantéHub 1012
ASANTE
RESET
0000944007B3
10BaseT to
network devices
AsantéHub 1012
10BaseT to
network devices
ASANTE
RESET
0000944007B3
AsantéHub 1012
ASANTE
RESET
0000944007B3
AsantéHub 1012
Segment A 10Base5 backbone
Active
Bridge
3in1 Port link to the Segment B
10Base5 backbone
Segment B 10Base5 backbone
AsantéHub 1012
ASANTE
RESET
0000944007B3
AsantéHub 1012
AsantéHub 1012
ASANTE
RESET
0000944007B3
10BaseT to
network devices
AsantéBridge 1012
Number 1
ASANTE
RESET
0000944007B3
10BaseT to
network devices
(also on Segment B)
AsantéHub 1012
ASANTE
RESET
0000944007B3
AsantéHub 1012
AsantéHub 1012
AUI link to the Segment A
10Base5 backbone
AsantéBridge
1012 Number 2
AsantéHub 1012
BRIDGE
AsantéHub 1012
ASANTE
RESET
0000944007B3
ASANTE
RESET
0000944007B3
10BaseT to
network devices
AsantéHub 1012
AsantéHub 1012
BRIDGE
Standby
Bridge
Page 2-6
Page 41

About Bridging
Figure 2-3 Redundant bridging
Internal bridge software will automatically designate one bridge
as the “active” bridge and the other bridge as the “standby” or
blocking bridge, preventing multiple transmissions of the same
packet by both bridges.
This software implements what is called a
and is commonly used in the configuration shown in Figur e
rithm
2-3.
The two bridges talk to each other periodically, checking each
other’s status. If the active bridge goes down or the link between
it and either segment is lost, the standby bridge automatically
(after a short time period) reconfigures itself as the active bridge,
and inter-segment transmissions will continue normally.
For a complete description of all spanning tree configuration
parameters, see Chapter 3, “AsantéBridge 1012
Local Management.”
spanning tree algo-
Page 2-7
Page 42

Chapter 2 — Connecting to the Network
Using the
3in1 Port
The 3in1 port is actually a single port with three connectors: an
AUI, RJ45, and BNC. Port connection is made using one of the following:
❏ The AsantéBridge can automatically select a port con-
nector to use; the connector selected depends on port
configuration: If only one connector is connected, for
example, the AUI, you select this port. If more than one
connector is attached (for e xample, both the AUI and the
BNC), the AsantéBridg e looks first for the AUI, then RJ45,
then the BNC.
❏ You can assign a specific port connector to use via
AsantéView network management software; this setting
remains in effect until the AsantéBridge is reset.
❏ You can configure the AsantéBridge hardware by install-
ing a jumper on the motherboard to use just the A UI port
connections; this setting cannot be changed except by
removing the jumper on the board.
The next three sections provide e xamples f or inter connecting the
AsantéBridge to your network. There are sample connection
schemes using each connector in the 3in1port.
Connecting to the
BNC Port
BNC port is typically used to interconnect hubs to a thin
The
Ethernet backbone. The backbone cable must be properly terminated, and the network configuration must not exceed minimum
and maximum distance length or device count guidelines as presented in the IEEE 802.3 10Base2 specifications.
To interconnect hubs on a thin Ethernet backbone:
1
Connect the AsantéBridge BNC connector to a T-connector
on a properly terminated thin cable backbone, as shown in
the Figure 2-4.
Page 2-8
Page 43

RJ21 10 BASE-T PORTS
Terminator
RJ21 10 BASE-T PORTS
IN or OUT
IN or OUT
BNC
3-IN-1 UPLINK
3-IN-1 UPLINK
Using the 3in1 Port
Thin Ethernet Backbone
for Segment B connected to
bridge external port with a MAU
AsantéBridge 1012
2A/250V Slow Blow Fuse
THROUGH
AMS LINK
PARTITION
TRAFFIC
RS232
AUI
UP=PC
DOWN=TERMINAL
END
Thin Ethernet Backbone for Segment A connected to
3in1 Port BNC connector (bridge hub port)
AsantéHub 1012
THROUGH
AMS LINK
RS232
AUI
BNC
PARTITION
TRAFFIC
UP=PC
DOWN=TERMINAL
END
Replace Only With Fuse of Same Rating
Spare Fuse in Fuse Holder
2A/250V Slow Blow Fuse
Replace Only With Fuse of Same Rating
Spare Fuse in Fuse Holder
AsantéHub 1012
2A/250V Slow Blow Fuse
Replace Only With Fuse of Same Rating
Spare Fuse in Fuse Holder
RJ21 10 BASE-T PORTS
IN or OUT
BNC
3-IN-1 UPLINK
THROUGH
AMS LINK
PARTITION
TRAFFIC
RS232
AUI
UP=PC
DOWN=TERMINAL
END
Terminator
Figure 2-4 Interconnecting Hubs on Thin Ethernet Backbone
❖
Note: The terminator may be used either at one end of a
T-connector, or at the end of a cable.
❖
Page 2-9
Page 44

Chapter 2 — Connecting to the Network
Connecting to the
AUI Port
The AUI port is typically used to interconnect hubs using a fiber
or thick Ethernet backbone, as illustrated in Figure 2-5 and Figure
2-6. It can also be used to interconnect hubs using a variety of
media, such as unshielded twisted-pair, depending on the external
transceiver you connect to the port.
A common approach is using two MAUs connected by attaching
the transmit pair of one MAU to the receive pair of another MAU.
As you do this, the integrity of tip-to-tip and ring-to-ring polarity
must be maintained.
Since the AUI port is 802.3 10Base5 compatible, you may use it
according to those specifications, paying special attention to maximum distance, number of devices, and termination guidelines.
❖ Note: Make sure SQE (Signal Quality Error) is disabled
on the MAU when it is attached to the AUI Port.
❖
Fiber Backbone for Segment B connected
to bridge external port with a MAU
Fiber Backbone for Segment A connected
to 3in1 AUI port (bridge hub port) with a MAU
2A/250V Slow Blow Fuse
Replace Only With Fuse of Same Rating
Spare Fuse in Fuse Holder
RJ21 10 BASE-T PORTS
IN or OUT
BNC
3-IN-1 UPLINK
THROUGH
AMS LINK
RS232
AUI
PARTITION
TRAFFIC
UP=PC
DOWN=TERMINAL
END
Figure 2-5 Interconnecting Using FOIRL (Fiber Optic Inter-Repeater Link)
Page 2-10
Page 45

RJ21 10 BASE-T PORTS
RJ21 10 BASE-T PORTS
RJ21 10 BASE-T PORTS
IN or OUT
IN or OUT
IN or OUT
BNC
3-IN-1 UPLINK
BNC
3-IN-1 UPLINK
BNC
3-IN-1 UPLINK
Using the 3in1 Port
AsantéBridge 1012
2A/250V Slow Blow Fuse
THROUGH
AMS LINK
RS232
AUI
PARTITION
TRAFFIC
UP=PC
DOWN=TERMINAL
END
Drop Cable Tranceivers
AsantéHub 1012
THROUGH
AMS LINK
RS232
AUI
PARTITION
TRAFFIC
UP=PC
DOWN=TERMINAL
END
AsantéHub 1012
THROUGH
AMS LINK
RS232
AUI
PARTITION
TRAFFIC
UP=PC
DOWN=TERMINAL
END
Replace Only With Fuse of Same Rating
Spare Fuse in Fuse Holder
2A/250V Slow Blow Fuse
Replace Only With Fuse of Same Rating
Spare Fuse in Fuse Holder
2A/250V Slow Blow Fuse
Replace Only With Fuse of Same Rating
Spare Fuse in Fuse Holder
Segment B connected
to bridge external port
Segment A connected
to AUI port (bridge hub
port)
Figure 2-6 Interconnecting to Thick Ethernet Backbone
Page 2-11
Page 46

Chapter 2 — Connecting to the Network
Connecting to the
RJ45 IN and Out Ports
You can connect an AsantéBridge to another hub using RJ45
extension cables to connect an RJ45 port on the front panel to the
RJ45 connector of another hub’s 3in1 port. This method is called
in-band daisychain and offers an economical way to connect
an
hubs together.
However, there are some restrictions:
❏ You can daisychain a maximum of four hubs together.
❏ The total device count (this means the hubs plus any
Ethernet devices connected directly to them) in the daisychain cannot exceed
❏ The total length of the daisychain, as measured from the
furthest hub
not exceed 2000 feet.
Configure the chain in the following manner:
1
2
Connect one end of the RJ45extension cable to the rear
panel RJ45 OUT (black colored) port of the AsantéBridge
1012.
Connect the other RJ45 jack to a front panel port on hub
#2.
to the Asanté Management Station, can-
twelve.
3
4
Connect the next extension cable being between the rear
panel RJ45 OUT (black colored) port of hub #2, and a front
panel port on hub #3.
Connect the last extension cable between the RJ45 OUT
port on hub #3 to the RJ45 IN port on the rear panel of
hub #4.
This second connection path can be used only if the network chain is ending (the daisy chain does not need to be
continued), preserving a front panel port as an additional
device connection. See Figure 2-7 on page 2-13.
Page 2-12
Page 47

RJ21 10 BASE-T PORTS
RJ21 10 BASE-T PORTS
IN or OUT
IN or OUT
Thin Ethernet Backbone
for Segment B connected to
bridge external port with a MAU
AsantéBridge 1012
THROUGH
AMS LINK
BNC
3-IN-1 UPLINK
PARTITION
TRAFFIC
RS232
AUI
UP=PC
DOWN=TERMINAL
END
RJ45 cable from 3in1 RJ45 OUT (hub
bridge port, Segment A) to RJ45 front
panel port on next hub in the chain
AsantéHub 1012
THROUGH
AMS LINK
BNC
3-IN-1 UPLINK
AUI
PARTITION
TRAFFIC
RS232
RJ45 cable from 3in1 RJ45 OUT to RJ45 front
panel port on next hub in the chain
UP=PC
DOWN=TERMINAL
END
Using the 3in1 Port
2A/250V Slow Blow Fuse
Replace Only With Fuse of Same Rating
Spare Fuse in Fuse Holder
2A/250V Slow Blow Fuse
Replace Only With Fuse of Same Rating
Spare Fuse in Fuse Holder
RJ21 10 BASE-T PORTS
RJ21 10 BASE-T PORTS
Figure 2-7 Connecting an In-Band Daisychaining
IN or OUT
BNC
3-IN-1 UPLINK
AsantéHub 1012
2A/250V Slow Blow Fuse
THROUGH
AMS LINK
PARTITION
TRAFFIC
RS232
AUI
UP=PC
DOWN=TERMINAL
END
Replace Only With Fuse of Same Rating
Spare Fuse in Fuse Holder
RJ45 cable from 3in1 RJ45 OUT to 3in1 RJ45 IN port
on the last hub in the chain (maximum of four
hubs allowed)
AsantéHub 1012
2A/250V Slow Blow Fuse
Replace Only With Fuse of Same Rating
Spare Fuse in Fuse Holder
IN or OUT
BNC
3-IN-1 UPLINK
THROUGH
AMS LINK
PARTITION
TRAFFIC
RS232
AUI
UP=PC
DOWN=TERMINAL
END
Page 2-13
Page 48

Chapter 2 — Connecting to the Network
Configuring a
Redundant
Link
One of the most common reasons for a loss of networ k services is
damage to, or failure of, cabling interconnections. By taking
advantage of the “Auto-sense” (The AsantéBridge 1012 automatically senses the presence of physical links connected to the 3in1
Uplink port), redundant network backbone links may be easily
configured for increased network reliability.
For example, thin Ethernet (BNC) wiring could be used as a
backup to a twisted-pair (10BaseT) backbone.
Redundant links work because the AsantéBridge 1012, using Autosense, can determine what media types are available and therefore, what connection it should use as the uplink.
Remember the priority sequence in which the hub searches for
an uplink connection:
❏ First priority is given to AUI
❏ Second to 10BaseT, and
❏ Third to BNC.
If, for example, your uplink is connected with BNC cabling and
you then add a 10BaseT cable to the uplink port, the result is that
Auto-sense will detect this and cause uplink traffic to switc h from
the BNC to the 10BaseT media because the 10BaseT is considered
higher priority.
Checking the Link
For each media type the checking methodology is a bit different.
AUI:
According to the priority scheme described above, AUI is the first
medium to be checked for use as the primary uplink connection.
The AsantéBridge knows to use the AUI port if it senses that a
MAU exists. The presence of a MAU is detected by pins 2 (CI-A)
and 9 (CI-B) sensing the MAU's transformer. As long as a MAU connection is detected, the 3in1 Uplink will use the AUI port. If no
MAU is detected, the hub will switch to the next available
medium in the priority sequence (10BaseT then BNC).
10BaseT:
According to the priority scheme described above, 10T will not
be the active uplink if an AUI connection exists. For the 10T connection, a Link Integrity Test is performed to determine if a link is
available on this port. This test c hec ks 1 of the 2 twisted pairs (RX
pair) that make up a 10T cable. If the test fails and BNC cabling
exists, then the uplink will be switched to the BNC medium.
Page 2-14
Page 49

Configuring a Redundant Link
BNC:
According to the priority scheme described above, BNC will not
be the active uplink if either an AUI or 10T connection exists. Due
to this ordering, if BNC is selected, it is assumed that this medium
is the only type available.
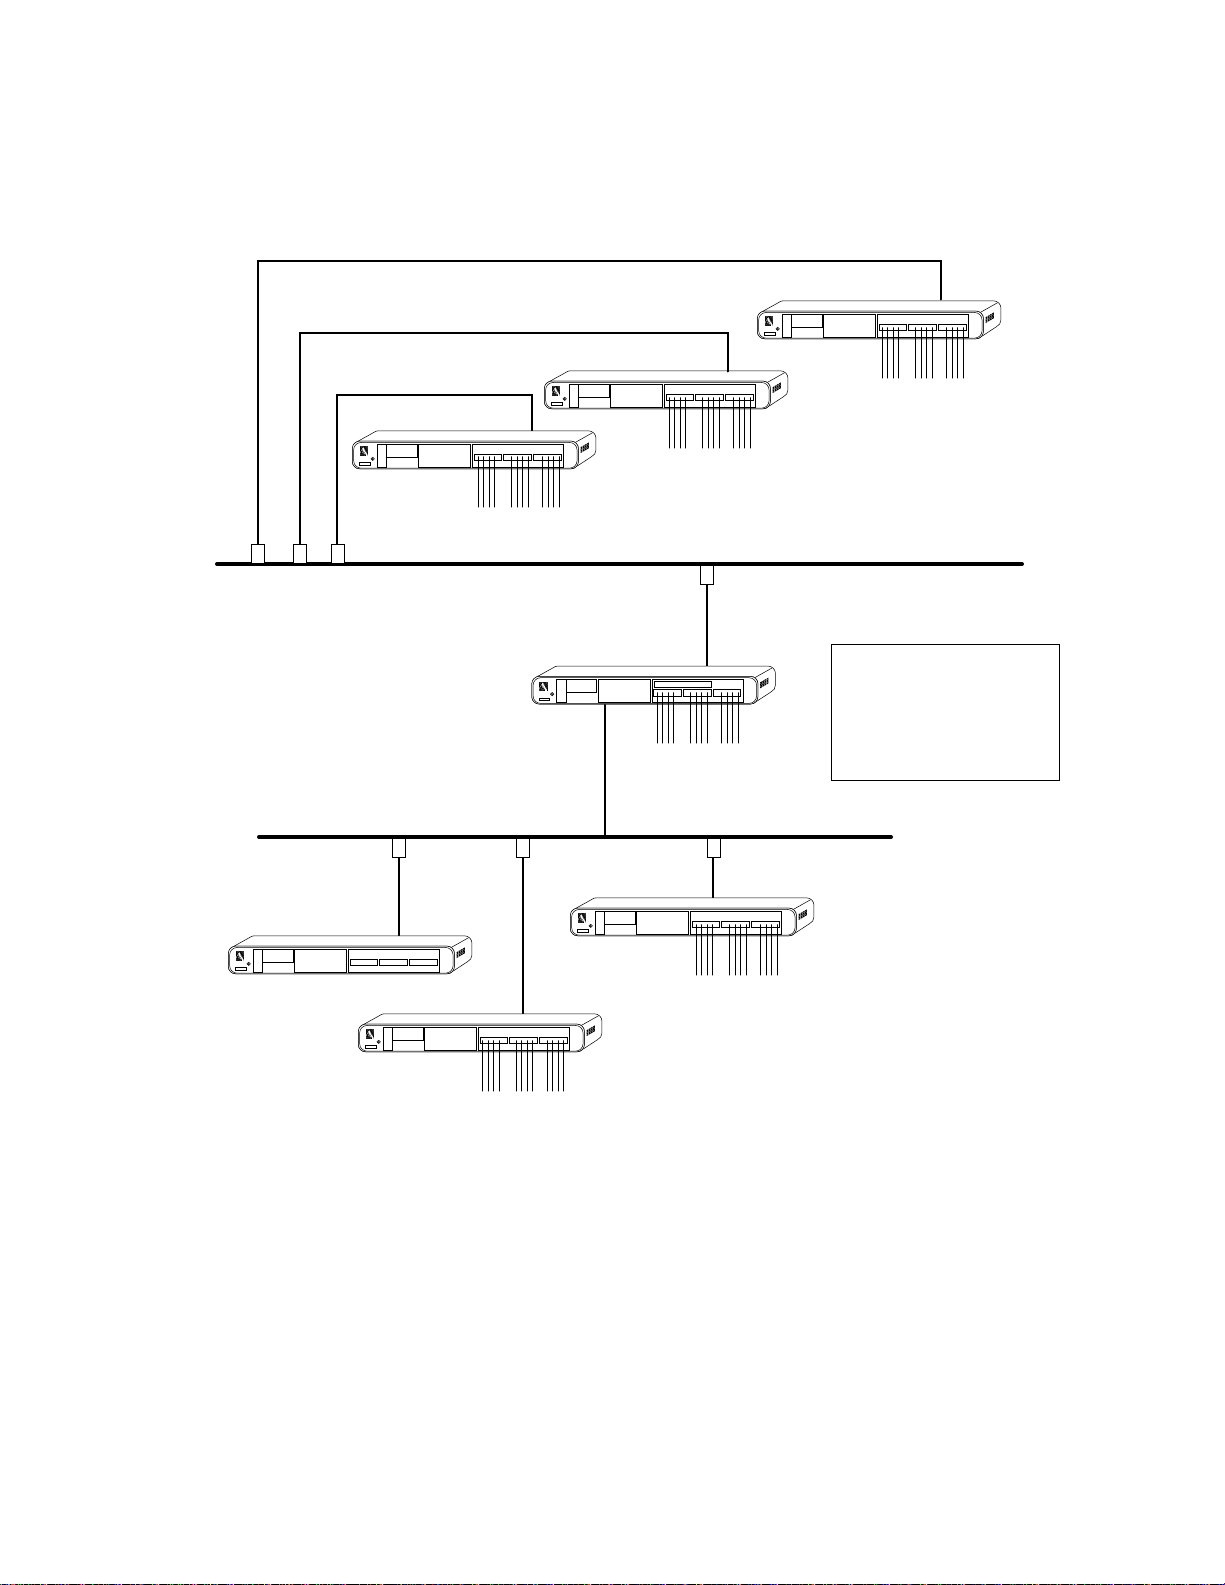
An Example
Configuration
RJ21 10 BASE-T PORTS
Segment A
To Segment A Backbone
RJ21 10 BASE-T PORTS
IN or OUT
IN or OUT
There are different redundant link cabling schemes which can be
used to provide increased network reliability. This example illustrates one possible scenario. The concepts here can be applied to
other possible redundant cabling schemes.
Segment B
Thin Ethernet Backbone
for Segment B connected to
bridge external port with a MAU
AsantéBridge 1012 (Main Hub)
2A/250V Slow Blow Fuse
BNC
3-IN-1 UPLINK
3-IN-1 UPLINK
THROUGH
AMS LINK
RS232
AUI
PARTITION
TRAFFIC
UP=PC
DOWN=TERMINAL
END
Replace Only With Fuse of Same Rating
Spare Fuse in Fuse Holder
Thin Ethernet Backbone for Segment A
connected to 3in1 Port BNC connector
(bridge hub port); secondary path in redundant
link
2A/250V Slow Blow Fuse
THROUGH
AMS LINK
RS232
AUI
BNC
PARTITION
TRAFFIC
UP=PC
DOWN=TERMINAL
END
Replace Only With Fuse of Same Rating
Spare Fuse in Fuse Holder
AsantéHub 1012
Thin Ethernet Backbone connected to 3in1 Port
BNC connector; secondary path in redundant
link
10BaseT cables connected
from AsanteBridge front
panel RJ45 ports to the
AsanteHub rear panel 3in1
RJ45 OUT ports. This Segment
A (bridge hub port) and the
primary path in the redundant
link.
RJ21 10 BASE-T PORTS
RJ21 10 BASE-T PORTS
IN or OUT
IN or OUT
BNC
3-IN-1 UPLINK
BNC
3-IN-1 UPLINK
2A/250V Slow Blow Fuse
THROUGH
AMS LINK
RS232
AUI
PARTITION
TRAFFIC
UP=PC
DOWN=TERMINAL
END
Replace Only With Fuse of Same Rating
Spare Fuse in Fuse Holder
AsantéHub 1012
Thin Ethernet Backbone connected to 3in1 Port
BNC connector; secondary path in redundant
link
2A/250V Slow Blow Fuse
THROUGH
AMS LINK
RS232
AUI
PARTITION
TRAFFIC
UP=PC
DOWN=TERMINAL
END
Replace Only With Fuse of Same Rating
Spare Fuse in Fuse Holder
AsantéHub 1012
Terminator
Figure 2-8 Redundant Links
Page 2-15
Page 50

Chapter 2 — Connecting to the Network
In Figure 2-8, there are three AsantéHubs and an AsantéBridge in
the network. These devices have workstations, printers, etc. connected to their twelve front panel ports. These hubs (and their clients) communicate with each other and to devices on the main
network backbone through the main hub (shown as the
AsantéBridge in the illustration). They use 10T cabling to connect
each of their 3in1 Uplink ports to a front panel port on the main
hub. The three hubs are also connected to the main network backbone's BNC (thin Ethernet) cabling. Since Auto-sense checks for
cabling using the priority sequence of AUI, then 10T, and finally, if
neither AUI nor 10T cabling exists, BNC, the hubs will communicate through their 3in1 ports using the 10T media rather than the
BNC. The main hub's 3in1 Uplink uses its BNC port to connect to
the main backbone.
If the Main Hub Goes Down
If the main hub goes down, the other three hubs' 3in1 Uplink
ports will detect that their 10T links have failed when they perform a Link Integrity Test. This causes them to switch over to the
BNC cabling of the main network backbone, thus allowing them
continued communication with each other and with devices on
the main backbone.
If a Link Goes Down to the Main Hub
If the main hub is up and running, but one or more of the other
three hubs has its 10T link to the main hub go down, the following would occur. A hub losing its 10T link to the main hub would
detect such a problem when it performed a Link Integrity T est for
its 10T connection on its 3in1 Uplink port. When the 10T link
failed, that hub would then switch to communicating through its
3in1 Uplink port via BNC cabling.
Page 2-16
Page 51

Setting Up Out-of-Band Links
Setting Up
Out-of-Band
Links
Interconnecting
Hubs
Using AsantéView 2.2 Out-of-Band to manage your new
AsantéBridge 1012 requires that you link your AsantéBridge 1012
into an out-of-band daisychain. This is very much like the in-band
daisychain described earlier, except that this arrangement is for
network management only and is not part of the normal network
wiring.
Setting up out-of-band links involves three steps:
❏ Linking hubs together (twelve maximum)
❏ Connecting your Asanté Management Station
❏ Configuring hub DIP switches
Linking the hubs together is always done the same way. Connecting your Asanté Management Station can be done three different
ways. Configuring the DIP switches depends on the position of a
hub in the daisychain and on where and how your Asanté Management Station is connected.
You interconnect AsantéHubs and AsantéBridges using the AMS
Link ports found on the rear panel of the AsantéBridge 1012 and
AsantéHub 1012, and the Network Management Module of the
AsantéHub 2072. Logically, the arrangement looks like this:
AMS Link Ports
Bridge/Hub RS232
Port
In-Band network
backbone
Hub #2Hub #1 Hub #3
AMS Link Ports
Bridge/Hub RS232
Port
Out-of-band RJ45
link
Out-of-band RJ45
link
Figure 2-9 Out-of-Band Links
AMS Link Ports
Bridge/Hub RS232
Port
The thin Ethernet backbone is shown for refer ence only. How you
configure the in-band linking is independent of the out-of-band
linking. You can have any kind of in-band link you want or not
have in-band links at all.
❖ Note: The two out-of-band RJ45 AMS Link ports are elec-
trically identical; it does not matter which port you use.
There are no in or out ports for out-of-band.
❖
Page 2-17
Page 52

Chapter 2 — Connecting to the Network
Connecting Your
Asanté Management
Station for Out-of-
Band Management
Asanté
Management
Station
Figure 2-9 shows only the out-of-band links in place. You still need
to connect a Macintosh or PC running Asantéview 2.2 Out-of-Band
software. Figure 2-10 shows the three ways that you can connect
your Asanté Management Station for out-of-band management.
Hub #1 Hub #2 Hub #3
AMS Link Ports
Bridge/Hub RS232
Port
In-Band
Extender
Figure 2-10 Connecting the Asanté Management Station for Out-of-Band
Link
AMS
Link
Cable
AMS Link Ports
Bridge/Hub RS232
Port
AMS Out-of-Band Link
Asanté
Management
Station
Note: The example here shows
three Asanté Management Stations. In an actual network, you
would normally only have one.
Bridge/Hub RS232
Port
AMS Out-of-Band Link
RS232 serial cable
AMS Link Ports
RS232 serial cable
Modem
Phone line
Modem
RS232 serial cable
Asanté
Management
Station
With Hub #1, the station is connected to one of the hub AMS Link
ports using the AMS Link Extender provided with the
AsantéBridge 1012 and is actually part of the daisychain itself. The
station could also have been connected to the AMS Link port on
Hub #3 at the other end of the chain. The effect would be the
same.
With Hub #2, the station is connected to the Bridge/Hub RS232
port using an RS232 serial data cable. In this case, the station is
not considered part of the daisychain, although it can talk to any
hub that is on the chain.
Hub #3 is identical to Hub #2 except for the modems. You must
use Hayes or Hay es compatible modems supporting a baud rate of
9600. The hub side modem must be set up to auto-answer.
Page 2-18
Page 53

Setting Up Out-of-Band Links
Recommended Method
The recommended method for connecting for out-of-band management is with the
AsantéBridge 1012.
AMS Link Extender included with your
RJ21 10 BASE-T PORTS
IN or OUT
BNC
3-IN-1 UPLINK
1
AUI
RJ45
RJ45
2
Connect the RJ45 connector on the AMS Link Extender to
AMS Link Port on the rear panel of the AsantéBridge
the
1012 as shown in Figure 2-11
Hub DIP Switch
THROUGH
AMS LINK
PARTITION
TRAFFIC
RS232
OR
UP=PC
DOWN=TERMINAL
Extender
END
. You can use either port.
2A/250V Slow Blow Fuse
Replace Only With Fuse of Same Rating
Spare Fuse in Fuse Holder
RS232
To PC COM Port
DIN-8
To MAC Modem
Port
Figure 2-11 Connecting the AMS Link Extender
Connect the other end of the AMS Link Extender cable to
the COM port on your PC or the modem port on a Macintosh.
3
rear panel and set both of the switches
DOWN.
Push the Reset button on the front panel.
Now locate the Hub DIP Switches on the AsantéBridge
4
You are now ready to log in with AsantéView Out-of-Band.
Distance Restrictions
The total distance between the Asanté Management Station and
the farthest hub in the chain cannot exceed 2000 feet, as measured from the Asanté Management Station to the farthest hub.
Page 2-19
Page 54

Chapter 2 — Connecting to the Network
Configuring Hub
DIP Switches
There are two DIP switches located to the right of the AMS Link
ports on the rear panel of the AsantéBridge 1012. These two
switches are set up according to how the AsantéBridge is positioned in the out-of-band daisychain and how you are connecting
your Asanté Management Station.
Follow these simple rules to set the switches:
Through/End Switch
Set UP if both AMS Link
ports are in use.
Set DOWN if only one AMS
port is in use
Figure 2-12 Switch Settings Key
PC/Terminal Switch
12
Set UP if you are
connecting your
Asanté Management Station
to the RS232 port and running
AsantéView Out-of-Band
Set DOWN if you are connecting
your Asanté Management Station
to one of the AMS Link ports
PC/Terminal Switch
❏ If the Asanté Management Station is connected to the
Bridge/Hub RS232 port, either directly or via a modem,
and you are running AsantéView Out-of-Band, set this
switch
❏ If you connect your station to one of the AMS Link ports
and are running AsantéView Out-of-Band, set this switch
DOWN.
UP.
Page 2-20
Through/End Switch
❏ If both AMS Link ports are in use, set the switch UP.
❏ If only one AMS Link port is in use, set the switch
DOWN.
Page 55

Connecting a VT100 Terminal
Connecting a
VT100 Terminal
The bridge can be configured and monitored through a direct
serial connection to the bridge RS232 port on the rear of the
bridge unit.
The bridge functions as a DCE; the terminal must be DTE.
You must use an RS232 straight-through serial cable to connect
the bridge serial port to your Macintosh or PC. The bridg e connector requires a male DB9; a Macintosh requires a DIN8, and PCs
may require DB9, DB15, or DB25 connectors.
Bridge AUI Port
Bridge Local Management
RS 232 Port
2A/250V Slow Blow Fuse
THROUGH
AMS LINK
RS232
RJ21 10 BASE-T PORTS
DB 15 Male
RS 232 Connector
IN or OUT
BNC
3-IN-1 UPLINK
AUI
PARTITION
TRAFFIC
UP=PC
DOWN=TERMINAL
END
Figure 2-13 Connecting the VT100 terminal
❖
Important: Do not connect the VT100 to the hub RS232
located below the bridge local management port.
port
This port is used only for connecting AsantéView Outof-Band.
❖
Replace Only With Fuse of Same Rating
Spare Fuse in Fuse Holder
To VT100 terminal,
PC COM port, or
Macintosh modem
port
The bridge local management port data communication parameters are preset at the factory and cannot be modified. You must set
up your terminal or emulation software to match these parameters:
Table 2-1 Local management port parameters
Parameter Setting
Baud rate 9600
Data bits 8
Stop bits 1
Parity bit None
Handshaking None
Page 2-21
Page 56

Chapter 2 — Connecting to the Network
Default
Table 2-2 lists the factory default settings.
Settings
Table 2-2 AsantéHub 1012 Factory Default Settings
Default To Modify
All RJ45/RJ21 ports have Link Integrity testing
enabled. Jumper JP8 is set OUT to enable
Link Integrity testing on the 3-in-1 Uplink
Primary link selection follows autoselection
sequence. Jumper JP7 is set OUT.
All front panel ports (RJ45) are hardware-configured IN and cannot be modified.
Port Control:
Link Test enabled
Jabber detection enabled
Polarity Correction enabled
Receive Threshold not reduced
Bridge/Hub Port (AMS Link): 9600 bps, 8 data
bits, 1 stop bit, no parity
Local Management Port (RS-232): 9600 bps, 8
data bits, 1 stop bit, no parity. (Communication rate between hub and PC or modem on
RS-232 port.)
Node Age time: 60 seconds. (Storage period
for hub statistics.)
SYS contact: none Configure in AsantéView or with Local Management
SNMP Read Community string: public Configure in AsantéView or with Local Management
SNMP Write Community String: private Configure in AsantéView or with Local Management
Modem Dial string: none Configure in AsantéView or with Local Management
*
*
Communication with a terminal is fixed at 9600 bps.
If you are using AsantéHub with a pre-10BaseT device,
disable Link Integrity. (You will not be able to obtain link
integrity status from disabled ports.)
To disable Link Integrity testing over the 3-in-1 Uplink
set JP8 IN.
To disable Link Integrity testing over device links, use
the Port Control window in AsantéView.
To force primary link selection to AUI, set jumper JP7
IN.
To connect two hubs using front panel ports, use a
crossover RJ45 cable (see Appendix C for pinouts).
Reconfigure using Port Control window in AsantéView.
Cannot be modified.
Configure using VT100 or PC/Macintosh running VT100
emulation software.
Configure in AsantéView.
Page 2-22
Page 57

AsantéBridge 1012
Local Management
• Before You Start on page 3-2
• Bridge Diagnostics on page 3-3
• Local Management Menu System
on page 3-4
• General Help Menu on page 3-6
3
• Configuration Menu System on page 3-7
• Statistics Menu System on page 3-38
Page 58

Chapter 3 — AsantéBridge 1012 Local Management
Before You Start
Local
Management
Menu
Page 3-4
General Help
Menu
Page 3-6
Configuration
Menu
Page 3-7
Statistics
Menu
The AsantéBridge 1012 can automatically integrate itself into y our
network environment without any programming or other user
intervention other than connecting to two network segments and
powering it on. However, there are extensive management functions available through the local management port.
To help you find your way to the information you need about
these functions, use the following flow chart.
Page 3-38
System
Information
Menu
Page 3-9 Page 3-10
TCP/IP
Parameters
Menu
Page 3-12 Page 3-13 Page 3-18 Page 3-19
Password
Menu
Software
Update Menu
Access Bridge
Filtering Table
SNMP Agent
Parameters
Menu
Page 3-11
Access SNMP
Trap Receiver
Table
Access Bridge
Forwarding
Table
Page 3-27Page 3-33
Out-of-Band
Parameters
Access SNMP
Community
Name Table
Setting Menu
Menu
Page 3-21
Spanning
Tree Port
Bridge
Parameters
Menu
Page 3-23
Spanning
Tree Bridge
Setting Menu
Page 3-24Page 3-26
Reset System
Page 3-36
Page 3-2
Page 59

Bridge Diagnostics
Bridge
Diagnostics
The AsantéBridg e 1012 is equipped with on-board diagnostics that
run when the bridge is powered on (cold start) or when reset,
either from the front panel or with the
from the local management
The diagnostics take a few seconds and are designed to check the
overall health of the bridge and hub hardware and internal software. As the diagnostics run, the VT100 window will scroll, listing
the separate tests and the results. Figure 3-1 shows a sample
screen.
If one of the diagnostics should fail or detect a system malfunction, an error message will be displayed in the window. Write
down what it says and call Asanté Technical Support for help.
Configuration Menu.
Reset system command
Figure 3-1 AsantéBridge 1012 Diagnostics
After the diagnostics are completed, the window scrolls up and
shows the normal AsantéBridge 1012 local management menu.
Page 3-3
Page 60

Chapter 3 — AsantéBridge 1012 Local Management
Local
Management
All AsantéBridge 1012 functions can be configured using a VT100
terminal (or a Macintosh or PC running VT100 terminal emulation
software). All necessary commands and functions are stored in
bridge memory — no special software is required other than the
terminal emulator if you are using a Mac or a PC.
This section presents each bridge local management menu screen
and provides definitions for each field on the screen. Also
included are simple procedures for selecting and modifying
bridge parameters where appropriate.
❖ Note: Detailed descriptions of bridge functions are not
provided. It is assumed that you have some knowledge
of how transparent learning bridges work, including
spanning tree configurations.
After the bridge power-on diagnostics are completed, the main
local management menu displays.
❖
Page 3-4
Figure 3-2 Local Management Main Menu
❏
General Help gives you keyboard commands for navigat-
ing through the local management windows.
❏ Configuration is the gateway to all bridge configuration
functions (Password protected).
❏ Statistics lets you access the bridge monitoring func-
tions.
1
Use the arrow keys to move the highlight selection bar to
the local management menu you want to use and then
press
return to open the selected menu.
Page 61

Local Management Menu System
2
To disconnect from the AsantéBridge 1012, use the appropriate VT100 command. This command may vary depending upon what terminal emulation software you are using.
Please see the documentation accompanying your emulation software for instructions.
❖ Important: Some areas of the local management menu
system are password protected. If you disconnect (quit
from your terminal emulation software) from the local
management menu system while you are within the
password protected area, anybody can re-establish a terminal link to the AsantéBridge and bypass the password.
You should always return to the main Local Management
Menu before you disconnect from the AsantéBridge
❖
1012.
Page 3-5
Page 62

Chapter 3 — AsantéBridge 1012 Local Management
General Help
Menu
The AsantéBridge 1012 VT100 local management port uses a variety of control characters (special keyboard characters) to control
editing on screen. This help screen tells what editing commands
are available and what they do.
Figure 3-3 Local Management Help Window
Enter control-z to return to the Local Management Menu.
Page 3-6
Page 63

Configuration Menu System
Configuration
Menu System
The main configuration menu, accessed only after entering a password, provides submenus and commands for:
Figure 3-4 Main Configuration Menu
❏
Checking and updating system information (text data
contained in bridge memory)
❏ Defining a new password for the Configuration Menu
❏ Checking and updating the SNMP agent parameters
❏ Displaying and modifying the hub Out-of-Band Parame-
ters Menu
❏ Accessing the Bridge Parameters Menu
❏ Resetting the bridge
Accessing the Configuration Menu system
You must be at the main Local Management Menu to enter the
menu system.
1
2
3
Use the arrow keys to select Configuration Menu and then
press
The bridge prompts you for a password.
Enter the password defined for this bridge.
The default password, set at the factory, is
Press
This opens the main
The first five menu entries are submenus. Use the Up/
Down arrow
item you want, then press
return.
Asanté.
return after entering your password.
Configuration Menu.
keys to move the selection bar to the menu
return to select it.
Page 3-7
Page 64

Chapter 3 — AsantéBridge 1012 Local Management
4
5
The Reset System item is a command. Selecting this item
and pressing
You must confirm that you want the unit reset before the
command is actually executed.
❖ Important: Resetting the bridge also resets the hub. All
packet data contained in hub or bridge buffers will be
lost.
Enter control-z to return to the previous menu without
taking any action here.
return opens a confirmation dialog.
Page 3-8
Page 65

Configuration Menu System
m
u
Syste
Information Men
The System Information menu stores text information in the
bridge memory.
Figure 3-5 System Information Window
❏
The Bridge/Hub MAC Address contains the physical
address assigned to the bridge and hub. This field cannot
be modified.
❏ The Name, Contact, and Location fields contain text
and can be modified.
To use the System Information menu, do the following:
1
2
Use the arrow keys to select the field to be modified and
then press
The contents of the selected field display in the data entry
bar at the bottom of the window.
Change the text string and press return to update the field
and send the data to the bridge.
You can enter up to 64 characters in each text string.
Press control-z to return to the previous menu.
return.
3
Page 3-9
Page 66

Chapter 3 — AsantéBridge 1012 Local Management
u
Password Men
Access to all bridge configuration functions is password protected. The password is stored in bridge memory. The default password is
password field is case sensitive.
This menu is not accessible from AsantéView.
Asanté. Be sure to enter it exactly as shown here; the
Figure 3-6 Password Menu
1
2
3
4
❖
Important: For security reasons, the current password is
not displayed. If you lose your password, you must call
Asanté Technical Support to be issued a new one.
Highlight the Password field and press return.
Enter the new password (maximum of 15 characters) in
the data entry bar at the prompt. Press
You will be prompted to re-enter the new password to
confirm it. Remember that the password field is case sensitive.
If you enter the new passw ord incorrectly, you are asked to
enter a new password again.
If you enter it correctly, the window returns to its original
state; the new password has been defined and sent to the
bridge.
Press control-z to return to the Configuration Menu.
return when done.
❖
Page 3-10
Page 67

Configuration Menu System
t
m
SNMP Agen
Parameters
Menu Syste
The bridge SNMP agent menu has the following four submenus:
Figure 3-7 SNMP Agent Parameters Menu
❏
TCP/IP Parameters, defining the bridge IP address, sub-
net mask
❏ Software Update, defining the server IP address for a
remote boot, the
name
❏ Access SNMP Trap Receiver Table
❏ Access SNMP Community Name Table
, and default router IP address
boot protocol to be used, the boot file
, and the update command itself
1
2
❖ Note: The SNMP parameters apply to both the hub and
bridge modules in the AsantéBridge 1012. The entire unit
has just one Ethernet address and one IP address.
Use the Up/Down arrow keys to move the highlight bar to
select the submenu you want and then press
This will open the selected menu window.
If you don’t want to select another menu, enter control-z
to return to the
Configuration Menu.
return.
❖
Page 3-11
Page 68

Chapter 3 — AsantéBridge 1012 Local Management
TCP/IP Parameters Menu
The IP address, subnet mask and default router IP address for the
bridge and hub are set from this menu.
Figure 3-8 TCP/IP Parameters Menu
❖
Important: You should understand how IP addressing
works before you attempt to modify any of these param-
❖
eters.
The IP address, subnet mask, and default router address currently
stored in bridge memory are shown in the
field. These data are retrieved from the bridge when the menu is
called from the
To use the TCP/IP Parameters menu, do the following:
1
2
Use the Up/Down arrows to select the parameter you
want to modify, then press
Press control-u to erase the current data and enter the ne w
IP address or mask.
SNMP Agent Parameters Menu.
return to select it.
CURRENT SETTING
Page 3-12
3
Press return.
Repeat 1-3 for the next field, if required.
4
Page 69

Configuration Menu System
5
Go to the Configuration Menu and reset the bridge to put
the changes into effect.
Software Update Menu
Figure 3-9 Software Update Menu
The Software Update menu provides the following information:
❏ Tells the bridge to execute a boot operation and to get
the boot image from a remote server. The server must be
capable of supporting network file transfers using the
tftp or bootp and tftp applications.
❏ Defines the boot protocols for the bridge
❏ Provides the IP address of the remote server the bridge
is to boot from
❏ Provides the name of the configuration file the bridge
must load during the boot operation
❏ Initiates a remote boot sequence
The parameters displayed are those currently stored in bridge
memory. They are retrieved from the bridge when the menu is
opened.
Page 3-13
Page 70

Chapter 3 — AsantéBridge 1012 Local Management
About the Software Update function
❖ Important: The softwar e update function is complex and
should be understood before you attempt it. Please read
through the following description
command.
The AsantéBridge uses this function to load new configuration
parameters and image files from a server somewhere on the network that the bridge is connected to.
Each AsantéBridge 1012 is shipped from the factory with a complete set of image code for both the hub and bridge residing in
memory. If you need to load a new version of this image code to
your AsantéBridge, the software upgrade function provides you
with this capability.
There are two transf er applications that can be used f or e xecuting
the software upgrade:
❏ bootp plus tftp (recommended)
❏ tftp only
❖
before you use this
Using the bootp application in conjunction with the tftp application causes the AsantéBridge to look for any server on the net running the bootp application. When it finds one, it will establish a
link to that server and request that an IP address be assigned to it.
After the IP address is assigned, the bridg e will look for the configuration file named in the
boot file name field. It will read in the
configuration file to find the name of the AsantéBridge image file,
plus any SNMP configuration parameters that are in the file.
If tftp alone is used, you must specify the IP address of the server
carrying the configuration and image files.
After finding out the name of the image file, the AsantéBridge uses
the tftp (Trivial File Transfer Protocol) to copy the image file to a
buffer area in bridge memory.
Next, the bridge checks the image files for integrity and completeness. If the file check is passed, the image files are then loaded
into the FLASH EPROM memory and a reset command is issued,
resetting the AsantéBridge and placing the new image code in
effect as well as any new SNMP parameters that were loaded.
If there is any kind of a failure, such as a corrupted image file,
incomplete configuration file, or most commonly, if either of the
image files cannot be found, the FLASH EPROM is
not updated.
Page 3-14
Page 71

Configuration Menu System
Instead, the bridge resets and then makes another attempt to
download new software, using the same set of parameters it had
before.
This cycle continues until:
❏ The required configuration and image files are loaded
or
❏ The cycle is interrupted by entering control-c from the
VT100
Entering control-c also opens another window on the VT100,
where the current software download parameters are displayed,
plus some additional control fields. You can use this window to
analyze what caused the failure and to reset the bridge back to a
“local boot mode” where it will use the image code currently
stored in its FLASH EPROM.
To use this window, do the following:
1
2
3
4
5
Use the Up/Down arrow keys to select the parameter you
want to modify. Press
Press control-u to er ase the current data and enter the new
parameter
dow.
Press return to enter the new parameter value.
Repeat steps1-3 for any other parameters to be modified.
Highlight the Software Update command and press return
to start the process.
The bridge requests that you confirm executing the download.
Respond yes or no (y or n) to the prompt at the bottom of
the window.
Entering n returns you to the window with no action
taken.
Entering y starts the software update process described
above.
in the data entry bar at the bottom of the win-
return when you have selected it.
Page 3-15
Page 72

Chapter 3 — AsantéBridge 1012 Local Management
6
Enter control-z to return to the SNMP Agent Parameter
Menu
If the software download process fails and you enter a
from the VT100, the AsantéBridge opens this window.
This window gives the currently defined SNMP and software
update parameters. Check them to make sure you have specified
the correct IP address for the boot server and provided the correct file name for the configuration file. Only two fields are active
in this window: the
STRAP SEQUENCE
The window opens with the
This field tells the bridge to either continue with the software
update process or to abort it and reload the existing image software currently residing in the FLASH EPROM.
without taking any action.
Figure 3-10 System Update Status Window
Software Update:, and EXECUTE BOOT-
.
Software Update: field highlighted.
control-c
Page 3-16
1
2
Change the Software Update: field by pressing return.
This makes the field toggle between
ENABLED
Use the arrow keys to move the highlight bar to the EXE-
CUTE BOOTSTRAP SEQUENCE
Press
.
return to execute the command.
DISABLED and
field.
Page 73

Configuration Menu System
If the update is not successful, entering a control-c stops the process and reopens the Update Status window, this time with all the
fields open for editing. This enables you to either fix the cause of
the update failure and restart the process or to abort the process
altogether and tell the bridge to boot from its own PROM.
Page 3-17
Page 74

Chapter 3 — AsantéBridge 1012 Local Management
SNMP Trap Receiver Table
Figure 3-11 SNMP Trap Receiver Table
You can define up to four trap receivers f or the bridge. A v alid trap
receiver is a Macintosh or PC running AsantéView 2.0 or later.
❏ The IP ADDRESS field contains the trap receiver IP
address currently stored in bridge memory.
❏ The COMMUNITY STRING field contains the string
value currently stored in bridge memory. The value contained in the field is sent with the trap message when a
trap event occurs.
❖ Note: Unique community string field values is intended
for third party software. AsantéV iew does not c heck for a
community string. All traps sent are received.
❏ The STATUS field, also in bridge memory, determines
whether a trap will be sent to this receiver or not. If set
OFF, no traps are sent by the bridge. If set to ON, traps
to
will be sent by the bridge.
❏ The SNMP Authentication Trap field (Enabled or Dis-
abled) determines whether or not an authentication trap
Enabled to allow a
1
2
will be sent by the bridge. It must be
trap to be sent.
Use the arrow keys to move the highlight selection bar to
IP ADDRESS field you want to modify and press return
the
to activate the data entry bar at the bottom of the window.
Press control-u to erase the current data and enter the ne w
address.
❖
Page 3-18
Page 75

Configuration Menu System
3
4
5
6
7
8
9
10
Press return to set the new value.
Repeat steps 1-3 for any other fields you want to modify.
Highlight the COMMUNITY STRING field for the IP
address you want and press
bar.
Enter the new string; press return to set the value.
Repeat steps 5-6 for the other community string fields.
Highlight the STATUS field you want to modify.
This is a toggle. Press the spacebar or return to switch.
Again using the arrow keys, highlight the SNMP Authenti-
cation Trap
field.
return to open the data entry
11
12
SNMP Community Name Table
This is also a toggle. Press the spacebar or return to switch
between
Enter control-z to return to the SNMP Agent Parameters
Menu
Enabled and Disabled.
.
Figure 3-12 SNMP Community Name Table
Page 3-19
Page 76

Chapter 3 — AsantéBridge 1012 Local Management
This table allows you to control access to SNMP MIB objects.
All data fields initially display the parameter values contained in
bridge memory at the time this menu is opened.
SNMP_COMMUNITY_STRING field
This string provides names for the SNMP communities (logical
groups of SNMP objects). Public and Private are the standard
default values.
The ACCESSING_MODE field specifies either Read Only or Read/
access for this community of objects.
Write
The
STATUS field determines if the associated SNMP community
is available or not. If set to
be accessed.
To use the SNMP Community Name Table, do the following:
OFF, this community of objects cannot
1
2
3
4
5
Use the arrow keys to move the highlight bar to the field
you want to edit.
The SNMP COMMUNITY STRING field is a text string and
is edited in the data entry bar. Select the field and press
return.
The data entry bar opens and displays the current field
contents. Press control-u to erase the current data and
then enter the new string.
Press return when the new data is correct.
The ACCESSING_MODE field toggles between Read Only
Read/Write. Select the field and press the space bar or
and
return to toggle between entries.
The STATUS field is also a toggle. Press the space bar or
return to display ON or OFF.
Enter control-z to return to the SNMP Agent Parameters
Menu
.
Page 3-20
Page 77

Configuration Menu System
d
u
Out-of-Ban
Parameters Men
Defines data communication and user password parameters for
accessing the bridge using AsantéView Out-of-Band network management software and an RS 232 modem connection.
Figure 3-13 Out-of-Band Parameters Menu
❏
The Out-of-Band Baud Rate sets up a modem for both
incoming calls and outgoing calls. It can be set to a maximum of 9600 baud.
❏ The Out-of-Band Dial String is a placeholder only.
❏ Out-of-Band Password controls access to the bridge
when an Asanté Management Station running AsantéView Out-of-Band connects to the bridge via a modem.
The management station must send a matching password to establish the connection.
1
2
3
4
Use the arrows keys to move the highlight selection bar to
the field you want to modify.
The Out-of-Band Baud Rate field has preset values. Select
the field and tap the
the available baud rates.
The Out-of-Band Dial String is a text field. Select it and
press
Enter the new string and press
field.
The Out-of-Band Password field is also a text string. Select
it and press
return to open the data entry bar.
return to open the data entry bar.
space bar or return to toggle through
return to place it into the
Page 3-21
Page 78

Chapter 3 — AsantéBridge 1012 Local Management
Enter the new password and pr ess return. You can enter as
many as fifteen characters.
5
Enter control-z to return to the Configuration Menu.
Page 3-22
Page 79

Configuration Menu System
m
Bridge Parameters
Menu Syste
This menu provides submenus used to configure AsantéBridge
1012 features only. There are submenus for:
❏ Setting bridge spanning tree parameters
❏ Setting bridge port spanning tree parameters
❏ Accessing and defining entries in the bridge forwarding
table
❏ Accessing and defining entries in the bridge filtering
table
1
2
Figure 3-14 Bridge Parameters Menu
Use the arrow keys to move the highlight bar to the submenu you want and press
The selected menu opens.
Enter control-z to return to the Configuration Menu.
return.
Page 3-23
Page 80

Chapter 3 — AsantéBridge 1012 Local Management
Spanning Tree Bridge Parameters Menu
Figure 3-15 Spanning Tree Bridge Parameters Menu
Only the fields not displayed in bold type can be edited; the boldface type fields are read only.
❏ Bridge ID: the unique bridge identification tag assigned
to this AsantéBridge; based on the unit Ethernet address
and its priority
❏ Root ID: the bridge ID of the current root bridge; will
match the
rent root bridge
❏ Bridge State: indicating either Standby (not passing
packets between segments), or
between segments)
❏ Priority:
❏
❏ Maximum Age: time the bridge will wait for a configura-
tion message from the active root bridge before starting
the bridge contention process.
❏ Hello Time: the time interval between issuing configura-
tion messages.
❏ Forward Delay: time the bridge takes to transition from
the listening state to the learning state, and from the
learning state to the forwarding state
❏ Ageout Time: the amount of time the bridge holds a for-
warding address in the forw arding table without hearing
from that address.
Bridge ID field only if this bridge is the cur-
Active (passing packets
Page 3-24
Page 81

Configuration Menu System
These parameters can change rapidly depending on spanning tr ee
activity. To update the window, enter
1
Use the Up/Down arrow keys to select the field you want
to modify; press
return when it is selected.
control-r.
2
3
4
Press control-u to erase the current data and then enter the
new parameter in the data entry bar, then press
Repeat steps1-2 for any other fields you want to modify.
Enter control-z to return to the Bridge Parameters Menu.
return.
Page 3-25
Page 82

Chapter 3 — AsantéBridge 1012 Local Management
Spanning Tree Port Setting Menu
Figure 3-16 Spanning Tree Port Setting Menu
The Spanning Tree Port Setting menu has the following fields:
❏ Ext/Hub Port: enables or disables the external port or
the hub side port linking one network segment to the
bridge.
❏ Ext/Hub Port Priority: assigns a priority value to the port
(external or hub side); used in determining the port
state.
❏ Ext/Hub Port Path Cost: the cost value to be used in
determining the path to the root bridge.
❏ Ext/Hub Port State: the current state of the port (for-
warding, listening, learning, and blocked).
1
2
3
Use the Up/Down arrow keys to select the field you want
to modify.
The Ext/Hub Port fields are toggles; press the spacebar to
alternate between enabled and disabled. The AsantéBridge
1012 requires that you confirm changing the field.
All other fields are data entry. Select the field and press
return to open the data entry bar at the bottom of the win-
dow.
Page 3-26
Page 83

Configuration Menu System
4
press
return.
Enter control-z to return to the Bridge Parameters Menu.
5
Bridge Forwarding Table
About Forwarding
Forwarding is the process of passing packets fr om one bridge port
to the other. To do this, the bridge must know what devices are on
each of the segments its ports are connected to. The bridge maintains this device location data in its forwarding table.
The AsantéBridge 1012 acquires forwarding table data in two
ways:
❏ Device segment locations can be manually loaded into
the table, using either the VT100 local manag ement port
or AsantéView 2.2.
❏ Device locations can be dynamically learned by the
bridge as part of normal bridge operations.
Enter control-u to erase the field, enter the new value, and
Table Functions
Use Left/Right Arrow Keys to
select
Figure 3-17 Bridge Forwarding Table
Table Data Fields
Use Up/Down Arrow Keys to
select
The Bridge Forwarding Table can hold as many as 4096 Ethernet
addresses, with an individual configuration associated with each
address.
The table provides several tools for working with forwarding
addresses:
Page 3-27
Page 84

Chapter 3 — AsantéBridge 1012 Local Management
❏ Edit brings up the table editor, where you can add,
delete, and modify Ethernet addresses
❏ Search opens the search utility, where y ou can look for a
specific address or go to a specific page in the table
❏ Next Page brings up the next sequential page (if there is
one) in the table
❏ Prev Page returns you to the preceding page
❏ Exit returns you to the Bridge Parameters Menu
This table contains five classes of Ethernet addresses:
❏ Dynamic or “learned” by the bridge during normal for-
warding operations
❏ Static or manually entered into the forwarding table
❏ Management, or the Ethernet address of the bridge
itself (cannot be modified or deleted)
❏ Broadcast and Spanning Tree cannot be modified or
deleted
Static addresses have three subclasses:
❏ Permanent: can only be deleted using the table editor
❏ Delete on reset: address is automatically deleted from
the table when the bridge is reset (includes a power-on
reset)
❏ Delete on timeout: address is automatically deleted
when the Max Ageout timer times out (or the bridge is
reset) unless the bridge has heard from the address, in
which case the timer is reset
The Bridge Forwarding Table requires the following editing rules:
❏ Dynamic addresses can be modified (you must first con-
vert them to static) or deleted. They are learned dynamically and cannot be added manually.
❏ Management, Broadcast, Spanning Tree, and Static
addresses cannot be modified, added, or deleted.
The address data field is divided into two subfields: Ethernet
Address
and MODE. The Mode field is updated when you edit the
address field.
The MODE field is an alphanumeric code defining the characteris-
tics for the entry in the associated address field. The contents of
this field are generated when the address field is created.
Page 3-28
Page 85

Configuration Menu System
The alphabetic portion of the field defines the type of entry.
Table 3-1 Forwarding Table Mode Alphabetic Entries
Entry Definition
BRC Broadcast; cannot be added, deleted, or modified
DYM Dynamic; added dynamically when bridge learns a new address
Cannot be manually added, can be deleted, can be modified if con-
verted to a static entry
MNG Management; cannot be added, deleted, or modified
SPT Spanning Tree, permanent; cannot be added, deleted, or modified
STP Static; permanent, can be added, deleted, or modified
STR Static; deleted if bridge is reset; can be added deleted, or modified
STT Static, deleted on timeout; can be added, deleted, or modified
The numeric portion defines the input port and output port.
input port refers to the segment the transmitting device is
Here,
on, and
to.
output port refers to the segment the packet is forwar ded
Table 3-2 Forwarding Table Mode Numeric Entries
Entry In Port Out Port
1- External segment External segment
2- External segment Hub segment
3- External segment External segment and Hub segment
-1 Hub segment External segment
-2 Hub segment Hub segment
-3 Hub segment External segment and Hub segment
11 External and Hub seg-
ment
22 External and Hub seg-
ment
33 External and Hub seg-
ment
0- External segment Discard; do not forward
-0 Hub segment Discard; do not forward
00 External and Hub seg-
ment
External segment
Hub segment
External segment and Hub segment
Discard; do not forward
About dynamic and static table entries
The bridge treats these two classes of entries differently:
A
dynamic table entry represents the segment location (which
segment the device is connected to). After a reset or on being
powered up, the bridge does not have any dynamic entries in its
forwarding table. However, it is monitoring traffic on both.
Page 3-29
Page 86

Chapter 3 — AsantéBridge 1012 Local Management
When a device on either segment transmits, its packets are read
by the bridge. The bridge reads the
the packets and writes that address into the table as a dynamic
entry with a tag associating it with the segment it was received
on. Thereafter, when the bridge receives a packet on either segment, it will compare the
the table entry.
If there is a match, the packet is forwarded to the appropriate segment. If there is no match, the packet is forwarded to
site segment from which it is received
Static table entries are treated differently. These are manually
entered and are only deleted from the table under circumstances
defined at the time the addresses are entered. There are also differences in the way the bridge treats these entries.
When the bridge receives a packet from either segment, it reads
destination address of the packet and checks the forwarding
the
table for static entries. If a match is found, the packet is forwarded
according to the instructions associated with the matching table
entry.
If a match is not found in the static entries, the table is checked
again to see if there is a dynamic entry for this address.
If there is already a dynamic entry the bridge then checks for a
dynamic entry matching the
and forwards it accordingly.
If there is no existing dynamic entry, the bridge writes the source
address into the table as a dynamic address as described above.
In summary:
❏ A dynamic entry is derived from the source address of
an incoming packet and is used to direct forwarding of
packets carrying this address as their
address.
❏ A static entry is manually entered and is used to direct
forwarding of packets carrying this address as their
tination.
destination address of that packet to
source address contained in
the oppo-
.
destination address of the packet
destination
des-
Page 3-30
Page 87

Configuration Menu System
Using the Edit Function
Figure 3-18 Editing the Forwarding Table
To use the Search Function, do the following:
1
2
Use the Left/Right arrow keys to select the Edit function.
return.
Press
The table editor displays. Here you can add, delete, or
modify table entries.
Use the Left/Right arrow keys to select the editing function you want and then press
Add lets you add another address to the table. Selecting
the command opens the data entry bar, which will contain
the Ethernet address that is currently selected (highlighted) in the table. The editor will change over to a
command if you enter a duplicate Ethernet address.
ify
Delete removes the selected entry from the table. The edi-
tor asks you to confirm any deletion from the table. However, you cannot delete the management (MNG), broadcast
(BRC) or the spanning tree address (SPT).
Modify allows you to do the following:
• change the Ethernet address
• define the address static subcategory (permanent, delete
• on reset, delete on timeout)
• define the input port
• define the output port
Exit returns you to the original forwarding table display.
return.
Mod-
Page 3-31
Page 88

Chapter 3 — AsantéBridge 1012 Local Management
Using the Search Function
Figure 3-19 Searching for an Address
To use the Search Function, do the following:
1
2
Use the Left/Right arrow keys to select the function and
then press
The Search Function window displays.
Using the Left/Right arrow keys, select the search function you want.
By Address is for searching f or a specific Ethernet address.
The data entry bar opens when you select this function
and contains the Ethernet address that is currently highlighted. Change the address to the one you want to search
for and press
go to the page where it is located and automatically select
it for you.
By Page sends you to a designated page in the table. The
data entry bar opens when you select the function. Enter
the page you want and press
return.
return. If the address is found, the table will
return.
Page 3-32
Page 89

Read packet
Configuration Menu System
Bridge Filtering Table
About the Filtering Table
The filtering table should be viewed as
that determine whether any given packet is forwarded from
ters
one segment to the other. Each parameter set contains three
ranges and an ON/OFF switch.
The following flowchart shows packet flow in the pipeline.
pipelined sets of parame-
Status for Set 1
ON or OFF
OFF
Status for Set 2
ON or OFF
OFF
Status for Set 3
ON or OFF
OFF
Status for Set n
ON or OFF
OFF
ON
ON
ON
ON
Packet source address
fall within SRC range?
Yes
Packet destination
address fall within
DST range?
Yes
Packet type fall
within packet type
range?
Yes
Filter Mode
set for
Forward or
Discard?
No
No
No
Forward as
defined in
Forwarding Table
Forward
Packet
Forward
Discard
Packet
Discard
Check the next
available Set, if there
is one. If not, then
forward as defined
in Forwarding Table
Page 3-33
Page 90

Chapter 3 — AsantéBridge 1012 Local Management
Each range within the set acts as a filter in a pipeline. A packet has
to get past all three filters to completely traverse the pipeline and
be forwarded (or discarded, according to how the filter mode is
set).
Figure 3-20 Bridge Filtering Table
As many as ten range entries can be stored in the table.
Incoming packets are checked against this table
after they are
checked against the forwarding table.
❏ Exit returns you to the Bridge Parameters Menu.
❏ Next/Prev Page moves you one page forward or back-
ward in the table.
❏ Filtering Mode sets up how the entire table filters: If set
FORWARD only packets defined by the type field
to
with Ethernet addresses falling within ranges defined in
the table are forwarded
turned ON
❏ If Filtering Mode is set to DISCARD the reverse is true:
. All other packets are discarded.
if the Status for the range is
Packets defined by Type and address within this entry
will be discarded
.
ON
❏ DST Address defines a range of addresses for the
if the Status for the range is turned
devices allowed to have this packet forwarded to the
specified devices.
❏ SRC Address defines a ranges of addresses for the send-
ing devices allowed to forward packets to the devices
defined in the
❏ Type defines the packet or protocol type to be for-
DST Address field.
warded or discarded.
Page 3-34
Page 91

Configuration Menu System
❏ Status enables or disables the filtering function for this
range of addresses.
To use the Bridge Filtering Table, do the following:
1
2
3
4
5
Use the arrow keys to highlight the LO DST address field
and press
The current value in the field is displayed in the data entry
bar at the bottom of the window.
Enter control-u to clear the entry bar and enter the new
lower range limit for packet destination addresses for this
parameter set.
Press
Select the HI DST address field and press return.
Enter the new upper range limit for packet destination
addresses for the parameter set.
Press return when the entry is correct.
Select the LO SRC Address field and enter a new lower
range limit for packet source addresses.
Press return when the entry is correct.
return.
return when the entry is correct.
6
7
8
9
10
Select the HI SRC Address field and enter a new upper
range limit for packet destination addresses.
Press return when the entry is correct.
Select the LO Type field and define the lower range limit
for packet types (protocols).
Select the HI T ype field and define the upper rang e limit for
packet types.
Select the Status field and use the spacebar to toggle it
ON or OFF.
Repeat steps 1-9 for each additional parameter set in the
table.
Page 3-35
Page 92

Chapter 3 — AsantéBridge 1012 Local Management
Resetting the Bridge
You can reset the AsantéBridge 1012 in three different ways:
❏ Cycle the power. This resets both the bridge and hub
portions of the device. The repeater is not affected.
❏ Push the Reset button on the front panel. This resets
both hub and bridge.
❏ Send the Reset system command from the Configura-
tion Menu
. This resets both the bridge and the hub.
Figure 3-21 Resetting the Bridge
1
Use the arrow keys to select the Reset system command.
2
Press return to reset the bridge.
Confirmation is required. The command executes only
after you have confirmed your choice.
Your display will begin to cycle through the bridge power-
on diagnostics and return to the
Menu
Enter control-z to return to the Local Management Menu.
.
Local Management
3
Remember that a reset:
❏ Resets the bridge and hub statistics counters to zero
❏ Erases any packets in bridge and hub memory at the
time of the reset
❏ Prevents the bridge from forwarding or filtering data
flow until the power-on diagnostics have run to completion and the bridge has completed reconfiguring
❏ Erases dynamic forwarding addresses
Page 3-36
Page 93

Configuration Menu System
❏ Erases static forwarding addresses configured for delete
on reset
❏ Does not affect the password for the Configuration
Menu
❏ Retains any new settings for IP address, IP mask, and
default router IP address
Page 3-37
Page 94

Chapter 3 — AsantéBridge 1012 Local Management
Statistics Menu
System
The AsantéBridge 1012 provides several counters that monitor
traffic on both bridge ports.
A password is not required to access the statistics counters. Just
select the
and press
shown in Figure 3-22.
The counters displayed represent the total count for each category accumulated since the last reset or cold start (power-on).
Counter contents are not preserved when the bridge is powered
off.
Bridge Statistics field on the Local Management Menu
return. This opens the Bridge Port Statistics Menu, as
Figure 3-22 Bridge Statistics
To display and modify the Statistics Menu, do the following:
1
2
3
You can stop the counter displays from incrementing with
freeze screen command. Use the arrow keys to select
the
the command and then press
This stops the displays from incrementing. It does
the counter from incrementing. When you unfreeze the
screen, all displays update to the actual value of the
counters.
Set all counters back to zero with the Reset Counters command.
Enter control-z to return to the Bridge Port Statistics
Menu
.
return.
not stop
Page 3-38
Page 95

A
Support for
Pre 10BaseT Devices
Page 96

Appendix A — Support for Pre 10BaseT Devices
This appendix provides guidelines for integrating non-10BaseT
compatible devices for your Asanté 10BaseT Local Area Network.
For a device that has an Ethernet card with an AUI port, simply
obtain a TP-MAU (Media Attachment Unit) such as the Asanté 10T
MAU . A TP-MA U is an e xternal device which allows you to connect
a 10BaseT RJ-45 connector to your AUI (DB-15) port.
For a device with an adapter card that supports an earlier version
of 10BaseT, you should disable the Link Integrity test for the port
connected to that device. First, check with the vendor to make
sure disabling the Link Integrity makes the card compatible with
the AsantéHub 1012. Then do the following steps:
1
2
Determine which port number the workstation is wired to
on the AsantéHub.
From the AsantéView Port Control window, disable link
integrity testing on that port. (For this procedure, see the
AsantéView manual for your version of AsantéView.)
You should know the following:
❏ AsantéView does not gather statistics from ports with
Link Integrity disabled.
❏ The Link/Receive LED for the disabled port(s) is always
on (green).
❖ Note: Link Integrity can be disabled for the uplink in
hardware; see Chapter 1, “Quick Start.”
❖
Page A-2
Page 97

B
Technical Specifications
Page 98

Appendix B — Technical Specifications
This appendix describes the technical features of the
AsantéBridge 1012.
Standards Supported:
IEEE 802.3 Ethernet specifications for thick (10Base5), thin
(10Base2), and unshielded twisted pair (10BaseT) media
IEEE 802.1d specifications for transparent bridging with spanning
tree implementation
Data Rate: 10 Mbps
Maximum Cable Distances:
10BaseT (UTP): 100m (328 ft.)
10Base2 (thin): 200m (656 ft.)
10Base5 (thick): 50m (163 ft.)
Ports:
13 Unshielded Twisted Pair (UTP device ports)
1 Autoswitch 3-in-1 Uplink with three physical port options:
1 Attachment Unit Interface (AUI)
1 BNC Thin Ethernet
2 RJ-45
1 AUI for external bridge port
1 internal bridge port (connected internally to the hub; the hub
itself is the internal bridge port)
LEDs:
14 to indicate Link Integrity Status
14 to indicate Autopartitioning Status
8 to show Hub Bandwidth Utilization
4 to show Collision Percentage
1 to show Late Collision
1 to show Alignment/CRC Errors
1 to show Runt/Fragmented Packets
1 to show Short Event/Missing SFD
1 to show CPU Activity
1 to show Message Waiting
1 to show SNMP Option present
1 to show Power on/off
1 to show Uplink Partition Status (rear panel)
Page B-2
Page 99

1 to show Uplink Link/Receive Status (rear panel)
3 to show received packets, forwarded packets, collisions on
external bridge port
3 to show received packets, forwarded packets, collisions on hub
bridge port
3 to show bridge status within a spanning tree
Power Requirements:
Input Voltage: 100-250 VAC, 47-63 Hz single phase; continuous
voltage input range
Input Current: 1.2A @ 100 VAC (Max.)
0.5A @ 220 VAC (Maximum)
0.5A @ 100 VAC (typical)
Electromagnetic Emissions: Meets FCC Class A requirements
Safety: Designed in accordance with UL 1950, CSA 22.2 No. 220,
IEC 950, TUV, and VDE requirements
Mounting: Desktop, Rack (with bracket), or Wall (with bracket)
Physical Dimensions: 10” L (25.4 cm) x 2.2” H (5.9 cm) x 16” W
(40.6 cm)
Weight: Approximately 6 lbs. (2.73 kg)
Environmental:
Operating Temperature: 0 to 40° C ambient
Operating Humidity: 5 to 85% noncondensing
Operating Altitude: 10,000 ft. (3,048 m)
Storage Temperature: -30 to 80° C
Storage Humidity: 5 to 90% noncondensing
Storage Altitude: 25,000 ft. (7,620 m)
Page B-3
Page 100

Appendix B — Technical Specifications
Page B-4
 Loading...