

Page 1

AsantéFAST™ 10/100
and
AsantéNIC
PCI Ethernet Adapter
Installation Guide
™
-PCI
Page 2

Page 3

AsantéFAST™ 10/100
and
AsantéNIC
™
-PCI
PCI Ethernet Adapter
Installation Guide
Asanté Technologies, Inc.
821 Fox Lane
San Jose, CA 95131
November 1995
Part Number 06-00220-01 Rev. B
Printed in USA
Page 4

Copyright Notice
Copyright 1995 by Asanté Technologies, Inc.
All rights reserved. No part of this manual, or any associated artwork, software, product design
or design concept, may be copied, reproduced or stored, in whole or in part, in any form or by
any means mechanical, electronic, optical, photocopying, recording or otherwise, including
translation to another language or format, without the express written consent of Asanté
Technologies, Inc.
Trademarks
Asanté Technologies, AsantéFAST and AsantéNIC are trademarks of Asanté Technologies, Inc.
Apple, AppleTalk, EtherTalk, AppleShare and Power Macintosh are registered trademarks of
Apple Computer, Inc. Microsoft, Windows and the Windows Logo are registered trademarks of
Microsoft Corporation.
Ethernet is a registered trademark of the Xerox Corporation.
All brand names and products are trademarks or registered trademarks of their respective
holders.
FCC Information
This device complies with part 15 of the FCC Rules. Operation is subject to the following two
conditions: (1) this device may not cause harmful interference and (2) this device must accept
any interference received, including interference that may cause undesired operation.
Operation of this equipment in a residential area is likely to cause interference, in which case,
the user, at his own risk and expense will be required to correct the interference.
Asanté Warranty
Asanté Technologies, Inc. warrants that this product will be free from defects in title, materials
and manufacturing workmanship. If the product is found to be defective, then, as your sole
remedy and as the manufacturer’s only obligation, Asanté Technologies, Inc. will repair or
replace the product. This warranty is exclusive and is limited to the AsantéFAST 10/100 and
AsantéNIC adapters.
This warranty shall not apply to products that have been subjected to abuse, misuse, abnormal
electrical or environmental conditions, or any condition other than what can be considered
normal use.
Warranty Disclaimers
Asanté Technologies, Inc. makes no other warranties, express, implied or otherwise, regarding
AsantéFAST 10/100 and AsantéNIC adapters, and specifically disclaims any warranty for merchantability or fitness for a particular purpose.
The exclusion of implied warranties is not permitted in some States and the exclusions specified herein may not apply to you. This warranty provides you with specific legal rights. There
may be other rights that you have which vary from State to State.
Developer tested only, Novell makes no warranty with respect to this product.
Limitation of Liability
The liability of Asanté Technologies, Inc. arising from this warranty and sale shall be limited to a
refund of the purchase price. In no event shall Asanté Technologies, Inc. be liable for costs of
procurement of substitute products or services, or for any lost profits, or for any consequential,
incidental, direct or indirect damages, however caused and on any theory of liability, arising
from this warranty and sale. These limitations shall apply notwithstanding any failure of
essential purpose of any limited remedy.
Page 5

DRAFT
Table of Contents
Introduction . . . . . . . . . . . . . . . . . . . . . . . . . . . . . . . . . . . . . . 1-1
Conventions . . . . . . . . . . . . . . . . . . . . . . . . . . . . . . . . . . . . . . . . . . . . 1-1
AsantéFAST 10/100 Adapter for PCI . . . . . . . . . . . . . . . . . . . . . . . . . . 1-1
AsantéNIC-PCI Adapter . . . . . . . . . . . . . . . . . . . . . . . . . . . . . . . . . . . . 1-2
Package Contents . . . . . . . . . . . . . . . . . . . . . . . . . . . . . . . . . . . . . . . . .1-3
PCI Local Bus . . . . . . . . . . . . . . . . . . . . . . . . . . . . . . . . . . . . . . . . . . . 1-4
Installing the Asanté PCI Adapter . . . . . . . . . . . . . . . . . . . . . 2-1
Installing the Adapter . . . . . . . . . . . . . . . . . . . . . . . . . . . . . . . . . . . . . 2-1
Connecting the Adapter to the Network . . . . . . . . . . . . . . . . . . . . . . 2-2
Connecting a UTP Cable . . . . . . . . . . . . . . . . . . . . . . . . . . . . . . . .2-2
Connecting a Thick Ethernet Cable (AsantéNIC-PCI Only) . . . . .2-2
Configuring the Adapter . . . . . . . . . . . . . . . . . . . . . . . . . . . . . . . . . . . 2-3
Self-Configuring the Adapter . . . . . . . . . . . . . . . . . . . . . . . . . . . . .2-3
Computers without the Self-Configuring Feature . . . . . . . . . . . . .2-3
Configuring 10Mbps, 100Mbps, or Full Duplex Operation
(AsantéFAST 10/100 Only) . . . . . . . . . . . . . . . . . . . . . . . . . . . . . .2-3
Testing the Adapter . . . . . . . . . . . . . . . . . . . . . . . . . . . . . . . . . . . . . . .2-4
Installing Network Drivers . . . . . . . . . . . . . . . . . . . . . . . . . . . 3-1
Network Operating Systems Supported . . . . . . . . . . . . . . . . . . . . . . . 3-1
Installing Network Specific Drivers . . . . . . . . . . . . . . . . . . . . . . . . . . .3-2
Novell NetWare 3.x Client . . . . . . . . . . . . . . . . . . . . . . . . . . . . . .3-2
Novell NetWare 4.x Client . . . . . . . . . . . . . . . . . . . . . . . . . . . . . .3-3
Microsoft Windows 95 . . . . . . . . . . . . . . . . . . . . . . . . . . . . . . . . .3-4
Microsoft Windows for Workgroups . . . . . . . . . . . . . . . . . . . . . .3-5
Microsoft Windows NT Workstation . . . . . . . . . . . . . . . . . . . . . .3-7
Power Macintosh Open Transport Driver . . . . . . . . . . . . . . . . . .3-8
Page 6

Troubleshooting . . . . . . . . . . . . . . . . . . . . . . . . . . . . . . . . . . . 4-1
LED Indicators . . . . . . . . . . . . . . . . . . . . . . . . . . . . . . . . . . . . . . . . . . 4-1
Overview . . . . . . . . . . . . . . . . . . . . . . . . . . . . . . . . . . . . . . . . . . . .4-1
Link Integrity LED (AsantéFAST 10/100 and AsantéNIC-PCI) . . . .4-2
Data Traffic LED (AsantéFAST 10/100 and AsantéNIC-PCI) . . . . .4-2
100Mbps Operation LED (AsantéFAST 10/100 Only) . . . . . . . . . .4-3
10Mbps Operation LED (AsantéFAST 10/100 Only) . . . . . . . . . . .4-3
Using the Diagnostic Program . . . . . . . . . . . . . . . . . . . . . . . . . . . . . . 4-4
PC Diagnostic Program . . . . . . . . . . . . . . . . . . . . . . . . . . . . . . . . .4-4
Power Macintosh Diagnostic Program . . . . . . . . . . . . . . . . . . . . .4-5
Specifications . . . . . . . . . . . . . . . . . . . . . . . . . . . . . . . . . . . . . .A-1
Technical Support . . . . . . . . . . . . . . . . . . . . . . . . . . . . . . . . . .B-1
Page 7

DRAFT
1
Introduction
Conventions
This manual describes the installation procedures for two products:
❏
AsantéFAST 10/100 adapter for PCI
❏
AsantéNIC-PCI adapter
It also applies to two platforms:
❏
PC compatible
❏
Apple Power Macintosh
Most of the information applies to both products and platforms. When the
information is specific to a product or platform, it is noted in the heading for
the section or sub-section.
AsantéFAST 10/100 Adapter for PCI
The AsantéFAST 10/100 adapter for PCI gives you all-in-one compatibility to
10BASE-T and 100BASE-TX Ethernet networks for both PCI-based PC and
Power Macintosh computers. It’s ideal for resource intensive CAD/CAM,
client-server database, multimedia, pre-press, mission-critical, and server
applications.
Install the AsantéFAST 10/100 adapter on your existing 10Mbps (10BASE-T)
network to take advantage of the high-performance design and high-speed
PCI bus right from the start. Then, when it’s time to switch to 100Mbps
(100BASE-TX), simply plug the cable into an AsantéFAST 100 hub or other
100BASE-TX compliant hub and your adapter is ready to run at the 100Mbps
speed. The adapter automatically connects at the correct speed. A single
RJ-45 port and drivers support both 10 and 100Mbps operations.
Using NWay™ auto-negotiation, the adapter will sense the hub-speed and
configure the adapter accordingly. For added ease of use, the AsantéFAST
10/100 adapter has 4 LED lights for instant troubleshooting.
Page 8

Introduction
The AsantéFAST 10/100 adapter for PCI features are:
❏
32-bit bus mastering design allows maximum throughput without loading the host CPU.
❏
Installs easily with plug and play auto-configuration
through the PCI BIOS (system ROM).
❏
Easily visible LEDs indicate 10Mbps operation, 100Mbps
operation, Link integrity and Data traffic.
❏
National Semiconductor’s NWay™ auto-negotiation feature determines 10Mbps operation, 100Mbps operation,
or full duplex operation automatically.
❏
Supports full duplex mode for 20 or 200Mbps operation.
❏
100% compliant with IEEE 802.3 10BASE-T and 802.3u
100BASE-TX Ethernet standards.
❏
Supports major network operating systems for PC and
Power Macintosh platforms.
❏
Jumperless and switchless operation.
❏
Compliant with PCI specifications, version 2.0.
AsantéNIC-PCI Adapter
The AsantéNIC-PCI provides a cost-effective solution for increased network
performance. Using this adapter, your throughput will dramatically increase
in comparison to any ISA, EISA, or NuBus cards. Using bus-mastering architecture and burst mode, bottlenecks are minimized and file transfers are prevented from over-loading the host CPU.
Installation is simplistic compared to ISA or EISA card installations. Simply
plug the PCI adapter into your PC or Power Macintosh and let the adapter
self-configure to your system during power-up. The AsantéNIC-PCI adapter
will automatically configure all I/O addresses and interrupts on the PCI system.
Page 1-2
Page 9

PCI Local Bus
The AsantéNIC-PCI adapter features are:
❏
32-bit bus-mastering design provides maximum throughput without loading the host CPU.
❏
132 Mbps data transfer rate through the 32-bit PCI bus.
❏
Easy to install - plug and play self-configuration.
❏
Easy software selection of RJ-45 or AUI connection.
❏
Compatible with popular network operating systems for
PC and Power Macintosh.
❏
Two diagnostic LEDs for quick and easy troubleshooting.
❏
Remote boot ROM socket allows diskless workstation to
boot from the LAN server.
❏
Jumperless and switchless operation.
❏
100% compliant with IEEE 802.3 Ethernet.
❏
Compliant with PCI 2.0 Specification.
❏
Lifetime warranty and free technical support.
Package Contents
Before going any further, please make sure that you have the following
items:
❏
AsantéFAST 10/100 adapter for PCI or AsantéNIC-PCI
adapter installed in your computer
❏
Floppy disk which includes the following software:
❏
NetDoubler software application
❏
Electronic documentation for NetDoubler
❏
Device driver software
❏
Electronic documentation for driver software
∆
Note: The included Driver Disk is DOS formatted. Apple
Computer's System 7.5 OS can read the installation program and the driver from this disk. To use this disk on
PCI-based Power Macintosh, make sure that you do not
disable the System Extensions during power-up and that
PC Exchange is enabled in the Extensions Manager.
PCI Local Bus
The PCI (Peripheral Component Interconnect) local bus is a new industry
standard high performance bus designed for high I/O throughput. The 32-bit
PCI bus runs at a maximum of 33MHz, while handling a maximum data
transfer rate of 132 MBytes/second.
Page 1-3
Page 10

Introduction
One of the advantages of the PCI bus is that it is processor independent. The
Asanté PCI adapters are capable of working with both PCI-based PC and
Power Macintosh computers. PCI devices are also self configuring, making
them very easy to install and use.
The Asanté PCI adapters use 32-bit bus mastering architecture allowing maximum throughput with low CPU utilization.
➪
Important: The PCI bus slot used must support bus-mastering operations.
Page 1-4
Page 11
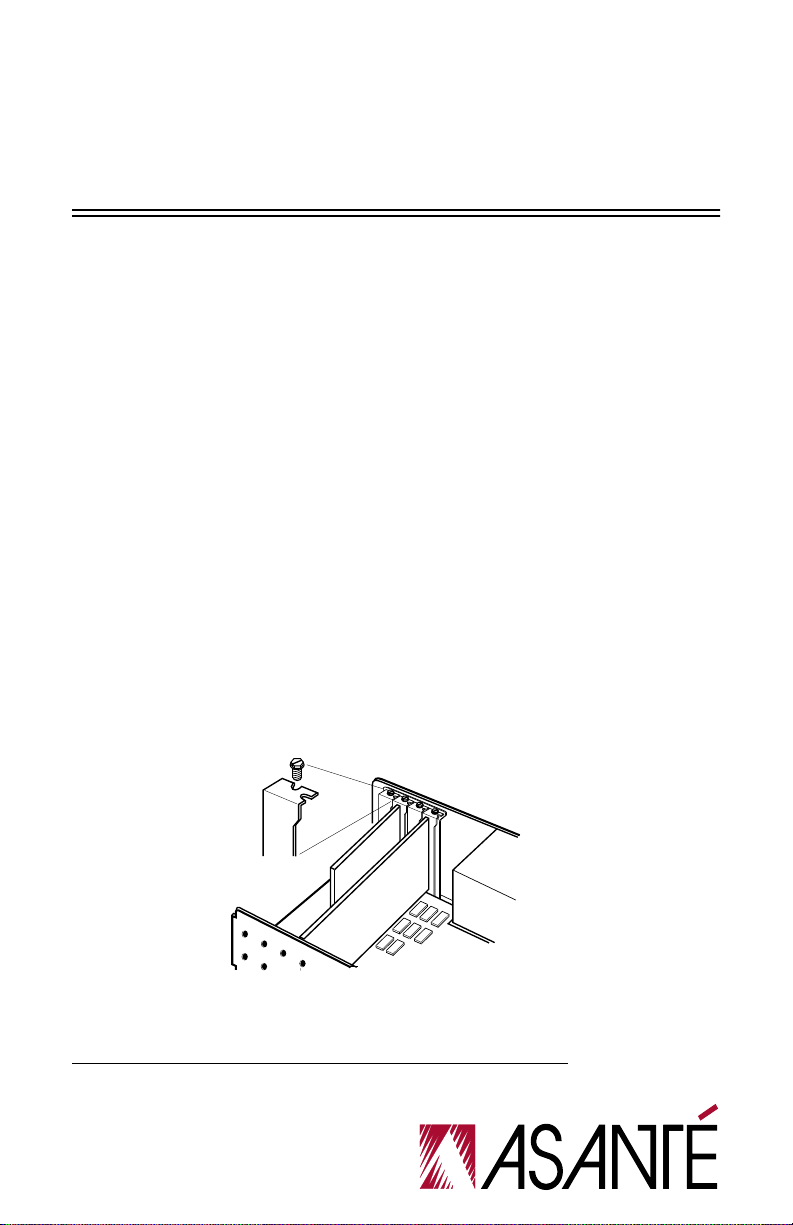
2
Installing the Asanté PCI Adapter
Installing the Adapter
The following instructions explain how to install the Asanté PCI adapter.
∆
Note: You do not need to set any jumpers or switches on
the adapter.
Turn the power off and remove the computer cover.
1
➪
Important: A network adapter is sensitive to static electricity and must be handled carefully. If you do not handle the adapter properly you can damage it and/or your
system.
Align the adapter’s edge connector with a PCI bus slot.
2
➪
Important: The PCI bus slot used must support bus mastering operations.
Push the adapter down into the slot until the adapter locks into
3
place as shown below.
Replace the computer cover.
4
Page 12

Installing the Asanté PCI Adapter
Connecting the Adapter to the Network
The AsantéFAST 10/100 adapter provides a single RJ-45 port for connecting
the adapter to your network. Using NWay™ auto-negotiation, the adapter
will sense the hub's speed and set the adapter to run at either 10Mbps or
100Mbps. See the
section for more details.
The AsantéNIC-PCI adapter provides both RJ-45 and AUI ports for your network. Easy on-screen configuration lets you select the port to use.
➪
Connecting a UTP Cable
To connect your UTP cable to the network using the RJ-45 connector, follow
the instructions below:
Plug the RJ45 connector on one end of your UTP cable into the
1
adapter’s RJ45 port.
Plug the other end of your UTP cable into the network hub or
2
wall socket connected to a network hub.
Turn the computer power on.
3
Configuring 10Mbps, 100Mbps or Full Duplex Operation
Important: Connection to a 100BASE-TX hub for
100Mbps operation requires a Category 5 unshielded
twisted-pair (UTP) cable. The maximum length from the
100BASE-TX hub to the adapter is 100 meters. Connection to a 10BASE-T hub for 10Mbps operation requires a
Category 3, 4, or 5 UTP cable.
Connecting a Thick Ethernet Cable (AsantéNIC-PCI Only)
To connect your thick Ethernet cable to the network using the AUI port on
the AsantéNIC-PCI adapter, follow the instructions below:
Connect the DB-15 connector on one end of the thick Ethernet
1
cable to the adapter’s AUI port.
Connect the other end of the cable to the external transceiver.
2
Lock the connector or tighten the screws, if necessary.
3
Turn the computer power on.
4
Page 2-2
Page 13

Configuring the Adapter
Configuring the Adapter
Self-Configuring the Adapter
One of the advantages of PCI is that all of its devices are self-configuring. The
Asanté PCI adapter is designed to utilize this feature.
To configure the adapter, plug it into a PCI slot with bus-mastering capability. During system initialization at power-up, the PCI BIOS (system ROM)
configuration software automatically selects an unused interrupt line and
I/O addresses for use with the adapter. You do not need to set interrupts, I/O
addresses, jumpers, or switches to configure the adapter.
Computers without the Self-Configuring Feature
Early versions of PCI BIOS do not support the PCI specification, version 2.0.
To successfully install the adapter in computers without the self-configuring
feature, you may need to modify IRQ jumper settings on the computer’s
motherboard and/or modify the PCI BIOS setup with the setup utility that
came with your computer system. Refer to your computer manuals for information on changing the BIOS setup for a PCI bus.
∆ Note: Check with your computer manufacturer to see if
your computer properly supports the PCI Specification,
version 2.0.
∆ Note: It is recommended that you verify the PCI configu-
ration using the PCI BIOS setup utility after installing the
adapter. Check that your PCI configuration do not conflict with other bus configuration.
Configuring 10Mbps, 100Mbps, or Full Duplex Operation
(AsantéFAST 10/100 Only)
The AsantéFAST 10/100 adapter supports National Semiconductor’s NWay™
auto-negotiation feature. NWay auto-negotiation allows the connected
devices to automatically configure to the highest performance mode of operation. The hierarchy of this mode of operation is listed below:
❏ 100BASE-TX Full Duplex
❏ 100BASE-TX
❏ 10BASE-T Full Duplex
❏ 10BASE-T
Page 2-3
Page 14

Installing the Asanté PCI Adapter
This means that after power up initialization, the adapter will automatically
connect at the appropriate speed (10Mbps or 100Mbps) and/or Full Duplex
without user intervention. The Full Duplex operation can only be configured
with a hub or a switch product that supports it.
If you are initially planning to use the adapter to run at 10Mbps speed, when
you are ready to upgrade to 100Mbps (100BASE-TX), it will not be necessary
to modify the configuration or settings. The same driver will run in both
10Mbps or 100Mbps speed.
Another benefit of NWay auto-negotiation is that a connection will not occur
without a common mode of operation between connecting devices.This
preserves network integrity and minimizes network downtime.
Testing the Adapter
Conducting a test is recommended after performing a first time installation
of the adapter. Successful test performance ensures that the adapter is operating properly. A diagnostic program for testing the adapter is included on
the Driver Disk. This program runs a number of tests and indicates the
results with PASS or FAIL.
Please refer to Chapter 4 for instructions on how to use the diagnostic program.
Page 2-4
Page 15

3
Installing Network Drivers
Network Operating Systems Supported
After installing, configuring and testing the Asanté PCI adapter, you are ready
to install network drivers and work with your network operating system.
Network operating systems that are supported are:
❏ PC Networks: Novell NetWare, Microsoft Windows for
Workgroups, Microsoft Windows 95, Microsoft Windows
NT, Microsoft LAN Manager, Banyan VINES, NDIS- and
ODI-compliant operating systems.
❏ Power Macintosh Networks: Apple System 7.5 or
higher, AppleShare, Novell NetWare for Macintosh, DEC
Pathworks, AppleTalk, and MacTCP.
This chapter describes driver installation in the following environments:
❏ PC Networks:
❏ Novell NetWare 3.x Client
❏ Novell NetWare 4.x Client
❏ Microsoft Windows 95
❏ Microsoft Windows for Workgroups
❏ Microsoft Windows NT Workstation
❏ Power Macintosh Networks:
❏ Power Macintosh Open Transport Driver
In general, the adapter will support a network operating system (NOS) that
works with NDIS and ODI drivers. For details about installing your NOS and
its drivers refer to the INSTALL.DOC files in each specific NOS subdirectory
on the Driver Disk and/or the manuals provided by your NOS.
∆ Note: The same installed driver can be used for 10Mbps
or 100Mbps operation with the AsantéFAST10/100
adapter.
Page 16

Installing Network Drivers
Installing Network Specific Drivers
Novell NetWare 3.x Client
This section shows you how to install Novell NetWare version 3.x ODI client
software.
Create a directory named NETWARE on your C drive.
1
To do this, type the following command at the DOS command
line prompt:
MD C:\NETWARE
Insert either the NetWare WSGEN disk that came with NetWare
2
3.x or your master workstation disk into drive A.
Copy the following three files to the NETWARE directory on your
3
C drive.
❏
LSL.COM
❏ IPXODI.COM
❏ NETX.COM
➪ Important: The AsantéNIC-PCI adapter requires
LSL.COM version 2.10 or later. Please check the version
number of your LSL.COM file.
Remove the NetWare WSGEN or master workstation disk from
4
the floppy drive.
Insert the Asanté Driver Disk into floppy drive A.
5
Copy the NET.CFG and the ODI driver files to the NETWARE
6
directory on your C drive. To do this, type:
COPY A:\NETWARE\NW3.X\CLIENT\NET.CFG C:\NETWARE
COPY A:\NETWARE\NW3.X\CLIENT\ASANTPCI.COM C:\NETWARE
Check your CONFIG.SYS file to make sure that this line
7
appears:
DEVICE=C:\DOS\SETVER.EXE
If you don’t see it there, type it in, then save the file.
∆ Note: The SETVER.EXE file must be in the C:\DOS
directory.
Page 3-2
Page 17

Installing Network Specific Drivers
Remove the Driver Disk from the floppy drive.
8
Restart your computer.
9
To run NetWare, type the following four commands, (in the fol-
10
lowing sequence) at the C:\NETWARE prompt:
LSL
ASANTPCI
IPXODI
NETX
Change to the network drive (usually F), and log in to your net-
11
work.
Novell NetWare 4.x Client
This section shows you how to install Novell NetWare version 4.x client software.
Run the NetWare Client Install program that came with Netware
1
4.x. Follow the instructions for the first three steps of the NetWare Client Install program as required.
At step 4, press Enter to install the driver for your adapter.
2
When prompted, insert the Asanté Driver Disk into the drive and
3
type the following:
A:\NETWARE\NW4.X\CLIENT
Press Enter.
4
The Network Board window appears.
Select Asanté PCI Network Adapter and press Enter.
5
The Settings for the Asanté PCI Network Adapter window
appears. It displays the selected settings for Base I/O Port, Hardware Interrupt, and Media Frame Type. You do not need to modify these settings.
Press ESC to continue.
6
At step 5, press Enter to continue with the NetWare installation.
7
Page 3-3
Page 18

Installing Network Drivers
When prompted, insert the appropriate NetWare Client Install
8
disk and press Enter.
Press Enter to exit to the DOS prompt.
9
Restart the computer to load the network drivers.
10
To log in to the network, type:
11
F:login
Microsoft Windows 95
This section shows you how to install the driver to use your adapter with
Windows 95. The instructions assume that you have previously installed
Windows 95 software on the computer.
∆ Note: If you are installing Windows 95 for the first time,
the Plug and Play technology of Windows 95 will detect
the AsantéFAST 10/100 adapter automatically. It will
select and install the generic “PCI Fast Ethernet DECchip
21140 Based Adapter” driver from the Windows 95 software. This driver will not work with the Asanté adapter.
The procedure to install the correct AsantéFAST driver is
to use the Custom Setup option. For detailed instructions, refer to the INSTALL.DOC file in the Win95 subdirectory on the Driver Disk.
Start Windows 95.
1
Click Start button.
2
Select Settings and open Control Panel.
3
In the Control Panel, double-click Network icon.
4
Click Add button.
5
In the Select Network Component Type window, select Adapter.
6
Click Add button.
7
Click Have Disk button and the Install from Disk window
8
appears.
Insert the Driver Disk into drive A.
9
Page 3-4
Page 19

Installing Network Specific Drivers
In the “Copy manufacturer's files from:” text box, type:
10
11
12
13
14
15
16
17
A:\WIN95
Click OK button.
Select “AsantéFAST Ethernet Adapter” then click OK.
Click OK button in the Network window.
Insert the Windows 95 CD in the CD-ROM drive.
Type the correct path for the CD (e.g. d:\win95) in the “Copy
files from:” text box.
Click OK button to begin copying files.
Restart the computer and logon the network.
Microsoft Windows for Workgroups
This section shows you how to install the drivers to use your adapter with
Windows for Workgroups. The instructions assume that you have previously
installed Windows for Workgroups 3.11 software on the computer.
Start Windows for Workgroups.
1
From the Program Manager, double-click the Network group
2
icon.
Double-click the Network Setup icon.
3
The Network Setup window appears.
Click the Networks... button.
4
The Networks window appears.
Click the radio button to Install Microsoft Windows Network.
5
Click the radio button for No additional network.
6
Click the OK button or press Enter.
7
Click the Drivers... button.
8
Click the Add Adapter... button.
9
The Add Network Adapter window appears.
Page 3-5
Page 20

Installing Network Drivers
Select Unlisted or Updated Network Adapter from the list.
10
Click the OK button or press Enter.
11
The Install Driver window appears.
Insert the Asanté Driver Disk into drive A.
12
Type the following in the text box:
13
14
15
16
17
A:\WFW
(The text A:\ may already be provided for you.)
Click the OK button or press Enter.
The Unlisted or Updated Network Adapter window appears.
Asanté PCI Network Adapter is listed in the window.
Click the OK button or press Enter.
The Network Drivers window appears.
Click the Close button.
The Network Setup window appears.
Click the OK button or press Enter.
The Microsoft Windows Network Names window appears. Your
User Name, Workgroup, and Computer Name may already appear
in the text boxes.
If necessary, type your User Name, Workgroup, and Computer
18
Name.
Click the OK button or press Enter.
19
The Install Driver window appears.
When prompted to do so, insert the requested disk from the
20
Windows for Workgroups disk set into drive A.
Click the OK button or press Enter.
21
When prompted to do so, insert the requested disk from the
22
Windows for Workgroups disk set into drive A.
Click the OK button or press Enter.
23
When prompted to do so, insert the Asanté Driver Disk into drive
24
A.
Page 3-6
Page 21

Installing Network Specific Drivers
Type the following in the text box:
25
26
27
28
A:\WFW
(The text A:\ may already be provided for you.)
Click the OK button or press Enter.
A message window appears stating that Network Setup has mod-
ified the CONFIG.SYS, AUTOEXEC.BAT, and SYSTEM.INI
files.
Click the OK button or press Enter.
The Windows Setup window appears.
Click the button that restarts your computer.
Microsoft Windows NT Workstation
This section shows you how to install the driver to use your adapter with
Microsoft Windows NT. The instructions assume that you have previously
installed Windows NT software on your computer.
∆ Note: For instructions to install the driver to use the
adapter with Microsoft Windows NT Advanced Server,
refer to the INSTALL.DOC file in the specific Windows
NT subdirectory.
Start Windows NT.
1
Double-click the Main group icon.
2
Double-click the Control Panel.
3
Double-click the Network icon.
4
The Network Settings window appears.
Click the Add Adapter button.
5
The Add Network Adapter window appears.
Select the <Other> Required disk from manufacturer option then
6
click the Continue button.
At the Insert Disk window type:
7
A:\WIN_NT31 (if you’re using Windows NT version 3.1) or
Page 3-7
Page 22

Installing Network Drivers
A:\WIN_NT35 (if you’re using Windows NT version 3.5)
Press Enter.
8
The Select OEM Option window appears with AsantéFAST
10/100 Adapter or AsantéNIC-PCI Adapter as options.
Select the appropriate PCI adapter.
9
Click the OK button.
10
The AsantéFAST 10/100 Adapter Setup window or AsantéNIC-PCI
Adapter Setup window appears with Connection Type highlighted.
Select the appropriate Connection Type from the dropdown list
11
box.
Click the OK button.
12
The files are copied to the hard drive and then the Network Settings window reappears.
Click the OK button to complete the installation.
13
Restart the computer.
14
Power Macintosh Open Transport Driver
The Driver Disk includes Asanté’s Open Transport PCI device driver for the
Power Macintosh. Asanté’s Open Transport driver supports AppleTalk and
TCP/IP protocols simultaneously.
This section shows you how to install the Open Transport driver for the
adapter on your PCI-based Power Macintosh.
➪ Important: To use the Driver Disk on your Power Macin-
tosh, make sure that you do not disable the System
Extensions during power-up and that PC Exchange is
enabled in the Extensions Manager.
Insert the Asanté Driver Disk into the floppy drive and double-
1
click the Driver Disk icon.
Double-click on the Power Macintosh folder.
2
Page 3-8
Page 23

Installing Network Specific Drivers
Double-click the AsantéFAST Installer icon or the AsantéNIC-PCI
3
Installer icon and click OK when the Installer banner appears.
The Easy Install dialog box then appears.
4
➪ Important: To properly install the Open Transport
driver, you must use the Installer program. Do not drag
the files to the System Folder; doing so may not install
the files properly.
Click the Install button.
5
The Installer program examines your Macintosh and installs the
appropriate driver.
Click the Restart button when the message appears stating that
6
the installation was successful.
After successfully installing the adapter and the driver, you need
to configure the AppleTalk control panels on the Macintosh.
Select Control Panels from the Apple Menu.
7
Select AppleTalk from the Control Panels submenu.
8
The AppleTalk control panel appears.
Click the Connect Via: dropdown list box showing available com-
9
munication connections.
Select the Ethernet slot number where the adapter is installed.
10
Close the AppleTalk control panel by clicking on the close box.
11
A dialog box appears asking whether you want to save changes.
Page 3-9
Page 24

Installing Network Drivers
Click Save.
12
∆ Note: To verify the Ethernet connection, you can use
the Chooser. This displays the availability of network
printers, file servers, and/or shared disks, verifying that
you are connected to the network. If you do not see network devices in the Chooser, first check that at least one
of the other network devices is powered on before
assuming there’s a problem with your Ethernet connection.
Page 3-10
Page 25

4
Troubleshooting
LED Indicators
Overview
The figure below shows the LED indicators that illustrate the presence of
Link Integrity (LI), Data Traffic (TX), 100Mbps operation and 10Mbps operation for installation verification and diagnostic purposes.
10Mbps LED100Mbps LED
TX LEDLI LED
AsantéFAST 10/100 adapter
TX LEDLI LED
AsantéNIC-PCI adapter
Page 26

Troubleshooting
Link Integrity LED (AsantéFAST 10/100 and
AsantéNIC-PCI)
The green Link Integrity (LI) LED indicates a valid connection to the network. If link integrity is not detected, there is a link failure and the LI LED
will be off. The transmit and receive functions of the adapter also will be disabled.
State Description
On • Normal data packets are received or
link integrity is detected
Off • No unshielded twisted-pair cable is
connected
• No power source to hub
• Unshielded twisted-pair cable is
faulty
• Unshielded twisted-pair wire
exceeds the recommended length
Data Traffic LED (AsantéFAST 10/100 and AsantéNIC-PCI)
The amber Data Traffic (TX) LED indicates the activity (transmit data) status
of the adapter controller board. The LED should blink when data packets are
being transmitted from the cable.
State Description
Blinking • Data packets being transmitted
Off • Power off
• No data packets being transmitted
Page 4-2
Page 27

LED Indicators
100Mbps Operation LED (AsantéFAST 10/100 Only)
The green 100Mbps (100) LED indicates the configuration of the adapter for
100Mbps (100BASE-TX) operation.
State Description
On • Configured for 100Mbps operation.
Off • Not configured for 100Mbps operation.
10Mbps Operation LED (AsantéFAST 10/100 Only)
The amber 10Mbps (10) LED indicates the configuration of the adapter for
10Mbps (10BASE-T) operation.
State Description
On • Configured for 10Mbps operation.
Off • Not configured for 10Mbps operation.
∆ Note: When the computer powers up the 10Mbps Oper-
ation LED light comes on as the default. Once the device
driver has been loaded into memory and the appropriate
network speed is automatically sensed, the 10 or 100
Mbps LED will be lit.
Page 4-3
Page 28

Troubleshooting
Using the Diagnostic Program
The diagnostic program runs diagnostic tests to help you identify problems
on the adapter and provides configuration information on your adapter.
PC Diagnostic Program
To run the diagnostic program on your PC, follow the procedure below.
Insert the Asanté Driver Disk into drive A.
1
At the DOS prompt, type the following command:
2
3
4
A:\UTILITY\DIAGPCI
Press Enter.
A window appears displaying a warning message that you should
read.
Press C to continue (or ESC to abort the diagnostic program).
The diagnostic program searches for adapters installed in your
computer system. A screen appears showing you the adapters
found.
Select the appropriate adapter from the list and press Enter.
5
Use the UP or DOWN arrow key to make a selection.
A Screen appears showing you the following menu options:
❏ Loopback Tests: Tests the adapter by sending packets
across the components for loopback tests.
❏ Adapter Status: Displays the adapter configuration infor-
mation such as PCI slot number, base I/O address, interrupt line, media type, network speed, and Ethernet node
address.
❏ Go Back to previous screen
Select Loopback Tests and press Enter.
6
The program runs a series of tests. Their results are displayed for
you after each test with a PASSED or FAILED indication.
When the tests finish, verify the results to make sure that all tests
7
passed.
Page 4-4
Page 29

Using the Diagnostic Program
If a test fails, check that the adapter is seated properly in a PCI
bus-mastering slot or try installing the adapter in a different PCI
slot and run the tests again.
Press any key to return to the menu option screen.
8
To use the Adapter Status menu command to display the adapter
configuration information follow the procedure below, otherwise, continue to step 11.
Select Adapter Status and press Enter.
9
The diagnostic program reads the configuration information
from the adapter and displays this information on the screen.
∆ Note: For AsantéFAST 10/100 only, if the Network Speed
status is shown as Unknown, it may be that the network
cable is not connected, or the network cable is bad.
Press any key to return to the menu option screen.
10
Select Exit to DOS and press Enter.
11
Power Macintosh Diagnostic Program
To run the diagnostic program on your Power Macintosh, follow the procedure below.
Select Control Panels from the Apple Menu and select AppleTalk
1
from the Control Panels submenu.
The AppleTalk control panel appears.
Click the Connect Via: dropdown list box showing available com-
2
munication connections.
Select Printer port and close the AppleTalk control panel by
3
clicking on the close box.
Click Save to save changes.
4
Insert the Asanté Driver Disk into floppy drive and double-click
5
the diskette icon to open it.
Double-click the Power Macintosh folder icon.
6
Double-click the Utility Folder icon.
7
Page 4-5
Page 30

Troubleshooting
Double-click the AsantéFAST™ Troubleshooter icon or the
8
AsantéNIC-PCI Troubleshooter icon to start the program.
Click the OK button in the Troubleshooter startup screen.
9
The Troubleshooter loads and displays the main window with the
following tests:
❏ Loopback Test verifies the operation of the network
interface circuitry and the adapter by transmitting and
receiving special packets.
❏ Ping-Pong Test verifies communication with another
Macintosh on the network.
❏ Bandwidth Utilization Test calculates the total band-
width utilization of the network.
Click the checkboxes to select the Loopback Test, the Ping-Pong
10
Test, and the Bandwidth Utilization Test.
Click the highlighted slot number where the adapter is installed.
11
Click the TEST button to start the test sequence.
12
If the Bandwidth Utilization Test is selected, press any key to stop
packet collection.
When the tests finish, the test results are displayed in the Troubleshooter window.
Verify the results to make sure that all tests passed.
13
If a test fails, check that the adapter is seated properly in a PCI
slot or try installing the adapter in a different PCI slot and run the
tests again.
Click the QUIT button in the Troubleshooter window or Quit
14
from the menu bar.
Select Control Panels from the Apple Menu and select AppleTalk
15
from the Control Panels submenu.
The AppleTalk control panel appears.
Click the Connect Via: dropdown list box showing available com-
16
munication connections.
Select the Ethernet slot number where the adapter is installed.
17
Close the AppleTalk control panel by clicking on the close box.
18
Page 4-6
Page 31

Using the Diagnostic Program
A dialog box appears asking whether you want to save changes.
Click Save.
19
To run the Asanté Driver Local Statistics (ADLS) program on your Power
Macintosh to display the configuration information on the adapter, follow
the procedure below.
Insert the Asanté Driver Disk into floppy drive and double-click
1
the diskette icon to open it.
Double-click the Power Macintosh folder icon.
2
Double-click the Utility Folder icon.
3
Double-click the AsantéFAST™ ADLS icon or the AsantéNIC-PCI
4
ADLS icon to start the program.
The ADLS window appears showing the following adapter con-
figuration information such as driver version, PCI slot number,
adapter type, AppleTalk version, transmit status and receive status.
Verify the configuration information on the adapter.
5
Select Quit from the menu bar to close the ADLS program.
6
Page 4-7
Page 32

Troubleshooting
Page 4-8
Page 33

Specifications
AsantéFAST 10/100 Adapter AsantéNIC-PCI Adapter
Systems Supported Systems Supported
❏ PCI Local Bus PCs ❏ PCI Local Bus PCs
❏ PCI-based Power Macintoshes ❏ PCI-based Power Macintoshes
Interface Connections Interface Connections
A
❏ Single RJ-45 (Using NWay™,
auto-negotiate 10BASE-T or
100BASE-TX operation)
Bus Supported Bus Supported
❏ PCI, 32-bit bus mastering ❏ PCI, 32-bit bus mastering
LAN Drivers Available LAN Drivers Available
❏ PC: ODI and NDIS drivers ❏ PC: ODI and NDIS drivers
❏ Power Macintosh: Open Trans-
port
LEDs LEDs
❏ 4 LEDs indicate link integrity,
data traffic, 10Mbps operation,
and 100Mbps operation
❏ RJ-45
❏ AUI
❏ Power Macintosh: Open Trans-
port
❏ 2 LEDs indicate link integrity
and data traffic
Page 34

Specifications
AsantéFAST 10/100 Adapter AsantéNIC-PCI Adapter
100BASE-TX Link Specifications 10BASE-T Link Specifications
❏ Cable: 2 pairs of Category 5
unshielded twisted pair or
shielded twisted pair (ISO
11801 or ANSI/EIA/TIA 568A)
❏ Maximum Length: 100 m (328
ft.) computer to wiring closet.
Maximum network diameter
205 m (672 ft.) without bridging or routing
Power Requirements Power Requirements
❏ Cable: 2 pairs of Category 3,4
or 5 unshielded twisted pair
❏ Maximum Length for UTP
cable: 100 m (328 ft.) computer to wiring closet
❏ +5 volts @ 0.8 Amp. maximum ❏ +5 volts @ 0.8 Amp. maximum
Environmental Conditions Environmental Conditions
❏ Temperature: 0
oC
❏ Relative Humidity: 5% to 85%
non-condensing
Standards Compliance Standards Compliance
o
to 50
C ❏ Temperature: 0
❏ Relative Humidity: 5% to 85%
non-condensing
oC
to 50oC
❏ IEEE 802.3u 100BASE-TX ❏ IEEE 802.3 10BASE-T
❏ IEEE 802.3 10BASE-T ❏ PCI 2.0 specifications
❏ PCI 2.0 specifications ❏ FCC Part 15J Class A
❏ FCC Part 15J Class A
Page A-2
Page 35

Technical Support
Contacting Technical Support
To contact Asanté Technical Support:
Telephone (800) 622-7464
(408) 435-0706
Fax (408) 432-6018
Fax-Back (800) 741-8607
(408) 954-8607
Bulletin Board Service (BBS) (408) 432-1416
ARA BBS (guest log in) (408) 894-0765
AppleLink mail/BBS ASANTE.TECH
FTP Archive ftp.asante.com
Internet mail support@asante.com
Worldwide Web Site http://www.asante.com
B
Technical Support Hours
6:-00 AM to 6:00 PM Pacific Standard Time USA, Monday-Friday
Page 36

Page B-2
Page 37

Page 38

ASANTÉ TECHNOLOGIES, INC., 821 FOX LANE, SAN JOSE, CA 95131
PHONE: 408.435.8388, 800.662.9686 • FAX: 408.432.7511, APPLELINK: ASANTE.SALES, e-mail address: sales@asante.com
©1995 Asanté Technologies Inc., Asanté is a trademark of Asanté Technologies, Inc. All brand names and products are
trademarks or registered trademarks of their respective holders. Part Number 06-00220-01
 Loading...