

Page 1
1
TBXPAL
TV Mode
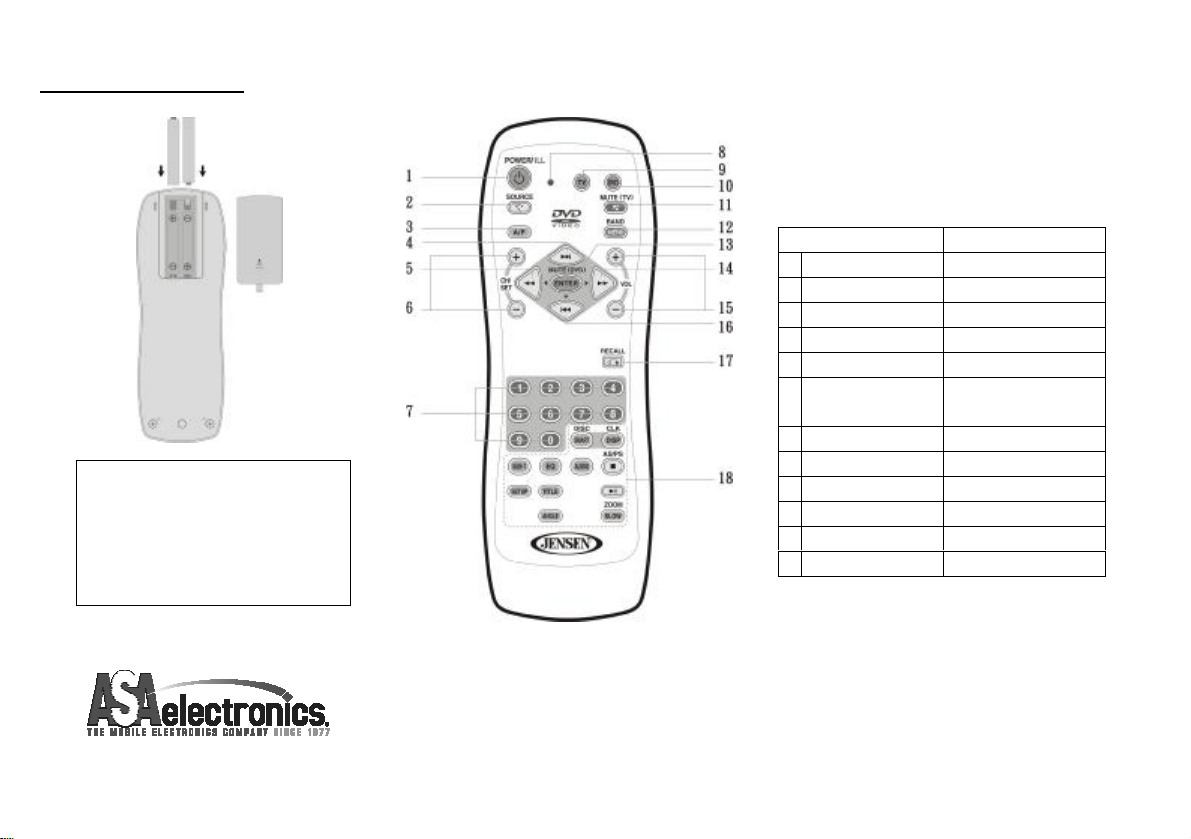
Remote Operation (1)
To prevent battery leakage which may result in
bodily injury or damage to the remote:
1. Install all batteries correctly, + and – as
marked on the remote control.
2. Do not mix batteries:(OLD and NEW or
CARBON and ALKALINE, etc.)
3. Remove batteries when the remote is not
used for a long time.
Button Function
1. POWER Power On/Off
3. A/P (AUTO PROGRAM) Channel Scanning
4. / 5./ 14./ 16. ( ▲ ◄ ► ▼) Up/Down/Left/Right
6. CH (+/-) Channel Up/Down
7. 1/2/3/4/5/6/7/8/9/0 Numbers
8. LED TV Mode – Red Flash
DVD Mode – Green Flash
9. TV TV Mode Selected
11. MUTE (TV) Mutes Audio
12. MENU OSD Menu for TV setting
13. ENTER Select Input
15. VOLUME (+/-) Audio Increase/Decrease
17. RECALL Channel Return
Notes:
1. Some buttons on remote have two functions (for TV & DVD mode). When press the TV button, the remote will get in TV function mode,
each time when press the TV function button, the LED will flash “RED” light. When in DVD mode, each time when press the DVD
function button, the LED will flash “GREEN” light.
2. Some of buttons are designed for operating single disc DVD player, pls read the DVD manual to operate the DVD player
Page 2
2
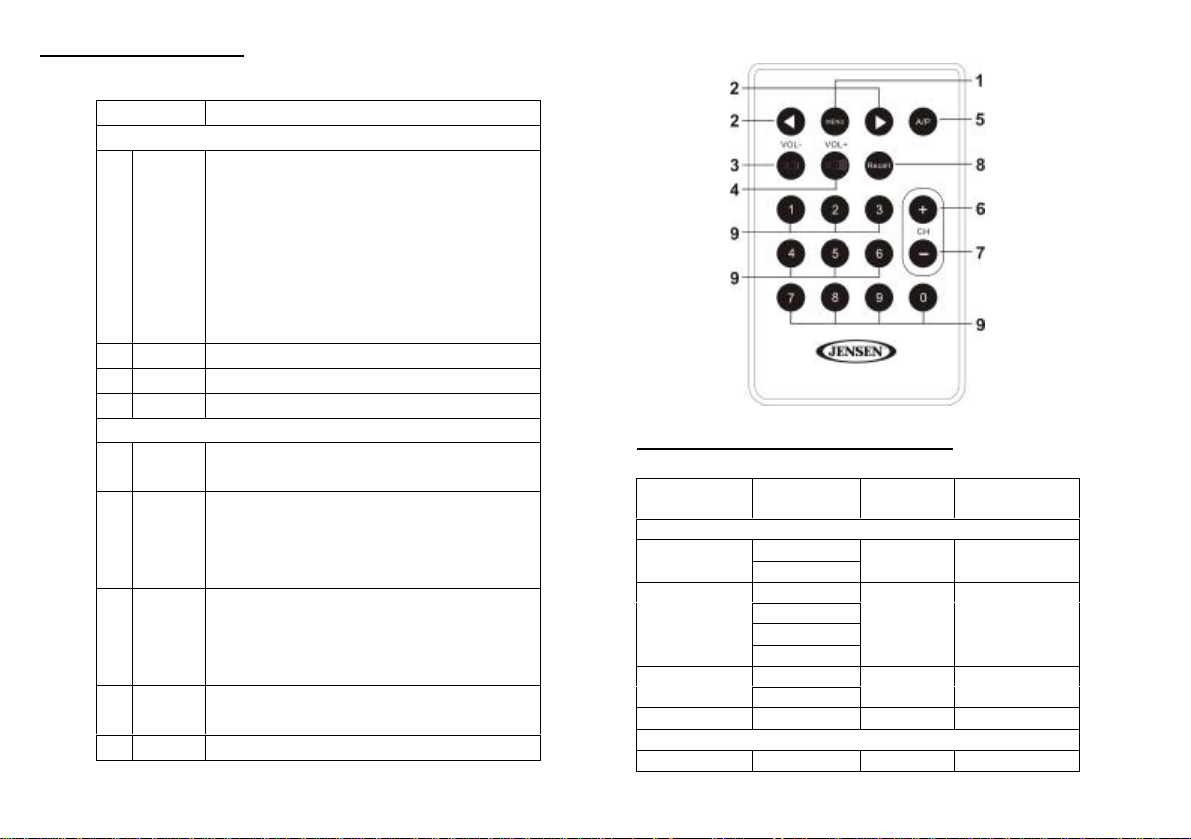
Remote Operation (2)
OSD (On Screen Display)
Control
Button Descriptions
1 MENU 1. Press “MENU” to activate the OSD menu.
2 ◄ / ► Browse and select an option for a item in the OSD menu
3 VOL- Decrease the volume of sound.
4 VOL+ Increase the volume of sound.
5 A/P Scan all channels in CATV and AIR modes and save
6 CH+ If “CHANNEL SKIP” is ON:
7 CH- If “CHANNEL SKIP” is ON:
8 Recall Return to previous channel in the specific mode set in the
9 0 ~ 9 Direct Input for channel number
Included Remote
2. Press again to navigate options
TUNER MODE (RF input mode)
AUDIO OUTPUT (audio output mode)
CHANNEL SKIP (channel skip mode)
RESET:(restore to factory default value)
3. Press ◄ or ► to browse and select an option.
OSD menu will disappear 6 seconds after no input.
JENSEN TV-specific
channels that are detected.
Will tune TV to next available channel.
If “CHANNEL SKIP” is OFF:
Will tune TV up by one number.
Will tune TV to previous available channel.
If “CHANNEL SKIP” is OFF:
Will tune TV down by one number.
“TUNER MODE”.
MENU
ITEMS
AUDIO OUTPUT
RESET ► or ◄ N/A N/A
VOLUME Scrolling bar medium YES
OPTIONS DEFAULT
VALUE
MENU, ◄, ►
CABLE TUNER MODE
AIR
STEREO
MAIN
SUB
MONO
ON CHANNEL SKIP
OFF
AIR YES
STEREO YES
ON YES
VOL-, VOL+
MEMORIZED
LAST
Page 3

3
Basic Operations
1. Power TBXPAL On
1-1 Feed the “+12VDC” power supply to TBXPAL’s “POWER INPUT” socket.
2. Set TV source to A/V input
3. Scan Channels and Auto-programming
3-1 Press the [ A /P ] button on the remote.
Tuner will scan all channels in the “AIR” and “CATV” modes and memorize
channels with PAL TV signal in the modes for “AIR” and “CATV” .
It takes 45 and 75 seconds to scan in the “AIR” and “CATV” modes respectively.
4. Adjust the volume of Audio Output
4-1 Press the [ VOL + ] button to increase the audio volume.
4-2 Press the [ VOL - ] button to decrease the audio volume.
5. Adjust the TBXPAL’s System Settings
Press [ MENU ] button to activate the setting menu.
5-1 The 1st menu item is “TUNER MODE”. Press [ ► ] or [ ◄ ] to browse and select
a tuner mode from “AIR” and “CATV”.
5-2 Press [ MENU ] 2nd time. The 2nd menu item is “AUDIO OUTPUT”.
Press [ ► ] or [ ◄ ] to browse and select an option from “STEREO”, “MAIN”,
“SUB” or “MONO” depending on the audio signals available in the TV signal.
5-3 Press [ MENU ] 3rd time. The 3rd menu item is “CHANNEL SKIP”.
Press [ ► ] or [ ◄ ] to turn the skip mode “ON” or “OFF”.
When skip mode is “ON”, pressing [ CH+ ] or [ CH- ] will go to next or previous
broadcasted channel.
When skip mode is “OFF”, pressing [ CH+ ] or [ CH- ] will increase or decrease
the channel by one.
5-4 Press [ MENU ] 4th time. The 4th menu item is “RESET”.
Press [ ► ] or [ ◄ ] to restore the factory’s default value for above settings, and
remove programmed channels with PAL TV signal for “AIR” and “CATV”
modes.
All settings are saved to non-volatile memory when OSD disappears.
( Approximate 6 seconds for storage)
6. Searching a channel and Watching
6-1 Press [ CH+ ] or [ CH- ].
6-2 Directly Input a channel number by pressing [ 0 ] ~ [ 9 ] buttons.
Page 4

4
Specification
Installation Instructions
1. Locate a suitable location close to “AV monitor” (Television, etc.)
2. Connect Red wire to +12VDC Accessory Source.
3. Connect Black wire to a known chassis ground -12VDC
4. Plug the other end of the DC power cord into the TBXPAL.
5. Connect TBXPAL A/V output to TV A/V input using supplied RCA cable.
6. Connect TV coax cable to “TV ANTENNA INPUT”.
7. Plug the external IR cable for remote controlling.
Connect the external IR cable and mount IR Sensor where it will be easy for viewer to use.
Item
1 AUDIO-LEFT OUTPUT (RCA)
2 AUDIO-RIGHT OUTPUT (RCA)
3 VIDEO OUTPUT (RCA)
4 EXTERNAL REMOTE INPUT
5 TV ANTENNA INPUT (IEC 169-2)
6 POWER INPUT
Function
Composition Video Output 1 Vp-p @ 75 ohm
Audio Output 0.5 Vp-p @ 10K ohm
RF Input Socket IEC 169-2
TV System PAL B/G, D/K, I
DC Input / Operating Range +12VDC (10 ~ 16 VDC)
Power Consumption 4.8W (Max.)
 Loading...