

Page 1
DIRECTV
®
Mobile
Receiver/Controller
User’s Guide
Page 2
DIRECTV
®
Mobile Receiver/Controller
User’s Guide
Congratulations! You have chosen TracVision, a
revolutionary antenna system delivering live satellite
TV entertainment on the go. With hundreds of
channels of digital-quality TV and music to enjoy,
traveling will never be the same!
This User’s Guide provides all of the basic
information you need to operate the DIRECTV
mobile receiver/controller and receive the DIRECTV
programming you want. For detailed antenna system
installation information, please refer to the TracVision
Installation Guide.
Welcome Page
KVH Part # 54-0376 Rev. B
© 2007 KVH Industries, Inc., All rights reserved.
Page 3

Trademarks
KVH, TracVision, and DewShield are trademarks of KVH Industries, Inc.
Programming, pricing, terms, and conditions are subject to change. Pricing
residential. Taxes not included. Receipt of DIRECTV programming is subject
to the DIRECTV Customer Agreement, a copy of which is provided at
DIRECTV.com/legal and in your first bill.
DIRECTV and the Cyclone Design logo, DIRECTV INTERACTIVE, TOTAL
CHOICE, DIRECTV HOME SERVICES, FREEVIEW, and DIRECT TICKET
are trademarks of DIRECTV, Inc. All trademarks, marks, names, or product
names referenced in this publication are the property of their respective
owners, and KVH neither endorses nor otherwise sponsors any such
products or services referred to herein.
Macrovision Information – Macrovision is a registered trademark of
Macrovision Corporation. This device incorporates an anticopy process
technology that is protected by U.S. patents 4,631,603; 4,577,216; 4,819,098;
and other intellectual property rights. The anticopy process is licensed for
noncommercial, home use only. Reverse engineering or disassembly is
prohibited.
StarSight Information – StarSight features licensed under one or more of the
following patents: 4,706,121; 5,151,789; 5,353,121; 5,353,277; 5,479,266;
5,479,268; and 5,532,754. Use rights reserved.
TruSurround Information – TruSurround and the symbol are trademarks
of SRS Labs, Inc. TruSurround technology is incorporated under license from
SRS Labs, Inc.
ENERGYSTAR Information – ENERGYSTAR and the ENERGYSTAR
certification mark are registered U.S. marks.
TiVo is a registered trademark of TiVo Inc., or its subsidiaries.
Software contained in the mobile receiver/controller and referenced in this
manual is copyright ©1995-2006 by DIRECTV, Inc. Some features are patent
pending. WatchWizard, PreSelect, TurboTune, and OneLine Guide are
trademarks of Hughes Network Systems. “NFL,” the NFL Shield, and “NFL
SUNDAY TICKET” are registered trademarks of the National Football League
and its affiliates. “NHL,” the NHL Shield, and “NHL CENTER ICE” are
registered trademarks of the National Hockey League. “MLB,” “MLB EXTRA
INNINGS,” “Major League Baseball,” and the Major League Baseball
silhouetted batter logo are service marks of Major League Baseball
Properties, Inc. Major League Baseball trademarks and copyright are used
with permission of Major League Baseball Properties, Inc. All other
trademarks and service marks are the property of their respective owners.
Disclaimer
Every effort has been made to ensure the correctness and completeness of
the material in this document. No company shall be liable for errors
contained herein. The information in this document is subject to change
without notice. No warranty of any kind is made with regard to this material,
including, but not limited to, the implied warranties of merchantability and
fitness for a particular purpose.
Note on recording programming
Most television programs and films are copyrighted. This means that
someone has legal rights governing the reproduction and distribution of this
material. In certain circumstances, copyright law may apply to private taping
of copyrighted materials. In most cases, it is permissible to record for your
personal use, as long as you do not sell the material. You must act
responsibly in this area–check into the matter if you are unsure.
Some pay-per-view programs may be licensed from producers as “view-only”
programs. These are copyrighted programs, and may not be copied or
reproduced for any purpose without the express written permission of the
copyright owner.
54-0376
ii
DIRECTV Mobile Receiver/Controller User’s Guide
Page 4
Important Safety Instructions
-
Please Read
For your safety and protection, read this safety
section carefully.
Heed Cautions – Be sure to follow all cautions on the
product and in the operating instructions. Cautions
are indicated by a icon.
Follow Instructions – Be sure to follow all operating
instructions as detailed in this manual.
The following caution appears on the back of the
receiver/controller:
Do not open the receiver/controller’s cover. Opening
or removing the cover may expose you to dangerous
voltage.
Do Not Attempt Repairs Yourself
Refer all servicing needs to qualified service
personnel. Servicing is required when a unit has
been damaged in any way or does not operate
normally. Evidence of tampering or unauthorized
repairs will void the warranty.
54-0376
iii
Important Safety Instructions
Avoid Driver Distraction
It is dangerous to watch television
or operate the remote control
while you are driving a vehicle or
piloting a vessel. TracVision is
designed specifically to provide entertainment
to passengers and should never be connected to
active video screens visible to the vehicle/vessel
driver while in motion. Failure to pay full
attention to travel conditions could result in an
accident or collision with personal injury or
death resulting.
WARNING!
CAUTION
Page 5

Federal Communications Commission (FCC)
Regulatory Information for Vehicle Use
Declaration of Conformity – Standards to which Conformity is declared:
FCC Part 15
This device complies with Part 15 of the FCC Rules. Operation is subject
to the following two conditions: (1) this device may not cause harmful
interference, and (2) this device must accept any interference received,
including interference that may cause undesired operation.
Responsible Party’s Name: KVH Industries, Inc.
Address: 50 Enterprise Center, Middletown, RI 02842
Telephone: 1-401-847-3327
Trade Name: KVH
Type of Equipment: Satellite Receiver
Model Number: TracVision DIRECTV Mobile Receiver/Controller
Federal Communications Commission (FCC) –This equipment complies
with Part 15 of the FCC rules.
Part 15 Compliance – This equipment has been tested and found to comply
with the limits for a Class B digital device, pursuant to Part 15 of the FCC
rules. These limits are designed to provide reasonable protection against
harmful interference in a vehicle installation. This equipment generates, uses,
and can radiate radio frequency energy and, if not installed and used in
accordance with the instructions, may cause harmful interference to radio
communications.
However there is no guarantee that interference will not occur in a particular
installation. If this equipment does cause harmful interference to radio or
television reception, which can be determined by removing and applying
power to the equipment, the user is encouraged to try to correct the
interference by one or more of the following measures:
• Increase the separation between the equipment and the
receiver/controller.
• Connect the equipment on a circuit different from that to which the
receiver/controller is connected.
• Consult the dealer or an experienced auto electronics technician for help.
The user may find the following booklet, prepared by the Federal
Communications Commission, helpful: “How to Identify and Resolve Radio
and TV Interference Problems.” This booklet is available from the U.S.
Government Printing Office, Washington, DC.
To meet FCC requirements, only components certified to comply with
Class B limits may be attached to this device. Operation with noncertified
peripherals is likely to result in interference to radio and TV reception.
To meet FCC requirements, shielded cables are required to connect the
device to another Class B certified device.
54-0376
iv
DIRECTV Mobile Receiver/Controller User’s Guide
Page 6

Receiver/Controller Activation
NOTICE: This product will NOT work correctly
unless you follow the procedure below.
Before you can start watching satellite TV via
TracVision, the receiver/controller must be activated.
Once your antenna system is fully installed, follow
the steps below to activate the receiver/controller.
1. Ensure your antenna has a clear view of the
southern sky then turn on your TracVision
system and tune to the preview channel (100).
2. Locate your red Activation Card.
3. Call KVH’s Activation Department at:
1-866-551-8004
(24 hours a day, 7 days a week)
4. After activation is complete, KVH’s Activation
Department will provide an access card number,
receiver ID number, DIRECTV serial number, and
model number. Enter these numbers in the
associated boxes on the red Activation Card.
Technical Support
The TracVision system has been designed with
durability and low maintenance in mind. If you
experience an operating problem or otherwise require
technical assistance, please call your local authorized
TracVision dealer/installer. If an authorized
dealer/installer is not located nearby, contact KVH
Technical Support directly:
Phone: 1-401-847-3327
E-mail: techs@kvh.com
54-0376
v
Technical Support
Please have the antenna and receiver/
controller serial numbers handy when
calling to activate. The serial numbers are
noted on the red Activation Card.
Page 7

54-0376
vi
DIRECTV Mobile Receiver/Controller User’s Guide
Send Us Your Comments About This Manual
If you have any comments regarding this manual,
please e-mail them to manuals@kvh.com. Your
feedback is greatly appreciated!
Page 8

54-0376
vii
Table of Contents
Table of Contents
1 Introduction . . . . . . . . . . . . . . . . . . . .1.1
1-1 Using this Manual . . . . . . . . . . . . . . . .1.3
1-2 System Overview . . . . . . . . . . . . . . . .1.4
1-3 Receiving Satellite TV Signals . . . . . .1.5
2 Getting Started . . . . . . . . . . . . . . . . . .2.1
2-1 Turning On the Antenna . . . . . . . . . . .2.3
2-2 Changing Channels . . . . . . . . . . . . . . .2.5
2-3 Turning Off the Antenna . . . . . . . . . . .2.5
2-4 Viewing a Program Description . . . . . .2.5
3 Using the Remote Control . . . . . . . . . . .3.1
3-1 Remote Control Functions . . . . . . . . .3.3
3-2 Programming the Remote Control
to Operate Other Components . . . . . .3.9
3-3 Controlling Multiple Receivers . . . . . .3.10
3-4 Installing the Remote Control
Batteries . . . . . . . . . . . . . . . . . . . . . .3.11
4 Overview of Onscreen Displays . . . . . . .4.1
4-1 The Channel Banner . . . . . . . . . . . . . .4.3
4-2 The Program Guide . . . . . . . . . . . . . . .4.4
4-3 The Menu System . . . . . . . . . . . . . . . .4.5
5 Using Program Guides . . . . . . . . . . . . .5.1
5-1 Program Guide Styles . . . . . . . . . . . . .5.3
5-2 Using the Program Guide . . . . . . . . . .5.5
5-3 Using the OneLine Guide . . . . . . . . . .5.6
5-4 Using TurboTune for Quick Access
to Favorite Channels . . . . . . . . . . . . . .5.7
5-5 Setting Guide Preferences . . . . . . . . .5.9
6 Setting Favorites and Filters . . . . . . . . .6.1
6-1 Using Favorite Channel Lists . . . . . . .6.3
6-2 Filtering the Program Guide . . . . . . . .6.7
6-3 Selecting Guide Times . . . . . . . . . . . .6.8
6-4 Using WatchWizard to Search
for Programs . . . . . . . . . . . . . . . . . . . .6.9
Page 9

54-0376
viii
DIRECTV Mobile Receiver/Controller User’s Guide
7 Using Access Controls . . . . . . . . . . . . .7.1
7-1 Locking & Unlocking the System . . . .7.3
7-2 Setting Ratings Limits . . . . . . . . . . . . .7.5
7-3 Setting Time Limits . . . . . . . . . . . . . . .7.6
8 Other Menu Functions . . . . . . . . . . . . .8.1
8-1 Adjusting Audio Settings . . . . . . . . . . .8.3
8-2 Adjusting Video Settings . . . . . . . . . . .8.5
8-3 Using the Program Director to
Schedule Future Programs . . . . . . . . .8.6
8-4 Reading Mail from DIRECTV . . . . . . .8.8
8-5 Setting System Preferences . . . . . . . .8.9
8-6 Advanced System Setup
Functions . . . . . . . . . . . . . . . . . . . . . .8.11
9 Antenna Controls . . . . . . . . . . . . . . . . .9.1
9-1 Viewing Current Settings . . . . . . . . . . .9.3
9-2 Turning DewShield On/Off . . . . . . . . .9.4
9-3 Turning the Beeper On/Off . . . . . . . . .9.5
9-4 Designating the Receiver
as Primary or Secondary . . . . . . . . . .9.6
9-5 Switching Satellites . . . . . . . . . . . . . . .9.8
9-6 Changing the List of Available
Satellites . . . . . . . . . . . . . . . . . . . . . .9.10
10 Troubleshooting . . . . . . . . . . . . . . . . .10.1
10-1 Five Simple Checks . . . . . . . . . . . . .10.3
10-2 Troubleshooting Matrix . . . . . . . . . . .10.4
10-3 Causes and Solutions to
Common Problems . . . . . . . . . . . . . .10.5
10-4 System Status Lights . . . . . . . . . . .10.10
10-5 Viewing Diagnostic Information . . . .10.12
10-6 Viewing Serial Numbers . . . . . . . . .10.13
10-7 Viewing Software Versions . . . . . . .10.14
10-8 Technical Support . . . . . . . . . . . . . .10.15
Appendices . . . . . . . . . . . . . . . . . . . . . . .A.1
A System Wiring Diagrams . . . . . . . . . .A.3
B Elevation Maps . . . . . . . . . . . . . . . . .A.23
Page 10

54-0376
1.1
Introduction
1 Introduction
This section provides a basic overview of this manual and the
TracVision system. It also explains the three essentials for good
satellite TV reception.
Contents
1-1 Using this Manual . . . . . . . . . . . . . . . . . . . . . . . . . . . . .1.3
1-2 System Overview . . . . . . . . . . . . . . . . . . . . . . . . . . . . . .1.4
1-3 Receiving Satellite TV Signals . . . . . . . . . . . . . . . . . . . .1.5
Page 11
1-1 Using this Manual
This manual provides complete instructions for
operating your mobile receiver/controller.
Throughout this manual, important information is
marked for your attention by the following icons:
A helpful tip that either directs you to a
related area within the manual or offers
suggestions on getting the highest
quality out of your system.
An alert to important information
regarding procedures, product
specifications, or product use.
Indicates the most commonly used
functions listed in Section 3-1, “Remote
Control Functions.”
Format Conventions
This manual uses the following typographical
conventions to help clarify instructions:
Text Example Description
...the MUTE button. Remote control buttons
...the Cancel button. Onscreen items
“Highlight”
For the purposes of this manual, the term “highlight”
refers to the following operator action:
“Use the remote control’s joystick to move the
highlight onto the desired onscreen item.”
Example: “Highlight the Lock & Limits tab” means
“Use the remote control’s joystick to move the
highlight onto the Lock & Limits tab.”
“Receiver”
For the purposes of this manual, the term “receiver”
refers to the DIRECTV mobile receiver/controller.
54-0376
1.3
Introduction
Page 12
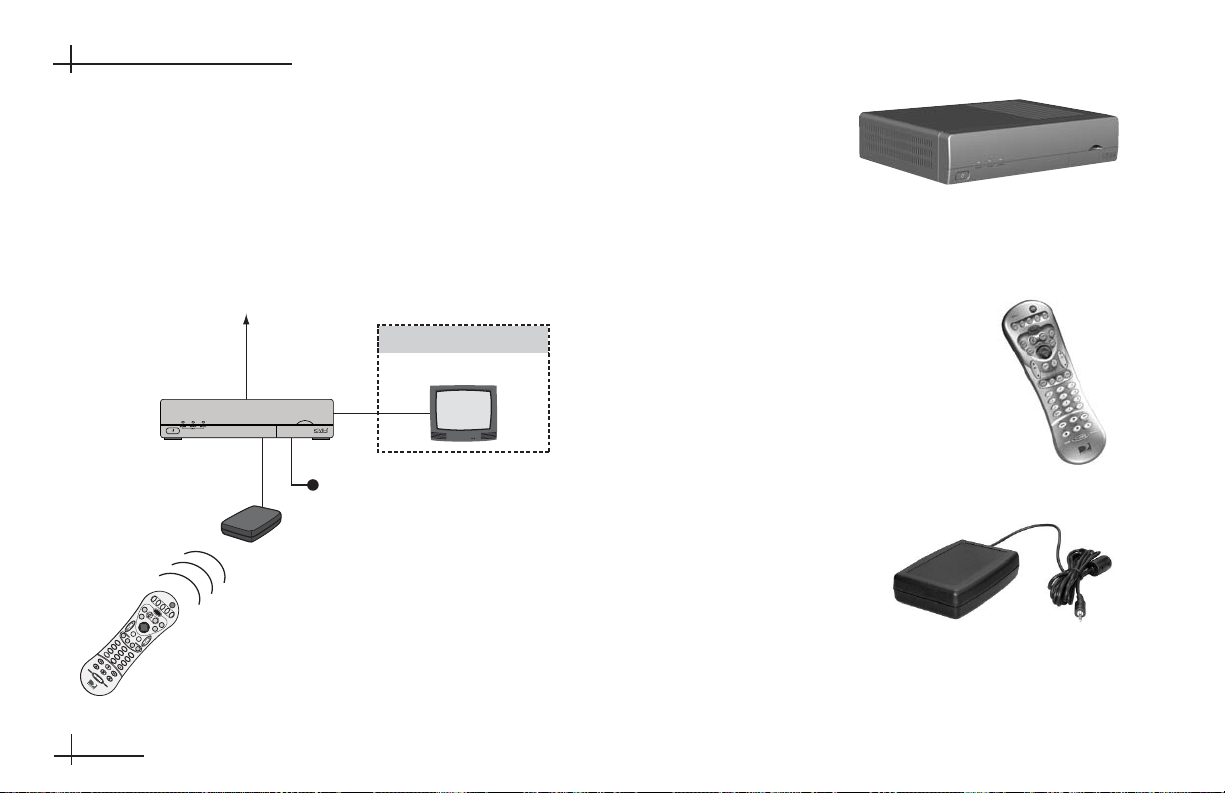
1-2 System Overview
Your TracVision system is a state-of-the-art, actively
stabilized antenna system that delivers live satellite
TV to your mobile audio/video entertainment
system.
Mobile Receiver/Controller
The mobile receiver/
controller decodes
satellite TV signals from
the antenna unit and sends the signals to the
audio/video system. It also powers and controls the
TracVision antenna.
Remote Control
The wireless RF/IR remote control
allows you to control all receiver
functions. The remote does not need
to be pointed directly at the receiver
for the signal to be received.
RF Converter
The RF converter receives
RF commands from the
remote control, converts
them to digital signals, and
sends them to the receiver
for processing. Since the
receiver does not include an IR eye, the RF converter
is required to receive commands from the remote.
54-0376
1.4
DIRECTV Mobile Receiver/Controller User’s Guide
TracVision System Diagram (Typical Installation)
To TracVision Antenna
Purchased Separately
Receiver/
Controller
Input Power (+12 VDC)
RF Converter
H
R
M
C
9
D
V
D
V
C
R
P
W
R
A
U
X
M
E
N
U
T
G
V
U
I
D
E
S
A
T
I
N
F
O
T
U
R
O
N
E
L
B
I
N
O
E
G
U
V
I
F
D
O
A
V
L
E
S
E
L
C
E
L
C
E
T
A
R
M
U
T
P
E
R
O
G
P
D
R
I
E
R
V
C
C
E
H
S
H
C
E
A
T
R
O
C
R
P
H
1
A
G
A
U
E
D
I
O
4
V
I
D
2
E
O
7
5
I
N
P
U
3
T
8
R
E
W
0
R
P
E
L
C
A
Y
S
T
O
P
F
F
P
A
U
S
E
6
9
Remote Control
Video Display(s)
Page 13
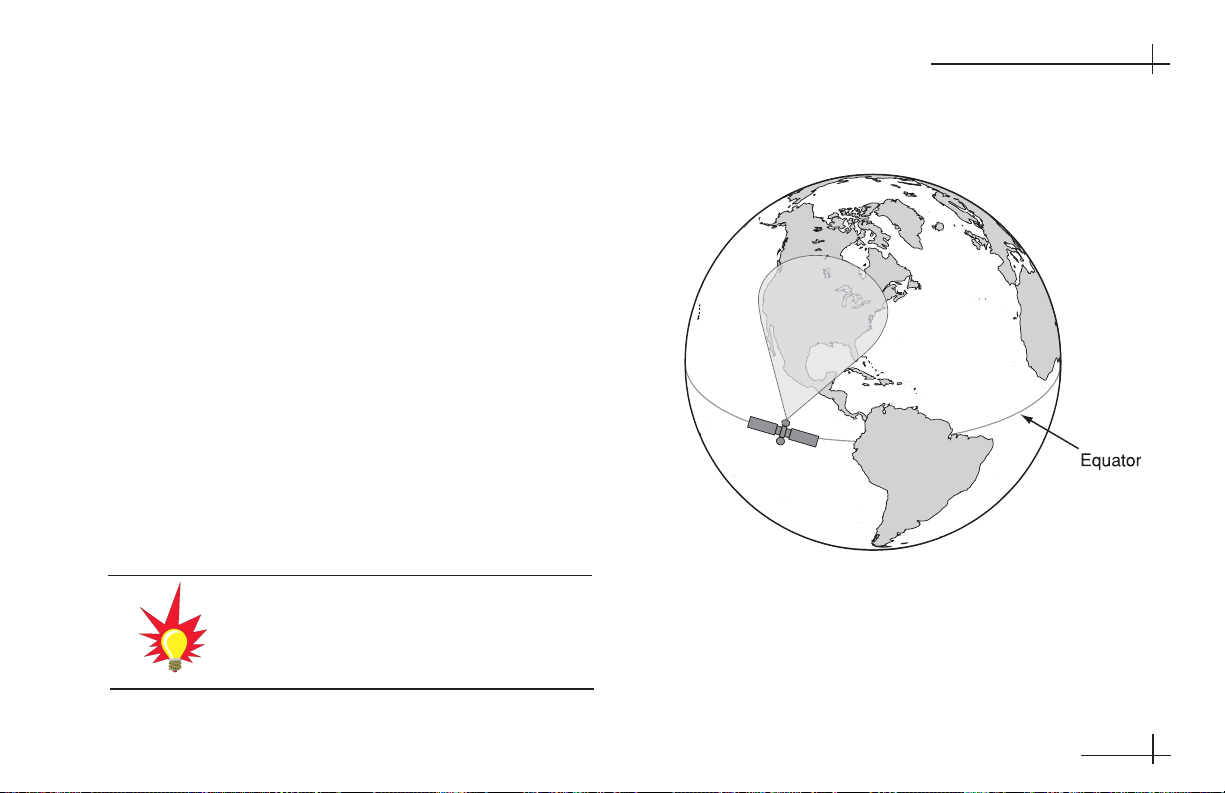
1-3 Receiving Satellite TV Signals
Like a satellite dish used at home, the TracVision
antenna needs a clear view of the DIRECTV
®
satellite(s) to receive satellite TV signals. Consider the
three essentials noted on the following pages to
ensure trouble-free reception.
Satellite Footprint
Each DIRECTV satellite is located at a fixed position
above the Earth’s equator and beams TV signals
down to North America. To receive TV signals from
one of these satellites, you must be located within its
coverage area (for example, the 101 satellite
encompasses much of the continental United States).
As you approach the edges of the coverage area, the
strength of the signal degrades, resulting in weaker
reception.
54-0376
1.5
Introduction
DIRECTV 101 Satellite Location
To view satellite coverage maps, please
visit KVH’s website at www.kvh.com/
footprint.
Page 14
Elevation Angle
Since TV satellites are located above the equator, the
TracVision antenna needs to point toward the
southern sky to receive satellite TV signals. In
addition, the antenna must be tilted at the proper
elevation angle to point at the satellite. The further
south you go, the higher the elevation becomes. For
example, if you’re in the Massachusetts area, the 101
satellite is located 33º above the southern horizon.
But if you go to Florida, the elevation increases to 50º.
While you’re moving, the antenna automatically
rotates toward the southern sky and tilts to the
proper elevation, ensuring you’re always pointed at
the satellite. Elevation ranges of TracVision antennas:
Antenna Model Elevation Range
TracVision A7 31°-57°
TracVision R6 15°-60°
TracVision M3 or M2 10°-80°
Maps of approximate elevation angles for DIRECTV
satellites are provided in Appendix B on page A.23.
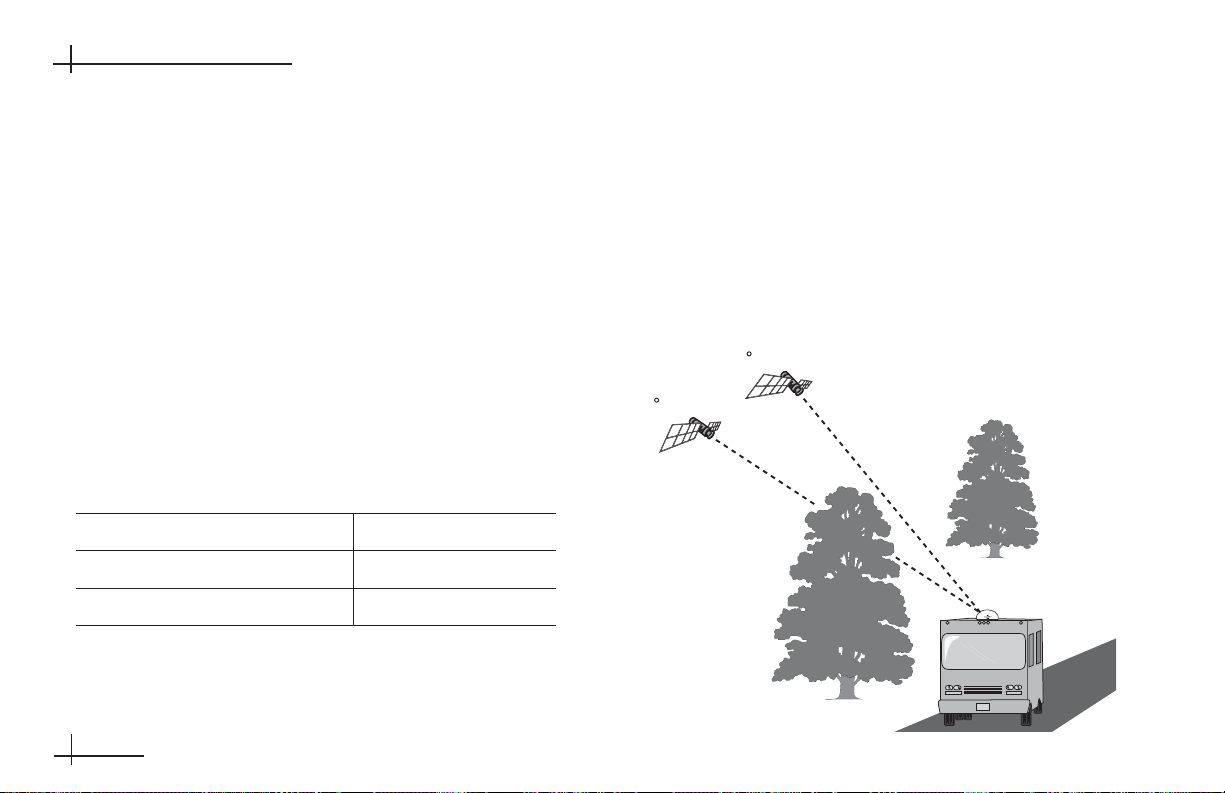
Blockage
Since the TracVision antenna must have a clear view
of the DIRECTV satellite to receive satellite TV
signals, anything that stands between the antenna
and the satellite can block the signal, resulting in lost
reception. Common causes of blockage include trees,
buildings, and bridges. Heavy rain, ice, or snow may
also temporarily interrupt satellite signals.
54-0376
1.6
DIRECTV Mobile Receiver/Controller User’s Guide
Higher Satellite Elevation = Less Blockage
50 Elevation
33 Elevation
Blocked!
Page 15

54-0376
2.1
Getting Started
2 Getting Started
This section provides basic operation instructions, so you can
quickly start using your TracVision system.
Contents
2-1 Turning On the Antenna . . . . . . . . . . . . . . . . . . . . . . . . .2.3
2-2 Changing Channels . . . . . . . . . . . . . . . . . . . . . . . . . . . . .2.5
2-3 Turning Off the Antenna . . . . . . . . . . . . . . . . . . . . . . . . .2.5
2-4 Viewing a Program Description . . . . . . . . . . . . . . . . . . .2.5
Page 16
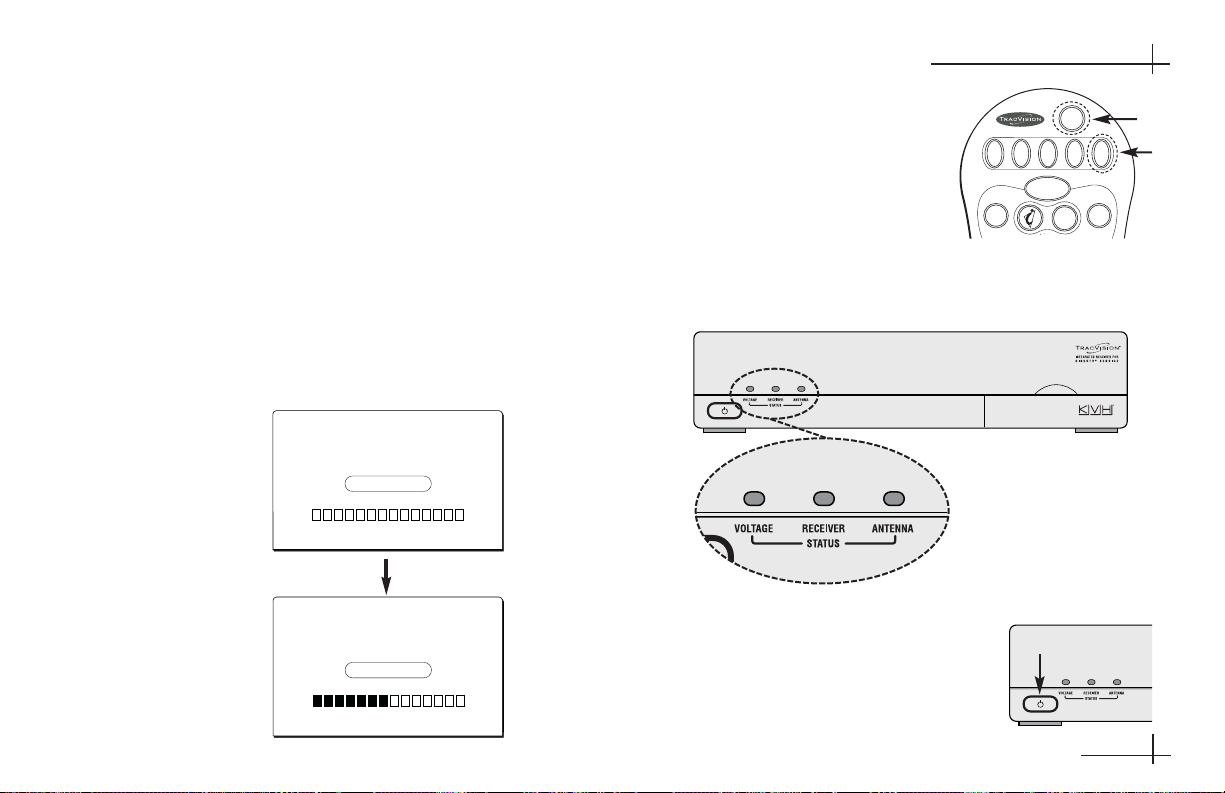
4. If Message 1 does not
appear after 30 seconds,
press the remote control’s
SAT button. Then press
the remote’s PWR button.
The receiver beeps twice,
the Antenna status light begins to flash green,
and the Voltage status light should be lit green.
If the receiver’s Voltage status
light is off, press the power
switch on the front of the
receiver to turn on the
receiver.
54-0376
2.3
Getting Started
2-1 Turning On the Antenna
To quickly start watching satellite TV using the
TracVision system, follow the simple steps below.
1. Apply power to the mobile receiver/controller.
The Receiver status light should turn green.
2. Turn on your TV and select the satellite input (not
the VCR input).
3. Wait 30-60 seconds for the antenna to acquire the
satellite signal. The TV will show the following:
Message 2
Message 1
PWR
DVD VCR AUX TV SAT
GUIDE
MENU
TURBO
FAV
Status Lights
Power Switch
For details about the status
lights, see Section 10-4,
“System Status Lights” on
page 10.10.
If your satellite dish is ready for DIRECTV
service, please wait until your
Advanced Program Guide
Signal not available...
If your satellite dish is ready for DIRECTV
service, please wait until your
Advanced Program Guide
Installation
Installation
™
is prepared.
™
is prepared.
®
®
Acquiring guide data...
Page 17
2.4
DIRECTV Mobile Receiver/Controller User’s Guide
5. If Message 2 does not appear after Message 1,
ensure that the antenna has a clear view of the
satellite. The antenna requires an unobstructed
view of the sky to receive satellite TV signals.*
Once the antenna locks onto the satellite, the
receiver starts downloading the program guide.
This may take up to 60 seconds.
Once the program guide has loaded, you can start
enjoying satellite TV!**
Program Guide
54-0208
* For details about satellite reception requirements, see page 1.5.
** If you can only view the DIRECTV Preview Channel, your receiver
has not been activated. See page v.
Why Does the Receiver Beep?
The receiver beeps to indicate the
status of the antenna.
2 beeps = Antenna is powering on
1 beep = Antenna is powering off
Page 18
2-3 Turning Off the Antenna
To turn off the antenna, follow the steps below:
1. Press the remote
control’s SAT button.
The button should blink
red.
2. Press the PWR button.
The receiver beeps once
to indicate that power to
the antenna is turned off.
2-4 Viewing a Program Description
To view a description of the
currently selected program,
press the INFO button.
PWR
DVD VCR AUX TV SAT
GUIDE
MENU
TURBO
FAV
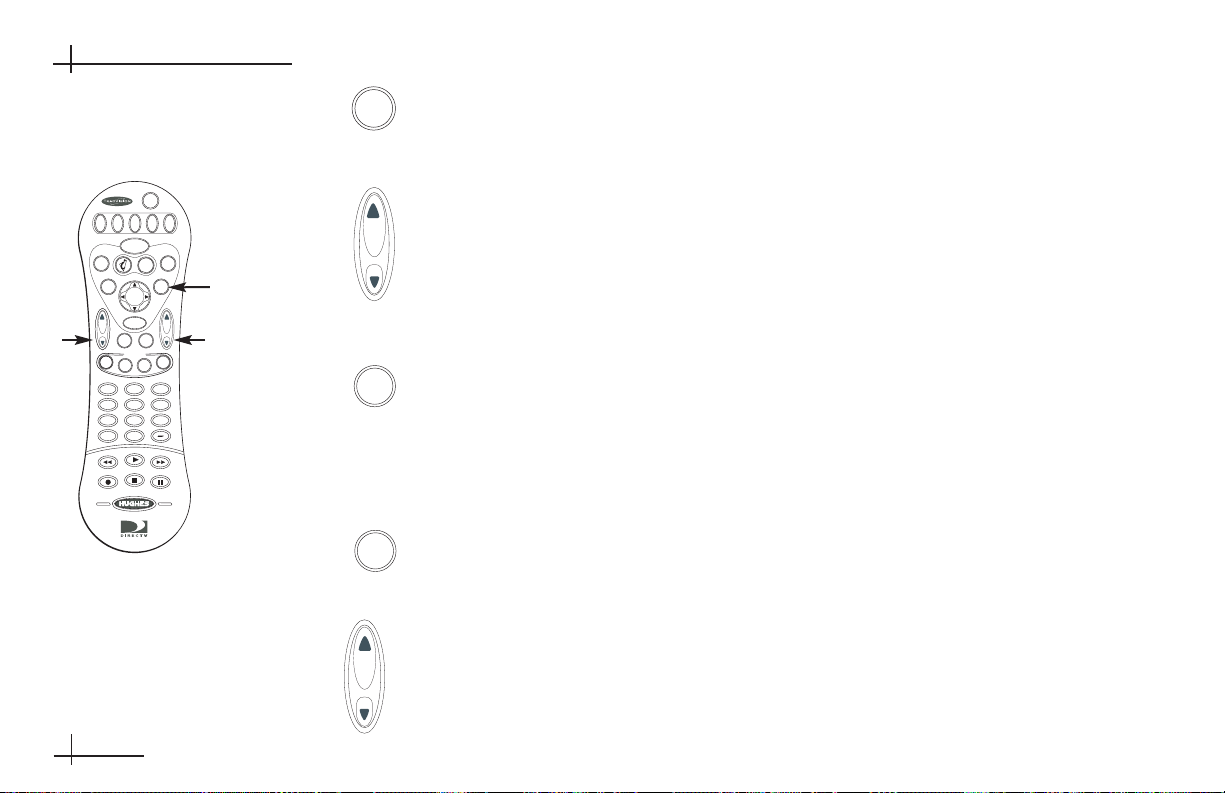
2-2 Changing Channels
To change the channel, press
the SAT button then select
any of the following options:
Press the CHANNEL
(CH) button to tune to
the next or previous
channel.
or
Using the numeric
keypad, enter the
channel number.
or
Press the GUIDE button
to bring up the
program guide. While
in the program guide,
use the joystick or
CHANNEL (CH)
button to scroll through
the list, and press the
SELECT button to tune
to a channel.
54-0376
Getting Started
A
B
C
C
C
A
B
2
1
2.5
PWR
DVD VCR AUX TV SAT
GUIDE
MENU
TURBO
E
G
N
I
U
L
I
D
E
N
E
O
INFO CLEAR
T
C
E
L
E
S
PREV
MUTE
CH
DIRECTOR
PROG
SEARCH
123
456
789
INPUT
REW
REC
VIDEO
AUDIO
0
PLAY
FF
STOP
PAUSE
FAV
P
CHVOL
A
G
E
DVD VCR AUX TV SAT
MENU
INFO CLEAR
N
O
GUIDE
N
I
L
E
PWR
FAV
TURBO
E
G
U
I
D
E
Page 19

54-0376
3.1
Using the Remote Control
3 Using the Remote
Control
This section explains how to use the remote control functions,
program the remote to work with other components, and replace
the remote control batteries.
Contents
3-1 Remote Control Functions . . . . . . . . . . . . . . . . . . . . . . .3.3
3-2 Programming the Remote Control
to Operate Other Components . . . . . . . . . . . . . . . . . . . .3.9
3-3 Controlling Multiple Receivers . . . . . . . . . . . . . . . . . . .3.10
3-4 Installing the Remote Control Batteries . . . . . . . . . . . .3.11
Page 20

54-0376
3.3
Using the Remote Control
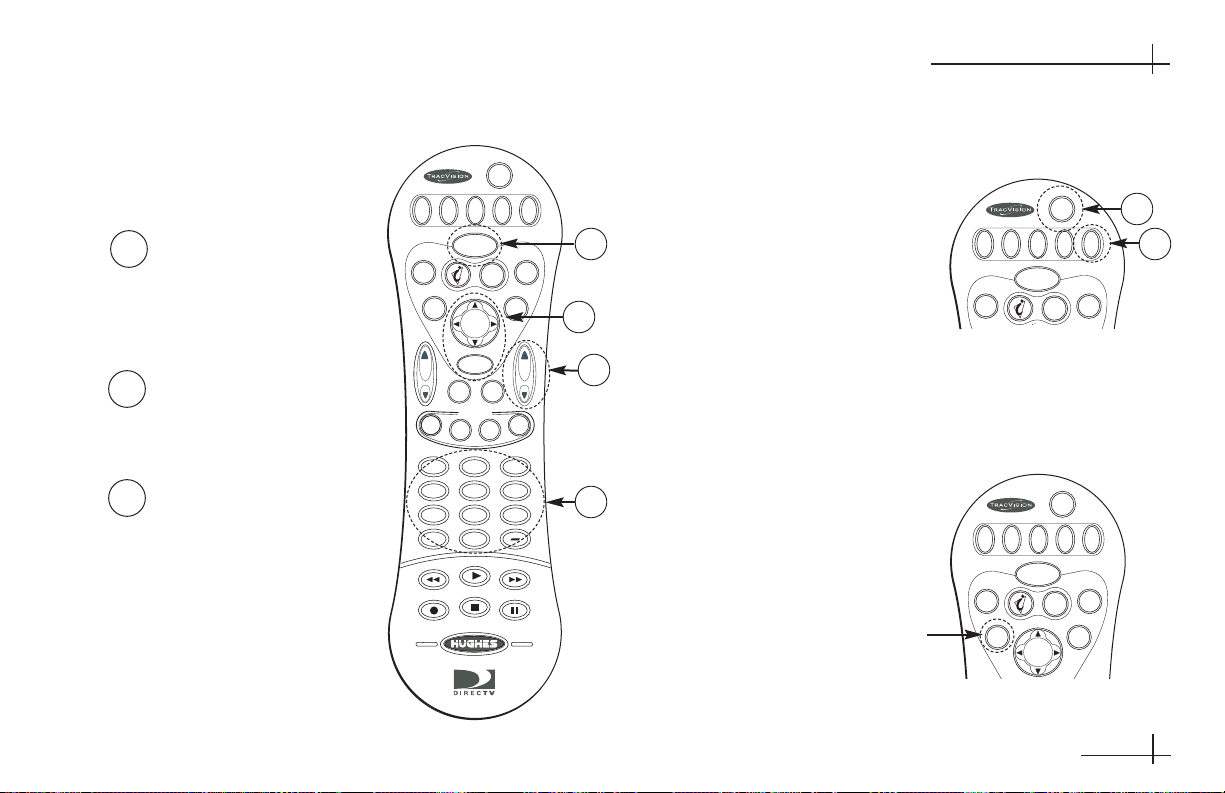
TracVision Remote Control
3-1 Remote Control Functions
Your system comes with an easy-to-use, backlit
remote control that uses RF (radio frequency) signals
instead of IR (infrared) to control the receiver. This
allows you to operate the receiver without pointing
the remote directly at it. This page shows the
locations and names of the remote control buttons.
The next few pages detail the buttons’ functions. A
icon indicates the most frequently used functions.
For your safety, this product must NOT be
operated by the driver of the vehicle/vessel.
Receiver Control Group
Volume
Mute
PWR
DVD VCR AUX TV SAT
GUIDE
MENU
E
N
O
INFO CLEAR
S
MUTE
DIRECTOR
PROG
SEARCH
123
456
789
INPUT
REW
REC
FAV
TURBO
E
G
N
I
U
L
I
D
E
P
T
C
E
L
E
CHVOL
A
G
E
PREV
CH
VIDEO
AUDIO
0
PLAY
FF
STOP
PAUSE
Power On/Off
Component Select
Receiver Control Group
Channel (CH)
Previous Channel
Director Group
Numeric Keypad
NOT USEDInput
VCR Control
Backlight On/Off
Program Guide
NOT USED
Main Menu
Information
Select
GUIDE
MENU
TURBO
E
G
N
I
U
L
E
N
O
INFO CLEAR
T
C
E
L
E
S
FAV
I
D
E
Favorites
Clear
Joystick
TurboTune
Page 21
54-0376
DIRECTV Mobile Receiver/Controller User’s Guide
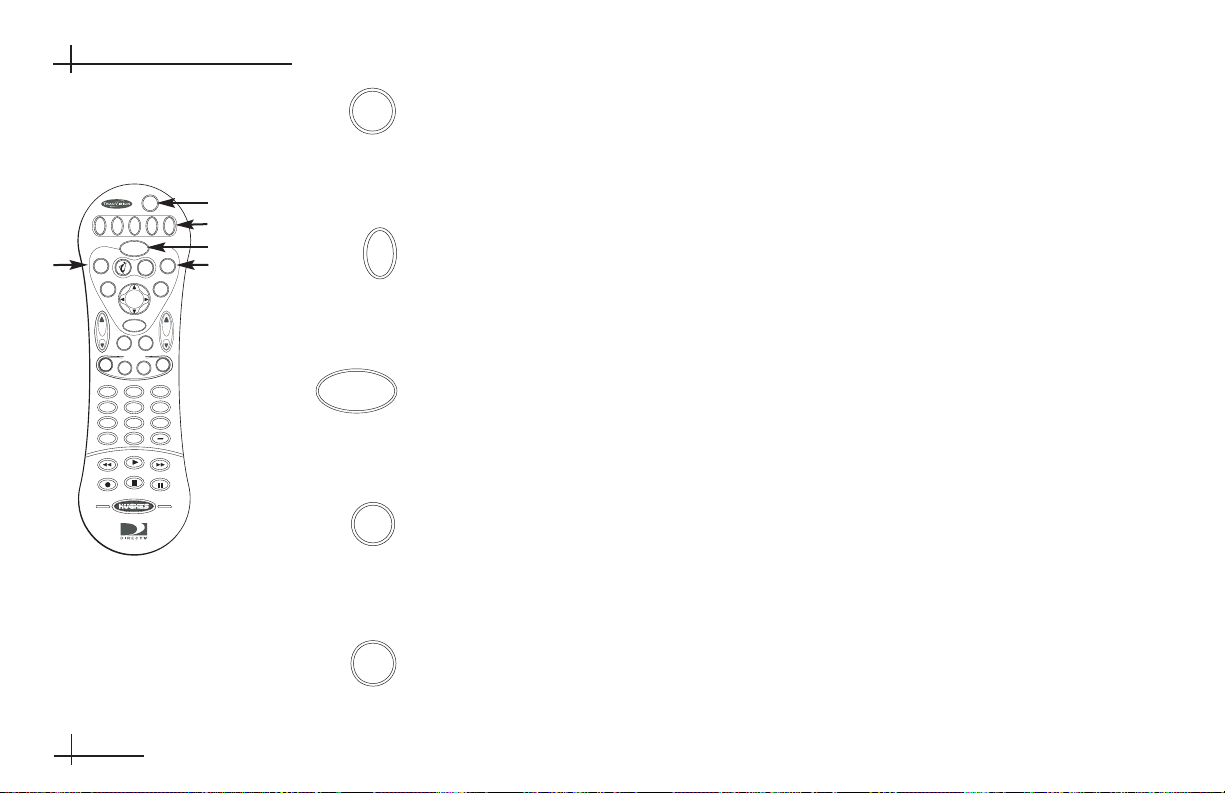
Press the PWR button to turn the selected component’s power on/off. If the
SAT button is currently selected, pressing the PWR button turns the
TracVision antenna on/off (but receiver remains powered in standby).
Press the SAT component select button to control the mobile receiver. To
control a different component, press the associated component select button.
For example, press the VCR button to control the VCR.
Press the GUIDE button to display the program guide. Press it a second
time (while a program title is highlighted) to display the Category Filter
menu. See Section 5, “Using Program Guides,” on page 5.1 for details.
Press the MENU button to bring up the main menu. The menu system
allows you to access all system features and settings. See Section 4-3, “The
Menu System,” on page 4.5 for details.
Press the TURBO button to display the TurboTune
™
guide. TurboTune gives
you quick access to 27 of your favorite channels. See Section 5-4, “Using
TurboTune for Quick Access to Favorite Channels,” on page 5.7 for details.
3.4
PWR
DVD VCR AUX TV SAT
GUIDE
MENU
TURBO
E
G
N
I
U
L
I
D
E
N
E
O
INFO CLEAR
T
C
E
L
E
S
PREV
MUTE
CH
DIRECTOR
PROG
SEARCH
AUDIO
123
456
789
INPUT
0
PLAY
REW
STOP
REC
PAUSE
PWR
FAV
SAT
P
CHVOL
A
G
E
VIDEO
GUIDE
FF
MENU
TURBO
Page 22
54-0376
3.5
Using the Remote Control
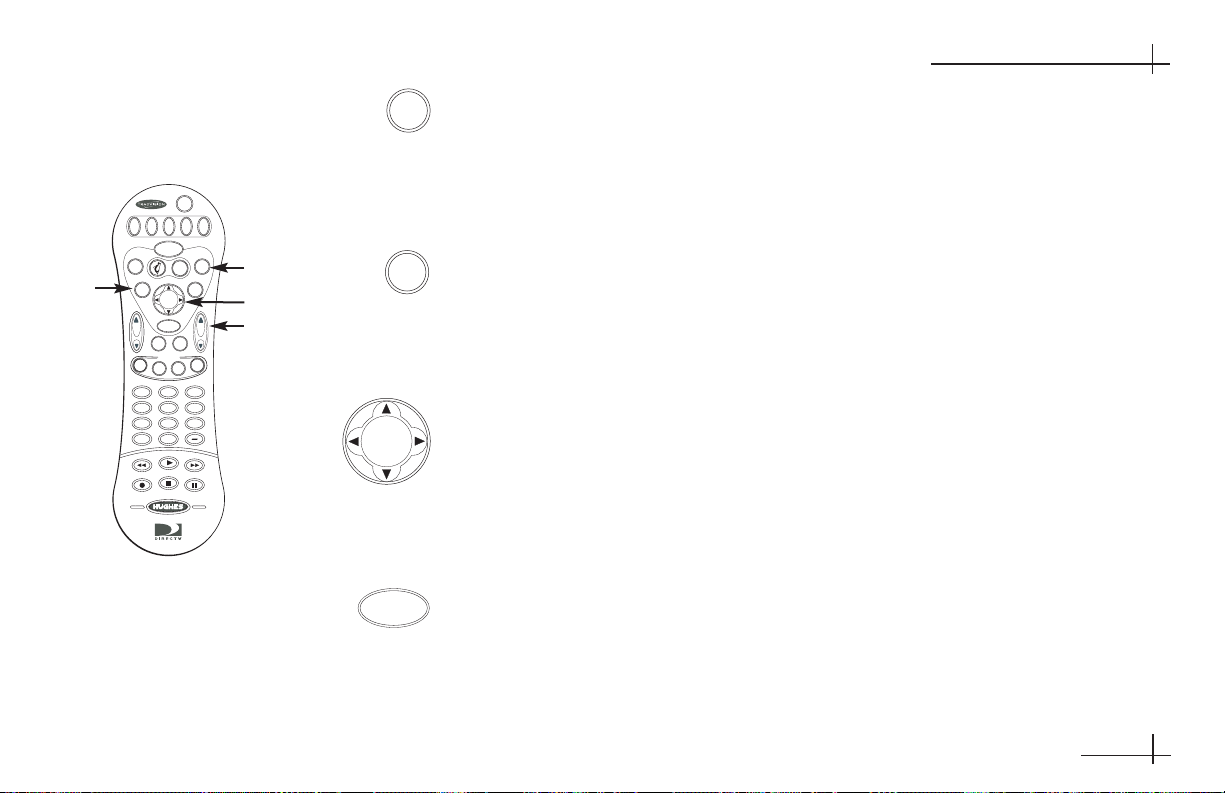
Press the FAV button to view listings for your favorite channels. You can set
up four different lists of favorite channels. Each press of the FAV button
brings up the next favorite channel list. See Section 6-1, “Using Favorite
Channel Lists,” on page 6.3 for details.
Press the INFO button to display a brief description about the program you
are viewing. If the program guide is displayed, the INFO button provides
scheduling information about the highlighted program.
Use the joystick to move up, down, left, or right through the onscreen
displays.
If you are currently watching a program, press the joystick up or down to
display the OneLine guide. When the OneLine guide appears, press the
joystick up or down to step to the next higher- or lower-numbered channel.
Press the SELECT button to activate or choose a highlighted menu option.
PWR
DVD VCR AUX TV SAT
GUIDE
MENU
TURBO
E
G
N
I
U
L
I
D
E
N
E
O
INFO CLEAR
T
C
E
L
E
S
PREV
MUTE
CH
DIRECTOR
PROG
SEARCH
AUDIO
123
456
789
INPUT
0
PLAY
REW
STOP
REC
PAUSE
FAV
FAV
INFO
P
CHVOL
A
G
E
VIDEO
E
G
N
I
U
L
I
D
E
N
O
E
FF
T
C
E
L
E
S
Page 23
54-0376
3.6
DIRECTV Mobile Receiver/Controller User’s Guide
Press the CLEAR button to exit from any onscreen guide, remove banners,
or cancel an action.
Use the VOLUME (VOL) button to raise or lower the volume on your TV.
The remote control must be programmed to operate your TV for the VOLUME
button to work (see Section 3-2, “Programming the Remote Control to Operate
Other Components,” on page 3.9).
Press the MUTE button to turn off the volume on your TV. The remote control
must be programmed to operate your TV for the MUTE button to work (see
Section 3-2, “Programming the Remote Control to Operate Other Components,” on
page 3.9).
Press the PREVIOUS CHANNEL (PREV CH) button to toggle between the
current channel and the last channel you were watching.
Use the CHANNEL (CH) button to change the channel to the previous or
next available channel. Also use it to scroll through a page of program
guide listings.
PWR
DVD VCR AUX TV SAT
GUIDE
MENU
TURBO
E
G
N
I
U
L
I
D
E
N
E
O
INFO CLEAR
T
C
E
L
E
S
PREV
MUTE
CH
DIRECTOR
PROG
SEARCH
AUDIO
123
456
789
INPUT
0
PLAY
REW
STOP
REC
PAUSE
CLEAR
VOL
FAV
P
CHVOL
A
G
E
VIDEO
MUTE
FF
PREV
CH
CH
P
A
G
E
Page 24
54-0376
3.7
Using the Remote Control
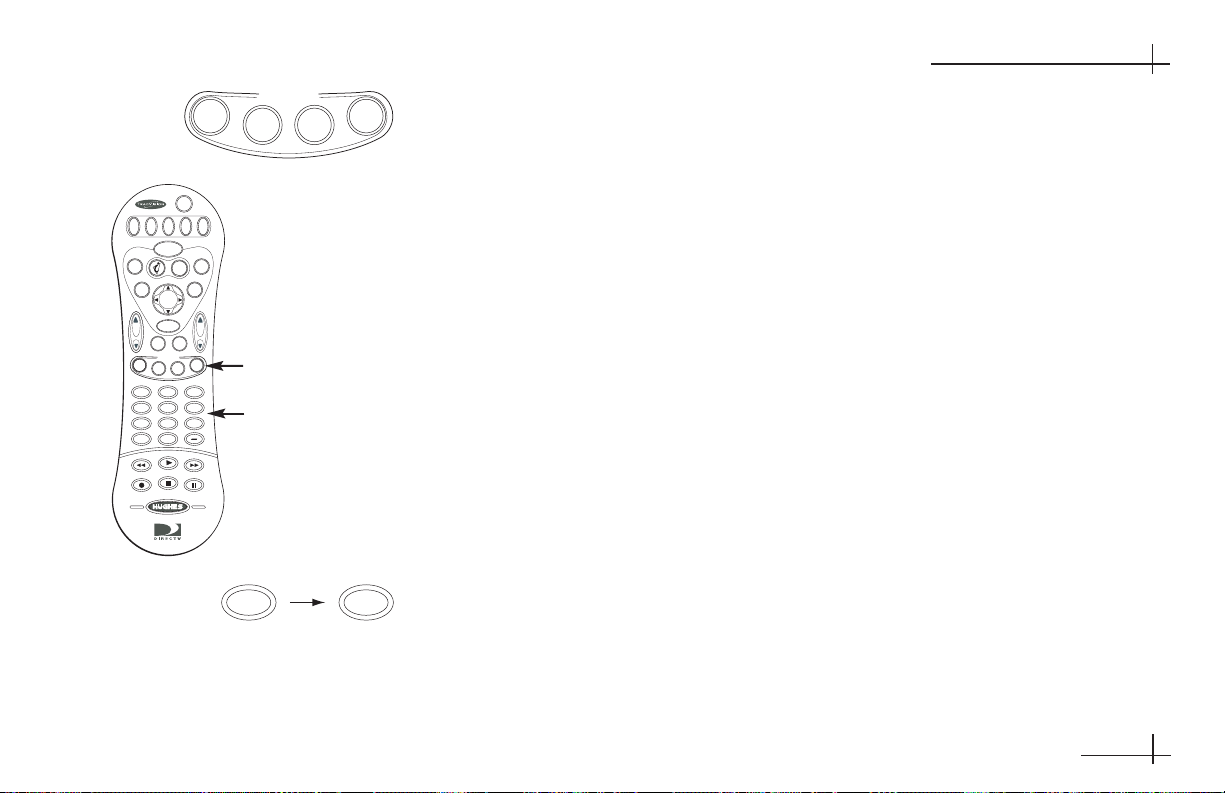
The DIRECTOR buttons provide convenient shortcuts to the following
functions:
If the program guide is currently displayed, press the PROG button to use the
program director, which allows you to program an event for viewing in
advance. See Section 8-3, “Using the Program Director to Schedule Future
Programs,” on page 8.6 for details.
Press the SEARCH button to bring up the WatchWizard™, which allows you to
search for programs using criteria such as rating, showtime, language, and
category. See Section 6-4, “Using WatchWizard to Search for Programs,” on page 6.9
for details.
Press the AUDIO button to bring up the audio adjustment menu. See
Section 8-1, “Adjusting Audio Settings,” on page 8.3 for details.
Press the VIDEO button to bring up the video adjustment menu. See Section 8-2,
“Adjusting Video Settings,” on page 8.5 for details.
Use the numeric keypad buttons (0 - 9) whenever you need to enter a specific
number, such as a channel or a lock code.
PWR
DVD VCR AUX TV SAT
GUIDE
MENU
TURBO
E
G
N
I
U
L
I
D
E
N
E
O
INFO CLEAR
T
C
E
L
E
S
PREV
MUTE
CH
DIRECTOR
PROG
SEARCH
AUDIO
123
456
789
INPUT
0
PLAY
REW
STOP
REC
PROG
DIRECTOR
SEARCH
AUDIO
VIDEO
FAV
P
CHVOL
A
G
E
VIDEO
FF
PAUSE
0
9
Page 25
54-0376
3.8
DIRECTV Mobile Receiver/Controller User’s Guide
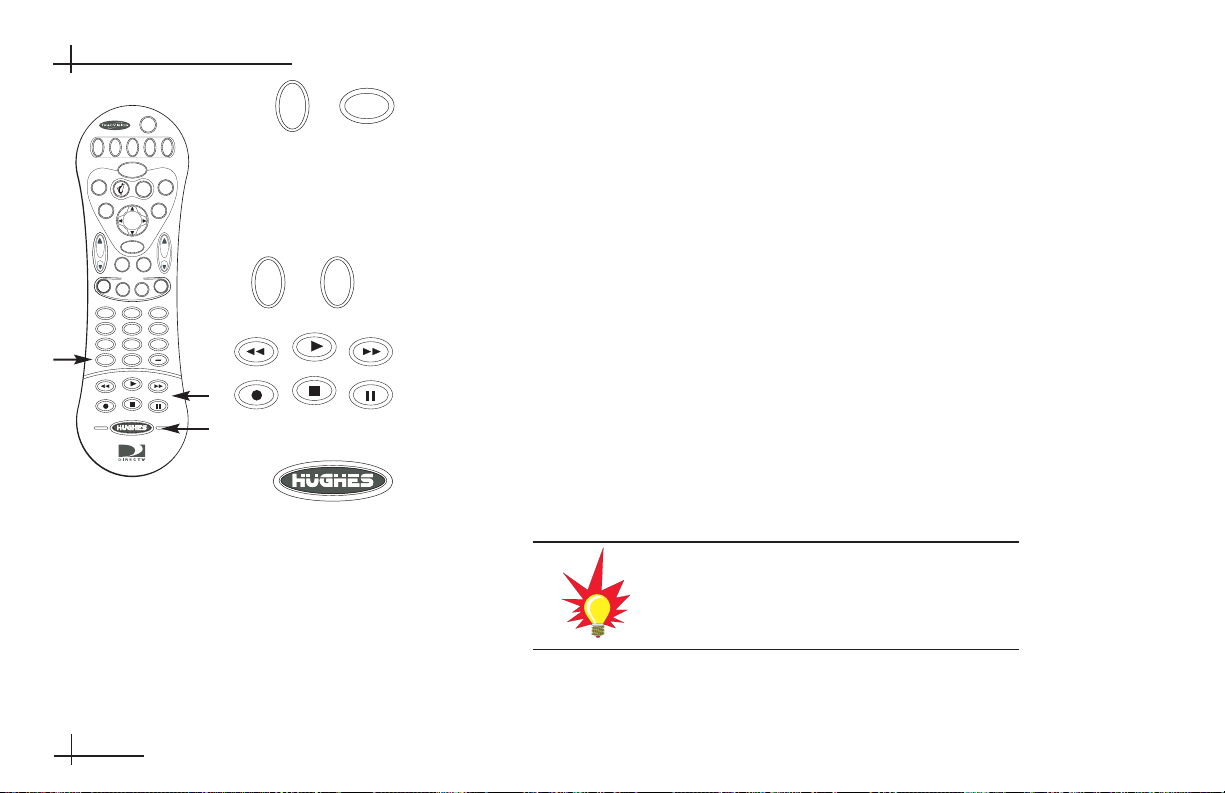
The INPUT button allows you to select a video feed from a different source
connected to your TV, such as a VCR (if the TV component button is
selected). The remote control must be programmed to operate your TV for the
INPUT button to work (see Section 3-2, “Programming the Remote Control to
Operate Other Components,” on page 3.9).
Use the VCR control buttons to operate your VCR or DVD player (the VCR
or DVD component button must be selected first). The remote control must be
programmed to operate your VCR/DVD player for the VCR control buttons to
work (see Section 3-2, “Programming the Remote Control to Operate Other
Components,” on page 3.9).
Press the HUGHES button to turn the remote control’s backlight on/off.
If you lose your remote control, please call
or visit your local KVH authorized dealer to
order a replacement.
+
or
+
PWR
DVD VCR AUX TV SAT
GUIDE
MENU
TURBO
E
G
N
I
U
L
I
D
E
N
E
O
INFO CLEAR
T
C
E
L
E
S
PREV
MUTE
CH
DIRECTOR
PROG
SEARCH
AUDIO
123
456
789
INPUT
0
PLAY
REW
STOP
REC
PAUSE
INPUT
TV
FAV
P
CHVOL
A
G
E
VIDEO
VCR
REW
FF
REC
PLAY
STOP
DVD
FF
PAUSE
Page 26

54-0376
3.9
Using the Remote Control
3-2 Programming the Remote Control
to Operate Other Components
In addition to controlling the mobile receiver, you
may be able to operate your TV, VCR, DVD, or AUX
components using your TracVision remote control. To
program your remote control, follow the steps below.
1. Keep the remote control aimed at the IR input (or
“eye”) for the component you want to control.
For example, if you want to program the remote
control to operate the TV, keep the remote aimed
at the TV’s IR input.
2. Press and hold the remote control’s component
button (for example, TV).
3. At the same time, press the MUTE button for two
seconds.
4. Release both buttons.
The component button should light and remain
lit. If it doesn’t remain lit, repeat Steps 1 through
4 above.
5. Repeatedly press the upper part of the
CHANNEL (CH) button.
6. Continue pressing the CHANNEL
(CH) button to step through the codes
until the component turns off,
indicating that you have found the
correct device code. If you accidentally pass a code
that responds or realize you may not have been aiming
the remote control at the component, repeatedly press
the lower part of the CHANNEL (CH) button to step
backward through the codes.
7. Press the remote control’s PWR button to verify
that you have found the proper code. The correct
code will turn the component on and off.
8. Press the component button again to lock in the
code (in this example, the TV button).
To operate a component, first press the desired
component button (DVD, VCR, AUX, TV, or SAT).
Then use the remote control buttons that apply to that
component. For example, the VOLUME (VOL) and
MUTE buttons apply only to a TV; the VCR control
buttons apply only to a VCR or DVD player.
CH
P
A
G
E
Page 27
54-0376
3.10
DIRECTV Mobile Receiver/Controller User’s Guide
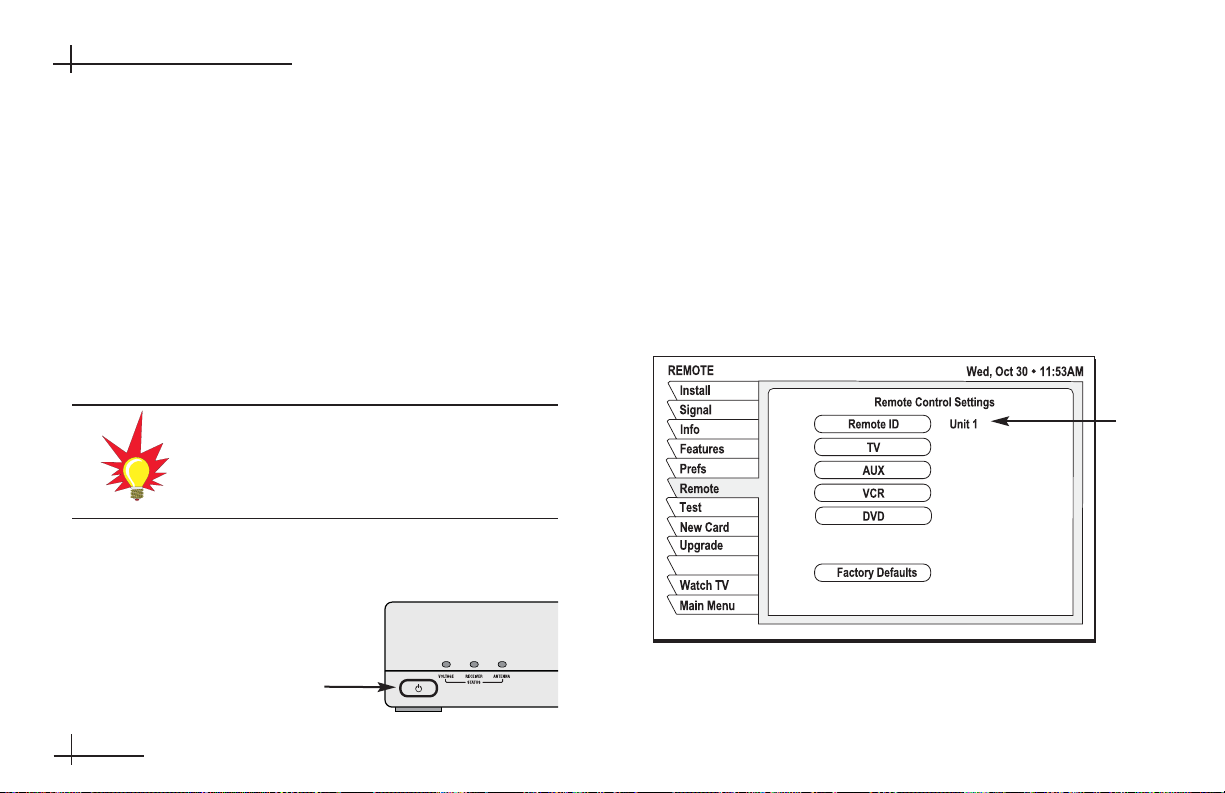
2. Turn on the receiver you want to control with the
remote.
3. Press the MENU button to access the main menu.
4. From the main menu, highlight the System Setup
tab and press SELECT.
5. Highlight the Remote tab to access Remote
Control Settings.
6. Highlight the Remote ID button.
7. Press and hold the SAT button.
3-3 Controlling Multiple Receivers
If you are using multiple KVH mobile receivers, you
can change a remote control ID to avoid interference
or “cross talk” between the two remotes. The remote
control ID can be a number from “001” to “008.”
For example, if you have two receivers, you can set
one receiver and remote to 001 and the other
receiver/remote to 002. That way, the 002 remote
cannot operate the 001 receiver, and the 001 remote
cannot operate the 002 receiver.
To set a remote control and receiver to use a different
remote ID, follow the steps below.
1. First turn off the receiver(s)
you do not want to control
with the remote you are
programming.
Remote Control Code Entry
For details on ordering an additional mobile
receiver, please call or visit your local KVH
authorized dealer/installer.
Antenna
Page 28
54-0376
3.11
Using the Remote Control
8. At the same time, press the MUTE button for two
seconds.
9. Release both buttons. The SAT button should
remain lit. If it doesn’t, repeat Steps 7-9.
10. Enter the desired ID number (between “001” and
“008”) using the numeric keypad.
11. Press the SAT button to lock in the code.
12. Press the SELECT button twice.
The number to the right of the highlighted Remote
ID button will change to the new code. Check that
the ID has been set properly by testing the remote
control to ensure that it controls the receiver.
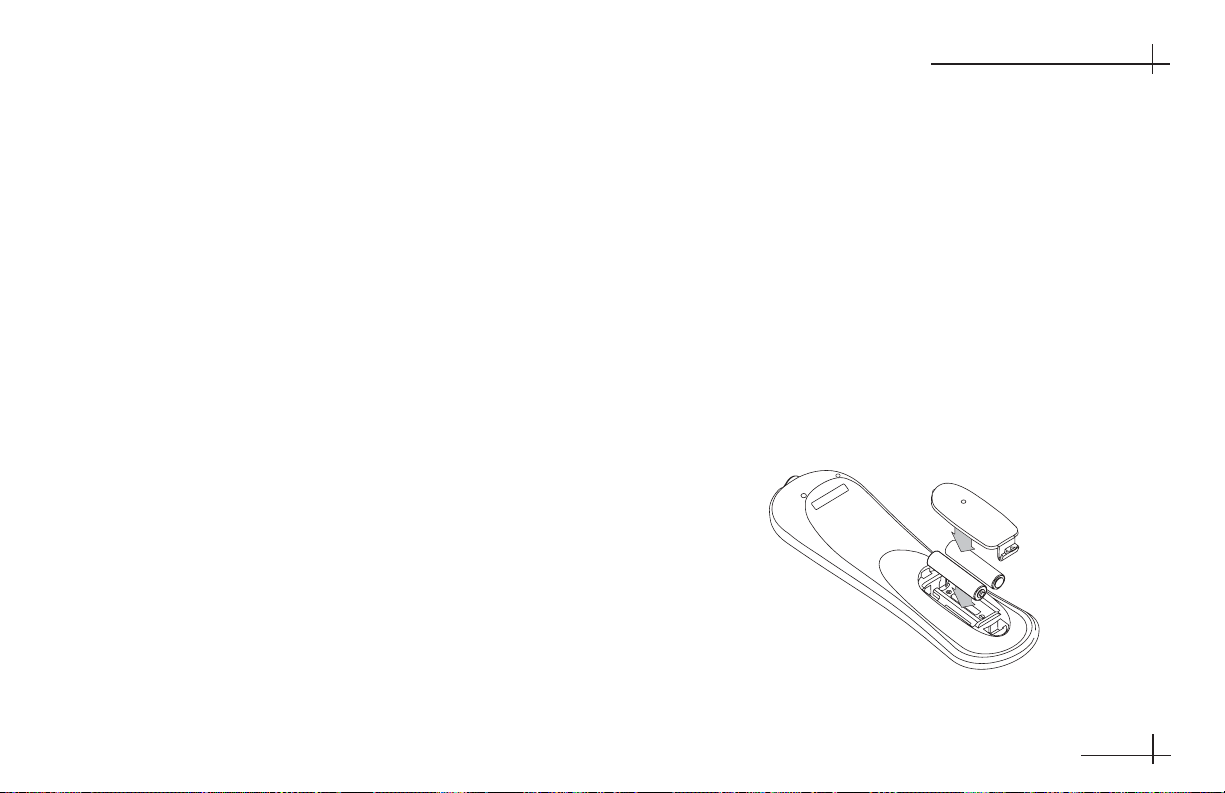
3-4 Installing the Remote Control
Batteries
To install or replace the remote control’s batteries,
follow the steps below.
1. Remove the battery compartment cover, located
on the back of the remote control.
2. Insert two AAA batteries as shown, observing the
correct polarity.
3. Replace the battery compartment cover.
Remote Control Batteries
Page 29

54-0376
4.1
Overview of Onscreen Displays
4 Overview of
Onscreen Displays
This section introduces the three types of onscreen displays: the
Channel Banner, the Program Guide, and the Menu System.
Contents
4-1 The Channel Banner . . . . . . . . . . . . . . . . . . . . . . . . . . . .4.3
4-2 The Program Guide . . . . . . . . . . . . . . . . . . . . . . . . . . . .4.4
4-3 The Menu System . . . . . . . . . . . . . . . . . . . . . . . . . . . . .4.5
Page 30

54-0376
4.3
Overview of Onscreen Displays
4-1 The Channel Banner
Whenever you change channels while you are
watching TV, the channel banner appears at the top
of the screen. You can also display the channel banner
by pressing the INFO button while watching TV.
The channel banner displays the following
information:
• Currently selected channel and program
• Description of the currently selected program
• Date/time
• Icons may appear below the date/time to
indicate system status or details about the
program
The channel banner disappears from the screen after
a few seconds. Or press the CLEAR button to remove
the channel banner immediately.
Channel Banner
Icon
Meaning
Pay
per
view
$
All Channels
6:00AM
to Thu, 6:00AM
100
DTV:Watch Pay Per View Previews Here!
Movie. Catch previews of DIRECTV Pay Per View movies
and events plus the latest DIRECTV FREEVIEW
information. Updated weekly. News.
NEW
CC
MAIL
Closed
Interactive
programming
available
Dolby
Digital
audio
available
caption
available
Unread
mail
Limits
enforced
Limits
override
Wed, Dec 17 2:54PM
$
Rated: None
ALT.
CANT
AUDIO
TAPE
Other
Taping
audio
not
available
allowed
CC
DATA
SVCS.
Data
available
NEW
MAIL
ALL DAY
All Day
Ticket
Letter
Box
format
Page 31

54-0376
4.4
DIRECTV Mobile Receiver/Controller User’s Guide
4-2 The Program Guide
To display the program guide, press the GUIDE
button. You can also access the program guide from
the menu system’s Program Guide tab.
The program guide displays the following
information:
• Listing of current programs and up to seven days
of future programming
• Short description of the program currently
highlighted
• Date/time
• Icons may appear below the date/time to
indicate system status or details about the
program currently highlighted
• If the picture-in-guide feature is enabled, video of
the currently selected channel appears in the
upper right corner of the screen
For details on how to use the program guide, see
Section 5, “Using Program Guides,” on page 5.1.
With favorite channel lists and category filters, you
can easily customize the channel guide to show only
those channels or programs of interest to you. See
Section 6, “Setting Favorites and Filters,” on page 6.1 for
details.
Program Guide
Page 32

54-0376
4.5
Overview of Onscreen Displays
4-3 The Menu System
To display the main menu, press the MENU button.
The menu system gives you access to all system
functions and settings. The common elements of all
menus are noted below.
The following icons appear in several menus:
Toggle or Step - Press SELECT to toggle
(switch) a setting from “on” to “off” or to
step through the available choices each time
you press SELECT.
List of Options - Menu button will display a
list of choices in a pop-up menu when you
press SELECT.
Series of Boxes - Multiple screens will
appear in a series requesting that you enter
numbers and/or letters for the particular
feature when you press SELECT.
Menu Elements
Main Menu
Page 33

54-0376
4.6
DIRECTV Mobile Receiver/Controller User’s Guide
To move the highlight:
Use the joystick to move the highlight within the
menus.
To select a menu item:
Highlight the desired menu item and press the
SELECT button to select a main menu item or execute
an action.
To exit a menu or cancel an action:
Press the CLEAR button to exit a menu or cancel an
action.
The following pages list all of the functions accessible
from the menu system. These functions are explained
in detail in later sections of this manual.
You will not be able to use the Purchases
tab. This function requires a phone line
connection, which is not possible with
TracVision.
Page 34

54-0376
4.7
Overview of Onscreen Displays
Main Menu Tab Screens Functions See Page:
Program Guide Program Guide • View and modify the program guide 5.1
Guide Options Theme • Filter the program guide by program category 6.7
Times • Change the time period shown in the program guide 6.8
Fav List • Select a specific channel list (Fav. A, Fav. B, Fav. C, 6.4
Family, or New Channels) to be an active program guide
Fav Setup • Create and edit a channel list (Fav. A, Fav. B, Fav. C, Family, 6.3
or New Channels)
Options • Set Guide Options: 5.9
- Guide style (grid or logo)
- Picture in guide (on/off)
- Guide zoom (on/off)
- Multi-color (on/off)
- Channel sort (numeric or alphabetical)
- Filters (temporary or persistent)
- 1-line guide (1-4 rows)
- Reset options to default settings
Set Turbo • Set and edit TurboTune channels 5.7
Page 35

54-0376
4.8
DIRECTV Mobile Receiver/Controller User’s Guide
Main Menu Tab Screens Functions See Page:
Audio & Video Audio • Set default audio language and alternate audio language 8.3
• Set left/right audio balance
Video • Select screen ratio (4:3 or 16:9) 8.5
• Center menus on your monitor (up/down and right/left)
• Select color scheme and onscreen display translucency
Program Director Schedule • Automatically tune to programs at a specific date/time 8.6
WatchWizard WWSetup • Search for programming using specific words and 6.9
other criteria
WWResult • Display search results 6.10
Channels • Search for channels based on categories of programming 6.11
Purchases Upcoming NOT USED --
Past NOT USED --
Lock & Limits Lock • Lock and unlock the system 7.3
Fav Setup • Create a program listing containing only selected 6.3
channels
Ratings • Set maximum program rating allowed for viewing 7.5
Limits • Set viewing times and maximum viewing hours 7.6
View Mail Mail • Read messages from DIRECTV 8.8
Page 36

54-0376
4.9
Overview of Onscreen Displays
Main Menu Tab Screens Functions See Page:
System Setup Install • Change the list of available satellites 8.11
• Scan the sky for available satellites
• Reload the program guide
Signal • View satellite signal strength 8.11
Info • Display receiver information 8.12
Features • Display current receiver features 8.12
Prefs • Adjust user-selectable system settings 8.9
Remote • Change the remote ID 3.10
Test • Initiate a simple diagnostics test 8.12
New Card • Prepare a new access card 8.12
Upgrade • Display upgrade status and history 8.12
Antenna • View current settings 9.1
• Turn DewShield on/off
(TracVision R6 only)
• Turn the beeper on/off
• Designate the receiver as primary or secondary
• Switch satellites
Page 37

54-0376
5.1
Using Program Guides
5 Using Program
Guides
This section explains how to select a program guide style, use the
different guide features, and set guide preferences.
Contents
5-1 Program Guide Styles . . . . . . . . . . . . . . . . . . . . . . . . . .5.3
5-2 Using the Program Guide . . . . . . . . . . . . . . . . . . . . . . . .5.5
5-3 Using the OneLine Guide . . . . . . . . . . . . . . . . . . . . . . . .5.6
5-4 Using TurboTune for Quick Access
to Favorite Channels . . . . . . . . . . . . . . . . . . . . . . . . . . . .5.7
5-5 Setting Guide Preferences . . . . . . . . . . . . . . . . . . . . . . .5.9
Page 38

54-0376
5.3
Using Program Guides
5-1 Program Guide Styles
You can set up the program guide to present
information using either of two styles:
•Grid
• Logo
The following sections explain how to select a style
and describe the features of each style.
Selecting a Guide Style
To select a guide style, follow the steps below.
1. Press the GUIDE button twice to display the
Guide Options menu [or select Guide Options
from the main menu].
2. Highlight the Options tab.
3. Highlight the Guide Style button.
4. Press the SELECT button to toggle between Grid
and Logo guide styles.
5. Press the CLEAR button to return to the program
you were viewing.
Selecting a Guide Style
When the program guide is onscreen,
simply press the GUIDE button once to
display the Guide Options menu.
Page 39

54-0376
5.4
DIRECTV Mobile Receiver/Controller User’s Guide
Grid Guide
• Easy to see what programs are available at a
particular time.
• Lists up to seven days of current and upcoming
programming.
• The program title and description appear above
the grid as you highlight each program.
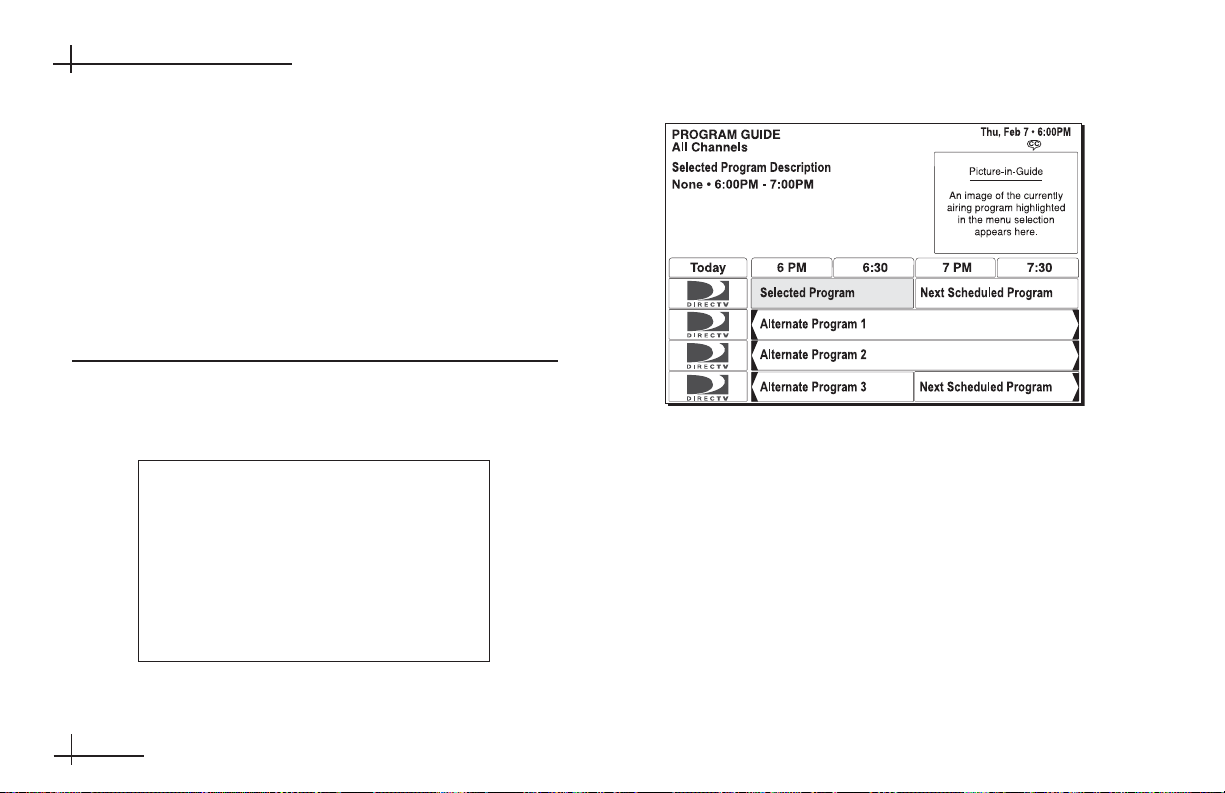
Logo Guide
• Select your favorite channels, rather than
selecting specific programs.
• Only current programming can be selected from
the logo guide.
• The current program title and description appear
above the logo grid as you highlight each
channel.
Grid Guide
Logo Guide
LOGO GUIDE
All Channels
A description of the program currently
airing on the highlighted network
menu appears here, if available.
Title of the program on the network selected in menu
Thu, Feb 7 6:00PM
CC
Picture-in-Guide
An image of the currently
airing program highlighted
in the menu selection
appears here
Page 40

54-0376
5.5
Using Program Guides
5-2 Using the Program Guide
To display the program guide:
Press the GUIDE button to bring up the guide.
To move the highlight:
Use the joystick to move the highlight within the
guide.
Move the highlight to the right to show future
programming. Move the highlight up/down to
scroll through the listing. Move the highlight
onto a channel icon to view that channel’s current
program in the picture-in-guide window (if
enabled).
To scroll up/down one page:
Press the CHANNEL (CH) button up/down to
scroll through a full page of guide entries at a
time.
To jump to a specific channel listing:
Use the numeric keypad to enter the channel
number to go directly to the listing for a specific
channel.
To view a program’s description:
Press the INFO button for a full description of the
highlighted program.
To tune to a program:
Press the SELECT button to tune to a highlighted
program. The program must be currently in progress.
To exit the guide:
Press the CLEAR button to exit the program
guide.
Cells with arrows indicate the program
started at an earlier time or continues later
than can be shown in the selected time
period.
If program information cannot entirely fit in
the space provided, an ellipsis (…) indicates
that a portion of the title is not shown.
Page 41

54-0376
5.6
DIRECTV Mobile Receiver/Controller User’s Guide
5-3 Using the OneLine Guide
The OneLine Guide, which appears at the bottom of
your screen, displays a segment of the program
guide, starting with the currently viewed channel. It
displays 1, 2, 3, or 4 rows at a time, based on the
current guide preferences.
To display the OneLine Guide:
Press the joystick up or down while watching TV
to bring up the OneLine guide.
To move the highlight:
Use the joystick to move the highlight within the
guide.
Move the highlight to the right to show future
programming. Move the highlight up/down to
display the next or previous channel.
To show the OneLine Guide for a specific channel:
Use the numeric keypad to enter the channel
number to display the OneLine Guide for that
channel.
To view a program’s description:
Press the INFO button to display current or
future program information in the channel
banner.
To tune to a program:
Press the SELECT button to tune to a highlighted
program.
To exit the guide:
Press the CLEAR button to exit the OneLine
guide.
OneLine Guide
100 10:30 11 am 11:30 12:00pm
DTV
Watch Pay Per View Previews now!
PROGRAM GUIDE All Channels
Page 42

54-0376
5.7
Using Program Guides
5-4 Using TurboTune for Quick Access
to Favorite Channels
The TurboTune feature gives you quick access to 27 of
your favorite channels. Three groups of nine of your
favorite channels are available as Turbo 1, Turbo 2,
and Turbo 3.
Setting TurboTune Channels
To set up channels in TurboTune, follow the steps
below.
1. Press the TURBO button, then highlight the
Setup button and press SELECT [or select Guide
Options from the main menu, then highlight the
Set Turbo tab].
2. Highlight a vacant channel box (shows “Add
Channel”) and press SELECT. Or you can highlight
an occupied box instead to overwrite its set channel
with your new selection.
3. Using the joystick or the CHANNEL (CH) button,
choose the desired channel in the setup box
(shown below) and press SELECT. You can also use
the numeric remote control buttons to enter a specific
channel number.
4. Highlight the OK button and press SELECT.
TurboTune Guide
Adding a Channel to TurboTune
DIRECTV Pay Per View Prev
Turbo 1Turbo 1 Turbo 2 Turbo 3
Add
Channel
SETUP
Page 43

54-0376
5.8
DIRECTV Mobile Receiver/Controller User’s Guide
Adding the Current Channel to TurboTune
If you want to add the channel you’re currently
watching to TurboTune, follow the steps below.
1. Press the TURBO button to display the
TurboTune guide.
2. Highlight a vacant channel box (shows “Add
Channel”) and press SELECT to add the channel
you are watching to the TurboTune guide.
Selecting a Channel from TurboTune
To tune to a channel in TurboTune, follow the steps
below.
1. Press the TURBO button.
2. Highlight the channel you want to watch and
press SELECT.
TurboTune Guide
Press the TURBO button to cycle through
Turbo 1, Turbo 2, and Turbo 3 program
groups while the TurboTune guide is
onscreen.
DIRECTV Pay Per View Prev
Turbo 1Turbo 1 Turbo 2 Turbo 3
Add
Channel
SETUP
Page 44

54-0376
5.9
Using Program Guides
Renaming TurboTune Groups
You can rename each nine-channel TurboTune group
to anything you choose, using up to 10 letters,
numbers, spaces, etc. For example, Turbo 1 could be
renamed “Mom” and Turbo 2 renamed “Dad.”
To rename a group, follow the steps below.
1. Press the TURBO button [or select Guide
Options from the main menu and highlight the
Set Turbo tab].
2. Highlight the grid name (Turbo 1, Turbo 2, or
Turbo 3) that you want to rename and press
SELECT.
3. Use the onscreen keyboard to enter the new name
(to enter a letter on the keyboard, highlight the
letter and press SELECT).
4. Once you’ve entered the desired name, highlight
the OK button and press SELECT.
To redo the entry, highlight the Clear button and press
SELECT. To cancel the change, press the CLEAR button
[or highlight the Cancel button and press SELECT].
5-5 Setting Guide Preferences
The Guide Options menu allows you to customize the
appearance and behavior of onscreen guides.
To set guide preferences, follow the steps below.
1. Press the GUIDE button twice while watching a
program [or select the Guide Options tab from
the main menu].
2. Highlight the Options tab.
Guide Options
Page 45

54-0376
5.10
DIRECTV Mobile Receiver/Controller User’s Guide
3. Highlight the menu button for the setting you
wish to modify:
Guide Style
Press SELECT to choose either grid or logo style of
program guide. See Section 5-1, “Program Guide
Styles,” on page 5.3 for details.
Picture In Guide
Press SELECT to turn the picture-in-guide feature
on/off. If turned on, video of the currently selected
program appears in a small box when you’re viewing
the program guide.
Guide Zoom
Press SELECT to turn guide zoom on/off. If turned
on, and the picture-in-guide feature is turned on,
video of the currently selected program “zooms in”
to the small screen when the program guide is
selected. If turned off, the “zooming” animation from
full screen to small screen is disabled.
Multi-Color
Press SELECT to turn multi-color on/off. If turned
on, program cells appear in different colors, based on
their type of content. The four colors are as follows:
Color Category
Orange News
Green Sports
Purple Movies
Blue Other
If multi-color is turned off, all cells are blue in color.
Channel Sort
Press SELECT to choose either numeric or alpha. If
numeric, the program guide is sorted by channel
number. If alpha, the program guide channels are
sorted alphabetically.
Page 46

54-0376
5.11
Using Program Guides
Filters
Press SELECT to choose either temporary or
persistent. If temporary, the filters you apply are
active only while the program guide remains
onscreen; once you exit the program guide, all filters
are cleared. If persistent, the filters you apply remain
active after you exit the program guide.
1-Line Guide
Press SELECT to choose the number of rows that will
display whenever you select the OneLine guide. You
can choose from 1 to 4 rows.
Page 47

54-0376
6.1
Setting Favorites and Filters
6 Setting Favorites
and Filters
This section explains how to set up lists of favorite channels, filter
the program guide by category and time, and search for programs
based on content.
Contents
6-1 Using Favorite Channel Lists . . . . . . . . . . . . . . . . . . . . .6.3
6-2 Filtering the Program Guide . . . . . . . . . . . . . . . . . . . . . .6.7
6-3 Selecting Guide Times . . . . . . . . . . . . . . . . . . . . . . . . . .6.8
6-4 Using WatchWizard to Search for Programs . . . . . . . . .6.9
Page 48

54-0376
6.3
Setting Favorites and Filters
6-1 Using Favorite Channel Lists
Favorite channel lists help you organize the hundreds
of available channels into more manageable groups.
Each of the four lists can contain as many or as few
channels as you wish. You can customize these
groups in several ways. For example, Fav. A could be
Dad’s favorite channels, Fav. B could be Mom’s
favorites, Fav. C could be the kids’ channels, and
Family could be all channels that Mom and Dad have
deemed appropriate for the entire family.
Creating a Channel List
1. Press the MENU button to access the main menu.
2. Highlight the Guide Options or Lock & Limits
tab from the main menu and press SELECT.
3. Highlight the Fav Setup tab and press SELECT to
open the Favorite List Setup pane.
The four columns of small boxes are called tag boxes.
The first three columns of tag boxes are the Fav. A,
Fav. B, and Fav. C. channel lists. The last column is
the Family list.
Favorite List Setup
Fav. A Fav. B Fav. C Family
Page 49

54-0376
6.4
DIRECTV Mobile Receiver/Controller User’s Guide
4. In the desired channel list column, highlight the
tag box for the channel that you want to add or
remove. Use the joystick or CHANNEL (CH) button
to scroll up or down to view other channels.
5. Press SELECT to add or remove the check mark
in the tag box. A check mark indicates that the
channel is included in the favorite channel list.
(In the example on the previous page, WABC is
included in the Fav. A and Family channel lists,
but not the Fav. B or Fav. C channel lists.)
6. When you have added all of the channels that
you want in your list, press the CLEAR button to
resume watching TV.
Switching Between Favorite Lists
Once you have created your favorite channel lists, use
the remote control’s FAV button to cycle through
them quickly and easily. Each press of the FAV button
brings up the next favorite channel list. [You can also
select a list by highlighting the Fav List tab from the
Guide Options menu.] Only channels that are set up
in the selected favorite channel list will be accessible
for viewing.
If the Family list has not had any channels
added to it, and the receiver is locked, no
channels can be viewed without first
unlocking the receiver. To avoid this
inconvenience, create the Family list before
locking the receiver. See
Section 7, “Using
Access Controls,” on page 7.1
for details
about controlling system access.
Favorite Lists
Page 50

54-0376
6.5
Setting Favorites and Filters
Renaming a Channel List
1. At the Favorite List Setup pane, highlight the
Rename button and press SELECT.
A Rename List menu appears. You can rename
the first three lists. You cannot rename the All or
Family lists.
2. Highlight the list you wish to rename and press
SELECT.
3. Use the onscreen keyboard to enter the new name
(to enter a letter on the keyboard, highlight the
letter and press SELECT).
4. Once you’ve entered the desired name, highlight
the OK button and press SELECT.
To redo the entry, highlight the Clear button and press
SELECT. To cancel the change, press the CLEAR button
[or highlight the Cancel button and press SELECT].
Generating an Auto Set List
The Auto Set function generates a complete list of
viewable channels.
To generate an Auto Set list, follow the steps below.
1. At the Favorite List Setup pane, highlight the
Auto Set button and press SELECT.
2. Highlight a favorite channel list to be
programmed and press SELECT.
It may take several minutes for the receiver to
scan through all channels and determine which
ones you’re authorized to receive. The scan
results will be stored in the selected favorite
channel list.
Auto Set may exclude some channels, such
as the Music Choice channels, or include
some pay per view channels. This does not
mean that the receiver is faulty. These
channels were excluded or included due to
the receiver’s analysis process. You can
manually edit the list to correct these
oversights.
Page 51

54-0376
6.6
Adding and Removing Channels
To add or delete a channel from a selected favorite
channel list, follow the steps below.
To add all available channels to a favorite list:
1. At the Favorite List Setup pane, highlight the
Add All button and press SELECT.
2. Highlight the list you wish to modify and press
SELECT.
To remove all channels from a favorite list:
1. At the Favorite List Setup pane, highlight the
Delete All button and press SELECT.
2. Highlight the list you wish to modify and press
SELECT.
To add or delete individual channels from a favorite list:
At the Favorite List Setup pane, highlight the tag box
for the particular channel you wish to add or remove
and press SELECT. A check mark indicates that the
channel is included in the selected favorite channel
list. An empty tag box indicates that the channel is
excluded from the list.
Finding New Channels
Occasionally, new channels are added to the available
programming selections. The number of channels that
have been added since you created your channel list
appears in the New Channels window on the
Favorite List Setup pane. To view these channels in
the lists, highlight the New Channels button and
press SELECT.
DIRECTV Mobile Receiver/Controller User’s Guide
Favorite List Setup
Page 52

54-0376
6.7
6-2 Filtering the Program Guide
The Category Filter menu allows you to filter the
program guide to show just those channels that
match your viewing interests.
To filter the guide by program categories, such as
movies, sports, or news, follow the steps below.
1. Press the GUIDE button twice while watching TV
[or select the Guide Options tab from the main
menu]. If the Program Guide is currently displayed,
press the GUIDE button just once.
2. Highlight the Theme tab.
3. Highlight a category (other than All) and press
SELECT.
4. A subcategory menu appears, allowing you to
further refine a chosen theme. To choose a
subcategory, highlight the subcategory and press
SELECT.
For example, if you select the Movies category, you
can refine your selection using a subcategory such as
Action/Adventure.
Once you’ve selected a category/subcategory, the
program guide will be filtered to show only those
channels offering programs of the selected category
and subcategory. In this example, the guide would
only display channels featuring Action/Adventure
movies.
Setting Favorites and Filters
Category Filter
Page 53

54-0376
6.8
DIRECTV Mobile Receiver/Controller User’s Guide
6-3 Selecting Guide Times
The Guide Times menu provides easy access to future
programming information.
To advance the guide to a future day/time period,
follow the steps below.
1. Press the GUIDE button twice while watching TV
[or select the Guide Options tab from the main
menu]. If the Program Guide is currently displayed,
press the GUIDE button just once.
2. Highlight the Times tab.
3. Highlight the AM/PM button and press SELECT
to toggle between AM and PM.
4. Highlight the day you want the guide to begin
and press SELECT.
Guide Times
Page 54

54-0376
6.9
Setting Favorites and Filters
6-4 Using WatchWizard to Search
for Programs
WatchWizard allows you to search for programs
using criteria such as rating, showtime, language, and
category. You can even search for a specific word
found in program titles or descriptions. WatchWizard
can store up to eight separate searches using any
combination of criteria and text.
Performing a Search
1. Press the SEARCH button [or select the
WatchWizard tab from the main menu].
2. Highlight the WWSetup tab.
3. Highlight one of the eight search buttons and
press SELECT.
4. A search menu appears where you can enter your
search criteria. Narrow your search results by
combining multiple criteria. To choose a criteria,
highlight the associated button and press
SELECT.
WatchWizard Program Searches
WatchWizard Search Menu
WATCHWIZARD SETUP
WWSetup
WWResult
Channels
Watch TV
Main Menu
WATCHWIZARD SETUP
WWSetup
WWResult
Channels
Watch TV
Main Menu
WatchWizard Program Searches
Search
Empty
Empty
Empty
Empty
Empty
Empty
Empty
Rename Clear Clear All
Results Guide
Now
Ratings
All
English
Reset
Search 1
Movies, Action/Adventure
WatchWord
Showtimes Category
Language
Wed, Oct. 2 1:45 PM
Wed, Oct. 27 1:11 PM
Director
All
Actor
All
Back
Page 55

54-0376
6.10
DIRECTV Mobile Receiver/Controller User’s Guide
To enter text, use the onscreen keyboard (to enter a
letter on the keyboard, highlight the letter and press
SELECT). Once you’ve entered the desired text,
highlight the OK button and press SELECT.
Viewing Search Results
To view a list of programs matching your search
criteria, highlight the WWResult tab. To view the
search results as a guide, highlight the Results Guide
button on the WWSetup tab and press SELECT.
When a program guide is onscreen, press the
SEARCH button on the remote control to
automatically highlight programs matching your
search results. Press the SEARCH button again to
highlight the next result, based on starting time.
WatchWizard Keyboard Entry
If you prefer, you can change the keyboard
to a standard (QWERTY) layout. Simply
highlight the toggle icon on the default
button board and press SELECT.
WatchWizard Results
WATCHWIZARD RESULTS
WWSetup
WWResult
Channels
Watch TV
Main Menu
Today Search 1
Today Search 1
WatchWizard Result
3:00PM 100
Program Title 1
3:30PM 105
Program Title 2
Wed, Oct. 27 1:11 PM
Result: 2Searching...
Page 56

54-0376
6.11
Setting Favorites and Filters
Using the Channels Search
You can also search for channels that offer a specific
type of programming by using the category-based
channels search.
1. Press the SEARCH button while watching TV [or
select the WatchWizard tab from the main menu].
2. Highlight the Channels tab.
3. Highlight the Category button and press
SELECT.
4. Highlight the desired category from the list and
press SELECT.
5. A subcategory menu appears, allowing you to
further refine your search. To choose a
subcategory, highlight the subcategory and press
SELECT. A list of channels offering the selected
type of programming appears.
Channels Search
CHANNELS SEARCH
WWSetup
WWResult
Channels
Watch TV
Main Menu
Category Based Channel Search
100
DTV
Category
Movies
MOVIE SHOWCASE on DIRECTV
previews whats hot this week on
premium movie services HBO,
Please select a Category
STARZ! and SHOWTIME, plus the
new releases on BLOCKBUSTER
Pay Per View Movies. Movie.
Sat, Oct 5 6:24 PM
to begin search.
Page 57

54-0376
7.1
Using Access Controls
7 Using Access
Controls
This section explains how to lock and unlock the system using a
passcode. It also explains how to set rating and time limits.
Contents
7-1 Locking & Unlocking the System . . . . . . . . . . . . . . . . . .7.3
7-2 Setting Ratings Limits . . . . . . . . . . . . . . . . . . . . . . . . . .7.5
7-3 Setting Time Limits . . . . . . . . . . . . . . . . . . . . . . . . . . . .7.6
Page 58

54-0376
7.3
Using Access Controls
7-1 Locking & Unlocking the System
You can easily set limits to restrict the viewing of
satellite TV programming. When accompanied by the
channel lists, these limits provide a great degree of
control.
When you first install the mobile receiver, it will be
unlocked. That is, no limits or restrictions are in
effect. To enforce limits (ratings, TV timer, and
“Family” favorite list), you must lock the system
using a passcode.
Locking the Receiver
To lock the system, follow the steps below.
1. Press the MENU button to access the main menu.
2. Highlight the Lock & Limits tab and press
SELECT.
3. Highlight the Lock tab to display the Parental
Lock pane.
4. Highlight the Lock button and press SELECT.
Parental Lock
Once the system is locked, only existing
Family list channels will be accessible. If the
Family list does not contain any channels,
no channels can be viewed without first
unlocking the system. To avoid this, verify
the contents of the Family list before locking
the receiver. See
Section 6-1, “Using
Favorite Channel Lists,” on page 6.3
for
details.
PARENTAL LOCK
Lock
Fav Setup
Ratings
Limits
Watch TV
Main Menu
Enforce rating, spending, and
viewing limits, and restrict
access to Family list channels.
Enter the 4 digit passcode to
lock(unlock) your receiver.
LOCK SYSTEM
Passcode
Lock
* * * *
Lock
OK
Cancel
Wed, Jul 18 9:15 AM
CONFIRM PASSCODE
Passcode
Lock
* * * *
OK
Cancel
Page 59

54-0376
7.4
DIRECTV Mobile Receiver/Controller User’s Guide
5. The Lock System pop-up panel appears. Enter a
four-digit passcode using the remote control’s
numeric keypad.
6. Highlight the OK button and press SELECT.
7. Enter the code again to confirm, then highlight
the OK button and press SELECT.
Once you select OK, the mobile receiver is
locked. You must enter the proper passcode
to unlock it. A lock icon appears in the
program guide and channel banner to
remind you that the system is locked.
Overriding the System Lock
When the system is locked, inaccessible channels will
show a “limit exceeded” message. To temporarily
override the system lock, follow the steps below.
1. While the “limit exceeded” message is onscreen,
press SELECT.
2. Enter your four-digit passcode using the remote
control’s numeric keypad.
3. Highlight the OK button and press SELECT.
An icon indicating lock override appears
under the date/time whenever the
program guide or channel banner is
displayed.
If you forget your four-digit code, please call
DIRECTV at 1-800-DIRECTV (347-3288).
To abort the locking process, highlight the
Cancel button and press SELECT.
Page 60

54-0376
7.5
Using Access Controls
Unlocking the System
To remove the lock and all of its restrictions, follow
the steps below.
1. Press the MENU button to access the main menu.
2. Highlight the Lock & Limits tab and press
SELECT.
3. Highlight the Lock tab.
4. Highlight the Unlock button and press SELECT.
5. Use the remote control’s numeric keypad to enter
the same code you entered to lock the system.
6. Highlight the OK button and press SELECT. To
abort and keep the lock in effect, highlight the Cancel
button and press SELECT.
Once the system is unlocked, all limits and
restrictions are removed!
7-2 Setting Ratings Limits
Ratings help you to determine whether a program’s
content is appropriate for a particular audience. To
select the maximum ratings limits that can be viewed
on your system, follow the steps below.
1. Press the MENU button to access the main menu.
2. Highlight the Lock & Limits tab and press
SELECT.
3. Highlight the Ratings tab.
The button used to lock the system is also
used to unlock the system.
Ratings Limits Setup
RATINGS LIMITS
Lock
Fav Setup
Ratings
Limits
Watch TV
Main Menu
Children
General Audience
Dialogue
Sex
Violence
Language
Movies
Not Rated
Sat, Oct 5 4:40PM
Allow All
Allow TV-14
Allow TV-14
Allow TV-14
Allow TV-14
Allow TV-14
Allow PG
Allow All
Page 61

54-0376
7.6
DIRECTV Mobile Receiver/Controller User’s Guide
7-3 Setting Time Limits
You can restrict your system to allow viewing only
during specific hours and/or a maximum number of
hours. To set time limits, follow the steps below.
1. Press the MENU button to access the main menu.
2. Highlight the Lock & Limits tab and press
SELECT.
3. Highlight the Limits tab.
4. Highlight the button for the type of programming
you want to restrict and press SELECT.
5. Highlight the maximum rating you want to allow
(for the selected type of programming) from the
pop-up submenu and press SELECT. Yo u m a y
choose Block All or Allow All instead of setting a
specific limit.
Ratings Limits
Maximum Viewing Limits
Remember, limits are only active while the
system is locked. If the system is unlocked,
all restrictions are removed.
RATINGS LIMITS
Lock
Fav Setup
Ratings
Limits
Watch TV
Main Menu
Violence
Children
Block All
Violence
Parental Guidance Suggested.
Movies
Not Rated
TV-PG
TV-14
TV-MA
Allow All
Sat, Oct 5 7:17PM
Allow All
Allow TV-14
Allow TV-14
Allow TV-14
Block All
Allow TV-14
Allow PG
Allow All
SPENDING/VIEWING LIMITS
Lock
Fav Setup
Ratings
Limits
Watch TV
Main Menu
Max Spending
Monday
Tuesday
Wednesday
Thursday
Friday
Saturday
Sunday
Total time watched today: 1:12
Wed, Jul 18 10:11AM
$5.00
24:00 Hours allowed
24:00 Hours allowed
24:00 Hours allowed
24:00 Hours allowed
24:00 Hours allowed
24:00 Hours allowed
24:00 Hours allowed
Page 62

54-0376
7.7
Using Access Controls
4. Highlight the day of the week that you want to
limit and press SELECT.
5. a. If you want to limit the maximum number of
viewing hours for that day, highlight the
Total Time button and use the remote
control’s numeric keypad to enter the limit.
b. If you want to limit that day’s viewing to a
specific time period, highlight the From
button and use the remote control’s numeric
keypad to set the earliest time. Then highlight
the Through button and set the latest time.
6. Highlight the OK button and press SELECT.
Setting Allowable Viewing Times
Setting Maximum Viewing Hours
The Max Spending button is not applicable
to your TracVision system.
Remember, limits are only active while the
system is locked. If the system is unlocked,
all restrictions are removed.
SPENDING / VIEWING LIMITS
Lock
Fav Lists
Ratings
Limits
Review
From Through
Watch TV
N/A N/A 18:00
Main Menu
Max Spending
Monday
Saturday Viewing Time Limit
Tuesday
Wednesday
Thursday
Friday
Saturday
Sunday
-OR-
24:00
24:00
24:00
24:00
24:00
18:00
24:00
$10.00
Hours
Total time
Hours
Hours
Hours
Hours
Hours
Hours
allowed
allowed
allowed
allowed
allowed
allowed
allowed
Wed, May 9 4:50 PM
OK
Cancel
SPENDING / VIEWING LIMITS
Lock
Fav Lists
Ratings
Limits
Review
From Through
Watch TV
10:00
Main Menu
Saturday Viewing Time Limit
AM
Max Spending
Monday
Tuesday
Wednesday
Thursday
Friday
Saturday
Sunday
-OR-
24:00
24:00
24:00
24:00
24:00
9:30
24:00
$10.00
Hours
Total time
Hours
N/APM11:30
Hours
Hours
Hours
Hours
Hours
allowed
allowed
allowed
allowed
allowed
allowed
allowed
Wed, May 9 4:50 PM
OK
Cancel
Page 63

54-0376
8.1
Other Menu Functions
8 Other Menu
Functions
This section explains how to change audio/video settings, schedule
future programs, and change system settings.
Contents
8-1 Adjusting Audio Settings . . . . . . . . . . . . . . . . . . . . . . . .8.3
8-2 Adjusting Video Settings . . . . . . . . . . . . . . . . . . . . . . . .8.5
8-3 Using the Program Director to Schedule
Future Programs . . . . . . . . . . . . . . . . . . . . . . . . . . . . . .8.6
8-4 Reading Mail from DIRECTV . . . . . . . . . . . . . . . . . . . . .8.8
8-5 Setting System Preferences . . . . . . . . . . . . . . . . . . . . . .8.9
8-6 Advanced System Setup Functions . . . . . . . . . . . . . . .8.11
Page 64

54-0376
8.3
Other Menu Functions
8-1 Adjusting Audio Settings
From the Audio Adjustment menu, you can select
languages for default audio and alternate audio. You
can also adjust the left/right balance.
To set audio preferences, follow the steps below.
1. Press the AUDIO button [or select the Audio &
Video tab from the main menu].
2. Highlight the menu button for the setting you
wish to modify:
Default Audio and Alternate Audio
Your receiver supports alternate audio services. A
icon appears below the date and time in a
program’s description to indicate alternate audio is
available for that particular program.
You will hear the default audio language all the time
if that language is being transmitted and an alternate
language has not been activated. If your selected
default language is not being transmitted for a
program, you will hear the language in which the
program is broadcast.
UDIO
Occasionally, an audio track may be offered
that is not being broadcast, in which case
the audio will not change or you will not
hear any audio. Change channels to restore
the audio track to the one specified on the
Audio Adjustment menu.
Audio Adjustment
AUDIO ADJUSTMENT
Audio
Video
Watch TV
Main Menu
Default Audio
Alternate Audio
Audio Balance
Factory Defaults
Wed, Oct 16 • 2:15AM
English
English
Center
ALT.
A
Page 65

54-0376
8.4
DIRECTV Mobile Receiver/Controller User’s Guide
To set up your default and alternate audio languages,
follow the steps below.
1. Press the AUDIO button to access the Audio
Adjustment menu.
2. Highlight the Default Audio button (to set your
primary language preference) or the Alternate
Audio button (to select your alternate language
preference) and press SELECT.
3. Highlight the desired language for the default or
alternate language and press SELECT.
To select the alternate audio when watching TV,
follow the steps below.
1. If the icon appears below the date and time
in a program’s description, press the joystick left
or right while you are viewing that program.
2. An alternate language option based on your
alternate audio selection appears. Press SELECT
to listen to the program in the alternate language.
When you change the channel, audio will revert
to your selected Default Audio language.
Audio Balance
To adjust the audio balance left or right, highlight the
Audio Balance button and press SELECT. Use the
joystick to adjust the balance, then highlight the Done
button and pres SELECT.
UDIO
Selecting Default Audio Language
ALT.
A
Page 66

54-0376
8.5
Other Menu Functions
8-2 Adjusting Video Settings
From the Video Adjustment menu, you can set the
screen’s aspect ratio and change the appearance of
onscreen displays.
To set video preferences, follow the steps below.
1. Press the VIDEO button [or select the Audio &
Video tab from the main menu].
2. Highlight the menu button for the setting you
wish to modify:
Screen Ratio
Press SELECT to choose either a 4:3 (standard) or 16:9
(widescreen) screen aspect ratio.
Menu Centering
Press SELECT to bring up the centering pop-up
panel. Use the joystick to adjust the onscreen menu
position on your TV, then highlight the OK button
and press SELECT.
Color Scheme
Press SELECT to bring up a color pop-up menu.
Highlight the desired menu color scheme (Indigo,
Ice, Sky, Forest, or Merlot) and press SELECT.
Translucency
Press SELECT to bring up the translucency pop-up
menu. Use the joystick to adjust the amount of menu
translucency, from solid to 100% translucent, then
highlight the DONE button and press SELECT.
Video Adjustments
Page 67

54-0376
DIRECTV Mobile Receiver/Controller User’s Guide
8-3 Using the Program Director to
Schedule Future Programs
The Program Director allows you to automatically
tune to a program at a specific date and time, or tune
to a program on a repeating basis. The receiver will
turn on (if necessary) and tune to the specified
channel at the chosen date and time. You can
program up to 32 events in advance.
Scheduling an Event from the Program Guide
You can easily schedule an upcoming program that
you find listed in the program guide. Simply
highlight the upcoming program in the program
guide and press SELECT. A check mark appears next
to your selection. At the start date/time of the
scheduled program, the receiver will automatically
tune to that program.
Scheduling an Event from the Program Director
To schedule a program from the Program Director
menu, follow the steps below.
1. Press the MENU button to access the main menu.
2. Highlight the Program Director tab and press
SELECT.
3. Highlight an empty slot and press SELECT.
From the program guide, you can schedule
a program only for a specific date and time.
To schedule recurring programs and future
programs not yet listed on the program
guide, use the Program Director menu.
8.6
Program Director
PROGRAM DIRECTOR
Schedule
Watch TV
Main Menu
Add and Modify Scheduled Events
Chan Start Length Frequency
Wed, Oct 2 • 7:14PM
Page 68

54-0376
8.7
Other Menu Functions
4. Highlight the Schedule
to View button from the
Schedule Options popup menu and press
SELECT.
5. Use the joystick or numeric keypad to choose the
desired channel from the channel selection pane.
Then highlight the OK button and press SELECT.
6. Highlight the Start column and use the joystick
or numeric keypad to set the program’s start
time. Be sure to specify AM or PM (or N for
noon, M for midnight if you specified 12:00).
7. Highlight the Duration column and use the
joystick or numeric keypad to set the program’s
duration in hours and minutes.
8. Highlight the Frequency column and use the
joystick to select when, or how often, the event
occurs: Today, Tomorrow, Every Mon, Every Tue,
Every Wed, Every Thu, Every Fri, Every Sat,
Every Sun, Everyday, Mon-Fri, or “/” (specify a
date).
9. Review your settings, then highlight the OK
button and press SELECT. To abort, highlight the
Cancel button and press SELECT.
Channel Selection Pane
If you specify a date, use the month/day
format. The year is set automatically.
Schedule Options
Schedule to View ( )
Cancel
Page 69

54-0376
8.8
DIRECTV Mobile Receiver/Controller User’s Guide
Deleting a Scheduled Event
To cancel a scheduled event, follow the steps below.
1. Press the MENU button to access the main menu.
2. Highlight the Program Director tab and press
SELECT.
3. Highlight the event you want to cancel and press
SELECT.
4. Highlight the Delete Event button from the
Schedule Options pop-up menu and press
SELECT.
8-4 Reading Mail from DIRECTV
DIRECTV uses the Mail feature to send you
important information, notify you of special events,
and tell you about special offers. When you receive a
new message, a icon appears at the top of all
menus until you’ve read the message.
Reading Your Messages
To read your mail, follow the steps below.
1. Press the MENU button to access the main menu.
2. Highlight the View Mail tab and press SELECT.
3. If the message is longer than a single page,
highlight the Page button and use the CHANNEL
(CH) button to step through the pages.
4. If you have more than one message in your
mailbox, highlight the Message button and use
the joystick to navigate through multiple
messages.
If the program you want to cancel is a onetime program that’s not currently in
progress, you can cancel the event from
the program guide. Simply highlight the
program you want to cancel in the program
guide and press SELECT to remove the
check mark.
MAIL
NEW
Page 70

8.9
54-0376
Other Menu Functions
Erasing a Message
To permanently remove a message, highlight the
Erase button and press SELECT. Messages are
automatically deleted as they become outdated or if space is
needed for newer incoming messages.
8-5 Setting System Preferences
The Preferences menu allows you to customize
various system settings.
To set system preferences, follow the steps below.
1. Press the MENU button to access the main menu.
2. Highlight the System Setup tab and press
SELECT.
3. Highlight the Prefs tab.
View Mail
Once you erase a message, it cannot be
retrieved.
Preferences
VIEW MAIL
Mail
Watch TV
Main Menu
Read Message
Erase
Message
Second page of message text...
Fri, Jul 6 5:24AM
1 of 3 Page 2
APG Load Type
Antenna
Fast
Page 71

54-0376
8.10
DIRECTV Mobile Receiver/Controller User’s Guide
4. Highlight the menu button for the setting you
wish to modify:
Menu Language
Press SELECT to choose either English (default) or
Spanish for the menu language. The text in all
onscreen menus will be shown in the selected
language.
Time Zone
Press SELECT to bring up the time zone pop-up
menu. Then highlight your time zone and press
SELECT. The program guide will show programming
times based on this time zone. The default setting is
the time zone used on your account.
Daylight Saving
Press SELECT to bring up the Daylight Saving popup menu. Then highlight the desired daylight saving
option (Observed, Not Observed, or Default) and
press SELECT.
Banner Style
Press SELECT to choose either a Short or Full banner
style. A full banner always shows the program
description within the channel banner; a short banner
shows just the program’s title.
APG Load Type
Press SELECT to choose either a Fast or Full program
guide load. With fast load selected, you should see a
picture on the TV within 15 seconds after startup.
With full load selected, you might have to wait 45
seconds or more to see a picture on the TV. Therefore,
KVH recommends that you keep APG Load Type set
to Fast.
Factory Defaults
Press SELECT to restore the Preferences options to
their original factory settings.
When you press the INFO button while
watching TV, a full channel banner is
displayed, regardless of the Banner Style
setting.
Page 72

54-0376
8.11
Other Menu Functions
8-6 Advanced System Setup Functions
Besides the Remote and Preferences menus described
previously, the System Setup menu provides other
functions, all of which are rarely, if ever, used.
To use the advanced system setup functions, follow
the steps below.
1. Press the MENU button to access the main menu.
2. Highlight the System Setup tab and press
SELECT.
3. Highlight the menu tab for the advanced function
you wish to use.
Install
The Antenna Setup pane offers three functions:
Function Description
Choose Satellites Allows you to select which satellites to
include in the list of available satellites;
refer to
Section 9-6, “Changing the List
of Available Satellites” on page 9.10
Scan for Satellite Commands the antenna to search the
sky for available satellites; this function
is not recommended – use the Choose
Satellites function instead
Reload APG Reloads the complete program guide;
use this function to fix a guide problem
Signal
The Signal pane shows the strength of the satellite
signal. The higher the signal strength, the better the
reception.
System Setup Menu (Install Tab Selected)
Antenna Setup
Page 73

54-0376
8.12
DIRECTV Mobile Receiver/Controller User’s Guide
Info
The System Information pane lists general
information about your mobile receiver, including
model, ID, access card, and software version.
Features
The Features pane lists some of the receiver’s special
features.
Test
The Test function performs a simple diagnostics test
on the system. When complete, a report shows
system information and indicates whether the Signal,
Tuning, and Front Panel functions passed the test.
New Card
In the unlikely event that your receiver’s access card
must be replaced, use the New Card function to
initialize the new card.
Upgrade
The Upgrade pane shows your receiver’s upgrade
history. Occasionally, DIRECTV will automatically
update your receiver’s software.
Antenna
The Antenna Controls pane allows you to configure
the TracVision antenna. Complete details are
provided in the next section.
If you need a new access card, please
call KVH at 401-847-3327.
Page 74

54-0376
9.1
Antenna Controls
9 Antenna Controls
This section explains how to control the TracVision antenna using
the receiver’s onscreen menus.
Contents
9-1 Viewing Current Settings . . . . . . . . . . . . . . . . . . . . . . . .9.3
9-2 Turning DewShield On/Off . . . . . . . . . . . . . . . . . . . . . . .9.4
9-3 Turning the Beeper On/Off . . . . . . . . . . . . . . . . . . . . . . .9.5
9-4 Designating the Receiver as Primary or Secondary . . . .9.6
9-5 Switching Satellites . . . . . . . . . . . . . . . . . . . . . . . . . . . .9.8
9-6 Changing the List of Available Satellites . . . . . . . . . . . .9.10
Page 75

9-1 Viewing Current Settings
Follow the steps below to view the antenna’s current
settings.
1. Press the MENU button to access the main menu.
2. Highlight the System Setup tab and press
SELECT.
3. Highlight the Antenna tab.
4. Highlight the Current Settings button and press
SELECT.
The following settings are reported:
Function Possible Settings
Sat Switching Auto / Manual
Current Sat Name of satellite selected for tracking
DewShield* Auto / Off
Beeper On / Off
Receiver Type Primary / Secondary
* DewShield is only available with TracVision R6 systems.
54-0376
9.3
Antenna Controls
Antenna Controls – Current Settings
If you are using the onscreen menu on a
secondary receiver, only “Beeper” and
“Receiver Type” settings are available.
Antenna
Antenna
Diagnostics
Antenna Controls
Modify Settings
Sat Select
Current Settings
Sat Switching: Auto
Current Sat: 101
DewShield: Auto
Beeper: On
Receiver Type: Primary
Page 76

9-2 Turning DewShield On/Off
TracVision R6 Systems Only
The DewShield electronic dew elimination system
(patent pending) keeps the antenna dome clear of dew,
ensuring optimum reception of satellite TV signals
(moisture weakens satellite signals).
Unless conserving vehicle power is a critical concern,
you should leave DewShield set to AUTO. Follow the
steps below if you need to change the current setting.
1. Using your primary receiver, press the MENU
button to access the main menu.
2. Highlight the System Setup tab and press
SELECT.
3. Highlight the Antenna tab.
4. Highlight the Modify Settings button and press
SELECT.
5. If you want to enable DewShield, highlight
DewShield Auto. If you want to turn off
DewShield, highlight DewShield Off. Then press
SELECT.
54-0376
9.4
DIRECTV Mobile Receiver/Controller User’s Guide
Change Settings – DewShield
DewShield is designed to prevent dew
from forming. If DewShield is set to OFF,
and dew has formed on the dome, setting
DewShield back to AUTO will not shed
water. For this reason, KVH recommends
you always keep DewShield set to AUTO.
Antenna
Antenna
Antenna Settings
Current Settings
Model ID : 1
Model : TVR6
Version : 1.4
Tuning Delay : 0
Antenna Capabilities : Multisat
Two-way
Antenna Controls
Cancel
Diagnostics
DewShield Auto
DewShield Off
Beeper On
Beeper Off
Set Primary
Set Secondary
Show Serial #s
Show SW Version
Set to Defaults
Modify Settings
Sat Select
Page 77

9-3 Turning the Beeper On/Off
The mobile receiver beeps to indicate the status of the
antenna.
2 beeps = Antenna is powering on
1 beep = Antenna is powering off
If you prefer, you can silence (turn off) the beeper.
Follow the steps below if you need to turn the beeper
on or off.
1. Press the MENU button to access the main menu.
2. Highlight the System Setup tab and press
SELECT.
3. Highlight the Antenna tab.
4. Highlight the Modify Settings button and press
SELECT.
5. If you want to turn on the beeper, highlight
Beeper On. If you want to turn off the beeper,
highlight Beeper Off. Then press SELECT.
54-0376
9.5
Antenna Controls
Change Settings – Beeper
Antenna
Antenna
Antenna Settings
Current Settings
Model ID : 1
Model : TVR6
Version : 1.4
Tuning Delay : 0
Antenna Capabilities : Multisat
Two-way
Antenna Controls
Cancel
Diagnostics
DewShield Auto
DewShield Off
Beeper On
Beeper Off
Set Primary
Set Secondary
Show Serial #s
Show SW Version
Set to Defaults
Modify Settings
Sat Select
Page 78

9-4 Designating the Receiver as
Primary or Secondary
Each mobile receiver/controller must be designated
as either a primary or a secondary receiver.
Primary Receiver
• Supplies power to the antenna
• Allows you to control the antenna
• Can receive local channels (within your DMA)
• Must be connected directly to the antenna, either
via a single coax cable or a splitter’s “Primary”
jack (see Appendix A for wiring diagrams)
• Only one allowed per system
Secondary Receiver
• Does not power or control the antenna
• Simply receives a TV signal from the antenna
• A system may have one, none, or multiple
secondary receivers
Follow the steps below to designate the receiver as a
primary or secondary receiver.
1. Press the MENU button to access the main menu.
2. Highlight the System Setup tab and press
SELECT.
3. Highlight the Antenna tab.
4. Highlight the Modify Settings button and press
SELECT.
54-0376
9.6
DIRECTV Mobile Receiver/Controller User’s Guide
Change Settings – Receiver Designation
Antenna
Antenna
Antenna Settings
Current Settings
Diagnostics
Model ID : 1
Model : TVR6
Version : 1.4
Tuning Delay : 0
Antenna Capabilities : Multisat
Two-way
Antenna Controls
Cancel
DewShield Auto
DewShield Off
Beeper On
Beeper Off
Set Primary
Set Secondary
Show Serial #s
Show SW Version
Set to Defaults
Modify Settings
Sat Select
Page 79

5. If you want to designate the receiver as the
primary receiver, highlight Set Primary. If you
want to designate the receiver as a secondary
receiver, highlight Set Secondary. Then press
SELECT.
ANTENNA Light on Secondary Receivers
The ANTENNA light on secondary receivers will
remain off at all times. Only the primary receiver can
monitor antenna status.
54-0376
9.7
Antenna Controls
ANTENNA Light on Secondary Receiver
Receivers are set to “Primary” by default at
the factory. Therefore, you will need to set
any additional receivers to “Secondary.”
Always Off
Page 80

9-5 Switching Satellites
If your antenna system is configured for multiple
satellites, you can easily switch between the available
satellites either automatically or manually.
Automatic Switching
When the system is set up for automatic switching,
the antenna automatically switches satellites as you
change channels using the primary receiver’s remote.
Follow the steps below to select automatic switching.
1. Using the primary receiver, press the MENU
button to access the main menu.
2. Highlight the System Setup tab and press
SELECT.
3. Highlight the Antenna tab.
4. Highlight the Sat Select button and press
SELECT.
5. Highlight Auto Switch and press SELECT. Yo u
can now switch satellites simply by changing
channels on the remote control.
54-0376
9.8
DIRECTV Mobile Receiver/Controller User’s Guide
Sat Select – Automatic
Antenna
Antenna
Antenna Controls
Antenna Settings
Current Settings
Diagnostics
Model ID : 1
Model : TVR6
Version : 1.4
Tuning Delay : 0
Antenna Capabilities : Multisat
Two-way
Cancel
Go to Sat 101
Go to Sat 119
Go to Sat 110
Go to Sat 72.5
Auto Switch
Modify Settings
Sat Select
Page 81

Manual Switching
If you prefer, you can switch satellites manually from
the Sat Select menu.
Follow the steps below to manually switch to a
different satellite.
1. Using the primary receiver, press the MENU
button to access the main menu.
2. Highlight the System Setup tab and press
SELECT.
3. Highlight the Antenna tab.
4. Highlight the Sat Select button and press
SELECT.
5. Highlight the Go to Sat selection for the desired
satellite and press SELECT. For example, to switch
to the 119 satellite, highlight Go to Sat 119 and press
SELECT.
The antenna enters Manual mode and begins tracking
the selected satellite.
54-0376
9.9
Antenna Controls
When you manually select a satellite, the
system enters Manual mode. To restore
automatic switching, you need to select
“Auto Switch” from the Sat Select menu.
Sat Select – Manual
Antenna
Antenna
Current Settings
Diagnostics
Model ID : 1
Model : TVR6
Version : 1.4
Tuning Delay : 0
Antenna Capabilities : Multisat
Two-way
Cancel
Go to Sat 101
Go to Sat 119
Go to Sat 110
Go to Sat 72.5
Auto Switch
Modify Settings
Sat Select
Antenna Controls
Antenna Settings
Page 82

9-6 Changing the List of Available
Satellites
If your antenna system supports multiple satellites,
you can choose which satellites will be active for your
system. Follow the steps below to add or remove
satellites from the list of supported satellites.
1. Using your primary receiver, press the MENU
button to access the main menu.
2. Highlight the System Setup tab and press
SELECT.
3. Highlight the Install tab.
4. At the Antenna Setup pane, highlight the Choose
Satellites button and press SELECT.
5. At the pop-up menu, highlight one of the
satellites that you want to add or remove.
6. Press SELECT to add or remove the check mark
next to the satellite’s name. A check mark
indicates that the satellite is included in the list of
available satellites.
7. When you have selected all of the satellites that
you want in the list, highlight the OK button and
press SELECT.
54-0376
9.10
DIRECTV Mobile Receiver/Controller User’s Guide
Antenna Setup
Antenna Setup
Satellite Supported by Antenna
101.0
110.0
119.0
72.5
Page 83

54-0376
10.1
Troubleshooting
10 Troubleshooting
This section identifies basic problems along with their possible causes
and solutions. It also explains what the status lights indicate, how to
view diagnostic information, and how to get technical support.
Contents
10-1 Five Simple Checks . . . . . . . . . . . . . . . . . . . . . . . . . . .10.3
10-2 Troubleshooting Matrix . . . . . . . . . . . . . . . . . . . . . . . .10.4
10-3 Causes and Solutions to Common Problems . . . . . . . .10.5
10-4 System Status Lights . . . . . . . . . . . . . . . . . . . . . . . . .10.10
10-5 Viewing Diagnostics Information . . . . . . . . . . . . . . . .10.12
10-6 Viewing Serial Numbers . . . . . . . . . . . . . . . . . . . . . . .10.13
10-7 Viewing Software Versions . . . . . . . . . . . . . . . . . . . . .10.14
10-8 Technical Support . . . . . . . . . . . . . . . . . . . . . . . . . . . .10.15
Page 84

10-1 Five Simple Checks
If you are experiencing a problem, first check the five
simple things below. If none of these are the problem,
continue troubleshooting using the remainder of this
section as a guide.
Can the antenna see the satellite?
The antenna requires an unobstructed view of the
southern sky to receive satellite TV signals. Common
causes of blockage include trees, buildings, bridges,
or mountains.
Excessive dirt or moisture on the antenna dome?
Dirt buildup or moisture on the dome can reduce
satellite reception. Clean the exterior of the dome
periodically. In addition, if you have a TracVision R6,
keep DewShield set to AUTO to ensure optimum
reception (see Section 9-2 on page 9.4).
Is It Raining Cats and Dogs?
Heavy rain or snow can weaken satellite TV signals.
Reception should improve once the inclement
weather subsides.
Does the TV Display “Please Call Ext. 722”?
If you can only access the preview channels, such as
channel 100, while all other channels show a message
to call Ext. 722, the receiver may have lost its
activation data. To fix this problem, call DIRECTV
customer service at 1-800-DIRECTV (347-3288). Be
sure the antenna is tracking the satellite when you call.
Are the Receiver and TV Connected and Turned On?
Make sure the power switch on the front of the KVH
mobile receiver/controller is turned on (VOLTAGE
light is lit green). Also make sure your TV is turned
on and set up for the satellite input. Finally, check the
connecting cables to ensure none have come loose.
54-0376
Troubleshooting
2
3
4
2
2
1
5
2
4
You can also try resetting the receiver:
1. Stop in a blockage-free area.
2. Turn off the receiver’s power switch (on
the front panel, not on the remote).
3. Wait one minute, then turn the receiver’s
power switch back on.
4. If the TracVision antenna is turned off,
turn it on (press SAT then PWR).
5. Wait one minute for initialization.
10.3
Page 85

DIRECTV Mobile Receiver/Controller User’s Guide
System does not power on
No video on TV screen
Intermittent picture for short intervals
System works at rest, but not on the move
System does not find satellite
System restarts itself
Receiver beeps continuously at startup
Snowy DIRECTV television picture
Picture jumbled or freezing
Remote does not work
Remote does not operate other component
Only Preview channels are accessible
Local channels are not accessible
S
a
te
llite
c
overa
g
e
i
s
s
u
e
Wea
k
s
a
te
llite
s
ig
n
a
l
A
n
te
n
n
a
fa
u
lty
R
e
c
e
i
v
e
r
fa
u
lty
S
a
te
llite
s
ig
n
a
l
blocked
P
O
S
S
IB
L
E
C
AU
S
E
SYMPTOM
R
e
m
o
te
c
o
n
tro
l b
a
tte
rie
s
d
e
a
d
R
e
c
e
i
ve
r locke
d
u
p
R
e
c
e
i
ver powe
r
sw
itc
h
t
u
rn
e
d
o
ff
L
o
o
s
e
c
a
ble
c
o
n
n
e
c
to
rs
R
e
c
e
i
ve
r
n
o
t a
c
ti
v
a
te
d
P
ro
p
e
r c
o
m
p
o
n
e
n
t
bu
tto
n
n
o
t p
re
s
s
e
d
IN
P
U
T
bu
tto
n
n
o
t
s
e
t to
s
a
t
e
llite
s
o
u
rc
e
S
y
s
te
m
lo
cke
d
b
y
p
a
s
s
c
o
d
e
R
e
m
o
te
c
o
n
tro
l n
o
t p
ro
gr
a
m
m
e
d
B
l
ow
n
f
u
s
e
XX X X X X
X X
XXXX XX
X
X
XXX XX
X
X
X
X
XX
X
X
X
X
X
X
XX X
X
XX X X
X
X
X
XX
X
A
u
d
io
/v
id
e
o
s
y
s
te
m
no
t
s
e
t
u
p
p
ro
p
e
rly
P
ro
gram
G
uid
e
lo
a
d
i
n
ter
ru
p
te
d
R
F
c
o
n
ver
te
r too
c
lo
se
to
re
c
e
i
ve
r
X
X
A
u
d
io
/vid
e
o
s
y
s
te
m
fa
u
lty
X
X
X
X
X
X
R
e
c
e
i
v
e
r lo
s
t a
c
ti
vatio
n
i
n
for
m
a
tio
n
X
In
s
u
ffic
ie
n
t p
owe
r
X
X
X
X
X
X
Fa
v
o
rite
c
h
a
n
n
e
l li
s
t a
c
ti
v
e
X
O
u
ts
id
e
D
e
s
ig
n
a
te
d
M
a
rk
e
t A
re
a
(D
M
A
)
X
X
X
X
X
X
X
X
S
y
s
t
e
m
n
o
t
s
e
t
u
p
f
o
r
a
l
l
s
a
t
e
l
l
i
t
e
s
X
X
X
Some channels are not accessible
Audio is noisy
G
ro
u
n
d
lo
o
p
g
e
n
e
r
a
ti
n
g e
le
c
t
rica
l
n
o
ise
XX
X
10-2 Troubleshooting Matrix
54-0376
10.4
Page 86

Blown Fuse
The rear panel of the receiver includes a fast-blow
fuse rated for 8 amps. If this fuse has blown, the
system will not operate.
Unscrew the cap and replace
the fuse. If you replace the
fuse, but it blows again,
check the receiver to ensure
that it is clear of debris and
the connectors are tight. Do
not replace the fuse with a
larger amperage fuse.
Insufficient Power
With the vehicle/vessel powered up and the receiver
turned on, power at the receiver must measure at
least 10 VDC (supporting 60 watts) for the TracVision
system to work properly. Check the receiver’s power
connection and ensure that it is wired to a dedicated
circuit. If other devices are wired to the same circuit,
these additional loads might drain power away from
the receiver.
54-0376
Troubleshooting
10.5
10-3 Causes and Solutions to Common
Problems
There are a number of common issues that can affect
the signal reception quality or the operation of the
TracVision system. The following sections identify
these issues and provide potential solutions.
Receiver Power Switch Turned Off
Your mobile receiver’s power switch (see below)
must remain on for the system to work. If the system
is entirely non-functional, check the switch to ensure
that it is turned on. The VOLTAGE status light
illuminates green when turned on.
Power Switch
,
Fuse
POWER (10-16V DC)
USB
FUSE (8A)
MAINTENANCE PORTS
RS232
Page 87

54-0376
10.6
DIRECTV Mobile Receiver/Controller User’s Guide
Loose Cable Connectors
A loose connector can reduce the signal quality.
Check the cable connections at the antenna unit,
receiver, RF converter, audio/video components, and
other equipment to ensure they are securely attached.
Satellite Signal Blocked
Satellite signals can be blocked or degraded by tall or
solid stuctures such as trees, buildings, mountains, or
bridges. Simply moving to clear an obstruction will
restore signal quality. Rain clouds, heavy rain, and
snow can also affect satellite signal reception. For
more details about satellite blockage, see Section 1-3,
“Receiving Satellite TV Signals,” on page 1.5.
In addition, dirt, snow, ice, or heavy moisture on the
antenna dome can disrupt satellite signals, so be sure
to clean the antenna periodically.
Satellite Coverage Issue
TracVision will provide good satellite TV reception
throughout the entire satellite coverage area.
However, signal quality can be degraded as you
approach the fringe of this area. To view the most up-to-
date coverage maps, visit KVH’s website at www.kvh.com/
footprint. For more details about satellite coverage, see
Section 1-3, “Receiving Satellite TV Signals,” on page 1.5.
Weak Satellite Signal
Just like radio stations, some satellite TV channels
transmit a stronger signal than others. If you’re
unable to receive a clear signal on one channel, try
switching to another channel. Weaker channels are
more vulnerable to interference, such as rain or snow.
Receiver Not Activated
If you can only access the DIRECTV preview
channels, such as channel 100, while all other
channels show a message to call DIRECTV, your
receiver has not been activated. To activate your
system, please call KVH’s Activation Department at
1-866-551-8004. Activation support is available
24 hours a day, seven days a week.
Page 88

54-0376
Troubleshooting
Receiver Lost Activation Information
If you can only access the DIRECTV preview
channels, such as channel 100, while all other
channels show a message to call Ext. 722, and you
have already activated the receiver, the receiver may
have lost its stored activation data. This may occur if
the receiver is left idle (does not receive a satellite
signal) for an extended period of time. To fix this
problem, please call DIRECTV customer service at
1-800-DIRECTV (347-3288). You will need to provide
your phone number. Be sure the TracVision system is
turned on, has a clear view of the sky, and is tuned to the
DIRECTV preview channel before you call. The system
will receive a signal from the satellite to fix the problem.
Proper Component Button Not Pressed
To operate the satellite TV system using the remote
control, first press the remote control’s SAT button.
The remote control will not operate the receiver
unless the SAT button is active. To operate a
component other than the satellite receiver, first press
the corresponding component button on the remote
control. For example, to operate the TV monitor using
the remote control, first press the TV button.
INPUT Button Not Set to Satellite Source
If satellite programming is not displayed on your TV,
you may have selected an alternate video input. Press
the remote control’s TV button. Then press the
remote’s INPUT button until the correct satellite input
is displayed.
Audio/Video System Not Set Up Properly
If satellite programming is not displayed on your TV,
you may have the wrong input selected on your
audio/video system. Try switching to another input
(for example, VIDEO 1 or VIDEO 2; AUX1, AUX2, or
A/V) whichever input is assigned to the mobile
receiver. In addition, ensure that the audio/video
system is powered on.
System Locked by Passcode
If you can only access Family list channels, and the
lock icon ( ) appears under the date/time, the
system has been locked with a passcode. For details
on unlocking the system, see Section 7-1, “Locking &
Unlocking the System,” on page 7.3. If no channels are
assigned to the Family list, no channels can be viewed
without first unlocking the system
10.7
Page 89

54-0376
10.8
DIRECTV Mobile Receiver/Controller User’s Guide
Favorite Channel List Active
If a favorite channel list is active, only channels set up
in that list are accessible. Press the remote control’s
FAV button to cycle through the lists. See Section 6-1,
“Using Favorite Channel Lists,” on page 6.3 for details.
Remote Control Not Programmed
If you cannot operate a component with the remote
control, first ensure that the associated component
button (DVD, VCR, AUX, or TV) is selected. If the
correct button is selected, you need to program the
remote control to operate the component. See
Section 3-2, “Programming the Remote Control to Operate
Other Components,” on page 3.9 for details.
Program Guide Load Interrupted
If the program guide load is interrupted at startup,
certain channels may not be available temporarily.
Guide load interruptions could occur as a result of
satellite blockage (see “Satellite Signal Blocked” on
page 10.6). The missing channels will eventually be
restored as the receiver completes the program guide
download during normal operation.
Receiver Locked Up
Since your mobile receiver is a computing
component, it is susceptible to erratic changes in
power and/or signal, like any computer, and these
sudden changes can cause it to become “confused.”
To clear this condition, try pressing the remote
control’s SAT button before trying to control the
receiver. If that doesn’t work, turn off vehicle/vessel
power or the receiver’s power switch for 30 seconds,
then turn it back on.
Outside Designated Market Area (DMA)
Local channels are available only within the
Designated Market Area (DMA) used on your
account. The antenna cannot receive local channels if
you travel outside of your DMA.
System Not Set Up for All Satellites
If your antenna system supports multiple satellites,
you can choose to omit certain satellites from the
system’s list of available satellites. If you do so, you
will not be able to access channels that are carried on
those omitted satellites. For details, see Section 9-6,
“Changing the List of Available Satellites” on page 9.10.
Page 90

Ground Loop Generating Electrical Noise
The system’s audio cables might pick up the electrical
noise or hum caused by a ground loop on the
vehicle/vessel. To eliminate this noise, install a
ground loop isolator in-line between the receiver’s
“Audio” jacks and your TV’s audio input. (use Radio
Shack model 270-054 or equivalent)
Audio/Video System Faulty
If there is no picture on your TV, your mobile
audio/video system may be faulty. Please seek
technical assistance from either the installer of your
audio/video system or a dealer authorized by the
system’s manufacturer to repair the system.
Antenna or Receiver Faulty
In the case of a faulty antenna or receiver, please seek
technical support as described in Section 10-8,
“Technical Support” on page 10.15.
Do NOT attempt repairs yourself. Refer all
servicing needs to qualified service
personnel. Evidence of tampering or
unauthorized repairs will void the warranty.
54-0376
10.9
Troubleshooting
RF Converter Too Close to Receiver
The RF converter must be placed at least three feet
away from the receiver. Placing the RF converter
closer to the receiver may result in interference,
causing the remote control to operate intermittently
or not at all. Also make sure the RF converter is not
located behind a metal structure.
Remote Control Batteries Dead
Replace the two AAA batteries as shown below,
observing the correct polarity.
Remote Control Batteries
If you lose your remote control, please call
or visit your local KVH authorized dealer to
order a replacement.
Page 91

54-0376
10.10
10-4 System Status Lights
Three status lights on the front of the mobile receiver
indicate the current status of the system and can help
you identify problems.
During normal operation, all three status lights
should be lit green. The following tables explain what
the different light conditions indicate.
DIRECTV Mobile Receiver/Controller User’s Guide
System Status Lights
Light is... Indicates Description
Off Off Receiver is OFF (power switch is off) or no power input
Green OK Good power (between 10-16 VDC at receiver)
Green, flashing Cable Open Open detected in antenna cable (check antenna coax connection)
Orange Low Power Low power (between 8-10 VDC at receiver)
Red, flashing Bad Power Insufficient power (less than 8 VDC or more than 16 VDC input)
VOLTAGE Light Indications
If multiple receivers are connected, the
ANTENNA light on secondary receivers will
remain off at all times. Only the primary
receiver can monitor antenna status.
Page 92

54-0376
10.11
Troubleshooting
Light is... Indicates Description
Off Off
Antenna is OFF or disconnected, bad power, receiver in Standby,
or receiver set to Secondary
Green Tracking Antenna is tracking the DIRECTV satellite
Green, flashing Searching Antenna is searching for a satellite
Orange, flashing* Overload Overload or short circuit detected on the antenna cable
Red No Comm Receiver cannot communicate with the antenna
Red, flashing Fault Error detected in antenna
ANTENNA Light Indications
Light is... Indicates Description
Off Off Receiver is OFF (power switch is off)
Green OK Receiver is ON
Orange Standby Receiver is ON but antenna is turned OFF
Orange, flashing* Overload Overload or short circuit detected on the antenna cable
Red Fault Internal power fault
RECEIVER Light Indications
* The RECEIVER and ANTENNA lights both flash orange if an overload or short circuit is detected.
Page 93

10-5 Viewing Diagnostic Information
Follow the steps below to view diagnostics
information on the receiver.
1. Using your primary receiver, press the MENU
button to access the main menu.
2. Highlight the System Setup tab and press
SELECT.
3. Highlight the Antenna tab.
4. Highlight the Diagnostics button and press
SELECT.
Component Possible States
Receiver State OK / Error
Antenna State Idle / Initializing / Searching / Tracking /
Error
Current Sat Name of satellite the antenna is tracking
RF OK / Low / Error; Actual RF level
Available Sats List of installed satellites / Error
Component Possible States
GPS Position Current position in latitude/longitude /
Acquiring / Error
Cable OK / Shorted / Open
System DC OK / Low / Bad; Actual VDC at receiver
Antenna DC OK / Error; Actual VDC at antenna
Gyro OK / Error
10.12
DIRECTV Mobile Receiver/Controller User’s Guide
Diagnostics
If the receiver reports an error, please contact
Technical Support for assistance. See Section 10-8,
“Technical Support” on page 10.15.
54-0376
Antenna
Antenna
Current Settings
Receiver State: OK
Antenna State: Tracking
Current Sat: 101
RF: OK; 95
Available Sats: 101, 119
GPS Position: 42.1N 72.3W
Cable: OK
System DC: OK; 11.5
Antenna DC: OK; 30.2
Gyro: OK
If errors, call KVH: 401-847-3327
Antenna Controls
Diagnostics
Modify Settings
Sat Select
Page 94

10-6 Viewing Serial Numbers
Follow the steps below to view the system serial
numbers.
1. Using your primary receiver, press the MENU
button to access the main menu.
2. Highlight the System Setup tab and press
SELECT.
3. Highlight the Antenna tab.
4. Highlight the Modify Settings button and press
SELECT.
5. Highlight Show Serial #s and press SELECT.
The receiver and antenna serial numbers appear on
the screen.
54-0376
10.13
Troubleshooting
Change Settings – Show Serial #s
If you use this function on a secondary
receiver, only the receiver serial number will
appear on the screen.
Antenna
Antenna
Antenna
Antenna
Antenna Settings
Current Settings
Model ID : 1
Model : TVR6
Version : 1.4
Tuning Delay : 0
Antenna Capabilities : Multisat
Two-way
Current Settings
TracVision Receiver Ser #: 123456789
TracVision Antenna Ser #: 123456789
Antenna Controls
Cancel
Diagnostics
DewShield Auto
DewShield Off
Beeper On
Beeper Off
Set Primary
Set Secondary
Show Serial #s
Show SW Version
Set to Defaults
Antenna Controls
Diagnostics
Modify Settings
Sat Select
Modify Settings
Sat Select
Page 95

10-7 Viewing Software Versions
Follow the steps below to view the system software
versions.
1. Using your primary receiver, press the MENU
button to access the main menu.
2. Highlight the System Setup tab and press
SELECT.
3. Highlight the Antenna tab.
4. Highlight the Modify Settings button and press
SELECT.
5. Highlight Show SW Version and press SELECT.
The TracVision software versions appear on the
screen.
54-0376
10.14
DIRECTV Mobile Receiver/Controller User’s Guide
Change Settings – Show Software Versions
Antenna
Antenna
Antenna
Antenna
Antenna Settings
Current Settings
Model ID : 1
Model : TVR6
Version : 1.4
Tuning Delay : 0
Antenna Capabilities : Multisat
Two-way
Current Settings
TracVision Software Versions:
Receiver SW Version: DELUXE3 (Revision 4)
Version 0.13 (Dec 21 2005 14:46:50)
Antenna SW Version: 1.4; 1.0; 1.1
Antenna Controls
Cancel
Diagnostics
DewShield Auto
DewShield Off
Beeper On
Beeper Off
Set Primary
Set Secondary
Show Serial #s
Show SW Version
Set to Defaults
Antenna Controls
Diagnostics
Modify Settings
Sat Select
Modify Settings
Sat Select
Page 96

10-8 Technical Support
The TracVision antenna and mobile receiver/
controller are sophisticated electronic devices; only
KVH-authorized technicians have the tools and
expertise necessary to diagnose and repair a system
fault. Therefore, if you experience any operating
problem or require technical assistance, please call or
visit your local authorized TracVision dealer. You can
find an authorized technician near you by visiting
our website at www.kvh.com/wheretogetservice.
If you need help finding an authorized technician,
please contact KVH Technical Support:
Phone: 401-847-3327
E-mail: techs@kvh.com
Please have your antenna and receiver/controller
serial numbers ready before calling technical support.
The serial numbers are located on the red Activation
Card. You can also find the serial numbers from the
primary receiver’s onscreen menu (see Section 10-6,
“Viewing Serial Numbers” on page 10.13).
54-0376
10.15
Troubleshooting
Page 97

54-0376
A.1
Appendices
Appendices
This section provides wiring diagrams and notes for typical
TracVision configurations and maps showing the DIRECTV
®
satellites’ elevation angles off the horizon.
Contents
A System Wiring Diagrams . . . . . . . . . . . . . . . . . . . . . . . .A.3
B Elevation Maps . . . . . . . . . . . . . . . . . . . . . . . . . . . . . . .A.23
Page 98

54-0376
System Wiring Diagrams
Appendix A
System Wiring Diagrams
The diagrams on the following pages show how to
wire the system for various configurations:
Original KVH mobile receiver/controller* AND: Requires Part #: Page:
No additional receivers N/A A.4
One (1) additional mobile receiver/controller 72-0177 A.6
Two (2) additional mobile receiver/controllers 72-0177 (x2)A.8
One (1) standard-def home receiver** 72-0177 & 19-0347 A.10
Two (2) standard-def home receivers** 72-0177 & 19-0410 A.12
One (1) additional mobile receiver/controller and one (1) standard-def home receiver** 72-0177 (x2) & 19-0347 A.14
One (1) standard-def digital video recorder (DVR)** 72-0177 & 19-0410 A.16
One (1) standard-def home receiver and one (1) standard-def DVR** 72-0177, 19-0410, & 19-0123 A.18
One (1) additional mobile receiver/controller and one (1) standard-def DVR** 72-0177 (x2) & 19-0410 A.20
* The original mobile receiver/controller, bundled with the TracVision system, is required in all configurations. It supplies power to the antenna.
** The KVH mobile receiver/controller is a standard-definition unit, not a high-definition (HD) unit, so the system cannot recognize high-definition
(HD) channels. If you wish to use a home receiver or DVR with the system, be sure to use a standard-definition (non-HD) model.
Before making any wiring changes, be sure to
turn off vehicle/vessel power.
A.3
If your desired configuration is not shown here,
please call KVH Technical Support at 401-847-3327
for assistance.
Page 99

54-0376
A.4
DIRECTV Mobile Receiver/Controller User’s Guide
Wiring Diagram for a Single Mobile Receiver/Controller
KVH Mobile Receiver/Controller
To Antenna
Black
Red
Ground
DC Power
Input Power
(10-16 VDC)
To Video
(Option 2)
To Video
(Option 1)
Tested to comply
with FCC Standards
VIDEO AUDIO L AUDIO R
S-VIDEO
To Audio
(Option 1)
RF
REMOTE
INPUT
CAUTION
This device complies with Part 15 of the FCC rules. Operation is subject
to the following two conditions: (1) This device must not cause harmful
interference, and (2) This device must accept any interference received,
including interference that may cause undesired operation.
DIGITAL
TO
AUDIO
110W/HD
OUT
CONVERTER
To Audio
(Option 2)
TO KVH
ANTENNA
POWER (10-16V DC)
MAINTENANCE PORTS
USB
RF Converter
FUSE (8A)
RS232
Service/
Maintenance
Only
Page 100

Single Mobile Receiver/Controller
Audio/Video Connections
• To connect the receiver/controller to the TV’s
video input, you can choose either of the
following options:
Option 1 - RCA-type jack
Option 2 - S-Video jack
• To connect the receiver/controller to the TV’s
audio input, you can choose either of the
following options:
Option 1 - RCA-type jacks
Option 2 - Digital audio jack
• Standard audio/video cables with RCA-type
connectors are included with the receiver/
controller.
• If the TV has only a coaxial input, you will need
to use an RF modulator to convert the RCA-type
input to a coaxial output. (use Radio Shack model
15-2526 or equivalent)
Power
• The receiver/controller requires a 10-16 volts DC
(VDC) power input supporting 60 watts.
• If vehicle/vessel power fluctuates or is noisy,
KVH recommends that you use an AC/DC
power supply to connect power to the
receiver/controller.
RF Converter
• The RF converter should be placed at least 3 feet
away from the receiver/controller. If it is too close
to the receiver/controller, the remote control
might not operate properly.
• Avoid placing the RF converter behind a metal
surface or in an area surrounded by metal.
54-0376
A.5
System Wiring Diagrams
 Loading...