

Page 1
OWNER’S MANUAL
AND
INSTALLATION GUIDE
MS1500
MARINE HIGH POWER AM/FM STEREO RADIO WITH
Visit us at www.asaelectronics.com to see our full line of mobile audio and video products.
MADE IN CHINA
C O M PACT DISC PLAYER, CDC SHUTTLE CONTROLS,
AND WIRED REMOTE CAPA B I L I T Y
Page 2
I N S T A L L A T I O N
Preparation
Please read entire manual before installation.
Before You Start
1.Disconnect negative battery terminal.
(consult a qualified technician for instructions)
2.Avoid installing the unit where it would be subject to high temperatures,
such as from direct sunlight, or where it would be subject to dust, dirt or excessive vibration.
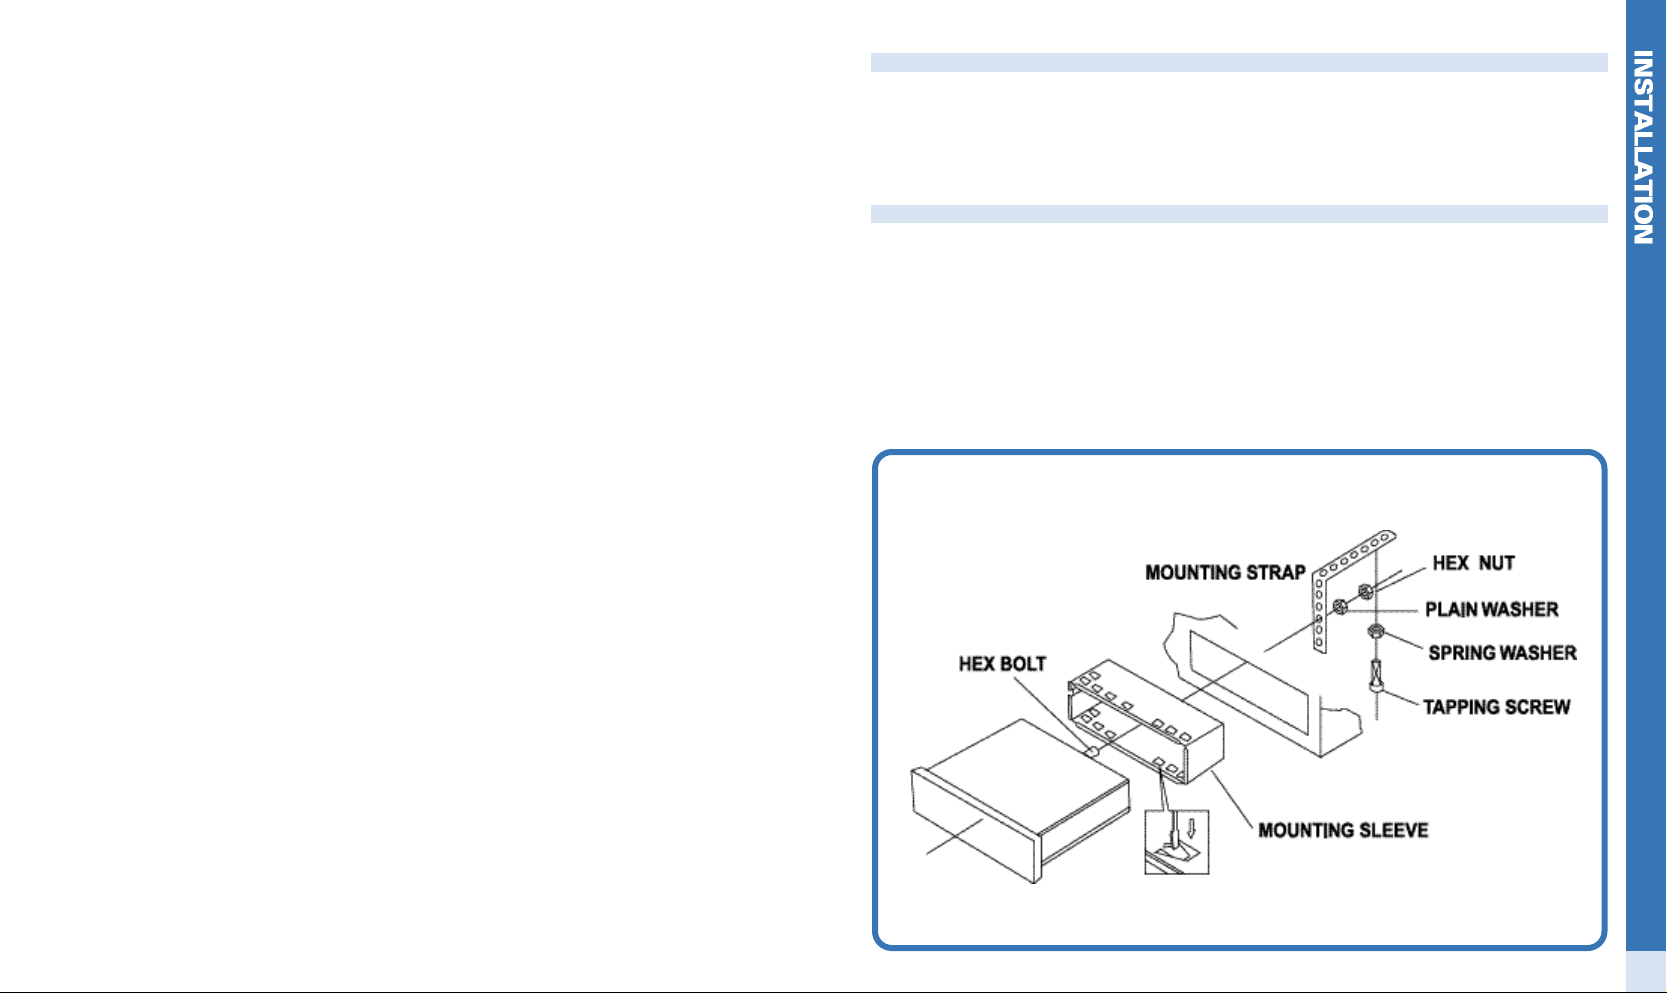
Getting Started
1.Remove 2 transit screws located on top of the unit.
2.Insert the supplied keys into the slots as shown, and slide the unit out of the mounting sleeve.
3.Install mounting sleeve into dash opening, bending tabs to secure.
4.Some vehicles may require an installation kit and/or wiring harness adapter.(sold separately)
5.Ensure that the MS1500 is installed horizontally.
6.Attach speaker and power wires to the mating harness pigtails supplied with the MS1500.
7.Carefully double check the wiring, then plug the pigtails into the radio harness, and the
harness into the rear of the radio. Plug the antenna into the antenna connector.
8.Test for correct operation, then slide the MS1500 fully into the mounting sleeve.
1
Page 3

Page 4

BASIC OPERATION
Power (PWR) ❷
Press PWR or any other button (except EJECT) to turn the unit on. Inserting a CD will turn
the unit on automatically. Press PWR to turn the unit off.
LCD Panel ❺
The Liquid Crystal Display (LCD) panel displays the frequency and all activated functions.
Note: LCD panels may take longer to illuminate when subjected to cold temperatures
for an extended period of time. In addition, the visibility of the numbers on the LCD
may decrease slightly. The LCD display will return to normal when
temperature increases to a normal range.
Mode (MODE) ❹
Press MODE(Radio/CD Play/CD Changer/Aux) to select a different mode of operation as
indicated on the display panel. During CD player operation, pressing MODE will change to
radio mode without ejecting the disc. The CDP indication will remain in the display to show
that a disc is still loaded in the unit. Press MODE again to return to other mode.
Note:The MS1500 is equipped with auxiliary audio input cables enabling you to
connect a pre-amp level external audio source directly to the head unit. This allows
you to listen to an auxiliary audio source on the vehicle speakers.
Loudness (LOUD)
When listening to music at low volume levels, this feature will boost the bass and treble ranges:
1.Press and hold BAND/LOUD for more than two seconds to activate. The unit will beep when
this feature is activated, and "LOUD ON" will appear in the display for five seconds.
"LOUD" will appear at the top of the display while this feature is activated.
2.Press and hold BAND/LOUD for more than two seconds to deactivate. The unit will beep
when this feature is activated, and "LOUD OFF" will appear in the display for five seconds.
"LOUD" will no longer appear at the top of the display.
Volume ❸
The volume buttons (up and down arrows) increase and decrease the volume level of the unit.
To increase volume one level, press the up arrow (!). The volume will increase, and the level
(VOL 00 to VOL 100) will appear in the display for five seconds or until another function is
activated. To increase the volume rapidly, press and hold the up arrow until the desired volume
level is reached.
To decrease volume one level, press the down arrow ("). The volume will decrease, and the
level (VOL 00 to VOL 100) will appear in the display for five seconds or until another function is
activated. To decrease the volume rapidly, press and hold the down arrow until the desired
volume level is reached.
Mute ❾
Press MUTE to silence the audio volume from the system. "MUTE" will flash in the display for
five seconds. To restore sound, press MUTE again or activate any other function of the unit.
When the mute feature is deactivated, the audio volume will return to the level setting in use
before the mute feature was activated.
4
Equalizer Selector (EQ ) ❻
Press E Q to apply sound effects to the unit's audio output signal. When activated, the EQ
function will access one of the following modes: CLASSICS, POP M, or ROCK M. FLAT
indicates no equalizer enhancements of the program, thereby removing the preset sound
effects. DSP OFF inhibits selection of equalizer mode enhancement.
Reset Button
The reset button is located on the front of the radio between MUTE and AS/PS.
Reset should only be activated under the following circumstances:
1.Upon initial installation after all wiring is completed.
2.Upon malfunction of any switches on the unit.
Use a pencil (or other non-metallic object) to press the reset button, which will clear the
system and restore normal operation.
Adjust Sound ❿
Press SEL to to step through the menu of audio functions. The first option is volume (VOL),
followed by bass (BAS), treble (TRB), balance (BAL), fader (FAD), and back to volume (VOL).
VOL BASS TRE BAL FAD
Bass
1.Press SEL twice until "BAS" appears in the display.
2.Press the volume buttons up or down to adjust Bass from -10 to +10. "BAS 00" represents flat
response.
The bass level will be shown on the display for five seconds or until another function is
a c t i v a t e d .
Treble
1.Press SEL three times until "TRB" appears in the display.
2.Press the volume buttons up or down to adjust Treble from -10 to +10. "TRB 00" represents
flat response.
The treble level will be shown on the display for five seconds or until another function is activated.
Balance
1.Press SEL four times until "BAL" appears in the display.
2.Press volume buttons up (right) or down (left) to adjust Balance between the right and
leftspeakers from BAL 10R to BAL 10L. "BALL=R" represents an equal balance level between
the right and left speakers.
The balance position will be shown on the display for five seconds or until another function
isactivated.
Fader
1.Press SEL five times until "FAD" appears in the display.
2.Press volume buttons up (front) or down (rear) to adjust Fader between the front and rear
speakers from FAD 10F to FAD 10R. "FAD F=R" represents an equal balance between the
front and rear speakers.
5
Page 5

RADIO OPERATION
Seek Tuning ❶
Press the up or down tuning button momentarily to seek the next strong station in the current
band.
Manual Tuning ❶
1.Press the up or down tuning buttons for more than two seconds to select manual tuning mode.
"MANUAL" will appear momentarily on the display.
2.Press the up or down tuning buttons momentarily to move radio frequency up or down one
step at a time.
3.Press and hold the up or down tuning buttons to quickly advance to a certain frequency.
Release when the desired frequency is reached. If manual tuning is not adjusted for five
seconds, the unit will return to Seek tuning mode. "AUTO" will appear momentarily
on the display.
Band
Press BAND to change during radio play to switch between three FM bands and one AM band.
"F1", "F2", "F3", or "AM" will appear in the display momentarily to indicate which band is
currently selected.
Frequency Spacing
U.S. frequency spacing is the default, and a switch on the bottom of the chassis allows a change
to European spacing. Slide the switch to the desired setting using a small screwdriver blade,
then press RESET to activate the change.
Store and Recall a Station
Up to 24 stations (six on each band) can be stored as presets.
This radio contains special circuitry which does not require a voltage source connected to the
radio to maintain memories.
1.To store a station, select the desired band and station.
2 Press and hold the desired preset button (one through six) for more than two seconds. When
stored, the unit will beep, and the preset number will appear in the display. The station is now
stored and can be re-called at any time by momentarly pressing the corresponding preset button.
3.Repeat for the remaining five presets on the current band and for all presets on the other bands.
Automatically Store Stations
Select six strong stations and store them in the current band using the Automatic Store (AS)
feature. To enable this feature,
press and hold AS/PS for more than two seconds. The radio will automatically scan the band in
use and enter strong stations into the preset memory positions for that band. The new stations
replace stations already stored in that band.
Preset Scan ❼
Press AS/PS momentarily to scan the six preset stations in the current band. The unit will stop
at each station for 10 seconds before continuing to the next station. The frequency will flash on
the display during preset scan. Press AS/PS momentarily again to stop scanning and listen to
the current station.
6
7
Page 6

CD PLAYER OPERATION
Insert CD
With the label surface facing up, gently insert the disc into the slot until the soft-loading
mechanism engages and disc play begins. "S-CDP" will appear in the display momentarily, and
the CD icon will become animated. "CDP" will appear in the display momentarily with the track
number and elapsed time.
Note: The unit is designed for play of standard 5" (12 cm.) compact discs only. Do not
attempt to use 3" (8 cm.) CD singles in this unit, either with or without an adaptor, as
damage to the player and/or the disc may occur. Such damage will not be covered by the
warranty on this product.
Eject CD ❽
Press the eject button to stop CD play and eject the disc. The unit will change to radio operation.
If the disc is not removed from the unit within 15 seconds, the disc will be reloaded and "SCDP"
will reappear in the display.
Track Select ❶
Track select features are used to quickly access the beginning of a particular track. Press the up
or down tuning button to move forward (up tuning bottom) or backward (down tuning button) on
the disc to locate the desired track. Track numbers will appear
in the display as they are accessed.
Fast Forward and Fast Reverse ❶
Press and hold the up or down tuning buttons to fast forward or fast reverse a track. During
either function, the elapsed time will appear on the display. Release the button to resume
CD play.
Pause
Press PAUSE to freeze disc play. "S--PAUSE" will appear in the display for five seconds. Press
PAUSE again to resume disc play.
Scan
During disc play, press SCN to play the first 10 seconds to each track on the disc. When the
desired track is reached, press SCN again to end the scan function and play the selected track.
The scan function will also be canceled by activating the repeat or shuffle functions.
Repeat (RPT)
Press RPT during disc play to continuously repeat the selected track. "S--RPT" will appear in the
display for five seconds. Press RPT again to stop repeating, and regular play will resume. The
repeat function will also be canceled by activating the scan or shuffle functions.
Shuffle (SHF)
Press SHF during disc play to play all tracks on a CD in random, shuffled order. "S--SHF" will in
the display for five seconds. Press SHF again to stop random play, and regular play will resume.
The shuffle function will also be canceled by activating the scan or repeat functions.
CD CHANGER OPERATION FOR OPTIONAL ACC56M CHANGER
TRACK UP/DOWN ❶
The Track Select function is used to quickly access the beginning of a particular track. Press
Track Up or Track Down to locate the desired track as shown by the track number indication on
the LCD panel.
TRACK SEARCH ❶
High-speed audible search to any section of the disc can be made by the search functions.
Press and hold the button to advance quickly in the forward direction or press and hold the
button to advance rapidly in the backward direction. During search operation, the rotation disc
symbol will turn faster and the appropriate symbol or will flash on the LCD panel. When the
Track Up is held and end of the last track is reached, or the Track Down is held and the unit
reaches the beginning of the first track on the disc, the unit will enter the Pause mode until the
button is released.
DISC UP/DOWN BUTTON
Press the DISC select button to select the desired disc for play as shown on the LCD panel. The
unit will automatically load the selected disc and begin play. To advance to a higher number
disc, press the Preset #6 (Disc Up) button. To return to a lower number, press the Preset #5
(Disc Down).
TRACK/DISC SCAN (SCN)
When the Preset #2(Scan) button is pressed, the indication SCN will appear on the LCD panel
and the first 10 seconds of each track on the disc will be played in order. When a desired track
is reached, press the Preset #2(Scan) button again and play of that track will continue (SCN will
disappear from the display). Scan mode will be cancelled by activating any other function
(Repeat, Shuffle, Disc Up/Down, Track Up/Down, or Track Search).
When the Preset #2(Scan) button is pressed and held for longer than 2 seconds, the SCN and
DISC indications will appear on the LCD panel and the first 10 seconds of the first track of each
disc in the magazine will be played. When a desired disc is reached, press the Preset #2(Scan)
button again and play of that disc will continue (SCN and DISC will disappear from the display).
Disc Scan mode will also be cancelled by activating any other function (Repeat, Shuffle, Disc
Up/Down, Track Up/Down, or Track Search).
TRACK/DISC REPEAT (RPT)
When the Preset #3(Repeat) button is pressed, the indication RPT will appear on the LCD panel
and play of the selected track will be continuously repeated until the Repeat mode is cancelled
by pressing the Preset #3(Repeat) button again or by activating the Scan or Shuffle functions.
When the Preset #3(Repeat) button is pressed and held longer than 2 seconds, the RPT and
DISC indications will appear on the LCD panel and play of the selected disc will be continually
repeated until the Disc Repeat mode is cancelled by pressing the Preset #3(Repeat) button
again or by activating the Scan or Shuffle functions.
TRACK/DISC SHUFFLE (SHF)
When the Preset #4(Shuffle) button is pressed, the indication SHF will appear on the LCD panel
and the tracks on the disc will be played in a random, shuffled order. The Track Skip 5 f u n c t i o n
will also select tracks in the shuffled order instead of the normal progression. The Track
8
9
Page 7

Shuffle mode can be cancelled by pressing the Preset #4(Shuffle) button again, or by activating
the Scan or Repeat functions. When the Preset #4(Shuffle) button is pressed and held longer
than 2 seconds, the SHF and DISC indications will appear on the LCD panel and the discs in the
magazine will be played in a random shuffled order, as well as the tracks on each disc. When all
the tracks on the selected disc have been played, the next disc will be selected in shuffled order
and its tracks will be played in shuffled order. The Disc Shuffle mode can be cancelled by
pressing the Preset #4(Shuffle) button again, or by activating the Scan or Repeat functions.
INSTALLATION OF THE OPTIONAL ACC56M CD CHANGER
1 0
NOTE:
Contact your marine dealer or ASA Electronics (www.asaelectronics.com) to obtain the ACC56M CD
C h a n g e r .
1 1
Page 8

CD PLAYER TROUBLESHOOTING
Problem
Does not operate
Possible Cause
No power to yellow or red wire; Inline fuse
b l o w n
Corrective Action
Check connection with test light; check vehicle
fuse with test light; Replace fuse
WIRED REMOTE CONTROL (REMMS1500 OPTION)
Mounting Remote
The REMMS1500 comes with an aluminum mounting bracket that has 4 (four)notches cut
into it so the bracket can be broken away for different mounting depths.
No power to unit
Speakers not operating
Not all speakers
o p e r a t e
Blows fuses
CD skips too much
ERROR 1
ERROR 2
Inline fuse blown
Speaker harness not connected
Incorrect splices or connections; Speaker wires
shorting to chassis ground or to each other
Power wire shorting to ground; Speaker wires
shorting to ground; Incorrect/too small a fuse
Receiver mount is not solid or backstrap is not
s e c u r e
The disc is not loading or ejecting properly
An error in the laser reading the disc Ejec
the disc,
Visit www.asaelectronics.com for technical assistance
Replace fuse
Connect speaker harness; check speaker wires
Check all splices and connections; check splices
and insulate all bare wires
Make sure wire is not pinched; Install fuse of
correct rating
Check mounting and backstrap, and tighten if
i n e e d e d
Reload or press the Eject button; check the
condition of the disk or try another disk
Make sure it is clean, undamaged, and loaded
correctly; reload and check or try another disc
Remote Operation
The REMMS1500 operation is the same as functions on the front panel of the MS1500
head unit.
See Pages 3-8 for detailed operation descriptions.
Volume Down
❸ Volume Up
❷ Power
Tune/Track Up
❶ Tune/track Down
❹ Mode
Band
1 2
1 3
Page 9

S P E C I F I C A T I O N S
CD / CD CHANGER
Signal-to-noise ⋯⋯⋯⋯⋯⋯⋯⋯⋯⋯⋯⋯⋯⋯⋯⋯⋯⋯⋯⋯⋯⋯⋯⋯⋯⋯⋯⋯⋯⋯⋯⋯>86dB
Frequency response⋯⋯⋯⋯⋯⋯⋯⋯⋯⋯⋯⋯⋯⋯⋯⋯⋯⋯⋯⋯⋯⋯⋯⋯20Hz-20kHz, ±3dB
Channel separation @ 1kHz ⋯⋯⋯⋯⋯⋯⋯⋯⋯⋯⋯⋯⋯⋯⋯⋯⋯⋯⋯⋯⋯⋯⋯⋯⋯⋯>65dB
D/A converter⋯⋯⋯⋯⋯⋯⋯⋯⋯⋯⋯⋯⋯⋯⋯⋯⋯⋯⋯⋯⋯⋯⋯⋯⋯⋯⋯⋯⋯⋯⋯⋯1 Bit/CH
FM Tuner
Tuning range ⋯⋯⋯⋯⋯⋯⋯⋯⋯⋯⋯⋯⋯⋯⋯⋯⋯⋯⋯⋯⋯⋯⋯⋯⋯⋯⋯87.5MHz-107.9MHz
FM mono sensitivity ⋯⋯⋯⋯⋯⋯⋯⋯⋯⋯⋯⋯⋯⋯⋯⋯⋯⋯⋯⋯⋯⋯⋯⋯⋯⋯⋯⋯⋯⋯12dBf
50dB quieting sensitivity (stereo) ⋯⋯⋯⋯⋯⋯⋯⋯⋯⋯⋯⋯⋯⋯⋯⋯⋯⋯⋯⋯⋯⋯⋯⋯16dBf
Stereo separation @ 1kHz ⋯⋯⋯⋯⋯⋯⋯⋯⋯⋯⋯⋯⋯⋯⋯⋯⋯⋯⋯⋯⋯⋯⋯⋯⋯⋯⋯40dB
Frequency response ⋯⋯⋯⋯⋯⋯⋯⋯⋯⋯⋯⋯⋯⋯⋯⋯⋯⋯⋯⋯⋯⋯⋯ 30Hz-13kHz, ±3dB
AM Tuner
Tuning range ⋯⋯⋯⋯⋯⋯⋯⋯⋯⋯⋯⋯⋯⋯⋯⋯⋯⋯⋯⋯⋯⋯⋯⋯⋯⋯⋯⋯530kHz-1710kHz
AM sensitivity ⋯⋯⋯⋯⋯⋯⋯⋯⋯⋯⋯⋯⋯⋯⋯⋯⋯⋯⋯⋯⋯⋯⋯⋯⋯⋯⋯⋯⋯⋯⋯⋯⋯30uV
Frequency response ⋯⋯⋯⋯⋯⋯⋯⋯⋯⋯⋯⋯⋯⋯⋯⋯⋯⋯⋯⋯⋯⋯⋯⋯ 80Hz-2kHz, ±3dB
General
Total system power ⋯⋯⋯⋯⋯⋯⋯⋯⋯⋯⋯⋯⋯⋯⋯⋯⋯⋯⋯⋯⋯⋯⋯⋯⋯⋯160 Watts Peak
Power output⋯⋯⋯⋯⋯⋯⋯⋯⋯⋯⋯⋯⋯⋯⋯⋯⋯⋯⋯⋯⋯⋯⋯⋯⋯⋯⋯⋯⋯⋯⋯⋯⋯40Wx4
Power supply ⋯⋯⋯⋯⋯⋯⋯⋯⋯⋯⋯⋯⋯⋯⋯⋯⋯⋯⋯⋯⋯⋯⋯11-16 VDC, negative ground
Speaker output impedance ⋯⋯⋯⋯⋯⋯⋯⋯⋯⋯⋯⋯⋯⋯⋯⋯⋯⋯⋯⋯⋯⋯⋯⋯⋯⋯4 ohms
Fuse ⋯⋯⋯⋯⋯⋯⋯⋯⋯⋯⋯⋯⋯⋯⋯⋯⋯⋯⋯⋯⋯⋯⋯⋯⋯⋯⋯⋯⋯10 amp fast blow ATO
Dimensions ⋯⋯⋯⋯⋯⋯⋯⋯⋯⋯⋯⋯⋯⋯⋯7" x 6"47/64 x 2" ((W)178 x (D)171 x (H)50 mm)
1 51 4
Page 10

M E N U
1 6
 Loading...