

Page 1

AWM950
High Power AM/FM/DVD Player
Owner’s Manual
Designed Specifically for the
Van and RV lndustries
Page 2

Thank you for your purchase of the AWM950. It is designed to give you good value and many hours of
listening enjoyment. Please read this manual carefully, as it should be able to answer many of your questions
about the operation and features of this product.
IMPORTANT NOTES
Avoid installing unit in locations described below:
-Places exposed to heat radiating appliances such as electric heaters
-On top of other equipment that radiates heat
-Places lacking ventilation or dusty places
-Humid or moist places
Features:
-AM/FM Wallmount Stereo with DVD Player
-Suspended Automotive DVD Deck Mechanism
-Electronic Tuner
-Locking Power / Speaker Connector
-Clock /Alarm
-2-Channel (Left, Right with A/B Speaker Outputs)
-Auxiliary Input Function
-Backlit Controls
-Reverse P olarity Protection
-50 Watts Power Output
-12VDC
-US/European Bands
-Bass/Treble
-Alarm Defeat Switch
REAR PANEL FEATURES
-External Fuse Holder
-Main Wiring Pigtail with Locking Amp Connector (12-Pin)
-Auxiliary Input Phone Jacks (Left and Right)
Manual contents: Page:
Features-Manual contents 1
Controls Identification 2-3
Operation Instructions 4-10
Hook Up Wiring Color Code 11
Installation/Specification 12
Warranty 13
1
Page 3
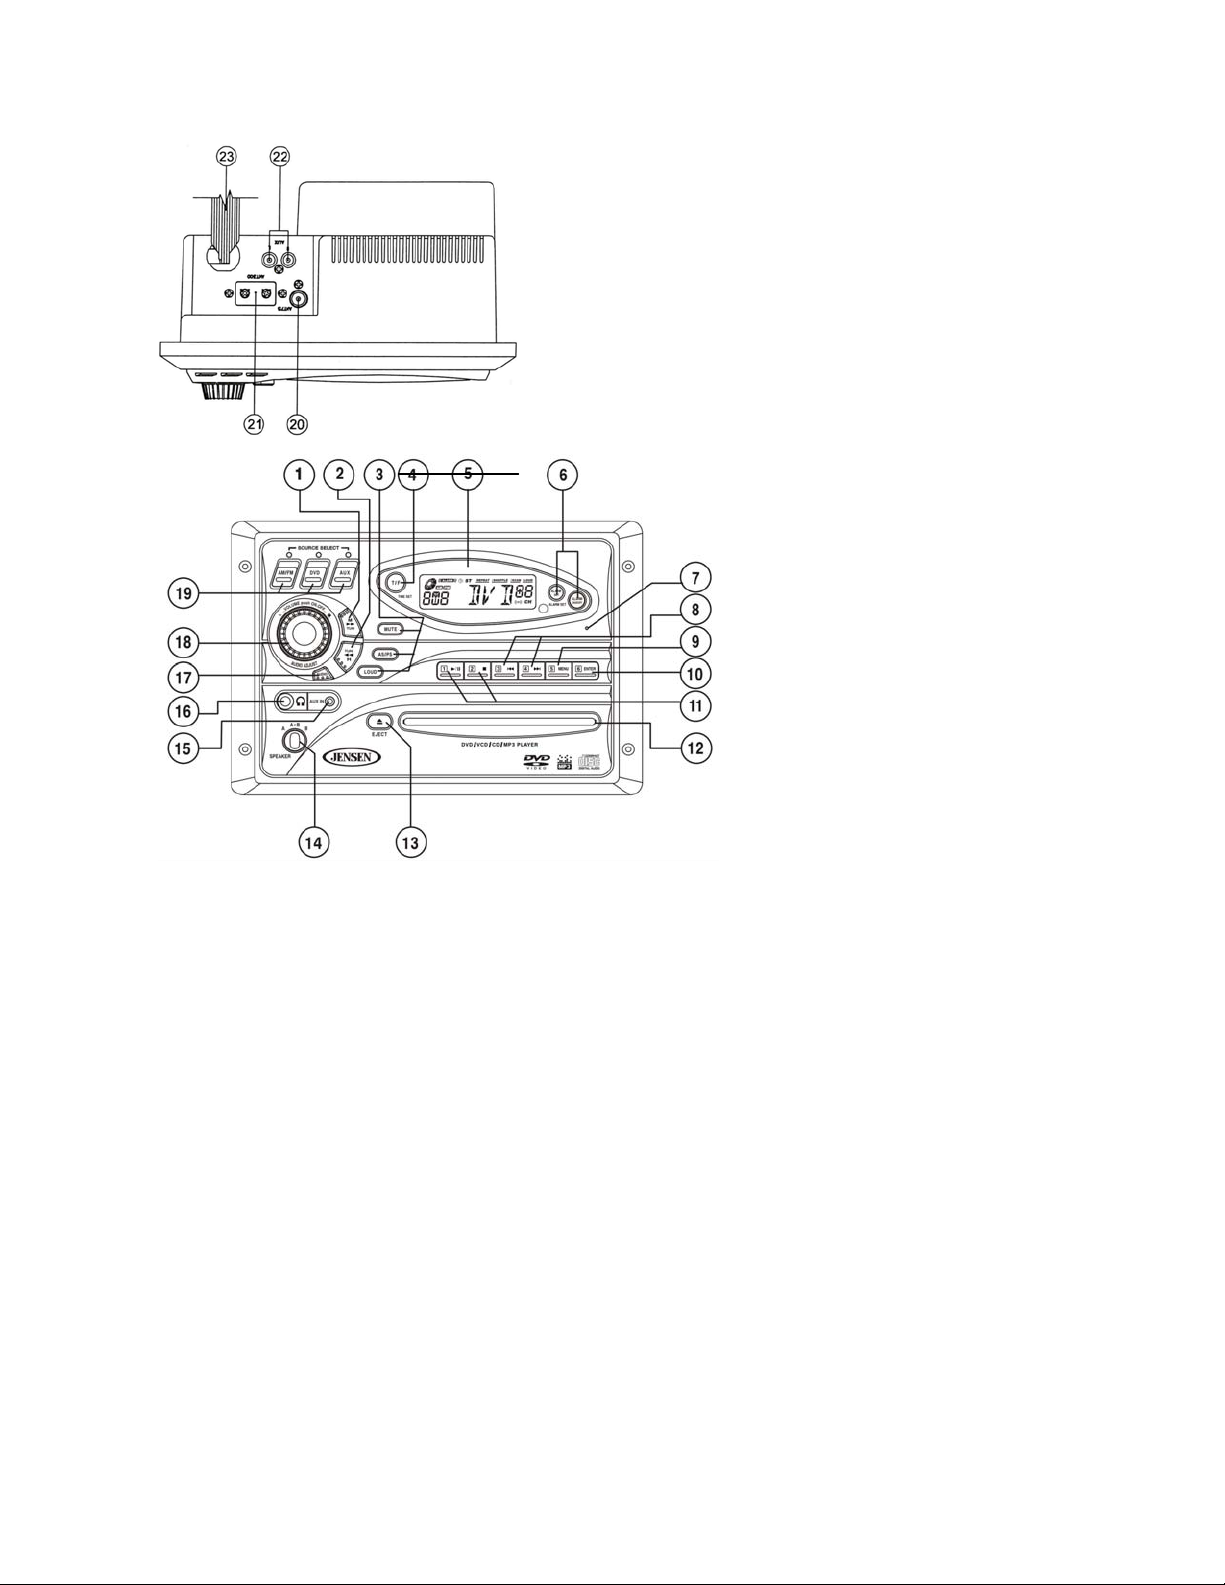
Controls Identification:
Controls Identification
1) Tuning Up / Seek / Minute Set Button
2) Tuning Down / Seek / Hour Set Button
3) Mute / AS/PS / Loud Buttons
4) Time Set Button
5) Display Window
6) Alarm Set / Alarm On/Off Buttons
7) Button Reset
8) Preset # 3 (Previous) / Preset # 4 (Next)
9) Preset # 5 (Menu)
10) Preset # 6 (Enter)
11) Preset # 1 (Play/Pause) / Preset # 2
(Stop)
12) DVD Player
13) Eject Button
14) Speaker Selector
15) 1/8” Auxiliary Input Jack
16) Stereo Headphone Jack
17) Audio Adjust Button
18) Power Switch w/Volume Control
19) Source Selectors
20) Car Antenna Jack – 75 ohm
21) FM Antenna Terminals
22) RCA Auxiliary Input Jacks
23) Harness
2
Page 4
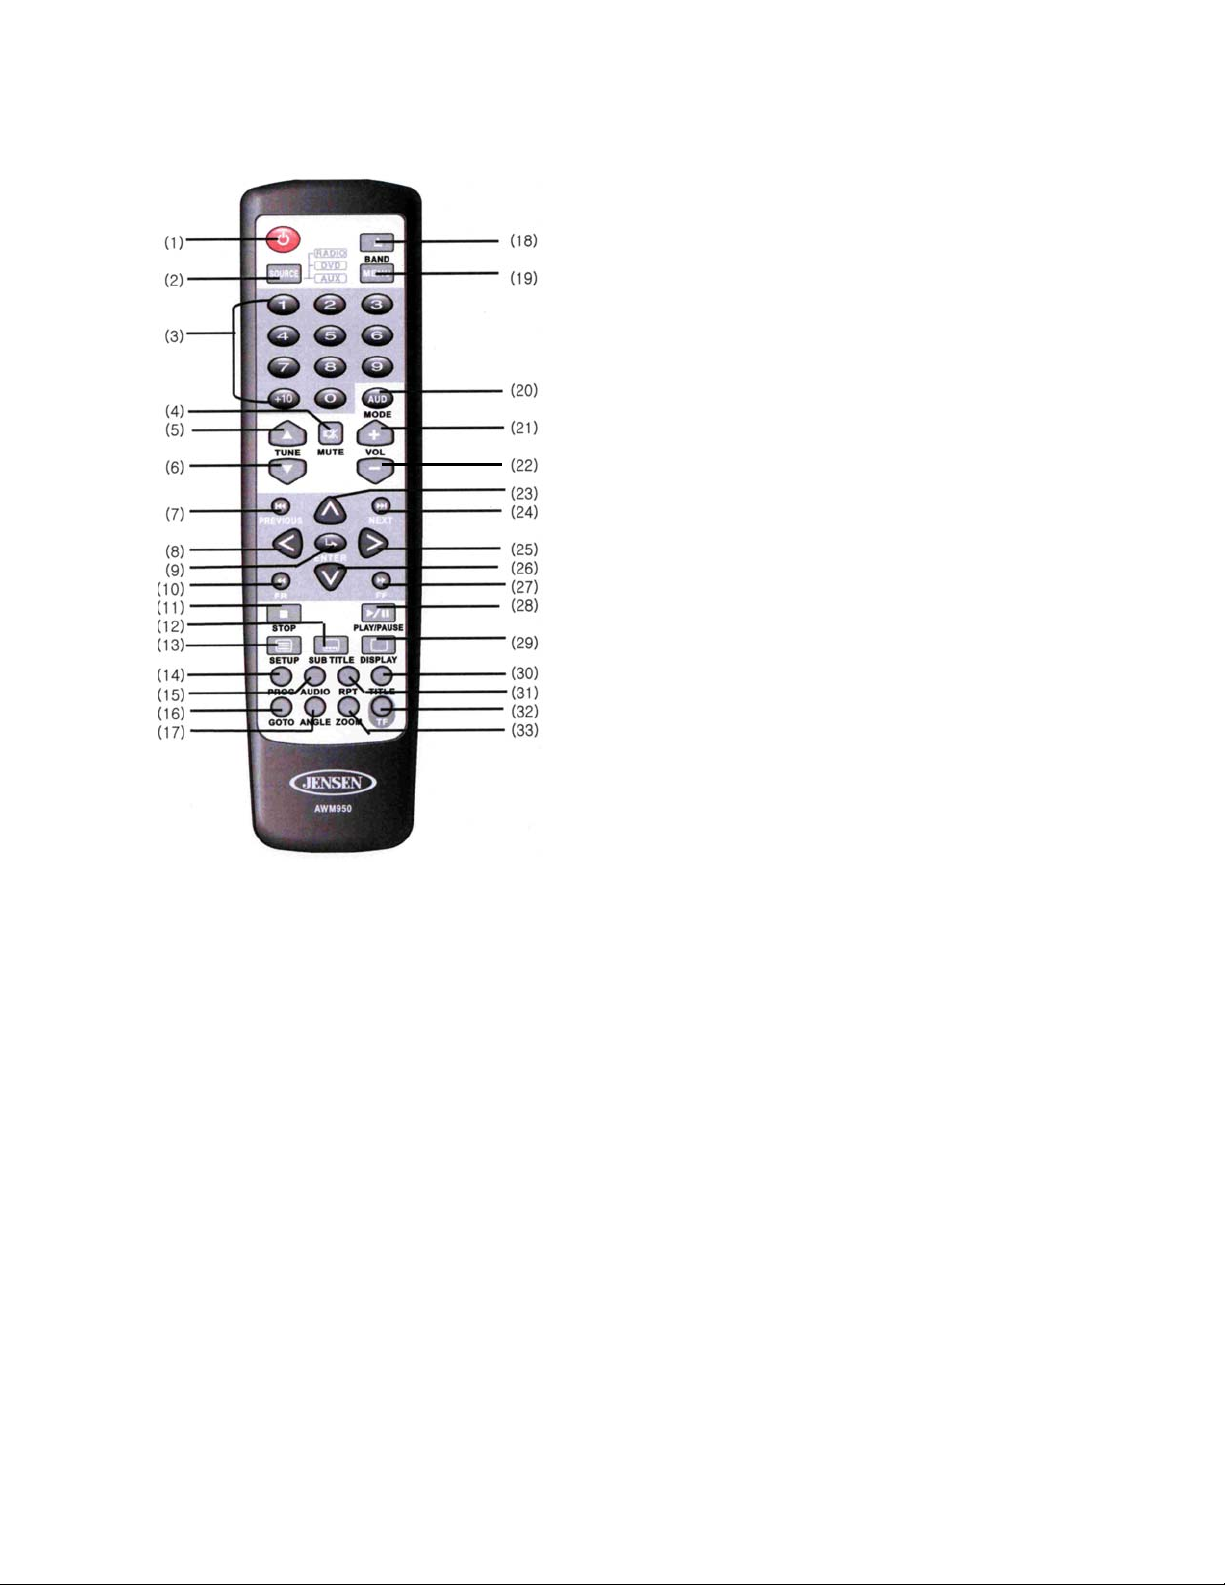
Remote Controls Identification
Remote Controls Identification
1) Power
2) Source
3) Numeric Buttons
4) Mute
5) Tune Up
6) Tune Down
7) Previous
8) Left
9) Enter
10) Fast Reverse
11) Stop
12) Subtitle
13) Setup
14) Program
15) Audio (DVD)
16) Go To
17) Angle
18) Eject
19) Menu/Band
20) Audio Mode
21) Vol +
22) Vol –
23) Up
24) Next
25) Right
26) Down
27) Fast Forwarding
28) Play / Pause
29) Display
30) Title
31) Repeat
32) Time / Freq
33) Zoom
3
Page 5

Operating Instructions:
NOTE: Number in parenthesis (#) corresponds with “Control Identification” on page 3.
Note : Power can be turned on by pushing any button on the front of the AWM950.
LIQUID CRYSTAL DISPLAY PANEL
The liquid crystal display (LCD) panel displays the frequency, time and activated functions.
Note: It is characteristic of LCD panels that, if subjected to cold temperatures for an extended period of time,
they will take longer to illuminate than under normal conditions. In addition, the visibility of the numbers on
the LCD may slightly decrease. The LCD readout will return to normal when the temperature increases to a
normal range.
TUNER
1) Turn power on by pushing the Power switch /Volume control button (18).
2) Use the Source Selectors (19), select the AM/FM button
3) Use the Speaker Selector Switch(14) to choose speaker output
4) Use the Tuner Up (1) or Down (2) buttons to select station manually. Also, the Station Preset buttons can
select stations (this will be discussed later in the manual). Push either of the seek buttons (1 or 2) to tune
to the next higher or lower active stati on.
5) Adjust Volume Control (18) to suit taste.
DVD PLAYER
1) Turn power on by pushing the power switch / volume control button (18).
2) Insert an available disc such as DVD, CD, or MP3 CD into the DVD player (12)
3) Use the Speaker Selector switch (14) to choose between speaker output, headphones or both.
4) Press the DVD Play/Pause button (11).
5) You may change tracks or chapters by using the Next or Previous buttons (8).
6) To change to AM/FM or Aux. Inputs, press the corresponding button; to return to DVD press the DVD
button.
8) To eject the disc, press the Eject bu t to n ( 13).
AUXILIARY INPUT
1) Push Power Switch (18) “On”.
2) Using the Source Selectors (19), choose the b utton label ed “AUX”.
3) If there is an external source (example: CD shuttle or TV audio) connected to the Auxiliary Input Jacks
(22) on the rear of the radio, then you can listen to your external source through the system.
SETTING THE CLOCK
1) Push Power Switch (18) “On”.
2) Press the T/F button (4) to display the clock
3) Hold the T/F button (4) and simultaneously use the H and M buttons (1 and 2) to adjust hours and
minutes.
Note: The T/F also toggles between time and radio frequency on the display.
SETTING STATION INTO MEMORY PRESET
1) This unit has the ability to set 18 FM and 12 AM stations into memory.
2) To set the AM or FM stations into memory, first tune to the desired station.
4
Page 6

3) Then press and hold one of preset buttons (8,9,10 or 11) for more than 3 seconds.
DVD PLAYBACK OPERATIONS
***Please refer to the remote control figure on page 4.
PLAY/PAUSE
Press the button to play or pause.
EJECT
Press this button to load or eject disc.
STOP
Press this button once when playing, the unit stops and the stop location is memorized. When user presses
the PLAY button after that, the unit will resume playback, If user press STOP twice, then disc stops and unit
will play the disc from the beginning when the PLAY button is next pressed.
NUMERIC BUTTON
Push the buttons to play your favorite track. If the track is from 1 to 9, you can directly press the number. If
the track number is 10 and over, you should use button 10+ and the other number buttons together to select
the track.
DIRECTION BUTTON AND ENTER BUTTON
Press the DIRECTION button to move the cursor to the selected item, and then press the ENTER button to
confirm it.
FF/FR
Press the button to select fast reverse or forward with di ff erent speed.
ZOOM
Press the button during normal playback to zoom a picture, Press this button repeatedly to change the
magnification levels.
REPEAT
When playing DVD disc, press the button to repeat the title or current chapter. When playing VCD or CD disc,
press the button to repeat current track, all tracks and RANDOM play mode.
GOTO
Press this button to select time, track or chapter.
AUDIO
When playing a DVD disc, press the button to select audio language. When playing other kinds of disc, press
the button to select audio channel.
DISPLAY
Press this button to display the current playback information on the screen
VOL+/VOL-
Press the button to adjust sound volume.
MUTE
Press this button to mute
5
Page 7

SETUP
Press this button to enter setup menu.
PREVIOUS/NEXT
Press this button to go to the PREVIOUS/NEXT chapter, track or song.
TITLE
For DVD discs, press this button to enter the title menu, press the DIRECTION buttons and PLAY button to
select and play (only if supported by the discs).
MENU
Press this button once to return to the root menu. If user selected none of the chapters in the menu, and
press MENU again, last position memory function will turn on and the disc will be played from where user
last pressed the MENU button.
SUBTILE
For DVD disc, press this button to select subtitle.
ANGLE
Press this button to select different visual angles if stored on the DVD disc.
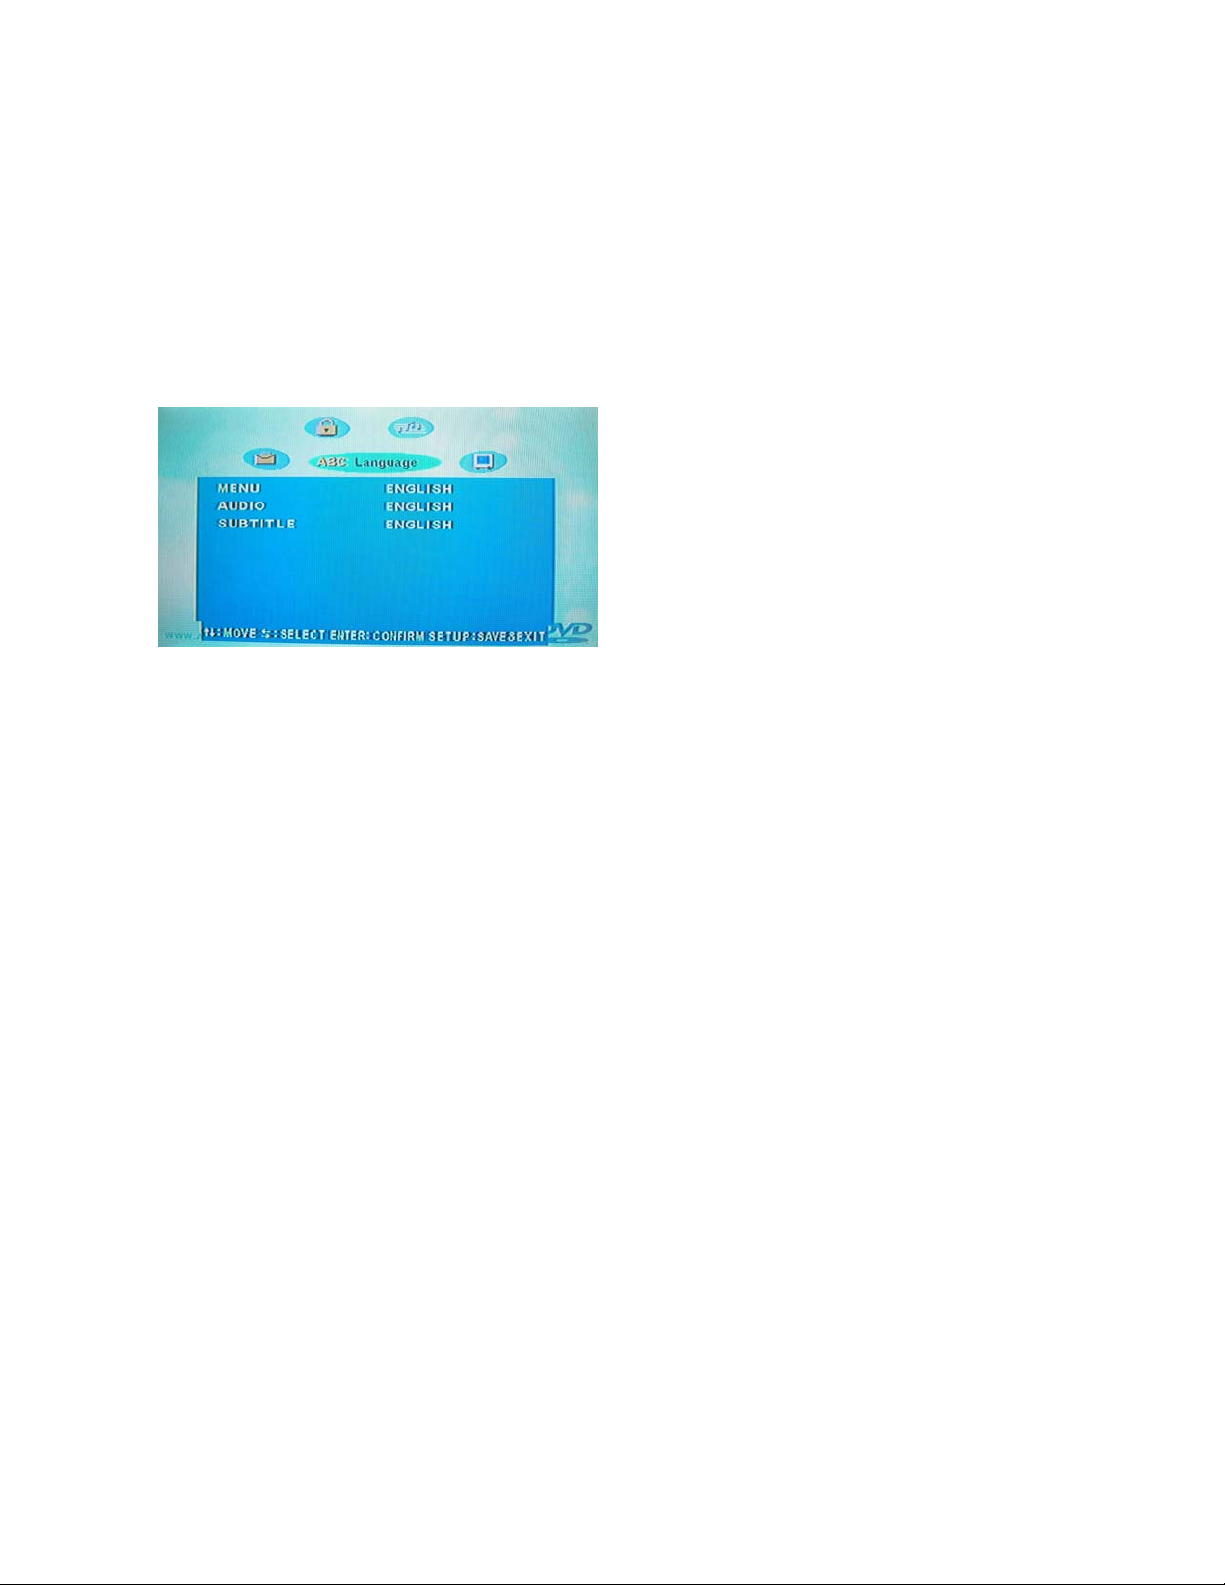
SETUP OF PLAYER FUNCTION
This menu can be used to choose audio language, subtitle language, OSD language and DVD menu
language. You need to set up these items when you begin to play a DVD disc. When you start to play a DVD
disc, the DVD player will automatically choose default language if the DVD player contains this language
already.
You can press SETUP button on the remote control to bring this setup
Use UP/DOWN arrow buttons to select the item that you want to change.
USE LEFT/RIGHT arrow buttons to change your setting.
USE UP/DOWN arrow button to exit the item you want
USE UP/DOWN arrow button to page icon and highlight it. Use LEFT/RIGHT arrow buttons to change
setup menu page.
After finishing your setting, you can choose SETUP to exit and save these modifications into memory.
GENERAL SETUP
OSD LANGUAGE
This item is used to select OSD (On-screen display) language. It includes
English
6
Page 8
SCREEN SAVER
This item is used to open/close SCREEN SAVER
On: Screen saver will automatically be executed if the screen keeps still for whole fifteen minutes
OFF : Screen saver would not be executed in any situation
LOAD SETUP DEFAULT
This item is used to restore all menus as fa ctory defaults, except the item related to P arent Control Sub-item.
RESET
LANGUAGE SETUP
MENU
When you begin to play a DVD disc, this player will automatically select its default menu language which you
could choose among the following items, depending on the particular DVD disk options.
ENGLISH
FRENCH
RUSSIAN
JAP ANESE
GERMAN
AUDIO
When you begin to play a DVD disc, this player will automatically select its default audio language which you
could choose among the following items.
ENGLISH
FRENCH
RUSSIAN
JAP ANESE
GERMAN
SUBTITLE
When you begin to play a DVD disc, the default subtitle of this player will automatically be displayed which
you could choose among the following items.
ENGLISH
FRENCH
RUSSIAN
JAP ANESE
GERMAN
7
Page 9

VIDEO SETUP
TV SCREEN
Which picture format appears on your TV depends on what kind of TV you have and the picture mode your
TV is set to;
4:3 – LETTER BOX refers to pictures where black bands appear at the top and bottom.
16:9 – WIDE SCREEN for wide screen TV (Full mode)
TV OUTPUT
This item is used to select a TV signal system to match your TV set. It includes ;
AUTO
NTSC
PAL
SCAN MODE
INTERLACED (Interlaced scanning)
The default setting of the DVD player is INTERLACED (Interlaced scanning)
BRIGHTNESS
This item is used to adjust the BRIGHTNESS to your screen
Press ENTER button to enter this item
Press LEFT/RIGHT arrow buttons to adjust brightness
Press UP/DOWN ar r ow buttons to exi t
CONTRAST
This item is used to adjust the CONTRAST to your screen
Press ENTER button to enter this item
Press LEFT/RIGHT arrow buttons to adjust contrast
Press UP/DOW N ar r o w bu ttons to exit
SA TURATION
This item is used to adjust the SATURATION to your screen
Press ENTER button to enter this item
Press LEFT/RIGHT arrow buttons to adjust saturation
Press UP/DOW N ar r o w bu ttons to exit
8
Page 10

AUDIO SETUP
CHANNEL
2CH STEREO – Select stereo
2CH LT/RT – Select left and right channel
DIGITAL OUTPUT
SET – Each DVD disc has its own Audio output options. You can set up the D VD’s Dig ital Audio O utput
according to your speaker system. This item contains ;
DOLBY – Select LPCM and BITSTREAM output and OFF
DTS – Select LPCM and BITSTREAM OUTPUT and OFF
MPEG – Select LPCM and BITSTREAM output and OFF
PCM – Select L PCM 48KHz and LPCM 96KHz output
DIGITAL OUTPUT – Turn digital output ON and OFF
HDCD UPSAMPLE – Turn HDCD up sample ON and OFF
BACK – back to AUDIO SETUP MENU
SECURITY SETUP
PAREN TAL CONTROL
The parental control is a rating system such as movie ratings. This helps you control the types of DVD that
your family watches. For example, you could edit out violent scenes that are unsuitable for children
Use UP/DOWN arrow buttons to select pass word item, and enter a personal 4 digital right security code.
Use UP/DOWN arrow buttons to select parent control, and use LEFT/RIGHT arrow buttons to select the
parental control level.
Press UP/DOW N ar ro w but t ons t o exi t. You can not play DVD dis cs rat ed hi gh er t han l eve l you sel ec ted
unless you cancel the parental control function.
Note ; This feature works with DVD discs that have been assigned a rating.
9
Page 11

CHANGING PARENTAL CONTROL PASSWORD
Use UP/DOWN arrow buttons to select Password item.
Enter old 4 – digital security code
Then enter new 4 digital security code
Press UP/DOWN arrow button to exit
Note : New 4 – digital security code will take effect after closing the Setup menu.
NOTE :
It is necessary to stop the disc playback if you want to enter the PREFERENCES MENU ITEM.
In PREFERENCES MENU ITEM, the system default password is 0000.
Operating instructions
USING THE AUDIO ADJUST BUTTON
1) You can toggle between volume, treble, bass and balance control by pressing the Audio Adjust button (17)
2) Once at the desired function, you can use the volume buttons to adjust.
SETTING THE ALARM
1) Hold the Alarm set button (6)
2) Use the H and M buttons (1 and 2) to adjust hours and minutes.
3) The alarm On/Off button (6) activates or deactivates the alarm.
AS/PS BUTTON
This button is f or Auto-Store tuning (AS) and Preset Scan Tuning (PS) (3).
1) Press this button momentarily during radio operation to scan the preset stations in the chosen band’s
memory. The unit will stop at each preset station for approximately 5 seconds before continuing on to the
next preset station. Press this button momentarily to stop preset scan operation and remain on the
current station.
2) A press of this button for longer than 2 seconds will activate the Auto-Store tuning feature which will
automatically scan the band and enter up to 6 strong stations into the preset memories. After entering
the stations into the memories, the unit will automatically stop at each station for approx. 5 seconds so
each station can be heard.
Note ; if you hav e al ready set t he pres et memori es t o your favorite stations, activating the Auto-Store feature
will erase those stations and enter the new strong stations.
10
Page 12

Hook up wiring color code.
WIRING COLOR CODE
COLOR FUNCTION
ORANGE/WHITE STRIPE +12VDC IGNITION POWER
GREEN/WHITE STRIPE +12VDC BATTERY POWER
BLACK/WHITE STRIPE POWER GROUND (-12VDC)
WHITE LEFT (A) SPEAKER (+)
VIOLET LEFT (A) SPEAKER (-)
BLUE RIGHT (A) SPEAKER (+)
LIGHT GREEN RIGHT (A) SPEAKER (-)
RED LEFT (B) SPEAKER (+)
VIOLET/BLACK STRIPE LEFT (B) SPEAKER (-)
YELLOW RIGHT (B) SPEAKER (+)
LT GREEN/BLACK STRIPE RIGHT (B) SPEAKER (-)
RCA CONNECTOR
RCA JACK (AUX-R) AUDIO IN (R)
RCA JACK (AUX-L) AUDIO IN (L)
WIRE/PLUG COLOR
BLACK / Y ELLOW VIDEO OUT
GRAY / YELLOW VIDEO IN
BLACK / RED AUDIO OUTPUT (R)
BLACK / WHITE AUDIO OUTPUT (L)
11
Page 13

Installation:
1) Cut a mounting hole in the desired location using mounting hole diagram (below) and use the four
3x20min self tapping screws provided to mount the unit.
2) Route power, speaker and antenna cables through hole and connect to unit as outlined in the Wiring
Color Code diagram on the previous page.
3) After making sure connections are correct, test operation.
Specifications:
Operating Voltage: 11-16VDC
Output Power: 50 Watts Total (25 Watts per Channel)
Output Wiring: 2/4 speaker and Headphone System
Output Impedance: Compatible with 4-8 Ohm Speakers,
4 Ohm Load Min.
Tuning Range: (AM)530-1710 KHz
(FM) 87.5-107.9 MHz
Sensitivity (AM) less than 15uv
(FM) less than 2.5uv
FM Stereo Separation: More than 30dB
DVD Frequency Response: 20-20,000 Hz
DVD Channel Separation: 50dB
DVD S/N Ratio: 70dB
DVD Distortion: 0.2%
SizeOverall Size: 10.43”(W)x7” (H)x6.26 (D)
265mm(W)x178mm(H)x159mm(D)
Mounting Size: 9.25”(W)x6.05”(H)x5.25”(D)
235mm(W)x154mm(H)x133mm(D)
Weight: 3.75 lbs.(1.7 Kg)
*Specifications are subject to change without notice.
12
Page 14

WARRANTY
13
 Loading...