

Page 1
Operation
JENSEN
WeJcomei
What you’re holding is no ordinary owner's manual. We've tried to make the instructions in this owner's
manual clear and easy to toflow. if you take a few minutes to look through it. you'll learn how to use all of
the features on your new Jensen car stereo for maximum enjoyment.
Warranty Service
If your Jensen stereo should ever require service, you will need to have the orioinal dated receipt, if you
ever need to return the unit fcr any reason, always include the receipt with the product.
How to Enjoy the CD3010X AM/FM Stereo
Radio/Compact Disc Ptayer with Remote
Controf and Auxiliary input Jack
Basic Operation
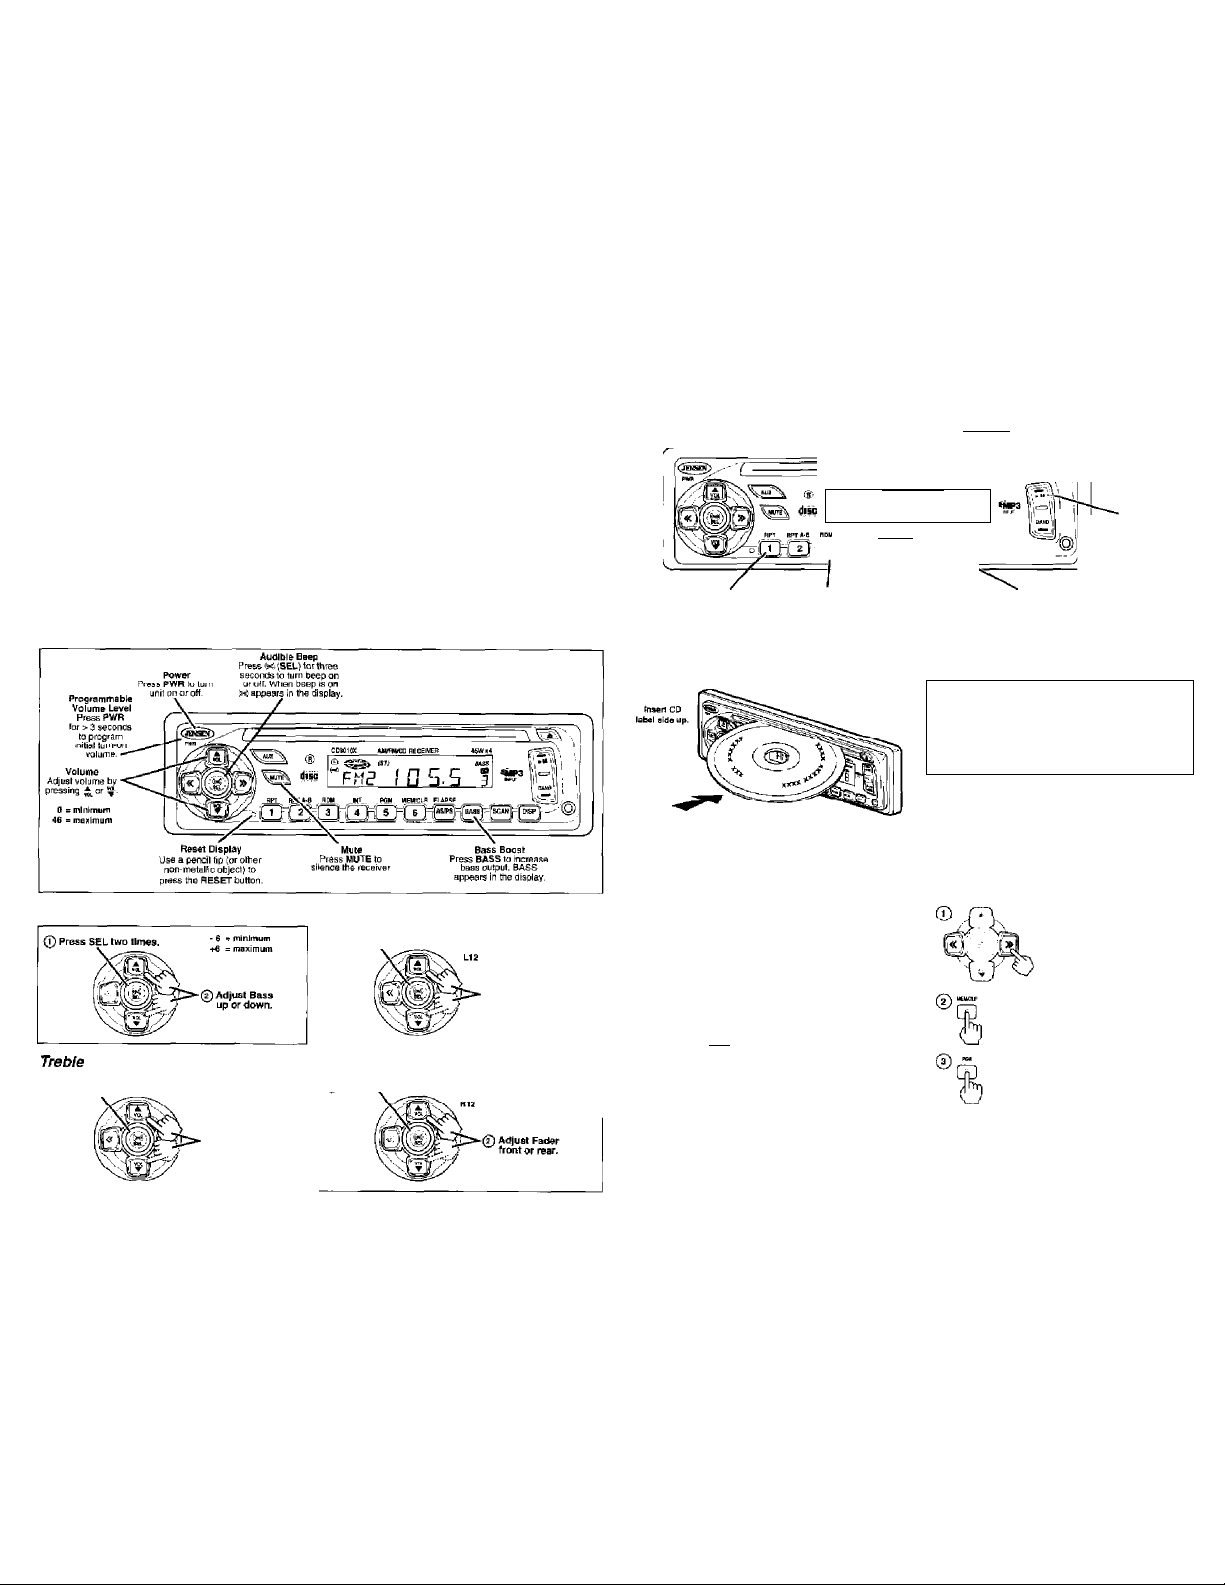
Power • Volume • Audible Beep • Reset • Mute • Bass Boost
Bass
0 Press SEL three limes.
• S = minimum
40 = maximum
0Ad|ust Treble
up Of dovm.
Balance
©Press S6L tour times. = mgnt si>e.ke„ only
^ COO s Equal sound right «nd left
e Left speakers only
r?) Adjust Balance
Isft or right.
Fader
o Press SEL five times. ^^2 = speakei? only
COO a Equal sound right and left
! near speaKers only
CD Player Operation
Repeat • Random • Intro Scan • Elapse (CD Display) * Pause
WfMiCOBECEIVEB
© «rj
rt iC
i(j3 iQ;SlHS:
Repeat'
Press RPT to corffinuously
repeal same track. Press
ayulii lu Ftepe'iit
Insert and Eject CD
Push a CD into slot. The CD will begin to play.
Press a (eject) to stop CD play and eject
Cn frnm slot. Unit does not have to be
turned on to eject CD from slot.
Repeat Selection (RPT A-B)
The Repeat A-B function allows you to continuously
repeat a selection of music.
1. Press RPT A‘6 to set the
beginning point (A).
Random
Press RDM lo play an
tracks on CD tn random
oraer. press again to stop
Random play.
I 5
®
The chosen selection of music will repeat over
and over until RPT A-B is pressed again.
2. Press RPT A-B again to set the
end point (B).
I n
Lu
PBM UflVC^ eiAh$g
Prffis WT to play first
ten seconds of each
track. Press again to
slop Intro Scar and
listen to track.
M»
3
jj.b
'tniro Scan
Fast Forward and Fast Reverse
/*1 Press « or» for more
B -1
Program CD Tracks
Use Program function to select up to 8
CD tracks to play in any order. Program
works by allowing you to select a track
rujmher for each spot In the playing
sequence. A CD must be inserted to
use Program,
Note
• Do not expose CD player to extremely high or
low temperatures.
• Do not drive with ejected CD in the slot
Press M to pause
^ CD Display
Press ELAPSE to
seojence disolay
through track number
or elapsed lima.
\ than one second to fast
^-5=^ forward or fast reverse.
>1 Sec you release the button.
CD play slarls rrorn when
1. Press « or >> to
choose track number.
2. Press MEWCLR to
enter track number into
memory. Disp/ay shows
next track number in
sequence. Continue (up
to 8 times) for all desired
tracks,
3. Press PGM to play CD
in programmed order.
Pause
CD pJay,
Page 2
Clock Priority
Ifw Hold
In CD Mode
When the display priority is set to clock, the
clock will be displayed indicating the cuirent
time.
Pressing DISP button will temporarily display CD
track number, lime remaining or elapsed time
depending on ourront CD dioploy option
selected. After five seconds the display will
return to the clock.
1, Press and hold DISP
button while pressing
» button to select
Clock Priority.
Pressing DISP button while
in Clock Priority will
temporarily display selected
ctation frequency.
Set the Clock
0 "*■ Clock Priority, press and hold
TfL DISP button for three seconds
V J until i^olnn flnshcQ, then release.
n ^"»”1 rr
U l_«_I u
2. Press «to change
hours,»to
change minutes.
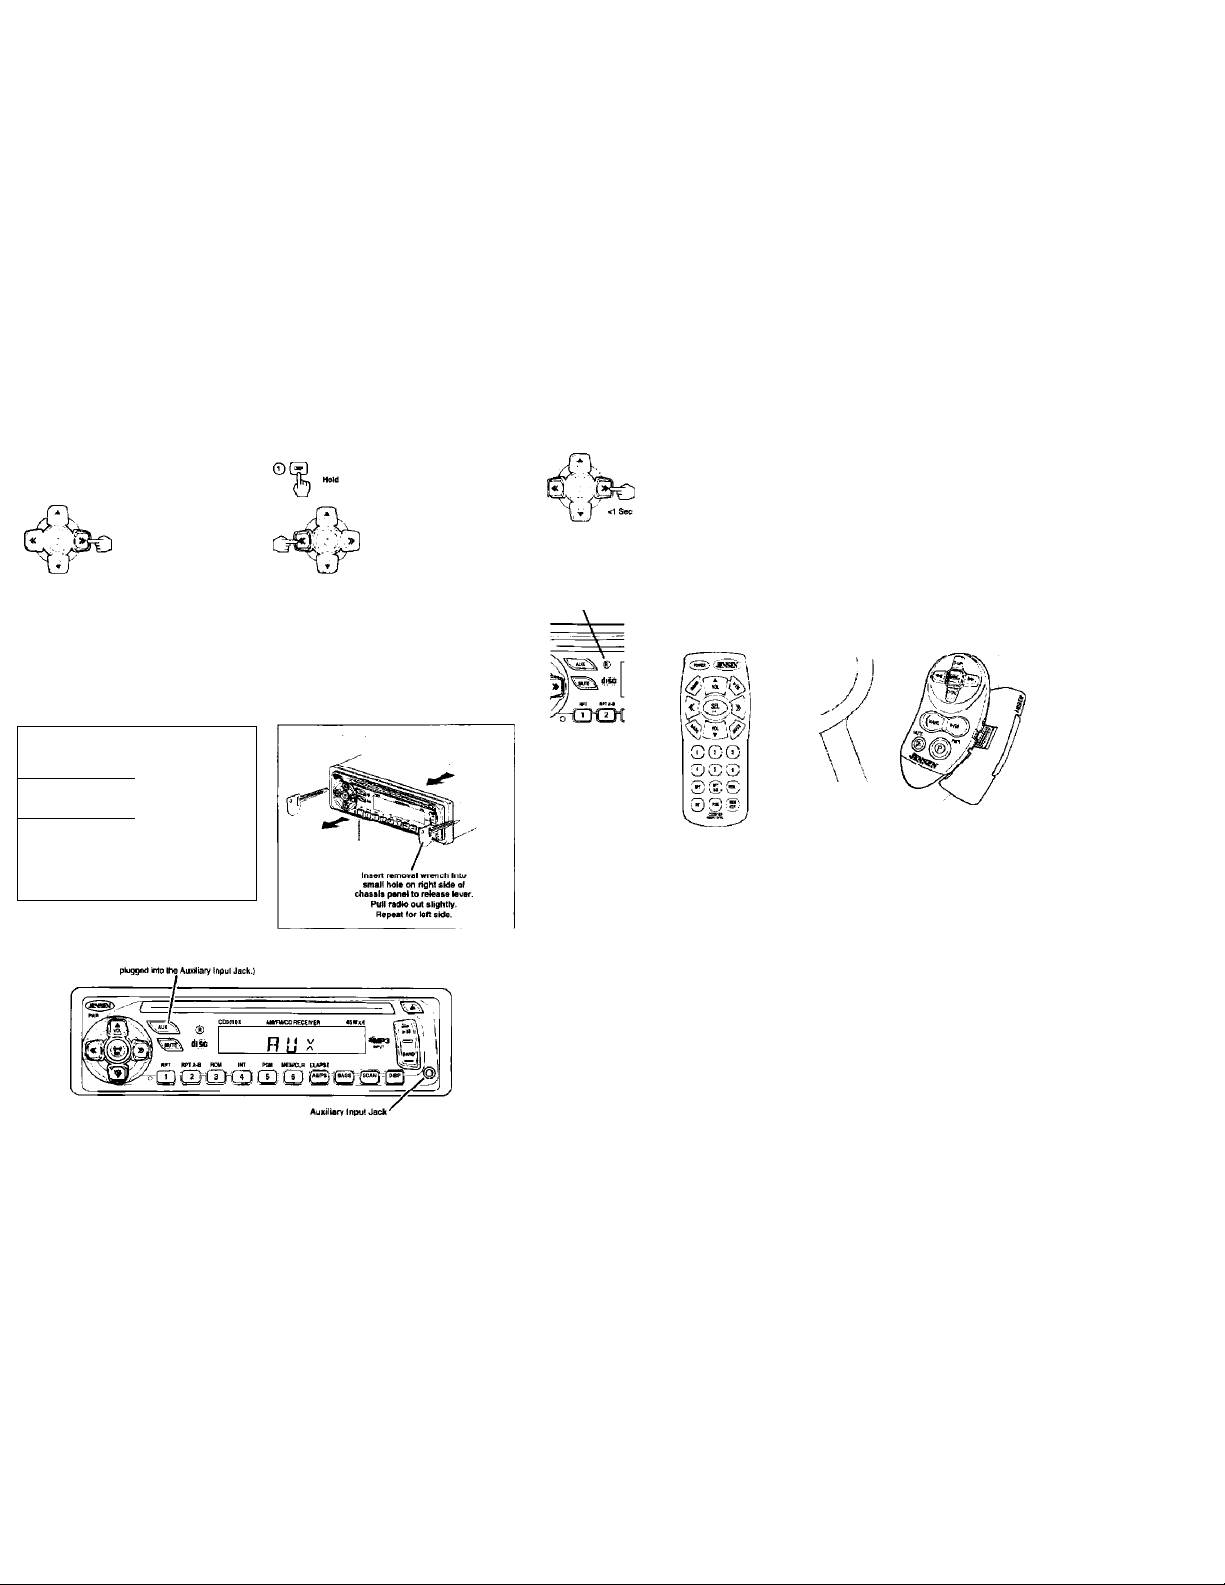
Auxiliary Input
Auxiliary Input Mode
Press AUX toacsese Auxiliary Inpul Mode.
Frequency Priority
In CD Mode
When the display priority is eot to frequency,
display indicates CD track number or elapsed
time, depending on current CD display option
selected.
Pressing DISP button will temporarily display
clock. After five seconds the display will return to
the CD display.
1. Press and hold DISP
button while pressing
<< button to select
Frepuency Priority,
Pressing DISP button while
In Frequency Priority will
temporarily display clock.
Removing Radio from Dash
Press « or»for less than
one second to advartce CD to
next track. Track numbers
&l>uw un display.
Remote Control
Ttie Rairiole Control will allow you 10 control the basic runciions of the CD3010X.
The CD3010X is also compatible with the Jensen 1R20 steering wheel remote
control. (Purchased separately.)
Jensen CD3010X Remote Control Jensen IR20 Remote Control
Specifications
CD Player
Signal/noise ratio
Freauenev response .
Channel separation ....
D/A converter
FMTuner
Tuning range............................................................................
FM mono sensitivity..................................................................
bO OB quieting sensitivity (stereo)...........................................
Stereo separation 9 1 kHz
AM Tuner
Tuning range............................................................................
Amplifier
Power output............................................................
General
Power supply..
Speaker output Impedance
Dimensions ..............................
Speciticatloris subiect lo change without notice.
...................
lotal system power
.............
.......................................................
..................................................................
......................................................
..........
..20 H= 20 kHz
................
..............
1 Bit/CH
.. 87.5niH2-107.9 MHz
530 kHz-1720 kHz
...................
11-16 VDC, negative ground
.................................................
.................................10 amp fasi blow ATO
,, 7' X 7" X 2” (178mm x 178mm x 55titi
.....
4-a Ohms
>65 dB
12 dBI
16dB1
40 dB
Page 3

Radio Operation
Select a Band
Press BAND button to change radio
(1 = I between three FM bands and two AM
j bands. Each band stores up to six
preset stations.
Tuning
Automatically Store Stations
0 Select six strong stations and store
%
©
Preset Scan
0i^ii Scan stations Stored in the current
%
® ^
O
«3Sfrc
SeekTuning
Press a « or» button
for more than three
seconds to rnove radio
frequency number up or
down one step.
Manual Tuning
Press a « Of» button
for less than three second
to move to next station
automatically.
'' them In thA niirrpnt band.
1. Select a band (if needed).
2. Press AS/PS button for more
than three seconds. The new
stations replace stations
already stored in that band.
1. Select a band (if needed).
2. Press AS/PS button for less
than three seconds. Radio
pauses for ten seconds at
each preset station. Press
AS/PS again to stop scanning
when desired station is
Preset Stations
Press SCAN to scan through strong
stations in the current band. Radio pauses
for five seconds at each strong station.
Press SCAN again to listen to current
WARRANTY
90 DAY / i2 MONTH LIMITED WARRANTY
AUDIOVOX SPECIALIZED APPLICATIONS. LLC (the Company) warrants to the original retail
purchaser of this product that should this product or any part thereof, under nom^al use and
conditions, be proven defective in nnateriat or workmanship within 90 days from the date of original
purchase, such defect(s) will be repaired or replaced (at the Company's option) w№out charge for
parts and repair labor. After the initial 90 day period and for a period of 12 months from the date
of the original purchase, the Company will supply at no charge a replacement for any defective
part(s).
To obtain repair or replacement within the terms of this warranty, the end user should contact the
O.E.M. The product is to be delivered to the OEM or original place of purchase, with proof of
warranty coverage (e.g. dated bill of sale, and serial number of the unit, and vinff), specification of
(ÌRfAnf(i!), trsnsportation prepaid, to an approved warranty station
This warranty does rx)t extend to the elimination of externally gerierated static or noise, to the
correcticKi of antenna problems, to costs incurred for removal or reinstailation of the product, or to
damage to any tapes, cd's. dvd's. speakers, accessories, or eiecbical systems.
This warranty does not apply to any product or part thereof which, in the opinion of №e Comply,
has been damaged through alteration, improper installation, mishandling, misuse, neglect, or
accident.
THE EXTEMT OF THE COMPANY’S LIABILITY UNDER THIS WARRANTY IS LIMITED TO THE REPAIR
OR REPU^CEMENT PROVIDED ABOVE, AND, IN NO EVENT, SHALL THE COMPANYS LIABILITY
EXCEED THE PURCHASE PRICE PAID BY THE PURCHASER FOR THE PRODUCT.
This warranty is in lieu of all other express warranties or liabilities.
ANY IMPLIED WARRANTIES. INCLUDING ANY IMPLIED WARRAhiTY OF MERCHANTABILITY,
SHALL BE LIMITED TO THE DURATION OF THIS WARRANTY. ANY ACTION FOR BREECH OF ANY
WARRANTY HEREUNDER INCLUDING ANY IMPLIED WARRANTY OF MERCHANTABILITY MUST BE
BROUGFfT WITHIN A PERIOD OF 30 DAYS FROM THE DATE OF ORIGINAL PURCHASE. IN NO
CASE SHALL THE COMPANY BE LIABLE FOR ANY CONSEQUENTIAL OR INCIDENTAL DAMAGES
FOR BREECH OF THIS OR ANY OTHER WARRANTY, EXPRESS OR IMPLIED WHATSOEVER.
No person or representative is authorized to assume for the Company any liability other that expressed
herein in connectkxi with the sale of this product.
Some states do rx3t allow limitations on how long an implied warranty lasts or the exclusion or limKation
of incidental or conseguenti^ damages so the above limitations or exclusions trtay not apply to you.
This warranty gives you specific legal rights and you may also have other rights which vary from state
to state.
AUDIOVOX SPECIALIZED APPLICATIONS, LLC.
Visit us at www.asaelectrenics.cein
Page 4

insiclllciuun
JKMSEJN
Wetcome!
For your Jensen stereo to work right, it must be installed correctly. This manual wKl show you how to
install your new Ijkn a pro It’S a good idea to read all of these instructions before you begin the
installation. Most Installaf/ans are straightforward and can be handled by a do-it-yourselfer with the right
tools and patience. But. do-it-yourself installation isn't for everyone. You may want to turn the installation
job over to an experienced installer.
Wprmnfy Servlet*
If your Jensen stereo should ever require service, you will need to have the original dated receipt. If you
ever need to return the unit for any reason, always include the receipt with the product.
How to Install the CD3010X AM/FM Stereo
Radlo/Compact Disc Player with Remote
Control and Auxiliary input Jack
1. Before You Begin Installation
Tools and Supplies Needed
• Torx type. Flat and Phillips screwdrivers
• Wire cutters and strippers
• Tools to remove existing radio (screw driver,
socket wrench set or other tools)
• Radio romoval tool for Ford care (oarly IflRfte
models and newer)
• Electrical tape
•Crimping tool
• Volt meterATest light
• Crimp connections
• 10 gauge wire for power connections
•16-18 gauge speaker wi re
Speaker Requirements
Only connect the CD3010X to spoakere rated In
the load impedance range of 4 to 8 ohms.
Speakers with e load impedance less than 4
ohms could damage the CD3010X.
Disconnect Battery
Before you begin, always disconnect
the battery negative terminal.
o. nwirmy
Wiring with a Wiring Adapter (Purchase Separately)
Wiring Diagram
-:f[|
|F|)©
1 ifi'
Ijlju
A 1 1
ill A©
2. Preparation
Radio
Remove Old Radio
Standard Bracket Mounted rr^M nnrlnp .Ippnt
Power Antenna
Connect to power antenna or amplifier, If not used,
tape bare end of wire.
Ground
Connect to ground terminal or clean, unpamted part
of chassis.
Mpmnry/Banery
Connect to battery or 12 volt power source that is
always alive.
77re radio will not work if this wire Is not
connected.
Acceesory^gnitlon
Connect to existing radio wire or radio fuse.
Fuai»s
When replacing a fuse, make sure new fuse is correct
type and amperage. Using an incorrect fuse could
damage radio. The C03010X uses one 10 amp fuse
located below wiring connector
• 10 amp fast blow ATO
Page 5

neconnei^i cfunery
When wiring is complete, reconnect ^ .
the battery negative terminal.
4. Final Installation
5. Troubleshooting
Corr«c1lv« Action
Page 6

install Half-sleeve
Set Frequency Spacing Switch
There is a seleclable frequency spacing switch on the
bottom of the unit. Before Installing the unit into the
dastibudiU, cuiiriiiM tlidl the »niluli is sel lu IIih uorrect
setting for your area of operation.
Europe
Problem
Does not operate (display
does not II
No power to unit
No speakers operate
fdisplav llgtits norrrtally)
Not all speakers operate
Blowo fuaea
Eh'2 appears on c&splay Disc loading matfuncbon
ER-3 appears on display Disc eject malfunctbn
ER-4. ER-7, Efl-e
appears on display
ER-B. ER-6 aooears on dISDtav
CP skips too mixiti
Cause
No power to yellow wire
No power to red wire
Inline fuse blown Replace fuse.
Inline fuseblown
Speaker harness not connected
Incorrect spiicds or connections
Speaker wires shorting to chassis
ground or to each other
Pcwiei wli'a *rMiliiig to ¿rouriU MAke auiA wir« Is rot pinctied.
Speaker wires shorting to ground
Incorrect fuse/fuse too small
Oise reading malfunction
Track chanoe maifunclion
Receiver mourn is not soltd or
backstrap is not secure
Corrective Action
Check connection with test light.
Check vehicle fuse with test nghi.
Check/r^tacefuse.
Connect speaker harness.
Check speaker wires.
Check all splices and connections.
Check splices, insulate all bare wires.
Msite sure wire is not pinched.
install fuse of correct rating.
Press RESET button. Insert disc and try again.
Press RESET button. Insert disc and try again.
Try a different dso. The disc may be
damaged ordirty.
Press RESET button. Insert disc and try again.
Check mounting and backstrap. tighten it
r^eeded
 Loading...