

Page 1
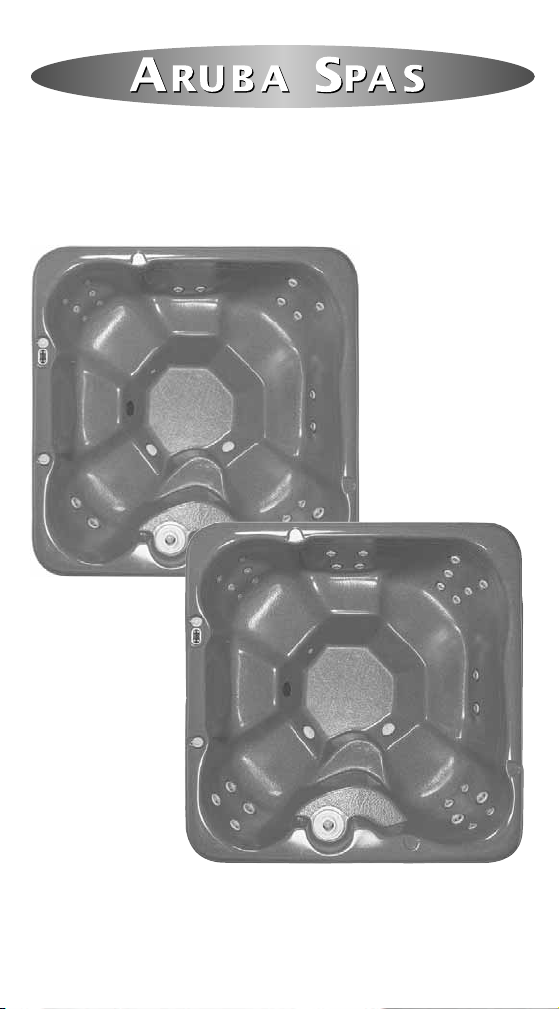
O
O
WNERS
WNERS
MANU
MANU
AL
AL
ARUBA SPAS
Box 2266 Station R
Kelowna, BC V1X 4K6
1-800-609-2227
Page 2

TTABLE OF CONTENTS
ABLE OF CONTENTS
Introduction. . . . . . . . . . . . . . . . . . . . . . . . . . . . . . . . . . . . . . . . . . . . . . . 1
How Your Aruba Spa is Built . . . . . . . . . . . . . . . . . . . . . . . . . . . . . . . 2
Getting Started . . . . . . . . . . . . . . . . . . . . . . . . . . . . . . . . . . . . . . . . . . . . 3
Tools Required For Installation . . . . . . . . . . . . . . . . . . . . . . . . . . . . 4
Items Required For The Installation Of Your Spa . . . . . . . . . . . . 4
Important Safety Instructions . . . . . . . . . . . . . . . . . . . . . . . . . . . . . . . 5
Positioning Your Spa. . . . . . . . . . . . . . . . . . . . . . . . . . . . . . . . . . . . . . . 6
Yard Installation . . . . . . . . . . . . . . . . . . . . . . . . . . . . . . . . . . . . . . . . . 6
Deck Installation . . . . . . . . . . . . . . . . . . . . . . . . . . . . . . . . . . . . . . . . 6
Indoor Installation . . . . . . . . . . . . . . . . . . . . . . . . . . . . . . . . . . . . . . . 7
Electrical Connection. . . . . . . . . . . . . . . . . . . . . . . . . . . . . . . . . . . . . . . 8
Important Safety Instructions . . . . . . . . . . . . . . . . . . . . . . . . . . . . . 8
Start Up Preparations . . . . . . . . . . . . . . . . . . . . . . . . . . . . . . . . . . . . . . 9
Initial Start-up . . . . . . . . . . . . . . . . . . . . . . . . . . . . . . . . . . . . . . . . . . . 10
Spa Operations Guide. . . . . . . . . . . . . . . . . . . . . . . . . . . . . . . . . . . . . 12
Topside Control Component Identification . . . . . . . . . . . . . . . . . 12
Filter Cycles . . . . . . . . . . . . . . . . . . . . . . . . . . . . . . . . . . . . . . . . . . . 13
Hydrotherapy Jets . . . . . . . . . . . . . . . . . . . . . . . . . . . . . . . . . . . . . . 14
Ozonators . . . . . . . . . . . . . . . . . . . . . . . . . . . . . . . . . . . . . . . . . . . . . 16
Trouble Shooting . . . . . . . . . . . . . . . . . . . . . . . . . . . . . . . . . . . . . . . 17
Chemical Maintenance . . . . . . . . . . . . . . . . . . . . . . . . . . . . . . . . . . . . 19
Initial Start-up Procedures . . . . . . . . . . . . . . . . . . . . . . . . . . . . . . . 20
Water Maintenance Schedule. . . . . . . . . . . . . . . . . . . . . . . . . . . . . 21
Conducting Proper Water Tests. . . . . . . . . . . . . . . . . . . . . . . . . . . 21
Chemical Table Of Equivalents Chart . . . . . . . . . . . . . . . . . . . . . 23
Problems Associated With Improper Water Balance . . . . . . . . . 23
Care For Your Spa. . . . . . . . . . . . . . . . . . . . . . . . . . . . . . . . . . . . . . . . . 24
Draining Your Spa . . . . . . . . . . . . . . . . . . . . . . . . . . . . . . . . . . . . . . 24
Filter Cleaning . . . . . . . . . . . . . . . . . . . . . . . . . . . . . . . . . . . . . . . . . 25
Spa Surface . . . . . . . . . . . . . . . . . . . . . . . . . . . . . . . . . . . . . . . . . . . . 25
Cabinet . . . . . . . . . . . . . . . . . . . . . . . . . . . . . . . . . . . . . . . . . . . . . . . 26
Cover . . . . . . . . . . . . . . . . . . . . . . . . . . . . . . . . . . . . . . . . . . . . . . . . . 26
Special Cold Weather Instructions. . . . . . . . . . . . . . . . . . . . . . . . . . 28
Warranty Information . . . . . . . . . . . . . . . . . . . . . . . . . . . . . . . . . . . . . 29
Warranty. . . . . . . . . . . . . . . . . . . . . . . . . . . . . . . . . . . . . . . . . . . . . . . . . 30
Trouble Shooting Guide . . . . . . . . . . . . . . . . . . . . . . . . . . . . . . . . . . . 32
Circulating System. . . . . . . . . . . . . . . . . . . . . . . . . . . . . . . . . . . . . . . . 35
Weekly Maintenance Schedule. . . . . . . . . . . . . . . . . . . . . . . . . . . . . 37
Page 3

1
INTRODUCTION
INTRODUCTION
Dear
Dear ArAr
uba Customer
uba Customer,,
Thank you for purchasing an
Aruba Spa. At Aruba Spas
our philosophy is simple,
build the best spa, back it
with an excellent warranty
and with comprehensive
customer service. The 2003
Aruba Spa includes many
features, which are designed
to ensure that your spa is
dependable and simple to
operate. This manual will
guide you
through the
set-up,
installation
and startup of your
new spa. It
will explain
how to
operate and
care for
your spa.
We believe
reading this
entire
owner’s
manual is
the simplest way to ensure the full
enjoyment of your new
Aruba Spa. It is most important that you read and follow the safety instructions
included in this manual.
You should become familiar
with all of the safety guidelines listed in this manual
and make sure you follow
them while using your spa.
At Aruba what we know
how to do best is build spas.
We have learned that quality
through simplicity is the best
way to build a spa. We
believe that knowing how
your spa is built will make
installing and operating it
easier, so the first part of this
manual explains how your
spa is built. Please take the
time to read this section of
your owner’s manual.
It is important that you keep
this manual for reference
purposes. We have tried to
make sure
this manual
includes all
the information you
will need
about your
spa.
If you have
any further
questions
or need
additional
information
please call
one of our
customer
service representatives at 1800-609-2227. We are certain
that you will find owning an
Aruba Spa as relaxing as
using it.
The highlighted terms are
used throughout this manual to indicate facts that are
particularly important for
your safety, and for maintaining your spa in good
working order.
HAZARD
Denotes risk of personal injury.
WARNING
Denotes a circumstance that
could cause personal injury or a
circumstance where damage to
the spa’s surface, structure or
equipment could occur.
IMPORTANT
Denotes extremely important
information.
Page 4

2
HO
HOW W YY
OUR
OUR
ARUB
ARUB
A SP
A SP
A IS BUIL
A IS BUILTT
At Aruba, building spas is our passion. We believe that quality through simplicity is the best way to build a spa. Over
the years we have refined our spa construction process to
achieve the best results. We are proud of the results that we
have achieved using the methods described below and hope
that knowing how your spa is made will make installing and
operating it easier.
The building process starts with the shell of the spa. At
Aruba Spas we use the thickest acrylic sheet available. Using
a thicker acrylic sheet is important because the spa shell is
formed by placing a heated acrylic sheet over a vacuum-former, which molds it into the shape of the spa. As the acrylic
sheet is formed it stretches and thins. Using a thicker acrylic
sheet ensures a stronger and more durable surface.
Fiberglass backing is then applied to provide structural support for the acrylic shell. A triple bond system is used to
ensure a complete bond is formed between the acrylic spa
shell and the fiberglass structural support. A unique type of
resin is applied as a skin coat to the outside surface of the spa
shell. This skin coat is then backed by an additional layer of
fiberglass reinforced resin. The skin coat forms a chemical
bond between the acrylic spa shell and the fiberglass structural support. This triple bond system ensures the long lasting integrity of both the spa shell and spa surface.
After fiberglassing, the holes for the jets are precision drilled
through the spa shell. The rough surface of the fiberglass
backing around the holes is then machined and smoothed.
We take this extra step in manufacturing to ensure the jets
seat against a smooth surface for a tight fit and seal.
The plumbing system is then installed and lines are attached
to each of the jets. A manifold is installed at each junction
between the main plumbing line and the lines leading to the
jets. Running a short line from the manifold directly beneath
the jets provides the best water pressure and allows the jets
to operate at their full capacity. Once the spa is plumbed it is
water tested as part of our quality inspection process to
ensure that there are no leaks.
The spa shell is then lowered into the framed cabinet or “spa
skirt”. At Aruba Spas we use this innovative process to
ensure the structural integrity of our spas. Wooden supports
Page 5

3
are then custom fitted by hand to the areas underneath the
seats and stairs to provide additional strength to these areas.
This process recognizes that every spa is not identical and
ensures individual inspection and custom fitting of each spa.
The spa shell is then insulated with 2 LB closed cell foam. As
Aruba Spas are made in Canada we know Canadian weather conditions. With this in mind we use enough insulation to
get the maximum obtainable R factor from our insulating
foam. The use of closed cell foam ensures that water cannot
be absorbed into the insulation. The insulation also locks all
supports into place and secures the spa to the spa skirt.
The electronic operating system, which controls the heating,
filtration and lighting systems is then installed and pre-tested in our factory. We have selected a well designed operating system that is easy to use and features a number of energy-saving options and safety options such as child lock-out.
The final touch to the spa is the attractive spa skirt with
strong, stable corners and removable side panels fitted into
the frame to allow easy access to all plumbing. The spa skirt
is made from solid tongue-in groove, red cedar and is
designed to use shorter lengths of wood that may otherwise
not have been utilized. We only use wood that has been harvested from select-cut forests using environmentally responsible techniques.
GETTING ST
GETTING STARAR
TED
TED
Your spa comes complete with the following items:
• HTC-4 R12 tapered Grey Spa Cover with locks and Spa
Cover Limited Warranty.
• Digital Pack and Topside Unit
• Aqua Flo Flow-Master Owners Manual
• Aruba Spas Limited Warranty Registration
• Allen Key
Please check to make sure you have received all these items.
In addition, if you have ordered any extra accessories please
check to make sure that they have been included with your
spa.
Page 6

4
TOOLS REQUIRED FOR INSTALLATION
• Voltmeter
• Ammeter
• Ohmmeter
• Screwdrivers (Phillips & flat head)
• 2 wire restrainers
• Wire cutters
• Wire strippers
• #6 AWG 3 wire Chg: (plus ground) if spa is more than 30ft
from the Main Breaker Box.
ITEMS REQUIRED FOR THE
INSTALLATION OF YOUR SPA
• At least four people are required at time of delivery to
place your spa into position.
• 220 Volt Electrical Service
• An Electrician to do the electrical connection.
• 50 Amp GFCI circuit breaker. (see page 8)
• An Allen Key to open and remove the access panel. (supplied by Aruba Spas)
Page 7

5
1) Children should not use spas
or hot tubs without adult supervision.
2) Do not use spas or hot tubs
unless all suction guards are
installed to prevent body hair
entrapment.
3) People using medications
and/or who have an adverse
medical history should consult a
physician before
using a spa or
hot tub.
4) People with
infectious diseases should not
use a spa or hot
tub.
5) To avoid
injury, exercise
care when entering or leaving a
spa or hot tub.
6) Do not use
drugs or alcohol
before or during
the use of a spa
or hot tub to
avoid unconsciousness and
possible drowning.
7) Pregnant or
possibly pregnant women should consult a
physician before using a spa or
hot tub.
8) Water temperature in excess
of 40 degrees C (104 degrees F)
may be injurious to your health.
9) Before entering a spa or hot
tub, check the water temperature readout on the topside control.
10) Do not use a spa or hot tub
immediately following strenuous exercise.
11) Prolonged immersion in a
spa or hot tub may be injurious
to you health.
12) Do not permit electric appliances (such as light, telephone,
radio, or television) within 1.5
meters (5 feet) of a spa or hot
tub.
13) Maintain water
chemistry in accordance with manufacture’s instructions.
HYPERTHERMIA
Hyperthermia occurs
when the internal
temperature of the
body reaches a level
several degrees
above the normal
temperature of 37
degrees C (98.6
degrees F). The
symptoms of hyperthermia include
drowsiness, lethargy
due to an increase in
the internal temperature of the body. The
effects of hyperthermia include:
• Unawareness of
impending heat
• Failure to perceive heat
• Failure to recognize the need
to leave the spa
• Fetal damage in pregnant
women
• Unconsciousness and danger
of drowning
IMPOR
IMPORTT
ANT SAFETY INSTRUC
ANT SAFETY INSTRUC
TIONS
TIONS
WARNING
It is most
important that
you read
these safety
instructions
before
using your
spa.
HAZARD
The use of
alcohol or
drugs greatly
increases the
risk of hyper-
thermia in
spas.
Page 8

6
POSITIONING
POSITIONING YY
OUR SP
OUR SPAA
Your spa is self-contained. You can place it on a deck, patio,
in your yard, or indoors. Proper site location is an important
element of the overall enjoyment of your new spa, so make
sure you take enough time to properly plan out the positioning of your spa. The following information is provided to
help you determine where to place your spa. If you have any
questions or concerns about where to locate your spa, please
contact our customer service department.
YARD INSTALLATION
Position your spa above ground in an area with good
drainage, on a level surface that contacts the spa fully. The
ideal base is a concrete pad, however compacted gravel,
paving stones or railway ties may also be used. Locate the
spa so the equipment door is readily accessible. The equipment has to be above grade and not subject to flooding. If
using compacted gravel, it must be on a firm level base and
it must be contained in a secure wood or concrete border so
that the loose gravel cannot shift once the spa is in place.
DECK INSTALLATION
Before placing your spa on a deck or other raised platform,
you must have the structure checked for its loading capacity
by an Engineer or competent Contractor. Before placing the
spa on the deck, you should place 1.5” high-density foam
insulation under the spa. This helps insulate the spa and prevent the transmission of noise. At the same time providing
the underside of the spa with extra insulation.
WARNING
One must support the entire base of the
spa, from the outside edges to the centre, to
support its weight. Improper placement of
your spa may void the warranty.
IMPORTANT
Check with your local building codes with
regards to fencing and gate requirements.
Your spa measures 84”x84”x34” the dry
weight is 650 lbs, with water 4000 lbs.
Page 9

7
INDOOR INSTALLATION
Before attempting to place the spa indoors check the door
openings to ensure that they are large enough for the spa to
fit through. In addition, you must have the structure
checked for its loading capacity by an Engineer or competent
Contractor. The minimum loading capacity required is 100
lbs per square foot. The spa should be placed in a well-ventilated area so that excess condensation can be removed from
the area where the spa is located. Locate the spa so the
equipment door is readily accessible for maintenance and
service needs, and ensure you have an area with proper
drainage.
You may also wish to think about the following considerations before installing your spa:
• location to facilitate adult supervision if children are using
the spa
• location relative to trees (falling leaves and shade)
• exposure to sunlight
• landscaping and night-time lighting
• view from your house
• wind direction
• storage area for maintenance equipment and chemicals
• adjustment of sprinklers so they do not hit spa or spa cabinet
WARNING
Do not permit electric appliances (such as
light, telephone, radio, or television) within
1.5 meters (5 feet) of a spa or hot tub.
Page 10

ELECTRIC
ELECTRIC
AL CONNECTION
AL CONNECTION
A certified electrician must make all electrical connections to
your spa, in accordance with all applicable electrical codes
for your area. The spa’s GFCI breaker must be sized in accordance to electrical requirements of spa. The Full Load
Amperage (FLA) is recorded on the spa’s nameplate.
ELECTRICAL CONNECTION ACCESS
To access Electrical connections:
Electrical connections are within the spa pack. There are 2
wire access locations on either side of the front panel. The
electrical requirements are 220V with a neutral.
IMPORTANT SAFETY INSTRUCTIONS
1. Read and follow all instructions.
2. A ground terminal is located inside the supply terminal
box. To reduce the risk of electric shock this terminal must
be connected to the grounding means provided in the electric
GND
N
L1
L2
WARNING
Failure to use a GFCI breaker for electrical
connection to your spa could result in seri-
ous harm or death. No electrical power
should be available near the spa without
GFCI protection.
WARNING
Electrical codes change from Province to
Province. Check with your electrician for
the electrical codes in your area.
8
Page 11

9
supply service panel with a continuous copper wire equivalent in size to the circuit conductors supplying this equipment.
3. At least two lugs marked “Bonding Lugs” are provided on
the external surface or inside the supply terminal box. To
reduce the risk of electric shock, connect the local common
bonding grid in the area of the spa to these terminals with an
insulated or bare copper conductor not smaller than #6
AWG .
4. All field installed metal components such as rails, ladders,
drains or other similar hardware within 3 meters of the spa
shall be bonded to the equipment grounding bus with copper conductors no smaller than #6 AWG.
5. Save these instructions.
STSTARARTT-UP PREP
-UP PREP
ARA
ARA
TIONS
TIONS
Before performing the operations in this section, make sure
you have read and understood all of the previous instructions set forth in this manual. Make sure the spa has been
installed correctly, including electrical wiring connections as
specified in the previous sections. The following procedures
must be done in the order they are listed.
Things to check before turning on the power to the spa:
1) Make sure the spa is clean, and that there is no foreign
material in the spa.
WARNING
Unions must be hand tightened before filling the spa with water. Failure to do so may
cause the unions to leak, which can damage
the spa pack, and voids the warranty.
WARNING
Do not run the pump until the spa is full of
water. Running the spa pump without
water could cause damage to the operating
system and void the warranty.
Page 12
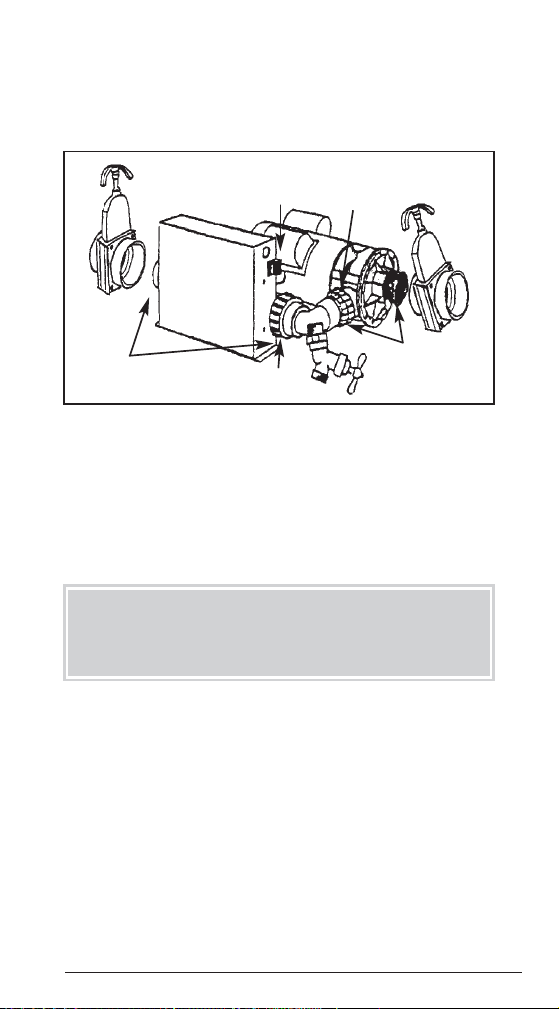
2) Check all four unions (or six if you have a circulating system) and ensure that they are hand tight. There are two white
unions on the pump: one on the inlet side and one on the discharge side. See equipment diagram.
There are also two black unions located on each end of the
stainless steel heater barrel. The unions can come lose during
shipping, and may need to be tightened. Do not over tighten
the unions. If a union leaks after being hand tightened close
the knife valves to stop the flow of water. Loosen the union
that is leaking and inspect the O-ring for a possible crimp.
Reinstall the O-ring and retighten the union.
3) To fill your spa, place garden hose directly in the filter. The
spa holds 360 gallons (1620 litres) of water. You will notice
that there is an indented wave in the spa. This is the water
line. It is important that you maintain your water at this
level.
INITIAL ST
INITIAL STARARTT
-UP
-UP
Before proceeding with the initial start-up, make sure you
have completed the start-up preparations from the previous
section. The following procedures must be done in the order
they are listed.
WARNING
Only turn union one turn
counter clockwise.
10
Knife Valve #2
Knife Valve #1
Hose Bib
SPA
PACK
Black
Unions
White
Unions
Pump
Union #2
Union #1
Page 13

11
1) Make sure all of the jets are in the full open position, (refer
to Hydrotherapy Jets, page 13).
2) The Electronic Operating System spa control has automatic functions that operate upon start-up and normal operation
to protect the system. Power up system and “Pur” will
appear for 30 seconds while system is in purge mode then
normal operation will resume.
3) With the breaker in the “On” position check to see if water
is circulating. If not then you must prime the pump. To prime
the pump turn union #1 slowly 1/2 to 1 turn to release air,
being careful not to open too far. After you hear the water
begin circulating, retighten the union. The pump must be
primed every time the water is changed. Check to see if
water is coming from all the jets.
4) At the end of the boot up, 30 seconds, the pump will be in
high speed until the water temperature reaches 52°F. If your
water temperature is below 39°F, at the time of fill, the topside control will toggle back and forth reading th2/39. The
pack system is in lockout and the pump will run in high
speed until the water temperature reaches 52°F. Once the
water temperature has reached 52°F, the pump will then run
in low speed. You can now set your water temperature to
your desired level.
Note: At the time of boot up, your spa will automatically go
through its first filtration cycle for 2 hours.
5) Press the pump button on the control panel to test if the
pump is changing from low to high-speed, (refer to Topside
Control Component Identification, next page). You will be
able to tell the difference between low and high-speed by the
sound of the water moving through the spa’s plumbing system. Press the pump button again to return the pump to low
speed.
6) Once the water has reached the set temperature add chem-
HAZARD
This system should be set to maintain
a water temperature NO GREATER THAN
40° CELSIUS (104° F).
Page 14
icals to adjust the water balance (see Chemical Maintenance,
page 19).
7) The spa pack is thoroughly tested before shipping. The
most common cause of immediate pack failure is dry firing
(this occurs if the pump is running and the water is not circulating) and this type of failure is not covered by warranty.
8) If you experience any problems with the procedures above
contact an Aruba customer service representative.
9) After your spa is operational you must install the Spa
Cover latches. The locks will already be attached to the end
of the straps. Position the tie strap so it is fully extended,
without stretching. Locate the 2 holes on the locking mechanism, marking them with a pen. Remove the locking mechanism from the strap and fasten to the spa.
SPSPA OPERA
A OPERA
TIONS GUIDE
TIONS GUIDE
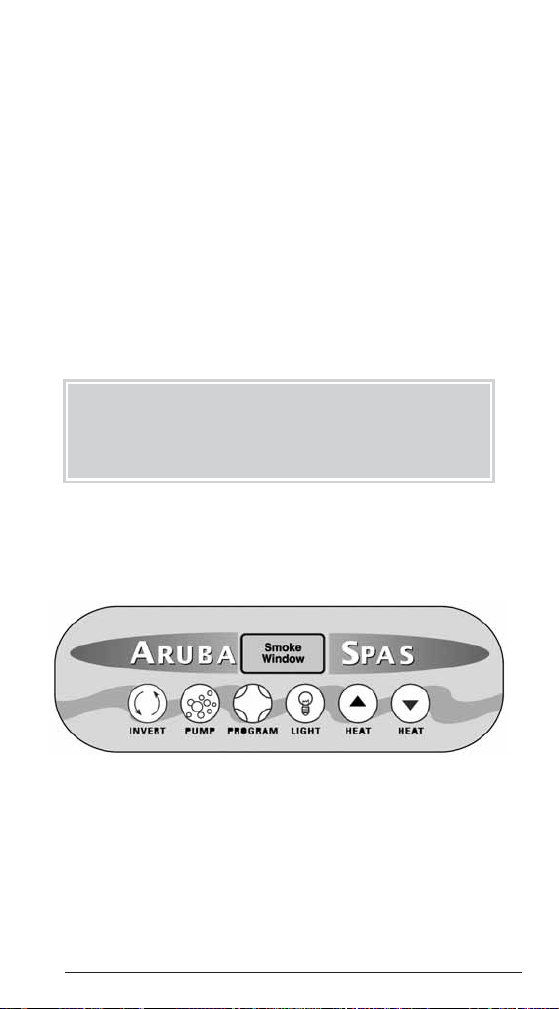
TTopside Contr
opside Contr
ol Component Identification
ol Component Identification
Heat
Heat s
and Heat
and Heat t
buttons
buttons
The spa’s thermostat is to provide you with optimum control
of the spa water temperature. This temperature set point can
be adjusted from 21° C (70° F) to 40° C (104 degrees F).
Invert Button
Invert Button
This button will flip the LED readout 180°.
HAZARD
Never leave an uncovered spa unattended,
and never leave a covered spa unlatched.
12
Page 15

13
Pump button
Pump button
The control panel button designated “PUMP” activates the
pump when pressed. The pump sequence is low speed, high
speed, off. The pump, when the “PUMP” button is manually pressed, turns off after thirty minutes (a thirty-minute
default).
NOTE: You will not be able to turn off your pump if your spa is in
a filter cycle, heating, or in freeze protection (less than 52°F).
Light
Light
The control panel button designated “LIGHT” activates the
spa light when pressed. The light turns off after two hour (a
two-hour default).
Filter Cycle Pr
Filter Cycle Pr
ogramming
ogramming
Proper filtration is an important key to maintaining the clarity of your spa’s water. The filter system is designed for
unsurpassed effectiveness at removing debris and suspensions from the water while the water is circulating.
By pressing the Heat key and the Program key at the same
time, you can adjust your filtration cycle from the factory setting of 2 hours every 12 hours, in 1-hour intervals.
NOTE: If the water temperature does not drop the internal timer
still operates the filter cycle to ensure proper filtration.
CELSIUS OR FAHRENHEIT
By pressing the Program key and the Light key at the same
time you can change the degree settings from Celsius to
Fahrenheit or vise versa.
AIR CONTROLS
There are two air controls beside the topside control panel.
By turning these controls you may adjust the amount of air
going to the jets. When fully open you are getting the maximum amount of air for full hydrotherapy action. To reduce
the amount of air coming out of the jets simply close the air
controls.
Page 16
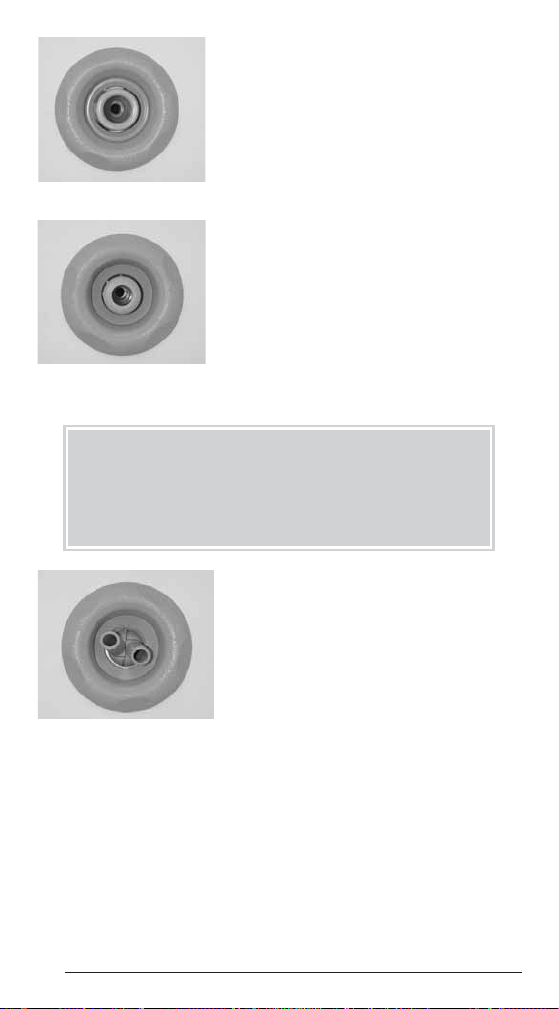
HYDROTHERAPY JETS
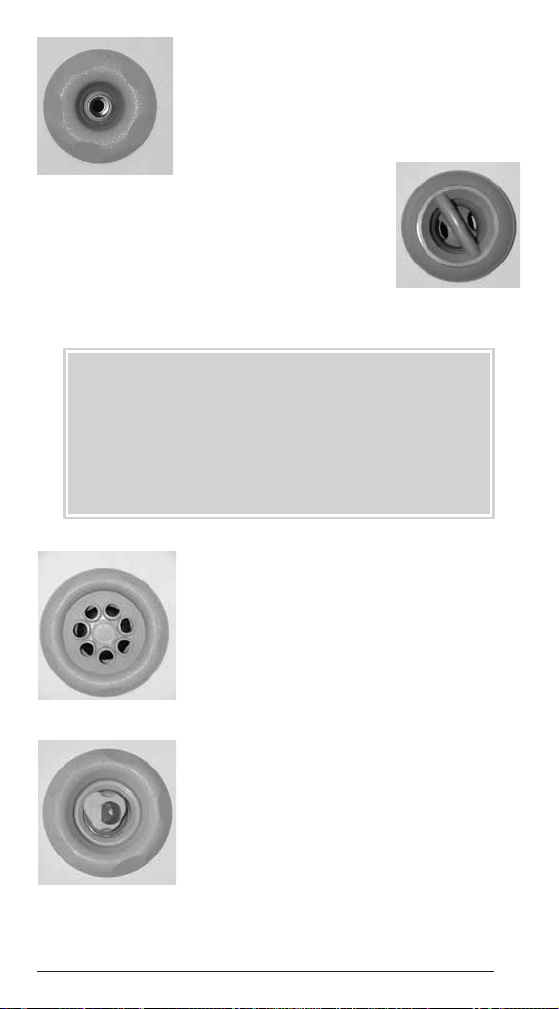
Your spa is equipped with the following jets:
You can adjust the volume of water
from these jets by turning the face
plate clock wise to decrease the volume of water and counter clock wise
to increase it. You can also change the
direction of the water flow by pushing
on the side of the small orifice in the
centre of the trim kit.
You can adjust the volume of water
from the micro swirl jets by turning
the face plate 1/2 turn clockwise to
decrease the volume of water and
counter clock wise to increase it.
The micro-swirl jets on your spa are
interchangeable. To remove either
trim kit you must place a screwdriver
between the face plate and the acrylic
spa surface then push with a gentle upwards motion and the
trim kit will pop out of the jet body. To replace just place the
trim kit into the jet body and gently push it into place. Be
careful not to scratch the spa surface with the screwdriver
and do not force the trim kit into or out of the jet body. To
remove adjustable jets, pop them out an inch then unscrew
them.
WARNING:
All jet trim kits must be properly seated or
air flow may be restricted
14
Micr
Micr
o Swirl
o Swirl
Adjustable jets
Adjustable jets
Micr
Micr
o Dir
o Dir
ectional
ectional
Page 17
15
The cluster jets are small single orifice
jets that are not adjustable and cannot be
removed.
The purpose of the ozone jet is to inject
ozone into your spa. It is not to be used for
hydrotherapy. If you do not have an ozonator water will still flow into the spa from
this jet.
You can adjust the volume of water from
both the swirl jets and the massage jets
by turning the face plate clockwise to
decrease the volume of water and counter clockwise to increase the volume of
water.
The massage jet provides a wide pattern
of massage with a high volume of water
that flows in a large circular pattern for
deep muscle massage. The swirl jets
provide a similar circular pattern that is
more focused to a smaller area. These
jets working together in the same seating
area provide you with a large volume of
hydrotherapy massage.
WARNING
Do not block Ozone Jet at anytime.
Blocking the Ozone Jet may result in
damaging the ozonator and voiding the
warranty.
Massage Jet
Massage Jet
Swirl Jet
Swirl Jet
Cluster Jets
Cluster Jets
Ozone Jet
Ozone Jet
Page 18

CHILD LOCKOUT (LOC)
This special feature is used to prevent unauthorized use of
the spa. This system incorporates a unique panel locking
system which disables the controls on the panel. The temperature readout flashes in this function.
You can enable the lockout function by pressing the Heat key
and Light key at the same time. You can disable the lockout
function by doing the same.
OZONATORS-OPTIONAL
(Standar
(Standar
d on the
d on the ArAr
uba Deluxe Spa)
uba Deluxe Spa)
Ozone is injected into the spa’s water during the filtration
cycle. The ozone is injected into the water to supplement
chemical sanitizers, oxidize organics and control minerals. If
during a filter cycle the pump is manually turned on, the
ozonator will turn off. The ozonator will remain off until the
start of the next filter cycle.
WARNING
Do not block Ozone Jet at anytime.
Blocking the Ozone Jet may result in
damaging the Ozonator and voiding the
warranty.
IMPORTANT
It is necessary to use Chlorine or Bromine
chemical treatment with an ozonator.
WARNING
This system only accepts a 220v Ozonator.
16
Page 19

17
TROUBLE SHOOTING
This is a self-diagnostic control system. The system will
automatically display an alphanumeric symbol if a problem
is detected.
No display at topside
No display at topside
- Check that the topside is correctly plugged into spa
pack.
- Check the breaker
- Check that connection to main board is clean and
sound
Display flashes "th1/39" on system start up
Display flashes "th1/39" on system start up
- Check that the temperature sensing probe connection
to main board is clean and sound
Display flashes"th2/curr
Display flashes"th2/curr
ent temperatur
ent temperatur
e" on system
e" on system
start up
start up
- Check that the temperature sensing probe connected to
the main board is clean and sound
Note: a new temperature-sensing probe may be needed for the above
2 points.
Display flashes "th2/39" on system start up
Display flashes "th2/39" on system start up
- This indicates that both thermisters are detecting spa
water temperature of less than 39° F/4° C or they are
both disconnected (open). The pump will run in this
condition.
Display flashes "OH" (OVER HEA
Display flashes "OH" (OVER HEAT)T)
- This indicates that the spa water temperature is over
112° F. The system should shut down in this state and
will re-start automatically when the water cools below
112° F
Display flashes "hot" (OVER HEA
Display flashes "hot" (OVER HEA
T)
T)
- This indicates that the heater body is over 112° F. The
system should shut down in this state and will re-start
automatically when the water cools below 112° F.
Display flashes "HL" (HIGH LIMIT)
Display flashes "HL" (HIGH LIMIT)
- This indicates that either the heater or the spa has
reached 118° F or higher. The system will not re-start
automatically. To re-start the system, the water temperature must be below 112° F and the heater key at the
topside control must be pressed.
Page 20

Display flashes "FLO" (FLOW)
Display flashes "FLO" (FLOW)
- This indicates that there is a water flow problem or
defective pressure switch.
- You may have an air lock at the heater barrel. See page
11 for priming the pump.
- Make sure filters are clean
- Check that service valves are open
- Ensure water level is at water line
- Check for obstruction of flow
Display flashes "FLC"
Display flashes "FLC"
- This indicates that the flow switch is stuck in the
closed position and should be replaced.
Erratic operation at topside panel
Erratic operation at topside panel
- Shut off system and restart
- Check for debris inside topside panel control housing
- Check cable connection at the topside control, remove,
clean and reconnect
- Try new topside control
No heat
No heat
- Check the topside control for "HL". This indicates that
the system has overheated. Make sure the temperature
has fallen to less than 112° F and press the heat key to
reset.
- Check that the temperature set point is higher than
actual tub temperature.
- Check for flashing LED at topside control to indicate
heat demand
- Check to see if the pilot light at the equipment panel is
on. This indicates if power is actually getting to the
heater element. If this light is on and there is still no
heat, the element should be checked for continuity. If
there is no continuity, the element needs to be replaced.
Over
Over
heat
heat
- If the water is too hot and the high limit has tripped the
breaker, the water must be allowed to drop to less than
112° F before it will reset. Reset by pressing the heat
key at the topside control.
- The circulation of the water may be too low, allowing
the heater body to overheat. Be sure that all valves are
fully open to allow maximum water flow over the
heater element.
18
Page 21

19
The friction and radiant heat from the pump motor can cause
an extremely high ambient temperature around the spa and
the equipment causing an overheat condition. If this condition is suspect, try running the spa with the equipment door
off to see if it still overheats.
GrGround Fault Interr
ound Fault Interr
upter T
upter T
rips
rips
- Check if it does it only when heat turns on, if so check
element by removing the power to the element terminal and turn the heat on. If it only faults when the element is connected with power, the element has a
ground fault and must be replaced.
- This can be done with the pump, ozonator, or any
other peripheral equipment as a process of elimination
to see where the fault may be.
- Be sure that the neutral on the GFCI has been wired
properly in the main panel.
Impr
Impr
oper T
oper T
emperatur
emperatur
e Measur
e Measur
ement
ement
- Remove temperature sensor from it’s current location
and submerge directly into the spa/hot tub water.
Compare it to another accurate digital thermometer.
This will tell you if it is the sensor or the application.
(See temperature sensor in the description and use of
controls section of this manual).
PrPressur
essur
e Switch
e Switch
- The pressure switch is not adjustable.
CHEMIC
CHEMIC
AL MAINTEN
AL MAINTEN
ANCE
ANCE
Your spa comes with a cartridge filter system. Filtering of
the water helps to maintain water cleanliness and clarity.
While the filter traps most solid materials, it is still necessary
to add a sanitizer such as bromine or chlorine to the water to
control bacteria, algae and to oxidize any organic materials
in the water. This section will explain how to use bromine to
maintain clean, clear and odor-free water. Chlorine is also
available through your local Pool and/or Spa retail outlet.
When purchasing from your local retailer, it is recommended
that you bring a sample of your water for analysis and guidance on which chemicals you may require.
Chemicals and test strips can be purchased directly from
Aruba Spas by calling us at 1-800-609-2227.
Page 22

INITIAL START UP PROCEDURES
(dosages are for 360 gallons (1620 litres) of water)
1. Use your test strips or test kit to test your fill water for pH,
total alkalinity to determine any water balance adjustments
necessary.
2. When filling your spa with water, add STAIN & SCALE to
protect your spa against staining and scale formation on the
spa walls and on the heater element.
3. You must balance your water so that it is neither alkaline
(scale forming) nor acidic (corrosive). Balanced spa water
should be between 7.4 - 7.6 on the pH scale, with total alkalinity in the range of 125 - 150 ppm. Use SPA INCREASE (pH
up) or SPA DECREASE (pH down) as needed to adjust the
pH. Add alkalinity increaser to raise total alkalinity.
WARNING
Improper chemical maintenance can
damage the spa surface and/or equipment,
and will void the warranty.
WARNING
Make sure you dilute all chemicals with
spa water before adding them to the spa.
Adding full strength chemicals to the spa
may damage the spa surface and will void
the warranty.
IMPORTANT
You must use either chlorine or bromine
based chemicals. You may change from
chlorine to bromine without emptying the
tub. If you are changing from bromine to
chlorine you then must empty the tub and
start with fresh water. Never mix chlorine
with bromine out of the water.
20
Page 23

21
4. Once your water has reached the set temperature, add
your choice of sanitizer, bromine or chlorine. The importance
of maintaining an adequate level of sanitizer in your spa can
not be overemphasized. Warm water presents a fertile environment for the growth of bacteria and viruses. This growth
is prevented when adequate sanitizer levels are continuously maintained.
WATER MAINTENANCE SCHEDULE
WWeekly
eekly
1. Sanitizer - check to insure sanitizer level is at the right
range. Add sanitizer when necessary.
2. Add a sequestering agent to prevent scaling and staining.
3. Add a flocculent to spa water. This will quickly clean and
brighten hazy, cloudy water caused by microcontaminants in
the water that are too small for the filter to remove.
4. If you are using bromine or chlorine tablets, it is also recommended to add a shock treatment on a fresh fill and weekly thereafter. If the spa has had high use during the week, an
additional shock treatment would be required.
*Note: When adding a shock treatment, please insure the spa cover
is left off the spa at least 30 minutes, to allow the “gassing off”
process. It also saves wear and tear on your spa cover.
5. You may occasionally need to use a small amount of ANTI
FOAM to reduce foaming and sudsing should it occur. Soap
residue will cause foaming - rinse out bathing suits well.
CONDUCTING PROPER WATER TESTS
1. Total alkalinity is the key to water balance. Always adjust
total alkalinity first, and then pH.
WARNING
Sanitizers such as Sodium
Tri-chlor type chlorine (tablets/sticks), calci-
um hypochlorite, sodium hypochlorite, or
any chemical that may remain undissolved
on the spa surface will damage your spa
and will void the warranty completely.
Page 24

2. Water should be circulating before you take your sample.
If the pump has been off, turn it on for a few minutes. If you
are using a test kit rinse the sample vial 2 or 3 times with the
spa water before you take your sample. Sample the water
from 46 cm (18”) below the water surface. If you are using
test strips they should be immersed to a depth of 46 cm (18”)
and then swirled three times. Follow the manufacturers
directions carefully when performing your water test with
either the test strips or the test kit.
3. The ideal range for proper water maintenance is as follows:
BROMINE 3.0 - 5.0 ppm
CHLORINE 1.0 - 3.0 ppm
pH 7.4 - 7.6 ppm
ALKALINITY 125 - 150 ppm
4. Bromine (or Chlorine) levels need to be tested daily.
5. pH levels need to tested daily.
6. The water in your spa should be hard (bypass water softener). If you suspect you have soft water, you may need a
calcium increaser. Check with your local spa store.
7. Alkalinity levels need to be tested weekly.
8. Water testing should be done at home using test strips or
an accurate test kit, or by taking your water to a spa or pool
retail outlet and having them test your water sample (you
should expect to pay a nominal fee for this service).
IMPORTANT
If your bromine (or chlorine) reading
is above 6.0 you may obtain a false result
when testing for pH. In this case,
lower the chlorine or bromine before per-
forming any other tests.
22
Page 25

23
CHEMICAL TABLE
OF EQUIVALENTS CHART
15 ml = 1 TBS
4 TBS = 1/4 cup
15 g = 1 TBS
PROBLEMS ASSOCIATED WITH
IMPROPER WATER BALANCE
Low pH:
Low pH:
• causes rapid sanitizer loss.
• causes eye irritation and itchy skin.
• corrodes equipment
Solution: add pH increaser (pH up) to raise the pH levels.
High pH:
High pH:
• forms scale.
• causes short filter runs.
• clouds water.
• reduces sanitizer efficiency.
Solution: add pH decreaser (pH down) to lower the pH
levels.
Low Sanitizer Levels:
Low Sanitizer Levels:
• allows growth of bacteria and viruses in spa water.
Solution: refer to Chemical Maintenance, Initial Start Up
Procedures, page 19.
Page 26

Causes of pH change:
Causes of pH change:
• adding water.
• rain.
• bather load.
• adding chemicals.
• dust.
• algae.
CCARE FOR
ARE FOR YY
OUR SP
OUR SPAA
DRAINING YOUR SPA
Drain and re-fill the spa as indicated below:
Average Use: Every 60 - 90 days
Heavy Use: Every 30 days
After Parties: Drain
Before draining your spa you may add whirl-o-clean to the
warm water and start the pump for about 30 minutes. This
will help in eliminating grease and oils in the plumbing and
jets.
TTo drain the spa:
o drain the spa:
1. Turn off all power to your spa.
2. Attach a hose to the hose bib at the bottom of the spa and
gravity drain by the siphon method.
3. Clean the surface (see “Spa Surface” later in this section).
4. Refill the spa. Follow the initial start-up procedures to reprime the spa.
WARNING
Do not leave your spa exposed to direct
sunlight when there is no water in the spa.
Exposure to direct sunlight could damage
the spa shell and void your warranty.
24
Page 27
25
FILTER CLEANING
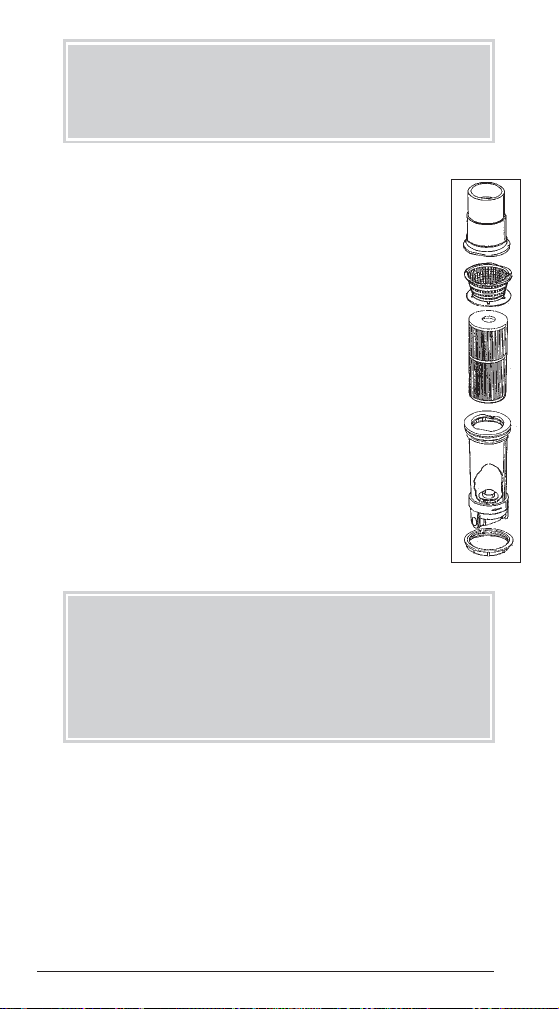
1. Your spa is equipped with a top access filter.
To access the filter cartridge, remove the skimmer basket and filter cartridge.
2. Once a week remove filter, just hose it off well
and replace it. Every 4-6 weeks properly clean
your filter in a filter cleaner solution. Soak 4-6
hours (or overnight).
3. Once cleaned, re-install filter cartridge and
skimmer basket.
4. How often the cartridge filter needs to be
cleaned depends largely upon how many bathers
are using the hot tub. With average use we recommend cleaning the cartridge filters approximately every 4-6 weeks. However, more frequent or greater numbers of people may require
more frequent cleaning.
SPA SURFACE
Your spa has a very high quality acrylic surface. Stains and
dirt will generally not adhere to the surface. Do not use
household products for cleaning the spa surface. Be careful
of detergents as they may contain phosphates that may contaminate the water and will cause foam build-up. Also,
many cleaning agents contain abrasives which will scratch
the surface, and therefore must not be used. After cleaning,
be sure to rinse the surface with water to ensure all excess
IMPORTANT
Be sure to thoroughly rinse the filter
cartridge to thoroughly remove any
cleaning agents. If this is not
accomplished, foaming of the water may
occur during the filter cycle of the hot tub.
WARNING
Make sure you replace your filter cartridges
at least once every six months.
Page 28

cleaning solution is properly diluted and removed. This will
avoid unnecessary reaction of skin irritations from chemical
contact to the body. Follow product recommendations. You
may also wish to periodically polish the acrylic surface with
spa polish (Gel Gloss).
CABINET
When properly cared for the Cedar cabinet of your spa will
maintain its good looks for many years. All woods react to
the elements differently by expanding and contracting, so
make sure you re-stain the wood every 10 to 12 months with
an oil based stain to thoroughly protect the wood. Clear
wood finish can be used as a good wood sealing agent. The
wood must be properly maintained.
COVER
With safety and convenience in mind the spa cover has been
designed with child safety latches and a slope designed to
create a natural run-off for rain water. Please ensure the use
of spa straps and latches to secure the cover when not in use.
This will help to discourage unsupervised children from
entering the spa and keep the spa cover secure in high-wind
conditions.
DO NOT allow snow to build up on the cover as it is not
intended to bear weight. Weight on the cover may cause the
edges of the cover to curl, or progressively warp and bow the
cover, or in extreme cases cause the foam inserts to break. To
avoid this keep all weightbearing objects off of the cover.
Water and snow must be swept off to keep them from accumulating or puddling on the cover. Should puddling occur,
WARNING
Do not use caustic solutions as they may
damage the spa shell surface and void the
warranty.
WARNING
When cleaning the surface use only acrylic
cleaners.
26
Page 29

27
unzip the vinyl, remove the foam insert, turn it over and reinsert it.
The thermal cover should be cleaned regularly. As often as
is necessary wash the cover with a mild soap and rinse with
clean water. All vinyls contain plasticizers which must be
maintained to prevent drying out, cracking, flaking and
deterioration. These plasticizers migrate out and escape naturally through time. Sun and cold speed up this process.
Application of a vinyl cleaner and conditioner at least once a
month will retard this deterioration. We recommend the use
of 303 Protectant.
The vinyls used in your spa cover are marine treated, but
will deteriorate faster when exposed to high levels of chlorine, bromine, ozone or other active chemicals. Each time
Chemicals are added, remove the cover completely and place
it far enough away so that splashing will not reach the cover.
The cover handles and tie downs are double reinforced with
thick vinyl coated rip-stop PVC material. However, mistreatment by sudden jarring motions can damage them. To prevent damage any handling of the cover must be done in a
gentle manner.
IMPORTANT
Fading and discolouration
of the spa cover will occur naturally
with extended exposure to the sun.
WARNING
The cover is not a safety cover. Do not
stand, sit or lie on it or permit any heavy
weight to rest on it. This will damage the
cover and void the warranty.
Page 30

SPECIAL COLD
SPECIAL COLD
WEA
WEA
THER
THER
INSTRUCTIONS
INSTRUCTIONS
Your spa is designed for year round use and winter operation. Winter is also perhaps the most enjoyable season for spa
use. We also recommend continuous operation throughout
the winter months because it is very difficult to get water out
of all of the plumbing lines. If for some reason you must
close down your spa in the winter we recommend you winterize it as follows:
1. Drain your spa completely. You may tip your spa on edge
and use a wet vacuum or blower to evacuate as much water
as possible from the spa. The idea is to get all the water out
of the plumbing lines and equipment.
2. Once the spa is completely drained, open the hose bib and
loosen the unions to allow the water to expend freely within
the system. Also, remove the drain plug on the bottom of the
pump. This should prevent any ice from expanding and
damaging drainpipes and fittings. The key is to eliminate
any sealed areas in the system that may contain water. Your
local pool and spa retailer may provide this service at a nominal fee.
3. If you receive a heavy snowfall during the winter, you may
want to build a temporary cover over the top of your spa.
This can be done with 1/2” sheets of plywood supported by
2’ x 4’ cross members.
WARNING
Any damage caused to the spa by freezing,
once it has been drained for the winter, is
not covered by warranty.
WARNING
Do not use solvents, petroleum based
products, abrasive cleaners or strong
detergents. Do not use products that
contain silicone or alcohol. Use of these
products will damage the cover and void
the warranty.
28
Page 31

29
WWARRANTY INFORMA
ARRANTY INFORMA
TION
TION
We are pleased to announce that Aruba Spas has an excellent
and secure warranty program. This program offers the best
protection because it is backed by “full reimbursement contractual liability insurance” which protects the customer for
the full length of the term of the warranty. Make sure you
return the Warranty Registration Card that comes with your
spa.
If you encounter a problem with your spa please take the following steps.
1. Refer to the Trouble Shooting guides on page 17 and 32.
Use these guides to determine what may be wrong with your
spa. This is important information to give the service technician. In addition, checking the guides will help you to determine if you need to call for warranty assistance.
2. If you need assistance in trouble shooting call
1-800-609-2227.
IMPORTANT
Smart Protect Warranty certificate is on
page 30. Please make sure you read this
document carefully. It is important to
understand this warranty
and its exclusions.
For warranty service contact a
Smart Protect Warranty service agent at
1-877--877-2087
Page 32
LIMITED
WARRANTY
RIDGEWOOD ENTERPRISES LTD., the manufacturers of ARUBA SPAS extends this
limited warranty solely to the original purchaser of any ARUBA brand spa
manufactured after January 1, 2003.
FIVE YEAR LIMITED SHELL STRUCTURE and SURFACE
ARUBA SPAS warrants the spa against water loss due to defects in the spa shell for
a period of five years from the original date of purchase. ARUBA SPAS warrants
the interior surface of the spa against blistering, cracking, or delaminating for a
period of five years from the original date of purchase.
FIVE YEAR LIMITED NO LEAK
ARUBA SPAS warrants the spa against loss of water due to defects in the fittings
and plumbing lines for a period of five years from the original date of purchase.
ONE YEAR LIMITED SKIRT
ARUBA SPAS warrants the wood cabinet against defects in workmanship and
materials (excluding skirt finish) for one year from the original date of purchase.
TWO YEAR LIMITED SPA PACK AND PUMP
ARUBA SPAS warrants the spa pack and pump against mechanical or electrical
breakdown: parts and labour, for a period of two years from the original date of
purchase.
920 Leathead Rd
Kelowna, BC V1X 2J8 1-877-877-2087
30
THREE YEAR LIMITED HEATER BARRELL
ARUBA SPAS warrants the heater element against failure: labour coverage for a
period of two years and parts coverage for a period of three years from the original date of purchase.
Page 33

REGISTRATION: To validate this warranty, the original purchaser must complete
the warranty registration card and mail it to ARUBA SPAS within 30 days of delivery of the spa.
PERFORMANCE: In the event of any defect covered by this Limited Warranty,
ARUBA SPAS or its authorized agent will correct such defect subject to the terms
and conditions contained in this Limited Warranty. There will be no charge for
parts or labor to repair the spa, although you may be assessed reasonable
repairman travel mileage charges if the spa is located outside your service
agent’s area. If SMART PROTECT WARRANTY determines that repair of the covered defect is not feasible, we reserve the right to instead provide a replacement spa equal in value to the original purchase price of the defective spa.
Removal of the defective spa and delivery and installations of the replacement
spa will be the responsibility of the spa owner. To obtain service for any defect
covered by this Limited Warranty, notify SMART PROTECT WARRANTY PROGRAM
within 30 days of its occurrence and use all reasonable means to protect the spa
from further damage.
EXCLUSIONS: This Limited Warranty is void if the ARUBA SPA has been subjected
to alteration, neglect, misuse or abuse; If any repairs have been attempted by
anyone other than ARUBA SPAS or its authorized agent; or if the failure is caused
by accident, acts of God, or other causes beyond the control of ARUBA SPAS,
Neglect, misuse and abuse include any installation, operation, improper water
balance or maintenance of the spa other than in accordance with the owner’s
manual. This Limited Warranty does not provide coverage for demonstrator,
used, repurchased or reconditioned spas, spa kits, unplumbed spas, or factory
seconds and/or any ARUBA SPA used for commercial use. This Limited Warranty
does not provide coverage for filter cartridges, jet trim kits, fuses, pump seals, Orings, gaskets, and light bulbs, or any item attached to, or installed on, the spa
after the date of manufacture. OZONATORS AND SPA INSULATED COVERS ARE
EXCLUDED FROM THIS LIMITED WARRANTY, ALTHOUGH THEY ARE COVERED BY
SEPARATE WARRANTIES BY THEIR MANUFACTURES.
SERVICE CHARGES: All service calls will be subject to an $80.00 (eighty dollars)
charge. If the service work performed is covered by this Limited Warranty, the
charges will be refunded. If the service work performed is not covered by this
Limited Warranty, the service charges will apply. Service or warranty work performed outside the city limits from where the spa was purchased will be subjected to mileage charges and related expenses.
LIMITATIONS: This Limited Warranty takes the place of all other warranties, express
or implied, in fact or at law, including implied warranties of merchantability and
fitness for a particular purpose. All warranty service must be performed by
ARUBA SPAS or its authorized agents, No agent, dealer, distributor, service company or other party is authorized to change, modify or extend the terms of the
Limited Warranty in any manner whatsoever.
DISCLAIMERS: ARUBA SPAS and its authorized agents shall not be liable for any
injury, loss, or other damage, whether incidental or consequential, airing out of
any defect covered by this Limited Warranty, including without limitation, loss of
use of the spa and cost of removal of defective product, even if ARUBA SPAS
has been advised of the possibilities of such damage. The liability of ARUBA SPAS
under this Limited Warranty, if any, shall not exceed the original amount paid for
the defective product. Coverage under this Limited Warranty shall commence
as of the original date of purchase and the duration of such coverage shall not
extend for any reason whatsoever beyond the stated time periods. These disclaimers shall be equally applicable to any service provided by ARUBA SPAS or
its authorized agents.
LEGAL RIGHTS: This Limited Warranty gives you specific legal rights. Some states
or provinces do not allow the exclusion or limitation of incidental or consequential damages, therefore the above limitations may not apply to you.
31
Page 34

TROUBLE SHOO
TROUBLE SHOO
TING GUIDE
TING GUIDE
PROBLEM • DIAGNOSIS • ACTION
P: Spa won’t turn on
D: No power in spa
A1: Check Breaker
A2: Check Fuses
P: Spa comes on by itself
D: Normal function of heating and
filtering
A: No action required
P: Pump shuts down unexpectedly
while in use
D: Default timer of 30 minutes in the
electronic operating system
A: Reactivate by touching desired button
P: Spa does not heat
D: Temperature setting is too low
A: Turn up thermostat
P: Poor jet action
D: Dirty filter
A: Clean filter
D: Air lock in pump
A: Loosen end pump union to release air
D: Water level too low
A: Fill spa
P: Spa light is out
D: Burned out bulb
A: Replace bulb
(The Light housing is located behind the spa
pack, and there is no need to drain the spa to
change the light bulb.)
32
Page 35

33
P: Motor shuts down while in use
D: Protective device has shut down
motor to protect from overheating
A: The automatic device will reset the
motor when it cools down
P: GFCI shuts down frequently
D: Faulty GFCI
A: Call electrician
D: Heater element has failed
A: Call Aruba Spas Smart Protect Warranty
D: Ozonator has failed
A: Replace Ozonator
P: Abnormal water usage
D: Excessive evaporation
A: Use spa cover when not in use,
lower thermostat setting
D: Leak in plumbing
A1: Tighten unions (see #2, START-UP
PREPARATIONS)
A2: Call Smart Protect Warranty
P: Water not clean
D: Filter dirty or clogged
A: Clean or replace filter
D: Clogged/blocked safety suction
A: Clean safety or suction or skimmer
D: Poor water chemistry
A: Test and correct
D: High content of solids in water
A: Drain and refill spa
P: Eye or skin irritation
D: pH is too high
A: Test and correct
Page 36

P: pH is too low
A: Test and correct
P: Formation of chloramines
The formation of chloramines is chlorine combining
with nitrogen from body wastes, oils etc. - causes
familiar chlorine odour
A: Correct by shock
P: Foaming of water
D: High concentration of oils and
organics being agitated by jets
A: Add antifoam
D: Soft water
A: Test and correct
P: Scale deposits
D: High calcium level, high pH, high
alkalinity
A: Test and correct
P: Water leaks or drips in equipment
D: “O” ring or seals drying out
A: Lubricate “O” rings or replace
P: Filter often has air in it
D: Water level is too low
A: Add water to appropriate level
D: Leak in top of filter
A: Check for cracks, replace “O” rings
34
Page 37

35
CIRCULA
CIRCULA
TION PUMP
TION PUMP
OPERA
OPERA
TIONS:
TIONS:
(Optional Pur
(Optional Pur
chase)
chase)
When you start up your spa ensure that both knife valves on
either side of your circulation pump are in the open position
(up). Loosen the union to release any air then re-tighten.
You cannot operate the circulation pump from the topside
control, it is pre-programmed to run 24 hours a day.
Page 38

WEEKL
WEEKL
Y MAINTEN
Y MAINTEN
ANCE SCHEDULE
ANCE SCHEDULE
Clean
Filter
Shock
Treatment
Water
Clarifier
Check Chemical
Balance
General
Maintenance
DATE
36
Page 39
A Division Of
Ridgewood Enterprises Ltd.
920 Leathead Road,
Kelowna, BC V1X 2J8
Aruba Spas reserves the right to make
changes in specifications without notice
 Loading...