

Aruba IAP-205H, IAP-228, IAP-204, IAP-277, IAP-205 User Manual
...
Aruba Instant
6.5.0.0-4.3.0.0
User Guide

Copyright Information
© Copyright 2016 Hewlett Packard Enterprise Development LP.
Open Source Code
This product includes code licensed under the GNU General Public License, the GNU Lesser General Public
License, and/or certain other open source licenses. A complete machine-readable copy of the source code
corresponding to such code is available upon request. This offer is valid to anyone in receipt of this information
and shall expire three years following the date of the final distribution of this product version by Hewlett
Packard Enterprise Company. To obtain such source code, send a check or money order in the amount of US
$10.00 to:
Hewlett Packard Enterprise Company
Attn: General Counsel
3000 Hanover Street
Palo Alto, CA 94304
USA
Revision 03 | October 2016 Aruba Instant 6.5.0.0-4.3.0.0 | User Guide

Contents
About this Guide 9
Intended Audience 9
Related Documents 9
Conventions 9
Contacting Support 10
About Aruba Instant 12
Instant Overview 12
What is New in this Release 15
Setting up an IAP 18
Setting up Instant Network 18
Provisioning an IAP 19
Logging in to the Instant UI 22
Accessing the Instant CLI 23
Automatic Retrieval of Configuration 27
Managed Mode Operations 27
Prerequisites 27
Configuring Managed Mode Parameters 28
Verifying the Configuration 29
Instant User Interface 31
Login Screen 31
Main Window 32
Initial Configuration Tasks 60
Configuring System Parameters 60
Changing Password 66
Customizing IAP Settings 68
Modifying the IAP Host Name 68
Configuring Zone Settings on an IAP 68
Specifying a Method for Obtaining IP Address 69
Configuring External Antenna 69
Configuring Radio Profiles for an IAP 70
Aruba Instant 6.5.0.0-4.3.0.0 | User Guide | 3

Configuring Uplink VLANfor an IAP 72
Changing USB Port Status 73
Master Election and Virtual Controller 73
Adding an IAP to the Network 75
Removing an IAP from the Network 75
VLAN Configuration 77
VLAN Pooling 77
Uplink VLAN Monitoring and Detection on Upstream Devices 77
IPv6 Support 78
IPv6 Notation 78
Enabling IPv6 Support for IAP Configuration 78
Firewall Support for IPv6 80
Debugging Commands 80
Wireless Network Profiles 81
Configuring Wireless Network Profiles 81
Configuring Fast Roaming for Wireless Clients 101
Configuring Modulation Rates on a WLAN SSID 104
Multi-User-MIMO 105
Management Frame Protection 106
Disabling Short Preamble for Wireless Client 106
Editing Status of a WLAN SSID Profile 106
Editing a WLAN SSID Profile 107
Deleting a WLAN SSID Profile 107
Wired Profiles 108
Configuring a Wired Profile 108
Assigning a Profile to Ethernet Ports 113
Editing a Wired Profile 113
Deleting a Wired Profile 114
Link Aggregation Control Protocol 114
Understanding Hierarchical Deployment 115
Captive Portal for Guest Access 117
Understanding Captive Portal 117
Configuring a WLANSSID for Guest Access 118
Configuring Wired Profile for Guest Access 124
4 | Aruba Instant 6.5.0.0-4.3.0.0 | User Guide

Configuring Internal Captive Portal for Guest Network 126
Configuring External Captive Portal for a Guest Network 129
Configuring Facebook Login 135
Configuring Guest Logon Role and Access Rules for Guest Users 136
Configuring Captive Portal Roles for an SSID 138
Configuring Walled Garden Access 141
Authentication and User Management 143
Managing IAP Users 143
Supported Authentication Methods 148
Supported EAP Authentication Frameworks 150
Configuring Authentication Servers 151
Understanding Encryption Types 164
Configuring Authentication Survivability 166
Configuring 802.1X Authentication for a Network Profile 167
Enabling 802.1X Supplicant Support 169
Configuring MAC Authentication for a Network Profile 170
Configuring MAC Authentication with 802.1X Authentication 172
Configuring MAC Authentication with Captive Portal Authentication 174
Configuring WISPr Authentication 175
Blacklisting Clients 176
Uploading Certificates 179
Roles and Policies 182
Firewall Policies 182
Content Filtering 195
Configuring User Roles 199
Configuring Derivation Rules 201
Using Advanced Expressions in Role and VLAN Derivation Rules 207
DHCP Configuration 211
Configuring DHCP Scopes 211
Configuring the Default DHCP Scope for Client IP Assignment 218
Configuring Time-Based Services 221
Time Range Profiles 221
Configuring a Time Range Profile 221
Applying a Time Range Profile to a WLAN SSID 222
Aruba Instant 6.5.0.0-4.3.0.0 | User Guide | 5

Verifying the Configuration 223
Dynamic DNS Registration 225
Enabling Dynamic DNS 225
Configuring Dynamic DNSUpdates for Clients 226
Verifying the Configuration 227
VPN Configuration 228
Understanding VPN Features 228
Configuring a Tunnel from an IAP to a Mobility Controller 229
Configuring Routing Profiles 240
IAP-VPN Deployment 242
Understanding IAP-VPN Architecture 242
Configuring IAP and Controller for IAP-VPN Operations 245
Adaptive Radio Management 253
ARM Overview 253
Configuring ARM Features on an IAP 254
Configuring Radio Settings 260
Deep Packet Inspection and Application Visibility 264
Deep Packet Inspection 264
Enabling Application Visibility 264
Application Visibility 265
Enabling URL Visibility 270
Configuring ACL Rules for Application and Application Categories 270
Configuring Web Policy Enforcement Service 273
Voice and Video 276
Wi-Fi Multimedia Traffic Management 276
Media Classification for Voice and Video Calls 279
Enabling Enhanced Voice Call Tracking 280
Services 282
Configuring AirGroup 282
Configuring an IAP for RTLSSupport 291
Configuring an IAP for Analytics and Location Engine Support 292
Managing BLEBeacons 293
Configuring OpenDNS Credentials 294
Integrating an IAP with Palo Alto Networks Firewall 295
6 | Aruba Instant 6.5.0.0-4.3.0.0 | User Guide

Integrating an IAP with an XMLAPIInterface 297
CALEA Integration and Lawful Intercept Compliance 299
IAP Management and Monitoring 305
Managing an IAP from AirWave 305
Managing IAP from Aruba Central 314
Uplink Configuration 317
Uplink Interfaces 317
Uplink Preferences and Switching 322
Intrusion Detection 327
Detecting and Classifying Rogue IAPs 327
OS Fingerprinting 327
Configuring Wireless Intrusion Protection and Detection Levels 328
Configuring IDS 333
Mesh IAP Configuration 334
Mesh Network Overview 334
Setting up Instant Mesh Network 335
Configuring Wired Bridging on Ethernet 0 for Mesh Point 335
Mobility and Client Management 337
Layer-3 Mobility Overview 337
Configuring L3-Mobility 338
Spectrum Monitor 340
Understanding Spectrum Data 340
Configuring Spectrum Monitors and Hybrid IAPs 346
IAP Maintenance 348
Upgrading an IAP 348
Backing up and Restoring IAP Configuration Data 351
Converting an IAP to a Remote AP and Campus AP 352
Resetting a Remote AP or Campus AP to an IAP 358
Rebooting the IAP 358
Monitoring Devices and Logs 360
Configuring SNMP 360
Configuring a Syslog Server 364
Configuring TFTP Dump Server 365
Running Debug Commands 366
Aruba Instant 6.5.0.0-4.3.0.0 | User Guide | 7

Uplink Bandwidth Monitoring 370
Hotspot Profiles 372
Understanding Hotspot Profiles 372
Configuring Hotspot Profiles 374
Sample Configuration 385
Mobility Access Switch Integration 388
Mobility Access Switch Overview 388
Configuring IAPs for Mobility Access Switch Integration 389
ClearPass Guest Setup 390
Configuring ClearPass Guest 390
Verifying ClearPass Guest Setup 394
Troubleshooting 394
IAP-VPN Deployment Scenarios 396
Scenario 1—IPsec: Single Datacenter Deployment with No Redundancy 397
Scenario 2—IPsec: Single Datacenter with Multiple Controllers for Redundancy 401
Scenario 3—IPsec: Multiple Datacenter Deployment with Primary and Backup Controllers for
Redundancy 405
Scenario 4—GRE: Single Datacenter Deployment with No Redundancy 410
Glossary 413
Acronyms and Abbreviations 418
Glossary 433
8 | Aruba Instant 6.5.0.0-4.3.0.0 | User Guide

Chapter 1
About this Guide
This User Guide describes the features supported by Aruba Instant and provides detailed instructions for
setting up and configuring the Instantnetwork.
Intended Audience
This guide is intended for administrators who configure and useIAPs.
Related Documents
In addition to this document, the Instant product documentation includes the following:
l Aruba Instant Access Point Installation Guides
l Aruba Instant Quick Start Guide
l Aruba Instant CLI Reference Guide
l Aruba Instant MIB Reference Guide
l Aruba Instant Syslog Messages Reference Guide
l Aruba Instant Release Notes
Conventions
The following conventions are used throughout this manual to emphasize important concepts:
Table 1: Typographical Conventions
Style Type Description
Italics
System items
Commands
This style is used to emphasize important terms and to mark the titles of
books.
This fixed-width font depicts the following:
l Sample screen output
l System prompts
l Filenames, software devices, and specific commands when mentioned in
the text.
In the command examples, this style depicts the keywords that must be
typed exactly as shown.
Aruba Instant 6.5.0.0-4.3.0.0 | User Guide About this Guide | 9
Table 1: Typographical Conventions
Style Type Description
<Arguments> In the command examples, italicized text within angle brackets represents
items that you should replace with information appropriate to your specific
situation. For example:
# send <text message>
In this example, you would type “send” at the system prompt exactly as
shown, followed by the text of the message you wish to send. Do not type
the angle brackets.
[Optional]
{Item A |
Item B}
Command examples enclosed in square brackets are optional. Do not type
the square brackets.
In the command examples, items within curly brackets and separated by a
vertical bar represent the available choices. Enter only one choice. Do not
type the curly brackets or bars.
The following informational icons are used throughout this guide:
Indicates helpful suggestions, pertinent information, and important things to remember.
Indicates a risk of damage to your hardware or loss of data.
Indicates a risk of personal injury or death.
Contacting Support
Table 2: Support Information
Main Site arubanetworks.com
Support Site support.arubanetworks.com
Airheads Social Forums and
Knowledge Base
North American Telephone 1-800-943-4526 (Toll Free)
International Telephone arubanetworks.com/support-services/contact-support/
10 | About this Guide Aruba Instant 6.5.0.0-4.3.0.0 | User Guide
community.arubanetworks.com
1-408-754-1200

Software Licensing Site hpe.com/networking/support
End-of-life Information arubanetworks.com/support-services/end-of-life/
Security Incident Response
Team (SIRT)
Site: arubanetworks.com/support-services/security-bulletins/
Email: sirt@arubanetworks.com
Aruba Instant 6.5.0.0-4.3.0.0 | User Guide About this Guide | 11

Chapter 2
About Aruba Instant
This chapter provides the following information:
l Instant Overview on page 12
l What is New in this Release on page 15
Instant Overview
Instant virtualizes Aruba Mobility Controller capabilities on 802.1--capable access points (APs), creating a
feature-rich enterprise-grade wireless LAN (WLAN) that combines affordability and configuration simplicity.
Instant is a simple, easy to deploy turnkey WLAN solution consisting of one or more IAPs. An Ethernet port
with routable connectivity to the Internet or a self-enclosed network is used for deploying an Instant Wireless
Network. An Instant Access Point (IAP) can be installed at a single site or deployed across multiple
geographically dispersed locations. Designed specifically for easy deployment and proactive management of
networks, Instant is ideal for small customers or remote locations without requiring any on-site IT
administrator.
Instant consists of an IAP and a Virtual Controller (VC). The VC resides within one of the IAPs. In an Instant
deployment scenario, only the first IAP needs to be configured. After the first IAP is configured, the other IAPs
inherit all the required configuration information from the VC. Instant continually monitors the network to
determine the IAP that should function as a VC at any time, and the VC will move from one IAP to another as
necessary without impacting network performance.
Supported IAP Platforms
The following table provides a list of IAP platforms that support Instant software:
Table 3: Supported IAP Platforms
IAP Platform Minimum Required Instant Software Version
IAP-334/335 Instant 6.5.0.0-4.3.0.0 or later
IAP-314/315 Instant 6.5.0.0-4.3.0.0 or later
IAP-324/325 Instant 6.4.4.3-4.2.2.0 or later
IAP-205H
IAP-228
IAP-277
Instant 6.4.3.1-4.2.0.0 or later
IAP-204/205
IAP-214/215
IAP-103
IAP-274/275
Aruba Instant 6.5.0.0-4.3.0.0 | User Guide About Aruba Instant | 12
Instant 6.4.2.0-4.1.1.0 or later
Instant 6.4.0.2-4.1.0.0 or later
Table 3: Supported IAP Platforms
IAP Platform Minimum Required Instant Software Version
IAP-114/115
IAP-224/225
RAP-155/155P Instant 6.2.1.0-3.3.0.0 or later
RAP-108/109 Instant 6.2.0.0-3.2.0.0 or later
Instant 6.3.1.1-4.0.0.0 or later
Each IAP model has a minimum required Instant softwareversion as shown in Table 3. When a new IAP is
added into an existing cluster, it can join the cluster only if the existing cluster is running at least the minimum
required version of that IAP. If the existing cluster is running a version prior to the minimum required version
of the new IAP, new IAP will not come up and may reboot with the reason Image sync fail. To recover from
this condition, upgrade the existing cluster to at least the minimum required version of the new IAP first, and
add the new IAP.
Aruba recommends that networks with more than 128 IAPs be designed as multiple, smaller VC networks with
Layer-3 mobility enabled between these networks.
Aruba IAPs are available in the following variants:
l US (United States)
l JP (Japan)
l IL (Israel)
l RW
The following table provides the variants supported for each IAPplatform:
Table 4: Supported IAP Variants
IAPModel (Reg
Domain)
IAP-334/335 Yes Yes Yes Yes
IAP-314/315 Yes Yes Yes Yes
IAP-324/325 Yes Yes Yes Yes
IAP-277 Yes Yes No Yes
IAP-274/275 Yes Yes Yes Yes
IAP-###-US
(US only)
IAP-###-JP
(Japan
only)
IAP-###-IL
(Israel
only)
IAP-###-RW
(Rest of the
World
except
US/JP/IL)
13 | About Aruba Instant Aruba Instant 6.5.0.0-4.3.0.0 | User Guide

Table 4: Supported IAP Variants
IAPModel (Reg
Domain)
IAP-228 Yes Yes No Yes
IAP-###-US
(US only)
IAP-###-JP
(Japan
only)
IAP-###-IL
(Israel
only)
IAP-###-RW
(Rest of the
World
except
US/JP/IL)
IAP-224/225 Yes Yes Yes
IAP-214/215 Yes Yes Yes Yes
IAP-205H Yes Yes Yes Yes
IAP-204/205 Yes Yes Yes Yes
RAP155/155P
IAP-114/115 Yes Yes Yes
RAP-108/109 Yes Yes Yes No
IAP-103
Yes Yes Yes No
Yes Yes Yes Yes
Yes
Yes
For information on regulatory domains and the list of countries supported by the IAP-###-RW type, see the
Specifying Country Code section in Logging in to the Instant UI on page 22
Instant UI
The Instant User Interface (UI) provides a standard web-based interface that allows you to configure and
monitor a Wi-Fi network. Instant is accessible through a standard web browser from a remote management
console or workstation and can be launched using the following browsers:
l Microsoft Internet Explorer 11 or earlier
l Apple Safari 6.0 or later
l Google Chrome 23.0.1271.95 or later
l Mozilla Firefox 17.0 or later
If the Instant UI is launched through an unsupported browser, a warning message is displayed along with a list
of recommended browsers. However, the users are allowed to log in using the Continue login link on the
Login page.
To view the Instant UI, ensure that JavaScript is enabled on the web browser.
The Instant UI logs out automatically if the window is inactive for 15 minutes.
Aruba Instant 6.5.0.0-4.3.0.0 | User Guide About Aruba Instant | 14

Instant CLI
The Instant Command Line Interface (CLI) is a text-based interface that is accessible through a Secure Shell
(SSH) session.
SSH access requires that you configure an IP address and a default gateway on the IAP and connect the IAP to
your network. This is typically performed when the Instant network on an IAP is set up.
What is New in this Release
The following features are introduced in Instant 6.5.0.0-4.3.0.0:
Table 5: New Features
Feature Description
New Option Added for
Broadcast Filtering
Media Classification
Techniques for Voice
and Video
Enabling Enhanced Voice
Call Tracking
Configuring Maximum
Clients on SSIDRadio
Profiles
Redirect Blocked
HTTPSWebsites to a
Custom Page URL
A new option called Unicast-ARP-Only has been added to broadcast filtering. This option
converts the ARP requests to unicast frames and sends them directly to the associated
clients.
Starting from Instant 6.5.0.0-4.3.0.0, IAP supports media classification for Skype for
Business and Apple Facetime.
Voice and Video calls can be prioritized by the following media classification types:
l Classifying voice and video calls by using an ACLwith the classify-media option
enabled
l STUNbased media classification
The Master IAP sends an SNMP trap to the third-party SNMP server with the location
details of the VoIP caller.
The maximum number of clients allowed to connect to a WLANSSIDRadio profile can
now be individually set using the Instant CLI.
Instant 6.5.0.0-4.3.0.0 allows you to redirect blocked HTTPS websites to a custom page
url by configuring the Redirect-Blocked-HTTPSrule type for WLANSSIDand wired
profiles.
Configuring Security
Settings for a Wired
Profile
UI support for Enet-VLAN
Setting
ARM Channel Selection IAPs can trigger a radio profile to perform frequent scanning and selection of a valid
15 | About Aruba Instant Aruba Instant 6.5.0.0-4.3.0.0 | User Guide
Instant supports the trusted ports in an IAP to enable wired users on a Layer-3 mode to
connect to a switch or a router which is connected to the downlink port of the IAP. A new
parameter called Port type is introduced in the wired profile of the Instant UI. IAPs can
now manage incoming traffic received from the clients.
A new system parameter Uplink switch native VLAN which is introduced in the
Instant UI restricts the IAP from sending out tagged frames to clients connected on the
SSID that has the same VLAN as the native VLAN of the upstream switch, to which the
IAP is connected.
channel in a short span of time. A new command, ap-frequent-scan enables the IAPs to
frequently scan signals in the radio profile.

Table 5: New Features
Feature Description
Hashing of Management
User Password
Banner and
Loginsession
Configuration using CLI
Temporal Diversity and
Retries Configuration
using CLI
IPv6 Support This release introduces support for IPv6 and enables the IAP to access control
Management Frame
Protection
The password of management users can be stored and displayed in hash format
instead of encrypted text format. Hashed passwords are more secured as they cannot
be reversed.
IAPs can display a text banner when users are on a management session. The session
can remain active even without any user activity. The commands banner and
loginsession are introduced in this feature.
The parameters temporal-diversity and max-retries are introduced to enable the IAP
to perform software retries, and also manage the retry attempts when clients are not
responding to 802.11 packets.
capabilities to clients, firewall enhancements, management of IAPs through a static IPV6
IP, support for IPV6 RADIUS server.
An IEEE 802.11w standard that increases security by providing data confidentiality of
management frames.
Support for New IAP Devices
Instant 6.5.0.0-4.3.0.0 release introduces support for the following new IAP devices. These new devices do not
interoperate with Instant versions lower than Instant 6.5.0.0-4.3.0.0. If these IAPs are placed into a cluster
running older Instant versions prior to Instant 6.5.0.0-4.3.0.0, the devices will reboot with the Image Sync
Fail reason. To resolve this issue, upgrade the existing cluster to minimum Instant 6.5.0.0-4.3.0.0 release, and
then add the new IAP devices.
Aruba Instant 6.5.0.0-4.3.0.0 | User Guide About Aruba Instant | 16

Table 6: New Hardware Platforms
Feature Description
IAP-314/315 The IAP-310 Series (IAP-314/315) wireless access points support IEEE 802.11ac
standards for high-performance WLAN, and are equipped with two single-band radios,
which can provide network access and monitor the network simultaneously. Multi-User
Multiple-In Multiple-Output (MU-MIMO) technology allows these access points to deliver
high-performance 802.11n 2.4 GHz and 802.11ac 5 GHz functionality, while also
supporting 802.11a/b/g wireless services.
The IAP-310 Series wireless access points provide the following capabilities:
l IEEE 802.11a/b/g/n/ac wireless access point
l IEEE 802.11a/b/g/n/ac wireless air monitor
l IEEE 802.11a/b/g/n/ac spectrum analysis
l Compatible with IEEE 802.3at PoE+ and 802.3af PoE
l Support for MCS8 and MCS9
l Centralized management, configuration and upgrades
l Integrated Bluetooth Low Energy (BLE) radio
IAP-334/335
The IAP-330 Series (IAP-334/335) wireless access points support IEEE 802.11ac
standards for high-performance WLAN, and are equipped with two dual-band radios,
which can provide network access and monitor the network simultaneously. MU-MIMO
technology allows this access point to deliver high-performance 802.11n 2.4 GHz and
802.11ac 5 GHz functionality, while also supporting 802.11a/b/g wireless services.
The IAP-330 wireless access points provide the following capabilities:
l IEEE 802.11a/b/g/n/ac wireless access point
l IEEE 802.11a/b/g/n/ac wireless air monitor
l IEEE 802.11a/b/g/n/ac spectrum analysis
l Compatible with IEEE 802.3at PoE+ power sources
l Centralized management, configuration and upgrades
l Integrated BLE radio
17 | About Aruba Instant Aruba Instant 6.5.0.0-4.3.0.0 | User Guide

Chapter 3
Setting up an IAP
This chapter describes the following procedures:
l Setting up Instant Network on page 18
l Provisioning an IAP on page 19
l Logging in to the Instant UI on page 22
l Accessing the Instant CLI on page 23
Setting up Instant Network
Before installing an IAP:
l Ensure that you have an Ethernet cable of the required length to connect an IAP to the home router.
l Ensurethat you have one of the following power sources:
n IEEE 802.3af/at-compliant Power over Ethernet (PoE) source. The PoE source can be any power source
equipment (PSE) switch or a midspan PSE device.
n IAP power adapter kit.
Perform the following procedures to set up the Instant network:
1. Connecting an IAP on page 18
2. Assigning an IP address to the IAP on page 18
Connecting an IAP
Based on the type of the power source used, perform oneof the following steps to connect an IAP to the
power source:
l PoE switch—Connect the Ethernet 0 (Enet0) port of the IAP to the appropriate port on the PoE switch.
l PoE midspan—Connect the Enet0 port of the IAP to the appropriate port on the PoE midspan.
l AC to DC power adapter—Connect the 12V DC power jack socket to the AC to DC power adapter.
RAP-155P supports PSE for 802.3at-powered device(class 0-4) on one port (E1 or E2), or 802.3af-powered DC
IN (Power Socket) on two ports (E1 and E2).
Assigning an IP address to the IAP
The IAP needs an IP address for network connectivity. When you connect an IAP to a network, it receives an IP
address from a DHCP server.
To obtain an IP address for an IAP:
1. Ensure that the DHCP service is enabled on the network.
2. Connect the Enet0 port of IAP to a switch or router using an Ethernet cable.
3. Connect the IAP to a power source. The IAP receives an IP address provided by the switch or router.
If there is no DHCP service on the network, the IAP can be assigned a static IP address. If a static IP is not
assigned, the IAP obtains an IPautomatically within the 169.254 subnet.
Aruba Instant 6.5.0.0-4.3.0.0 | User Guide Setting up an IAP | 18

Assigning a Static IP
To assign a static IP to an IAP:
1. Connect a terminal, PC, or workstation running a terminal emulation program to the Console port on the
IAP.
2. Turn on the IAP. An autoboot countdown prompt that allows you to interrupt the normal startup process
and access apboot is displayed.
3. Press Enter key before the timer expires. The IAP goes into the apboot mode.
4. In the apboot mode, execute the following commands to assign a static IP to the IAP.
Hit <Enter> to stop autoboot: 0
apboot>
apboot> setenv ipaddr 192.0.2.0
apboot> setenv netmask 255.255.255.0
apboot> setenv gatewayip 192.0.2.2
apboot> save
Saving Environment to Flash...
Un-Protected 1 sectors
.done
Erased 1 sectors
Writing
5. Use the printenv command to view the configuration.
apboot> printenv
Provisioning an IAP
This section provides the following information:
l Zero Touch Provisioning of IAPs on page 19
l Provisioning IAPs though Aruba Central
l Provisioning IAPs through AirWave
Zero Touch Provisioning of IAPs
Zero Touch Provisioning eliminates the traditional method of deploying and maintaining devices and allows
you to provision new devices in your network automatically, without manual intervention. Following are the
zero-touch provisioning methods for Instant.
Aruba Activate is a cloud-based service designed to enable more efficient deployment and maintenance of
IAPs. Aruba activate is hosted in the cloud and is available at activate.arubanetworks.com. You can register for
a free account by using the serial number and MACaddress of the device you currently own. For more
information on how to setup your device and provision using Aruba Activate, refer to the Aruba Activate User
Guide.
In order for zero-touch provisioning to be successful, the timezone of the IAP must be in synchronization with
the NTPserver.
To facilitate zero-touch provisioning using the AirWave Management Platform (AMP), Central, or Activate, you
must configure the firewall and wired infrastructure to either allow the NTP traffic to pool.ntp.org, or provide
alternative NTP servers under DHCP options. For more information on configuring an NTPserver, see
NTPServer.
19 | Setting up an IAP Aruba Instant 6.5.0.0-4.3.0.0 | User Guide

In a scenario where the NTP server is unreachable, the connection between the IAP and Activate will fall back to
the unsecured status. The NTPclient process running in the back end will continuously attempt to reconnect to
the NTPserver until a secure connection is established. The NTPclient process receives a response from the
NTP server on successfully establishing a connection and notifies the CLIprocess which runs a series of checks
to ensure the NTPserver is reachable.
Connecting to a Provisioning Wi-Fi Network
The IAPs boot with factory default configuration and try to provision automatically. If the automatic
provisioning is successful, the Instant SSID will not be available. If AirWave and Activate arenot reachable and
the automatic provisioning fails, the Instant SSID becomes available and the users can connect to a
provisioning network by using the Instant SSID.
To connect to a provisioning Wi-Fi network:
1. Ensure that the client is not connected to any wired network.
2. Connect a wireless-enabled client to a provisioning Wi-Fi network: for example, Instant.
3. If the Windows operating system (OS) is used:
a. Click the wireless network connection icon in the system tray. The Wireless Network Connection
window is displayed.
b. Click the Instant network and then click Connect.
4. If the Mac OS system is used:
a. Click the AirPort icon. A list of available Wi-Fi networks is displayed.
b. Click the instant network.
The Instant SSIDs are broadcast in 2.4 GHz only.
IAP Cluster
IAPs in the same VLAN automatically find each other and form a single functioning network managed by a VC.
Moving an IAP from one cluster to another requires a factory reset of the IAP.
Disabling the Provisioning Wi-Fi Network
The provisioning network is enabled by default. Instant provides the option to disable the provisioning
network through the console port. Use this option only when you do not want the default SSID Instant to be
broadcast in your network.
To disable the provisioning network:
1. Connect a terminal, PC, or workstation running a terminal emulation program to the Console port on the
IAP.
2. Configure the terminal or terminal emulation program to use the following communication settings:
Table 7: Terminal Communication Settings
Baud Rate Data Bits Parity Stop Bits Flow Control
9600 8 None 1 None
3. Turn on the IAP. An autoboot countdown prompt that allows you to interrupt the normal startup process
and access apboot is displayed.
Aruba Instant 6.5.0.0-4.3.0.0 | User Guide Setting up an IAP | 20

4. Click Enterkey before the timer expires. The IAP goes into the apboot mode through console.
5. In the apboot mode, execute the following commands to disable the provisioning network:
apboot> factory_reset
apboot> setenv disable_prov_ssid 1
apboot> saveenv
apboot> reset
Provisioning IAPs through Central
For provisioning IAPs through Aruba Central, the IAPs must obtain the cloud activation key.
Obtaining Cloud Activation Key
The IAPs obtain the cloud activation key from the Aruba Activate server in the following scenarios:
l During reboot, if the VC has the Central URL stored, it will connect directly to Central using the activation
key obtained from the Aruba Activate server. If there is no URL stored, the VC tries to establish a connection
with the Activate server every 5 minutes, until a successful SSL connection is established and the activation
key is obtained.
l If the IAP VC has a Central URL stored, but fails to establish a connection to Central in three attempts, the
VCreconnects to the Activate server to obtain a new activation key.
The cloud activation key obtained from the Activate server is valid for 10 days. To obtain a new activation key,
IAPs reconnect to the Activate server after the initially assigned key expires.
Prerequisites for Obtaining the Cloud Activation Key
To ensure that the IAPs obtain the cloud activation key from the Aruba Activate server, perform the following
checks:
l The serial number or the MAC address of the IAP is registered in the Activate database.
l The IAP is operational and is able to connect to the Internet.
l IAP has received a DNS server address through DHCP or static configuration.
l IAP is able to configure time zone using a Network Time Proticol (NTP) server.
l The required firewall ports are open. Most of the communication between devices on the remote site and
the Central server in the cloud is carried out through HTTPS (TCP 443). However, you may need to configure
the following ports:
n TCP port 443 for configuration and management of devices.
n TCP port 80 for image upgrade.
n UDP port 123 for NTP server to configure timezone when factory default IAP comes up.
n TCP port 2083 for Remote Authentication Dial-In User Service (RADIUS) authentication for guest
management. If 2083 port is blocked, the HTTPS protocol is used.
If a cloud activation key is not obtained, perform the following checks:
l If the IAP IPaddress is assigned from the DHCP server, ensure that the DNSserver is configured.
l If the IAP is assigned a static IP address, manually configure the DNSserver IPaddress. For more
information, see Specifying a Method for Obtaining IP Address.
Viewing the Cloud Activation Key
If IAP has already obtained the activation key, complete the following steps:
1. Connect to the Instant SSID and type http://instant.arubanetworks.com in the web browser.
2. Log in to the website by using the default username admin and the default password admin.
3. In the IAP UI, navigate to Maintenance > About and copy the cloud activation key.
21 | Setting up an IAP Aruba Instant 6.5.0.0-4.3.0.0 | User Guide
4. To view the MACaddress of the master IAP, click the device nameunder the Access Point widget. The
MACaddress will be displayed under the Info section of the main window.
You can also check the cloud activation keyof an IAP by running the show about and show activate status
commands. For more information on these commands, refer to the Aruba Instant 6.5.0.0-4.3.0.0 CLIReference
Guide.
If the IAP is deployed in the cluster mode, the slave IAPs do not obtain the activation key. You must use the
cloud activation key and MACaddress of the master IAP for provisioning through Central.
Provisioning IAPs through AirWave
For information on provisioning IAPs through AirWave, refer to the AirWave Deployment Guide.
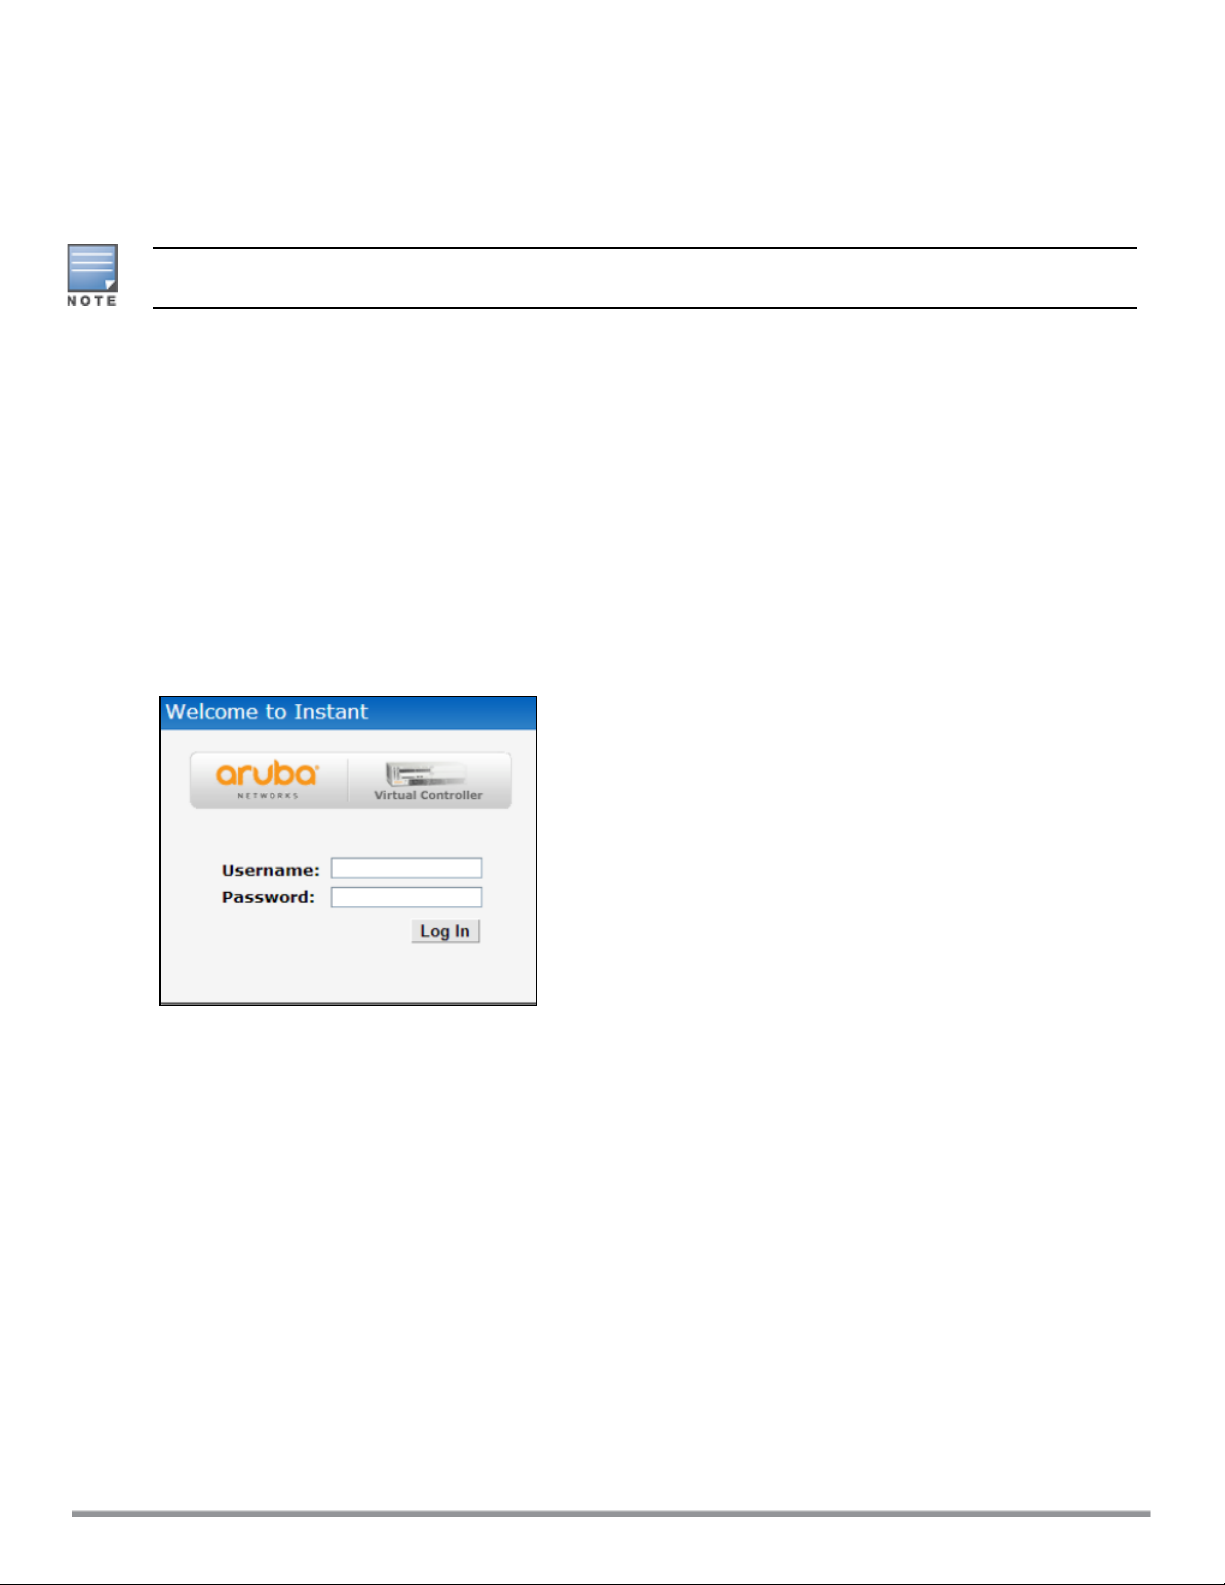
Logging in to the Instant UI
Launch a web browser and enter http://instant.arubanetworks.com. In the login screen, enter the following
credentials:
l Username—admin
l Password—admin
The following figure shows the Login screen:
Figure 1 Login Screen
When you use a provisioning Wi-Fi network to connect to the Internet, all browser requests are directed to the
Instant UI. For example, if you enter www.example.com in the address bar, you are directed to the Instant UI.
You can change the default login credentials after the first login.
Regulatory Domains
The IEEE 802.11/b/g/n Wi-Fi networks operate in the 2.4 GHz spectrum and IEEE 802.11a/n operates in the 5
GHz spectrum. The spectrum is divided into channels. The 2.4 GHz spectrum is divided into 14 overlapping,
staggered 20 MHz wireless carrier channels. These channels are spaced 5 MHz apart. The 5 GHz spectrum is
divided into more channels. The channels that can be used in a particular country vary based on the
regulations of that country.
The initial Wi-Fi setup requires you to specify the country code for the country in which the Instant operates.
This configuration sets the regulatory domain for the radio frequencies that the IAPs use. Within the regulated
transmission spectrum, a high-throughput 802.11ac, 802.11a, 802.11b/g, or 802.11n radio setting can be
configured. The available 20 MHz, 40 MHz, or 80 MHz channels are dependent on the specified country code.
Aruba Instant 6.5.0.0-4.3.0.0 | User Guide Setting up an IAP | 22
You cannot change the country code for the IAPs in the restricted regulatory domains such as US, Japan, and
Israel for most of the IAP models. For IAP-RW variants, you can select from the list of supported regulatory
domains. If the supported country code is not in the list, contact your Aruba Support team to know if the
required country code is supported and obtain the software that supports the required country code.
Improper country code assignments can disrupt wireless transmissions. Most countries impose
penalties and sanctions on operators of wireless networks with devices set to improper country
codes.
To view the country code information, run the show country-codes command.
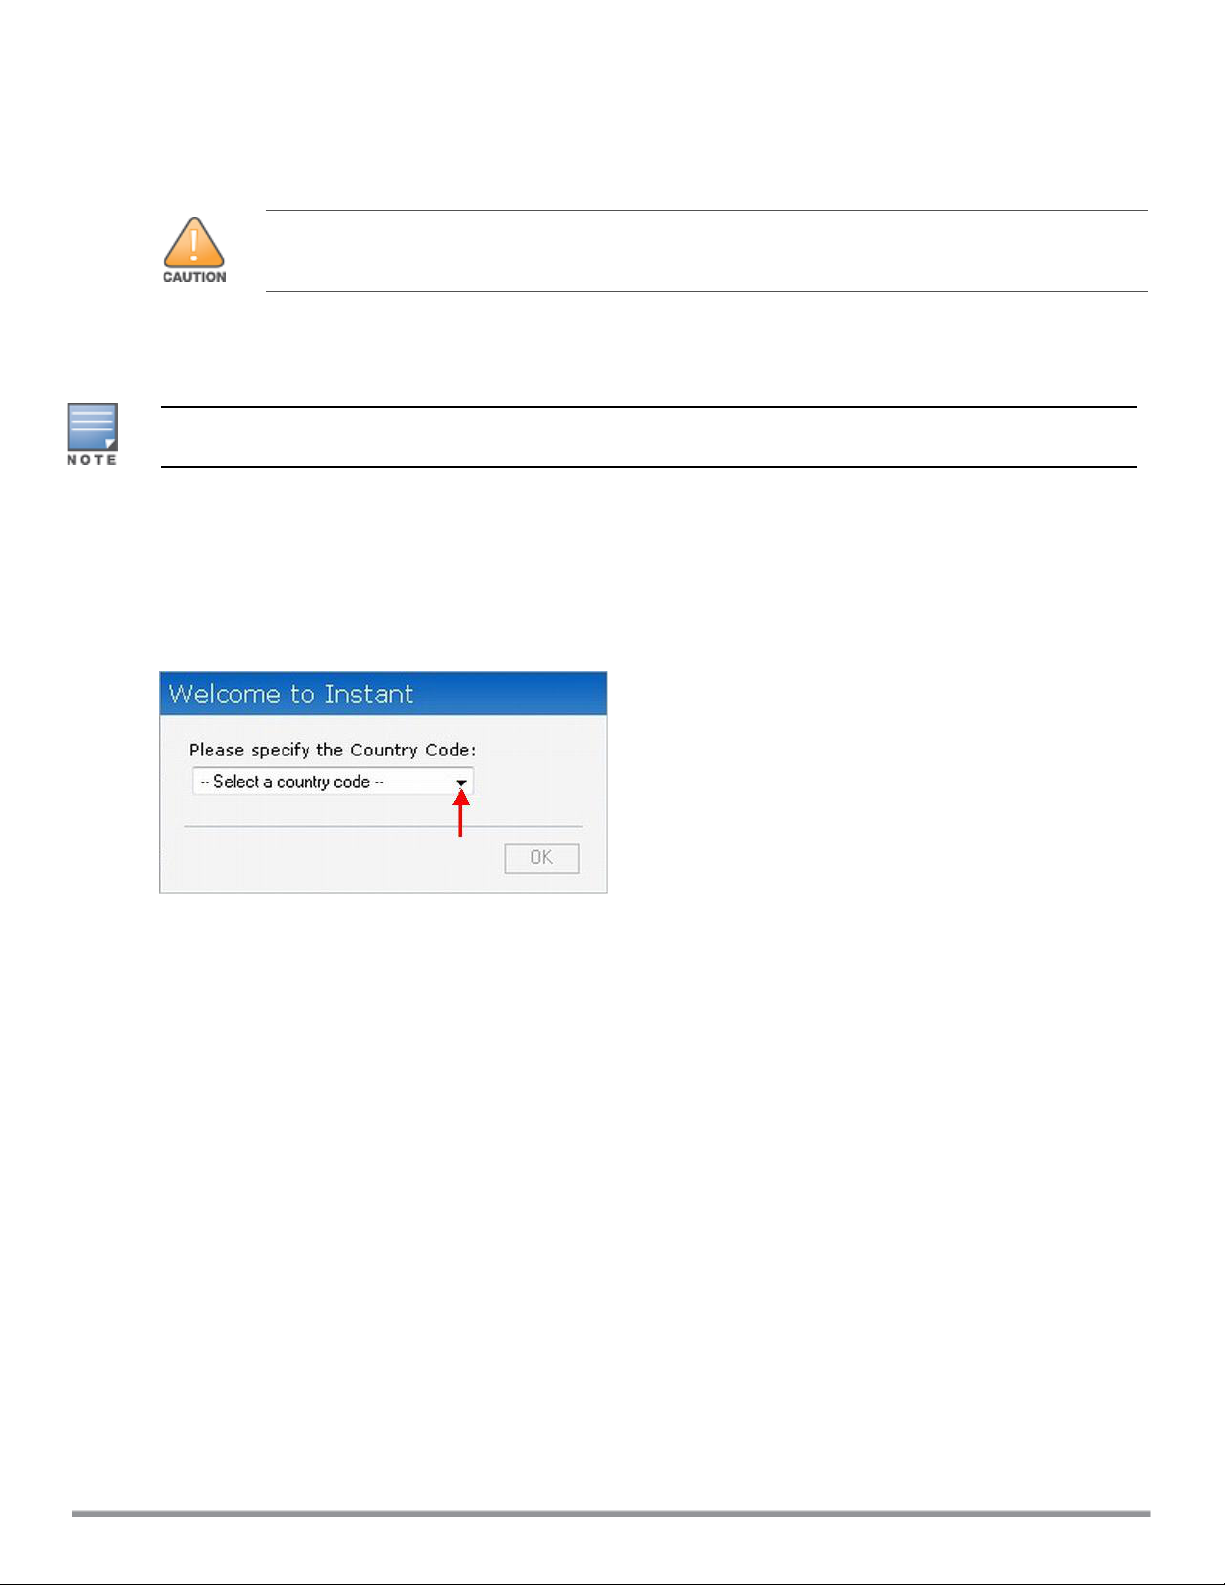
Specifying Country Code
This procedure is applicable only to the IAP-RW variants. Skip this step if you are installing IAP in the United
States, Japan, or Israel.
The Country Code window is displayed for the IAP-RW variants when you log in to the IAP UI for the first time.
The Please Specify the Country Code drop-down list displays only the supported country codes. If the IAP
cluster consists of multiple IAP platforms, the country codes supported by the master IAP is displayed for all
other IAPs in the cluster. Select a country code from the list and click OK. The IAP operates in the selected
country code domain.
Figure 2 Specifying a Country Code
.
You can also view the list of supported country codes for the IAP-RW variants using the show country-codes
command.
Accessing the Instant CLI
Instant supports the use of Command Line Interface (CLI) for scripting purposes. When you make
configuration changes on a master IAP in the CLI, all associated IAPs in the cluster inherit these changes and
subsequently update their configurations. By default, you can access the CLI from the serial port or from an
SSH session. You must explicitly enableTelnet access on the IAP to access the CLI through a Telnet session.
For information on enabling SSH and Telnet access to the IAP CLI, see Terminal access on page 64.
Connecting to a CLI Session
On connecting to a CLI session, the system displays its host name followed by the login prompt. Use the
administrator credentials to start a CLI session. For example:
User: admin
If the login is successful, the privileged command mode is enabled and a command prompt is displayed. For
example:
(Instant AP)#
23 | Setting up an IAP Aruba Instant 6.5.0.0-4.3.0.0 | User Guide

The privileged EXEC mode provides access to show, clear, ping, traceroute, and commit commands. The
configuration commands are available in the config mode. To move from Privileged EXEC mode to the
Configuration mode, enter the following command at the command prompt:
(Instant AP)# configure terminal
The configure terminal command allows you to enter the basic configuration mode and the command prompt
is displayed as follows:
(Instant AP)(config)#
The Instant CLI allows CLI scripting in several other subcommand modes to allow the users to configure
individual interfaces, SSIDs, access rules, and security settings.
You can use the question mark (?) to view the commands available in a privileged EXEC mode, configuration
mode, or subcommand mode.
Although automatic completion is supported for some commands such as configure terminal, the
complete exit and end commands must be entered at command prompt.
Applying Configuration Changes
Each command processed by the VC is applied on all the slaves in a cluster. The changes configured in a CLI
session are saved in the CLI context. The CLI does not support the configuration data exceeding the 4K buffer
size in a CLI session. Therefore, Aruba recommends that you configure fewer changes at a time and apply the
changes at regular intervals.
To apply and save the configuration changes at regular intervals, execute the following command in the
privileged EXEC mode:
(Instant AP)# commit apply
To apply the configuration changes to the cluster without saving the configuration, execute the following
command in the privileged EXEC mode:
(Instant AP)# commit apply no-save
To view the changes that are yet to be applied, execute the following command in the privileged EXEC mode:
(Instant AP)# show uncommitted-config
To revert to the earlier configuration, execute the following command in the privileged EXEC mode.
(Instant AP)# commit revert
Example:
To apply and view the configuration changes:
(Instant AP)(config)# rf dot11a-radio-profile
(Instant AP)(RF dot11a Radio Profile)# beacon-interval 200
(Instant AP)(RF dot11a Radio Profile)# no legacy-mode
(Instant AP)(RF dot11a Radio Profile)# dot11h
(Instant AP)(RF dot11a Radio Profile)# interference-immunity 3
(Instant AP)(RF dot11a Radio Profile)# csa-count 2
(Instant AP)(RF dot11a Radio Profile)# spectrum-monitor
(Instant AP)(RF dot11a Radio Profile)# end
(Instant AP)# show uncommitted-config
rf dot11a-radio-profile
beacon-interval 200
no legacy-mode
dot11h
interference-immunity 3
csa-count 2
spectrum-monitor
Aruba Instant 6.5.0.0-4.3.0.0 | User Guide Setting up an IAP | 24

(Instant AP)# commit apply
Using Sequence-Sensitive Commands
The Instant CLI does not support positioning or precedence of sequence-sensitive commands. Therefore,
Aruba recommends that you remove the existing configuration before adding or modifying the configuration
details for sequence-sensitive commands. You can either delete an existing profile or remove a specific
configuration by using the no… commands.
The following table lists the sequence-sensitive commands and the corresponding no commands to remove
the configuration:
Table 8: Sequence-Sensitive Commands
Sequence-Sensitive Command Corresponding no command
opendns <username <password> no opendns
rule <dest> <mask> <match> <protocol> <start-port>
<end-port> {permit | deny | src-nat | dst-nat {<IP-
address> <port> | <port>}}[<option1....option9>]
mgmt-auth-server <auth-profile-name>
set-role <attribute>{{equals| not-equals | startswith | ends-with | contains} <operator> <role> |
value-of}
set-vlan <attribute>{{equals | not-equals | startswith | ends-with | contains} <operator> <VLAN-ID> |
value-of}
auth-server <name> no auth-server <name>
no rule <dest> <mask> <match>
<protocol> <start-port> <end-port>
{permit | deny | src-nat | dst-nat}
no mgmt-auth-server <auth-profilename>
no set-role <attribute>{{equals |
not-equals | starts-with | ends-with
| contains} <operator>| value-of}
no set-role
no set-vlan <attribute>{{equals |
not-equals | starts-with | ends-with
| contains} <operator> | value-of}
no set-vlan
Banner and Loginsession Configuration using CLI
Starting from Instant 6.5.0.0-4.3.0.0, the Banner and Loginsession Configuration feature is introduced in the
IAP, wherein the text banner can be displayed at the login prompt when users are on a management (Telnet or
SSH) session of the CLI, and the management session can remain active even when there is no user activity
involved.
The banner command defines a text banner to be displayed at the login prompt of a CLI. Instant supports up
to 16 lines text, and each line accepts a maximum of 255 characters including spaces.
To configure a banner:
(Instant AP)(config)# banner motd <motd_text>
Example of a text banner configuration:
(Instant AP)(config)# banner motd "######welcome to login instant###########"
(Instant AP)(config)# banner motd "####please start to input admin and password#########"
(Instant AP)(config)# banner motd "###Don't leak the password###"
(Instant AP)(config)# end
(Instant AP)# commit apply
25 | Setting up an IAP Aruba Instant 6.5.0.0-4.3.0.0 | User Guide

To display the banner:
(Instant AP)# show banner
The loginsession command configures the management session (Telnet or SSH) to remain active without any
user activity.
To define a timeout interval:
(Instant AP) (config) #loginsession timeout <val>
<val> can be any number of minutes from 5 to 60, or any number of seconds from 1 to 3600. You can also
specify a timeout value of 0 to disable CLI session timeouts. The users must re-login to the IAP after the session
times out. The session does not time out when the value is set to 0.
Aruba Instant 6.5.0.0-4.3.0.0 | User Guide Setting up an IAP | 26

Chapter 4
Automatic Retrieval of Configuration
This chapter provides the following information:
l Managed Mode Operations on page27
l Prerequisites on page 27
l Configuring Managed Mode Parameters on page 28
l Verifying the Configuration on page 29
Managed Mode Operations
IAPs support managed mode operations to retrieve the configuration file from a server through the File
Transfer Protocol (FTP) or FTP over Secure Sockets Layer (FTPS), and automatically update the IAP
configuration.
The server details for retrieving configuration files are stored in the basic configuration of the IAPs. The basic
configuration of an IAP includes settings specific to an IAP, for example, host name, static IP, and radio
configuration settings. When an IAP boots up, it performs a GET operation to retrieve the configuration (.cfg)
file from the associated server using the specified download method.
After the initial configuration is applied to the IAPs, the configuration can be changed at any point. You can
configure a polling mechanism to fetch the latest configuration by using an FTP or FTPS client periodically. If
the remote configuration is different from the one running on the IAP and if a differencein the configuration
file is detected by the IAP, the new configuration is applied. At any given time, IAPs can fetch only one
configuration file, which may include the configuration details specific to an IAP. For configuring polling
mechanism and downloading configuration files, the users are required to provide credentials (username and
password). However, if automatic mode is enabled, the user credentials required to fetch the configuration file
areautomatically generated. To enable automatic configuration of the IAPs, configure the managed mode
command parameters.
Prerequisites
Perform the following checks before configuring the managed mode command parameters:
l Ensure that the IAP is running Instant 6.2.1.0-3.4 or later versions.
l When the IAPs are in the managed mode, ensure that the IAPs are not managed by AirWave.
Aruba Instant 6.5.0.0-4.3.0.0 | User Guide Automatic Retrieval of Configuration | 27

Configuring Managed Mode Parameters
To enable the automatic configuration, perform the steps described in the following table:
Table 9: Managed Mode Commands
Steps Command
1. Start a CLI session to configure the
managed-mode profile for automatic
configuration.
2. Enable automatic configuration
Or
Specify the user credentials.
3. Specify the configuration file.
4. Specify the configuration file
download method.
5. Specify the name of the server or the
IP address of the server from which
the configuration file must be
downloaded.
(Instant AP)(config)# managed-mode-profile
(Instant AP)(managed-mode-profile)# automatic
Or
(Instant AP)(managed-mode-profile)# username <username>
(Instant AP)(managed-mode-profile)# password <password>
NOTE: If the automatic mode is enabled, the user credentials are
automatically generated based on IAP MAC address.
(Instant AP)(managed-mode-profile)# config-filename
<file_name>
Filename—Indicates filename in the alphanumeric format. Ensure that
configuration file name does not exceed 40 characters.
(Instant AP)(managed-mode-profile)# download-method
<ftp|ftps>
You can use either FTP or FTPS for downloading configuration files.
(Instant AP)(managed-mode-profile)# server <server_name>
28 | Automatic Retrieval of Configuration Aruba Instant 6.5.0.0-4.3.0.0 | User Guide

Table 9: Managed Mode Commands
Steps Command
6. Configure the day and time at which
the IAPs can poll the configuration
files from the server.
7. Configure the time interval in
minutes between two retries, after
which IAPs can retry downloading the
configuration file.
8. Apply the configuration changes.
(Instant AP) (managed-mode-profile)# sync-time day <dd>
hour <hh> min <mm> window <window>
Based on the expected frequency of configuration changes and
maintenance window, you can set the configuration synchronization
timeline.
l day <dd>—Indicates day, for example to configure Sunday as the
day, specify 01. To configure the synchronization period as
everyday, specifiy 00.
l hour <hh>—Indicates hour within the range of 0–23.
l min <mm>—Indicates minutes within the range of 0–59.
l window <hh>—Defines a window for synchronization of the
configuration file. The default value is 3 hours.
(Instant AP)(managed-mode-profile)# retry-poll-period
<seconds>
NOTE: Specify the retry interval in seconds within the range of 5–60
seconds. The default retry interval is 5 seconds.
(Instant AP)(managed-mode-profile)# end
(Instant AP)# commit apply
If you want to apply the configuration immediately and do not want to wait until next configuration retrieval
attempt, execute the following command:
(Instant AP)# managed-mode-sync-server
Example
To configure managed mode profile:
(Instant AP)(config)# managed-mode-profile
(Instant AP)(managed-mode-profile)# username <username>
(Instant AP)(managed-mode-profile)# password <password>
(Instant AP)(managed-mode-profile)# config-filename instant.cfg
(Instant AP)(managed-mode-profile)# download-method ftps
(Instant AP)(managed-mode-profile)# sync-time day 00 hour 03 min 30 window 02
(Instant AP)(managed-mode-profile)# retry-poll-period 10
(Instant AP)(managed-mode-profile)# end
(Instant AP)# commit apply
Verifying the Configuration
To verify if the automatic configuration functions, perform the following checks:
1. Verify the status of configuration by running the following commands at the command prompt:
(Instant AP)# show managed-mode config
(Instant AP)# show managed-mode status
2. Verify the status of download by running the following command at the command prompt:
(Instant AP)# show managed-mode logs
Aruba Instant 6.5.0.0-4.3.0.0 | User Guide Automatic Retrieval of Configuration | 29

If the configuration settings retrieved in the configuration file are incomplete, IAPs reboot with the earlier
configuration.
30 | Automatic Retrieval of Configuration Aruba Instant 6.5.0.0-4.3.0.0 | User Guide
 Loading...