

Page 1
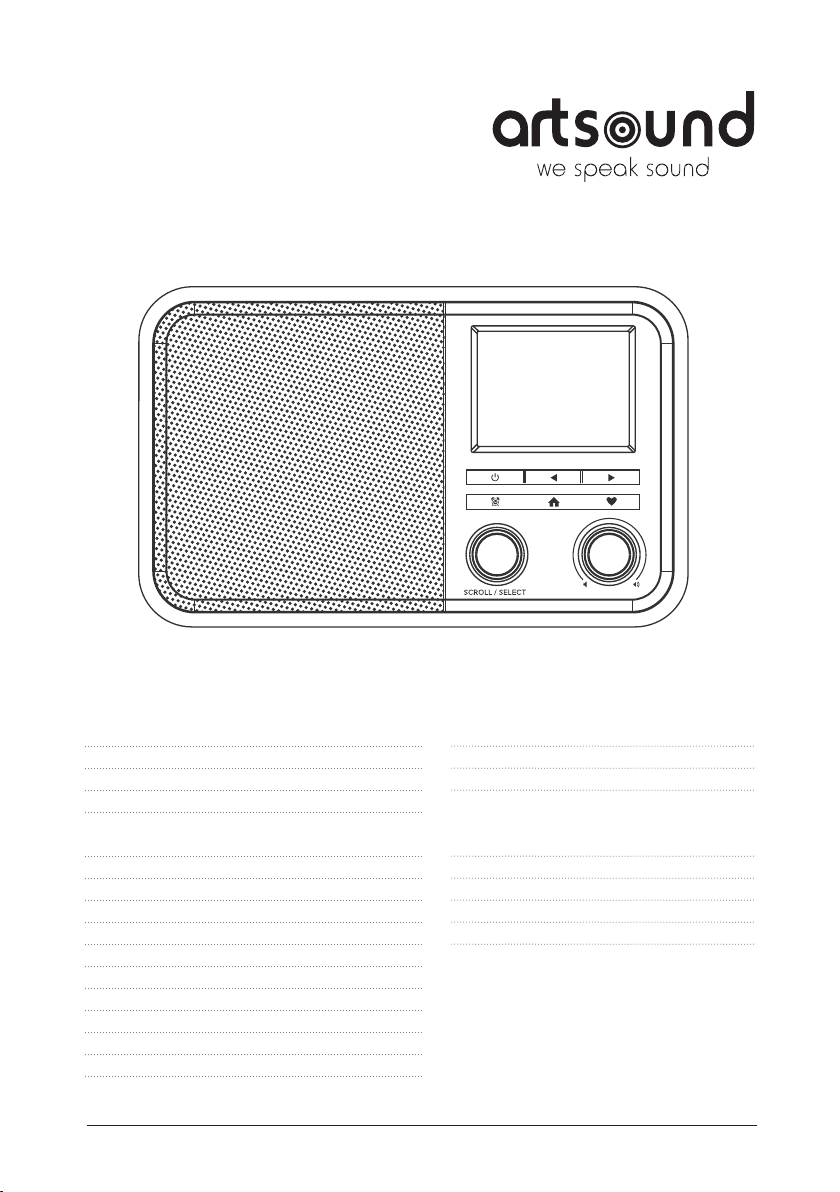
OPERATING MANUAL
ArtSound R8
Internet / DAB+ radio
TABLE OF CONTENTS
1. Warnings and safety 2
2. Contents of the box 2
3. Location of Controls 2
4. Remote control 3
5. How to input password for
your wireless network 4
6. Before you start 4
7. Getting started 4
8. Charging battery 5
9. Network Setup 5
10. Overview of features and functions 6
11. Internet Radio 6
12. Media Centre 8
13. DAB+/DAB Radio 8
14. FM Radio 9
15. Bluetooth playback 9
16. Alarm Setting 10
17. Sleep Timer Setting 10
18. Configuration 10
19. Remote control via PC / Smart phone
Tuning internet radio & manage favourite 14
20. Trouble Shooting 16
21. Helpful Tips 17
22. Technical Specification 18
23. Warranty conditions 19
1
Page 2
R8
Thank you for buying our ArtSound R8 radio. We hope you’ll enjoy it for years to come. Please read these instructions carefully and keep this manual for later reference.
The R8 is a high-quality internet, DAB+ and FM radio with Bluetooth and a built-in rechargeable battery.
1. WARNINGS AND SAFETY
• To prevent fire or electric shocks, the device must not be exposed to rain or humidity.
• For your own safety: to prevent electric shocks do not remove the housing.
• Do not try to repair any malfunctioning parts of the device yourself. Ask a professional expert to do this for you.
• When plugged into the mains, the device remains electrically charged even when switched o.
2. CONTENTS OF THE BOX
• ArtSound R8 radio
• Power adaptor
• Remote control (without batteries)
• User manual
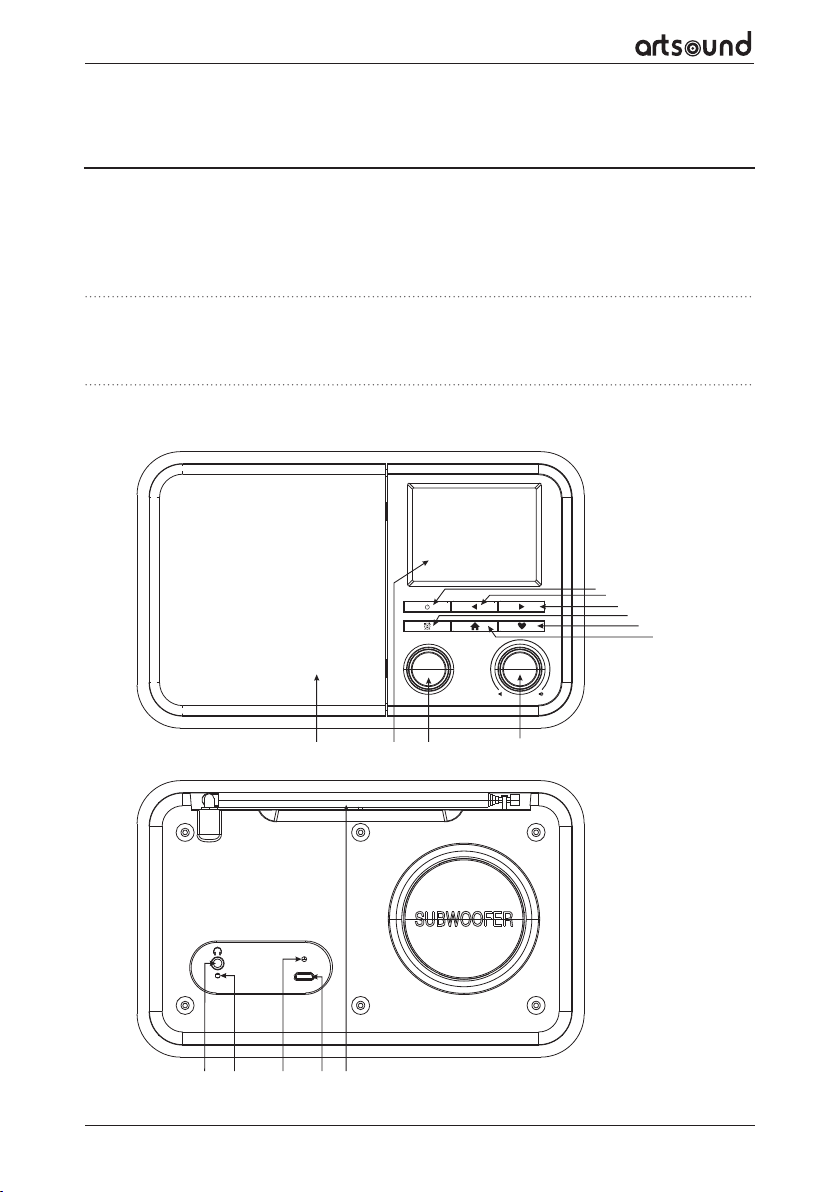
3. LOCATION OF CONTROLS
1
2
3
4
6
5
SCROLL / SELECT
10 9 8 7
LED
Reset
11 12 13 14 15
DC 5V
2
Page 3
1. Press and hold to power on/o
Press and release to Standby / activate the radio
(Standby is enabled only when power is connected. It will be disabled when internal battery
is used)
2.
Back to previous menu/left cursor
3. ⊲ Right cursor/Enter edit menu under Favourite
list /View the big clock & radio info under playing
screen
4. Press to enter the alarm setting (Alarm 1 and
Alarm 2)
5.
Access Home screen/press this button to return
to the playing screen
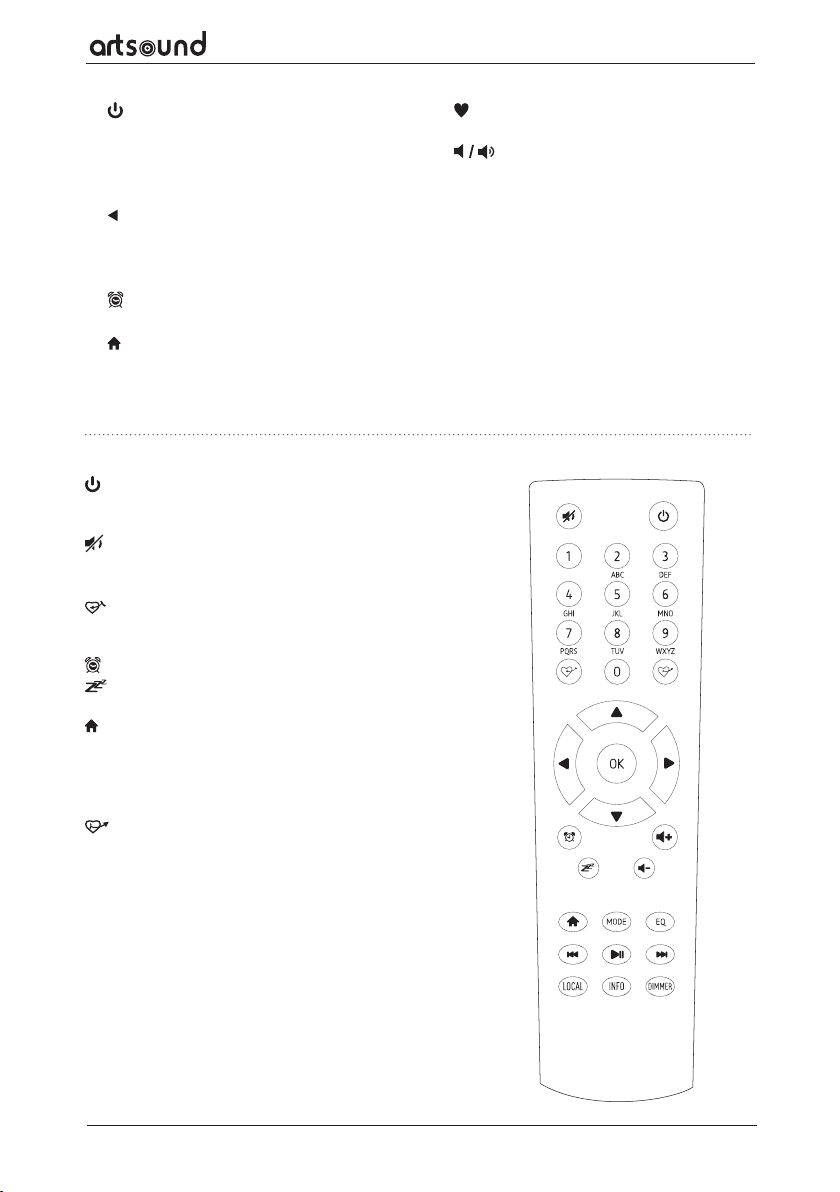
4. REMOTE CONTROL
Press to toggle between Standby and Operation
(applicable only when Standby is enabled with power
connected to the radio)
Mute
0-9 Input index number on the list / input characters for
WiFi password
Preset the current playing station to Favorite
▲ Cursor up
⊳ Cursor left / back to previous menu
Alarm button
Sleep Timer
Mode Switch between radio modes
Home
Previous station on the list/previous track on blue-
tooth/Media Centre
Local Access the local station list (Local area set up in
Configuration)
Recall the favorite list
OK confirm button
⊲ Cursor right
▼ Cursor down
Vol+ Volume up
Vol- Volume down
EQ Equalizer
Next station on the list/next track on bluetooth/Media
Centre
Play/pause for Bluetooth/Media Centre Play/stop for
Internet radio
Dimmer Access the Dimmer menu to adjust the brightness
of the display
Info Quick access to Network and System information
Press and hold to preset a particular station
6.
Press to recall the favourite list
7.
8. Scroll / Select
9. TFT color screen 2.4"
10. Speaker
11. Earphone jack 3.5 mm
12. Reset pin hole
13. LED indicator for battery charging
14. DC IN Jack
15. Telescopic antenna
Rotate to adjust the volume level
Rotate to scroll along, up/down on the menu Press
in to confirm / Select menu options
Press in to stop / resume playback of radio channel
R8
3
Page 4
R8
5. HOW TO INPUT PASSWORD FOR YOUR WIRELESS NETWORK
USING REMOTE CONTROL
On the alpha-numeric keypad, press the button repeatedly to cycle through the characters assigned to each button. Refer to the following list. To input a character, highlight it and press the [OK] button to confirm and
input the next character. When it comes to the last character of the password, press and hold [OK] to complete
the entry.
Button 1: 1 and dierent kind of symbols
!@#$%^&*()_+[]{};:'”\|,./<>? Button 2: 2ABCabc
Button 3: 3DEFdef
Button 4: 4GHIghi
Button 5: 5JKLjkl
USING CONTROL BUTTON ON THE RADIO UNIT
Use the [Scroll/Select] knob to scroll through the characters, highlight it and press [Scroll/Select] knob to
confirm and input the next character. When it comes to the last character of the password , press and hold
[Scroll/Select] knob to confirm and complete the entry.
Note: The password is case sensitive.
Button 6: 6MNOmno
Button 7: 7PQRSpqrs
Button 8: 8TUVtuv
Button 9: 9WXYZwxyz
Button 0: 0
6. BEFORE YOU START
Please ensure the following is ready:
You have a broadband internet connection.
A wireless broadband router is connected to the internet successfully. The radio supports Wireless B, G and N
connection (Wireless N router can also be used with the setting on B or G). You know the Wired Equivalent
Privacy (WEP) or Wi-Fi Protected Access (WPA) data encryption code/password. You need to key in the correct
code when the radio is connected to the wireless router for network connection. If you do not know the code/
password, please contact the person/technician who set up the router/network for you.
The radio can work via Wireless network connection (Wi-Fi connection).
7. GETTING STARTED
The radio is powered by the built-in lithium battery. A USB cable and a power plug are supplied in the product
package.
Press and hold the [
To power o the radio, press and hold the same button.
The Standby mode is enabled only when the power is connected and so to make use of the Alarm clock function.
Connect the power supply to the radio, press and hold the [ ] button to turn it on. Pressing the [ ] button
again will put the radio into standby.
4
] button to power on.
Page 5
8. CHARGING BATTERY
12: 01am
Configure Network?
Yes No
←to pr eviou s →to next SelectOK whe ndone
12:01am
Add/Remove AP 1/ 4
< Add AP(Scan) >
Add AP(WPS butto n) >
Add AP(Sma rtConfig) >
Remove AP >
12: 01am
Ne twork O ptions >
Wi-Fi Channels >
< Add/R emove Ap >
AP:[] >
Network 3/7
12: 01am
Configure Network?
Yes No
←to pr eviou s →to next SelectOK whe ndone
12: 01am
Configure Network?
Yes No
←to pr eviou s →to next SelectOK whe ndone
12: 01am
Ne twork O ptions >
Wi-Fi Channels >
< Add/R emove Ap >
AP:[] >
Network 3/7
You can check the level of battery power remains on the radio. There is a battery power indicator showing
on the top row of the screen. When battery power is low, the battery indicator keeps blinking as a reminder for
battery charging. To charge the battery, connect the micro USB plug to the port where located at the rear side of
the radio, connect the other end to a power source supplied in 5V OUT, or connect the USB cable to the power
plug supplied in the package and plug in to the electric outlet. The LED will light up in red indicates the battery is
charging. The LED will turn to green when charging is done.
Note: The charging might take much longer to complete if the radio is playing while charging.
9. NETWORK SETUP
Internet connection can be setup via Wireless network (WiFi). Your radio
requires a broadband Internet connection.
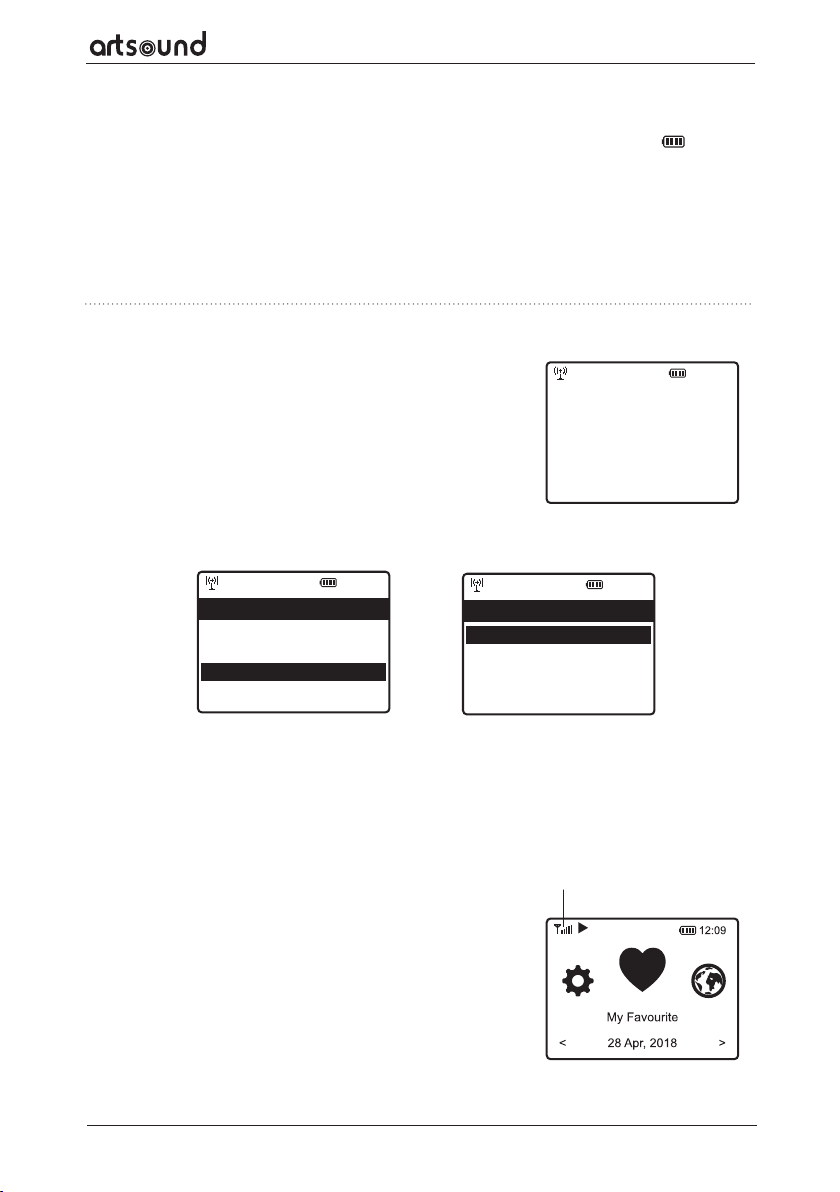
• If this is first time use, the Configure Network wizard will be displayed.
Choose Yes to start configuring network. Press the [ ⊳ ] button to highlight
Yes and press [Scroll/Select] to confirm.
Configure Network?
Yes No
12: 01am
R8
• Select Add/Remove AP from the list, use the [Scroll/Select] knob to scroll and press it to confirm, then choose
Add AP (Scan):
• It will start scanning the Wi-Fi networks available. Scroll to your network and press [Scroll/Select] to confirm. If
• When the Wi-Fi connection is successful, the Association Complete will
your wifi network has a password protected, it will ask you to enter the passphrase/password. Please refer to
the above section 'How to input password for your wireless network' on P.3.
Note: The password is case sensitive. Please consult with the one who setup your network if you don't know
the password.
be shown briefly. The wifi signal bar will appear on the top left corner of
the display
12: 01am
Network 3/7
Ne twork O ptions >
Wi-Fi Channels >
< Add/R emove Ap >
AP:[] >
←to pr eviou s →to next SelectOK whe ndone
12:01am
Add/Remove AP 1/ 4
< Add AP(Scan) >
Add AP(WPS butto n) >
Add AP(Sma rtConfig) >
Remove AP >
Wi-Fi s ignal bar
5
Page 6
R8
12: 01am
Int ernet Radi o 1/3
< Skytune >
Search(Skyt une) >
Histor y >
10. OVERVIEW OF FEATURES AND FUNCTIONS
Press [ ] to enter the main menu. Scroll by rotating the [Scroll/Select]
knob or the [ ⊳ / ⊲ ] button on remote:
My Favorite To show the list of favorite stations which have been assigned to the presets. There are
up to 99 presets available.
Internet Radio Start exploring the worldwide radio stations and music here.
Media Centre You can browse and stream music from your network via UPnP or DLNA Compatible
devices.
DAB+/DAB Radio
Pick up DAB+ and DAB radio signal if available in your local area (no internet connection
required).
FM Radio Receive ordinary FM radio stations in your local area (no internet connection required).
BT Streaming Bluetooth playback, to play audio stream (receive) from another Bluetooth enabled
device after pairing/connected each other.
Alarm Alarm clock. Two alarm settings available (works only when power is connected).
Sleep Timer Enable the timer to turn the radio in standby after the selected time elapsed.
Configuration More options/settings available to personalize as you desire.
11. INTERNET RADIO
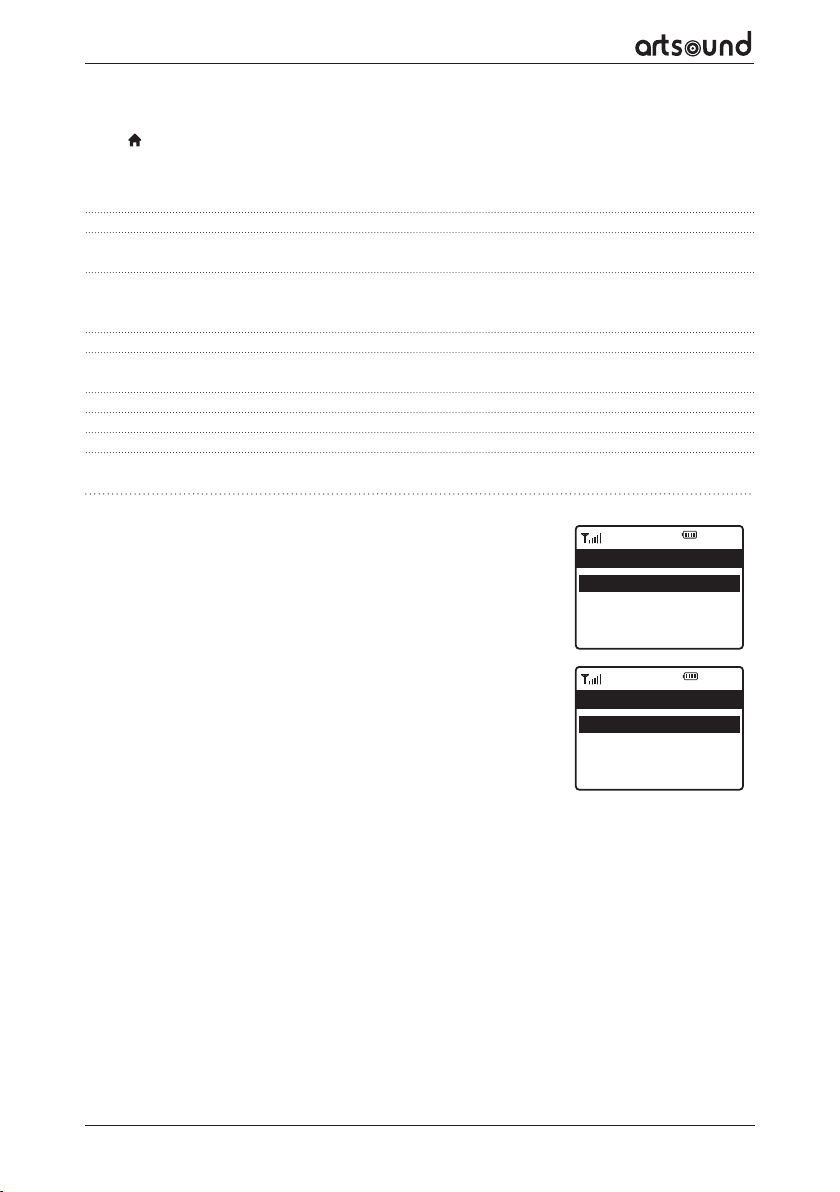
On the main menu, choose Internet Radio and you will find the options below:
SKYTUNE
Select Skytune to start enjoying thousands of radio stations over the world. You
can filter your search by Region, Music genre and talks.
The Local Radio let you access quickly the stations available in your local
area through internet connection.
Note - You can change the Local Radio area under Configuration> Local radio
setup. Please refer to section 12 for the details.
When you scroll along the list of Globe All and want to quickly reach to a certain point of the long list, input the
index number on the remote control to quickly jump to that point. For example, on the remote control, input 2 8
and press OK, it will highlight the station no. 28.
SEARCH
Instead of browsing the radio station list, you can input a few characters of the desired station to filter out / short
list the stations.
HISTORY
The radio memorizes the stations you have listened up to 99 stations.
If you have listened more than 99 stations, it will supersede the first station that you have listened.
12: 01am
Int ernet Radi o 1/3
< Skytune >
Search(Skyt une) >
Histor y >
12: 01am
Skytune 1/5
<Globe Most Popula r >
Loc al Radi o >
Globe All >
Globe B y Genre >
6
Page 7
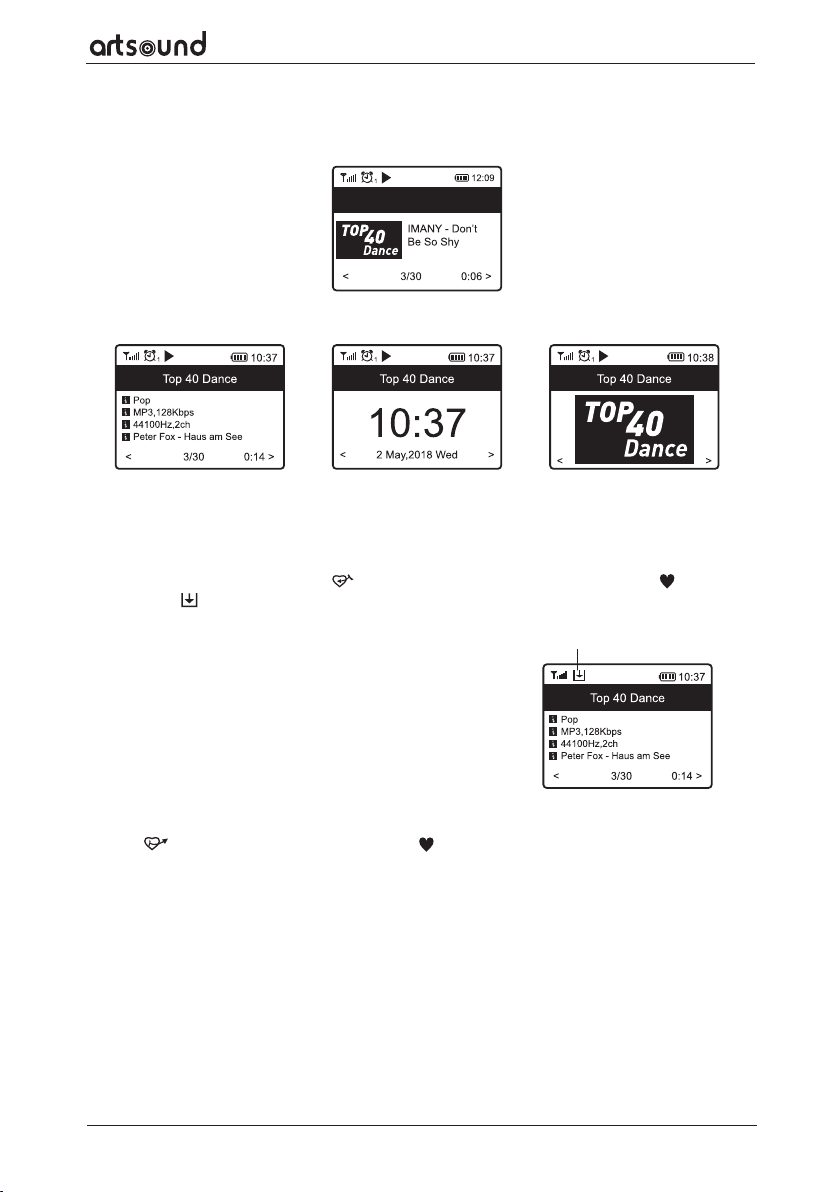
START PLAYING INTERNET RADIO
When a radio station starts playing, more radio information can be displayed. Press the ⊲ button in the state of
the playing screen below:
Every time you press the ⊲ button, it will toggle between the big clock and the radio channel information:
MY FAVORITE
This is to show the list of your Favorite stations which have been assigned to the presets.
R8
PRESET A STATION
When a radio station is playing, press the
you will see the icon appears as below. It means the station is added to the Favorite list.
The new added station will always show in the last item on the Favorite
list. You can store up to 150 presets.
RECALL A STATION
Press the
navigate to My Favourite on the main menu and select it to confirm.
EDIT YOUR FAVORITE LIST
On the Favorite list, choose the radio station you want to edit then press the [ ⊲ ] button on the remote control
(or press [ ⊲ ] on the unit). It will enter the Edit menu with the following options:
Move down To move down the ranking of a station
Move up To move up the ranking of a station
Delete To delete a particular station
Move to top To move the station to the top of the favorite list.
Move to bottom To move the station to the bottom of the favorite list.
button on the remote control or press the briefly on the radio unit to recall the list of presets, or
button on the remote control or press and hold the on the unit,
Preset icon
7
Page 8
R8
12. MEDIA CENTRE
The device supports UPnP and is DLNA-compatible.
This provides the opportunity to stream music from your network. However, this requires you to have a compatible device in your network that can function as a server. This can be e.g., a network hard drive or a conventional
PC with e.g., Windows 8 via which access to the shared folder or media sharing is permitted. The folders can
then be browsed and played on the radio.
Note – Please make sure your computer laptop is on the same Wi-Fi network as the Radio before you start using
this function.
MUSIC STREAMING
• Once the UPnP/DLNA compatible server is configure to share media files with your radio, you can start music
streaming.
• On the main menu, select Media Centre and choose UPnP.
• It may take a few seconds for the radio to complete the scan for available UPnP servers. If no UPnP servers are
found, it will show Empty List.
• After a successful scan is done, select your UPnP server.
• The radio will show the media categories available from the UPnP server, e.g. 'Music', 'Playlists' etc.
• Choose the media files that you wish to play.
You can set the mode of playback under Configuration > Playback setup.
MY PLAYLIST
You can make your own playlist for the UPnP music files. Choose and highlight the song you want to add to
playlist, press and hold the [Scroll/Select] knob or press and hold the [OK] button on remote, until the sign
appears. The song will be added to My playlist.
CLEAR MY PLAYLIST
Remove all songs in “My Playlist” to allow a new playlist to be prepared.
Note – If you have DLNA compatible servers available, follow the steps described above to browse the audio
files from DLNA compatible device on the radio to play.
13. DAB+/DAB RADIO
If there is Digital Audio Broadcasting (DAB) in your area, the Radio can pick up the DAB stations as well (no
internet connection is required). The Radio supports both DAB and DAB+.
Place the Radio close to the window and extend the antenna as far as it can go to get the best reception. Sometimes you may need to adjust the direction of the antenna to improve reception.
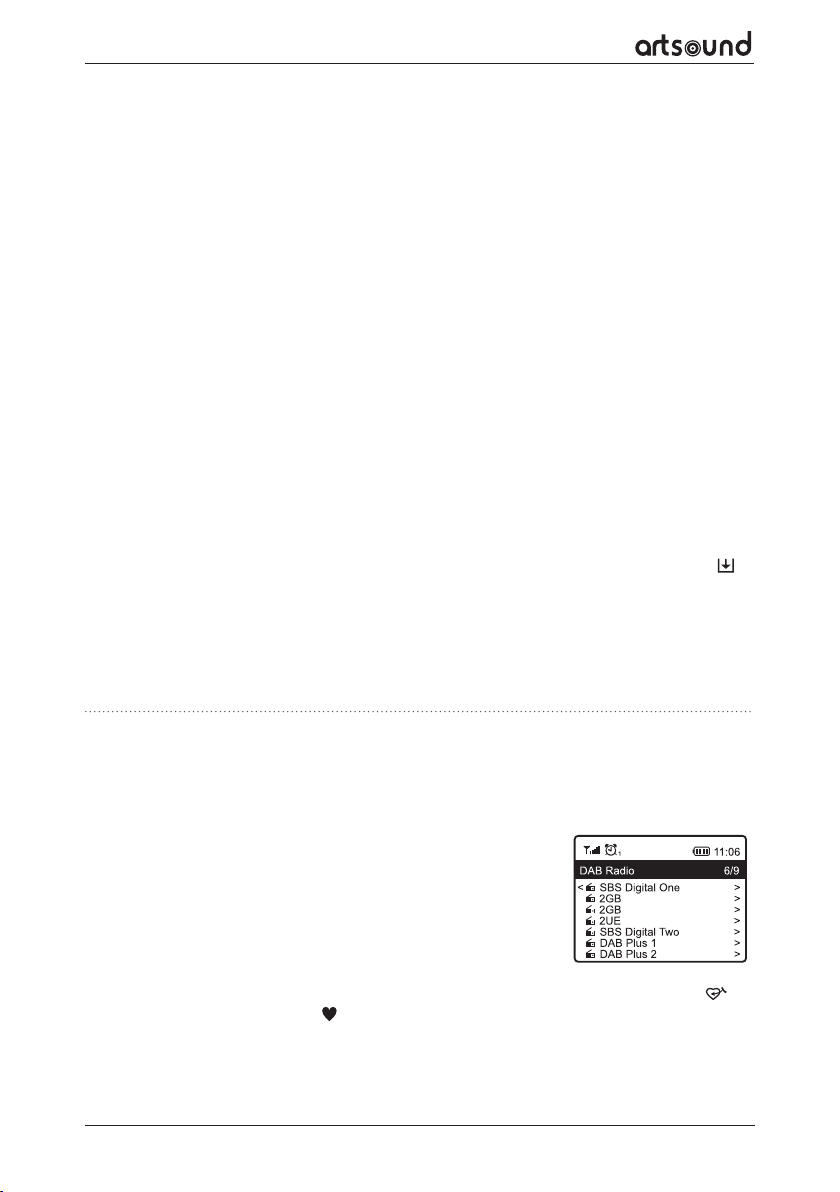
On the Home screen, scroll to DAB Radio or use the [Mode] button on remote
to switch to DAB Radio. Press [OK] to start.
It will ask whether you want to Scan DAB Station. Press [Scroll/Select] knob
(or OK button on remote) to start scanning and it will show the progress on the
number of channels received. When it is done, a preset page will be displayed
for your action.
You can select the channel and start listening to it. Whenever you want to add to My Favourite, press the
button on remote or press and hold the button on the radio, and it will add to the favourite list.
Always press the [
8
⊳ ] button to return to the Preset list.
Page 9
R8
Note – When a DAB radio is playing, press the [ ⊲ ] button to view more radio information, each time you press
the [ ⊲ ] button, it will display various information at a time such as radio frequency, rolling texts (if available) and
big time clock.
New digital radio stations should be picked up automatically by the radio if they are part of a multiplex you
already received. Otherwise you need to do the Preset Scan again.
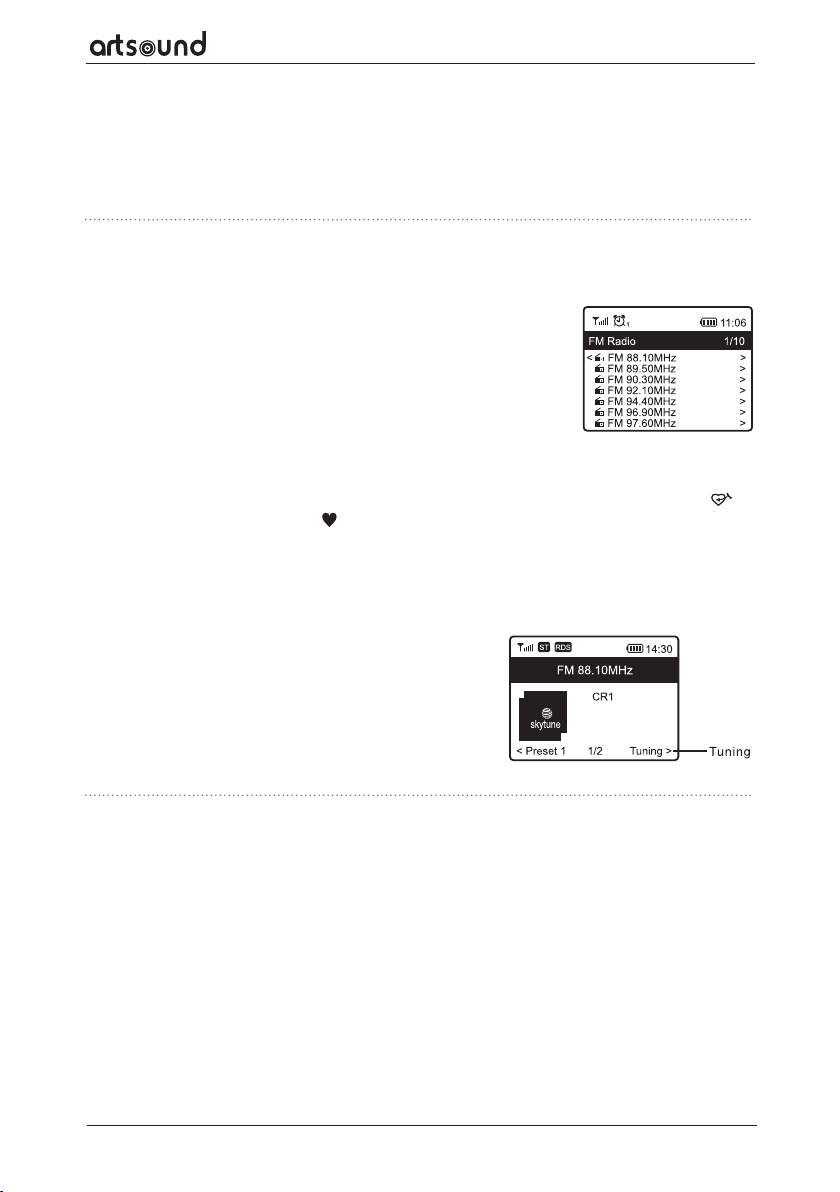
14. FM RADIO
To receive the ordinary FM stations (no internet connection is required), place the
radio close to the window and extend the antenna as far as it can go to get the
best reception. You may need to adjust the direction of the antenna to improve
reception.
On the Home screen, scroll to FM Radio or use the [Mode] button on remote to
switch to FM Radio. Press [Scroll/Select] knob (or OK button on remote) to start.
It will ask whether you want to Scan FM Station. Confirm to start scanning and it
will show the progress on the number of channels are found. When it is done, it
will automatically save the found channels on presets and display the list for your
action.
You can select the channel and start listening to it. Whenever you want to add to My Favourite, press the
button on remote or press and hold the button on the radio, and it will add to the favourite list.
Always press the [
Note – When it is playing FM radio, press the [
[⊲] button, it will display various information at a time such as radio frequency and big clock display.
MANUAL TUNE
To manual tune to the frequency, press and hold the [OK] on remote
or press and hold [Scroll/Select] on the radio, until you see the
"Tuning" appeared on the display, at the bottom right corner. Use
the [Scroll/Select]
knob ( or [
done, press and hold the [Scroll/Select] knob (or press and hold the
[OK] button on remote) to exit manual tune.
⊳] button to return to the Preset list.
⊲] button to view more radio information, each time you press the
⊳ / ⊲] button on remote) to tune the frequency. When
15. BLUETOOTH PLAYBACK
Before transmission between your Bluetooth device
and the radio is possible, both devices must be
coupled. This process is called "pairing". The radio is
served as a receiver, to receive music stream to play
on the radio.
If you have already coupled to a Bluetooth device
before, this connection will be restored automatically
when both devices are in range and Bluetooth operation has been selected on the radio. "Pairing" does
not have to be repeated. This function may need to be
activated in your Bluetooth device, however.
• Push the Menu button to display the selection menu
for the dierent operating modes.
• Use the up/down button to select the operating
mode Bluetooth and push the dial switch.
• Switch your Bluetooth device to which you want to
connect the radio on and activate the pairing mode
here. The device scans for Bluetooth devices in the
reception range.
• When the radio is found, your bluetooth device
shows its name
ArtSoundR8-XXXX (the XXXX is an identification
code for your radio unit).
• Select the radio at your bluetooth device.
• Start playback on your bluetooth device.
• Playback now takes place using the radio.
9
Page 10
R8
16. ALARM SETTING
Important!
To use the Alarm clock function, please have the radio connected with a power supply so to have the Standby
mode enabled. When the radio is turned on, press and release the [ ] button to put the radio into standby.
Standby is disabled when the radio is using internal battery.
• Press [
• Select either Alarm 1 or Alarm 2, choose Turn on to activate the Alarm.
• Follow the alarm wizard instructions to set the alarm.
• The wizard will guide you through the settings below:
Time Set the time for the alarm
Sound You can choose Wake to Tone, My Favourite, Wake to FM Radio or Wake to DAB
Repeat You can schedule the alarm as you desire -Everyday, Once or multiple days.
Alarm Volume Adjust the volume of the alarm as you like by rotating the [Scroll/Select] knob or [▲/▼]
Alarm duration Set the duration of the alarm from the preset options ranging from 30 to 180 minutes.
• After the above settings are completed, press the [
] button on the radio or press the [ ] button on the remote control.
Radio as the alarm source.
Note : Wake to FM or Wake to DAB Radio - only the preset stations can be used for the
radio alarm (if the preset scan has been completed).
Wake to My Favourite: Please preset your favorite station before setting this as the alarm
source.
button on remote.
The radio will be turned to standby when the selected duration of time is due.
⊳] button to exit and make sure the Alarm is turned on. You
will see the Alarm icon appeared on the display if it is activated.
STOPPING THE ALARM/ACTIVATE THE SNOOZE FUNCTION
When the alarm goes o, press the [
Snooze feature.
When the Snooze is activated, the alarm is muted for 9 minutes and sounds again when the time is due. You can
repeat the process multiple times.
To stop the "Snooze" function, press the [ ] .
] to stop the alarm or press the [Scroll/Select] knob to activate the
17. SLEEP TIMER SETTING
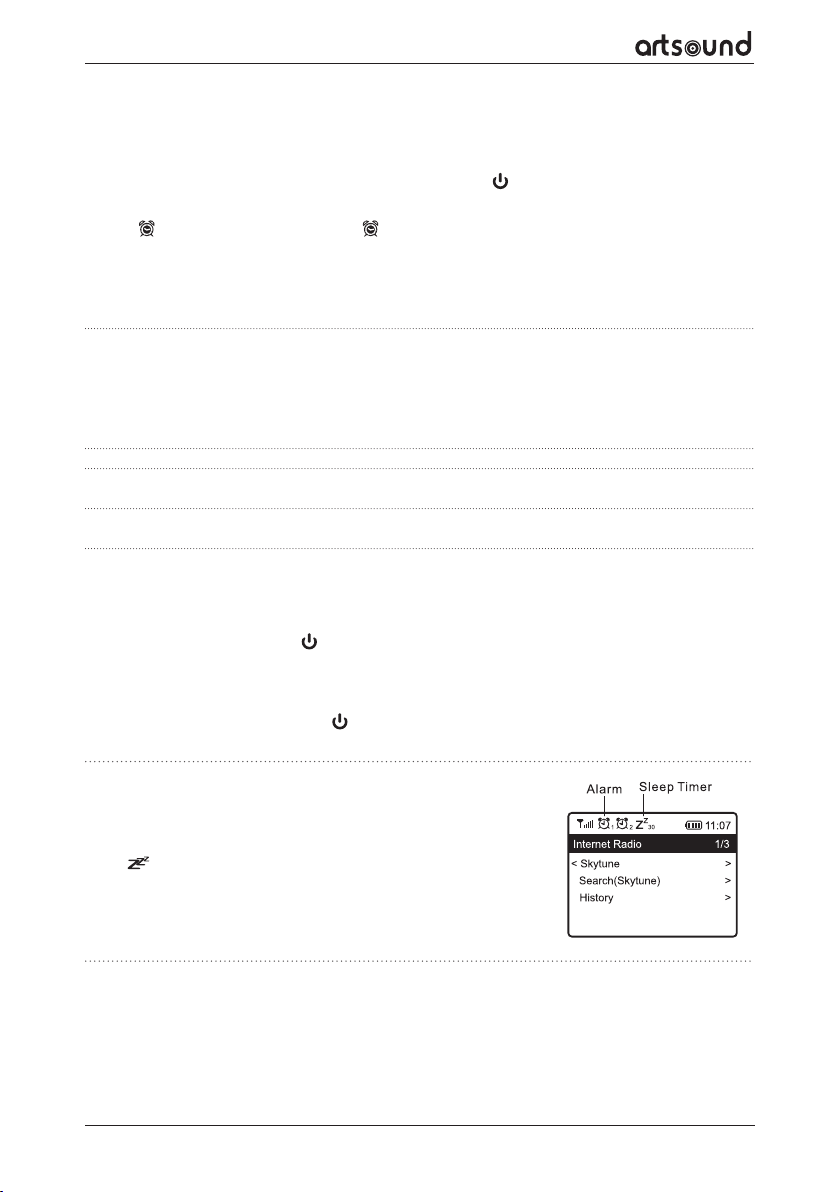
You can set the timer to let the radio goes standby after the selected time
elapsed in the range of 15 minutes to 180 minutes.
Press [
Timer option on the main menu.
You will see the icon appeared on the display if the timer is set.
] button on the remote control to set the timer, or navigate to Sleep
18. CONFIGURATION
Here you will find the complete settings / options available to configure your own radio. On the main menu,
navigate to Configuration setting. Press OK and you will see a list of options available.
10
Page 11
NETWORK
Network Options
Always on: The WLAN function remains switched on (faster access when switching from other modes of radio).
Auto o in 30s: The WLAN function shuts down after 30 seconds when not in use (to save energy).
Wi-Fi Network
• Add / Remove AP
Add AP – It will scan out a list of routers around.
Add AP (WPS button) – Choose this option to connect your Wi-Fi router via WPS if the router has a
WPS button.
Remove AP – If you have already added a router and want to remove it, choose this option.
Note – Always place the radio within 2 meters of the Wi-Fi router for setup.
• AP: [ ]
If you have added more than one routers on the radio and want to switch to another one,
select this option to change.
• Signal
This is to show the strength of the Wi-Fi Signal of the Wi-Fi router as received by the radio. Usually signal
levels lower than -70dBm is at weaker level and if it aects the reception of your radio, you may need to
optimize the router location or check any problem of the router itself.
• IP
The IP is set Dynamic by default. Select to change Fixed IP according to your network condition.
• DNS
The DNS is set Dynamic by default. Select to change <Fixed> DNS according to your network condition.
WIFI CHANNELS
Not all of the Wi-Fi channels are available in every country. There may be variation between dierent countries.
Therefore it is necessary to choose the Wi-Fi channels to ensure the Wi- Fi performs satisfactory.
We have already set the channels according to the requirement in dierent countries. Choose the country you
are staying from the list to get the correct channel.
DATE AND TIME
The radio will set your local time automatically after the internet connection is completed. If you want to do
manual setting, change it by the following options:
• Time zone
Auto-set Time Zone: This option is set by default.
Manual-set Time Zone: Choose this option if you want to set the time in
another region. Choose and highlight the region/city you prefer and press OK to confirm.
Coupled with NTP (use network time) and DST (Daylight time saving) will be adjusted automatically if you
choose to use network time (NTP).
• Set Time Format
Choose either 12-hour or 24-hour notation you prefer.
• Set Date Format
• DST (Day Light Saving)
Enable on/o
• NTP (Use network time)
NTP is designed to synchronize a device's clock with a time server. Your radio will synchronize the time server
by default every time it powers up and connects to Internet. This ensures a very high degree of accuracy
in the radio's clock. You can change to use other time server by inputting the URL address (see below NTP
server). You can choose “Do not use network time” if you don't want it to.
R8
11
Page 12
R8
If you choose not to use NTP for clock synchronization, highlight the NTP (Network time protocal) and press
OK to make the change. You will see the Set Date & Time appeared on the menu. Select it and adjust the
date and time as you desire.
• NTP Server
NTP is designed to synchronize a device's clock with a time server. Here it shows the server being used for
the radio.
LANGUAGE
The default language is English, you can choose other languages as preferred. Scroll with the ▲▼ buttons on
remote or [Scroll/Select] knob to the item with
language of choice. English, French, Spanish, Italian, German, Dutch, Polish, Russian and more are available.
LOCAL RADIO
The radio is set by default to detect the radio stations in your local area automatically through internet connection and these stations can be accessed by a press of [Local] button on remote. You can also set Local in another
region if you want. Highlight the Local Radio and press OK. Choose Manual-set Local radio to change the region
setting.
DAB SET UP
• DAB Preset Scan
You can always carry out a new scanning of DAB channels by selecting this option. All current presets and
channels will be erased.
• DAB Radio Preset
The scanned DAB stations will be listed here for management. You can move the position or even delete any
station. Scroll to the station and press [ ⊲ ] button. A pop up window will be presented: Move up, Move down
and Delete.
and press OK. Scroll to highlight and press OK to select your
FM SETUP
• FM Area
Choose the Region according to your physical location to define the search range for the radio.
• FM Preset Scan
You can always carry out a new scanning of FM channels by selecting this option. All current presets and
channels will be erased.
The radio at the lowest frequency of the scanned values will be highlighted. The preset list will be saved unless
a new preset scan is carried out.
• FM Radio Presets
You can adjust the preset ranking by Move down, Move up or Delete it. Highlight one of the preset, then press
the [ ⊲ ] button, it will enter into the Edit menu. Always press the [ ⊳ ] button to return to the Preset list.
PLAYBACK SETUP
This is to set the mode of playback under UPnP/DLNA compatible streaming: Repeat All, Repeat Once or Shuffle.
RESUME PLAY OPTIONS
This is to set the device whether to return to the last operating mode when it is switched on or displays the Home
screen.
12
Page 13
R8
DIMMER
You can set the backlight level for the display as you prefer. There are two settings: Mode and Level
• Mode – Normal or Power Saving
Normal – the display will stay with the same level of brightness all the time without dim down.
Dim – the display will dim down after 20 seconds if no operation is made on the radio.
• Level – Bright and Dim
Bright – This is to adjust the level of brightness in Normal mode. Dim – This is to adjust the level of brightness in Dim mode.
• Dimmer in Standby (Standby is only enabled when power is connected)
The display brightness in standby mode can be adjusted manually by turning the rotary knob [Scroll/Select]
or press the ▼ ▲ buttons on remote. If no action taken in 20 seconds, it will restore to the dim value as set in
Configuration.
EQ EQUALISER
Various music genres can be set.
BUFFER TIME
Sometimes you may experience uneven playback of the internet radio. This can happen if the internet connection
is slow or network congestion occurs. To help improving the situation, you can choose longer buer time to get a
few seconds of radio stream before beginning to play.
The default value is 2 seconds. You can choose 5 seconds if you prefer to have a longer buering time.
INFORMATION
View the Network and System Information of your radio.
To access quickly to this information, press the [Info] button on the remote control.
When you use your PC to manage the My favorite stations, you have to use the IP address and you can view
this info from here. Then type in the IP address ( Configuration > Info > Network > IP ) to your PC's browser input
window.
SOFTWARE UPDATE
There may be a software update to upgrade features of the radio from time to time.
RESET TO DEFAULT
You can do the reset to clear all the settings and return to default settings.
** Please note all the Station presets, Settings and configuration will be erased after you have performed the
Reset.
13
Page 14
R8
19. REMOTE CONTROL VIA PC / SMART PHONE
TUNING INTERNET RADIO & MANAGE FAVOURITE
Experience an easy way to control tuning internet radio channels and manage your favourite list via PC or Smart phone's web browser.
The supported browsers are Internet Explorer and Chrome.
• Connect your PC or Smart phone to the same Wi-Fi network as your radio.
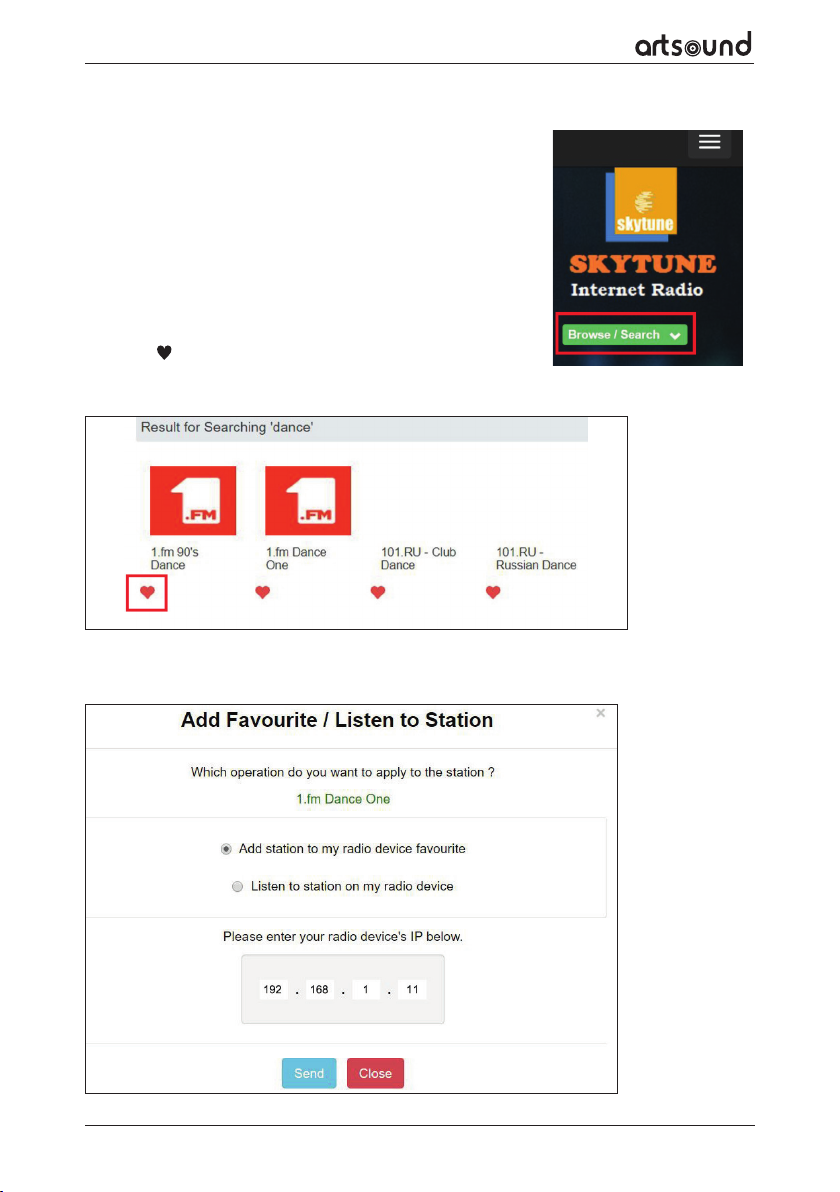
• Visit www.skytune.net
• On the home page, click “Browse/Search”
• Browse or enter the name to search the radio channel, a list of internet
radio channels will be displayed.
• Click the “ ” symbol
• It will prompt you whether to "Add Favourite" or "Listen to Station". Enter the IP address of your radio (e.g.
192.168.1.11):
14
Page 15
The IP address can be located on the radio unit as follow:
• On the remote control, press the [Info] button, choose Network and scroll to IP to view the IP address
• On the radio, return to the main menu. Navigate to Configuration > Information > Network Information > IP
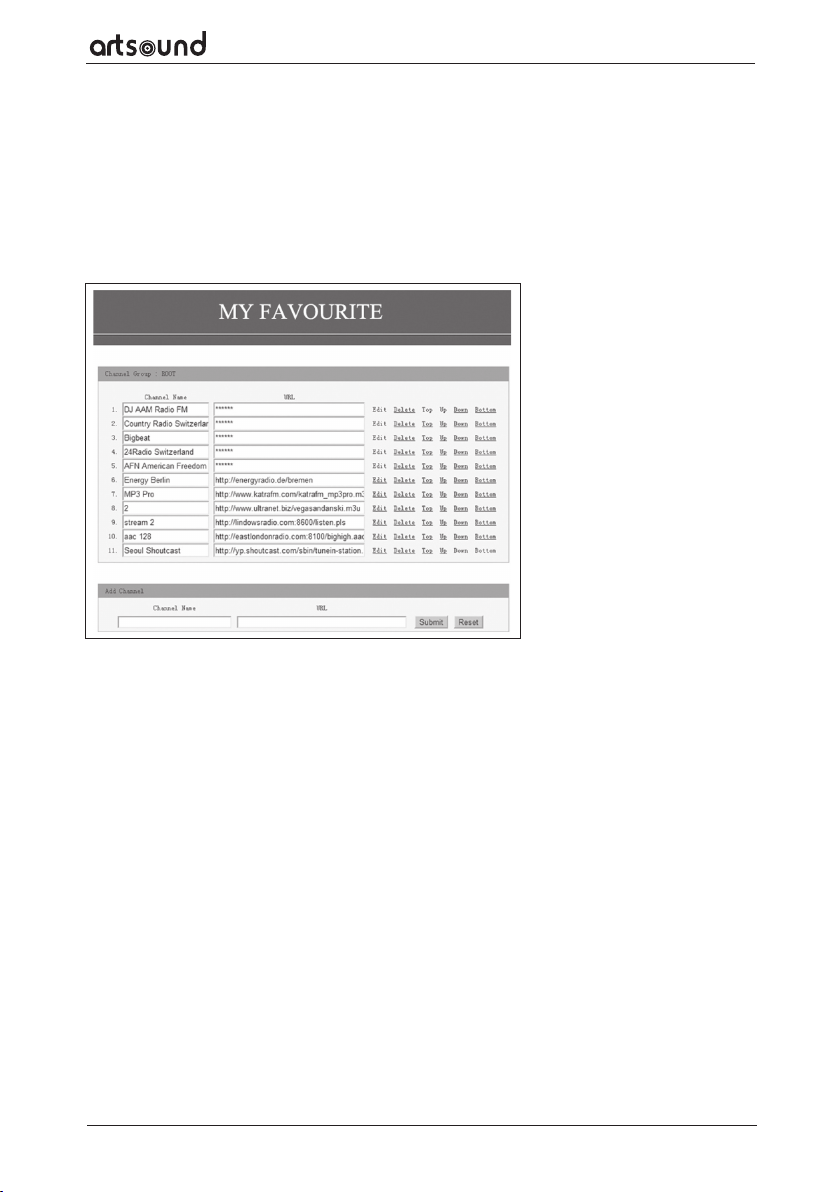
Select "Listen to Station", click "Send" and the radio unit will switch playing the channel and the "My Favourite"
page will pop up on the web browser.
You can then choose to add the playing station to favourite or manage your list by other edit options. Any
changes will synchronize to the radio unit immediately.
R8
You can also add the radio channel if you know the published audio stream URL with the streaming format as
follow:
1. Transport: HTTP progressive like HLS and HTTP like Shoutcast, Icecast
2. Audio: MP3, AAC, AAC+, FLAC
3. Playlist: M3U, PLS
15
Page 16
R8
20. TROUBLE SHOOTING
Problem Cause Solutions
Cannot connect to
Wi-Fi network
Network down • Confirm that a Wi-Fi or Ethernet Wired connected PC can
access the internet (i.e. can browse the web) using the
same network.
• Check that a DHCP server is available, or that you have
configured a static IP address on the radio.
• Check that you firewall is not blocking any outgoing
ports. As a minimum the radio needs access to UDP and
TCP ports 80,443 and 8008, DNS port 53.
Router restricts
access to listed MAC
addresses
Obtain the MAC address from Configuration > Information
> Network
> Wi-Fi MAC and add to the allowed equipment list on your
access point.
Note: The radio has separate MAC addresses for wired and
wireless networks.
Insucient Wi-Fi
signal strength
Unknown encryption
method
Firewall preventing
access
If your radio can connect
to the network successfully, but is unable to play
particular stations
No DAB/FM reception • Please carry out “Factory Reset” on the radio and extend
DAB/FM radio reception
is poor
• Check distance to router; see if a computer can connect
to the network in this location
• Optimize the distance of the router’s location
Change encryption method on router. The radio supports
WEP, WPA, WPA2
Windows Media Player:
varies — non-Microsoft firewalls may require configuration
for UPnP.
• The station is not broadcasting at this time of the day
(remember it may be located in a dierent time zone).
• The station has too many people trying to attach to the
radio station server and the server capacity is not large
enough.
• The station has reached the maximum allowed number of
simultaneous listeners.
• The link on the radio is out of date. The update of the
link is done regularly. To get the updated list of stations,
please access from Internet radio > Skytune. In case a
particular stream is still not working, please contact us or
report the case to Skytune.
the antenna.
• Move the radio close to the window.
• Please check that the aerial is extended for the maximum
signal strength and adjust the direction to improve
reception.
• Check that you do not have other electrical equipment
too close to your radio, causing interference.
16
Page 17
No sound • Please check if the volume is muted. Tune up the volume
and see.
• If that happens on a particular internet radio station,
please try other channels and see if this is isolated issue
on that station.
R8
Radio got freeze or no
response
Insert a small paper clip in the reset pinhole and hold the
button down, the radio will switch o. Try turning the radio
on again.
21. HELPFUL TIPS
1 If the Internet Radio keeps re-buering radio station:
The Internet Radio is streaming the data from the radio station via your broadband connection, if there is a
high error rate on your broadband connection, or the connection is intermittent, then it will cause the Internet
Radio to pause until the connection is re-established and it has received enough data to start playing again.
If your Internet Radio keeps stopping, please check the DSL modem to ensure that the Broadband line is not
suering a high error rate or disconnections. If you are experiencing these problems, you will need to contact
your broadband supplier.
2. What is Buering?
When playing a stream, the Internet Radio/Media player, downloads a small amount of the stream before
it starts playing. This is used to fill in any gaps in the stream that may occur if the internet or the wireless
network is busy.
The Internet Radio streams music data from the PC while you are listening. If a stream gets blocked or experiences Internet congestion while transferring it may stop/interfere with the quality of play. If this happens,
check your internet connection speed- it must be faster than the speed of the streams.
3. My radio is working but some stations cannot be played.
The problem may be due to one or more of the followings:
a. The radio station is no longer broadcasting.
b. The radio station has reached the maximum allowed number of simultaneous listeners.
c. The radio station has changed the stream arrangement and the link is no longer valid.
d. The radio station is not broadcasting at the time of the day (not all stations are broadcasting 24 hours
throughout the day).
e. The Internet connection between your radio and the radio station server is too slow or unstable to support
the data rate of the broadcast.
17
Page 18
R8
22. TECHNICAL SPECIFICATION
discription internet – DAB+ - FM - bluetooth radio
radio internet radio (auto update)
FM (RDS) / DAB+
memory 99 programmable radio stations
functions search by genre, location or your favourites
alarm / clock / sleep timer / internet clock sync (NTP)
equalizer
subwoofer
antenna telescopic
Bluetooth Yes (V4.2 BR/EDR 2.4 GHz)
internet connection WLAN -802.11b/g/n
uPnP & DLNA support
control remote control
output headphone jack
power supply micro USB (DC 5V)
battery 2200mAh (4 h) – Lithium - Ion
dimensions (h x w x d) 115 x 186 x 110 mm
weight / piece 0,89kg
composition wood / ABS plastic
colour black
Remark: Specification may vary without notice
18
Page 19
R8
23. WARRANTY CONDITIONS
2 year warranty from date of purchase. The warranty is limited to the repair of replacement of the defective
material insofar as this defect is a result of normal use and the device has not been damaged. Artsound is not
responsible for any other costs that ensue as a result of the defect (e.g. transport). For details, please consult our
general terms and conditions of sale.
This product bears the selective sorting symbol for waste electrical and electronic equipment (WEEE).
This means that this product must be handled pursuant to European Directive 2002/96/EC in order to
be recycled or dismantled to minimize its impact on the environment.For further information, please
contact your local or regional authorities.
I, House Of Music NV, hereby declare that the type of radio equipment ARTSOUND complies with Directive 2014/53/EU. The full text of the EU Declaration of Conformity can be found at the following internet
address: http://www.artsound.be/en/support/downloads
Disclaimer: All trademarks are the property of their respective owners. All specifications and information are
subject to change without further notice. Slight variations and dierences might appear between printed photos
and actual product due to product enhancement.
House Of Music NV - Schoonboeke 10 B-9600 Ronse - Belgium
19
Page 20

House of Music nv, Schoonboeke 10, BE-9600 Ronse
 Loading...