


R3

R3
DAB/DAB+/FM/AUX radio
INHOUDSOPGAVE
1 Inleiding 3
1.1 Veiligheid 3
1.2 Kenmerken 3
1.3 Inhoud van de verpakking 4
1.4 Externe benodigdheden 4
1.5 Gebruikte afspraken in deze gebruiksaanwijzing 4
2 Bedieningstoetsen, aansluitingen en display 4
2.1 Belangrijkste bedieningstoetsen 4
2.2 Aansluitingen 5
2.3 Schermen 5
3 Opstarten en instellen 6
3.1 Tijdweergave 12/24 u 6
3.2 Tijd/datum 6
3.3 Auto update 6
3.4 Handmatige instelling 6
4 Bediening 5
4.1 DAB-radiomodus 6
4.2 FM-radiomodus 7
4.3 Aux-in modus 7
5 Alarmen en slaapstand 8
5.1 Alarmen 8
5.2 Snooze 8
5.3 Slaapstand 8
6. Systeeminstellingen 8
6.1 Audio uitgang 8
6.2 Equalizer 8
6.3 Tijd 8
6.4 Scherm helderheid 9
6.5 Standby 9
6.6 Taal 9
6.7 Fabrieksinstellingen 9
7 Foutmeldingen & Probleemoplossing 9
8 Technische kenmerken 10
2

1 Inleiding
1.1 Veiligheidsinstructies
Bewaar deze gebruiksaanwijzing voor later gebruik.
• WAARSCHUWING: Om het risico op brand
en elektrische schokken te vermijden, mag dit
apparaat niet worden blootgesteld aan regen of
vocht. Het apparaat mag niet worden blootgesteld aan druppels of spatwater en er mogen
geen met vloeistof gevulde voorwerpen, zoals
vazen, op het apparaat worden geplaatst.
• WAARSCHUWING: De directe plug-in adapter
wordt gebruikt om het toestel uit te schakelen
en moet steeds vlot bedienbaar blijven.
• Een bliksemflits met een pijl in een driehoek
waarschuwt de gebruiker voor de aanwezigheid
van niet-geïsoleerde, gevaarlijke spanning in de
behuizing van het product, die hoog genoeg
kan zijn om brand of elektrische schokken te
veroorzaken.
• Waarschuwing: Om het risico op elektrische
schokken te beperken, mag het deksel (of de
achterplaat) niet worden verwijderd; binnenin
zitten geen onderdelen die de gebruiker zelf kan
repareren. Laat reparaties over aan bevoegde
personen.
• Het uitroepteken in een gelijkzijdige driehoek
waarschuwt de gebruiker voor de aanwezigheid
van belangrijke bedienings- en onderhoudsinstructies in de meegeleverde documentatie.
•
Correct weggooien van het product. Dit
symbool wijst erop dat het product in de EU
niet met het huisafval mag worden weggegooid.
Om mogelijke schade aan het milieu of aan de
menselijke gezondheid als gevolg van ongecontroleerde afvalverwijdering te voorkomen,
dient het apparaat op een verantwoorde manier
te worden gerecycleerd om het duurzaam
hergebruik van materiële hulpbronnen te bevorderen. Om uw gebruikte apparaat in te leveren,
gelieve gebruik te maken van het inlever- en
verzamelsysteem of contact op te nemen met
de winkelier bij wie u het product hebt aangekocht. Hij kan het product wegbrengen voor een
milieuveilige recyclage.
• Plaats geen open vlammen, zoals brandende
kaarsen, op of in de buurt van het apparaat.
• WAARSCHUWING: Er bestaat gevaar op
ontploffing als de batterij niet correct wordt
vervangen. Vervang enkel door een batterij van
hetzelfde of gelijkwaardig type.
• WAARSCHUWING: De batterij (batterij, batterijen of batterijpack) mag niet worden blootgesteld aan extreme hitte, zoals zonlicht, vuur of
dergelijke meer.
• Gebruik dit product niet in de buurt van water
of vocht.
• Gebruik enkel een droge doek om het apparaat
schoon te maken.
• Haal de stekker van het apparaat uit het stopcontact voor u het schoonmaakt.
• Plaats het apparaat op een stevig oppervlak.
• Plaats het apparaat niet in een gesloten boekenkast of een kast zonder voldoende ventilatie.
• Installeer het apparaat niet in de buurt van
warmtebronnen als radiators, kachelroosters,
fornuizen of andere apparaten die warmte
produceren.
• Zorg ervoor dat niet op het stroomsnoer kan
worden getrapt of dat het niet gekneld kan
raken, vooral bij de verdeelstekkers en de plaatsen waar het snoer uit het apparaat komt.
• Service of reparatie is vereist wanneer het toestel
beschadigd is. Probeer het apparaat niet zelf te
repareren. Het openen of verwijderen van de af
dekplaten kan u blootstellen aan gevaarlijk hoge
spanningen of andere gevaren. Neem contact
op met de fabrikant om te worden doorverwezen
naar een erkend servicecenter bij u in de buurt.
• Om het risico op brand of elektrische schokken
te voorkomen, dient u overbelasting van wandstopcontacten of stekkerdozen te vermijden.
• Zorg ervoor dat er geen voorwerpen of vloeistoffen in het apparaat terechtkomen.
• Gebruik geschikte stroombronnen. Sluit het apparaat op een geschikte stroombron aan, zoals
wordt omschreven in de bedieningsinstructies of
aangegeven op het apparaat.
1.2 Kenmerken
In deze handleiding wordt het gebruik omschreven
van de R3, een geperfectioneerd maar
gebruiksvriendelijk audiosysteem dat over de
volgende modi beschikt:
• DAB/DAB+ digitale radio met een ruime
keuze aan openbaar toegankelijke zenders en
geluid van digitale kwaliteit
• FM met RDS (Radio Data System)
• AUX IN voor externe muziekbronnen, zoals
mp3-spelers
De R3 beschikt daarnaast over de volgende functionaliteiten:
• Groot TFT-kleurendisplay voor een eenvoudige
bediening en een duidelijke weergave van de
-
NL
3

informatie
• Klok met auto-updatemogelijkheid en twee
aparte alarmen
• Slaap- en sluimerstand
• Meerdere talen
1.3 Inhoud van de verpakking
In de verpakking vindt u de volgende onderdelen:
• 1 R3 apparaat
• 1 DC-stroomadapter van 9V 1,5 A & batterij
7,4V/2200mAh ingebouwd
• 1 gebruiksaanwijzing
1.4 Externe benodigdheden
Om de R3 te bedienen, zijn de volgende externe
benodigdheden vereist:
• Een stroombron (netstroom van 100-240 V)
• Een externe audiobron (voor de AUX IN-modus)
1.5 Gebruikte afspraken in deze
gebruiksaanwijzing
Knop (druk) op een fysieke knop op het keypad
Optie (selecteer een) optie in het menu op het
display
Naam Menu, scherm of een andere naam
2 Bedieningstoetsen, aansluitingen
en display
2.1 Belangrijkste bedieningstoetsen
1.
TUNE/SELECT/ VOLUME/MUTE/SNOOZE:
Draai hieraan om door een menu of zenderlijst
te bladeren. De gekozen optie wordt ‘omge
keerd’ weergegeven (donkere tekens tegen
een witte achtergrond). Druk op de knop om
te selecteren. Draai tijdens het afspelen aan de
knop om het volume te verhogen of te verla
gen. Druk tijdens het afspelen op de knop om
de muziek te dempen. Druk wanneer het alarm
afgaat op de knop om de sluimerstand gedu
rende een vooraf ingestelde duur te activeren.
2. STANDBY: Schakel de stand-bymodus in
of keer ernaar terug (weergave van klok en
datum) of annuleer de slaap- of alarmfunctie.
3. SLEEP: Druk tijdens het afspelen op SLEEP;
de R3 keert dan na een vooraf ingestelde duur
terug naar de stand-bymodus.
4. SOURCE: Druk hierop om de verschillende
modi te selecteren: DAB, FM, Aux.
5. ALARM: Als u op Alarm drukt, wordt op het
scherm Alarm 1 en Alarm 2 weergegeven;
draai vervolgens aan de knop SELECT en
druk op deze knop om alarm 1 of alarm 2 te
selecteren om in te stellen.
6. INFO: Bekijk meer informatie over de huidige
zender of het huidige nummer. Druk nogmaals
op de knop om verdere informatieschermen
weer te geven en om vervolgens terug te
keren naar het normale scherm van de huidige
zender of het huidige nummer.
7. BACK/MENU: BACK: Terugkeren naar het
vorige scherm; In de afspeelmodus kan deze
knop gebruikt worden om terug te keren naar
de vorige afspeellijst of zenderlijst; MENU:
geeft het menu voor de huidige modus weer.
Druk nogmaals op de knop om het scherm
van de huidige zender of het huidige nummer
weer te geven.
8. PRESET: Druk hierop om uw favoriete zen-
ders op te slaan (maximum 10); druk hierop
om de favoriete zender te selecteren of een
opgeslagen zender op te roepen.
9.
TUNE-/ : Tune-: Druk hierop om in de FM- of
DAB-modus de volgende zender te selecteren;
houd in de FM-modus de knop Tune- 2 seconden
ingedrukt om automatisch te zoeken naar zen
ders.
10. TUNE+/ : Druk hierop om in de FM- of
DAB-modus de volgende zender te selecteren; houd in de FM-modus de knop Tune+
2 seconden ingedrukt om automatisch naar
zenders te zoeken.
11. : Druk hierop om een volledige scan uit te
voeren.
-
-
-
-
4
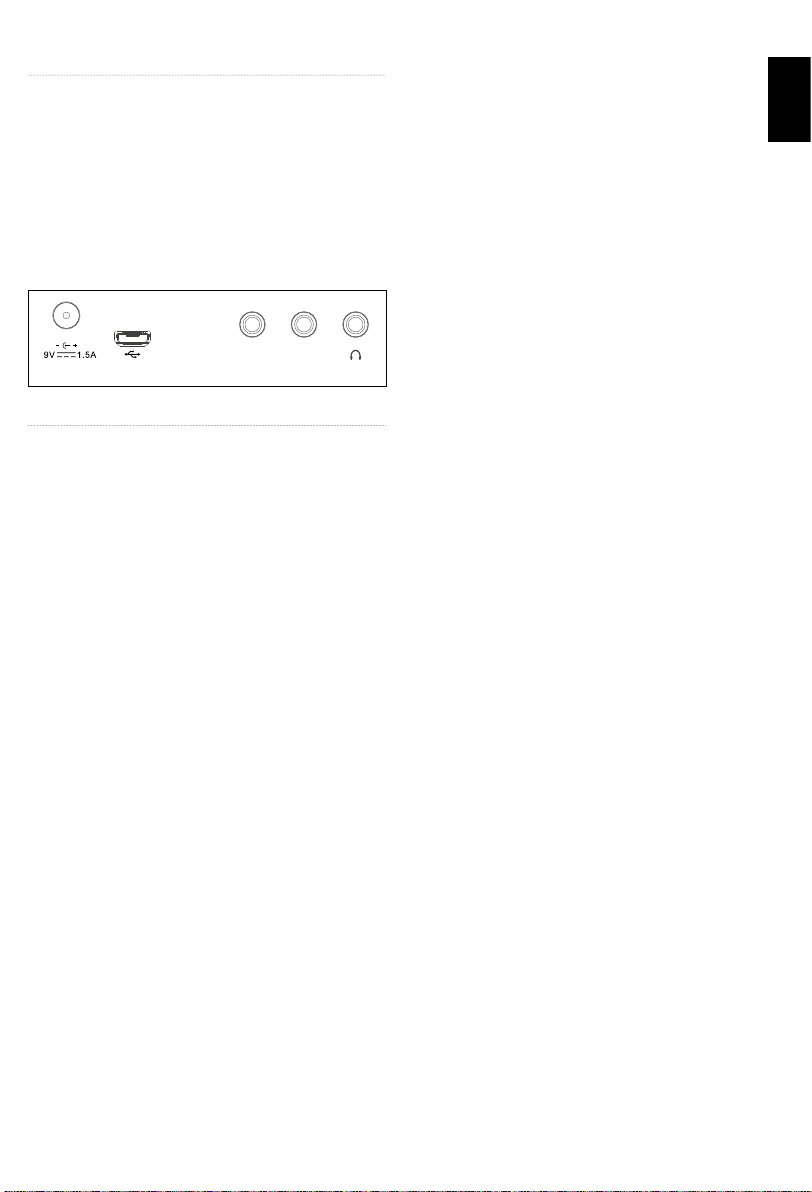
2.2 Aansluitingen aan de achterkant
Zoals hieronder wordt afgebeeld, zijn er aan de
achterkant verschillende aansluitingen. Van links
naar rechts:
• DC-stroomingang (9 V)
• Mini USB voor software update
• AUX IN (voor de aansluiting van externe media,
zoals een iPod)
• Lijnuitgang (voor de aansluiting van een externe
versterker)
• Hoofdtelefoonuitgang.
AUX IN LINE OUT
2.3 Schermen
Het display geeft verschillende menu’s, dialoogvensters en schermen weer, zoals hieronder
omschreven.
Er zijn in principe zes types van schermen:
• Stand-by (klok)
• Splash-scherm (modus)
• Scherm Now playing
• Dialoogschermen
• Fout- of informatiescherm
• Menuschermen
Als de tekst te lang is voor het scherm, ziet u het
eerste deel en vervolgens loopt de tekst na een
paar seconden door zodat u alles kunt lezen. Op
het stand-byscherm worden de tijd, de datum en
de eventuele actieve alarmtijden weergegeven.
Naarmate u door de afspeelmodi bladert via
SOURCE, geeft de R3 voor elke modus een
scherm weer. Na één seconde opent de R3 de
geselecteerde modus en tracht de laatste zender
of het laatste nummer af te spelen die in deze modus werd beluisterd. Is dit niet mogelijk, dan tracht
de R3 verbinding te maken met de geselecteerde
bron, door te zoeken naar zenders of netwerken,
of door naar invoer van de gebruiker te vragen.
Op de Now Playing-schermen wordt informatie
weergegeven over de audiobron en het nummer
dat wordt afgespeeld (voor zover beschikbaar).
Dialoogschermen worden weergegeven om het
de gebruiker toe te laten instellingen te wijzigen.
De R3 heeft in principe drie soorten menu’s. Gebruik de Select-knop om door de opties te bladeren
en opties te selecteren. Een schuifbalk rechts op
het scherm geeft aan of er nog meer opties be
schikbaar zijn boven of onder de zichtbare opties.
Elke modus heeft een Modusmenu, met specifieke
opties voor die modus.
Zo heeft het FM-modusmenu bijvoorbeeld slechts
twee opties: Scan setting en Audio setting
Daarnaast heeft elk modusmenu twee eindopties:
Systems settings > en Main Menu >. ‘>’ wijst
erop dat er in volgende menu nog meer opties zijn.
In System settings hebt u toegang tot de systeeminstellingen en informatie over onder meer de
tijd, de taal en de software-updates.
Menu’s met meer opties dan op één scherm passen, hebben een schuifbalk aan de rechterkant.
In Main menu hebt u toegang tot alle modi, plus de
slaap- en timerfuncties.
Bepaalde menu’s, zoals Systems settings, hebben
meerdere submenu’s.
-
NL
Fout- en informatieschermen geven enkele
seconden lang specifieke meldingen weer en
gaan vervolgens automatisch over naar een ander
scherm.
5

3 Opstarten en instellen
De R3 is eenvoudig te gebruiken. Om de DAB- of
FM-radio te beluisteren, hebt u alleen een stroombron nodig (netstroom van 100 tot 240 V);
Verschuif de knop achter de batterij voor het
eerste gebruik om deze te activeren.
3.1 Tijdweergave 12/24 u
Om te schakelen tussen het 12- en het 24 -uurformaat, selecteert u Set 12/24 uur en vervolgens uw
voorkeur.
3.2 Tijd/datum
De tijd en de datum kunnen handmatig of automatisch worden ingesteld.
3.3 Auto-update
Auto-update werkt met data die via DAB, FM
of het internet worden verstuurd. De klok wordt
alleen bijgewerkt in de overeenkomstige modus;
u selecteert dus best een modus die u vaak
gebruikt.
3.4 Handmatige instelling
Als u No update instelt, vraagt de wizard u nu om
de tijd en de datum handmatig in te stellen.
De datum en de tijd worden weergegeven als
dd-mm-jjjj en uu:mm AM/PM, waarbij de eerste
waarde, dd, actief is (knippert).
4 Bediening
4.1 DAB-radiomodus
In de DAB-radiomodus kunt u digitale radio ontvangen via DAB/DAB+ en informatie bekijken over
de zender, de stream en het nummer dat wordt
afgespeeld. Om de DAB-modus te openen, drukt
u op Mode tot op het display DAB RADIO wordt
afgebeeld, of selecteert u Menu > Main Menu >
DAB
• Als u bepaalde zenders niet goed ontvangt
(haperend geluid), wenst u wellicht enkel zenders met een goede signaalsterkte in de lijst te
zetten.
Om een scan handmatig te starten, selecteert u
Menu > Full Scan.
Van zodra de scan voltooid is, beeldt de radio een
lijst van de beschikbare zenders af.
Om zenders te verwijderen die in de lijst staan
maar niet beschikbaar zijn, selecteert u Menu >
Prune invalid.
4.1.2 Voorkeuzezenders
De R3 heeft 10 voorkeuzezenders voor DAB.
Om een voorkeuzestation op te slaan, houd de
Preset knop ingedrukt totdat een lijst genummerd
1 tot 10 verschijnt dewelke als “empty” of met een
station naam staan aangeduid. Kies met de Select
knop een nummer en druk de knop in om het
huidig station op te slaan.
Om een voorkeuzezender te selecteren, houdt u
Preset kort ingedrukt en selecteert u een van de
voorkeuzezenders in de zenderlijst.
4.1.3 Handmatige afstemming
Naast de “scan” methode kan men ook handmatig
afstemmen op een bepaald kanaal/frequentie.
Druk Menu > manual> scroll met Select > druk
Select op te kiezen.
Het display toont een indicatie van de signaalsterkte van de geselecteerde frequentie.
4.1.1 Zenders zoeken
Wanneer u voor het eerst de DAB-radiomodus
selecteert of de zenderlijst leeg is, voert de R3
automatisch een volledige scan uit om te zien welke
zenders beschikbaar zijn. Het kan zijn dat u ook
een scan handmatig moet opstarten om de zender
lijst te updaten. Hiervoor zijn verschillende redenen:
• De beschikbare zenders veranderen af en toe.
• Als de ontvangst tijdens de eerste scan niet
goed was (bijvoorbeeld omdat e antenne niet
was uitgetrokken), kan dit resulteren in een lege
of onvolledige zenderlijst.
6
Wijzigingen van de antenne positie zijn waar te
nemen door een veranderende ontvangststerkte.
-
4.1.4 Informatie over de huidige weergave
Tijdens het afspelen van een stream, geeft het
scherm de naam en de DLS-informatie (Dynamic
Label Segment) ervan weer die door de zender
worden meegezonden, met realtime-informatie

zoals de naam van het programma, de titel van het
nummer en de contactgegevens.
Om meer informatie te zien, drukt u op Info.
Telkens u op Info drukt, wordt andere informatie
afgebeeld: DLS-tekst, type van programma, naam
ensemble/frequentie/signaalsterkte/foutniveau,
bitrate/codec/kanalen en de datum van vandaag.
4.1.5 Andere instellingen
Dynamic range compression
Met deze functie kunnen radio’s het dynamisch
bereik van de uitgaande audiostream comprimeren zodat het volume van zachte klanken wordt
verhoogd en dat van luide klanken wordt gedempt.
Dit kan nuttig zijn als u naar muziek luistert met
een hoog dynamisch bereik in een lawaaierige
omgeving (bijvoorbeeld, klassieke muziek in de
keuken).
Om de DRC van de R3 aan te passen, selecteert
u Menu > DRC en vervolgens DRC high, DRC low
of DRC off.
Opmerking: De DRC-instelling van de R3 heeft
geen invloed als de uitzending geen DRC-informatie bevat.
4.2. FM-radiomodus
In de FM-radiomodus kunt u de analoge radiozenders uit de FM-band ontvangen alsook RDS-informatie (Radio Data System) bekijken over de
zender en het programma (indien uitgezonden).
Druk op Mode tot op het display FM Radio wordt
afgebeeld.
4.2.1 Zenders selecteren
Om een zender te vinden, drukt u op Select. De
weergave van de frequenties neemt toe naarmate de R3 de FM-band aftast. U kunt ook naar
omhoog of naar omlaag zoeken door de knoppen
>> of << ingedrukt te houden of handmatig de
frequentie bij te stellen door er kort op te drukken
of door aan de Select-knop te draaien.
4.2.2 Voorkeuzezenders
De R3 heeft 10 presets voor FM welke op dezelfde
manier werken als de DAB presets. (4.1.3)
4.2.3 Informatie over de huidige weergave
Tijdens het afspelen van een FM-zender, wordt op
het scherm een van de twee volgende datasets
afgebeeld:
• Als er RDS-informatie beschikbaar is, wordt
standaard de naam van de dienst weergegeven
(de zendernaam).
U kunt door de overige RDS-informatie heen
bladeren door op Info te drukken. Telkens u op
Info drukt, wordt andere informatie afgebeeld:
RDS-radiotekst, RDS-programmatype, frequentie en de datum van vandaag.
• Als er geen RDS-informatie beschikbaar is, wordt
de huidige ingestelde frequentie afgebeeld.
4.2.4 Instellingen
Scaninstellingen
De FM-scans stoppen standaard bij iedere beschikbare zender. Dit kan resulteren in een zwakke
signaal-ruisverhouding (geruis) bij zwakke zenders.
Om de scaninstellingen zodanig aan te passen dat
enkel bij sterke zenders wordt gestopt, selecteert
u Menu > Scan setting > Strong stations only?
> Yes.
Audio-instellingen
Standaard worden alle zenders in stereo weergegeven. Bij zwakke zenders kan dit resulteren in een
zwakke signaal-ruisververhouding (geruis). Om
zwakke zenders in mono af te spelen, selecteert u
Menu > Audio setting > Forced mono
4.3 AUX IN-modus
In AUX IN-modus wordt audio van een externe
bron afgespeeld, zoals een mp3-speler. Om audio
af te spelen in AUX IN-modus:
1. Sluit u de externe audiobron aan op de AUX
IN-stereoaansluiting van 3,5 mm.
2. Drukt u op Source totdat op het display AUX In
wordt afgebeeld.
3. Past u het volume van de R3 aan (en, zo nodig,
van de audiobron).
NL
7

4.4. Afgespeelde informatie
Bij selectie van Aux In wordt op het scherm Aux In
samen met de datum afgebeeld.
5 Alarmen en slaapstand
Naast een klok/kalender, beschikt de R3 ook over
twee veelzijdige wekkers met snooze functie, en
een slaapstand om het systeem na een ingestelde
tijd uit te schakelen. Elk alarm kan zodanig worden
ingesteld dat het in een bepaalde modus start.
5.1 Alarmen
Om een alarm in te stellen of aan te passen, drukt
u op Alarm.
Selecteer het alarmnummer (1 of 2) en stel de
volgende parameters in:
• Alarm: on/off,
• Frequency: Daily, Once, Weekends of Weekdays,
• Time
• Source: Buzzer, Internet radio, DAB, FM
• Preset: Last listened of 1-10
• Duur 15/30/45/60/90/120 minuten
• Volume: 0 - max.
Om de nieuwe instellingen te activeren, rolt u naar
omlaag af en selecteert u Save. Op het scherm
worden de actieve alarmen afgebeeld met een
icoontje onderaan links.
5.3 Slaapstand
Om de slaaptimer in te stellen drukt u op Sleep.
U kiest uit sleep OFF, 15/30/45/60/90/120
Van zodra u een slaapperiode hebt geselecteerd,
keert het systeem terug naar het hoofdmenu. De
resterende tijd wordt aangeduid, na deze tijd gaat
de radio over in Standby.
6 Systeeminstellingen
Selecteer Menu > System Settings >,
kies vervolgens één van onderstaande opties:
• Sleep
• Alarm
• Equalizer
• Time/Date
• Backlight
• Language
• Factory Reset
• Software upgrade
• Software version
Navigeer via de Select knop – Back – laat u terugkeren naar het vorige menupunt. Menu brengt u
terug naar het hoofdscherm.
6.1 Audio uitgang
Optie om direct te luisteren naar de ingebouwde
luidspreker (Speakers) of via de SPDIF uitgang op
de achterzijde (SPDIF).
5.2 Snooze
Op de ingestelde tijd zal het alarm afgaan. Om het
alarm tijdelijk te stoppen, drukt u op Snooze. U
kunt de snooze-periode zo nodig aanpassen met
de Select-knop. De radiokeert gedurende de ingestelde periode terug naar stand-by en het icoontje
van het tijdelijk stopgezette alarm knippert.
8
6.2 Equalize r
Een aantal vaste presets en een My Equaliser
optie dewelke eigen instellingen toelaat.My EQ… |
Normal | Classic | Jazz | Pop | Rock | Speech
6.2.1 My EQ…
Treble and bass audio frequenties kunnen aangepast worden evanals ‘Loudness’ On of Off.
6.3 Tijd
De tijd en datum kunnen handmatig of automatisch aangepast. Met auto-update worden tijd en
datum gesynchroniseerd met national uitgestuurde
signalen over DAB en FM.
Het formaat voor datum en tijd kunnen ingesteld.
Het tijd menu omvat volgende opties:
• Set Time/Date zie onder
• Auto update - Update from Any | Update from
DAB | Update from FM | No Update
• Set 12/24 hour - 12 | 24
• Set date format - dd-mm-yyyy | mm-dd-yyyy.

Set time/date
Deze optie laat u handmatig datum en tijd instellen.
Wijzig de waarde via de Select knop en druk om
te bevestigen. De volgende waarde begint te
knipperen.
6.4 Scherm helderheid
Het scherm van de R3 heeft 3 instelbare helderheidsniveaus en instelbare timeout. Er zijn 3
instellingen mogelijk:
• Timeout - Light On | 10 | 20 | 30 | 45 | 60 | 90 |
120 | 180
• On level - Low | Mid | High
• Dim level - Low | Mid | High
6.5 Standby
Na een bepaalde tijd gaat de R3 over in standby.
6.6 Taal
De taal voor het keuzemenu kan ingesteld in:
Engels | Frans | Duits | Italiaans
6.7 Terugstellen naar fabriekswaarden
Bij een terugstelling naar fabriekswaarden worden
alle gebruikersinstellingen naar de standaardwaarden teruggezet. De instellingen voor tijd/datum en
voorkeuzezenders gaan dus verloren.
Om het apparaat terug te stellen naar de fabriekswaarden, selecteert u Factory reset > Proceed
>Yes.
7 Probleemoplossing en foutmeldingen
7.1 Foutmeldingen
Boodschap Omschrijving
Service not available Geen DAB ontvangst
Signal error Het DAB signaal werd onderbroken
No DAB Station Het station wordt niet gevonden.
(No Name) Het huidige station laat geen naam zien.
No stations found Geen DAB stations beschikbaar – check antenne
No RadioText Geen RDS beschikbaar voor dit station
No PTY Geen PTY programma type info beschikbaar.
DAB mode
FM mode
NL
Update failed Software upgrade niet gelukt
Time is not set Er werd geen tijd ingesteld
Time Not saved Aangepaste tijd werd niet bewaard
Alarm Not saved Alarm werd niet bewaard
Invalid Date Geen geldige datum ingevoerd
Algemene boodschappen
9

7.2 Probleemoplossing
Probleem Oorzaak Oplossingen
FM: ruis
DAB: storing Verplaats de radio
cut-out Herscan de stations
DAB: ‘No stations Zwakke signaalsterkte Herscan de stations
available’ message
Zwakke signaalsterkte Check/verplaats de antenne
Check voor DAB/DAB+ de lokale
dekkingsgraad voor deze technologie.
8 Technische kenmerken
Model: R3 draagbare FM/DAB+ radio
Type: DAB/DAB+/FM/AUX
Stroomtoevoer: 9V DC of Lithiumbatterij 2 cellen: 7,4V/2200 mA/H
(om de batterij te laden dient u mogelijk de schakelaar in het batterijvak op On te zetten. Zet
de schakelaar op OFF als u de batterij lange tijd niet gebruikt). De batterij kan worden opgeladen wanneer de radio op netstroom is aangesloten en de schakelaar op ON staat.
De technische kenmerken kunnen zonder voorbericht worden gewijzigd.
10

R3
Radio DAB/DAB+/FM/AUX
TABLE DES MATIÈRES
1 Introduction 12
1.1 Sécurité 12
1.2 Caractéristiques 12
1.3 Contenu de l’emballage 13
1.4 Ressources externes 13
1.5 Conventions utilisées dans ce manuel 13
2 Commandes, connecteurs et afficheur 13
2.1 Commandes principales 13
2.2 Connecteurs 14
2.3 Écrans 14
3 Démarrage et configuration 15
3.1 Affichage 12/24 heures 15
3.2 Heure/Date 15
3.3 Mise à jour automatique 15
3.4 Réglage manuel 15
4 Fonctionnement 15
4.1 Mode Radio DAB 15
4.2 Mode Radio FM 16
4.3 Mode AUX IN 17
5. Alarmes et veille 17
5.1 Alarmes 17
5.2 Snooze 17
5.3 Veille 17
6 Paramètres de système 17
6.1 Sortie audio 17
6.2 Egaliseur 17
6.3 Heure 18
6.4 Rétro-éclairage 18
6.5 Mode veille 18
6.6 Langue 18
6.7 Réinitialisation 18
7 Messages d’erreur & dépannage 19
8 Caractéristiques techniques 19
FR
11

1 Introduction
1.1 Consignes de sécurité
Conservez ce mode d’emploi afin de pouvoir vous
y référer ultérieurement.
• AVERTISSEMENT : Afin de réduire le risque
d’incendie ou d’électrocution, n’exposez pas
cet appareil à la pluie ni à l’humidité. Mettez
l’appareil à l’abri des projections de liquides ou
des éclaboussures. Ne déposez pas d’objets
contenant de l’eau, tels que des vases, sur
l’appareil.
• AVERTISSEMENT : L’adaptateur enfichable sert
de dispositif de déconnexion. Ce dispositif doit
rester utilisable à tout moment.
• Le symbole représentant un éclair dans un
triangle équilatéral est destiné à alerter l’utilisateur de la présence, à l’intérieur de l’appareil, de
hautes tensions non isolées suffisamment fortes
pour présenter un risque d’électrocution.
• Avertissement : Afin de réduire le risque d’électro-
cution, n’ouvrez pas le boîtier (ou le dos). L’appareil ne contient pas de composants susceptibles
d’être réparés par l’utilisateur. Toute réparation
doit être confiée à un technicien qualifié.
• Le symbole représentant un point d’exclamation
dans un triangle équilatéral est destiné à avertir
l’utilisateur de la présence, dans la documentation de l’appareil, d’instructions importantes
pour l’utilisation et la maintenance.
•
Mise au rebut correcte de cet appareil. Ce
symbole indique que, dans l’UE, cet appareil ne
doit pas être éliminé avec les déchets ménagers. Pour éviter l’élimination non contrôlée de
déchets, potentiellement nocive pour l’environnement et la santé humaine, recyclez cet
appareil de manière responsable, afin de promouvoir la réutilisation durable des ressources
matérielles. Pour retourner un appareil usagé,
utilisez les systèmes de retour et de collecte ou
contactez le revendeur chez lequel vous l’avez
acheté. Ce dernier pourra reprendre l’appareil
en vue d’un recyclage respectueux de l’environnement.
• Ne posez aucune source de flammes nues,
comme une bougie allumée, sur l’appareil.
• ATTENTION : Risque d’explosion si la pile n’est
pas remplacée correctement. Remplacez exclusivement par une pile du même type ou de type
équivalent.
12
• AVERTISSEMENT : Les piles (pile, piles ou pack
de piles) ne doivent pas être exposées à une
chaleur excessive, notamment la lumière du
soleil et le feu.
• N’utilisez pas cet appareil à proximité d’eau ou
d’humidité.
• Nettoyez uniquement à l’aide d’un chiffon sec.
• Débranchez l’appareil de la prise murale avant
de le nettoyer.
• Posez l’appareil sur une surface solide.
• Ne le placez pas dans une bibliothèque fermée
ou une armoire qui pourrait empêcher la circulation d’air dans ses ouvertures de ventilation.
• N’installez pas l’appareil à proximité de sources
de chaleur, telles que radiateurs, bouches d’air
chaud, poêles ou autres appareils qui dégagent
de la chaleur.
• Protégez le cordon d’alimentation en veillant à
ce qu’il ne puisse être ni écrasé, ni pincé, en
particulier au niveau des fiches et du point où
celles-ci sortent de l’appareil.
• Si l’appareil est endommagé, il doit faire l’objet
d’une intervention de réparation. Ne tentez pas
de réparer cet appareil vous-même. L’ouverture
ou le retrait de capots peut vous exposer à des
tensions dangereuses ou à d’autres dangers.
Contactez le fabricant afin de connaître les
coordonnées du centre de service le plus
proche.
• Pour éviter tout risque d’incendie ou d’électrocution, évitez de surcharger les prises murales,
les cordons d’extension ou les blocs multiprises.
• Ne laissez aucun corps étranger ou liquide
pénétrer dans l’appareil.
• Utilisez des sources d’alimentation électrique
appropriées. Branchez l’appareil sur une source
d’alimentation électrique appropriée, comme
l’explique le mode d’emploi ou comme indiqué
sur l’appareil.
1.2 Caractéristiques
Ce manuel explique comment utiliser le R3, un
système audio connecté aussi perfectionné que
convivial, doté des modes suivants :
• Radio numérique DAB/DAB+ offrant un vaste
choix de canaux gratuits, diffusés en qualité
sonore numérique
• FM avec RDS (Radio Data System)
• AUX IN pour les sources musicales externes,
comme les lecteurs MP3
Le R3 dispose aussi des fonctionnalités suivantes :
• Grand afficheur couleur TFT, pour une commande aisée et un affichage clair des informations.
• Horloge avec possibilité de mise à jour automa-

tique et doubles alarmes indépendantes
• Veille/réveil répété
• Plusieurs langues d’utilisation
1.3 Contenu de l’emballage
L’emballage contient les éléments suivants :
• 1 unité R3
• 1 adaptateur secteur CC 9V 1,5A et batterie
rechargeable 7,4V/2200mAh
• 1 mode d’emploi
1.4 Ressources externes
Pour pouvoir utiliser le R3, les ressources externes
suivantes sont requises :
• Une source d’alimentation électrique (alimentation secteur 100-240 V)
• Une source audio externe (pour le mode AUX
IN)
1.5 Conventions utilisées dans ce manuel
Bouton (appuyer) sur une touche du clavier
Option (sélectionner) une option de menu sur
l’afficheur
Nom Menu, écran ou autre nom
2 Commandes, connecteurs
et afficheur
2.1 Commandes principales
1. TUNE/SELECT/ VOLUME/MUTE/SNOOZE :
Tournez pour faire défiler les éléments d’un
menu ou la liste des stations.
L’option choisie est mise en surbrillance en
texte inversé (caractères sombres sur un
arrière-plan blanc). Appuyez sur le bouton
pour la sélectionner. Tournez le bouton pour
augmenter ou diminuer le volume pendant la
lecture. Appuyez sur le bouton pour mettre la
musique en sourdine. Appuyez sur le bouton
pour activer le réveil répété lorsqu’une alarme
est déclenchée.
2. STANDBY : Allume l’appareil ou revient en
mode veille (l’horloge et la date sont affichées),
ou annule la veille ou l’alarme.
3. SLEEP : En cours de lecture, appuyez sur
SLEEP pour que le R3 se mette en veille après
un délai prédéfini.
4. SOURCE : Appuyez pour sélectionner les
différents modes : DAB, FM, AUX.
5. ALARM : Si vous appuyez sur Alarm, les indi-
cations Alarm 1 et Alarm 2 s’affichent. Tournez
le bouton puis appuyez sur le bouton SELECT
afin de sélectionner l’alarme 1 ou l’alarme 2 et
la configurer.
6. INFO : Permet d’afficher plus d’informations
sur la station ou la plage en cours de lecture.
Appuyez à nouveau pour faire défiler d’autres
écrans d’information, puis revenir à l’écran
normal de lecture en cours.
7. BACK/MENU : BACK : Permet de revenir
à l’écran précédent. En cours de lecture, ce
bouton permet de revenir à la dernière liste de
plages ou de stations. MENU : Affiche le menu
du mode actuel. Appuyez à nouveau pour
revenir à l’écran de lecture en cours.
8. PRESET : Appuyez pour enregistrer une
station favorite parmi vos préréglages (vous
pouvez enregistrer 10 stations favorites). Appuyez pour sélectionner une station favorite ou
rappel un préréglage.
9.
TUNE-/ :
suivante en mode FM/DAB. Maintenez le bouton Tune- enfoncé pendant 2 secondes pour
lancer la recherche automatique de stations en
mode FM.
10. TUNE+/ : Permet de sélectionner la station
suivante en mode FM/DAB. Maintenez le bouton Tune+ enfoncé pendant 2 secondes pour
lancer la recherche automatique de stations en
mode FM.
11. : Appuyez pour effectuer une recherche
automatique de la bande sélectionnée.
Permet de sélectionner la station
FR
13

2.2 Connecteurs à l’arrière
Comme illustré ci-dessous l’appareil comporte les
connecteurs (de gauche à droite) suivants :
• Entrée d’alimentation CC (9 V)
• Mini USB pour mise à jour
• AUX IN (pour la connexion d’un lecteur multimédia externe, comme un iPod)
• Line OUT (pour la connexion à un amplificateur
externe)
• Sortie pour casque
AUX IN LINE OUT
2.3 Écrans
L’écran présente différents menus, dialogues et
affichages, comme décrit ci-dessous. Il existe six
types d’écrans :
• Veille (horloge)
• Démarrage (mode)
• Lecture en cours
• Dialogue
• Erreur/Information
• Menu
Si le texte est trop long pour tenir entièrement à
l’écran, il s’affiche d’abord sous forme tronquée
puis, après quelques secondes, il défile lentement
pour vous permettre de le lire entièrement. L’écran
de veille (Standby) affiche l’heure, la date et toutes
les alarmes activées.
Lorsque vous faites défiler les modes de lecture en
utilisant la touche SOURCE, le R3 affiche un écran
de démarrage pour chaque mode. Après une
seconde, le R3 entre dans le mode sélectionné et
essaie de lancer la diffusion de la dernière station
ou piste écoutée dans le mode choisi. Si ce n’est
pas possible, le R3 essaie de se connecter à la
source sélectionnée en lançant une recherche de
station ou de réseau, ou en invitant l’utilisateur à
indiquer la source, si nécessaire.
Les écrans de lecture en cours affichent les informations disponibles sur la source audio et la piste
en cours de lecture.
Des boîtes de dialogue permettent à l’utilisateur
de modifier des paramètres.
Les écrans d’erreur/information fournissent
des messages spécifiques pendant quelques
secondes, puis reviennent automatiquement à un
autre écran.
Menus
Le R3 comporte trois types de menus. Utilisez le
bouton Select pour parcourir les menus et choisir
des options. La barre de défilement, sur la droite
de l’écran, indique s’il y a des options au-dessus
et en dessous de celles qui sont visibles.
Chaque mode comporte un menu d’options
spécifiques.
Par exemple, le menu du mode FM ne comprend
que deux options : Scan setting et Audio setting.
En outre, chaque menu de mode propose les
options suivantes en fin de liste :
System settings > Main menu >. Le « > »
indique des options qui mènent à des menus
sous-jacents.
Le menu System settings donne accès aux paramètres du système et aux informations concernant
le réseau, l’heure, la langue et la mise à jour du
logiciel.
Les menus contenant plus d’options que l’écran
ne peut en afficher comportent une barre de défilement sur la droite.
Main menu donne accès à tous les modes, plus
aux fonctions de mise en veille et d’alarme.
Certains menus, par exemple System settings,
comportent plusieurs sous-menus.
14

3 Démarrage et configuration
Le R3 est d’une utilisation aisée. Pour écouter la
radio DAB ou FM, il suffit de disposer d’une source
d’alimentation (alimentation secteur 100-240V).
Faites glisser le bouton pour la première
fois derrière la batterie pour l'activer
3.1 Affichage 12/24 heures
Pour basculer entre les modes 12 et 24 heures,
sélectionnez Set 12/24 hour pour définir votre
préférence.
3.2 Heure/Date
L’heure et la date peuvent être réglées manuellement
ou automatiquement. En cas de mise à jour automa
tique, l’heure et la date sont synchronisées automatiquement avec des horloges externes. La mise à jour
automatique est généralement plus précise.
3.3 Mise à jour automatique
La mise à jour automatique utilise des données
envoyées via DAB, FM. L’horloge n’est mise à jour
que lorsqu’elle est dans un mode correspondant.
Mieux vaut donc choisir un mode que vous utilisez
régulièrement.
3.4 Réglage manuel
Si vous choisissez No update, l’assistant vous
invite à entrer manuellement la date et l’heure.
4 Fonctionnement
Cette section décrit les fonctions d’exploitation
disponibles pour chacune des trois sources audio.
4.1 Mode Radio DAB
Le mode Radio DAB capte les signaux de radio
numérique DAB/DAB+ et affiche des informations
sur la station, le flux et la piste en cours de lecture.
Pour accéder au mode DAB, appuyez sur Mode
jusqu’à ce que DAB Radio soit affiché, ou choisissez. Menu > Main menu > DAB.
4.1.1 Recherche de stations
La première fois que vous sélectionnez le mode
Radio DAB, ou si la liste des stations est vide, le
R3 STEREO effectue une recherche intégrale des
stations disponibles. Il peut aussi être nécessaire
de lancer une recherche manuelle afin de mettre
à jour la liste des stations pour l’une des raisons
suivantes :
• Les stations disponibles changent de temps à
autre.
• Si la réception n’était pas bonne pendant la
recherche initiale (par exemple, l’antenne n’était
pas relevée), la liste des stations disponibles
peut être vide ou incomplète.
• Si la réception de certaines stations est perturbée, il peut être utile de n’écouter que les
stations sont le signal est assez fort
Pour lancer une recherche manuelle, choisissez
Menu > Scan.
Au terme de la recherche, la liste des stations de
radio disponibles s’affiche.
Pour supprimer les stations indiquées dans la liste,
mais qui ne sont pas disponibles, choisissez Menu
> Prune invalid.
Pour écouter une station ou changer de station,
tournez le bouton Select afin d’afficher la liste des
stations, puis appuyez dessus pour en sélectionner
-
une. Lorsque la station est sélectionnée, sa lecture
débute et l’écran affiche des informations à son
sujet, au sujet de la plage ou de l’émission diffusée.
4.1.2 Presets
R3 a 10 préréglages pour les stations DAB.
Pour enregistrer un préréglage de radio DAB,
maintenez la touche Preset enfoncée jusqu'à ce
que l'écran Save preset s'affiche. (1-10)
Pour sélectionner un préréglage, appuyez brièvement sur Preset, puis sur l'une des stations
préréglées.
4.1.3 Réglage manuel
En plus de la méthode «scan» peut également
être réglée manuellement à un canal / fréquence
spécifique.
Appuyez sur Menu> Manuel> défilement pour
sélectionner> appuyez sur Choisir pour choisir.
L'afficheur indique une indication de la puissance
du signal de la fréquence sélectionnée.
Les modifications apportées à la position de l'antenne peuvent être observées par une intensité de
signal de changement.
FR
15

4.1.4 Informations sur la lecture en cours
Pendant la lecture du flux, l’écran affiche son nom
et les informations DLS (Dynamic Label Segment)
diffusées par la station. Vous recevez ainsi des
informations en temps réel comme le nom du programme, le titre de la plage et les informations de
contact. Les émissions en stéréo sont indiquées
par une icône en haut de l’écran.
Pour afficher d’autres informations, appuyez sur
Info. À chaque pression sur Info, un ensemble
d’informations différent s’affiche : texte DLS, type
de programme, nom/fréquence d’ensemble, force
du signal/taux d’erreur, débit binaire/codec/canaux
et date du jour.
Le mode Radio FM capte les signaux de radio
analogiques sur la bande FM et affiche des informations RDS (Radio Data System) au sujet de la
station et de l’émission (si elles sont diffusées).
Pour passer en mode FM, appuyez sur Mode
jusqu’à ce que FM Radio s’affiche ou accédez à
Menu > Main menu > FM.
4.2.1 Sélection de stations
Pour trouver une station, appuyez sur Select.
L’affichage des fréquences augmente à mesure
que le R3 analyse la bande FM. Alternativement,
vous pouvez lancer la recherche vers le haut ou le
bas en appuyant sur les boutons >> ou << et en
les maintenant enfoncés, syntoniser manuellement
en effectuant des pressions rapides, ou tourner le
bouton Select.
4.2.2 Stations mémoires
Le R3 a 10 mémoires préréglées pour FM, qui
fonctionnent de la même manière que DAB presets de mode, comme décrit précédemment dans
la section 4.1.3 Presets.
4.2.3 Informations sur la lecture en cours
Pendant la lecture d’une station FM, l’écran affiche
l’un des deux jeux de données suivants :
• Si des informations RDS sont disponibles, le
nom du service (p. ex. le nom de la station) est
affiché par défaut.
Vous pouvez faire défiler les autres informations
RDS en appuyant sur Info. À chaque pression sur Info, un jeu d’informations différentes
s’affichent : texte de radio RDS, type de programme RDS, fréquences et date du jour.
• Si les informations RDS ne sont pas disponibles,
la fréquence en cours d’écoute est indiquée.
4.1.5 Autres configurations
Dynamic range compression
Certaines émissions DAB comporte la fonctionnalité DRC (Dynamic range compression), qui permet
aux radios de compresser la plage dynamique du
flux audio en sortie. Le volume des sons faibles
est ainsi augmenté et celui des sons puissants est
réduit. Cette fonctionnalité peut être utile si vous
écoutez de la musique à plage dynamique élevée
dans un environnement bruyant (par exemple de la
musique classique en cuisine).
Pour modifier le réglage DRC du R3, choisissez
Menu > DRC, puis DRC high, DRC low ou DRC off.
Remarque : Le réglage DRC du R3 n’a aucun effet
si la diffusion ne comprend pas de données DRC.
4.2. Mode Radio FM
16
4.2.4 Paramètres
Paramètres de recherche
Par défaut, la recherche FM s’arrête sur n’importe
quelle station disponible. Il peut en résulter un
mauvais rapport signal/bruit (sifflement) sur les
stations dont le signal est trop faible. Pour modifier
les paramètres de recherche afin qu’elle ne s’arrête
que sur les stations dont le signal est suffisant,
choisissez Menu > Scan setting > Strong stations
only? > Yes.
Paramètres audio
Par défaut, toutes les stations stéréo sont diffusées en stéréo. Si le signal d’une station est
trop faible, il peut en résulter un mauvais rapport
signal/bruit (sifflement). Pour lire les stations
faibles en mono, choisissez Menu >Audio setting

> Forced mono
4.3 Mode AUX IN
Le mode AUX IN permet de lire de l’audio à partir
d’une source externe telle qu’un lecteur MP3.
Pour lire de l’audio en mode AUX IN :
1. Connectez la source audio externe à la prise
stéréo 3,5 mm AUX IN.
2.
Appuyez sur Mode jusqu’à ce que AUX In s’affiche, ou choisissez Menu> Main menu > AUX In.
3. Réglez le volume du R3 (et, si nécessaire, le
dispositif source audio) de la façon appropriée.
4.4. Informations sur la lecture
Lors de la sélection Aux In Aux est sur l'écran
affichée avec la date.
5 Alarmes et veille
Outre l’horloge et le calendrier, l’appareil comporte
deux alarmes polyvalentes avec réveil répété et
une fonction de mise en veille qui éteint le système
après un délai prédéfini. Chaque alarme peut être
réglée de façon à se déclencher dans un mode
précis.
5.1 Alarmes
Pour définir ou modifier une alarme, appuyez
sur Alarm ou choisissez Menu > Main Menu >
Alarms.
Sélectionnez le numéro de l’alarme (1 ou 2), puis
définissez les paramètres suivants :
• Enable: on/off
• Frequency: Daily, Once, Weekends ou Weekdays
• Time
• Mode: Buzzer, Internet radio, DAB, FM
• Preset: Last listened ou 1-10,
• Volume: 0 - max.
Pour activer les nouveaux paramètres, faites défiler
vers le bas puis choisissez Save.L’écran présente
les alarmes actives, avec une icône dans le coin
inférieur gauche.
FR
5.2 Snooze
L’alarme se déclenche à l’heure réglée. Pour l’interrompre temporairement, appuyez sur Snooze.
Vous pouvez modifier la période de réveil répété
à l’aide du bouton Select. La radio revient en
mode attente pendant la période définie et l’icône
d’alarme en sourdine clignote.
5.3 Veille
Pour régler le minuteur de veille, choisissez Menu
> Main menu > Sleep puis sélectionnez Sleep OFF,
15 MINS, 30 MINS, 45 MINS ou 60 MINS.
Lorsque vous sélectionnez une période de veille, le
système revient au menu principal.
Appuyez sur Menu pour revenir à l’écran de
lecture en cours.
6 Les paramètres du système
Les paramètres système vous permettent d’adapter la R3 avec une variété d’options qui vous
conviennent.
Pour accéder aux paramètres du système tout
mode Sélectionnez Menu> Paramètres système>,
puis choisissez parmi les différentes options
comme décrit dans le menu ci-dessous.
Les options de configuration du système de menu
sont:
• Veille
Alarme
• Egaliseur
• Heure/Date
• Rétro-éclairage
• La langue
• Retour aux paramètres d’usine
6.1 Sortie Audio
Présente la possibilité de diriger la sortie audio du
haut-parleurs (haut-parleurs) ou le port SPDIF à
l’arrière de l’unité (SPDIF).
6.2 Égaliseur
Plusieurs modes d’égalisation prédéfinis sont disponibles, ainsi qu’un réglage défini par l’utilisateur.
My EQ… | Normal | Classic | Jazz | Pop | Rock |
Speech
17

6.2.1 My EQ…
Cette option vous permet de définir un biais dans
les fréquences audio aigus et les basses et tourner
'Loudness' On ou Off. Les valeurs peuvent être
réglées entre -7 (Minus 7) et +7 (plus 7). Treble (Utilisez le bouton de commande de sélection pour
choisir une valeur de polarisation entre -7 et +7)
Bass - (Utilisez le bouton de commande de
sélection pour choisir une valeur de polarisation
entre -7 et +7) Loudness - On ou Off. (Lorsqu'elle
est activée, les sons de haute et basse fréquence
de bas niveau sont amplifiées pour donner un son
«plus complète».)
6.3 Heure
La date et l’heure peuvent être mises à jour manuellement ou automatiquement. Avec l’auto-mise
à jour, l’heure et la date sont automatiquement
synchronisés avec les signaux horaires nationaux
diffusés sur DAB et FM (le cas échéant).
Vous pouvez également sélectionner le format
d’affichage pour l’heure et la date.
Le menu Time contient les options suivantes:
• Set Time / Date - (voir ci-dessous)
• Mise à jour automatique - Mise à jour de préférence | Mise à jour de la DAB | Mise à jour de FM |
Pas de mise à jour
• Réglez 12/24 heures - 12 | 24
• Format de date Set - dd-mm-aaaa | mm-jj-aaaa.
6.5 Mode veille
Si le R 3 ne soit pas interagi après un temps il peut
automatiquement passer en mode veille.
6.6 Langue
La langue utilisée pour l’affichage des messages
peuvent être sélectionnés à partir de: English |
français | Deutsch | Italiano
6.7 Réinitialisation
Une réinitialisation rétablit tous les réglages par
défaut. La date et l’heure, la configuration réseau
et les préréglages sont donc effacés. Par contre, la
version logicielle actuelle de la radio est conservée.
Pour effectuer une réinitialisation, choisissez Menu
> System settings > Factory reset Proceed >Yes.
6.4 Rétro-éclairage
Le R3 a un rétro-éclairage avec trois réglages de
luminosité, et la temporisation réglable (ce qui est
le délai, en secondes, après quoi l'affichage passe
au niveau Dim).
• Il y a trois paramètres:
Timeout - Light On | 10 | 20 | 30 | 45 | 60 | 90 | 120
| 180
• Au niveau - Faible | Mid | Haute
• Niveau Dim - Bas | Mid | Haute
18

7 Dépannage et messages d'erreur
7.1 Messages d'erreur
Message Description
Service pas disponible Pas de réception DAB
Erreur de signal Le signal DAB a été interrompu.
Pas de station DAB Le station ne peut pas être trouvé.
(No Name) Pas de nom pour le station en cours.
No stations found Pas de stations DAB stations disponible – Vérifiez l’antenne.
No RadioText Pas d’information RDS.
No Name No RDS station name is being broadcast
Update failed Mise à jour pas effectué
Time is not set Pas de l’heure configuré
Time Not saved Changements de l’heure pas sauvegardés.
Alarm Not saved Alarm pas sauvegardé
Invalid Date Pas de date validée.
7.2 Dépannage
Problème Cause Solutions
FM : Siement
Mode DAB
Mode FM
General messages
Signal trop faible Vérifiez/déplacez l'antenne
FR
DAB : brouillage/coupures
intermittentes
DAB : Message « No stations available »
Signal trop faible
Déplacez la radio
Relancez la recherche des stations locales
(forte puissance)
Comme ci-dessus, puis relancez la recherche de stations
8 Caractéristiques techniques
Modèle : Haut-parleur portable pour streaming sans fil R3
Type : WiFi/DLNA/Radio Internet/DAB/DAB+/FM/AUX
Alimentation électrique : 9 V CC ou pile Lithium 2 cellules 7,4 V/2200 mA/H
(Pour charger la pile, il peut être nécessaire de mettre l'interrupteur à l'intérieur du logement de la pile en
position ON. Mettez-le en position OFF si vous n'utilisez pas l'appareil pendant une longue période). La
pile peut être rechargée lorsque la radio est connectée à l'alimentation électrique et que l'interrupteur est
en position ON.
Toutes les caractéristiques peuvent être modifiées sans avis préalable.
19

R3
Portable Radio
DAB/ DAB+/ FM/ AUX
TABLE OF CONTENT
1 Introduction 21
1.1 Safety Instruction 21
1.2 Features 21
1.3 Carton contents 22
1.4 External resources 22
1.5 Conventions used in this manual 22
2 Controls, connectors and display 22
2.1 Main controls 22
2.2 Connectors 22
2.3 Display 23
3 started and setup 23
3.1 12/24 hour display 23
3.2 Time/date 23
3.3 Auto-update 23
3.4 Manual set 24
4 Operation 24
4.1 DAB radio mode 24
4.2 FM radio mode 25
4.3 Aux in mode 25
5 Alarms snooze and sleep 26
5.1 Alarms 26
5.2 Snooze 26
5.3 Sleep 26
6 System settings 27
6.1 Audio Output 27
6.2 Equalizer 27
6.3 Time 27
6.4 Backlight 27
6.5 Inactive Standby 27
6.6 Language 27
6.7 Factory reset 27
7 Troubleshooting and error messages 28
7.1 Error messages 28
7.2 Troubleshooting 28
8 Technical Specifications 28
20

1 Introduction
1.1 Safety Instructions
Please store this instruction manual for future
reference.
• WARNING: To reduce the risk of fire or electric
shock, do not expose this apparatus to rain or
moisture. The apparatus shall not be exposed
to dripping or splashing and that objects filled
with liquids, such as vases, shall not be placed
on apparatus.
• WARNING: The direct plug-in adapter is used as
disconnect device, the disconnect device shall
remain readily operable.
• This lightning flash with arrowhead symbol within an equilateral triangle is intended to alert the
user to the presence of non-insulated “dangerous voltage” within the product’s enclosure that
may be of sufficient magnitude to constitute a
risk of electric shock.
• Warning: To reduce the risk of electric shock,
do not remove cover (or back) as there are no
user-serviceable parts inside. Refer servicing to
qualified personnel.
• The exclamation point within an equilateral
triangle is intended to alert the user to the presence of important operating and maintenance
instructions in the literature accompanying the
appliance.
• Correct Disposal of this product. This
marking indicates that this product should
not be disposed with other household wastes
throughout the EU. To prevent possible harm
to the environment or human health from uncontrolled waste disposal, recycle it responsibly
to promote the sustainable reuse of material
resources. To return your used device, please
use the return and collection systems or contact
the retailer where the product was purchased.
They can take this product for environmental
safe recycling.
• No naked flame sources, such as lighted candles, should be placed on the apparatus.
• CAUTION: Danger of explosion if battery is
incorrectly replaced. Replace only with the same
or equivalent type.
• WARNING: The battery (battery or batteries or
battery pack) shall not be exposed to excessive
heat such as sunshine, fire or the like.
• Do not use this product near water or moisture.
• Clean only with a dry cloth.
• Unplug this product from the wall outlet before
cleaning.
• Place the unit on a solid surface.
• Do not put it in a closed bookcase or a cabinet
that may keep air from flowing through its ventilation openings.
• Do not install near any heat sources, such as
radiators, heat registers, stoves or other appliances that produce heat.
• Protect the power cord from being walked on
or pinched, particularly at plugs and the point
where they exit from the product.
• Servicing is required when the product has
been damaged. Do not attempt to service this
product yourself. Opening or removing covers
may expose you to dangerous voltages or other
hazards. Please contact the manufacturer to be
referred to an authorized service center near you.
• To prevent risk of fire or electric shock, avoid
over loading wall outlets, extension cords, or
integral convenience receptacles.
• Do not let objects or liquids enter the product.
• Use proper power sources. Plug the product
into a proper power source, as described in
the operating instructions or as marked on the
product.
1.2 Features
This manual describes how to use the R3, with the
following modes:
• DAB/DAB+ digital radio with a wide choice
of channels and digital quality sound broadcast
free-to-air.
• FM with RDS (Radio Data System)
• Aux in for external music sources such as MP3
players
R3 also provides the following features:
• TFT color display for DAB slideshow images, clear information display and easy option
selection
• Clock with auto-update capability and dual
independent alarms, - Sleep/snooze,
• Multiple operating languages
UK
21

1.3 Carton contents
After you unpack the box, you will find the following items
• 1 R3 unit
• 1 DC 9V 1.5A power adapter and 1 Lithium battery 2 cells 7.4V/2200mA/H
• 1 User manual
1.4 External resources
To operate R3, the following external resources are
needed:
• A power source (100-240 V mains power supply)
These external resources can be used for specific functions:
• An external audio source (for Aux In mode).
1.5 Conventions used in this manual
Button (press) Physical button on the keypad
Option (select) Menu option shown on the
display
Name Menu, screen or other name
2 Controls, connectors and display
2.1 Main controls
1. TUNE/SELECT/ VOLUME/MUTE/
SNOOZE: Turn to scroll through a menu or
station list.
The chosen option is highlighted in reverse
text (dark characters on a white background),
Press to the button to select. Turn to the
button to adjust the volume up or down when
playback. Press to the button to mute the music when playing. Press the button to snooze
a set time when alarm sounding.
2. STANDBY: Turn on or back to standby mode
(showing clock and date) or cancel sleep or
cancel alarm function.
3. SLEEP: When playing, press SLEEP, R3 will
back to standby after a set time.
4. SOURCE: Press to Source to select different
modes DAB, FM, Aux.
5. ALARM: Press to Alarm, the screen will
display Alarm 1 and Alarm 2; then Rotate and
press the SELECT button to select alarm 1 or
alarm 2 to set up.
6. INFO: View more information about the station
or track playing. Press again to cycle through
further information screens then return to the
normal Now playing screen.
7. BAC K /MENU: BACK : Return to previous
screen. In play mode, this button may be
used to return to the last track list or station
list; MENU: Show menu for the current mode.
Press again to show Now playing screen.
8. PRESET: Press to preset to save the favorite
station (save 10 favorite stations ); Press to
select the favorite station or preset recall.
9. TUNE-/ : Tune-: Press to select the next
station under FM/DAB mode; Press to hold
the Tune- button 2 seconds to auto-scan the
stations under the FM mode.
10. TUNE+/ : Press to select the next station
under FM/DAB mode; Press to hold the Tune+
button 2 seconds to auto-scan the stations
under the FM mode.
11. : Press to perform a full scan.
2.2 Connectors
As shown below has connectors (from left to right)
for the following:
• DC power in (9 V)
• Mini USB for software upgrade [service only]
• Aux in (to connect external media like iPod)
• Line out (to connect to an external amplifier)
• Headphones out.
22
AUX IN LINE OUT

2.3 Display
The screen shows various menus, dialogues and
displays as described below.
There are basically six types of screen:
• Standby (clock)
• Splash (mode)
• Now playing
• Dialogue
• Error/Information
• Menu
When text is too long to fit on the screen, it is first
shown truncated, then after a few seconds, slowly
scrolls so that you can read it all. The Standby
screen shows the time, date and any active alarm
times. As you cycle through the play modes using
SOURCE, R3 shows a splash screen for each
mode. After one second, R3 enters the selected
mode and tries to start playing the last station
or track that was playing in that mode. If this is
not possible, R3 tries to connect to the selected
source by scanning for stations, or prompting for
user input as appropriate.
Now playing screens show information about
the audio source and track now playing, where
available.
Dialogue screens are shown to allow the user to
change settings.
Error/Information screens give specific messages for a few seconds, then change
automatically to another screen.
Menus
R3 has basically three types of menu. Use the Select control to step through and select options. A
scroll bar on the right of the screen shows if there
are further options above or below those visible.
Each mode has a Mode menu, with options specific to that mode.
For example, the FM mode menu has just two
options: Scan Setting and Audio Setting
UK
In addition, each mode menu has two final options:
System settings > and Main menu >.The ‘>’
indicates options leading to further menus.
The System settings menu allows access to
system settings and information such astime,
language and software update.
Menus with more options than will fit on one
screen have a scroll bar to the right. The Main
menu allows access to all modes plus sleep and
timer functions.
Some menus, for example the System settings
menu, have several submenus.
3 Start and setup
R3 is easy to use. To play DAB or FM radio, all you
need is a power source (a 100-240 V mains supply);
1. Place R3 on a suitable shelf or table.
2. Extend the telescopic antenna.
3. Connect the power adaptor between R3 and
the mains supply.
Slide the button for the first time behind the
battery to activate it.
3.1 12/24 hour display
To change between 12 and 24 hour display, select
Set 12/24 hour and then select your preference.
3.2 Time/date
The time and date can be updated manually or
automatically.
3.3 Auto-update
Auto-update works with data sent over DAB, FM. The
clock is only updated when in a corresponding mode,
so it is best to select a mode you use
regularly.
23

3.4 Manual set
If you set No update, the wizard now prompts you
to set the time and date manually.
The date and time are displayed as dd-mm-yyyy
and hh:mm.
4 Operation
4.1 DAB radio mode
DAB radio mode receives DAB/DAB+ digital radio
and displays information about the station and
programme /track as broadcast.
To enter DAB mode, either press Mode until the
display shows DAB Radio or select Menu > Main
menu > DAB.
4.1.1 Scanning fo stations
The first time you use R3, or if the station list is
empty, the radio automatically performs a full scan
to see what stations are available. You may also
need to start a scan manually to update the list of
stations for one of the following reasons:
• New stations may become available from time
to time.
• If reception was not good for the original scan
(for example the antenna was not up), this may
result in an empty or incomplete list of available
stations.
• If you have poor reception of some stations
causing the audio to break up, you may wish to
list only stations with good signal strength.
To do a full scan Select Menu > Full scan.
Once a scan is complete, the radio returns to playing the previously-selected station or first station
on the station list.
To remove stations that are listed but unavailable
Select Menu > Prune invalid.
4.1.2 Presets
R3 has 10 preset stores for DAB stations.
To store a station in a preset store Press and hold
preset until the display shows a list of the Preset
stores numbered 1 to 10 these are displayed as
either Empty or with the currently stored station
name. Use the Select control button to choose
a preset memory then press Select to store the
currently-playing station. After confirming the
preset station is stored the display reverts to the
Now playing screen. To recall a preset station
Press Preset briefly. Select one of the listed preset
stations using the select control button and press
Select to choose the highlighted preset station.
4.1.3 Manual tune
As well as the normal method of scanning, you
can also manually tune to a particular channel /
frequency.
To manually tune Press Menu > Manual tune then
use select control button to display a particular
channel/frequency, press Select to tune to that
channel/frequency.
The display shows a live indication of the received
signal strength on the selected frequency.
Adjustments to your antenna will be manifested in
the received signal strength displayed.
4.1.4 Now playing information
While a station is playing, the screen shows its
name and DLS (Dynamic Label Segment) information broadcast by the station such as programme
name, track title and contact details.
Slideshow
The normal now playing screen shows a thumbnail
of the currently available slideshow image. (If no
slideshow image is available a default DAB thumbnail image is displayed). The Select button cycles
through the following slideshow displays.
Slideshow image and DLS text being broadcast by
the current station.
24

To view further information Press Info .
Each time you press Info, the next set of information is displayed, cycling through: DLS text, DL
Plus information (this is only displayed if broadcast
by the station), programme type, ensemble name,
channel number/frequency, signal strength, power
status (Mains/Battery), and date.
4.1.5 Other settings
Dynamic range compression (DRC)
This function reduces the difference between the
loudest and quietest audio being broadcast.
Effectively, this makes quiet sounds comparatively
louder, and loud sounds comparatively quieter.
Note: DRC only works if it is enabled by the
broadcaster for a specific station.
To change the DRC setting
Select Menu > DRC > The options available are:
DRC high | low | off.
4.2. FM radio mode
FM radio mode receives analogue radio from the
FM band and displays RDS (Radio Data System)
information about the station and show (where
broadcast).
To enter FM mode
Press Mode until the display shows FM Mode
4.2.1 Selecting stations
To scan for a station in FM mode Press Select .R3
scans up through the FM band frequencies, showing the current frequency on the screen display.
A scan stops when a signal is found. R3 can be
set to stop at each station or only at stations with a
strong signal.
Alternatively, you can tune, using the select control
button on the top or the left and right buttons on
the IR remote control, in 50 kHz steps.
4.2.2 Presets
R3 has 10 preset memories for FM, which work in
the same way as DAB mode presets, as described
earlier in section 4.1.3 Presets.
4.2.3 Now playing information
While FM radio is playing, the screen shows its frequency, or if RDS information is available, station
name and any further ‘RadioText’ information. If no
information is available, just the frequency and a
No RadioText message is shown.
To view further information about the broadcast
Press Info. Each time you press Info, the next set
of information is displayed, cycling through: RDS
Radio text, programme type, frequency, name,
mono/stereo, power status, and date. To return
to the default Now playing screen Press and hold
Info .
4.2.4 Settings
Scan settings
By default, FM scans stop at any available station
(All stations). This may include poor quality audio
from weak stations.
Options: Strong stations only | All stations
To change the scan settings, to stop only at stations with good signal strength
Select Menu > Scan setting then Strong stations
only.
Audio settings
By default, all stereo stations are reproduced in
stereo. For weak stations, this may result in poor
quality audio. The audio quality can be improved
using mono.
Options: Stereo allowed | Forced mono
To play weak stations in mono Select Menu >
Audio setting > Forced mono.
4.3 Aux In mode
Aux In mode plays audio from an external source
such as an MP3 player.
To play audio with Aux In mode,
1. Turn the volume low on both R3 and, if adjustable, the audio source device.
2. Connect the external audio source to the Aux In
3.5 mm stereo socket.
3. Press source until the display shows Auxiliary
Input.
4. Adjust the volume of R3 (and, if necessary, the
audio source device) as required.
UK
25

4.4. Now playing information
When in Aux In mode, the screen shows Auxiliary
Input and the date.
5 Alarms snooze and sleep
As well as a clock/calendar, there are two versatile
wake-up alarms with snooze facility, and a sleep
function to turn the system off after a set period of
time. The alarm sound for each alarm can use a
buzzer or a selection from the audio sources.
To set the clock/calendar
The settings for the internal clock and setting
Alarm, Snooze and Sleep function are all accessible via the Systems Setting menu.
5.1 Alarms
Note: Alarms will only function when the R3 unit is
On (mains or battery power) or in Standby mode
(Mains power only). Attempting to enter Standby
mode when powered only by battery will turn the
R3 unit Off.
An active alarm is indicated by its icon in the bottom line of the display.
Note: Alarms can be switched on or off in standby
mode (see below), however, the alarm parameters
can only be set when the R3 is on.
To set alarms
Press Alarm and use the Select control button to
select the required Alarm 1 or 2 and press Select
To accept the displayed alarm settings press
Alarm
To exit alarm setting mode, press Menu or Back
(alternatively, the Alarm display will timeout and automatically return to the Now Playing screen after
a short time).
The alarm setup prompts you for the following parameters. Select a value for each parameter in turn
turning the select control button and press Select
to confirm and move on to the next parameter.
Parameters
Alarm – Off | On
Frequency - Daily | Once | Weekends | Weekdays
Choose the days on which the alarm is active.
Note: if you choose ‘Once’, you are prompted to
enter the required date.
On time – hours and minutes
Source – Buzzer | DAB | FM
If DAB or FM is chosen as the audio source you
will also be prompted to select the Last played
station or one of the preset stations (if set).
Duration – 15 | 30 | 45 | 60 | 90 | 120 minutes
If the alarm is not cancelled R3 returns to standby
after this time period.
Volume – (use the TUNE-/TUNE+ button to set the
required alarm volume 4-16)
This is the volume the alarm will build up to. (Initially the alarm sounds at a low volume and gradually
gets louder to the set volume).
In all listening modes active alarms are indicated
by displaying the relevant Alarm 1 and/or Alarm 2
icons.
At the set time, the alarm will sound, quietly at first,
then gradually building up to the set volume. When
an alarm sounds, the icon in the display flashes.
To cancel a sounding alarm and switch the radio
to standby
Press Standby or Alarm .
5.2 Snoo ze
To temporarily silence a sounding alarm, press
Sleep. You can change the snooze period by repeatedly pressing Sleep. Snooze periods are 5, 10,
15 and 30 minutes. The radio returns to standby
for the set time period with a snooze countdown
displayed. When the countdown reaches 0 (zero)
the alarm is triggered again.
Press Standby or Alarm to fully cancel a sounding
alarm and switch the radio to standby
5.3 Sleep
To set the sleep timer while the radio is playing
Press Sleep. You can choose the sleep delay time in
minutes from: Sleep Off | 15 | 30 | 45 | 60 | 90 | 120
Use select control button to cycle through the options (or press Sleep repeatedly) then press Select
to choose the displayed option.
Once you select a sleep delay period, the display
returns to the Now playing screen displaying a
Crescent moon icon and the remaining time, in
minutes, before the sleep time expires.
After the sleep delay period the radio switches to
standby mode.
26

6 System settings
The System Settings allow you to tailor the R3 with
a variety of options to suit you.
To access system settings from any mode Select
Menu > System Settings >, then choose from
the various options as described in the menu as
below.
The System Setting Menu options are:
• Sleep
• Alarm
• Equaliser
• Time/Date
• Backlight
• Language
• Factory Reset
• Software upgrade
• Software version
6.1 Audio Output
Presents the option to direct audio output to the
built in speakers (Speakers) or the SPDIF port on
the back of the unit (SPDIF).
6.2 Equalizer
This presents a number of preset settings plus a
My Equaliser option to allow you to create your
own equaliser settings.
My EQ… | Normal | Classic | Jazz | Pop | Rock |
Speech
6.2.1 My EQ…
This option allows you to set a bias in the treble
and bass audio frequencies and turn ‘Loudness’
On or Off.
6.3 Time
The time and date can be updated manually or
automatically. With auto-update, the time and
date are automatically synchronised with national
time signals broadcast over DAB and FM (when
available).
You can also select the display format for the time
and date.
The Time menu contains the following options:
• Set Time/Date – (see below)
• Auto update - Update from Any | Update from
DAB | Update from FM | No Update
• Set 12/24 hour - 12 | 24
• Set date format - dd-mm-yyyy | mm-dd-yyyy.
Set time/date
This option is for manually setting the time and
date displayed. The time displays as hh:mm, with
the first value, hh, active (flashing). Adjust each
value using the select control button and press
Select to confirm. The next value then becomes
active and flashes. The date values follow and are
set in the same way.
Note: The date displays as dd-mm-yyyy or mmdd-yyyy depending on your choice of date format
(see above).
6.4 Backlight
The R3 has a backlight with three brightness
settings, and adjustable timeout (this is the time
delay, in seconds, after which the display switches
to the Dim level).
There are three settings:
• Timeout - Light On | 10 | 20 | 30 | 45 | 60 | 90 |
120 | 180
• On level - Low | Mid | High
• Dim level - Low | Mid | High
Note: a green tick indicates the currently selected
value for each setting.
6.5 Inactive Standby
If the R3is not interacted with for a time it can
automatically enter Standby mode.
6.6 Language
The language used for display messages can be
selected from: English | Français | Deutsch | Italiano
6.7 Factory reset
A factory reset clears all user defined settings,
replacing them with the original default values, so
time/date, preferences/settings, DAB station list
and preset stations are all lost.
If you select Factory reset, you are asked to confirm by selecting “Yes”.
UK
27

7 Troubleshooting and error messages
7.1 Error messages
Message Description
Service not available No DAB reception
Signal error The DAB signal has been interrupted.
No DAB Station The listed station cannot be found.
(No Name) The current station does not broadcast an identity name.
No stations found No DAB stations are available – check aerial.
No RadioText No RDS text information is available on this station.
No PTY No RDS programme type information is available.
No Name No RDS station name is being broadcast
Update failed Software upgrade failed
Time is not set No time value is currently set on this platform.
Time Not saved Any changes made to the time settings will be lost.
Alarm Not saved Any changes made to the Alarm settings will be lost.
Invalid Date The entered value does not match a valid date.
7.2 Probleemoplossing
Problem Cause Solutions
FM: Hiss
DAB: burbling/intermittent Move radio
cut-out Rescan high-strength stations only
DAB: ‘No stations Low signal strength As above then rescan stations.
available’ message
DAB mode
FM mode
General messages
Low signal strength Check/move antenna
For DAB or DAB+, check the
current status of local coverage with
your national digital radio authority.
8 Technical Specification
Model: R3 Portable Radio
Type: Digital Radio with FM
Power Supply: 9 V DC or Lithium battery 2cells 7.4V/2200mA/H
(to charge the battery you may need to put On the switch located inside the battery compartment. Put the switch to OFF if not used the battery for a long time). The battery can be
recharged when the radio is supplied with the power supply and the switch is ON.
Specifications are subject to change without notice
28

UK
29

30

31

Ontdek het volledige ArtSound aanbod
op www.artsound.be
Discover the complete ArtSound
range at www.artsound.be
Découvrez la gamme ArtSound
complète sur www.artsound.be
House of Music nv
Ronse, Belgium
www.artsound.be
info@houseofmusic.be
www.artsound.be @Art_Sound ArtSound.Audio
 Loading...