

Arthur martin ASF65090S, ASF65090W User Manual

user manual
Dishwasher
ASF 65090
2 electrolux
Electrolux. Thinking of you.
Share more of our thinking at www.electrolux.com
Contents
Safety information 2
Product description 3
Control panel 4
Use of the appliance 5
Setting the water softener 5
Use of dishwasher salt 7
Use of rinse aid 7
Loading cutlery and dishes 8
Use of detergent 10
Multitab function 11
Subject to change without notice
Setting and starting a washing programme
Washing programmes 13
Care and cleaning 14
What to do if… 16
Technical data 17
Installation 17
Water connection 18
Electrical connection 19
Environment concerns 19
Safety information
For your safety and correct operation of
the appliance, read this manual carefully
before installation and use. Always keep
these instructions with the appliance
even if you move or sell it. Users must
fully know the operation and safety features of the appliance.
Correct use
• The appliance is designed exclusively for
domestic use.
• Only use the appliance to clean household
utensils that are applicable for dishwashers.
• Do not put solvents in the appliance. Risk
of explosion.
• Put the knives and all items with sharp
points in the cutlery basket with their
points down. If not, put in a horizontal position in the upper basket.
• Use only branded products for dishwashers (detergent, salt, rinse aid).
• If you open the door while the appliance is
in operation, hot steam can escape. Risk
of skin burns.
•Do not remove dishes from the dishwasher
before the end of the washing programme.
• When the washing programme is completed, disconnect the mains plug from the
mains socket and close the water tap.
• Only an authorised service engineer can
repair this appliance. Use only original
spare parts.
• Do not do repairs yourself to prevent injury
and damage to the appliance. Always contact your local Service Force Centre.
General safety
• Persons (including children) with reduced
physical sensory, mental capabilities or
lack of experience and knowledge must
not use the appliance. They must have supervision or instruction for the operation of
the appliance by a person responsible for
their safety.
• Obey the safety instructions from the manufacturer of the dishwasher detergent to
prevent burns to eyes, mouth and throat.
• Do not drink the water from the dishwasher. Detergent residues can stay in your appliance.
• Always close the door when you do not
use the appliance to prevent injury and not
to stumble over the open door.
• Do not sit or stand on the open door.
Child safety
• Only adults can use this appliance. Children must get supervision to make sure
that they do not play with the appliance.
• Keep all the packaging away from children.
There is a risk of suffocation.
• Keep all detergents in a safe area. Do not
let children touch the detergents.
• Keep children away from the appliance
when the door is open.
12
electrolux 3
Installation
• Make sure that the appliance is not damaged because of transport. Do not connect a damaged appliance. If necessary,
contact the supplier.
• Remove all packaging before first use.
• A qualified and competent person must do
the electrical installation.
• A qualified and competent person must do
the plumbing installation.
• Do not change the specifications or modify
this product. Risk of injury and damage to
the appliance.
• Do not use the appliance:
Product description
– if the mains cable or water hoses are
damaged,
– if the control panel, worktop or plinth
area are damaged, that you can get access to the inner side of the appliance.
Contact your local Service Force Centre.
• Do not drill into the sides of the appliance
to prevent damage to hydraulic and electrical components.
Warning! Carefully obey the
instructions for electrical and water
connections.
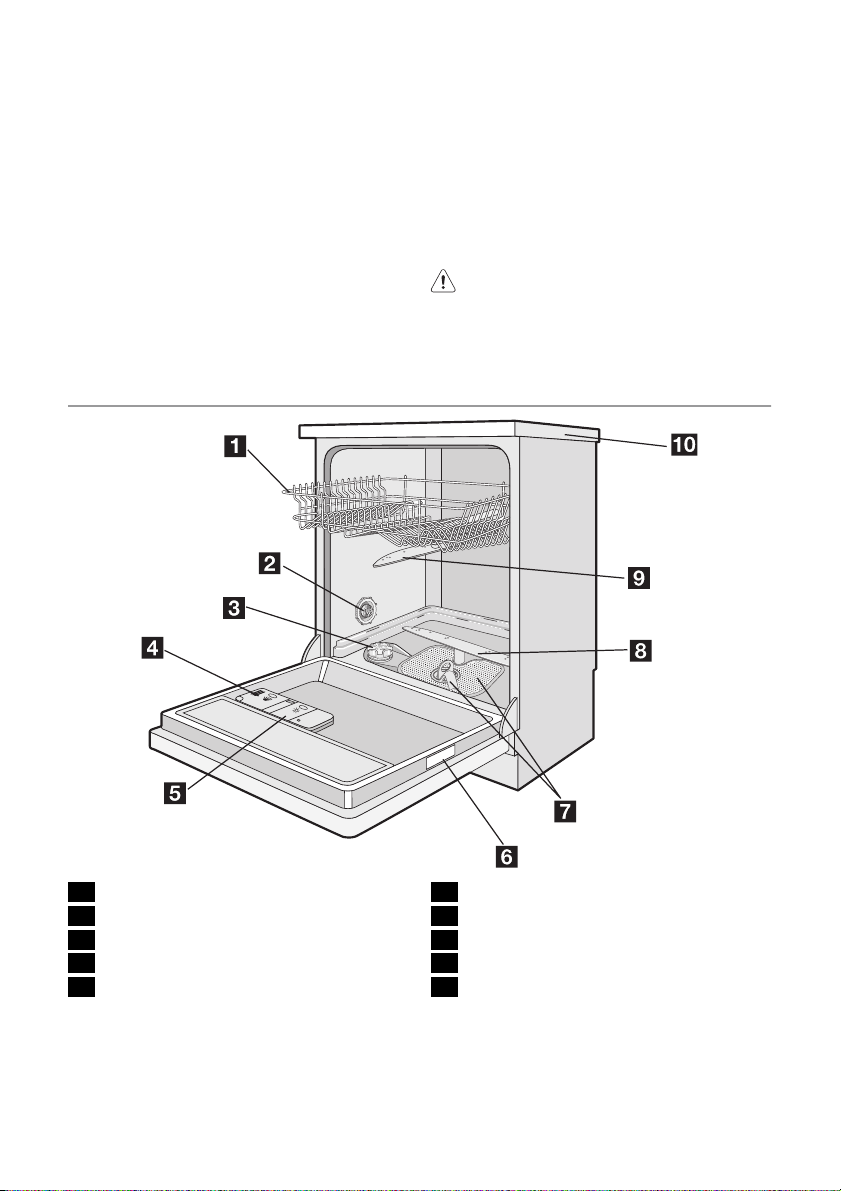
1 Upper basket
2 Water hardness dial
3 Salt container
4 Detergent dispenser
5 Rinse aid dispenser
6 Rating plate
7 Filters
8 Lower spray arm
9 Upper spray arm
10 Worktop
4 electrolux
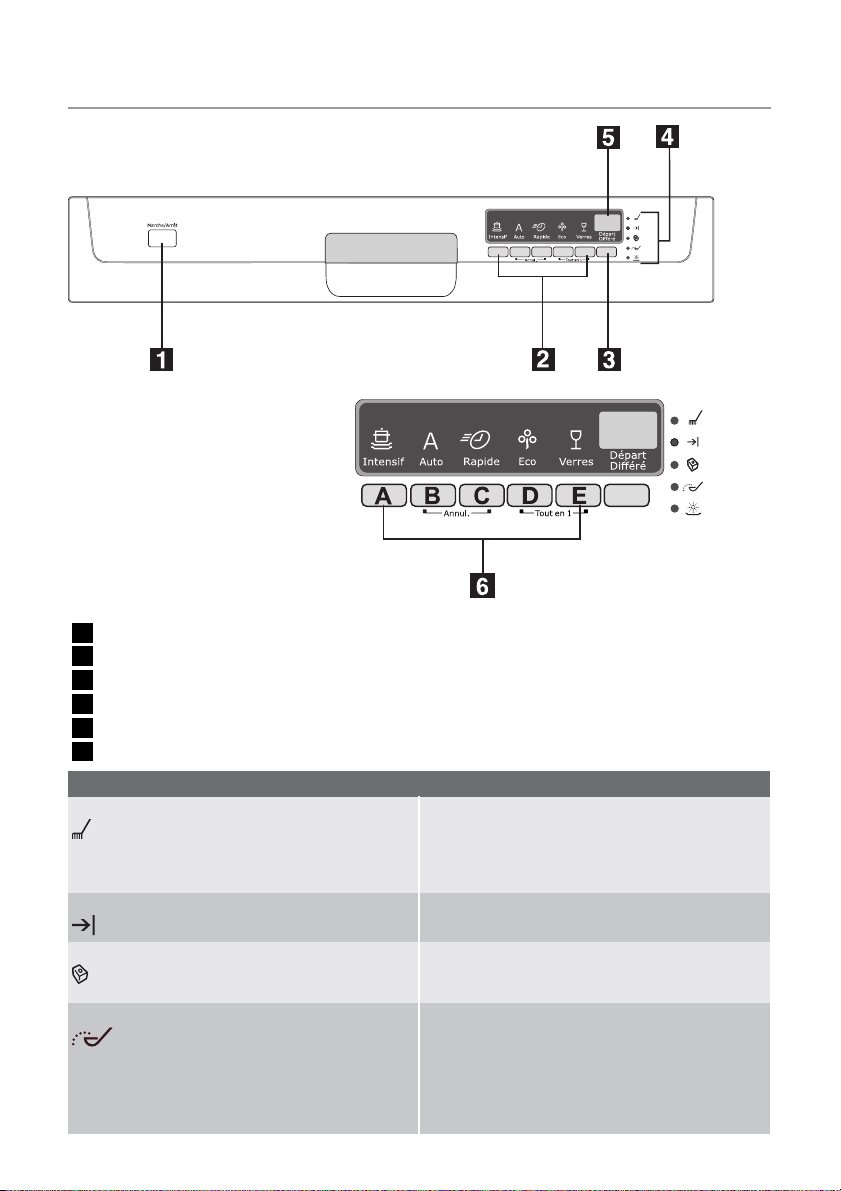
Control panel
1 On/off button
2 Programme selection buttons
3 Delay start button
4 Indicator lights
5 Digital display
6 Function buttons
Indicator lights
Programme in progress – Comes on when you select a washing pro-
End of programme The indicator light comes on when the washing
Multitab The indicator light shows the activation/deactiva-
1)
Salt
gramme,
– stays on for all the duration of the washing pro-
gramme,
– goes off at the end of the washing programme.
programme is completed.
tion of the multitab function. Refer to 'Multitab
function'.
The indicator light comes on when it is necessary
to fill the salt container. Refer to 'Use of dishwasher salt'.
After you fill the container, the salt indicator light
can continue to stay on for some hours. This does
not have an unwanted effect on the operation of
the appliance.
electrolux 5
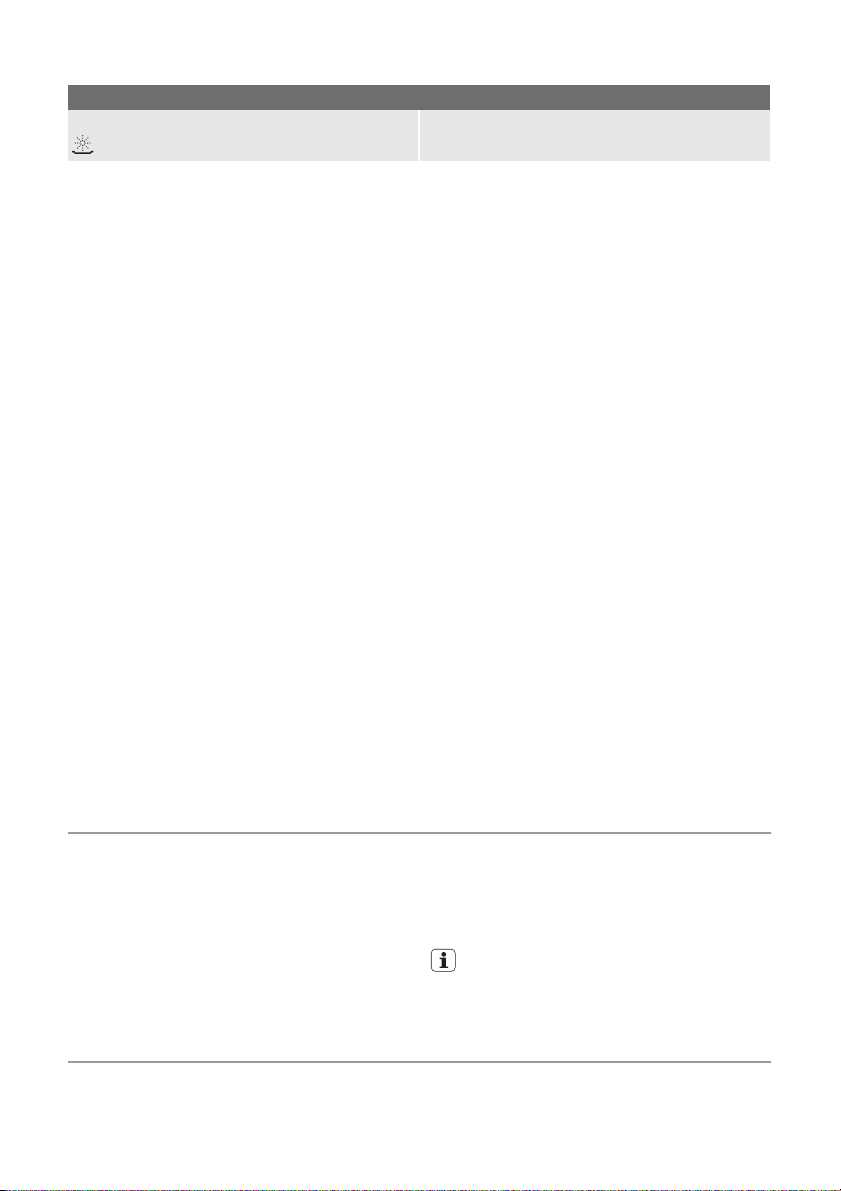
Indicator lights
Rinse aid
1) When the salt and/or rinse aid containers are empty, the related indicator lights do not come on while
1)
a washing programme operates.
Programme selection buttons
With these buttons you can select the washing programme. Press a programme button,
the related indicator light comes on. Refer to
'Washing programmes' chapter for more data about the washing programmes.
Delay start button
Use the delay start button to delay the start
of the washing programme with an interval
between 1 and 19 hours. Refer to the chapter
'Setting and starting a washing programme'.
Digital display
The display shows:
• the set level of the water softener.
• Remaining time to the end of the programme.
• Activation/deactivation of the rinse aid dispenser (only with multitab function on).
• End of the washing programme. The display shows a zero.
• Number of hours in delay start.
• Fault codes.
Function buttons
Use the function buttons for these opera-
The indicator light comes on when it is necessary
to fill the rinse aid. Refer to 'Use of rinse aid'.
• To cancel the washing programme in progress or a delay start in progress. Refer to
the chapter 'Setting and starting a washing
programme'.
• To activate/deactivate the multitab function. Refer to the chapter 'Multitab function'.
• To deactivate/activate the rinse aid dispenser, when multitab function is active.
Refer to the chapter 'Multitab function'.
Setting mode
When you press the on/off button and all
programme indicator lights come on, the appliance is in setting mode.
The appliance must be in setting mode for
these operations:
– To set a washing programme.
– To set the water softener level.
– To deactivate/activate the rinse aid dis-
penser.
When you press the on/off button and only
one programme indicator light comes on,
cancel the programme to go back to the setting mode. Refer to the chapter 'Setting and
starting a washing programme'.
tions:
• To set the water softener. Refer to the
chapter 'Setting the water softener'.
Use of the appliance
Refer to the following instructions for each
step of procedure:
1. Make a check if the water softener level
is correct for the water hardness in your
area. If necessary set the water softener.
2. Fill the salt container with dishwasher salt.
3. Fill the rinse aid dispenser with rinse aid.
4. Load cutlery and dishes into the dish-
washer.
Setting the water softener
The water softener removes minerals and
salts from the water supply. Minerals and
5. Set the correct washing programme for
the type of load and soil.
6. Fill the detergent dispenser with the correct quantity of detergent.
7. Start the washing programme.
If you use combi detergent tablets ('3 in
1', '4 in 1', '5 in 1', etc.), refer to the
chapter 'Multitab function'.
salts can have bad effect on the operation of
the appliance.
6 electrolux
Water hardness is measured in equivalent
scales:
• German degrees (dH°).
• French degrees (°TH).
•Clarke.
Adjust the water softener to the water hardness in your area. If necessary, contact your
local water authority.
• mmol/l (millimol per litre - international unit
for the hardness of water).
Water hardness Water hardness setting
°dH °TH mmol/l Clarke manually electronically
51 - 70 91 - 125 9,1 - 12,5 64 - 88 2 10
43 - 50 76 - 90 7,6 - 9,0 53 - 63 2 9
37 - 42 65 - 75 6,5 - 7,5 46 - 52 2 8
29 - 36 51 - 64 5,1 - 6,4 36 - 45 2 7
23 - 28 40 - 50 4,0 - 5,0 28 - 35 2 6
19 - 22 33 - 39 3,3 - 3,9 23 - 27 2 5
15 - 18 26 - 32 2,6 - 3,2 18 - 22 1 4
11 - 14 19 - 25 1,9 - 2,5 13 - 17 1 3
4 - 10 7 - 18 0,7 - 1,8 5 - 12 1 2
< 4 < 7 < 0,7 < 5
1) No use of salt required.
You must set the water softener manually and electronically.
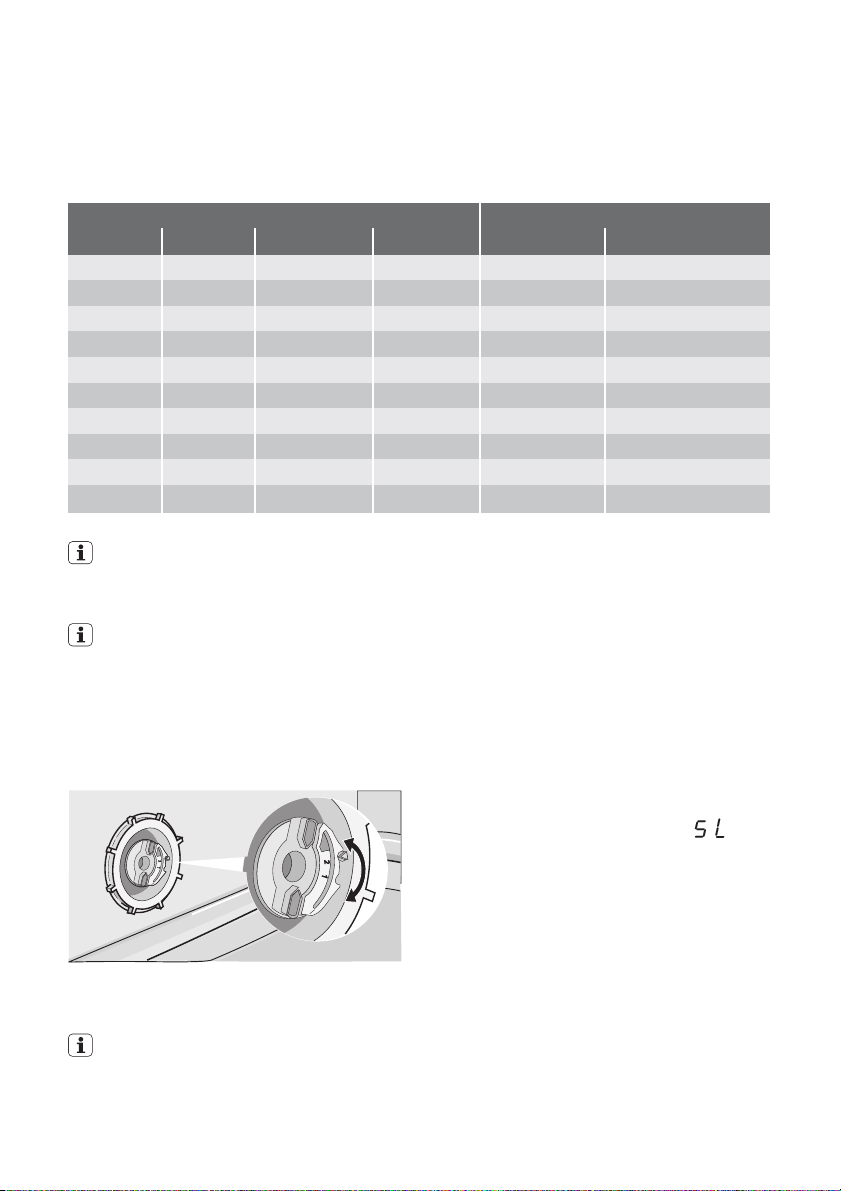
Manual adjustment
The appliance is set at the factory at position 2.
1. Open the door.
2. Remove the lower basket.
3. Turn the water hardness dial to position
1 or 2 (refer to the chart).
4. Install the lower basket.
1. Switch on the appliance.
2. Make sure that the appliance is in setting
mode.
3. Press and hold function buttons B and C
until the indicator lights of function buttons A, B and C start to flash.
4. Release function buttons B and C.
5. Press function button A.
– The indicator lights for function buttons
B and C go off.
– The indicator light for function button A
continues to flash.
1)
1
– The digital display shows the current
level.
Example: digital display shows
el 5.
6. Press the function button A one time to
increase the water softener level by one
step.
7. Press the on/off button to save the operation.
1)
1
= lev-
5. Close the door.
Electronic adjustment
The water softener is set at the factory at level 5.
 Loading...