

Page 1
SyncGen
User’s Manual
Page 2

1
Page 3
IMPORTANT SAFETY INSTRUCTION – READ FIRST
This symbol, whenever it appears, This symbol, wherever it appears, alerts you
alerts you to the presence of uninsulated to important operating and maintenance
dangerous voltage inside the enclosure-voltage instructions in the accompanying literature.
that may be sufficient to constitute a risk of shock. Please read the manual.
Read instructions:
Retain these safety and operating instructions for future reference. Heed all warnings printed here and on the
equipment. Follow the operating instructions printed in this user manual.
Do not open:
There are no user serviceable parts inside. Refer any service work to qualified technical personnel only.
Power sources:
Connect the units power supply to mains power only of the type described in this user manual or marked on
the power supply.
Power supply:
Use the power supply with sealed mains plug appropriate for your local mains supply as provided with the
equipment. If the provided supply does not fit into your outlet consult your service agent. Route the power cord
so that it is not likely to be walked on, stretched or pinched by items placed upon or against it.
Grounding:
Do not defeat the grounding and polarization means of the power supply.
Moisture:
To reduce the risk of fire or electrical shock do not expose the unit to moisture or use in damp or wet conditions. Do not place container of liquid on unit.
Heat:
Do not locate the unit close to excessive heat or direct sunlight, as this could cause a fire hazard. Locate the
unit away from any equipment, which produces heat such as: power supplies, power amplifiers and heaters.
Environment:
Protect from excessive dirt, dust, heat, and vibration when operating and storing. Avoid tobacco ash, drink
spillage and smoke, especially that associated with smoke machines.
Handling:
Protect the controls from damage during transit. Use adequate padding if you need to ship the unit. To avoid
injury to yourself or damage to the equipment, take care when lifting, moving, or carrying the unit.
Servicing:
Unplug power immediately if equipment is exposed to moisture, the power supply becomes damaged during a
lightning storm or if smoke odor or noise is noted. Refer servicing to qualified technical personnel only.
Installation:
Install the unit in accordance with the instructions printed in the user manual.
2
Page 4

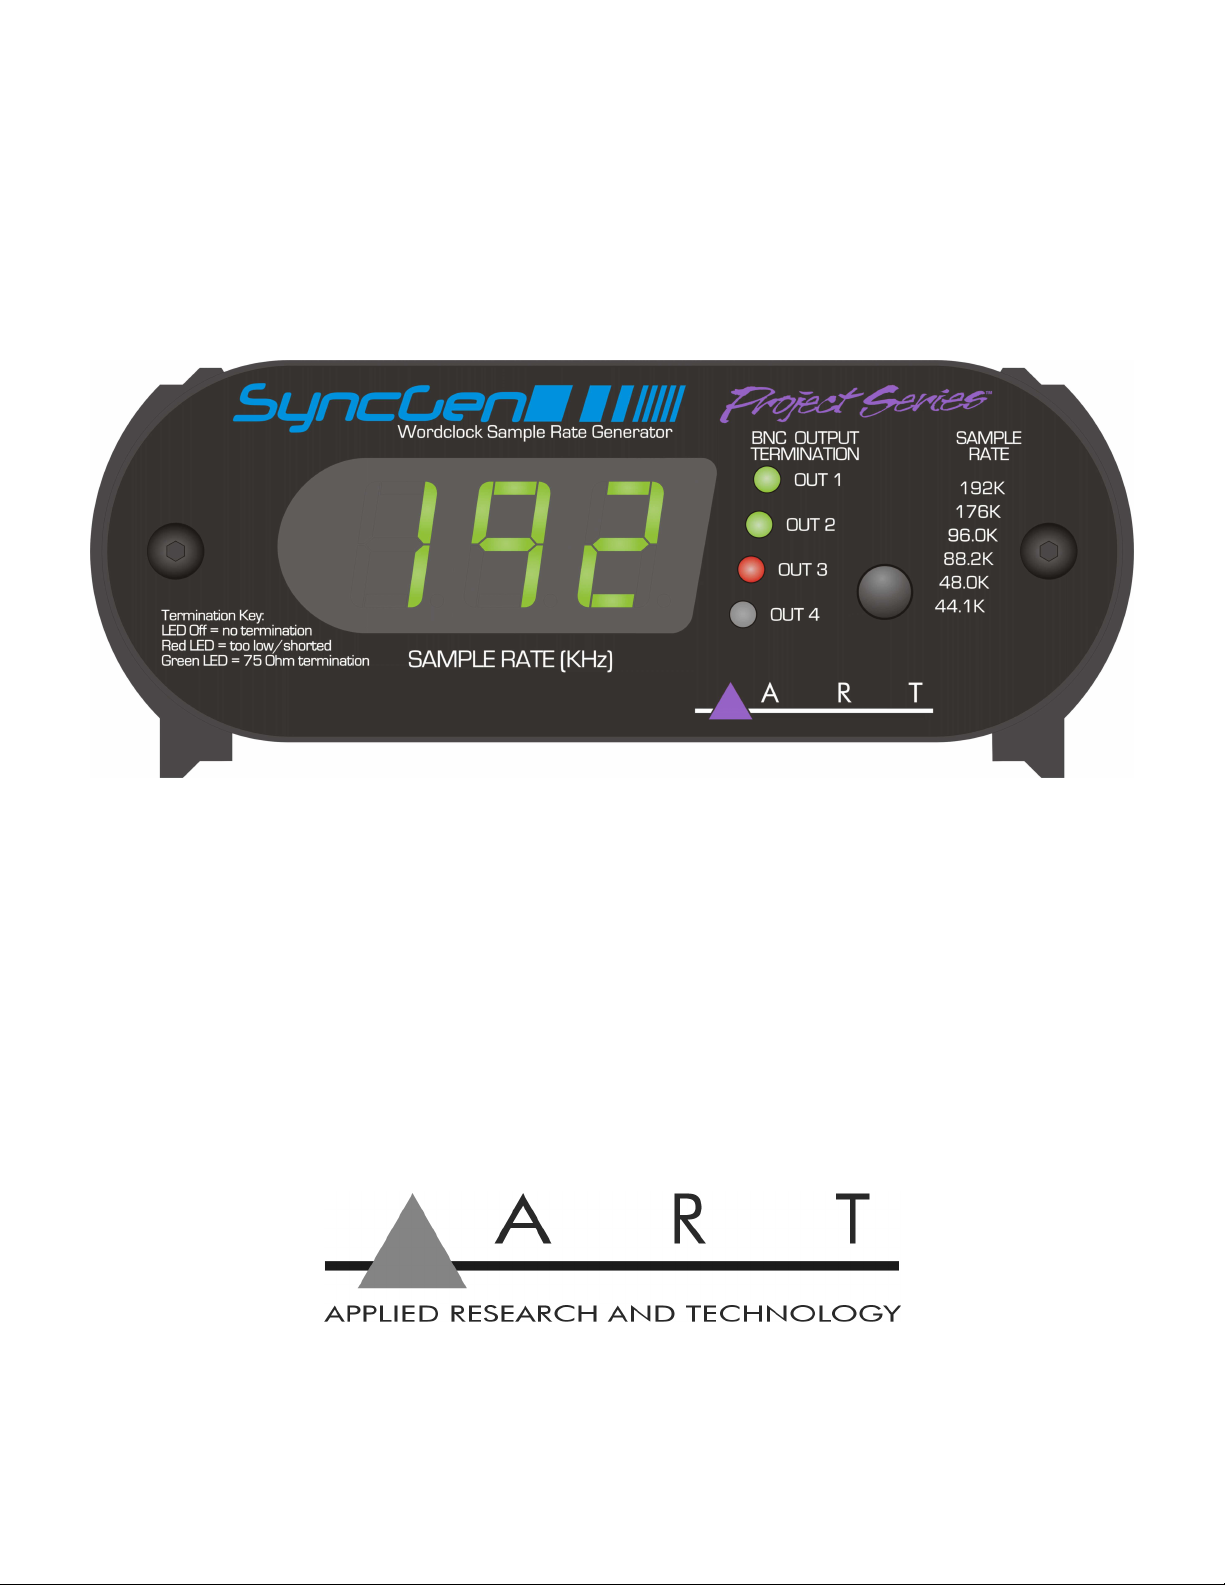
INTRODUCTION:
Thank you for purchasing the ART SyncGen. This product will allow you to improve the sound of your
digital recording system by providing a solid time-base reference. We hope that you enjoy the flexibility and reliability the SyncGen has to offer.
You can drive either the BNC Wordclock Input or the S/PDIF Input of your recording gear with one of
the SyncGen's outputs thereby allowing the SyncGen to work together with a wide variety of digital
audio equipment.
Using a wordclock generator will centralize all of the timing, reducing accumulated timing errors
between the individual units that make up a digital recording chain.
The ART SyncGen can also tell you about the status of your BNC wordclock cables and terminations.
You can see which pieces of gear are internally terminated, and if a cable is connected properly. A
green indicator shows correct termination. Red indicates an output that is shorted or over-terminated.
When a termination LED is unlit, the output is unconnected or not terminated.
Changing the Sample Rate
Depressing the front panel Sample Rate button will step through the six master clock rates with each
subsequent button push. The numeric display will indicate the clock frequency present at the BNC
wordclock and coaxial S/PDIF outputs. The SyncGen will also remember and maintain this sample
rate setting the next time that it is powered up.
You may however need to adjust the sample rate in other areas of your system in order to complete
the setup process. First change the sample rate setting in the recording software on your computer.
Second, some recording hardware cannot auto-detect and then lock to the incoming sample rate. In
these cases, you will need to manually set the hardware device sample rate using whatever means is
provided by the manufacturer of the hardware device, be it a software driver or a front panel control
setting.
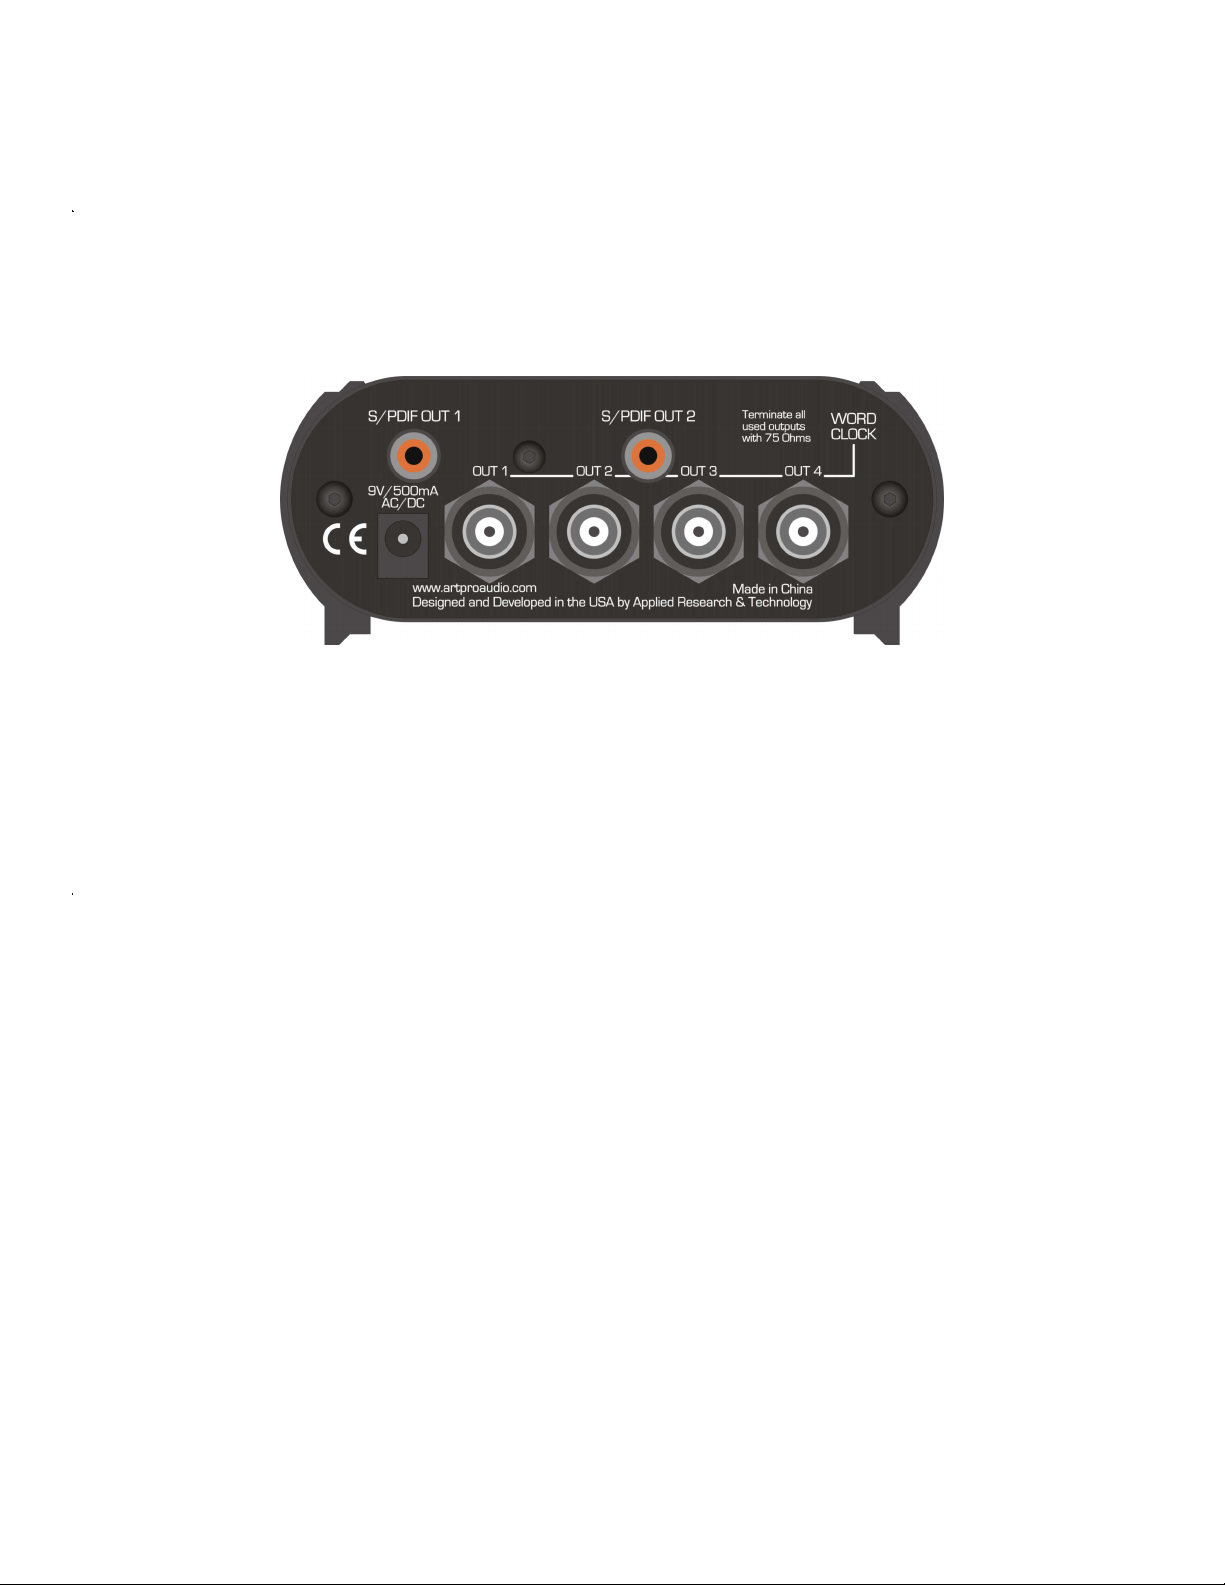
Hooking up the SyncGen
Applying the SyncGen is a two step process.
1) Connect each audio device’s wordclock (or S/PDIF) input to the SyncGen.
2) Terminate each connection if required. (See below “Termination and why it is needed” )
All S/PDIF inputs are already terminated, therefore the SyncGen has no termination LEDs for its two
S/PDIF coaxial outputs.
Most products with a single BNC wordclock input are terminated. The SyncGen will immediately
recognize when it is connected to a device that has internal termination by illuminating the corresponding output termination LED green. If the termination LED for the output you have connected
lights Green, then you are done!
If the Termination LED is Off, then the connection requires termination. Add a 75 Ohm terminator at
the end of the cable run, either on the second wordclock input (Wordclock Thru) if available, or by
adding a BNC “T” adaptor. A BNC “T” has two female ends (for cables) and one male end (to connect
to a jack). You can buy these at RadioShack model #278-112.
3
Page 5
If the Termination LED is RED, then there is an output-loading problem, and the output may be too
low to function. Try removing the 75 Ohm terminator if you added one onto this output. If that is NOT
the cause, then the output may be shorted. (A defective or improperly connected cable could cause
this.)
If an output is unterminated or unused, the LED will not light.
The SyncGen uses discrete 75 Ohm output drivers that adapt to the output load. Each output is
protected from shorts and over-voltage due to accidental incorrect termination.
Termination and why it is needed
A terminator is simply a resistor connected between the signal and ground at the end of a cable.
Termination reduces the reflections from the undriven end of a cable. These reflections can skew the
timing of the waveform leading to timing errors. The longer the cable run, the worse the errors are
that can be created.
A green termination LED will indicate that a SyncGen output is correctly terminated.
If you have too many terminators or a cable short, the LED will light red. This typically happens when
you have a device with internal termination and you add a 75 Ohm terminator to the cable as well.
An easy way to check for internal termination is to connect to the digital audio unit that you are unsure
of, and check the termination LED. If it lights green, this device has internal termination.
The SyncGen can also double as a handy BNC wordclock cable tester. First connect a cable; the
termination LEDS should remain unlit indicating no short circuit. Next connect a 75 Ohm terminator
using a BNC “T” adaptor. The termination LED should light green indicating a good connection.
S/PDIF outputs
Two coaxial S/PDIF outputs are provided to allow synchronization of digital audio devices that lack
BNC wordclock inputs. Devices like the Digidesign Digi 002 have coax S/PDIF inputs that can be
selected as the source for timing reference. Use this input with the ART SyncGen to tie the timing of
this device in with the rest of your system. The SyncGen’s S/PDIF output has all audio bits set to zero
“digital black”, providing a locking source for these applications.
4
Page 6
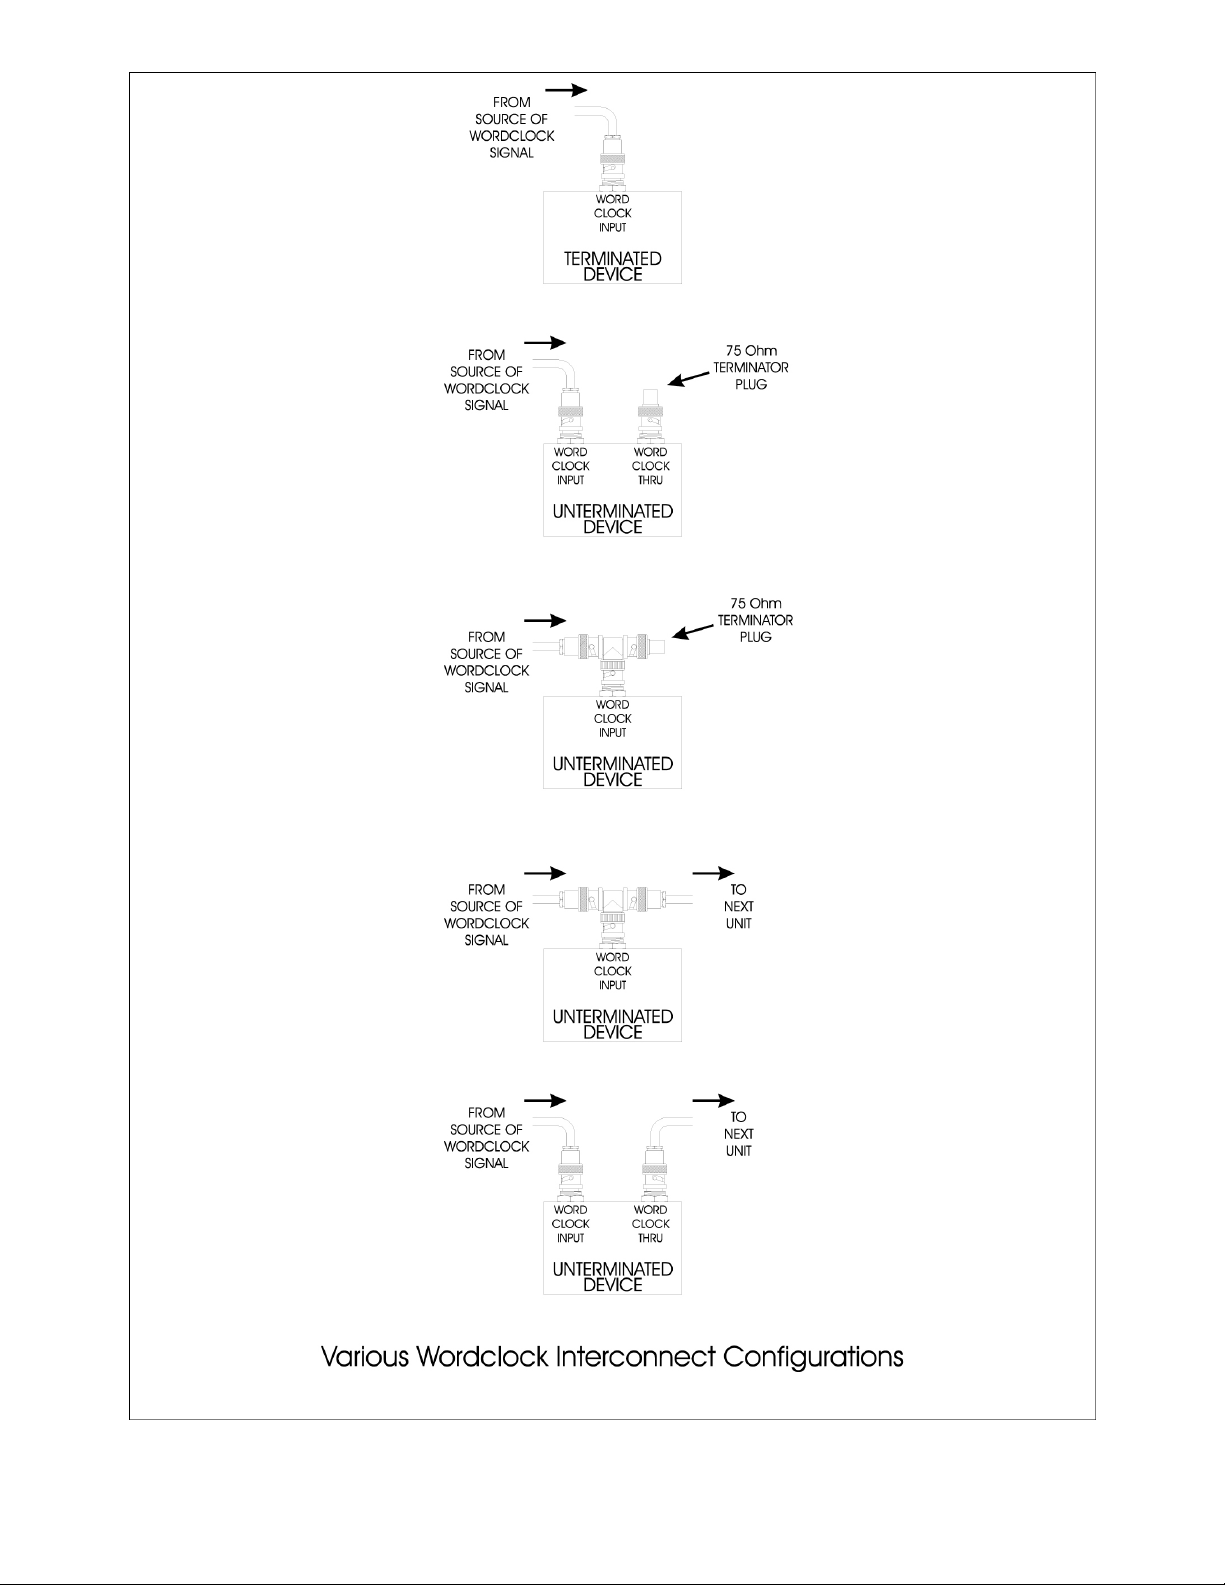
Diagram 1.
5
Page 7

Connecting more than one device to an output
More than one digital audio unit can be connected to a single wordclock output by daisy chaining the
audio units together using either their Wordclock Thru jacks or by the use of BNC “T” adaptors.
ART products with Wordclock Thru jacks are NOT terminated internally, thereby allowing easy connection of more than one device to a single SyncGen wordclock output. A 75 Ohm terminator will be
required on the last unit in the chain (furthest from the SyncGen).
NOTE: If you have a digital audio device with internal termination, it should ALWAYS be placed at the
end of the cable run. You should not use a BNC “T” Adaptor on a unit with internal termination as this
effectively places a termination at that point in the line. Terminations should always occur at the end
of a line.
Cable length
The delay through a high quality cable is a little over one nanosecond (1 x 10
-9
sec.) per foot. We
would recommend keeping cable lengths less than 15 feet (or 15 feet maximum length between all
different devices connected to the same SyncGen output), as this would represent about a one half of
one bit interval at 192KHz.
Jitter
Jitter is the variation in the timing of the sample rate. Imagine calling out each second as it ticks off
using the second hand of a watch. Now, imagine that the watch is shaking so much that you can
hardly see the precise position of the second hand. This inability to correctly read the second hand is
a source of signal error.
Digital systems need to do this millions of times a second since audio samples are broken up into 64
(bit) intervals per sample (44100 samples/sec. x 64 = 2.822 million bits/sec.) Both recording and
playback jitter will create audible errors, however jitter in the recording process is a permanent part of
the recording and cannot easily be corrected with standard playback gear. Therefore the SyncGen
can be a very useful recording tool.
6
Page 8

WARRANTY INFORMATION:
Limited Warranty
Applied Research and Technology will provide warranty and service for this unit in accordance with the following warrants:
Applied Research and Technology, (A R T) warrants to the original purchaser that this product and the components thereof will be free from defects in workmanship and materials for a period of one
purchase. Applied Research and Technology will, without charge, repair or replace, at its option, defective
product or component parts upon prepaid delivery to the factory service department or authorized service
center, accompanied by proof of purchase date in the form of a valid sales receipt.
Exclusions
This warranty does not apply in the event of misuse or abuse of the product or as a result of unauthorized
alterations or repairs. This warranty is void if the serial number is altered, defaced, or removed.
A R T reserves the right to make changes in design or make additions to or improvements upon this product
without any obligation to install the same on products previously manufactured.
A R T shall not be liable for any consequential damages, including without limitation damages resulting from
loss of use. Some states do not allow limitations of incidental or consequential damages, so the above limitation or exclusion may not apply to you. This warranty gives you specific rights and you may have other rights,
which vary from state to state.
For units purchased outside the United States, an authorized distributor of Applied Research and Technology
will provide service.
SERVICE:
The following information is provided in the unlikely event that your unit requires service.
1) Be sure that the unit is the cause of the problem. Check to make sure the unit has power, all cables are
connected correctly, and the cables themselves are in working condition. You may want to consult with your
dealer for assistance in troubleshooting or testing your particular configuration.
2) If you believe the ART unit is at fault, go to www.artproaudio.com
more assistance, or directly request a Return Authorization for service in the “resources” area of the website.
3) If you are returning the unit for service, pack the unit in its original carton or a reasonable substitute. The
original packaging may not be suitable as a shipping carton, so consider putting the packaged unit in another
box for shipping. Print the RA number clearly on the outside of the shipping box.
4) Include, with your unit, a note with the RA number and your contact information including a daytime phone
number, preferably attached to the top of the unit.
. You may contact Customer Service for
year from the date of
7
Page 9

Notes:
8
Page 10

Specifications:
Wordclock Outputs............................ 4 - BNC, 5 Vpp into 75 Ohms,
.......................................................... 5.75 Vpp unterminated, 40 mA RMS max output
S/PDIF Outputs................................2 - RCA Female, coaxial 75 Ohms 0.5 Vpp conforms to IEC
60958 spec. All audio bits set to zero “Digital Black”
Sample Rates ..................................44.1 KHz, 48 KHz, 88.2 KHz, 96 KHz, 176 KHz, 192 KHz
Timebase accuracy..........................+
10 ppm @ 0°C to 50°C
Jitter .................................................<
100 psec. rms
External supply Requirements ......... 8.5-14 VDC OR 7-12 VAC @ 500mA Max.
Dimensions ......................................1.87”H x 4.61”W x 4.27”D – (47.5mm H x 117mm W x 108mm D)
Weight.............................................. 1.89 lbs. (0.86 kg) w/power supply and packaging.
ART maintains a policy of constant product improvement. ART reserves the right to make changes in
design or make additions to or improvements upon this product without any obligation to install same
on products previously manufactured. Therefore, specifications are subject to change without notice.
Applied Research & Technology
www.artproaudio.com
© 2006, 2007 Applied Research & Technology
9
Page 11

10
Page 12

www.artproaudio.com
E-mail: cserve@artproaudio.com
SyncGen SG-5004-101
11
 Loading...