

Aroma Super POT User Manual

SUPER P O T / S U K I Y A K I
COOKE R
Instruction Manual &
Cookbook

Congratulations on your purchase of the Aroma Super
Pot! It will become one of the most exciting appliances
in your home.
The Aroma Super Pot has been designed to be
extremely versatile. It can be used as a Skillet, Steamer,
Slow Cooker, Stir Fryer, Sukiyaki Cooker, or Warmer.
Published By:
Aroma Housewares Co.
6469 Flanders Drive
San Diego, CA 92121
1999 Aroma Housewares Company

IMPORTANT SAFEGUARDS
Basic safety precautions should always be followed when using
electrical appliances, including the following:
1. Read all Instructions.
2. Do not touch hot surfaces. Use handles or knobs.
3. To protect against electrical shock, do not immerse electrical
cord in water or other liquid.
4. Close supervision is necessary when any appliance is used by
or near children.
5. Unplug from outlet when not in use and before cleaning. Allow
to cool before putting on or taking off parts.
6. Do not operate any appliance with a damaged cord or plug or
after the appliance malfunctions or has been damaged in any
manner. Return appliance to the nearest authorized service
facility for examination, repair or adjustment.
7. The use of accessory attachments not recommended by the
appliance manufacturer may result in fire, electric shock or
injury.
8. Do not use outdoors.
9. Do not let cord touch hot surfaces or hang over the edge of a
counter or table.
10. Do not place on or near a hot gas or electric burner or in a
heated oven.
11. Extreme caution must be used when using or moving an
appliance containing hot oil or other hot liquids.
12. Do not use the appliance for other than intended use.
13. Always attach plug to appliance first, and then plug cord into
the wall outlet. To disconnect, turn any control to "OFF", and
then remove plug from wall outlet.
14. Preheating of the appliance is not necessary.
This appliance is intended for household use only.
SAVE THESE INSTRUCTIONS
1

SHORT CORD INSTRUCTIONS
POLARIZED PLUG
If this appliance has a polarized plug (one blade is wider than the
other) follow the instructions below:
To reduce the risk of electric shock, this plug is intended to fit into
a polarized outlet only one way. If the plug does not fit fully into
the outlet, reverse the plug. If it still does not fit, contact a qualified
electrician. Do not attempt to modify the plug in any way.
1. A detachable power-supply cord is provided to reduce risks
resulting from becoming entangled in or tripping over a longer
cord.
2. Longer detachable power-supply cords or extension cords are
available and may be used if care is exercised in their use.
3. If a longer detachable power-supply cord or extension cord is
used:
a. The marked electrical rating of the extension cord should
be at least as great as the electrical rating of the appliance.
b. The longer cord should be arranged so that it will not drape
over the counter top or tabletop where it can be pulled on
by children or tripped over unintentionally, the extension
cord should be a grounding-type 3-wire cord.
2
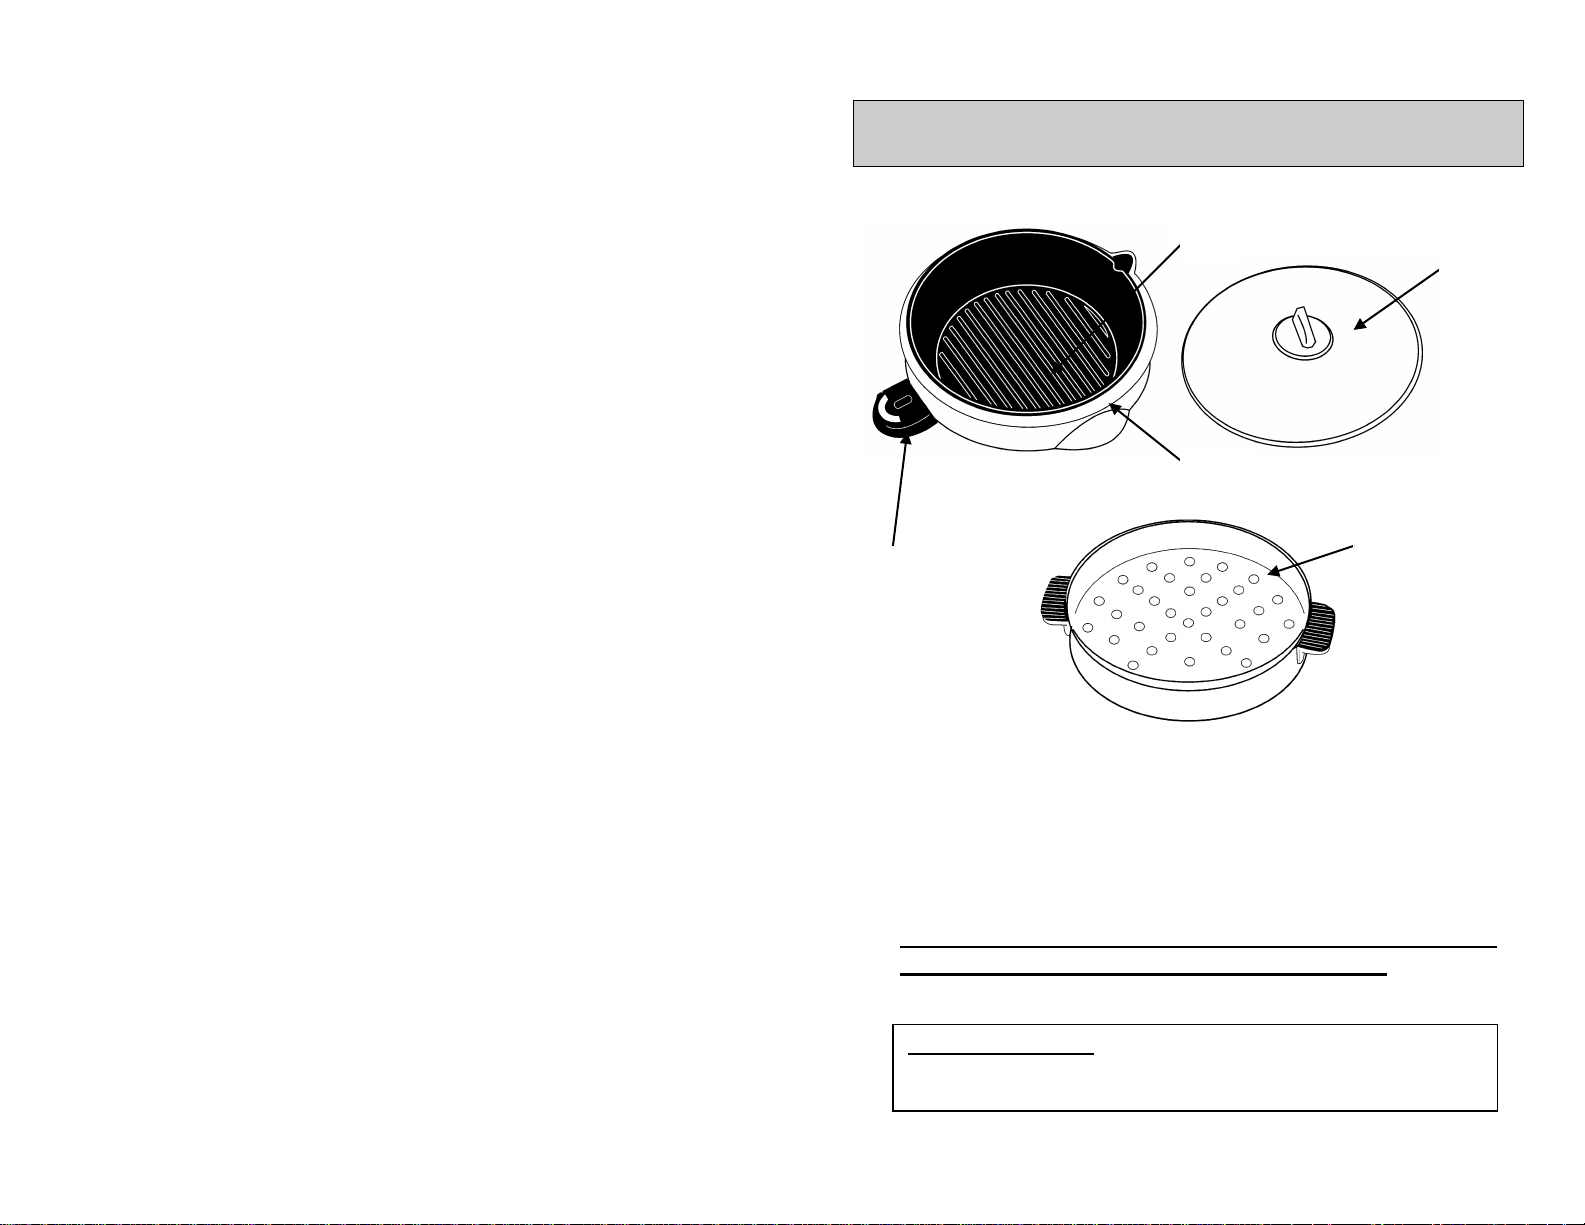
IDENTIFICATION PAGE
B
A
C
D
E
IMPORTANT NOTE: The removable temperature control is
specially designed to be used for this super pot only. Using other
temperature control for the super pot may severely damage the product.
A. Quick release non-stick cooking pan with ridges
B. See-through, tempered glass lid
C. Cool-touch body
D. Removable, full range adjustable temperature control
E. ***Optional steam tray
If you need the steam tray, you may contact our Customer
Service Dept. at 1-800-276-6286 for purchasing.
3

BEFORE USING
HOW TO USE
1. Remove all packaging materials.
2. Pull the cooking pan away from the plastic base.
3. Wash the cooking pan, base, and lid with warm soapy water
using a sponge or dishcloth.
4. Rinse and dry thoroughly to remove soap residue.
Do not use abrasive cleaners or scouring pads.
Never immerse the power cord withTemperature Control.
1. Condition the non-stick surface with vegetable oil or
shortening.
2. Move temperature selector to "OFF". Plug the power cord
with Temperature Control to the appliance first, and then plug
cord into the wall outlet.
3. Select desired temperature setting for your cooking. The red
indicator light will illuminate.
4. The light will go off when the cooking pan has reached the
selected temperature.
5. When finished, move temperature selector back to the OFF
position and unplug the power cord.
NOTE:
During operation the light will turn on and off indicating the
proper temperature is being maintained.
Do not turn the power on when there is nothing in the pan.
Wooden, heatproof plastic, and nylon utensils are
recommended. Metal utensils may scratch the non-stick
surface.
4
 Loading...