

Page 1
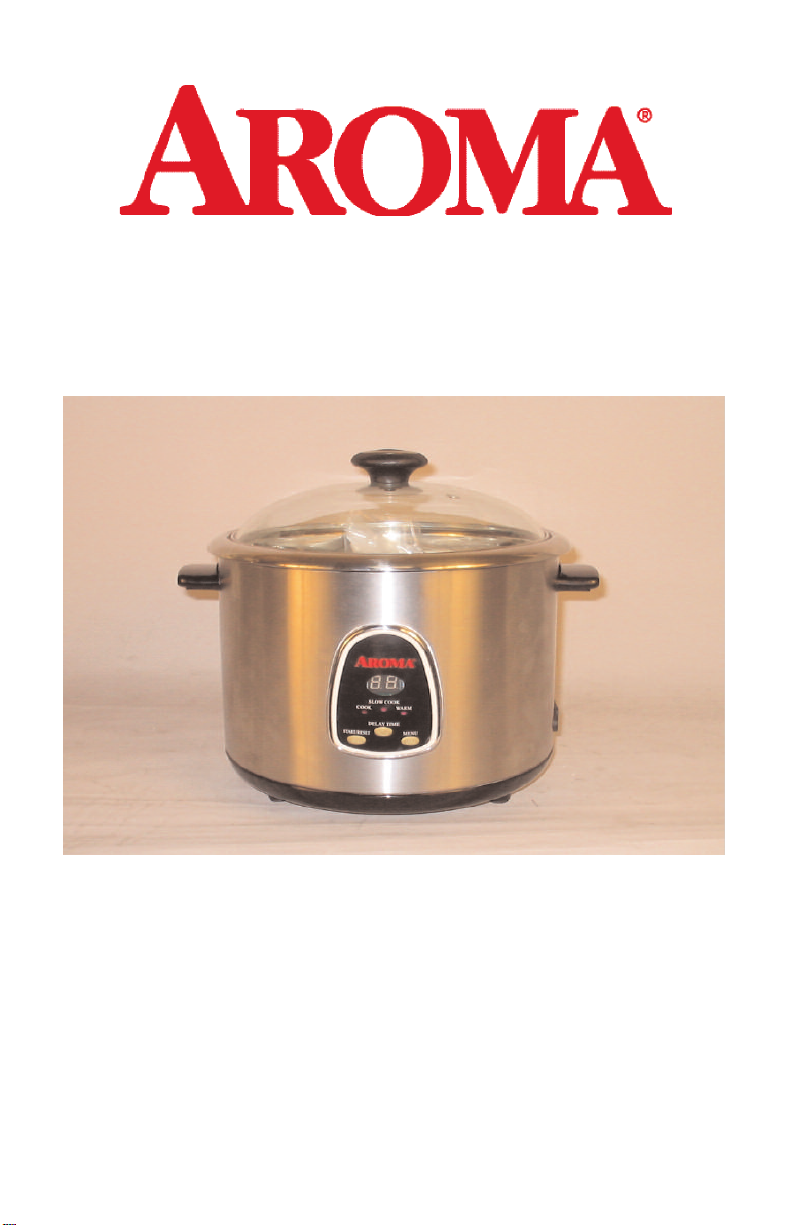
Stainless Steel Rice Cooker with
Stainless Steel Interior and Exterior
Instruction Manual &
Cooking Guide
Model: PRC-550/556
Page 2

Congratulations on your purchase of the Electronic Rice Cooker
& Food Steamer. It will surely become one of the most practical appliances
in your kitchen.
Please read all instructions before first use.
Published By:
Aroma Housewares Co.
6469 Flanders Drive
San Diego, CA 92121
U.S.A.
1-800-276-6286
www.aromaco.com
© 2004 Aroma Housewares CompanyAll rights reserved.
Page 3

IMPORTANT SAFEGUARDS
1. Important:Read all instructionscarefully before first use.
2. Make sure the appliance is OFF when not in use, before putting on or taking off
parts, and before cleaning.
3. To protect against electricalshock, do not immerse cord, plug or the appliance
itself in water or other liquid.
4. Keep the appliance away from the children to avoid accidents.
5. Unplug from outlet when not in use and before cleaning. Allow unit to cool
before puttingon or taking off parts, and before cleaning the appliance.
6. Do not operate any appliance with a damaged cord or plug or after the
appliancemalfunctions or has been damaged in any manner. Returnappliance
to the nearest authorized service facility for examination, repair or adjustment.
7. Do not use attachments or accessories other than those suppliedor
recommendedby the manufacturer. Incompatible parts create a hazard.
8. Do not use outdoors.
9. Do not let cord hang over edge of table or counter, or touch hot surfaces.
10. Do not place on or near a hot gas or electric burner or in a heated oven.
11. Do not use the appliance for other than intended use.
12. Extremecaution must be used when moving the apliance containing rice or
liquids.
13. Alwaysunplug from the base of the wall outlet. Neverpull on the cord.
14. The rice cooker should be operated on a separate electricalcircuit from other
operatingappliances. If the electric circuit is overloadedwith other appliances,
this appliancemay not operate properly.
15. Maximumrice capacity is 1.8 Liters (volume capacity is 4.0 Liters).
16. Avoidsudden temperature changes when using the rice cooker.
17. Use only with 120VAC power outlet.
18. Alwaysmake sure the outside of the inner cooking pot is dry prior to use. If
cooking pot is returned to cooker when wet, it will damage this product causing
it to malfunction.
19. Use extreme caution when opening the lid during or after cooking. Hot steam
will escape and could cause burns.
20. Duringthe cooking & slow cooking stage, you may notice steam coming from
the vents on the lids. This is normal.
SAVE THESE INSTRUCTIONS
1
Page 4

SHORT CORD INSTRUCTION
SHORT CORD INSTRUCTIONS
Ashort power supply cord is to be provided to reduce the risk resulting from becoming
entangled in or tripping over a longer cord. An extension cord is available and may be
used if care is exercised in its use. If an extension cord is used, the marked electrical
rating of the extension cord should be at least as great as the electrical rating of the
appliance. If the appliance is of the grounded type, the extension cord should be a
grounding 3-wire cord. The extension cord should be arranged so that it will not drape
over the countertop or tabletop where it can be pulled on by children or tripped over
unintentionally.
POLARIZED PLUG
POLARIZED PLUG
This appliance has a polarized plug (one blade is wider than the other); follow the
instructions below:
To reduce the risk of electric shock, this plug is intended to fit into a polarized outlet
only one way. If the plug does not fit fully into the outlet, reverse the plug. If it still does
not fit, contact a qualified electrician. Do not attempt to modify the plug in any way.
GROUNDING INSTRUCTIONS
This appliance must be grounded while in use to protect the operator from electrical
shock. The appliance is equipped with a 3-conductor cord and a 3-prong groundingtype plug to fit the proper grounding-type receptacle. The appliance has a plug that
looks like sketch A. An adaptor, sketch B, should be used for connecting sketch-A plug
plugs to two-plugs to two-prong receptacles. The grounding tab, which extends from
the adaptor, must be connected to a permanent ground such as a properly grounded
outlet box as shown in sketch C using a metal screw.
This appliance is for household use only.
2
Page 5

ABOUT RICE & SENSOR LOGIC
Rice is a valuable source of low fat, complex carbohydrates and is abundant in
thiamin, niacin and iron. It is an essential ingredient for a healthy diet.
There are many different varieties of rice available in the market. YourAroma Rice
Cooker can cook any type perfectly every time. Following are the commonly
available varieties of rice and their characteristics:
Long Grain Rice
Typicallythis rice is not starchy and has loose, individual grains after cooking. The
"California" rice is soft; "Carolina" is a little firmer, and "Jasmine" is the firmest of the
long grain variety and is flavorful and aromatic.
Short Grain Rice
Short grain is characteristically soft, sticky and chewy. This is the rice used to make
sushi. "California Rice" is soft; "Sweet Rice", often called "pearl" rice for its round
shape, is extra sticky and is excellent for making rice pudding.
Brown Rice
Brown rice is often considered the most healthy variety. It has bran layers on the rice
grains and contains more B-complex vitamins, iron, calcium, and fiber than polished
(white) rice. The most popular brown rice is long grain and has a chewy texture.
Wild Rice
Wild Rice comes in many delicious varieties and mixes. Often it is mixed with long
grain rice for its firmer texture and rich brown to black color. Wild rice makes
wonderful stuffing for poultry when cooked with broth and mixed with your favorite
dried fruits.
3
Page 6
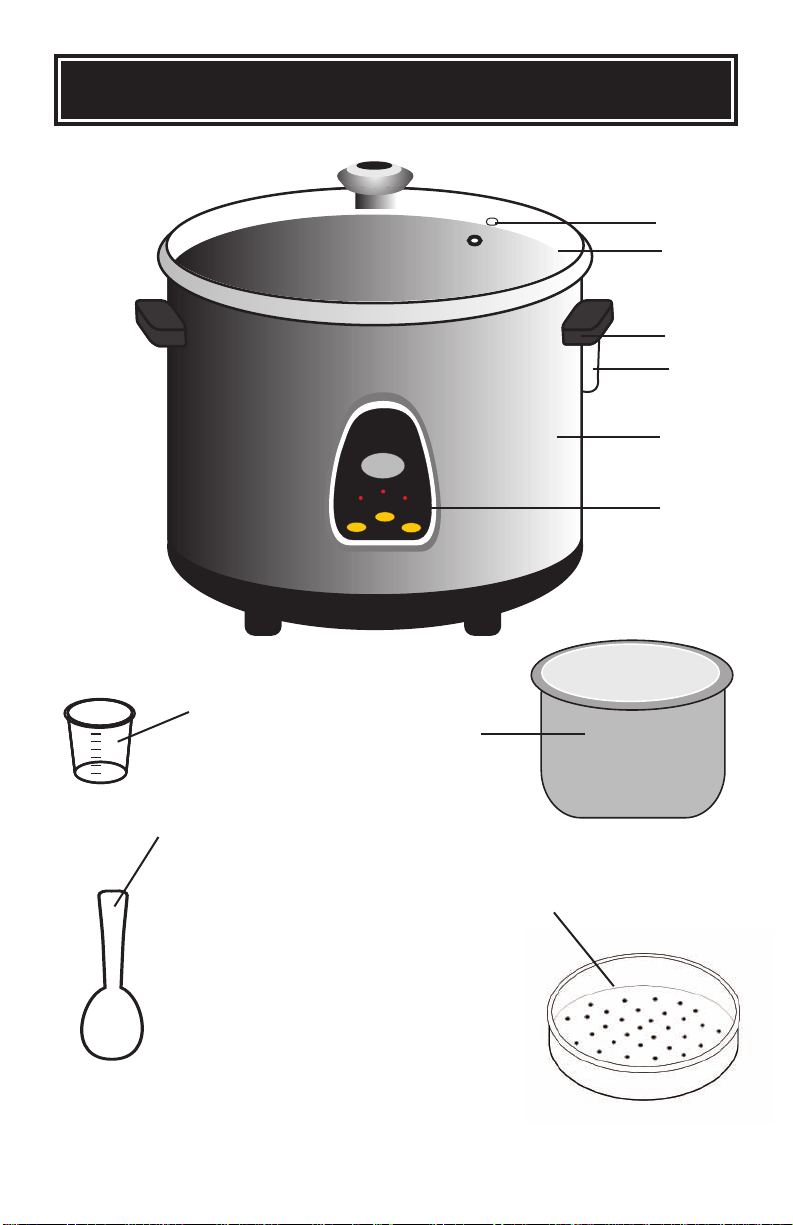
PARTS IDENTIFICATION
AROMA
S
LOWCOOK
C
OOK
W
ARM
DELAYTIME
START/RESET
M
ENU
4
2
3
5
1
6
10
9
1. Rice cooker base
2. Lid
3. Handle
4. Steam vent
5. Condensation collector
6. Control panel
7. Stainless steel inner pot
8. Steam tray
9. Measuring cup
10. Rice paddle
7
8
4
Page 7

HOW TO USE
Before First Use:
1. Readall instructions and important safeguards.
2. Removeall packaging materials and make sure items are received in good
condition.Tear up all plastic bags as they can pose a risk to children.
4. Wash accessories in warm soapy water. Rinse and dry thoroughly.
5. Removeinner pot from rice cooker and clean with warm soapy water. Rinse
and dry thoroughly before returningto cooker. Wipebody clean with a damp
cloth.
Do not use abrasive cleaners or scouring pads.
Do not immerse the rice cooker,cord or plug in water at any time.
To Cook Rice:
1. Maximumcapacity of this rice cooker is 1.8 Liters (10 measuringcups). Do not
cook more than the maximum capacity.
2. Removethe rice pot from the rice cooker and put rice inside the rice pot. Using
tap water, wash the rice inside the pot prior to cooking.
3. Usinga dry cloth, wipe off the water on the outside of the rice pot thoroughly.
4. Put rice pot back into the rice cooker. Close the rice cooker lid.
5. Plugintot he wall outlet. The control panel will show “00”, and you will hear a
beep.
6. Press“Menu” button to select cook mode. Cooking indicator light will turn on.
7. Press“Start/Reset” button to start cooking rice.
8. After cooking state is finished, cooking idicator light will turn off and the warming
indicatorlight will automatically turn on. The control panel will show thecooking
time and will reset once the warming idnicator light automaticallyturns on. Time
display show s from 0.0 - 9.0. 0.1 = 6 minutes, 0.2 = 12 minutes, 0.3 = 18
minutes,1.0 = 1 hour,2.0 = 2 hours, 9.0 =9 hours, etc. Max warming time is 9
hours.
9. Press“Start/Reset” button again to shut off power.
Warming:
1. Pluginto the wall outlet,control panel will show “00”, and you will hear a beep.
2. Press“Menu” button to select warm mode. Warmingindicator light will turn on.
Timedisplay shows from 0.0 - 9.0. 0.1 = 6 minutes, 0.2 = 12 minutes, 0.3 = 18
minutes,1.0 = 1 hour,2.0 = 2 hours, 9.0 =9 hours, etc. Max warming time is 9
hours.
3. Press“Start/Reset” button to start warming mode. Pressbutton again to shut of
power.
5
Page 8

HOW TO USE (CONTINUE)
To Slow Cook:
1. Wash the foods and combine all ingredientsin the pot.
2. Plug into the wall outlet, control panel will show “00” and you will hear a
beep.
3. Press “Menu” button to select Slow Cook mode. Slow Cooking indicator
light will turn on.
4. Press “Start/Reset” button to start slow cooking mode.
5. Press “Start/Reset” button to shut off power.
Timer:
This button allows you to program your rice cooker to finish cook rice for a later
time. Each time “Delay Time” is pushed, the timer will advance 1 hour. You can
reset the delay time by pressing the “Start/Reset”button twice.
The time shown on the clock display is the total delay time required to start
cooking. The timer cannot be set beyond 9 hours.
Example:If it is 2:00 p.m. and you want your rice cookingat 6:00 p.m.
1. Combine all ingredientsin the pot.
2. Place the pot inside the rice cooker.
3. Close the lid.
4. Press “Menu” to select desired mode.
5. Press “Delay Time”until display reads “4:00” since it is 4 hours from the time
you press “Start/Reset”.
6. Press “Start/Reset”button, the timer will start to count backwardsby minutes
until the correct time for the cooker to start is reached and it will provide you
fresh rice or soup at the time you selected it to be ready.
CAUTION:
• Do not open lid when in use as it will delay cooking time and will releasehot
steam, which may cause burns.
• If cooking pot is returnedto cookerwhen wet, it will damage this product causing
it to malfunction.
6
Page 9

HOW TO CLEAN
Always unplug unit and allow to cool completely before cleaning.
1. Remove the inner cooking pot. Wash it in warm, soapy water using a sponge or
dishcloth.
2. Rinse and dry thoroughly.
3. Repeat process with steam tray, and other provided accessories.
4. Wipe the body of the rice cooker clean with a damp cloth.
To Clean Condensation Collector:
Condensationcollector should be cleaned after every use.
1. Remove collector by gently pulling straight out.
2. Washwith warm soapy water. Rinse and dry thoroughly.
5. Return collector to original positionby clicking back into the groovesof the rice cooker.
Do not use harsh abrasive cleaners or products that are not considered safe to
use on nonstick coatings.
Do not immerse rice cooker base in water or any other liquid. This appliance is
NOT dishwasher safe. Inner pot is NOT dishwasher safe.
7
Page 10
COOKING GUIDES
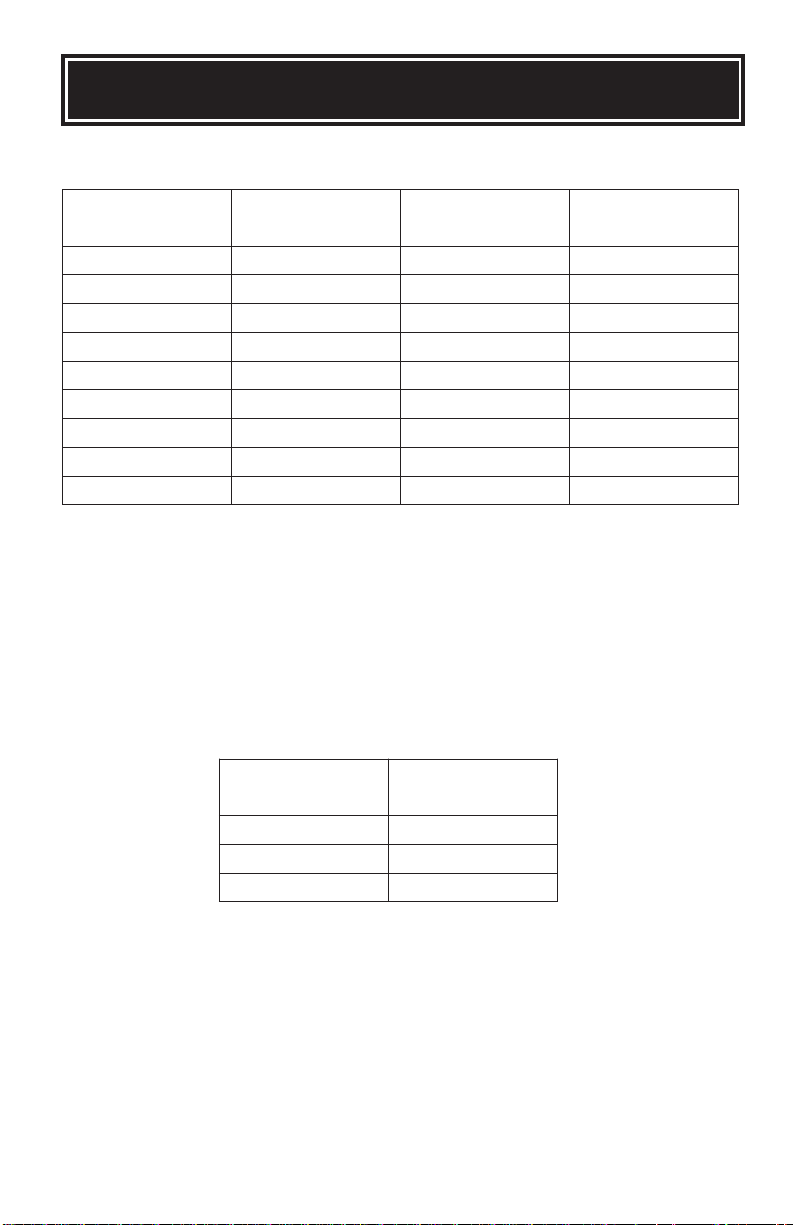
Rice/Water Measurement Chart:
UNCOOKED
RICE
2 Cups 2-1/2 Cups LIne 2 4 Cups
3 Cups 3-1/2 Cups LIne 3 6 Cups
4 Cups 4-1/2 Cups Line 4 8 Cups
5 Cups 5-1/2 Cups Line 5 10 Cups
6 Cups 6-1/2 Cups Line 6 12 Cups
7 Cups 7-1/2 Cups Line 7 14 Cups
8 Cups 8-1/2 Cups Line 8 16 Cups
9 Cups 9-1/2 Cups Line 9 18 Cups
10 Cups 10-1/2 Cups Line 10 20 Cups
NOTE
• When cookingbrown or wild rice, add an additional 3/4 cup water.
• The measuringcup includedis not an exact cup. Chartrefers to cups of
rice/waterbased on the measuringcup provided.
• This is only a general measuring guide. As there are many different kinds of rice
available(see About Rice on page 3), rice/water measurementmay vary slightly.
Porridge Chart:
WATER WITH
MEASURING CUP
UNCOOKED
RICE
1/2 Cup 3 Cups
1 Cup 6 Cups
2 Cups 12 Cups
WATER WITH
MEASURING CUP
INNER POT
WATER LINE
APPROX COOKED
RICE YIELD
HELPFUL HINTS:
1. Rinserice to removeexcess bran and starch. This will help reduce browning and
stickingto the bottom of the pot, but it may also reduce nutrientsin rice.
2. Ifyou have experiencedany sticking due to the type of rice you are using, try
adding a light coating of vegetable oil to the bottom of the inner pot before adding
rice.
3. Forsofter rice, allow rice to soak for 10-20 minutes prior to cooking.
8
Page 11
COOKING GUIDES
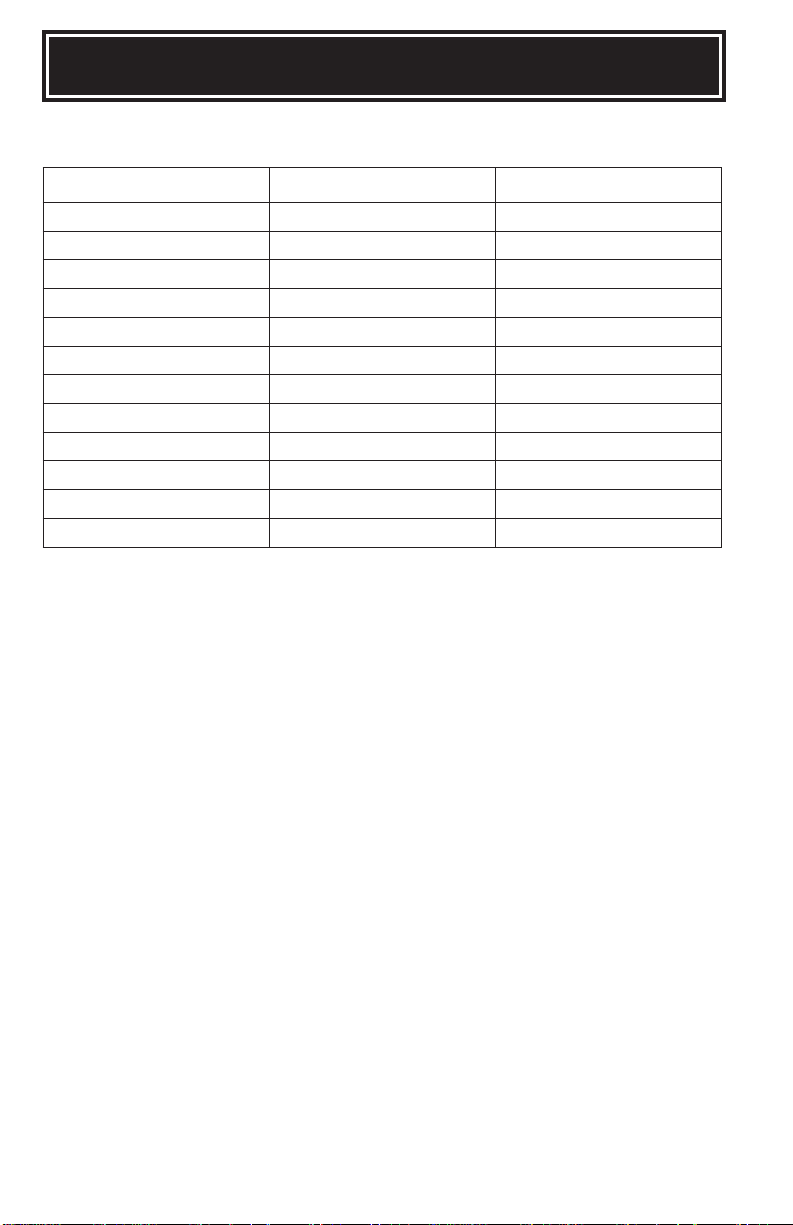
Steaming Chart:
VEGETABLE AMOUNT OF WATER STEAMING TIME
Asparagus 1/2 Cup 10 Minutes
Broccoli 1/4 Cup 5 Minutes
Cabbage 1 Cup 15 Minutes
Carrots 1 Cup 15 Minutes
Cauliflower 1 Cup 15 Minutes
Corn 1 Cup 15 Minutes
Eggplant 1-1/4 Cup 20 Minutes
Green Beans 1 Cup 15 Minutes
Peas 1/2 Cup 10 Minutes
Spinach 1/2 Cup 10 Minutes
Squash 1/2 Cup 10 Minutes
Zucchini 1/2 Cup 10 Minutes
HELPFUL HINTS:
1. Sincemost vegetables only absorb a small amount of water, there is no need to
increasethe amount of water with a larger serving of vegetables.
2. Alwayskeep the lid on the cooker during the entire steaming process. Opening
the lid causes a loss of heat and steam,resulting in a slower cooking time, and
may cause burns. Ifyou find it necessary to open the lid, use caution. You may
want to add a small amount of water to help restore the cooking time.
3. Altitude, humidity and outside temperature will affect cooking times.
4. Thesteaming chart is for referenceonly. Actual cooking time may vary.
9
Page 12

LIMITED WARRANTY
Aroma HousewaresCompany warrants this product free from defects in material and
workmanshipfor one year from provabledate of purchase in continentalUnited
States.
Within this warrantyperiod, Aroma HousewaresCompany will repair or replace, at its
option, defectiveparts at no charge, providedthe product is returned,freight prepaid
with proof of purchase and U.S. $6.00 for shipping and handling charges payable to
Aroma HousewaresCompany. Before returning an item, please call the toll free
number below for return authorizationnumber. Allow 2-4 weeks for return shipping.
This warranty does not cover improper installation, misuse, abuse or neglect on the
part of the owner. Warranty is also invalid in any case that the product is taken apart
or serviced by an unauthorized servicestation.
This warranty gives you specificlegal rights and which may vary from state to state
and does not cover areas outside the United States.
AROMAHOUSEWARESCOMPANY
6469 Flanders Drive
San Diego, California92121
1-800-276-6286
M-F, 8:30AM - 5:00 PM, PacificTime
Website:www.aromaco.com
 Loading...