

Page 1
www.AromaCo.com
Manual de instrucciones
AWK-290BD
eléctrica
Digital tetera
Digital
Electric Kettle
AWK-290BD
Instruction Manual
www.AromaCo.com
Page 2
Congratulations on your purchase of the Digital Electric Kettle.
This handy appliance provides more speed and convenience than
traditional stovetop kettles, not to mention the increased safety
features! The compact, cordless body is made to blend seamlessly and
stylishly into your kitchen.
The advanced digital controls of the Aroma®Digital Electric Kettle allow it
to be set to four different keep-warm temperatures— perfect for a variety
of uses!
Spectral Illumination Technology is a beautiful way to observe the
temperature of the water as it heats, changing colors depending upon
the temperature level.
This product was designed with your safety in mind. Features such as
cordless pouring and the 360° swivel base, which allows left or
right-handed gripping, are designed to remove many of the dangers and
inconveniences associated with other kettles. Additional safety
features include the stay-cool handle and base, drip-free pouring spout
and automatic-shut off with boil dry protection.
For maximum convenience, your new Aroma®Digital Electric Kettle is
equipped with a removable mesh decalcification filter to help remove
mineral impurities from your water. In addition, the heating element is
concealed— leaving it unexposed to mineral build up. To further fight
scale, it is best to always use distilled water in the kettle and follow the
cleaning and maintenance instructions in this manual. With proper use
and maintenance, your new electric kettle will boil through pot after pot
of hot water for years to come!
®
For more information on your Aroma
Digital Electric Kettle, or for product
service and other home appliance solutions, please visit us online at
www.AromaCo.com.
© 2010 Aroma Housewares Company. Todos los derechos reservados.
www.AromaCo.com
1-800-276-6286
U.S.A.
San Diego, CA 92121
6469 Flanders Drive
Aroma Housewares Co.
Publicado Por:
www.AromaCo.com.
otros electrodomésticos caseros, por favor visítenos en línea al:
información sobre su tetera eléctrica digital Aroma®, o para servicio de
va a evaporar agua de tarro en tarro, durante años y años. Para mayor
Con un buen uso y un mantenimiento adecuado, su tetera eléctrica le
manual.
instrucciones de limpieza y mantenimiento que le ofrecemos en este
evitar el sarro le sugerimos que siempre utilice agua destilada y siga las
para evitar que esté expuesto a una acumulación de minerales. Para
pudiese tener el agua. Además el elemento térmico está escondido
desprendible, que le ayuda a deshacerse de impurezas minerales que
está equipada con un filtro decalcificador con malla
®
Aroma
secos. Para una mayor conveniencia, su nueva tetera eléctrica digital
finalmente un apagador automático con protección para hervidos
mango y la base que no se calientan, un vertedor que no gotea y
asociados con otras teteras. Otras medidas de seguridad incluyen el
diseñados para eliminar muchas de las inconveniencias y peligros
de 360° que permite ser usada por la izquierda o la derecha, fueron
características tales como verter sin alambres, así como la base giratoria
Este producto fue diseñado teniendo su seguridad en mente. Atributos y
su nivel de calor.
como la temperatura del agua hace que ésta cambie de colores según
La tecnología de iluminación espectral es una bella manera de observar
Published By:
Aroma Housewares Co.
6469 Flanders Drive
San Diego, CA 92121
U.S.A.
1-800-276-6286
www.AromaCo.com
© 2010 Aroma Housewares Company All rights reserved.
una abundante variedad de usos!
permiten programarla en cuatro diferentes temperaturas, ¡perfecta para
le
®
Los avanzados controles digitales de su tetera eléctrica digital Aroma
cocina.
coraza inalámbrica hecha para combinar elegantemente con su
olvidar mencionar sus múltiples medidas de seguridad! Su compacta
velocidad y comodidad que los fogones de estufa tradicionales, ¡Sin
Este conveniente y cómodo electrodoméstico le proporciona más
Felicidades en la compra de su tetera eléctrica digital .
Page 3

1
GUARDE ESTAS INSTRUCCIONES
18. Desenchufe la unidad cuando no esté en uso y antes de limpiarla.
funcionamiento de la unidad.
condiciones insalubres y la posibilidad de incendio o de mal
calentarse. Dichas acumulaciones dentro de la tostadora crean
alimentos cuyo relleno o cobertura se pueda derretir y gotear al
incendio o el mal funcionamiento de la tostadora. No coloque
17. Limpie regularmente las migas acumuladas para prevenir riesgos de
supervisión durante su funcionamiento.
16. Para prevenir la posibilidad de un incendio, no deje la tostadora sin
conectada a un tomacorriente.
15. No intente retirar alimentos atascados cuando la tostadora está
paredes.
o en contacto con materiales inflamables, como cortinas, telas y
14. La tostadora puede causar un incendio si se utiliza cuando está tapada
incendiarse o provocar un choque eléctrico.
de papel de aluminio o utensilios en la tostadora, ya que podrían
13. No coloque porciones demasiado grandes de alimentos, envolturas
12. No utilice la tostadora para ningún otro fin que el indicado.
tomacorriente. Nunca jale del cable para desenchufar la unidad.
11. Para desenchufar la tostadora, tome el enchufe y retírelo del
eléctrica caliente, ni dentro de un horno caliente.
10. No coloque la tostadora sobre o cerca de una hornalla de gas o
ni que toque superficies calientes.
9. No permita que el cable cuelgue del borde de la mesa o mostrador,
8. No lo utilice en exteriores.
resultar en incendio, choque eléctrico o lesiones a personas.
Housewares puede
®
7. El uso de accesorios no recomendados por Aroma
ajusten.
a nuestro servicio a clientes para que lo examinen, lo repararen o lo
bien cuando haya funcionado defectuosamente. Por favor contacte
No se opere ningún aparato con un cordón o enchufe dañado, o
6.
manipularla.
limpiarla. Permita que la unidad se enfríe antes de limpiarla o
5. Siempre desenchufe la unidad cuando no esté en uso y antes de
de ellos, es necesaria una atenta supervisión.
4. Cuando un aparato electrodoméstico es utilizado por niños, o cerca
instrucciones para la limpieza.
sumerja el cable, el enchufe o el hervidor en agua u otro líquido. Vea las
3. Para evitar incendios, descargas eléctricas y lesiones personales, no
superficies se calientan mucho.
2. No toque las superficies calientes. Utilice las asas o manijas. Las
cuidadosamente.
1. Importante: Antes de usarse por favor lea todas las instrucciones
precauciones básicas de seguridad, incluyendo las siguientes:
Cuando se usen aparatos electricos, siempre deberán observarse las
Basic safety precautions should always be followed when using electrical
appliances, including the following:
1. Read all instructions before using the appliance.
2. Do not touch hot surfaces. Use handles or knobs. Surfaces will become
extremely hot.
3. To protect against fire, electric shock and injury to persons do not
immerse cord, plug or kettle in water or any other liquid. See
instructions for cleaning.
4. Close supervision is necessary when any appliance is used by or near
children.
5. Always unplug the appliance from the outlet when not in use and
before cleaning. Allow to cool completely before cleaning and
handling.
6. Do not operate the appliance with a damaged cord or plug, or after
the appliance malfunctions or is dropped or damaged in any manner.
Contact Aroma®customer service for examination, repair or
electrical/mechanical adjustment.
7. The use of accessory attachments not recommended by Aroma
Housewares may result in fire, electric shock or injury to persons.
8. Do not use outdoors.
9. Do not allow cord to hang over the edge of the table or counter or
to touch hot surfaces.
10.Do not place kettle on or near a hot gas or electric burner or in a
heated oven.
11.To disconnect, turn any control to the “OFF” position, then remove the
plug.
12.Do not use the kettle for anything other than its intended use.
13.The power base must only be used with the provided kettle.
14.Only use the kettle to heat water. No other liquids should be placed
inside the kettle.
15.Do not unscrew any screws on the kettle or power base or attempt to
disassemble them in any way.
16.Do not attempt to move the kettle during the heating process.
17.This appliance is for household use only.
18.Do not immerse this appliance or any of its parts, other than the
removable filter, in water.
19.Scalding may occur if the lid is opened during the boiling cycle.
20.Caution: If water exceeds the “MAX” line, the boiled water may spill
out.
IMPORTANT SAFEGUARDS
®
MEDIDAS IMPORTANTES DE SEGURIDAD
SAVE THESE INSTRUCTIONS
1
Page 4
SHORT CORD INSTRUCTIONS
(A)
CIRCUIT GROUNDING
CONDUCTOR
CONNECTED
PROPERLY
GROUND
PRONG
(C)
ADAPTER
GROUNDING MEANS
AA22D
(B)
METAL
MOUNTING
SCREW
COVER OF GROUNDED
OUTLET BOX
(
A)
CIRCUIT GROUNDING
C
ONDUCTOR
CONNECTED
PROPERLY
GROUND
PRONG
(
C)
A
DAPTER
GROUNDING MEANS
AA22D
(B)
METAL
MOUNTING
S
CREW
COVER OF GROUNDED
OUTLET BOX
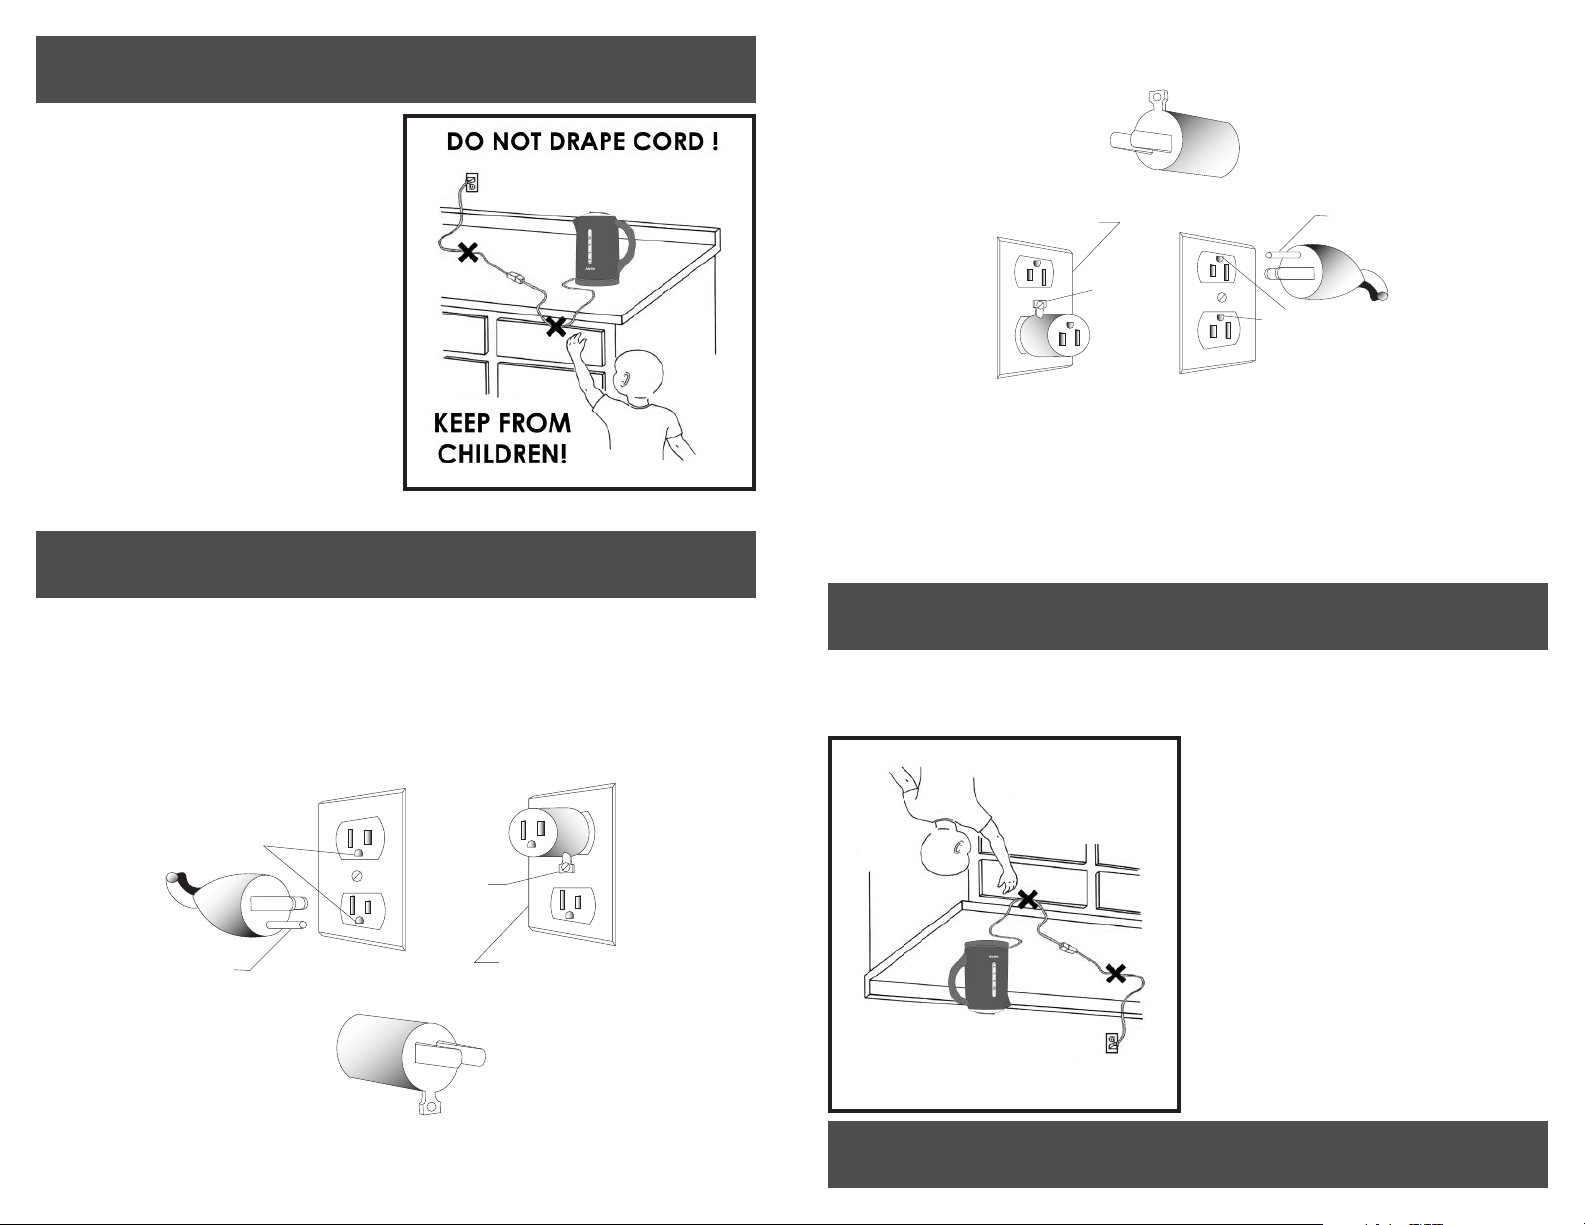
1. A short power-supply cord is provided
to reduce the risks resulting from
becoming entangled in or tripping
over a longer cord.
2. Longer extension cords are available
and may be used if care is exercised
in their use.
3. If a longer extension cord is used:
a. The marked electrical rating of the
extension cord should be at least
as great as the electrical rating of
the appliance.
b. The longer cord should be
arranged so that it will not drape
over the countertop or tabletop
where it can be pulled by children
or tripped over unintentionally.
c. If the appliance is of the grounded
type, the extension cord should be a grounding 3-wire cord.
GROUNDING INSTRUCTIONS
This appliance must be grounded while in use to protect the operator from
electrical shock. The appliance is equipped with a 3-conductor cord and a
3-prong grounding-type plug to fit the proper grounding-type receptacle. The
appliance has a plug that looks like sketch A. An adapter, sketch B, should be
used for connecting sketch-A plug plugs to two-plugs to two-prong receptacles.
The grounding tab, which extends from the adapter, must be connected to a
permanent ground such as a properly grounded outlet box as shown in sketch C
using a metal screw.
This appliance is for household use only.
2
2
ESTE APARATO ES PARA USO DOMÉSTICO.
significa AA22D
Conexión a tierra
Adaptador
tierra
caja de toma de
Cubierta de la
metálico
montaje
Tornillo de
(B)
(C)
tierra
Diente de
conectado
correctamente
circuito terrestre
Conductor de
(A)
se muestra en el dibujo C usando un tornillo metálico.
permanente tal y como una caja de salida debidamente puesta a tierra como
tierra, que se extiende del adaptador, debe conectarse a un puesto a tierra
B, para conectar la clavija al receptáculo de dos espigas. La espiga de puesto a
una clavija como se muestra en el dibujo A. Se debe usar un adaptador, dibujo
contacto para entrar al receptáculo correcto de puesto a tierra. El aparato tiene
un cable de 3 conductores y una clavija de puesto a tierra de 3 espigas de
proteger al usuario contra un choque eléctrico. El aparato viene equipado con
Este aparato electrodoméstico debe estar puesto a tierra mientras se usa para
IINNSSTTRRUUCCCCIIOONNEESS PPAARRAA PPOONNEERR AA TTIIEERRRRAA
a tierra de 3 cables.
c. Si el aparato es del tipo de tierra, el cable de extensión debe ser un cable
pudiera tropezarse con el cable sin querer.
jalado por un niño o alguien
NIÑOS!
LEJOS DE LOS
¡MANTÉNGALO
o mesa en donde pudiera ser
cuelguepor el borde del mostrador
colocado de manera que no
b. El cable más largo debe ser
clasificación eléctrica del aparato.
por lo menos igual que la
en el cable de extensión debe ser
a. La clasificación eléctrica marcada
largo:
3. Si se usa un cable de extensión más
sumo cuidado.
disponibles y deben ser usados con
2. Hay cables de extensión más largos
un cable más largo.
riesgo de tropezarse o enredarse con
¡NO DEJE QUE EL CABLE CUELGUE!
corto con el propósito de reducir el
1. Se proporciona un cable eléctrico
INSTRUCCIONES DE CABLE CORTO
Page 5
3
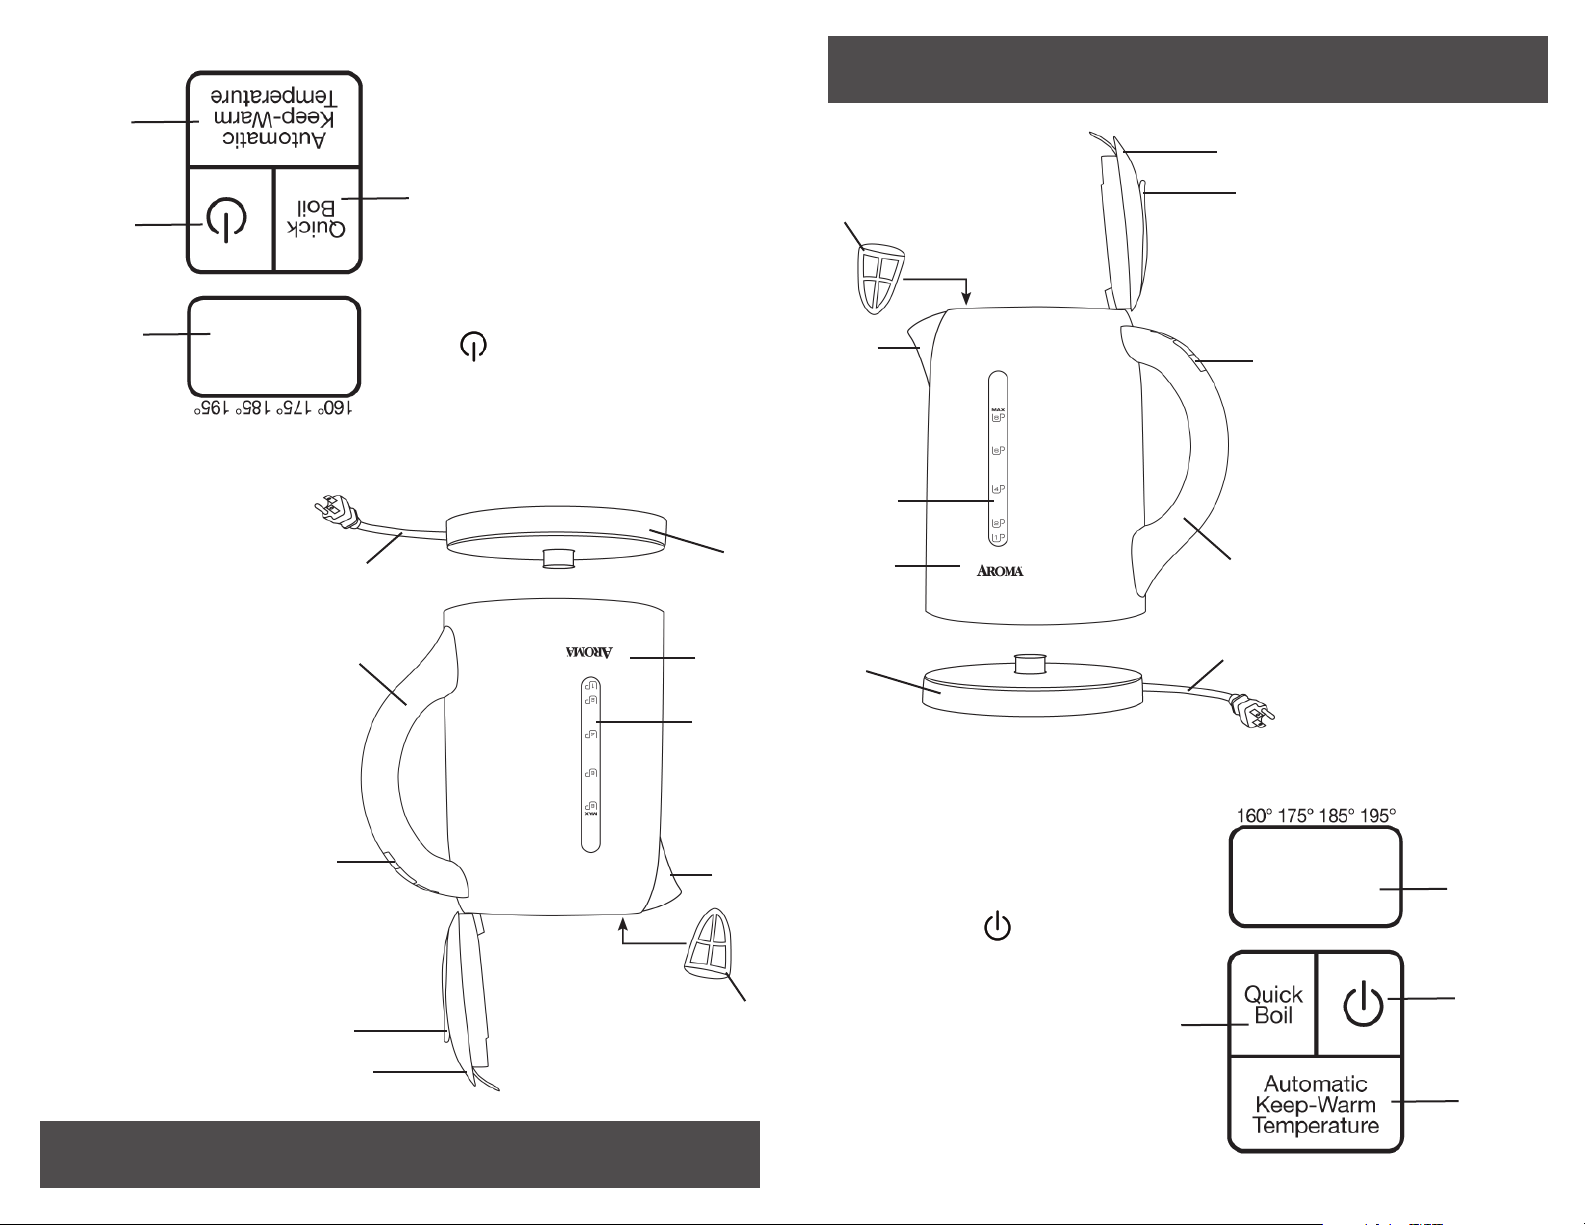
PARTS IDENTIFICATION
13
ebulllición
14
12
11
14. Botón para rápida
automáticamente
caliente
temperatura
mantener la
13. Botón para
12. Botón de poder ( )
11. Pantalla digital
10
9
Panel de control digital
8
5
4
10.Filtro desmontable
9. Surtidor o caño
agua
8. Indicador del nivel del
7. Bastidor de la tetera
6. Base de poder
5. Cable de corriente
4. Manija de agarre fácil
digital
de la tetera
3
3. Panel de control
2. Palanca de la tapa
1. Tapa de la tetera
2
6
7
7
6
8
Digital Control Panel
9
11.Digital Display
12.Power ( ) Button
13.Automatic
Keep-Warm
10
Temperature Button
14.Quick Boil Button
14
1
2
1. Kettle Lid
2. Kettle Lid Lever
3. Digital Control Panel
3
4. Easy-Grip Handle
5. Power Cord
6. Power Base
7. Kettle Body
8. Water Level Indicator
9. Spout
10.Removable Filter
4
5
11
12
1
13
IDENTIFICACION DE LAS PARTES
3
Page 6
USING YOUR ELECTRIC KETTLE
4
CONTINÚA EN LA PÁGINA SIGUIENTE
Before First Use:
Before using for the first time, it is recommended to clean the interior of
the kettle thoroughly. Please follow the procedure below before using
the kettle:
1. Remove all packing materials and ensure that the kettle has been
received in good condition.
2. Taking care to keep the electrical components on the exterior of the
kettle dry, wipe out the interior of the kettle with a damp, soapy cloth.
If your hand will not fit inside the kettle, swish warm, soapy water
around in the interior of the kettle with the lid closed.
3. Rinse out the inside of the kettle thoroughly with water.
4. Remove the decalcification filter (see “Removing & Inserting the
Filter” on page 7 for instructions). Wash filter in warm, soapy water.
Rinse and dry thoroughly before placing back in the kettle.
5. With a damp cloth, gently wipe off the exterior of the kettle. Do not
wipe off electrical components as this may cause damage to the
kettle.
6. Dry all parts completely.
7. It is also recommended to run your kettle through at least one boiling
cycle before using it to consume beverages. Following the instructions
in “To Boil Water” below, boil one kettle of water. When water has
boiled, pour it out and rinse the inside of the kettle once more. Your
kettle is now ready for use.
NOTE:
•Do not use abrasive cleaners or scouring pads.
•Do not immerse the kettle body or power base in water at any time.
To Boil Water:
1. Place the power base on a sturdy, level and heat-resistant surface.
2. Make sure that the removable filter is properly inserted. See “Removing
and Inserting the Filter” on page 7 for instructions on inserting the filter.
3. Open the kettle lid and fill with water through the lid opening. Do not
fill past the “MAX” line on the water level indicator. Use distilled water
when possible for best taste and to minimize mineral build-up in the
kettle.
NOTE:
•Never fill the kettle with any liquid other than water.
4. Close the lid, ensuring it locks securely into place.
tetera en la base de poder y enchufar el cable en el toma corrientes del muro.
secos y colocados sobre una base plana y sólida para posteriormente situar la
5. Asegúrese de que tanto la tetera como la base de poder estén totalmente
4. Cierre la tapa y asegúrese de que está atrancada.
• Nunca llene la tetera con ningún líquido que no sea agua.
NOTA:
minerales.
use agua destilada para mejorar el sabor y para evitar la acumulación de
tapa. No lo llene mas de donde está la línea indicadora “MAX” De ser posible
3. Abra la tapa de la tetera y llénela de agua a través de la apertura de la
la página 7 “Cómo retirar e insertar el filtro.”
2. Cerciórese de que el filtro desmontable esté debidamente insertado. Vaya a
1. Coloque la base de poder sobre una superficie sólida y resistente al calor.
Para hervir agua:
cualquier momento.
• No sumerja el cuerpo de la tetera o la base de poder en agua en
• No use limpiadores abrasivos o estropajos.
NOTA:
más. Su tetera ahora está lista.
agua haya hervido, deséchela y enjuague el interior de la tetera una vez
Siguiendo las instrucciones de abajo, hierva una tetera de agua. Cuando el
completo antes de usar el agua para consumir bebidas.
7. También se recomienda que opere su tetera durante un ciclo de hervir
6. Seque todas las partes por completo.
los componentes eléctricos. Esto puede causar daños a la unidad.
5. Con un paño húmedo, limpie con cuidado el exterior de la tetera. No limpie
Enjuáguelo y séquelo bien antes de colocarlo de nuevo en la unidad.
página 7 con las instrucciones). Lave el filtro con agua tibia con jabón.
4. Retire el filtro de descalcificación (vea “Cómo retirar e insertar el filtro” de la
3. Enjuague bien el interior de la tetera con agua.
tibia con jabón en el interior de la tetera y agítela con la tapa cerrada.
húmedo con agua y jabón. Si su mano no cabe en la tetera, coloque agua
tetera se mantengan secos, limpie el interior de la tetera con un paño
2. Teniendo cuidado de que los componentes eléctricos en el exterior de la
producto en buenas condiciones.
1. Retire todo el material de empaque y asegúrese de haber recibido el
usar la tetera:
interior de la tetera. Por favor siga el procedimiento de abajo antes de
Antes de usarse por primera vez, se recomienda limpiar muy bien el
Antes de primer uso:
CONTINUED ON NEXT PAGE
4
COMO USAR SU APARATO
Page 7
5
USING YOUR ELECTRIC KETTLE
To Boil Water:
5. Making sure the kettle and power base are completely dry and sitting
on a level, sturdy surface, plug the power cord into a wall outlet and
place the kettle onto the power base.
6. Press the POWER ( )button to turn on the kettle. The POWER ( )
para apagarlo. Cuando no esté en uso, desconecte el cable del muro.
12. Si la tetera sigue prendida, presione el botón de Poder (Power) una sola vez
estén secas antes de volver a ponerla sobre su base.
11. Después de servir, asegúrese que el fondo de la tetera y su base de poder
El levantar la tetera de la base causará que se apague.
agarre fácil. Procure no tocar la armazón de la tetera porque estará caliente.
10. Levante la tetera de la base de poder antes de servir, utilizando la manija de
dejará de calentar.
9. Una vez que el agua haya iniciado la ebullición, la tetera emitirá un pitido y
195°F y por encima de Rojo
185°F Morado
175°F Azul
160°F y debajo de Verde azulado
Temperatura Color
Guía sobre el espectro de colores
guía rápida sobre el espectro de colores en función de las temperaturas:
tonalidades de acuerdo a los aumentos en la temperatura. Abajo hay una
la temperatura en tiempos reales (superior a los 100° F) y la luz cambiará de
8. Cuando se empiece a calentar el agua la pantalla digital empezará a indicar
• Cuerpo de la tetera se pondrán muy caliente.
• Nunca abra la tapa mientras el agua está hirviendo.
de temperatura cambie de “LO”.
el agua en la tetera puede tardar en cruzar y subir los 100° F y la pantalla
• Según la cantidad de agua que se quiera hervir y de factores ambientales,
NOTA:
ventana indicadora del nivel del agua.
iluminará y la iluminación de espectro mostrará un color verde azulado en la
empezará a calentar el agua y el botón de Hervido Rápido (QUICK BOIL) se
7. Presione el botón de Hervido Rápido (QUICK BOIL). La tetera inmediatamente
agua está a la temperatura de la habitación (menos de 100° F).
iluminará y el marcador de temperatura enseñará un “LO” para indicar que el
6. Presione el botón de Poder (POWER) para prender la tetera. El botón se
Para hervir agua:
button will illuminate. The temperature display will display “LO” to
indicate the water temperature is at room temperature (below 100°F).
7. Press the QUICK BOIL button. The kettle will immediately begin to heat
the water. The QUICK BOIL button will illuminate and spectrum
illumination will show a teal color in the water level indicator windows.
NOTE:
•Depending upon the amount of water being boiled and
environmental factors, the kettle may not appear to immediately
begin heating. It may take some time before the water crosses
100°F and the temperature display screen changes from “LO.”
•Never open the lid while water is boiling.
•The kettle body will become extremely hot.
8. As the water begins to heat, the digital display will show the
temperature in real time (above 100°F). Spectrum illumination will
change colors as the temperature increases. Below is a quick guide to
the Spectrum Illumination colors.
Spectrum Illumination Temperature Guide
Temperature Spectrum Illumination Color
160°F and Below Teal
175°F Blue
185°F Purple
195°F and Above Red
9. Once the water has reached a boil, the kettle will beep and stop
heating.
10.Lift the kettle off the power base before pouring, using the easy-grip
handle. Take care not to touch the kettle body, as it will be hot. Lifting
the kettle off the power base will turn it off.
11.After pouring, make sure the bottom of the kettle and the power base
are dry before placing kettle back onto the power base.
12.If the kettle is still on, press the POWER ( ) button once to turn it off.
When not in use unplug the power base from the wall outlet.
COMO USAR SU APARATO
5
Page 8
6
USING YOUR ELECTRIC KETTLE
Using the Keep Warm Temperatures:
1. Place power base on a sturdy, level and heat-resistant surface.
2. Make sure that the removable filter is properly inserted. See “Removing
and Inserting the Filter” on page 7 for instructions on inserting the filter.
3. Open the kettle lid and fill with water through the lid opening. Do not
fill past the “MAX” line on the water level indicator. Use distilled water
when possible for best taste and to minimize mineral build-up in the
kettle.
NOTE:
• Never fill kettle with any liquid other than water.
4. Close the lid, ensuring it locks securely into place.
5. Making sure the kettle and power base are completely dry and sitting
on a level, sturdy surface, plug the power cord into a wall outlet and
place the kettle onto the power base.
6. Press the POWER ( ) button to turn on the kettle. The POWER ( )
button will illuminate. The digital display will display “LO” to indicate
the water temperature is at room temperature (below 100°F).
7. Press the AUTOMATIC KEEP-WARM TEMPERATURE button. The
temperature display will flash 160° as the lowest keep-warm
temperature.
8. Each additional press of the AUTOMATIC KEEP-WARM TEMPERATURE
button will toggle between the keep-warm temperatures. Automatic
Keep-Warm will set to 160°, 175°, 185° and 195°. Below are several
suggested temperature setting uses:
Suggested Keep-Warm Uses
Temperature Suggested Use
160°F Green Tea
175°F White Tea
185°F Oolong Tea
195°F French Press Coffee
9. Once the desired temperature setting is reached, the digital display will
continue to blink. After roughly 5 seconds, it will set to the selected
temperature with a beep.
10.The kettle will begin to heat to the selected temperature.
NOTE:
•Depending upon the amount of water being boiled and
environmental factors, the kettle may not appear to immediately
begin heating. It may take some time before the water crosses
100°F and the temperature display screen changes from “LO.”
CONTINUED ON NEXT PAGE
6
CONTINÚA EN LA PÁGINA SIGUIENTE
temperatura seleccionada.
pitido y dejará de calentarse y ocasionalmente se calentará para mantener la
11. Una vez se ha alcanzado la temperatura seleccionada, la tetera emitirá un
10. La tetera empezará a calentar a la temperatura elegida.
temperatura elegida mediante un pitido.
continuará parpadeando. Después de casi 5 segundos indicará la
9. Una vez se ha alcanzado el esquema de temperatura ideal, la pantalla
195°F Café Francés
185°F Té Oolong
175°F Té Blanco
160°F Té Verde
Temperatura Usos sugeridos
Usos sugeridos para mantener caliente la temperatura:
160°, 175°, 185° y 195°. Abajo encontrará ajustes de temperaturas sugeridas:
(AUTOMATIC KEEP-WARM TEMPERATURE), alternará entre las temperaturas de
8. Cada presión adicional del botón del Temperatura caliente automática
intermitente indicándolo como el nivel más bajo.
KEEP-WARM TEMPERATURE). La pantalla de la temperatura exhibirá un 160°
7. Presione el botón de Temperatura caliente automática (AUTOMATIC
temperatura del agua está a la temperatura ambiental (inferior a 100°F)
a iluminar y la pantalla enseñará las letras “LO” para indicarnos que la
6. Presione el botón de Poder (POWER) para prender la tetera. Este botón se va
tetera en la base de poder y enchufarla en la pared.
secas y sobre una superficie firme y pareja, para posteriormente colocar la
5. Primero cerciórese de que la tetera y la base de poder estén totalmente
4. Cierre la tapa asegurándose de que encajó bien en su lugar.
• Nunca llene la tetera con ningún líquido que no sea agua.
NOTA:
destilada.
sabor y para minimizar la acumulación de minerales en la tetera, utilice agua
de donde está la línea de “MAX” en el indicador de agua. Para un mejor
3. Abra la tapa de la tetera y llénela de agua por la apertura. No la llene mas
instrucciones.
sección de “Cómo retirar e insertar el filtro” en la página 7 para recibir
2. Verifique que el filtro desmontable esté correctamente insertado. Vea la
1. Coloque la base de poder sobre una superficie nivelada y resistente al calor.
caliente:
Utilizando las temperaturas para mantenerla
COMO USAR SU APARATO
Page 9
7
al teléfono gratuito 1-800-276-6286.
de Servicio al Cliente
®
Ilustración B
Ilustración A
www.AromaCo.com o póngase en contacto Aroma
• Perdió su filtro? Las piezas de repuesto están disponibles en línea en
CONSEJO ÚTIL:
Using the Keep Warm Temperatures:
11.Once the selected temperature is reached, the kettle will beep and
12.Lift the kettle off the power base before pouring, using the easy-grip
13.After pouring, make sure the bottom of the kettle and the power base
14.To continue using the Keep-Warm setting, press the POWER ( ) button
15.To turn off the kettle, press the POWER ( ) button twice.
USING YOUR ELECTRIC KETTLE
stop heating. The kettle will heat occasionally in order to maintain the
selected temperature.
handle. Take care not to touch the kettle body, as it will be hot. Lifting
the kettle off the power base will turn it off.
are dry before placing kettle on the power base.
to turn the kettle back on and select the desired keep-warm
temperature by pressing the AUTOMATIC KEEP-WARM TEMPERATURE
button.
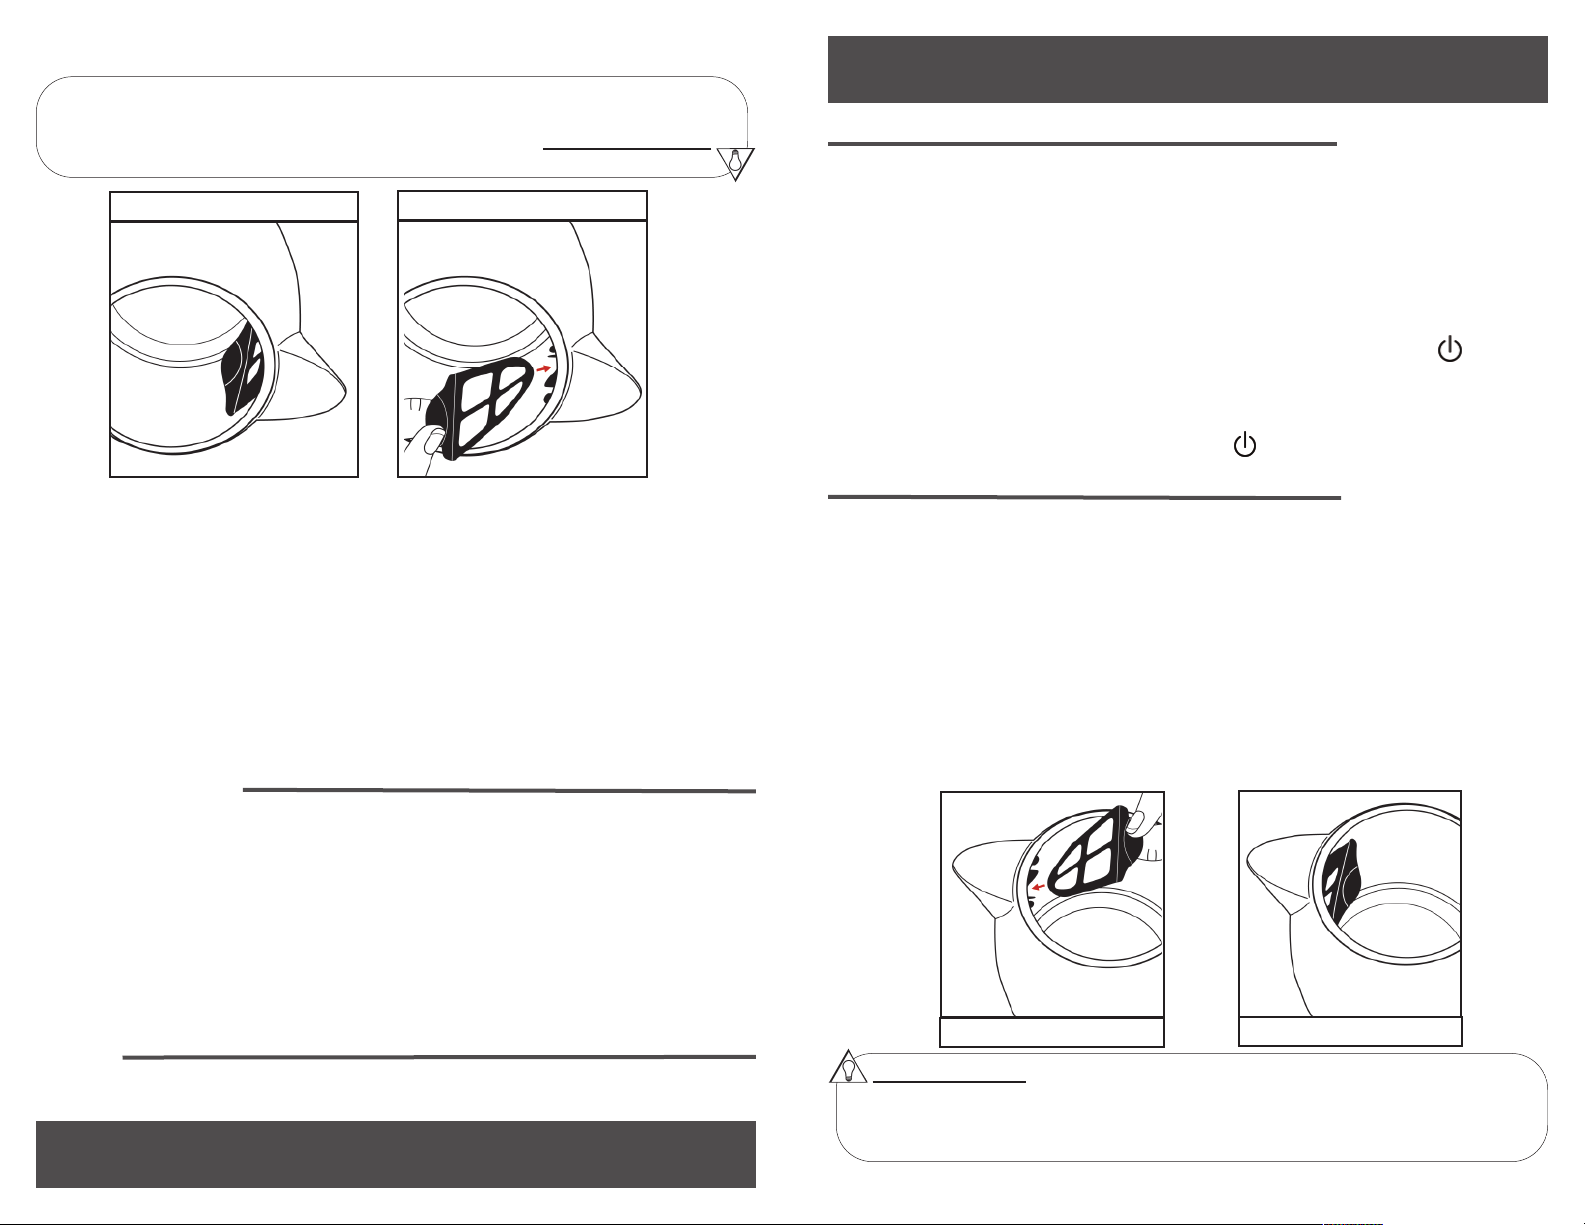
Removing and Inserting the Filter:
tetera está lista para usarse.
3. Una vez que el filtro esté bien colocado en su lugar (Ilustración B), la
clic en su lugar.
abrazaderas de la parte interior del pico surtidor hasta que el filtro haga
2. Tomando el filtro de la pestaña (Ilustración A), deslícelo hacia las
1. Abra la tapa.
Para insertar el filtro:
3. Lave y enjuague el filtro, luego vuelva a colocarlo.
filtro se debe deslizar hacia afuera con facilidad.
2. Sujete la pestaña de la parte superior del filtro y jálela hacia arriba. El
1. Espere hasta que la unidad se haya enfriado por completo. Abra la tapa.
Para retirar el filtro:
To remove the filter:
1. Do not attempt to remove the filter until the unit has cooled
completely. Open the lid.
2. Grasp the angled tab on top of the filter and pull upward. The filter
should slide out easily.
3. Wash and rinse the filter, then replace.
To insert the filter:
1. Open the lid.
2. Grasping the filter at the angled tab (Illustration A), slide the filter into
the slots on the inside of the spout until the filter fits securely into place.
3. Once the filter is securely in place (Illustration B), the kettle will be
ready for use.
Cómo retirar y insertar el filtero:
15.Para apagar la tetera presione el botón de Power dos veces seguidas.
Temperatura caliente automática (AUTOMATIC KEEP-WARM TEMPERATURE).
continuar con la temperatura deseada presionando el botón de
haga presión en el botón de Poder (Power) para prender la tetera otra vez y
14.Para continuar utilizando el mismo esquema de temperatura de ‘Keep-Warm’
estén secos antes de volver a colocar la tetera sobre la base.
13.Después de servir, asegúrese que la base de la tetera y la base de poder
seguramente estará caliente. Al levantarla de la base esta se apagará.
fácil empuñadura. Procure no tocar el cuerpo de la tetera porque
12.Antes de servir levante la tetera de la base de poder usando la manija de
caliente:
Utilizando las temperaturas para mantenerla
COMO USAR SU APARATO
HELPFUL HINT:
•Misplaced your filter? Replacement parts are available online at
www.AromaCo.com or contact Aroma®Customer Service toll-free
at 1-800-276-6286.
Illustration A
7
Illustration B
Page 10
HOW TO CLEAN
1. Always unplug unit and allow to cool completely before cleaning.
2. Wipe the exterior of the kettle with a clean, damp cloth, taking care
to avoid electrical components. Use a soft cloth to dry.
3. To clean the interior of the kettle, use a soft sponge and soapy water
to gently scrub. If your hand will not fit inside the kettle, swish warm,
soapy water around the inside of the kettle with the lid closed. Rinse
thoroughly with water.
4. The filter can be removed for cleaning (see “Removing and Inserting
the Filter” on page 7 for instructions). Never attempt to remove the
filter when the kettle is hot or contains hot water. Wash filter in warm,
soapy water. Rinse and dry thoroughly before placing back in the
unit.
CAUTION:
• Never attempt to disassemble the kettle or power base.
• Never immerse the kettle, cord, plug or power base in water.
Always take care not to allow electrical components to come into
contact with water.
• Do not use abrasive cleaners or scouring pads of any kind on the
kettle or power base. This will cause damage to the finish and may
create a risk of electric shock.
• Any other servicing should be performed by Aroma®Housewares
Company. Contact Aroma®customer service at 1-800-276-6268,
Mon-Fri 8:30am - 4:30PM Pacific Time or online at
www.AromaCo.com.
Removing Mineral Deposits:
Hard water can leave mineral deposits that create scale build-up on the
interior of the kettle. To avoid this build-up, it is best to always use distilled
water. If mineral deposits do occur, follow the instructions below to
remove them.
1. Fill the kettle halfway with water and bring to a boil.
2. Add one cup of white vinegar. Let the mixture soak overnight or for at
least 6 hours.
3. Empty the mixture and rinse out the kettle.
4. Refill the kettle with water only. Bring to a boil and empty again.
5. Repeat as needed.
8
5. Repita el proceso tantas veces sea necesario.
4. Vuelva a llenar la tetera sólo con agua. Deje que hierva y vuelva a vaciarla.
3. Vacíe la mezcla y enjuague la tetera.
noche o al menos 6 horas.
2. Agregue una taza de vinagre blanco. Deje que la mezcla repose durante la
1. Llene la tetera a la mitad con agua y deje que hierva.
siga las instrucciones de abajo para eliminarlo.
esta acumulación, es mejor usar siempre agua destilada. Si se acumula sarro,
acumulación de incrustaciones en el interior de la tetera. Con el fin de evitar
El agua dura puede dejar sarro, o depósitos minerales, que genera la
Cómo eliminar el sarro:
línea en www.AromaCo.com.
1-800-276-6268 de lunes a viernes 8:30 am - 4:30 pm hora del Pacífico o en
Company. Póngase en contacto con Aroma de servicio al cliente
Housewares
®
• Cualquier otro servicio debe ser realizado por Aroma
riesgo de choque eléctrico.
tetera o la base. Esto causará daños al acabado y puede generar un
• No use limpiadores abrasivos ni fibras para tallar de ningún tipo sobre la
contacto con el agua.
tenga cuidado de no permitir que los componentes eléctricos entren en
• Nunca sumerja la tetera, el cable, el enchufe ni la base en agua. Siempre
• Nunca intente desarmar la tetera ni la base.
PRECAUCIÓN:
en la unidad.
agua tibia con jabón. Enjuáguelo y séquelo bien antes de colocarlo de nuevo
cuando la tetera está caliente o contenga agua caliente. Lave el filtro con
filtro” de la página 7 con las instrucciones). Nunca intente retirar el filtro
4. El filtro se puede desmontar para limpiarlo (vea el “Cómo retirar e insertar el
Enjuáguela bien con agua.
tibia con jabón en el interior de la tetera y agítela con la tapa cerrada.
para tallarla con cuidado. Si su mano no entra en la tetera, coloque agua
3. Para limpiar el interior de la tetera, use una esponja suave y agua con jabón
secarla.
cuidado de evitar tocar los componentes eléctricos. Use un paño suave para
2. Limpie el exterior de la tetera con un paño limpio y húmedo, teniendo
limpiarla.
1. Siempre desconecte la unidad y permita que se enfríe por completo antes de
COMO LIMPIAR
8
Page 11

9
LIMITED WARRANTY
Aroma Housewares Company warrants this product free from defects in
Sitio Web: www.AromaCo.com
L-V, 8:30 AM - 4:30 PM, Tiempo del Pacífico
1-800-276-6286
San Diego, California 92121
6469 Flanders Drive
AROMA HOUSEWARES COMPANY
Unidos.
variar de un estado a otro y no cubre áreas fuera de los Estados
Esta garantía le da derechos legales específicos los cuales podrán
material and workmanship for one year from provable date of purchase
in the continental United States.
Within this warranty period, Aroma Housewares Company will repair or
replace, at its option, defective parts at no charge, provided the product
is returned, freight prepaid with proof of purchase and U.S. $12.00 for
shipping and handling charges payable to Aroma Housewares
Company. Before returning an item, please call the toll free number
below for a return authorization number. Allow 2-4 weeks for return
shipping.
mantenimiento en un centro de servicio no autorizado.
inválida en caso de que el aparato sea desarmado o se le dé
maltrato o negligencia por parte del usuario. La garantía también es
Esta garantía no cubre la instalación incorrecta, el uso indebido,
aparato nuevamente.
autorización de devolución. Espere entre 2-4 semanas para recibir el
telefónico gratuito que está más abajo para obtener un número de
Company. Antes de devolver un producto, sírvase llamar al número
para cargos de envío y manejo a favor de Aroma Housewares
flete prepagado, con comprobación de compra y $12.00 dólares
ningún costo, siempre y cuando el producto sea devuelto, con el
reparará o reemplazará, a su opción, las partes defectuosas sin
Dentro de este período de garantía, Aroma Housewares Company
la parte continental de los Estados Unidos.
de un año a partir de la fecha comprobada de compra dentro de
tenga defectos en sus materiales y fabricación durante un período
Aroma Housewares Company garantiza que este producto no
This warranty does not cover improper installation, misuse, abuse or
neglect on the part of the owner. Warranty is also invalid in any case that
the product is taken apart or serviced by an unauthorized service station.
This warranty gives you specific legal rights, which may vary from state to
state, and does not cover areas outside the United States.
AROMA HOUSEWARES COMPANY
6469 Flanders Drive
San Diego, California 92121
1-800-276-6286
M-F, 8:30 AM - 4:30 PM, Pacific Time
Website: www.AromaCo.com
GARANTÍA LIMITADA
9
 Loading...