

Aroma ART-620TB User Manual

Roaster Oven
With Timer and Buffet Server
Instruction Manual
& Recipes
Congratulations on your purchase of AROMA
Roaster Oven.
Your new Roaster Oven with timer and buffet server
will be one of the most versatile cooking appliances in
your modern kitchen. Enjoy this wonderful AROMA
Roaster Oven.
Read all instructions before your use.
Published By:
Aroma Housewares Company
6469 Flanders Drive
San Diego, CA 92121
U.S.A.
Copyright 2001 Aroma Housewares Co.

IMPORTANT SAFEGUARDS
Basic safety precautions should always be followed when using electrical
appliances, including the following:
1. Read all instructions before using.
2. Do not touch hot surfaces. Use handles or knobs.
3. To protect against electrical shock, do not immerse the appliance,
cord, or plug in water or other liquid.
4. Close supervision is necessary when any appliance is used by or near
children.
5. Unplug from outlet when not in use and before cleaning. Allow to
cool before putting on or taking off parts, and before cleaning the
appliance.
6. Do not operate any appliance with a damaged cord or plug or after
the appliance malfunctions or has been damaged in any manner.
Return appliance to the nearest authorized service facility for
examination, repair or adjustment.
7. The use of accessory attachments not recommended by the appliance
manufacturer may result in fire, electric shock or injury.
8. Do not use outdoors.
9. Do not let cord touch hot surfaces or hang over the edge of a counter
or table.
10. Do not place on or near a hot burner or in a heated oven.
11. Extreme caution must be used when using or moving an appliance
containing hot oil or other hot liquids.
12. Do not use the appliance for other than intended use.
13. Do not clean with metal scouring pads. Pieces can break off the pad
and touch electrical parts, creating a risk of electric shock.
14. Be sure to use on a heat resistant and even surface. Keep at least 4
inches away from walls and other flammables in a well-ventilated
area.
15. Prior to plugging appliance into the wall outlet ensure temperature
control is set to the "OFF" position. To disconnect, turn the
temperature control to the "OFF" position, and then remove plug
from wall outlet.
16. The timer must be set for the roaster oven to start operating.
This appliance is intended for Household Use Only.
SAVE THESE INSTRUCTIONS
1

SHORT CORD INSTRUCTIONS
1. A short power-supply cord is provided to reduce risks resulting
from becoming entangled in or tripping over a longer cord.
2. Longer extension cords are available and may be used if care is
exercised in their use.
3. If a longer extension cord is used:
a. The marked electrical rating of the extension cord should
be at least as great as the electrical rating of the appliance.
b. The longer cord should be arranged so that it will not drape
over the counter top or table top where it can be pulled on
by children or tripped over unintentionally.
POLARIZED PLUG
This appliance has a polarized plug (one blade is wider than the
other) follow the instructions below:
To reduce the risk of electric shock, this plug is intended to fit into
a polarized outlet only one way. If the plug does not fit fully into
the outlet, reverse the plug. If it still does not fit, contact a qualified
electrician. Do not attempt to modify the plug in any way.
2
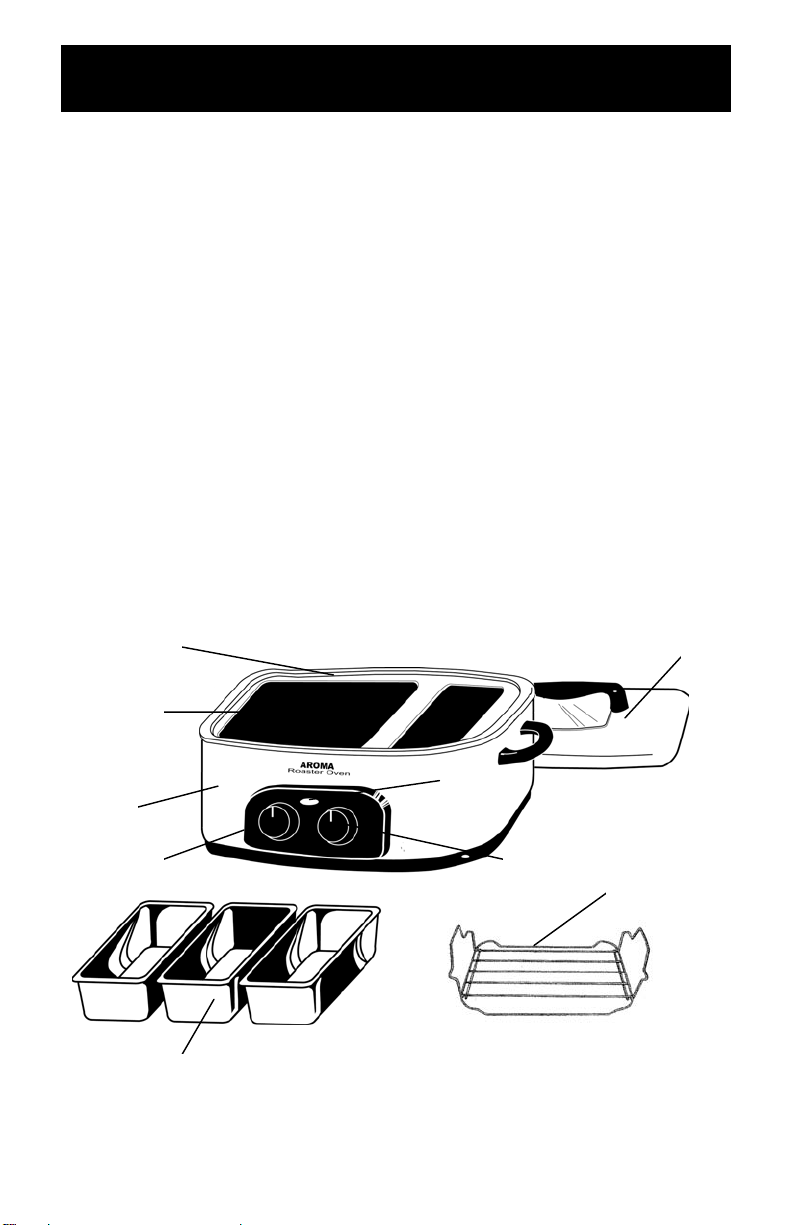
PARTS IDENTIFICATION
1. Lid: Includes assembling package of lid, lid handle, 1 piece of glass
and 2 screws.
2. Buffet Server: Includes 3 serving trays and 1 tray holder frame.
3. Removable Cooking Pan: The cooking pan can be removed for
easy cleaning after each use.
4. Reversible Rack: The rack permits easy placement of food into or
removal of food from the cooking pan and allows grease to drain
from food during cooking. The rack can be inverted for steaming.
5. Roaster Oven Body: It is heated with an electrical band heater
surrounding the side wall to provide a “Ring of heat” for uniform
heating of food inside the cooking pan.
6. Timer: can be set up to 3 hours or set oven Stay On.
7. Temperature Control: The temperature control automatically
controls oven temperature at the set level.
8. Indicator light: It indicates that the roaster oven is energized and
also indicates that the preset temperature is reached.
2
3
8
5
6
7
2
3
1
4

BEFORE USING
ASSEMBLE LID HANDLE AND VIEWING WINDOW
1. Locate the lid, lid handle (the ends of handle are attached with 2
screws) and 1 piece of glass
2. Unscrew the screws on the handle for use.
3. Use screw driver to screw one end of the handle first.
Do not screw too tight yet before inserting the glass.
4. Insert the glass (as the viewing window) onto the opening of the lid top.
When necessary, use 2 pieces of tape on both sides of the glass to
prevent it from moving when assembling the handle.
5. After the glass is placed on the lid opening, screw the other end of
the handle to the lid. Make sure both side of handle are tightly
screwed.
6. Remove the tape that were used for temporarily
securing the glass before cooking.
CLEAN
1. Remove all packaging materials.
2. Wash the Cooking Pan, Lid, and any accessories with warm soapy
water using a sponge or dishcloth.
3. Rinse thoroughly to remove soap residue.
4. Wipe body clean with a damp cloth.
Do not use abrasive cleaners or scouring pads.
Do not immerse the appliance in water at any time.
PRE-HEAT BEFORE FIRST USE OF ROASTER OVEN
1. Slight smoke and odor may be emitted during the first few uses. We
recommend pre-heating the Roaster Oven to eliminate the smoke
and odor.
2. Ensure temperature control is set to the "OFF" position and plug into
a 120V AC outlet ONLY.
3. Set timer and temperature. The timer must be set for the roaster
oven to start operating. Pre-heat the oven for 30 minutes at 400°F or
until smoke and odors no longer exist.
4
 Loading...