

Aroma ARC-787D-1NG User Manual

ARC-787D-1NG
www.AromaCo.com
7-Cup
Digital Rice Cooker
& Food Steamer
Instruction Manual
Manual de instrucciones
digital de 7 tazas
Arrocera y vaporera
www.AromaCo.com
ARC-787D-1NG

Congratulations on your purchase of the 7-Cup Digital Rice
Cooker. In no time at all, you’ll be making fantastic, restaurant-quality rice
at the touch of a button! Whether long, medium or short grain, this
cooker is specially calibrated to prepare all varieties of rice, including
tough-to-cook whole grain brown rice, to fluffy perfection.
In addition to rice, your new Aroma®Rice Cooker is ideal for healthy,
one-pot meals for the whole family. The convenient steam tray inserts
directly over the rice, allowing you to cook moist, fresh meats and
vegetables at the same time, in the same pot. Steaming foods locks in
their natural flavor and nutrients without added oil or fat, for meals that are
as nutritious and low-calorie as they are easy.
And the all-new Sauté-Then-Simmer Technology™is ideal for the easy
preparation of Spanish rice, risottos, pilafs, packaged meal helpers, stir frys
and more!
But it doesn’t end there. Your new rice cooker is also great for soups, stews,
stocks, gumbos, jambalaya, breakfast frittata, dips and even desserts!
Several delicious recipes are included at the back of this manual, and
even more are available online at www.AromaCo.com.
This manual contains instructions for using your rice cooker and its
convenient pre-programmed digital settings, as well as all of the
accessories included. There are also helpful measurement charts for
cooking rice and steaming.
For more information on your Aroma®Rice Cooker, or for product service,
recipes and other home appliance solutions, please visit us online at
www.AromaCo.com.
© 2009 Aroma Housewares Company. Todos los derechos reservados.
www.AromaCo.com
1-800-276-6286
U.S.A.
San Diego, CA 92121
6469 Flanders Drive
Aroma Housewares Co.
Publicado Por:
línea en www.AromaCo.com.
recetas y soluciones de otros electrodomésticos, por favor visítenos en
Para más información acerca de su arrocera o el servicio del producto,
cocinar arroz y otros alimentos al vapor.
que se incluyen. También se incluyen tablas útiles de medida para
configuraciones digitales preprogramadas, así como todos los accesorios
Este manual contiene instrucciones para usar su arrocera y sus
incluyen varias deliciosas recetas.
desayuno, dips y hasta postres! En la parte trasera de este manual se
sopas, guisos, caldos, sopas de mariscos, jambalaya, frittatas para el
Pero esto no es todo. ¡Su nueva arrocera también es grandiosa para
facilidad: Arroz a la Mexicana, Arroz Risotto, Pilafs ¡y mas!
La nueva Función para Salteados (Sauté) es ideal para preparar con
Published By:
Aroma Housewares Co.
6469 Flanders Drive
San Diego, CA 92121
U.S.A.
1-800-276-6286
www.AromaCo.com
© 2009 Aroma Housewares Company All rights reserved.
bajos en calorías como fáciles de preparar.
tener que agregar aceite o grasa, para platillos que son tan nutritivos y
cuales se pierden con frecuencia con otros métodos de cocinado) sin
olla. Los alimentos al vapor encierran sus nutrientes y sabores naturales (los
cocinar vegetales y carnes frescas al vapor al mismo tiempo, en la misma
charola de vapor se inserta directamente encima el arroz, permitiéndole
saludables cocinados en una sola olla para toda la familia. La cómoda
es ideal para platillos
®
Además del arroz, su nueva Arrocera Aroma
arroz integral difícil de cocinar, con un esponjado perfecto.
especialmente para cocinar todas las variedades de arroz, incluyendo el
grano sea largo, mediano o corto, esta máquina está calibrada
calidad de un restaurante, con el toque de un botón! Ya sea que el
cualquier momento, usted estará preparando arroz fantástico, de la
Felicidades por comprar la Arrocera Digital para 7 Tazas. ¡En

1
GUARDE ESTAS INSTRUCCIONES
proporcionada.
interior removible que le ha sido
eléctrico cocine solo en la charola
23. Para evitar el riesgo de un choque
muro.
separe el cable del enchufe en el
en “OFF” (desconectar) y después
22. Para desconectar póngase el control
en una estufa u hornilla.
deformación no se use la olla interior
21. Para prevenir y evitar daño o
caliente).
esté en “Keep-Warm” (manténgase
más de 12 horas cuando la función
20. No deje el arroz en la olla interior por
quemaduras.
puede escaparse y causar serias
después, de cocinar. El vapor ardiente
la tapa y durante, o inmediatamente
19. Use precaución extrema cuando abra
apropiadamente.
provocar que no funcione
olla puede dañar al aparato o
usada. Si la olla se regresa mojada a la
la olla interior esté seca antes de ser
18. Cerciórese siempre que el exterior de
funcione adecuadamente.
al aparato o bien causar que este no
otros aparatos esto puede: bien dañar
circuito eléctrico se sobrecarga con
aparatos en funcionamiento. Si el
circuito eléctrico separado de otros
17. Su arrocera debe de operarse en un
pared, nunca jale el cordón.
16. Siempre desconecte el enchufe de la
de 120V AC. (corriente alternativa).
15. Úsese solo con un enchufe eléctrico
escaldar.
que el calor es extremo y le puede
parte superior de su olla de presión, ya
ventilador de vapor situado en la
14. No toque, cubra u obstruya el
precaución.
otros líquidos, úselo con mucha
conteniendo arroz, aceite caliente o
13. Cuando utilice el aparato
diferente al deseado.
12. No se use el aparato para otro uso
calentador o de un horno caliente.
11. No lo coloque sobre, o cerca, de un
mostrador.
que cuelgue de alguna mesa o
contacto con superficies calientes o
10. No permitan que el cordón haga
9. No se utilice a la intemperie.
un choque eléctrico o una lesión.
Housewares puede ocasionar fuego,
recomendados por Aroma
8. El uso de refacciones o accesorios no
lo examinen, lo repararen o lo ajusten.
a nuestro servicio a clientes para que
defectuosamente. Por favor contacte
cuando haya funcionado
cordón o enchufe dañado, o bien
7. No se opere ningún aparato con un
agregarle o quitarle piezas.
que el aparato se enfríe antes de
esté en uso y antes de lavarse. Permita
6. Desconéctese del enchufe cuando no
estrecha supervisión.
cerca de ellos, se recomienda una
5. Si el aparato es usado por niños, o
cualquier otro líquido.
enchufe o el aparato en agua o
eléctrica, no sumerja el cordón, el
4. Para protegerse contra una descarga
y resistentes al calor.
3. Úsese solo en superficies secas, planas
utilice las manijas o las perillas.
2. No toque las superficies calientes,
cuidadosamente.
lea todas las instrucciones
1. Importante: Antes de usarse por favor
ciones básicas de seguridad, incluyendo las siguientes:
Cuando se usen aparatos electricos, siempre deberán observarse las precau-
IMPORTANT SAFEGUARDS
Basic safety precautions should always be followed when using electrical
appliances, including the following:
1. Important: Read all instructions
carefully before first use.
2. Do not touch hot surfaces. Use the
handles or knobs.
3. Use only on a level, dry and
heat-resistant surface.
4. To protect against electrical shock,
do not immerse cord, plug or the
appliance in water or any other
liquid.
5. Close supervision is necessary when
the appliance is used by or near
children.
6. Unplug from outlet when not in use
and before cleaning. Allow unit to
cool before putting on or taking off
parts and before cleaning the
appliance.
7. Do not operate any appliance with
a damaged cord or plug or after the
appliance malfunctions or has been
damaged in any manner. Contact
Aroma customer service for
examination, repair or adjustment.
8. The use of accessory attachments
not recommended by Aroma
Housewares may result in fire,
electrical shock or injury.
9. Do not use outdoors.
10. Do not let cord touch hot surfaces or
hang over the edge of a counter or
table.
11. Do not place on or near a hot
burner or in a heated oven.
12. Do not use the appliance for other
than its intended use.
13. Extreme caution must be used when
moving the appliance containing
rice, hot oil or other liquids.
14. Do not touch, cover or obstruct the
steam vent on the top of the rice
cooker as it is extremely hot and may
cause scalding.
15. Use only with a 120V AC power
outlet.
16. Always unplug from the base of the
wall outlet. Never pull on the cord.
17. The rice cooker should be operated
on a separate electrical circuit from
other operating appliances. If the
electrical circuit is overloaded with
other appliances, the appliance
may not operate properly.
18. Always make sure the outside of the
inner pot is dry prior to use. If the inner
pot is returned to the cooker when
wet, it may damage or cause the
product to malfunction.
19. Use extreme caution when opening
the lid during or after cooking. Hot
steam will escape and may cause
burns.
20. Rice should not be left in the inner
pot with the “Keep-Warm” function
on for more than 12 hours.
21. To prevent damage or deformation,
do not use the inner pot on a
stovetop or burner.
22. To disconnect, turn any control to
“OFF,” then remove the plug from
the wall outlet.
23. To reduce the risk of electrical shock,
cook only in the removable inner pot
provided.
SAVE THESE INSTRUCTIONS
MEDIDAS IMPORTANTES DE SEGURIDAD
1
2
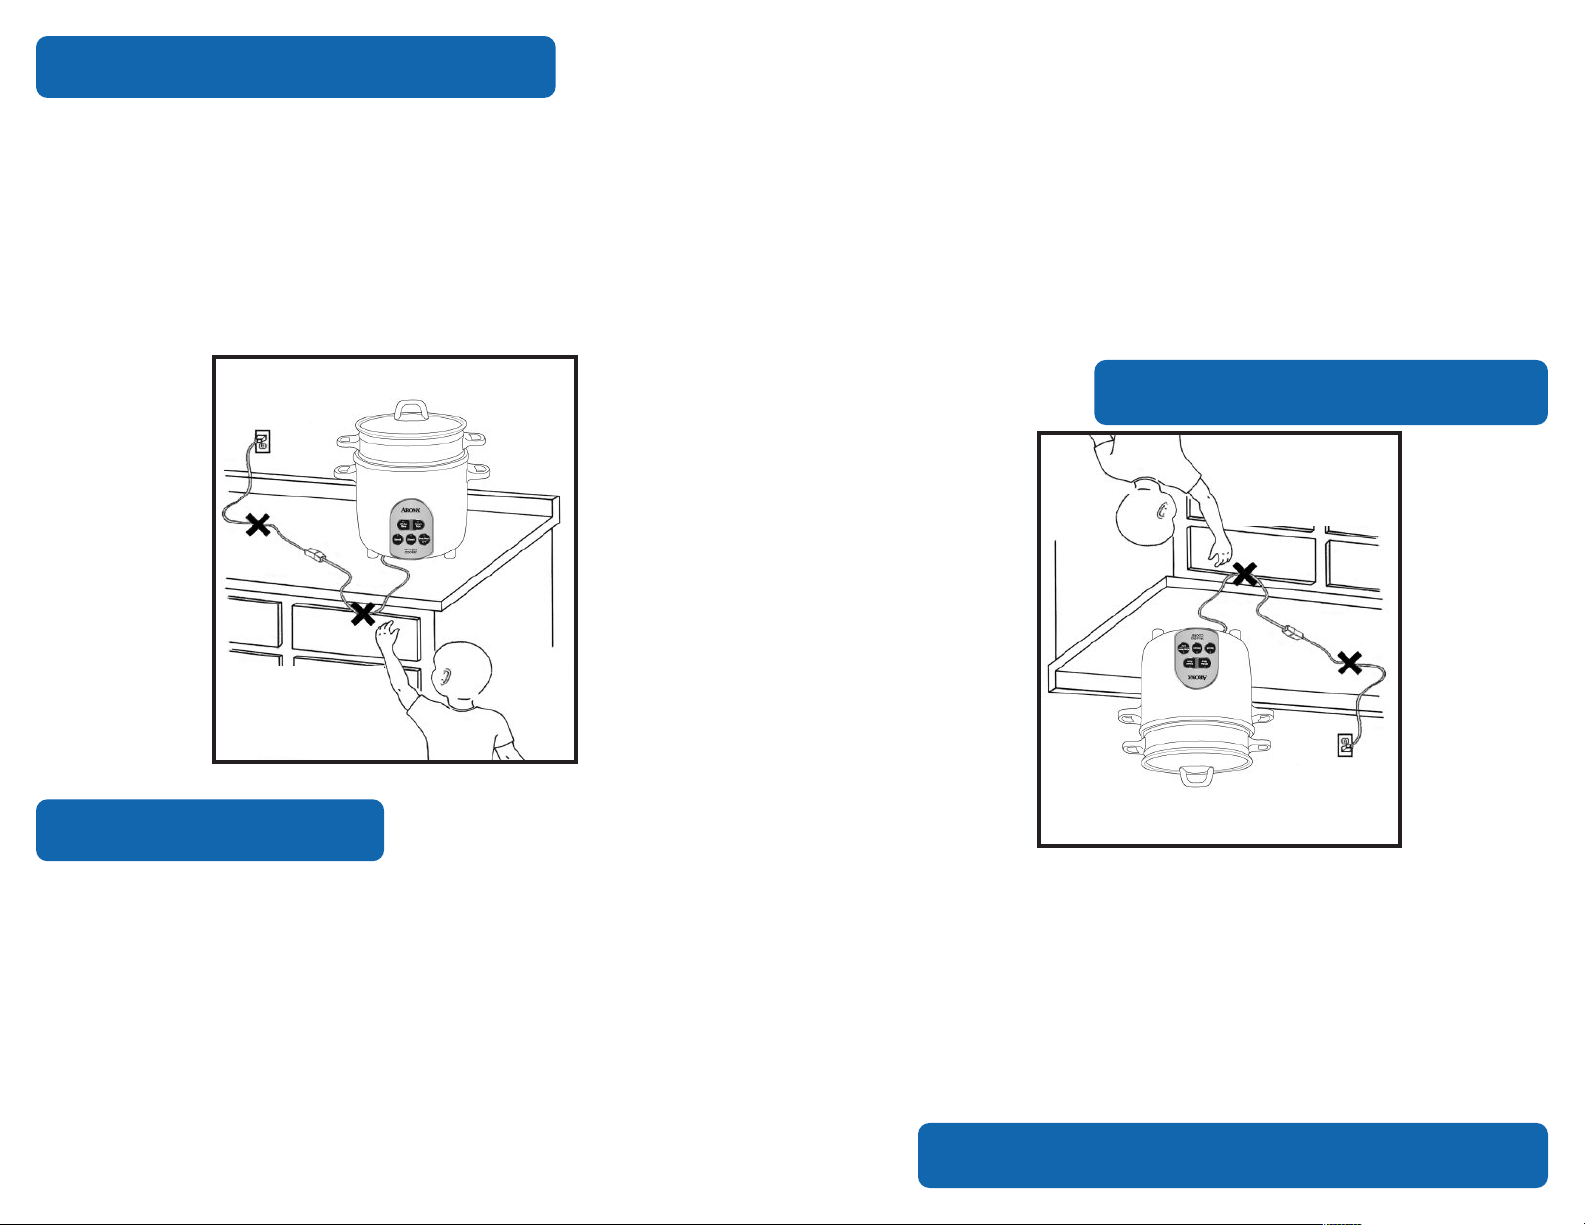
SHORT CORD INSTRUCTIONS
1. A short power-supply cord is provided to reduce the risks resulting from
becoming entangled in or tripping over a longer cord.
2. Longer extension cords are available and may be used if care is exercised in
their use.
3. If a longer extension cord is used:
a. The marked electrical rating of the extension cord should be at least as
great as the electrical rating of the appliance.
b. The longer cord should be arranged so that it will not drape over the
counter top or tabletop where it can be pulled by children or tripped over
unintentionally.
DO NOT DRAPE CORD!
ESTE APARATO ES PARA USO DOMÉSTICO.
cualquier peligro.
cante o su agencia de servicio u otra persona calificada para hacer que se evita
Si esté estropeado el cordón eléctrico, hay que ser reemplazado por el fabri-
peligroso.
trar, llame a un electricista calificada. No intente de modificar la clavija, es muy
no entra completamente, da vuelta a la clavija. Si aun la clavija no puede endebe de enchufar un lado en enchufes de luz de ploya polarisada. Si la clavija
Para reducir el riesgo de descarga eléctrica, este ploya intencionalmente solo
Si este aparato tiene ploya polarizada:
PLOYA POLARIZADA
NIÑOS!
LEJOS DE LOS
¡MANTÉNGALO
KEEP FROM
CHILDREN!
POLARIZED PLUG
This appliance has a polarized plug (one blade is wider than the other); follow
the instructions below:
To reduce the risk of electric shock, this plug is intended to fit into a polarized
outlet only one way. If the plug does not fit fully into the outlet, reverse the plug.
If it still does not fit, contact a qualified electrician. Do not attempt to modify the
plug in any way.
If the supply cord is damaged, it must be replaced by the manufacturer, its
service agent or a similarly qualified person in order to avoid a hazard.
This appliance is for household use only.
2
CUELGUE!
CUELGUE!
¡NO DEJE QUE EL CABLE
¡NO DEJE QUE EL CABLE
niño o alguien pudiera tropezarse con el cable sin querer.
el borde del mostrador o mesa en donde pudiera ser jalado por un
b. El cable más largo debe ser colocado de manera que no cuelguepor
por lo menos igual que la clasificación eléctrica del aparato.
a. La clasificación eléctrica marcada en el cable de extensión debe ser
3. Si se usa un cable de extensión más largo:
sumo cuidado.
2. Hay cables de extensión más largos disponibles y deben ser usados con
riesgo de tropezarse o enredarse con un cable más largo.
1. Se proporciona un cable eléctrico corto con el propósito de reducir el
INSTRUCCIONES DE CABLE CORTO
3
Indicador
Botón / Luz del
13. Arroz Integral
Indicador
Botón / Luz del
Caliente”
12. “Manténgase
Indicador
Botón / Luz del
11. Al Vapor
Indicador
Botón / Luz del
10. Salteado
Indicador
Botón / Luz del
9. Arroz Blanco
12
13
Tablero de control
11
10
9
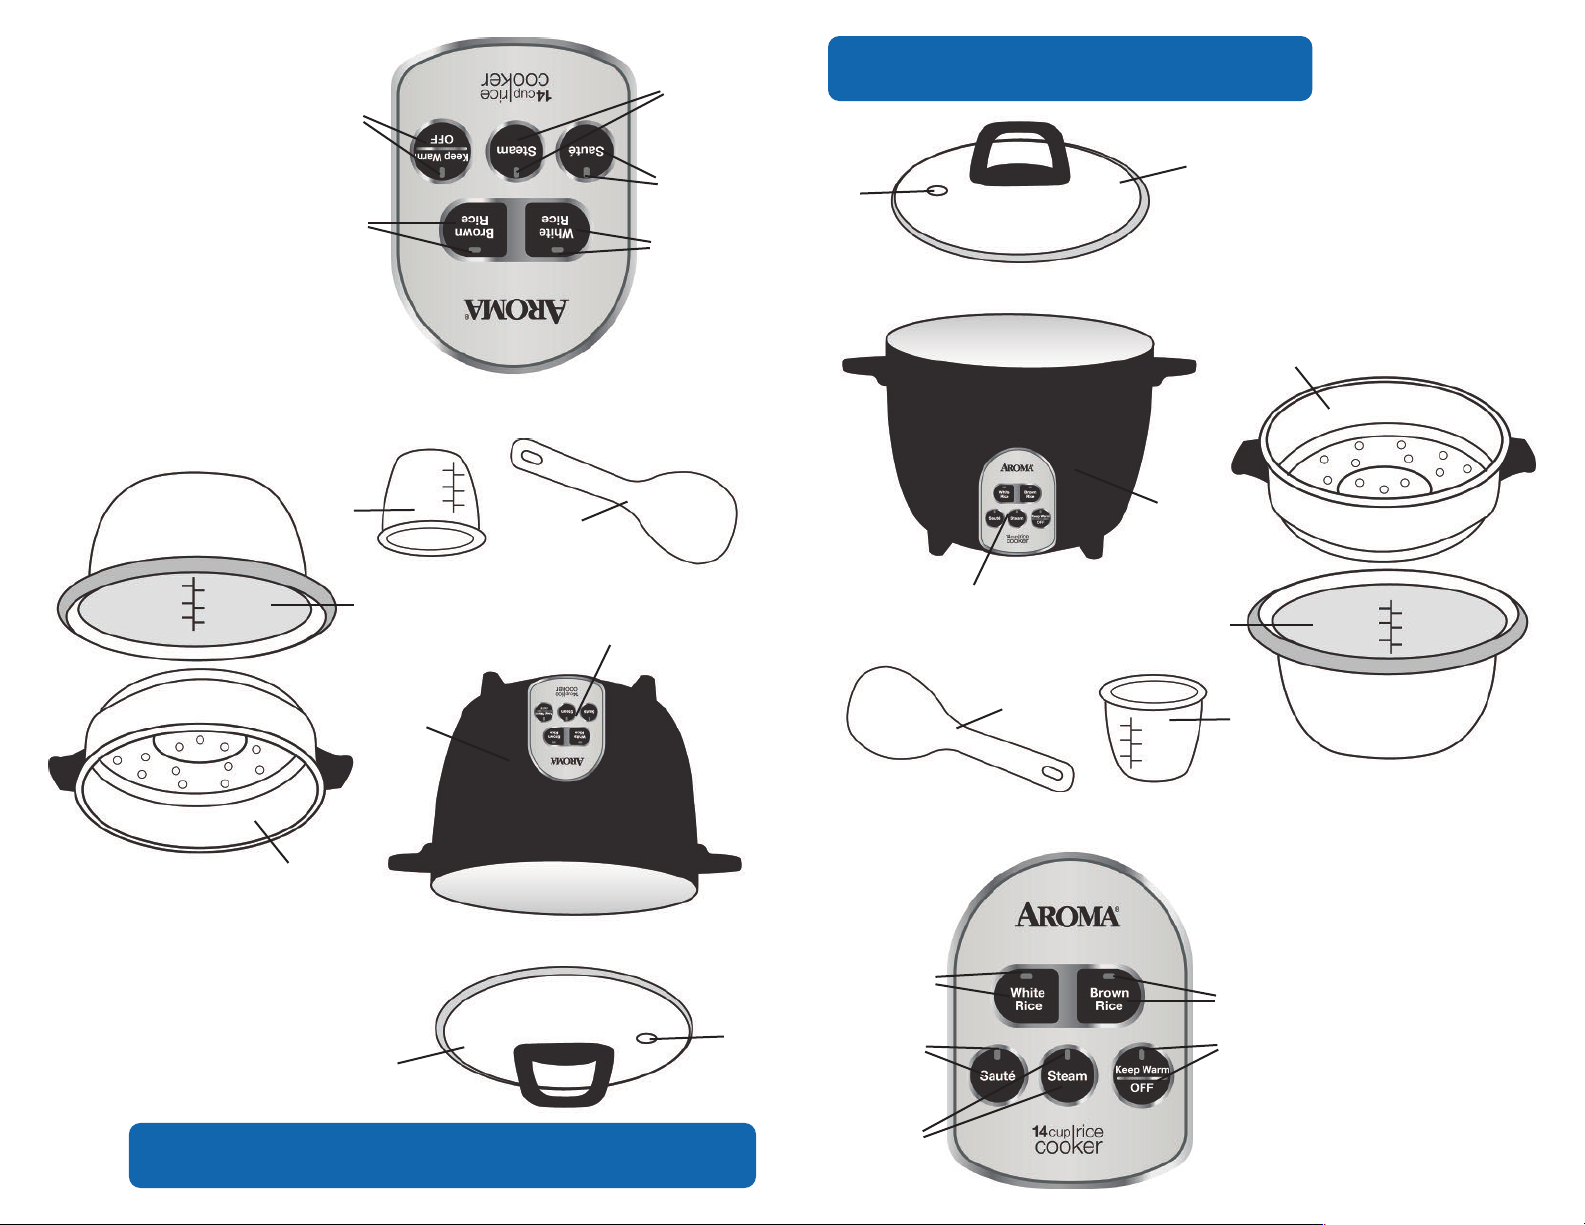
PARTS IDENTIFICATION
8
1. Tempered Glass
Lid
1
2
2. Steam Tray
3. Rice Cooker
Body
4. Inner Pot
5. Measuring Cup
6. Rice Paddle
7. Digital Control
Panel
8. Steam Vent
5
4
6
7
7
3
6
Control Panel
2
8. Ventilador de vapor
7. Tablero de control
6. Cuchara para arroz
5. Taza de medir
4. Olla interior
3. Olla exterior
2. Charola de vapor
vidrio
1. Tapadera de
1
8
IDENTIFICACION DE LAS PARTES
9
10
11
3
4
5
9. White Rice
Button/Indicator
Light
10. Sauté
Button/Indicator
Light
11. Steam
Button/Indicator
13
12
3
Light
12. Keep-Warm/Off
Button/Indicator
Light
13. Brown Rice
Button/Indicator
Light

4
USING YOUR RICE COOKER
Before First Use:
1. Read all instructions and important safeguards.
2. Remove all packaging materials and check that all items have been received
in good condition.
3. Tear up all plastic bags as they can pose a risk to children.
4. Wash lid and accessories in warm, soapy water. Rinse and dry thoroughly.
5. Remove inner pot from rice cooker and clean with warm, soapy water. Rinse
and dry thoroughly before returning to cooker.
6. Wipe body clean with a damp cloth.
NOTE:
• Do not use abrasive cleaners or scouring pads.
• Do not immerse the rice cooker base, cord or plug in water at any time.
To Cook Rice:
1. Using the measuring cup provided, measure out the desired amount of rice.
One full, level cup of uncooked rice will yield 2 cups of cooked rice. The
measuring cup provided adheres to rice industry standards (180mL) and is not
equal to one U.S. cup (240 mL).
2. Rinse rice in a separate container until the water becomes relatively clear;
drain.
3. Place rinsed rice in the inner pot.
4. Using the measuring cup provided or the water measurement lines located
inside the inner pot, add the appropriate amount of water. See the “Rice/Water
Measurement Table” on page 6 for suggested rice/water ratios.
HELPFUL HINT:
• To add an extra dimension of flavor to rice, try substituting a favorite variety
of meat or vegetable broth or stock. The ratio of broth/stock to rice will be
the same as water to rice.
5. Making sure that the exterior of the inner pot is clean, dry and free of debris; set
the inner pot into the rice cooker. Place the lid securely onto the rice cooker
and plug the power cord into a wall outlet.
6. To begin cooking, press the WHITE RICE or BROWN RICE button, depending upon
the type of rice to be cooked. The cooking mode indicator light will illuminate.
Once cooking is complete, the rice cooker will automatically switch to “KeepWarm” mode.
HELPFUL HINT:
• For softer rice, allow rice to soak for 10-20 minutes prior to cooking.
CONTINÚA EN LA PÁGINA SIGUIENTE
• Para un arroz más suave, remójelo por unos 10 - 20 minutos antes de cocinarlo.
CONSEJO ÚTIL:
“Keep-Warm” (Manténgase Caliente).
terminado de cocinar, la olla automáticamente cambiará la luz a la modalidad de
La luz del indicador de la modalidad de cocinar se prenderá. Una vez se haya
BROWN RICE (Arroz Integral); dependiendo del tipo de arroz que se quiera cocinar.
6. Para empezar a cocinar presione el botón que dice: WHITE RICE (Arroz Blanco) o
sobre la arrocera y conecte el cable de corriente en el enchufe de la pared.
deshechos, coloque la olla interior en la arrocera. Coloque la tapa con seguridad
5. Para asegurarnos que el exterior de la olla interior esté limpio, seco y libre de
porcentual de caldo/arroz debe de ser el mismo que el de agua con el arroz.
una variedad de su caldo de carne o de verduras favoritos; el índice
• Para agregarle una dimensión extra de sabor al arroz, trate de sustituirlo con
CONSEJO ÚTIL:
las proporciones sugeridas de arroz/agua.
apropiada. Vea las “Tablas para Medir el Arroz/Agua” en la página 6 para accesar
que están localizadas adentro de la olla interior, agregue la cantidad de agua
4. Usando la taza para medir que viene con el equipo, o las líneas para medir el agua
3. Ponga el arroz enjuagado en la olla interior.
después drene.
2. Enjuague el arroz en un recipiente separado hasta que el agua se vuelva clara,
americana (240 ml.).
se adhiere a los estándares de la industria arrocera (180 ml.) y no es igual a la taza
arroz crudo debe de rendirle dos tazas de arroz cocido. La tasa medidora provista
1. Utilizando la tasa para medir, mida la cantidad de arroz deseada; una taza llena de
Para cocinar el arroz:
• Nunca meta al agua la base de la olla, cordones, clavijas o enchufes.
• No use limpiadores abrasivos o estropajos.
NOTA:
6. Enjuague el bastidor con un trapo húmedo.
Enjuague y seque concienzudamente antes de regresarla a la olla.
5. Desmonte la charola interior de la olla y límpiela con agua limpia, tibia y jabonosa.
Enjuague y seque concienzudamente.
4. Ventile al vapor y lave la tapa y los accesorios con agua limpia, tibia y jabonosa.
los niños.
3. Deshágase de todas las bolsas de plástico ya que pueden significar un riesgo para
llegado en buen estado.
2. Desempaque los materiales de embalaje y verifique que todos los artículos hayan
1. Lea todas las instrucciones y todas las medidas de seguridad.
Antes de usarse por primera vez:
CONTINUED ON NEXT PAGE
4
COMO USAR SU APARATO

5
USING YOUR RICE COOKER
To Cook Rice:
7. After cooking, remove the lid and use the rice paddle to stir the rice. This will release
excess moisture and give the rice a fluffier texture. Then, replace the lid and allow
the unit to remain on “Keep-Warm” mode for 5-10 minutes. This will ensure optimal
rice texture and moisture level.
NOTE:
Brown rice requires a much longer cooking cycle than other rice varieties
due to the extra bran layers on the grains. The “Brown Rice” function on this
rice cooker allows extra time and adjusted heat settings in order to cook the
rice properly. If it appears the rice cooker is not operating immediately on
the “Brown Rice” setting, this is due to a low-heat soak cycle that proceeds
the cooking cycle to produce better brown rice results.
8. Press the KEEP-WARM/OFF button to turn off the rice cooker. If the KEEP-WARM/OFF
button is not pressed, the rice cooker will remain in “Keep-Warm” mode. It is not
abrir la tapa durante el cocimiento.
Para evitar una pérdida de vapor y períodos de cocimiento más largos, evite
NOTA:
modalidad por más de 12 horas.
de “Mantener Caliente” (Keep Warm) y no es conveniente dejar el arroz en esta
interior
. Si este botón no es presionado, la arrocera continuará en la modalidad
8. Presione el botón de KEEP-WARM/OFF (Calor/Apagado) para apagar la olla
recommended to leave rice on “Keep-Warm” mode for more than 12 hours.
NOTE:
To avoid a loss of steam and longer cooking times, do not open the lid at
any point during the cooking process.
producir mejores resultados en el arroz integral.
ciclo de absorción de bajo calor que prosigue al ciclo de cocimiento para
inmediatamente en la configuración del “Arroz Integral”, esto se debe a un
propiamente. Si parece que la olla de presión de arroz no está operando
tiempo extra y ofrece parámetros de calor ajustados para cocinar el arroz
que tienen los granos. La función del “Arroz Integral” en esta olla permite
las otras variedades de arroz, y esto se debe a las capas extra de salvado
El arroz integral requiere de un ciclo de cocimiento bastante mas largo que
NOTA:
asegurará que obtengamos una textura y un nivel de humedad óptimos.
modalidad de “Mantener Caliente” (Keep Warm) por unos 5 a 10 minutos; esto
Después, reemplace la tapa y permita que la unidad se mantenga en la
liberará la humedad excesiva y le dará al arroz una textura mas esponjada.
7. Después de cocinar, quite la tapa y use la paleta de arroz para batirlo. Esto
Para cocinar el arroz:
COMO USAR SU APARATO
5
 Loading...