

Page 1
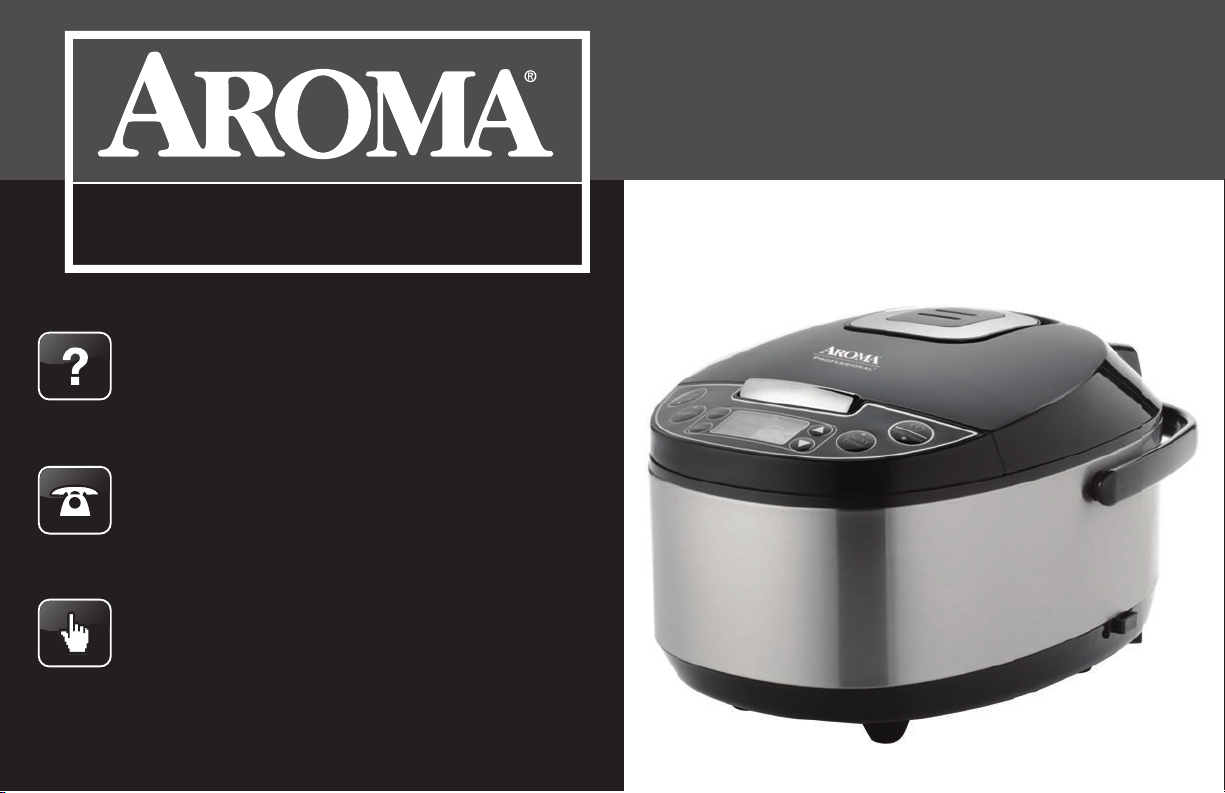
Instruction Manual
Rice Cooker & Food Steamer
ARC-620SB
Professional
Questions or concerns about your
rice cooker?
Before returning to the store...
Aroma’s customer service experts are happy
to help. Call us toll-free at 1-800-276-6286.
Answers to many common questions and
even replacement parts can be found online.
Visit www.AromaCo.com/Support.
™
Page 2
Congratulations on your purchase of the Aroma® 20-Cup Rice Cooker & Food Steamer! In no time at all, you’ll be making fantastic, restaurant-quality rice at the touch
of a button. Whether long, medium or short grain, this cooker is specially calibrated to prepare a variety of rice, including tough-to-cook whole grain brown rice, to uffy
perfection.
Your new Aroma® rice cooker is also ideal for convenient, one-pot meals for the whole family. Use the “Steam” function to prepare healthy meals by locking in the natural
avor and nutrients of food without added oil and fat— for meals that are as easy as they are nutritious. Or cook delicious and tender homemade roasts, stews and more
with the “Slow Cook” function. It sets from 2 to 10 hours to easily prepare all of your family’s slow-cooked favorites. Aroma’s patent-pending Sauté-Then-Simmer™ (STS™)
is ideal for Spanish rice, risottos, pilafs, packaged meal helpers, stir frys and more. It sautés foods at a high heat and automatically switch over to its simmer mode once
liquid is added. The “Soup” function is great for preparing savory stews and stocks. And the “Oatmeal” function does the trick when it comes to cooking hearty oatmeal
and porridge. The “Cake” function lets you whip up cakes and other sweet desserts with ease, eliminating the need to closely monitor “baking” so you have more time.
Once your rice cooker is nished cooking your desired meal or dessert, it will automatically switch to its “Keep-Warm” setting, so there’s no need to worry about overcooking.
This manual contains instructions for using your rice cooker and its convenient pre-programmed digital settings, as well as all of the accessories included. There are
also helpful measurement charts for cooking rice and steaming. Several delicious recipes are included at the back of this manual, and even more are available online at
www.AromaCo.com.
For more information on your Aroma® rice cooker, or for product service, recipes and other home appliance solutions, please visit us online at www.AromaCo.com.
See what’s cooking with Aroma online!
www.AromaTestKitchen.com www.facebook.com/AromaHousewares www.twitter.com/AromaHousewares
Published By:
Aroma Housewares Co.
6469 Flanders Drive
San Diego, CA 92121, U.S.A.
1-800-276-6286
www.AromaCo.com
©2014 Aroma Housewares Company
All rights reserved.
www.pinterest.com/AromaHousewares
Page 3

IMPORTANT SAFEGUARDS
Basic safety precautions should always be followed when using electrical appliances, including the following:
1. Important: Read all instructions carefully before rst use.
2. Do not touch hot surfaces. Use the handles or knobs.
3. Use only on a level, dry and heat-resistant surface.
4. To protect against re, electric shock and injury to persons, do not immerse
cord, plug or the appliance in water or any other liquid. See instructions for
cleaning.
5. Close supervision is necessary when the appliance is used by or near
children.
6. Unplug from outlet when not in use and before cleaning. Allow unit to cool
before putting on or taking off parts and before cleaning the appliance.
7. Do not operate any appliance with a damaged cord or plug or after the
appliance malfunctions or has been damaged in any manner. Contact Aroma
customer service for examination, repair or adjustment.
8. The use of accessory attachments not recommended by Aroma
Housewares may result in re, electrical shock or injury.
9. Do not use outdoors.
10. Do not let cord touch hot surfaces or hang over the edge of a counter or
table.
11. Do not place on or near a hot gas or electric burner or in a heated oven.
12. Do not use the appliance for other than its intended use.
®
SAVE THESE INSTRUCTIONS
13. Extreme caution must be used when moving the appliance containing rice, hot oil
or other liquids.
14. Do not touch, cover or obstruct the steam vent on the top of the rice cooker as it
is extremely hot and may cause scalding.
15. Use only with a 120V AC power outlet.
16. Always unplug from the base of the wall outlet. Never pull on the cord.
17. The rice cooker should be operated on a separate electrical circuit from other
operating appliances. If the electrical circuit is overloaded with other appliances,
the appliance may not operate properly.
18. Always make sure the outside of the inner cooking pot is dry prior to use. If
the inner pot is returned to the cooker when wet, it may damage or cause the
product to malfunction.
®
19. Use extreme caution when opening the lid during or after cooking. Hot steam will
escape and may cause burns.
20. Rice should not be left in the inner pot with the “Keep-Warm” function on for
more than 12 hours.
21. To prevent damage or deformation, do not use the inner pot on a stovetop or
burner.
22. To disconnect, turn any control to “OFF,” then remove the plug from the wall
outlet.
23. To reduce the risk of electrical shock, cook only in the removable inner cooking
pot provided.
1
Page 4
IMPORTANT SAFEGUARDS
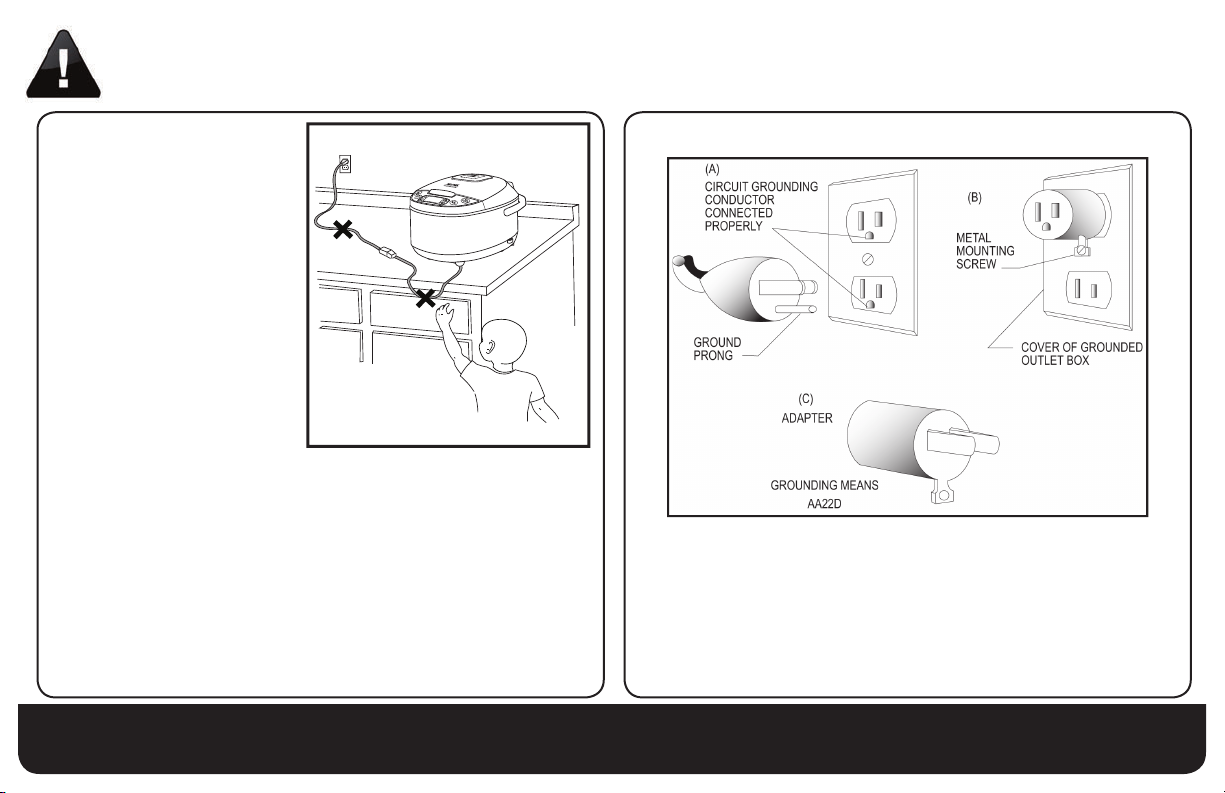
Short Cord
DO NOT DRAPE CORD!
Instructions
1. A short power-supply cord is
provided to reduce the risks
resulting from becoming
entangled in or tripping over
a longer cord.
2. Longer extension cords are
available and may be used if
care is exercised in their use.
3. If a longer extension cord is
used:
a. The marked electrical
rating of the extension
cord should be at least as great as the electrical rating of the
appliance.
b. The longer cord should be arranged so that it will not drape over the
countertop or tabletop where it can be pulled by children or tripped
over unintentionally.
c. The extension cord should be a grounding-type 3-wire cord.
KEEP AWAY
FROM CHILDREN!
Grounding Instructions
This appliance must be grounded while in use to protect the operator from
electrical shock. The appliance is equipped with a 3-conductor cord and a
3-prong grounding-type plug to t the proper grounding-type receptacle. The
appliance has a plug that looks like sketch A. An adapter, sketch B, should be
used for connecting sketch-A plugs to two-prong receptacles. The grounding
tab, which extends from the adapter, must be connected to a permanent
ground such as a properly grounded outlet box as shown in sketch C using a
metal screw.
THIS APPLIANCE IS FOR HOUSEHOLD USE ONLY.
2
Page 5
PARTS IDENTIFICATION
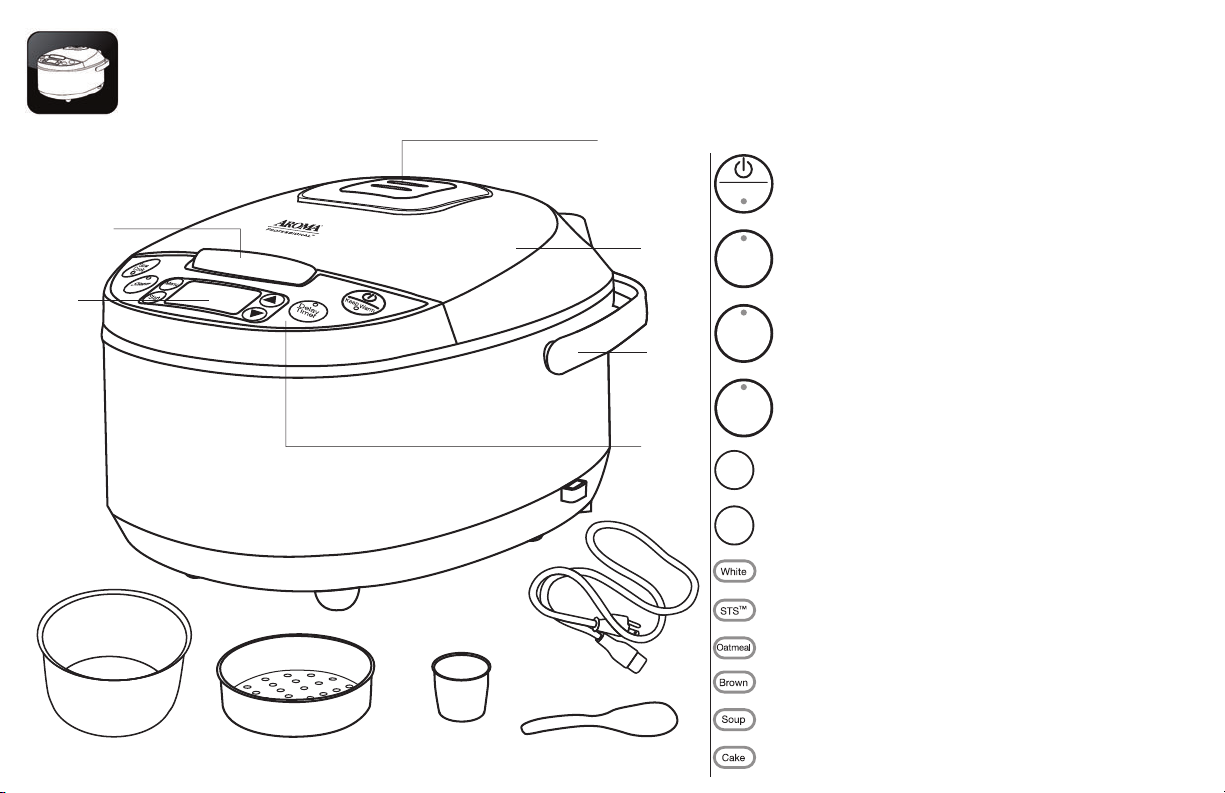
Lid Release
Button
Digital
Display
Inner Cooking Pot Steam Tray
Measuring Cup
Steam Vent
Lid
Handle
Control
Panel
Removable Power Cord
Serving Spatula
Digital Controls
Power/Keep-Warm Button
The POWER/KEEP WARM button serves two purposes. One press of
the POWER/KEEP WARM button will turn the rice cooker on. A second
Keep Warm
press will set the rice cooker to its “Keep-Warm” setting.
Delay Timer
Delay
The DELAY TIMER sets up to 15 hours for rice ready when it’s needed.
Timer
Add rice and water in the morning and set the timer for mealtime at
night.
Steam
The STEAM button is perfect for healthy sides and main courses. Set
Steam
the time food needs to steam, it will begin to countdown once water
reaches a boil and shut off once time has elapsed.
Slow Cook
Slow
The SLOW COOK button sets to slow cook from 2 to 10 hours and is
Cook
great for homemade roasts and stews.
The MENU button allows the rice cooker to be set to one of its 6
Menu
specialized cooking functions: White, Brown, STS
Cake.
The START button begins cooking on the selected function.
Start
The WHITE function cooks restaurant-quality white rice automatically.
Aroma’s patent-pending Sauté-Then-Simmer™ (STS™) Technology will
sauté foods at a high heat and automatically switch over to its simmer
mode once liquid is added.
The OATMEAL function is perfect for preparing a hearty breakfast classic.
The BROWN function is ideal for cooking brown rice and other tough-to-
cook whole grains to perfection.
The SOUP function is great for preparing savory soups and delicious
stews.
The CAKE function “bakes” cakes and other treats.
™
, Soup, Oatmeal and
3
Page 6
BEFORE FIRST USE
1. Read all instructions and important safeguards.
2. Remove all packaging materials and check that all items have been received in good condition.
3. Tear up all plastic bags as they can pose a risk to children.
4. Wash steam vent and all other accessories in warm, soapy water. Rinse and dry thoroughly.
5. Remove the inner cooking pot from rice cooker and clean with warm, soapy water. Rinse and dry thoroughly before returning to cooker.
6. Wipe body clean with a damp cloth.
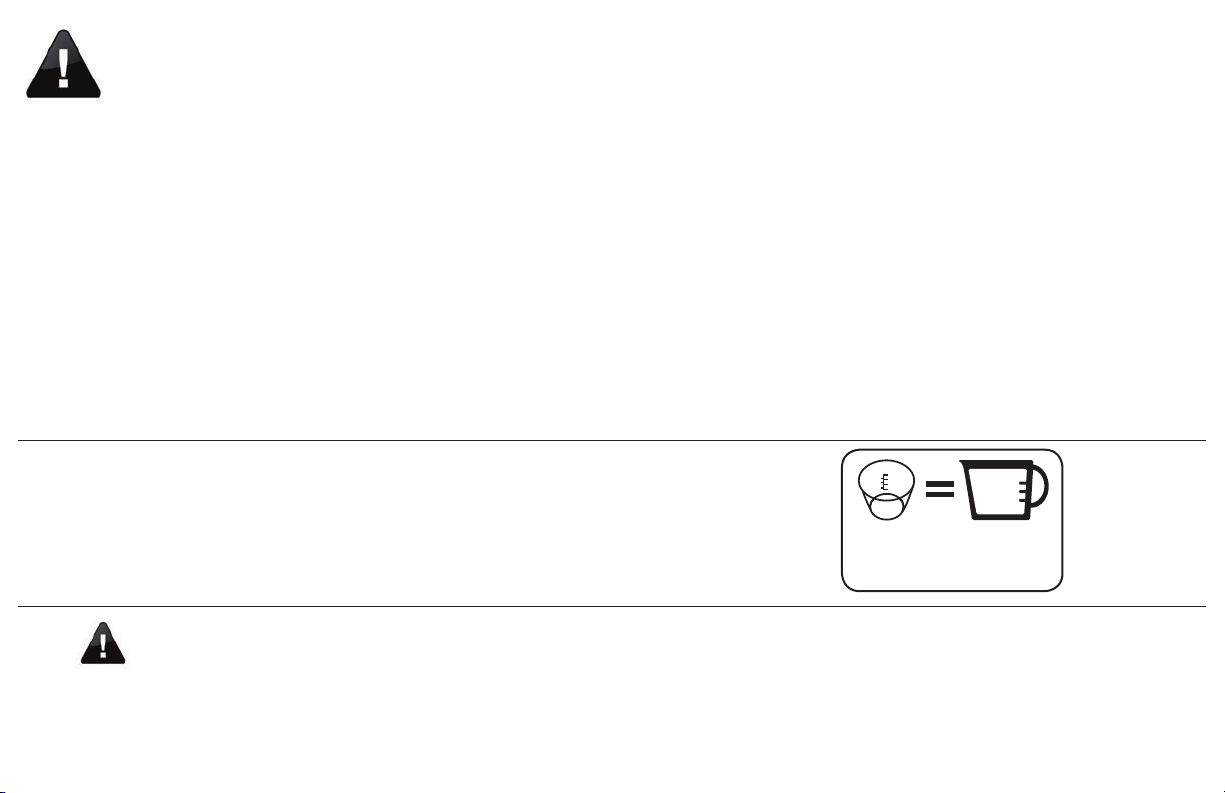
3/4
US cups
The provided rice cooker
cup is the equivalent to
a ¾ standard US cup.
• Do not use abrasive cleaners or scouring pads.
• Do not immerse the rice cooker base, cord or plug in water at any time.
NOTE
4
Page 7
Delay
Timer
Start
Menu
Steam
Slow
Cook
Keep Warm
White
Oatmeal
Brown
Soup
Cake
STS™
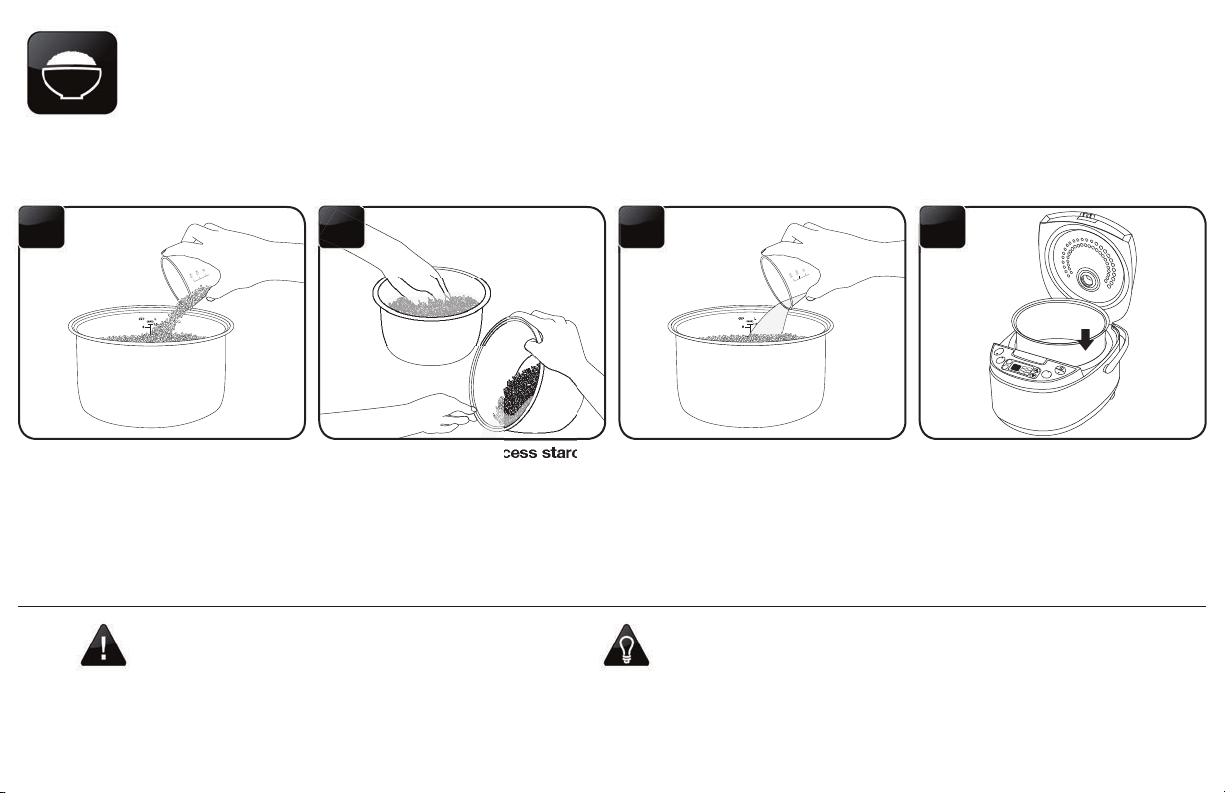
TO COOK RICE
41 32
Using the provided measuring cup,
add rice to the inner cooking pot.
• Before placing the inner cooking pot into the rice
cooker, check that the cooking pot is dry and free of
debris. Adding the inner cooking pot when wet may
damage the rice cooker.
NOTE
Rinse rice to remove excess starch.
Drain.
Fill with water to the line which
matches the number of cups of
rice being cooked. For example, if
cooking two cups of uncooked rice,
water should be lled to line 2 in the
inner pot.
• If you misplace the measuring cup, a ¾ standard US cup is an exact
replacement.
HELPFUL
HINTS
• To add more avor to rice, try substituting a favorite meat/vegetable
broth or stock. The ratio of broth/stock to rice will be the same as
water to rice.
• For approximate rice cooking times and suggested rice/water ratios,
see the “Rice/Water Measurement Table” on page 8.
Place the inner cooking pot into the
rice cooker.
5
Page 8
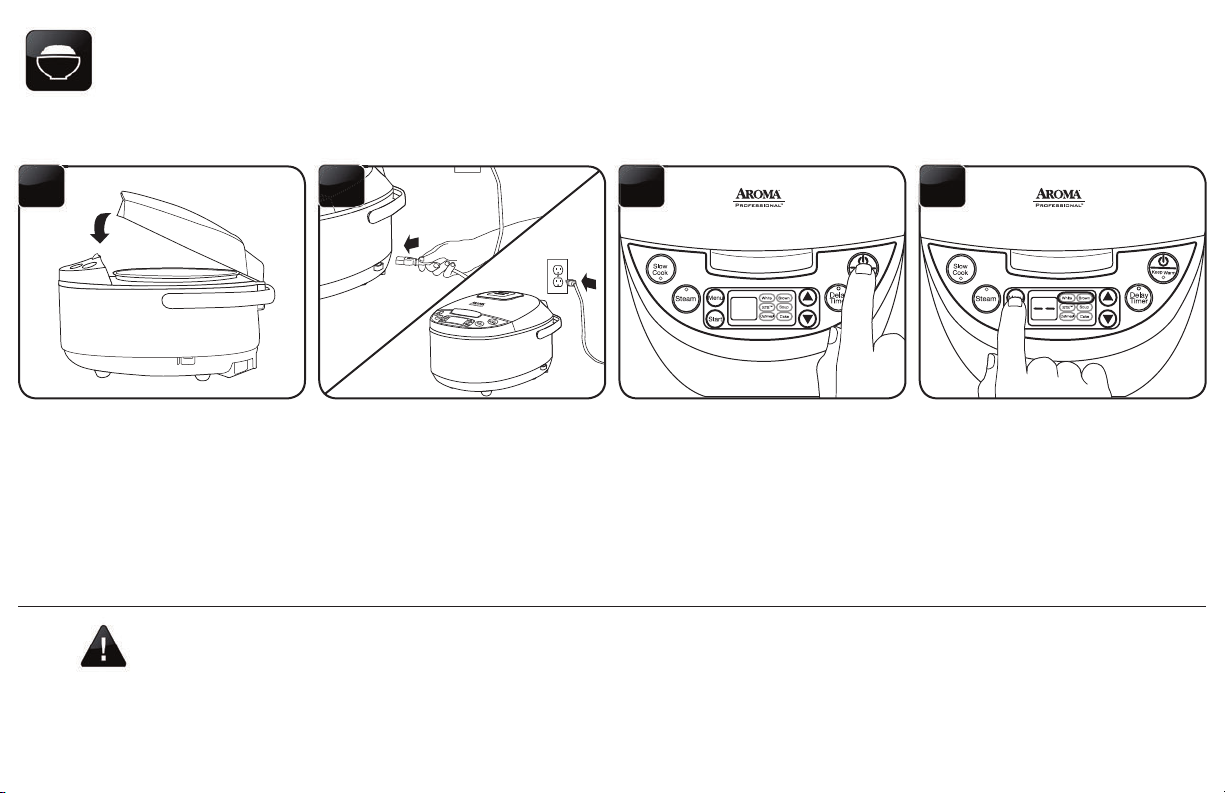
TO COOK RICE (CONT.)
7 865
Close the lid securely.
• Brown rice requires a longer cooking cycle than white rice due to the extra bran layers on the grain. If it appears the rice cooker is not immediately
cooking this is due to the a low-heat soak cycle that precedes cooking to produce ufer grains.
NOTE
6
Connect the power cord to the rice
cooker and plug into an available
outlet.
Press the POWER/KEEP-WARM
button to turn on the rice cooker.
Press the MENU button to cycle
to the “White” or “Brown” function
depending on the type of rice being
cooked. The indicator light will
conrm which function is selected.
Page 9
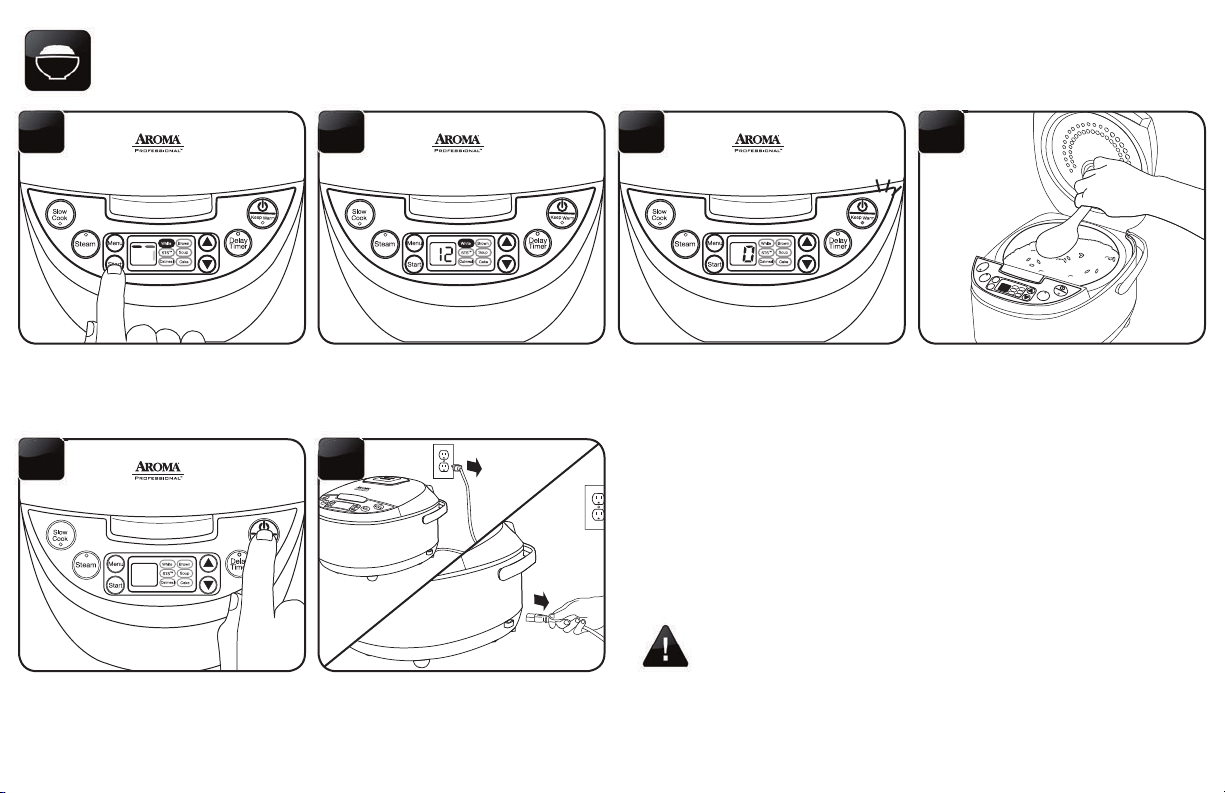
TO COOK RICE (CONT.)
Delay
Timer
Start
Menu
Steam
Slow
Cook
Keep Warm
White
Oatmeal
Brown
Soup
Cake
STS™
9
Press the START button to begin
cooking the rice. The digital display
will show a “chasing” pattern and the
indicator light will become solid to
indicate that it is cooking.
13
When nished serving, turn the rice
cooker off by pressing the POWER/
KEEP WARM button once to change
it from its “Keep-Warm” setting and
then press and hold again until the rice
cooker powers off.
The rice cooker will countdown
the nal minutes of cook time (12
minutes for “White” and 25 minutes
for “Brown”).
14
Unplug the power cord from the
power outlet rst, then from the rice
cooker.
Once rice is nished, the rice cooker
will beep and automatically switch to
“Keep-Warm.” The digital display will
show the number of hours the rice
cooker has been on “Keep-Warm,”
beginning with “0.”
• Rice should not be left in the rice cooker on “Keep-Warm” for
more than 12 hours.
NOTE
121110
For best results, stir the rice with
the serving spatula to distribute any
remaining moisture.
7
Page 10
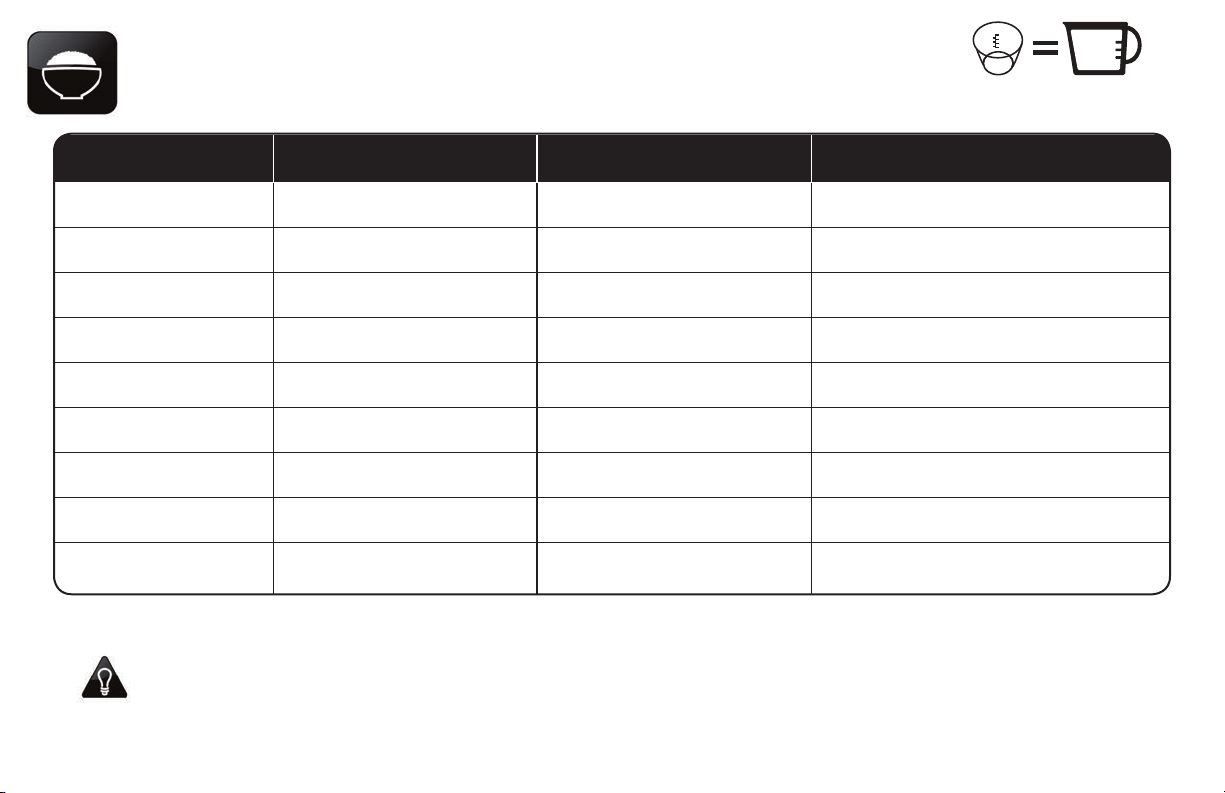
RICE/WATER MEASUREMENT TABLE
UNCOOKED RICE RICE WATER LINE INSIDE POT APPROX. COOKED RICE YIELD COOKING TIMES
2 Rice Cooker Cups* Line 2 4 Rice Cooker Cups*
WHITE RICE: 35-40 Min.
BROWN RICE: 100-105 Min.
3 Rice Cooker Cups* Line 3 6 Rice Cooker Cups*
WHITE RICE: 37-42 Min.
BROWN RICE: 102-107 Min.
4 Rice Cooker Cups* Line 4 8 Rice Cooker Cups*
WHITE RICE: 39-44 Min.
BROWN RICE: 110-115 Min.
5 Rice Cooker Cups* Line 5 10 Rice Cooker Cups*
WHITE RICE: 41-46 Min.
BROWN RICE: 114-119 Min.
6 Rice Cooker Cups* Line 6 12 Rice Cooker Cups*
WHITE RICE: 43-48 Min.
BROWN RICE: 116-121 Min.
7 Rice Cooker Cups* Line 7 14 Rice Cooker Cups*
WHITE RICE: 45-50 Min.
BROWN RICE: 118-123 Min.
8 Rice Cooker Cups* Line 8 16 Rice Cooker Cups*
WHITE RICE: 47-52 Min.
BROWN RICE: 120-125 Min.
9 Rice Cooker Cups* Line 9 18 Rice Cooker Cups*
WHITE RICE: 49-54 Min.
BROWN RICE: 123-128 Min.
10 Rice Cooker Cups* Line 10 20 Rice Cooker Cups*
WHITE RICE: 51-56 Min.
BROWN RICE: 125-130 Min.
The provided rice cooker
cup is the equivalent to
a ¾ standard US cup.
3/4
US cups
* Cups referrenced are with the included rice cooker measuring cup. The measuring cup included adheres to rice cooker industry standards and is not
equal to a standard U.S. measuring cup. The included measuring cup is equal to a standard ¾ US cup.
HELPFUL
HINTS
8
• Rinse rice before placing it into the inner pot to remove excess bran and starch. This will help reduce browning and sticking to the
bottom of the pot.
• Want perfect brown rice without the wait? Use the “Delay Timer.” Simply add rice and water in the morning and set the “Delay Timer” to
the number of hours when rice will be needed. See “To Use Delay Timer” on page 9 for instructions.
• This chart is only a general measuring guide. As there are many different kinds of rice available (see “About Rice” on page 29), rice/water
measurements may vary.
Page 11
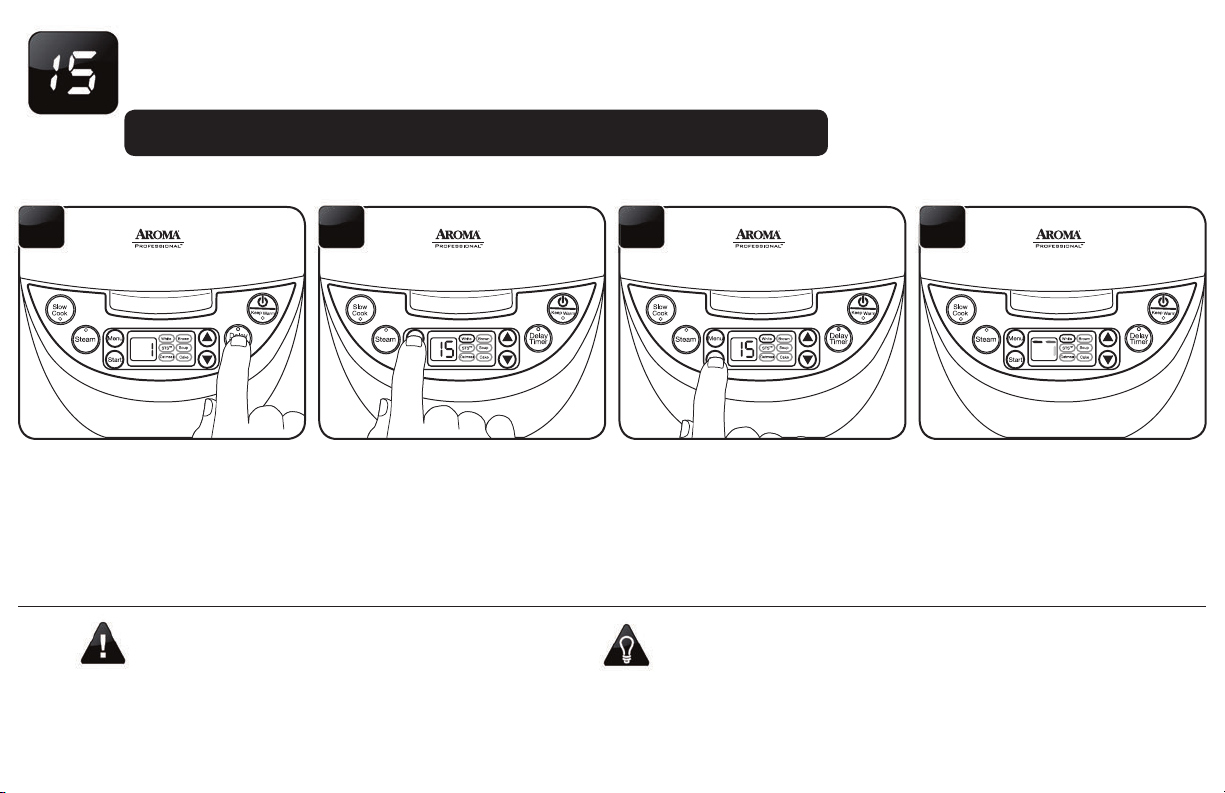
TO USE THE DELAY TIMER
Follow steps 1 to 7 of “To Cook Rice” beginning on page 5.
118 109
Press the DELAY TIMER button.
Each press increases in one hour
increments. It may be set 1 to 15
hours in advance.
• Due to the longer cooking time needed, the “Brown Rice”
setting may only be delayed for 2 or more hours.
NOTE
• The “Delay Timer” will only work with the “White” and
“Brown” functions.
Once the needed time is selected,
press the MENU button to cycle to
the “White” or “Brown” function
depending on the type of rice being
cooked. The indicator light will
conrm which function is selected.
Press the START button to set the
delayed time. The digital display will
show the amount of time remaining
before rice begins cooking and the
indicator light will become solid.
• If you misplace the measuring cup, a ¾ standard US cup is an
exact replacement.
HELPFUL
HINTS
• To add more avor to rice, try substituting a favorite meat or
vegetable broth or stock. The ratio of broth/stock to rice will be the
same as water to rice.
Once the rice begins cooking, the
digital display will show a “chasing”
pattern.
9
Page 12
Delay
Timer
Start
Menu
Steam
Slow
Cook
Keep Warm
White
Oatmeal
Brown
Soup
Cake
STS™
TO USE THE DELAY TIMER (CONT.)
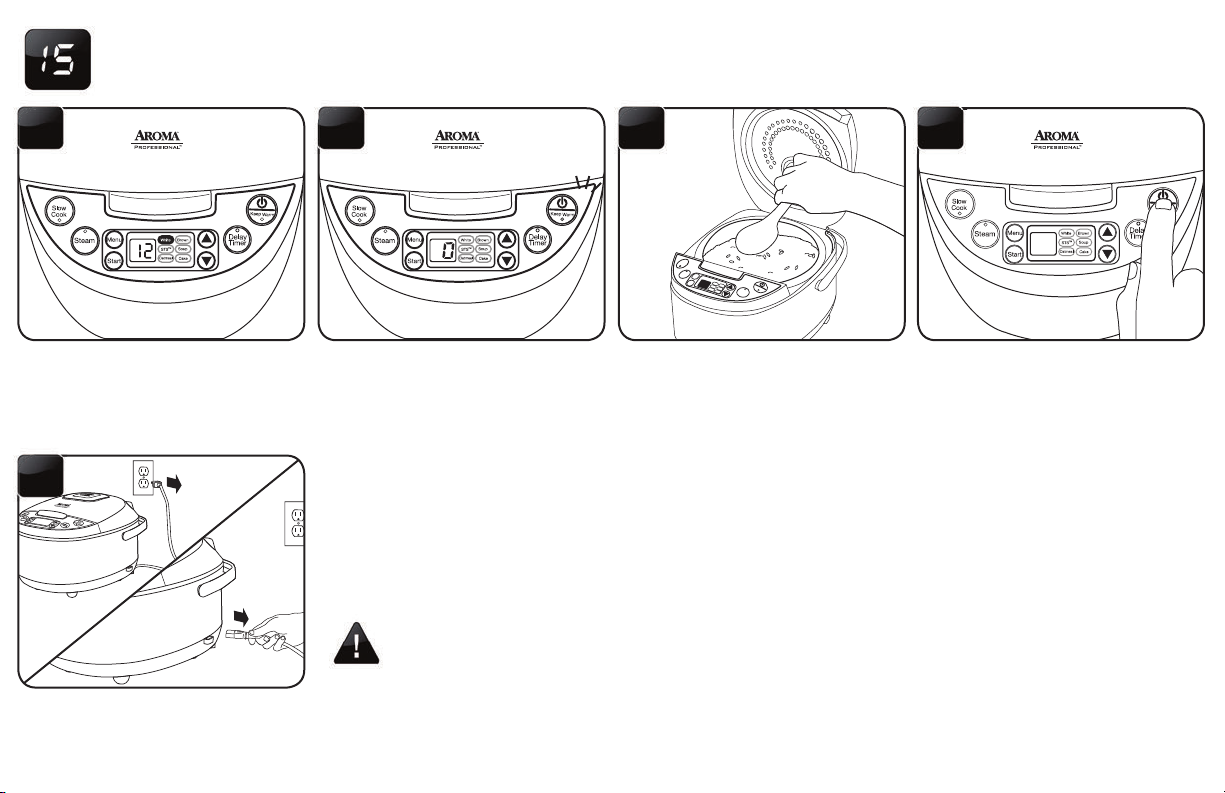
12
The rice cooker will countdown
the nal minutes of cook time (12
minutes for “White” and 25 minutes
for “Brown”).
16
Unplug the power cord from the
power outlet rst, then from the rice
cooker.
10
Once rice is nished, the rice cooker
will beep and automatically switch to
“Keep-Warm.” The digital display will
show the number of hours the rice
cooker has been on “Keep-Warm,”
beginning with “0.”
• Rice should not be left in the rice cooker on “Keep-Warm” for more than 12 hours.
NOTE
14 1513
For best results, stir the rice with
the serving spatula to distribute any
remaining moisture.
When nished serving rice, turn
the rice cooker off by pressing the
POWER/KEEP WARM button once
to change it from its “Keep-Warm”
setting and then press and hold again
until the rice cooker powers off.
Page 13
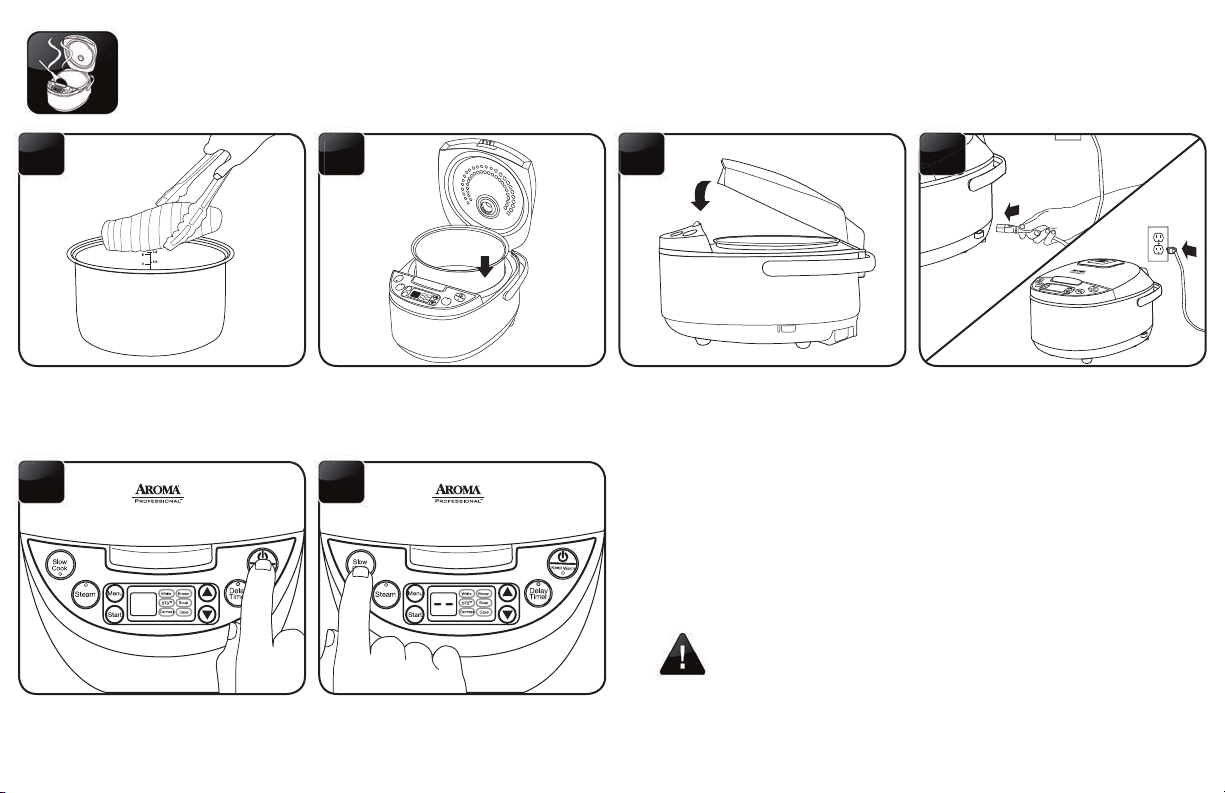
TO SLOW COOK
Delay
Timer
Start
Menu
Steam
Slow
Cook
Keep Warm
White
Oatmeal
Brown
Soup
Cake
STS™
1 3
Add food to be slow cooked to the
inner cooking pot.
5
Press the POWER/KEEP-WARM
button to turn the rice cooker on.
2
Place the inner cooking pot into the
slow cooker.
6
Press the SLOW COOK button.
Close the lid securely.
• Before placing the inner cooking pot into the rice cooker, check
NOTE
that the cooking pot is dry and free of debris. Adding the inner
cooking pot when wet may damage the rice cooker.
4
Connect the power cord to the rice
cooker and plug into an available
outlet.
11
Page 14
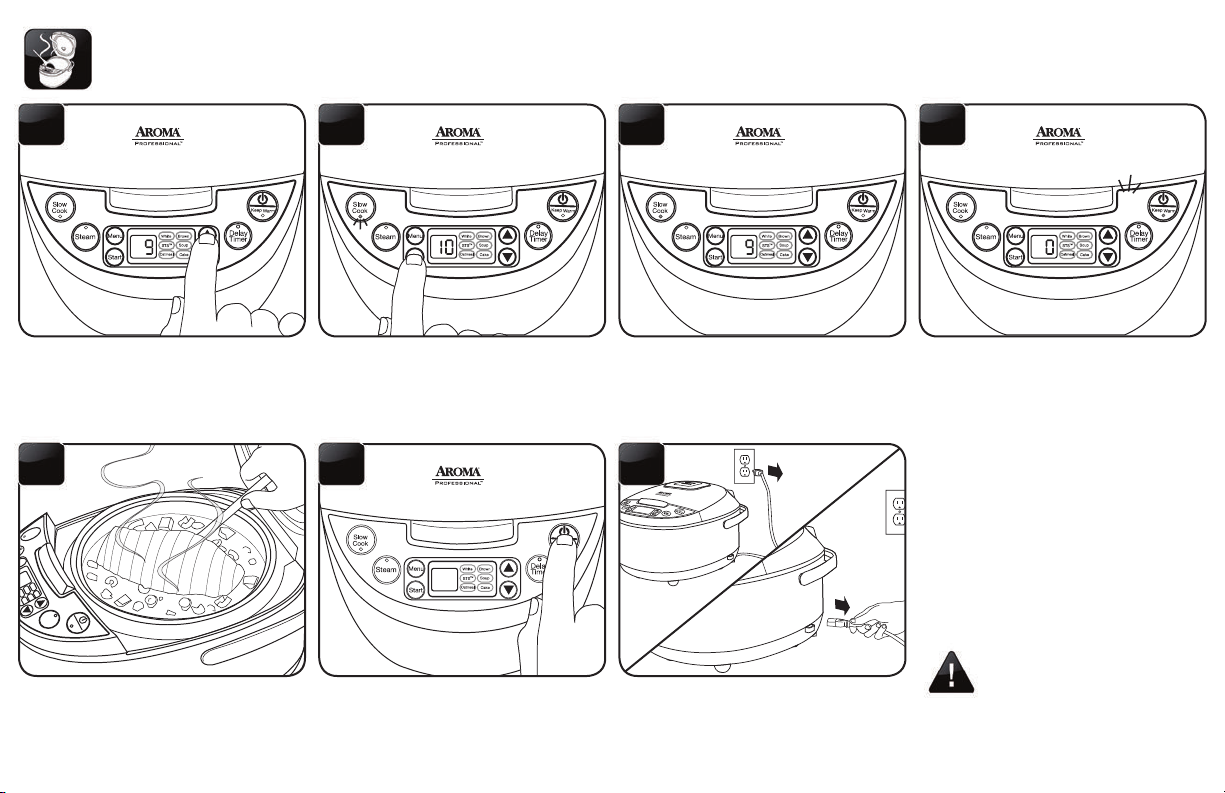
TO SLOW COOK (CONT.)
Slow
Cook
White
STS
™
Delay
Timer
Brown
Soup
Cake
Keep Warm
7
Use the UP (▲) or DOWN (▼)
buttons to set the time. These
buttons will adjust cooking time in
one hour increments between 2 and
10 hours.
11
Open the lid to check food for
doneness. If fully cooked, remove
food for serving.
12
Press the START button to begin
slow cooking at the selected time.
The digital display will show the
remaining cooking time and the
button’s indicator light will become
solid to indicate that it is cooking.
12
When nished serving, turn the rice
cooker off by pressing the POWER/
KEEP WARM button once to change
it from its “Keep-Warm” setting and
then press and hold again until the
rice cooker powers off.
9
The rice cooker will begin to slow
cook. The digital display will count
down in one hour increments from
the selected time.
13
Unplug the power cord from the
power outlet rst, then from the rice
cooker.
108
Once the selected time has passed,
the rice cooker will beep and switch
to “Keep-Warm” mode. The digital
display will show the number of
hours the rice cooker has been on
“Keep-Warm,” beginning with “0.”
• Do not leave food on
“Keep-Warm” for more
NOTE
than 12 hours.
Page 15
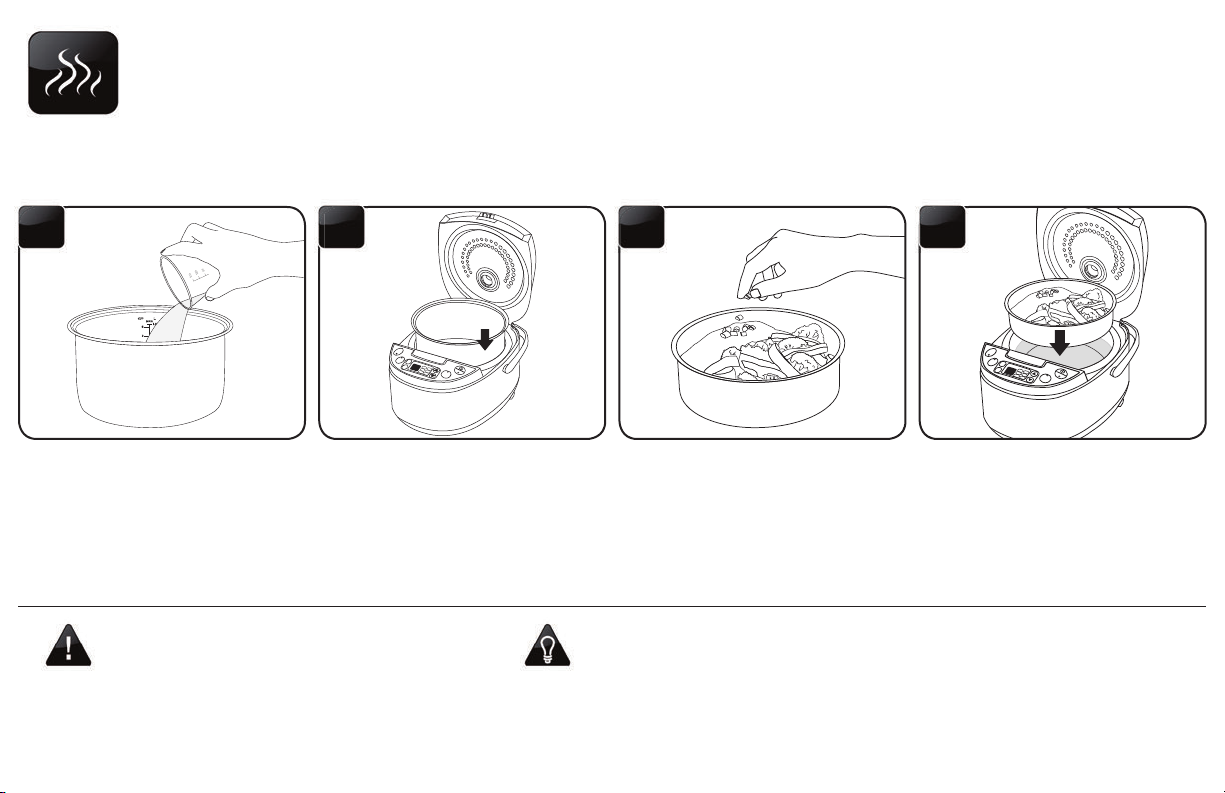
TO STEAM
Delay
Timer
Start
Menu
Steam
Slow
Cook
Keep Warm
White
Oatmeal
Brown
Soup
Cake
STS™
Using the provided measuring
cup, add 3 cups water to the inner
cooking pot.
• If too little water is added, the rice cooker will stop
prematurely.
• Before placing the inner cooking pot into the rice
NOTE
cooker, check that the cooking pot is dry and free of
debris. Adding the inner cooking pot when wet may
damage the rice cooker.
Place the inner cooking pot into the
rice cooker.
HELPFUL
HINTS
32
Place food to be steamed onto the
steam tray.
41
Slow
Cook
Steam
Menu
Start
White
Brown
STS™
Keep Warm
Soup
Oatmeal
Delay
Cake
Timer
Place the steam tray into the rice
cooker.
• If you misplace the measuring cup, a ¾ standard US cup is an exact replacement.
• Smaller foods may be placed on a heat-proof dish and then placed onto the steam
tray. Parchment paper or aluminum foil may be used as well. Place the paper/foil in the
center of the steam tray and ensure it does not create a seal along the bottom of the
steam tray. For best results, it is recommended to puncture small holes in the paper/
foil.
• For suggested steaming times and water amounts, see the meat and vegetable
steaming tables on page 18.
13
Page 16
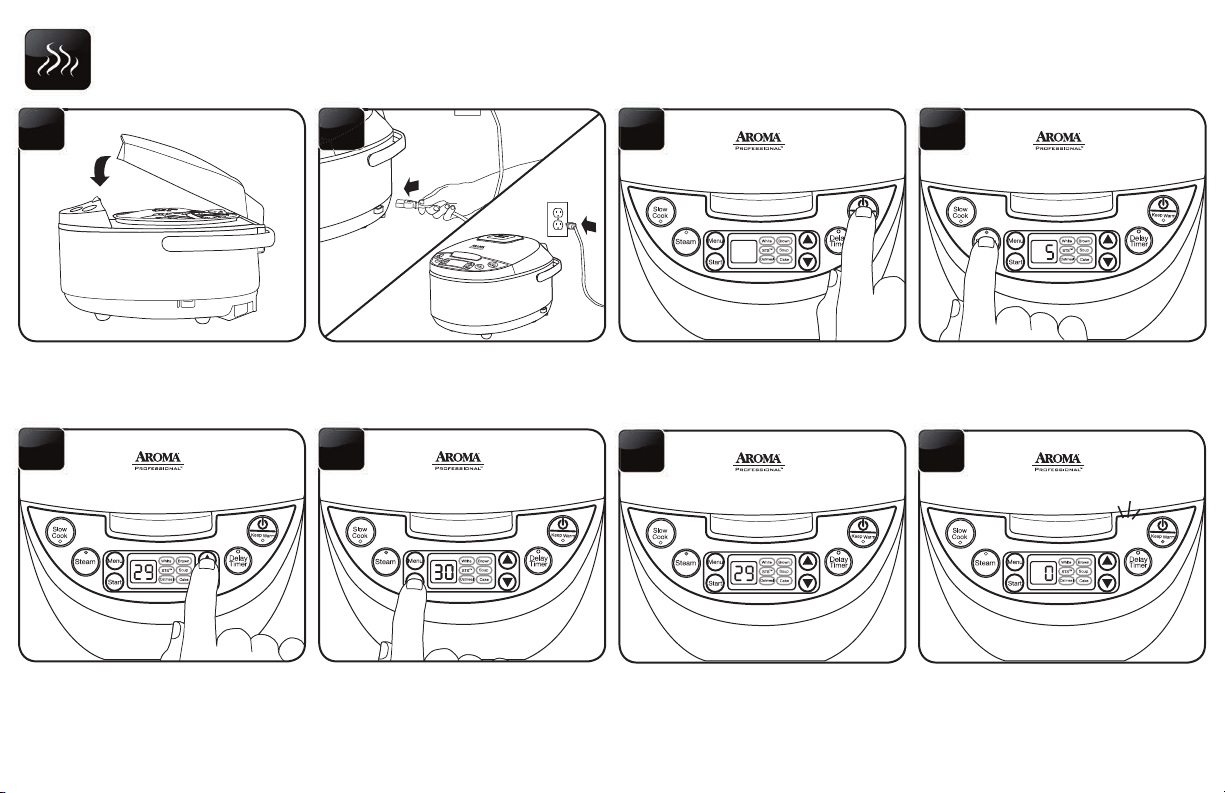
TO STEAM (CONT.)
5
Close the lid securely.
9
Use the UP (▲) or DOWN (▼) buttons
to set the time. These buttons will
adjust cooking time in one minute
increments between 5 and 30
minutes.
14
Connect the power cord to the rice
cooker and plug into an available
outlet.
10
Press the START button to begin
steaming at the selected time. The
digital display will show the remaining
cooking time and the button’s
indicator light will become solid to
indicate that it is cooking.
7
Press the POWER/KEEP-WARM
button to turn the rice cooker on.
11
Once the water reaches a boil, the
digital display will count down in one
minute increments from the selected
time.
86
Press the STEAM button. The digital
display will show a ashing 5 to
represent ve minutes of steam
time.
12
Once the selected time has passed,
the rice cooker will beep and switch
to “Keep-Warm” mode. The digital
display will show the number of
hours the rice cooker has been on
“Keep-Warm,” beginning with “0.”
Page 17
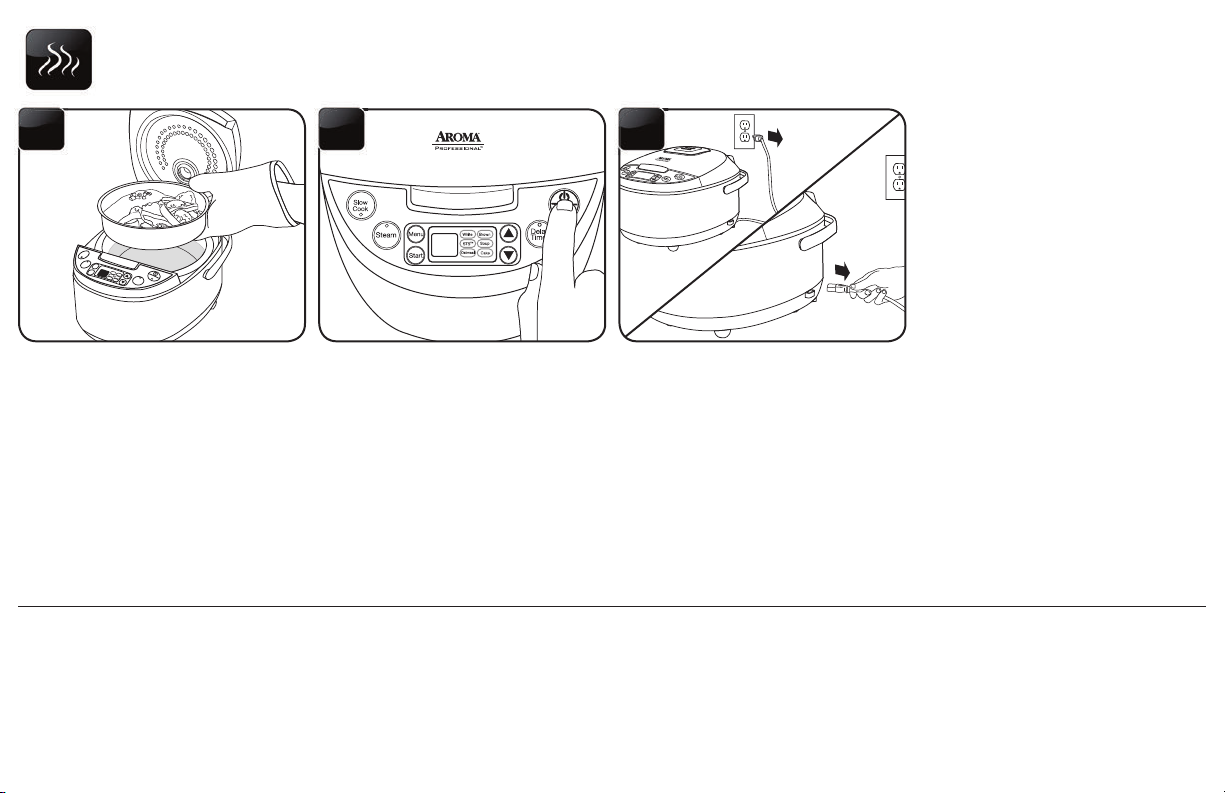
TO STEAM (CONT.)
Delay
Timer
Start
Menu
Steam
Slow
Cook
Keep Warm
White
Oatmeal
Brown
Soup
Cake
STS™
13
Check steamed food for doneness. If
nished steaming, carefully remove
the steam tray. It will be hot.
14
When nished serving, turn the rice
cooker off by pressing the POWER/
KEEP WARM button once to change
it from its “Keep-Warm” setting and
then press and hold again until the rice
cooker powers off.
15
Unplug the power cord from the
power outlet rst, then from the rice
cooker.
15
Page 18
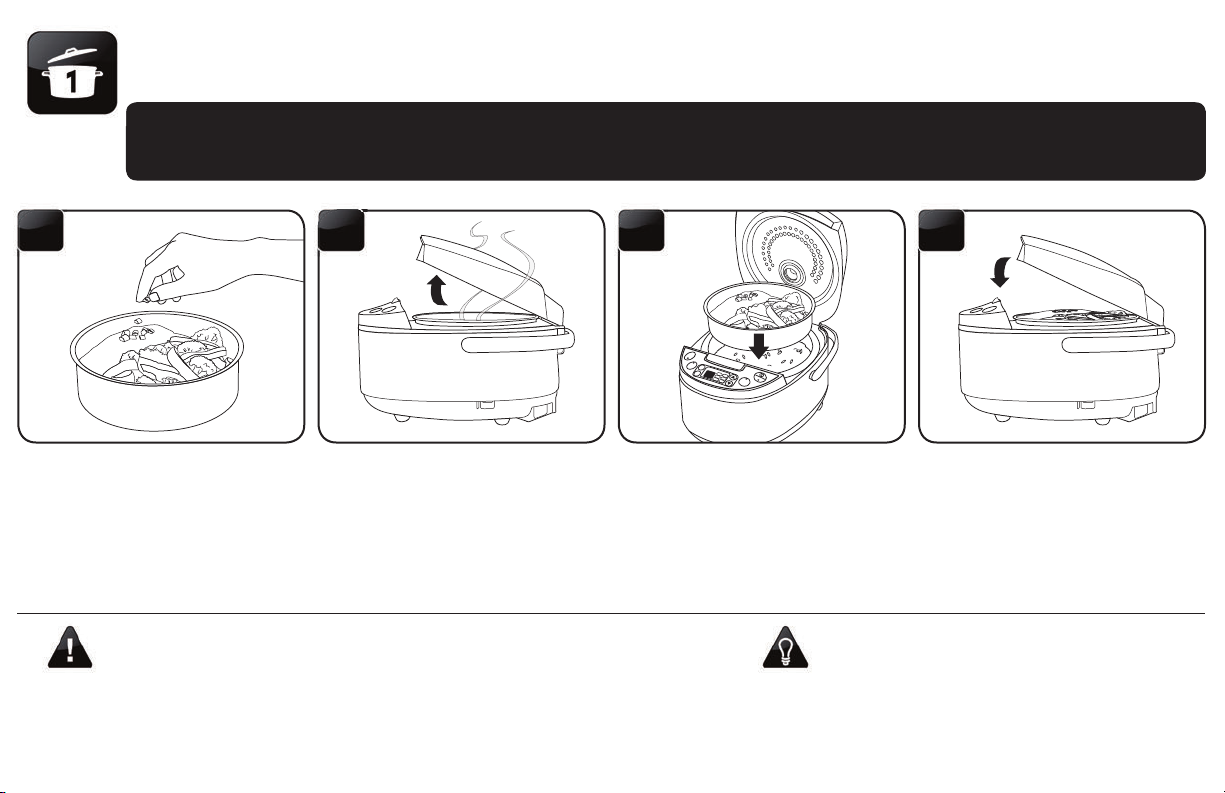
TO STEAM FOOD & SIMULTANEOUSLY COOK RICE
To steam while cooking rice, begin cooking rice by following steps 1 to 9 of “To Cook Rice”
on page 5.
1310 1211
Slow
Cook
Steam
Menu
Start
White
Brown
STS™
Keep Warm
Soup
Oatmeal
Delay
Cake
Timer
Place food to be steamed onto the
steam tray.
• Do not attempt to cook more than 8 cups (uncooked) of rice if steaming and cooking rice
simultaneously. The steam tray will not t properly if more than 8 cups of rice are cooked.
• Food can be steamed at any time while rice cooks, however for best results food should
NOTE
be steamed toward the end of the rice cooking cycle. This will allow for rice and steamed
food to be ready at the same time. See the “Rice/Water Measurement Table” on page 8
for approximate rice cooking times.
16
• Before placing the inner cooking pot into the rice cooker, check that the cooking pot is dry
and free of debris. Adding the inner cooking pot when wet may damage the rice cooker.
Using caution to avoid escaping
steam, open the lid.
cooker.
Close the lid securely.Place steam tray into the rice
• Refer to the steaming tables for meats and
vegetables on page 18 for hints and approximate
HELPFUL
HINTS
steaming times. See the “Rice/Water Measurement
Table” included on page 8 for approximate rice
cooking times.
Page 19
Delay
Timer
Start
Menu
Steam
Slow
Cook
Keep Warm
White
Oatmeal
Brown
Soup
Cake
STS™
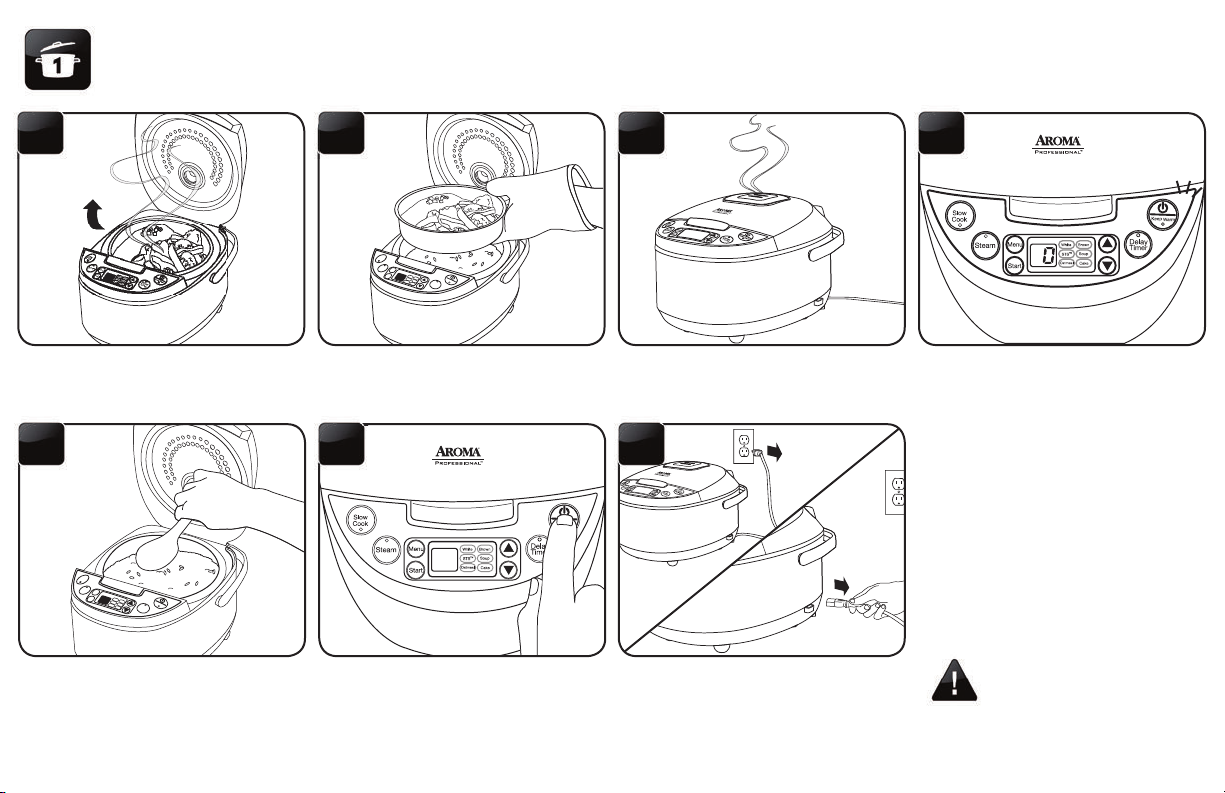
TO STEAM FOOD & SIMULTANEOUSLY COOK RICE (CONT.)
Delay
Timer
Start
Menu
Steam
Slow
Cook
Keep Warm
White
Oatmeal
Brown
Soup
Cake
STS™
14
Slow
Cook
Steam
Menu
Start
White
Brown
STS™
Keep Warm
Soup
Oatmeal
Delay
Cake
Timer
Using caution, open the lid to check
food for doneness.
18
For best results, stir the rice with
the serving spatula to distribute any
remaining moisture.
15
If food is nished steaming, carefully
remove the steam tray. It will be hot.
19
When nished serving, turn the rice
cooker off by pressing the POWER/
KEEP WARM button once to change
it from its “Keep-Warm” setting and
then press and hold again until the rice
cooker powers off.
16
Allow the rice cooker to continue
cooking rice.
20
Unplug the power cord from the
power outlet rst, then from the rice
cooker.
17
Once the selected time has passed,
the rice cooker will beep and switch
to “Keep-Warm” mode. The digital
display will show the number of
hours the rice cooker has been on
“Keep-Warm,” beginning with “0.”
• Rice should not be left
in the rice cooker on
NOTE
“Keep-Warm” for more
than 12 hours.
17
Page 20
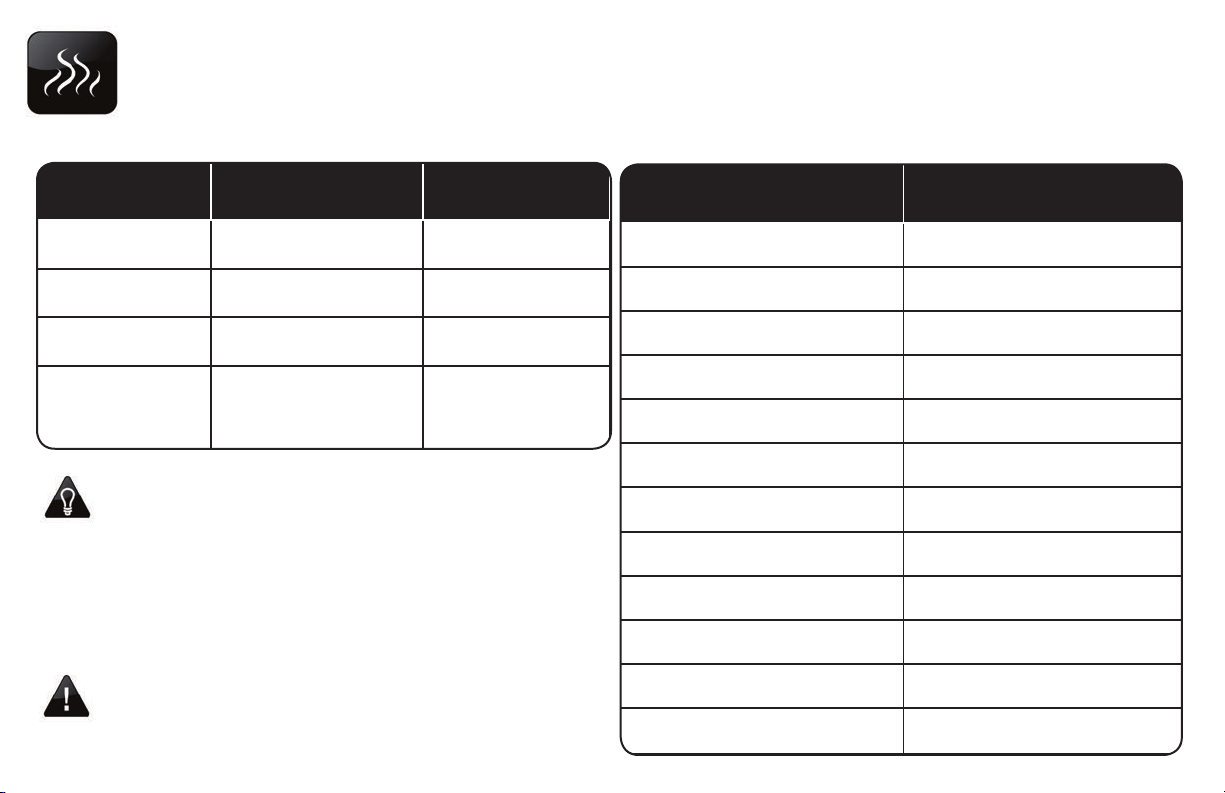
STEAMING TABLES
MEAT STEAMING TIME
SAFE INTERNAL
TEMPERATURE
Fish 25 Min. 140°F
Chicken 30 Min. 165°F
Pork 30 Min. 160°F
Beef
Medium = 25 Min.
Medium-Well = 30 Min.
Well = 33 Min.
160°F
VEGETABLE STEAMING TIME
Asparagus 9-11 Minutes
Broccoli 6-8 Minutes
Cabbage 5-7 Minutes
Carrots 11-13 Minutes
Cauliower 7-9 Minutes
Corn on the Cob 12-16 Minutes
Green Beans 9-11 Minutes
Peas 4-6 Minutes
Potatoes 28-33 Minutes
Spinach 2-4 Minutes
Squash 9-11 Minutes
Zucchini 9-11 Minutes
When steaming, Aroma® recommends using 3 cups of water with the provided measuring cup.
Meat Steaming Table
• Since most vegetables only absorb a small amount of water, there is
no need to increase the amount of water with a larger serving
HELPFUL
HINTS
NOTE
18
of vegetables.
• Steaming times may vary depending upon the cut of meat being
used.
• To ensure meat tastes its best, and to prevent possible illness, check
that meat is completely cooked prior to serving. If it is not, simply
place more water in the inner cooking pot and repeat the cooking
process until the meat is adequately cooked.
• Altitude, humidity and outside temperature will affect cooking times.
• These steaming charts are for reference only. Actual cooking times
may vary.
Vegetable Steaming Table
Page 21
Delay
Timer
Start
Menu
Steam
Slow
Cook
Keep Warm
White
Oatmeal
Brown
Soup
Cake
STS™
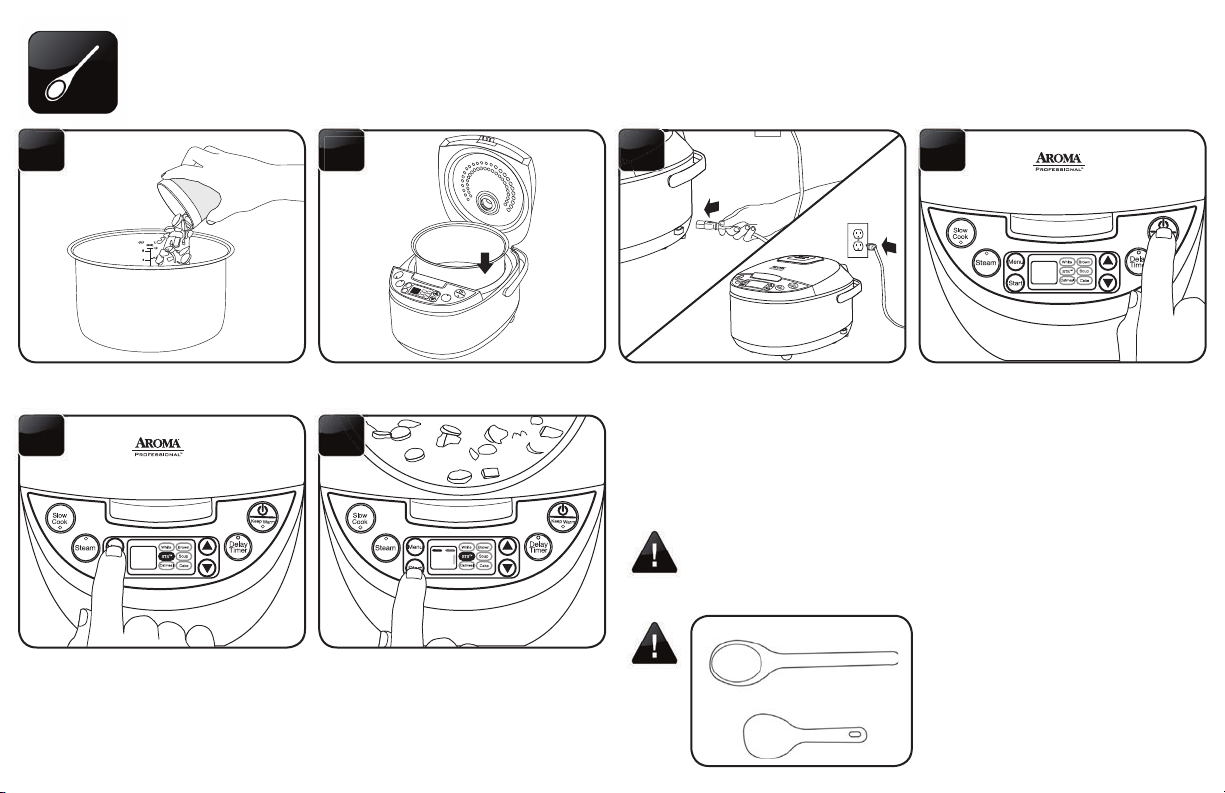
TO USE SAUTÉ-THEN-SIMMER
™
41 32
Add ingredients to be sautéed/
browned to the inner cooking pot.
5
Press the MENU button to cycle to
the “STS™” function. The indicator
light will conrm which function is
selected.
Place the inner cooking pot into the
rice cooker.
6
Press the START button to begin
sautéing. The digital display will show
a “chasing” pattern and the indicator
light will become solid to indicate that
it is cooking. Using a long-handled
wooden spoon, stir ingredients until
sautéed/browned to the desired level.
Connect the power cord to the rice
cooker and plug into an available
outlet.
• Before placing the inner cooking pot into the rice cooker, check that
the cooking pot is dry and free of debris. Adding the inner cooking pot
NOTE
CAUTION
when wet may damage the rice cooker.
X
Press the POWER button to turn on
the rice cooker.
• Do not use the provided serving
spatula to sauté. It is not intended
to be used in contact with high
temperatures. Use a long-handled
wooden or heat-safe spoon to stir
food while sautéing.
19
Page 22
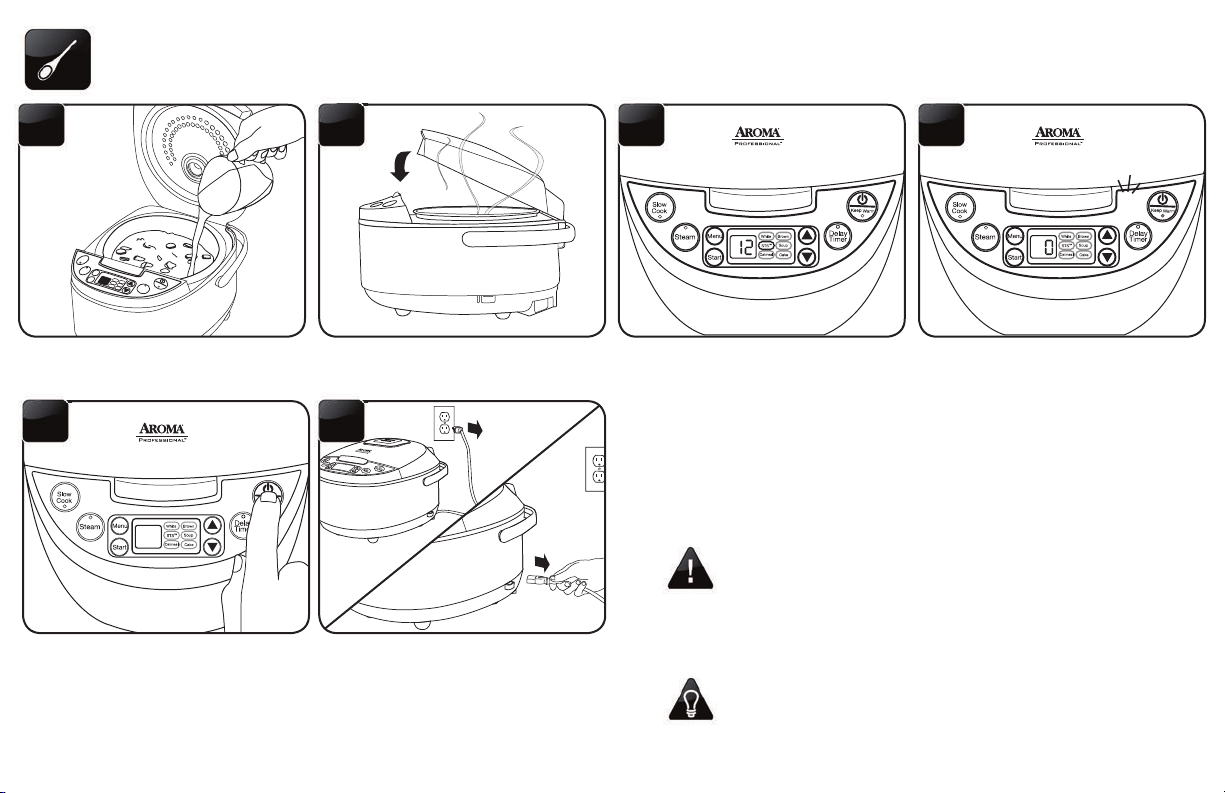
TO USE SAUTÉ-THEN-SIMMER™ (CONT.)
Delay
Timer
Start
Menu
Steam
Slow
Cook
Keep Warm
White
Oatmeal
Brown
Soup
Cake
STS™
7
Add other called for ingredients and
liquid to the inner cooking pot.
11
When nished serving, turn the rice
cooker off by pressing the POWER/
KEEP WARM button once to change
it from its “Keep-Warm” setting and
then press and hold again until the
rice cooker powers off.
20
8
Close the lid securely and allow the
rice cooker to cook.
12
Unplug the power cord from the
power outlet rst, then from the rice
cooker.
9
After a few minutes, the rice cooker
will automatically switch to its
“Simmer” mode. The rice cooker will
countdown the nal minutes of cook
time starting at 12 minutes.
• Food should not be left in the rice cooker on “Keep-Warm”
for more than 12 hours.
NOTE
• If sautéing only, after food has been sautéed/browned to
the desired level, press the POWER/KEEP WARM button to
HELPFUL
HINTS
switch the rice cooker to its “Keep-Warm” setting to keep
sautéed food warm and fresh for serving.
10
Once the meal has cooked, the rice
cooker will beep and automatically
switch over to “Keep-Warm.”
Page 23
Delay
Timer
Start
Menu
Steam
Slow
Cook
Keep Warm
White
Oatmeal
Brown
Soup
Cake
STS™
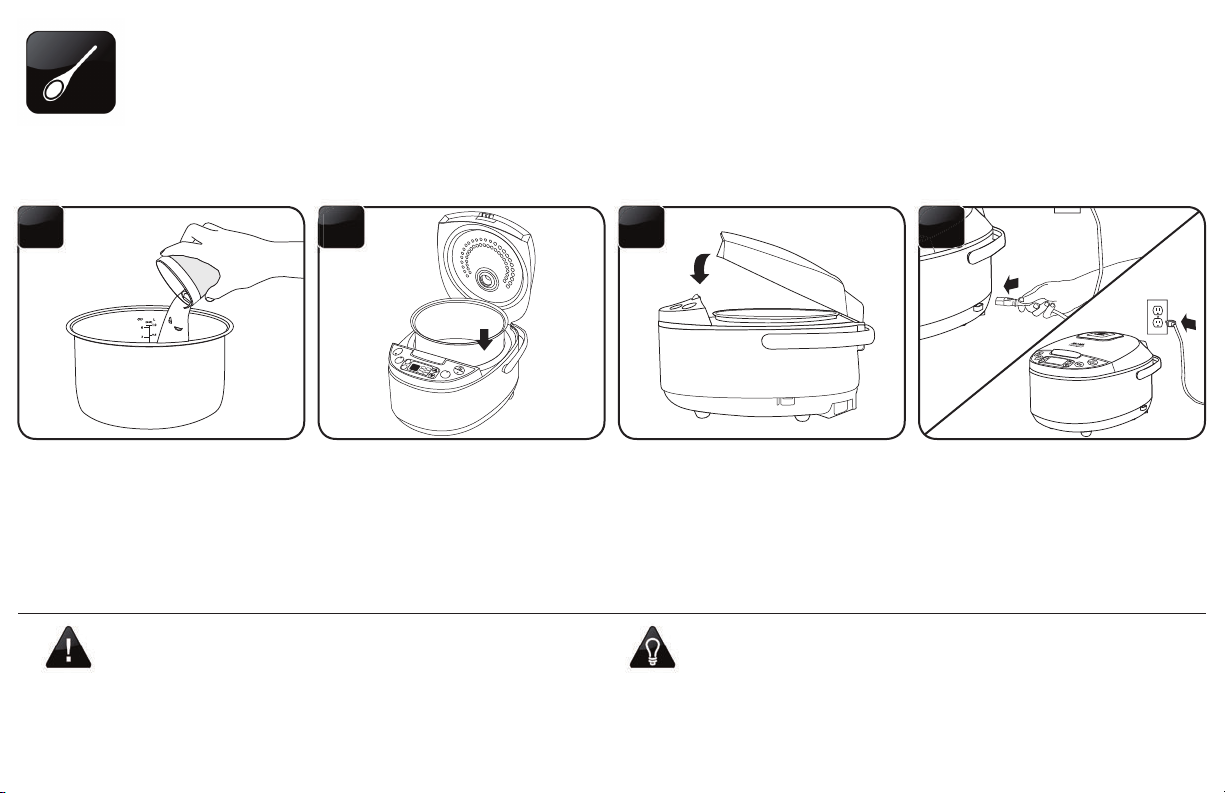
TO USE THE SOUP FUNCTION
1 32
Add ingredients to the inner cooking
pot.
• The “Soup” function is a programmed cooking setting that operates
for 120 minutes before switching to the “Keep-Warm” setting.
NOTE
• Before placing the inner cooking pot into the rice cooker, check
that the cooking pot is dry and free of debris. Adding the inner
cooking pot when wet may damage the rice cooker.
rice cooker.
Close the lid securely.Place the inner cooking pot into the
HELPFUL
HINTS
4
Connect the power cord to the rice
cooker and plug into an available
outlet.
• The “Soup” function is also great for stews and chili.
21
Page 24
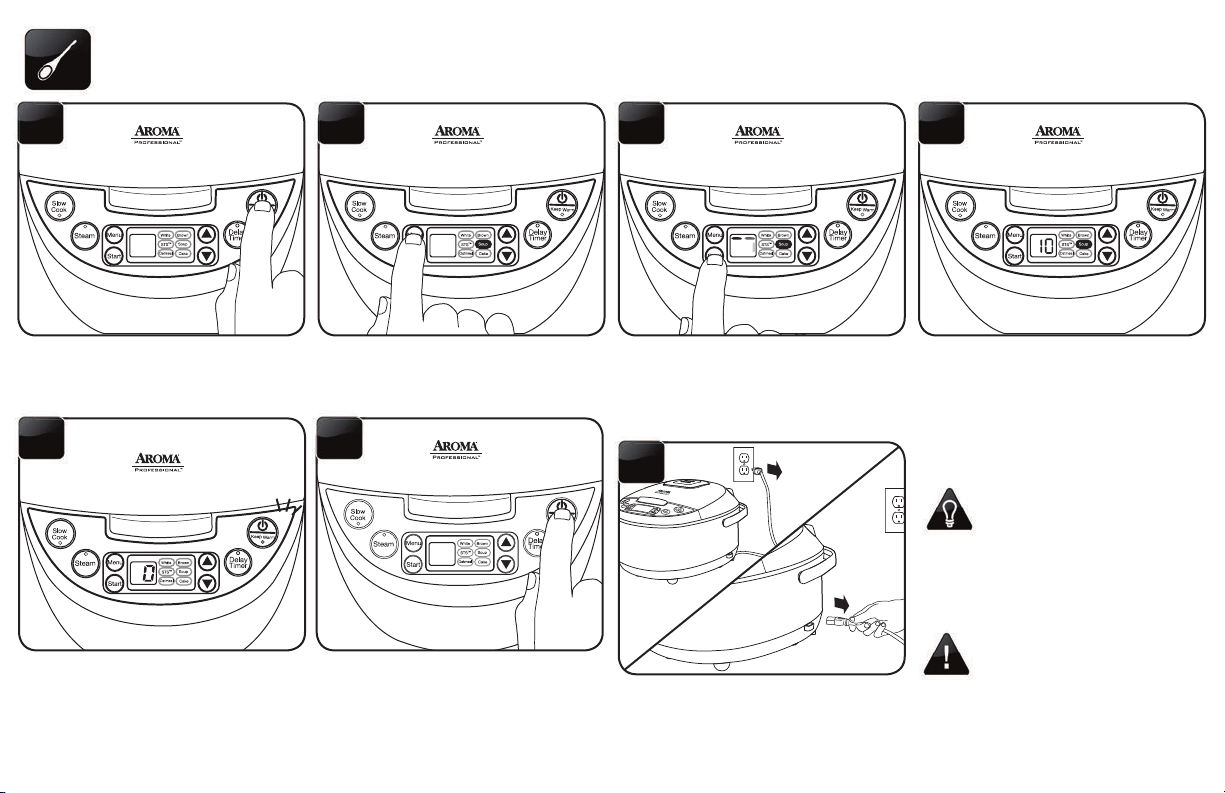
TO USE THE SOUP FUNCTION (CONT.)
5
Press the POWER/KEEP-WARM
button to turn the rice cooker on.
9
Once food is nished, the rice cooker
will beep and automatically switch to
its “Keep-Warm” setting. The digital
display will show the number of hours
the rice cooker has been on the “KeepWarm” setting,” beginning with “0.”
22
Press the MENU button to cycle to
the “Soup” function. The indicator
light will conrm which function is
selected.
10
When nished serving, turn the rice
cooker off by pressing the POWER/
KEEP WARM button once to change
it from its “Keep-Warm” setting and
then press and hold again until the
rice cooker powers off.
7
Press the START button to begin
cooking on the selected function.
The digital display will show a
“chasing” pattern and the indicator
light will become solid to indicate
that it is cooking.
11
Unplug the power cord from the
power outlet rst, then from the rice
cooker.
86
The rice cooker will countdown the
nal minutes of cook time starting at
10 minutes.
• Using caution to avoid
escaping steam, open the
HELPFUL
HINTS
NOTE
lid and stir occasionally
with a long-handled
wooden spoon to assist
with cooking.
• Food should not be left in
the rice cooker on “KeepWarm” for more than 12
hours.
Page 25
Delay
Timer
Start
Menu
Steam
Slow
Cook
Keep Warm
White
Oatmeal
Brown
Soup
Cake
STS™
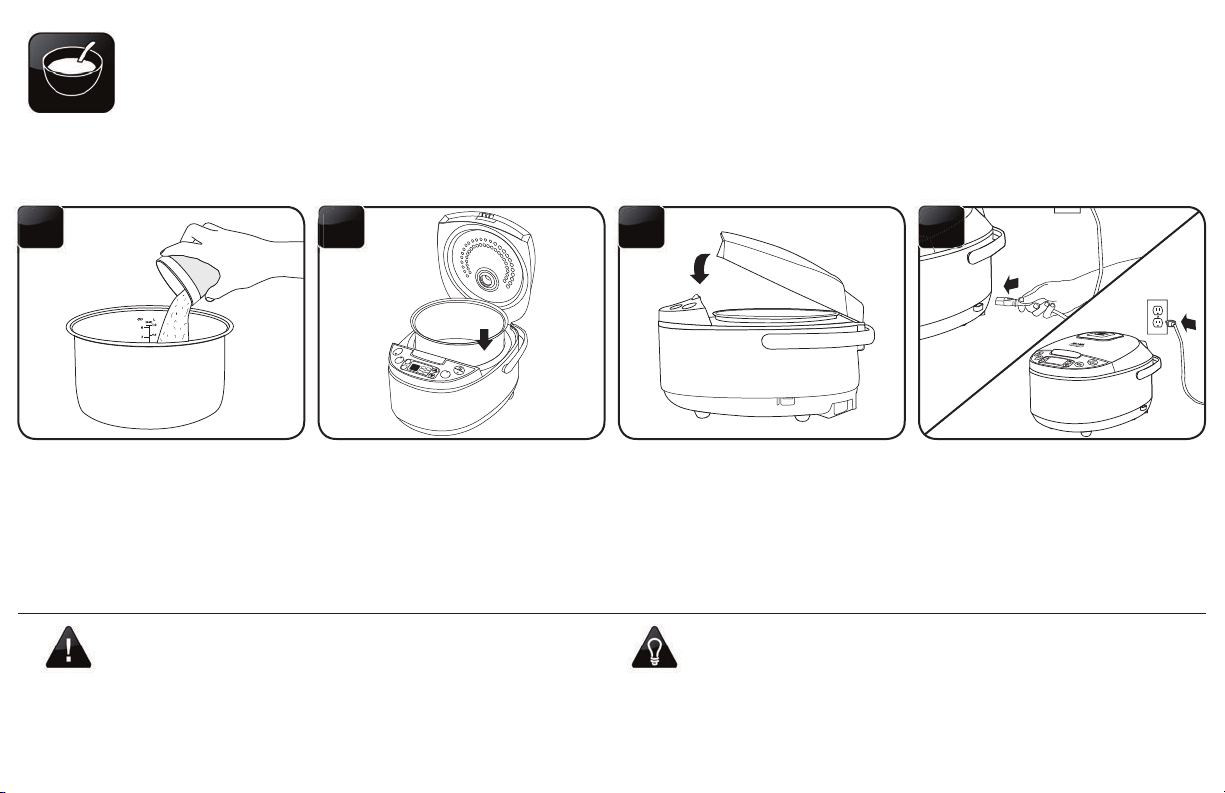
TO USE THE OATMEAL FUNCTION
1 32
Follow packaging instructions for
suggested oatmeal/water ratio,
add oatmeal and water to the inner
cooking pot.
• Before placing the inner cooking pot into the rice cooker, check
that the cooking pot is dry and free of debris. Adding the inner
NOTE
cooking pot when wet may damage the rice cooker.
rice cooker.
Close the lid securely.Place the inner cooking pot into the
HELPFUL
HINTS
4
Connect the power cord to the rice
cooker and plug into an available
outlet.
• The “Oatmeal” function is also great for other types of
porridge.
23
Page 26
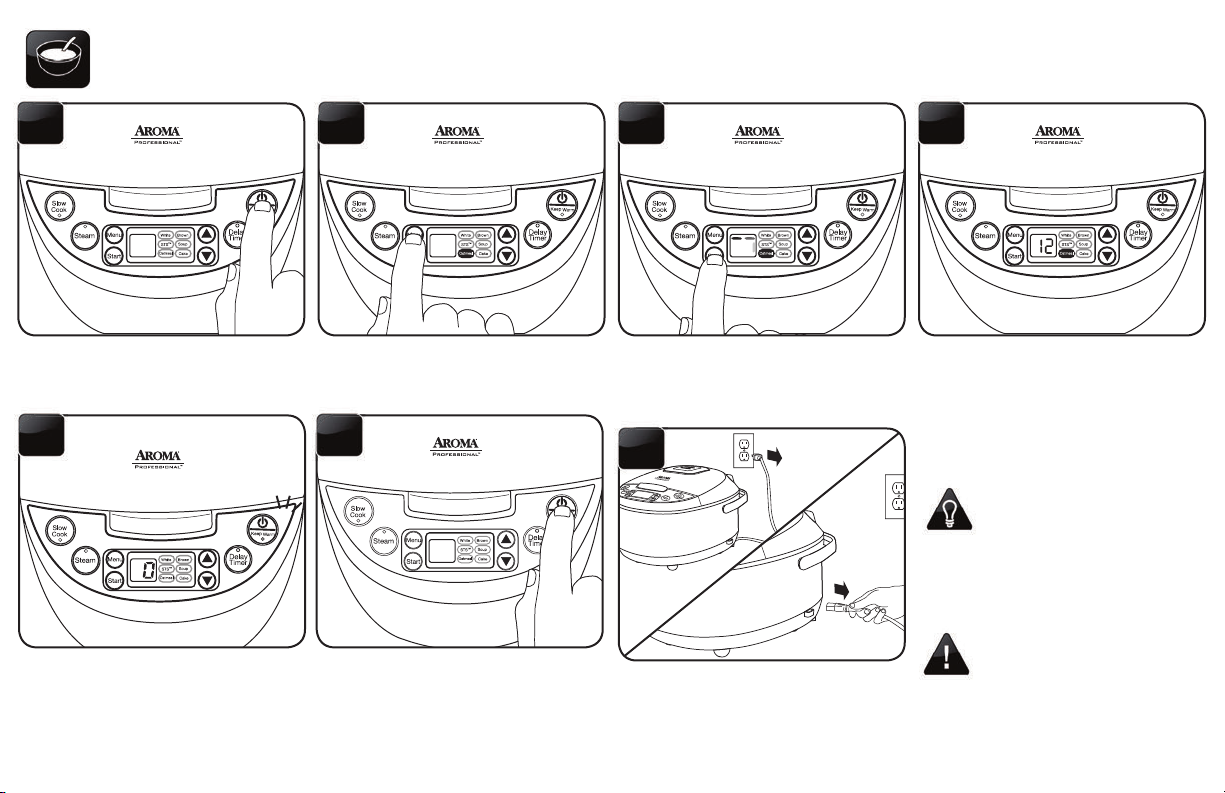
TO USE THE OATMEAL FUNCTION (CONT.)
5
Press the POWER/KEEP-WARM button
to turn the rice cooker on.
9
Once oatmeal is nished, the rice cooker
will beep and automatically switch to its
“Keep-Warm” setting. The digital display
will show the number of hours the rice
cooker has been on the “Keep-Warm”
setting,” beginning with “0.”
24
Press the MENU button to cycle to the
“Oatmeal” function. The indicator light
will conrm which function is selected.
10
When nished serving, turn the rice
cooker off by pressing the POWER/
KEEP WARM button once to change
it from its “Keep-Warm” setting and
then press and hold again until the rice
cooker powers off.
7
Press the START button to begin cooking
on the selected function. The digital
display will show a “chasing” pattern and
the indicator light will become solid to
indicate that it is cooking.
11
Unplug the power cord from the power
outlet rst, then from the rice cooker.
86
The rice cooker will countdown the
nal minutes of cook time starting at
12 minutes.
• Using caution to avoid
escaping steam, open the
HELPFUL
HINTS
NOTE
lid and stir occasionally
with a long-handled
wooden spoon to assist
with cooking.
• Oatmeal should not be
left in the rice cooker on
“Keep-Warm” for more
than 12 hours.
Page 27
Delay
Timer
Start
Menu
Steam
Slow
Cook
Keep Warm
White
Oatmeal
Brown
Soup
Cake
STS™
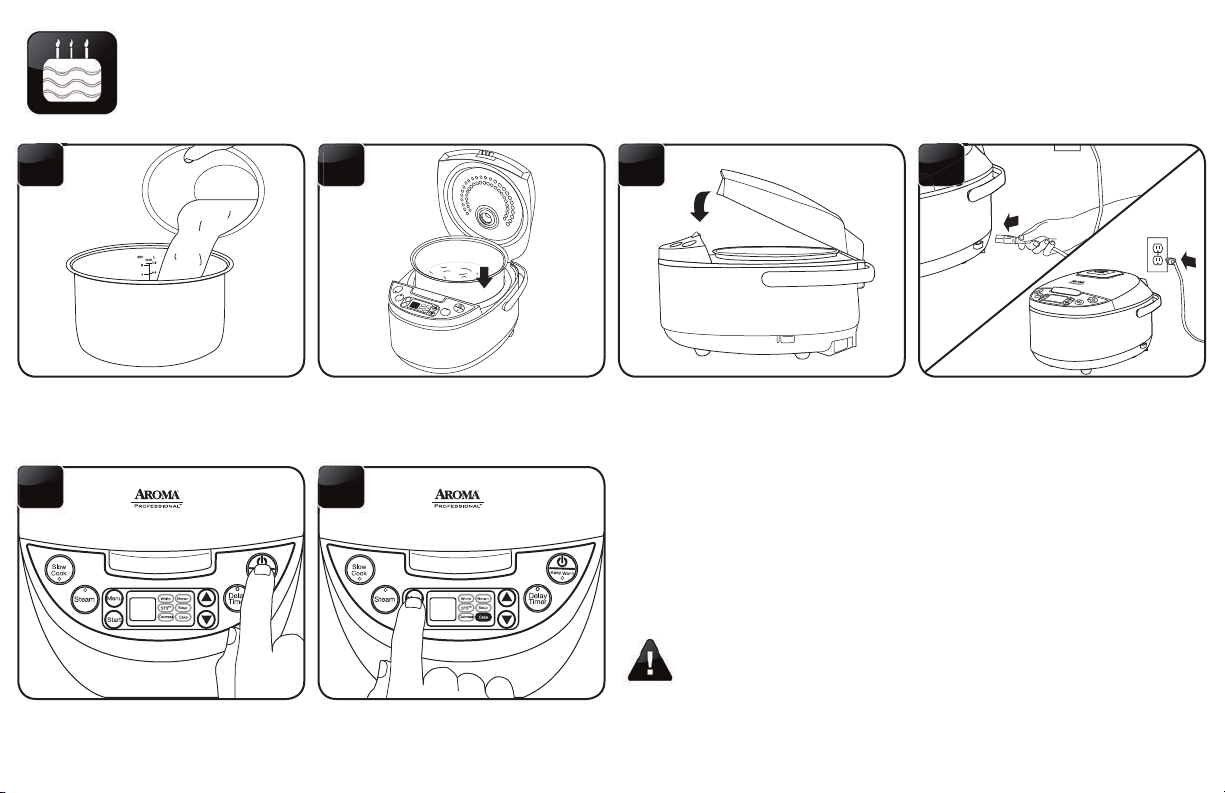
TO USE THE CAKE FUNCTION
1 32
Follow instructions on cake mix
packaging or recipe to mix liquid
ingredients and cake mix. Add cake
mix into the inner pot.
5
Press the POWER/KEEP WARM
button to turn the rice cooker on.
rice cooker.
6
Press the MENU button to cycle to the
“Cake” function. The indicator light will
conrm which function is selected.
Close the lid securely.Place the inner cooking pot into the
NOTE
4
Connect the power cord to the rice
cooker and plug into an available
outlet.
• Before placing the inner cooking pot into the rice cooker, check
that the cooking pot is dry and free of debris. Adding the inner
cooking pot when wet may damage the rice cooker.
• The Cake function will run for 50 minutes before switching to
Keep-Warm. Adjust cook time accordingly depending on the
recipe being used.
25
Page 28
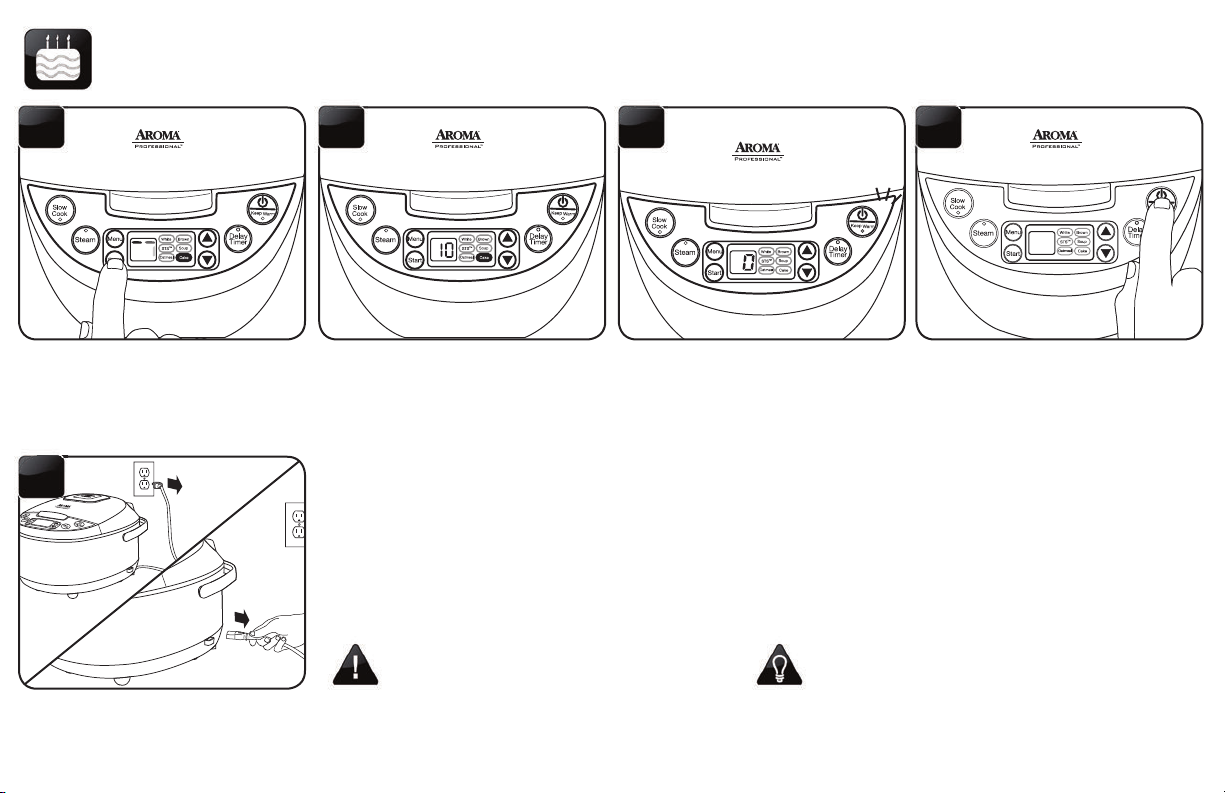
TO USE THE CAKE FUNCTION (CONT.)
7
Press the START button to begin
cooking on the selected function.
The digital display will show a
“chasing” pattern and the indicator
light will become solid to indicate
that it is cooking.
11
Unplug the power cord from the
power outlet rst, then from the rice
cooker.
26
8
The rice cooker will countdown the
nal minutes of cook time starting at
10 minutes.
• Cake should not be left in the rice cooker
on “Keep-Warm” for more than 12 hours.
NOTE
Remove cake immediately for best results.
9
Once cake is nished, the rice cooker
will beep and automatically switch
to its “Keep-Warm” setting. The
digital display will show the number
of hours the rice cooker has been on
the “Keep-Warm” setting,” beginning
with “0.”
• Check cake for doneness by placing a toothpick
into the cake. If it comes out clean the cake is
HELPFUL
HINTS
ready!
10
Remove the cake carefully by
inverting the inner pot onto a at dish
or surface. Turn the rice cooker off
by pressing the POWER/KEEP WARM
button once to change it from its
“Keep-Warm” setting and then press
and hold again until the rice cooker
powers off.
Page 29
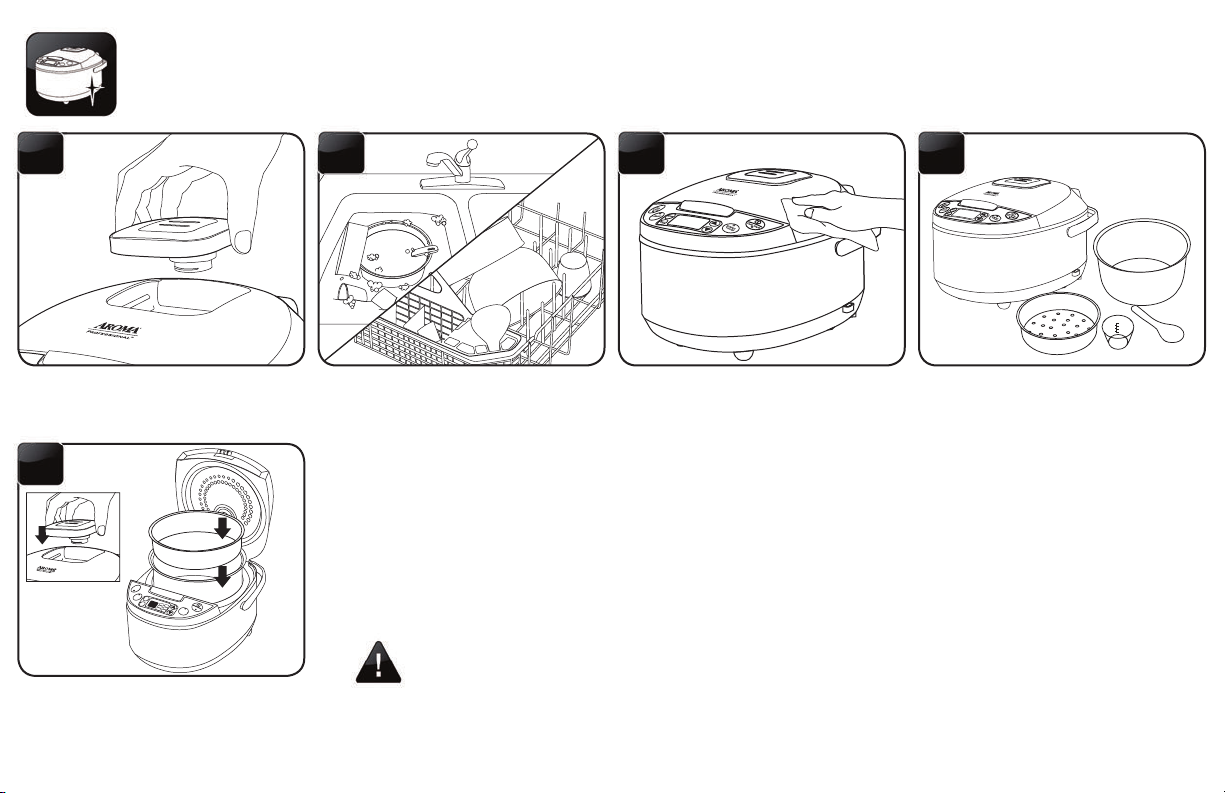
TO CLEAN
Delay
Timer
Start
Menu
Steam
Slow
Cook
Keep Warm
White
Oatmeal
Brown
Soup
Cake
STS™
41 32
Remove the steam vent. Thoroughly dry rice cooker body and
Hand wash the inner cooking pot
and all accessories or wash them in
Wipe rice cooker body clean with a
damp cloth.
all accessories.
the dishwasher.
5
• Do not use harsh abrasive cleaners, scouring pads or products that are not considered safe to use on
nonstick coatings.
Reassemble for next use.
• If washing in the dishwasher, a slight discoloration to the inner pot and accessories may occur. This is
NOTE
cosmetic only and will not affect performance.
• Any other servicing should be performed by Aroma® Housewares. Contact Aroma® customer service at
1-800-276-6286, Monday to Friday 8:30AM-4:30PM PST.
27
Page 30

Rice is too dry/hard after cooking.
If your rice is dry or hard/chewy when the rice cooker switches to “Keep-Warm” mode, additional water and cooking
time will soften the rice. Depending on how dry your rice is, add ½ to 1 cup of water and stir through. Close the lid
and select the “White” function. When rice cooker switches to “Keep-Warm” mode, open the lid and stir the rice to
check the consistency. Repeat as necessary until rice is soft and moist.
Rice is too moist/soggy after cooking.
If your rice is still too moist or soggy when the rice cooker switches to “Keep-Warm” mode, use the serving spatula
to stir the rice. This will redistribute the bottom (moistest) part of the rice as well as release excess moisture. Close
the lid and allow to remain on “Keep-Warm” mode for 10-30 minutes as needed, opening the lid and stirring
periodically to release excess moisture.
The bottom layer of rice is browned/
caramelized.
The bottom layer of cooked rice may become slightly browned and/or caramelized during cooking. To reduce
browning, rice should be rinsed before cooking to remove any excess starch. Stirring rice once it switches to
“Keep-Warm” will also help to reduce browning/caramelizing.
TROUBLESHOOTING
Because rice varieties may vary in their make-up, results may differ. Below are some troubleshooting tips to help you achieve the
desired consistency.
28
Page 31

ABOUT RICE
Courtesy of the USA Rice Federation
Rice is the perfect foundation for today’s healthier eating. It is a nutrient-dense complex carbohydrate that supplies energy, ber, essential vitamins and minerals
and benecial antioxidants. Rice combines well with other healthy foods such as vegetables, fruits, meat, seafood, poultry, beans and soy foods.
Nearly 88% of rice consumed in the U.S. is grown in the U.S. Arkansas, California, Louisiana, Texas, Mississippi and Missouri produce high-quality varieties of
short, medium and long grain rice as well as specialty rices including jasmine, basmati, arborio, red aromatic and black japonica, among others.
There are many different varieties of rice available in the market. Your Aroma
available varieties of rice and their characteristics:
®
Rice Cooker can cook any type perfectly every time. The following are the commonly
Long Grain Rice
This rice has a long, slender kernel three to four times longer than its width.
Due to its starch composition, cooked grains are more separate, light and
uffy compared to medium or short grain rice. The majority of white rice is
enriched to restore nutrients lost during processing. Great for entrees and
side dishes— rice bowls, stir-fries, salads and pilafs.
Medium Grain Rice
When compared to long grain rice, medium grain rice has a shorter, wider
kernel that is two to three times longer than its width. Cooked grains are
more moist and tender than long grain, and have a greater tendency to
cling together. Great for entrees, sushi, risotto and rice puddings.
Short Grain Rice
Short grain rice has a short, plump, almost round kernel. Cooked grains are
soft and cling together, yet remain separate and are somewhat chewy, with
a slight springiness to the bite. Great for sushi, Asian dishes and desserts.
For recipes and rice information visit the USA Rice Federation online at www.usarice.com/consumer.
Brown Rice
Brown rice is a 100% whole grain food that ts the U.S. Dietary Guidelines for
Americans recommendation to increase daily intake of whole grains. Brown rice
contains the nutrient-dense bran and inner germ layer where many benecial
compounds are found. Brown rice is available in short, medium and long grain
varieties and can be used interchangeably with enriched white rice.
Wild Rice
Wild rice is an aquatic grass grown in Minnesota and California and is a frequent
addition to long grain rice pilafs and rice mixes. Its unique avor, texture and
rich dark color provide a delicious accent to rice dishes. Wild rice also makes
a wonderful stufng for poultry when cooked with broth and mixed with your
favorite dried fruits.
29
Page 32

ABOUT RICE
Courtesy of the USA Rice Federation
Did You Know?
• Rice is the primary dietary staple for more than half of the world’s population.
• U.S. grown rice is the standard for excellence and accounts for nearly 88% of the rice consumed in America. It is grown and harvested by local farmers in
ve south-central states and California.
• Rice contains no sodium, cholesterol, trans fats or gluten, and has only a trace of fat. One half-cup of rice contains about 100 calories.
• Research shows that people who eat rice have healthier diets than non-rice eaters and eat more like the U.S. Dietary Guidelines for Americans
recommendations.
• Whole grains like brown rice help reduce the risk of chronic diseases such as heart disease, diabetes and certain cancers, and aid in weight management.
• Brown rice is a 100% whole grain. One cup of whole grain brown rice provides two of the three recommended daily servings of whole grains.
• Eating rice triggers the production of serotonin in the brain, a chemical that helps regulate and improve mood.
• September is National Rice Month - promoting awareness of the versatility and the value of U.S. grown rice.
30
For recipes and rice information visit the USA Rice Federation online at www.usarice.com/consumer.
Page 33
RECIPES
Mushroom Risotto
Ingredients
2 tbsp Olive Oil
1 cup Sliced Mushrooms of
Your Choice
2 cups Arborio Rice
½ Onion, Diced
2 Garlic Cloves, Crushed
1 cup White Wine
2 tbsp Butter
Ingredients
Cake:
½ box Yellow Cake Mix of Your Choice
Rum to Substitute for Water
Glaze:
½ cup Rum
½ cup Butter
½ cup Brown Sugar
¹⁄₈ cup Water
3 cups Chicken Stock
½ cup Heavy Cream
½ cup Shredded Parmesan Cheese
¼ cup Chopped Italian Parsley
_ Salt and Pepper
™
Set the rice cooker to the Sauté-Then-Simmer
and add olive oil, garlic, mushrooms and onion. Sauté until
onions are soft for about 8 minutes. Add rice and stir. Add wine
and cook until mostly absorbed by rice. Add the chicken stock
and close the lid. Once the rice cooker beeps, add the cream,
parmesan cheese, butter and parsley. Stir to combine and taste.
Add salt and pepper if needed.
(STS™) function
Rum Cake
Prepare ½ box of cake batter according to directions, but replace half of the water
amount asked for with rum. Since using half of the cake mix, the water/rum ratio should
also be cut in half. Rinse the inner pot and coat with a cooking spray. Add the batter and
set on cake mode. Wait for cake cycle to nish and remove carefully by inverting onto a
wire rack.
For the glaze, set your rice cooker on Sauté-Then-Simmer™ (STS™) function and add
water, butter, sugar and rum. Stir until sugar has dissolved and butter has melted. With
a toothpick poke holes into the cake and pour the glaze on top, smoothing with a knife if
needed.
For additional rice cooker recipes, or even to submit your own, visit our website at www.AromaCo.com!
31
Page 34

RECIPES (CONT.)
Rice Cooker Cupcakes
Ingredients
1 box Chocolate Cupcake Mix
3 Eggs
3 cups Water
1 container Any Flavor Frosting
6 Silicon Cupcake Molds
6 Paper Cupcake Cups
Ingredients
1 lb. Spicy Smoked Sausage
1 lb. Shrimp, Peeled and Deveined
2 cups Cooked Chicken, Shredded
1½ cups Rice
4 cups Chicken Broth
1 4-oz. can Diced Green Chilies
2 tbsp Creole Seasoning
Mix cupcake mix according to box instructions. Place cupcake cups in molds. Add
cupcake mix. Place cupcakes in steam tray and close the lid. Set to the “Steam” function
according to box baking instructions (30 minutes typically). Using caution, open the lid
and check cupcakes for doneness. If ready, add frosting and enjoy!
Jambalaya
Cut the smoked sausage in half, lengthwise, then into 1/4” half circles. Add all ingredients
to the inner pot and mix well. Place inner pot in the rice cooker and close the lid. Set to
the “White Rice” function. The rice cooker will automatically switch to “Keep-Warm” mode
once the meal is ready.
32
For additional rice cooker recipes, or even to submit your own, visit our website at www.AromaCo.com!
Page 35
RECIPES (CONT.)
Chicken Noodle Soup
Ingredients
2 lbs. Chicken Thighs
1 Yellow Onion, Cut into Small Quarters
10 Celery Stalks Cut into Bite-sized Pieces
10 Carrots Cut into Bite-sized Rounds
8 cups Chicken Stock
2 tbsp Olive Oil
2 Bay Leaves
2 Sprigs of Thyme
- Salt and Pepper, for Added Taste
Ingredients
¾ cup Old-Fashioned Oatmeal
1½ cups Milk
¼ cup Brown Sugar
- Dash of Salt
Add olive oil, onions and celery to the inner pot and place it inside the rice cooker. Select
the Sauté-Then-Simmer
Add chicken thighs and brown on both sides. Add the stock, carrots and herbs, then
close the lid. Set to the “Soup” function and let cook. When the “Soup” function nishes,
remove and shred the chicken with two forks and put it back in the soup. Serve with your
favorite add-ons.
™
(STS™) function and cook until fragrant or about ten minutes.
Breakfast Oatmeal
Set the rice cooker to its Sauté-Then-Simmer™ (STS™) function and add the milk and
sugar. Stir until milk is warm and sugar has dissolved. Add salt and oatmeal. Close the lid
and set to the “Oatmeal” function. Serve when oatmeal is nished cooking.
For additional rice cooker recipes, or even to submit your own, visit our website at www.AromaCo.com!
33
Page 36

WARRANTY
LIMITED WARRANTY
Aroma Housewares Company warrants this product free from defects in
material and workmanship for ve years from provable date of purchase in
the United States.
Within this warranty period, Aroma Housewares Company will repair or
replace, at its option, defective parts at no charge, provided the product
is returned, freight prepaid with proof of purchase and U.S. $20.00 for
shipping and handling charges payable to Aroma Housewares Company.
Before returning an item, please call the toll free number below for a return
authorization number. Allow 2-4 weeks for return shipping.
This warranty does not cover improper installation, misuse, abuse or
neglect on the part of the owner. Warranty is also invalid in any case that
the product is taken apart or serviced by an unauthorized service station.
This warranty gives you specic legal rights, which may vary from state to
state, and does not cover areas outside the United States.
AROMA HOUSEWARES COMPANY
6469 Flanders Drive
San Diego, California 92121
1-800-276-6286
M-F, 8:30 AM - 4:30 PM, Pacic Time
Website: www.AromaCo.com
SERVICE & SUPPORT
In the event of a warranty claim, or if service is required for this product, please
contact Aroma® customer service toll-free at:
1-800-276-6286
M-F, 8:30AM-4:30PM, Pacic Time
Or we can be reached online at [email protected].
For your records, we recommend stapling your sales receipt to this page along with
a written record of the following:
Date of Purchase:
Place of Purchase:
• Proof of purchase is required for all warranty claims.
NOTE
34
 Loading...