

ARC-1010SB
www.AromaCo.com
20-Cup
Digital Rice Cooker
& Food Steamer
Instruction Manual
Manual de instrucciones
digital de 20 tazas
Arrocera y vaporera
www.AromaCo.com
ARC-1010SB

Congratulations on your purchase of the 20-Cup Digital Rice
Cooker. In no time at all, you’ll be making fantastic, restaurant-quality rice
at the touch of a button! Whether long, medium or short grain, this
cooker is specially calibrated to prepare all varieties of rice, including
tough-to-cook whole grain b
In addition to rice, your new Aroma
rown rice, to fluffy perfection.
®
Rice Cooker is ideal for healthy,
one-pot meals for the whole family. The convenient steam tray inserts
directly over the rice, allowing you to cook moist, fresh meats and
vegetables at the same time, in the same pot. Steaming foods locks in
their natural flavor and nutrients without added oil or fat, for meals that
are as nutritious and low-calorie as they are easy.
®
Aroma
’s Sauté-Then-Simmer™Technology is ideal for the easy
preparation of Spanish rice, risottos, pilafs, packaged meal helpers, stir frys
and more stovetop favorites!
But it doesn’t end there. Your new rice cooker is also great for soups,
stews, stocks, gumbos, jambalaya, breakfast frittata, dips and even
desserts!
Several delicious recipes are included at the back of this manual, and
even more are available online at www.AromaCo.com.
odos los accesorios
© 2011 Aroma Housewares Company Todos los derechos reservados.
www.AromaCo.com
1-800-276-6286
U.S.A.
San Diego, CA 92121
6469 Flanders Drive
Aroma Housewares Co.
Publicado Por:
línea en www.AromaCo.com.
recetas y soluciones de otros electrodomésticos, por favor visítenos en
Para más información acerca de su arrocera o el servicio del producto,
cocinar arroz y otros alimentos al vapor.
que se incluyen. También se incluyen tablas útiles de medida para
configuraciones digitales preprogramadas, así como t
Este manual contiene instrucciones para usar su arrocera y sus
This manual contains instructions for using your rice cooker and its
onvenient pre-programmed digital settings, as well as all of the
c
accessories included. There are also helpful measurement charts for
cooking rice and steaming.
®
For more information on your Aroma
rice cooker, or for product service,
recipes and other home appliance solutions, please visit us online at
www.AromaCo.com.
Published By:
Aroma Housewares Co.
6469 Flanders Drive
San Diego, CA 92121
U.S.A.
1-800-276-6286
www.AromaCo.com
© 2011 Aroma Housewares Company All rights reserved.
incluyen varias deliciosas recetas.
desayuno, dips y hasta postres! En la parte trasera de este manual se
sopas, guisos, caldos, sopas de mariscos, jambalaya, frittatas para el
Pero esto no es todo. ¡Su nueva arrocera también es grandiosa para
facilidad: arroz a la Mexicana, arroz risotto, pilafs ¡y mas!
ara Salteados (Sauté) es ideal para preparar con
La nueva función p
tan nutritivos y bajos en calorías como fáciles de preparar.
cocinado) sin tener que agregar aceite o grasa, para platillos que son
naturales (los cuales se pierden con frecuencia con otros métodos de
misma olla. Los alimentos al vapor encierran sus nutrientes y sabores
cocinar vegetales y carnes frescas al vapor al mismo tiempo, en la
charola de vapor se inserta directamente encima el arroz, permitiéndole
n una sola olla para toda la familia. La cómoda
es ideal para platillos
®
saludables cocinados e
Además del arroz, su nueva arrocera Aroma
arroz integral difícil de cocinar, con un esponjado perfecto.
especialmente para cocinar todas las variedades de arroz, incluyendo el
grano sea largo, mediano o corto, esta máquina está calibrada
calidad de un restaurante, con el toque de un botón! Ya sea que el
cualquier momento, usted estará preparando arroz fantástico, de la
Felicidades por comprar la arrocera digital para 20 tazas . ¡En

1
GUARDE ESTAS INSTRUCCIONES
IMPORTANT SAFEGUARDS
Basic safety precautions should always be followed when using electrical
appliances, including the following:
proporcionada.
interiorremovible que le ha sido
eléctricococinesoloenla charola
23. Para evitarelriesgode unchoque
muro.
separeelcabledelenchufeenel
en“OFF”(desconectar) y después
22. Para desconectarpóngaseel control
enunaestufa u hornilla.
deformaciónno seusela ollainterior
21. Para preveniry evitardañoo
caliente).
esté en “Keep-Warm”(manténgase
función
r
másde12 horascuando la
20. Nodejeelarrozenla olla interiorpor
quemaduras.
puedeescaparse y causar serias
después,de cocinar.El vaporardiente
latapay durante,o inmediatamente
19. Useprecauciónextremacuandoabra
apropiadamente.
provocarque no funcione
olla puededañar al aparatoo
usada.Sila ollaseregresamojadaa la
laollainterior estésecaantes de ser
18. Cercióresesiempre que el exteriorde
funcioneadecuadamente.
alaparatoo biencausarqueesteno
otrosaparatosesto puede:bien daña
circuitoeléctrico se sobrecargacon
aparatosen funcionamiento.Si el
circuitoeléctrico separadode otros
17. Suarroceradebe de operarse en un
pared,nunca jaleel cordón.
16. Siempredesconecte el enchufedela
de120VAC(corrientealternativa).
15. Úsesesoloconun enchufeeléctrico
escaldar.
queelcaloresextremoy lepuede
partesuperiordesu ollade presión, ya
ventiladordevapor situado en la
14. Notoque,cubrau obstruyael
rie.
fecuandono
precaución.
otroslíquidos, úseloconmucha
conteniendoarroz, aceitecalienteo
13. Cuandoutiliceelaparato
diferenteal deseado.
12. Nose use elaparatoparaotro uso
calentadoro de unhornocaliente.
11. Nolo coloque sobre, o cerca, de un
mostrador.
quecuelguedealgunamesao
contactocon superficiescalienteso
10. Nopermitanqueelcordónhaga
9. No seutilicea laintempe
unchoqueeléctrico o una lesión.
Housewarespuedeocasionarfuego,
recomendadosporAroma
8. El usoderefaccioneso accesorios no
loexaminen, lo reparareno loajusten.
a nuestroservicioa clientesparaque
defectuosamente.Porfavorcontacte
cuandohayafuncionado
cordóno enchufe dañado,o bien
7. No seopereningúnaparatoconun
agregarleo quitarlepiezas.
queelaparatose enfríeantesde
esté en usoy antes de lavarse. Permita
6. Desconéctese del enchu
estrechasupervisión.
cercade ellos,serecomiendauna
5. Si elaparatoes usadoporniños,o
cualquierotrolíquido.
enchufe o el aparatoenaguao
eléctrica,nosumerjaelcordón,el
4. Paraprotegersecontraunadescarga
y resistentesal calor.
3. Úsesesolo en superficiessecas,planas
utilice las manijaso las perillas.
2. No toquelas superficiescalientes,
cuidadosamente.
leatodas las instrucciones
1. Importante:Antes de usarseporfavor
carefullybeforefirstuse.
2. Donot touchhot surfaces.Usethe
handles orknobs.
3. Useonlyon a level,dryand
heat-resistantsurface.
4. Toprotectagainstelectricalshock,
donot immerse cord,plugorthe
appliancein wateroranyother
liquid.
5. Closesupervisionis necessarywhen
theapplianceisusedby ornear
children.
6. Unplugfromoutletwhennot inuse
andbeforecleaning. Allowunitto
cool beforeputtingon ortakingoff
partsand beforecleaning the
appliance.
7. Donot operate anyappliancewith
a damaged cord orplugorafterthe
appliancemalfunctionsorhasbeen
damaged inany manner. Contact
®
Aroma
customerservicefor
examination,repairoradjustment.
8. Theuseofaccessoryattachments
notrecommended byAroma
®
Housewares mayresultinfire,
electrical shockorinjury.
9. Donot useoutdoors.
10. Donot letcordtouch hotsurfacesor
hang over theedgeofacounteror
table.
11. Donot placeonornearahot
burneror inaheated oven.
12. Donot usetheappliance forother
than itsintended use.
1. Important: Read allinstructions
13. Extreme caution must beusedwhen
movingtheappliance containing
rice,hot oilor otherliquids.
14. Donot touch,cover orobstructthe
steamventonthetop oftherice
cookeras itisextremelyhotandmay
causescalding.
15. Useonlywitha120VACpower
outlet.
16. Alwaysunplugfromthe base ofthe
wall outlet. Neverpullonthecord.
17. Thericecookershould beoperated
onaseparateelectricalcircuitfrom
otheroperating appliances.Ifthe
electrical circuit isoverlo
aded with
otherappliances,theappliance
maynotoperateproperly.
18. Alwaysmakesuretheoutsideofthe
innercookingpot isdry priortouse.If
theinnerpot isreturnedtothe
cookerwhenwet, itmay damageor
causethe productto malfunction.
19. Useextremecaution when opening
thelidduringor after cooking.Hot
steamwillescapeand may cause
scalding.
20. Rice shouldnotbe leftin theinner
cooking potwiththe“Keep-Warm”
functionon formorethan12hours.
21. Topreve
ntdamage or deformation,
donotuse theinner cookingpot on
a stovetopor burner.
22. Todisconnect,turn anycontrolto
“OFF,”thenremovetheplugfrom
thewalloutlet.
23. Toreducethe risk ofelectricalshock,
cook onlyin theremovable inner
cooking potprovided.
precauciones básicas de seguridad, incluyendo las siguientes:
Cuando se usen aparatos electricos, siempre deberán observarse las
SAVE THESE INSTRUCTIONS
MEDIDAS IMPORTANTES DE SEGURIDAD
1
2
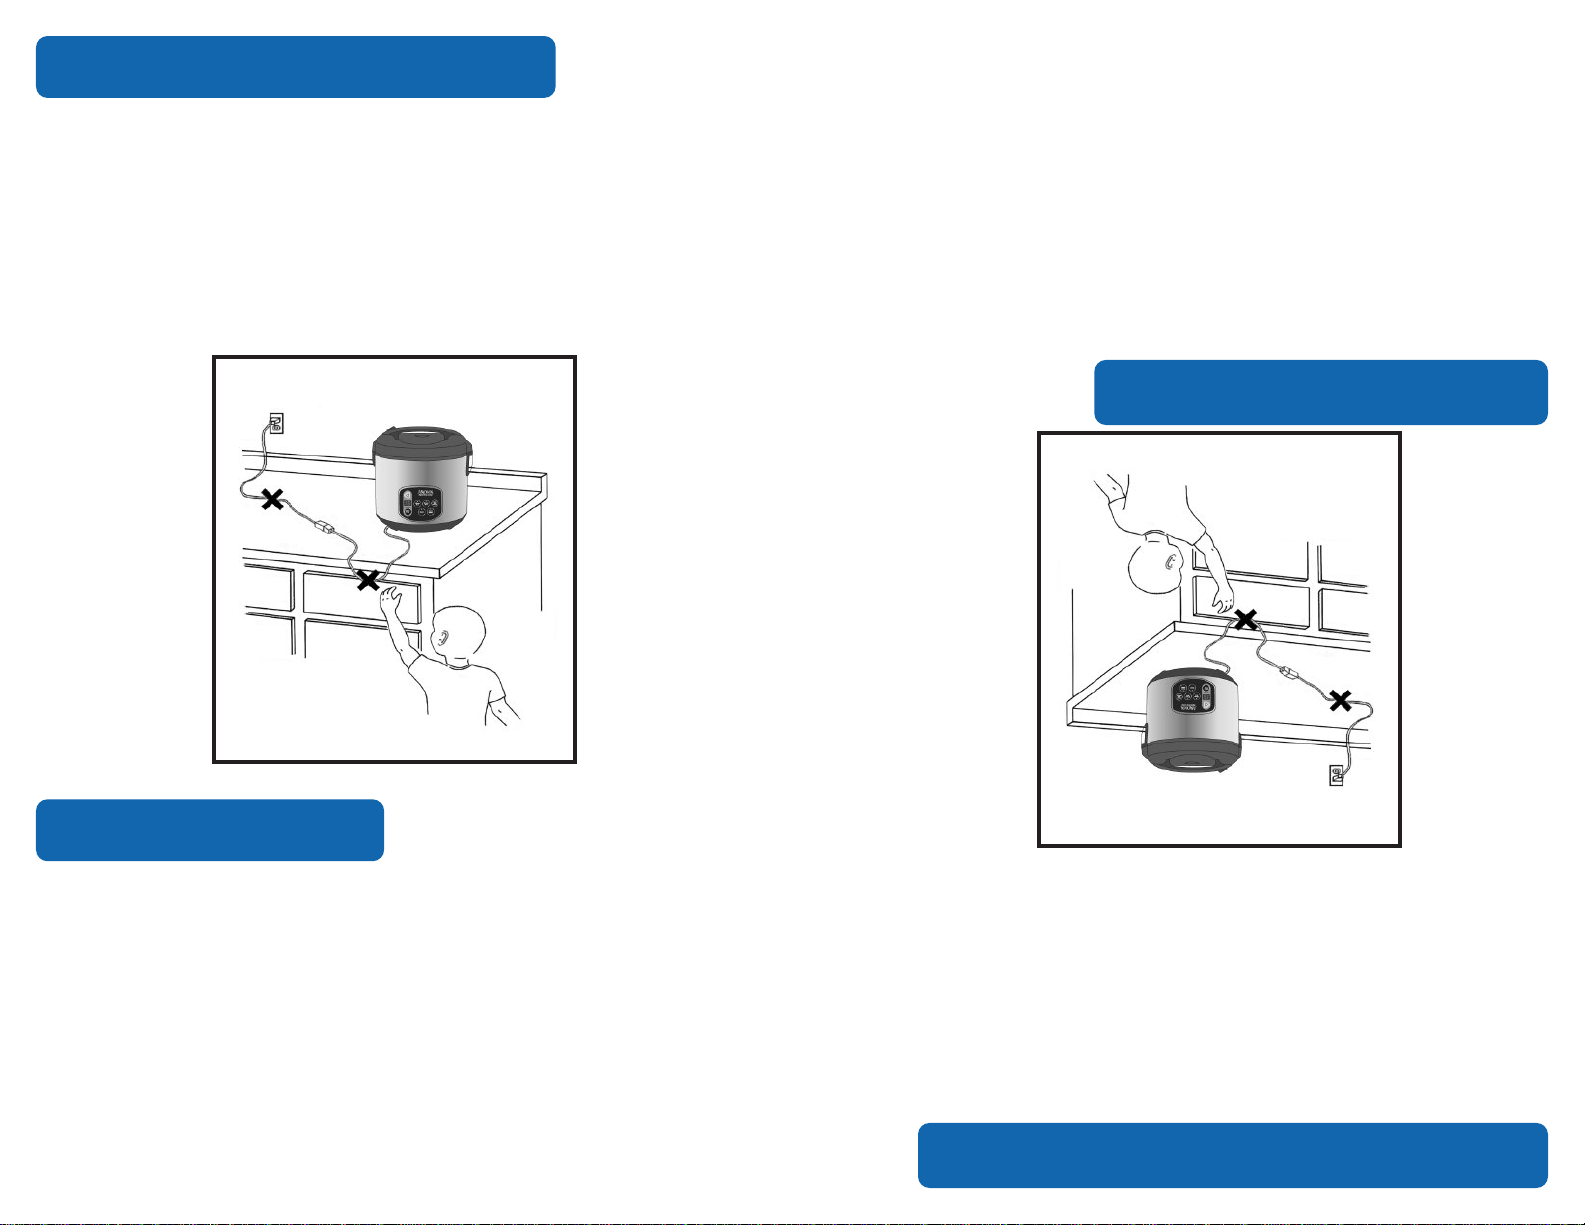
SHORT CORD INSTRUCTIONS
1. A short power-supply cord is provided to reduce the risks resulting from
becoming entangled in or tripping over a longer cord.
2. Longer extension cords are available and may be used if care is exercised in
their use.
3. If a longer extension cord is used:
a. The marked electrical rating of the extension cord should be at least as
great as the electrical rating of the appliance.
b. The longer cord should be arranged so that it will not drape over the
counter top or tabletop where i
unintentionally.
DO NOT DRAPE CORD!
an be pulled by children or tripped over
t c
ESTE APARATO ES PARA USO DOMÉSTICO.
evita cualquier peligro.
tra persona calificada para hacer que se
fabricante o su agencia de servicio u o
Si esté estropeado el cordón eléctrico, hay que ser reemplazado por el
peligroso.
trar, llame a un electricista calificada. No intente de modificar la clavija, es muy
no entra completamente, da vuelta a la clavija. Si aun la clavija no puede endebe de enchufar un lado en enchufes de luz de ploya polarisada. Si la clavija
Para reducir el riesgo de descarga eléctrica, este ploya intencionalmente solo
Si este aparato tiene ploya polarizada:
PLOYA POLARIZADA
NIÑOS!
LEJOS DE LOS
¡MANTÉNGALO
KEEP FROM
CHILDREN!
POLARIZED PLUG
This appliance has a polarized plug (one blade is wider than the other); follow
the instructions below:
To reduce the risk of electric shock, this plug is intended to fit into a polarized
outlet only one way. If the plug does not fit fully into the outlet, reverse the plug.
If it still does not fit, contact a qualified electrician. Do not attempt to modify the
plug in any way.
If the supply cord is damaged, it must be replaced by the manufacturer, its
service agent or a similarly qualified person in order to avoid a hazard.
This appliance is for household use only.
2
CUELGUE!
esa en donde pudiera ser jalado por un
dor o m
¡NO DEJE QUE EL CABLE
niño o alguien pudiera tropezarse con el cable sin querer.
el borde del mostra
b. El cable más largo debe ser colocado de manera que no cuelguepor
por lo menos igual que la clasificación eléctrica del aparato.
a. La clasificación eléctrica marcada en el cable de extensión debe ser
3. Si se usa un cable de extensión más largo:
sumo cuidado.
2. Hay cables de extensión más largos disponibles y deben ser usados con
riesgo de tropezarse o enredarse con un cable más largo.
1. Se proporciona un cable eléctrico corto con el propósito de reducir el
INSTRUCCIONES DE CABLE CORTO
Luz indicadora de arroz blanco
integral
Luz indicadora de arroz
Indicador de salteado
“manténgase caliente”
caliente”/Luz indicadora de
Luz indicadora de vapor
programador del tiempo
tiempo/ Luz Indicadora de
10
10. Charola de vapor
9. Taza para medir
8. Espátula para servir
7. Olla de cocinar
control
6. Tablero de
condensación
5. Recogedor de
4. Tapa
3. Manija
vapor
para abrir la tapa
5
2. Ventilador de
1. Botón pulsador
4
3
19. Botón para arroz blanco/
18. Botón para arroz integral/
17. Botón para salteado/ Luz
16. Botón de “manténgase
15. Botón para vapor/
14. Botón del programador del
13. Luz indicadora de cocimiento
17
12. Pantalla digital
11. Botón de poder
16
18
Tablero de control
9
6
15
14
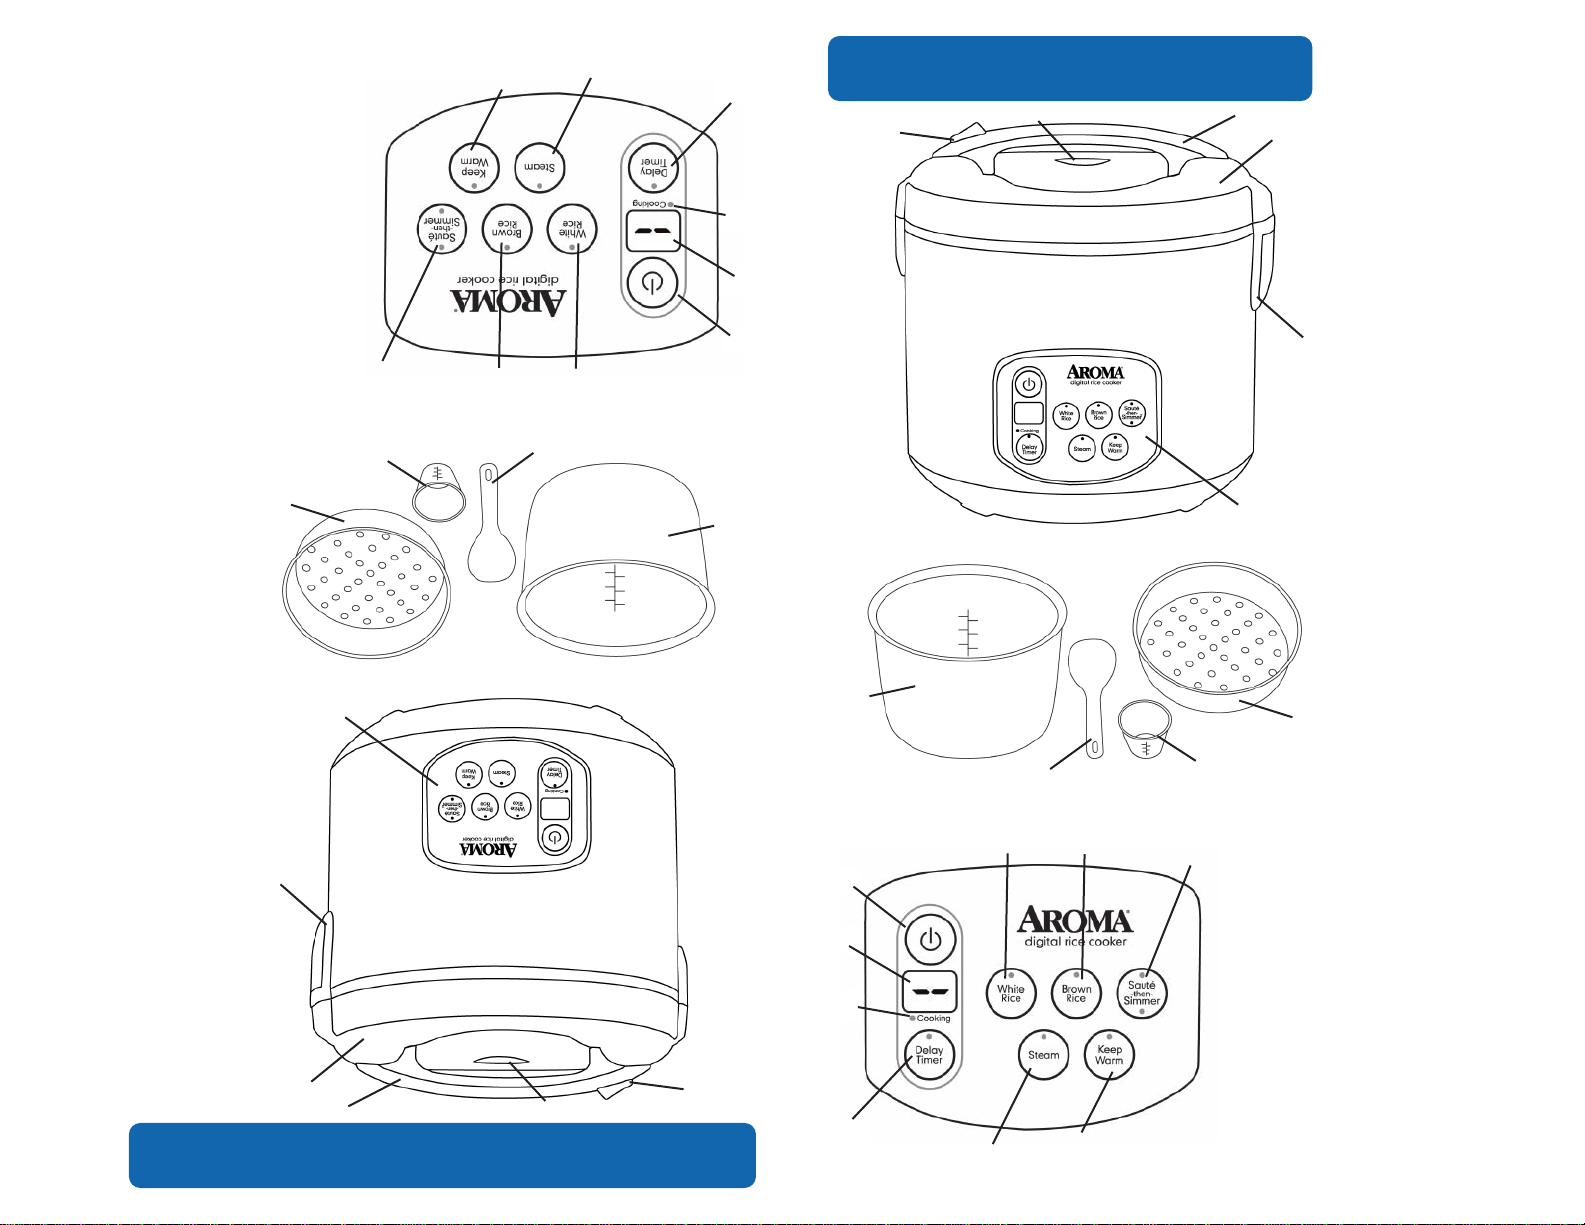
PARTS IDENTIFICATION
2
1
3
4
13
12
11
19
8
7
6
1. Lid Release
5
Button
2. Steam Vent
3. Handle
4. Lid
5. Condensation
Collector
6. Control Panel
7. Inner Cooking Pot
8. Serving Spatula
9. Measuring Cup
10. Steam Tray
7
10
8
9
Control Panel
19
18
11
12
13
1
3
2
IDENTIFICACION DE LAS PARTES
14
15
16
3
11. Power Button
17
12. Digital Display
13. Cooking Indicator Light
14. Delay Timer Button/
Indicator Light
15. Steam Button/ Indicator
Light
16. Keep-Warm Button/
Indicator Light
17. Sauté-Then-Simmer™
Button/ Indicator Light
18. Brown Rice Button/
Indicator Light
19. White Rice Button/
Indicator Light

4
USING YOUR RICE COOKER
Before First Use:
1. Read all instructions and important safeguards.
2. Remove all packaging materials and check that all items have been
received in good condition.
3. Tear up all plastic bags as they can pose a risk to children.
4. Wash lid, steam vent and accessories in warm, soapy water. Rinse and dry
thoroughly.
5. Remove the inner cooking pot from rice cooker and clean with warm, soapy
water. Rinse and dry thoroughly before returning to cooker.
6. Wipe body clean with a damp cloth.
NOTE:
• Do not use abrasive cleaners or scouring pads.
• Do not immerse the rice cooker base, cord or plug in water at any time.
To Cook Rice:
1. Using the measuring cup provided, measure out the desired amount of rice.
One full, level cup of uncooked rice will yield 2 cups of cooked rice. The
measuring cup provided adheres to rice industry standards (180mL) and is not
equal to one U.S. cup (240 mL).
2. Rinse rice in a separate container until the water becomes relatively clear;
drain.
3. Place rinsed rice in the inner cooking pot.
4. Using the measuring cup provided or the water measurement lines located
inside the inner c
“Rice/Water Measurement Table” on page 6 for suggested rice/water ratios.
HELPFUL HINT:
•To add an extra dimension of flavor to rice, try substituting a favorite variety
of meat or vegetable broth or stock. The ratio of broth/stock to rice will be
the same as water to rice.
ooking pot, add the appropriate amount of water. See the
na vez terminado
CONTINÚA EN LA PÁGINA SIGUIENTE
modalidad de “Manténgase caliente” (Keep-Warm).
el cocimiento, la arrocera automáticamente cambiará a la
prenderá para indicar que la olla ha empezado a cocinar. U
8. Después de aproximadamente 5 segundos la luz indicadora de cocimiento se
función seleccionada se iluminará.
INTEGRAL, dependiendo del tipo de arroz que se va a cocinar. La luz de la
7. Para empezar a cocinar, presione los botones de ARROZ BLANCO o ARROZ
digital enseñará dos rayas azules.
luces indicadoras de los botones tendrán destellos sucesivos y la pantalla
6. Prenda la arrocera presionando el botón de Poder (Power). Cada una de las
esté cerrada propiamente y conecte el cordón eléctrico en el enchufe del muro.
deshechos, coloque la olla de cocinar en la olla de presión, asegúrese que la tapa
5. Para asegurarnos que el exterior de la olla de cocinar esté limpio, seco y libre de
porcentual de caldo/arrozdebe de ser el mismo que el de agua con el arroz.
una variedad de su caldo de carne o de verduras favoritos; el índice
• Para agregarle una dimensión extra de sabor al arroz, trate de sustituirlo con
CONSEJO ÚTIL:
para accesar las proporciones sugeridas de arroz/agua.
de agua apropiada. Vea las “Tablas para Medir el Arroz/Agua” en la página 6
agua que están localizadas adentro de la olla de cocinar, agregue la cantidad
4. Usando la taza para medir que viene con el equipo, o las líneas para medir el
3. Ponga el arroz enjuagado en la olla de cocinar.
después drene.
2. Enjuague el arroz en un recipiente separado hasta que el agua se vuelva clara,
a la taza americana (240 ml.).
provista se adhiere a los estándares de la industria arrocera (180 ml.) y no es igual
de arroz crudo debe de rendirle dos tazas de arroz cocido. La taza medidora
1. Utilizando la taza para medir, mida la cantidad de arroz deseada; una taza llena
Para cocinar el arroz:
• Nunca meta al agua la base de la olla, cordones, clavijas o enchufes.
• No use limpiadores abrasivos o estropajos.
NOTA:
5. Making sure that the exterior of the inner cooking pot is clean, dry and free of
debris; set the inner cooking pot into the rice cooker. Snap the lid closed
securely and plug the power cord into a wall outlet.
6. Turn the rice cooker on by pressing the POWER button. Each button’s indicator
light will flash in succession and the digital display will show two blue dashes.
7. To begin cooking, press the WHITE RICE or BROWN RICE button, depending
upon the type of rice to be cooked. The selected function’s indicator light will
illuminate.
8. After approximately 5 seconds, the cooking indicator light will illuminate
to show that the rice cooker has begun cooking. Once cooking is complete,
the rice cooker will automatically switch to “Keep-Warm” mode.
CONTINUED ON NEXT PAGE
4
6. Enjuague el bastidor con un trapo húmedo.
eque concienzudamente antes de regresarla a la olla.
jabonosa. Enjuague y s
5. Desmonte la charola interior de la olla y límpiela con agua limpia, tibia y
Enjuague y seque concienzudamente.
4. Ventile al vapor y lave la tapa y los accesorios con agua limpia, tibia y jabonosa.
para los niños.
3. Deshágase de todas las bolsas de plástico ya que pueden significar un riesgo
llegado en buen estado.
2. Desempaque los materiales de embalaje y verifique que todos los artículos hayan
1. Lea todas las instrucciones y todas las medidas de seguridad.
Antes de usarse por primera vez:
COMO USAR SU APARATO

5
USING YOUR RICE COOKER
To Cook Rice:
HELPFUL HINT:
•For softer rice, allow rice to soak for 10-20 minutes prior to cooking.
9. The rice cooker will beep to indicate that c
automatically switch to “Keep-Warm” mode. Open the lid and use the serving
spatula to stir the rice. This will release excess moisture and give the rice a
fluffier texture. Then, close the lid and allow the rice cooker to remain on
“Keep-Warm” mode for 5-10 minutes. This will ensure an optimal rice texture
evite abrir la tapa durante el cocimiento.
• Para evitar una pérdida de vapor y períodos de cocimiento más largos,
NOTA:
modalidad por más de 12 horas.
caliente” (Keep-Warm) y no recomendamos se deje el arroz en esta
botón de poder, la arrocera permanecerá en la modalidad de “Manténgase
11. Presione dos veces el botón de poder para apagar la olla. Si no se presiona el
de “Manténgase caliente” (Keep-Warm).
10. La pantalla digital nos dirá cuántas horas ha estado la olla en la modalidad
cocimiento para producir mejores resultados en el arroz integral.
rosigue al ciclo de
debe a un ciclo de absorción de bajo calor que p
operando inmediatamente en la configuración del “Arroz Integral”, esto se
el arroz propiamente. Si parece que la olla de presión de arroz no está
permite tiempo extra y ofrece parámetros de calor ajustados para cocinar
vado que tienen los granos. La función del “Arroz Integral” en esta olla
que las otras variedades de arroz, y esto se debe a las capas extra de sal
• El arroz integral requiere de un ciclo de cocimiento bastante mas largo
and moisture level.
NOTE:
•Brown rice requires a much longer cooking cycle than other rice varieties
due to the extra bran layers on the grains. The “Brown Rice” function on this
rice cooker allows extra time and adjusted heat settings in order to cook
the rice properly. If it appears the rice cooker is not heating up immediately
on the “Brown Rice” setting, this is due to a low-heat soak cycle that
proceeds the cooking cycle to produce better brown rice results.
10.
The digital display will show how many hours the rice cooker has been on
“Keep-Warm” mode.
11. Press the POWER button twice to turn off the rice cooker. If the POWER button is
not pressed, the rice cooker will remain in “Keep-Warm” mode. It is not
recommended to leave rice on “Keep-Warm” mode for more than 12 hours.
NOTE:
•To avoid a loss of steam and longer cooking times, do not open the lid at
any point during the cooking process.
ooking has completed, and
NOTA:
humedad óptimo.
na mejor textura y un nivel de
unos 5-10 minutos. Esto nos garantizará u
permanezca en la modalidad de “Manténgase caliente” (Keep-Warm) por
una textura mas esponjosa. Ahora cierre la tapa y permita que la unidad
para revolver el arroz. Esto sacará el exceso de humedad y le dará al arroz
“Manténgase caliente” (Keep-Warm). Abra la tapa y use la espátula de servir
ha terminado, y automáticamente cambiara a la modalidad de
9. La arrocera emitirá un sonido bip para indicarnos que el ciclo de cocimiento
cocinarlo.
• Para un arroz más suave, remójelo por unos 10 - 20 minutos antes de
CONSEJO ÚTIL:
Para cocinar el arroz:
COMO USAR SU APARATO
5

COOKING GUIDE
6
UNCOOKED
RICE
2 Cups 2½ Cups Line 2 4 Cups
3 Cups 3½ Cups Line 3 6 Cups
4 Cups 4½ Cups Line 4 8 Cups
5 Cups 5½ Cups Line 5 10 Cups
6 Cups 6½ Cups Line 6 12 Cups
7 Cups 7½ Cups Line 7 14 Cups
8 Cups 8½ Cups Line 8 16 Cups
9 Cups 9½ Cups Line 9 18 Cups
10 Cups 10½ Cups Line 10 20 Cups
WATER
WATERLINE
INSIDE POT
RICE
APPROX.
COOKED
RICE YIELD
COOKING TIMES
WHITE RICE: 30-35 Min.
BROWN RICE: 100-105 Min.
WHITE RICE: 32-37 Min.
BROWN RICE: 102-107 Min.
WHITE RICE: 34-39 Min.
BROWN RICE: 110-115 Min.
WHITE RICE: 38-43 Min.
BROWN RICE: 114-119 Min.
WHITE RICE: 40-45 Min.
BROWN RICE: 116-121 Min.
WHITE RICE: 41-46 Min.
BROWN RICE: 118-123 Min.
WHITE RICE: 43-48 Min.
BROWN RICE: 120-125 Min.
WHITE RICE: 44-49 Min.
BROWN RICE: 123-128 Min.
WHITE RICE: 46-51 Min.
BROWN RICE: 125-130 Min.
HELPFUL HINTS:
• Rinse rice before placing it into the inner cooking pot to remove excess
bran and starch. This will help reduce browning and sticking to the bottom
of the pot.
• Want perfect brown rice without the wait? Use the “Delay Timer.” Simply
add rice and water in the morning and set the “Delay Timer” for when rice
will be needed that night. See “To Use Delay Timer” on page 7 for more
details.
• This chart is only a general measuring guide. As there are many different
About Rice” on page 16), rice/water
kinds of rice available (s
measurements may vary.
ee “
medidas de arroz/agua pueden oscilar.
el Arroz” en la página 16) las
Acerca d
clases disponibles de arroz (vea “
• Esta tabla gráfica es solo una guía cuantitativa. Como existen muchas
antiadherente al fondo del sartén interior.
de agregarle una cubierta ligera de aceite vegetal o bien un vaporizador
• Si ha experimentado que el arroz se adhiera en el fondo del sartén, trate
y que se adhiera a la base del sartén.
exceso de salvado y almidón. Esto ayudará a prevenir que se dore el arroz
• Enjuague el arroz antes de ponerlo en la olla de cocinar para quitarle el
CONSEJOS ÚTILES:
ARROZ INTEGRAL: 125-130 Min.
ARROZ BLANCO: 46-51 Min.
ARROZ INTEGRAL: 123-128 Min.
ARROZ BLANCO: 44-49 Min.
ARROZ INTEGRAL: 120-125 Min.
ARROZ BLANCO: 43-48 Min.
ARROZ INTEGRAL: 118-123 Min.
ARROZ BLANCO: 41-46 Min.
ARROZ INTEGRAL: 116-121 Min.
ARROZ BLANCO: 40-45 Min.
ARROZ INTEGRAL: 114-119 Min.
ARROZ BLANCO: 38-43 Min.
ARROZ INTEGRAL: 110-115 Min.
ARROZ BLANCO: 34-39 Min.
ARROZ INTEGRAL: 102-107 Min.
ARROZ BLANCO: 32-37 Min.
.
ARROZ INTEGRAL: 100-105 Min
ARROZ BLANCO: 30-35 Min.
10 Tazas 10½ Tazas Línea10 20 Tazas
9 Tazas 9½ Tazas Línea 9 18 Tazas
8 Tazas 8½ Tazas Línea 8 16 Tazas
7 Tazas 7½ Tazas Línea 7 14 Tazas
6 Tazas 6½ Tazas Línea 6 12 Tazas
5 Tazas 5½ Tazas Línea 5 10 Tazas
4 Tazas 4½ Tazas Línea 4 8 Tazas
3 Tazas 3½ Tazas Línea 3 6 Tazas
2 Tazas 2½ Tazas Línea 2 4 Tazas
COCIDO
TIEMPOS DE COCINAR
ARROZ
DE LA OLLA
ADENTRO
AGUA
CRUDO
ARROZ
LÍNEA
GUIAS DE COCCION
6

7
“Manténgase
e presiona el
Ilustración Visual Digital
Arroz
agua
Linea de
aparecerán en la pantalla (Vea la ilustración).
(Brown Rice) dos brillantes líneas rojas
“Arroz blanco” (White Rice) o “Arroz integral”
Cuando se estén utilizando las funciones de
.
“Manténgase caliente” (Keep-Warm)
retraso” (Delay Timer), “vapor” (Steam) y
para las funciones de “temporizador de
La pantalla digital en estas unidades es sólo
NOTA:
modalidad por más de 12 horas.
y no recomendamos se deje el arroz en esta
ara iniciar el ciclo de cocimiento retardado.
caliente” (Keep-Warm)
botón de poder, la arrocera permanecerá en la modalidad de
7. Presione dos veces el botón de poder para apagar la olla. Si no s
mantenido la olla en esta modalidad.
caliente” (Keep-Warm). La pantalla digital indicará cuántas horas se ha
sonido bip y cambiará automáticamente a la modalidad de “Manténgase
6. Cuando el ciclo de cocimiento ha terminado, la olla avisará mediante un
haya empezado a cocinar el arroz.
5. La lus indicadora de cocimiento se iluminará, una vez que la olla cocinadora
cual está cocinando, p
4. Presione el botón de ARROZ BLANCO o ARROZ INTEGRAL, dependiendo de
cancelar su elección y volver a programar.
3. Presione el botón de poder (Power) una sola vez en cualquier momento para
que Ud. desea haber terminado de cocinar.
una hora, hasta que en la pantalla digital aparezca el número de horas en las
2. Presione el botón de Delay Timer (temporizador de retraso) en incrementos de
1. Siga los pasos del 1 al 6 en la página 4 del folleto “Para Cocinar Arroz.”
Para usar el Programador del Tiempo:
COMO USAR SU APARATO
obtener perfectos resultados en el arroz.
Este es un método rápido y sencillo para
llenar hasta la línea 6 de la olla interior).
6 tazas de arroz crudo deberían de
correspondiente cantidad de agua, (Ej.:
llene la olla interior con la
cantidad deseada de arroz; después
arroz. Cerciórese de primero colocar la
correcta de agua según la cantidad de
pueden usarse para medir la cantidad
Las líneas de agua en la olla interior
Inner Pot Water Lines:
The water lines in the inner cooking
pot may be used to measure the
correct amount of water for rice. Be
sure to add the desired amount of
rice first. Then fill the inner cooking
pot with water to the corresponding
line in the inner cooking pot (i.e. 6
ups of uncooked rice would be filled
c
to line 6 in the inner pot). This is a
quick and easy way to achieve
perfect rice results.
To Use Delay Timer:
1. Follow steps 1 through 6 of “To Cook Rice” on page 4.
2. Press the DELAY TIMER button (in 1-hour increments) until the digital display
shows the number of hours in which you would like your rice to be finished
cooking.
3. Press the POWER button once at any time to cancel your choice and reset.
4. Press WHITE RICE or BROWN RICE button, depending upon the rice being
cooked, to begin the delayed cooking cycle.
5. The cooking indicator light will illuminate once the rice cooker begins
cooking t
6. When cooking has completed, the rice cooker will beep and automatically
switch to “Keep-Warm” mode. The digital display will show how many hours
the rice cooker has been on “Keep-Warm” mode.
7. Press the POWER button twice to turn off the rice cooker. If the POWER button
is not pressed, the rice cooker will remain in “Keep-Warm” mode. It is not
recommended to leave rice on “Keep-Warm” mode for more than 12 hours.
NOTE:
The digital display on this unit is for the
“Delay Timer,” “Steam” and “Keep-Warm”
functions only. When using the “White Rice,”
“Brown Rice” or “
functions, the display will show two red lines
(See illustration).
Líneas de agua interiores en la olla:
COOKING GUIDE
USING YOUR RICE COOKER
he rice.
Sauté-Then-Simmer
™”
Digital Display Illustration
GUIAS DE COCCION
7

USING YOUR RICE COOKER
To Use Sauté-Then-Simmer™Technology:
Aroma’s patent-pending Sauté-Then-Simmer™(STS) Technology is excellent for
making delicious Spanish rice, risottos, pilafs, packaged meal helpers and more!
8
1. Add ingredients to be sautéed/browned to the inner cooking pot.
2. Turn the rice cooker on by pressing the POWER button.
3. Press the SAUTÉ-THEN-SIMMER
4. Using a long-handled wooden or heat-safe spoon, stir ingredients until
sautéed/browned to the desired l
5. After food has sautéed properly, add other called for ingredients and liquid.
When liquid is added, Sauté-Then-Simmer™will sense a change in
temperature. After roughly 5 minutes, the rice cooker will then automatically
switch over to simmer mode. The simmer indicator light will illuminate.
6. Close the lid, snapping it closed securely. Allow the rice cooker to cook until it
is finished. The rice cooker will automatically switch to “Keep-Warm” mode
with several a
7. Press the POWER button twice to turn off the rice cooker. If the POWER button
is not pressed, the rice cooker will remain on “Keep-Warm” mode. It is not
recommended to leave rice on “Keep-Warm” mode for more than 12 hours.
udible beeps once the meal has finished cooking.
™
button. The sauté indicator light will illuminate.
evel.
NOTE:
• To avoid a loss of steam and longer cooking times, do not open the lid at any
point during the simmering process.
To Sauté Only:
Sauté-Then-Simmer™is also excellent for stir frying veggies and browning meat.
1. Add ingredients to be sautéed/browned.
2. Turn the rice cooker on by pressing the POWER button.
3. Press the SAUTÉ-THEN-SIMMER
4. Using a long-handled wooden or heat-safe spoon, stir ingredients until
sautéed/browned to the desired level.
Press the POWER button twice to turn off the rice cooker.
5.
6. Remove sautéed food from the rice cooker, u
hot.
™
button. The sauté indicator light will illuminate.
sing caution as it will be
extremely
CAUTION:
• Do not use the provided serving spatula to sauté. It is
not intended to be used in contact with high
temperatures. Use a long-handled wooden or
heat-safe spoon to stir food while sautéing.
X
NOTE:
• It is important to turn off the rice cooker after sautéeing, as the rice cooker will
not turn off on its own.
X
evite abrir la tapa durante el cocimiento.
• Para evitar una pérdida de vapor y períodos de cocimiento más largos,
NOTA:
modalidad por más de 12 horas.
Manténgase caliente
” y no recomendamos se deje el arroz en esta
l botón de poder, la arrocera permanecerá en la modalidad de
aya terminado su
“
presiona e
7. Presione dos veces el botón de poder para apagar la arrocera. Si no se
arroz.
minutos. Esto garantizará una textura y un nivel de humedad óptimo en su
la modalidad de “Manténgase caliente” (Keep-Warm) por unos 10–15
más esponjada. Ahora cierra la tapa y deje que la unidad se mantenga en
la comida. Esto liberará el exceso de humedad dándole al arroz una textura
6. Después de cocinar abra la tapa y use la espátula para servir para remover
cocimiento.
“Manténgase caliente” (Keep-Warm) cuando el arroz h
terminado. La arrocera cambiará automáticamente a la modalidad de
5. Cierra la tapa sobre la arrocera y permita que esta cocine hasta haber
automáticamente a la modalidad de “Cocinando arroz” (Rice Cooking).
arrocera de Aroma percibirá el cambio en la temperatura, cambiando
otra que pida por los ingredientes, una vez que el arroz este ya salteado. La
4. Si usa la función de “Salteado” para cocinar un platillo con arroz, agregue
batir comida durante el salteado.
una cuchara de madera de manija larga para
diseñada para usarse a altas temperaturas. Use
incluida en el equipo para saltear. No está
• No use la paleta para revolver arroz que viene
PRECAUCIÓN:
salteen/doren a su gusto.
4. Utilizando una larga cuchara de madera, agite los ingredientes hasta que se
3. Agregue los ingredientes que van a ser salteados/dorados.
salteado se prenderá.
(Salteado). La luz del indicador de
™
2. Presione el botón de SAUTÉ-THEN-SIMMER
1. Prenda la arrocera presionando el botón de poder.
Mexicana, risottos y pilafs. También es ideal para dorar carnes.
La función de salteado es excelente para preparar un delicioso arroz a la
Para salteado:
COMO USAR SU APARATO
8

9
USING YOUR RICE COOKER
To Steam Food:
dañar su aparato y provocar que no funcione debidamente.
• Si la olla interior es regresada todavía mojada a la arrocera, esto puede
• Solo abra la tapa cuando sea necesario.
PRECAUCIÓN:
1. Add the desired amount of water to the inner cooking pot. A convenient
steaming guide has been included on page 11 for vegetables and page 12 for
meat.
2. Place food to be steamed onto the steam tray.
SIMULTANEAMENTE, VAYA A LA PÁGINA 10.
PARA INSTRUCCIONES DE CÓMO GUIZAR Y COCINAR AL VAPOR
odalidad por más de 12 horas.
esta m
y no recomendamos se deje el arroz en
botón de poder, la arrocera permanecerá en la modalidad de “Keep Warm”
10. Presione dos veces el botón de poder para apagar la olla. Si no se presiona el
de “Keep Warm.”
9
. La pantalla digital nos dirá cuántas horas ha estado la olla en la modalidad
modalidad de ‘Manténgase Caliente’ (Keep-Warm).
sonora para decirnos que ya está listo y automáticamente cambiará a la
. Una vez que ha transcurrido el tiempo programado, la olla emitirá otra señal
8
una vez que el agua de la olla ha empezado a hervir.
7. La pantalla digital iniciará una cuenta regresiva en incrementos de un minuto,
ya se inició la función de AL VAPOR (Steam).
DE COCIMIENTO (Cooking Indicador Light) empiece a brillar indicándonos que
bip y el número exhibido dejará de relampaguearpara que la LUZ INDICADORA
bip para decirnos que se está programando al tiempo deseado. Nos dará otro
na vez que se haya llegado al tiempo deseado, la arrocera emitirá otro sonido
6. U
para cancelar su elección y volver a programar.
5. En cualquier momento puede presione el botón de PODER (Power) una sola vez
30 minutos, para después verse reducido a solo cinco minutos.
botón incrementará el tiempo en un minuto adicional. El ciclo aumentara hasta
indicando cinco minutos de tiempo al vapor. Cada presión adicional de este
4. Presione el botón de Al Vapor (Steam) y la pantalla desplegará un numero ‘5’
3. Coloque la charola para vapor adentro de la arrocera.
y después colocar en la bandeja del vapor.
• Alimentos más pequeños se pueden colocar en un plato resistente al calor
CONSEJO ÚTIL:
cierre la cubierta, cerrándola herméticamente a presión.
2. Coloque los alimentos que van a cocerse al vapor en la charola de vapor y
verduras y en la página 12 para carnes.
convenienteguía para cocer al vapor ha sido incluida en la página 11 para
1. Agréguese la cantidad deseada de agua en la olla interior. Una muy
HELPFUL HINTS:
• Smaller foods may be placed on a heat-proof dish and then placed into
the steam tray.
3. Placethe steam tray inside the rice cooker and close the lid, snapping it closed
securely.
4. Pressthe STEAM button. The digital display will show a flashing “5” representing
five minutes of steam time. Each additional press of the steam button will
increase the steaming time by one minute. The steam time will cycle up to 30
minutes, after which it will cycle back to five minutes.
5. Press the POWER button once at any time to cancel your choice and reset.
6. Once the desired tim
it is setting at the selected time. It will beep once more and the number
displayed will stop flashing and the COOKING INDICATOR LIGHT will illuminate to
indicate the steam function has begun.
7. The digital display will begin to count down in one minute increments from the
time selected once the water in the rice cooker has reached a boil.
8. Afterthe selected time has passed, the rice cooker will be beep to indicate it is
do
ne and automatically switch to “Keep-Warm” mode.
.
9
The digital display will show how many hours the rice cooker has been on
“Keep-Warm” mode.
10. Press the POWER button twice to turn off the rice cooker. If the POWER button is
not pressed, the rice cooker will remain in “Keep-Warm” mode. It is not
recommendedto leave rice on “Keep-Warm” mode for more than 12 hours.
SEE PAGE 10 FOR INSTRUCTIONS ON COOKING RICE
e has been reached, the rice cooker will beep to indicate
AND STEAMING SIMULTANEOUSLY.
CAUTION:
• Open the lid only when necessary.
• If the inner pot is returned to the rice cooker when wet it may damage this
product, causing it to malfunction.
Para cocer al vapor:
COMO USAR SU APARATO
9

USING YOUR RICE COOKER
10
To Steam Food And Cook Rice Simultaneously:
One of the most convenient features of this rice cooker is the ability to both cook
rice and steam food simultaneously, ideal for creating delicious, all-in-one meals.
1. Place the desired amount of rice and appropriate amount of water into the
inner cooking pot. See “To Cook Rice” on page 4 for details.
2. Place the inner cooking pot into the unit and begin to cook the rice.
NOTE:
•Do not attempt to cook more than 8 cups (uncooked) of rice if steaming
and cooking rice simultaneously. The steam tray will not fit.
3. Refer to the steaming guides for vegetables (page 11) or meat (page 12) for
hints and approximate steaming times. It is best to insert the food to be
steamed toward the end of the rice cooking cycle so that your meal is fresh
and warm all at once. See the “Rice/Water Measurement Table” included on
Page 6 for approximate rice cooking times.
4. Place your c
lid, using caution as steam escaping will be extremely hot, and place the
steam tray into the rice cooker.
5. Close the lid securely and allow the rice cooker to resume cooking.
6. Once food has been steamed for the appropriate time open the lid. Use
caution when opening the lid as steam escaping will be extremely hot.
Remove the steam tray and check food to be sure it has been thoroughly
cooked. Exercise caution when r
hot.
7. If the rice has not finished cooking, close the lid of the rice cooker and allow
rice to continue to cook until done. Once the rice is finished, the rice cooker
will beep and automatically switch to “Keep-Warm” mode.
8.
The digital display will show how many hours the rice cooker has been on
“Keep-Warm” mode.
9. Press the POWER button twice to turn off the rice cooker. If the POWER button is
not pressed, the rice cooker will remain in “Keep-Warm” mode. It is not
recommended to leave rice on “Keep-Warm” mode for more than 12 hours.
hoice of vegetables and/or meat into the steam tray. Open the
emoving the steam tray as well, as it will be
ue su comida
apelmazada o mojada.
hasta el final del ciclo para que la comida no se enfríe o se vuelva
cocimiento de arroz; sin embargo le recomendamos que cocine al vapor
• Se puede cocinar al vapor durante cualquier parte del ciclo de
NOTA:
modalidad por más de 12 horas.
caliente” (Keep-Warm) y no recomendamos se deje el arroz en esta
botón de poder, la arrocera permanecerá en la modalidad de “Manténgase
10. Presione dos veces el botón de poder para apagar la olla. Si no se presiona el
aliente” (Keep-Warm).
e cocimiento, vea las
de “Manténgase c
9. La pantalla digital nos dirá cuántas horas ha estado la olla en la modalidad
caliente” (Keep-Warm).
proceso la olla automáticamente cambiará a la modalidad de “Manténgase
que el arroz continúe su cocimiento hasta que esté listo. Una vez terminado el
7. Si el arroz no ha finalizado su cocimiento, cierre la tapa de la olla y permita
de vapor ya que tendrá altas temperaturas.
haya sido debidamente cocinada. Ejerza precaución cuando separe la olla
la tapa con precaución y retire la charola de vapor. Verifique q
6. Una vez que la comida ha sido cocida al vapor por el tiempo indicado, abra
5. Cierre la tapa y permita que la olla continúe cocinando.
caliente, coloque la charola en la olla de presión.
tapa, y con mucha precaución, ya que el vapor que sale es extremadamente
4. Coloque sus verduras o carnes seleccionadas en la charola de vapor; abra la
“Tablas de Medidas de Arroz/Agua” incluidas en la página 6.
caliente al mismo tiempo. Para tiempos aproximados d
hasta el final del ciclo para guisar arroz, para que su comida esté fresca y
(página 12). Le aconsejamos meter la comida que va a ser cocida al vapor
favor recurra a las guías para cocer al vapor verduras (página 11) y carnes
3. Para sugerencias y para tiempos aproximados de cocimiento al vapor, por
guisar y cocer simultáneamente, ya que la charola de vapor no cabrá.
• No intente cocinar mas de 6 tasas de arroz (crudo sin cocer) si desea
NOTA:
NOTE:
•It is possible to steam at any point during the rice cooking cycle. However,
it is recommended that you steam during the end of the cycle so that
steamed food does not grow cold or become soggy before the rice is
ready.
10
2. Coloque la olla interior en la unidad y empiece a cocinar el arroz.
Cocinar Arroz”.
agua en la olla interior. Para detalles vaya a la página 4 de la sección “Para
1. Coloque la cantidad deseada de arroz así como la cantidad apropiada de
comidas “todas en una.”
de guisar y de cocer al vapor simultáneamente, ideal para crear deliciosas
Una de las ventajas mas convenientes de este producto consiste en la habilidad
Para cocinar al vapor y guisar simultáneamente:
COMO USAR SU APARATO

11
STEAMING GUIDE
VEGETABLE STEAMING CHART:
mpos r
los tie
• Esta “Tabla para Cocer Al Vapor Los Vegetales” es solo como referencia;
afectarán los tiempos de cocimiento.
• La altitud, la humedad y la temperatura exterior definitivamente
cocimiento.
cerciórese de agregar un poco de agua para restaurar el tiempo de
de cocimiento más lento. Si es totalmente necesario quitar la tapa,
abrirla causará una pérdida de vapor y de calor, provocando un tiempo
• Mantenga la tapa cerrada durante el proceso de cocimiento ya que al
vapor, o la charola de vapor no cabrá en
su cocción. No guise más de 8 tazas de arroz crudo mientras se cose al
charola para el vapor sobre el arroz mientras este se cocina verificando
las instrucciones de la página 10. Coloque durante el tiempo necesario la
• Cuando se esté guisando y cocinando al vapor simultáneamente, siga
mayor de verduras.
de agua, no es necesario aumenta el nivel de agua para una cantidad
• Ya que la mayoría de las verduras solo pueden absorber cierta cantidad
eales de cocimiento variarán.
lla.
la o
CONSEJOS ÚTILES:
¾
20 Minutos
20 Minutos
20 Minutos
20 Minutos
25 Minutos1 TazaEjotes
30 Minutos
25 Minutos1 TazaMaiz
25 Minutos1 TazaColiflor
25 Minutos1 TazaZanahoria
25 Minutos1 TazaCol
15 Minutos
20 Minutos
COCIMIENTO
TIEMPO DE
Taza
¾
Taza
¾
Taza
¾
Taza
¼
Tazas
½
Taza
¾
Taza
1
CANTIDAD DE AGUAVEGETAL
Calabacín
Calabaza
Espinaca
Chicharos
Berenjena
Brocoli
Espárragos
VEGETABLE AMOUNT OF WATER STEAMING TIME
Asparagus ¾ Cup 20 Minutes
Broccoli ½ Cup 15 Minutes
Cabbage 1 Cup 25 Minutes
Carrots 1 Cup 25 Minutes
Cauliflower 1 Cup 25 Minutes
Corn 1 Cup 25 Minutes
Eggplant 1¼ Cups 30 Minutes
Green Beans 1 Cup 15 Minutes
Peas ¾ Cup 20 Minutes
Spinach ¾ Cup 20 Minutes
Squash ¾ Cup 20 Minutes
Zucchini ¾ Cup 20 Minutes
HELPFUL HINTS:
• Since most vegetables only absorb a small amount of water, there is no
need to increase the amount of water with a larger serving of vegetables.
• When steaming and cooking rice simultaneously, follow the instructions on
page 10. Place the steam tray over the rice as it cooks for the amount of
time needed, checking the food every so often for doneness. Do not cook
more than 8 cups of uncooked rice while steaming, or the steam tray will
not fit into the rice cooker.
ossible, keep the lid closed during the entire steaming process.
hen p
• W
Opening the lid causes a loss of heat and steam, resulting in a slower
cooking time. If you find it necessary to open the lid, you may want to
add a small amount of water to help restore the cooking time.
• Altitude, humidity and outside temperature will affect cooking times.
• This steaming chart is for reference only. Actual cooking times may vary.
TABLA PARA COCER AL VAPOR LOS VEGETALES:
GUIAS DE COCCION
11

STEAMING GUIDE
MEAT STEAMING CHART:
Meat Amount of Water Steaming Time
Fish 2 Cups 25 Min. 140º
Chicken 2½ Cups 30 Min. 165º
Pork 2½ Cups 30 Min. 160º
Medium = 25 Min.
Beef 2½ Cups
Medium-Well = 30 Min.
Well = 33 Min.
NOTE:
• Steaming times may vary depending on the cut of meat being used.
• To ensure meat tastes its best, and to prevent possible illness, check that
meat is completely cooked prior to serving. If it is not, simply place more
water in the inner cooking pot and repeat the cooking process until the
meat is adequately cooked.
• When steaming and cooking rice simultaneously, follow the instructions on
page 10. Place the steam tray over the rice as it cooks for the amount of
time needed, checking t
more than 8 cups of uncooked rice while steaming, or the steam tray will
not fit into the rice cooker.
• When possible, keep the lid closed during the entire steaming process.
Opening the lid causes a loss of heat and steam, resulting in a slower
cooking time. If you find it necessary to open the lid, you may want to
add a small amount of water to help restore the cooking time.
• This steaming chart is for reference only. Actual cooki
he food every so often for doneness. Do not cook
ng t
Safe Internal
Temperature
160º
imes may vary
Manténgase
12
más de 12 horas.
y no recomendamos se deje el arroz en esta modalidad por
caliente (Keep-Warm)
botón de poder, la arrocera permanecerá en la modalidad de
6. Presione dos veces el botón de poder para apagar la olla. Si no se presiona el
esta modalidad.
el botón de Manténgase caliente (Keep-Warm) para que la olla cambie a
5. Cuando la sopa, el guisado y el chili hayan terminado su cocimiento, presione
agite con frecuencia.
4. Permita que la sopa, el guisado y el chili se cocinen hasta que estén listos y
modalidad de cocimiento.
la luz indicadora de cocimiento, para avisarnos que la olla está ya en la
3. Presione el botón de ARROZ BLANCO y su indicador se iluminará, al igual que
pared.
la charola interior en la olla de presión, cierre la tapa y conecte el enchufe en la
2. Verifique que el exterior de a olla de cocinar esté limpia, seca y sin basura; ponga
1. Agregue los ingredientes en la olla de cocinar.
Para cocinar sopas, caldos y chilis:
COMO USAR SU APARATO
charola no entrará en la olla.
cocine más de 8 tazas de arroz crudo mientras se cocine al vapor porque la
inspecciona frecuentemente la comida para verificar su cocimiento. No
esté cocinando por la cantidad de tiempo indicada, al tiempo que
na 1
0. Coloque la charola de vapor sobre el arroz mientras este se
de la pági
• Cuando guise y cocine al vapor arroz simultáneamente, siga las instrucciones
el proceso de cocimiento hasta que la carne esté adecuadamente cocinada.
servirla; si no es así, simplemente ponga más agua en la charola interior y repita
enfermedades, verifique que la carne esté completamente cocinada antes de
• Para asegurarnos que la carne tenga su mejor sabor y para prevenir posibles
carne.
• Los tiempos de cocimiento pueden variar dependiendo de los cortes de la
NOTA:
USING YOUR RICE COOKER
To Cook Soups, Stews and Chilis:
1. Add ingredients to the inner cooking pot.
Making sure that the exterior of the inner cooking pot is clean, dry and free of
2.
debris; set the inner cooking pot into the rice cooker. Close the lid and plug
the power cord into a wall outlet.
3. Press the POWER button to turn on the rice cooker.
Press the WHITE RICE button. The white rice indicator light will illuminate.
4.
Roughly 5 seconds after pressing the WHITE RICE button, the cooking indicator
light will illuminate to show the rice c
5. Allow soup/stew/chili to cook until ready, stirring often.
6. When soup/stew/chili is finished cooking, press the KEEP-WARM button. The
cooker will then switch to “Keep-Warm” mode.
Press the POWER button twice to turn off the rice cooker.
7.
ooker has begun cooking.
12
160º
Muy hecho = 33 Min.
Bien hecho = 30 Min.
En su punto = 25 Min.
Temperatura sana
cocimiento
Tiempo de
2-1/2 Tazas
2-1/2 Tazas 30 Min. 160º
2-1/2 Tazas 30 Min. 165º
2 Tazas 25 Min. 140º
agua
Cantidad de
vaca
Carne de
cerdo
Carne de
Pollo
Pescado
Carne
TABLA PARA COCER AL VAPOR LAS CARNES:
GUIAS DE COCCION

13
HOW TO CLEAN
Always unplug unit and allow to cool completely before cleaning.
Housewares Company.
• Cualquier otro que mantiene se debe realizar por el Aroma
funcionamiento.
mojada, esto puede dañar el producto y causar un mal
antes de usarse. Si la charola interior se regresa a la olla todavía
• Asegúrese siempre que el exterior de la charola interior esté seca
consideren seguros para usarse en recubrimientos no adherentes.
• No utilice limpiadores abrasivos ásperos o productos que no se
NOTA:
lavar en el lavaplatos!
arroz, taza para medir y recogedor de condensación se puede
• ¡Para incluso una limpieza más rápida, la olla interna, pala para el
CONSEJO ÚTIL:
posterior.
so
Diagrama 1
l recogedor de condensación en el grifo después de cada uso.
•Reintroduzca el ventilador de vapor para un u
•Seque el ventilador de vapor con un trapo suave.
caliente y jabonosa. Séquese completamente.
•Vacíe y limpie el ventilador de vapor en agua
en el “Diagrama 1.”
•Saque el ventilador de vapor como se demuestra
cada uso):
7. Para limpiar el ventilador de vapor (después de
poner antes del siguiente uso.
Quite presionado en la flecha marcada "Push" (presione). Vuelva a
6. Vacié e
caliente. Seque con un paño suave.
5. Enjuague la parte interior de la tapa con un trapo húmedo y
Seque con un paño suave.
4. Limpie la parte inferior de la tapa con un paño húmedo y caliente.
provistos.
3. Repita el proceso con la charola de vapor y otros accesorios
2. Sacuda y seque completamente.
una esponja o un trapo de cocina.
1. Quite la olla interna, lávela en agua caliente y jabonosa utilizando
enfríe.
Antes de limpiar la unidad por favor desconéctela para permitir que se
1. Remove the inner cooking pot. Wash it in warm, soapy water using a
sponge or dishcloth.
2. Rinse and dry thoroughly.
3. Repeat process with steam tray and other provided accessories.
4. Wipe the underside of the lid with a warm, damp cloth. Dry with a soft
cloth.
5. Wipe the body of the rice cooker and the underside of the lid clean
with a damp cloth.
6. Empty out the condensation collector into a sink after each use.
Remove by pressing on the arrow marked “PUSH”. Attach before next
use.
7. To clean the steam vent (clean after each use):
• Pull out the steam vent as shown in “Diagram 1.”
• Empty and wash the steam vent in warm, soapy
water. Rinse thoroughly.
• Dry the steam vent with a soft cloth.
• Reinsert the steam vent for next use.
Diagram 1
HELPFUL HINT:
• For even faster cleanup, the inner cooking pot, serving spatula,
measuring cup and condensation collector can be washed in the
dishwasher!
NOTE:
•Do not use harsh abrasive cleaners, scouring pads or products that
are not considered safe to use on nonstick coatings.
•Always make sure the outside of the inner pot is dry prior to use. If
the inner cooking pot is returned to the rice cooker when wet, it
may damage this product, causing it to malfunction.
•Any other servicing should be performed by Aroma Housewares
Company.
COMO LIMPIAR EL APARATO
13

TROUBLESHOOTING
Because rice varieties may vary in their make-up, results may differ. Below
are some troubleshooting tips to help you achieve the desired
consistency.
PROBLEM SOLUTION
If your rice is dry or hard/chewy when the rice
cooker switches to “Keep-Warm” mode,
additional water and cooking time will soften
Rice is too dry/hard
after cooking.
the rice. Depending on how dry your rice is,
add ½ to 1 cup of water and stir through.
Close the lid and press the WHITE RICE button.
When rice cooker switches to “Keep-Warm”
mode, open the lid and stir the rice to check
the consistency. Repeat as necessary until
rice is soft and moist.
14
para liberar el exceso de humedad.
abriendo la tapa y agitando periódicamente
unos 10-30 minutos según sea necesario,
” por
Manténgase
Manténgase caliente
,” entonces use una palita de madera
modalidad de “
Cierre la tapa y permita que se quede en la
mas húmeda y soltará la humead excesiva.
para agitar el arroz, esto redistribuirá la parte
caliente
cambió a la modalidad de “
húmedo o apelmazado cuando la olla ya
Si su arroz quedó todavía demasiado
de cocinarse.
apelmazado después
demasiado húmedo y
El arroz quedó
Rice is too moist/soggy
after cooking.
If your rice is still too wet or soggy when the
rice cooker switches to “Keep-Warm” mode,
use the serving spatula to stir the rice. This will
redistribute the bottom (moistest) part of the
rice as well as release excess moisture. Close
the lid and allow to remain on “Keep-Warm”
mode for 10-30 minutes as needed, opening
the lid and stirring periodically to release
excess moisture.
14
hasta que el arroz quede suave y húmedo.
consistencia. Repítase como sea necesario
tapa y agite el arroz para revisar su
,” abra la
Manténgase caliente
modalidad “
WHITE RICE. Cuando la olla cambie a la
revuélvase. Cierre la tapa y presione el botón
agregue de ½ a 1 taza de agua y
Dependiendo qué tan seco esté su arroz,
tiempo adicional para suavizar el arroz.
“Keep-Warm,” entonces use de agua y
cuando la olla cambia a la modalidad de
Si su arroz quedó seco, duro y chicloso
cocinado.
después de ser
demasiado seco y duro
El arroz quedó
PROBLEMA SOLUCION
deseada.
para resolver problemas para ayudarle a conseguir la consistencia
resultados también pueden ser diferentes. Abajo hay algunos consejos
Porque las variedades de arroz pueden variar en su composición, los
SOLUCIONANDO PROBLEMAS

15
HELPFUL HINTS
tiempo de la receta haya transcurrido.
de cocimiento y APAGUE MANUALMENTE la arrocera cuando el
forma continuará cocinando a altas temperaturas.Vigile el proceso
cuidadosamente y no deje la arrocera desatendida, ya que de otra
hasta que todos los líquidos se hayan hervido. Siga la receta
utilicen cantidades importantes de líquidos, la olla no se va a apagar
, pero si la receta pide vapores o sopas donde se
.” Esto está muy bien cuando cocinamos
e que la
platillos de arroz
Manténgase caliente
“
automáticamente a la modalidad de baja temperatura
hierven las temperaturas se elevaran causando que la olla cambie
controlada por la temperatura de la olla interior. Cuando los líquidos
3) Es importante recordar que el ciclo de cocimiento de la arrocera es
cocina.
bastante largas para batir. NO USE las palitas cortas para este tipo de
c
aliente por lo que debe utilizar cucharas de plástico o madera
temperaturas, como serian hornos o estufas. La charola interior estará
precaución como si estuviese cocinando con aparatos de altas
2) Si la receta de cocina le pide freír mantequilla o aceite, use tanta
vapor.
abisagrada, mantenga la cara y manos lejos de la olla para evitar el
antes y después del ciclo de cocimiento. Cuando abra la cubierta
cantidades de vapor. Extreme sus precauciones cuando abra la olla,
1) Las arroceras cocinan a temperaturas muy altas y producen grandes
Medidas de Seguridad:
caldo.
Normalmente un cubo y una taza de agua equivalen a una taza de
caldo “Bouillon” los cuales vienen en una gran variedad de sabores.
en su supermercado. Otra sugerencia seria la de utilizar cubos de
textura y el sabor del arroz y pueden encontrarse fácilmente
• Puede utilizar caldos y extractos en vez de agua para mejorar la
nuevo.
comida esté totalmente cocinada, agregue más agua y préndala de
• Si la arrocera cocinadota de arroz llegase a apagarse antes d
sal de mesa.
Necesitará usar una y media veces mas sal kosher de lo que seria con
que no tiene impurezas o aditivos y se disuelve con facilidad.
• Cuando alguna receta de cocina le pida sal, utilice la sal “kosher,” ya
su comida.
rápida la limpieza al tiempo que evita agregarle sabores o calorías a
para cocinar (no pegajoso) es una excelente forma de hacer más
• El rociar la charola interior con una ligera capa de un atomizador
• Spraying the inner cooking pot with a light coating of nonstick cooking
spray is a great way to make cleanup easier without adding flavor or
calories to your meal.
• When a recipe calls for salt, use kosher salt. It has no impurities or
additives and dissolves easily. You will need to use about one and a
half times more kosher salt than you would table salt.
• If the rice cooker shuts off before the food is totally cooked, add
more water and start the cooker again.
• Stocks and broths can b
improve texture when cooking rice. Stocks and broths can be found in
your local supermarket. Another option is to use bouillon cubes (they
come in a wide variety of flavors). One cube and one cup of water
usually makes one cup of stock.
Safety Considerations:
1) Rice cookers cook at very high temperatures and will produce large
amounts of steam. Use extreme caution when opening rice cooker
during and after the cooking cycle. When lifting the hinged cover,
keep hands and face away from the rice cooker to avoid the steam.
2) If a recipe calls for the sauteing of butter or oil, use extreme
caution, as you would when cooking with other high-temperature
devices like a stove or oven. The inner cooking pot will be hot, so use
a long-handled plastic o
the short-handled serving spatula for this type of cooking.
3) It is important to remember that the rice cooking cycle of the rice
cooker is controlled by the temperature of the inner cooking pot.
When liquid boils off, the temperature will rise, causing the rice cooker
to automatically shift into the low temperature “Keep-Warm” mode.
This is fine for making rice dishes but if a recipe calls for making soups,
or other recipes where copious q
cooker will not shut off until all liquid is boiled away. Follow the recipe
carefully and do not leave the rice cooker unattended as it will
continue to cook at high temperatures when making soups, stews
and chilis. Monitor the cooking process. MANUALLY TURN OFF the rice
cooker when the time that the recipe stipulates has elapsed.
e used in place of water to add flavor and
r wooden spoon for stirring. DO NOT USE
uantities of liquid are used, the rice
CONSEJOS ÚTILES
15

ABOUT RICE Courtesy of the USA Rice Federations
For recipes and rice information visit the USA Rice Federation online at
www.usarice.com/consumer.
Rice is the perfect foundation for today’s healthier eating. It is a nutrient-dense
complex carbohydrate that supplies energy, fiber, essential vitamins and
minerals and beneficial antioxidants. Rice combines well with other healthy foods
such as vegetables, fruits, meat, seafood, poultry, beans and soy foods.
Nearly 88% of rice consumed in the U.S. is grown in the U.S. Arkansas, California,
Louisiana, Texas, Mississippi and Missouri produce high-quality varieties o
medium and long grain rice as well as specialty rices including jasmine, basmati,
arborio, red aromatic and black japonica, among others.
There are many different varieties of rice available in the market. Your Aroma
Rice Cooker can cook any type perfectly every time. The following are the
commonly available varieties of rice and their characteristics:
Long Grain Rice
This rice has a long, slender kernel three
to four times longer than its width. Due
to its starch composition, cooked grains
are more separate, light and fluffy
compared to medium or short grain rice.
The majority of white rice is enriched to
restore nutrients lost during processing.
Great for entrees and side dishes— rice
bowls, stir-fries, salads and pilafs.
Medium Grain Rice
When compared to long grain rice,
medium grain rice has a shorter, wider
kernel that i
than its width. Cooked grains are more
moist and tender than long grain, and
have a greater tendency to cling
together. Great for entrees, sushi, risotto
and rice puddings.
Short Grain Rice
Short grain rice has a short, plump,
almost round kernel. Cooked grains are
soft and cling together, yet remain
separate and are somewhat chewy,
with a slight springiness to the bite. Great
for sushi, Asian dishes and desserts.
s two to three times longer
Brown Rice
Brown rice is a 100% whole grain food
that fits the U.S. Dietary Guidelines for
Americans recommendation to
increase daily intake of whole grains.
Brown rice contains the nutrient-dense
bran and inner germ layer where many
beneficial compounds are found.
Brown rice is available in short, medium
and long grain varieties and can be
used interchangeably with enriched
white rice.
Wild Rice
Wild rice is an aquatic grass grown in
Minnesota and California and is a
frequent a
pilafs and rice mixes. Its unique flavor,
texture and rich dark color provide a
delicious accent to rice dishes. Wild
rice also makes a wonderful stuffing for
poultry when cooked with broth and
mixed with your favorite dried fruits.
ddition to long grain rice
f short,
®
16
p
referidas.
mezclado con sus frutas secadas
cuando está cocinado con caldo y
maravilloso para las aves de corral
salvaje también hace un relleno
delicioso a los platos del arroz. El arroz
oscuro rico proporcionan un acento
arroz. Su sabor único, textura y color
arroz del granolargo y las mezclas del
una adición frecuente a los pilafs del
crecida en Minnesota y California y es
El arroz salvaje es una hierba acuática
Arroz silvestre
orto y ancho, y su
arroz blanco enriquecido.
tilizar alternativamente con
e la soya.
puede u
grano corto, mediano y largo y se
disponible en varios tipos, inluso el
de la nuez. El arroz integral está
gomosa y un sabor delicado similar al
dan un color tostado, una textura algo
conserva las capas de salvado que le
tiene la cáscara exterior, pero
granos enteros. El arroz integral no
producto diario del aumento de
recomendación de los americanos al
dietéticas de los EE.UU. para la
entero del grano que cabe las pautas
El arroz integral es un alimento el 100%
Arroz integral
puede cada vez cocinar cualquier tipo de arroz
®
p
latos asiáticos y postres.
pegajosa al comerlos. Ideal para sushi,
y algo gomosos, y dejan una sensación
unirse, pero aun así quedan separados
cocidos quedan blandos y tienden a
corto y casi redondeado. Los granos
El arroz de grano corto es más relleno,
Arroz de grano corto
leche.
plato principal , risotto o arroz con
mayor tendencia a unirse. Ideal para
arroz de grano largo, y tienen una
quedan más húmedos y tiernos que el
que su ancho. Los granos cocidos
longitud es de dos a tres veces mayor
largo, es más c
comparación con el arroz de grano
El arroz de grano mediano, en
Arroz de grano mediano
ensaladas y pilafs.
de arroz, frituras con poco aceite,
principal y acompañamiento: tazones
mediano o corto. Ideal como plato
comparación con el arroz de grano
separados, ligeros y esponjosos, en
granos cocidos quedan más
Dada su composición de almidón, los
cuatro veces mayor que su ancho.
delgado, y su longitud es de tres a
El arroz de grano largo es alargado y
Arroz de grano largo
comúnmente disponibles y sus características:
perfectamente. A continuación encontrará las variedades de arroz
Arrocera de Aroma
Hay muchas diferentes variedades de arroz disponibles en el mercado. Su
rojo, entre otros.
especialidad incluyendo jazmín, basmati, arborio, japonica aromático y negro
de alta calidad de arroz corto, medio y largo del grano así como arroz de la
Arkansas, California, Luisiana, Tejas, Mississippi y Missouri producen las variedades
Casi el 88% de arroz consumido en los E.E.U.U. se produce en los E.E.U.U.
de res, pescado y ave, frijoles y productos derivados d
se puede combinar con otros alimentos saludables, como verduras, frutas, carne
minerales esenciales, y antioxidantes beneficiosos para nuestro cuerpo. El arroz
un carbohidrato complejo que proporciona energía, fibra, vitaminas y
El arroz es la base perfecta para tener una alimentación más sana hoy en día. Es
www.usarice.com/consumer.
Para más información, visite el sitio web de la Federación de Arroz de los EEUU en
16
ACERCA DEL ARROZ Cortesía de la Federación de Arroz de EEUU

e grano
17
conocimiento de la versatilidad y el valor del arroz producido en los EE. UU.
• Septiembre es el Mes Nacional del Arroz, durante el cual se promueve el
química que ayuda a regular y mejorar el estado de ánimo.
• El arroz estimula la producción de serotonina en el cerebro, una sustancia
entero.
entero proporciona dos de las tres porciones diarias recomendadas de grano
• El arroz integral es 100% de grano entero. Una taza de arroz integral d
ayuda en la gerencia del peso.
crónicas tales como enfermedad cardíaca, diabetes y ciertos cánceres, y
• Los granos enteros como el arroz integral reducen el riesgo de enfermedades
americanos.
dietéticas de los Estados Unidos para las recomendaciones de los
dietas más sanas que comedores del no-arroz y comen más como las pautas
• L
a investigación demuestra que las personas que comen el arroz tienen
un rastro de la grasa. Una mitad-taza de arroz contiene cerca de 100 calorías.
• El arroz no contiene sodio, colesterol, grasas trans o gluten, y tiene solamente
por agricultores locales en cinco estados centrales del sur y en California.
casi el 88% del arroz que se consume en el país. Es cultivado y cosechado
• El arroz que se cultiva en los EE. UU. es el estándar de excelencia y representa
la población mundial.
• El arroz es el principal ingrediente básico de la dieta de más de la mitad de
¿Sabía que?
ABOUT RICE Courtesy of the USA Rice Federations
For recipes and rice information visit the USA Rice Federation online at
www.usarice.com/consumer.
Did You Know?
• Rice is the primary dietary staple for more than half of the world’s population.
• U.S. grown rice is the standard for excellence and accounts for nearly 88% of
the rice consumed in America. It is grown and harvested by local farmers in
five south-central states and California.
• Rice contains no sodium, cholesterol, trans fats or gluten, and has only a trace
of fat. One half-cup of rice contains about 100 calories.
• Research shows that people who eat rice have healthier diets than n
eaters and eat more like the U.S. Dietary Guidelines for Americans
recommendations.
• Whole grains like brown rice help reduce the risk of chronic diseases such as
heart disease, diabetes and certain cancers, and aid in weight management.
• Brown rice is a 100% whole grain. One cup of whole grain brown rice provides
two of the three recommended daily servings of whole grains.
• Eating rice triggers the production of serotonin in the brain, a chemical that
helps regulate a
• September is National Rice Month - promoting awareness of the versatility and
the value of U.S. grown rice.
nd improve mood.
on-rice
ACERCA DEL ARROZ Cortesía de la Federación de Arroz de EEUU
17

18
RECIPES
Jambalaya
1 lb spicy smoked sausage
1 lb. shrimp, peeled and deveined
2 cups cooked chicken, shredded
1½ cups rice
4 cups chicken broth
1 4-oz. can diced green chiles
2 tbsp. Creole seasoning
Press the POWER button to turn on the rice cooker. Cut the smoked
sausage in half, lengthwise, then into ¼" half circles. Add all ingredients
to the inner cooking pot and mix well. Place inner cooking pot in the rice
cooker and close the lid. Press WHITE RICE. The rice cooker will
automatically s
Serves 4.
Game Day Chili Cheese Dip
1 small onion, chopped
2 tsp. vegetable oil
1 clove garlic, minced
2 15-oz. cans prepared chili without beans
1 cup prepared medium salsa
½ cup black olives, sliced
3 ounces low-fat cream cheese, cubed
3 ounces cheddar cheese, grated
- Tortilla chips, for dipping
Press the POWER button to turn on the rice cooker. Place the onion, oil
and garlic in the inner cooking pot. Press SAUTÉ-THEN-SIMMER™ and the
sauté indicator light will illuminate. Sauté for 3 minutes. Use a large
wooden spoon to gently stir as the onion and garlic cook. Add the chili,
salsa, olives, cream cheese and cheddar cheese. Stir to combine all of
the ingredients, close the lid. Cook for 4 minutes. Carefully open the lid,
keeping hands and face away to avoid steam burns, and stir the dip.
Cook again for 3 minutes. Open the lid and stir again. Continue cooking
until the dip is warm throughout and the cheeses are melted. When
done, serve in a large bowl and use the tortilla chips for dipping.
witch to "Keep-Warm" mode once the meal is ready.
¡Disfrútelo!
se tortillitas fritas para sopear.
jo y la cebolla se cuecen. Agréguele el chili, la
listo, sírvalo en un platón grande y u
que la crema de untar y los quesos se hayan derretido. Cuando esté
minutos. Abra la tapa y revuelva otra vez. Continúe el cocimiento hasta
quemaduras por el vapor. Bata el dip y cocínelo de nuevo por tres
tapa con cuidado manteniendo la cara y las manos lejos para evitar
presione el botón de ARROZ BLANCO. Cocine por 4 minutos, abra la
salsa, las aceitunas, el queso crema y el queso chédar; cierre la tapa y
suavemente mientras el a
por 3 minutos. Use una cuchara de madera larga para revolverlos
Coloque la cebolla, el aceite y el ajo en la olla interior y fríalos ‘salteado’
3 onzas de tortillitas fritas para sopear
3 onzas de queso rallado chédar
3 onzas de cubitos de queso crema bajo en calorías
½ taza de rebanas de aceitunas negras
1 taza de salsa preparada
2 latas de 15 onzas de Chili preparado (sin frijoles)
1 clavo de ajo picado
2 cucharas de mesa de aceite vegetal
1 cebollita en trozos
del juego de pelota
Salsa para untar de Chili con Queso, para el día
(Keep-Warm). Sirve a 4 comensales.
esté listo, la olla automáticamente cambiará a Manténgase Caliente
otón ARROZ BLANCO. Cuando el platillo
cierre la tapa y presione el b
interior y mézclelos bien. Ponga la olla interior en la olla cocinadora,
semi-círculos de ¼ de pulgada. Agregue todos los ingredientes en la olla
Corte la salchicha ahumada a la mitad y a lo largo, después en
2 cucharas de mesa de aderezo ‘Criollo’
1 lata de 4 onzas de chiles verdes en cubitos
4 tazas de caldo de pollo
1½ tazas de arroz
2 tazas de pollo cocido y molido
1 libra de camarón pelado y desvenado
1 libra de salchicha ahumada y condimentada
18
Jambalaya
RECETAS

19
RECIPES
Sauté-Then-Simmer™ Spanish Rice
2 tbsp. olive oil (can use up to 1/4 cup)
1 onion, chopped fine
1 garlic clove, minced
2 cups medium or long-grain white rice
2½ cups chicken stock (or vegetable stock if vegetarian)
1 tbsp. tomato paste
Pinch oregano
1 tsp. salt
Press the POWER button to turn on the rice cooker. Add rice, olive oil,
onion and garlic to the inner cooking pot. Press the SAUTÉ-THEN-SIMMER
button. The sauté indicator light will illuminate. Using a long-handled
wooden spoon, stir ingredients frequently and allow to sauté for roughly
5 minutes, or until onion is soft. Add remaining ingredients. Sauté-ThenSimmer™ Technology will then will automatically adjust to simmer to
cook rice. Close the lid securely and allow to cook. Once rice is finished,
6 porciones.
Rinde 4 a
os ingredientes para
(Salteado). La luz del indicador de Salteado se
Presione el botón de
™
(Keep-Warm) cuando el arroz haya terminado su cocimiento.
automáticamente a la modalidad de “Manténgase caliente”
permita que esta cocine hasta haber terminado. La arrocera cambiará
la modalidad de “Cocinando arroz” (Rice Cooking). Cierra la tapa y
percibirá el cambio en la temperatura, cambiando automáticamente a
sobre 5 minutos. Agregue los ingredientes restantes. La arrocera
Utilizando una larga cuchara de madera, agite l
prenderá. Agregue el arroz, el aceite de oliva, la cebolla y el ajo.
SAUTÉ-THEN-SIMMER
Prenda la arrocera presionando el botón de Poder.
1 cucharadita de sal
- Sujetador de orégano
1 cucharadas de goma de tomate
2½ tazas de consomé de pollo bajo en sodio
2 cucharadas de arroz de grano largo
1 clavo de ajo, picado
1 cebolla, picada en cubos
2 cucharadas de aceite de oliva
Arroz a la Mexicana
RECETAS
the rice cooker will automatically switch to “Keep-Warm” mode. Serves 4
to 6.
Sauté-Then-Simmer™ Risotto
¼ cup yellow onion, diced small
1 large garlic clove, chopped fine
1 tbsp. olive oil
1 cup Arborio rice, uncooked
¼ cup vermouth
4 cups chicken broth
1 cup whipping cream
3 tbsp. butter
⅓ cup Parmesancheese, shredded
Press the POWER button to turn on the rice cooker. Add onion, garlic and
olive oil to inner cooking pot. Press the SAUTÉ-THEN-SIMMER
sauté indicator light will illuminate. Add rice and mix with a long handled
spoon until well coated. Add vermouth and stir until liquid has been
absorbed. Stir in the chicken broth and whipping cream; mix well and
close the lid securely. Sauté-Then-Simmer™ Technology will then will
automatically adjust to simmer to cook rice. Once the rice cooker
automatically turns to “Keep-Warm,” open tempered glass lid and stir in
butter and Parmesan cheese. Serves 4 to 6.
19
™
button. The
™

20
RECIPES
Green Chile Chicken and Rice
1½ cups rice
3 cups chicken broth
2 tbsp. diced minced onion
½ tsp. salt
1 10-oz. can chicken breast chunks, with liquid
1 4-oz. can diced green chiles, with liquid
- Salt, to taste
Press the POWER button to turn on the rice cooker. Place all ingredients
in the inner cooking pot and stir. Place inner cooking pot into the rice
cooker, cover and press the WHITE RICE button. Allow to cook until rice
cooker switches to “Keep-Warm” mode. Add salt to taste. Stir and serve
immediately as a main c
San Antonio Rice
1 cup rice
1 jar (12 oz.) fresh salsa, mild or hot
1 tbsp. vegetable oil
1 cup fresh or canned corn kernels
½ tsp. ground cumin
½ tsp. salt
1¼ cups water
- Fresh ground pepper, to taste
- Fresh minced cilantro, for garnish
Press the POWER button to turn on the rice cooker. Add all ingredients
except cilantro to the inner cooking pot, stir, close the lid and press the
WHITE RICE button. When rice cooker switches to “Keep-Warm” mode,
open the cooker, quickly stir and re-cover. Allow to stand for 8-10
minutes before serving. Spoon onto a serving dish, garnish with fresh
cilantro and serve. Makes a flavorful supper or side dish for grilled
chicken or fish. Serves 3-4.
For additional rice cooker recipes, or even to submit your own,
visit our website at www.AromaCo.com!
ourse. Serves 4.
www.AromaCo.com
suyas, visite nuestro sitio web en:
Para recibir recetas adicionales, o también para someter las
Para 3-4 comensales.
principal o bien como guarnición para pollo a la parrilla o pescado.
servir. Adórnelo con cilantro fresco y sírvalo. Magnifico como plato
arrocera, bata de nuevo y tápela otra vez. Espere 8-10 minutos para
bra la
olla cambie a la modalidad de “Manténgase caliente”, a
agite, cierre la tapa y presione el botón de ARROZ BLANCO. Cuando la
Excepto el cilantro, mezcle todos los ingredientes en la cacerola interior,
- Cilantro fresco en trocitos como adorno
- Pimienta molida al gusto
1 ¼ taza de agua
½ cuchara de mesa de sal
½ cuchara de mesa de comino molido
1 taza de granos de maíz frescos o de lata
1 cuchara de mesa de aceite vegetal
1 jarra de 12 onzas de salsa fresca (suave o picante)
1 taza de arroz
Arroz San Antonio
comensales.
sírvala de inmediato, como un delicioso platillo principal. Sirve a 4
l gusto, agítela y
modalidad de “Manténgase Caliente,” agréguele sal a
ARROZ BLANCO. Déjela cocer hasta que la arrocera cambie a la
ponga la cazuela en la olla cocinadora, tápela y presione el botón de
Coloque todos los ingredientes en la cazuela interior y revuelva. Ahora
- Sal, al gusto
1 lata de 4 onzas de chiles verdes en cubitos en su jugo
en su jugo
1 lata de 10 onzas de pedacearía de pechuga de pollo
½ cucharada de sal
2 cucharas de mesa de cebollitas en trozos
3 tazas de caldo de pollo
1 ½ tazas de arroz
Arroz y Pollo con Chile Verde
20
RECETAS

21
LIMITED WARRANTY
Aroma Housewares Company warrants this product free from defects in
material and workmanship for one year from provable date of purchase
in the continental United States.
Sitio Web: www.AromaCo.com
:30 PM, Tiempo del Pacífico
1-800-276-6286
San Diego, California 92121
6469 Flanders Drive
AROMA HOUSEWARES COMPANY
Within this warranty period, Aroma Housewares Company will repair or
L-V, 8:30 AM - 4
Unidos.
variar de un estado a otro y no cubre áreas fuera de los Estados
Esta garantía le da derechos legales específicos los cuales podrán
mantenimiento en un centro de servicio no autorizado.
inválida en caso de que el aparato sea desarmado o se le dé
maltrato o negligencia por parte del usuario. La garantía también es
o cubre la instalación incorrecta, el uso indebido,
eemplazará, a su opción, las partes defectuosas sin
Esta garantía n
aparato nuevamente.
autorización de devolución. Espere entre 2-4 semanas para recibir el
telefónico gratuito que está más abajo para obtener un número de
Company. Antes de devolver un producto, sírvase llamar al número
para cargos de envío y manejo a favor de Aroma Housewares
flete prepagado, con comprobación de compra y $14.00 dólares
ningún costo, siempre y cuando el producto sea devuelto, con el
reparará o r
Dentro de este período de garantía, Aroma Housewares Company
replace, at its option, defective parts at no charge, provided the product
is returned, freight prepaid with proof of purchase and U.S. $14.00 for
shipping and handling charges payable to Aroma Housewares
Company. Before returning an item, please call the toll free number
below for a return authorization number. Allow 2-4 weeks for return
shipping.
This warranty does not cover improper installation,misuse, abuse or
neglect on the part of the owner. Warranty is also invalid in any case that
the product is taken apart or serviced by an unauthorized service station.
This warranty gives you specific legal rights, which may vary from state to
state, and does not cover areas outside the United States.
AROMA HOUSEWARES COMPANY
6469 Flanders Drive
San Diego, California 92121
1-800-276-6286
M-F, 8:30 AM - 4:30 PM, Pacific Time
Website: www.AromaCo.com
la parte continental de los Estados Unidos.
de un año a partir de la fecha comprobada de compra dentro de
tenga defectos en sus materiales y fabricación durante un período
Aroma Housewares Company garantiza que este producto no
GARANTÍA LIMITADA
21
 Loading...