

Aroma AEM-646 User Manual
Instruction Manual
Model AEM-646
Cappu-Latté
Espresso System
™
Congratulations!
Your Cappu-Latté Espresso System will make a fine addition to
your home. Now you can enjoy the great taste of gourmet espresso in the
comfort of your own kitchen. This elegant, high-quality unit will provide great
tasting espresso coffee in just minutes time after time.
Please read the following instructions carefully before your first use.
Published By:
Aroma Housewares Co.
6469 Flanders Drive
San Diego, CA 92121
U.S.A.
1-800-276-6286
www.aromaco.com
© 2005 Aroma Housewares Company All rights reserved.

IMPORTANT SAFEGUARDS
1. Read all instructions before use.
2. Do not touch hot surfaces. Use handles or knobs.
3. To protect against electrical shock, do not immerse cord, plug or espresso maker
in water or any other liquid.
4. Close supervision is necessary when this appliance is used by or near children.
This appliance is not intented to be used by children.
5. Unplug from outlet when not in use and before cleaning. Allow to completely cool
before putting on or taking off any parts and before cleaning.
6. Do not operate this appliance with a damaged cord, plug or after the appliance
malfunctions or has been damaged in any manner. Return appliance to the
nearest authorized service facility for examination, repair or adjustment.
7. The use of accessory attachments not recommended by the appliance
manufacturer may cause injuries.
8. Do not use outdoors.
9. Do not let cord hang over edge of table or counter, or touch hot surfaces.
10. Do not place on or near a hot gas or electrical burner or in a heated oven.
11. To disconnect, press the Power button, then remove plug from wall outlet.
12. Do not use appliance for anything other than its intended use.
13. Scalding may occur if the lid is removed during the brewing process.
SAVE THESE INSTRUCTIONS
Product for Household Use Only.
Basic safety precautions should always be followed when using electrical appliances,
including the following:
1

SHORT CORD INSTRUCTIONS
1. Ashort power-supply cord is provided to reduce risk resulting from becoming
entangled in or tripping over a longer cord.
2. Longer extension cords are available and may be used if care is exercised.
3. If a longer extension cord is used:
a. The marked electrical rating of the extension cord should be at least as great as the
electrical rating of the appliance.
b. The longer cord should be arranged so that it will not drape over counter or tabletop
where it can be pulled by children or tripped over unintentionally.
c. If the appliance is of the grounded type, the extension cord should be a grounding-type-
3-wire cord
POLARIZED PLUG
This appliance has a polarized plug (one blade is wider than the other); follow the
instructions below:
To reduce the risk of electric shock, this plug is intended to fit into a polarized outlet
only one way. If plug does not fully fit into the outlet, reverse the plug. If it still does
not fit, contact a qualified electrician. Do not attempt to modify the plug in any way.
This appliance is for household use only.
2
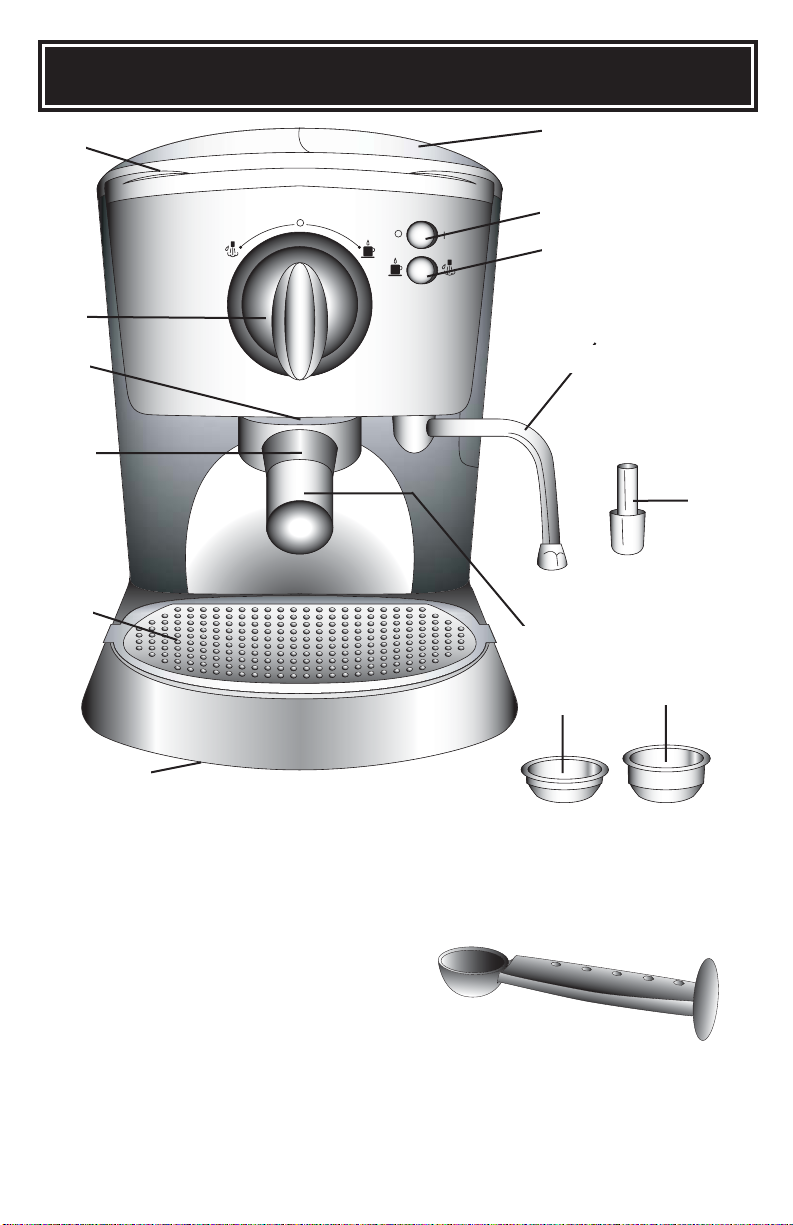
PARTS IDENTIFICATION
1. Removable water reservoir
2. Power switch
3. Preheat switch
4. Steam nozzle
5. Froth attachment
6. 2-cup filter
7. 1-cup filter
8. Filter handle
9. Slip resistant rubber feet
10. Drip tray with overflow protection
11. Filter lock
12. Espresso brewing head
13. Operation dial
14. Preheating plate
3
1
9
8
7
6
5
4
3
2
14
13
12
11
10
Measuring scoop & tamper
P
ower
P
P
ower
reheat
R
eady
HOW TO USE
Before First Use:
1. Read all the instructions and important safeguards.
2. Remove all packaging materials; make sure all your items are received in good
condition.
3. Lift water reservoir lid and remove the measuring spoon from the water reservoir.
4. Wash all the accessories with warm soapy water using a sponge or dishcloth.
5. Rinse thoroughly to remove soapy residue.
6. Wipe body clean with a damp cloth.
Pre-Rinsing the Cappu-Latte Espresso System:
1. Remove the water reservoir, wash thoroughly with warm soap and water, and fill it up
with cold water. Return the reservoir and plug the unit into an outlet.
2. Place a filter in the filter handle and position the filter handle on the espresso brewing
head. Lock the filter handle in place, but do not over tighten.
3. Place a large container beneath the brewing head.
4. Once the ready light illuminates the water has been heated to the correct
temperature. Turn the operation dial clockwise to the espresso function and allow all
the water to run through the unit.
** It may be necessary to turn the operation dial back to the “O” off position
mid-cycle to empty the large container.
¾ Do not use abrasive cleaners or scouring pads.
¾ Do not immerse the espresso maker, cord or plug in water at any time.
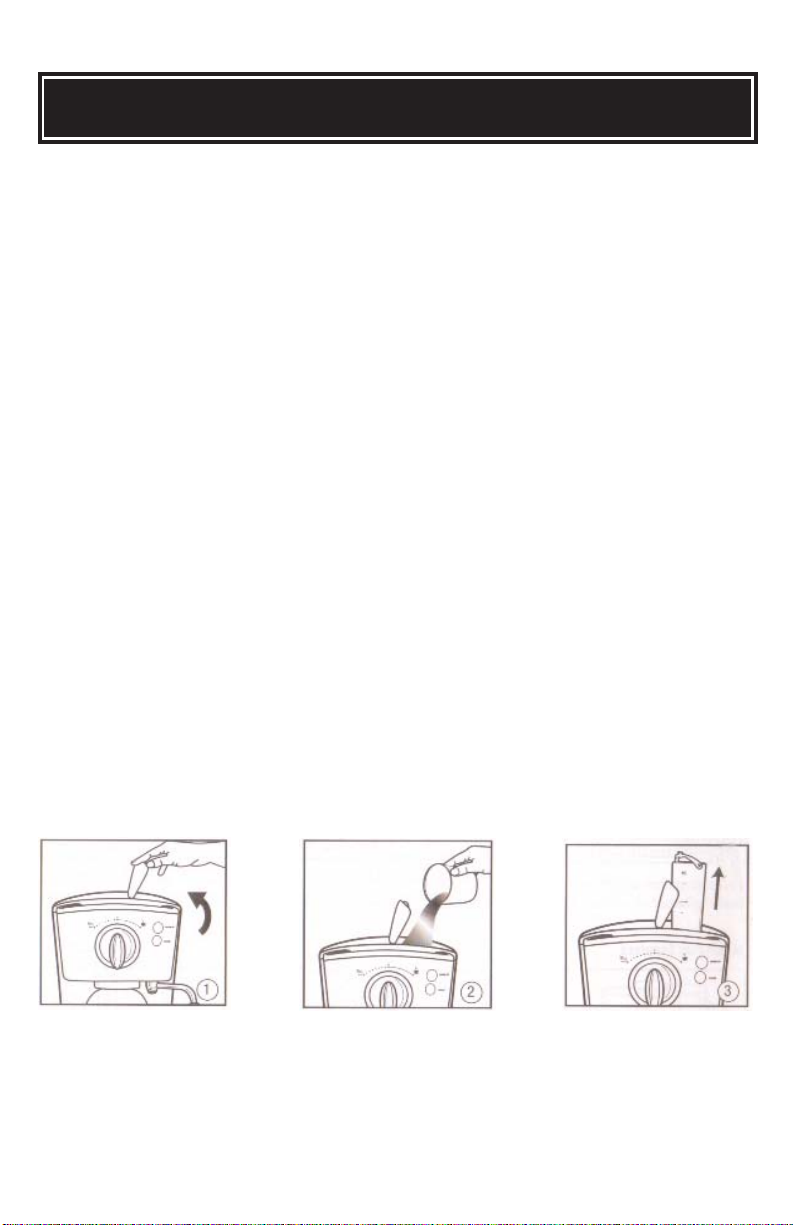
Filling The Water Reservoir:
Or
Lift up to open the lid of
the water reservoir
While it is in place, fill
the water reservoir with
cold water
Remove water reservoir
4
 Loading...