

Page 1
STARTING UP
Before using your ARNOVA for the rst time, completely charge the battery!
!
▲
Charging the Battery
1. Connect the USB cable to the ARNOVA and to a running computer.
2. The ARNOVA device will start charging.
- The Power indicator light is red while the battery is charging.
- It will turn yellow when the battery is fully charged.
Installation Wizard
The first time you start up your ARNOVA, the installation wizard will bring you
through a few screens to help you set up the principal settings: language, country,
time, etc.
ENGLISH
1
Page 2
ENGLISH
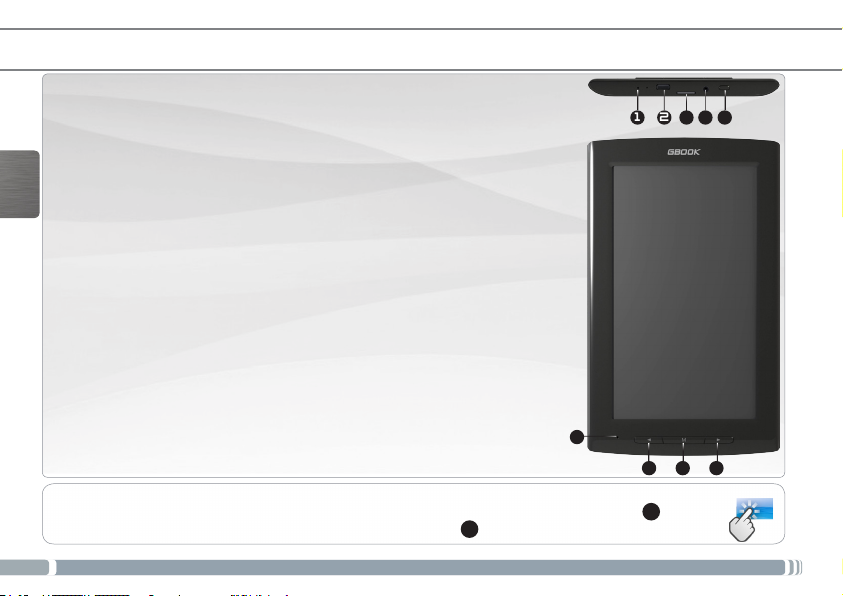
DESCRIPTION OF THE DEVICE
DESCRIPTION OF THE DEVICE
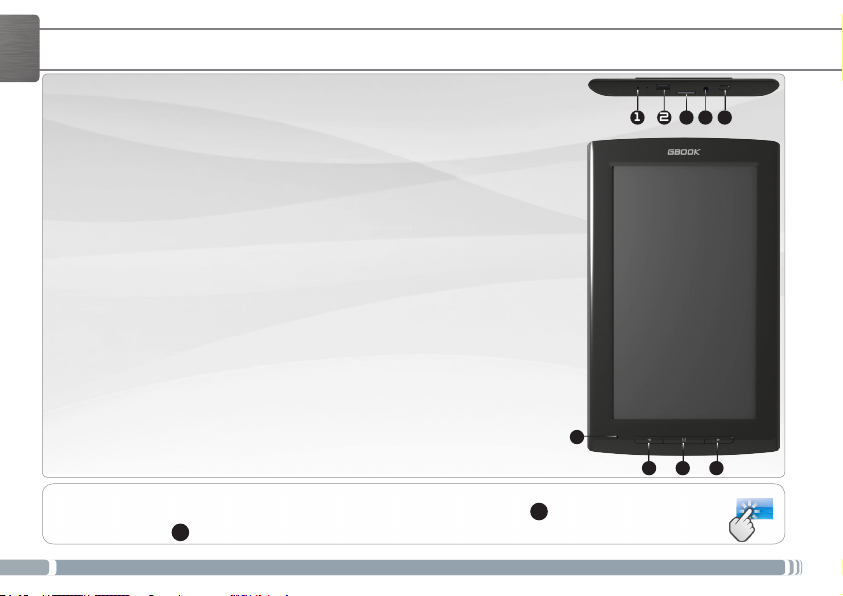
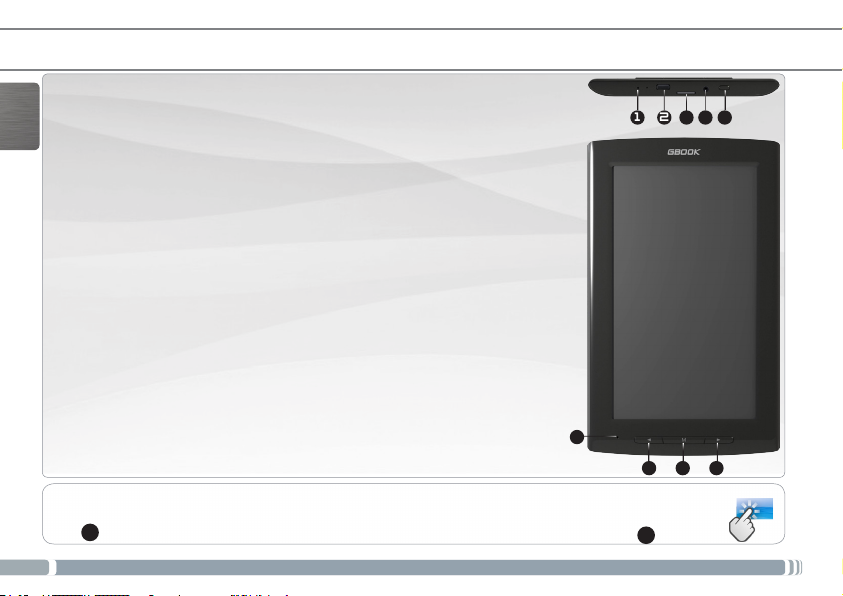
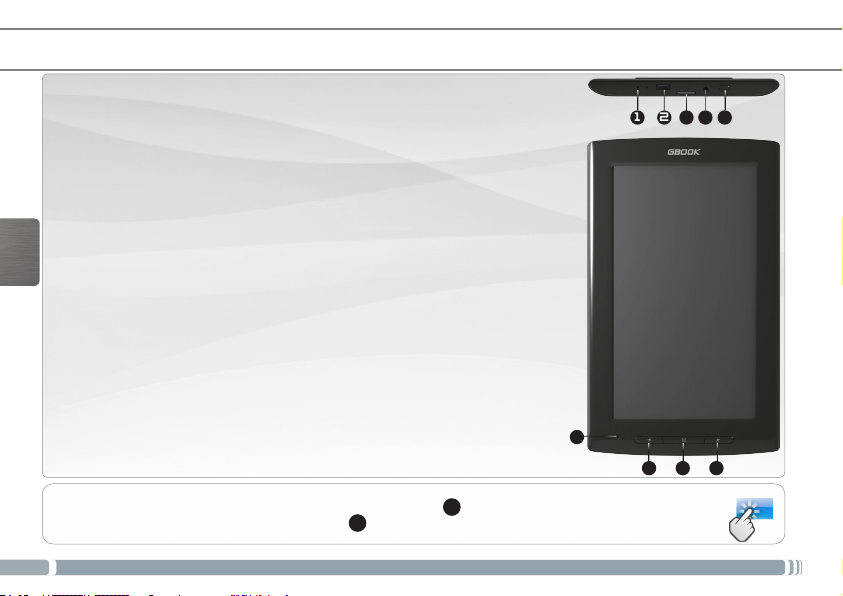
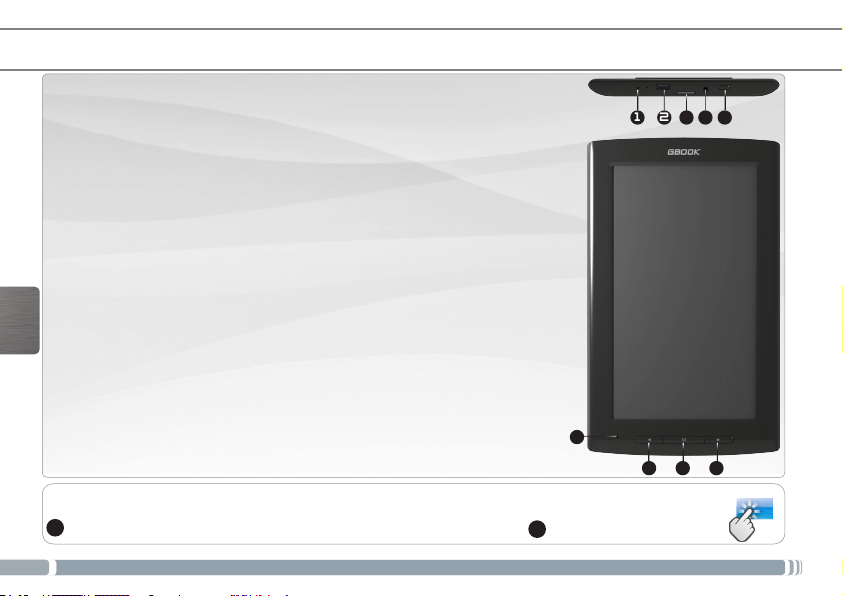
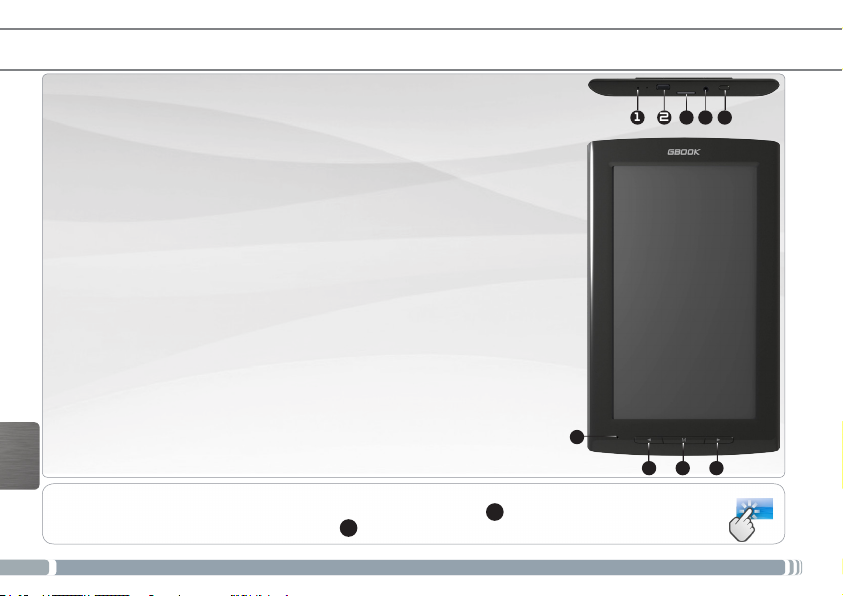
1. Hardware Reset: in the event that your ARNOVA freezes operation,
you can press the “pinhole reset” button by using a sharp object such
as a toothpick.
2. Micro-USB port:
- to charge the battery of your ARNOVA
- to connect your ARNOVA to your computer using the included USB
cable in order to transfer les
3. Micro-SD card slot
4. Headphone jack
5. On/Off button
6. Microphone
7. Previous page button
8. Menu button
9. Next page button
IMPORTANT:
Your device is frozen.You can turn it off. Press the ON/OFF button 5 for 10 seconds or press
the reset button 1.
2
6
21
543
987
???
Page 3
ENGLISH
www
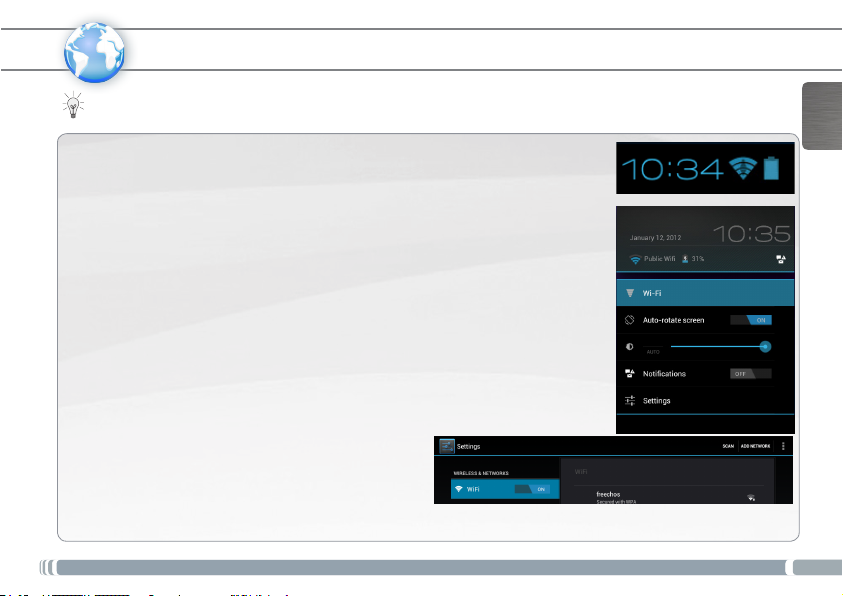
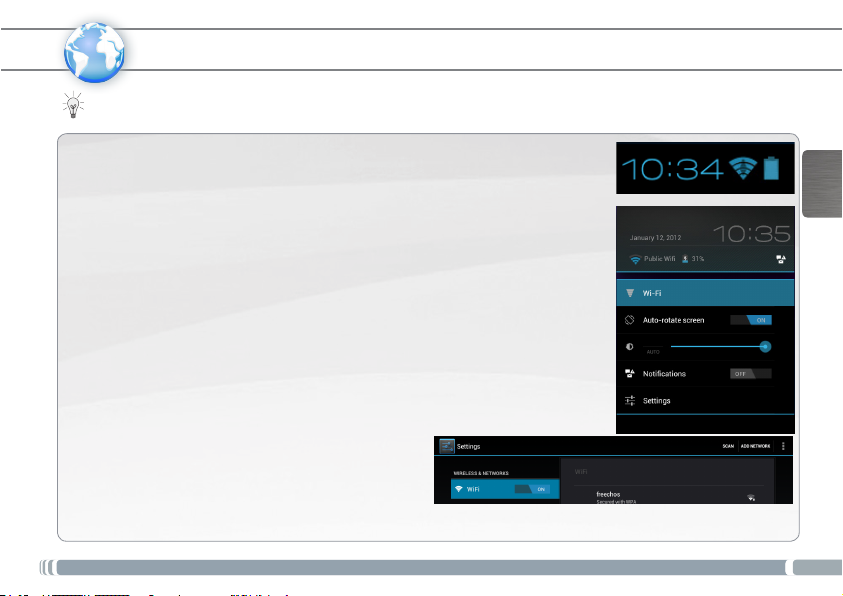
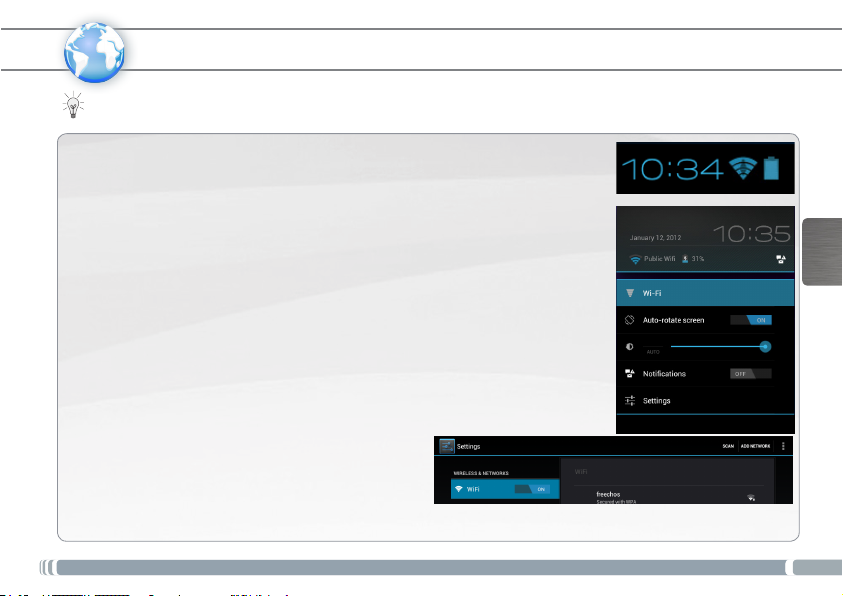
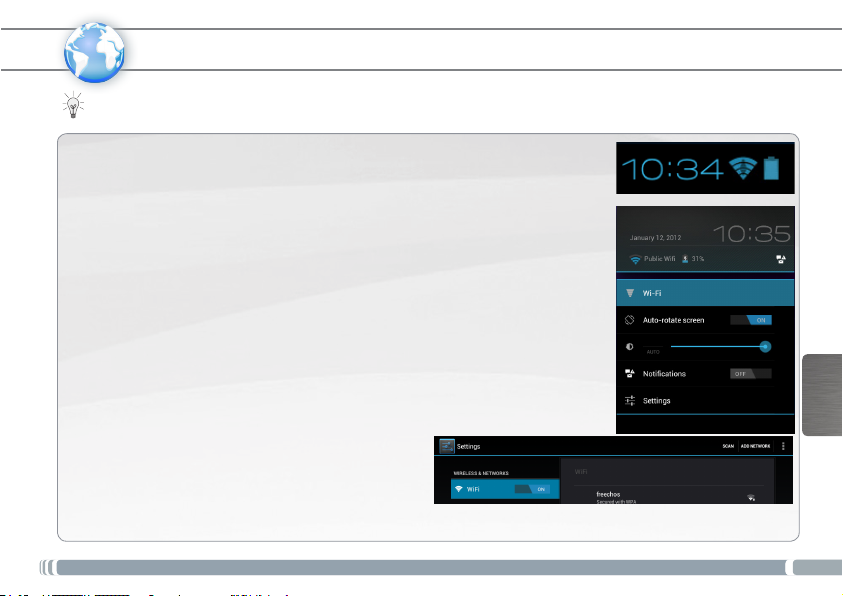
How to congure a WiFi network
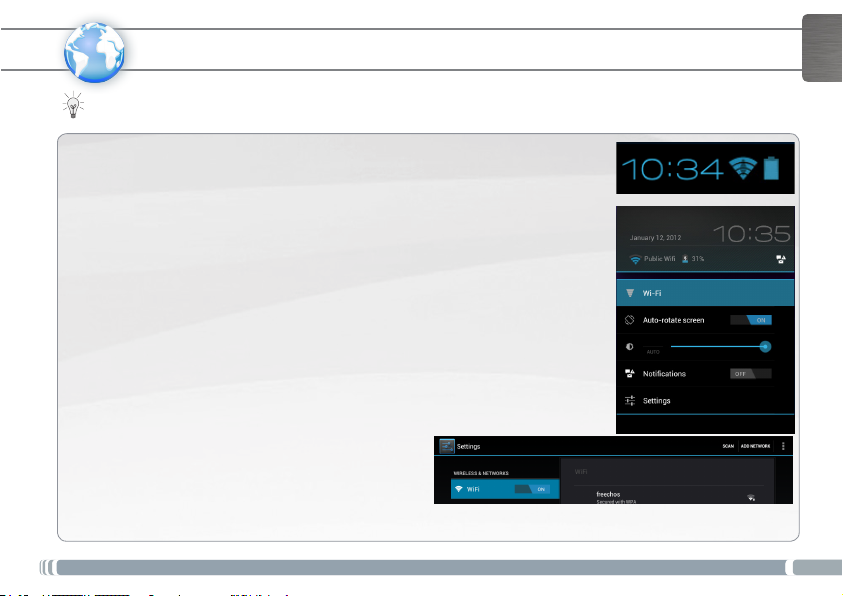
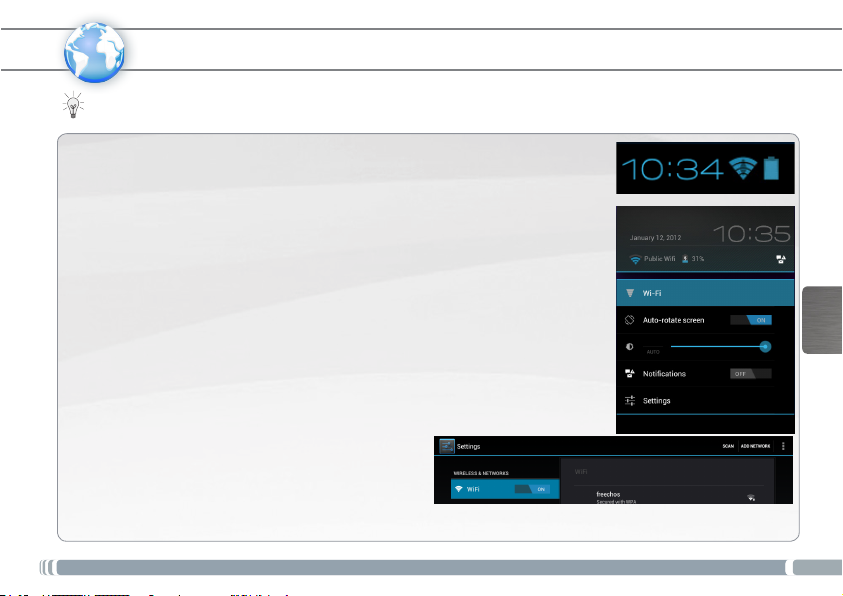
From the status bar, at the bottom right hand of the screen, you can access the WiFi
settings quickly.
1. Touch the time in the status bar. The status dashboard is displayed.
2. Touch the time in the status dashboard. The setting dashboard is displayed below.
3. Touch WiFi to open the WiFi settings.
4. If the WiFi is off, slide the WiFi switch to the On position.
Once the WiFi is on, the ARNOVA will scan for available WiFi networks.
Secured networks are indicated with a Lock icon. If the device finds a network that
you connected to previously, it connects to it.
5. Touch the network you want to connect to.
6. Enter the required network information* and touch Connect.
We recommend that you select Show password in order to be able to see the
characters you are typing.
Your ARNOVA will attempt to establish a connection to that WiFi access point.
* For free access WiFi points, there is no need to enter
any special information. For secured networks, you
will need a key (a series of numbers and/or letters) of
the type WEP, WPA, or WPA2. To obtain the exact
connection parameters required, contact the Internet
service provider.
CONNECTING TO THE WIFI NETWORK
For this procedure to work, you need to be in a WiFi zone that will allow you to connect to it. Every time the
ARNOVA is in range of a network that you have already configured once, it will attempt to make a connection.
3
Page 4
ENGLISH
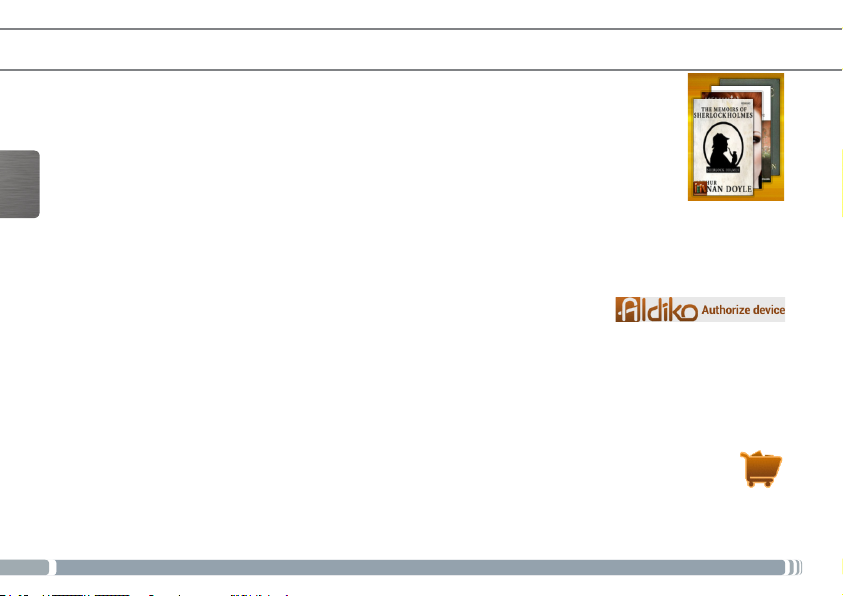
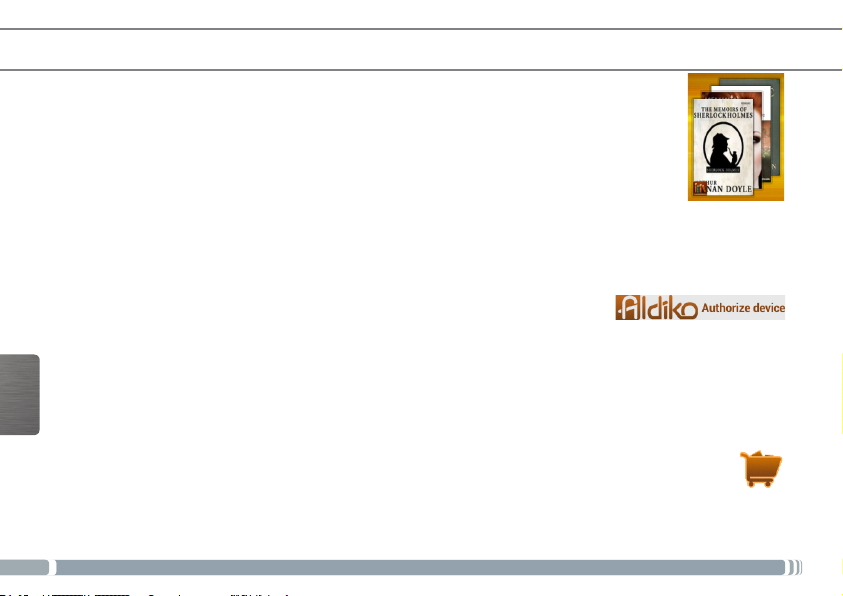
ALDIKO BOOK PREMIUM
The Aldiko Book Reader supports Adobe-DRMed ePub and PDF as well as non-encrypted ePub and
PDF formats.
Installing Aldiko
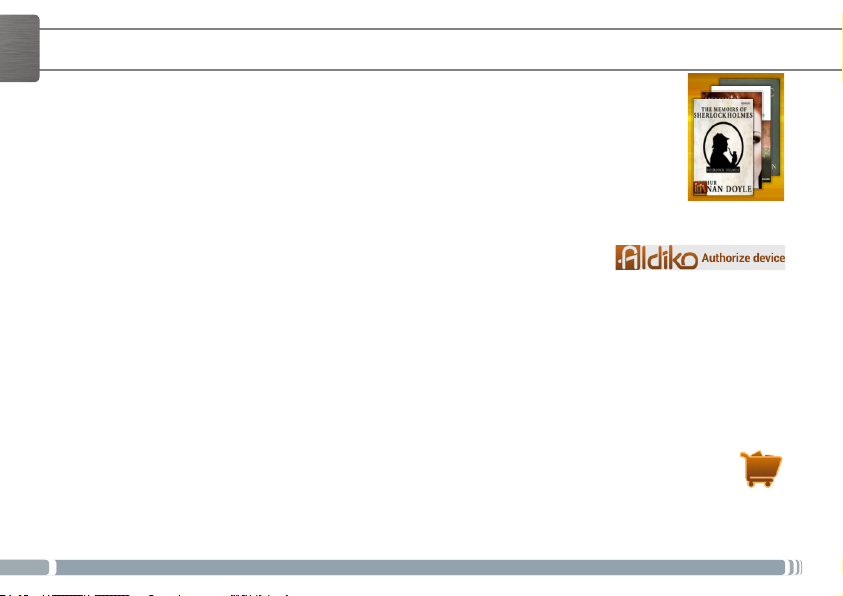
Aldiko Book Premium is preloaded in your device.
1. The rst time you start the device, go through the wizard.
2. At the screen Third party applications, tap Install.
A widget is created on the home screen.
NOTE: If you miss the Third party applications screen, open the Files app and select System > Apk.
Tap Aldiko and follow the on-screen instructions.
Authorizing your Device with an Adobe ID
Authorizing your device is necessary in order to read eBooks protected with Adobe-DRM.
To authorize your device:
1. Go to the Aldiko Book Reader.
2. Tap the menu icon in the upper right corner.
3. Tap Settings, then tap Adobe DRM.
If you have an Adobe ID already, type in your Adobe ID and Password and tap Sign in.
If you don’t have an Adobe ID, tap Register and you will be linked to the registration page.
- Please note that Adobe limits your total amount of authorizations.
- Each time you authorize your device with an Adobe ID, it counts against your total number, even though you do
it on the same device.
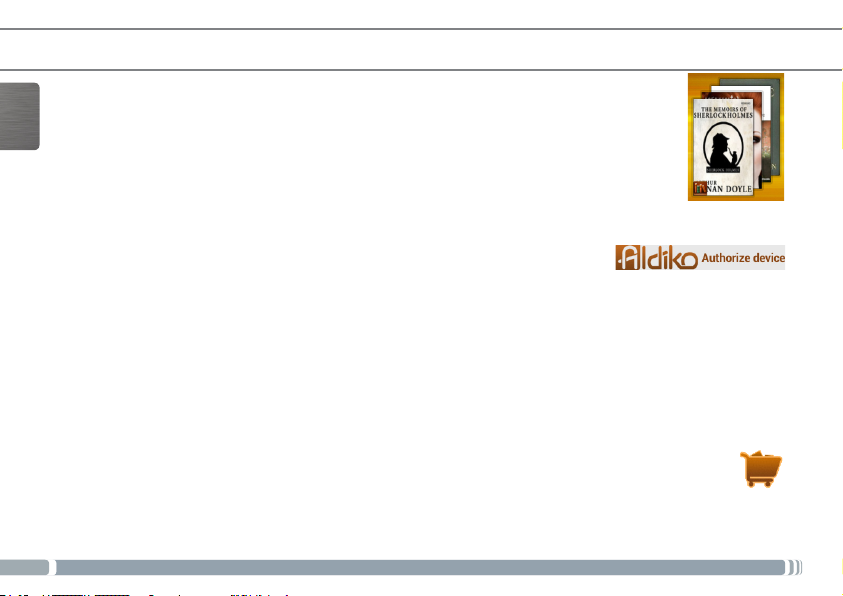
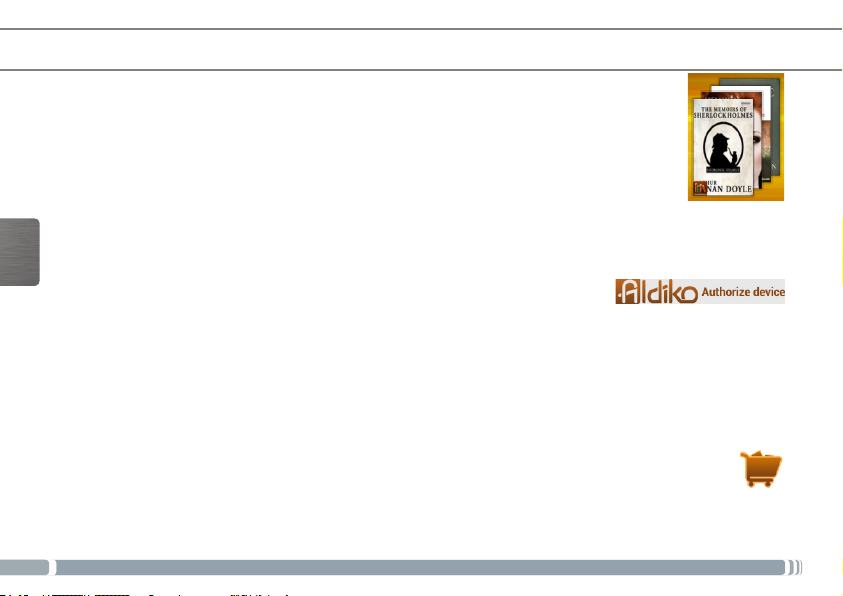
Purchase and download eBooks in Store
1. Tap the Store icon.
2. Choose a book that you like.
- If it’s a free book, tap the Download button.
The book will be automatically downloaded to your personal bookshelf.
- If the book is a paid book, tap the Buy button and continue to nish the transaction and download the book.
4
Page 5
ALDIKO BOOK PREMIUM
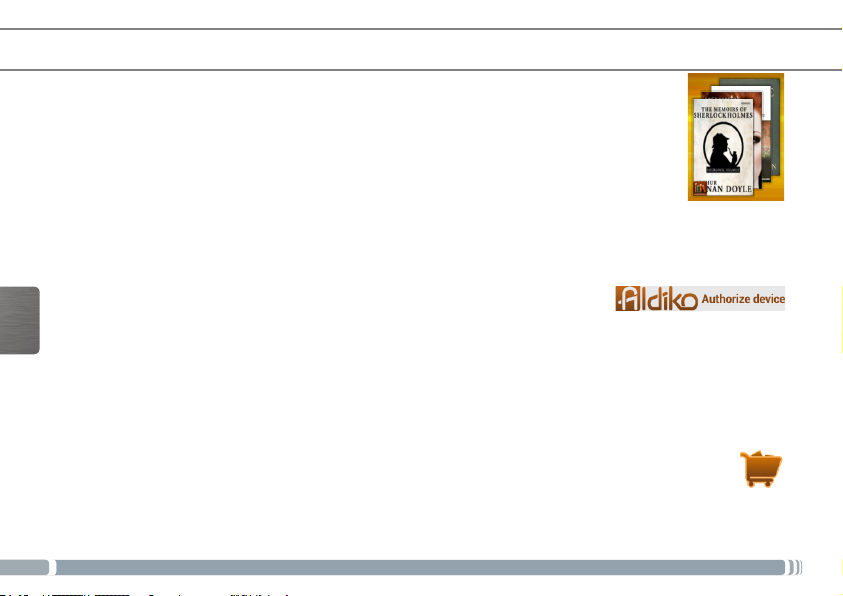
To start reading a book, tap on the book cover.
When reading a book, a menu overlay is available. It allows to access options.
You can access overlay menu options by tapping on the center of the device screen when reading.
Go to...
You can access table of contents.
Type in a particular page will bring you to that page of a book.
Bookmarks: add bookmark, delete bookmark.
Day/Night
Switch between day/night modes by tapping on he “Day/Night” icon.
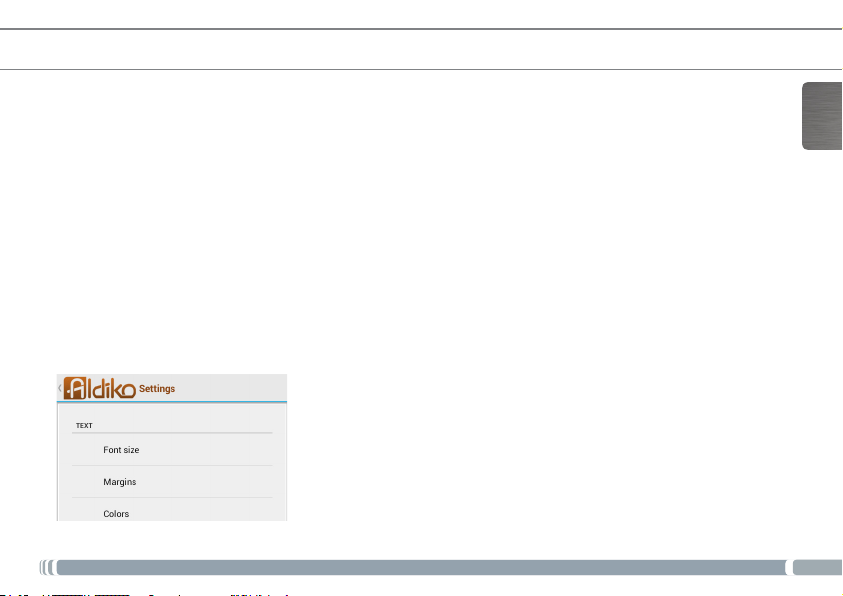
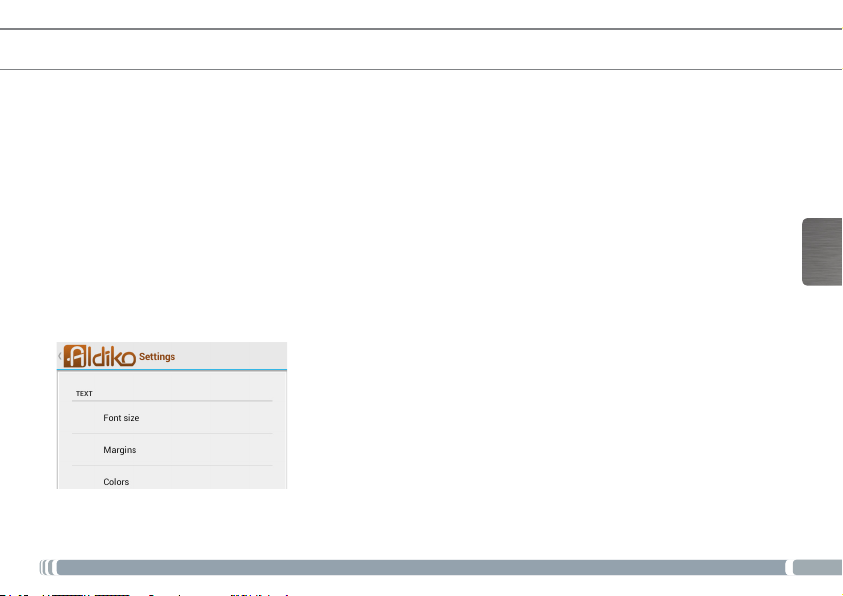
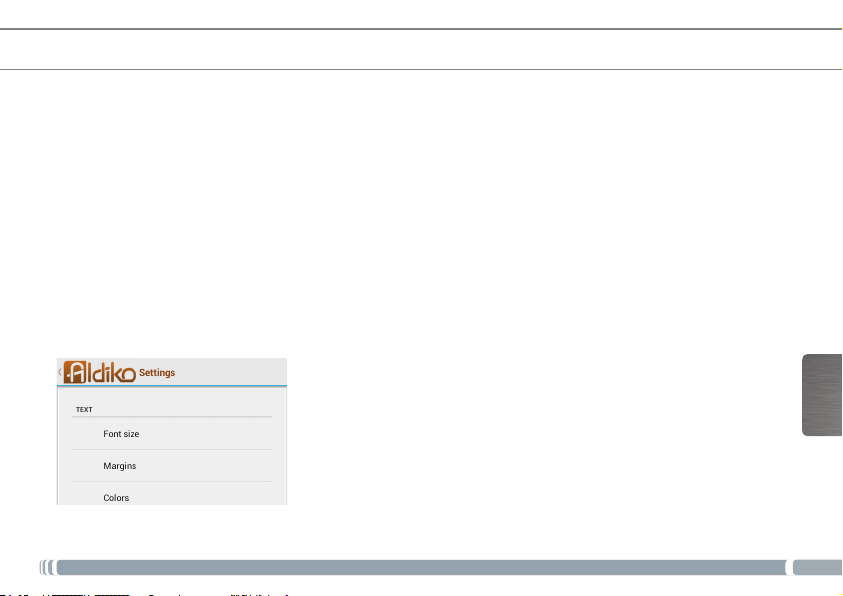
Settings
You can adjust text orientation. If you choose “Automatic”, that means the text will rotate along with your device.
Adjust brightness when reading: slide your nger along the left edge of the device screen.
More: access the advanced settings to customize your reading settings.
More
Select Help for more detailed information about the use of Aldiko.
ENGLISH
5
Page 6
ENGLISH
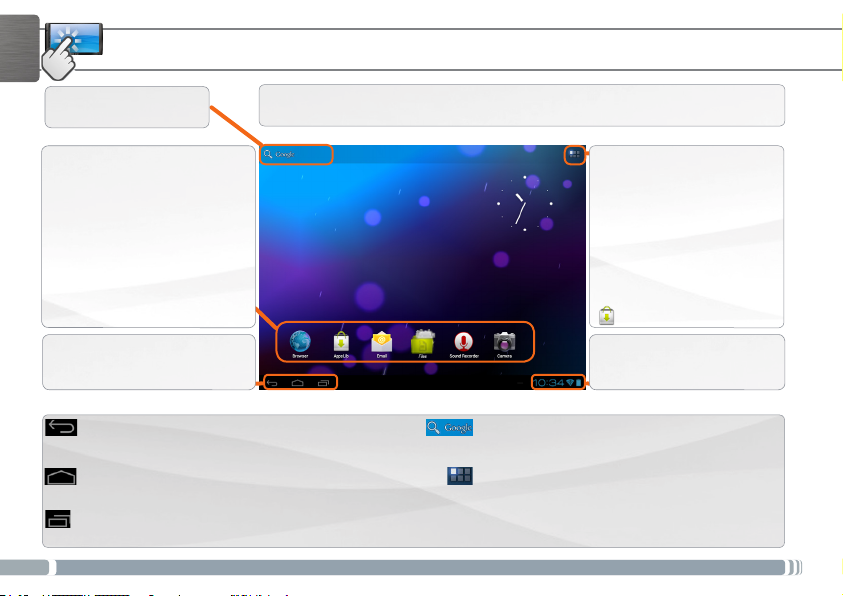
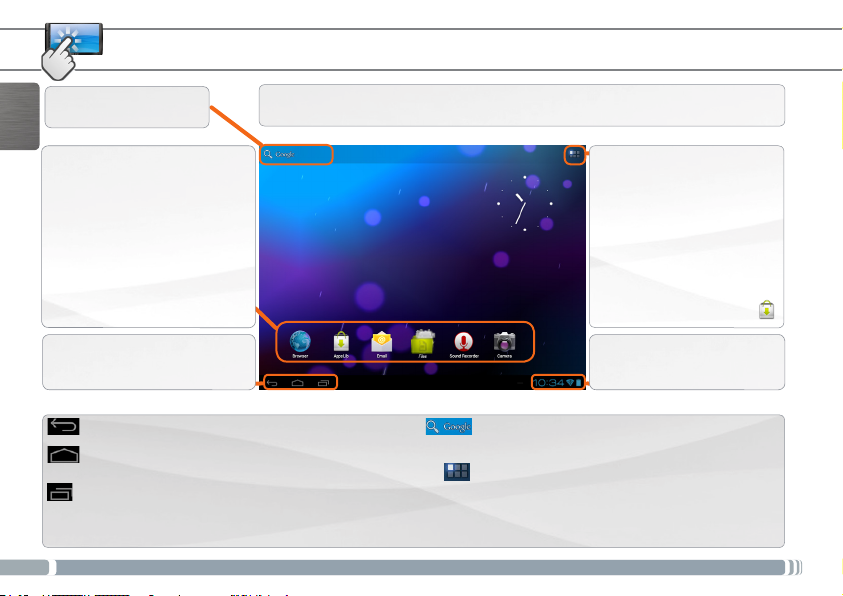
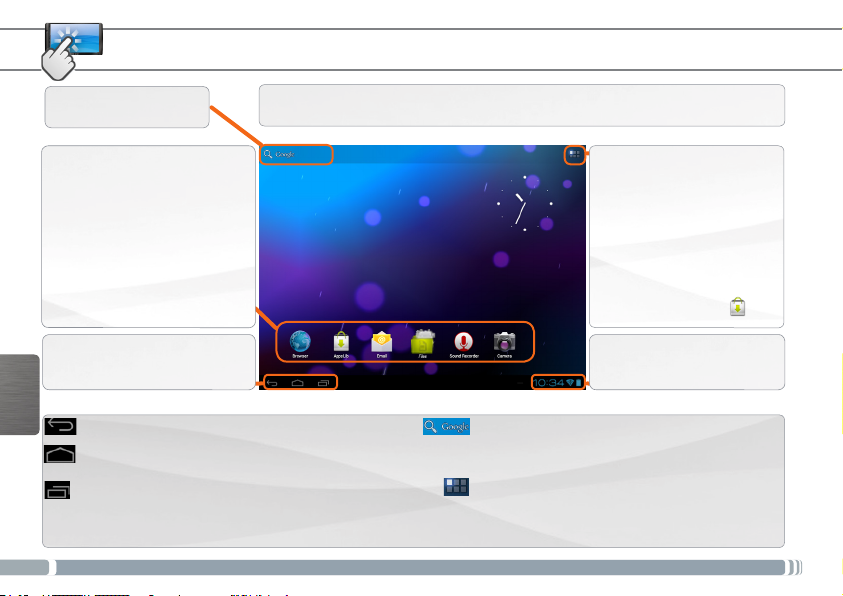
Touch for text search
THE ANDROID INTERFACE
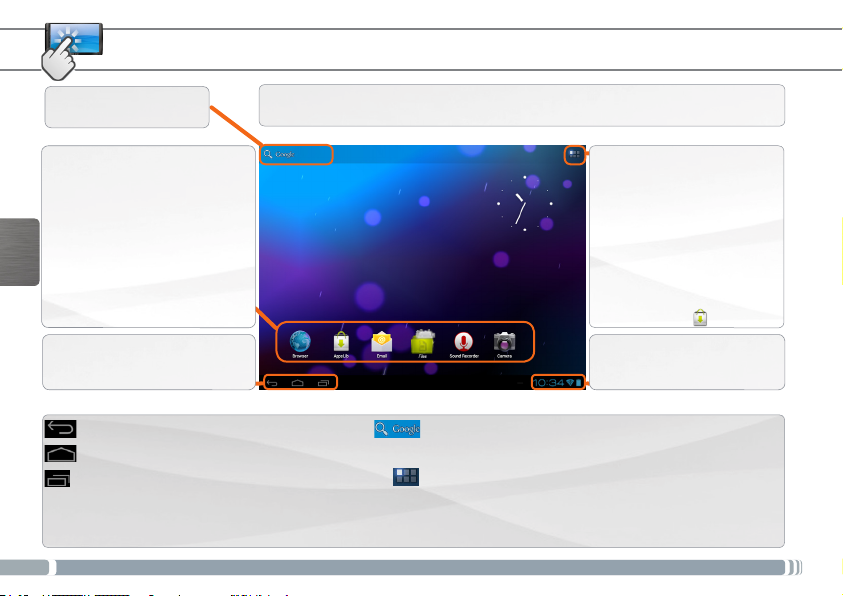
Your ARNOVA device is equipped with a capacitive touchscreen. Use your
fingertip to navigate.
These are default Android™
applications. Tap on an icon
to open the corresponding
application. You can customize
the Home screen by adding/
removing shortcuts and
widgets, changing the wallpaper
etc. See next page.
The navigation bar displays
the Back, Home and Recent
Apps buttons.
The Back button - to go back to your previous
screen.
The Home button - to return to the main screen.
The Recent Apps button - to navigate among your apps.
- to remove a thumbnail from the list, swipe it left or right.
6
All apps button
Tap on this icon to reveal all
the Android™ applications
and widgets installed on your
ARNOVA (games, various
tools, etc.). You can copy
them onto the Home screen.
You can get more Android™
applications from AppsLib
.
The status bar displays
notications and system
icons.
Main Touchscreen buttons
The Search button - to type terms to search
your tablet and the web.
The All apps button - to nd all your apps and
widgets.
Page 7
CUSTOMIZING YOUR PRODUCT
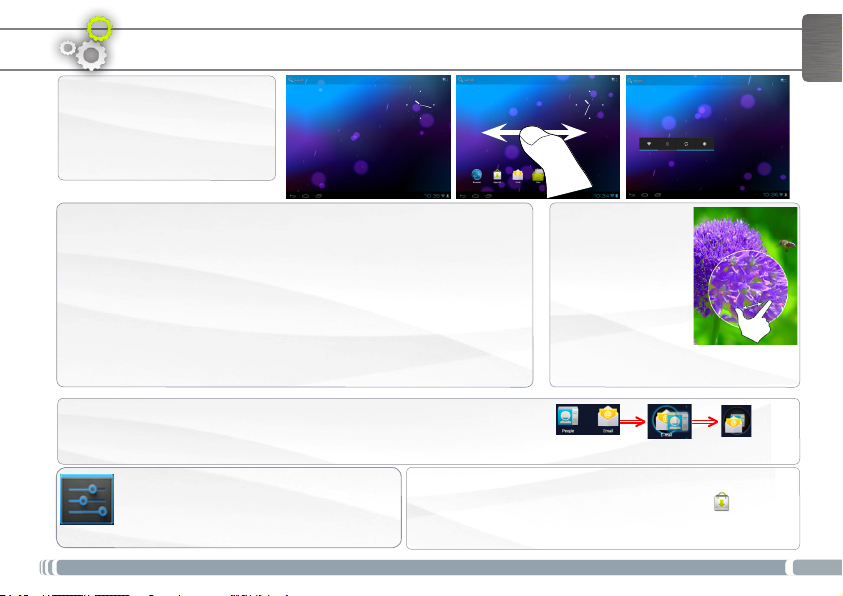
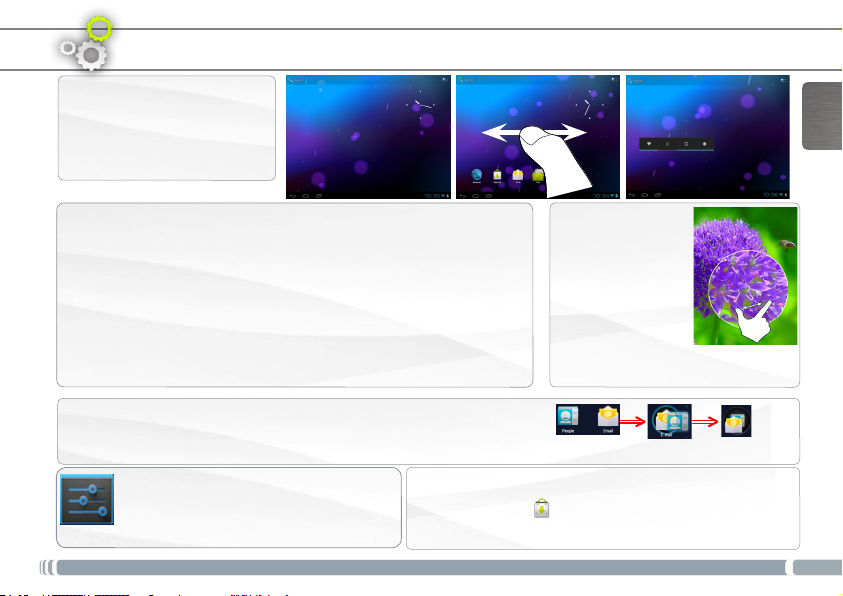
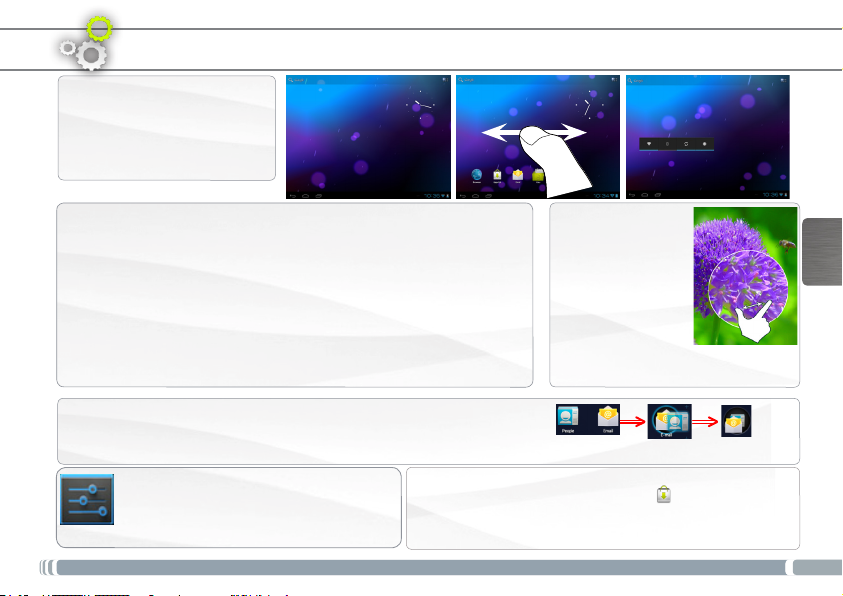
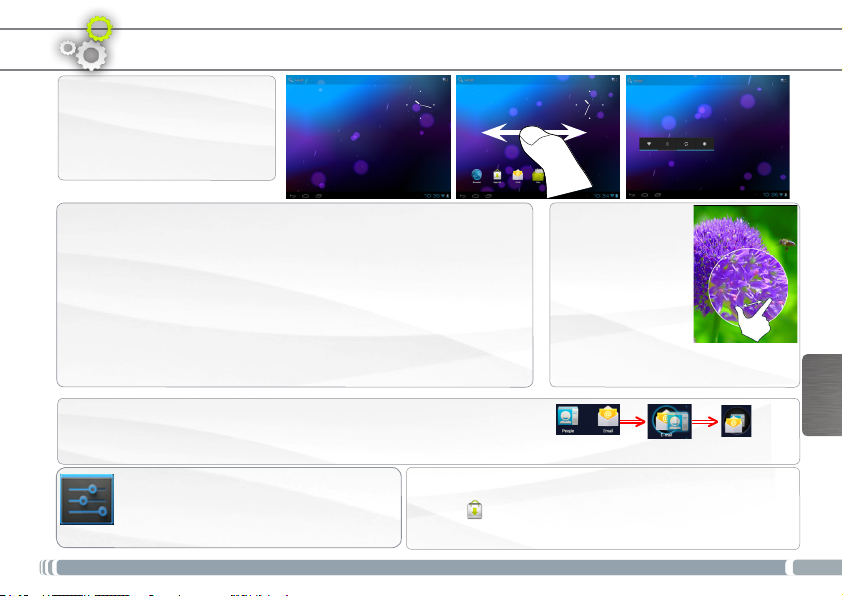
The extended Home screen
Navigate between different
home screen panels by swiping
left and right.
ENGLISH
Customizing the Home screen panels
- To change your wallpaper, hold your nger on the screen at an empty
location, then choose from the list.
Arranging & working with apps
- To move a Home screen item, touch and hold your nger onto it until
the positioning gridlines appear, then slide it to the desired location,
and release your nger.
- To remove a Home screen item, touch and hold it, slide your nger
towards the top of the screen and drop it over the Remove icon.
Removing an item from the All apps screens will uninstall the item.
Creating application folders: you can combine several application icons in a
folder. Drop one app icon over another on a Home screen and the two icons
will be combined.
Changing the Settings
Tap on Settings and choose a menu among
these categories: Wireless & networks,
Device, Personal, System.
Adding more applications with APPSLIB : with the ARNOVA
connected to the WiFi, tap on the AppsLib icon .
This online library has thousands of applications to
download and use.
Zoom: In some apps
(such as
Browser, and Gallery),
you can zoom in and
out by placing two
fingers on the screen
at once and pinching
them together
(to zoom out) or
spreading them apart (to zoom in).
7
Page 8
ENGLISH
CUSTOMIZING YOUR PRODUCT
Add widgets
Widgets are like windows into your apps. They’re available from an All Apps tab for you to move onto your Home
screens.
To see your widgets:
1. Touch the All Apps icon on your Home screen.
2. Touch Widgets at the top of the screen.
3. From the main Widgets screen, you can:
- move between screens: Swipe left or right.
- drag a widget to a Home screen. Touch and hold the widget’s icon, slide your nger where you want to place it
and lift your nger.
You may be asked to make further choices before the widget activates. If there isn’t room where you have
dropped it, the widget won’t be added to the Home screen.
Extend the life of your battery
- If you aren’t using WiFi, use the Settings app to turn it off.
- Turn down screen brightness and set a shorter Sleep timeout: Settings > Device > Display.
- If you don’t need it, turn off automatic syncing for all apps: Settings > Personal > Accounts & sync. Note that
this means you need to sync manually to collect messages, email, and other recent information, and won’t
receive notications when updates occur.
8
Page 9
TRANSFERRING MEDIA
1. Turn on your ARNOVA.
2. Connect the supplied USB cable to the ARNOVA and to a running computer.
3. The ARNOVA will ask you if you want to connect it. Tap on Turn on USB storage to
connect it and press OK to conrm.
Within a few seconds the ARNOVA will appear as an icon on your computer.
4. You can transfer your media files to the ARNOVA either by copy/pasting them into
the respective folders using Windows® Explorer (or the Finder on a Mac®), or by using
Windows Media® Player. Open Windows Media Player® and then use the Sync tab to
synchronize your music, videos, and photos onto your ARNOVA. See Windows Media
Player®’s Help to learn more about this.
5. Once all your file transfers are finished, close Windows® Explorer and any other program
that may have read or written to the ARNOVA. Click on the ‘safely remove’ icon in the
system tray, next to the clock. You can now unplug the USB cable.
ENGLISH
9
Page 10
www
ENGLISH
We recommend that you take a few minutes to register it (http://arnovatech.com/register). This will allow you to get
access to ARNOVA technical support (http://arnovatech.com/support).
REGISTER YOUR PRODUCT!
Ä On the web at http://arnovatech.com/register
?
As we are often updating and improving our products, your device’s software may have a slightly different appearance or modified
functionality than presented in this Quick Start Guide.
10
NEED HELP?
On our Website: see the Frequently Asked Questions section on http://arnovatech.com/faq
Contact our Technical Support Team: visit http://arnovatech.com/support for e-mail support.
Please register your product before contacting Technical Support (see Register your Product).
Page 11
PREMIÈRE UTILISATION
Avant d’utiliser votre ARNOVA pour la première fois, chargez complètement sa batterie !
!
▲
Charger la batterie
1. Connectez le câble USB fourni à l’ARNOVA et à un ordinateur allumé.
2. Votre ARNOVA commence à se charger.
Le témoin de fonctionnement est rouge lorsque la batterie est en charge.
Il devient jaune lorsque la batterie est chargée.
Assistant d’installation
La première fois que vous allumez l’ARNOVA, l’assistant d’installation vous aide à configurer les principaux
réglages de l’appareil : la langue, le pays, l’heure, etc.
FRANÇAIS
11
Page 12
DESCRIPTION DE L’APPAREIL
1. Bouton Reset
FRANÇAIS
2. Port micro-USB :
- permet de charger l’appareil,
- permet de connecter votre ARNOVA à un ordinateur, à
l’aide du câble USB fourni afin de transférer des fichiers.
3. Emplacement pour cartes Micro-SD
4. Prise casque
5. Bouton On/Off : permet d’allumer ou d’éteindre l’appareil.
6. Microphone
7. Bouton Page précédente
8. Bouton de Menu
9. Bouton page suivante
IMPORTANT:
votre produit ne réagit plus. Vous pouvez l’arrêter en actionnant pendant 10 secondes le bouton ON/
OFF 5 ou en utilisant le bouton de réinitialisation (reset). Voir Réinitialisation de l’appareil 1.
► *
12
Câble vidéo (Mini-HDMI vers HDMI) non-fourni.
6
21
543
987
???
Page 13
www
Comment configurer un réseau WiFi
A partir de la barre de statut, dans le coin inférieur droit de l’écran, vous pouvez
accéder rapidement aux paramètres WiFi.
1. Touchez l’heure dans la barre de statut. Le panneau des statuts s’afche.
2. Touchez l’heure dans le panneau des statuts. Le tableau des paramètres s’afche.
3. Touchez WiFi pour afcher les paramètres WiFi.
4. Si le WiFi est désactivé, faites glisser le bouton WiFi sur Marche.
5. Sélectionnez le réseau auquel vous souhaitez vous connecter.
6. Saisissez les informations réseaux demandées*, puis touchez Connecter.
Votre ARNOVA va maintenant tenter d’établir une connexion avec le point d’accès
WiFi.
* Pour vous connecter à un réseau WiFi ouvert, il n’est
pas nécessaire de saisir les informations réseau. Pour
un réseau protégé, vous devrez entrer une clé (une
suite de chiffres et/ou de lettres) du type WEP, WPA ou
WPA2. Pour obtenir les paramètres de connexion exacts,
contacter le fournisseur d’accès à Internet.
SE CONNECTER À UN RÉSEAU WIFI
Pour suivre cette procédure, vous devez vous situer dans une zone WiFi vous permettant de vous connecter.
Chaque fois que l’ARNOVA détectera un réseau que vous avez déjà configuré, il tentera de s’y connecter.
Lorsque le WiFi est activé, l’ARNOVA recherche les réseaux WiFi disponibles.
Les réseaux sécurisés sont associés à un icone représentant un cadenas.
Si l’appareil détecte un réseau que vous avez utilisé précédemment, il s’y connecte.
Il est conseillé de sélectionner Afficher le mot de passe pour afficher les
caractères saisis.
FRANÇAIS
13
Page 14
ALDIKO BOOK PREMIUM
L’application Aldiko Book Reader lit les chiers ePub et PDF protégés par Adobe-DRMd ainsi que les
autres types de chiers ePub et PDF non protégés.
Installer Aldiko
Aldiko Book Premium est préchargé sur votre appareil.
FRANÇAIS
1. La première fois que vous démarrez votre appareil, laissez vous guider par l’assistant de
démarrage.
2. Sur l’écran Application tierces, sélectionnez Installer.
Un widget est créé sur l’écran d’accueil.
NOTE: Il est aussi possible d’installer l’application à partir de l’application Fichiers > System > Apk.
Sélectionne Aldiko et l’installation démarre.
Autoriser votre appareil à lire des chiers DRM avec votre identiant Adobe
Il est nécessaire d’autoriser votre appareil pour lire des chiers protégés par Adobe DRM.
Pour autoriser votre appareil :
1. Allez sur l’application Aldiko Book Reader.
2. Sélectionnez l’icône de menu dans le coin supérieur droit.
3. Sélectionnez Paramètres, puis Adobe DRM.
Si vous avez déjà un Adobe ID, saisissez votre identiant et mot de passe. Sélectionnez Connexion.
Si vous n’avez pas d’Adobe ID, sélectionnez Créer un compte.
- Vous avez un nombre d’autorisations à ne pas dépasser.
- A chaque fois que vous autorisez votre appareil avec un Adobe ID, vous diminuez le nombre d’autorisations
possible même si vous utilisez le même appareil.
Acheter et télécharger des eBooks
1. Sélectionnez l’icône Librairie.
2. Sélectionnez un livre.
- S’il s’agit d’un livre gratuit, sélectionnez le bouton Télécharger.
Le livre est automatiquement téléchargé sur votre appareil.
- S’il s’agit d’un livre payant, sélectionnez le bouton Acheter et suivre les instructions à l’écran.
14
Page 15
ALDIKO BOOK PREMIUM
Pour ouvrir un livre, sélectionnez-le.
Lors de la lecture, il est possible d’afcher un menu en surimpression. Vous avez diférentes options.
Touchez le milieu de l’écran pour afcher le menu en surimpression.
Aller à...
Accédez à la table des matières.
La saisie d’un numéro de page vous afche la page donnée.
Marques-page: ajouter, supprimer.
Jour/Nuit
Passer d’un afchage en mode jour à un afchage en mode nuit ou vice versa.
Paramètres
Ajustez l’orientation du texte. Si vous sélectionnez Automatique, cela permet de dénir l’orientation du texte en
fonction de la rotation de votre produit.
Réglez la luminosité lors de la lecture: glissez votre doigt le long de la partie gauche de l’écran de bas en haut.
Plus: accédez aux paramètres avancées.
Plus Sélectionnez Aide pour une assistance complète sur l’utilisation d’Aldiko.
FRANÇAIS
15
Page 16
L’INTERFACE ANDROID
Pour saisir vos termes de
recherche
FRANÇAIS
Des raccourcis Android™
par défaut. Appuyez sur un
icone pour ouvrir l’application
correspondante. Vous pouvez
personnaliser l’écran d’accueil
en ajoutant/supprimant des
raccourcis et des widgets, en
changeant le fond d’écran, etc.
Voir page suivante.
La barre de navigation afche
les icones Retour, Accueil et
Applications récentes.
L’icone Retour - retour à l’écran précédent.
L’icone Accueil - pour retourner à
l’écran d’accueil.
L’icone Applications récentes - Pour ouvrir les
applications utilisées récemment. Pour fermer une
application, faites-la glisser vers la gauche ou vers la
droite.
16
Votre ARNOVA est équipé d’un écran tactile capacitif. Utiliser la pulpe de votre
doigt pour naviguer.
Icone Toutes les applications
Appuyez sur cet icone
pour afficher toutes les
applications Android™
installées sur votre ARNOVA
(jeux, différents outils, etc.). Il
est possible de les copier sur
l’écran d’accueil. Vous pouvez
obtenir d’autres applications
Android™ depuis AppsLib .
La barre de statut afche des
notications et des icones
système.
Principales boutons tactiles
L’icone Recherche - pour saisir les termes de
recherche
L’icone Toutes les applications - pour voir tous
vos widgets et vos applications.
Page 17
PERSONNALISATION DE L’APPAREIL
L’écran d’accueil étendu
Faites glisser votre doigt
horizontalement sur l’écran pour
aller sur le côté gauche ou droit
de l’écran d’accueil étendu.
FRANÇAIS
Changer le fond d’écran
- Pour changer votre fond d’écran, maintenez votre doigt appuyé sur un
emplacement vide de l’écran, puis choisissez parmi la liste d’options.
Organiser et utiliser les applications
- Pour déplacer un élément, maintenez votre doigt appuyé sur l’icone
jusqu’à ce que s’afchent les lignes de positionnement, puis faites-le
glisser vers l’emplacement souhaité, et relâchez.
- Pour supprimer l’icone d’une application de l’écran d’accueil, maintenez
votre doigt appuyé sur l’icone, puis faites le glisser vers le haut de l’écran,
et déposez le sur l’icone Supprimer. En supprimant un icone à partir de
l’écran Toutes les applications, vous la désinstaller.
Créer des dossiers d’applications : vous pouvez regrouper plusieurs icones
d’applications dans un dossier. Dans un écran d’accueil, déposez un icone sur
un autre pour les rassembler.
Modification des paramètres
Appuyez sur Paramètres et choisissez un
menu parmi ces catégories : Connexions et
réseaux, Appareil, Personnel, Système, etc.
Ajouter d’autres d’applications avec APPSLIB
Connectez votre ARNOVA à un réseau WiFi, puis appuyez
sur l’icone AppsLib . Ce portail de téléchargement vous
propose des milliers d’applications gratuites et payantes à
télécharger.
Zoomer : Dans des
applications telles
que les navigateurs,
vous pouvez zoomer
ou dézoomer. Il suft
de placer deux doigts
sur l’écran et les
écarter pour zoomer
ou les rapprocher
dans un mouvement de pincement
pour dézoomer.
17
Page 18
PERSONNALISATION DE L’APPAREIL
Ajouter des widgets
FRANÇAIS
Les widgets sont comparables à des fenêtres ouvertes sur vos applications. Vous pouvez les sélectionner dans
l’onglet “Toutes les applications”, puis les déplacer vers vos écrans d’accueil.
Pour afcher vos widgets, procédez comme suit :
1. Dans l’écran d’accueil, appuyez sur l’icône Toutes les
applications .
2. Appuyez sur Widgets en haut de l’écran.
3. Dans l’écran principal des widgets, vous pouvez effectuer les actions suivantes :
- passer d’un écran à l’autre : faites glisser votre doigt vers la gauche ou vers la droite.
- faire glisser un widget jusqu’à un écran d’accueil : appuyez de manière prolongée sur l’icône d’un widget,
faites glisser votre doigt jusqu’à l’emplacement de votre choix, puis relevez le doigt.
Dans certains cas, vous serez invité à sélectionner d’autres options pour activer le widget. S’il n’y a pas de place
à l’emplacement où vous déposez le widget, ce dernier ne sera pas ajouté à l’écran d’accueil.
Prolonger l’autonomie de votre batterie
- Pour désactiver les signaux que vous n’utilisez pas (WiFi), accédez à l’application Paramètres.
- Pour diminuer la luminosité de l’écran et dénir un délai de mise en veille plus court, appuyez sur Paramètres
> Appareil > Afchage.
- Si vous n’en avez pas besoin, désactivez la synchronisation automatique pour toutes les applications. Pour
ce faire, appuyez sur Paramètres > Personnel > Comptes et synchro. Notez que cela signie que vous devrez
effectuer une synchronisation manuelle pour récupérer vos messages, vos e-mails, ainsi que les autres
informations récentes. En outre, vous ne recevrez aucune notication pendant les mises à jour.
18
Page 19
TRANSFERT DE FICHIERS MULTIMÉDIA
1. Allumez votre ARNOVA.
2. Connectez le câble USB fourni à votre ARNOVA et à un ordinateur allumé.
3. L’ARNOVA vous propose de le connecter. Sélectionnez Activer la mémoire de stockage
USB pour le connecter et appuyez sur OK pour confirmer.
Après quelques secondes, l’ARNOVA apparaît sous la forme d’une icône sur votre
ordinateur.
4. Pour transférer vos fichiers sur l’ARNOVA, vous pouvez les copier/coller
directement dans les dossiers respectifs de l’appareil (avec Windows® Explorer
ou le Finder sur Mac®), ou vous pouvez également utiliser Windows Media®
Player. Lancez Windows Media Player®, puis utilisez l’onglet Synchroniser pour
synchroniser vos chansons, vidéos et photos avec votre ARNOVA. Consultez l’aide
de Windows Media Player® pour en savoir plus à ce sujet.
5. Une fois que tous les transferts de fichiers sont terminés, fermez Windows Media®
Player ou tout autre programme susceptible d’utiliser l’ARNOVA. Cliquez ensuite
sur l’icône de retrait du périphérique en toute sécurité dans la barre des tâches, à
côté de l’horloge. Vous pouvez à présent débrancher le câble USB.
FRANÇAIS
19
Page 20
www
FRANÇAIS
Nous vous conseillons de prendre quelques minutes pour l’enregistrer (http://arnovatech.com/register). Cela vous
permettra d’avoir accès au support technique ARNOVA (http://arnovatech.com/support).
ENREGISTREZ VOTRE PRODUIT !
Ä Sur Internet : http://arnovatech.com/register
?
Comme nous mettons à jour et améliorons régulièrement nos produits, le logiciel de votre appareil peut présenter une interface ou
des fonctionnalités légèrement différentes de celles décrites dans ce guide.
20
BESOIN D’AIDE ?
Sur notre site Web: Consultez la Foire Aux Questions (FAQ) sur http://arnovatech.com/faq
Contactez notre équipe d’assistance technique: Allez sur http://arnovatech.com/support pour une assistance
par e-mail. Veuillez enregistrer votre produit avant de contacter notre équipe d’assistance technique (voir
Enregistrez votre Produit).
Page 21
STARTEN
Vor der erstmaligen Verwendung des ARNOVA sollte der Akku vollständig aufgeladen werden!
!
▲
Auaden des Akkus
1. Verbinden Sie den ARNOVA über das mitgelieferte USB-Kabel mit Ihrem Computer.
2. Daraufhin startet den Ladevorgang.
Während der Akku aufgeladen wird, leuchtet die Leistungsanzeige rot.
Installationsassistent
Wenn Sie Ihren ARNOVA das erste Mal in Betrieb nehmen, leitet Sie der Installationsassistent durch einige
Bildschirme, um Ihnen dabei zu helfen, die grundlegenden Einstellungen vorzunehmen. Sprache, Land,
Uhrzeit usw.
DEUTSCH
21
Page 22
BESCHREIBUNG DES ARNOVA
1. Hardware-Reset
2. Micro USB Port:
- zum Aufladen der Batterie Ihres ARNOVA
DEUTSCH
- zum Verbinden des ARNOVA mit dem Computer über
das mitgelieferte USB Kabel (zur Datei-Übertragung).
3. microSD Karten Steckplatz
4. Kopfhöreranschluss
5. EIN/AUS-Taste
6. Eingebautes Mikro
7. Taste f. nächste Seite
8. Menü Taste
9. Taste Nächste Seite
WICHTIG:
Ihr Gerät ist abgestürzt, bitte schalten Sie es aus. Drücken und halten Sie den Ein-/Aus-Taste 5 für 10
Sekunden oder drücken Sie den Reset-Schalter, Hardware-Reset 1.
22
► *
Mit einem optionalen Video Kabel (HDMI / Mini HDMI).
6
21
543
987
???
Page 23
www
Dazu müssen Sie sich in Reichweite eines WLAN-Netzwerks befinden. Das ARNOVA Gerät erkennt bereits
konfigurierte Netzwerke und wird mit diesen eine Verbindung herstellen.
Konfiguration eines WiFi-Netzwerks
Von der Statusleiste aus können Sie schnell auf die WiFi-Einstellungen zugreifen.
1. Tippen Sie auf die Uhrzeit in der Statusleiste. Das Status-Dashboard wird
angezeigt.
2. Tippen Sie auf die Uhrzeit im Status-Dashboard. Es wird jetzt darunter das
Dashboard für Einstellungen angezeigt.
3. Berühren Sie WiFi, um die WiFi-Einstellungen zu öffnen.
4. Bei ausgeschaltetem WiFi schieben Sie den WiFi-Schalter in die Position AN.
Nachdem das WiFi eingeschaltet wurde, sucht das ARNOVA nach verfügbaren
WiFi-Netzwerken. Gesicherte Netzwerke werden mit einem Schlosssymbol
angezeigt. Findet das Gerät eine zuvor vorhandene Verbindung, wird diese
verwendet.
5. Berühren Sie das Netzwerk, zu dem Sie eine Verbindung herstellen möchten.
6. Geben Sie die erforderlichen Netzwerk-Informationen * ein und berühren
Sie Connect (Verbinden). Wir empfehlen, dass Sie Show Password (Passwort
anzeigen) wählen, damit Sie die Zeichen, die Sie tippen, sehen können.
Ihr ARNOVA wird jetzt eine Verbindung zu diesem WiFi-Access-Point herstellen.
* Für kostenlose WiFi-Access Points besteht kein Bedarf
für das Eingeben spezieller Informationen. Für abgesicherte
Netzwerke benötigen Sie einen Schlüssel (eine Serie von
Zahlen und/oder Buchstaben) des Typs WEP, WPA oder
WPA2. Um die exakten Verbindungsparameter zu erhalten,
kontaktieren Sie den Internetprovider.
WIFI-NETZWERKVERBINDUNG
DEUTSCH
23
Page 24
ALDIKO BOOK PREMIUM
Der Aldiko Book Reader unterstützt Adobe-DRMed ePub- und PDF-Dateien sowie nicht verschlüsselte
ePub- und PDF-Formate.
Installation von Aldiko
Aldiko Book Premium ist auf Ihrem Gerät vorgeladen.
1. Beim ersten Start des Geräts arbeiten Sie sich durch den Assistenten.
2. Im Bildschirm “Anwendungen von Drittanbietern” tippen Sie auf “Installieren”.
Auf dem Startbildschirm wird jetzt ein Widget erstellt.
HINWEIS: Fehlt der Bildschirm für die Anwendungen von Drittanbietern, öffnen Sie die App “Dateien”
DEUTSCH
und wählen dann System > Apk. Tippen Sie auf Aldiko und folgen Sie den Hinweisen auf dem
Bildschirm.
Autorisierung Ihres Geräts anhand einer Adobe-ID
Um mit Adobe-DRM geschützte eBooks lesen zu können, müssen Sie Ihr Gerät autorisieren.
So autorisieren Sie Ihr Gerät:
1. Öffnen Sie den Aldiko Book Reader.
2. Tippen Sie in der oberen rechten Ecke auf das Menüsymbol.
3. Tippen Sie auf Einstellungen und dann auf Adobe DRM.
4. Geben Sie Ihre Adobe ID (falls vorhanden) und das Passwort ein und tippen Sie auf “Anmelden”. Besitzen Sie
noch keine Adobe ID, tippen Sie auf “Anmelden” und Sie werden auf die Registrierungsseite weitergeleitet.
- Bitte beachten Sie, dass Adobe die Gesamtanzahl der Autorisierungen einschränkt. Jedes Mal, wenn Sie Ihr Gerät
mittels einer Adobe ID autorisieren, reduziert sich Ihre Gesamtanzahl um 1, auch wenn die Autorisierung auf dem
gleichen Gerät ausgeführt wird
Kaufen und Herunterladen von eBooks im Store
1. Tippen Sie auf das Symbol “Store”.
2. Wählen Sie ein Buch aus.
- Handelt es sich um ein kostenloses Buch, tippen Sie auf die Schaltäche “Download”. Das Buch wird jetzt
automatisch in Ihr persönliches Bücherregal heruntergeladen. Handelt es sich um ein kostenpichtiges Buch,
tippen Sie auf die Schaltäche “Jetzt kaufen”, um die Transaktion abzuschließen, und das Buch zu kaufen.
24
Page 25
ALDIKO BOOK PREMIUM
Um mit dem Lesen des Buchs zu beginnen, tippen Sie auf das Buchcover.
Während des Lesens eines Buches ist ein Menü-Overlay verfügbar. Über dieses Menü erhalten Sie weitere
Auswahlmöglichkeiten. Sie greifen auf die Optionen des Overlay-Menüs zu, indem Sie während des Lesens in die
Mitte des Gerätebildschirms tippen.
Gehe zu...
Sie können auf das Inhaltsverzeichnis zugreifen.
Durch die Eingabe einer bestimmten Seitenzahl gelangen Sie zu der Seite eines Buches.
Lesezeichen: Lesezeichen hinzufügen, Lesezeichen löschen.
Tag/Nacht
Wechseln Sie durch das Antippen des Symbols “Tag/Nacht” zwischen dem Modus Tag/Nacht.
Einstellungen
Sie können die Textausrichtung anpassen. Wählen Sie “Automatisch”, dreht sich der Text automatisch mit Ihrem
Gerät. Einstellen der Helligkeit während des Lesens: schieben Sie Ihren Finger entlang des linken Randes des
Gerätebildschirms. Mehr: Zugriff auf die erweiterten Einstellungen zur Anpassung Ihrer Leseeinstellungen.
Mehr
Wählen Sie “Hilfe” für detaillierte Informationen über die Verwendung von Aldiko.
DEUTSCH
25
Page 26
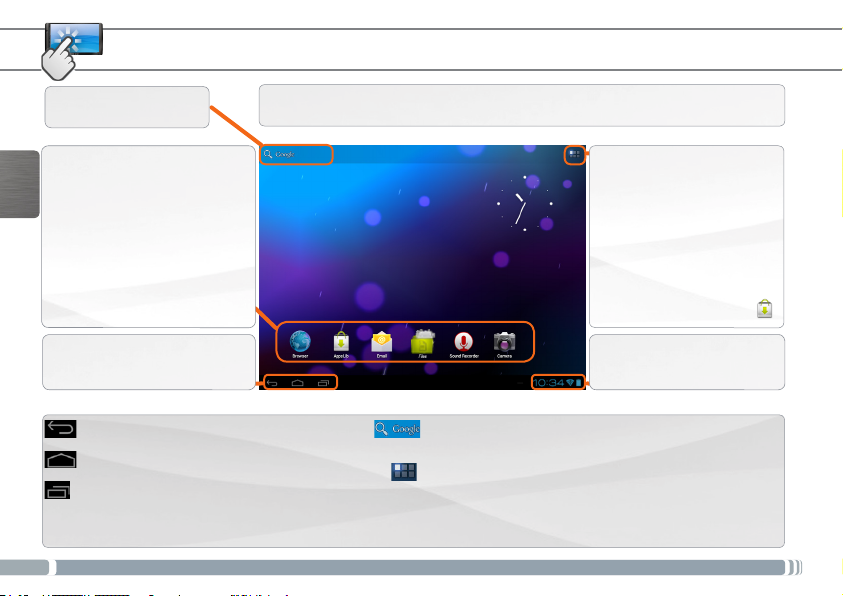
DIE ANDROID BENUTZEROBERFLÄCHE
Suchbegriff eintippen
Anzeige von DesktopVerknüpfungen von Android™.
Tippen Sie auf ein Icon, um die
entsprechende Anwendung zu
DEUTSCH
öffnen. Sie können den HomeScreen nach Ihren Wünschen
anpassen, indem Sie Shortcuts
und Widgets hinzufügen oder
entfernen oder das Design des
Hintergundes ändern.
Auf der Navigationsleiste werden
die Tasten Zurück, Startbildschirm
und Letzte Apps angezeigt.
Zurück - Zurück zum vorherigen Bildschirm.
Startbildschirm - Öffnet den Startbildschirm.
Letzte Apps - Öffnet eine Liste mit den Apps,
die Sie zuletzt verwendet haben. Schieben Sie
die Miniaturansicht nach links oder rechts, um
sie aus der Liste zu entfernen.
26
Ihr ARNOVA-Gerät ist mit einem Kapazitiven Touchscreen ausgerüstet.
Die Bedienung erfolgt durchBerührung des Touchscreens.
Alle Apps Symbol
Tippen Sie auf dieses Icon, um
alle installierten Android™Anwendungen zu sehen
(Spiele, verschiedene Tools,
usw.). Bei Bedarf können
Sie diese Anwendungen auf
Ihren Desktop kopieren. Sie
finden weitere Android™-
Anwendungen in AppsLib .
Auf der Statusleiste werden
Benachrichtigungen und die
Systemsymbole angezeigt.
Die wichtigsten Touch-Tasten
Das Suche Symbol -zum Eingeben von Begriffen, nach
denen das Tablet und das Web durchsucht werden sollen.
Das Symbol Alle Apps – um alle Ihre Apps und Widgets
anzuzeigen.
Page 27
ANPASSEN IHRES PRODUKTES
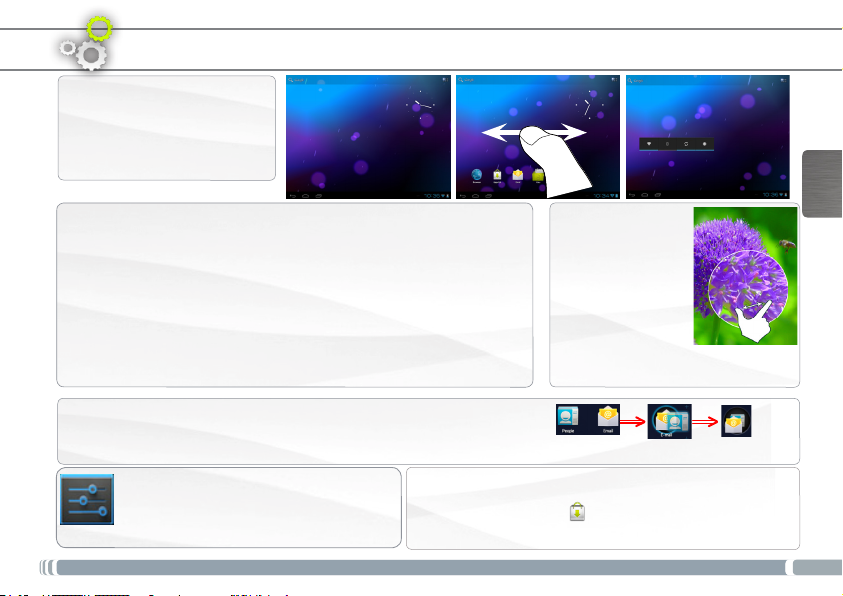
Der erweiterte Desktop
Bewegen Sie Ihren Finger
horizontal auf dem Touchscreen,
um auf die linke oder rechte
Seite des Desktops zu gelangen.
DEUTSCH
Hintergrund ändern
- Zum Ändern des Wallpaper den Finger auf eine freie Stelle des
Bildschirms legen und dann aus der Liste auswählen.
Apps anordnen und verwenden
- Zum Bewegen eines Home Screen Elements den Finger darauf legen
und so lange halten, bis die Rasterlinien zur Positionierung erscheinen.
Dann an die gewünschte Stelle schieben und loslassen.
- Wenn Sie ein App-Symbol vom Startbildschirm entfernen möchten,
berühren und halten Sie es, bewegen Sie Ihren Finger zum oberen
Bildschirmrand und legen Sie die App auf dem Symbol für Entfernen ab.
Erstellen von Ordnern: Sie können mehrere App-Symbole in einem Ordner
zusammenfassen. Wenn Sie ein App-Symbol auf einem Startbildschirm auf
einem anderen Symbol ablegen, werden die beiden Symbole kombiniert.
Einstellungen ändern
Tippen Sie auf Einstellungen und wählen Sie
aus einer Kategorie: Drahtlos & Netzwerke,
Gerät, Nutzer, System.
Applikationen hinzufügen - AppsLib: wenn Sie Ihren
ARNOVA mit dem WiFi verbunden haben, tippen Sie
auf das AppsLib Symbol . Dieses Online-Portal bietet
Ihnen tausende zum Teil kostenlose Apps zum Download.
Pinch-to-zoom:
Einige Anwendungen
lassen sich einfach
mit zwei Fingern
vergrößern und
verkleinern, indem
Sie zwei Finger
gleichzeitig auf den
Bildschirm legen
durch Zusammenziehen heraus- oder
durch spreizen heranzoomen.
27
Page 28
ANPASSEN IHRES PRODUKTES
Widgets hinzufügen
Widgets sind wie Fenster für Ihre Apps. Sie können sie über den Tab “Alle Apps” auf Ihre Startbildschirme
verschieben.
So zeigen Sie Ihre Widgets an:
DEUTSCH
1. Berühren Sie das Symbol Alle Apps auf Ihrem Startbildschirm.
2. Berühren Sie oben auf dem Bildschirm die Option Widgets.
3. Auf dem Widget-Hauptbildschirm haben Sie folgende Möglichkeiten:
- Zwischen Bildschirmen wechseln: Ziehen Sie den Finger nach links oder rechts.
- Widget auf einen Startbildschirm ziehen: Berühren und halten Sie das Symbol des Widgets, bewegen Sie
Ihren Finger an die Position, an der Sie das Symbol ablegen möchten, und heben Sie Ihren Finger an.
Unter Umständen müssen Sie weitere Optionen auswählen, bevor das Widget aktiviert wird. Ist an der Stelle, an
der Sie das Widget abgelegt haben, nicht genügend Platz, wird es nicht zum Startbildschirm hinzugefügt.
Akkulaufzeit verlängern
- Falls Sie kein WLAN verwenden, können Sie diesen über die App “Einstellungen” deaktivieren.
- Verringern Sie die Bildschirmhelligkeit und verkürzen Sie das Timeout für den Standby-Modus: Einstellungen >
Gerät > Display.
- Deaktivieren Sie die automatische Synchronisierung für alle Apps, wenn Sie diese nicht benötigen: Einstellungen
> Nutzer > Konten & Synchronisierung. Beachten Sie, dass Sie ab jetzt eine manuelle Synchronisierung
durchführen müssen, um Nachrichten, E-Mails und andere aktuelle Informationen abzurufen. Außerdem
erhalten Sie keine Benachrichtigung über aktuelle Updates mehr.
28
Page 29
ÜBERTRAGEN VON MEDIADATEIEN
1. Drücken Sie die Ein-/Aus-Taste, um der ARNOVA einzuschalten.
2. Verbinden Sie Ihren ARNOVA mit dem Computer, mit Hilfe des mitgeliefertem
USB-Kabels.
3. Sie werden gefragt, ob Sie verbinden möchten. Wählen Sie die Option USB-
Speicher aktivieren, dann tippen Sie auf OK.
Innerhalb weniger Sekunden erscheint der ARNOVA als Symbol auf Ihrem
Computer.
4. Sie können Ihre Media-Dateien durch Kopieren/Einfügen in die jeweiligen
Ordner auf Ihren ARNOVA entweder mit dem Windows® Explorer (oder mit
dem Finder auf einem Mac®) übertragen oder indem Sie den Windows Media®
Player verwenden. Verwenden Sie den Windows Media Player® (Tab Sync
[Synchronisieren]), um Musik, Videos und Fotos Ihrer Wahl auf Ihrem ARNOVA zu
synchronisieren. Weitere Informationen entnehmen Sie bitte der Windows Media
Player®-Hilfe.
5. Sobald die Dateiübertragung beendet ist, schließen Sie den Windows® Explorer
und alle anderen Programme. Klicken Sie auf das ‘Sicher entfernen’ Icon in der
Ablageleiste neben der Uhr. Sie können das USB-Kabel jetzt entfernen.
DEUTSCH
29
Page 30
www
Wir empfehlen Ihnen, sich ein paar Minuten Zeit zu nehmen, und es zu registrieren (http://arnovatech.com/register).
Dadurch erhalten Sie Zugriff auf den technischen Support von ARNOVA (http://arnovatech.com/support).
DEUTSCH
REGISTRIEREN SIE IHR PRODUKT!
Ä Im Internet unter http://arnovatech.com/register
?
Da unsere Produkte kontinuierlich aktualisiert und weiterentwickelt werden, kann die Software Ihres Geräts in Erscheinung und
Funktionalität geringfügige Abweichungen zu den Darstellungen in dieser Kurzbedienungsanleitung aufweisen.
30
SIE BENÖTIGEN HILFE?
Auf unserer Website: Für häug gestellte Fragen (FAQ) siehe http://arnovatech.com/faq
Kontaktieren Sie unseren technischen Kundendienst: Sie erhalten unter http://arnovatech.com/support Hilfe
per E-Mail. Bitte registrieren Sie Ihr Produkt, bevor Sie Kontakt mit dem technischen Support aufnehmen
(siehe Registrieren Sie Ihr Produkt).
Page 31
ANTES DE EMPEZAR
Antes de utilizar su ARNOVA por primera vez, cargue completamente la batería.
!
▲
Cargado de la batería
1. Conecte el cable USB suministrado al ARNOVA y a un ordenador encendido.
2. El ARNOVA empezará a cargarse.
El indicador de carga es de color rojo cuando la batería se está cargando.
Asistente para la instalación
La primera vez que encienda el ARNOVA, el asistente para la instalación le guiará a través de una serie de
pantallas que le ayudarán a configurar los parámetros principales: idioma, país, hora, etc.
ESPAÑOL
31
Page 32
DESCRIPCIÓN DEL ARNOVA
1. Restablecimiento del equipo
2. Puerto micro-USB:
- para cargar el dispositivo,
- para conectar el ARNOVA a un ordenador, mediante el
cable USB incluido (para transferir archivos).
3. Ranura para tarjetas Micro-SD
4. Toma de auriculares
ESPAÑOL
5. Botón ON/OFF: manténgalo pulsado para encender/apagar
el dispositivo.
6. Micrófono
7. Botón página anterior
8. Botón Menú
9. Botón página siguiente
6
IMPORTANTE:
Si su producto no responde. Puede apretar el botón ON / OFF 5 durante 10 segundos o utilisar el botón
de reinicio (reset), Restablecimiento del equipo 1.
►
32
* Con un cable de vídeo opcional (HDMI / Mini-HDMI).
21
543
987
???
Page 33
www
Para que este procedimiento funcione, debe encontrarse en una zona WiFi que le permita conectarse. Cuando
el ARNOVA se encuentre dentro del alcance de una red que ya haya configurado una vez, intentará realizar una
conexión.
Cómo congurar una red WiFi
Desde la barra del estado, es fácil acceder a la conguración inalámbrica.
1. Toca la hora en la barra de estado para mostrar el panel de control del estado.
2. Toca la hora en el panel de control del estado para mostrar, a continuación, el
parámetro del panel de control del estado.Toque WiFi para abrir WiFi ajustes.
Si los ajustes WiFi no se muestran, toque Inalámbrico y redes> WiFi ajustes
3. Si la WiFi está apagada, desliza el interruptor WiFi hasta la posición Sí.
Una vez la WiFi activada, ARNOVA buscará las redes WiFi disponibles.
Las redes protegidas aparecen indicadas con un icono de candado. En general, el
dispositivo se conectará a la red a la que se haya conectado anteriormente.
4. Toque en la red a la que desee conectarse.
5. Escriba la información necesaria*, y toque en Conectar. Recomendamos que
seleccione
Mostrar contraseña para ver los caracteres que está escribiendo.
El ARNOVA establecerá ahora una conexión a ese punto de acceso inalámbrico.
* Con respecto a los puntos de acceso WiFi gratuitos,
no es necesario introducir ninguna información especial.
En las redes protegidas, necesitará una clave (serie de
caracteres alfanuméricos) de tipo WEP, WPA o WPA2.
Solicite los parámetros de conexión exactos requeridos a
la servicio que gestione la red WiFi.
CONEXIÓN A UNA RED WIFI
ESPAÑOL
33
Page 34
ALDIKO BOOK PREMIUM
Aldiko Book Reader admite archivos Adobe-DRMed ePub y PDF, así como formatos ePub y PDF no
cifrados.
Instalación de Aldiko
Aldiko Book Premium viene preinstalado en tu dispositivo.
1. La primera vez que enciendas el dispositivo, déjate guiar por el asistente.
2. En la pantalla de aplicaciones de terceros, pincha en Install.
Se creará un widget en la pantalla de inicio.
NOTA: Si se te pasa la pantalla de aplicaciones de terceros, abre la aplicación Files
y selecciona System > Apk.
Activación del dispositivo con un ID de Adobe
Deberás activar el dispositivo para poder leer libros electrónicos protegidos con Adobe-DRM.
Para activar el dispositivo:
ESPAÑOL
1. Entra en la aplicación Aldiko Book Reader.
2. Pincha en el icono de menú en la esquina superior derecha.
3. Pincha en Settings y luego en Adobe DRM.
Si ya tienes un ID de Adobe, introduce tu ID de Adobe y contraseña y pincha en Sign in.
Si no tienes un ID de Adobe, pincha en Register y se te dirigirá a la página de registro.
- Ten en cuenta que Adobe limita el número total de activaciones.
- Cada vez que activas tu dispositivo con un ID de Adobe, estás reduciendo el número total disponible, aunque lo
hagas en el mismo dispositivo.
Compra y descarga de eBooks
1. Pincha en el icono Store.
2. Escoge un libro que te guste.
- Si el libro es gratuito, pincha en el botón Download. El libro se descargará automáticamente a tu estantería
personal.
- Si se trata de un libro de pago, pincha en el botón Buy y sigue los pasos hasta completar la transacción y
descargar el libro.
34
Page 35
ALDIKO BOOK PREMIUM
Para empezar a leer un libro, pincha en la cubierta.
Mientras lees, un menú superpuesto te da acceso a diversas opciones.
Para acceder a las opciones del menú superpuesto, pincha en el centro de la pantalla mientras estás leyendo.
Go to... (Ir a...)
Proporciona acceso al índice.
Teclea una página en concreto y te llevará a esa página del libro.
Bookmarks (Marcadores): para añadir y borrar marcadores.
Day/Night (Día/Noche)
Cambia entre los modos noche y día pinchando en el icono “Day/Night”.
Settings (Ajustes)
Aquí puedes ajustar la orientación del texto. Si escoges “Automatic”, el texto seguirá la rotación del dispositivo.
Para ajustar el brillo mientras lees, desliza un dedo por el lateral izquierdo de la pantalla.
Pincha en “More” para acceder a la conguración avanzada y personalizar tus parámetros de lectura.
More (Más)
Selecciona Help (Ayuda) para obtener más información sobre la utilización de Aldiko.
ESPAÑOL
35
Page 36
EL INTERFAZ DEL ANDROID
Toca para realizar una
búsqueda textual
Estos son los accesos directos
Android™. Dé un toque en un
icono para abrir la aplicación
correspondiente. Puede
personalizar la pantalla de inicio
añadiendo o eliminando accesos
directos y widgets, cambiando
el fondo, etc. Consulte la página
ESPAÑOL
siguiente.
La barra de navegación incluye
los botones Atrás, Inicio y Apps
recientes.
Volver - Volver a la pantalla anterior.
Inicio - Abre el escritorio.
Aplicaciones recientes - Abre una lista de
imágenes en miniatura de aplicaciones que has
utilizado recientemente. Si quieres eliminar una
miniatura de la lista, deslízala hacia la izquierda
o hacia la derecha.
36
El dispositivo ARNOVA está equipado con una pantalla táctil capacitiva.
Utilizar la pulpa de los dedos.
Todas las aplicaciones
Dé un toque en este
icono para mostrar
todas las aplicaciones
Android™ instaladas en el
ARNOVA (juegos, distintas
herramientas, etc.). Puede
copiarlas a la pantalla de
inicio. Usted puede obtener
otras aplicaciones Android™
desde AppsLib .
La barra de estado muestra
las noticaciones y los iconos
del sistema.
Botones principales con pantalla táctil
Los botones de búsqueda Buscar para escribir palabras y
buscarlas en su tablet y en la Web.
El icono de Todas las aplicaciones para ver todas tus
aplicaciones y todos tus widgets.
Page 37
PERSONALIZACIÓN DEL PRODUCTO
La pantalla de inicio ampliada
Deslice el dedo horizontalmente
en la pantalla para ir al lado
izquierdo o derecho de la
pantalla de inicio ampliada.
Personalización de los elementos de la pantalla de inicio
- Para cambiar el fondo de pantalla, mantenga el dedo en la pantalla en
un punto vacío y elija uno de la lista.
Cómo organizar y utilizar las aplicaciones
- Para desplazar un elemento de la pantalla de inicio, tóquelo y
mantenga el dedo sobre él hasta que aparezca la parrilla de posición, a
continuación, arrástrelo hasta el lugar que desee y suelte el dedo.
- Para eliminar el icono de una aplicación del escritorio, mantén pulsado
el icono, desliza el dedo por la pantalla y suelta la aplicación sobre el
icono para eliminar contenido.
Crear carpetas de aplicaciones: puedes combinar varios iconos de
aplicaciones en una carpeta. Arrastra el icono de una aplicación sobre el de
otra en una pantalla del escritorio y se combinarán ambos iconos.
Cambio de los ajustes
Dé un toque en Ajustes y elija una
categoría: Conexiones inalámbricas y redes,
Dispositivo, Personal, Sistem.
Agregar más aplicaciones - APPSLIB: Conecte el ARNOVA
a WiFi, a continuación, pulse el icono de AppsLib. Esta
biblioteca en línea de aplicaciones gratis y adquiribles para
descargar y utilizar.
Pinzar[Zoom]: En
algunas aplicaciones,
puede ampliar y
reducir la imagen
colocando dos
dedos en la pantalla
y acercándolos
(para reducir) o
separándolos (para
ampliar).
ESPAÑOL
37
Page 38
PERSONALIZACIÓN DEL PRODUCTO
Cómo añadir widgets
Los widgets son como ventanas de las aplicaciones. Están disponibles en la pestaña “Todas las aplicaciones”
para que puedas moverlos a las pantallas del escritorio.
Si quieres ver widgets, sigue estos pasos:
1. Toca el icono del menú de aplicaciones situado en el escritorio.
2. Toca Widgets en la parte superior de la pantalla.
3. A continuación, se indican las acciones que puedes realizar desde la pantalla principal de widgets.
- Desplazarte por las pantallas: puedes desplazarte hacia la izquierda o hacia la derecha.
ESPAÑOL
- Arrastrar un widget a una pantalla del escritorio: mantén pulsado el icono del widget, desliza el dedo
hasta la ubicación que quieras y levántalo.
Es posible que tengas que seleccionar otras opciones para activar el widget. Si no hay espacio suciente en
la ubicación que quieres, el widget no se añadirá al escritorio.
Cómo ampliar la duración de la batería
- Si no estás utilizando las conexiones WiFi, utiliza la aplicación Ajustes para desactivarlas.
- Desactiva el brillo de la pantalla y establece un tiempo de espera más corto para que el teléfono entre en
modo de suspensión (Ajustes > Dispositivo > Pantalla).
- Si no lo necesitas, desactiva la sincronización automática de todas las aplicaciones (Ajustes > Personal >
Cuentas y sincronización). Ten en cuenta que, de este modo, tendrás que sincronizar de forma manual los
mensajes, el correo electrónico y otro tipo de información reciente y que no recibirás noticaciones sobre
actualizaciones.
38
Page 39
TRANSFERENCIA DE ARCHIVOS MULTIMEDIA
1. Encender el dispositivo.
2. Conecte el cable USB suministrado al ARNOVA y a un ordenador encendido.
3. El ARNOVA le preguntará si desea conectarlo. Seleccione Permitir el almacenamiento de
memoria USB y pulse OK para confirmar.
En unos segundos, aparecerá el icono del ARNOVA en su ordenador.
4. Es posible transferir archivos multimedia al dispositivo ARNOVA copiándolos y
pegándolos en las carpetas correspondientes mediante el Explorador de Windows® (o la
función Finder en un Mac®), o bien utilizando Windows Media® Player. Utilice Windows
Media Player® (pestaña Sincronizar) para sincronizar la música, los vídeos y las fotos que
elija en su ARNOVA. Para saber más sobre esta función, consulte la ayuda de Windows
Media Player®.
5. Una vez nalizadas todas las transferencias de archivos, cierre el Explorador de
Windows® y cualquier otro programa que pueda haber leído o escrito en el ARNOVA.
Haga clic en el icono “Quitar hardware con seguridad” de la bandeja del sistema, junto al
reloj. Ahora ya puede desenchufar el cable USB.
ESPAÑOL
39
Page 40
www
Dedique unos pocos minutos de su tiempo para registrarlo (http://arnovatech.com/register). De esta forma, podrá
acceder al servicio de asistencia técnica de ARNOVA (http://arnovatech.com/support).
ESPAÑOL
?
Tenga en cuenta que como estamos actualizando y mejorando constantemente nuestros productos, el software de su dispositivo
puede variar ligeramente con respecto a lo descrito en esta Guía Rápida.
40
¡REGISTRE SU PRODUCTO!
Ä En Internet en http://arnovatech.com/register
¿NECESITA AYUDA?
En nuestro sitio web: consulte la sección de preguntas más frecuentes en http://arnovatech.com/faq
Póngase en contacto con nuestro equipo de Asistencia Técnica: visite http://arnovatech.com/support para la
asistencia por e-mail. Por favor, registre su producto antes de ponerse en contacto con la asistencia técnica
(consulte Registre su Producto).
Page 41
AVVIO
Prima di utilizzare il dispositivo ARNOVA per la prima volta, caricare completamente la batteria.
!
▲
Caricamento della batteria
1. Collegare il cavo USB in dotazione, al vostro ARNOVA e ad un PC funzionante.
2. Il dispositivo ARNOVA viene avviata la ricarica.
L’indicatore della carica è rosso quando la batteria è in ricarica.
Installazione guidata
Al primo avvio del dispositivo ARNOVA, l'installazione guidata consentirà di impostare
facilmente le impostazioni principali: lingua, paese, ora ecc.
ITALIANO
41
Page 42
DESCRIZIONE
1. Ripristino hardware
2. Porta micro USB:
- per caricare il dispositivo,
- per collegare ARNOVA al vostro PC, utilizzare il cavo
USB
3. Slot per scheda Micro-SD
4. Spinotto cuffie
5. Pulsante ON/OFF: tenere premuto per accendere/
spegnere.
ITALIANO
6. Microfono incorporato
7. Pulsante pagina precedente
8. Pulsante menu
9. Pulsante pagina successiva
6
IMPORTANTE:
Il vostro prodotto non reagisce più. Potete spegnerlo azionandolo durante 10 secondi il bottone ON/OFF
5
o utilizzando il bottone di re-inizalizzazione(reset), Rispristino hardware 1.
► * Con cavo video opzionale (HDMI / mini HDMI).
42
21
543
987
???
Page 43
www
Come congurare una rete WiFi
Dalla barra di sistema è possibile accedere rapidamente alle impostazioni WiFi.
1. Toccare l’ora sulla barra di stato. Viene visualizzato il dashboard di stato.
2. Toccare l’ora nel dashboard di stato.
3. Toccare WiFi per aprire le impostazioni WiFi.
4. Se il WiFi è disattivato, portare il selettore WiFi in posizione ON. Una volta che il
5. Toccare la rete alla quale si desidera connettersi.
6. Immettere le informazioni desiderate sulla rete* e toccare Connect. Consigliamo
A questo punto l’ARNOVA stabilirà una connessione a quel punto di accesso WiFi.
* Per i punti WiFi ad accesso libero, non è necessario
immettere informazioni specifiche. Per le reti protette,
è necessario una chiave (una serie di numeri e/o lettere)
di tipo WEP, WPA o WPA2. Contattare il Internet
Service Provider per ottenere i parametri di connessione
appropriati.
CONNESSIONE A UNA RETE WIRELESS
Per procedere è necessario trovarsi in una zona WIFI che permetta la connessione. Ogni qualvolta
ARNOVA si trova in un raggio di rete che avete già configurato una volta, cercherà una connessione.
Viene visualizzato dashboard di impostazione in basso.
Se le impostazioni WiFi non vengono visualizzate, tocca
Wireless e reti> impostazioni WiFi.
WiFi è attivo, ARNOVA verificherà la presenza delle reti WiFi disponibili. Le reti
protette sono indicate con un’icona di lucchetto. Se il dispositivo rileva una rete
cui ci si è collegati in precedenza, si connetterà ad essa.
di selezionare Show password, in modo da poter vedere i caratteri digitati.
ITALIANO
43
Page 44
ALDIKO BOOK PREMIUM
Aldiko Book Reader supporta ePub e PDF con Adobe-DRM e i formati ePub e PDF non criptati.
Installazione di Aldiko
Aldiko Book Premium è precaricato sul tuo dispositivo.
1. Al primo avvio del dispositivo, segui la procedura guidata.
2. Nella schermata Third party applications (Applicazioni di terze parti), premi Install (Installa).
Viene creato un widget nella schermata principale.
NOTA: se non viene visualizzata la schermata Third party applications (Applicazioni di terze parti), apri
l’app Files (File) e seleziona System (Sistema) > Apk.
Premi Aldiko e segui le istruzioni sullo schermo.
Autorizzazione del dispositivo con un ID Adobe
L’autorizzazione del dispositivo è necessaria per leggere gli eBook protetti con Adobe-DRM.
Per autorizzare il dispositivo:
1. Accedi all’Aldiko Book Reader.
2. Premi l’icona del menu nell’angolo in alto a destra.
3. Premi Settings (Impostazioni), quindi Adobe DRM.
ITALIANO
Se hai già un ID Adobe, immetti il tuo ID Adobe e la Password e premi Sign in (Accedi).
Se non hai un ID Adobe, premi Register (Registrati) e accederai alla pagina di registrazione.
- Nota: Adobe limita il numero totale di autorizzazioni.
- Ogni volta che autorizzi un dispositivo con un Adobe ID, diminuisce il totale di autorizzazioni disponibili, anche se
è lo stesso dispositivo già registrato.
Acquisto e download degli eBook nel negozio
1. Premi l’icona Store (negozio).
2. Scegli un libro che ti piace.
- Se è gratuito, premi il pulsante Download.
Il libro verrà scaricato automaticamente nella tua libreria personale.
- Se il libro è a pagamento, premi il pulsante Buy (Compra), porta a termine la transazione e scarica il libro.
44
Page 45
ALDIKO BOOK PREMIUM
Per iniziare a leggere un libro, tocca la copertina.
Quando leggi un libro, è disponibile un menu a sovrapposizione per accedere alle opzioni.
Puoi accedere alle opzioni del menu a sovrapposizione toccando il centro dello schermo del dispositivo mentre leggi.
Go to... (Vai a...)
Puoi accedere all’indice.
Digita un numero di pagina per accedere a quella pagina.
Bookmarks (Segnalibri): aggiungi un segnalibro, elimina un segnalibro.
Day/Night (Giorno/Notte)
Cambia la modalità giorno/notte premendo l’icona “Day/Night” (Giorno/Notte).
Settings (Impostazioni)
Puoi regolare l’orientamento del testo. Se scegli “Automatic” (Automatico), il testo ruoterà assieme al dispositivo.
Regolazione della luminosità durante la lettura: scorri il dito lungo il bordo dello schermo del dispositivo.
More (Altro): accedi alle impostazioni avanzate per personalizzare le impostazioni di lettura.
More (Altro)
Seleziona Help (Guida) per informazioni più dettagliate sull’uso di Aldiko.
ITALIANO
45
Page 46
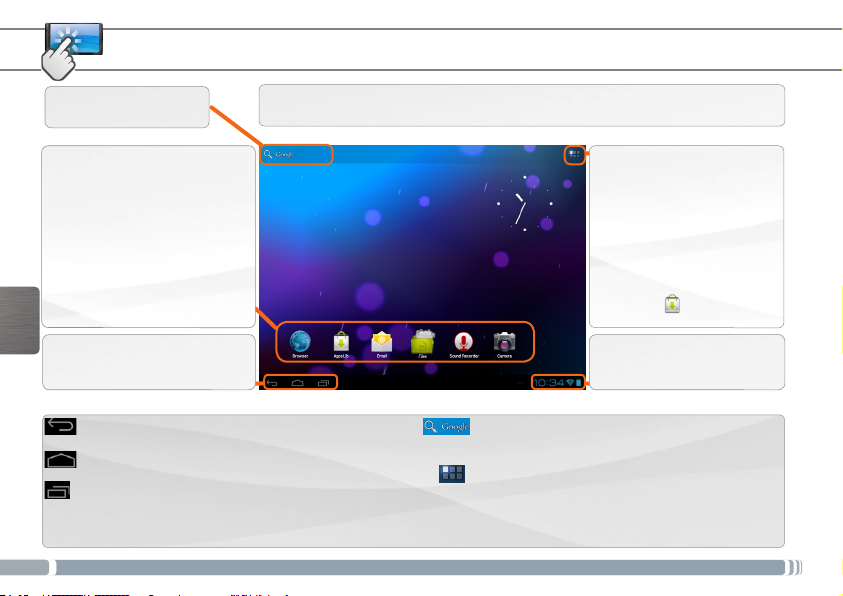
INTERFACCIA ANDROID
Selezionare la ricerca di
testo
Queste sono le scorciatoie
Android™. Sfiorare un’icona
per aprire l’applicazione
corrispondente. E’ possibile
personalizzare lo schermo
aggiungendo /rimuovendo
scorciatoie e congegni,
cambiando sfondo ecc.. - vedi
pagina successiva
ITALIANO
La barra di navigazione visualizza
i pulsanti Indietro, Home e App
Recenti.
Indietro – Consente di tornare alla schermata
precedente
Home – Consente di aprire la schermata Home.
Applicazioni recenti – Consente di aprire un elenco
di immagini in miniatura di applicazioni utilizzate di
recente. Per rimuovere una miniatura dall’elenco, farla
scorrere verso sinistra o destra.
46
Il dispositivo ARNOVA è dotato di uno capacitivo schermo a soramento.
Utilizzando la polpa delle dita.
Pulsanti principali del touch screen
Tutte le applicazioni
Sfiorare questa icona per
mostrare le applicazioni
Android™ installate sul
vostro ARNOVA (giochi, tools
vari ecc..). E’ possibile copiarli
direttamente sul vostro
schermo. Potete ottenere
altre applicazioni Android™
da Appslib .
La barra di stato visualizza
le notiche e le icone di
sistema.
I pulsanti di ricerca Search e Voice – per
eseguire ricerche nel tablet e in Internet.
Il pulsante Apps – per visualizzare tutti i propri
widget e applicazioni.
Page 47
PERSONALIZZA IL PRODOTTO
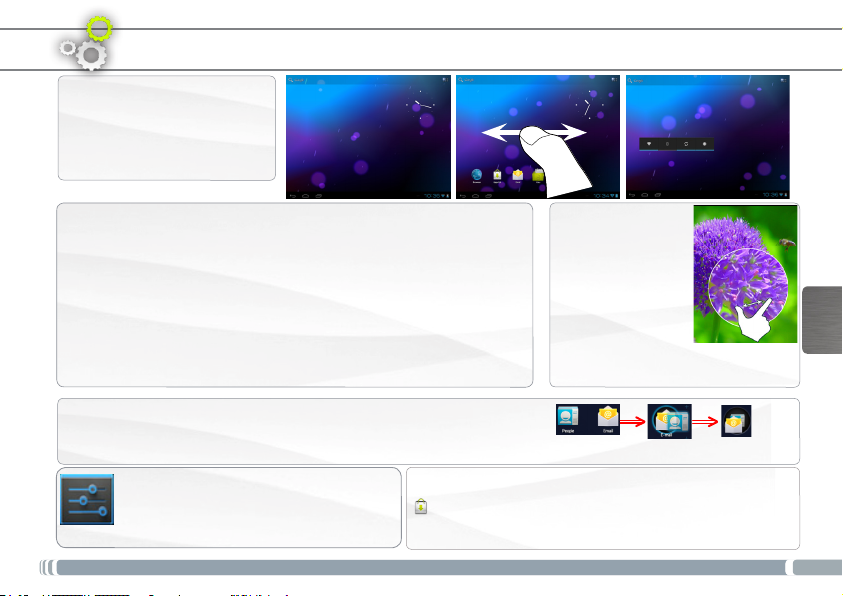
Schermo intero
Fare scivolare il dito in senso
orizzontale sullo schermo per
posizionarsi sulla parte sinistra o
destra dello schermo.
Cambiare lo sfondo
Per modificare lo sfondo, posizionare il dito sullo schermo in una posizione
vuota, quindi scegliere dall’elenco.
Disporre e utilizzare le applicazioni
- Per spostare un elemento della schermata Home, toccare e tenere
premuto il dito su di esso fino a quando non appaiono le linee della griglia
di posizionamento, quindi farlo scorrere sulla posizione desiderata e
rilasciare il dito.
- Per rimuovere l’icona di un’applicazione dalla schermata Home, toccarla
e tenere premuto, far scorrere il dito verso la parte superiore dello
schermo e rilasciare l’applicazione sopra l’icona Rimuovi.
Creazione di cartelle delle applicazioni: È possibile combinare diverse icone
di applicazioni in un’unica cartella. Rilasciare l’icona di un’applicazione sopra
un’altra in una schermata Home per combinare le due icone.
Cambio Impostazioni
Toccare Impostazioni e scegliere una
categoria: Wireless e reti, Dispositivo,
Personale, Sistema.
Aggiungere altre applicazioni - APPSLIB: connettete il vostro
ARNOVA a WiFi, poi premete cull’icona AppsLib
. Questo portale vi propone di scaricare, gratuitamente
e a pagamento, diverse migliaia di applicazioni. Scegliete
un’applicazione e scaricatela.
Avvicinare le
dita[Zoom]: In
alcune applicazioni,
è possibile eseguire
lo zoom avanti e
indietro posizionando
contemporaneamente
due dita sullo
schermo e
avvicinandole (per ridurre) o
allargandole (per ingrandire).
ITALIANO
47
Page 48
PERSONALIZZA IL PRODOTTO
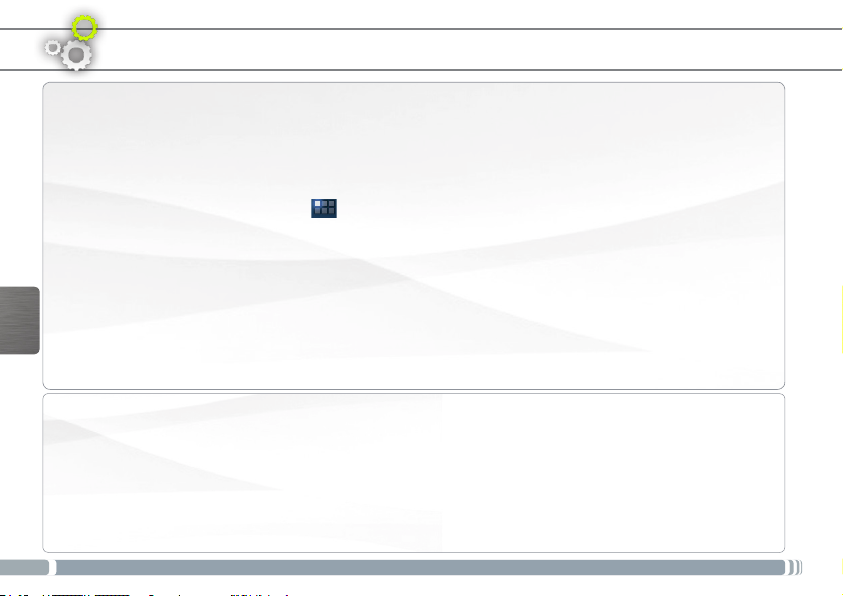
Aggiungere widget
I widget sono come nestre sulle applicazioni. Sono disponibili in una scheda Tutte le applicazioni per poterli
spostare nelle schermate Home.
Per visualizzare i widget, procedere nel seguente modo:
1. Toccare l’icona Tutte le applicazioni nella schermata Home.
2. Toccare Widget nella parte superiore dello schermo.
3. Nella schermata Widget principale, è possibile:
- Spostarsi tra le schermate. Scorrere verso sinistra o destra.
- Trascinare un widget in una schermata Home. Toccare e tenere premuta l’icona del widget, far scorrere il
dito no alla posizione desiderata, quindi sollevare il dito.
Potrebbe essere chiesto di fare altre scelte prima dell’attivazione del widget. Se non c’è spazio nella posizione
in cui viene rilasciato, il widget non viene aggiunto nella schermata Home.
ITALIANO
Prolungare la durata della batteria
- Se non si utilizzano le connessioni WiFi, utilizzare l’applicazione Impostazioni per disattivarle.
- Diminuire la luminosità dello schermo e impostare un timeout per la sospensione più breve in: Impostazioni >
Dispositivo > Display.
- Se non occorre, disattivare la sincronizzazione automatica per tutte le applicazioni in: Impostazioni >
Personali > Account e sincronizzazione. Ricordiamo che sarà quindi necessario effettuare manualmente la
sincronizzazione per raccogliere messaggi, email e altre informazioni recenti, e che non si riceveranno notiche
quando si vericheranno degli aggiornamenti.
48
Page 49
TRASFERIMENTO DI CONTENUTI MULTIMEDIALI
1. Accendere il prodotto.
2. Collegare il cavo USB in dotazione ad il ARNOVA e ad un computer funzionante.
3. Vi verrà chiesto se si desidera collegare il dispositivo. Selezionare Attiva archivio
USB e premere OK per confermare.
Dopo qualche secondo, verrà visualizzata l'icona ARNOVA sul computer.
4. I file multimediali possono essere trasferiti nel dispositivo ARNOVA copiandoli/
incollandoli nelle rispettive cartelle usando Windows® Explorer (o Finder su Mac®),
oppure usando Windows Media® Player. Utilizzare Windows Media Player®
(scheda Sync [Sincronizzazione]) per sincronizzare la musica, le foto e i video
desiderati nel dispositivo ARNOVA. Per ulteriori informazioni, consultare la Guida
di Windows Media Player®.
5. Una volta terminati tutti i trasferimenti dei le, chiudere Windows® Explorer
e tutti gli altri programmi che possano aver letto o scritto sull’ARNOVA. Fare
clic sull’icona “Rimozione sicura dell’hardware” nella barra di sistema, accanto
all’orologio. Potete adesso disconnettere il cavo USB.
ITALIANO
49
Page 50
www
Vi suggeriamo di registrarlo; ci vorranno solo pochi minuti (http://arnovatech.com/register). Una volta registrato,
potrete accedere al servizio di assistenza tecnica di ARNOVA (http://arnovatech.com/support).
REGISTRAZIONE DEL PRODOTTO
Ä Su Internet all'indirizzo http://arnovatech.com/register
?
ITALIANO
Poiché i nostri prodotti vengono continuamente aggiornati e migliorati, è possibile che il software del dispositivo si presenti in modo
leggermente diverso o con funzioni modicate rispetto a quanto presentato nella presente Guida rapida.
50
SERVE AIUTO?
Sul nostro sito Web: consultare la sezione FAQ (Frequently Asked Questions) all'indirizzo http://arnovatech.
com/faq
Contattare il nostro servizio di assistenza tecnica: visitare il sito Web http://arnovatech.com/support per
ricevere assistenza mediante posta elettronica. Registrare il prodotto prima di contattare il servizio di
assistenza tecnica (consultare Registrazione del Prodotto).
Page 51
OPSTARTEN
Laad de batterij volledig op alvorens de ARNOVA voor de eerste maal te gebruiken.
!
▲
De batteren laden
1. Verbind de meegeleverde USB-kabel met uw ARNOVA en een computer die aanstaat.
2. Uw ARNOVA zal starten met laden.
Het aan/uit-lampje brandt rood wanneeer de batterij aan het opladen is.
Installatiewizard
De eerste keer dat u uw ARNOVA opstart, zal de installatiewizard u door een paar schermen
leiden om u te helpen met de voornaamste instellingen: taal, land, tijd, enz.
NEDERLANDS
51
Page 52
BESCHRIJVING ARNOVA
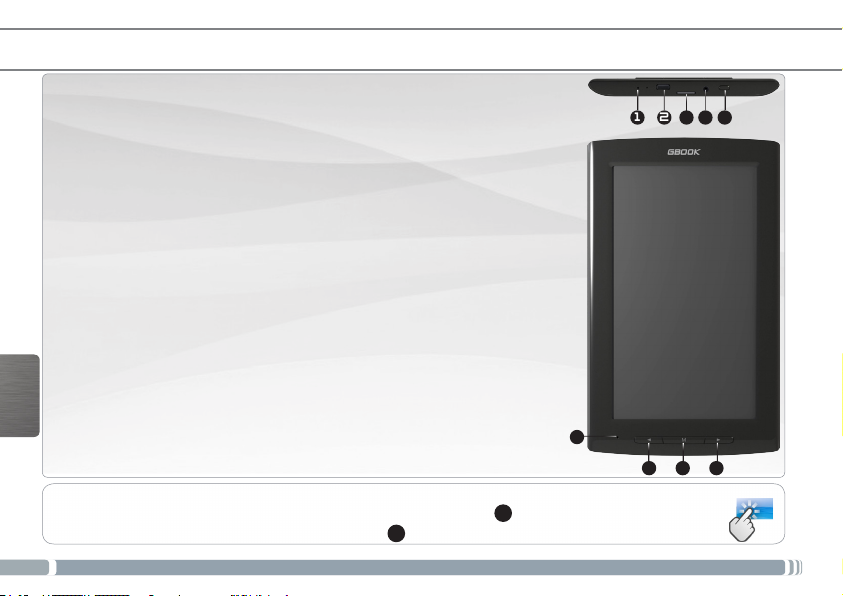
1. Het toestel resetten
2. Micro-USB-poort:
- voor het opladen van het apparaat
- met de bijgesloten USB-kabel kunt u uw ARNOVA met uw
computer verbinden (om bestanden over te brengen)
3. Micro-SD-kaartsleuf
4. Hoofdtelefoonaansluiting
5. AAN/UIT-knop: ingedrukt houden om in/uit te schakelen.
6. Ingebouwde microfoon
7. De toets Vorige pagina
8. De toets Menu
9. De toets Volgende pagina
NEDERLANDS
BELANGRIJKE
Uw product niet reageren. U kunt stoppen door op de AAN/UIT-knop 5 gedurende 10 seconden of met
behulp van de reset-knop (reset), Het toestel resetten 1.
►
52
* Optionele videokabel (HDMI / mini-HDMI) afzonderlijk te koop.
6
21
543
987
???
Page 53
www
Het opzetten van een WiFi-netwerk
Vanuit de systeembalk is het mogelijk om de WiFi-instellingen snel te openen.
1. Raak de tijd in de statusbalk. Het dashboard status wordt weergegeven.
2. Raak de tijd in het dashboard status.
3. Tik op WiFi om de WiFi-instellingen te openen. Als WiFi-instellingen niet worden
4. Als de WiFi is uitgeschakeld, schuift u de WiFi-schakelaar op de Aan positie.
5. Tik op het netwerk waarmee u een verbinding wilt maken.
6. Voer de nodige netwerkinformatie* in en tik op Connect (Verbinden). We bevelen
Uw ARNOVA zal nu een verbinding met dit WiFi-toegangspunt maken.
* Voor WiFi-punten met vrije toegang hoeven geen
speciale gegevens te worden ingevoerd. Voor beveiligde
netwerken moet u een sleutel (een reeks cijfers en/
of letters) van het WEP, WPA of WPA2. Vraag om
de Internet service provider om de juiste vereiste
verbindingsparameters te verkrijgen.
WIFI-NETWERKVERBINDING
Hiervoor dient u zich in een WiFi-zone te bevinden, zodat u verbinding kunt maken. Telkens dat uw ARNOVA
zich in een zone bevindt met een netwerk dat u al geconfigureerd hebt, zal het proberen om hier verbinding mee
te maken.
Het dashboard instellingen wordt hieronder weergegeven.
weergegeven, tik Draadloos en netwerken > WiFi-instellingen.
Zodra de WiFi ingeschakeld is, zal de ARNOVA naar beschikbare WiFi-netwerken
zoeken. Beveiligde netwerken worden aangegeven met een Slot icoon. Als het
apparaat een netwerk vindt dat u eerder verbond, verbindt het met deze.
aan dat u Show Password (Wachtwoord tonen) selecteert zodat u de tekens die u
invoert, kunt zien.
NEDERLANDS
53
Page 54
ALDIKO BOOK PREMIUM
De Aldiko Book Reader ondersteunt zowel Adobe-DRMed ePub en PDF als ongecodeerde ePub en PDF
indelingen.
Aldiko installeren
Aldiko Book Premium is reeds geïnstalleerd op uw reader.
1. Als u de reader voor de eerste keer start volgt u de assistent.
2. Bij het scherm Applicaties van derden klikt u op Installeren.
Er wordt een widget op uw bureaublad geïnstalleerd.
LET OP: Indien u het Applicaties van derden scherm mist, opent u de Bestanden app en selecteert y
Systeem >Apk. Klik op Aldiko en volg de instructies op het scherm.
Autoriseer uw Reader met Adobe ID
Het autoriseren van uw reader is noodzakelijk om eBooks beveiligd met Adobe-DRM te kunnen lezen.
Om uw reader te autoriseren:
1. Ga naar de Aldiko Book Reader.
2. Klik op het menu icoon in the rechterbovenhoek.
3. Klik op Instellingen en vervolgens op Adobe DRM.
Als u reeds een Adobe ID heeft, toets dan uw Adobe ID en Wachtwoord in en klik daarna op Inloggen.
Als u nog geen Adobe ID heeft, klikt u op Registreren en komt u op de registratiepagina terecht.
- Let op dat Adobe het aantal autorisaties limiteert!
- Elke keer dat u uw reader met een Adobe ID autoriseert, telt dit mee in het totaal, ondanks dat het om dezelfde
reader gaat.
NEDERLANDS
eBooks kopen en downloaden
1. Klik op het icoon Winkel.
2. Kies een boek naar wens.
- Als het een gratis boek is, klikt u op Download.
Het boek wordt automatisch gedownload naar uw persoonlijke boekenkast.
- Als het een betaald boek is, klikt u op Kopen en verder om de aankoop af te ronden en het boek te downloaden.
54
Page 55
ALDIKO BOOK PREMIUM
Om een boek te lezen klikt u op de omslag.
Tijdens het lezen van een boek is er een menu beschikbaar. Dit biedt u toegangsopties.
U kunt de menuopties opvragen door in het midden van de reader op het scherm te klikken.
Ga naar...
U kunt de inhoudsopgave opvragen.
Toets een specieke pagina in en u gaat vervolgens naar die pagina in het boek.
Favorieten: voeg favoriet toe, verwijder favoriet
Dag/Nacht
Wissel tussen dag- en nachtmodus door op het Dag/Nacht icoon te klikken.
Instellingen
U kunt de tekstoriëntatie kiezen. Als u Automatisch kiest roteert de tekst mee met uw reader.
Scherpte aanpassen tijdens het lezen: schuif uw vinger over het uiterst linkse deel van uw scherm.
Meer: uw leesinstellingen aanpassen met geavanceerde instellingen
Meer
Kies Help voor meer gedetailleerde informatie over het gebruik van de Aldiko.
NEDERLANDS
55
Page 56
DE ANDROID-INTERFACE
Toets om tekst te zoeken
Dit zijn de standaard Android™snelkoppelingen. Druk op een
pictogram om de betreffende
applicatie te openen. U kunt de
beginpagina personaliseren door
snelkoppelingen en widgets
toe te voegen/ te verwijderen,
het wallpaper (achtergrond) te
veranderen, enz.
De navigatiebalk geeft de Terug,
Startpagina en Recente apps
knoppen weer.
Terug – Terugkeren naar het vorige scherm
NEDERLANDS
Startpagina – Hiermee wordt het startscherm
geopend.
Recente apps – Hiermee wordt een lijst weergegeven met
miniaturen van apps waarmee u onlangs heeft gewerkt.
Als u een miniatuur uit de lijst wilt verwijderen, veegt u
deze met uw vinger naar links of rechts.
56
Uw ARNOVA-apparaat is uitgerust met een capacitieve aanraakscherm. Gebruik
de vinger pulp.
Belangrijkste touchscreen knoppen
Applicaties knop
Druk op dit pictogram
om al de op uw ARNOVA
geïnstalleerde Android™applicaties te zien (games,
verschillende instrumenten,
enz.). U kunt deze op uw
beginpagina plakken. U kunt
meer Android™-toepassingen
ophalen van AppsLib .
De statusbalk geeft
meldingen en systeem iconen
weer.
De knop Search (Zoeken) - hier kunt de
zoekwoorden opgeven die u op uw tablet en
internet wilt zoeken.
pictogram ‘Alle apps’ – om alle apps en widgets
weer te geven.
Page 57
PERSONALISEER UW PRODUCT
Het uitgebreide beginscherm
Schuif met uw vinger horizontaal
over het scherm om naar de
linker- of de rechterkant van uw
uitgebreide beginscherm te gaan.
De achtergrond wijzigen
Als u uw achtergrond wilt wijzigen, houdt u een leeg gedeelte van het
scherm aangeraakt met uw vinger en kiest u een optie in de lijst.
Apps ordenen en werken met apps
- Als u een item op het startscherm wilt verplaatsen, houdt u het item
aangeraakt met uw vinger, totdat de positioneringslijnen verschijnen.
Vervolgens sleept u het item naar de gewenste locatie en laat u het los.
- Als u een app-pictogram van het startscherm wilt verwijderen, blijft u
het pictogram aanraken, veegt u met uw vinger naar de bovenkant van
het scherm en laat u de app los op het pictogram ‘Verwijderen’ .
Mappen voor toepassingen maken: u kunt verschillende app-pictogrammen
combineren in een map. Laat het ene app-pictogram los op het andere op
een startscherm en de twee pictogrammen worden gecombineerd.
De instellingen wijzigen
Druk op Instellingen en kies een categorie:
Draadloos en netwerken, Apparaat,
Persoonlijk, Systeem.
Het toevoegen van meer toepassingen - APPSLIB: met de
ARNOVA verbonden met het WiFi, druk op het pictogram
AppsLib . Deze online bibliotheek van gratis en betaalde
toepassingen om te downloaden en te gebruiken.
Knijp[Zoom]:
In bepaalde
applicaties. U kunt
in- of uitzoomen
door tegelijkertijd
twee vingers op het
scherm te plaatsen en
deze dicht te knijpen
(uitzoomen) of uit
elkaar te halen (inzoomen).
NEDERLANDS
57
Page 58
PERSONALISEER UW PRODUCT
Widgets toevoegen
Met widgets heeft u overal toegang tot uw apps. U kunt ze vanaf het tabblad ‘Alle apps’ verplaatsen naar uw
startschermen.
Uw widgets weergeven:
1. Raak het pictogram ‘Alle apps’ aan op het startscherm.
2. Raak Widgets boven aan het scherm aan.
3. U kunt het volgende doen via het hoofdscherm ‘Widgets’:
- Schakelen tussen schermen: veeg met uw vinger naar links of rechts.
- Een widget naar een startscherm slepen: blijf het pictogram van de widget aanraken, veeg met uw vinger
naar de gewenste locatie en haal uw vinger van het scherm.
U kunt worden gevraagd meer keuzes te maken voordat de widget wordt geactiveerd. Als er geen ruimte
beschikbaar is op de locatie waar u de widget heeft losgelaten, wordt de widget niet toegevoegd aan het
startscherm.
De levensduur van de accu verlengen
- Als u wi niet gebruikt, kunt u de app Instellingen gebruiken om deze functies uit te schakelen.
NEDERLANDS
- Verlaag de helderheid van het scherm en stel een kortere time-out voor de slaapstand in: Instellingen >
Apparaat > Weergave.
- Als u automatische synchronisatie niet nodig heeft, schakelt u dit uit voor alle apps: Instellingen > Persoonlijk
> Accounts en synchronisatie. Houd er rekening mee dat dit betekent dat u handmatig moet synchroniseren
om berichten, e-mail en andere recente informatie te verzamelen en dat u geen meldingen ontvangt wanneer
er updates zijn.
58
Page 59
MEDIA OVERZETTEN NAAR UW ARNOVA
1. Schakel uw ARNOVA.
2. Verbind de meegeleverde USB-kabel met de ARNOVA en met een computer die aan
staat.
3. De ARNOVA Zult u vragen of u wilt aansluiten. Tik op Zet USB-opslag aan te sluiten en
druk op OK om te bevestigen.
Binnen enkele seconden verschijnt de ARNOVA als een pictogram op uw computer.
4. U kunt uw mediabestanden op de ARNOVA plaatsen door ze ofwel in de betreffende
map te kopiëren/met behulp van Windows® Verkenner (of met Zoeken op een Mac®)
ofwel met behulp van Windows Media® Player. Gebruik Windows Media Player®
(tabblad 'Sync') om de muziek, de video's en de foto's van uw keuze te synchroniseren.
Zie Help van Windows Media Player® voor meer informatie.
5. Sluit, zodra alle bestanden overgeplaatst zijn, Windows® Verkenner en eventuele
andere toepassingen die bestanden op de ARNOVA hebben gelezen of bestanden op
uw ARNOVA hebben geplaatst. Klik op het ‘VEILIG VERWIJDEREN’-pictogram in het
systeemvak, naast de klok. U kunt de USB-kabel nu loskoppelen.
NEDERLANDS
59
Page 60
www
Wij raden u aan om uw ARNOVA-product te registreren (http://arnovatech.com/register). Na registratie krijgt u
toegang tot de technische ondersteuning van ARNOVA (http://arnovatech.com/support).
UW PRODUCT REGISTREREN
Ä Op het internet op http://arnovatech.com/register
?
NEDERLANDS
Omdat we onze producten voortdurend aanpassen en verbeteren, kan de software van uw apparaat er een beetje anders uitzien of
een licht gewijzigde functionaliteit hebben dan voorgesteld in deze Snelstartgids.
60
HULP NODIG?
Op onze website: raadpleeg het onderdeel Frequently Asked Questions op http://arnovatech.com/faq
Neem contact op met onze Technisch ondersteuning: surf naar http://arnovatech.com/support voor
ondersteuning via e-mail. Registreer uw product alvorens contact op te nemen met onze Technische
ondersteuning (zie Uw product registreren).
Page 61
INICIANDO
!
▲
Antes de utilizar o dispositivo ARNOVA pela primeira vez, carregue completamente a bateria!
Carregar a bateria
1. Conecte o cabo de força fornecido com o conector USB ARNOVA e na tomada de parede.
2. O dispositivo ARNOVA começará a carregar.
A luz indicadora do botão Power ca vermelha enquanto a bateria carrega.
Assistente de instalação
Ao iniciar o dispositivo ARNOVA pela primeira vez, o assistente de instalação fornecerá
instruções através de alguns ecrãs para ajudar o utilizador a congurar as denições principais:
idioma, país, hora, etc.
PORTUGUÊS
61
Page 62
DESCRIÇÃO DO APARELHO
1. Repor hardware
2. Porta Micro-USB:
- para carregar a bateria do ARNOVA
- para conectar o ARNOVA no computador, usando o cabo
USB incluído (para transferir cheiros).
3. Ranhura para cartões Micro-SD
4. Saída para auriculares
5. Botão On/Off: permite ligar ou desligar o dispositivo.
6. Microfone incorporado
7. Botão Página anterior
8. Botão Menu
9. Botão Página seguinte
6
PORTUGUÊS
IMPORTANT:
O dispositivo bloqueou. Pode desligá-lo. Pressione o botão ON/OFF 5 durante 10 segundos ou
pressione o botão Repor. Ver Repor hardware 1.
► * Com Mini-HDMI opcional para cabo HDMI.
62
21
543
987
???
Page 63
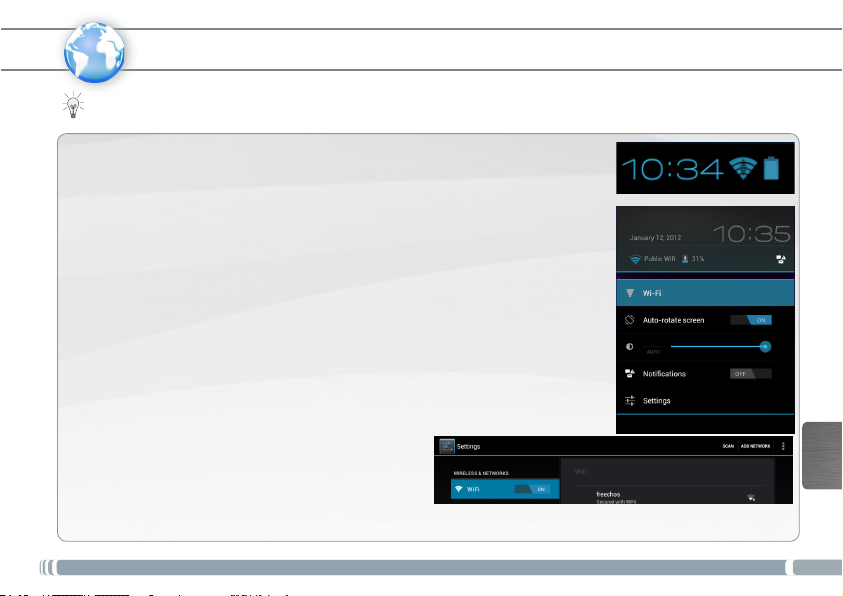
www
Para este procedimento de trabalho, você precisa estar em uma área de WiFi que permitirá que você se conecte
a ela. Todas as vezes que ARNOVA estiver no alcance de uma rede que você já configurou uma vez, ela tentará
fazer uma conexão.
Como congurar uma rede WiFi
Na barra do sistema, poderá aceder rapidamente às denições de WiFi.
1. Toque no tempo na barra de status. O quadro de status é exibido.
2. Toque no tempo no quadro de status. O quadro de conguração é exibido abaixo.
3. Toque em WiFi para abrir as denições de WiFi. Se as denições WiFi não são
exibidos, toque sem o e redes> denições de WiFi.
4. Se wifi estiver desligado, deslize o interruptor wifi para a posição Lig.
5. Quando activar wifi, o ARNOVA localizará as redes wifi disponíveis. As redes
seguras são indicadas com o ícone Bloqueio. Se o dispositivo encontrar uma rede
que foi previamente ligada, fará a ligação de novo. Toque na rede à qual pretende
conectar-se.
6. Introduza as informações de rede* necessárias e toque em Ligar.
É recomendável que o utilizador seleccione Mostrar palavra-passe para poder ver
os caracteres que está a introduzir.
O ARNOVA estabelecerá assim uma ligação com esse ponto de acesso WiFi.
* Para o acesso livre dos pontos WiFi, não há necessidade
de digitar qualquer informação especial. Para redes
seguras, você precisará uma chave (uma série de números
e/ou letras) do tipo WEP, WPA ou WPA2. Para obter os
parâmetros da conexão exata necessários, contate o
provedor de serviços da Internet.
CONECTANDO A UMA REDE WIFI
PORTUGUÊS
63
Page 64
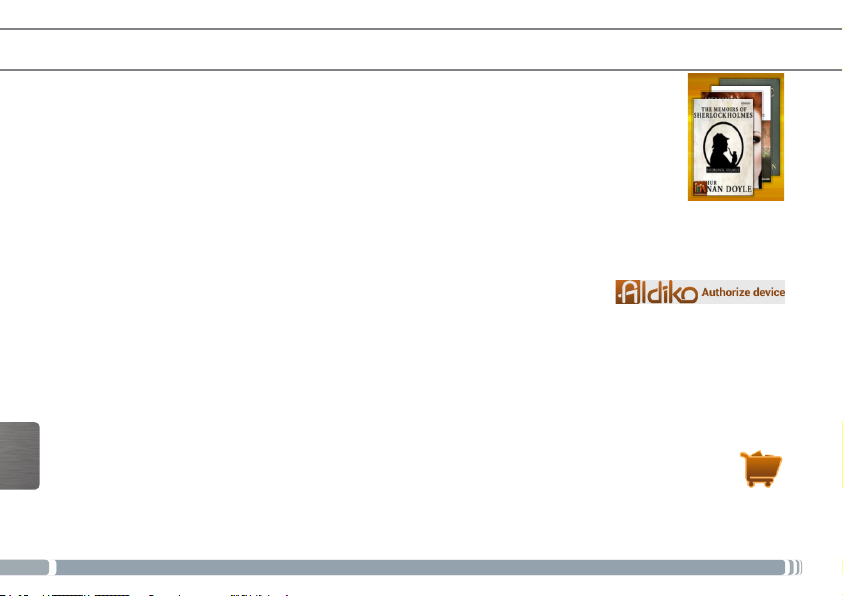
ALDIKO BOOK PREMIUM
O Aldiko Book Reader suporta Adobe-DRM ePub e PDF assim como os formatos nãoencriptados de ePub e PDF
Instalar o Aldiko
O Aldiko Book Premium é pré-carregado no seu dispositivo.
1. Da primeira vez que inicia o dispositivo, siga as instruções do assistente de instalação.
2. No ecrã de aplicações de terceiros, toque em Install (Instalar).
Uma ferramenta será criada no seu ecrã principal.
NOTA: se não encontrar o ecrã de aplicações de terceiros, abra a aplicação Files (Ficheiros) e
selecione System (Sistema) > Apk. Toque em Aldiko e siga as instruções que aparecem no ecrã.
Autenticar o seu dispositivo com um Adobe ID
É necessário autenticar o seu dispositivo para poder ler eBooks protegidos com o Adobe-DRM.
Para autenticar o seu dispositivo:
1. Entre no Aldiko Book Reader.
2. Toque no ícone de menu no canto superior direito.
3. Toque em Settings (Denições) e depois toque em Adobe DRM.
Se já possuir um Adobe ID, introduza o seu Adobe ID e a sua palavra-passe e toque em Sign in (Iniciar sessão).
Se não possuir um Adobe ID, toque em Register (Registar) e será enviado para a página de registo.
- Repare que a Adobe limita a sua quantidade total de autenticações..
- De cada vez que autentica o seu dispositivo com um Adobe ID, isso reduz o número total de vezes que o pode
fazer, mesmo que o faça no mesmo dispositivo.
Comprar e transferir eBooks da loja
1. Toque no ícone da loja.
2. Escolha o livro que desejar.
PORTUGUÊS
- Se for um livro grátis, toque no botão Download (Transferir).
O livro será automaticamente transferido para a sua estante pessoal.
- Se o livro tiver de ser comprado, toque no botão Buy (Comprar) e continue para concluir a transação e transferir
o livro.
64
Page 65
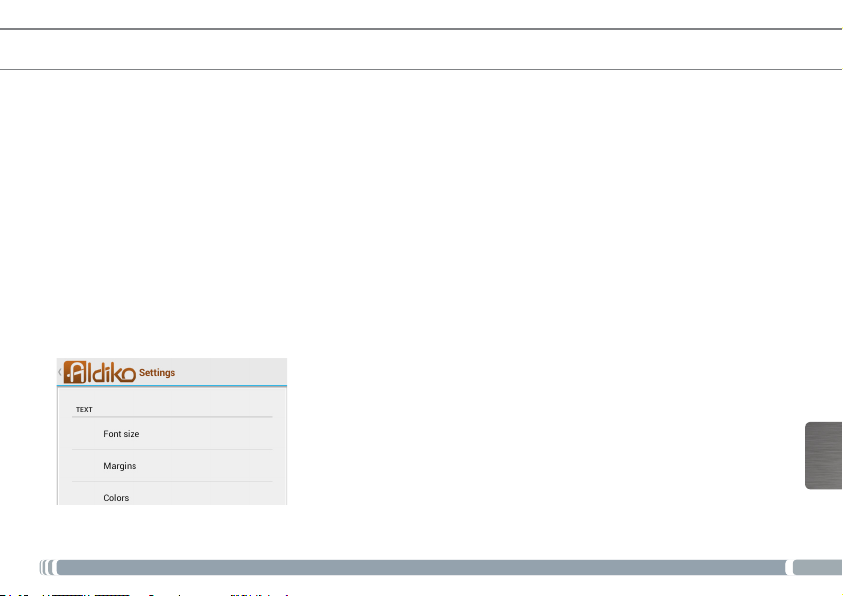
ALDIKO BOOK PREMIUM
Para começar a ler um livro, clique na capa do livro.
Quando estiver a ler um livro, tem disponível um menu sobreposto que lhe permite aceder às opções.
Toque no centro do ecrã do dispositivo quando estiver a ler, para aceder às opções do menu sobreposto.
Go to... (Ir para…)
Pode aceder a um índice de conteúdos.
Introduza o número de uma página e ser-lhe-á mostrada a página respetiva.
Bookmark (Marcadores): adicionar marcador, eliminar marcador.
Day/Night (Dia/Noite)
Alterne entre os modos dia/noite ao tocar no ícone Day/Night (Dia/Noite).
Settings (Denições)
Pode ajustar a orientação do texto. Se escolher “Automatic “ (Automático), signica que o texto irá rodar conforme
a orientação do seu dispositivo. Ajuste o brilho enquanto lê: percorra a extremidade esquerda do ecrã do seu
dispositivo com o dedo. More (Mais): aceda a denições avançadas para personalizar as suas denições de leitura.
More (Mais)
Selecione Help (Ajuda) para mais informações detalhadas acerca do uso do Aldiko.
PORTUGUÊS
65
Page 66
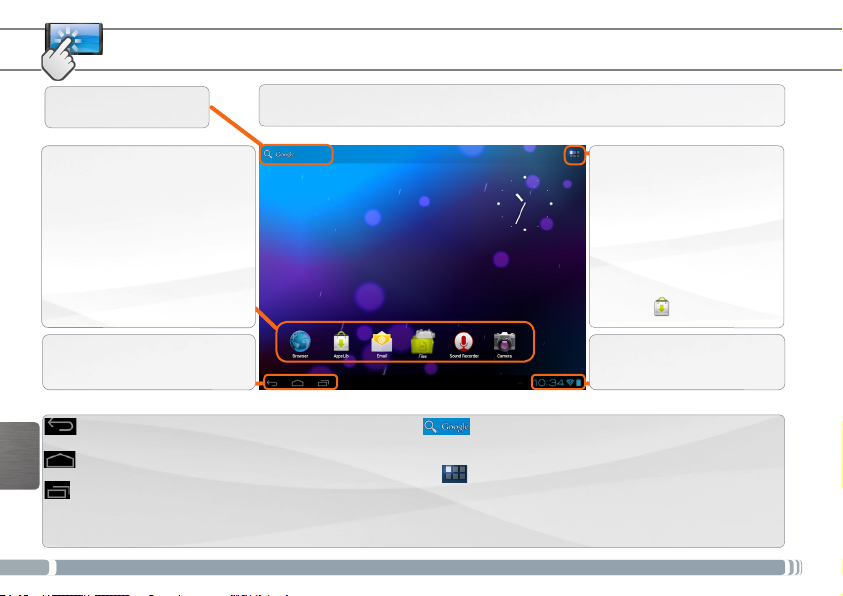
A INTERFACE ANDROID
Toque para procurar o
texto
Estes são os atalhos Android™
por defeito. Toque num
ícone para abrir a aplicação
correspondente. É possível
personalizar o ecrã inicial
através da adição/remoção de
atalhos e widgets, etc. Consulte
a próxima página.
A barra de navegação exibe os
botões Anterior, Ecrã Principal
e Ap recentes.
Anterior - para voltar ao ecrã
anterior.
Ecrã Principal - abre o Ecrã Principal.
PORTUGUÊS
Aplicações recentes - abre uma lista de miniaturas
de imagens das aplicações em que trabalhou
recentemente. Para remover uma miniatura da lista,
deslize-a rapidamente para a esquerda ou para a direita.
66
O dispositivo ARNOVA vem equipado com um ecrã táctil capacitivo. Utilize a
ponta do dedo para navegar.
Botões principais do ecrã táctil
O ícone Todas as Aplicações
Toque neste ícone para
apresentar todas as
aplicações An-droid™
instaladas no dispositivo
ARNOVA (jogos, ferramentas
várias, etc.). Pode copiá-las
para o ecrã inicial. Pode obter
mais aplicações Android™ na
AppsLib .
A barra de status exibe as
noticações e os ícones de
sistema.
O ícone Search (Pesquisar) – para digitar termos
a pesquisar no seu computador “tablet” e na
Web.
O ícone Todas as Aplicações - para ver todas as
aplicações e widgets.
Page 67
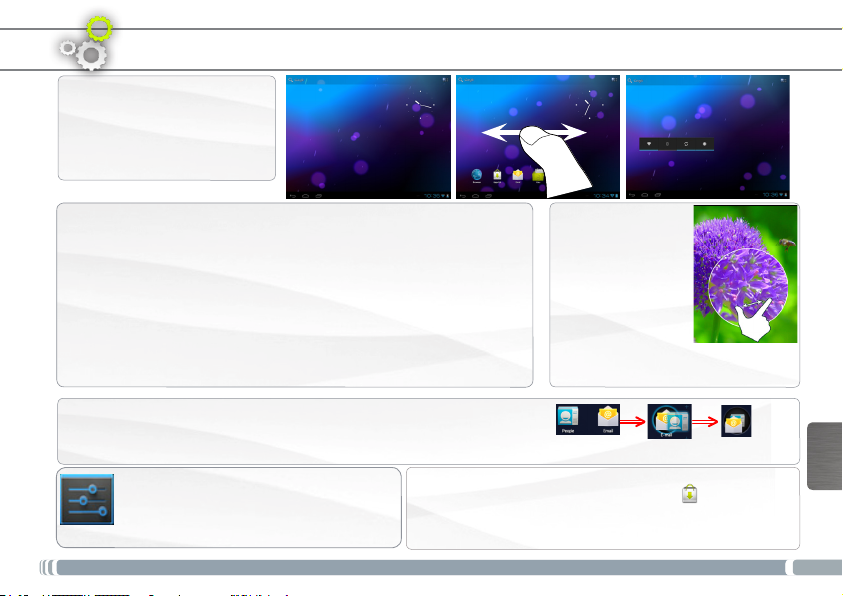
PERSONALIZANDO O SEU PRODUTO
Ecrã inicial ampliado
Deslize o dedo na horizontal
no ecrã para se deslocar para o
lado esquerdo ou direito do ecrã
inicial ampliado.
Alterar a imagem de fundo
Para alterar o seu papel de parede, toque continuamente com o dedo no
ecrã num local vazio, em seguida, selecione a partir da lista.
Organizar e trabalhar com aplicações
- Para mover um item no ecrã Home (Inicial), toque e mantenha o seu
dedo no mesmo até aparecer a grelha de posicionamento, em seguida,
deslize-o para a localização pretendida e retire o dedo.
- Para remover o ícone de uma aplicação do Ecrã Principal, toque sem
soltar no ícone, deslize o dedo para a parte superior do ecrã e largue a
aplicação sobre o ícone Remover.
Criar pastas de aplicações: pode combinar vários ícones de aplicações numa
pasta. Largue o ícone de uma aplicação sobre outro num Ecrã Principal e os
dois ícones serão combinados.
Mudando os Ajustes
Na tela inicial, toque em Ajustes e escolha
uma categoria: Redes sem fios e outras,
Dispositivo, Pessoal, Sistema.
Adicionando mais aplicações com APPSLIB: Com o ARNOVA
conectado à WiFi, toque no ícone AppsLib . Esta
biblioteca online de aplicações gratuitas e pagáveis para
fazer download e usar.
Aperte[Zoom]:
Em algumas
aplicações, o
utilizador pode
aumentar ou diminuir
o zoom pousando
dois dedos ao mesmo
tempo no ecrã e
apertando-os (para
diminuir o zoom) ou separando-os
(para aumentar o zoom).
PORTUGUÊS
67
Page 68
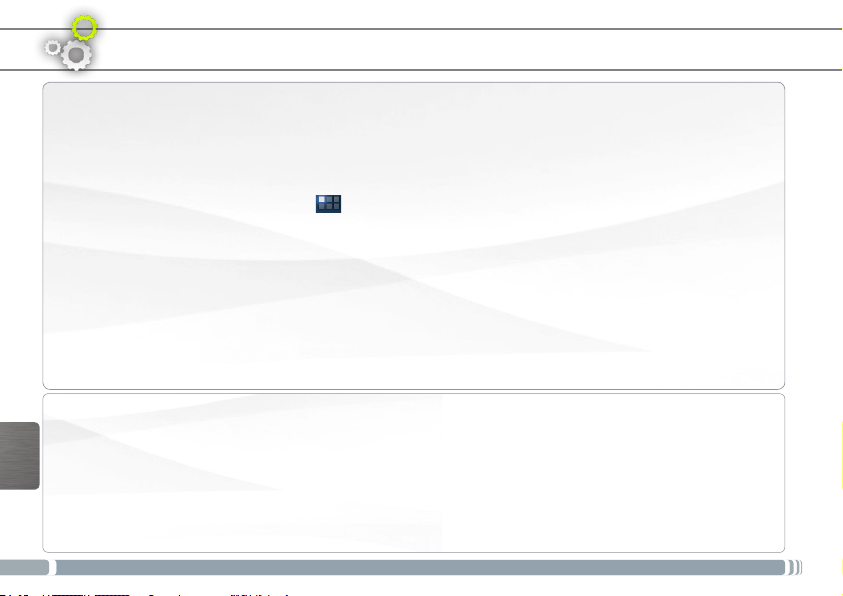
PERSONALIZANDO O SEU PRODUTO
Adicionar widgets
Os widgets são como janelas para as suas aplicações. Estão disponíveis num separador Todas as Aplicações
para que os possa mover para os Ecrãs Principais.
Para ver os seus widgets:
1. Toque no ícone Todas as Aplicações no Ecrã Principal.
2. Toque em Widgets na parte superior do ecrã.
3. No ecrã principal Widgets, pode
- Alternar entre ecrãs: deslize rapidamente para a esquerda ou para a direita.
- Arrastar um widget para um Ecrã Principal: toque sem soltar no ícone do widget, deslize o dedo para o local
onde pretende colocá-lo e levante o dedo.
Poderá ser necessário selecionar outras opções para ativar o widget. Se não existir espaço no local onde largou
o ícone, o widget não será adicionado ao Ecrã Principal.
Prolongar a duração da bateria
- Se não estiver a utilizar WiFi, utilize a aplicação Denições para os desativar.
- Diminua o brilho do ecrã e dena um tempo limite mais curto para a suspensão: Denições > Aparelho >
Visualização.
- Desative a sincronização automática de todas as aplicações: Denições > Pessoais > Contas e sincronização
PORTUGUÊS
se não necessitar desta funcionalidade. Tenha em atenção que este procedimento signica que terá de
proceder à sincronização manualmente para obter mensagens, e-mail e outras informações recentes e não
receberá noticações quando ocorrem atualizações.
68
Page 69
TRANSFERIR CONTEÚDO MULTIMÉDIA
1. Ligar o dispositivo.
2. Conecte o seu cabo USB fornecido ao ARNOVA e para executar no computador
USB 2.0 ou superiore
3. O ARNOVA irá perguntar se você quer ligar. Toque em Ativar armazenamento USB
para conectá-lo e pressione OK para conrmar.
4. Você pode transferir seus arquivos de mídia para o ARNOVA ou por copiar/colá-los
nas respectivas pastas usando
O Windows® Explorer (ou o Finder on a Mac®), ou usando o Windows Media® Player.
Abrir Windows Media Player® e em seguida usar a guia Sync para sincronizar sua
música, vídeos, e fotos. Veja Ajuda do Windows Media Player®’s para aprender mais
sobre isto.
5. Uma vez que todos os seus arquivos de transferência são nalizados, feche o
Windows® Explorer e qualquer outro programa que pode ser lido ou escrito no
ARNOVA. Clique no ícone ‘remover com segurança’ no caminho do sistema, próximo
ao relógio. Você pode agora desconectar o cabo USB.
.
via
PORTUGUÊS
69
Page 70
www
Recomendamos que você leve alguns minutos para registrá-lo (http://arnovatech.com/register). Isto lhe permitirá o
acesso ao suporte técnico ARNOVA (http://arnovatech.com/support).
REGISTRE SEU PRODUTO!
Ä Na web em http://arnovatech.com/register
?
PORTUGUÊS
Como muitas vezes atualizamos e melhoramos os nossos produtos, o seu software do dispositivo pode ter uma aparência
ligeiramente diferente ou funcionalidades modicadas das apresentadas neste Guia de Início Rápido.
70
PRECISA DE AJUDA?
Em nosso site da web: veja a seção de Perguntas Prequentes no http://arnovatech.com/faq
Contate nossa Equipe de Suporte Técnico: visite http://arnovatech.com/support para suporte de email.
Por favor, registre seu produto antes de contatar o Suporte Técnico (ver Registre o seu Produto).
Page 71
ВКЛЮЧЕНИЕ
Перед первым использованием устройства ARNOVA полностью
!
▲
зарядите батарею!
Зарядка батареи
1. Подсоедините USB-кабель к устройству ARNOVA и к включенному компьютеру.
2. Начнется зарядка устройства ARNOVA.
- Во время зарядки батареи индикатор питания светится красным цветом.
- После того, как батарея зарядится полностью, цвет переключится на желтый.
Мастер установки
При первом включении устройства ARNOVA мастер установки последовательно
предоставит ряд экранов, чтобы помочь Вам задать основные настройки: язык, страна,
время, и т. д.
РУССКИЙ
71
Page 72
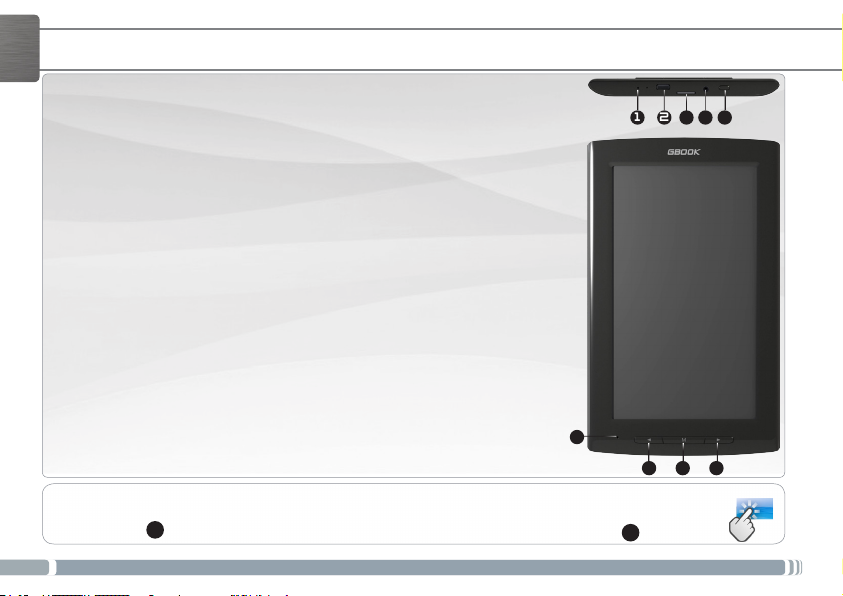
РУССКИЙ
ОПИСАНИЕ УСТРОЙСТВА
ОПИСАНИЕ УСТРОЙСТВА
1. Аппаратный сброс настроек: в случае зависания устройства
ARNOVA можно нажать кнопку сброса, пропустив сквозь
отверстие в корпусе острый предмет, например, зубочистку.
2. Порт micro-USB:
- для зарядки батареи устройства ARNOVA
- для подключения устройства ARNOVA к компьютеру при
помощи прилагаемого кабеля USB, чтобы передать файлы
3. Слот карты Micro-SD
4. Гнездо наушников
5. Кнопка Вкл/Выкл
6. Микрофон
7. Кнопка перехода на предыдущую страницу
8. Кнопка меню
9. Кнопка перехода на следующую страницу
6
ВНИМАНИЕ:
Ваше устройство «зависло». Вы можете выключить его. Удерживайте кнопку ON/OFF
(ВКЛ/ВЫКЛ) 5 нажатой в течение 10 секунд или нажмите кнопку сброса 1.
72
21
543
987
???
Page 73
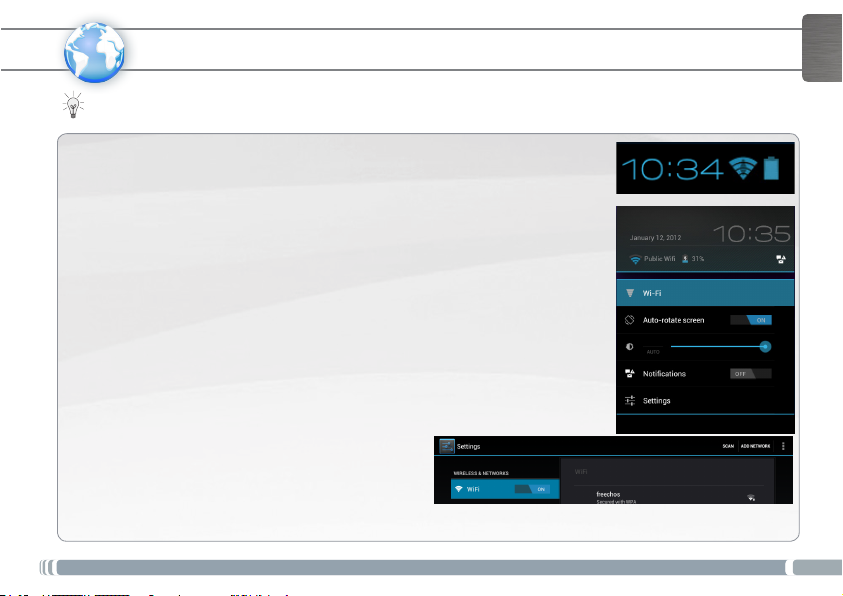
РУССКИЙ
www
Как настроить беспроводную сеть WiFi
Быстрый доступ к настройкам WiFi можно получить из строки состояния,
расположенной на экране внизу справа.
1. Прикоснитесь к часам в строке состояния. Отобразится панель состояния.
2. Прикоснитесь к часам на панели состояния. Внизу откроется панель настроек.
3. Прикоснитесь к пиктограмме WiFi, чтобы открыть настройки WiFi.
4. Если функция WiFi выключена, передвиньте переключатель WiFi в
5. Прикоснитесь к сети, к которой хотите подключиться.
6. Введите необходимую сетевую информацию* и прикоснитесь к надписи
Устройство ARNOVA предпримет попытку подключиться к этой точке доступа
WiFi.
* Для точек WiFi со свободным доступом ввод
специальной информации не требуется. Для
защищенных сетей Вам потребуется ключ
(последовательность цифр и/или букв) типа WEP, WPA
или WPA2. Обратитесь к провайдеру услуг Интернет,
чтобы получить точные параметры подключения.
ПОДКЛЮЧЕНИЕ К БЕСПРОВОДНОЙ СЕТИ
Для выполнения этой процедуры Вы должны находиться в зоне WiFi, которая позволит
подключиться к ней. Всякий раз, когда устройство ARNOVA окажется в зоне действия сети, которая
уже была ранее настроена, оно будет пытаться создать соединение.
положение On (Вкл.).
После включения WiFi устройство ARNOVA выполнит сканирование
доступных сетей WiFi . Защищенные сети отмечены пиктограммой в виде
замка. Если устройство обнаружит сеть, к которой Вы ранее подключались,
оно подключится к этой сети.
Connect.
Мы рекомендуем выбрать опцию Show password, чтобы знаки пароля
отображались при вводе.
73
Page 74
РУССКИЙ
Aldiko Book Reader поддерживает следующие форматы: Adobe-DRMed ePub, PDF, а также
незашифрованные ePub и PDF.
Установка Aldiko
На устройстве уже загружена программа Aldiko Book Premium.
1. При первом запуске устройства следуйте указаниям мастера.
2. На экране приложений сторонних разработчиков коснитесь Install (Установить).
Виджет создается на главном экране.
ПРИМЕЧАНИЕ. Если вы пропустили экран приложений сторонних разработчиков, откройте
приложение Files (Файлы) и выберите System (Система) > Apk. Коснитесь Aldiko и выполните
инструкции, отображаемые на экране. Apk. Tap Aldiko and follow the on-screen instructions.
Авторизация устройства с помощью идентификатора Adobe
Для чтения электронных книг, защищенных Adobe-DRM, необходима авторизация устройства.
Для авторизации устройства выполните нижеперечисленные действия.
1. Перейдите к Aldiko Book Reader.
2. Коснитесь значка меню в правом верхнем углу.
3. Коснитесь пункта Settings (Настройки), затем коснитесь Adobe DRM.
Если у вас уже есть идентификатор Adobe, введите его вместе с паролем и коснитесь Sign in (Войти).
Если у вас нет идентификатора Adobe, коснитесь Register (Регистрация), после чего откроется страница
регистрации.
Обратите внимание, что компания Adobe установила ограничение на общее количество авторизаций.
Каждый раз при авторизации устройства с помощью идентификатора Adobe учитывается общее число,
даже если это делается на одном и том же устройстве.
Покупка электронных книг в магазине и их загрузка
1. Коснитесь значка Store (Магазин).
2. Выберите книгу, которая вам нравится.
- Если это бесплатная книга, коснитесь кнопки Download (Загрузить).
Книга автоматически загрузится на вашу личную книжную полку.
- Если книга платная, коснитесь кнопки Buy (Купить), выполните покупку и завершите книгу.
74
ALDIKO BOOK PREMIUM
Page 75
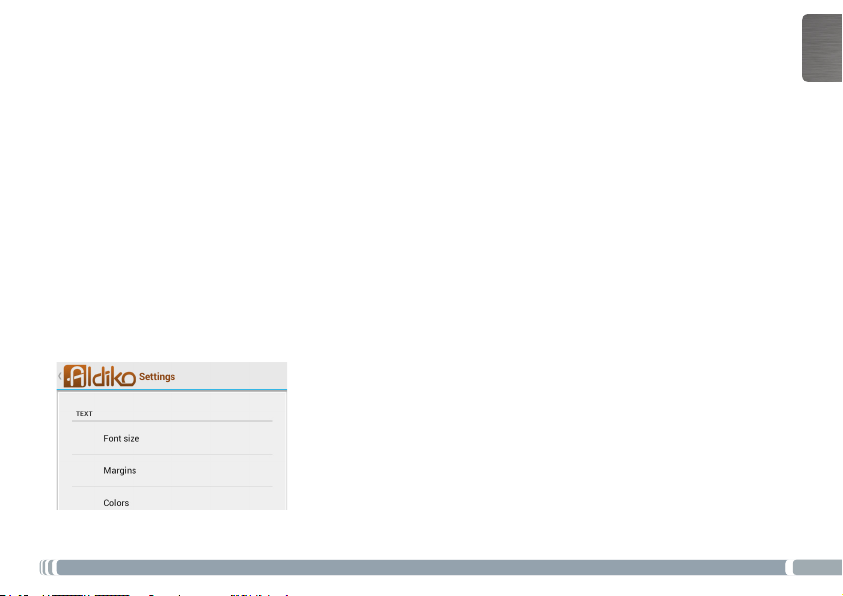
ALDIKO BOOK PREMIUM
Чтобы начать читать книгу, коснитесь ее обложки.
Во время чтения книги можно вывести меню поверх текста. Меню открывает доступ к опциям.
Для доступа к опциям выводимого поверх меню коснитесь экрана устройства в центре во время чтения.
Go to... (Перейти…)
Доступ к содержанию.
Введите нужный номер страницы для перехода.
Bookmarks (Закладки): добавление и удаление закладок.
Day/Night (День/Ночь)
Для переключения между дневным и ночным режимами коснитесь значка Day/Night (День/Ночь).
Settings (Настройки)
YМожно менять ориентацию текста. При выборе Automatic (Автоматически) текст будет поворачиваться
вместе с устройством.
Регулировка яркости во время чтения: проведите пальцем по левому краю экрана устройства.
More (Дополнительно): доступ к дополнительным настройкам параметров чтения.
More (Дополнительно)
Выберите Help (Справка) для просмотра более подробных сведений о работе с Aldiko.
РУССКИЙ
75
Page 76
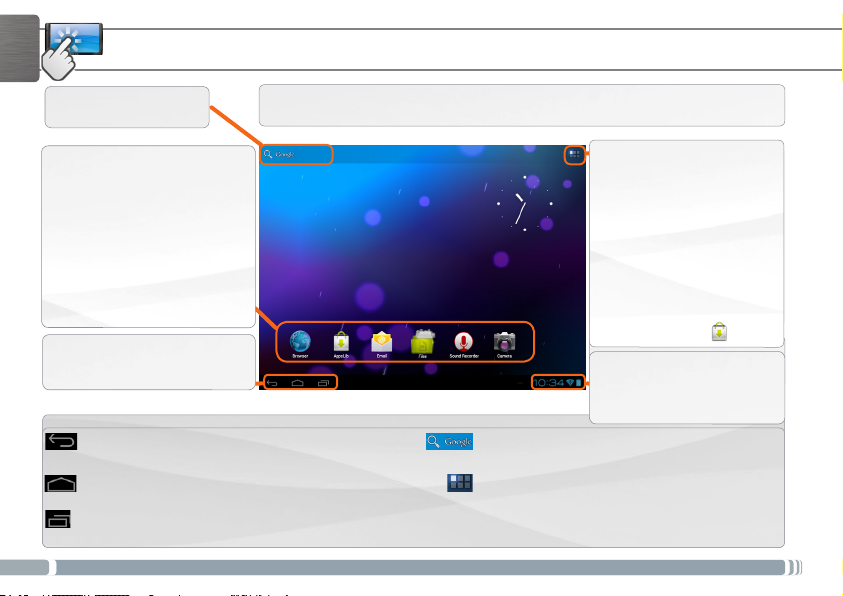
РУССКИЙ
Прикоснитесь, чтобы
выполнить текстовый
поиск
ИНТЕРФЕЙС ANDROID
Устройство ARNOVA оснащено емкостным сенсорным экраном.
Навигация осуществляется кончиком пальца.
Это приложения Android™
по умолчанию. Нажмите
на пиктограмму, чтобы
открыть соответствующее
приложение. Вы можете
настроить домашний экран
по своему вкусу, добавляя/
удаляя ярлыки и виджеты,
изменяя обои и т. д. См.
следующую страницу.
На панели навигации
отображаются кнопки
«Назад», «Домой» и
«Последние приложения».
Кнопки основного сенсорного экрана
Кнопка «Назад» - возврат к предыдущему
экрану.
Кнопка «Домой» - возврат на основной экран.
Кнопка «Поиск» - ввод текста для поиска в
планшете и в сети.
Кнопка «Все приложения» - просмотр всех
Ваших приложений и виджетов.
Кнопка «Последние приложения» - вызов используемых Вами приложений;
- для удаления закладки из списка, переместите ее влево или вправо.
76
Кнопка «Все приложения»
Нажмите на эту пиктограмму,
чтобы показать все приложения
и виджеты Android™,
установленные в Вашем
устройстве ARNOVA (игры,
различные инструменты, и т.
д.). Вы можете скопировать
их на домашний экран.
Дополнительные приложения
Android™ можно получить в
каталоге AppsLib .
В строке состояния
отображаются
уведомления и системные
пиктограммы.
Page 77
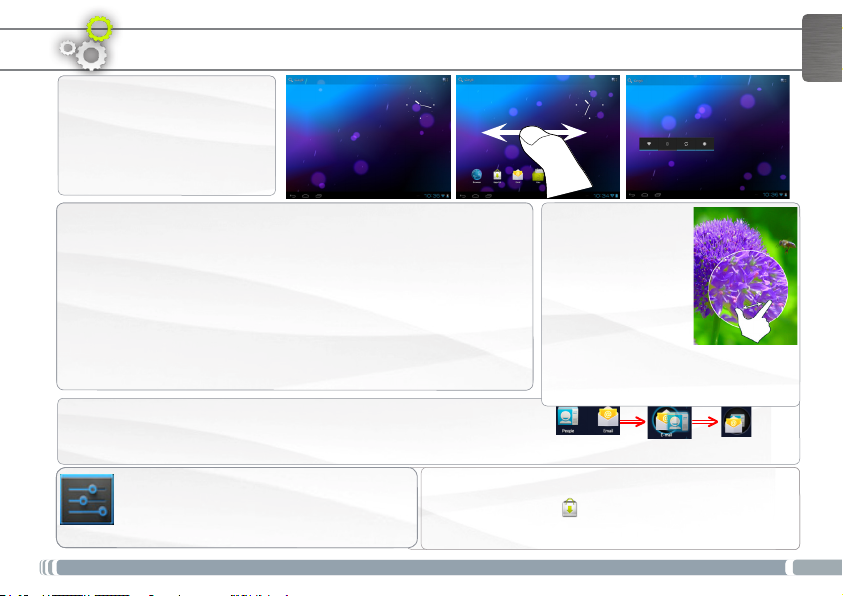
ПОЛЬЗОВАТЕЛЬСКАЯ НАСТРОЙКА
Расширенный домашний
экран
Переходы между панелями
домашнего экрана
осуществляются скользящим
движением влево и вправо.
Пользовательская настройка панелей домашнего экрана
- Чтобы изменить обои, удерживайте палец на свободном участке экрана,
а затем выберите обои из списка.
Упорядочение приложений и работа с ними
- Для перемещения объекта на домашнем экране прикоснитесь к нему
и удерживайте палец до появления сетки направляющих линий, затем
переместите его в требуемое положение и отпустите палец.
- Для удаления объекта на домашнем экране прикоснитесь к нему и,
удерживая палец, переместите его к верхней части экрана и отпустите
над пиктограммой «Удалить». Удаление объекта на экране «Все
приложения» приведет к удалению приложения.
Создание папок приложений: Вы можете объединить несколько
пиктограмм приложений в папке. Поместите пиктограмму одного
приложения поверх другого на домашнем столе, и пиктограммы
объединятся.
Изменение настроек
Нажмите на пиктограмму Settings (настройки) и
выберите меню одной из следующих категорий: Wireless
& networks (беспроводная связь и сети), Device
(устройство), Personal (личные), System (система).
Добавление приложений при помощи APPSLIB:
подключив устройство ARNOVA к сети WiFi, нажмите на
пиктограмму AppsLib .
В этой интерактивной библиотеке хранятся тысячи
приложений для загрузки и использования.
РУССКИЙ
Изменение масштаба:
В некоторых приложениях
(в частности, в «Браузер»
и «Галерея») можно
увеличить и уменьшить
масштаб просмотра,
поместив два
пальца на экран
одновременно, и
сближая их (для уменьшения) или
раздвигая (для увеличения).
77
Page 78
РУССКИЙ
Добавление виджетов
Виджеты - это объекты, подобные окнам приложений. Их можно просмотреть на вкладке «Все
приложения» и переместить на домашний экран.
Для просмотра имеющихся виджетов:
1. Прикоснитесь к пиктограмме «Все приложения» на домашнем экране.
2. Выберите Widgets (виджеты) в верхней части экрана.
3. На основном экране виджетов Вы можете:
- перемещаться между экранами: проводите пальцем влево или вправо.
- перетащить виджет на домашний экран. Прикоснитесь к пиктограмме виджета и, удерживая палец,
переместите ее в нужное положение, после чего отпустите.
Перед активацией виджета может отобразиться предложение выбрать дополнительные опции. Если в
указанном Вами месте недостаточно пространства для виджета, то он не будет добавлен на домашний
экран.
Продление срока службы батареи
- Если Вы не используете WiFi, выключите его в разделе настроек.
- Уменьшите яркость экрана и задайте более короткий интервал ожидания до его отключения (Sleep
timeout): Settings > Device > Display.
- Выключите автоматическую синхронизацию всех приложениц, если она не нужна: Settings > Personal
> Accounts & sync. Учтите, что Вам придется выполнять синхронизацию вручную, чтобы получить
сообщения, почту и другую новую информацию; кроме того, не будут приниматься уведомления об
обновлениях.
78
ПОЛЬЗОВАТЕЛЬСКАЯ НАСТРОЙКА
Page 79
ПЕРЕДАЧА МЕДИАФАЙЛОВ
1. Включите устройство ARNOVA.
2. Присоедините устройство ARNOVA к включенному компьютеру при помощи
прилагаемого кабеля USB.
3. На экране ARNOVA появится запрос на подтверждение подключения. Выберите Turn
on USB storage (включить накопитель USB) , чтобы подключить его и нажмите OK для
подтверждения.
Через несколько секунд на экране компьютера отобразится пиктограмма ARNOVA.
4. Вы можете перенести свои медиафайлы в ARNOVA, выполняя копирование/вставку в
соответствующие папки при помощи Проводника Windows® (или программы Finder в
компьютере Mac®), либо при помощи проигрывателя Windows Media® Player. Откройте
Windows Media Player® и воспользуйтесь вкладкой Sync для синхронизации музыки,
видео и фотографий с устройством ARNOVA. Обратитесь к справке Windows Media Player®
за дополнительными сведениями об этой операции.
5. Завершив пересылку файлов, закройте Проводник Windows® или другую программу, с
помощью которой выполнялось чтение или запись в ARNOVA. Нажмите на пиктограмму
«Безопасное извлечение» в области уведомлений рядом с часами. После этого Вы можете
отключить USB-кабель.
РУССКИЙ
79
Page 80
www
РУССКИЙ
Мы рекомендуем затратить несколько минут на регистрацию (http://arnovatech.com/register). Это даст
Вам возможность пользоваться технической поддержкой ARNOVA (http://arnovatech.com/support).
ЗАРЕГИСТРИРУЙТЕ СВОЕ УСТРОЙСТВО!
Ä В сети Интернет по адресу
http://arnovatech.com/register
?
Так как мы часто обновляем и улучшаем свою продукцию, графический интерфейс или функциональные возможности
программного обеспечения Вашего устройства могут несколько отличаться от представленных в настоящем Кратком
руководстве пользователя.
80
ТРЕБУЕТСЯ ПОМОЩЬ?
На нашем веб-сайте: обратитесь к разделу часто задаваемых вопросов по адресу
http://arnovatech.com/faq
Свяжитесь с нашей группой технической поддержки: перейдите на страницу
http://arnovatech.com/support , чтобы обратиться за поддержкой по электронной почте.
Перед обращением в Службу технической поддержки зарегистрируйте свое устройство (см.
раздел «Зарегистрируйте свое устройство»).
Page 81

National restrictions
This device is intended for home and ofce use in all EU countries (and other countries following the EU directive
1999/5/EC) without any limitation except for the countries mentioned below:
Country Restriction Reason/remark
Bulgaria None General authorization required for
France Outdoor use
limited to 10 mW
e.i.r.p. within the
band 2454-2483.5
MHz
Italy None If used outside of own premises, general
Luxembourg None General authorization required for
Norway Implemented This subsection does not apply for the
Russian Federation None Only for indoor applications
Note: Frequency 2454-2483.5MHZ are restricted to indoor use in France.
Consult the declaration of conformity on http://www.arnovatech.com/products/declaration_conformity.html
outdoor use and public service
Military Radiolocation use. Refarming
of the 2.4 GHz band has been ongoing
in recent years to allow current relaxed
regulation. Full implementation planned
2012
authorization is required.
network and service supply (not for
spectrum)
geographical aera within a radius of 20 km
from the centre of Ny-Alesund
81
Page 82

Open Source Software Offer
The software bundled with this product includes software les subject to certain open source license requirements.
Such open source software les are subject solely to the terms of the relevant open source software license. Such
open source software is provided on an “AS IS” basis to the maximum extent permitted by applicable law.
For the open source les contained herein, please access “Open source license” section located at: Settings\About
tablet\Legal information on the device for the relevant copyright and licensing terms. You may obtain a copy of
Apache License, Version 2.0 at http://www.apache.org/licenses/LICENSE-2.0. You may also obtain a copy of GNU
General Public License, Version 2 at the Free Software Foundation, INC, 51 Franklin Street, Fifth Floor, Boston, MA
02110-1301, USA.
Until the date that is three years after our last shipment of this product, you may obtain a copy of the source code
corresponding to the binaries for any GPL-Licensed le by contacting ARNOVA customer service
at http://www.arnovatech.com and ARNOVA will send you a link to such source code or will provide instructions to
get the source on a physical medium.
This offer is valid to anyone in receipt of this information.
82
 Loading...