

Page 1
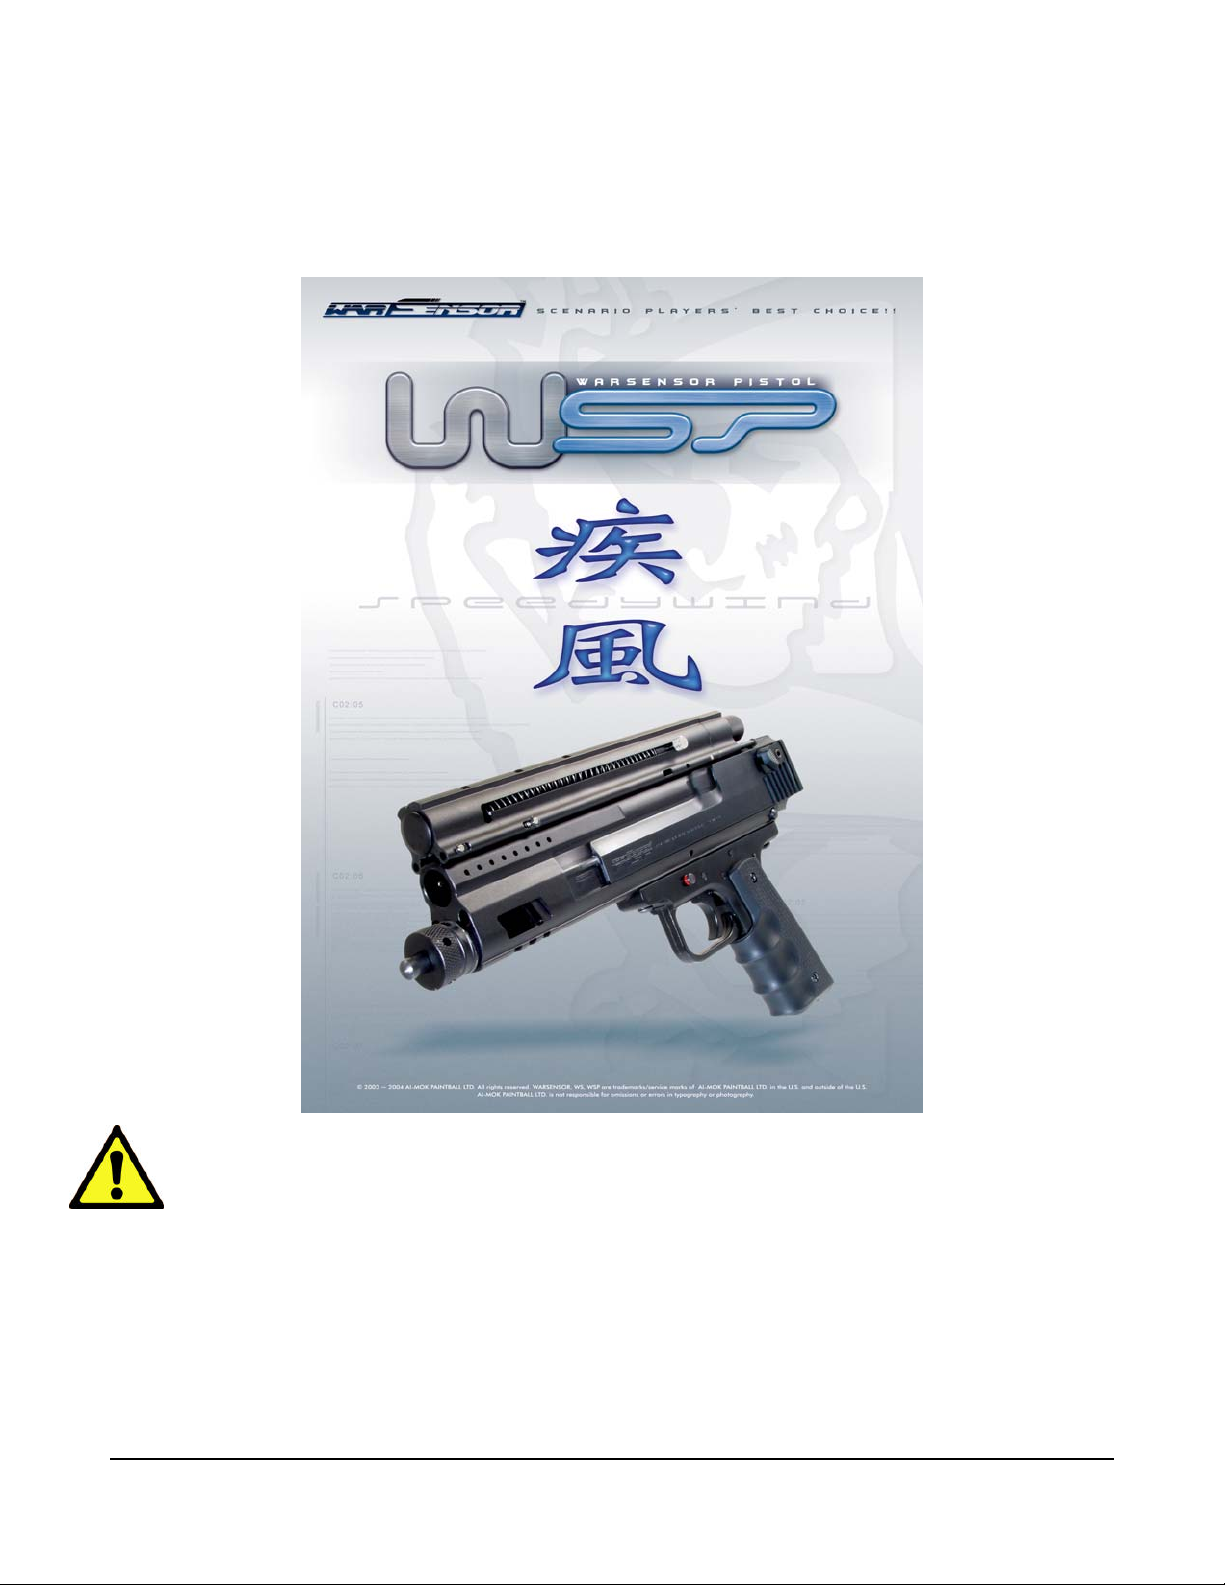
WARSENSOR WSP PAINTBALL PISTOL
OWNER’S MANUAL
WARNING
WARSENSOR PAINTBALL MARKERS ARE NOT A TOY. ANY MISUSE MAY CAUSE SERIOUS INJURY OR DEATH. THE
USER AND ANY PERSON WITHIN RANGE MUST WEAR EYE PROTECTION DESIGNED FOR PAINTBALL USE. READ THIS
OWNER’S MANUAL COMPLETELY
ARMOTECH and WARSENSOR are trademarks owned by AI-MOK Paintball Ltd.;
All ARMOTECH and WARSENSOR products are manufactured by ARMOTECH Taiwan Co., Ltd. only.
© 2004 - 2005 AI-MOK Paintball Ltd. All rights reserved
WARSENSOR WSP 1
Page 2

Paintball Safety Rules
Safety First!
WARNING
WARSENSOR PAINTBALL MARKERS ARE NOT A TOY. ANY MISUSE MAY CAUSE SERIOUS INJURY OR
DEATH. THE USER AND ANY PERSON WITHIN RANGE MUST WEAR EYE PROTECTION DESIGNED FOR
PAINTBALL USE. READ THIS OWNERS’S MANUAL COMPLETELY BEFORE LOADING, PRESSURIZING, OR
OPERATING YOUR WARSENSOR PAINTBALL MARKER.
• Always wear protective goggles & headgear designed for paintball when shooting this marker
• Everyone within range of an area where this paintball marker is used should wear protective goggles and headgear specifically
designed for paintball
• Operate this paintball marker only in areas where it is safe and lawful to do so
• Misuse of this marker may result in criminal charges or imprisonment
• This marker is intended for sale to adults. Adult supervision is recommended at all times whenever a minor is handling this
marker
• READ THIS OWNER’S MANUAL COMPLETELY BEFORE LOADING, PRESSURIZING, OR OPERATING THE WARSENSOR MARS SERIES PAINTBALL
MARKER!
• Never aim or shoot this paintball marker towards anybody who is not wearing protective goggles or headgear specifically
designed for paintball
• During game play, follow referee’s instructions and all field safety rules. Avoid shooting at another player’s head, neck or groin
area
• Play paintball only where the rules of safety for paintball are followed
• All paintball markers must be chronographed regularly. Adjust the marker to shoot paintballs at a velocity this is 300feet per
second (fps) or less and that does not exceed the velocity limit set by the Paintball Park or field where the marker is in use.
Chronograph the marker at regular intervals during the day, as well as any time the power source is refilled or changed, any
time the barrel or any part of the power system is changed, and upon request of any player or game official
• This paintball marker operates using compressed gas or air at specified pressure ranges. Follow safety procedures when
handling compressed gas or air. All filling of compressed gas or air cylinders must be done by qualified persons
• Follow the rules of safe marker handling: keep finger off the trigger until ready to shoot. Keep muzzle pointed in a safe direction.
In addition, firmly insert a barrel plug into the muzzle and push the mechanical or electronic safety to “ON” or “SAFE” when the
marker is not in use and when in any non-shooting area
• Never shoot at domestic animals or wildlife
• Never mark objects outside the confines of the game or authorized shooting areas
• Never look down the barrel of a marker
• Before disassembly, storage, or transport of this marker, remove ALL paintballs from the marker, barrel, and loader: remove
power source: and remove all gas or air from the power system. Insert a barrel plug and put the safety “ON”
• Carry your marker in a case or sturdy bag when transporting it in public
• Safely and securely store marker to prevent access to it by unauthorized persons or minors.
WARSENSOR WSP 2
Page 3
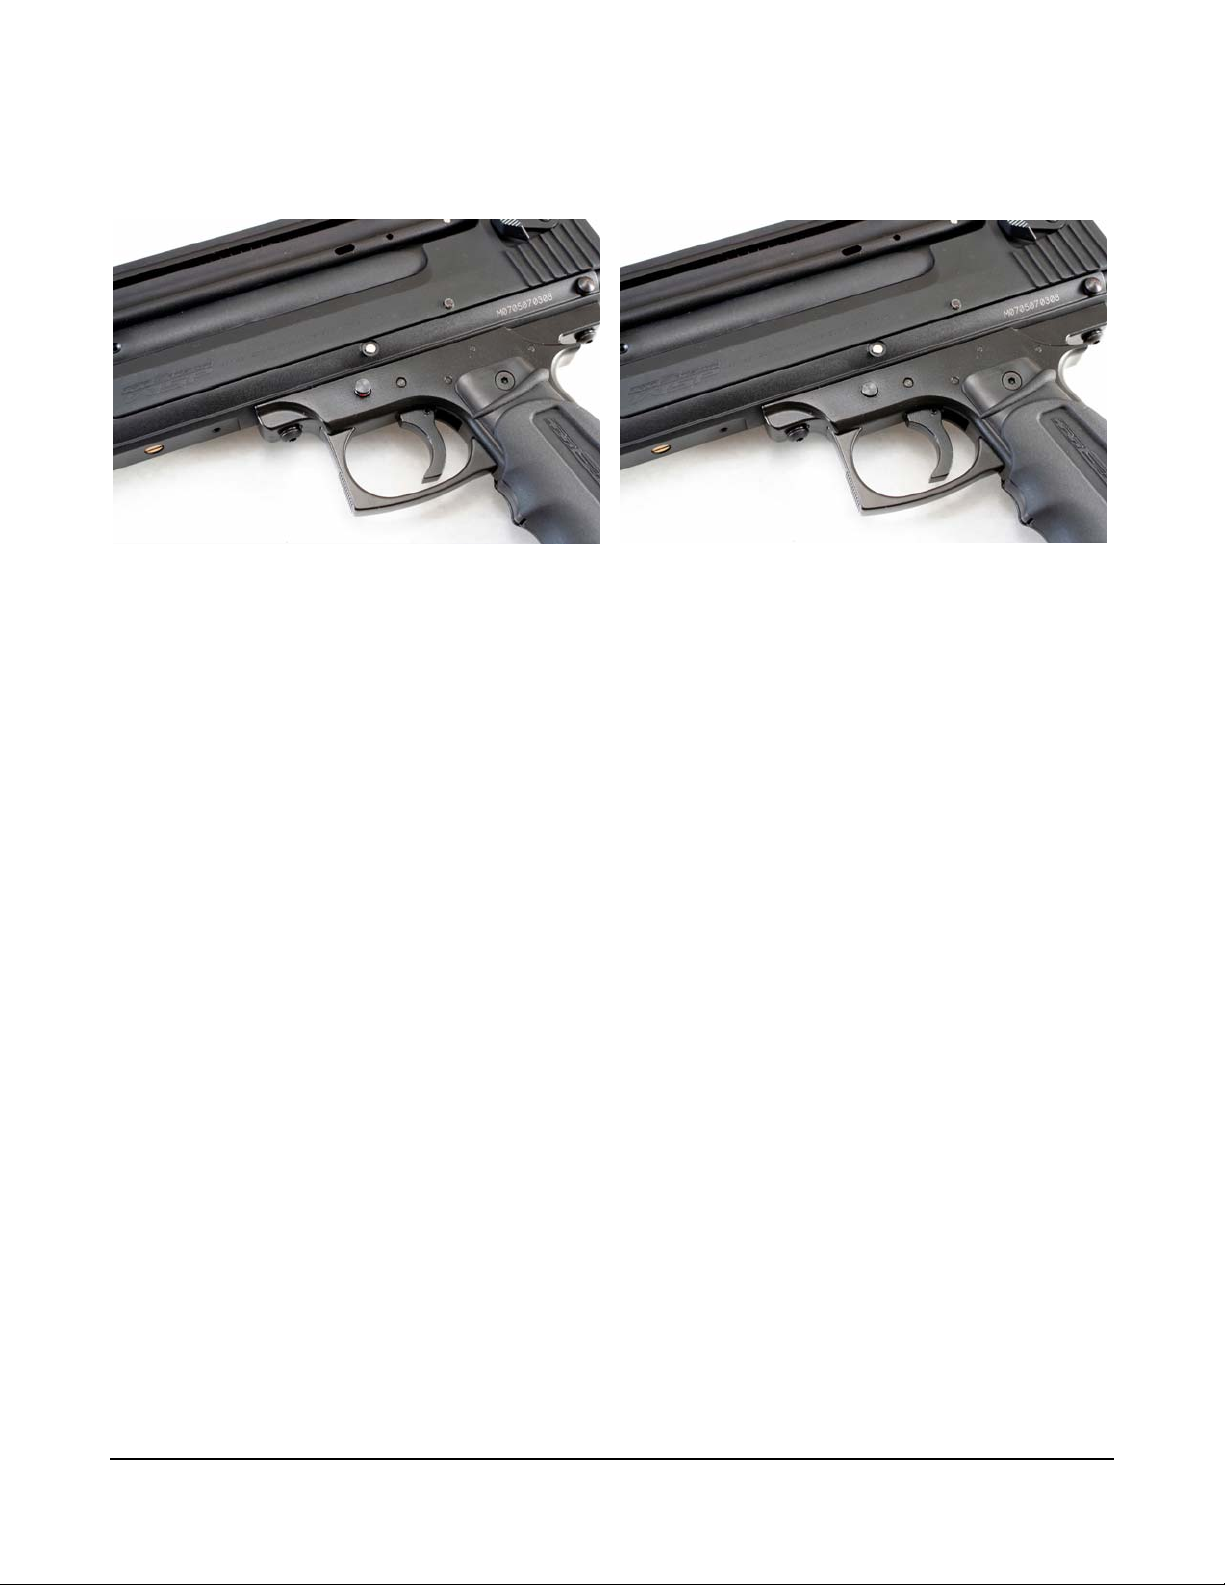
MARKER SAFETY SWITCH (ON TRIGGER FRAME)
SAFE OFF SAFE ON
Operating Instructions
Your marker should first be properly cleaned internally & lubricated prior to f iring to avoid unnecessary
wear or damage on the internals.
Make sure the safe switch is in the SAFE position. Press the button on the trigger fr ame to the right for
SAFE ON, and to the LEFT (red ring should be visible on the button) for SA FE OFF.
At this time do not attach power source, clip/hopper adapter, an d do not load any paintba lls into the
marker.
Insert barrel plug firmly into the barrel.
Pull the cocking slides straight back until the cocking mechanism locks back in the cocked position
Turn the safety switch to the FIRE position and then squeeze th e trigger with an even pre ssure. The
cocking slides should snap forward into the un-cocked position. You have just dry-fired yo ur
WARSENSOR marker. Do this a few times until you are comfortable with this operation and the feel of
the marker when cocking, and firing it.
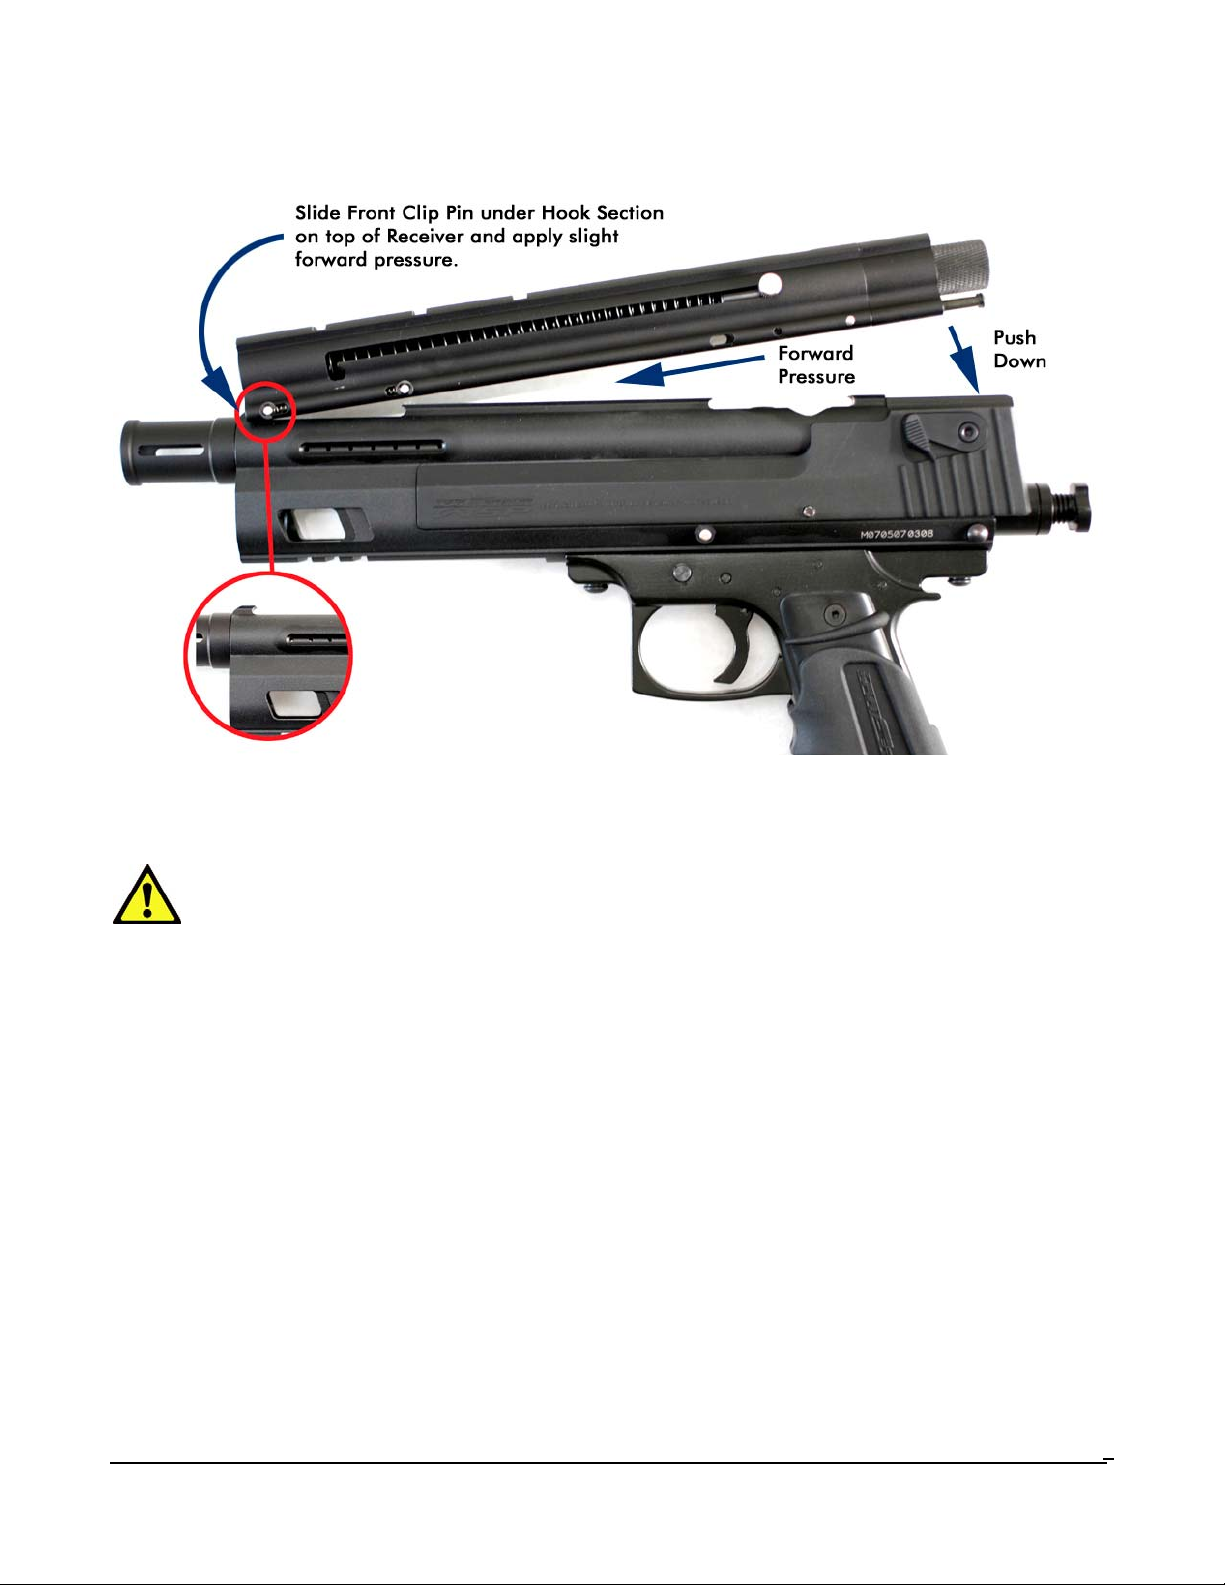
Attach the ammo/ball clip to the top of the marker. Depending on how your clips are co nfigured they
may insert differently. The WARSENSOR clips insert by sliding the front section o f the clip into the
milled groove at the top-front section of the receiv er body. Apply a slight for ward pressure and snap the
rear section of the clip into place (see illustration be low).
If your clip inserts from the rear, simply repeat the process but this time inser t the clip into the rea r
groove at the top of the receiver body, while pulling the other ret ainer clip back slightly wit h your fingers
so it snaps into position
WARSENSOR WSP 3
Page 4
WARSENSOR – THE SCENARIO EXPERT
Compressed Air/Gas
WARNING
The power system contains compressed gas or air when pressurized. Never
disassemble the marker until removing ALL the gas or air from the power system.
Always keep hands away from escaping CO2 gas. It can cause frostbite if allowed
to come in contact with skin.
• Before attaching any air or gas power source, read and understand this section of the owner’s
manual. Follow safety rules for handling compressed air/gas. If any leaks occur in the power
system, refer to troubleshooting section or WARSENSOR support. Use only cylinders for
compressed gas or air that comply with all applicable laws and regulations, including but not
limited to those of the US dept of transportation, OSHA, Compressed Gas Association and/or
American Society for Testing and Materials.
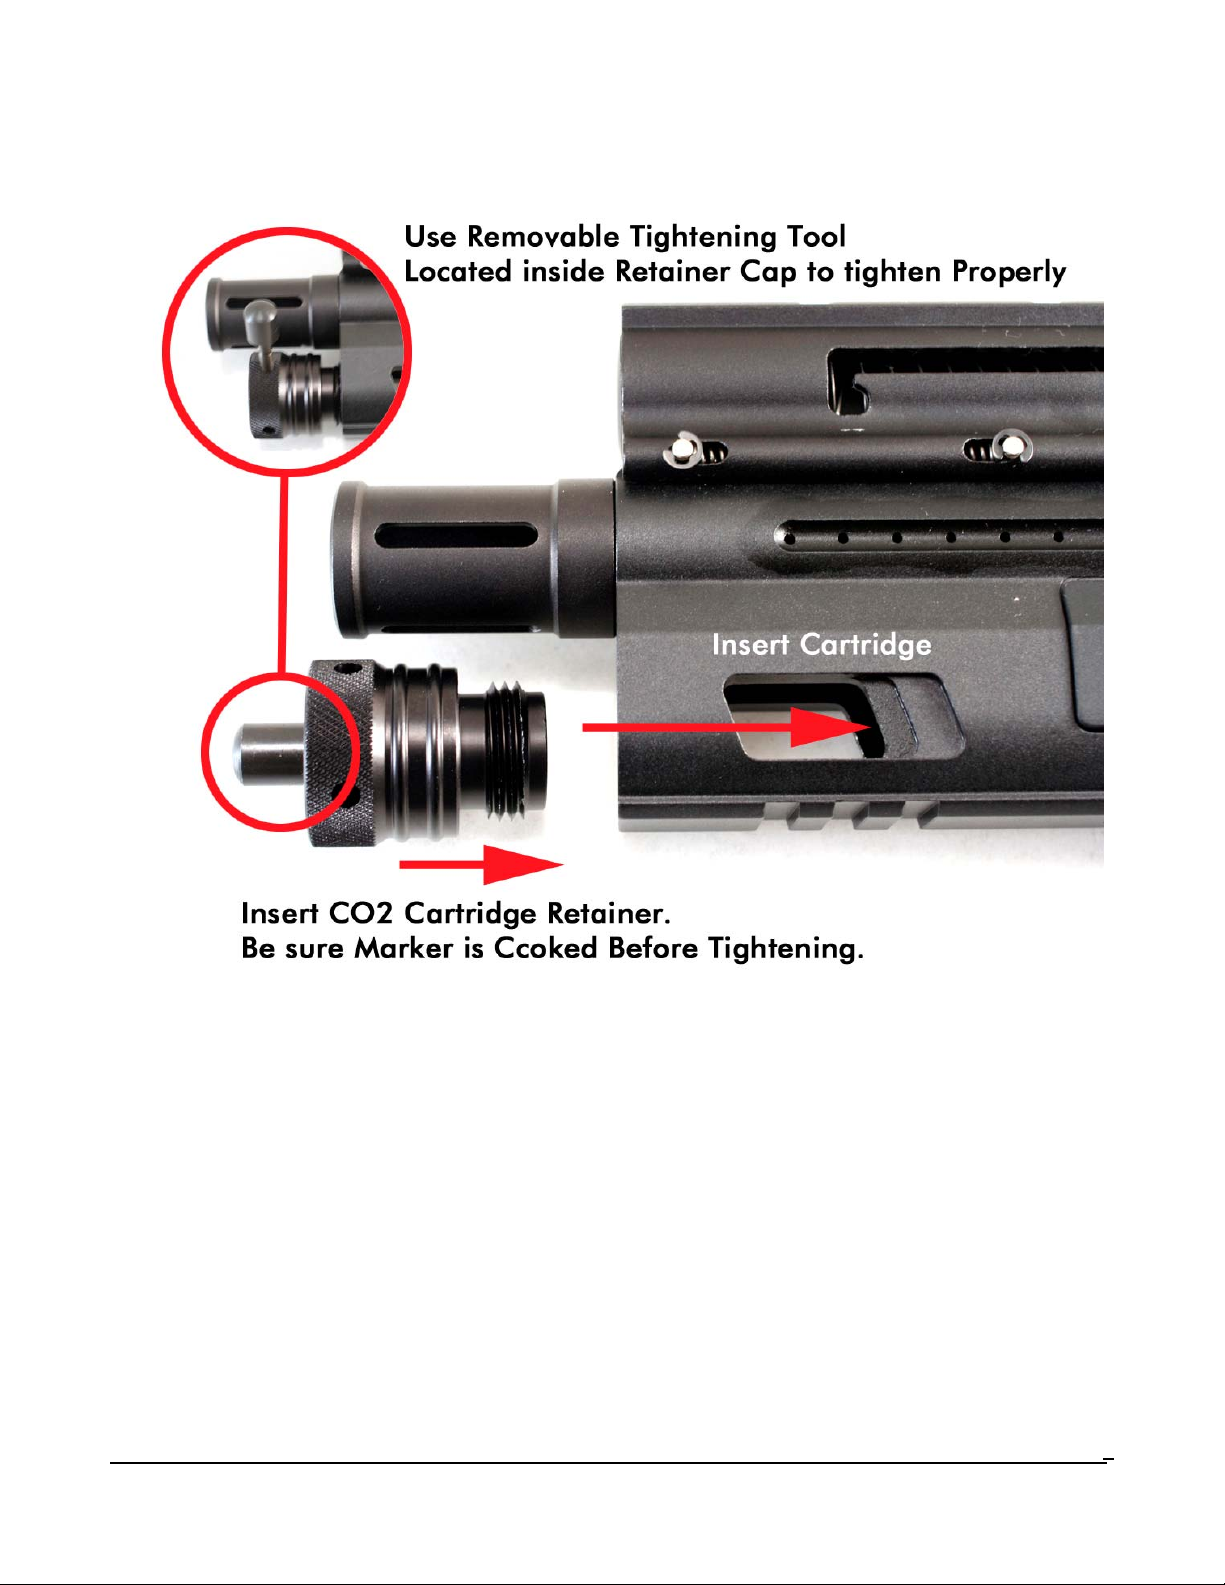
• CO2 CARTRIDGE: Small 12gr. CO2 cartridges are inserted into the front of the marker body,
just below the barrel and secured into place with a retainer cap. As the cap is tightened, it
presses the CO2 cartridge against a specialized activation pin – which punctures the cartridge
head, and starts the flow of CO2 into the marker.
WARSENSOR WSP
4
Page 5
WARSENSOR – THE SCENARIO EXPERT
• Test for function – now that the power source is loaded and the marker cocked, flip the safety
switch to the FIRE position and squeeze the trigger. The marker should shoot air, and the
cocking slides should cycle back to the cocked position ready to fire again. Repeat this several
times to get used to the recoil action of the marker. You have now fired your marker WITH
loaded power source.
The WARSENSOR paintball marker may be powered by CO2, regulated compressed air (HPA), or
regulated nitrogen. From the source of gas or air through the entire power system, there are varying
pressures that are applied to the marker and the components of the power system.
The marker requires a minimum of 400 psi for proper operation
WARSENSOR WSP
5
Page 6
WARSENSOR – THE SCENARIO EXPERT
V elocity Adjustments
WARNING
All paintball markers must be chronographed regularly. Adjust marker to shoot
paintballs at a velocity that is 280 feet per second (fps) or lower. Make sure the
velocity setting is not in violation of the limit set by the authorities of the location
where you are playing.
Chronograph the marker at regular intervals during the day as well as any time the
power source is refilled or changed or any time a player or game official requests.
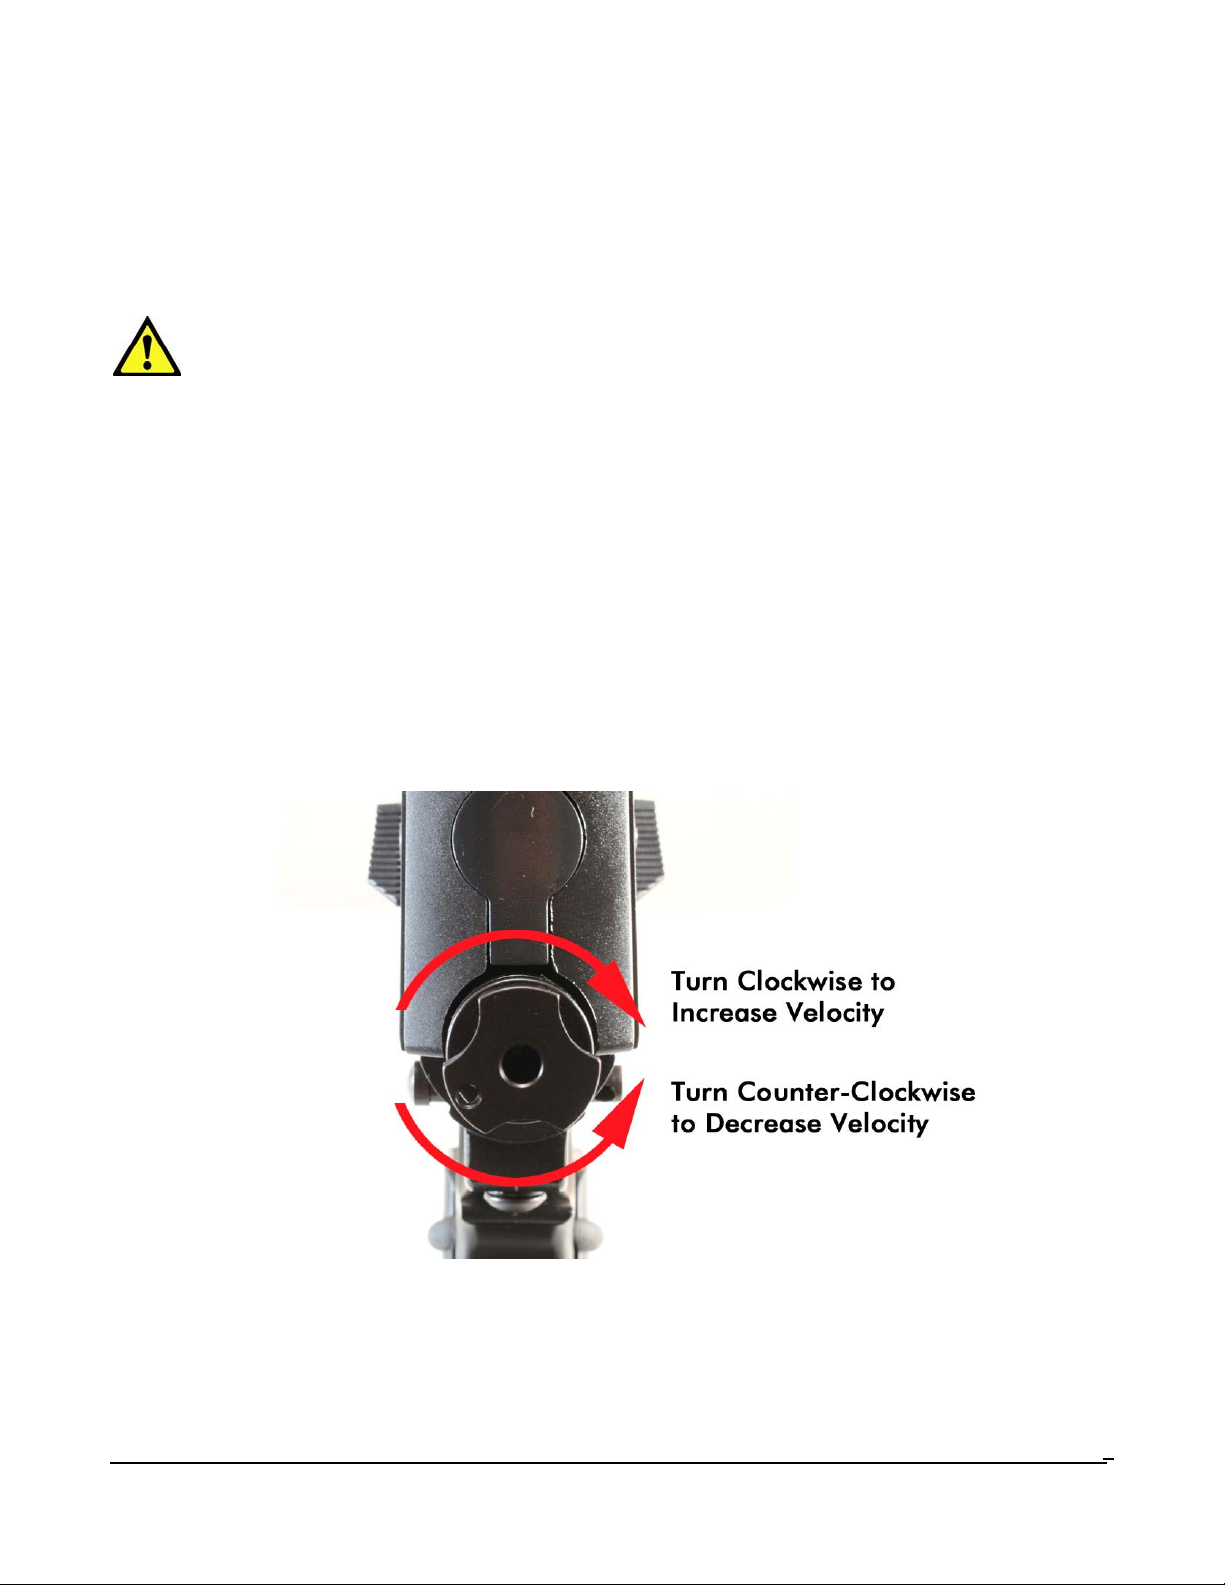
• The velocity knob is located at the back on the receiver (marker body). On the
WARSENSOR WSP marker this velocity adjuster can be turned by hand easily once the
locking retainer screw is loosened.
• The illustrations below show how to adjust the velocity screw.
To adjust velocity after loosening the locking retainer screw, turn the velocity screw clockwise in
½ turn increments. To decrease velocities turn the velocity screw counter-clockwise. Once the
desired velocity has been reached, lock the velocity screw in place.
WARSENSOR WSP
6
Page 7

WARSENSOR – THE SCENARIO EXPERT
• Note: velocity may fluctuate depending on factors such as altitude, type of power source
used, and climate conditions. Before using your marker make sure to perform a safe
velocity test.
• Use a chronograph and let’s ensure we are within the safely allowable velocity range.
Velocity should NEVER exceed 300 f.p.s. Some paintball fields may require your marker to
be set under 300 f.p.s.
Once you have achieved the proper velocity setting – you can lock it in place with the Velocity
Locking Screw.
WARSENSOR WSP
7
Page 8
WARSENSOR – THE SCENARIO EXPERT
Maintenance, Cleaning and Lubrication
The WARSENSOR marker should be cleaned and lubricated after every usage to ensure proper
function and longevity of the product.
NOTE: It is not necessary to disassemble the ENTIRE MARKER to perform standard maintenance and
lubrication tasks. DO NOT DISASSEMBLE OTHER AREAS OF THE MARKER UNLESS YOU ARE AN
EXPERIENCED AIRSMITH, OR HAVE BEEN ASKED TO DO SO BY AUTHORIZED WARSENSOR SERVICE
TECHNICIANS.
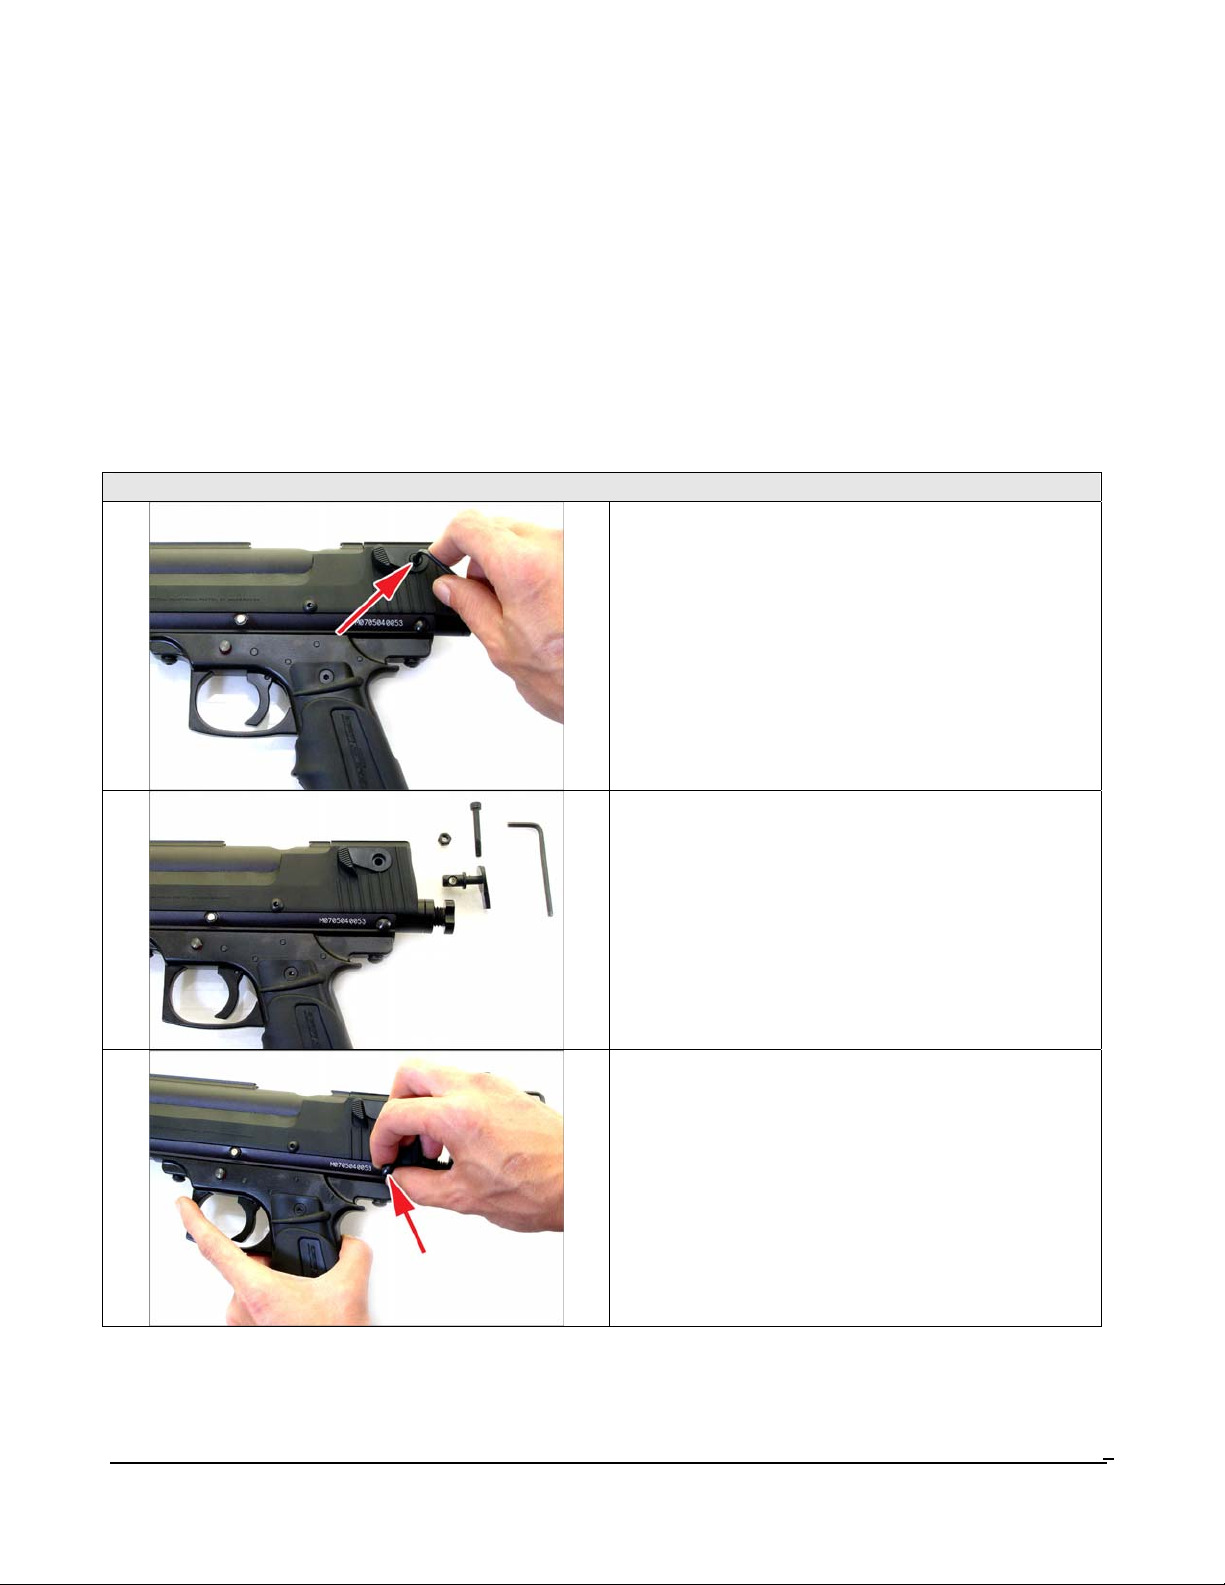
DESSEMBLAGE
STEP 1.
Remove the slide screw by using the wrench.
STEP 2.
Remove the slide back cover.
STEP 3.
Remove the strip pin.
WARSENSOR WSP
8
Page 9
WARSENSOR – THE SCENARIO EXPERT
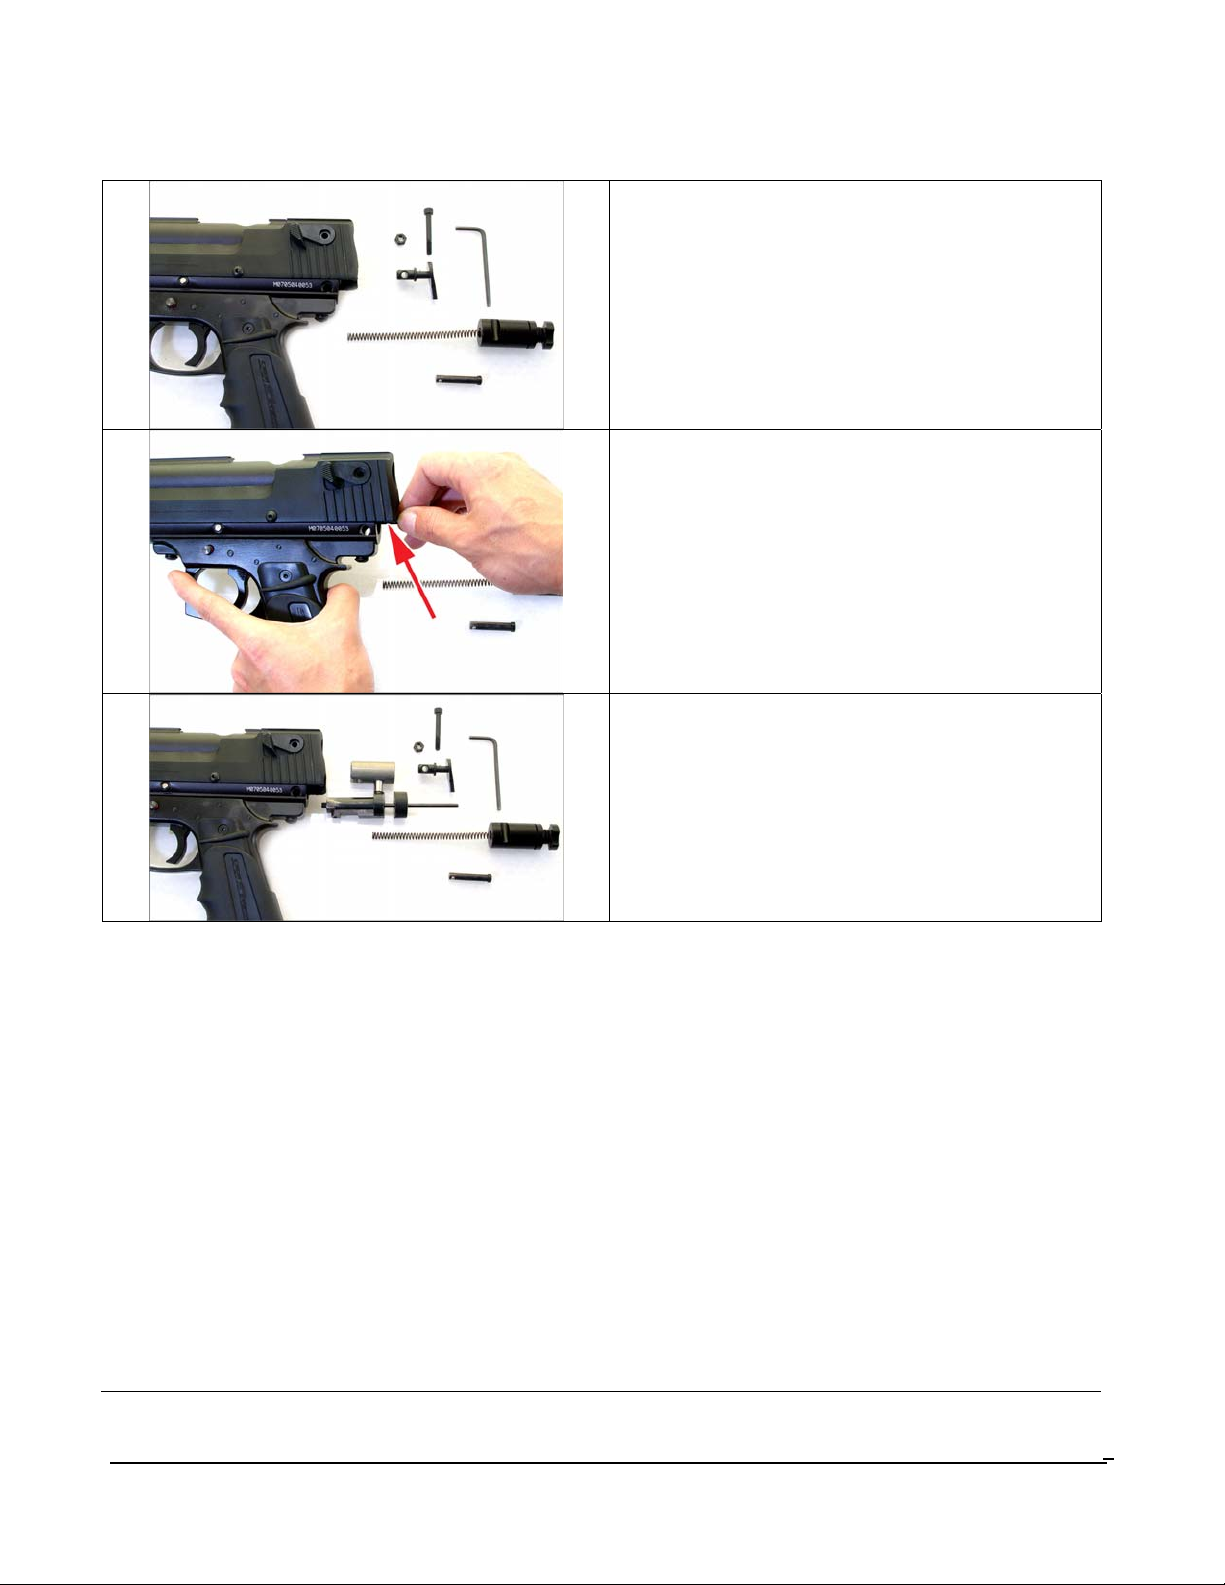
STEP 4.
Pull out the main spring and the plug.
STEP 5.
Pull out the spring guide.
(The spring guide is inserted into the spring in
order to keep the spring straight)
STEP 6.
Remove the bolt and hammer.
WARSENSOR WSP
9
Page 10
WARSENSOR – THE SCENARIO EXPERT
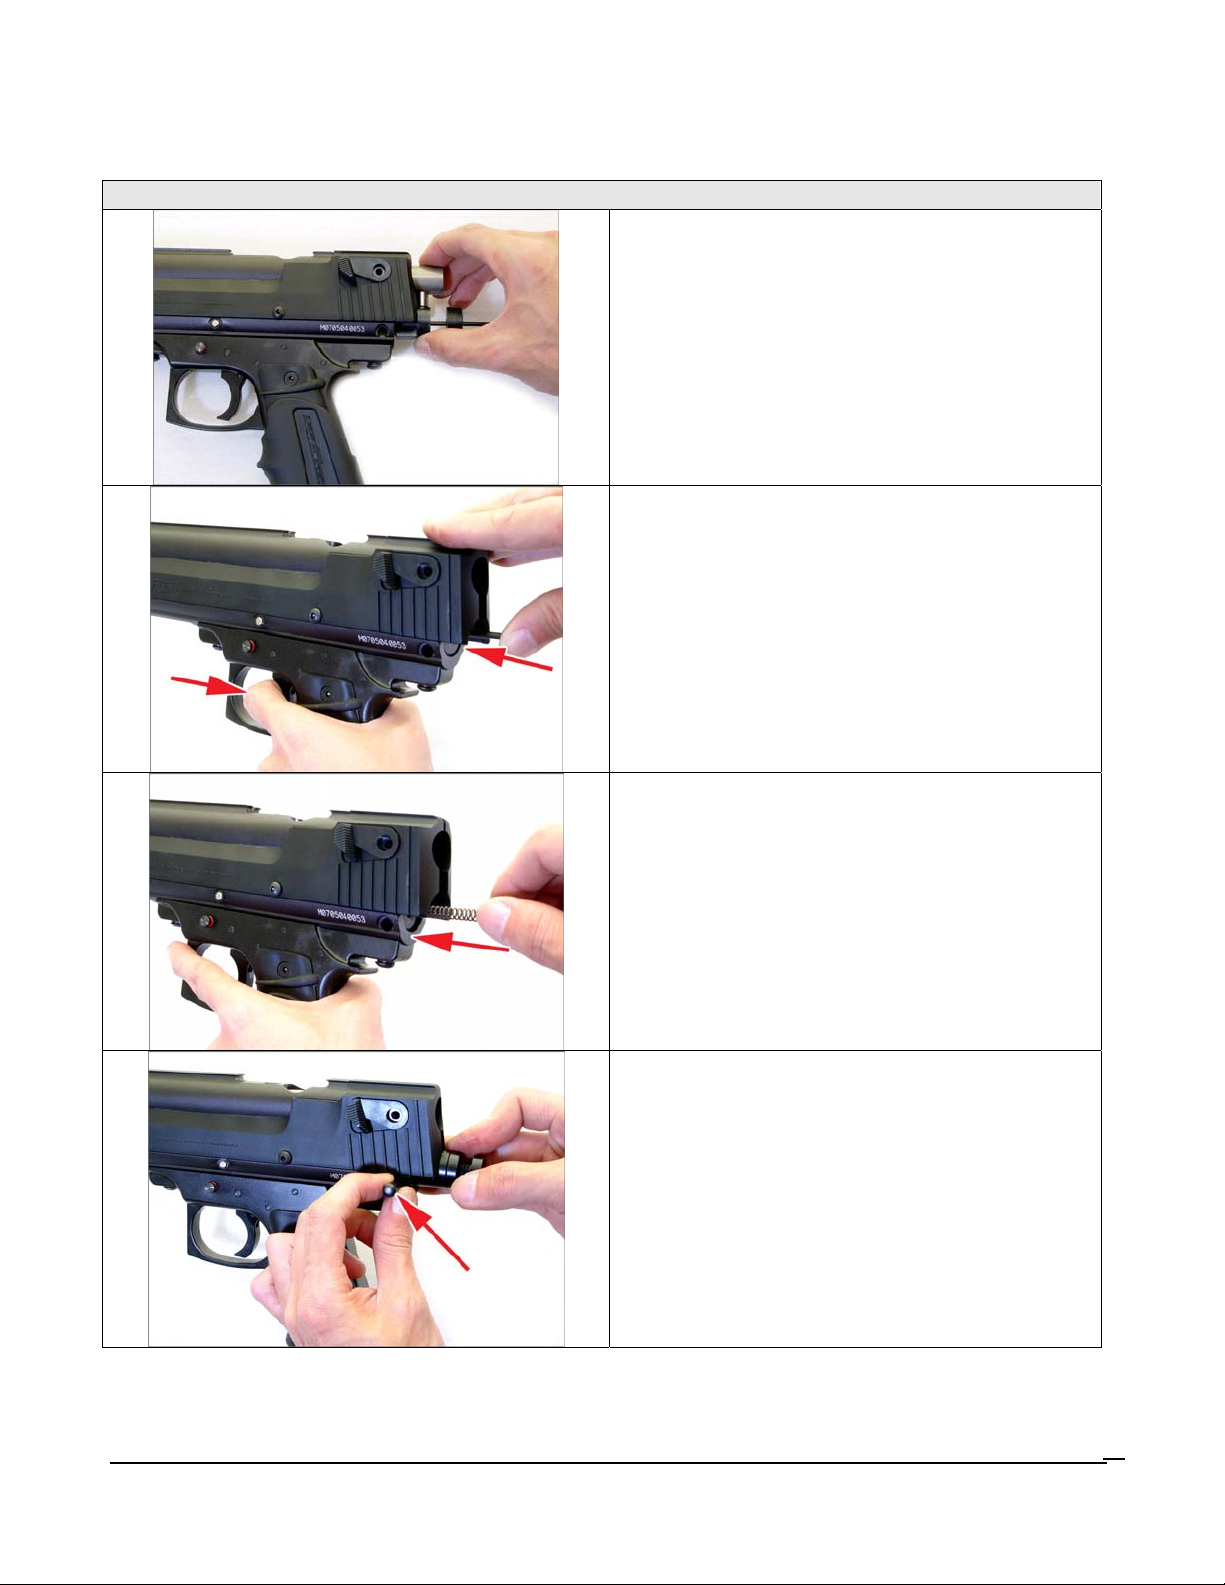
ASSEMBLAGE
STEP 1.
Connerct the inner hammer with the bolt and
put into the receiver.
STEP 2.
Push in the spring guide when pulling the trigger
to set the inner hammer on place.
STEP 3.
Insert the main spring.
STEP 4.
Put the plug on the insert the strip pin.
WARSENSOR WSP
10
Page 11
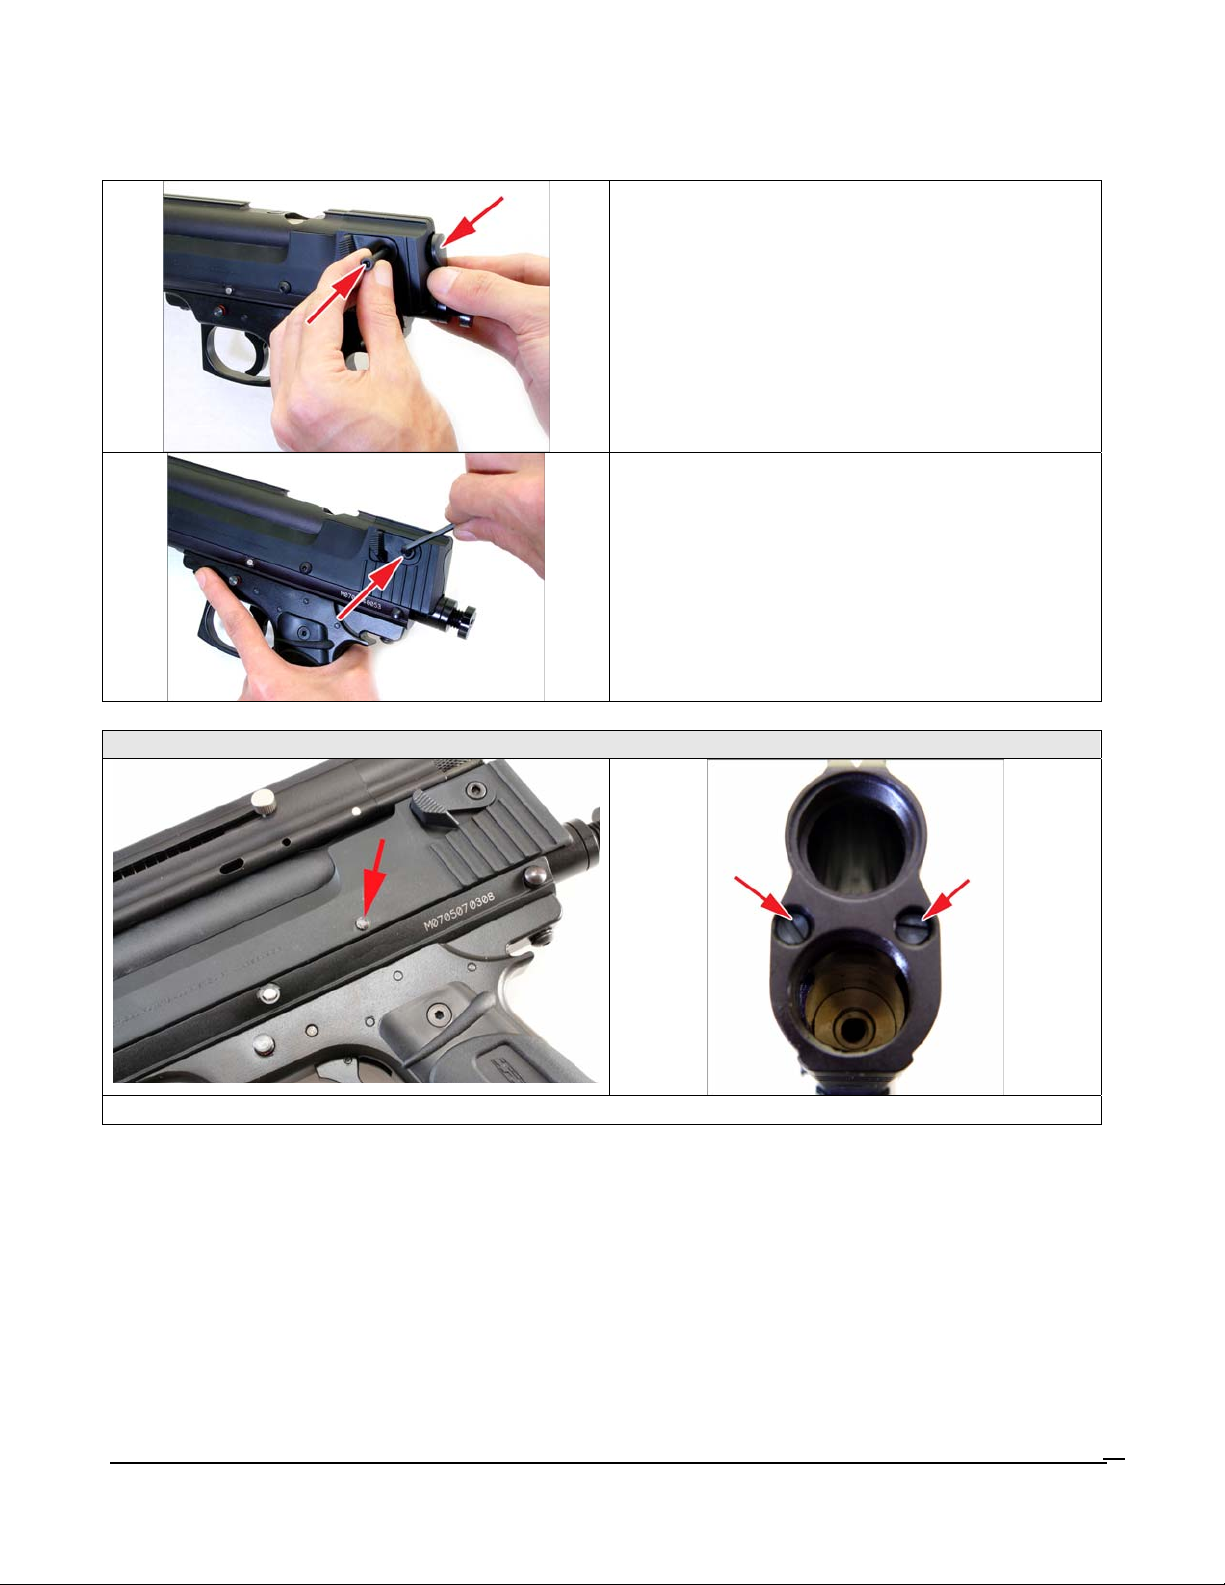
WARSENSOR – THE SCENARIO EXPERT
STEP 5.
Put the slide cover back the aligne the screw.
STEP 6.
DO NOT overtighten the highlighted screw, it
will affect the slide movement.
DO NOT touch these three screws.
IMPORTANT
WARSENSOR WSP
11
Page 12

WARSENSOR – THE SCENARIO EXPERT
Troubleshooting Tips,
Hints ‘n Tricks
• Marker not firing:
o Check to ensure there is a full CO2 cartridge in the marker. If you are using a bottom line
and external power source, check to ensure its turned ON and has sufficient PSI to
operate the marker.
o Check to ensure the marker is cocked
o Check to ensure the safe switch is in LIVE FIRE mode (switched to the left) (ALL MODELS.
• I hear a hissing sound when I attach the power source:
o ONLY Load CO2 cartridges with the marker in COCKED position, or CO2 will escape.
o If using a bottom line, check the o-ring on the air supply bottle – it may not look worn but
could be – and will leak
o If leak is not at bottle attachment, check the connection point for the bottom line adapter
in the CO2 chamber of the marker – it may not be properly seated- tighten the retainer lug
to seat it, or use some lubricant to ensure its not a leak due to dry o-rings
o Check the o-rings on the bottom line chamber to ensure they are not damaged
o If none of these sections are leaking, check the cup-seal to make sure it is sitting properly
against the valve. This is easily replaced with an WARSENSOR cup-seal or any spyder
compatible equivalent – the BLACK MAGIC cup-seal is highly recommended to cure cupseal leaks.
• I cannot cock the marker:
o Remove the velocity adjuster cap and examine the striker pin section to ensure it is
assembled properly
o Check the hex screw at the back of the trigger frame as it may be too tight and causing a
misalignment problem
o If this jam occurred after a ball break, carefully check to ensure there is residual skin
fragments of the ball stuck between the receiver housing and the barrel
o If this jam occurred not from a ball break, carefully disassemble the internals and check
to see if the o-rings are not dislodged or broken
WARSENSOR WSP
12
Page 13

WARSENSOR – THE SCENARIO EXPERT
• The marker shoots once and does not re-cock:
o The o-ring on the striker hammer could be damaged and needs replacing
o Check the cup seal to ensure the whole assembly is sitting properly and is not leaking
o Check your air supply to ensure you have sufficient pressure to operate the marker
• The marker fires and continues to rapid fire, the re-cock does not hold:
o The sear adjustment is too low – check the section on trigger adjustments and make the
appropriate changes to correct the problem
o Check the screws which hold the trigger frame to the receiver – if they are loose – tighten
them, in particular the rear screw
• The marker requires multiple trigger pulls to fire once:
o Trigger recoil springs may be dislodged or broken and not returning trigger to full frontal
position which engages the sear for the next trigger pull. Trigger disassembly and
checking will be required.
o Balls break in the breach when attempting rapid firing:
o Check to ensure the ball-clip is seated properly
o Check to ensure the loader cap is not blocking flow of balls into breach at the rear of the
clip
o Check the clip ball breach opening to ensure balls are passing smoothly and not jamming
(this could happen if balls are too big, or if they are mal-formed from swelling).
o Check the spring loaded clip ball feed – spring maybe too weak
o Balls may be too small and when fed into breach the waiting ball is half way down and
gets chopped when trigger is pulled. Recommended bore is .688/.690 for the WSP
• Balls are not flying straight when fired:
o Clean the barrel with a squeegee
o Make sure the balls are the correct size/caliber for the bore of the marker .689
• Balls roll out of the barrel or shoots 2 at a time:
o Ball bore is too small. It needs to be .689
WARSENSOR WSP
13
Page 14

WARSENSOR – THE SCENARIO EXPERT
o WARSENSOR recommends using tournament quality paint
RPS / PMI Brand (Big Ball/Warrior, El Tigre, Slam, All Star, Premium, Premium
Gold, Marballizer)
TC Paintballs (Viper Venoms, Viper Platinum, Pro Series)
Nelson Paintballs (Nel Splat, Anarchy, Nelson Gold)
PowerBall Paintballs
• Barrel threads look worn down and barrel wobbles a bit (G2 model only)
o Check to ensure barrel o-ring is in place properly
o Always use some grease type lubricant on the threads to avoid metal-to-metal wear
• Balls shoot but they do not appear to go the distance:
o Adjust the velocity and check it with a chronograph
o Check to ensure the striker spring is not damaged, weakened or broken
o Check your air supply to ensure there is sufficient pressure
o Check to ensure regulator settings are properly adjusted. Min pressure should not be less
than 450 p.s.i. on the HPA bottom line if you have that installed.
SUGGESTED ITEMS FOR PROPER MAINTENANCE
RodSqueegeewithSwabontheend
Cleaningcloths(softterry‐clothmaterial)
PaintballMarkerLubrication(OILdesignedforpaintballmarkers,orTeflon/Silicongrease)
o‐ringandspringreplacementkit(asaspare)
hex‐wrenchesofvarioussizes(markerco meswithmostcommonlyneededones)
BarrelPlugorCondom
WARSENSOR WSP
14
Page 15

WARSENSOR – THE SCENARIO EXPERT
RECOMMENDEDUPGRADES
Additionalpaintballammo clips
Quick‐Loadadapterforammoclips
10‐roundballpods
Bottomlineadapters(ifthisisyourmainmarker)
WARSENSOR WSP
15
 Loading...