

Page 1
WWW.WARSENSOR.COM
WARSENSOR WSF Manual
ARMOTECH and WARSENSOR are trademarks owned by AI-MOK Paintball Ltd.;
All ARMOTECH and WARSENSOR products are manufactured by ARMOTECH Taiwan Co., Ltd. only.
Mail: [email protected]
© 2004 - 2005 AI-MOK Paintball Ltd. All rights reserved
WARSENSOR WSF User Manual
Revision 1 printed 8/16/2005
1
Page 2
WWW.WARSENSOR.COM
Safety First!
WARNING
WARSENSO R PAINTBALL MARKERS ARE NOT A TOY. ANY MISUSE MAY CAUSE SERIOUS
INJURY OR DEATH. THE USER AND ANY PERSON WITHIN RANGE MUST WEAR EYE
PROTECTION DESIGNED FOR PAINTBALL USE. READ THIS OWNERS’S MANUAL
COMPLETELY BEFORE LOADING, PRESSURIZING, OR OPERATING YOUR WARSENSOR
P AINTBALL MARKER.
• Always wear protective goggles & headgear designed for paintball when shooting this marker
• Everyone within range of an area where this paintball marker is used should wear protective goggles and headgear
specifically designed for paintball
• Operate this paintball marker only in areas where it is safe and lawful to do so
• Misuse of this marker may result in criminal charges or imprisonment
• This marker is intended for sale to adults. Adult supervision is recommended at all times whenever a minor is handling this
marker
• READ THIS OWNER’S MANUAL COMPLETELY BEFORE LOADING, PRESSURIZING, OR OPERATING THE
WARSENSOR MARS SERIES PAINTBALL MARKER!
• Never aim or shoot this paintball marker towards anybody who is not wearing protective goggles or headgear specifically
designed for paintball
• During game play, follow referee’s instructions and all field safety rules. Avoid shooting at another player’s head, neck or
groin area
• Play paintball only where the rules of safety for paintball are followed
• All paintball markers must be chronograph ed regularly. Adjust the marker to shoot paintballs at a velocity this is 300feet per
second (fps) or less and that does not exceed the velocity limit set by the Paintball Park or field where t he marker is in use.
Chronograph the marker at regular intervals during the day, as well as any time the power source is refilled or changed, any
time the barrel or any part of the power system is changed, and upon request of any player or game official
• This paintball marker operates using compressed gas or air at specified pressure ranges. Follow safety procedures when
handling compressed gas or air. All filling of compressed gas or air cylinders must be done by qualified persons
• Follow the rules of safe marker handling: keep finger off the trigger until ready to shoot. Keep muzzle pointed in a safe
direction. In addition, firmly insert a barrel plug into the muzzle a nd push the mechanical or electronic safety to “ON” or
“SAFE” when the marker is not in use and when in any non-shooting area
2
WARSENSOR WSF User Manual
Revision 1 printed 8/16/2005
Mail: [email protected]
Page 3

WWW.WARSENSOR.COM
• Never shoot at domestic animals or wildlife
• Never mark objects outside the confines of the game or authorized shooting areas
• Never look down the barrel of a marker
• Before dis assembly, storage, or transport of this marker, remove ALL paintballs from the marker, barrel, and loader: remove
power source: and remove all gas or air from the power system. Insert a barrel plug and put the safety “ON”
• Carry your marker in a case or sturdy bag when transporting it in public
• Safely and securely store marker to prevent access to it by unauthorized persons or minors.
Table Of Contents
Introduction - Will give you a general idea of what to expect with the marker, and give you some
general information about the marker.
Diagram - See website directory.
Section 1
-Remove Internals - Step-By-Step guide on how to remove the internals.
-Lubrication - Will show you every part that needs lubrication in the WSF.
-Re-assemble - Proper way of re-assembling the WSF.
Section 2
-Applying air source - Shows you different configurations and the proper way to apply your air
source.
-Cocking Marker - Shows you how to properly cock your marker
-Leaks - If you have a problem with your WSF leaking.
Section 3
-Adjusting Detent - If your paint is rolling out, please refer to adjusting the ball detent.
-Securing your hopper - Shows you how to secure your hopper.
Section 4
-Adjusting Velocity - Show you how to stay within field limits
-Checking FPS - Safe and proper way of checking FPS
Mail: [email protected]
WARSENSOR WSF User Manual
Revision 1 printed 8/16/2005
3
Page 4
WWW.WARSENSOR.COM
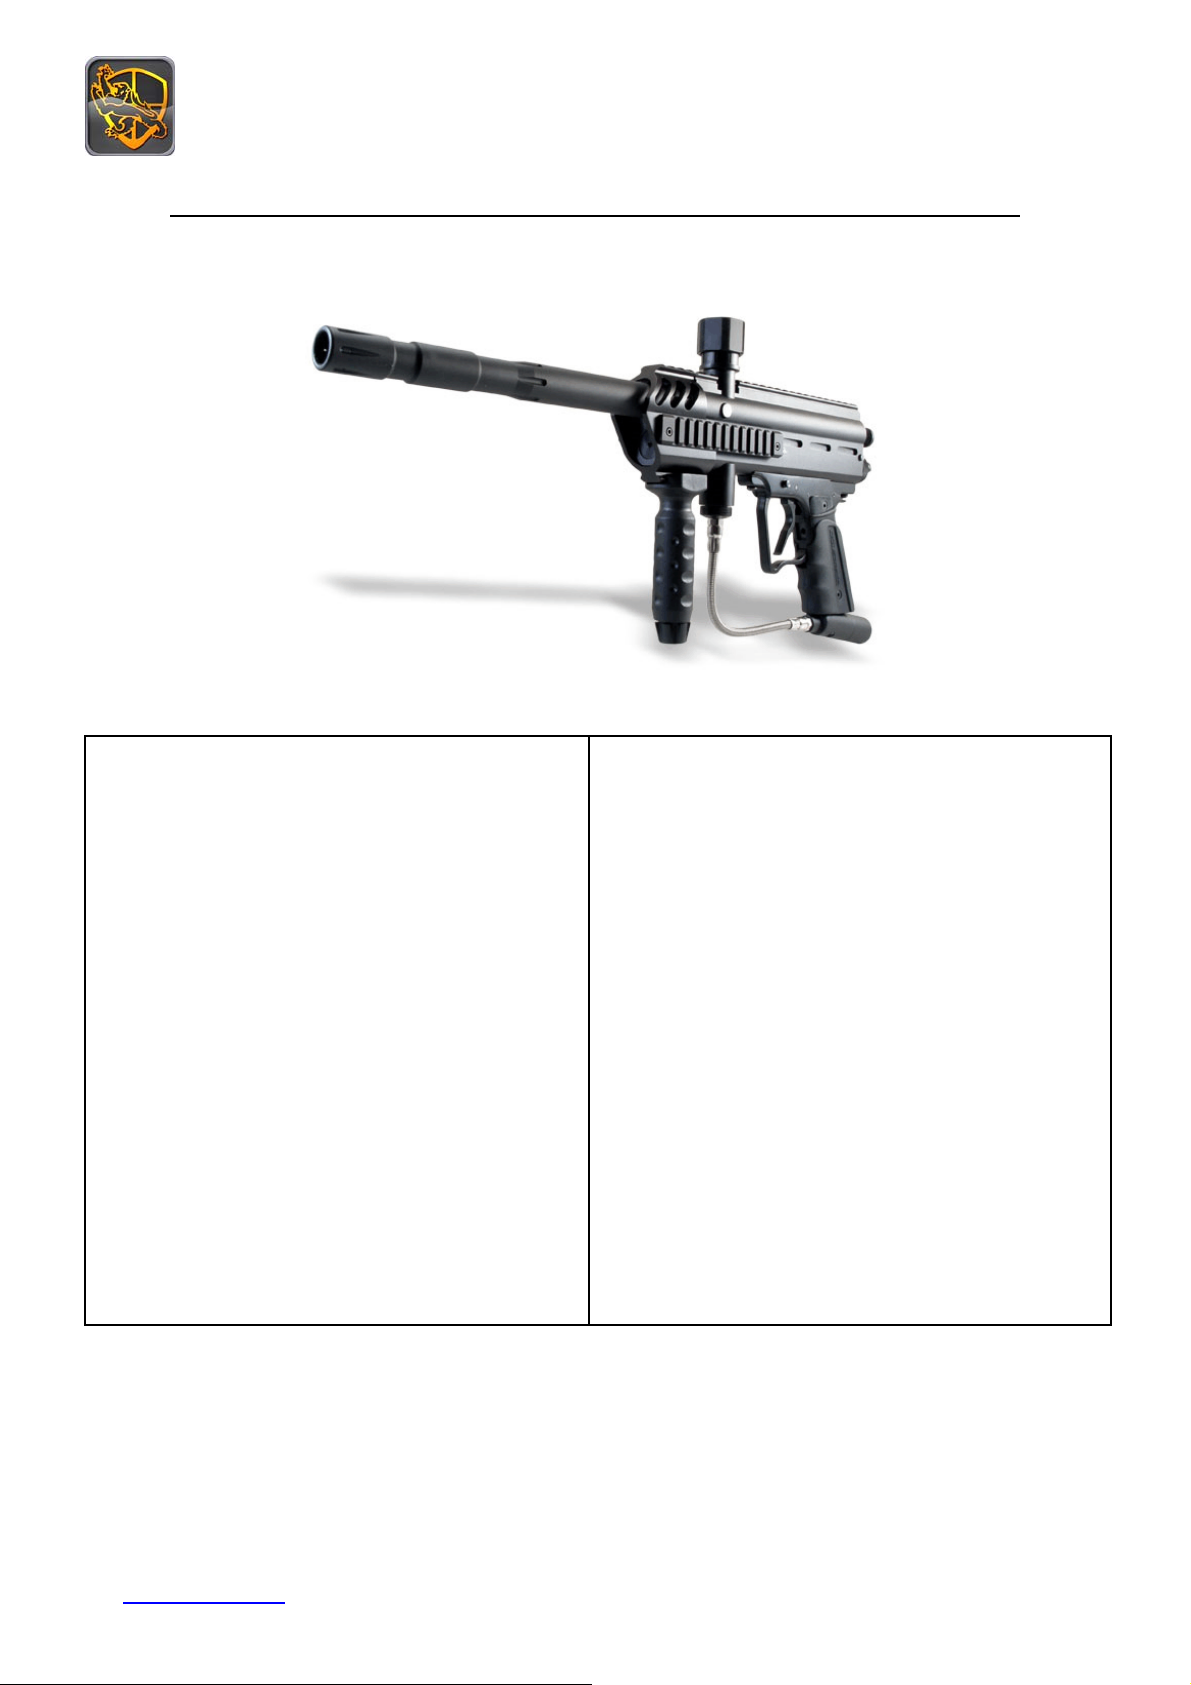
Introduction to the WSF
Your Package should Include the Following:
Package Contents:
-Warsensor Field Marker
-Vertical Feed System
-R.I.S. Handle
-12'’ Aluminum, Micro-Honed Barrel
-Bottom-Line Setup
-4 allen wrenches
-6mm (CR-V6)
-3/16th (CR-V5)
-5/32nd (CR-V4)
-2 standard orings (Color-Blue)
Features:
- Rear snap cocking system
-Tactical Style
-Vertical Power Feed
-R.I.S. Handle
-Delrin Bolt
-4 Sides Sight Rail
-Matte Finish Hard Anodizing
-12” Aluminum, Micro-Honed Barrel
-V elocity Adjuster
-Aluminum Double Trigger Frame
-Rubber Contoured Grip
-Quick Strip Pin
-Bottom-Line Set Up
-Operates on HPA, N2 or CO2
Mail: [email protected]
4
WARSENSOR WSF User Manual
Revision 1 printed 8/16/2005
Page 5
WWW.WARSENSOR.COM
Section 1
-Removing Internals
-Lubrication
-Re-assembly
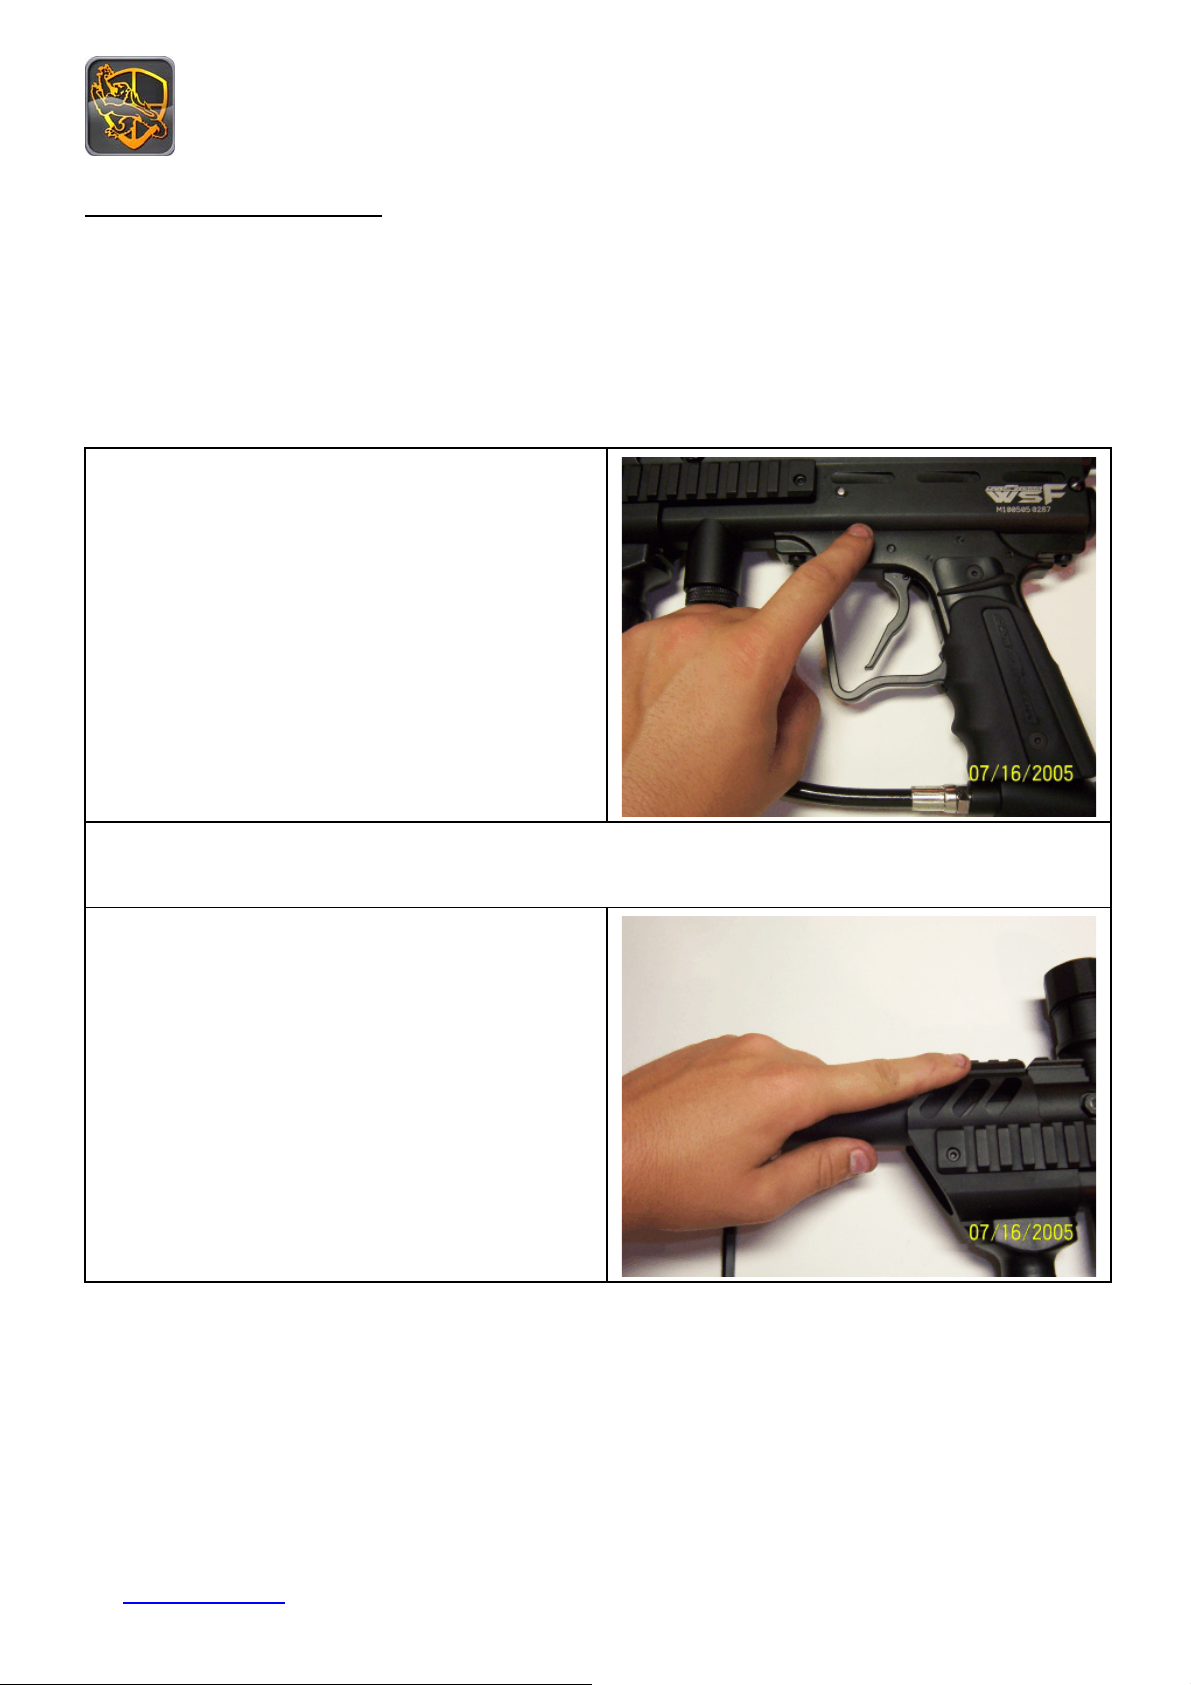
WSF Prepping
Please De-gas, or remove all compressed air in
your marker. Also Please have the safety in
the “on” position. (Red ring on safety not
visible)
Before any internals are removed from the marker, all external parts need to be removed for
easier access to the rest of the marker.
To remove your barrel:
Turn the barrel in a counter-clockwise motion to
remove.
Mail: [email protected]
WARSENSOR WSF User Manual
Revision 1 printed 8/16/2005
5
Page 6
WWW.WARSENSOR.COM
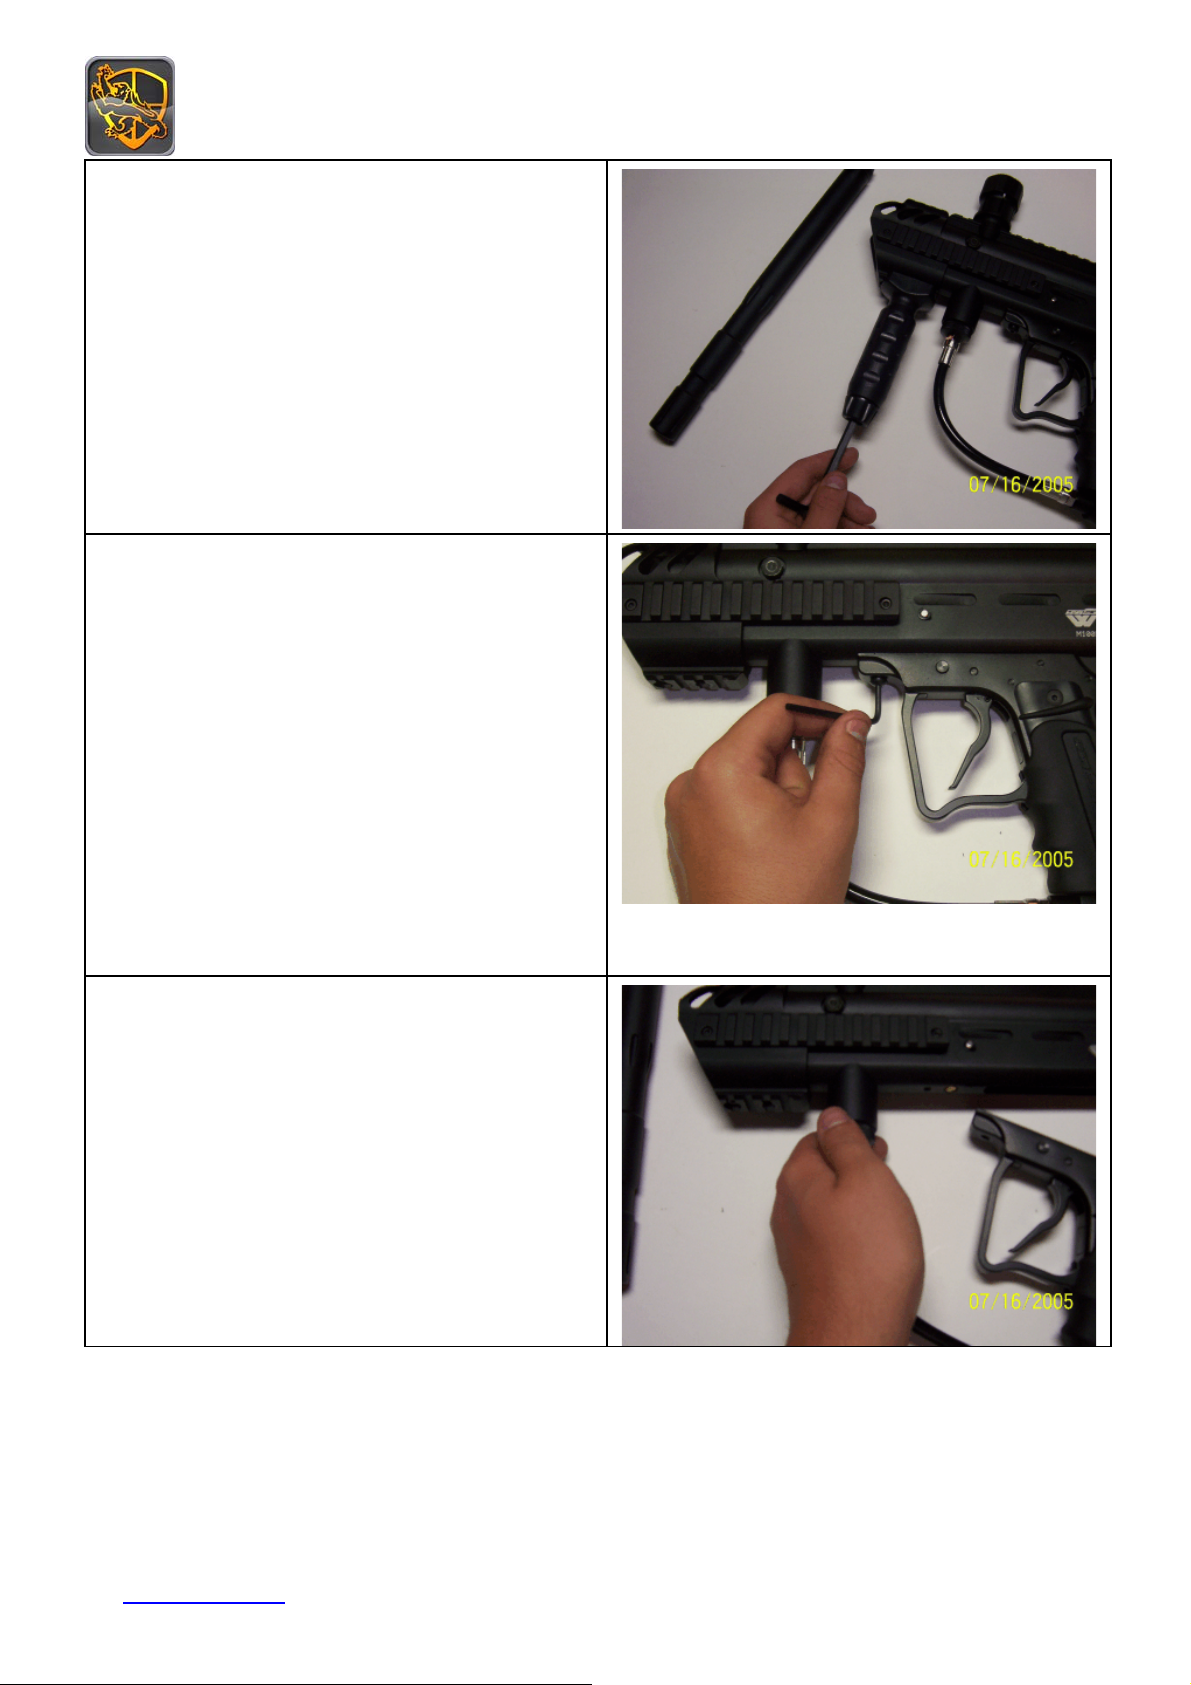
To remove R.I.S. Handle:
Put the 6mm (CR-V6) allen wrench into the
bottom of the R.I.S. handle. Turn in a
Counter-Clockwise motion to remove (Note: It
might be a little tough to remove at first, but
stick with it.).
To remove trigger group and bottom-line:
To remove trigger group and bottom-line:
Start off on the trigger group; take the
smallest allen wrench (5/32) and take off both
trigger screws (that are holding the trigger to
the
gun). Once you have removed the trigger from
the gun you can then remove the bottom-line,
to do so, you must turn in a counter-clockwise
motion to remove.
To remove trigger group and bottom-line:
Once you have removed the trigger from the
gun you can then remove the bottom-line, to do
so, you must turn in a counter-clockwise motion
to remove
Mail: [email protected]
WARSENSOR WSF User Manual
Revision 1 printed 8/16/2005
6
Page 7
WWW.WARSENSOR.COM
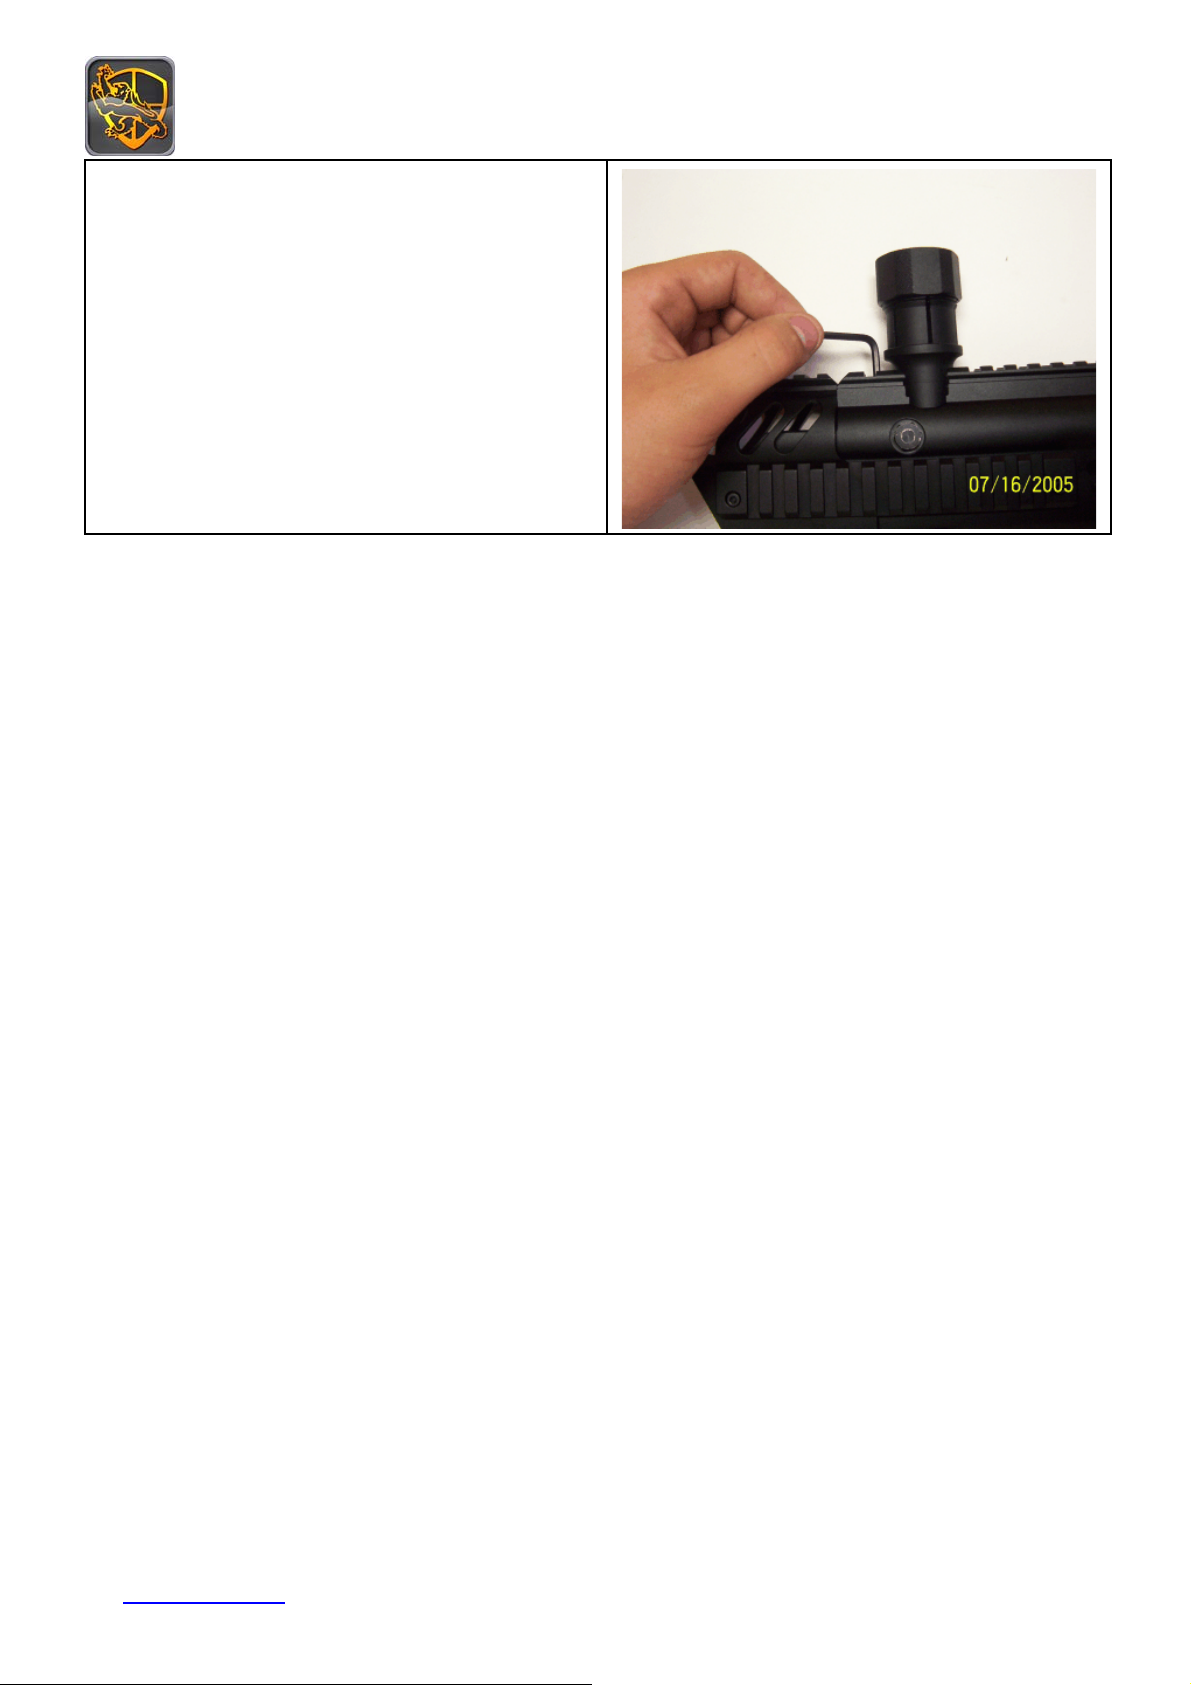
To remove Vertical Feed System:
The Vertical Feed System has 2 screws, one
on each side. To remove it, you use the
smallest allen wrench (5/32) on the screws and
turn them counter-clockwise.
Mail: [email protected]
WARSENSOR WSF User Manual
Revision 1 printed 8/16/2005
7
Page 8
WWW.WARSENSOR.COM
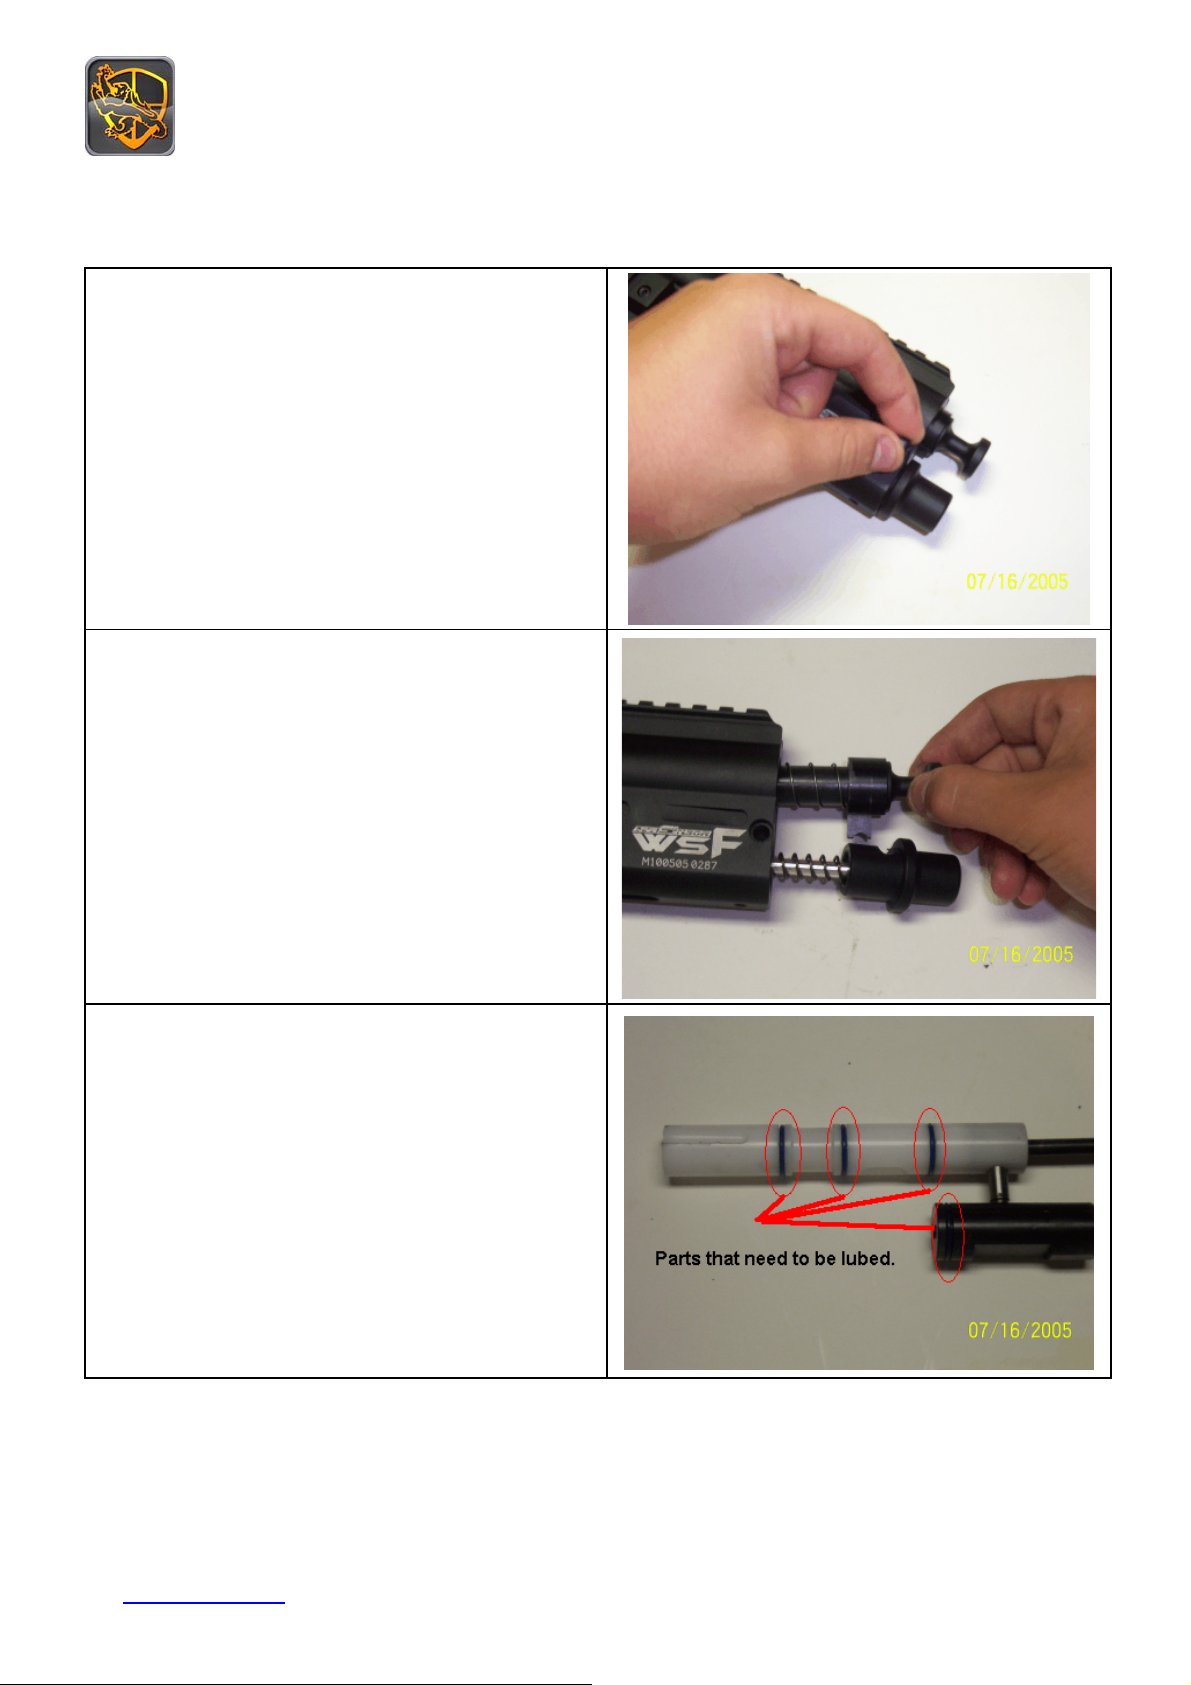
To Disassemble the WSF
Step 1:
Remove rear Quick Strip pin.
(Warning: Rear velocity adjuster is under
pressure due to spring. Please secure when
removing.)
Step 2:
Remove Internals.
(Note: They will all come out together.)
Step 3:
Lube all necessary parts.
(O-rings Only!)
Mail: [email protected]
WARSENSOR WSF User Manual
Revision 1 printed 8/16/2005
8
Page 9
WWW.WARSENSOR.COM
Note:
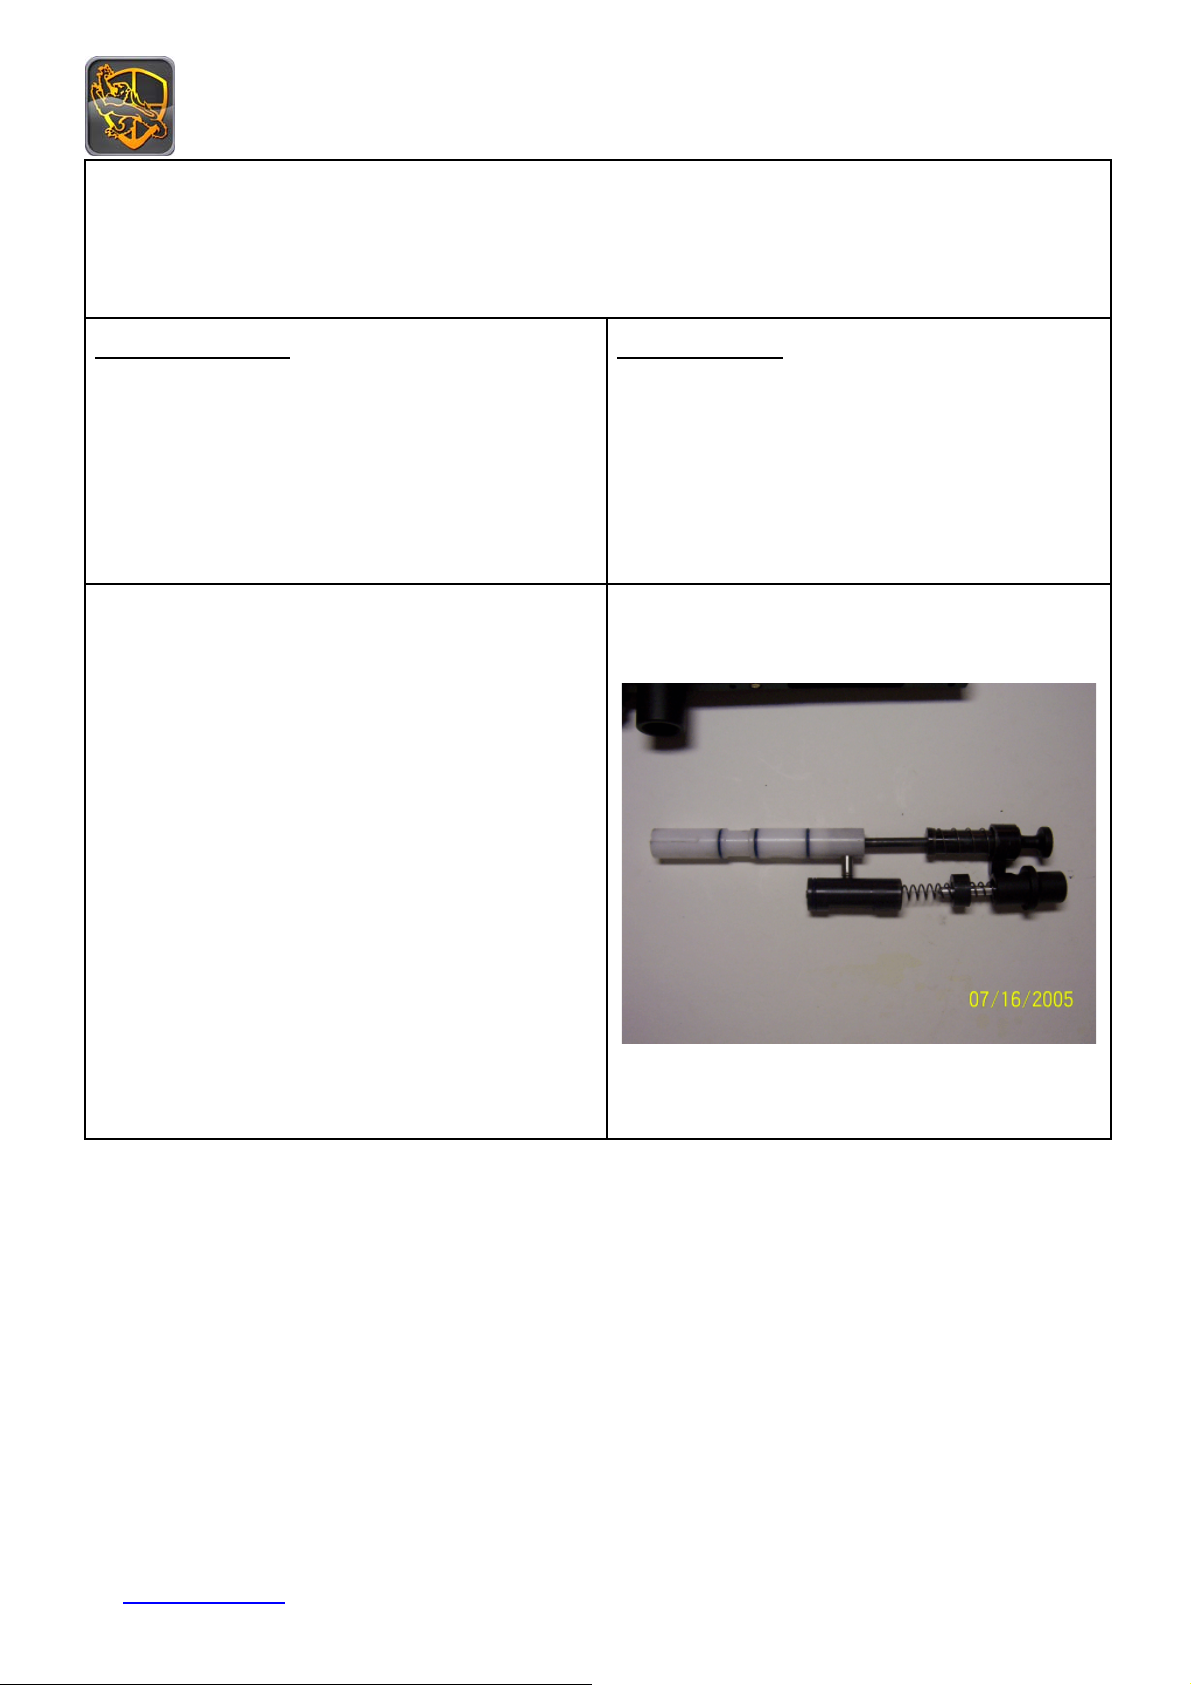
Repeat all steps in reverse for proper assembly of internal section. Pay close attention to the
orientation of the striker and bolt assembly. The bolt has an air hole that needs to be facing
down when installed or marker will not function!
Striker Assembly
1st striker
2nd striker buffer
rd
striker spring
3
4th spring guide (pin)
5th velocity cap
To re-assemble please make sure your bolt and
striker are connected properly. When
reinserting the internals into the receiver
ensure that they are both linked together.
It should look like the picture to your right.
Re-installation sequence:
st
Re-install the internals (Striker & Bolt
1
Bolt Assembly
Bolt (all one part)
assembly) along with the velocity cap.
2nd Re-insert Quick Strip pin to hold everything
together
3rd Install all of the cosmetic and external parts
in the reverse order they were taken off.
Mail: [email protected]
WARSENSOR WSF User Manual
Revision 1 printed 8/16/2005
9
Page 10
WWW.WARSENSOR.COM
Section 2
-Cocking Marker
-Applying air source
-Leaks
Warning: The power system used on the Warsensor Field Marker contains HPA/CO2/N2. Never work on or
disassemble the marker with compressed air source connected. This marker has a volumizer chamber which will
retain pressure. Please make sure your marker is properly clear of all compression before disassembly.
If working with CO2, avoid CO2 gas or escaping liquid to contact the skin, this will cause freezer burn on the
contacted skin.
Always insure your power source bottle is firmly screwed in to avoid accidental release which can cause bodily
harm.
Power Source options for WSF
Before attaching any power source to your marker, search for different power source options. This
marker is factory configured to use an air source attached directly to the bottom-line, but other options
are available.
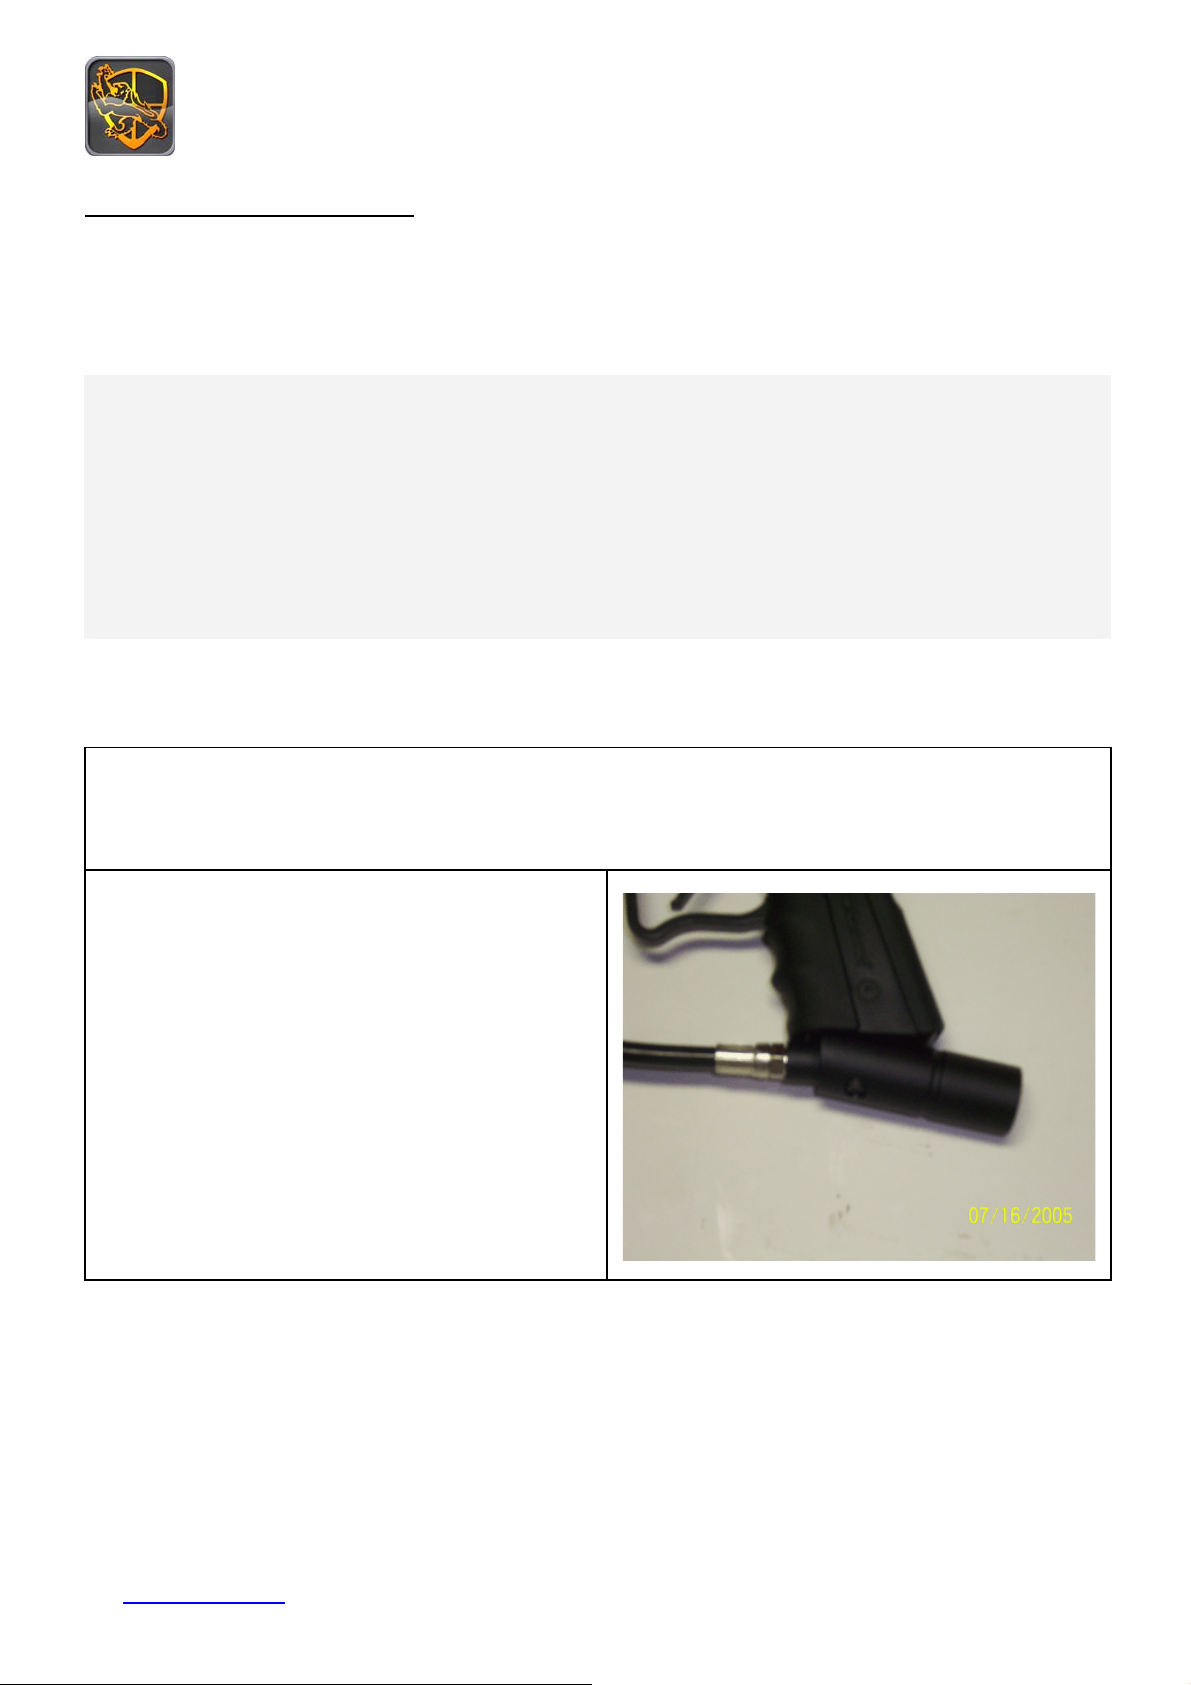
To run the power source off of the
bottom-line.
Attach the bottle to the bottom-line asa.
You may also run a remote from the bottom-line
asa. If you run a remote, a remote nipple
must be attached to the asa.
Mail: [email protected]
10
WARSENSOR WSF User Manual
Revision 1 printed 8/16/2005
Page 11
WWW.WARSENSOR.COM
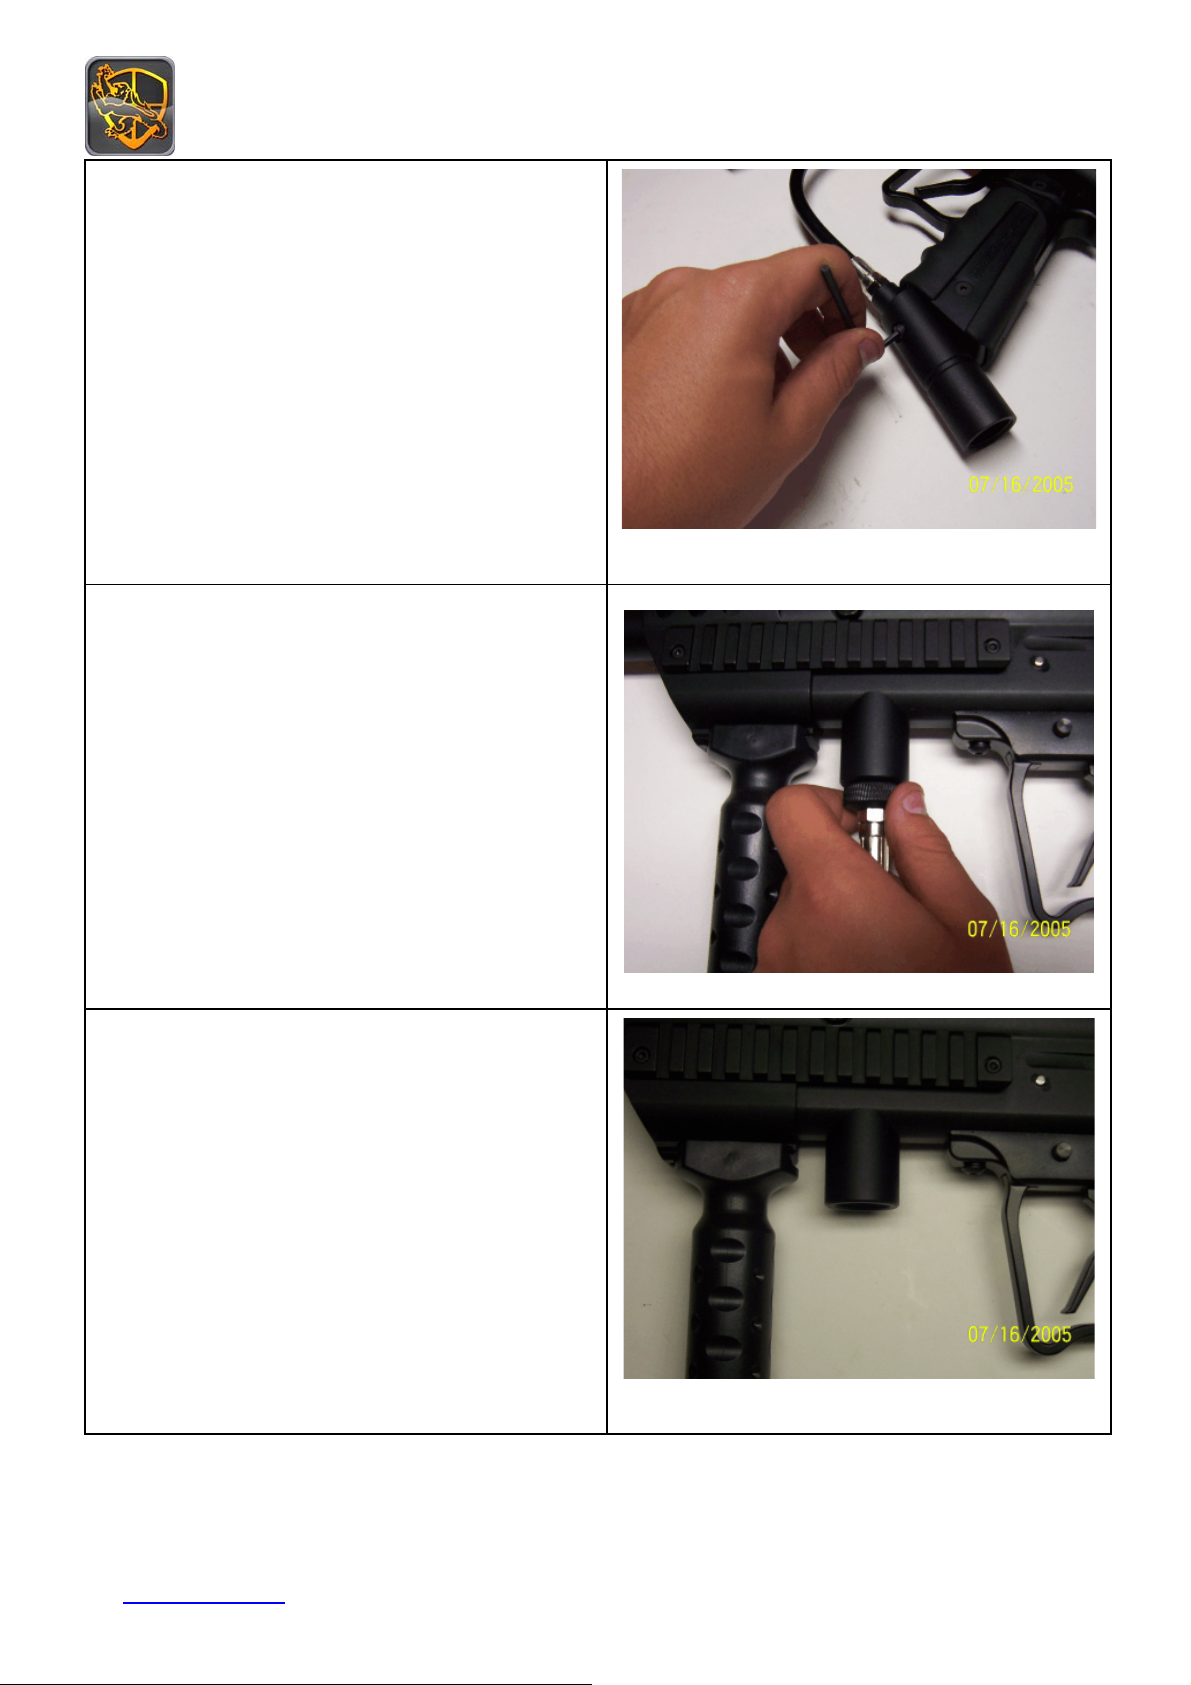
To run the power source off of the gun,
without use of bottom-line.
First you must remove the bottom-line asa from
the trigger group.
To run the power source off the gun,
without use of bottom-line.
You must then remove the rest of the
bottom-line from the gun
This is what you should be left with after you
have removed the bottom-line.
(Note: You may now attach a bottle, or remote
line nipple directly to the gun)
Mail: [email protected]
11
WARSENSOR WSF User Manual
Revision 1 printed 8/16/2005
Page 12
WWW.WARSENSOR.COM
Cocking your WSF
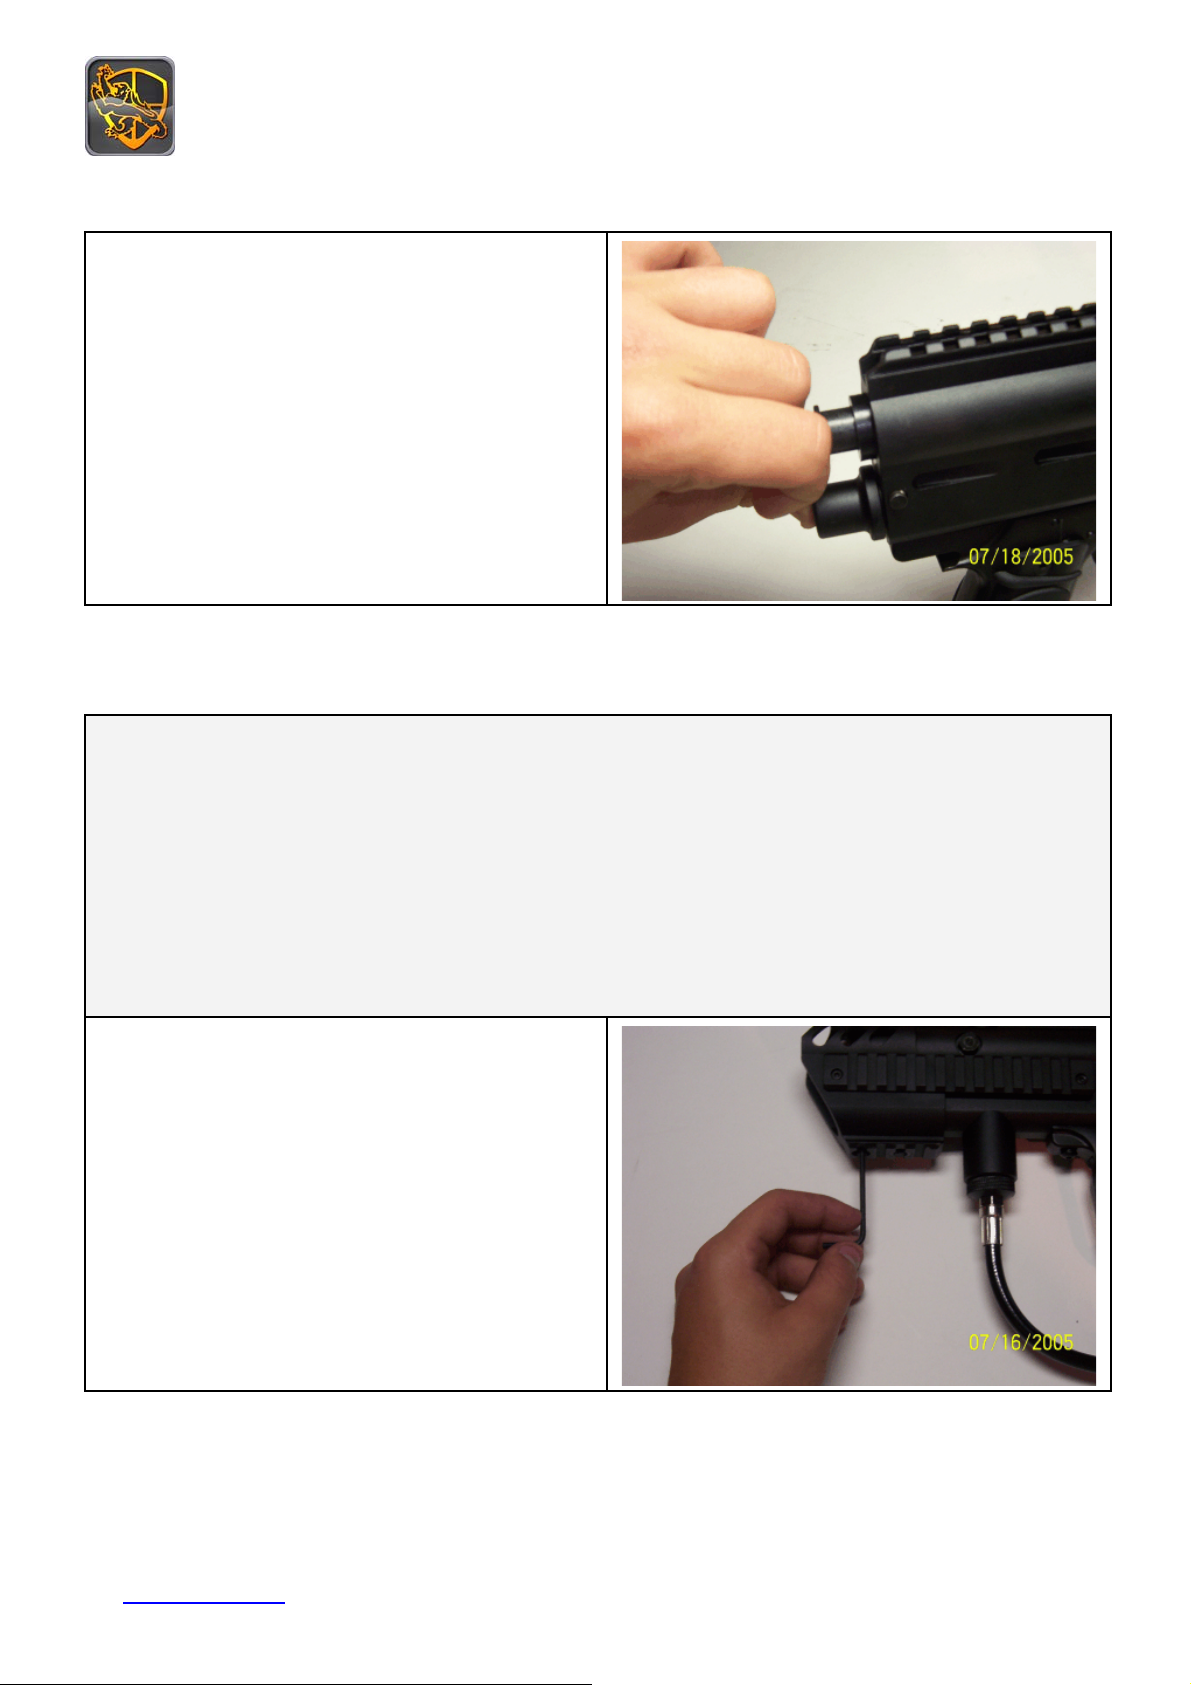
To Cock your WSF:
Firmly take the rear cocking bolt. Pull back,
and release. Your marker is now cocked.
Please make sure that your safety is on and
you have your barrel plug in.
Leaks
Leaks when gassing up marker:
If you are gassing up your marker and you hear leaking, please remember to cock your marker before
you gas your marker up.
Leaks out of the barrel.
If you happen to have a leak out of your barrel, it might be because of the Cup Seal.
To get to the Cup Seal, you must enter the Volumizer Chamber. Please make sure to remove any
airsource from the gun and discharge all compression before working with the volumizer chamber.
To enter the volumizer chamber:
You must remove the volumizer plug to get into
the volumizer chamber. To do so, you must
remove the R.I.S. handle, as it is hiding the
screw that holds the plug in place..
(Note: Volumizer plug is under pressure due to
volumizer spring, please secure when removing.)
(Note: If volumizer cap is stuck, the screw used to
secure it may be screwed into the top of plug for easy
removal.)
Mail: [email protected]
12
WARSENSOR WSF User Manual
Revision 1 printed 8/16/2005
Page 13
WWW.WARSENSOR.COM
Section 3
-Adjusting Detent
-Securing Hopper
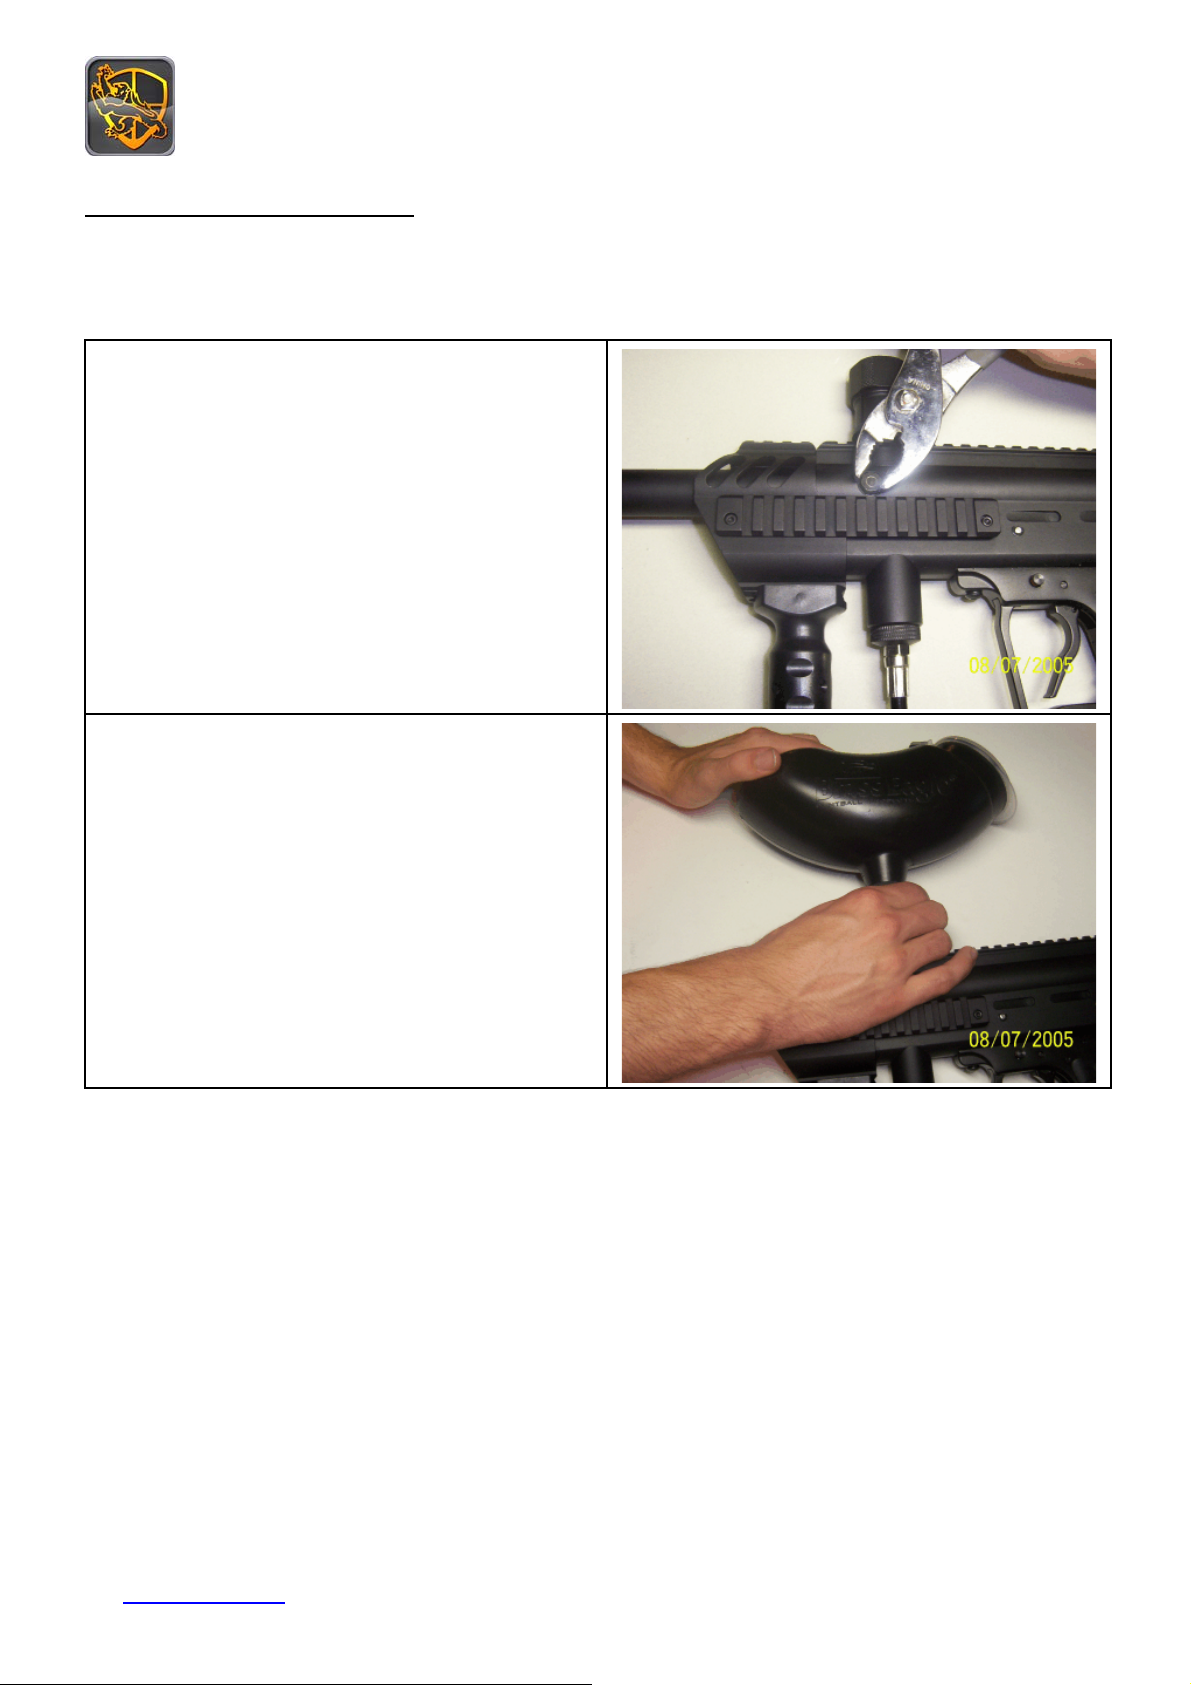
To adjust detent:
Take pliers or a wrench and turn the angel style
detent left to allow more movement and right to
allow less movement.
If balls roll out of your barrel, you must adjust
your detent to allow less movement.
To secure hopper:
1. Place hopper in adjustable feed neck.
2. Twist the feed neck collar right to secure
hopper.
Mail: [email protected]
13
WARSENSOR WSF User Manual
Revision 1 printed 8/16/2005
Page 14

WWW.WARSENSOR.COM
Section 4
-Adjusting Velocity
-Checking FPS
CHRONOGRAPHING
INTRODUCTION
This not only addresses some of the questions about chronographs and their proper use, but also to inform players
how "less than ethical players" purposely circumvent safety rules. I realize that it may give people "ideas" on how to
cheat, but if everyone knows about these nasty techniques, maybe more people will pick up on them.
A CHRONOGRAPH
A chronograph is a device which is designed to measure the velocity of a moving object. The first type of
chronographs were the "sensor type". The chronograph had two ligh t-sensitive sensors which marked the passing of
a projectile as a change in light levels. The computer chip in the chronograph uses the simple Velocity- EqualsDistance-Divided-By-Time equation, to determine the speed of the paintball. The first chronographs probably
wouldn't fit in an average size garage and tipped the scales at a couple of tons. They were designed to aid in the
research and development of firearms and ammunition.
The second type of chronograph is the "radar type". A radar chronograph uses " Doppler effe ct" radar which detects,
and measures the speed of, a moving object. It's the same technology used for police "speed guns" and military
target tracking systems.
THE IMPORTANCE OF CHRONOGRAPHING
Paintball goggles are stress tested to absorb an impact of aroun d 320 fps. Vel oci ties ove r 300 fps tend to br eak skin
and cause severe bruising. Higher velocity paintballs have been known to cause concussions (when impacting on
the temple). We don't want people to get hurt, so the limit was set at 300 fps.
You can't "guess" a paintball's velocity by the sound of the Warsensor Field Marker. (Although more experienced
payers have been known to approximate velocities for the sounds of paintmarkers familiar to them--this doesn't
replace chronographing). You can't tell its velocity by the size of the splat it makes. The chronograph, when used
properly, is the safest, most accurate way to determine the Warsensor Field Marker's velocity.
NOTE: Warsensor Field Marker which are at velocities of over 300 fps are said to be "hot" or "shooting hot".
THE PROPER WAY TO CHRONOGRAPH
1.Sensor Type - The ideal position is as follows. -The end of the barrel should be at least one foot away from the
front of the chronograph and at least six inches above it. -The barrel should be parallel to the plane of the sensors.
2.Radar Type - Rest the end of the barrel on the mount provided. There should be a clear space of at lea st five feet
14
WARSENSOR WSF User Manual
Revision 1 printed 8/16/2005
Mail: [email protected]
Page 15

WWW.WARSENSOR.COM
so the radar beam is not interrupted by bushes, walls, tress and other obstacles.
Always remember, the chronograph is NOT and impact sensor, so don't shoot it.
IF THE MAXIMUM LIMIT IS 300 FEET PER SECOND (FPS) IS IT OKAY TO SET MY PAINTMARKER TO 300
FPS?
ABSOLUTELY NOT! Due to ambient air temperature changes throughout the day, the effect of rapid firing on
pressure and temperature of the CO2, along with a dozen other things, will effect the velocity by up to 15 fps. Set
your Warsensor Field Marker at 300 fps first thing in the morning and you'll be shooting at least 315 fps by noon, or
sooner! Even stable systems like high pressure air and nitrogen have had velocity spikes.
THE MOST COMMON MISTAKES THAT RESULT IN INCORRECT READINGS
LIGHT. The sensor-type chronographs rely on ambient light. If it is too bright, or too dark, the chronograph will give
erroneous readings, or none at all. Because it detects changes in ambient light, if the muzzle of the Warse nsor Field
Marker is too close to the chrono, the expelled CO2 will also cause confusion in the reading.
SPACE. Radar chronographs don't suffer from any of these frailties. However, the radar chrono needs spa ce in front
of it so the beam can be projected from the chrono uninterrupted by obstacles such as trees, buildings and walls.
They operate on any light (or in complete darkness) and because the beam is projected out away from the shooter,
the ball naturally travels right into it. Don't worry about being irradiated. The beam is projected away from you.
Besides, if you're standing in the beam, I'm sure the paintballs hitting you will give you a subtle hint to move.
DIRTY BARRELS. Paint and shell fragments in the barrel will slow the ball down to bring the velocity down as much
as 10 feet per second (fps). Watch the balls as they travel; if they're corkscrewing and hooking, you kn ow the person
chronographing has a slimed barrel.
HOLD THE PUMP. With pump action paintmarkers, if you do not hold the pump forward when you fire, the bolt
usually blows back. This results in lowering CO2 pressure in the barrel and lowering velocities as much as 10 fps.
AIR SOURCE SHUT OFF. If the tank is shut off, unscrewed (to close the pin valve) or low on gas, the pressure is
lower. This results in VERY low chrono readings. Players can purposely cause this to happen. They charge the
paintmarker and then turn off the power source. There is still CO2 in the valve of the paintmarker, allowing them at
least one shot. To thwart this type of "mistake", it's best to take several shots over the chronograph. Ensure remote
systems are turned on, you can still fire the paintmarker with a hose full of CO2. If a player seems to be satisfied (or
even happy) with a velocity of 220 fps on their semi, you might want to keep an eye on them.
DIFFERENT BARRELS. Different barrel lengths and interior finishes will give different readings on the same
paintmarker. Shorter barrels give lower readings than longer ones. Players could switch barrels after
chronographing and change their velocities, this can happen intentionally or out of ignorance. Also if the interior, or
15
WARSENSOR WSF User Manual
Mail: [email protected]
Revision 1 printed 8/16/2005
Page 16
WWW.WARSENSOR.COM
bore, of the barrel is smaller than your paint, it will slow the velocity as well (because of increased friction between
the barrel and the moving ball). Switching to a barrel which is of a larger bore (but similar outward appearance) will
result in a drastic raising of velocity. Sometimes as much as 25 fps.
PAINT. Old paint, which has swollen slightly, will give slower velocities. (Again, because of increased friction.) Load
fresh paint and velocities start to climb. Due to the fact that different brands (and even different lots of the same
brand) vary in diameter, always chrono with the paint you're going to be using that day.
LIQUID OR GAS. Some paintmarkers run on liquid CO2; check to see if the paintmarker has a siphon bottle. Those
other CO2 systems that rely on gas have to be checked too. Any paintmarker running on gas will have significantly
higher velocities if they manage to pull liquid. When you chronograph, you want the worst-case scenario. Force the
paintmarker to draw liquid (by tipping it so liquid from the tank will flow into the valve and then firing a few shots) and
chronograph. A paintmarker chronoed a 260 fps on gas will go over 300 fps on liquid. Paintmarkers with regulators
and expansion chambers usually won't go liquid, as long as you're not pounding the paint down- range like you're
trying to put out a forest fire. (More on that later.) Don't make markers like the Automag take liquid, however, they
could get damaged internally.
DISCONNECTED REMOTES. Disconnecting the hose from your remote set-up will cause a drop in pressure in your
paintmarker, resulting in lower velocities. This is why in most tournaments you are not allowed to fire/disconnect
after you have been eliminated or the game has ended.
FRESH FILLS. A freshly filled CO2 tank will yield very low velocities. I've seen velocities climb 100 fps as tanks
warmed up! If the tank is frosty, tell them to go get a warmer one. (Usually the field will lend you a tank, if you don't
have another one.)
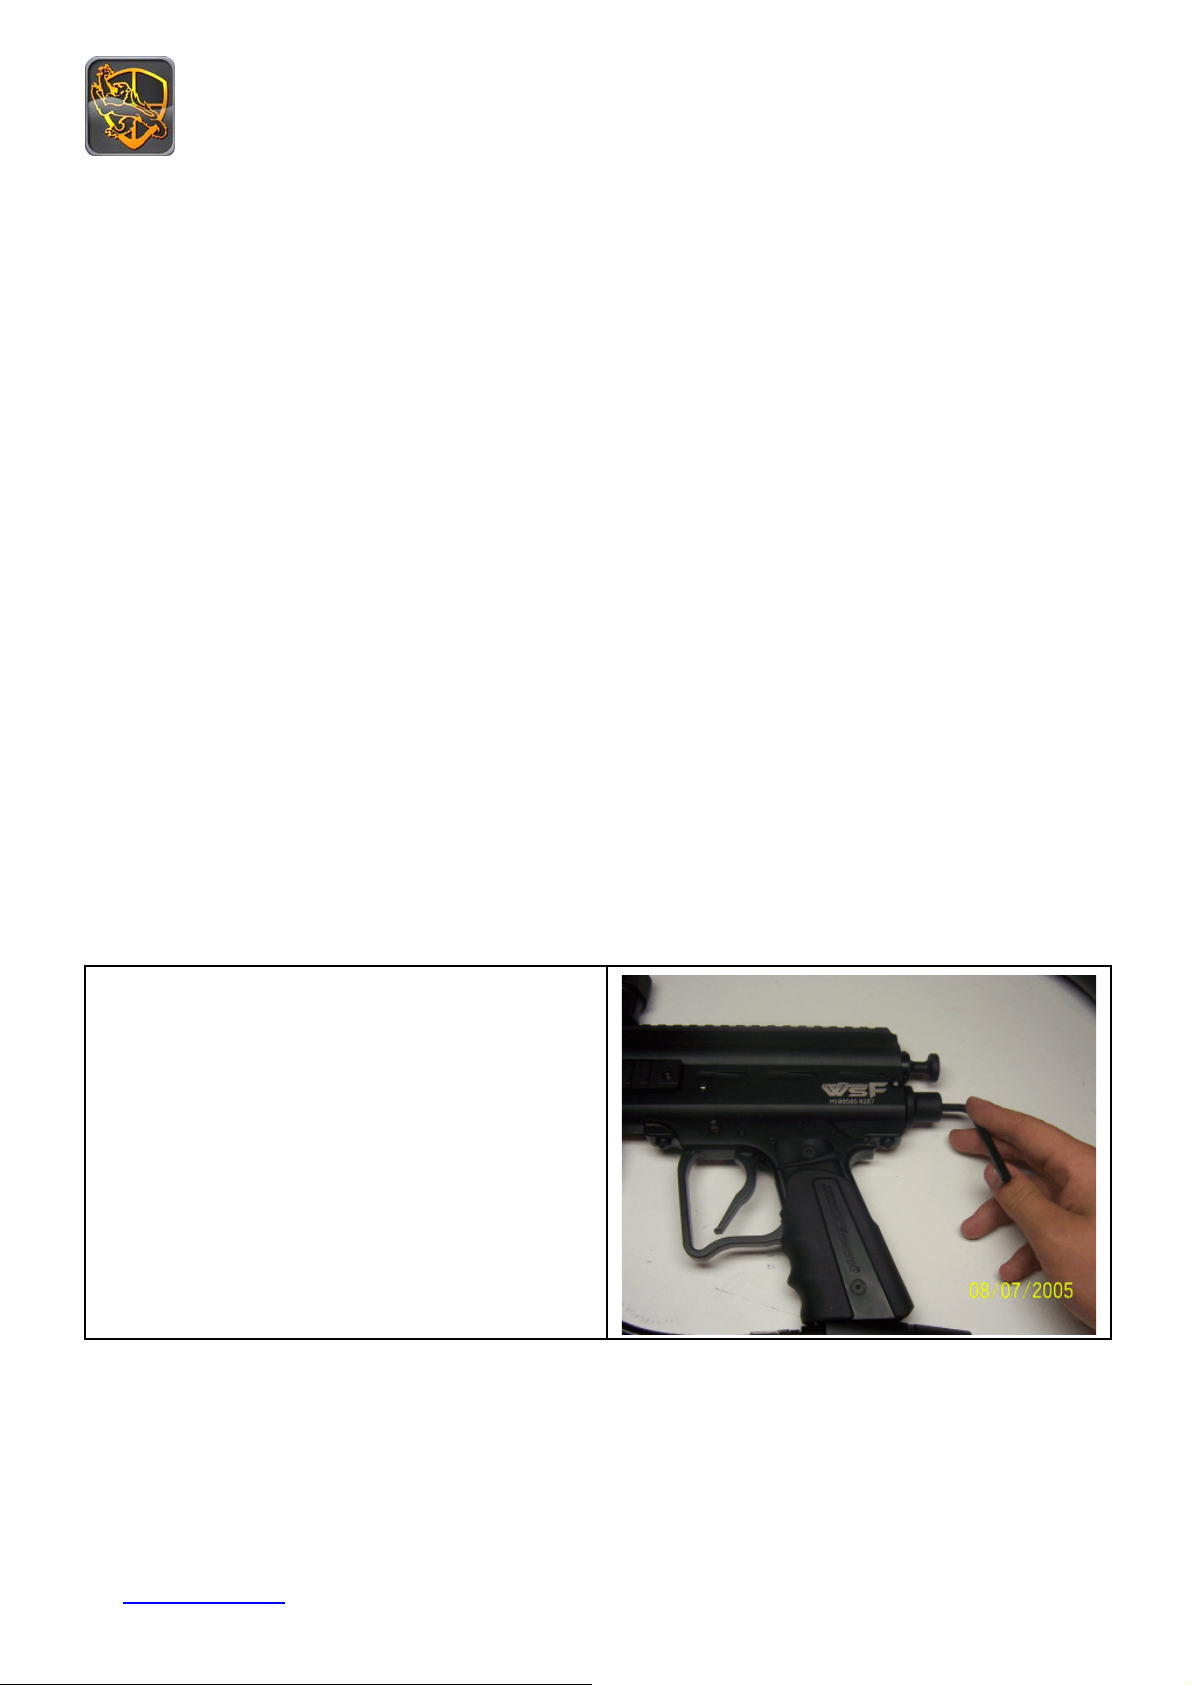
Adjusting your velocity/FPS:
Place CR-V5 Allen Wrench into velocity
adjuster. Turn Clockwise to lower velocity,
and turn counter-clockwise to raise velocity.
Mail: [email protected]
16
WARSENSOR WSF User Manual
Revision 1 printed 8/16/2005
 Loading...