


Operator’s Manual
20V Cordless
Wet/Dry Vacuum
2.5G 20V Cordless
Model No.
DVTB202 0901
FOR YOUR SAFETY
Read and understand this manual before use.
Keep this manual for future reference.
Distributed By
Cleva North America, Inc.
601 Regent Park Court
Greenville, SC 29607
The Armor All word mark and logo
are trademarks of The Armor All/
STP Products Company and are
used under license.

TABLE OF CONTENTS
SECTION PAGE
Warranty......................................................................................................................................
Important Safety Instructions.......................................................................................................
Symbols.......................................................................................................................................
Know Your Product - Cordless Toolbox Wet/Dry Vacuum............................................................
Unpacking Your Wet/Dry Vacuum & General Assembly..............................................................
General Operation.......................................................................................................................
Dry Vacuum Operation................................................................................................................
Liquid Vacuum Operation............................................................................................................
Blower Operation.........................................................................................................................
Inator Nozzle Adapter Operation................................................................................................
Maintenance................................................................................................................................
Installing & Cleaning Cartridge Filter...........................................................................................
Troubleshooting...........................................................................................................................
Exploded View.............................................................................................................................
Parts List.....................................................................................................................................
Thank you for purchasing this Armor All® wet/dry vacuum cleaner. Feel condent that with
Armor All® you are obtaining a high quality product engineered for optimal performance.
This vacuum is capable of picking up liquids and dry materials.
FOR YOUR SAFETY: CAREFULLY READ AND UNDERSTAND ALL INSTRUCTIONS
2
3
4
5
5
7
8
9
9
10
11
12
13
14
15
WARRANTY
We take pride in producing a high quality, durable product. This vac carries a limited two (2) year
warranty against defects in workmanship and materials from date of purchase under normal
household use. Please keep your receipt as proof of purchase. This warranty gives you specic
legal rights, and you may have other rights, which vary from state to state. For product service
call Customer Service at 1-866-384-8432.
Not Covered by Warranty:
• Any part that has become inoperative due to misuse, negligence, direct/indirect abuse,
accidents, improper maintenance, repairs or alterations;
• Consumables such as lters and accessories;
• Normal wear and tear of parts and attachments, such as hose, nozzles, or casters;
• Normal deterioration of the exterior nish due to use or exposure;
• Any product where serial number/data label is tampered with or removed;
• Any product purchased from an unauthorized retailer.
2

IMPORTANT SAFETY INSTRUCTIONS
READ AND UNDERSTAND ALL INSTRUCTIONS BEFORE USING THIS VACUUM.
Read and understand this owner’s manual and all labels on the Wet/Dry Vacuum
cleaner before operating. Safety is a combination of common sense, staying
alert and knowing how your vacuum works. Use this Wet/Dry Vacuum only as
described in this manual. To reduce the risk of personal injury or damage to your
Wet/Dry Vacuum, use only manufacturer recommended accessories.
SAVE THIS MANUAL
When using an vacuum, basic precautions should always be followed, including
the following:
Failure to follow the warnings and instructions may result in explosion, re and/or serious
injury.
WARNING!
• Do not run vacuum unattended.
• Do not use without lters in place.
• Do not use to pick up ammable or combustible liquids, such as gasoline, or use in areas where
they may be present.
• Do not pick up anything that is burning or smoking, such as cigarettes, matches, or hot ashes.
To reduce the risk of health hazards from vapors or dusts, do not vacuum toxic materials.
• Do not use or store near hazardous materials.
• If vacuum is not working as it should, has been dropped, damaged, left outdoors, or dropped
into water, return it to a service center.
• Do not allow to be used as a toy. Close attention is necessary when used by or near children.
• Do not put any object into openings. Do not use with any opening blocked; keep free of dust, lint,
hair, and anything that may reduce air ow.
• Keep hair, loose clothing, ngers, and all parts of body away from openings and moving parts.
• Use extra care when cleaning on stairs.
• Do not handle vacuum, charger, charger plug, or charger terminals with wet hands.
• Turn off all controls before removing the battery pack.
• Turn off the vacuum and remove the battery pack before connecting the hose or other
accessories.
• Prevent unintentional starting. Ensure the switch is in the off-position before connecting to
battery pack, picking up or carrying the vacuum. Carrying the vacuum with your nger on the
switch or energizing vacuum that have the switch on invites accidents.
• Disconnect the battery pack from the vacuum before making any adjustments, changing
accessories, or storing vacuum. Such preventive safety measures reduce the risk of starting the
vacuum accidentally.
• Recharge only with the charger specied by the manufacturer. A charger that is suitable for one
type of battery pack may create a risk of re when used with another battery pack.
• Use vacuum only with specically designated battery packs. Use of any other battery packs may
create a risk of injury and re.
• When battery pack is not in use, keep it away from other metal objects, like paper clips, coins,
keys, nails, screws or other small metal objects that can make a connection from one terminal to
another. Shorting the battery terminals together may cause burns or a re.
• Under abusive conditions, liquid may be ejected from the battery; avoid contact. If contact
accidentally occurs, ush with water. If liquid contacts eyes, additionally seek medical help.
Liquid ejected from the battery may cause irritation or burns.
To reduce the risk of re, explosion, or injury:
FOR FUTURE REFERENCE.
3

• Do not use a battery pack or vacuum that is damaged or modied. Damaged or modied
batteries may exhibit unpredictable behavior resulting in re, explosion or risk of injury.
• Do not expose a battery pack or vacuum to re or excessive temperature. Exposure to re or
temperature above 130°C (265°F) may cause explosion.
• Follow all charging instructions and do not charge the battery pack or vacuum outside of the
temperature range specied in the instructions. Charging improperly or at temperatures outside
of the specied range may damage the battery and increase the risk of re.
• Have servicing performed by a qualied repair person using only identical replacement parts.
This will ensure that the safety of the product is maintained.
• Do not modify or attempt to repair the vacuum or the battery pack except as indicated in the
instructions for use and care.
• Use only as described in this manual. Use only manufacturer’s recommended attachments.
• CAUTION! To reduce the risk of injury from moving parts. Disconnect battery pack before
cleaning or servicing.
• WARNING! To reduce the risk of re or explosion. Do not expose to rain. Store indoors.
• WARNING! To reduce the risk of re or explosion. Disconnect battery pack before cleaning or
servicing.
• Use the vacuum at a temperature between -5°C (23°F) and 40°C (104°F).
• Store the vacuum, the charger and the battery at a temperature between -20°C (-4°F) and 50°C
(122°F).
• BATTERY PACK For Use Only With 20LSC21 Charger or 20LFC19 Charger. BATTERY
CHARGER For Use Only With Battery 20LB2026 or Battery 20LB4027.
When using as blower:
• Direct air discharge only at work area.
• Do not use Wet/Dry Vacuum as a sprayer.
• Do not direct air at bystanders.
• Keep children away when blowing.
• Use safety goggles.
SAVE THIS INSTRUCTION
Household Type
SYMBOLS
The following signal words and meanings are intended to explain the levels of risk associated
with this product.
SYMBOL SIGNAL MEANING
DANGER
WARNING
CAUTION
NOTICE
Indicates an imminently hazardous situation, which, if not
avoided, will result in death or serious injury.
Indicates a potentially hazardous situation, which, if not
avoided, could result in death or serious injury.
Indicates a potentially hazardous situation, which, if not
avoided, may result in minor or moderate injury.
(Without Safety Alert Symbol) Indicates a situation that may
result in property damage.
4

KNOW YOUR PRODUCT - CORDLESS
TOOLBOX WET/DRY VACUUM
1
5
2
3
4
12 13 1411
Components
1. Battery Bay
2. Handle
3. Hose
4. Cover Latches (Front and Back)
5. On/Off Switch
6. Toolbox Cover
7. Blower Port
8. Adaptable Utility Nozzle with Pet Hair Rake
Adapter
9. Collection Tank
6
7
10
8
9
10. Vacuum Port
11. 2-in-1 Crevice Tool With Brush
12. Cartridge Filter
13. Inator Nozzle Adapter
14. Dust Brush Adapter
UNPACKING YOUR WET/DRY VACUUM
& GENERAL ASSEMBLY
1. Verify that the battery pack is not installed.
2. Undo the latches.
3. Remove the contents from inside the collection tank; make sure you have all contents as listed
on page 5.
5
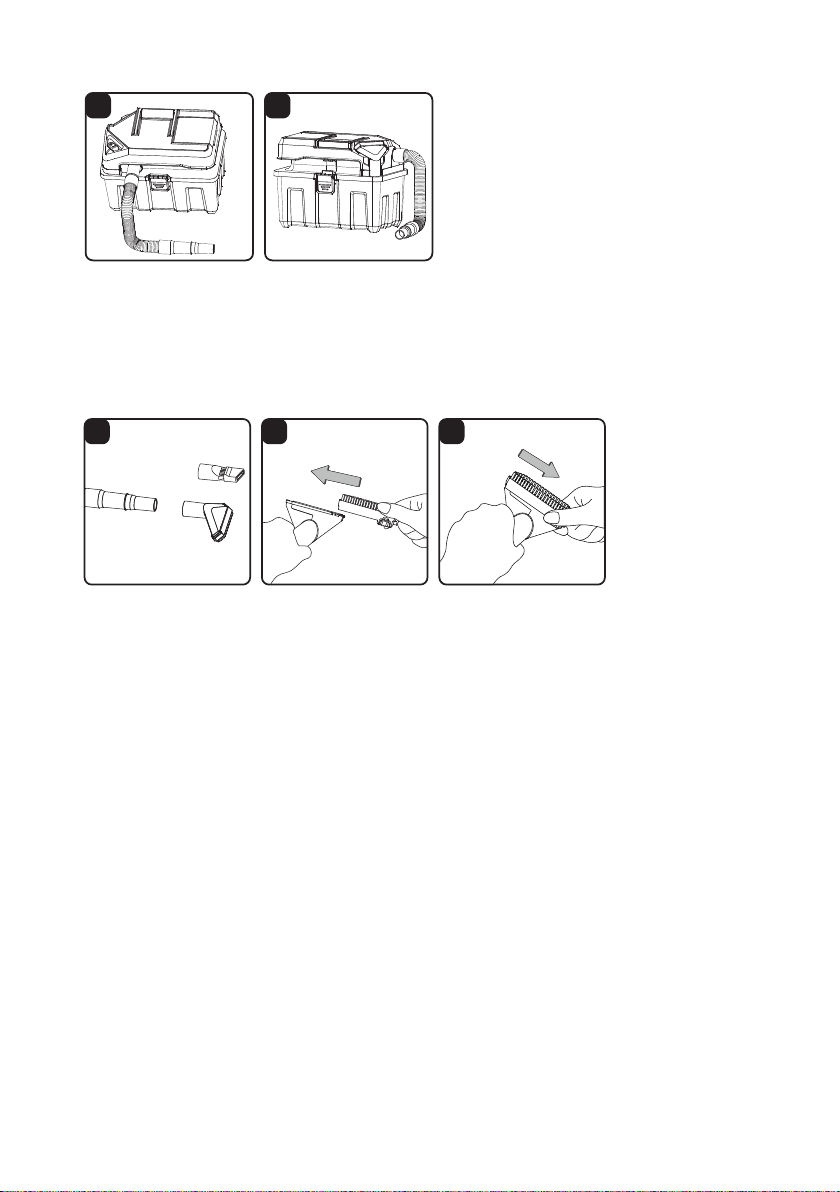
INSTALLING & REMOVING THE HOSE
1 2
1. Pull the work end of the hose out of the hose storage. (Fig. 1)
2. The other end of the hose is already connected to the vacuum port; make sure it is secure.
3. This wet/dry vacuum has blowing capabilities. To use as a blower, connect the larger end of the
hose to the blower port. (Fig. 2)
INSTALLING & REMOVING ACCESSORIES
3.1 3.2 3.3
Choose the desired accessories and push onto the smaller end of the hose. (Fig. 3.1)
Note: This wet/dry vac comes with an adaptable utility nozzle. This accessory can be used as a
wet nozzle, a brush, or a pet hair rake. To use the slide-on adapters follow these instructions:
1. Choose the brush or the pet hair rake adapter.
2. With the nozzle facing up, slide the adapter onto the utility/car nozzle until it clicks into place. (Fig.
3.2)
3. To remove, press the tab on the right side of the adapter and slide it off the utility/car nozzle. (Fig.
3.3)
6

GENERAL OPERATION
INSTALLING & REMOVING BATTERY PACK
1 2
1. Flip the ON/OFF switch to the 'O' OFF position. (Fig. 1)
2. To insert the battery pack, slide it into the battery bay until it snaps into place. (Fig. 2)
3. To remove the battery pack, press the latch and pull it out of the battery bay.
STARTING/STOPPING THE WET/DRY VACUUM
3 4
To turn on the wet/dry vacuum, ip the switch to the 'I' ON position. (Fig. 3) To turn off the wet/dry
vacuum, ip the switch to the 'O' OFF position. (Fig. 4)
O = OFF I = ON
7
DRY VACUUM OPERATION
WARNING:
ENTITLED ‘SAFETY INSTRUCTIONS & WARNINGS’. DO NOT VACUUM IN AREAS WITH
FLAMMABLE GASES, VAPORS, OR EXPLOSIVE DUSTS IN THE AIR. FLAMMABLE
GASES OR VAPORS INCLUDE BUT ARE NOT LIMITED TO: LIGHTER FLUID, SOLVENT
TYPE CLEANERS, OIL-BASED PAINTS, GASOLINE, ALCOHOL, OR AEROSOL SPRAYS.
EXPLOSIVE DUSTS INCLUDE BUT ARE NOT LIMITED TO: COAL, MAGNESIUM, GRAIN,
OR GUN POWDER. TO REDUCE THE RISK OF HEALTH HAZARDS FROM VAPORS OR
DUST, DO NOT VACUUM TOXIC MATERIALS.
BE SURE TO READ, UNDERSTAND, AND APPLY, INFORMATION
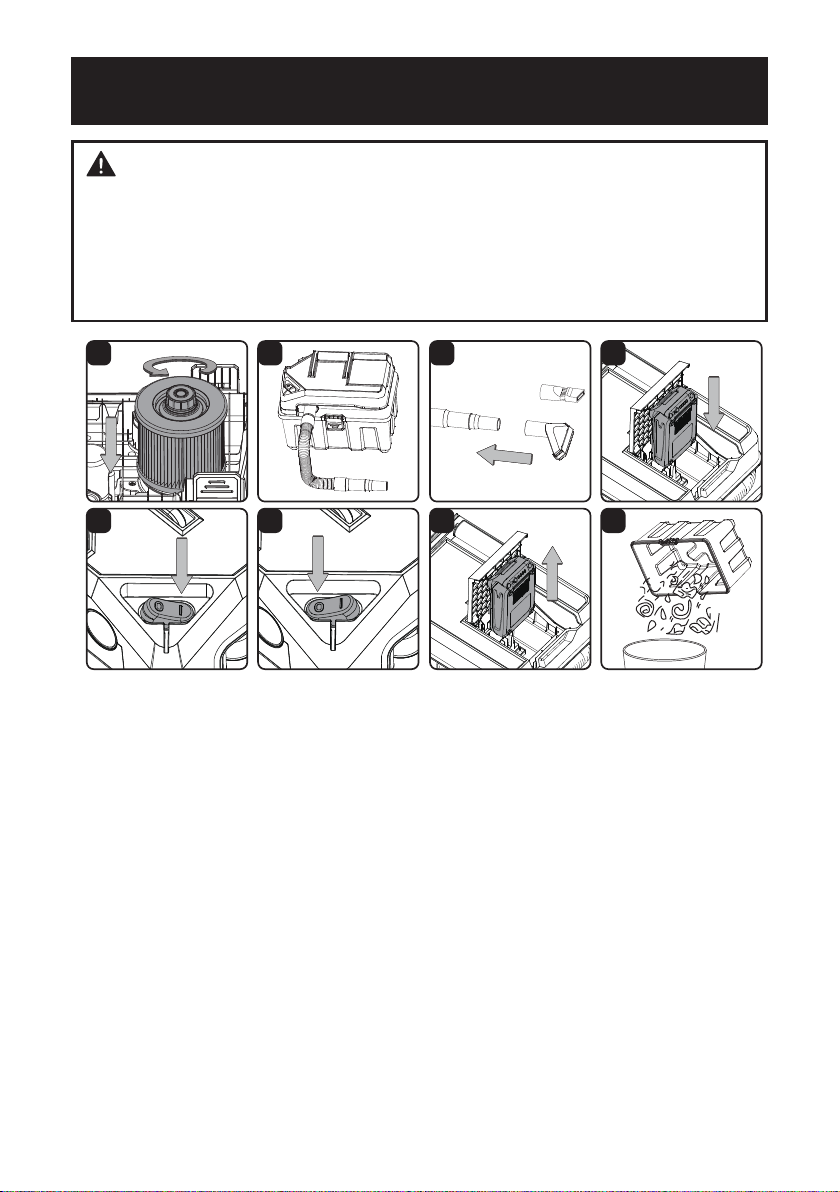
5 6 7 8
9 10 11 12
1. Verify that the cartridge lter is securely mounted. (Fig. 5) For installation instructions see page 12.
2. Insert the hose into the vacuum port. (Fig. 6)
3. Push required accessories onto the free end of the hose. (Fig. 7)
4. Make sure the battery pack is correctly installed. (Fig. 8) For installation instructions see page 7.
5. Turn the motor on by ipping the switch to the 'I' ON position. (Fig. 9)
Once you have completed vacuuming, or when the collection tank is full, turn the motor off by
ipping the switch to the 'O' OFF position. (Fig. 10) O = OFF I = ON
6. Remove the battery. (Fig. 11)
7. Empty the collection tank into a suitable receptacle. (Fig. 12)
8
LIQUID VACUUM OPERATION
Note: The provided lter can be used for both wet and dry vacuum operation.
1. Verify that the cartridge lter is securely mounted. ( Fig. 5) For installation instructions see page 12.
2. Insert the hose into the vacuum port. (Fig. 6)
3. Push required accessories onto the free end of the hose. (Fig. 7)
4. Make sure the battery pack is correctly installed. (Fig. 8) For installation instructions see page 7.
5. Turn the motor on by ipping the switch to the 'I' ON position. (Fig. 9)
6. Once you have completed vacuuming, or when the tank is full, turn the motor off by ipping the
switch to the 'O' OFF position. (Fig. 10)
7. Remove the battery. (Fig. 11)
8. Empty the collection tank into a suitable receptacle or drain. (Fig. 12)
IMPORTANT!
nozzle completely in the liquid; leave a gap at the tip of the nozzle opening to allow
air inow. The machine is tted with a oat valve that stops the suction action when
the collection tank reaches its maximum capacity. You will notice an increase in motor
speed. When this happens, turn off the machine, disconnect from power supply, and
drain the liquid into a suitable receptacle or drain. To continue vacuuming, ret the
power head to the collection tank. After wet vacuuming, turn the machine off and remove
the battery. Empty the collection tank, clean and dry the inside and outside before
storage.
When vacuuming large quantities of liquids, do not immerse the
BLOWER OPERATION
This wet/dry vacuum has blowing capabilities. To use the blower feature follow the
instructions listed.
WARNING:
WARNING:
WARNING:
ALWAYS WEAR SAFETY GOGGLES WHILE USING BLOWER.
KEEP BYSTANDERS CLEAR FROM BLOWING DEBRIS.
WEAR A DUST MASK IF BLOWING CREATES DUST THAT MIGHT BE
INHALED.
9
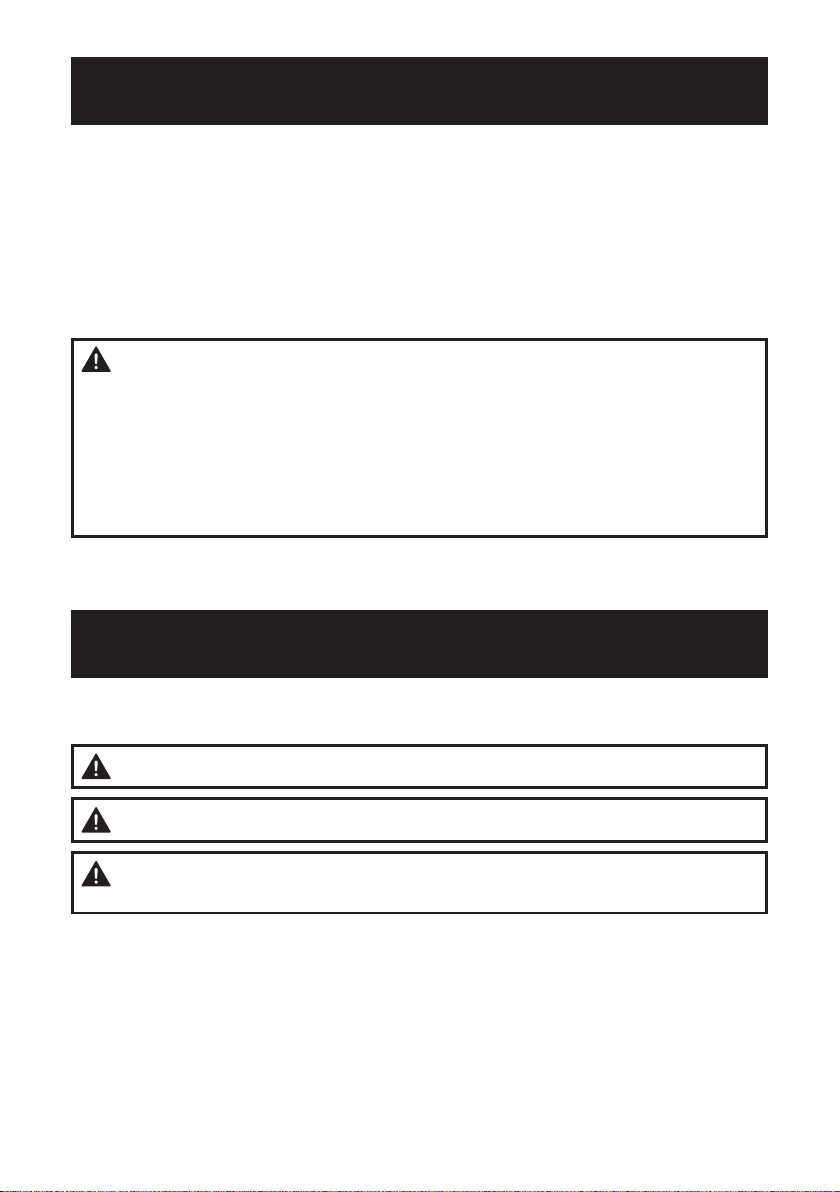
13 14 15
18 19
16
17
1. Make sure the collection tank is empty before using as a blower.
2. Connect the hose to the blower port. (Fig. 13)
3. Push required accessories onto the free end of the hose.
4. Make sure the battery is correctly installed. (Fig. 14) For installation instructions see page 7.
5. Turn the motor on by ipping the switch to the 'I' ON position. (Fig. 15)
Once you have completed blowing, turn the motor off by ipping the switch to the 'O' OFF
position. (Fig. 16) O = OFF I = ON
6. Remove the battery. (Fig. 17)
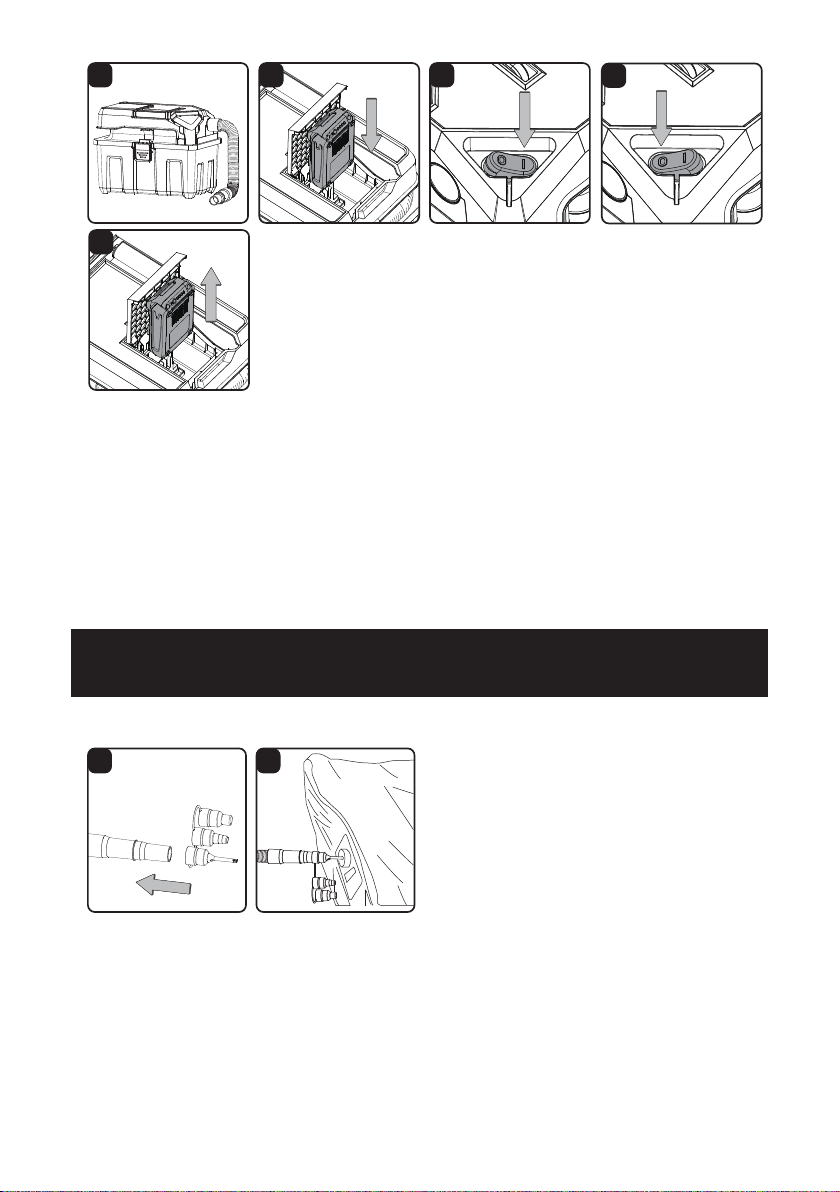
INFLATOR NOZZLE ADAPTER
OPERATION
INFLATING AN OBJECT
The included inator nozzle adapter allows any wet/dry vacuum with a blower function to be used
to inate items such as air mattresses and recreational oatation devices. These nozzles can also
be used to focus the air ow, allowing for more concentrated blowing.
1. Make sure the collection tank is empty before using the wet/dry vac to inate.
2. Connect the hose to the blower port.
3. Push the desired inator nozzle onto the free end of the hose. (Fig. 18)
4. Make sure the battery is correctly installed. For installation instructions see page 7.
5. Insert the inator nozzle into the air valve of the item being inated. (Fig. 19)
6. Turn the motor on by ipping the switch to the 'I' ON position. Once you have completed
inating, turn the motor off by ipping the switch to the 'O' OFF position.
7. Remove the battery.
10

DEFLATING AN OBJECT
1. Connect the hose to the vacuum port. (Fig. 6)
2. Push the desired inator nozzle onto the free end of the hose. (Fig. 19)
3. Make sure battery is correctly installed. For installation instructions see page 7.
4. Insert the inator nozzle into the air valve of the item being deated.
5. Turn the motor on by ipping the switch to the 'I' ON position. Once you have completed
deating, turn the motor off by ipping the switch to the 'O' OFF position.
6. Remove the battery.
MAINTENANCE
WARNING!
AND REMOVE THE BATTERY PACK FROM THE CHARGER OR TOOL BEFORE
PERFORMING ANY MAINTENANCE. NEVER DISASSEMBLE THE TOOL, BATTERY PACK
OR CHARGER.
IMPORTANT!
MAINTENANCE, MAKE SURE THAT THE TOOL IS SWITCHED OFF AND REMOVE THE
BATTERY BACK TO PREVENT ACCIDENTAL START-UP.
EMPTYING & CLEANING THE COLLECTION TANK
TO REDUCE THE RISK OF INJURY, ALWAYS UNPLUG THE CHARGER
BEFORE CLEANING YOUR VACUUM OR CARRYING OUT ANY
1 2
1. Verify that the battery has been removed from the battery bay. (Fig. 1)
2. Disconnect the hose from the vacuum.
3. Undo the latches and remove the power head from the collection tank.
4. Clear all dirt or debris from the collection tank and clean with mild soap and water. Allow to dry
before replacing the power head. (Fig. 2)
STORAGE
Before storing your vacuum cleaner, the collection tank should be emptied and cleaned. The
battery should be stored in a dry location. The accessories should be cleaned and stored so they
can be readily available when needed. Store wet/dry vacuum indoors.
REPAIRS
Repairs for this wet/dry vacuum should be performed only by qualied service personnel using
only identical replacement parts.
11

INSTALLING & CLEANING CARTRIDGE
FILTER
1 2 3 4
INSTALLING CARTRIDGE FILTER
1. Verify that the battery is disconnected. (Fig. 1)
2. Remove power head and place in an upside down position. (Fig. 2)
3. Install the cartridge lter over the lter cage, securing it with the retainer nut. Do not over-
tighten. (Fig. 2)
REMOVING AND CLEANING CARTRIDGE FILTER
1. Unscrew the retainer nut by turning counter clockwise. (Fig. 3)
2. Carefully hold and pull the cartridge lter up for removal.
3. Clean the cartridge lter by brushing or rinsing off the debris. (Fig. 4)
4. Install cleaned or new lter as instructed in steps 2 & 3 of INSTALLING CARTRIDGE FILTER.
5. Wet lters should be removed and allowed to air dry for 24 hours before installing onto the lter
cage.
12

TROUBLESHOOTING
Problem Possible Cause Solution
Vacuum will not operate.
Vacuum power is weak.
Vacuum turns off on its own.
Dust escapes from vacuum.
Battery has no capacity. Charge the battery.
Battery not inserted properly. Insert battery pack correctly.
Wrong battery being used.
There is a blockage in the hose
and the tank inlet.
The lter is clogged by ne dust.
The collection tank is full. Empty the collection tank.
Low battery capacity. Charge the battery.
No battery capacity. Charge the battery.
Battery may be depleted. Change the battery.
Filter is missing or installed
incorrectly.
Filter is damaged.
Be sure to use only the battery
and charger supplied with your
product.
Check the hose and tank inlet
for blockage.
Take off the lter and clean it or
install a new lter.
Check the lter for correct
installation.
Replace the lter. Purchase
online at www.vacmaster.com.
13

EXPLODED VIEW
9
8
10
1
7
2
2.1
4
3
6
5
4
14

PARTS LIST
Part Drawing Number Description Quantity
1 Power Head Assembly 1
2 551346102 Cartridge Filter Assembly 1
2.1 551346103 Retainer Nut 1
3 Collection Tank 1
4 551346105 Latch 2
5 551346106 Adaptable Utility Nozzle 1
6 551346114 Pet Hair Rake Adapter 1
7 551346113 Dust Brush Adapter 1
8 551346110 Hose 1
9 551346111 Inator Nozzle Adapter 1
10 551346112 2-in-1 Crevice Tool with Brush 1
For a replacement battery or battery charger please visit www.vacmaster.com or call
Customer Service at 1-866-384-8432.
15

Aspiradora inalámbrica
en mojado/seco de 20 V
Manual del usuario
Inalámbrico de 2,5 G 20 V
N.° de modelo
DVTB202 0901
POR SU SEGURIDAD
Lea y comprenda este manual antes de usar el producto.
Conserve este manual para futura referencia.
Distributed By
Cleva North America, Inc.
601 Regent Park Court
Greenville, SC 29607
La marca denominativa y el logotipo
de Armor All son marcas comerciales
de The Armor All / STP Products
Company y se utilizan bajo licencia.

TABLA DE CONTENIDOS
SECCIÓN PÁGINA
Garantía......................................................................................................................................
Instrucciones de seguridad importantes.....................................................................................
Símbolos.....................................................................................................................................
Conozca su producto: aspiradora en un área mojada/seca de caja de herramientas
inalámbrica..................................................................................................................................
Desempaque su aspiradora en seco/mojado y ensamblaje general............................................
Funcionamiento general..............................................................................................................
Operación de aspirado en seco..................................................................................................
Operación de aspirado en mojado...............................................................................................
Operación de soplado.................................................................................................................
Funcionamiento del adaptador de la boquilla del inador............................................................
Mantenimiento.............................................................................................................................
Instalación y limpieza del ltro de cartucho..................................................................................
Resolución de problemas............................................................................................................
Vista en detalle............................................................................................................................
Lista de piezas.............................................................................................................................
Gracias por comprar esta aspiradora para área mojada/seca Armor All®. Puede conar en que
con Armor All® obtendrá un producto de alta calidad diseñado para un rendimiento óptimo. Esta
aspiradora es capaz de recoger materiales líquidos y secos.
POR SU SEGURIDAD: LEA ATENTAMENTE Y ASEGÚRESE DE COMPRENDER TODAS LAS
INSTRUCCIONES
17
18
20
21
22
23
24
25
25
26
27
28
29
30
31
GARANTÍA
Nos sentimos orgullosos de ofrecer a usted un producto de alta calidad y durabilidad. Esta
aspiradora tiene una garantía limitada de dos (2) años contra defectos de mano de obra y
materiales a partir de la fecha de compra en uso doméstico normal. Guarde su boleta como
prueba de su compra. Esta garantía le entrega derechos legales especícos que pueden variar
según su estado (podría tener otros derechos adicionales). Para obtener ayuda, llame al servicio
de atención al cliente al 1-866-384-8432.
No cubierto por la garantía:
• Cualquier parte que esté inoperativa por culpa de uso indebido, negligencia, abuso directo/
indirecto, accidentes, mantenimiento inadecuado, reparaciones inadecuadas o alteraciones;
• Consumibles como ltros y accesorios;
• Desgaste y rotura normal de piezas y accesorios, tales como mangueras, boquillas o
ruedecillas;
• Deterioro normal del acabado exterior debido al uso o exposición;
• Cualquier producto cuya etiqueta con el número de serie/datos esté alterada o faltante;
• Cualquier producto adquirido en un punto de ventas no autorizado.
17

INSTRUCCIONES DE SEGURIDAD
IMPORTANTES
ANTES DE USAR ESTA ASPIRADORA, LEA Y COMPRENDA TODAS LAS
INSTRUCCIONES. Lea y comprenda tanto este manual del propietario como todas
las etiquetas de la aspiradora en seco/mojado antes de usarla. La seguridad es
una combinación sentido común, permanecer alerta y saber cómo funciona su
aspiradora. Use la aspiradora en seco/mojado solo como se indica en este manual.
Para reducir el riesgo de lesiones personales o daños a su aspiradora para
mojado/seco, use solo los accesorios recomendados por el fabricante.
CONSERVE ESTE MANUAL
PARA FUTURA REFERENCIA.
Al usar una aspiradora se deben seguir precauciones básicas, incluidas las
siguientes:
No seguir las advertencias e instrucciones puede provocar explosiones, incendios o
lesiones graves.
¡ADVERTENCIA!
• No aspire dejando la aspiradora sin su atención.
• No usar sin los ltros instalados.
• No use el producto para aspirar líquidos combustibles o inamables, como gasolina, ni lo use
en áreas donde tales elementos puedan estar presentes.
• No aspire elementos que estén en llamas o humeando, tales como cigarrillos, fósforos o cenizas
calientes. No aspire materiales tóxicos, a n de reducir el riesgo de peligros provocados por
vapores o polvo.
• No usar o almacenar cerca de materiales peligrosos.
• Si la aspiradora no funciona como debería, si se ha caído, dañado, dejado en exteriores o si se
ha caído al agua, entréguela en un centro de servicio.
• No permita que se utilice como un juguete. Se debe prestar estricta atención cuando el aparato
lo usen niños o cuando se use cerca de ellos.
• No ponga objetos sobre las aberturas. No la utilice si las aberturas están bloqueadas; mantenga
las aberturas libres de polvo, cabellos, pelusas y cualquier cosa que pueda reducir el ujo de aire.
• Mantenga su cabello, ropas holgadas, dedos y partes de su cuerpo lejos de las aberturas y
piezas móviles del producto.
• Tenga precaución adicional al limpiar en escaleras.
• No manipule la empuñadura, el cargador, el enchufe del cargador o los terminales del cargador
con sus manos mojadas.
• Apague todos los controles antes de quitar la batería.
• Apague la aspiradora y saque la batería antes de conectar la manguera u otros accesorios.
• Evite los arranques accidentales. Asegúrese de que el interruptor esté en posición de apagado
antes de conectar la batería y de tomar la aspiradora o transportarla. Transportar la aspiradora
con su dedo sobre el interruptor o energizar una aspiradora que tenga su interruptor encendido
es una invitación para que ocurran accidentes.
• Desconecte la batería de la aspiradora antes de realizar ajustes, cambiar accesorios o
almacenar la aspiradora. Tales medidas de seguridad preventivas reducen el riesgo de
encender la aspiradora por accidente.
• Recárguela solo con el cargador que especique el fabricante. Un cargador que es adecuado
para un tipo de paquete de batería puede crear riesgo de incendio si se utiliza con otro paquete
de batería diferente.
• Use la aspiradora solo con las baterías designadas especícamente para ella. El uso de
cualquier otro paquete de batería puede originar riesgo de lesiones y fuego.
Para reducir el riesgo de incendio, explosión o lesión:
18

• Cuando no utilice la batería, manténgala alejada de otros objetos metálicos como: clips,
monedas, llaves, clavos, tornillos u otros objetos pequeños de metal que puedan hacer
conexión de una terminal a otra. Que se provoque un cortocircuito en las terminales puede
provocar quemaduras o incendios.
• En condiciones adversas puede salir líquido de la batería; evite entrar en contacto con él. Si se
produce contacto de manera accidental, enjuáguese con agua. Si los ojos entran en contacto
con el líquido, busque además ayuda médica. El líquido que sale de la batería puede causar
irritación o quemaduras.
• No use una batería ni aspiradora dañadas o modicadas. Las baterías dañadas o modicadas
pueden presentar un comportamiento impredecible, provocando incendios, explosiones o riesgo
de lesiones.
• No exponga la batería o la aspiradora al fuego o temperaturas excesivas. La exposición al fuego
o a temperaturas sobre los 130 °C (265 °F) puede provocar una explosión.
• Siga todas las instrucciones de carga y no recargue la batería ni la aspiradora fuera del
rango de temperatura que se especica en las instrucciones. Una recarga inadecuada o a
temperaturas fuera del rango especicado podría dañar la batería y aumentar el riesgo de
incendio.
• Haga que las reparaciones las realice un técnico especializado, usando piezas de repuesto
idénticas. Esto garantiza que se mantenga la seguridad del producto.
• No modique ni intente reparar la aspiradora ni la batería, salvo según se indica en las
Instrucciones de uso y cuidado.
• Utilice el producto solo como se describe en este manual. Utilice solo los aditamentos
recomendados por el fabricante.
• ¡PRECAUCIÓN! Para reducir el riesgo de lesiones provocadas por piezas móviles. Desconecte
la batería antes de realizar trabajos de limpieza o reparación.
• ¡ADVERTENCIA! Para reducir el riesgo de incendio o explosión. No exponer a la lluvia.
Almacenar en interiores.
• ¡ADVERTENCIA! Para reducir el riesgo de incendio o explosión. Desconecte la batería antes de
realizar trabajos de limpieza o reparación.
• Use la aspiradora a una temperatura entre -5 y 40 °C (23 y 104 °F).
•
Almacene la aspiradora, el cargador y la batería a una temperatura entre -20 y 50 °C (-4 y 122 °F).
• PAQUETE DE BATERÍAS Solo para uso con el cargador 20LSC21 o el cargador 20LFC19.
CARGADOR DE LA BATERÍA Para usar solo con la batería 20LB2026 o la batería 20LB4027.
Al usar como sopladora:
• Descargue aire directamente solo sobre la zona de trabajo.
• No use la aspiradora en seco/mojado como pulverizador.
• No dirija el aire hacia personas.
• Mantenga a los niños alejados mientras utilice la aspiradora como sopladora.
• Utilice antiparras de seguridad.
GUARDE ESTAS INSTRUCCIONES
Uso doméstico
19

SÍMBOLOS
Las siguientes palabras y signicados están diseñados para explicar los niveles de riesgo
asociados a este producto.
SÍMBOLO SEÑAL SIGNIFICADO
PELIGRO
ADVERTENCIA
PRECAUCIÓN
AVISO
Indica una situación peligrosa inminente, la cual, de no
evitarse, causará una muerte o lesiones severas.
Indica una situación peligrosa potencial, la cual, de no
evitarse, podría causar una muerte o lesiones graves.
Indica una situación peligrosa potencial, la cual, de no
evitarse, podría causar una lesión menor o moderada.
(Sin símbolo de alerta de seguridad) indica una situación
que podría causar daños a la propiedad.
20

CONOZCA SU PRODUCTO: ASPIRADORA
INALÁMBRICA EN SECO Y MOJADO
1
5
2
3
4
12 13 1411
Componentes
1. Espacio de la batería
2. Manilla
3. Manguera
4. Pestillos de la tapa (delantera y trasera)
5. Interruptor encendido/apagado
6. Cubierta de la caja de herramientas
7. Puerto de soplido
8. Boquilla accesorio con adaptador de rastrillo
de pelo para mascotas
9. Tanque recolector
6
7
10
8
9
10. Puerto de aspirado
11. Herramienta para hendiduras 2 en 1 con
cepillo
12. Filtro de cartucho
13. Adaptador de boquilla de inado
14. Adaptador de cepillo de polvo
21

DESEMPAQUE SU ASPIRADORA EN SECO/
MOJADO Y ENSAMBLAJE GENERAL
1. Verique que la batería no esté instalada.
2. Suelte los seguros.
3. Saque el contenido del tanque recolector y asegúrese de tener todas las piezas que se indican
en la página 5.
INSTALACIÓN Y EXTRACCIÓN DE LA MANGUERA
1 2
1. Tire del extremo de trabajo de la manguera fuera del almacenamiento de la manguera. (Fig. 1)
2. El otro extremo de la manguera ya está conectada al puerto de aspirado; asegúrese de que
esté asegurada.
3. Esta aspiradora en seco/mojado también puede funcionar como sopladora. Para usar como
soplador, conecte el extremo más grande de la manguera al puerto del soplador. (Fig. 2)
INSTALACIÓN Y EXTRACCIÓN DE ACCESORIOS
3.1 3.2 3.3
Elija los accesorios deseados y presione en el extremo más pequeño de la manguera. (Fig. 3.1)
Nota: Esta aspiradora húmeda/seca viene con una boquilla adaptadora de utilidad. Este accesorio
se puede utilizar como una boquilla para área mojada, un cepillo o un rastrillo para el pelo de
mascotas. Para usar los adaptadores deslizables, siga estas instrucciones:
1. Elija el cepillo o el adaptador de rastrillo para el pelo de la mascota.
2. Con la boquilla hacia arriba, deslice el adaptador sobre la boquilla de la utilidad/carro hasta que
encaje en su lugar. (Fig. 3.2)
3. Para quitar, presione la pestaña en el lado derecho del adaptador y deslícela fuera de la
boquilla de accesorio/carro. (Fig. 3.3)
22

FUNCIONAMIENTO GENERAL
INSTALACIÓN Y EXTRACCIÓN DE LA BATERÍA
1 2
1. Mueva el interruptor de Encendido/Apagado hacia la posición de apagado “O”. (Fig. 1)
2. Para insertar la batería, deslícela dentro del compartimiento de la batería hasta que encaje en
su lugar. (Fig. 2)
3. Para extraer la batería, presione el pestillo y extráigala del compartimiento de la batería.
ENCENDIDO/DETENCIÓN DE LA ASPIRADORA EN SECO/MOJADO
3 4
Para encender la aspiradora en seco/mojado, mueva el interruptor hasta la posición de encendido
“I” (ENCENDIDO). (Fig. 3) Para apagar la aspiradora en mojado/seco, coloque el interruptor en la
posición “O” OFF (APAGADO). (Fig. 4)
O = APAGADO I = ENCENDIDO
23

OPERACIÓN DE ASPIRADO EN SECO
ADVERTENCIA:
INFORMACIÓN DE LA SECCIÓN “INSTRUCCIONES DE SEGURIDAD Y ADVERTENCIAS”.
NO ASPIRE EN ZONAS CON GASES, VAPORES O POLVOS INFLAMABLES EN EL AIRE.
ENTRE LOS GASES O VAPORES INFLAMABLES SE INCLUYEN, SIN LIMITACIÓN A, LOS
SIGUIENTES: FLUIDO DE ENCENDEDOR, LIMPIADORES TIPO SOLVENTES, PINTURAS
EN BASE A ÓLEO, BENCINA, ALCOHOL O SPRAYS DE AEROSOLES. ENTRE LOS
POLVOS EXPLOSIVOS SE INCLUYEN, SIN LIMITACIÓN A, LOS SIGUIENTES: CARBÓN,
MAGNESIO Y GRÁNULOS O PÓLVORA DE ARMAS. PARA REDUCIR LOS RIESGOS A LA
SALUD PROVOCADOS POR VAPORES O POLVOS, NO ASPIRE MATERIALES TÓXICOS.
ASEGÚRESE DE LEER, COMPRENDER Y APLICAR LA
5 6 7 8
9 10 11 12
1. Verique que el ltro del cartucho esté montado de forma segura. (Fig. 5) Para obtener
instrucciones de instalación, consulte la página 12.
2. Inserte la manguera en el puerto de aspirado. (Fig. 6)
3. Inserte los accesorios requeridos en el extremo libre de la manguera. (Fig. 7)
4. Asegúrese de que la batería esté instalada correctamente. (Fig. 8) Para obtener instrucciones
de instalación, consulte la página 7.
5. Encienda el motor moviendo el interruptor hacia la posición “I” (ENCENDIDO). (Fig. 9)
Una vez que haya completado la aspiración, o cuando el depósito de recolección esté lleno,
apague el motor colocando el interruptor en la posición “O” OFF (APAGADO). (Fig. 10)
O = APAGADO I = ENCENDIDO
6. Remove the battery. (Fig. 11)
7. Empty the collection tank into a suitable receptacle. (Fig. 12)
24

OPERACIÓN DE ASPIRADO EN MOJADO
Nota: El ltro incluido puede usarse para aspirar en seco o mojado.
1. Verique que el ltro del cartucho esté montado de forma segura. (Fig. 5) Para obtener
instrucciones de instalación, consulte la página 12.
2. Inserte la manguera en el puerto de aspirado. (Fig. 6)
3. Inserte los accesorios requeridos en el extremo libre de la manguera. (Fig. 7)
4. Asegúrese de que la batería esté instalada correctamente. (Fig. 8) Para obtener instrucciones de
instalación, consulte la página 7.
5. Encienda el motor moviendo el interruptor hacia la posición “I” (ENCENDIDO). (Fig. 9)
6. Una vez que haya completado la aspiración, o cuando el tanque esté lleno, apague el motor
colocando el interruptor en la posición “O” OFF (APAGADO). (Fig. 10)
7. Retire la pila. (Fig. 11)
8. Vacíe el depósito de recolección en un receptáculo o drenaje adecuado. (Fig. 12)
¡IMPORTANTE!
boquilla completamente en el líquido; deje una brecha en la punta de la abertura de la
boquilla para permitir el ingreso de aire. La máquina posee una válvula otante que
detiene la succión cuando el tanque recolector alcanza su capacidad máxima. Sentirá
un incremento en la velocidad del motor. Cuando esto suceda, apague la máquina,
desconéctela de la energía y drene el líquido en un receptáculo apto o drenaje. Para
seguir aspirando, reinstale el cabezal de alimentación en el tanque recolector. Tras
aspirar en mojado, apague la máquina y extraiga la batería. Vacíe el tanque recolector,
límpielo y seque tanto el interior como el exterior antes de guardar la aspiradora.
Al aspirar grandes cantidades de líquido, no sumerja la
OPERACIÓN DE SOPLADO
Esta aspiradora en seco/mojado también puede funcionar como sopladora. Para utilizar la
función de sopladora, siga estas instrucciones.
ADVERTENCIA:
ASPIRADORA.
ADVERTENCIA:
SEDIMENTOS QUE SOPLE LA ASPIRADORA.
ADVERTENCIA:
POLVOS QUE SE PUEDAN INHALAR.
USE SIEMPRE ANTIPARRAS DE SEGURIDAD AL USAR LA
MANTENGA A LAS PERSONAS ALEJADAS DE LOS
UTILICE UNA MÁSCARA ANTIPOLVO SI EL SOPLIDO CREA
25

13 14 15
18 19
16
17
1. Asegúrese de que el depósito de recolección esté vacío antes de usarlo como soplador.
2. Conecte la manguera en el puerto de soplado. (Fig. 13)
3. Inserte los accesorios requeridos en el extremo libre de la manguera.
4. Asegúrese de que la batería esté instalada correctamente. (Fig. 14) Para obtener instrucciones de
instalación, consulte la página 7.
5. Encienda el motor moviendo el interruptor hacia la posición “I” (ENCENDIDO). (Fig. 15)
Una vez que haya completado el soplado, apague el motor colocando el interruptor en la posición
“O” OFF (APAGADO). (Fig. 16)
6. Remove the battery. (Fig. 17)
O = APAGADO I = ENCENDIDO
FUNCIONAMIENTO DEL ADAPTADOR
DE LA BOQUILLA DEL INFLADOR
CÓMO INFLAR UN OBJETO
El adaptador de boquilla de inador incluido permite que se use cualquier aspiradora en mojado/
seco con una función de soplador para inar artículos como colchones de aire y dispositivos
de otación recreativa. Estas boquillas también se pueden usar para enfocar el ujo de aire,
permitiendo un soplado más concentrado.
1. Asegúrese de que el depósito de recolección esté vacío antes de usar la aspiradora de aire en
mojado/seco para inar.
2. Conecte la manguera en el puerto de soplado.
3. Empuje la boquilla del inador deseada en el extremo libre de la manguera. (Fig. 18)
4. Asegúrese de que la batería esté instalada correctamente. Para ver las instrucciones de
instalación, consulte la página 7.
26

5. Inserte la boquilla del inador en la válvula de aire del artículo que se está inando. (Fig. 19)
6. Encienda el motor moviendo el interruptor hacia la posición “I” (ENCENDIDO). Una vez
que haya completado el inado, apague el motor colocando el interruptor en la posición “O”
(APAGADO).
7. Retire la pila.
CÓMO DESINFLAR UN OBJETO
1. Conecte la manguera al puerto de aspirado. (Fig. 6)
2. Empuje la boquilla del inador deseada en el extremo libre de la manguera. (Fig. 19)
3. Asegúrese de que la batería esté instalada correctamente. Para ver las instrucciones de
instalación, consulte la página 7.
4. Inserte la boquilla del inador en la válvula de aire del elemento que se va a desinar.
5. Encienda el motor moviendo el interruptor hacia la posición “I” (ENCENDIDO). Una vez que
haya terminado de desinar, apague el motor colocando el interruptor en la posición “O”
(APAGADO).
6. Retire la pila.
MANTENIMIENTO
¡ADVERTENCIA!
DESCONECTE EL CARGADOR Y RETIRE EL PAQUETE DE BATERÍAS DEL CARGADOR
O DE LA HERRAMIENTA ANTES DE REALIZAR CUALQUIER MANTENIMIENTO. NUNCA
DESMONTE LA HERRAMIENTA, EL PAQUETE DE BATERÍAS O EL CARGADOR.
¡IMPORTANTE!
CUALQUIER MANTENIMIENTO, ASEGÚRESE DE QUE LA HERRAMIENTA ESTÉ
ENCENDIDA Y QUITE LA BATERÍA PARA EVITAR EL ARRANQUE ACCIDENTAL.
VACIADO Y LIMPIEZA DEL TANQUE RECOLECTOR
PARA REDUCIR EL RIESGO DE LESIONES, SIEMPRE
ANTES DE LIMPIAR LA ASPIRADORA O DE REALIZAR
1 2
1. Verique que la batería se haya retirado del compartimiento de la batería. (Fig. 1)
2. Desconecte la manguera de la aspiradora.
3. Desmonte los pestillos y retire el cabezal del motor del tanque recolector.
4. Extraiga todo el sedimento del tanque recolector y límpielo usando una solución suave de agua
y jabón. Deje que se seque antes de reemplazar el cabezal de potencia. (Fig. 2)
ALMACENAMIENTO
Antes de almacenar su aspiradora, debe vaciar y limpiar el tanque recolector. La batería debe
almacenarse en un lugar seco. Los accesorios deben limpiarse y almacenarse de manera tal que
puedan estar disponibles cuando sean necesarios. Almacene la aspiradora en seco/mojado en
interiores.
27

REPARACIONES
Las reparaciones de esta aspiradora en seco/mojado deben ser realizadas solo por personal de
servicio calicado, usando piezas de repuesto idénticas a las originales.
INSTALACIÓN Y LIMPIEZA DEL FILTRO DE
CARTUCHO
1 2 3 4
INSTALACIÓN DEL FILTRO DE CARTUCHO
1. Verique que la batería esté desconectada. (Fig. 1)
2. Saque el cabezal de alimentación y colóquelo en posición boca abajo. (Fig. 2)
3. Instale el ltro de cartucho sobre la jaula del ltro, asegurándolo con la tuerca retén. No apriete
más de la cuenta. (Fig. 2)
EXTRACCIÓN Y LIMPIEZA DEL FILTRO DEL CARTUCHO
1. Desenrosque la tuerca de retención girando en sentido contrario a las agujas del reloj. (Fig. 3)
2. Sostenga y tire cuidadosamente del ltro de cartucho para extraerlo.
3. Limpie el ltro del cartucho cepillando o enjuagando los restos. (Fig. 4)
4. Instale un ltro limpiado o nuevo como se indica en los pasos 2 y 3 de la sección
INSTALACIÓN DEL FILTRO DE CARTUCHO.
5. Los ltros para aspirado en mojado se deben sacar y dejar secar al aire durante 24 horas antes
de instalarlos en el receptáculo del ltro.
28

RESOLUCIÓN DE PROBLEMAS
Problema Posible causa Solución
La aspiradora no funciona.
La potencia de la aspiradora
es baja.
La aspiradora se apaga
sola.
Hay un escape de polvo
desde la aspiradora.
La batería no tiene energía. Cargue la batería.
La batería no se insertó
correctamente.
Está usando una batería incorrecta.
Hay un bloqueo en la manguera y
entrada del tanque recolector.
El ltro está saturado de polvo no.
El tanque recolector está lleno. Vacíe el tanque recolector.
Baja capacidad de la batería. Cargue la batería.
La batería no tiene capacidad. Cargue la batería.
La batería puede estar agotada. Cargue la batería.
El ltro no está instalado o está
instalado de forma incorrecta.
El ltro está dañado.
Inserte la batería
correctamente.
Asegúrese de usar solo la
batería y cargador incluidos con
su producto.
Check the hose and tank inlet
for blockage.
Saque el ltro y límpielo, o bien
instale un nuevo ltro.
Revise que el ltro esté bien
instalado.
Cambie el ltro. Compre en
línea en www.vacmaster.com.
29

VISTA EN DETALLE
9
8
10
1
7
2
2.1
4
3
6
5
4
30

LISTA DE PIEZAS
Pieza Número de dibujo Descripción Cantidad
1 Armado del cabezal de alimentación 1
2 551346102 Conjunto de piezas del ltro de cartucho 1
2.1 551346103 Tuerca retén 1
3 Tanque recolector 1
4 551346105 Seguro 2
5 551346106 Boquilla de utilidad adaptable 1
6 551346114 Adaptador de rastrillo para pelo de mascota 1
7 551346113 Adaptador de cepillo de polvo 1
8 551346110 Manguera 1
9 551346111 Adaptador de boquilla de inado 1
10 551346112 Herramienta para hendiduras 2 en 1 con cepillo 1
Para obtener una batería de repuesto o un cargador de batería, visite www.vacmaster.com
o llame a Servicio al cliente al 1-866-384-8432.
31
 Loading...