


iP1 SmartSystem – Personalized
Instruction Manual
• Read this manual carefully before loading or using the iP1 pistol.
WARNING
• The iP1 pistol will not operate if it is not within 10” of the iW1 wristwatch with the
matching key and the PIN code entered.
EN
This manual is only intended:
• For use with an iP1 pistol that has been referenced to an iW1
wristwatch; or
• to guide through the process of upgrading the iP1 Smart-
System – Basic to the iP1 SmartSystem – Personalized (see
Chapter 27)
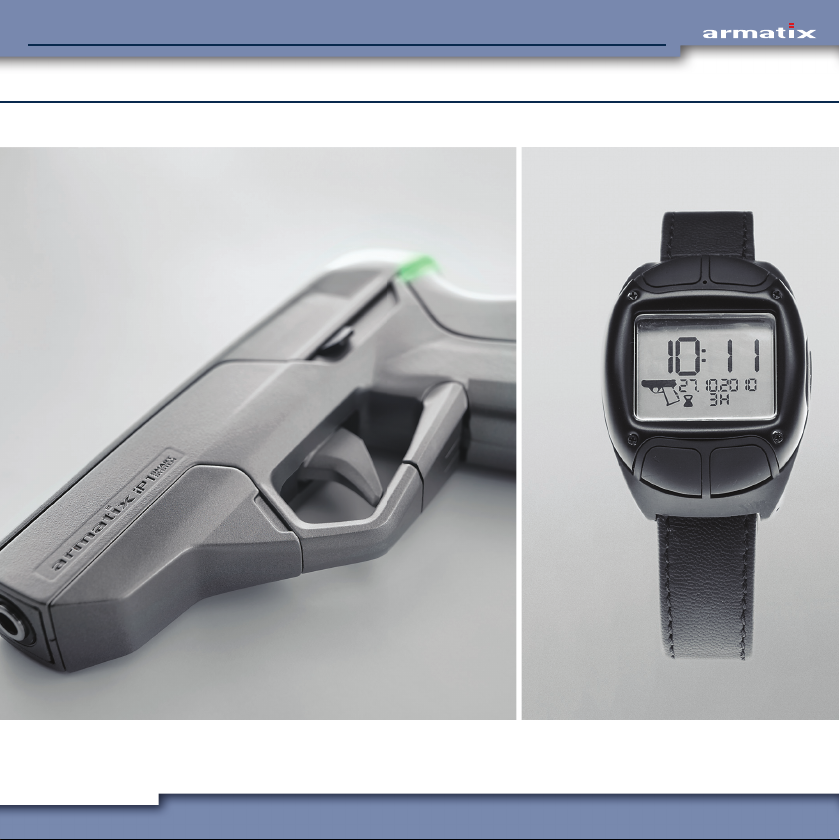
Armatix U.S.A., Inc.
Pistol iP1
Caliber .22lr
iP1 SmartSystem – PersonalizediP1 SmartSystem
2

iP1 SmartSystem – Personalized
3

iP1 SmartSystem – PersonalizediP1 SmartSystem
Safety precautions
Read this manual and the warnings contained in it before loading or using the iP1 pistol. This manual explains the
function and the handling of the iP1 SmartSystem — Personalized and warns of the potential dangers, including
death and serious personal injury, that can result from use of the iP1 pistol. This manual should always accompany
the iP1 SmartSystem — Personalized and be transferred with it if it is sold or otherwise made availebal to another
person.
Even if you are an experienced shooter, you must READ THIS ENTIRE MANUAL CAREFULLY before loading or firing
the iP1 pistol because it represents the first commercially available “personalized” firearm and has several unique
features and operating requirements not present in other firearms. This manual gives basic instructions on the
proper handling and functioning of the iP1 pistol. Your safety and the safety of others depend on you following the
instructions and warnings in this manual and the constant use of safe firearms practices. If you are unfamiliar with
firearms, take a course in the safe handling of firearms run by a qualified firearms instructor, your local gun club,
or a similar qualified organization.
Safety warning symbols
This manual contains several safety warnings and instructions preceded with:
These signal words are designed to draw your attention to important
safety information.
Indicates a hazardous situation which, if not avoided, could result in death or serious injury.
Indicates a hazardous situation, which, if not avoided, could result in minor or moderate injury.
Addresses safety practices not related to personal injury.
4

iP1 SmartSystem – PersonalizediP1 SmartSystem
General safety precautions
• Failure to follow the safety information and safety instructions in this manual could result
in death, serious personal injury and/or property damage.
• The iP1 pistol is intended for target shooting only and will not function if it is not within
10” of the referenced iW1 wristwatch and the PIN code entered, or it or the referenced
iW1 wristwatch do not have sufficient battery power, or communication between them is
blocked. It should not be relied upon for purposes of self-defense.
• Always deactivate the iP1 pistol when you are finished using it to help prevent it from being
misused by third parties.
• Always seek a doctor’s advice if you are taking medication to be sure that you are able to
shoot and handle a firearm safely.
• Never drink alcoholic beverages or take drugs before or while shooting. Your vision and
judgment could be seriously impaired, making your firearm handling unsafe.
• If the iP1 pistol or any other firearm is carelessly or improperly handled, you could cause a
negligent discharge, which could result in death, serious personal injury and/or proper ty
damage.
• Always handle the iP1 pistol as if it is loaded so that you never fire negligently.
• Never point the iP1 pistol at anything you do not intend to shoot.
• Never pull the trigger or put your finger on the trigger or in the trigger guard until you have
made the decision to fire.
• Never take anyone’s word that a firearm is unloaded; always check for yourself, with the
firearm pointed in a safe direction and your finger off of the trigger and outside of the
trigger guard.
5

iP1 SmartSystem – PersonalizediP1 SmartSystem
• Always make sure the iP1 pistol is unloaded and that the slide is locked open in the rearward position with the magazine taken out before handing it to another person.
• Never alter or modify the iP1 pistol because this could cause it to malfunction and create
a dangerous condition.
• If the iP1 pistol is dropped or forcefully struck, it could be damaged and may not function
properly. Have it inspected by Armatix U.S.A., Inc. before continuing to use it.
• Do not expose the iP1 pistol to high heat or moisture because they could damage its electronic elements and prevent it from functioning properly.
• Never carry the iP1 pistol out of a suitable holster with a cartridge loaded in the chamber.
• Always store and transport the iP1 pistol unloaded and locked in a suitable container, such
as the included pistol case, out of the reach and sight of children or other unauthorized
persons. The personalized nature of the iP1 pistol is not an excuse for the failure to follow
safe firearm storage practices.
• Never store or transport ammunition or the synced iW1 wristwatch together with the PINCard and the valid PIN codes of the iP1 SmartSystem in the same container as the iP1
pistol. The PIN-Card and the valid PIN codes of the iP1 SmartSystem must always be stored
separately and out of the reach and sight of children or other unauthorized persons.
6
iP1 SmartSystem – PersonalizediP1 SmartSystem
Most ammunition contains lead in the projectile and/or primer. Firing the iP1 pistol in a poorly
ventilated area can lead to the exposure to lead. Always wash your hands after handling ammunition, firing the iP1 pistol, and/or performing preventive maintenance on the iP1 pistol to
minimize your exposure to lead.
Do not dry fire the iP1 pistol (pull the trigger and allow the hammer to fall on an empty chamber) because this will result in premature wear. To practice pulling the trigger, use snap caps
or dummy rounds.
7

iP1 SmartSystem – PersonalizediP1 SmartSystem
Before it left the factory, the iP1 pistol was tested, carefully inspected, and packaged. Armatix
U.S.A., Inc. cannot control what happens to the pistol after it leaves the factory, therefore, carefully examine the iP1 pistol when you acquire it to ensure that it is unloaded and undamaged. If
you do not understand any of the warnings and instructions in this manual or have any problems
operating the iP1 pistol, contact Armatix U.S.A., Inc.’s customer service/warranty department at
1-855-477-1972 or customerservice@armatix.us. If you need another copy of this manual, contact
Armatix U.S.A., Inc.
Manufactured by: Imported and distributed in the United States by:
Armatix GmbH Armatix U.S.A., Inc.
Feringastraße 4 23121 Coltrane Avenue
85774 Unterföhring Germany Newhall, CA 91321
Tel.: +49 89 / 4 27 29 79 – 0 Tel.: 855-477-1972
Email: info@armatix.de Email: customerservice@armatix.us
Webpage: www.armatix.de Webpage: www.armatix.us
The Upto Date version of the instruction manual can also be downloaded at www.armatix.us.
8

iP1 SmartSystem – Personalized
Table of Contents
1 Introduction 12
2 Main Features of the iP1 Pistol 13
2.1 The iP1 14
2.1.1 Frame with LED and interchangeable backstraps 14
2.1.2 Slide with loaded chamber indicator (LCI) 14
2.1.3 Trigger with trigger switch 15
2.1.4 Slide release lever 16
2.1.5 Magazine release lever 16
2.1.6 Sights 16
3 Functioning of the iP1 SmartSystem – Personalized 17
4 Components of the iP1 SmartSystem – Personalized 18
5 Operation of the iW1 wristwatch 19
5.1 Display elements 19
5.1.1 Scrolling through the individual function menus of the iW1 wristwatch 21
5.1.2 Background lighting 23
5.2 Standard display 23
5.2.1 Setting the time and date 24
5.2.2 Alarm clock 26
5.2.3 Stopwatch 27
5.2.4 Pistol menu 28
9

iP1 SmartSystem – Personalized
6 Activating the iP1 pistol 29
7 Deactivating the iP1 pistol 31
8 Synchronizing the time between the iP1 pistol & the iW1 wristwatch 32
9 Changing / resetting the 5 digit PIN code using the 12 digit SuperPIN 34
10 Resetting the iP1 pistol using the 10 digit pistol PIN code 36
11 Referencing the iP1 pistol to the iW1 wristwatch 38
12 Checking the batteries without using the iW1 wristwatch 40
13 Automatic battery charge indicator 41
14 Loading 42
15 Firing 44
16 Reloading when firing 47
17 Clearing malfunctions (jams) 48
18 Trouble shooting 50
18.1 Mechanical malfunctions 50
18.2 Electronic malfunctions 52
19 Unloading procedure and safety check 54
20 Disassembly 56
21 Cleaning 59
21.1 Barrel 60
21.2 Slide 61
21.3 Frame 62
21.4 Magazine 62
10

iP1 SmartSystem – Personalized
22 Changing the backstrap / replacing the batteries in the iP1 pistol 64
23 Adjusting and changing the sights 66
24 Assembly 67
25 Function test 69
26 Storing the iP1 pistol 70
27 Upgrading the iP1 SmartSystem - Basic to the iP1 SmartSystem - Personalized 71
28 Updating the firmware 72
29 Changing the iW1 wristwatch batteries 73
Part list 74
Exploded drawing 75
Technical data 76
Limited one year operational warranty 77
FCC notice 79
Youth Handgun Safety Act Notice 80
State required safety warnings 84
11

iP1 SmartSystem – PersonalizediP1 SmartSystem
1 Introduction
Dear Customer,
Thank you for choosing the Armatix iP1 SmartSystem – Personalized, which consists of the iP1 .22LR
pistol and the iW1 wristwatch and represents a revolutionary innovation.
The iP1 pistol is referenced to the iW1 wristwatch and can only be fired by the authorized user,
who has the referenced iW1 wristwatch and the required PIN code. This is designed to prevent the
iP1 pistol from being fired by unauthorized persons who may gain access to it, but do not have
the matching iW1 wristwatch and all required PIN code. If you purchased the iP1 pistol and iW1
wristwatch together as an iP1 SmartSystem – Personalized, they are already referenced on delivery
and therefore have the joint “key.”
The heart of the system, the iP1, is a modern, high precision, single-action/double-action, semiautomatic pistol developed according to state-of-the-art technology and engineering principles. The
iP1 pistol, which is designed for accurate target shooting at distances up to 27 yards, features a
mechatronic safety device. This safety device is active by default and can only be deactivated using
the iW1 wristwatch.
The iP1 SmartSystem – Personalized is more than just a revolutionary safety concept. It is a true
innovation and represents the pistol of the future here and now.
Your Armatix Team
12

iP1 SmartSystem – PersonalizediP1 SmartSystem
1
2 Main features of the iP1 Pistol
The iP1 pistol is a semi-automatic, single-action/double-action .22LR pistol with a ten round detachable magazine that
has been developed in accordance with the latest ergonomic principles and criteria. The parts and operating elements
of the iP1 pistol are identified in the figure below:
1 Front sight
2
2 Loaded chamber indicator
3
3 Rear sight
4
4 Hammer
5
5 Slide
6
6 LED
7
8
7 Slide release lever
9
8 Backstrap with backstrap switch
10
9 Trigger switch
11
12
10 Trigger
11 Magazine release lever
12 Cover
13
13 Magazine
14
14 Recoil spring
13
iP1 SmartSystem – PersonalizediP1 SmartSystem
1.1 The iP1
1.1 .1 Frame with LED and interchangeable backstraps
The frame features interchangeable backstraps in three different sizes to properly fit the hands of
different users. The iP1 pistol comes with the small backstrap installed. Medium and large backstraps are available as options and can easily be changed by the user. The backstrap is linked to the
backstrap switch, which is activated to communicate with the iW1 wristwatch when the backstrap
is squeezed towards the front of the iP1 pistol. Depending on the status of the iP1 pistol, the LED will
light up in different colors when the backstrap is squeezed towards the front of the pistol:
• Green signals that the iP1 pistol is ready to be fired.
• Blue signals that the magazine has not been inserted or has not been inserted correctly.
• Red signals that the iP1 pistol is not activated and cannot be fired.
1.1.2 Slide with loaded chamber indicator (LCI)
The slide has a loaded chamber indicator (LCI) to comply with the laws of certain states. The upper
opening of the slide serves as a loaded chamber indicator (LCI) by allowing the user to look inside
the chamber to see whether or not a cartridge is loaded.
Although the iP1 pistol has a loaded chamber indicator (LCI) you should never solely rely on
it or your memory to determine whether the iP1 pistol is loaded or unloaded. Always retract
the slide by grasping it at the indented area at the rear of the slide and pulling it fully to the
rear and then visually and physically (with your finger) check to make sure there is not a
cartridge in the chamber.
14
iP1 SmartSystem – PersonalizediP1 SmartSystem
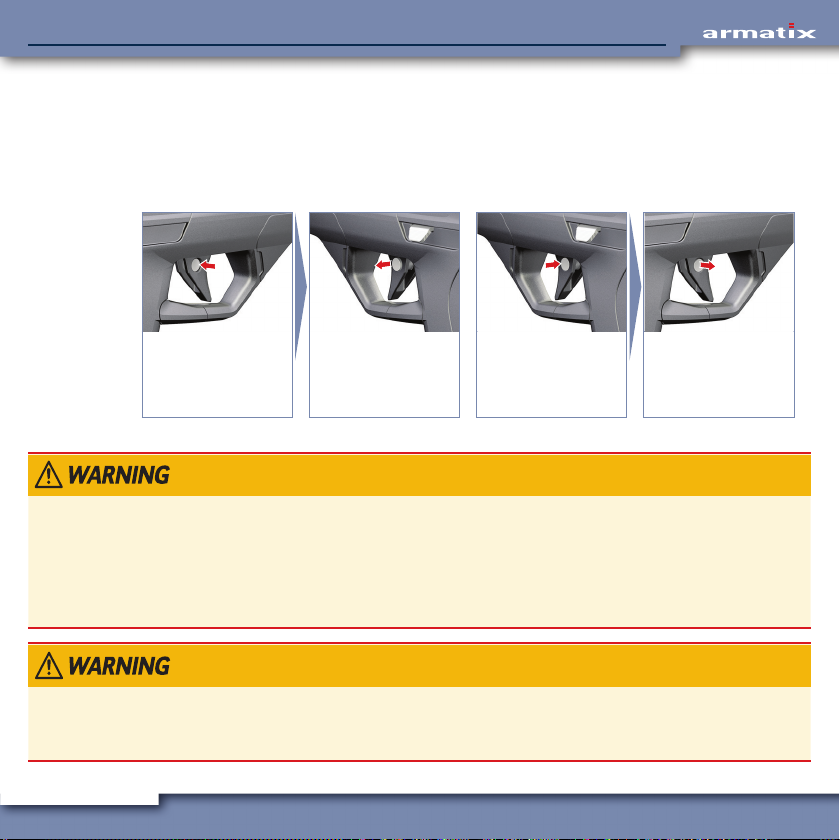
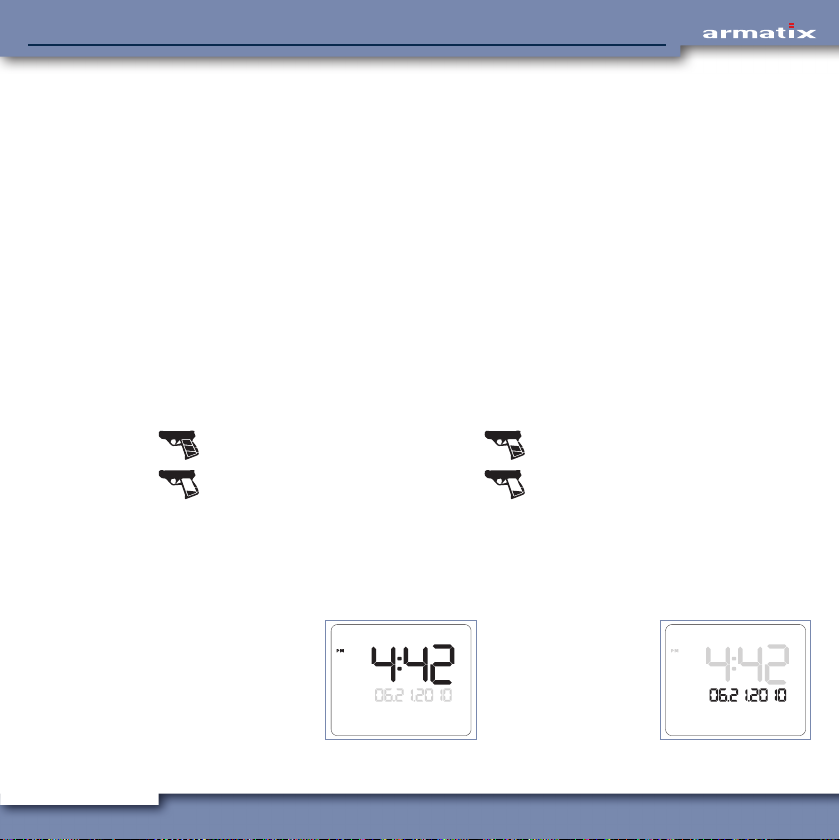
1.1.3 Trigger with Trigger Switch
The trigger includes a mechanical locking switch with prevents it from being pulled to the rear.
When the trigger switch is in the left position (when viewed in the firing direction, with the muzzle
pointed away from the user), the trigger is locked. When it is in the right position, the trigger is
released and can be pulled.
Pistol safe.
Trigger switch pressed
to the left in firing
direction.
Although iP1 pistols have several internal safeties features designed to prevent an unintentional discharge if the pistol is dropped or hit, the proper and safe function of the iP1 pistol
depends on it being used for its intended purposes and not being altered or modified. Like
any other mechanical device, if the iP1 pistol is subject to unusual and extreme forces, failure
can occur. Therefore, safe firearm handling practices and the instructions and safety warnings in this manual must always be followed to minimize the risk of a negligent discharge.
In case any of the iP1 pistol’s safety features prove to be ineffective for any reason, the
possibility of an unintentional discharge exists. If so, the iP1 pistol should be immediately
unloaded and not be used again until it has been examined by Armatix U.S.A., Inc.
15
Pistol safe.
Trigger switch pressed
to the left in firing
direction.
Pistol armed. Trigger
switch pressed to
the right in firing
direction.
Pistol armed. Trigger
switch pressed to
the right in firing
direction.

iP1 SmartSystem – PersonalizediP1 SmartSystem
1.1.4 Slide Release Lever
When the last round in the magazine is fired, the slide release lever will hold the slide locked in the
rearward position to signal that the magazine is empty. When the slide is pulled back with an empty
magazine in place, it will also be held in the rearward position by the slide release lever. In addition,
when there is no magazine inserted, the slide release lever can be manually pushed up to lock the
slide in the fully rearward position.
1.1.5 Magazine Release Lever
The magazine release lever is located beneath the trigger guard and is designed for use by both
right handed and left handed shooters. To remove the magazine, simply press down on the magazine lever from either the right or left side.
1.1.6 Sights
The front sight is available in four different heights and can easily be changed by the user. The rear
sight features a trapezoidal recess to simplify centering the front sight.
16

iP1 SmartSystem – PersonalizediP1 SmartSystem
2 Functioning of the iP1 SmartSystem – Personalized
The following describes how the iP1 pistol functions when the magazine is inserted, a round is in the
chamber, the trigger switch is in the right (released) position, and the synced iW1 wristwatch with
the PIN code entered and the pistol feature activated is worn on the wrist of your shooting hand:
• When the backstrap is squeezed towards the front of the iP1 pistol, the backstrap switch is
activated and communication between the iP1 pistol and iW1 wristwatch is initiated;
• When the trigger is pulled slightly to the rear, the iP1 pistol is activated for firing and the LED
lights up green.
• When the trigger is pulled fully back within 60 seconds, depending on the position of the ham-
mer, the following happens:
• If the hammer is already cocked (in the rear position), it is immediately released (fired in
single-action mode) or if the hammer is not cocked (in the forward position) it will first be fully
cocked and then immediately released (fired in double-action mode);
• When the hammer is released, it strikes the firing pin, which fires the cartridge in the cham-
ber;
• The recoil energy from the cartridge being fired causes the slide to move rearward, extracts
the fired cartridge casing from the chamber, ejects it, and cocks the hammer;
• The recoil spring then brings the slide forward to the closed position, during which it strips the
next cartridge from the magazine and transports it to the chamber.
• When the trigger is released, the iP1 pistol is ready to be fired again, until the last cartridge
in the magazine has been fired, after which the slide release will lock the slide in the open
(rearward) position.
Once you pull the trigger slightly to the rear, the iP1 pistol is activated for firing. You must pull
the trigger fully to the rear within 60 seconds or the iP1 pistol will return to inactive mode to
conserve battery power. If you do not pull the trigger fully to the rear within 60 seconds, you
must completely release the trigger to reactivate the pistol to allow it to be fired.
17

iP1 SmartSystem – PersonalizediP1 SmartSystem
3 Components of the iP1 SmartSystem – Personalized
Scope of supply
• iP1 pistol with magazine
• iW1 wristwatch (already referenced to the iP1 pistol)
• Lockable storage/transportation case
• Printed instruction manual
• PIN-card
• 1/10” diameter punch
• 2 AAA batteries for the iP1 pistol
• 1 CR2032 battery (already installed in the iW1 wristwatch)
• Warranty card
• Target: showing the grouping of the shots from the iP1 pistol
18
iP1 SmartSystem – PersonalizediP1 SmartSystem
4 Operation of the iW1 wristwatch
The iW1 wristwatch is used to control the iP1 pistol and should be worn on the wrist of your firing
hand as it must be within 10” of the iP1 pistol to communicate with it. Using a PIN code, it can be
used to activate the iP1 pistol, set the amount of time within which the iP1 pistol will remain active,
and deactivate the iP1 pistol before the set time expires. It indicates when the iP1 pistol is active, as
well as the charge level of the batteries of the iP1 pistol. In addition, it also functions as a normal
digital wristwatch, displaying the time and date, and features an alarm clock and stop watch.
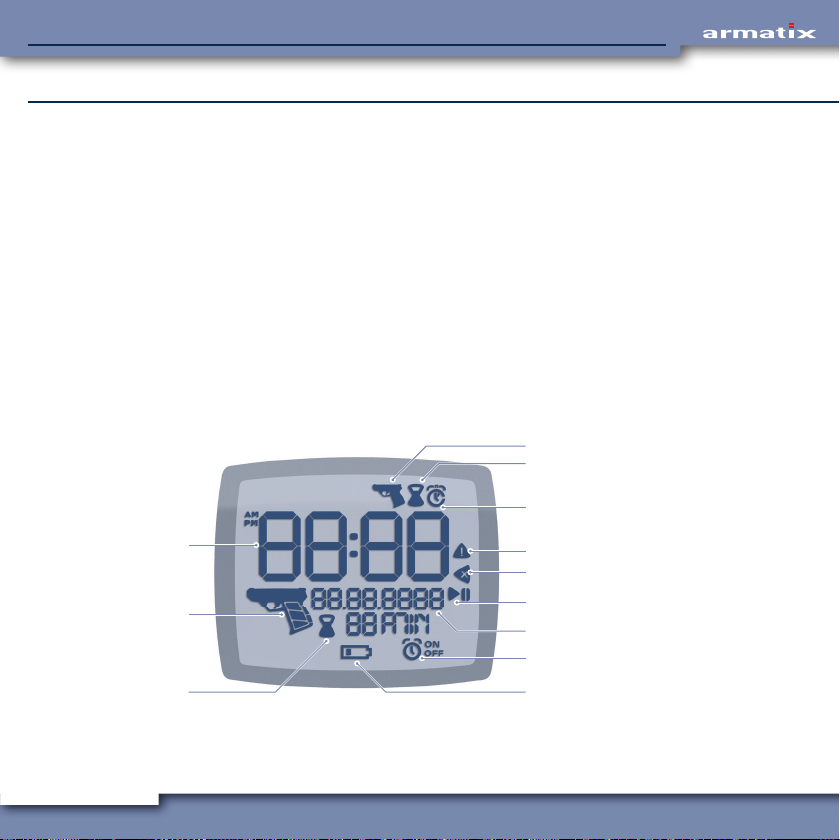
4.1 Display elements
In addition to the time and date, the respective active functions of the iW1 wristwatch are indicated
by various symbols on the display.
12
11
10
1 Pistol menu
2 Setting of remaining time
1
3 Alar m clock / stopwatch
2
4 Warning
3
5 Delete
4
6 Stopwatch start / s top
5
7 Date
6
8 Alar m clock On / Off
7
9 iW1 wristwatch battery
8
10 Display of remaining time
9
11 Pistol function of the iW1 wrist-
watch / iP1 pistol battery
12 Time
19
iP1 SmartSystem – PersonalizediP1 SmartSystem
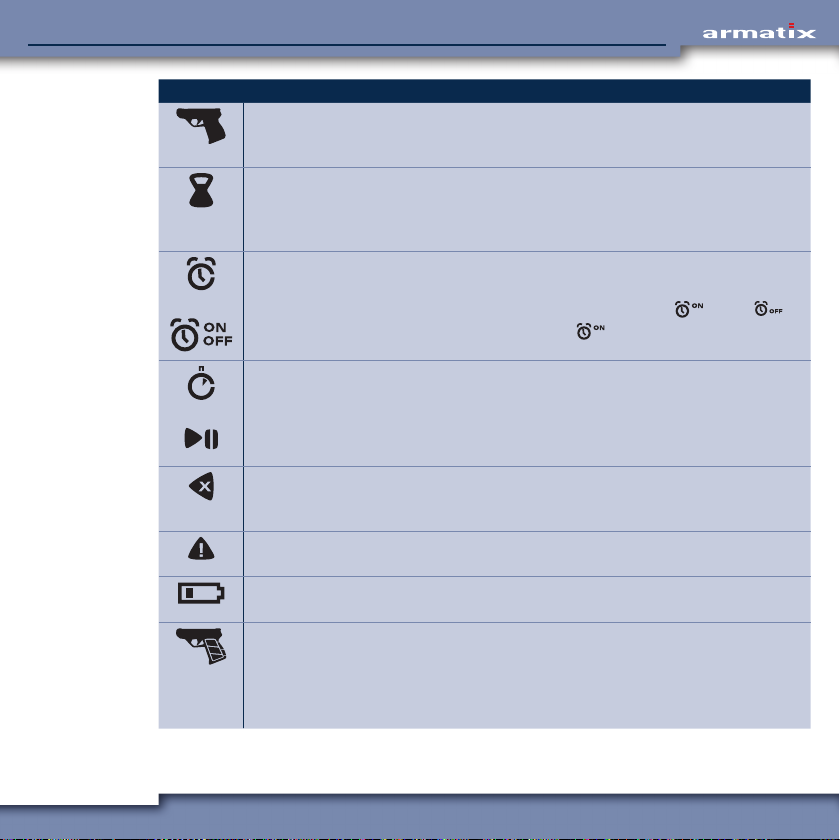
Symbol Meaning
Pistol menu
The small pistol symbol appears in the top right-hand corner when the pistol menu is called up.
Settings related directly to the pistol can be carried out here.
Remaining time
The symbol appears during setting of the remaining time. In the lower half of the display it indicates the remaining time displayed alongside for which the iW1 wristwatch
is activated.
Alarm clock
The symbol appears during setting of the alarm time.
After setting the alarm time, the alarm clock can be switched on (
When the alarm clock is switched on, the symbol
is switched on.
Stopwatch
The stopwatch symbol appears in the top right-hand corner of the display when the
stopwatch is active.
The start-stop symbol appears when the stopwatch is called up and indicates that the
stopwatch can be started, stopped and reset with the button MR.
Delete
The 'Delete' symbol indicates that the last input (e.g. the last digit entered during input
of the PIN code) can be deleted with the button MR.
Warning
This symbol indicates a failar.
iW1 Wristwatch battery
This symbol needs the battery of the iW1 wristwatch replaced.
Pistol function of the iW1 wristwatch / pistol battery
The large pistol symbol appears in every menu when the pistol function of the iW1
wristwatch is activated.
The three bars in the grip indicate the charge level of the battery in the pistol. They only
appear when communication has been established with the pistol.
indicates that the alarm clock
) or off ( ).
20
iP1 SmartSystem – PersonalizediP1 SmartSystem
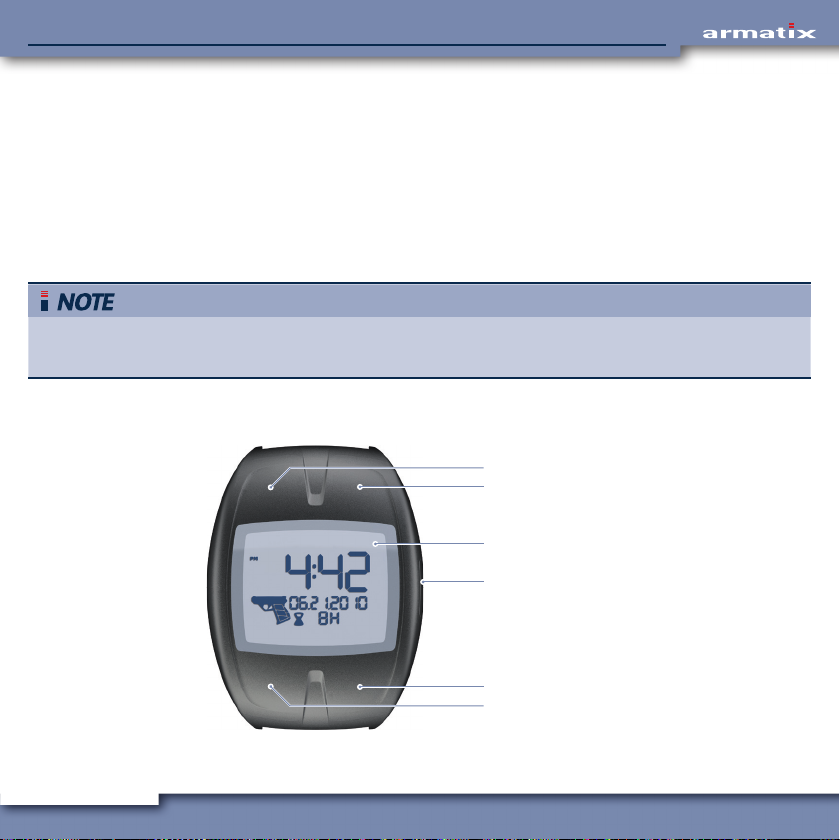
4.1.1 Scrolling through the individual function menus of the iW1 wristwatch
The basic functions of the iW1 wristwatch can be scrolled through using the bottom right and top
right buttons. Pressing the bottom right button will change the menu from the standard display
(time & date) to the pistol menu, the alarm clock, the stopwatch and back to the standard display.
Each pressing the top right button will change the menu in the opposite order.
To bring up a submenu, press the top right button for three seconds.
Unless alarm clock or stopwatch functions are in use, if no buttons are pressed within 20
seconds, the iW1 wristwatch will return to the standard display.
1
2
3
4
5
6
1 Button top left (TL)
2 Button top right (TR)
3 Display
4 Button middle right (MR)
5 Button bottom right (BR)
6 Button bottom left (BL)
21
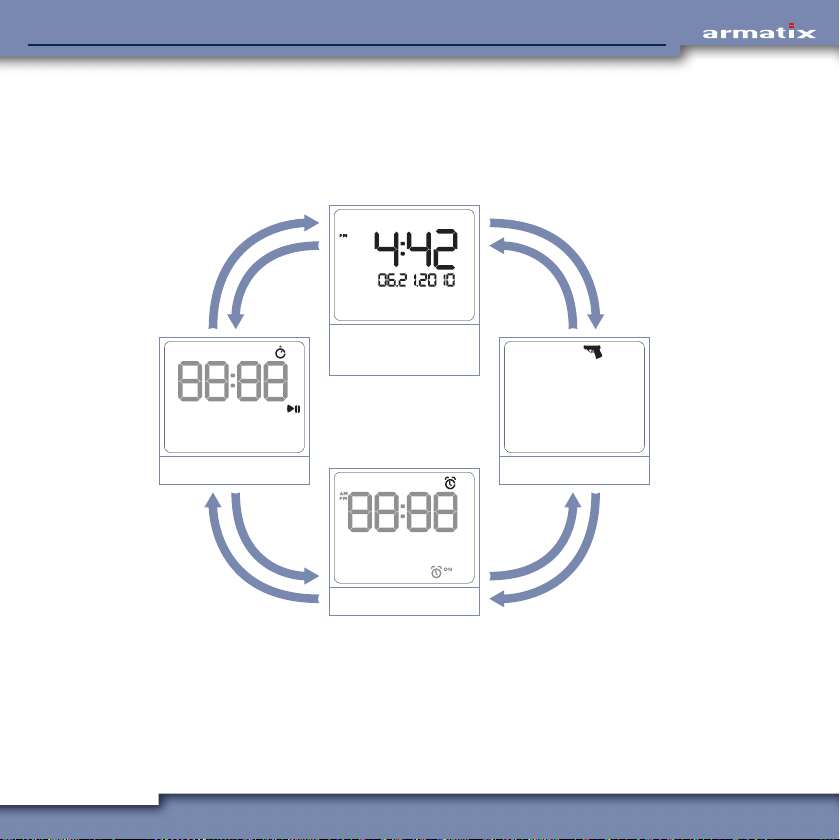
iP1 SmartSystem – PersonalizediP1 SmartSystem
The basic functions of the wrist watch can be scrolled through with the buttons BR and TR in the
recurring sequence illustrated below:
Menu sequence when scrolling through with button BR or TR.
BRBR
22
Stopwatch
TR
TR
Standard display
Time / date
Alarm clock
TR
Pistol menu
TR
BRBR
iP1 SmartSystem – PersonalizediP1 SmartSystem
4.1.2 Background lighting
The background lighting of the iW1 wristwatch display is activated by pressing the bottom left button for 3 seconds. The background lighting will shut off automatically after a short time.
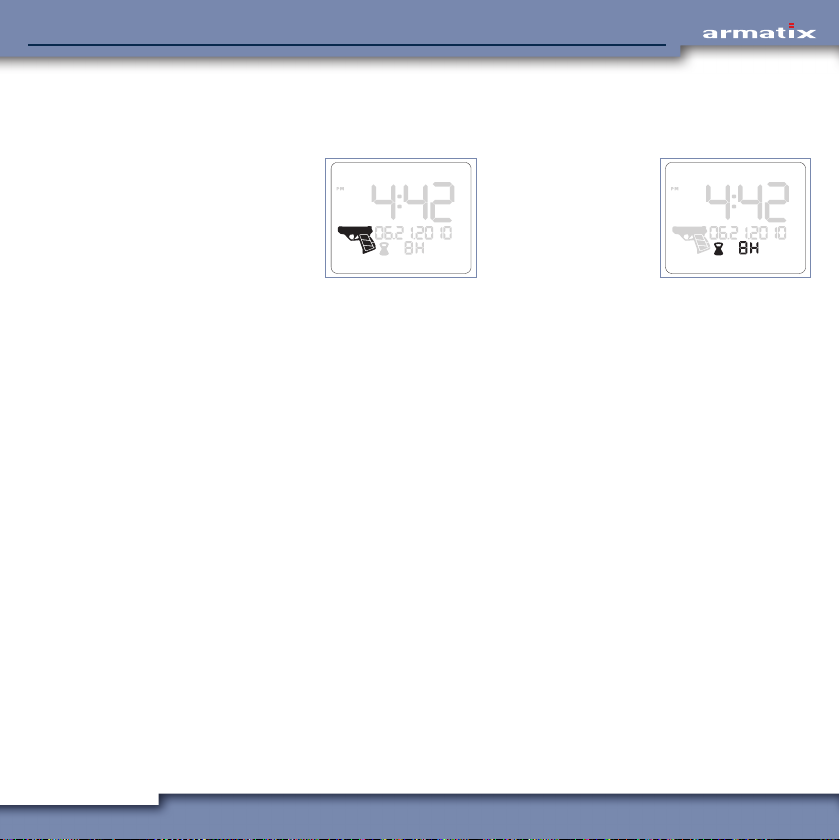
4.2 Standard display
The standard display shows time and date. In addition, when the pistol function of the iW1 wristwatch is activated and it is in communication with the iP1 pistol, the pistol icon will be shown in
the bottom left corner of the display, along with the remaining time until the pistol automatically
becomes deactivated. The status of the iP1 pistol’s battery charge is shown by the three bars in the
grip of the pistol icon:
Status of the pistol battery
Battery capacity 100% Battery capacity approx. 66%
Battery capacity approx. 33% (Bar flashes) Battery empty
The standard display
Current time. Current date.
23
iP1 SmartSystem – PersonalizediP1 SmartSystem
When the pistol function of the iW1 wristwatch is activated, the following information is displayed:
Activation status of the
iW1 wristwatch and
status of the pistol battery (bars in the grip).
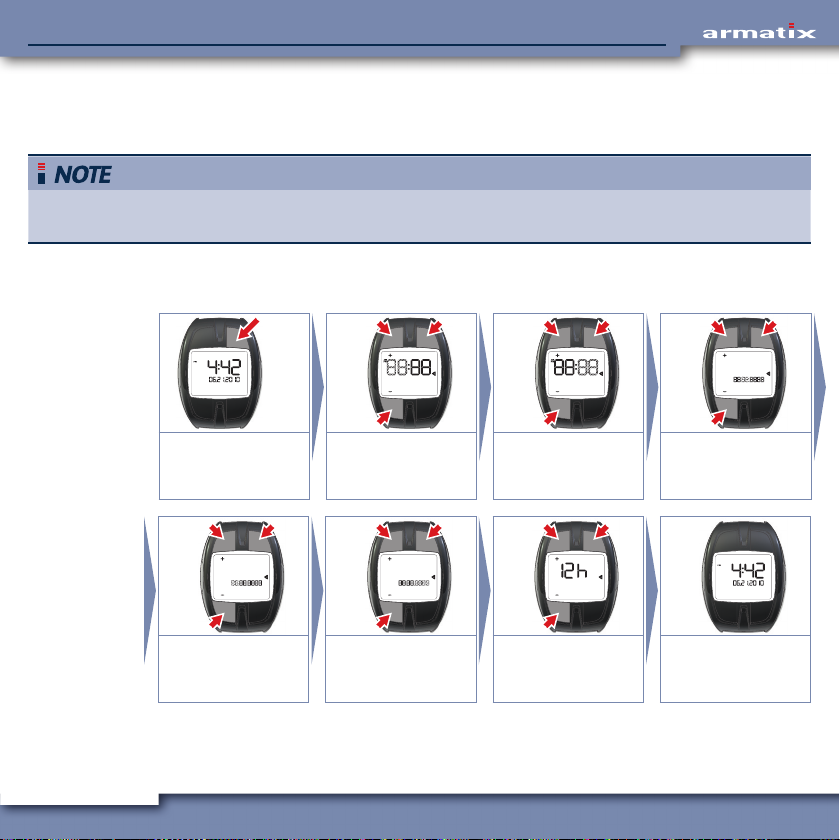
4.2.1 Setting the time and date
Beginning with the standard display, set the time and date by completing the following steps:
1. Press the top right button for three seconds to bring up the time setting submenu.
2. Adjust the hour by pressing the top left button to increase the hour or the bottom left button
to decrease the hour, and then press the top right button to confirm the hour setting and move
to the minute setting.
3. Adjust the minutes by pressing the top left button to increase the minutes or the bottom left
button to decrease the minutes, and then press the top right button to confirm the minute
setting and move to the date setting.
4. Adjust the date by pressing the top left button to increase the date or the bottom left button
to decrease the date, and then press the top right button to confirm the date setting and move
to the month setting.
5. Adjust the month by pressing the top left button to increase the month or the bottom left but-
ton to decrease the month, and then press the top right button to confirm the month setting
and move to the year setting.
6. Adjust the year by pressing the top left button to increase the year or the bottom left button
to decrease the year, and then press the top right button to confirm the year setting and move
to the time format setting.
Remaining time until
automatic deactivation
of the pistol function of
the iW1 wristwatch.
24
iP1 SmartSystem – PersonalizediP1 SmartSystem
7. Press the top left button or the bottom left button to alter between 24 hour and 12 hour
(a.m. / p.m.) format. Press the top right button to confirm the time format and return to the
standard display.
If the 24 hour time format is selected, the date will be displayed as date, month, year. If the 12
hour time format is selected, the date will be displayed as month, date, year.
3 sec.
Call up setting:
Hold TR pressed for 3
seconds.
+
–
Month:
Set (TL, BL)
and confirm (TR).
25
OK
+
–
Hours:
Set (TL, BL)
and confirm (TR).
+
–
Year:
Set (TL, BL)
and confirm (TR).
OK
OK
+
–
Minutes:
Set (TL, BL)
and confirm (TR).
24h
12h
12h / 24h mode:
Select (TL, BL)
and confirm (TR).
OK
OK
+
–
Day:
Set (TL, BL)
and confirm (TR).
Standard display
appears.
OK

iP1 SmartSystem – PersonalizediP1 SmartSystem
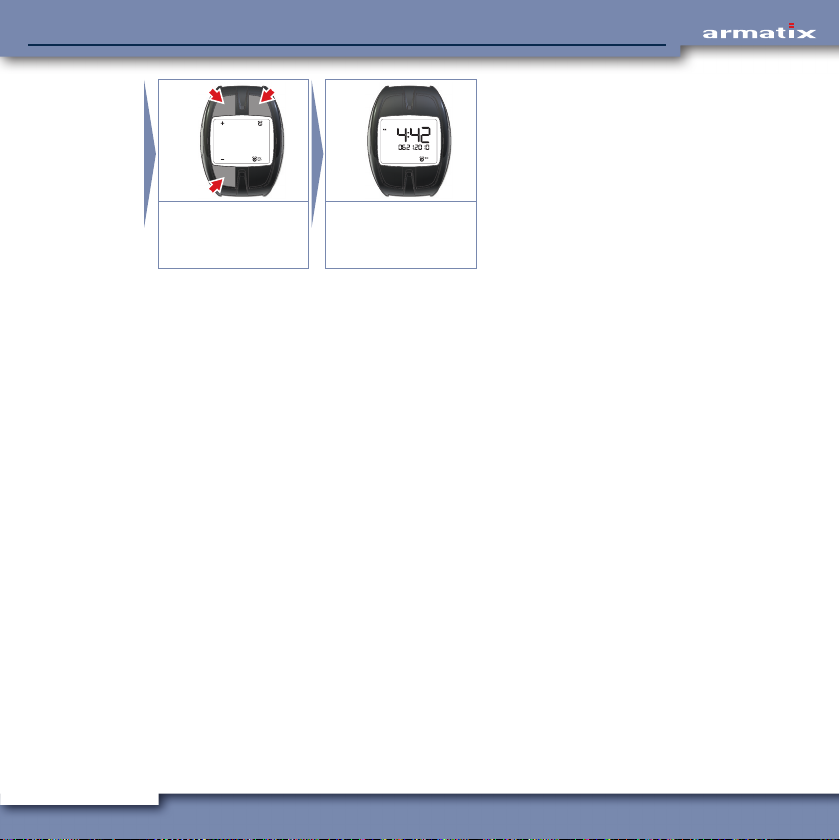
5.2.2 Alarm clock
The iW1 wristwatch has an alarm clock that will sound for 20 seconds at the set time. To set the
alarm, complete the following steps:
1. Beginning with the standard display, press the bottom right button twice to bring up the
alarm clock menu. The last time for which the alarm clock was set will be displayed.
2. Press the top right button for three seconds to set the alarm.
3. Adjust the hour by pressing the top left button to increase the hour or the bottom left button
to decrease the hour, and then press the top right button to confirm the hour setting and move
to the minute setting.
4. Adjust the minutes by pressing the top left button to increase the minutes or the bottom left
button to decrease the minutes, and then press the top right button to confirm the minute
setting.
5. When the alarm time is set, press the top left button to turn the alarm on, or the bottom left
button to turn the alarm off. Press the top right button to confirm your selection and to return
to the standard display.
When the alarm sounds, it can be turned off by pressing any button. It will sound again when the
set time is reached the next day. To deactivate the alarm, complete steps one and five above.
3 sec.
+
OK
+
OK
2x
Call up "Alarm clock"
menu:
Press BR 2x.
26
Display last alarm
time. To set:
Hold TR pressed for
3 seconds.
–
Hours:
Set (TL, BL)
and confirm (TR).
–
Minutes:
Set (TL, BL)
and confirm (TR).
iP1 SmartSystem – PersonalizediP1 SmartSystem
5.2.3 Stopwatch
+
–
Alarm clock on / off:
Set (TL, BL)
and confirm (TR).
The iW1 wristwatch has a stopwatch that can measure up to 99 hours and 59 minutes. The maximum accuracy of the stop watch is 1 second, and once 59 minutes and 59 seconds is exceeded,
it will only continue to measure hours and minutes. To use the stopwatch, complete the following
steps:
1. Beginning with the standard display, press the bottom right button three times to bring up
the stopwatch menu.
2. To start and stop the stopwatch, press the middle right button.
3. To reset the stopwatch, press the middle right button for three seconds.
4. While the stopwatch is running, the iW1 wristwatch will remain on the stopwatch menu. To
return to the standard display and leave the stop watch running in the background, press the
bottom right button.
OK
Standard display
appears.
27

iP1 SmartSystem – PersonalizediP1 SmartSystem
Call up "Stopwatch"
menu:
Press BR 3x.
A maximum of 99 hours and 59 minutes can be displayed. After that the stopwatch starts
again at 00 hours and 00 minutes.
5.2.4 Pistol menu
The pistol menu contains the functions for activating the iP1 pistol and setting the activation time
for which it will remain activated, as well as deactivating the iP1 pistol before the activation time
expires. These functions are described in Chapters 6-7.
3x 1x
Start timing:
Button MR.
Stop timing:
Button MR
Reset: Hold MR
pressed for 3 seconds.
Back to standard
display:
Press BR 1x.
28

iP1 SmartSystem – PersonalizediP1 SmartSystem
6 Activating the iP1 - Personalized pistol
To activate the iP1 pistol using the iW1 wristwatch, complete the following steps:
1. Beginning with the standard display, press the bottom right button to bring up the pistol
menu.
2. Press the top right button for 3 seconds to bring up the pistol submenu. Note: The pistol sub-
menu can also be accessed directly from the standard display by pressing the bottom right
button for three seconds.
3. Enter the 5 digit PIN code by pressing the top left button for 1, the top right button for 2,
the bottom left button for 3, and the bottom right button for 4. If you made an misstake in
entering a digit, it can be corrected by pressing the middle right button. When the fifth digit is
entered, the PIN code is automatically accepted. If the correct PIN code is entered, the display
will read “GOOD” for 2 seconds.
If an incorrect PIN code is entered, the display will read “FAIL.”. Press the top right button to
return to the standard display and repeat steps 1 through 3. If an incorrect PIN code is entered three times in a row, the iW1 wristwatch rejects further PIN code entries. The PIN code
function of the iW1 wristwatch must be reset using the SuperPIN pursuant to the instructions
in Chapter 9.
4. Enter the time (between a minimum of 1 hour and a maximum of 8 hours) within which the
pistol will remain activated by pressing the top left button to increase the activation time and
the bottom left button to decrease the activation time. Press the top right button to confirm
the setting. Once the activation time is set, the iW1 wristwatch will automatically return to
the standard display.
29

iP1 SmartSystem – PersonalizediP1 SmartSystem
When the activation time expires you will be alerted by a sound from the iW1 wristwatch and
the iP1 pistol will no longer be activated. To reactivate the iP1 pistol, you must complete steps
1 through 4 again.
5. To confirm that the iP1 pistol and iW1 wristwatch have been properly synced and are commu-
nicating with each other, hold the unloaded iP1 pistol (with an empty magazine and charged
batteries inserted) in your shooting hand and the iW1 wristwatch within 10” of it and actuate
the backstrap by squeezing it towards the front of the iP1 pistol:
• If the LED lights up green, the iP1 pistol has been successfully synced with the iW1
• If the LED lights up blue, there is no magazine in the iP1 pistol, or it is not correctly
• If the LED lights up red, the iP1pistol has not been successfully synced with the iW1 wrist-
• If the LED flashes red and the iW1 wristwatch displays “no sync,” follow the instructions
• If the LED flashes red and the iW1 wristwatch displays “noRef,” follow the instructions in
wristwatch and is actively communicating with it. The iP1 pistol is now capable of firing
when loaded.
inserted;
watch or is not communicating with it. The iP1 pistol is not capable of being fired. Make
sure the iP1 pistol is within 10” of the iW1 wristwatch and repeat steps one through five.
on synchronizing the time between the iP1 pistol and iW1 wristwatch in Chapter 8.
Chapter 11 to reference the iP1 pistol to the iW1 wristwatch.
30
Call up pistol menu:
Press BR 1x.
1x
3 sec.
Call up submenu:
Hold TR pressed for 3
seconds.
1
Enter PIN code.
Correction: MR.
2
43

iP1 SmartSystem – PersonalizediP1 SmartSystem
7 Deactivating the iP1 - Personalized pistol
To deactivate the iP1 pistol using the iW1 wristwatch before the activation time expires, complete
the following steps:
1. Beginning with the standard display, press the bottom right button to bring up the pistol
menu.
2. Press the top right button for 3 seconds to deactivate the pistol. Note: The iP1 pistol can also
be deactivated directly from the standard display by pressing the bottom right button for
three seconds.
3. The standard display will appear without the pistol icon and remaining activation time to
confirm that the iP1 pistol has been deactivated.
3 sec.
1x
Call up pistol menu:
Press BR 1x.
Deactivate pistol
function prematurely:
Hold TR pressed for 3
seconds.
Standard display
appears.
31

iP1 SmartSystem – PersonalizediP1 SmartSystem
8 Synchronizing the time between the iP1 pistol & the iW1 wristwatch
The iP1 pistol will only be activated by the iW1 wristwatch when their system times are synchronized. If the system times become unsynchronized, such as when the batteries in the iP1 pistol and/
or iW1 wristwatch are changed, or the system was not used for a long period of time, and the iP1
pistol is otherwise ready for use with the iW1 wristwatch:
• already referenced to the iW1 wristwatch;
• the correct PIN code has been entered in the iW1 wristwatch;
• the iP1 pistol is within 10” of the iW1 wristwatch;
• a magazine is inserted in the iP1 pistol; and
• the backstrap is actuated by squeezing it towards the front of the iP1 pistol
the display of the iW1 wristwatch will read “No SYnc” and the LED on the iP1 pistol will flash red. To
synchronize the time between the iP1 pistol and the iW1 wristwatch, complete the following steps:
1. If the iP1 pistol is loaded, unload it.
2. Insert an empty magazine in the iP1 pistol.
3. While holding the iP1 pistol within 10” of the iW1 wristwatch, actuate the backstrap by
squeezing it, while continuing to squeeze it, press the top left button on the iW1 wristwatch
once when the display reads “no SYnc.”
4. If iP1 pistol and iW1 wristwatch were successfully synchronized, the iW1 wristwatch will return to the standard display and the LED on the iP1 pistol will stop flashing.
5. If the “no SYnc” message continues to be displayed, stop squeezing the backstrap so the LED
on the iP1 pistol switches off, wait 20 seconds, and repeat steps 3-5.
6. If a flashing pistol is shown on the display, the synchronization was not successful. If you have
more than one iP1 SmartSystem – Personalized, make sure you are using the iW1 wristwatch
that is referenced to the iP1 pistol you are trying to synchronize.
32

iP1 SmartSystem – PersonalizediP1 SmartSystem
Starting situation is the message “no sync” on the display.
Display: "no sync"
pistol symbol,
+ and – flash.
Empty magazine
inserted. During back-
strap is actuated,
Press TL once.
iP1 Pistol and iW1
wristwatch are synchronised. Standard display
appears.
33

iP1 SmartSystem – PersonalizediP1 SmartSystem
9 Changing / resetting the 5 digit PIN code using the 12 digit SuperPIN
If the PIN code entry was deactivated because an incorrect PIN code was entered three times in a
row when attempting to activate the iP1 pistol, or you want to change the PIN code, you can define
a new PIN code using the iW1 wristwatch and the 12 digit SuperPIN by completing the following
steps:
1. Beginning with the standard display, press the bottom right, bottom left, top right, and top left
buttons at the same time for 3 seconds, until “SUPErPIN” is shown on the display.
2. Press the middle right button to cancel, or any other button to begin entering the SuperPIN.
3. Enter the 12 digit SuperPIN by pressing the top left button for 1, the top right button for 2, the
bottom left button for 3, and the bottom right button for 4. If you make an error in entering a
digit, it can be corrected by pressing the middle right button. After the last digit of the SuperPIN has been entered and the SuperPIN is correct, the display will read “PIN-1.”
If an incorrect SuperPIN is entered, the iW1 wristwatch will return to the standard display.
Repeat steps 1 through 3. If the incorrect SuperPIN is entered three times in a row, you will
have to wait ten minutes in the SuperPIN menu before attempting to enter the SuperPIN again.
4. Enter the new 5 digit PIN code you have selected by pressing the top left button for 1, the top
right button for 2, the bottom left button for 3, and the bottom right button for 4. If you make
an error in entering a digit, it can be corrected by pressing the middle right button. When the
fifth digit is entered, the PIN code is automatically accepted and the display will change to
“PIN-2.”
5. Re-enter the 5 digit PIN code you have selected by pressing the top left button for 1, the top
right button for 2, the bottom left button for 3, and the bottom right button for 4. If you make a
34

iP1 SmartSystem – PersonalizediP1 SmartSystem
misstake in entering a digit, it can be corrected by pressing the middle right button. When the
fifth digit is entered, the PIN code is automatically accepted. If both PIN code entries match,
the standard display will appear.
6. If the PIN code entries do not match, repeat steps 4 and 5.
3 sec.
3 sec.
Hold TL, TR, BL and
BR depressed for 3
seconds.
1 2
Enter new PIN code. Repeat new PIN code.
35
2
43
MR: Cancel.
Press any other button
to input the SuperPIN.
1
1
Enter SuperPIN.
MR: Correction.
43
2
43

iP1 SmartSystem – PersonalizediP1 SmartSystem
10 Resetting the iP1 pistol using the 10 digit pistol PIN code
Make sure that the iP1 pistol is unloaded (magazine removed and chamber empty) before
resetting it using the 10 digit pistol PIN code.
Do not reset the iP1 pistol with the iW1 wristwatch in public places to avoid that someone can
record the radio signal and can get access to your pistol PIN code when it is transferred from
the iW1 wristwatch to the iP1 pistol.
If you replace the iW1 wristwatch, you will need to reset the iP1 pistol. When the iP1 pistol is reset,
the key of the iW1 wristwatch in the iP1 pistol is deleted. To reset the iP1 pistol complete the following steps:
1. Using the iW1 wristwatch, bring up the pistol menu by pressing the bottom right button once.
2. To reset the iP1 pistol, press the top left and bottom left buttons at the same time for three
seconds.
3. To confirm resetting the iP1 pistol, press the top right button once.
4. Enter the 10-digit pistol PIN code, one digit at a time by pressing the top left button to move
upwards from one to nine, the bottom left button to move downwards from one to nine and
the top right button to confirm each digit to be entered. If you entered a digit incorrectly, press
the middle right button to delete it and then enter it again.
5. After all ten digits have been correctly entered, the pistol symbol on the iW1 wristwatch will
flash and the display reads “rES”.
6. Pick up the unloaded iP1 pistol (with an empty magazine inserted) and hold it in your shooting hand with the iW1 wristwatch within 10” of it and actuate the backstrap by squeezing it
towards the front of the pistol.
36

iP1 SmartSystem – PersonalizediP1 SmartSystem
7. If the display reads “dONE,” the iP1 pistol has been reset. If the display reads “no” an incorrect PIN code was entered and steps one through six must be repeated.
8. Press any of the buttons on the iW1 wristwatch to bring up the standard display.
Once the iP1 pistol has been reset, it cannot be fired until it has been referenced with a iW1
wristwatch again.
Call up pistol menu:
Press BR 1x.
After last digit:
pistol symbol flashes,
receiver ready.
37
1x
3 sec.
3 sec.
Function "Reset
pistol". Hold TL and
BL depressed for 3
seconds.
Hold the pistol in your
hand (backstrap actuated, empty magazine
inserted).
OK
1x
To input the pistol PIN
code:
press TR 1x.
Pistol PIN OK.
+
–
Enter digits individu-
ally (TL and BL) and
confirm (TR).
Correction: MR.
OK
Pistol PIN
incorrect.

iP1 SmartSystem – PersonalizediP1 SmartSystem
11 Referencing the iP1 pistol to the iW1 wristwatch
Make sure that the iP1 pistol is unloaded (magazine removed and chamber empty) before
referencing it to the iW1 wristwatch.
Before referencing the iP1 pistol to the iW1 wristwatch, you need to enter the PIN code in the iW1
wristwatch pursuant to the instructions on activating the pistol. If purchased as a iP1 SmartSystem
— Personalized, the iP1 pistol was already referenced to the iW1 wristwatch when it was manufactured. In this case is it only necessary to reference the iP1 pistol to the iW1 wristwatch if the iP1
pistol has been reset.
Do not reset the iP1 pistol with the iW1 wristwatch in public places to avoid that someone
can record the radio signal and can get access to your pistol PIN code when it is transferred
from the iW1 wristwatch to the iP1 pistol.
To reference the iP1 pistol to the iW1 wristwatch, complete the following steps:
1. Using the iW1 wristwatch, bring up the pistol menu by pressing the bottom right button once.
2. Press the top right and bottom right buttons at the same time for three seconds, until the
display reads “rEF GUN.”
3. Pick up the unloaded iP1 pistol (with an empty magazine inserted) and hold it in your shooting hand with the iW1 wristwatch within 10” of it and actuate the backstrap by squeezing it
towards the front of the iP1 pistol to transmit the iW1 wristwatch’s ID and key to the iP1 pistol.
4. If the display reads “rEF doNE” the iP1 pistol has been successfully referenced to the iW1
wristwatch. If the display reads “rEF no” repeat steps one through three.
5. Press any of the buttons on the iW1 wristwatch to bring up the standard display.
38

iP1 SmartSystem – PersonalizediP1 SmartSystem
Activate pistol func-
3 sec.
tion!
Hold the pistol in
your hand (backstrap
actuated, empty
magazine inserted).
1x
Call up pistol menu:
Press BR 1x.
Wristwatch ID and
code are transmit-
ted to the pistol and
stored.
Function "Reference
pistol": Hold TR and
BR depressed for 3
Referencing
successful
Press any button to
return to the standard
3 sec.
seconds.
display.
Wristwatch is ready to
transmit.
Standard display with
activated pistol func-
tion appears.
39

iP1 SmartSystem – PersonalizediP1 SmartSystem
12 Checking the batteries without using the iW1 wristwatch
Unless the iP1 pistol is in storage, check the battery charge level at least once a month and replace
batteries if necessary.
To check the battery charge level without using the iW1 wristwatch, remove the magazine and
grip the frame, and briefly squeeze the backstrap towards the front of the iP1 pistol and release it.
About five second after you stop squeezing the backstrap, the iP1 pistol will signal the status of its
batteries through the LED indicator:
• One green flash = the batteries have enough power.
• One red flash = the batteries are low on power and should be replaced soon.
• Two red flashes = the batteries are very low on power and must be immediately replaced
because the iP1 may not function reliably.
40

iP1 SmartSystem – PersonalizediP1 SmartSystem
13 Automatic battery charge indicator
Five seconds after the backstrap of the iP1 is released, the iP1 performs an electronic function
check, including checking the battery power. If the batteries are very low, and must be changed immediately to ensure reliable functioning of the iP1 pistol, it will be shown through the LED indicator,
about four seconds after the backstrap is squeezed the next time, as follows:
• If the LED is lit up in green or blue, it will flash red twice.
• If the LED is lit up in red, it will quickly flash off and on twice.
41

iP1 SmartSystem – PersonalizediP1 SmartSystem
14 Loading
Use of improper ammunition could cause death or serious personal injury, and/or property
damage. Only use high quality commercially manufactured .22 LR ammunition that meets
SAAMI or CIP standards.
Identify the particular type of ammunition that Armatix recommends for use in the iP1 pistol.
To load the magazine, press each cartridge into the magazine from the front, with the cartridge
bottom first, against the force of the magazine spring. A maximum of ten .22LR cartridges can be
loaded into the magazine.
Insert the magazine into the magazine well until the magazine catch locks into place.
1.
Release and remove
the magazine.
If the slide is in the forward position, hold the iP1 pistol with your firing hand and, while keeping your finger off the trigger and outside of the trigger guard, grasp the rear of the slide at the
indented area with your other hand and pull the slide fully back and then release it, allowing it to
return to the fully forward position. (Note: If you have difficulties locking the magazine, pull back
the slide and hold it in the rearward position while inserting the magazine).
or
42
2.
Grip the magazine,
pull the slide at the
same time when filling.
Insert the ammunition
as shown, max. 10x
caliber .22lr.
CLICK
Push in the magazine
completely.

iP1 SmartSystem – PersonalizediP1 SmartSystem
If the slide is locked in the rearward position, either press the slide stop lever down to release the
slide and return it to the fully forward position, or grasp the rear of the slide at the indented area
with your other hand and pull the slide fully back and then release it, allowing it to return to the
fully forward position.
43

iP1 SmartSystem – PersonalizediP1 SmartSystem
15 Firing
•
• Always make sure that the cover is locked before firing the iP1 pistol. If it is not correctly
installed, the pistol will still fire, but the slide will not be locked which could lead to serious personal injury and/or damage to the iP1 pistol.
• The iP1 pistol will not operate if it is not within 10” of the referenced iW1 wristwatch
and the PIN code entered.
• Before firing the iP1 pistol, run a clean patch through the barrel, from the chamber end,
using the cleaning rod. Repeat this procedure until the patch comes out of the barrel
with no gun oil or cleaner-lubricant-preservative on it because any obstruction in the
barrel could prevent the iP1 pistol from firing properly and result in death or serious
personal injury and/or damage to the iP1 pistol.
• Always be sure that the barrel of the iP1 pistol is clear of obstructions before firing it.
Remove any obstructions before firing the iP1 pistol so that it will function safely and
correctly. Any obstruction in the barrel could prevent the pistol from firing properly and
result in death or serious personal injury and/or damage to the pistol.
• In case of a failure to fire, continue to hold the iP1 pistol pointed towards the target for
at least 30 seconds. If a hangfire (slow ignition) has occurred, the cartridge should fire
within approximately 30 seconds. If the cartridge has not fired, remove the magazine,
eject the cartridge from the chamber and examine its primer. If the firing pin indentation is light or non-existent, stop using the iP1 pistol and have it examined by Armatix
U.S.A., Inc. If the firing pin indentation on the primer appears normal (compared to
similar previously fired cartridges) the cartridge may be defective. Separate the cartridge from other live ammunition and empty cases, reload the iP1 pistol and resume
firing. (Note: Dispose of misfired cartridges in accordance with the ammunition manufacturer’s instructions).
• Never use the iP1 pistol if it fails to function properly, and never force the slide closed on
a jammed cartridge because it could cause the cartridge to explode.
44

iP1 SmartSystem – PersonalizediP1 SmartSystem
• Never pull the trigger if the slide does not fully close to prevent a possible out of battery firing. If this happens, unload the iP1 pistol as described in Chapter 19, examine
the round that was in the chamber, and check the chamber to ensure that there are no
obstructions or debris in it.
• Always wear safety glasses when firing the iP1 pistol to protect your eyes.
• Always wear ear protection when firing the iP1 pistol to protect your hearing.
• Always be sure that your backstop is adequate to stop and contain bullets before firing
so that you do not hit anything outside of the shooting range area. A bullet could travel
through or past your target as far as 1.5 miles. If in doubt, do not shoot.
• Never shoot at a hard surface, such as a rock, or a liquid surface, such as water, because a bullet may ricochet and travel in any direction, striking you or someone else.
• Always put a responsible and competent person in charge to maintain safety, discipline
and control when a group is firing at a range, to reduce the likelihood of a negligent
discharge.
• Always carry the iP1 pistol unloaded with the slide locked open in the rearward position
while on a range until preparing to fire. Always keep the iP1 pistol pointed towards the
backstop when loading, firing, and unloading it.
• When ready to fire be sure that the area behind the slide is clear (check your thumb) and
do not hold the iP1 pistol near your body, because the slide will move forcefully rearward
when the pistol is fired. (Note: When firing with a two-hand grip, the thumb of the weak
hand should be on the weak hand side of the iP1 pistol, never behind the slide).
• Always keep yourself and others clear of the ejection port because spent cartridges are
hot and are ejected with enough force to cause injury. Never touch the slide or barrel
immediately after firing because they may be hot and could cause burns.
45

iP1 SmartSystem – PersonalizediP1 SmartSystem
• Never place your fingers in the ejection port because they could be injured by the movement of the slide.
• Never fire the iP1 pistol near an animal unless it is trained to accept that noise. An animal’s startled reaction could injure it, or cause it to injure you or someone else.
When the iP1 pistol is loaded with a cartridge in the chamber, the magazine is correctly inserted,
your synced iW1 wristwatch with the matching PIN code correctly entered is worn on the wrist of
your shooting hand, and the batteries in both the iP1 pistol and iW1 wristwatch have an adequate
charge, the iP1 pistol can be fired by completing the following steps:
1. Hold the iP1 pistol with your firing hand and support it with your other hand.
2. Squeeze the backstrap towards the front of the iP1 pistol to actuate it.
3. Aim at the target.
4. Push the trigger switch fully to the right.
5. Place your index finger on the trigger and pull it to its rearmost position and then release
it completely. (NOTE: In order to make sure that the system is ready for firing the following
round, the trigger must be released completely after every single shot.)
Once you pull the trigger slightly to the rear, the iP1 pistol is activated for firing. You must pull
the trigger fully to the rear within 60 seconds or the iP1 pistol will return to inactive mode to
conserve battery power. If you do not pull the trigger fully to the rear within 60 seconds after
you first begin pulling it, you must completely release the trigger to reactivate the pistol to
allow it to be fired.
After firing the last cartridge in the magazine, the slide will remain locked open in the rearward
position.
46

iP1 SmartSystem – PersonalizediP1 SmartSystem
2.
16 Reloading when firing
When reloaded in the following manner, the iP1 pistol will be cocked and ready to fire by
pulling the trigger. If you do not intend to immediately continue firing the iP1 pistol, do not
reload it in this manner.
When the last cartridge is fired, the slide will be locked in the rearward position by the slide stop
lever. In order to insert a new magazine and resume firing, complete the following steps:
1. Secure the trigger by pressing the trigger switch to the left.
2. Remove the empty magazine by pressing down on the magazine catch.
3. Insert a loaded magazine into the magazine well until the magazine catch locks it in place.
4. Release the slide to return it to the forward (closed) position by either pressing the slide stop
lever down or grasping the rear of the slide at the indented area with your other hand and
pulling the slide fully back and then releasing it.
5. Release the trigger by pressing the trigger switch to the right.
The authorized user (with the corresponding iW1 wristwatch) can now continue firing the iP1
pistol simply by pulling the trigger.
Secure trigger by
pressing the trigger
switch to the left.
47
1.
3.
Remove the magazine,
reload and install.
4.
Press the slide release
lever, the slide moves
2.
1.
forwards.
DANGER!
Pistol is loaded
and cocked!

iP1 SmartSystem – PersonalizediP1 SmartSystem
17 Clearing malfunctions (jams)
In case of a failure to fire, continue to hold the iP1 pistol pointed towards the target for at
least 30 seconds. If a hangfire (slow ignition) has occurred, the cartridge should fire within
approximately 30 seconds. If the cartridge has not fired, remove the magazine, eject the
cartridge from the chamber and examine its primer. If the firing pin indentation is light or
non-existent, stop using the iP1 pistol and have it examined by Armatix U.S.A., Inc. If the
firing pin indentation on the primer appears normal (compared to similar previously fired
cartridges) the cartridge may be defective. Separate the cartridge from other live ammunition and empty cases, reload the iP1 pistol and resume firing.
Dispose of misfired cartridges in accordance with the ammunition manufacturer’s instructions.
• If an unfired cartridge hangs up, jams or binds while being chambered, do not attempt
to force it into the chamber by pushing or striking the slide to attempt to close it because this could cause the cartridge to burst resulting in fragments of the cartridge
flying out of the ejection port with sufficient force to cause death or serious personal
injury and/or property damage.
• Always wear safety glasses when attempting to remove a jammed cartridge to protect
your eyes.
• Use of improper ammunition could cause death or serious personal injury and/or property damage. Only use high quality commercially manufactured .22 LR ammunition
that meets SAAMI or CIP standards.
48

iP1 SmartSystem – PersonalizediP1 SmartSystem
All auto-loading pistols may occasionally experience a malfunction (jam) related to the feeding of
ammunition. Most malfunctions are caused by improper ammunition, improper lubrication, or a
damaged magazine. To minimize the chance of malfunctions (jams), regularly clean the iP1 pistol
pursuant to the instructions in Chapter 21 of this manual.
If you experienced a malfunction (jam) while using a new brand, type, or lot of ammunition, try
firing another type of ammunition to determine whether the ammunition was the source of the
malfunction (jam). Identify the particular type of ammunition that Armatix recommends for use in
the iP1 pistol. If a cartridge becomes jammed while being chambered or extracted, follow the steps
below to remove it.
1. While keeping the muzzle of the iP1 pistol pointed in a safe direction (a safe direction is one
in which no one can possibly be injured in the event of an unintentional discharge), secure the
trigger by pressing the trigger switch to the left.
2. Remove the magazine if possible by pressing down on the magazine release. (Note: To prevent
damage to the magazine, do not allow it to fall to the floor).
3. While holding the grip with your firing hand, with your finger off of the trigger and outside of
the trigger guard, grasp the rear of the slide at the indented area with your other hand and
pull the slide fully back.
4. Lock the slide in the rearward (open) position by pushing up on the slide lock and slowly releasing the slide from the fully rearward position until it locks in the open position.
5. If the above steps have not removed the jammed cartridge, carefully remove the jammed
cartridge from the chamber using your fingers or a pointed wooden dowel.
Do not use a metal tool to attempt to remove an unfired cartridge because it could ignite
the primer and cause the cartridge to rupture resulting in fragments of the cartridge flying
out of the ejection port with sufficient force to cause death or serious personal injury and/
or property damage.
6. If you are unable to remove the jammed cartridge using the above steps, leave the slide locked
in the rearward (open) position and contact Armatix U.S.A., Inc. for further instructions.
49

iP1 SmartSystem – PersonalizediP1 SmartSystem
18 Trouble shooting
This chapter describes other possible malfunctions that may occur and corresponding remedial
measures that the user can perform based on the cause of the malfunction. If the malfunction cannot be remedied with the measures described here, please contact Armatix U.S.A., Inc.
18.1 Mechanical malfunctions
Malfunction Cause Remedial measure
Cartridge does not
fire.
Communication error between the
iW1 wristwatch and the iP1 pistol.
Faulty ammunition. Unload the iP1 pistol, dispose of the
iP1 pistol is very dirty. Clean the iP1 pistol.
See Chapters 8-11.
cartridge that failed to fire, and use
other / recommended ammunition.
Cartridge is not
ejected.
50
The trigger is not completely pulled
back within 60 seconds.
No or empty batteries in the iP1 pistol.
Electronics damaged. Contact Armatix U.S.A., Inc.
Faulty ammunition. Unload the iP1 pistol and use other /
Slide does not go back fully. Unload and clean the iP1 pistol, and
Ejection mechanism damaged. Contact Armatix U.S.A., Inc.
Pull the trigger within 60 seconds as
far as it will go.
Install fully charged batteries in the
iP1 pistol.
recommended ammunition.
perform a function test. Use other /
recommended ammunition.

iP1 SmartSystem – PersonalizediP1 SmartSystem
Malfunction Cause Remedial measure
Fired cartridge case
jams in the chamber.
Cartridge is not
chambered.
(Last) cartridge is
not delivered from
the magazine.
Slide does not remain back after the
last shot.
Slide does not close
completely.
Cartridge case deformed or chamber dirty.
Faulty ammunition. Use other / recommended am-
Chamber dirty. Unload and clean the iP1 pistol.
Recoil spring damaged. Replace recoil spring.
Magazine not inserted correctly. Push in the magazine completely
Magazine damaged. Replace magazine.
Magazine spring damaged. Contact Armatix U.S.A., Inc. or
Magazine damaged. Replace magazine.
Faulty ammunition. Use other / recommended ammuni-
Magazine spring damaged. Contact Armatix U.S.A., Inc. or
Slide does not go back fully. Clean the iP1 pistol, and perform a
Slide release lever damaged. Contact Armatix U.S.A., Inc.
Faulty ammunition. Use other / recommended ammuni-
iP1 pistol is dirty. Clean the iP1 pistol.
Recoil spring damaged. Replace recoil spring.
Remove the magazine. Push the
cartridge case out through the
barrel using a wooden dowel. Clean
the iP1 pistol. Use other / recommended ammunition.
munitio.
(must engage noticeably).
replace magazine.
tion.
replace magazine.
function test. Use other / recommended ammunition.
tion.
51

iP1 SmartSystem – PersonalizediP1 SmartSystem
Malfunction Cause Remedial measure
Bullet strikes to the
side of the target.
Bullet strikes above
or below the target.
18.2 Electronic malfunctions
Malfunction Cause Remedial measure
LED display does not
light up (backstrap
actuated).
Faulty ammunition. Use other / recommended ammuni-
Front sight not properly adjusted. Adjust front sight.
Faulty ammunition. Use other / recommended ammuni-
Front sight damaged. Replace front sight.
No or empty batteries in the iP1
pistol.
Backstrap switch damaged. Contact Armatix U.S.A., Inc.
tion.
tion.
Install fully charged batteries in the
iP1 pistol.
LED display lights
up red.
LED display flashes
red and “no sync”
message displayed
on the iW1 wristwatch
52
iP1 pistol is in “iP1 SmartSystem –
Basic-Mode”.
Pistol function of the iW1 wristwatch
not activated.
iW1 wristwatch is not communicating with the iP1 pistol.
System times of iW1 wristwatch and
iP1 pistol are not synchronized.
Wrong iW1 wristwatch. Make sure you are using the wrist-
Contact Armatix U.S.A., Inc.
Enter the 5 digit PIN code in the iW1
wristwatch.
Bring iW1 wristwatch within 10" of
the iP1 pistol.
Synchronize system times of iW1
wristwatch and iP1 pistol.
watch that is referenced to the iP1
pistol you are trying to synchronize.

iP1 SmartSystem – PersonalizediP1 SmartSystem
Malfunction Cause Remedial measure
LED display flashes
red and the pistol
symbol flashes on
the iW1 wristwatch.
iP1 pistol is not referenced with the
iW1 wristwatch.
Reference the iP1 pistol to the iW1
wristwatch.
LED display lights
up blue
LED display lights up
weakly.
No message on
display of the iW1
wristwatch.
No magazine inserted. Insert magazine.
Magazine not inserted correctly. Push in the magazine completely
iP1 pistol batteries have insufficient
charge.
Backstrap / optical waveguide dirty. Clean the iP1 pistol.
Optical waveguide damaged. Replace backstrap.
No battery inserted or battery
empty.
(must engage noticeably).
Replace the batteries in the iP1
pistol.
Replace the battery in the iW1
wristwatch.
53

iP1 SmartSystem – PersonalizediP1 SmartSystem
19 Unloading procedure and safety check
• Do not uncock the iP1 pistol with a cartridge in the chamber. If you lose your grip on the
hammer while lowering it, the iP1 pistol may unintentionally discharge, possibly leading
to death or serious personal injury to you or others.
• Although the iP1 pistol has a loaded chamber indicator (LCI) you should never solely
rely on it or your memory to determine whether the iP1 pistol is loaded or unloaded.
Always retract the slide by grasping it at the indented area at the rear of the slide and
pulling it fully to the rear and then visually and physically (with your finger) check to
make sure there is not a cartridge in the chamber.
• Although the iP1 pistol has a magazine disconnect, it is electronically controlled and
could fail. Never rely on a magazine disconnect to prevent the pistol from firing when
the magazine is removed and always retract the slide by grasping it at the indented
area at the rear of the slide and pulling it fully to the rear and then visually and physically (with your finger) check to make sure there is not a cartridge in the chamber.
To unload the iP1 pistol, follow the instructions below. To ensure that the iP1 pistol is unloaded,
you MUST proceed in this order.
1. Secure the trigger by pressing the trigger switch to the left.
2. Remove the magazine by pressing down on the magazine release. (Note: To prevent damage
to the magazine, do not allow it to fall to the floor).
3. While holding the grip with your firing hand, with your finger off of the trigger and outside of
the trigger guard, grasp the rear of the slide at the indented area with your other hand and
pull the slide fully back to eject any cartridge that may be in the chamber.
4. Lock the slide in the rearward (open) position by pushing up on the slide lock and slowly releasing the slide from the fully rearward position until it locks in the open position.
54

iP1 SmartSystem – PersonalizediP1 SmartSystem
5. Once the slide is locked to the rear, both visually and physically (with your finger) inspect both
the chamber and the magazine well of the iP1 pistol to be sure that no ammunition remains
in either place.
6. Release the slide to return it to the forward (closed) position by either pressing the slide stop
lever down or grasping the rear of the slide at the indented area with your other hand and
pulling the slide fully back and then releasing it.
7. Release the trigger by pressing the trigger switch to the right.
8. With the muzzle of the iP1 pistol pointed in a safe direction (a safe direction is one in which
no one can possibly be injured in the event of an unintentional discharge), hold the hammer in
the rearward position with your thumb, pull the trigger to allow the hammer to move forward,
then allow the hammer to slowly move forward using your thumb and release the trigger.
9. Secure the trigger by pressing the trigger switch to the left.
1.
1.
Secure trigger by
pressing the trigger
switch to the left.
Release and remove
the magazine.
55
2.
Grip the slide, pull
back completely, ...
… eject the cartridge.
Inspect the chamber - it
must be empty!
Release the slide, un-
cock the pistol. Make
sure that the trigger
is secured. Insert an
empty magazine, if
required.
2.

iP1 SmartSystem – PersonalizediP1 SmartSystem
20 Disassembly
• Unload all magazines and remove all live ammunition from the area before disassembling the iP1 pistol to reduce the chance of a negligent discharge.
• Although the iP1 pistol has a loaded chamber indicator (LCI) you should never solely
rely on it or your memory to determine whether the iP1 pistol is loaded or unloaded.
Always retract the slide by grasping it at the indented area at the rear of the slide and
pulling it fully to the rear and then visually and physically (with your finger) check to
make sure there is not a cartridge in the chamber.
• Although the iP1 pistol has a magazine disconnect, it is electronically controlled and
could fail. Never rely on a magazine disconnect to prevent the pistol from firing when
the magazine is removed and always retract the slide by grasping it at the indented
area at the rear of the slide and pulling it fully to the rear and then visually and physically (with your finger) check to make sure there is not a cartridge in the chamber.
• Never alter or modify the iP1 pistol because this could cause it to malfunction and create a dangerous condition.
• Always wear safety glasses when disassembling the iP1 pistol to protect your eyes from
components that are under pressure, such as springs.
To disassemble (field strip) the iP1 pistol for cleaning, follow the instructions below. To ensure that
the iP1 pistol is unloaded, disassembly MUST be performed in this order.
1. Secure the trigger by pressing the trigger switch to the left.
2. Remove the magazine by pressing down on the magazine catch. (Note: To prevent damage to
the magazine, do not allow it to fall to the floor).
56

iP1 SmartSystem – PersonalizediP1 SmartSystem
3. While holding the grip with your firing hand, with your finger off the trigger and outside of the
trigger guard, grasp the rear of the slide at the indented area with your other hand and pull
the slide fully back to eject any cartridge that may be in the chamber.
4. Lock the slide in the rearward (open) position by pushing up on the slide lock and slowly releasing the slide from the fully rearward position until it locks in the open position.
5. Once the slide is locked to the rear, both visually and physically (with your finger) inspect both
the chamber and the magazine well of the iP1 pistol to be sure that no ammunition remains
in either place.
6. Release the slide to return it to the forward (closed) position by either pressing the slide stop
lever down or grasping the rear of the slide at the indented area with your other hand and
pulling the slide fully back and then releasing it.
7. Press the cover release (the metal strip under the barrel in front of the trigger) upwards and,
while holding it in, pull the cover forward and away from the frame.
8. Pull the slide completely to the rear and then upwards to release it from the frame.
9. Push the slide forward and off of the barrel.
10. Pull the recoil spring forward off of the barrel.
In order to be able to remove the slide, the cover must
first be released and pulled off. To release the cover,
press the metal strip under the barrel in front of the trigger upwards and pull the cover off the pistol from the
front.
2.
1.
PRESS
Release and pull off
cover.
57

iP1 SmartSystem – PersonalizediP1 SmartSystem
After pulling off the
cover, the slide can
now be removed as
illustrated:
pletely to the rear and
Never further disassemble the iP1 pistol. Any further disassembly by untrained persons
could cause the iP1 pistol to malfunction and will void the warranty.
2.
Pull the slide com-
lift out.
1.
Remove the slide to
the front over the
barrel.
The pistol is
dismantled.
58

iP1 SmartSystem – PersonalizediP1 SmartSystem
21 Cleaning
• Always be sure that the barrel of the iP1 pistol is clear of obstructions before firing it.
Remove any obstructions before firing the iP1 pistol so that it will function safely and
correctly. Any obstruction in the barrel could prevent the pistol from firing properly and
result in death or serious personal injury and/or damage to the iP1 pistol.
• Although the iP1 pistol has a magazine disconnect, it is electronically controlled and
could fail. Never rely on a magazine disconnect and always retract the slide by grasping
it at the indented area at the rear of the slide and pulling it fully to the rear and then
visually and physically (with your finger) check to make sure there is not a cartridge in
the chamber.
• Always wear safety glasses when cleaning the iP1 pistol to protect your eyes from cleaning materials.
• Always make sure that no ammunition is located in the area where you clean the iP1
pistol. Cleaning solvents can affect the primer and powder in ammunition and cause
it to malfunction. This could result in a bullet being pushed into the barrel of the iP1
pistol and getting stuck. Firing another round with a bullet stuck in the barrel could
cause the barrel to burst and result in death or serious personal injury and/or damage
to the iP1 pistol.
• The frame of the iP1 pistol contains sensitive electric components. Leave the backstrap
installed on the frame when cleaning the iP1 pistol to protect its internal electronic
components. Be careful not to spill gun cleaning solvent, gun oil, or cleaner-lubricantpreservative on it because they could damage the electronics and prevent the iP1 pistol
from functioning.
• As with any semi-automatic pistol, the iP1 pistol should be disassembled before cleaning
it. Cleaning without field stripping, by merely locking the slide to the rear and inserting
the cleaning rod from the muzzle, can cause dirt, oil and solvents to build up inside the
iP1 pistol causing malfunctions.
59

iP1 SmartSystem – PersonalizediP1 SmartSystem
Only use commercially available gun solvent and gun oil or a cleaner-lubricant-preservative.
Use of improper cleaning fluids could damage the iP1 pistol.
Regular cleaning and care of the iP1 pistol is important to prolong its serve life by reducing wear
and helping to ensure its functional safety. You should clean the iP1 pistol:
• before firing it for the first time; and
• after every 250 rounds fired in an extended shooting session; and
• after each session in which you fire it; and
• at least every six months; and
• anytime it is exposed to the elements, becomes wet, etc.
To clean the iP1 pistol, first disassemble it into its five main components, the frame, slide, recoil
spring, cover, and magazine, pursuant to the instructions in Chapter 20.
21.1 Barrel
Clean the barrel as follows:
1. Wet a cleaning patch with a gun cleaning solvent or a cleaner-lubricant-preservative and run
it through the barrel, from the chamber end, several times using a cleaning rod.
2. Wet a bristled cleaning brush with gun cleaning solvent or a cleaner-lubricant-preservative
and run it back and forth in the barrel, from the chamber end, using a cleaning rod.
3. Wet a new cleaning patch with gun oil or a cleaner-lubricant-preservative and run it through
the barrel once, from the chamber end, with the cleaning rod and examine it. If it is not clean,
repeat steps two and three until the patch remains clean after being run through the barrel.
60

iP1 SmartSystem – PersonalizediP1 SmartSystem
4. Before firing the iP1 pistol, run a clean patch through the barrel, from the chamber end, using
the cleaning rod. Repeat this procedure until the patch comes out of the barrel with no gun oil
or cleaner-lubricant-preservative on it.
If you will be storing the iP1 pistol, do not perform step 4 until you are ready to use it.
5. Wet a nylon bristle brush with gun cleaning solvent or a cleaner-lubricant-preservative and
thoroughly brush the outside of the barrel to remove any dirt or residue.
6. Wipe the outside of the barrel dry with a clean patch and examine it. If it is not clean, repeat
steps five and six until the patch remains clean.
21.2 Slide
Clean the slide as follows:
1. Wet a nylon bristle brush with gun cleaning solvent or a cleaner-lubricant-preservative and
thoroughly brush the running surfaces where the slide matches with the frame.
2. Wipe the running surfaces where the slide matches with the guide rails of the frame with a
clean patch and examine it. If it is not clean, repeat steps one and two until the patch remains
clean.
3. Wet a nylon bristle brush with gun oil or a cleaner-lubricant-preservative and, while holding
the slide with the muzzle end facing down, brush the breech face and the area under the
extractor.
4. While holding the slide with the muzzle end facing down, wipe the breech face and the area
under the extractor with a clean patch and examine it. If it is not clean, repeat steps three and
four until the patch remains clean.
5. Check all other exposed areas of the slide for cleanliness. If any dirt or debris is found, remove
it with gun cleaning solvent or a cleaner-lubricant-preservative using a nylon bristle brush or
a clean patch.
61

iP1 SmartSystem – PersonalizediP1 SmartSystem
6. Wipe the exposed areas of the slide that you have cleaned in step 5 with a clean patch and
examine it. If it is not clean, repeat steps five and six until the patch remains clean.
21.3 Frame
Check the frame for cleanliness. If necessary, clean the frame as follows:
1. Wipe exposed parts of the frame with a clean patch that has been slightly dampened with gun
cleaning solvent or a cleaner-lubricant-preservative.
2. Wipe the exposed areas of the frame with a clean patch and examine it. If it is not clean,
repeat steps one and two until the patch remains clean.
21.4 Magazine
Inspect the magazine for dirt or visible damage. If necessary, clean the magazine as follows:
1. Wipe the outside of the magazine and the feed lips with a clean patch that has been slightly
dampened with gun cleaning solvent or a cleaner-lubricant-preservative.
2. Wipe the outside of the magazine and the feed lips with a clean patch and examine it. If it is
not clean, repeat steps one and two until the patch remains clean.
After you have cleaned the iP1 pistol, lubricate it as follows:
1. Slightly dampen a clean patch with gun oil or a cleaner-lubricant-preservative and wipe the
outside of the barrel, the inside of the slide, and the outside of the magazine.
2. Spread one drop of gun oil or a cleaner-lubricant-preservative along the running surfaces of
the slide where it matches with the guide rails of the frame.
62

iP1 SmartSystem – PersonalizediP1 SmartSystem
Your iP1 pistol is designed to operate properly with only a small amount of lubrication. Do not
over-lubricate the iP1 pistol because too much lubricant can collect unburned powder and
other debris and prevent the iP1 pistol from functioning properly.
After you have finished cleaning and lubricating the iP1 pistol, and before you assemble it, you
should inspect the barrel for lead build up, bulges, cracks or obstructions and inspect the frame and
slide for any corrosion or visible damage.
Do not use a cracked, bulged, or obstructed barrel. Contact Armatix U.S.A., Inc. for instructions on having it replaced.
Check the magazine to make sure the follower and lips are not damaged. Press down on the follower with your fingertip and release it to make sure it springs back up and does not catch in the
magazine tube.
63

iP1 SmartSystem – PersonalizediP1 SmartSystem
22 Changing the backstrap / replacing the batteries in the iP1 pistol
Make sure that the iP1 pistol is unloaded (magazine removed and chamber empty) before
changing the backstrap or replacing the batteries.
• The batteries included with the iP1 pistol are not rechargeable. Never try to recharge
non-rechargeable batteries. They may explode or catch fire.
• Never try to disassemble batteries. Battery fluids can cause serious injuries.
• Never expose batteries to high temperatures because they may explode.
• Never use mixed batteries in the iP1 pistol. The brand and charge status must be identi-
cal.
The iP1 pistol comes with interchangeable backstraps to vary the circumference of the frame. The
iP1 pistol comes with the small backstrap installed, but it can be replaced with the medium or large
backstraps by completing the following steps:
1. Use the 1/10” punch to push the pin at the bottom of the frame, near the magazine well,
fully out.
2. Pull the backstrap down a few millimeters, then to the back and away from the iP1 pistol.
3. If changing the batteries, remove the two AAA batteries and replace them with new ones.
Note: When viewed from the rear (muzzle pointed away from you) the battery on the left will
be installed with the positive side facing down and the battery on the right will be installed
with the positive side facing up).
4. Place the desired backstrap against the rear of the frame and push it up towards the slide.
64

iP1 SmartSystem – PersonalizediP1 SmartSystem
5. Use the 1/10” punch to push the pin into the hole at the bottom of the frame, near the magazine well, until it is flush with both ends.
1.
2.
First carry out safety
check then release and
remove the magazine.
Insert the batteries as
illustrated.
Press out the pin
using a punch (1/10 "
diameter).
Pull the backstrap
down and to the rear.
Fit the desired back-
strap and assemble
the pistol.
65

iP1 SmartSystem – PersonalizediP1 SmartSystem
23 Adjusting and changing the sights
Make sure that the iP1 pistol is unloaded (magazine removed and chamber empty) before
adjusting or changing the sights.
The front sight is held in place by the front sight mounting. The point of impact can be changed horizontally by adjusting the front sight. Front sights are available in four different heights to change
the point of impact vertically.
To adjust the point of impact horizontally (right or left), use a suitable tool, such as the 1/10” punch
or a screwdriver, to move the front sight to either the right or to the left in the mounting. (Note: The
front sight is securely attached to the front sight mounting and has to be pushed strongly to move
it. Securing the unloaded iP1 pistol is a vise will make it easier to adjust the front sight).
To replace the front sight, complete the following steps:
1. Remove the slide pursuant to the instructions in Chapter 20.
2. Remove the front sight mounting with front sight from the seat from the inside using the 1/10”
diameter punch.
3. Push the front sight to the side and out of the front sight mounting.
4. Push the new front sight into the mounting from the side.
5. Press the front sight mounting with front sight into the seat from above until it noticeably
engages.
6. Assemble the slide onto the iP1 pistol pursuant to the instructions in Chapter 24.
After replacing the front sight, it will be necessary to adjust it horizontally to ensure the proper
point of impact.
66

iP1 SmartSystem – PersonalizediP1 SmartSystem
24 Assembly
Always wear safety glasses when reassembling the iP1 pistol to protect your eyes from
springs.
To assemble the iP1 pistol, follow the instructions below.
1. Push the recoil spring onto the barrel.
2. Holding the frame in your firing hand, with your finger off of the trigger and outside of the
trigger guard, place the slide on top of the frame and over the recoil spring and pull the slide
back over the barrel as far as it will go, and then push it down onto the guide rails of the frame
and push it forward in the guide rails of the frame.
3. Align the cover with the grooves on the frame and push it towards the back of the iP1 pistol
until it locks into place.
Always make sure that the cover is locked in place when assembling the iP1 pistol. If it is
not correctly installed, the iP1 pistol will still fire, but the slide will not be locked in place
which could lead to serious personal injury and/or damage to the iP1 pistol.
67

iP1 SmartSystem – PersonalizediP1 SmartSystem
Push the recoil spring
onto the barrel.
CLICK
Push on the cover until
it engages.
68
Push the slide over the
spring and pull back
over the barrel.
CLICK
Push in the magazine
completely.
Pull the slide back as
far as it will go and
place onto the guide.
The pistol is
assembled.
Push the slide forward
in the guide.

iP1 SmartSystem – PersonalizediP1 SmartSystem
25 Function test
Make sure that the iP1 pistol is unloaded (both chamber and magazine empty) before performing a function test.
After assembling the iP1 pistol or remedying a malfunction, you should perform a function test to
ensure that it is operating correctly by completing the following steps:
1. Insert an empty magazine into the magazine well and make sure that it noticeably locks into
place.
2. Pull the slide back as far as it will go and release it to make sure that it is held in the open
position by the slide release lever.
3. Press down on the magazine release and make sure that the magazine falls free of the magazine well. (Note: To prevent damage to the magazine, do not allow it to fall to the floor).
4. Press down on the slide release lever and make sure that the slide moves fully forward.
5. With your finger off of the trigger and outside of the trigger guard, retract and release the
slide several times to make sure it moves freely.
6. Make sure the trigger switch is in the right (released) position and, with the muzzle of the
iP1 pistol pointed in a safe direction (a safe direction is one in which no one can possibly be
injured in the event of an unintentional discharge), pull the trigger fully to the rear to make
sure that the hammer is cocked and released.
7. Take your finger off of the trigger and allow it to come fully forward.
8. Move the trigger switch to the left (locked) position and make sure that it noticeably engages.
9. With the muzzle of the iP1 pistol pointed in a safe direction (a safe direction is one in which no
one can possibly be injured in the event of an unintentional discharge), pull the trigger fully to
the rear to make sure that the hammer is NOT cocked and released.
69

iP1 SmartSystem – PersonalizediP1 SmartSystem
26 Storing the iP1 pistol
• Always make sure the iP1 pistol is unloaded (both chamber and magazine empty) and
the hammer is in the forward (uncocked) position before storing it.
• Always store and transport the iP1 pistol unloaded and locked in a suitable container,
such as the included pistol case, out of the reach and sight of children or other unauthorized persons. The personalized nature of the iP1 pistol is not an excuse for the
failure to follow safe firearm storage practices.
• Never store or transport ammunition or the synced iW1 wristwatch together with the
PIN-Card and the valid PIN codes of the iP1 SmartSystem in the same container as the
iP1 pistol. The PIN-Card and the valid PIN codes of the iP1 SmartSystem must always
be stored separately and out of the reach and sight of children or other unauthorized
persons.
If the pistol function of the iW1 wristwatch is active, deactivate it pursuant to the instructions in
Chapter 7 before storing the iP1 pistol.
If you have not cleaned the iP1 pistol since last firing it, clean it pursuant to the instructions in
Chapter 21.
Insert your unloaded iP1 pistol in the included pistol case and store it separately from the iW1
wristwatch and ammunition, out of the reach and sight of children or other unauthorized persons,
in a place where it will not become wet or be subjected to high temperatures. (Note: If the iP1 pistol
is to be stored for an extended period of time, the batteries should be removed pursuant to the
instructions in Chapter 22.)
During storage, the iP1 pistol should be unpacked, inspected and cleaned every six months to
protect it from corrosion.
70

iP1 SmartSystem – PersonalizediP1 SmartSystem
27 Upgrading the iP1 SmartSystem - Basic to the iP1 SmartSystem Personalized
Make sure that the iP1 pistol is unloaded (both chamber and magazine empty) and the hammer is in the forward (uncocked) position before performing the upgrade procedure.
An iP1 SmartSystem – Basic can be upgraded to the iP1 SmartSystem – Personalized and synced
with an iW1 wristwatch. (Note: After you have synced the iP1 pistol to an iW1 wristwatch, it can not
be restored to the original iP1 SmartSystem – Basic configuration.)
To upgrade the iP1 SmartSystem – Basic to the iP1 SmartSystem – Personalized, proceed as follows:
1. First, delete the information stored in the iP1 pistol by resetting it as described in Chapter 10.
Resetting the iP1 also configures it to operate in Personalized mode.
2. Second, enter the 5-digit PIN code to your iW1 wristwatch as described in Chapter 6.
3. Third, reference the iP1 pistol to the iW1 wristwatch, as described in Chapter 11.
Now you are able to use the additional safety features of the SmartSystem - Personalized.
71

iP1 SmartSystem – PersonalizediP1 SmartSystem
28 Updating the firmware
The firmware for the iW1 wristwatch and the iP1 pistol can be updated using the optional USB
tool. To allow the iW1 wristwatch to communicate with the USB tool, beginning with the standard
display press the top left and bottom left buttons for 3 seconds until the display reads “HF rEAdy.”
To exit the USB communication mode and return to the standard display, press any key. Additional
information on updating the firmware is included with the optional USB tool.
3 sec.
3 sec.
Activate receiver: Hold
TL and BL depressed
for 3 seconds.
Receiver ready. Terminate waiting:
Press any button.
Standard display
appears.
72

iP1 SmartSystem – PersonalizediP1 SmartSystem
29 Changing the iW1 wristwatch batteries
• The battery included with the iW1 wristwatch is not rechargeable. Never try to recharge
non-rechargeable batteries. They may explode or catch fire.
• Never try to disassemble batteries. Battery fluids can cause serious injuries.
• Never expose batteries to high temperatures because they may explode.
The iW1 wristwatch operates using a single CR2032 battery. To change it, proceed as follows:
1. With the display of the iW1 wristwatch facing down, remove the battery by turning the battery
compartment cover counterclockwise.
2. Turn the iW1 wristwatch over and allow the old battery to fall out.
3. With the face of the iW1 wristwatch facing down again, insert the new battery with the negative side facing downwards.
4. Place the battery compartment cover back on the iW1 wristwatch and turn it clockwise to
lock it in place.
+
–
Release and remove
the battery compart-
ment cover.
73
Insert the battery as
shown.
Replace and lock the
battery compartment
cover.
The wristwatch is now
ready for use.

iP1 SmartSystem – PersonalizediP1 SmartSystem
Part list
The iP1 SmartSystem – Personalized from Armatix U.S.A., Inc. is a high-tech product that is manufactured with the highest precision. Accordingly, most parts have to be replaced by returning the
pistol to Armatix U.S.A., Inc.
Only those parts marked with an * are available for purchase and can be replaced by the user.
1. Frame
2. Slide
3. Recoil spring *
4. Cover *
5. Magazine assembly *
6. Backstrap: *
a. small (included)
b. medium (optional)
c. large (optional)
7. Backstrap pin *
8. Front sight mounting *
9. Front sight * (available in four different heights)
10. Batteries *
iW1 wristwatch *
The above part numbers correspond to the exploded drawing on Page 75.
74

iP1 SmartSystem – PersonalizediP1 SmartSystem
Exploded drawing
9*
8*
2
3*
75
4*
1
6c*
6b*
10*
6a*
7*
5*

iP1 SmartSystem – PersonalizediP1 SmartSystem
Technical Data
Technical Data Backstrap S Backstrap M Backstrap L
Overall length 170 mm
6.69 in
Overall width 30 mm
Trigger length 77 mm
3.03 in
Weight without magazine 518g / 18.27 oz.
with empty magazine 576g / 20.32 oz.
Barrel length 92 mm
173 mm
6.81 in
1.18 in
78 mm
3.07 in
3.62 in
175 mm
6.89 in
76

iP1 SmartSystem – PersonalizediP1 SmartSystem
Limited one year operational warranty
Subject to the terms, conditions and limitations outlined below, Armatix U.S.A., Inc. guarantees
the iP1 SmartSystem — Personalized against defects in materials and workmanship that adversely
affect its operation for a period of one (1) year from the date of its original purchase by the initial
consumer.
This warranty only becomes effective if activated by the original consumer purchaser within 30
days of the purchase date, by completing and returning the warranty card included with the iP1
SmartSystem — Personalized. Armatix U.S.A., Inc. reserves the right, at its sole discretion, to accept
proof of purchase in lieu of a completed warranty card.
To make a claim under this warranty, contact Armatix U.S.A., Inc. at: 23121 Coltrane Avenue, Newhall, CA 91321, customerservice@armatix.us or (855) 477-1972 for instructions on how to return
the iP1 SmartSystem — Personalized. Do not return the iP1 SmartSystem — Personalized for service
without prior authorization.
Limitations of warranty
The warranty will be void if any of the following occur:
1. the instructions in the Instruction Manual are not followed;
2. the iP1 SmartSystem — Personalized or any of its parts are altered or modified from
their original state;
3. damage is caused by misuse, abuse or improper maintenance; or
4. the iP1 SmartSystem — Personalized is disassembled beyond the instructions in Chapter
20 of the Instruction Manual.
There are no warranties which extend beyond the description on the face hereof.
77
iP1 SmartSystem – PersonalizediP1 SmartSystem
The sole and exclusive remedy pursuant to this warranty is the repair or replacement of the
iP1 SmartSystem — Personalized, at the sole discretion of Armatix U.S.A., Inc.
The implied warranties of merchantability and fitness for a particular purpose are expressly
disclaimed.
All disclaimers and limitations of liability shall still apply even if the limited remedy of repair
and replacement fails of its essential purpose.
In states where permitted, Armatix U.S.A., Inc. assumes no liability for incidental or consequential damage or for incidental expenses.
Any action against Armatix U.S.A., Inc. based on an alleged breach of this warranty must be
brought within one (1) year of the claimed breach.
Armatix U.S.A., Inc.’s liability for breach of warranty shall be limited to repair or replacement
of the iP1 SmartSystem — Personalized, at the sole discretion of Armatix U.S.A., Inc.
Manufactured by: Imported and distributed in the United States by:
Armatix GmbH Armatix U.S.A., Inc.
Feringastraße 4 23121 Coltrane Avenue
85774 Unterföhring Germany Newhall, CA 91321
Tel.: +49 89 / 4 27 29 79 – 0 Tel.: 855-477-1972
Email: info@armatix.de Email: customerservice@armatix.us
Webpage: www.armatix.de Webpage: www.armatix.us
78

iP1 SmartSystem – PersonalizediP1 SmartSystem
FCC Notice
This device complies with Part 15 of the FCC Rules. Operation is subject to the following two conditions: 1. This device may not cause harmful interference, and 2. this device must accept any interference received, including interference that may cause undesired operation. Changes or modifications not expressly approved by the party responsible for compliance could void the user’s authority
to operate the equipment.
79

iP1 SmartSystem – PersonalizediP1 SmartSystem
Youth Handgun Safety Act Notice
(1) The misuse of handguns is a leading contributor to juvenile violence and fatalities.
(2) Safely storing and securing firearms away from children will help prevent the unlawful posses-
sion of handguns by juveniles, stop accidents, and save lives.
(3) Federal law prohibits, except in certain limited circumstances, anyone under 18 years of age
from knowingly possessing a handgun, or any person from selling, delivering, or otherwise
transferring a handgun to a person under 18.
(4) A knowing violation of the prohibition against selling, delivering, or otherwise transferring a
handgun to a person under the age of 18 is, under certain circumstances, punishable by up to
10 years in prison.
FEDERAL LAW
The Gun Control Act of 1968, 18 U.S.C. Chapter 44, provides in pertinent part as follows:
18 U.S.C. § 922(x)
(1) It shall be unlawful for a person to sell, deliver, or otherwise transfer to a person who the
transferor knows or has reasonable cause to believe is a juvenile–
(A) a handgun; or
(B) ammunition that is suitable for use only in a handgun.
(2) It shall be unlawful for any person who is a juvenile to knowingly possess–
(A) a handgun; or
(B) ammunition that is suitable for use only in a handgun.
80

iP1 SmartSystem – PersonalizediP1 SmartSystem
(3) This subsection does not apply to–
(A) a temporary transfer of a handgun or ammunition to a juvenile or to the possession or
use of a handgun or ammunition by a juvenile if the handgun and ammunition are possessed
and used by the juvenile–
(i) in the course of employment, in the course of ranching or farming related to activities at
the residence of the juvenile (or on property used for ranching or farming at which the juvenile, with the permission of the property owner or lessee, is performing activities related
to the operation of the farm or ranch), target practice, hunting, or a course of instruction
in the safe and lawful use of a handgun;
(ii) with the prior written consent of the juvenile’s parent or guardian who is not prohibited
by Federal, State, or local law from possessing a firearm, except–
(I) during transportation by the juvenile of an unloaded handgun in a locked container
directly from the place of transfer to a place at which an activity described in clause (i)
is to take place and transportation by the juvenile of that handgun, unloaded and in
a locked container, directly from the place at which such an activity took place to the
transferor; or
(II) with respect to ranching or farming activities as described in clause (i), a juvenile
may possess and use a handgun or ammunition with the prior written approval of the
juvenile’s parent or legal guardian and at the direction of an adult who is not prohibited by Federal, State or local law from possessing a firearm;
(iii) the juvenile has the prior written consent in the juvenile’s possession at all times when
a handgun is in the possession of the juvenile; and
(iv) in accordance with State and local law;
(B) a juvenile who is a member of the Armed Forces of the United States or the National
Guard who possesses or is armed with a handgun in the line of duty;
81

iP1 SmartSystem – PersonalizediP1 SmartSystem
(C) a transfer by inheritance of title (but not possession) of a handgun or ammunition to a
juvenile; or
(D) the possession of a handgun or ammunition by a juvenile taken in defense of the juvenile
or other persons against an intruder into the residence of the juvenile or a residence in which
the juvenile is an invited guest.
(4) A handgun or ammunition, the possession of which is transferred to a juvenile in circumstanc-
es in which the transferor is not in violation of this subsection shall not be subject to permanent confiscation by the Government if its possession by the juvenile subsequently becomes
unlawful because of the conduct of the juvenile, but shall be returned to the lawful owner
when such handgun or ammunition is no longer required by the Government for the purposes
of investigation or prosecution.
(5) For purposes of this subsection, the term “juvenile” means a person who is less than 18 years
of age.
(6) (A) In a prosecution of a violation of this subsection, the court shall require the presence of a
juvenile defendant’s parent or legal guardian at all proceedings.
(B) The court may use the contempt power to enforce subparagraph (A).
(C) The court may excuse attendance of a parent or legal guardian of a juvenile defendant at
a proceeding in a prosecution of a violation of this subsection for good cause shown.
18 U.S.C. § 924(a)(6)
(A) (i) A juvenile who violates section 922(x) shall be fined under this title, imprisoned not more
than 1 year, or both, except that a juvenile described in clause (ii) shall be sentenced to probation on appropriate conditions and shall not be incarcerated unless the juvenile fails to comply
with a condition of probation.
82

iP1 SmartSystem – PersonalizediP1 SmartSystem
(ii) A juvenile is described in this clause if–
(B) A person other than a juvenile who knowingly violates section 922(x)–
(i) shall be fined under this title, imprisoned not more than 1 year, or both; and
(ii) if the person sold, delivered, or otherwise transferred a handgun or ammunition to a juvenile
knowing or having reasonable cause to know that the juvenile intended to carry or otherwise
possess or discharge or otherwise use the handgun or ammunition in the commission of a crime
of violence, shall be fined under this title, imprisoned not more than 10 years, or both.
(I) the offense of which the juvenile is charged is possession of a handgun or ammunition
in violation of section 922(x)(2); and
(II) the juvenile has not been convicted in any court of an offense (including an offense
under section 922(x) or a similar State law, but not including any other offense consisting
of conduct that if engaged in by an adult would not constitute an offense) or adjudicated
as a juvenile delinquent for conduct that if engaged in by an adult would constitute an
offense.
83

iP1 SmartSystem – PersonalizediP1 SmartSystem
State required safety warnings
The following warnings are required by certain jurisdictions:
California
WARNING
“Children are attracted to and can operate firearms that can cause severe injuries or
death. Prevent child access by always keeping guns locked away and unloaded when not
in use. If you keep a loaded firearm where a child obtains and improperly uses it, you may
be fined or sent to prison.”
ADVERTENCIA
“A los niños los atraen las armas de fuego y las pueden hacer funcionar. Ellos pueden
causarses lesions graves y la muerte. Evite que los niños tengan accesso a las armas de
fuego guardándolas siempre con llave y descargadas cuando no las esté utlizando. Si
usted tiene una arma de fuego cargada en un lugar en que un niño tiene acceso a ella y la
usa indebidamente, le pueden dar una multa o enviarlo a la cárcel.”
Connecticut
“UNLAWFUL STORAGE OF A LOADED FIREARM MAY RESULT IN IMPRISONMENT OR FINE.”
Florida
“IT IS UNLAWFUL, AND PUNISHABLE BY IMPRISONMENT AND FINE, FOR ANY ADULT TO STORE
OR LEAVE A FIREARM IN ANY PLACE WITHIN THE REACH OR EASY ACCESS OF A MINOR UNDER
18 YEARS OF AGE OR TO KNOWINGLY SELL OR OTHERWISE TRANSFER OWNERSHIP OR POSSESSION OF A FIREARM TO A MINOR OR A PERSON OF UNSOUND MIND.”
84

iP1 SmartSystem – PersonalizediP1 SmartSystem
Maine
“ENDANGERING THE WELFARE OF A CHILD IS A CRIME. IF YOU LEAVE A FIREARM AND AMMUNITION WITHIN EASY ACCESS OF A CHILD, YOU MAY BE SUBJECT TO FINE, IMPRISONMENT OR
BOTH. KEEP FIREARMS AND AMMUNITION LOCKED UP. USE TRIGGER LOCKS.”
Maryland
WARNING: “Children can operate firearms which may cause death or serious injury. It is a crime to
store or leave a loaded firearm in any location where an individual knew or should have known that
an unsupervised minor would gain access to the firearm. Store your firearm responsibly!”
Massachusetts
“WARNING FROM THE MASSACHUSETTS ATTORNEY GENERAL: This handgun is not equipped
with a device that fully blocks use by unauthorized users. More than 200,000 firearms like this
one are stolen from their owners every year in the United States. In addition, there are more than
a thousand suicides each year by younger children and teenagers who get access to firearms.
Hundreds more die from accidental discharge. It is likely that many more children sustain serious
wounds, or inflict such wounds accidentally on others. In order to limit the chance of such misuse,
it is imperative that you keep this weapon locked in a secure place and take reasonable preventive
steps necessary to limit the possibility of theft or accident. Failure to take reasonable preventive
steps may result in innocent lives being lost, and in some circumstances may result in your liability
for these deaths.”
“IT IS UNLAWFUL TO STORE OR KEEP A FIREARM, RIFLE, SHOTGUN OR MACHINE GUN IN ANY
PLACE UNLESS THAT WEAPON IS EQUIPPED WITH A TAMPER-RESISTANT SAFETY DEVICE OR IS
STORED OR KEPT IN A SECURELY LOCKED CONTAINER.”
New Jersey:
New York City:
“IT IS A CRIMINAL OFFENSE TO LEAVE A LOADED FIREARM WITHIN EASY ACCESS OF A MINOR.”
“THE USE OF A LOCKING DEVICE OR SAFETY LOCK IS ONLY ONE ASPECT OF RESPONSIBLE FIRE-
85

iP1 SmartSystem – PersonalizediP1 SmartSystem
ARMS STORAGE. FOR INCREASED SAFETY, FIREARMS SHOULD BE STORED UNLOADED AND
LOCKED IN A LOCATION THAT IS BOTH SEPARATE FROM THEIR AMMUNITION AND INACCESSIBLE TO CHILDREN AND OTHER UNAUTHORIZED PERSONS.”
North Carolina:
“IT IS UNLAWFUL TO STORE OR LEAVE A FIREARM THAT CAN BE DISCHARGED IN A MANNER
THAT A REASONABLE PERSON SHOULD KNOW IS ACCESSIBLE TO A MINOR.”
Texas:
“IT IS UNLAWFUL TO STORE, TRANSPORT, OR ABANDON AN UNSECURED FIREARM IN A PLACE
WHERE CHILDREN ARE LIKELY TO BE AND CAN OBTAIN ACCESS TO THE FIREARM.”
Wisconsin:
“IF YOU LEAVE A LOADED FIREARM WITHIN THE REACH OR EASY ACCESS OF A CHILD YOU MAY
BE FINED OR IMPRISONED OR BOTH IF THE CHILD IMPROPERLY DISCHARGES, POSSESSES, OR
EXHIBITS THE FIREARM.”
State laws and regulations concerning firearms change constantly. Please check with your
local federally licensed firearm dealer or state police for additional laws and regulations regarding the storage and use of firearms in your state.
86

iP1 SmartSystem – PersonalizediP1 SmartSystem
Manufactured by: Imported and distributed in the United States by:
Armatix GmbH Armatix U.S.A., Inc.
Feringastraße 4 23121 Coltrane Avenue
85774 Unterföhring Germany Newhall, CA 91321
Tel.: +49 89 / 4 27 29 79 – 0 Tel.: 855-477-1972
Email: info@armatix.de Email: customerservice@armatix.us
Webpage: www.armatix.de Webpage: www.armatix.us
Despite the greatest care taken in the compilation of this instruction manual, data can change even
at short notice. Therefore Armatix U.S.A., Inc. cannot guarantee the currentness, correctness, and/
or completeness of the information contained in this instruction manual. The current version of this
instruction manual can be downloaded at www.armatix.us
Copyright 2014: Armatix U.S.A., Inc. All rights reserved. Content, text, illustrations, diagrams and the layout of this instruction manual are protected by copyright
laws and other intellectual property rights. This instruction manual may not be copied, distributed, or modified without the prior written approval of Armatix U.S.A., Inc.
87

© Armatix U.S.A ., Inc. | V2014 - 01
Armatix U.S.A., Inc.
23121 Coltrane Ave
Newhall, CA. 91321
USA
Tel.: 1-855-477-1972
E-Mail: customerservice@armatix.us
Webpage: www.armatix.us
 Loading...