


Arlo Go
Mobile HD Security Camera
User Manual
NETGEAR, Inc.
350 East Plumeria Drive
San Jose, CA 95134, USA
December 2016
202-11684-01

Support
For product updates and web support, visit http://www.arlo.com/en-us/support/.
Trademarks
© NETGEAR, Inc., NETGEAR and the NETGEAR Logo are trademarks of NETGEAR, Inc. Any non-NETGEAR trademarks are used for
reference purposes only.
Compliance
For the current EU Declaration of Conformity, visit
http://support.netgear.com/app/answers/detail/a_id/11621/.
For regulatory compliance information, visit
http://www.netgear.com/about/regulatory/.
See the regulatory compliance document before connecting the power supply.
2

Contents
1. Set Up Your System 7
What You Need to Install and Use Your Arlo Go Camera 7
Activate Your SIM Card ..............................................................................................................................................................8
Get the Arlo app .....................................................................................................................................................................................8
Insert the SIM Card into Your Arlo Go Camera 9
Insert the Battery Into Your Arlo Go Camera 9
Set Up Your Arlo Go Camera ........................................................................................................................................10
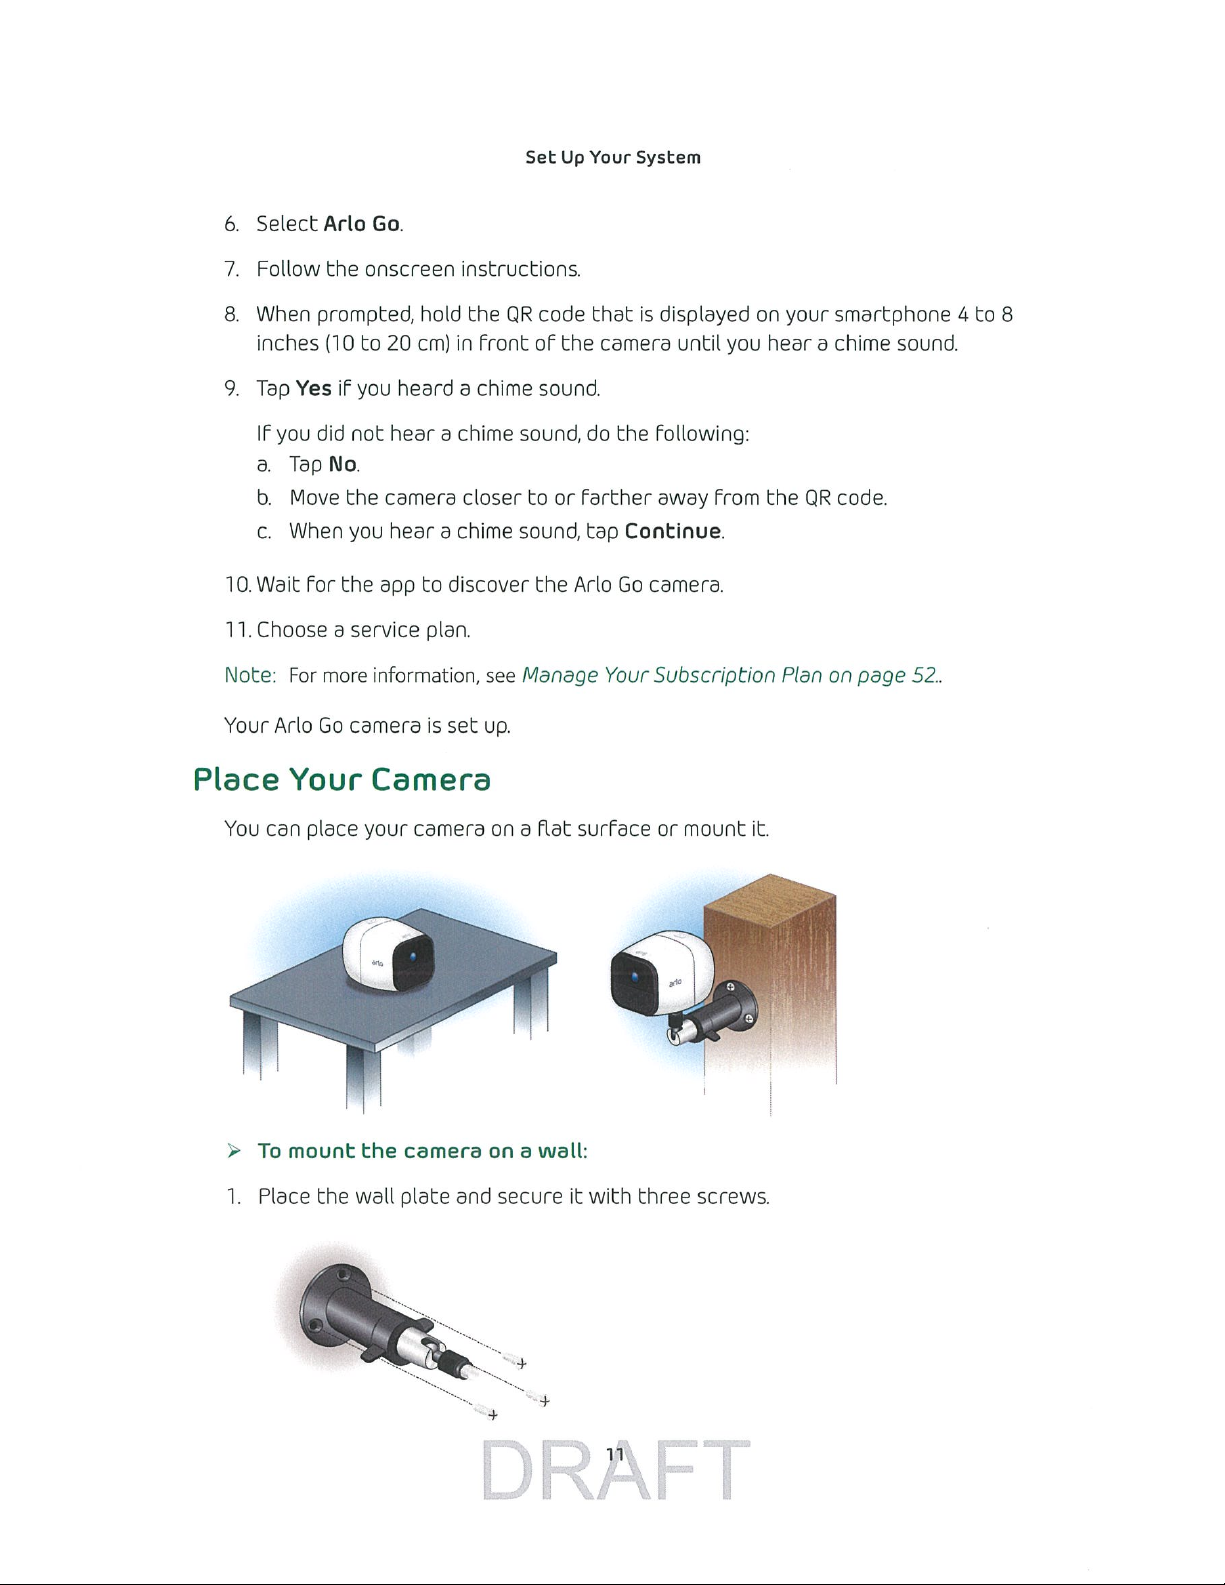
Place Your Camera ........................................................................................................................................................................11
Arlo Go Access and Cloud Storage ...................................................................................................................12
Arlo Go Camera Position ......................................................................................................................................................13
Charge Your Arlo Go Camera ......................................................................................................................................13
Camera LED Guide ..........................................................................................................................................................................14
2. View Your Content 15
View the Devices Page ...........................................................................................................................................................15
View the Camera Feeds .......................................................................................................................................................16
Record Clips From Live Video .....................................................................................................................................16
Talk and Listen ......................................................................................................................................................................................16
Control the Camera Feed Image ..........................................................................................................................17
Change the Camera Order ..............................................................................................................................................17
Zoom a Camera Image .............................................................................................................................................................18
Rotate a Camera Feed ............................................................................................................................................................18
Cloud Recording .................................................................................................................................................................................19
View Recordings.................................................................................................................................................................................19
Use the Library ....................................................................................................................................................................................19
Use the Filter ..........................................................................................................................................................................................20
Turn O the Filter ..........................................................................................................................................................................21
Share and Download Clips ...............................................................................................................................................21
3

3. Use an SD Card With Arlo Go 22
Supported SD Card Format ...........................................................................................................................................22
Insert an SD Card .............................................................................................................................................................................23
View the SD Card Status ....................................................................................................................................................23
Turn SD Card Recording O and On ...............................................................................................................24
View Videos Saved on an SD Card ......................................................................................................................25
Change the SD Card Overwrite Setting..................................................................................................26
Format an SD Card ........................................................................................................................................................................26
Safely Remove an SD Card ..............................................................................................................................................27
4. Personalize Your Camera 29
Name Your Camera .......................................................................................................................................................................29
Profile Settings .....................................................................................................................................................................................29
Change Your Password and User Name .................................................................................................30
Turn Auto Login On or O for a Smartphone ................................................................................30
Grant Access to Friends ......................................................................................................................................................31
Add a Friend ...............................................................................................................................................................................................31
Edit a Friend’s Access Privileges ..........................................................................................................................32
Delete a Friend ....................................................................................................................................................................................32
5. Modes, Rules, and Smart Alerts 34
Select a Mode .........................................................................................................................................................................................34
Change Motion Sensitivity ...............................................................................................................................................35
Change Audio Sensitivity ....................................................................................................................................................36
Manage Alerts ........................................................................................................................................................................................37
Create a Schedule ..........................................................................................................................................................................38
Add a Mode ..................................................................................................................................................................................................39
Motion Detection Activity Zones .........................................................................................................................41
Create an Activity Zone .......................................................................................................................................................41
Select an Activity Zone for a Rule.....................................................................................................................42
4

6. Settings 43
View Device Information .....................................................................................................................................................43
Turn the Camera LEDs O and On ....................................................................................................................43
Change the Time Zone ............................................................................................................................................................44
Change the Video Resolution .....................................................................................................................................45
Turn Night Vision On and O .......................................................................................................................................45
Turn the Microphone O and On .........................................................................................................................46
Change the Speaker Settings ...................................................................................................................................47
Specify Power Management ........................................................................................................................................47
Update the Firmware ...............................................................................................................................................................48
View or Change Cellular Network Settings .....................................................................................49
Restart the Camera.....................................................................................................................................................................50
Reset the Camera to Its Factory Settings .........................................................................................50
Remove a Camera From Your Account ......................................................................................................51
7. Manage Your Subscription Plan 52
Subscription Plans .........................................................................................................................................................................52
Renew Your Service Plan ...................................................................................................................................................52
Select a Premier or Elite Subscription Plan .....................................................................................52
Start or Stop a Continuos Video Recording Plan 53
8. Arlo Connect 54
Use Arlo With IFTTT ......................................................................................................................................................................54
Use Arlo Cameras With SmartThings ............................................................................................................54
9. Use SmartThings With Arlo Cameras 55
Prepare Arlo to Work With SmartThings ................................................................................................55
Use Arlo Camera Names That Are Easy to Recognize 55
Disarm Your Cameras ................................................................................................................................................................56
Integrate Your Arlo Cameras With the SmartThings App 56
Adjust the Motion Sensitivity Level ................................................................................................................58
5

Adjust Push Notifications ..................................................................................................................................................59
10. Troubleshooting 60
Check Arlo Go’s LTE Signal Strength.............................................................................................................60
Check Arlo Go’s Battery Level ..................................................................................................................................60
Arlo Go Is Not Streaming on a Mobile Device ................................................................................61
Cannot View Arlo Live Streaming in a Web Browser 61
Troubleshoot an Oine Arlo Go Camera ...............................................................................................62
Not Receiving Push Notifications .......................................................................................................................63
Check the Rules Settings for Armed Modes ...................................................................................63
Check the Arlo App Settings on an iOS Device 64
Check the Arlo App Settings on an Android Device 64
If You Said No to Push Notifications at Installation 64
11. Rechargeable Battery Safety 65
Safety Rules for Arlo Go Rechargeable Batteries 65
Safety Rules for Arlo Go Charging Station ........................................................................................66
6

1. Set Up Your System
77
Setting up your Arlo Go camera involves a few simple steps. Your Arlo account lets you
view videos from any Internet-connected computer or mobile device. You can use the
same Arlo app to set up and manage Arlo Go and Arlo cameras.
What You Need to Install and Use Your Arlo Go
Camera
You need the following to activate your Arlo Go camera:
• A computer or mobile device with Internet access
• An activated AT&T SIM card with a data plan
A SIM card comes pre-installed in every Arlo Go camera, but you must contact
AT&T to activate it. Keep your Arlo Go retail box with you when you contact
AT&T. The label on the bottom of the box has information that AT&T needs to
activate your SIM card. For more information about activating your SIM card,
see
Activate Your SIM Card on page 8.
• If you are using a computer, you also need a supported web browser. The
following browsers are qualified to work with the Arlo web application:
• Internet Explorer 10 or higher
• Microsoft Edge
• Firefox 3.5 or higher
• Safari 3 or higher (only with Mac OS X)
• Chrome (latest version)
• If you are using a mobile device, you need the Arlo app, which requires iOS
8 or higher or Android 4.1 or higher. To download the mobile app for your
smartphone or tablet, you can do one of the following:
• Visit your device’s app store and search for Arlo.
• If you have a QR reader installed on your device, scan this QR code to be
directed to the app in the app store on your device.
During activation, your Arlo Go camera must be in a location with AT&T data
coverage.
7
Set Up Your System
Activate Your SIM Card
The camera uses the AT&T network to send pictures and video to your Arlo
account in the cloud.
¾ To activate your SIM card:
1. If you know your AT&T Enterprise Sales Contact, contact that person with your
Arlo Go SIM ICCID and device IMEI. Both the SIM ICCID and the IMEI display on
the retail box.
If you don’t know your AT&T Enterprise Sales Contact, call AT&T Mobility Sales &
Services at 1-800-331-0500.
2. Select Find Your Account Representative.
This service is available Monday through Friday from 8 a.m. to 5 p.m., Central Time.
Get the Arlo app
For the best experience, downlaod the Arlo app by scanning this QR code or
searching for Arlo in the app store.
Note: If you already use the Arlo app, make sure that you are using the latest version. To
find out if an update is available, go to the app store and search for Arlo.
8
8

Set Up Your System
Insert the SIM Card into Your Arlo Go Camera
The Arlo Go camera comes with an AT&T LTE SIM card installed. If a SIM card is not
installed, insert a card into the SIM card slot.
¾ To insert a SIM card:
1. Unlock the battery compartment by
pressing and holding the latch.
2. Gently pull the battery door back to open
the compartment.
3. Align the gold SIM contacts.
4. Insert the SIM card into the SIM card slot.
Note: If you plan to store video recordings on an
optional SD card (sold separately), insert the SD
card now.
SIM card slot
SD card slot
Insert the Battery Into Your Arlo Go Camera
If power is available, you can plug your camera in and use it in powered mode. Best
practice is to insert the battery into your Arlo Go camera even if you plan to power
the camera using the power adapter.
¾ To insert the battery:
1. Align the battery contacts.
2. Insert the battery.
3. Close the battery door.
Note: The Arlo Go battery is partially charged when it leaves the factory.
9
Set Up Your System
Set Up Your Arlo Go Camera
Use the Arlo app and your Arlo account to set up your Arlo Go camera. If you
already have an Arlo account, you can add the Arlo Go camera to your account.
During setup, your Arlo Go camera must be connected to an AT&T network.
This requires that you are using a compatible device and a mobile service plan.
Additional restrictions and data charges might apply. Coverage and service are not
available everywhere.
After you add your Arlo Go camera to your Arlo account, you can place the Arlo Go
camera anywhere in AT&T’s network coverage area.
For information about optimizing LTE connectivity, scan this QR code or visit
http://tinyurl.com/jyoysqo.
To set up your Arlo Go camera:
1. Place the Arlo Go camera in a location with good cellular network coverage.
2. Make sure that the Alro Go camera is ready:
• You activated the SIM card.
• The SIM card is inserted in the camera.
• The Arlo Go camera LED is lit.
3. Launch the Arlo app from your smartphone.
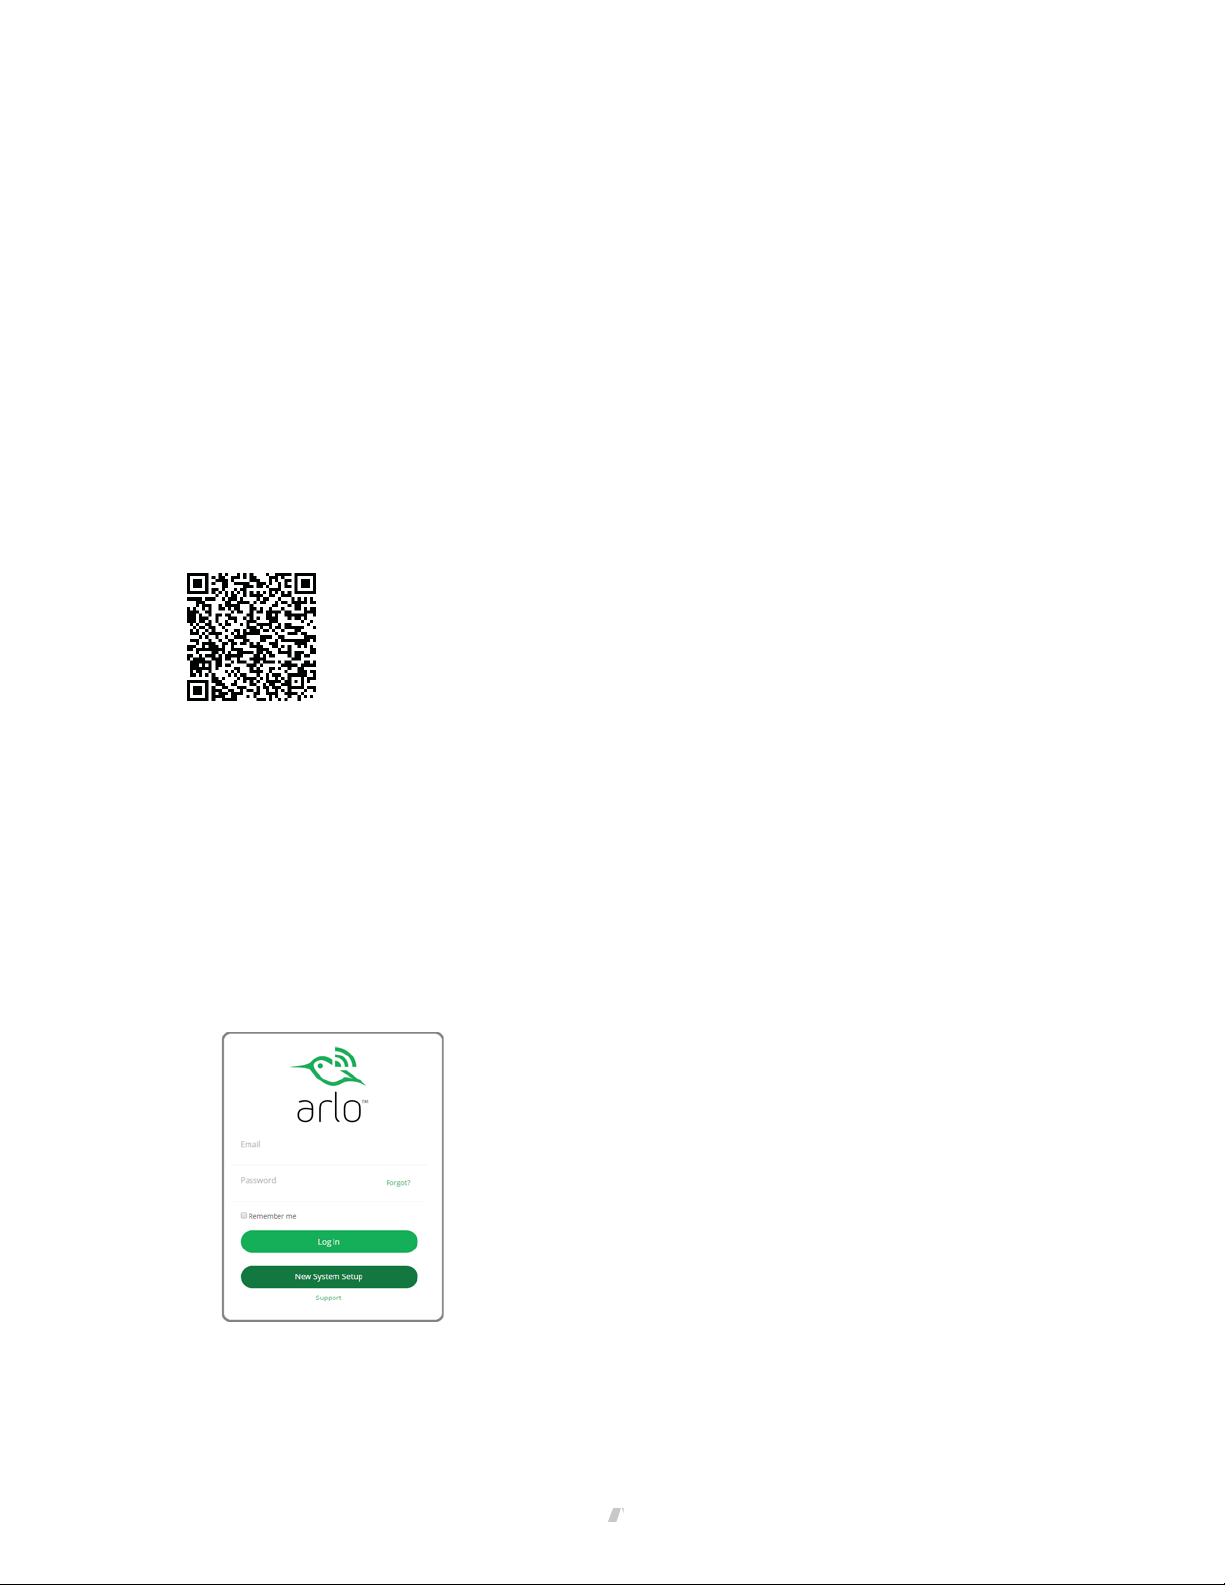
4. If you already set up an Arlo account, log in, and tap Add Device.
5. If you are setting up a new Arlo account, tap New System Setup.
10
0
Set Up Your System
2. Attach the camera to the wall plate.
If you’re mounting the camera to drywall, be sure to use the included plastic
drywall anchors.
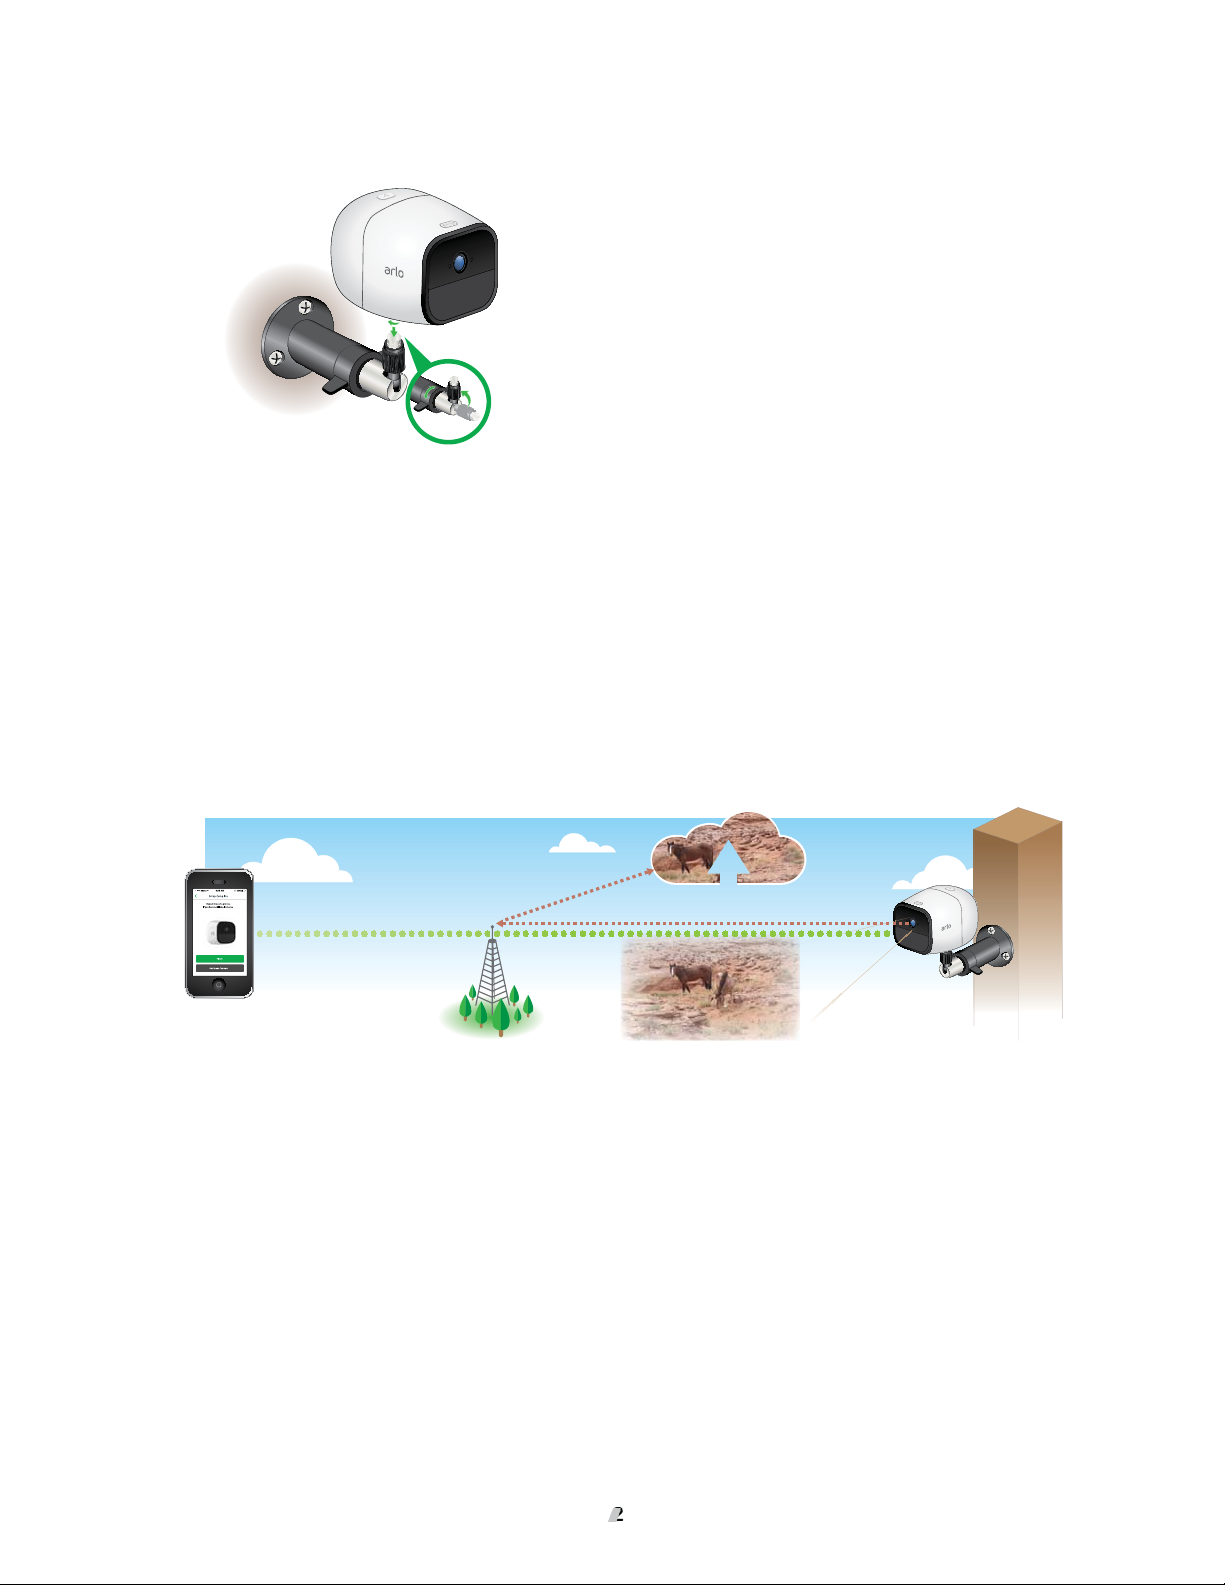
Arlo Go Access and Cloud Storage
The Arlo Go camera is designed to connect to the cellular network. During setup,
the Arlo app uses the cellular network to find your Arlo Go camera so that you can
add the camera to your Arlo account.
After setup, the Arlo Go camera uses the cellular network to send recordings to
the cloud storage associated with your Arlo account.
For best results, NETGEAR recommends placing your Arlo Go camera in a location
where it has at least three bars of LTE signal strength. If your Arlo Go camera is
in an area with consistently low LTE signal strength (two bars or less), you might
experience these problems:
• You are sometimes unable to view your camera live, or the video stream
fluctuates.
• You are sometimes unable to watch recorded videos right away.
• Notifications are sometimes delayed.
• Your battery depletes more quickly than usual because your camera spends so
much time attempting to reconnect to the network.
12
Set Up Your System
Arlo Go Camera Position
When placing your Arlo Go camera, keep these tips in mind:
• Avoid placing the camera in an area that gets a lot of light shining directly into
the camera lens.
• You can configure Arlo Go cameras to monitor part of the field view and to
detect motion only in the areas that you want monitor.
• Keep active locations in the camera’s field of view.
Arlo Go provides a 130-degree viewing angle. Position your camera so that the
space you want to monitor is within the camera’s field of view.
• Aim with the cloud.
To help with placing your camera, do a live stream from the Arlo Go camera.
Aim the camera while watching the video feed on your Arlo smartphone app to
make near-real-time adjustments to the camera’s position.
For more information, see the YouTube video
Security Camera.
How to Install Arlo Go Smart Home
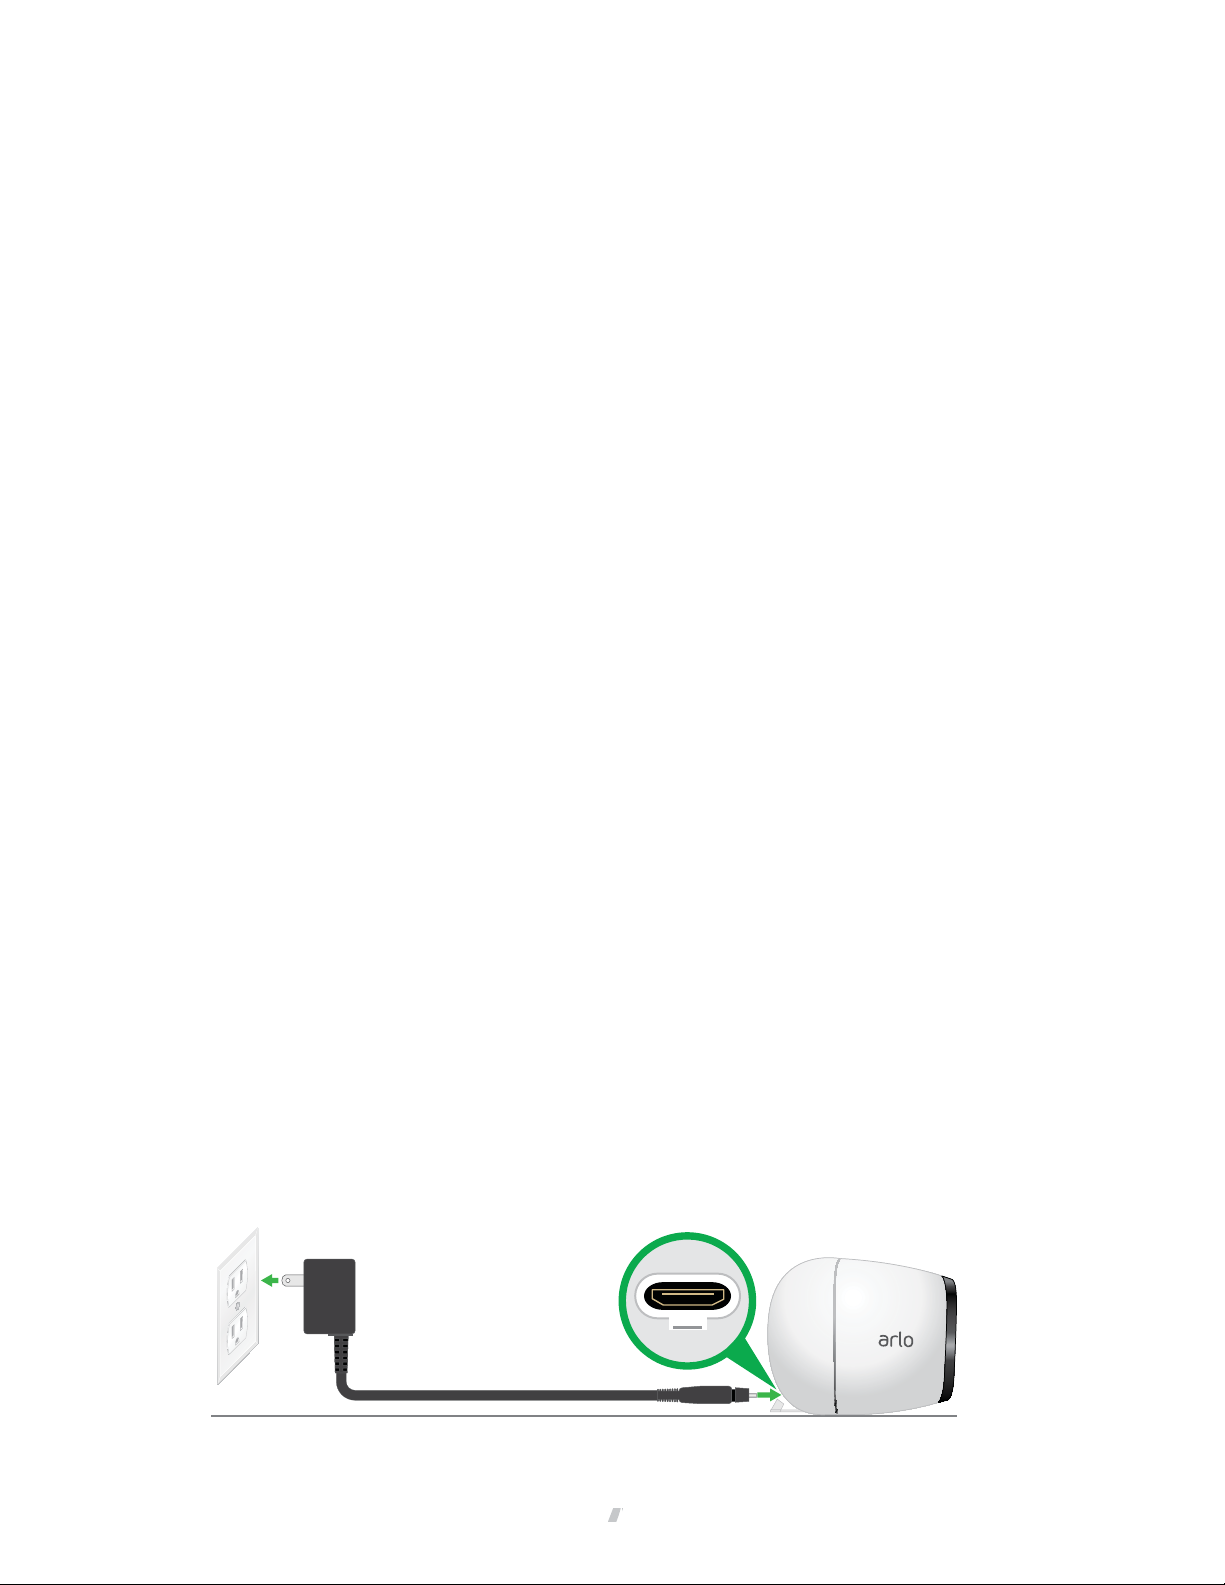
Charge Your Arlo Go Camera
The Arlo Go battery is partially charged when it leaves the factory. You can charge
your Arlo Go camera battery indoors or outdoors using the included waterresistant charging cable.
Note: For safety reasons, your Arlo Go cannot charge at temperatures below
freezing (32°F, 0°C).
¾ To charge the battery:
1. Connect the power adapter to the camera.
Caution: You must use an Arlo Go power adapter to charge the battery. Do not try to
power the camera or charge the battery with any power adapter other than the one
provided with the Arlo Go camera.
2. Plug the power adapter into an electical outlet.
13
13
Set Up Your System
The camera LED lights solid blue for two seconds when the camera battery is
fully charged.
Note: You can buy spare Arlo Go rechargeable batteries and charge them in the Arlo
Charging Station (sold separately). For uninterrupted Arlo Go camera use, we recommend
that you keep a fully charged spare battery on hand
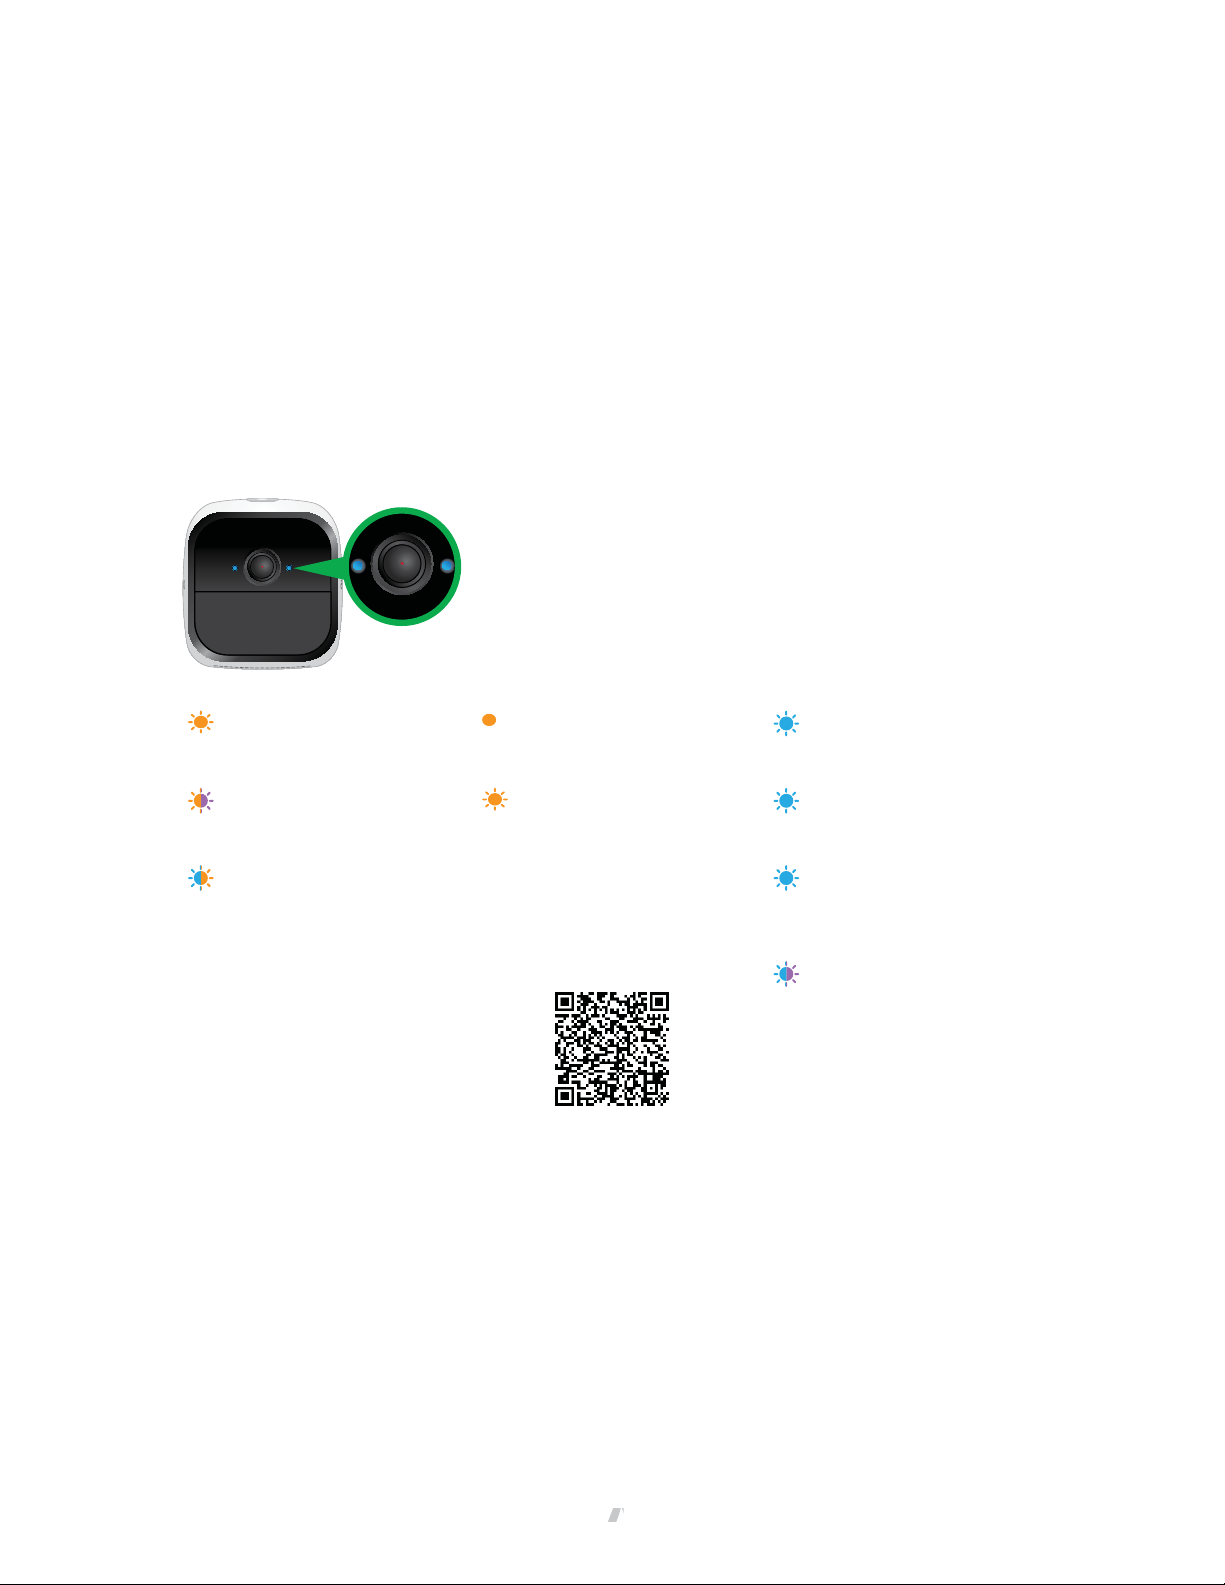
Camera LED Guide
The Arlo Go camera LEDs light in dierent colors to indicate how the camera is
operating.
Slow blinking amber
Mobile network coverage is
not available.
Blinking amber and purple
The SD card type is invalid.
Blinking amber and blue
The camera is receiving a
firmware upgrade.
Solid amber
No SIM card is inserted or
the SIM card is damaged.
Fast blinking amber
The camera connected to the
cellular network but it cannot
connect to the cloud.
For more information, visit
http://tinyurl.com/h8csb5a
or scan this QR code:
Very slow blinking blue
The camera is powering on.
Slow blinking blue
The camera is ready to scan
the QR code.
Fast blinking blue
The camera is connected to
the cloud.
Blinking blue and purple
The camera is connecting to
the network and the cloud.
14
2. View Your Content
Videos recorded by your Arlo Go camera are stored in a library. You can view your
recordings, mark them as favorites, and search using the filter.
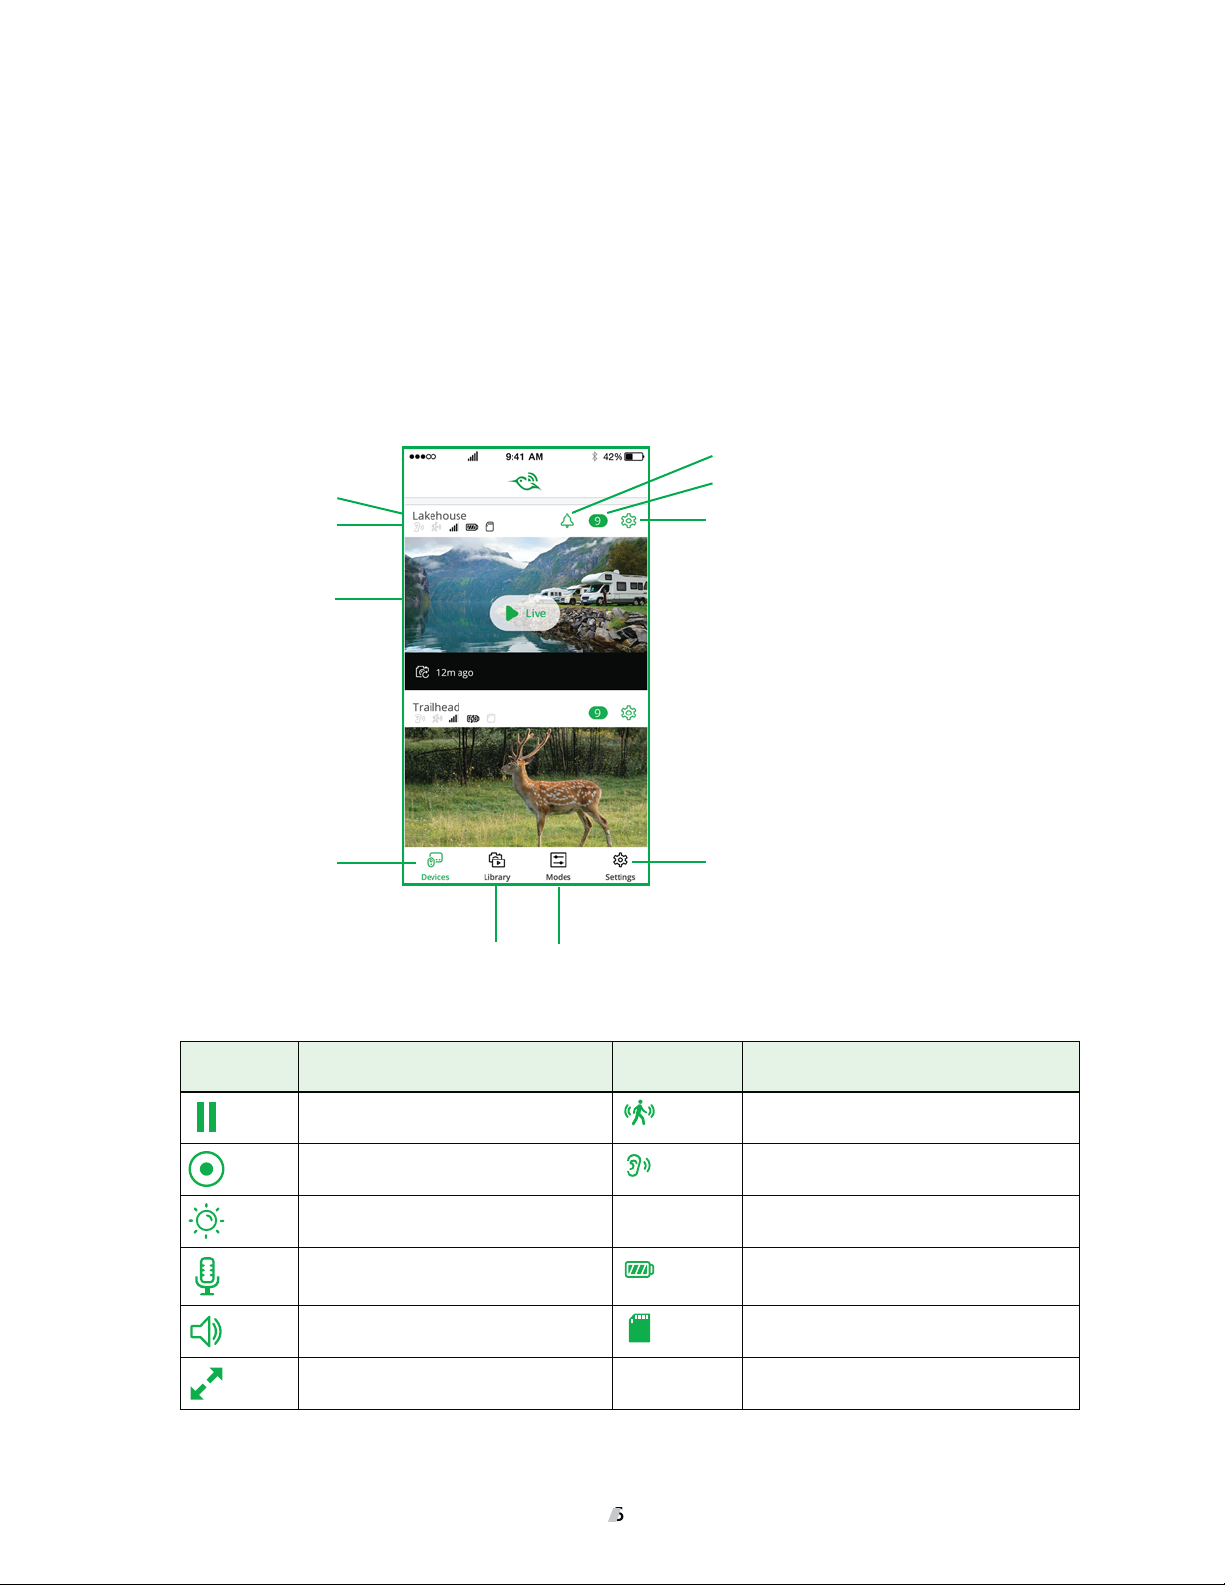
View the Devices Page
When you launch the Arlo app, the Devices page displays.
Alarm,
Camera name
Camera icons
Camera feed
Unviewed recordings
Settings
Select devices
Live Feed
Icon
Tap or click Live to display Camera Icon Display is based on the mode and
Pause Motion detection is on
Record video manually Sound detection is on
Brightness LTE signal
Microphone. Start using Talk and Listen Battery
Speaker. Mute the audio SD card
Full screen.
Recordings
library
Settings
Detection
modes
camera setup
15

View Your Content
616
View the Camera Feeds
You can view your Arlo Go camera feed at any time.
¾ To view camera feeds:
1. Tap the Arlo icon on your mobile device.
You can also enter arlo.netgear.com in the address bar of a browser.
The Devices page displays. The icons above each camera feed depend on the
rules in the currently selected mode. For information about these icons, see
View the Devices Page on page 15.
2. To view and listen to a live feed, tap or click Live on the camera feed image.
A row of live feed icons displays below the live stream image for the camera.
3. To stop viewing and listening to the live feed, tap or click the Pause icon.
Record Clips From Live Video
¾ To record clips from live video:
1. Tap the Arlo icon
You can also enter arlo.netgear.com in the address bar of a browser.
The Devices page displays.
2. Tap or click Live in the camera feed image.
The camera feed icons display at the bottom of the camera feed image.
3. Tap or click Record Video
This icon turns red to indicate that you are recording the live feed.
4. To stop recording, tap or click Record Video
on your mobile device.
.
Talk and Listen
.
¾ To talk and listen:
1. Tap the Arlo icon
You can also enter
on your mobile device.
arlo.netgear.com in the address bar of a browser.
16
1

View Your Content
The Devices page displays.
2. Tap or click Live in the camera feed image.
3. Tap or click Microphone
A microphone button displays.
4. Wait for the button to turn bright green.
This can take up to five seconds. When the button is bright green, Talk and
Listen is ready.
5. Press and hold or or click and hold the microphone button and speak.
.
Control the Camera Feed Image
If you use more than one camera, you can change the order in which the camera feeds
are displayed on the Devices page. You can also zoom, invert, or rotate the camera
feed image.
Change the Camera Order
¾ To change the camera order on the Devices page:
1. Tap the Arlo icon
You can also enter
The Devices page displays.
2. Tap or click Settings.
The Settings page displays.
3. Under System, tap or click Camera Order .
A list of cameras displays in the order that they display on the Devices page..
4. Tap or click Edit at the top of the page.
A list icon displays.
5. Tap and hold or right-click the list icon and drag the camera to the correct
position on the list.
6. Tap or click Done.
Your settings are saved.
on your mobile device.
arlo.netgear.com in the address bar of a browser.
17

Zoom a Camera Image
To zoom a camera image:
View Your Content
1. Tap the Arlo icon
on your mobile device.
You can also enter arlo.netgear.com in the address bar of a browser.
The Devices page displays.
2. Tap or click Settings > My Devices.
A list of cameras displays.
3. Tap or click the camera.
The camera settings display.
4. Tap or click Video Settings.
5. Under Activity Zones, tap or click Zoom
.
6. Resize and position the image box as necessary.
7. Tap or click the Zoom icon
.
Your settings are saved.
Rotate a Camera Feed
You can invert the video feed image.
¾ To rotate the video display:
1. Tap the Arlo icon on your mobile device.
You can also enter
The Devices page displays.
2. Tap or click Settings
The Settings page displays.
3. Tap or click My Devices.
A list of cameras displays.
4. Tap or click the camera.
arlo.netgear.com in the address bar of a browser.
18
8

View Your Content
The settings for the camera display.
5. Tap or click Video Settings.
The Video Settings page displays.
6. Tap or click Rotate Image.
7. The camera feed image is inverted.
Cloud Recording
With cloud recording, everything the Arlo Go cameras record is sent to the cloud
for secure storage in your library. You can access these recordings from anywhere
you are using a mobile device, or on a Windows or Mac computer. All recordings are
encrypted with the user name and password you create. No one else has access to
your recordings.
We provide free cloud storage for the life of the Arlo Go cameras. We store a
rolling seven days of recordings that are created when the Arlo Go camera detects
motion or sound. You can pay to store recordings in the cloud for the last 14 days
or 30 days. You can download recordings and save them to your mobile device or
computer for long-term storage.
View Recordings
Your Arlo Go camera stores recordings in the library. You can use the filter and the
calender to find and view specific recordings.
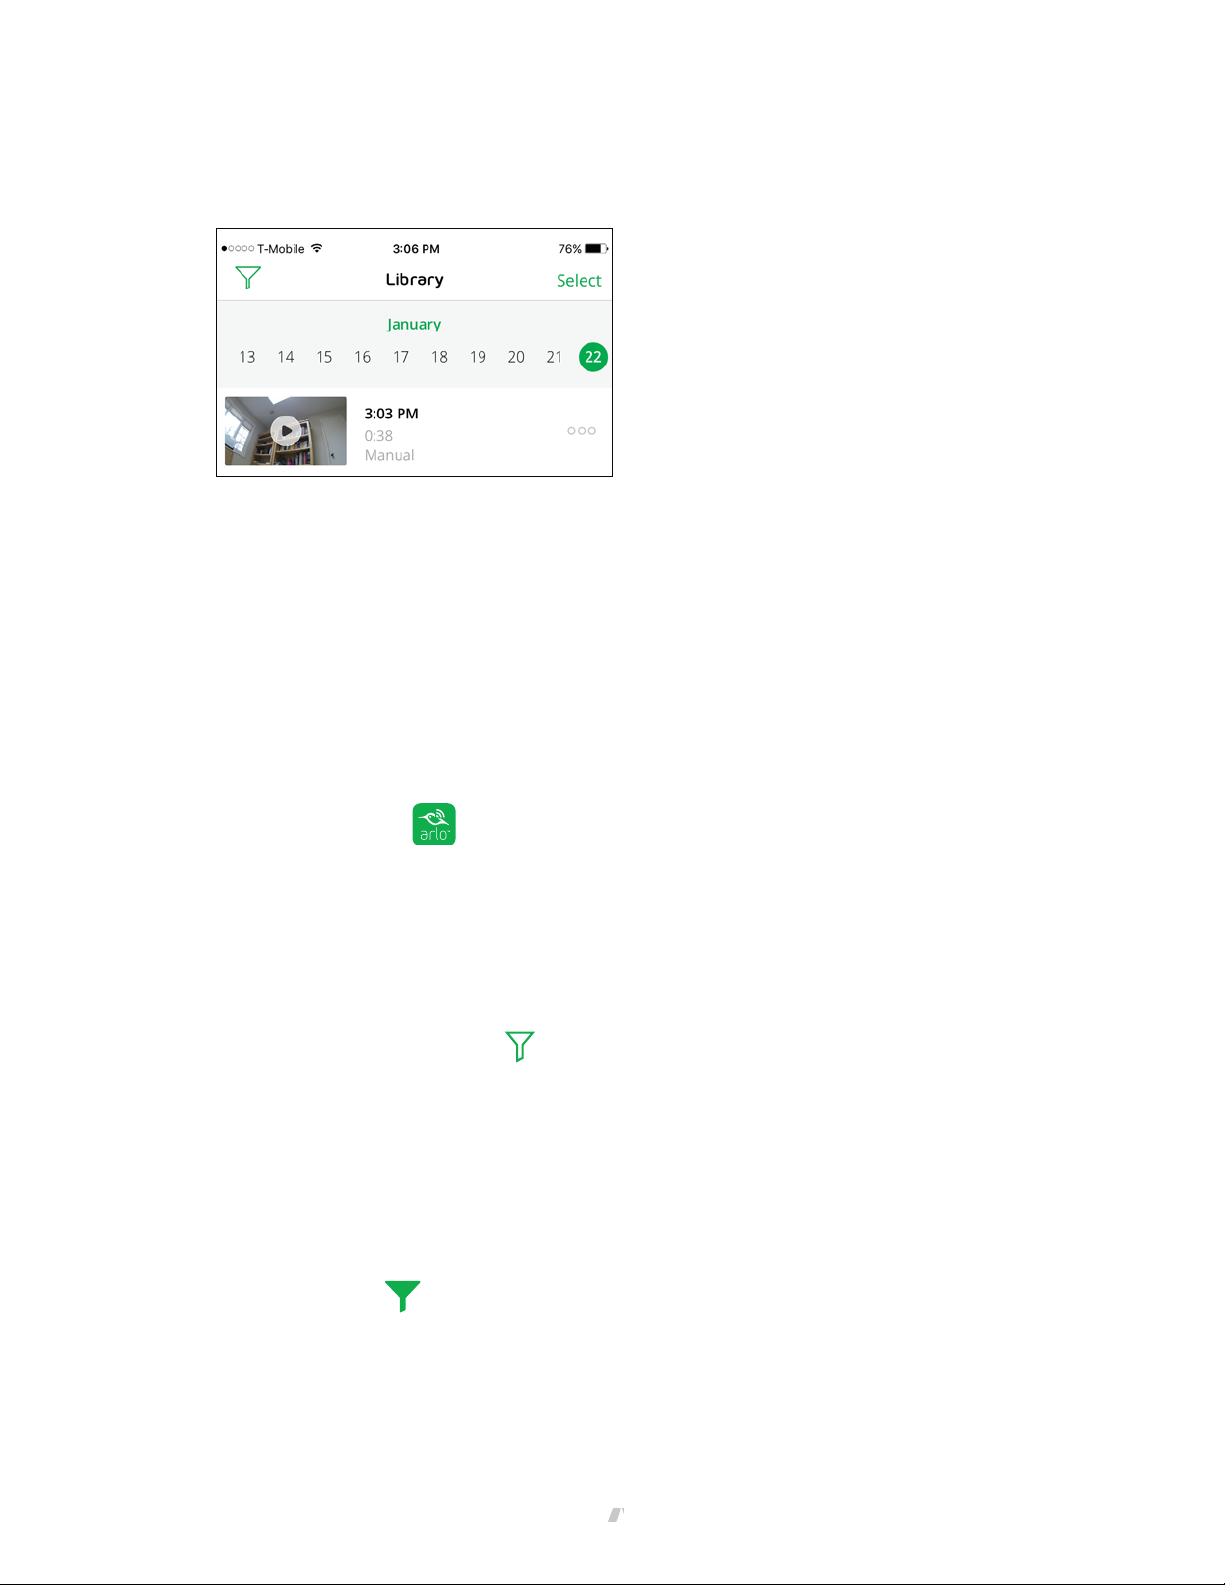
Use the Library
You can use the library to find and view recordings based on the date.
¾ To use the library:
1. Tap the Arlo icon on your mobile device.
You can also enter
The Devices page displays.
2. Tap or click Library.
The calendar displays on the top of the page.
arlo.netgear.com in the address bar of a browser.
19
View Your Content
3. If it is more than one month since you started recording, use the arrows on
either side of the month to choose a month to view.
Days on which a video clip was recorded are indicated with a green circle.
4. Tap or click a highlighted date.
Recordings from that date display below the calendar.
Use the Filter
You can use the filter to find and view recordings based on criteria that you select.
¾ To use the filter to view your library:
1. Tap the Arlo icon on your mobile device.
You can also enter
The Devices page displays.
2. Tap or click Library.
3. Tap or click the Filter icon
The filter page displays.
4. Tap or click the filtering criteria that you want to use.
5. To remove filtering, tap or click Reset.
6. Tap or click Done.
arlo.netgear.com in the address bar of a browser.
in the upper left corner of the page.
The Filter icon
becomes solid green to show that you are using filtering.
Recordings that match your filter selections display. Dates with recordings are
highlighted in dark green.
20
20

View Your Content
Turn O the Filter
The Filter icon on the Library page is solid green when you are using filtering.
When filtering is used, only the recordings in your library that match your filter
criteria display. You can turn o filtering.
¾ To turn o filtering for your library:
1. Tap the Arlo icon
You can also enter arlo.netgear.com in the address bar of a browser.
The Devices page displays.
2. Tap or click Library.
3. Tap or click the Filter icon
The Filter page displays.
4. Tap or click Reset at the bottom of the page.
Filtering is turned o. The Filter icon
filtering is not in use.
on your mobile device.
in the upper left corner of the page.
Share and Download Clips
¾ To share and download clips from the library:
1. Tap the Arlo icon
on your mobile device.
becomes an outline to show that
You can also enter arlo.netgear.com in the address bar of a browser.
The Devices page displays.
2. Tap or click Library.
The Library page displays.
3. Tap or click a video.
4. Tap or click Share
5. Tap or click the method that you want to use to share the shapshot or video.
The available methods depend on which apps you use on your smartphone or
computer.
.
21
 Loading...