

Page 1

1
Arlo Pro Quick Start Guide
Page 2
32
Welcome
Thank you for choosing Arlo Pro.
Getting started is easy.
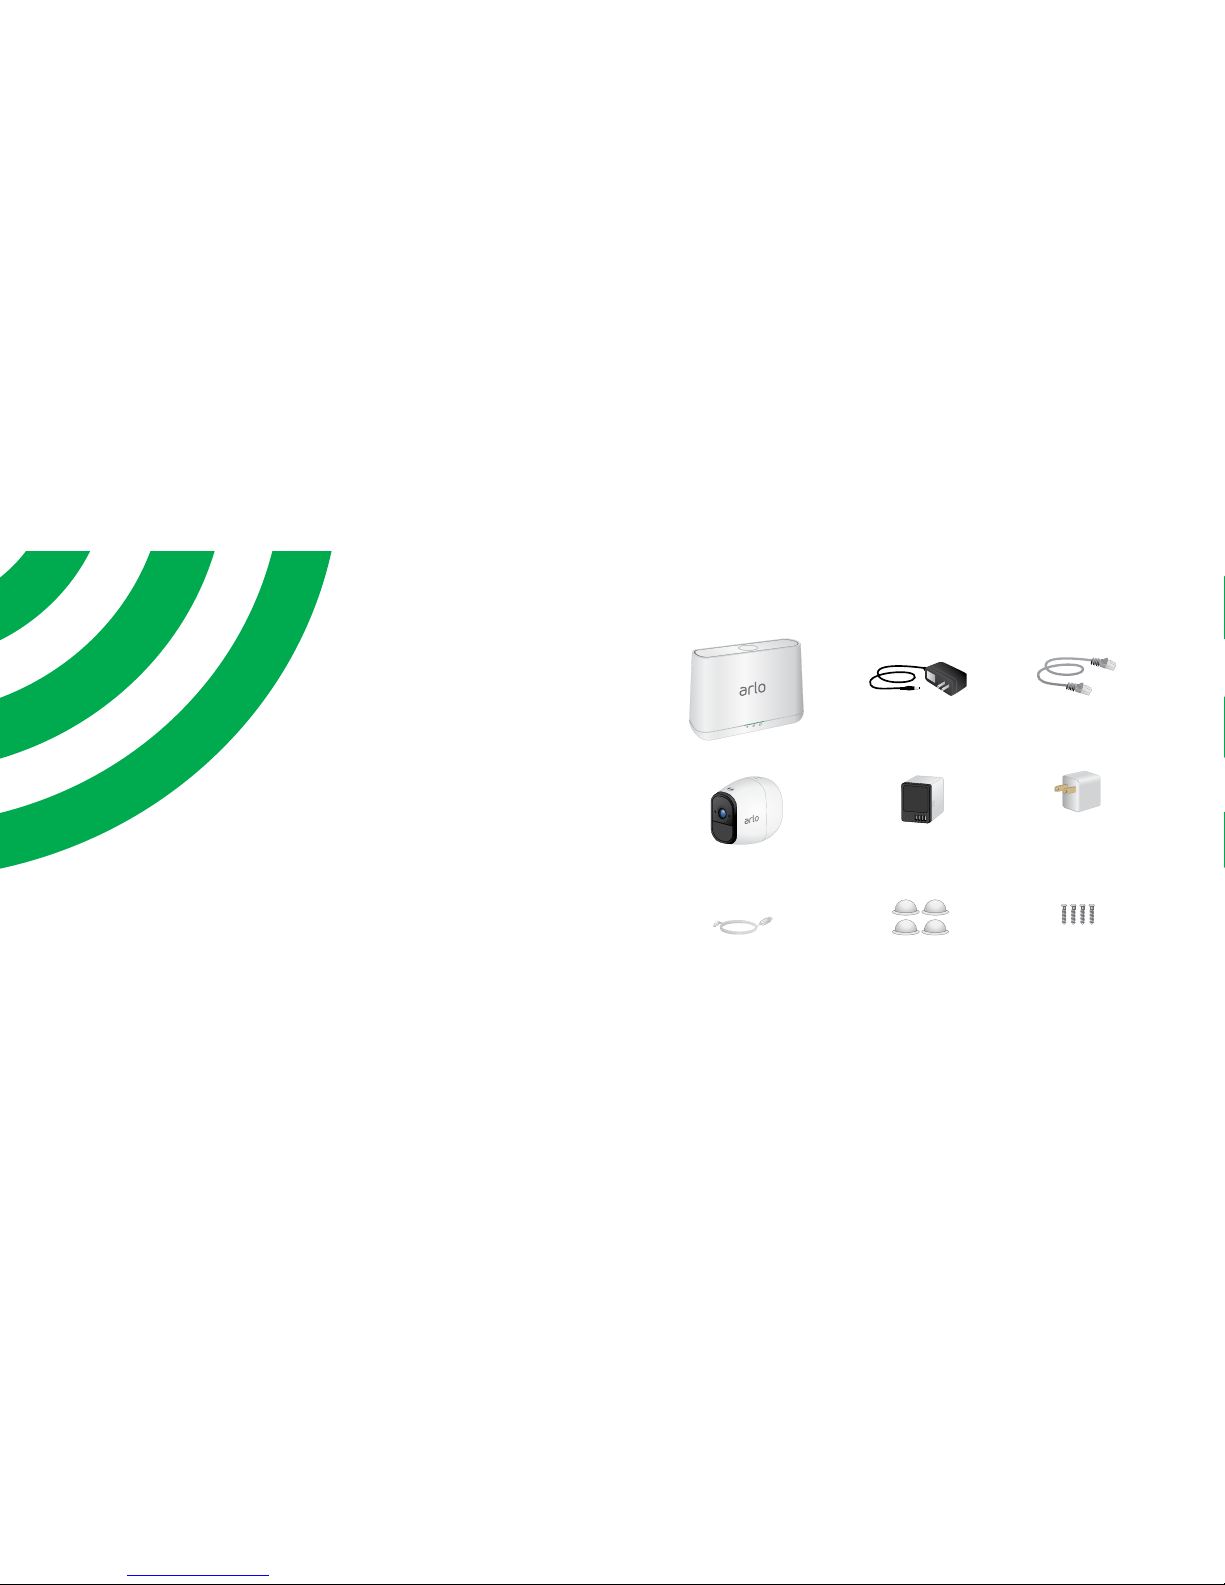
What’s Included
Base station
Base station AC
power adapter
Magnetic wall
mounts
Arlo Pro Wire-Free
camera
Rechargeable battery
Ethernet cable
Mounting
screws
Camera AC power
adapter
Power adapter
cable
Page 3
54
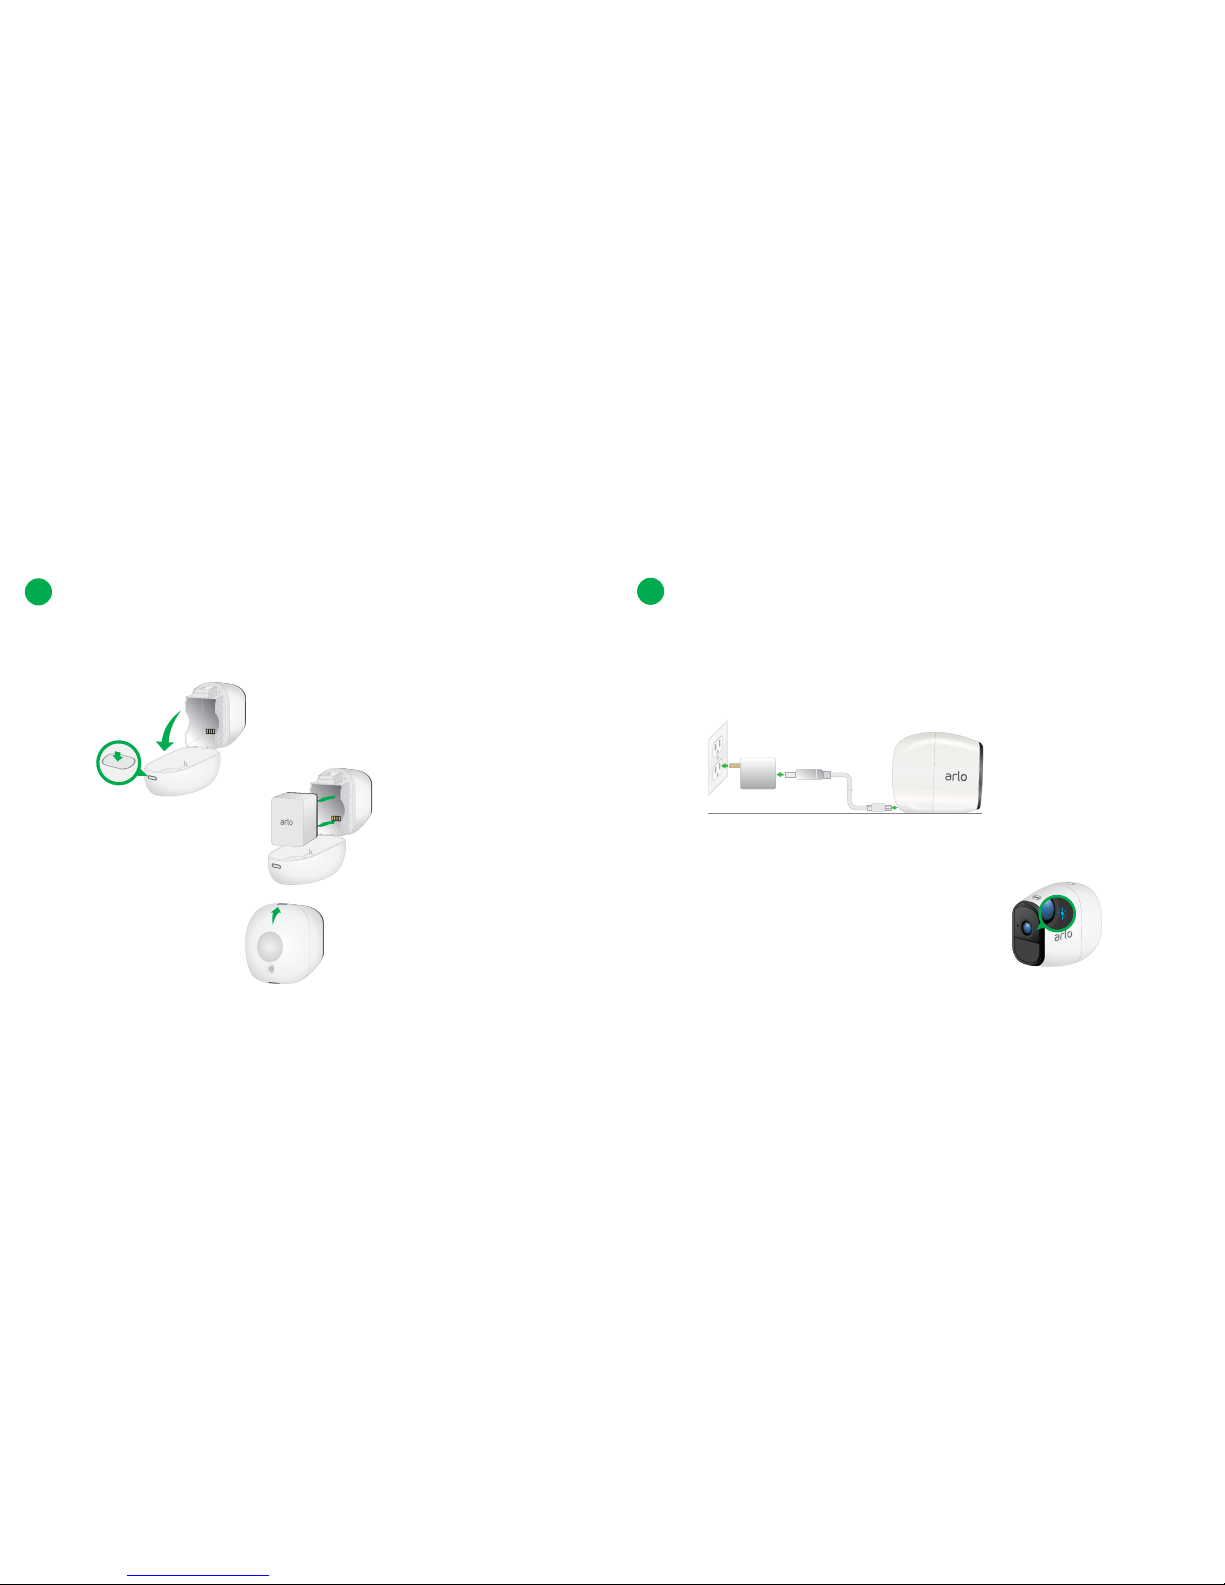
Charge Your Arlo Pro Camera
a. Connect the power adapter cable to the camera power adapter.
b. Connect the other end of the adapter cable to the camera.
c. Plug the power adapter into an electical outlet.
Note: The camera LED displays solid blue when the camera batter is fully
charged.
2
a. Unlock the battery compartment by pressing and holding the latch.
b. Gently pull the battery door back to open the compartment.
Insert the Battery Into Your Camera
1
c. Insert the battery.
d. Align the battery contacts
e. Close the battery door.
Page 4
76
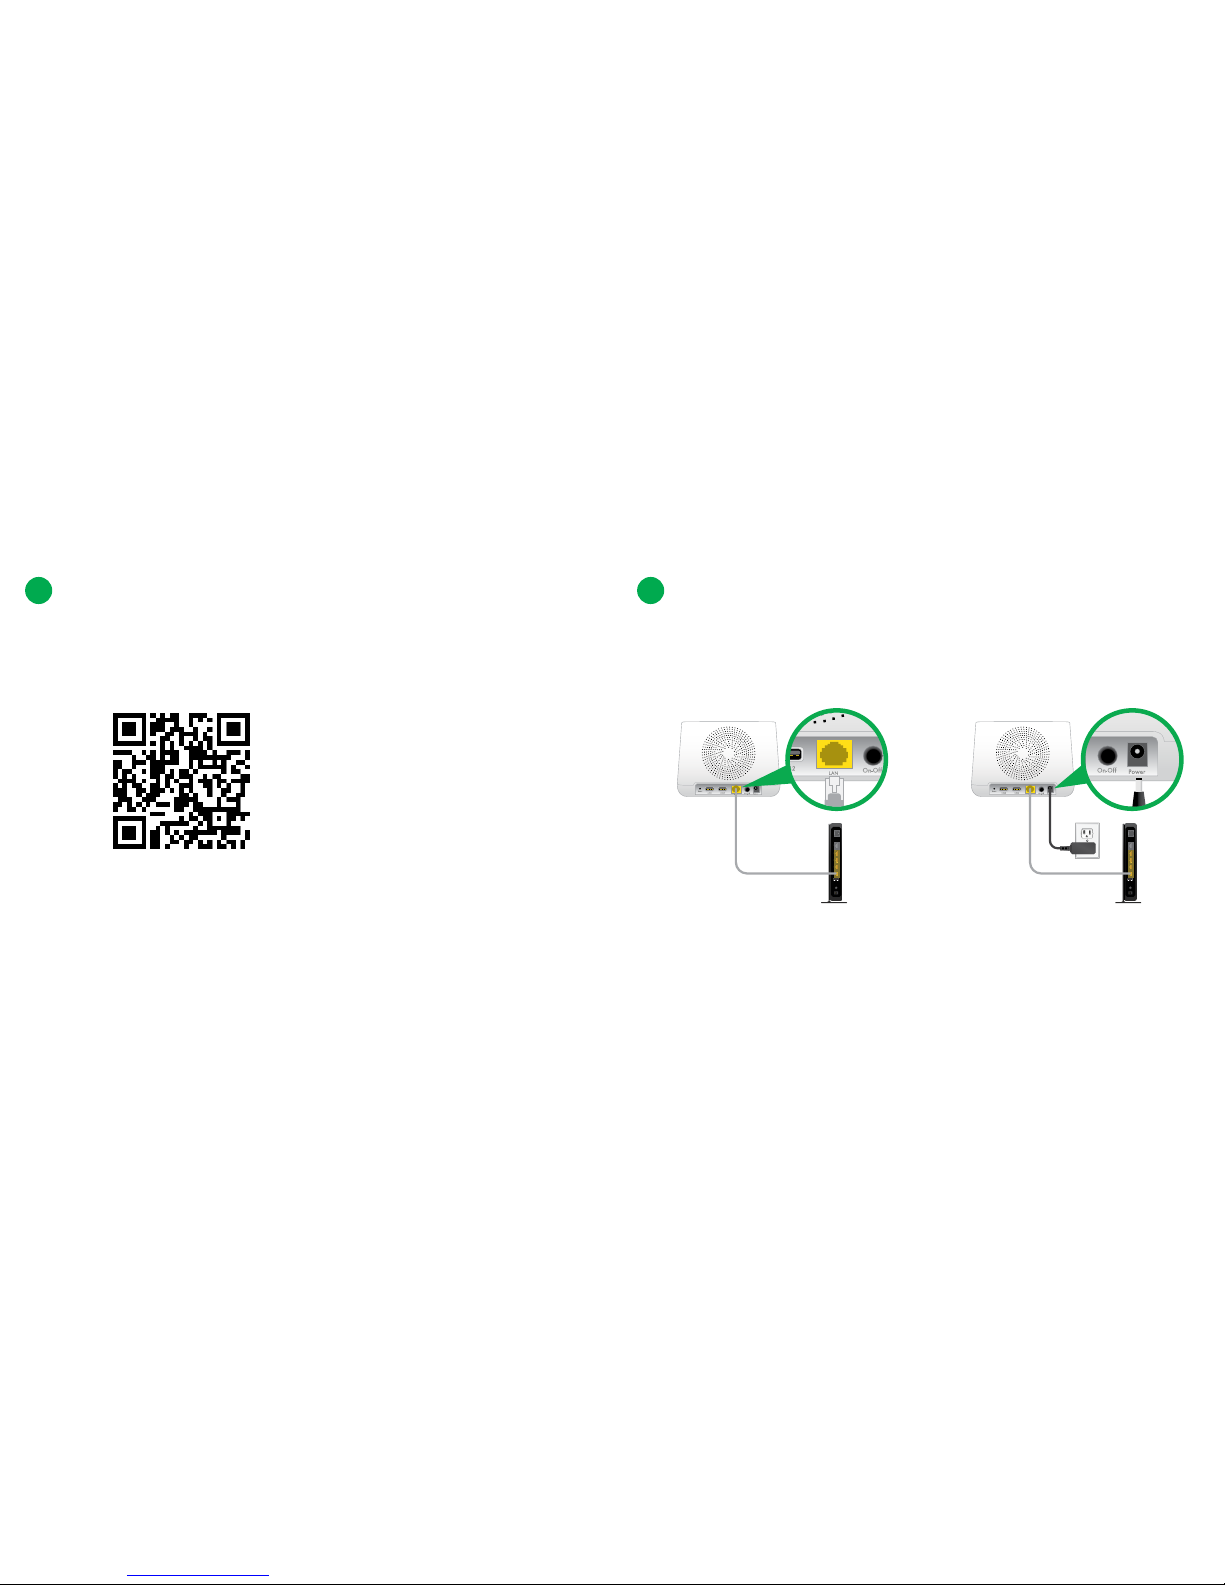
Get the App
For the best experience, download the Arlo app for your smartphone by
scanning this QR code.
3
updates.netgear.com/arlostaging
4
Connect Your Base Station to the Internet
a. Connect the base station to your
router using an Ethernet cable.
b. Connect the base station AC
adapter to your base station and
plug it in.
Page 5
98
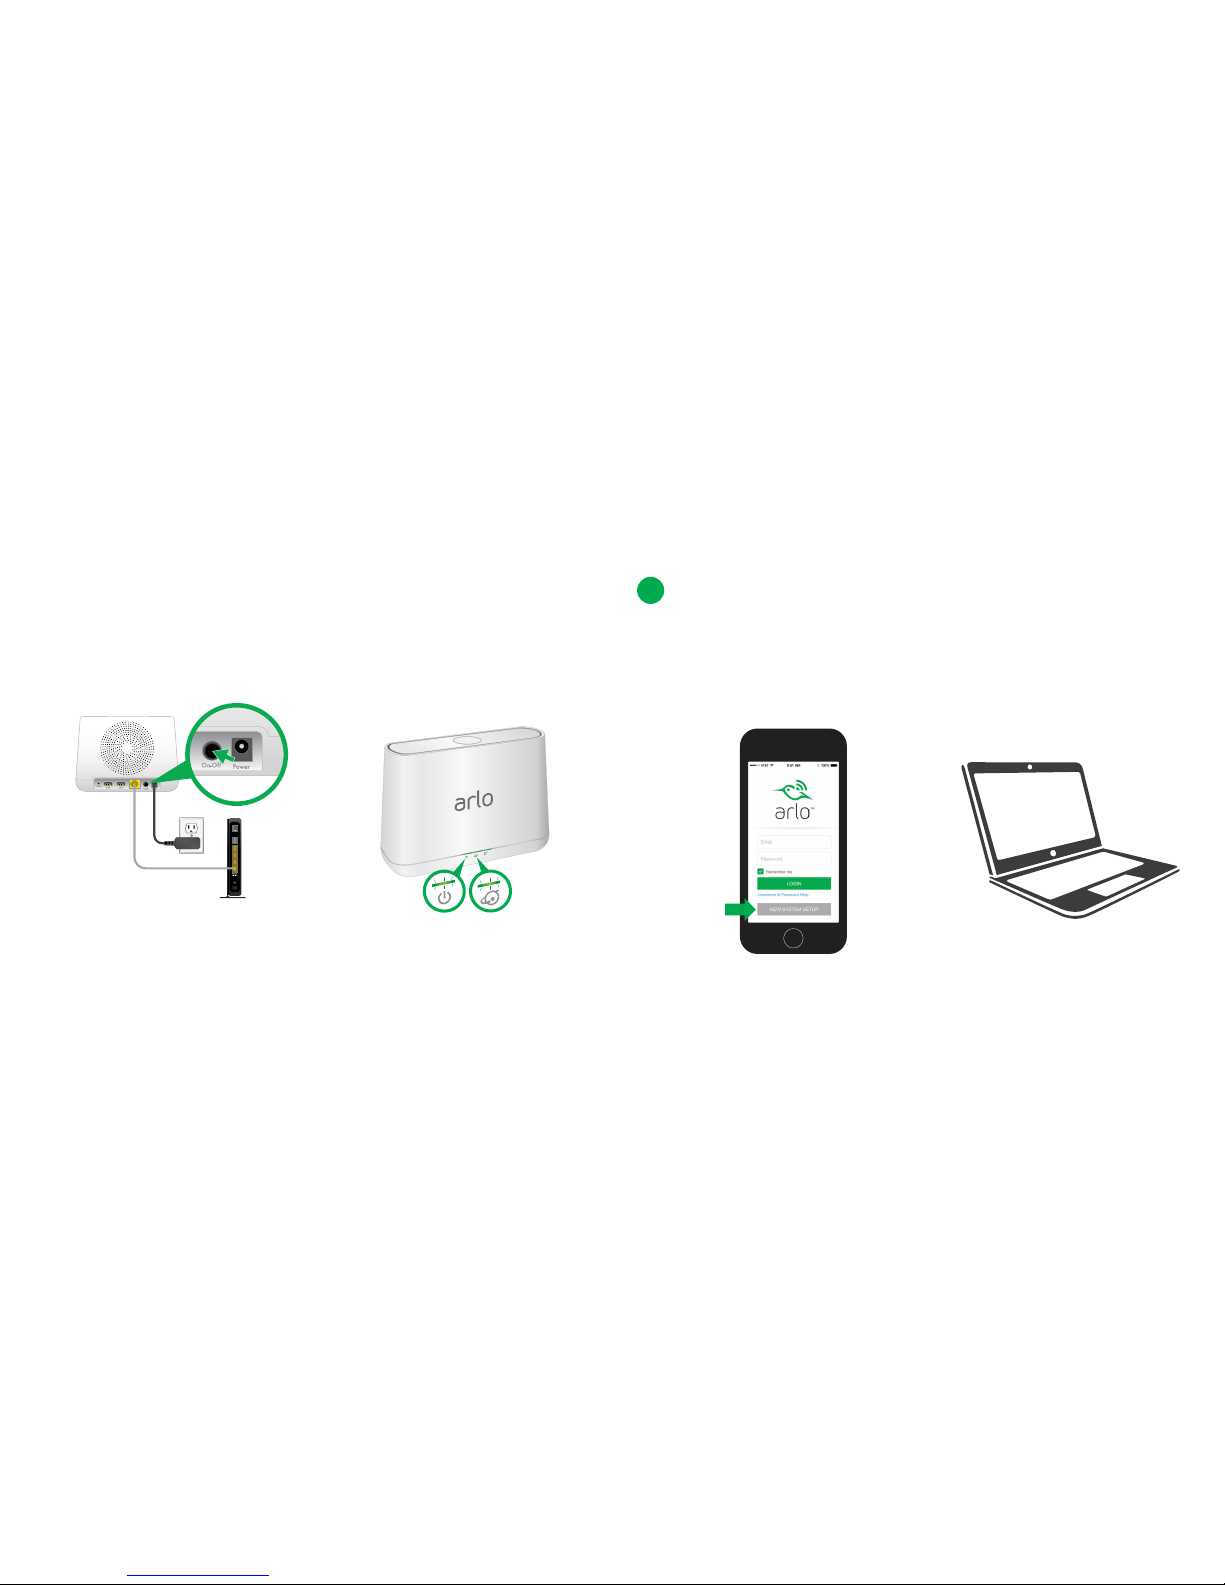
c. Turn the base station on by
pressing the On/O button.
The Power LED and Internet LED
on the front of the base station
light green in about two minutes.
Launch the app from your
smartphone and tap the New
System Setup button. Follow the
onscreen instructions.
Get an Account
5
Or from a computer, visit
updates.netgear.com/arlostaging and
follow the onscreen instructions.
Page 6
1110
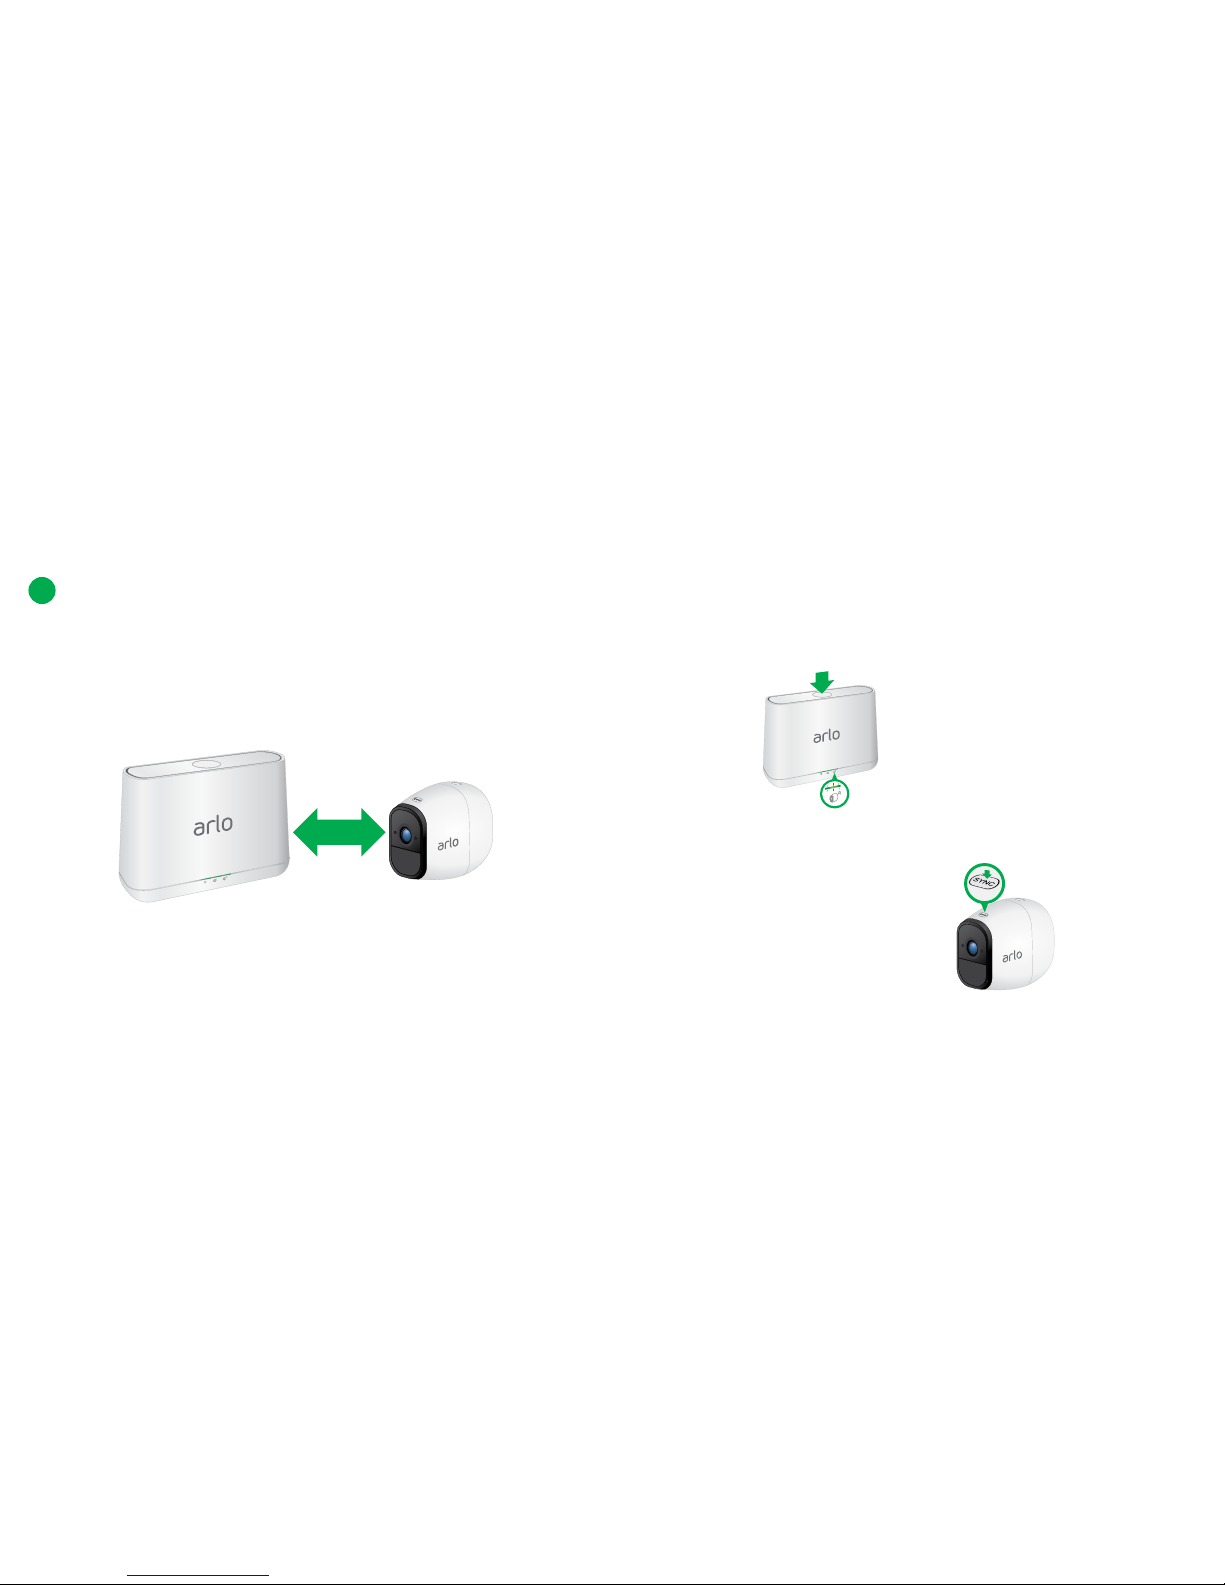
Sync Your Cameras With the Base Station
6
a. Bring the camera within 1 to 3 feet (30 to 100 centimeters) of the
base station.
Note: Cameras must be synced one at a time.
b. Press the Sync button on the top of the base station for
about two seconds and then release the button.
c. Wait for the Sync Status LED to blink green.
d. Press the Sync button on top of the camera for about two
seconds and then release the button.
Page 7
1312
The camera is ready for viewing.
The LED blinks amber if the sync is not successful. You must repeat the
sync process.
Syncing more than one camera?
Go to Page 9 and repeat steps 5a through 5d for each camera.
A blue LED on the camera blinks slowly when the sync process starts. The
blue LED blinks rapidly to confirm syncing.
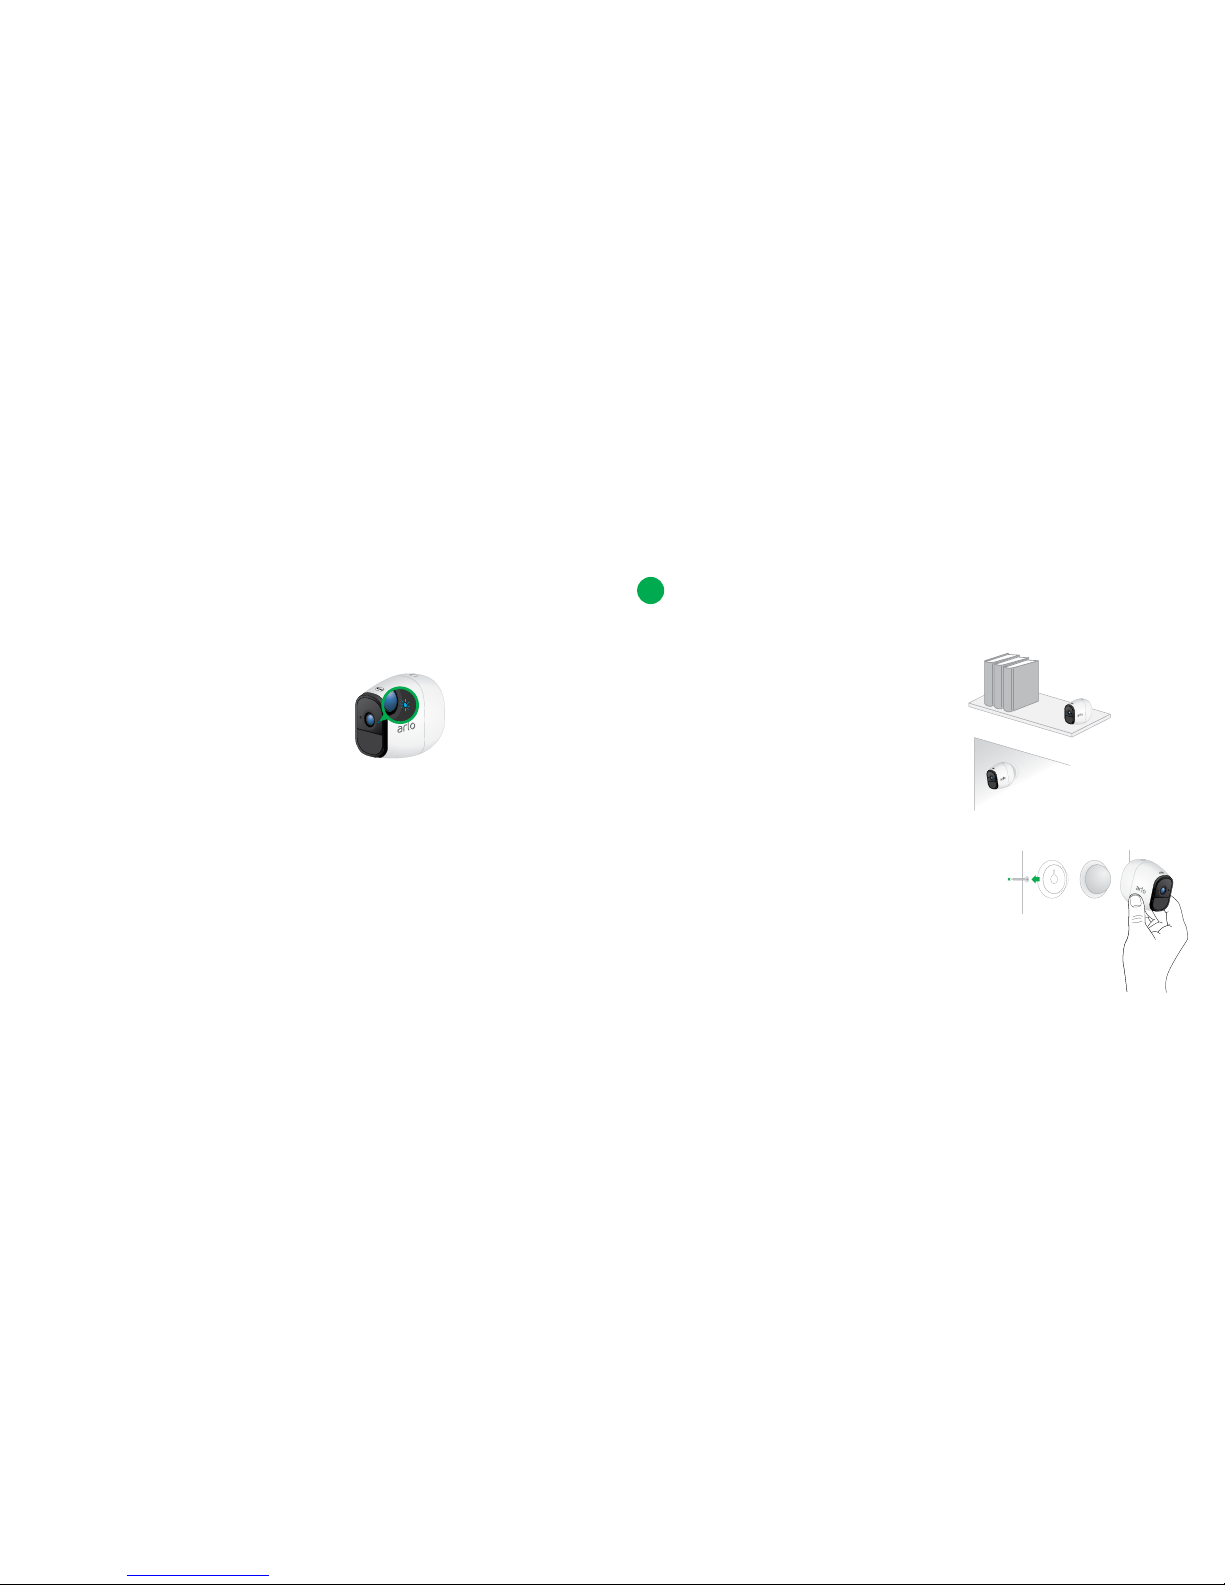
You can place your camera on a shelf or other flat surface, or you
can mount it to the wall.
Tip: Use the Arlo app in Position mode
(found in Camera Settings) to help aim the camera.
Place or Mount Your Cameras
7
¾ To mount your camera to the wall:
Fasten the mounting screw into the wall,
and hang the magnetic mount from the
screw.
If you’re mounting the camera to drywall, be
sure to use the plastic drywall anchors that
are provided.
Tip: You can also use double-sided tape instead of screws.
Page 8
1514
You’re Done!
Congratulations! Your Arlo System is set up and ready to go.
To view useful tutorial videos, find troubleshooting tips, or get support,
visit https://www.arlo.com/support/.
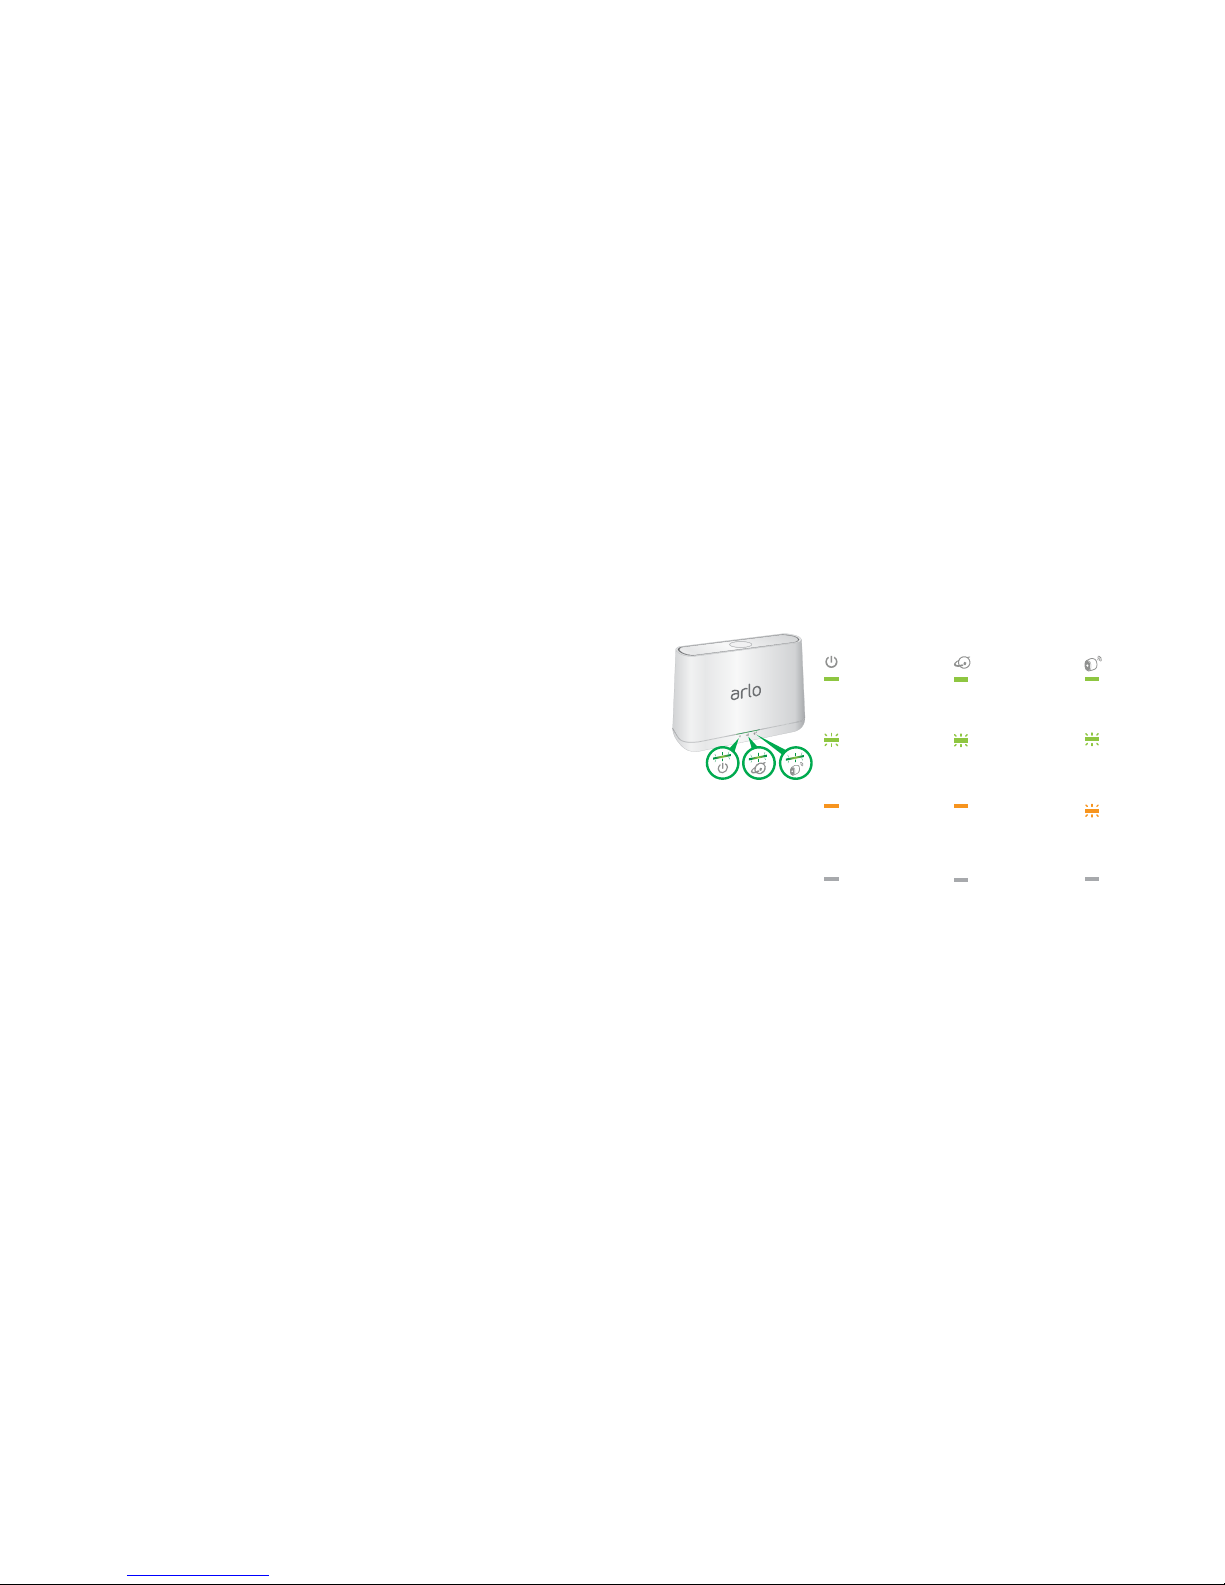
Base Station LED Guide
Green
The base station
is powered on.
Blinking green
A firmware update
is in progress. DO
NOT TURN OFF
BASE STATION OR
CAMERAS.
O
The base station
is powered o.
Amber
The base station
is booting.
Power
Green
The base station
is connected to
the Internet.
Blinking green
The base station is
sending data over
the Internet.
Amber
The base station is
connected to the
router but did not
establish an Internet
connection.
O
The base station is
not connected to
your router.
Internet
Green
Cameras are
connected to the
base station.
Blinking green
The base station
is attempting
to sync with a
camera.
Blinking amber
A camera is too
far from the base
station. Signal
strength is weak.
O
No cameras are
detected..
Camera
Page 9
16
©NETGEAR, Inc., NETGEAR, the NETGEAR Logo, and Arlo are trademarks of NETGEAR, Inc. Any
non-NETGEAR trademarks are used for reference purposes only.
Compliance
For the current EU Declaration of Conformity, visit
http://kb.netgear.com/app/answers/detail/a_id/11621/.
For regulatory compliance information, visit
http://www.netgear.com/about/regulatory/.
June 2016
350 East Plumeria Drive
San Jose, CA 95134, USA
BETA
NETGEAR INTL LTD
Building 3, University Technology Centre
Curraheen Road, Cork, Ireland
 Loading...