


83-00140F Printed in Japan
DOC.No.OM-28573 REV.6 03/02

SPOTCHEM EZ SP-4430 OPERATING MANUALDOC.No.OM-28573 REV.6 03/02
Premise
This manual contains important information on the functions of the
SPOTCHEM EZ SP-4430
Distributed by : A.Menarini I.F.R. srl
Diagnostics Division
This manual is issued by: ARKRAY, Inc.
Read carefully prior to starting up the unit.
It is recommended to retain this manual for future use.
This product conforms to European Directive 98/79/EC.
SPOTCHEM EZ SP-4430 OPERATING MANUAL DOC.No.OM-28573 REV.6 03/02
Introduction
The SP-4430 is an automated biochemical analyzer using a dry
chemistry system.
This manual contains outlines, instructions for the operation,
maintenance and troubleshooting for the SPOTCHEM SP-4430.
Before operating the SP-4430, read this manual carefully.
It is recommended to retain this manual for future use.
Always be careful when handling blood samples or waste reagent
strips. Incorrect or imprecise procedures may result in exposure
to pathogenic microbes.
This analyzer must only be operated by those trained in proper
procedures for clinical testing and handling of hazardous waste.
Anyone who operates the analyzer for the first time must be
assisted by a trained person.
Never touch the Reagent Table, Centrifuge-equipped Multi Rack,
or other places where sample residue may collect with bare
hands. When performing maintenance, always wear protective
gloves to prevent exposure to pathogenic microbes.
Separate used samples, tips and protective gloves from general
waste and discard them according to local regulation on
biohazardous waste.
・All rights reserved. Reproduction of this manual is forbidden.
・The contents of this manual are subject to change without further notice.
・Although we take all possible measures to ensure the contents of this manual, please notify your distributor
・when you have questions, or find errors or omission.
SPOTCHEM EZ SP-4430 OPERATING MANUALDOC.No.OM-28573 REV.6 03/02
Caution Marks
Pay careful attention to these caution marks in this Operating Manual.
Regarding accident resulting in injury or death.
To prevent infection of yourself or others from
pathogenic microbes, follow the instructions given
herein.
To prevent injuries to yourself or others, or material
damages, follow the instructions described.
Regarding damage and performance of products.
Failure to follow the instructions may lead to incorrect
results.
To prevent damage to the unit and assist you in making
best use of the capabilities of the analyzer, additional
explanations and notes are provided herein.
IMPORTANT
NOTE
Reference information on operation, additional
explanations and related functions are provided herein.
SPOTCHEM EZ SP-4430 OPERATING MANUAL DOC.No.OM-28573 REV.6 03/02

SPOTCHEM EZ SP-4430 OPERATING MANUALDOC.No.OM-28573 REV.6 03/02
Chapter 1
INTRODUCTION
Chapter 2
MEASUREMENT
Automated biochemical analyzer, SP-4430
Contents
Premise
Introduction
Caution Marks
Caution Labels
Contents
1-1 Outline
1-1-1 Features
1-1-2 Measurement principles
1-1-3 Specifications
1-2 Shipping Carton
1-2-1 Analyzer
1-2-2 Accessories
1-3 Parts Description and Function
1-3-1 Front of the analyzer
1-3-2 Operator panel
1-3-3 Rear of the analyzer
1-4 Setting up the Analyzer
1-4-1 Cautions
1-4-2 Setting up the analyzer
1-4-3 First operation after setting up
1-4-4 Notes at transportation
2-1 Outline of Measurement
2-1-1 SPOTCHEMⅡ Reagent Strips
2-1-2 Normal measurement
2-1-3 Calibration
2-2 Cautions
2-2-1 Cautions
2-2-2 Handling samples
2-2-3 Handling Reagent Strips
2-2-4 Handling magnetic cards
2-2-5 Handling tips
2-2-6 Handling centrifuges
2-3 Preparation for Measurement
2-3-1 Preparation
2-3-2 Startup
2-3-3 Checks before measurement
2-3-4 Preparation of samples
2-4 Measurement
2-4-1 Normal measurement
01
02
03
04
05
1-02
1-02
1-03
1-04
1-05
1-05
1-06
1-07
1-07
1-08
1-09
1-10
1-10
1-12
1-13
1-15
2-02
2-02
2-03
2-04
2-06
2-06
2-07
2-07
2-08
2-08
2-09
2-10
2-10
2-11
2-12
2-13
2-18
2-18

SPOTCHEM EZ SP-4430 OPERATING MANUAL DOC.No.OM-28573 REV.6 03/02
Chapter 3
SUB MENU
Chapter 4
MAINTENANCE
Chapter 5
TROUBLESHOOTING
Chapter 6
APPENDIX
2-5 Calibration
2-5-1 Overview of calibration
2-5-2 Calibration by magnetic card
2-5-3 Calibration by calibrator kit
2-6 Interpreting measurement results
2-6-1 Printing normal measurement results
2-6-2 Printing calibration results
3-1 Overview of SUB MENU
3-1-1 Composition of SUB MENU
3-2 Measurement Results Menu
3-2-1 Print measurement results
3-2-2 Transmit measurement results
3-2-3 Delete measurement results
3-3 Parameter Menu
3-3-1 Print parameters
3-3-2 Enter parameters
3-3-3 Initialize parameters
3-3-4 Enter sample type
3-3-5 Copy standard range setting
3-4 Maintenance
3-5 Mode Menu
3-6 Built-in Clock Adjustment
4-1 Outline of Maintenance
4-1-1 Frequency of Maintenance
4-2 Daily Maintenance
4-2-1 Cleaning the Reagent Table
4-2-2
Cleaning the Tip Waste Case and Protective Cover
4-3 Periodic Maintenance
4-3-1 Replacement of Thermal Printer Paper
4-3-2 Cleaning the Optical Window
4-3-3 Cleaning the Nozzle
4-3-4 Replacement of Nozzle
5-1 Error Messages
5-2 Trouble Messages
5-3 After sales service
6-1 Transmission Specifications
6-1-1 Protocol
6-1-2 Format
6-1-3 Format for measurement results (format 1)
6-1-4 Format for measurement results (format 2)
2-28
2-28
2-29
2-31
2-39
2-39
2-42
3-02
3-02
3-04
3-04
3-06
3-08
3-10
3-10
3-13
3-17
3-19
3-21
3-23
3-24
3-25
4-02
4-02
4-03
4-03
4-06
4-08
4-08
4-10
4-13
4-16
5-02
5-07
5-11
6-02
6-02
6-03
6-04
6-08

SPOTCHEM EZ SP-4430 OPERATING MANUALDOC.No.OM-28573 REV.6 03/02


SPOTCHEM EZ SP-4430 OPERATING MANUAL
DOC.No.OM-28573 REV.6 03/02
The SP-4430 is an automated biochemical analyzer using a dry
chemistry system. This chapter contains the information on the
functions and measurement principles of the SP-4430.
Chapter 1
INTRODUCTION
1-1 Outline
1-1-1 Features
1-1-2 Measurement principles
1-1-3 Specifications
1-2 Shipping Carton
1-2-1 Analyzer
1-2-2 Accessories
1-3 Parts Description and Function
1-3-1 Front of the analyzer
1-3-2 Operator panel
1-3-3 Rear of the analyzer
1-4 Setting up the Analyzer
1-4-1 Cautions
1-4-2 Setting up the analyzer
1-4-3 First operation after setting up
1-4-4 Notes at transportation

SPOTCHEM EZ SP-4430 OPERATING MANUALDOC.No.OM-28573 REV.6 03/02
1-1 Outline
Chapter 1 INTRODUCTION
■Compact and lightweight
design
■Energy-saving design
■Automatic Sampling
■Built-in centrifuge for
1 sample
■Simple calibration using
magnetic cards
■Sample Control by Bar
code
■Online Network through
two-way Transmission
1-1-1 Features
The footprint of the SP-4430 is as small as that of a
notebook computer. It weighs only 5 kg and can be
easily carried by one person. The small unit contains
various components such as a display, printer, 1sample centrifuge and automatic tip disposal
mechanism. No water supply or drainage system is
required, therefore it is suitable for examinations in
schools or bedside in hospitals. Power consumption
is greatly reduced.
Power consumption per 1 hour is approximately 50 W
on average (AC 100V, 60Hz when continuous
measurements are conducted).
The analyzer automatically absorbs samples set on the
Centrifuge-equipped Multi Rack and drops them on
reagent strips. Manual operation is not necessary, so
that the sampling amount becomes constant and
stable measurement results can be obtained.
The analyzer has a built-in centrifuge for 1 sample. By
placing the whole blood sample in the centrifuge tube
and setting it on the Centrifuge-equipped Multi Rack,
the operation, centrifugation
suction sampling is
conducted automatically. This saves centrifugation of
whole blood samples before measurement.
Calibration using magnetic cards
Reagent Card are
provided with the Reagent Strips
is possible, without
using the SPOTCHEM Calibrator Kit. By inserting
magnetic cards into the magnetic card reader,
differences between reagent strip lot number and daily
deviations are automatically calibrated.
Optional Hand-held Bar Code Reader is available. By
reading the bar code of each sample, the bar code is
automatically allocated as patient ID.
With the optional Data Management Software and
external devices, remote control of measurement
results and remote update of parameter settings are
possible.
SPOTCHEM EZ SP-4430 OPERATING MANUAL
DOC.No.OM-28573 REV.6 03/02
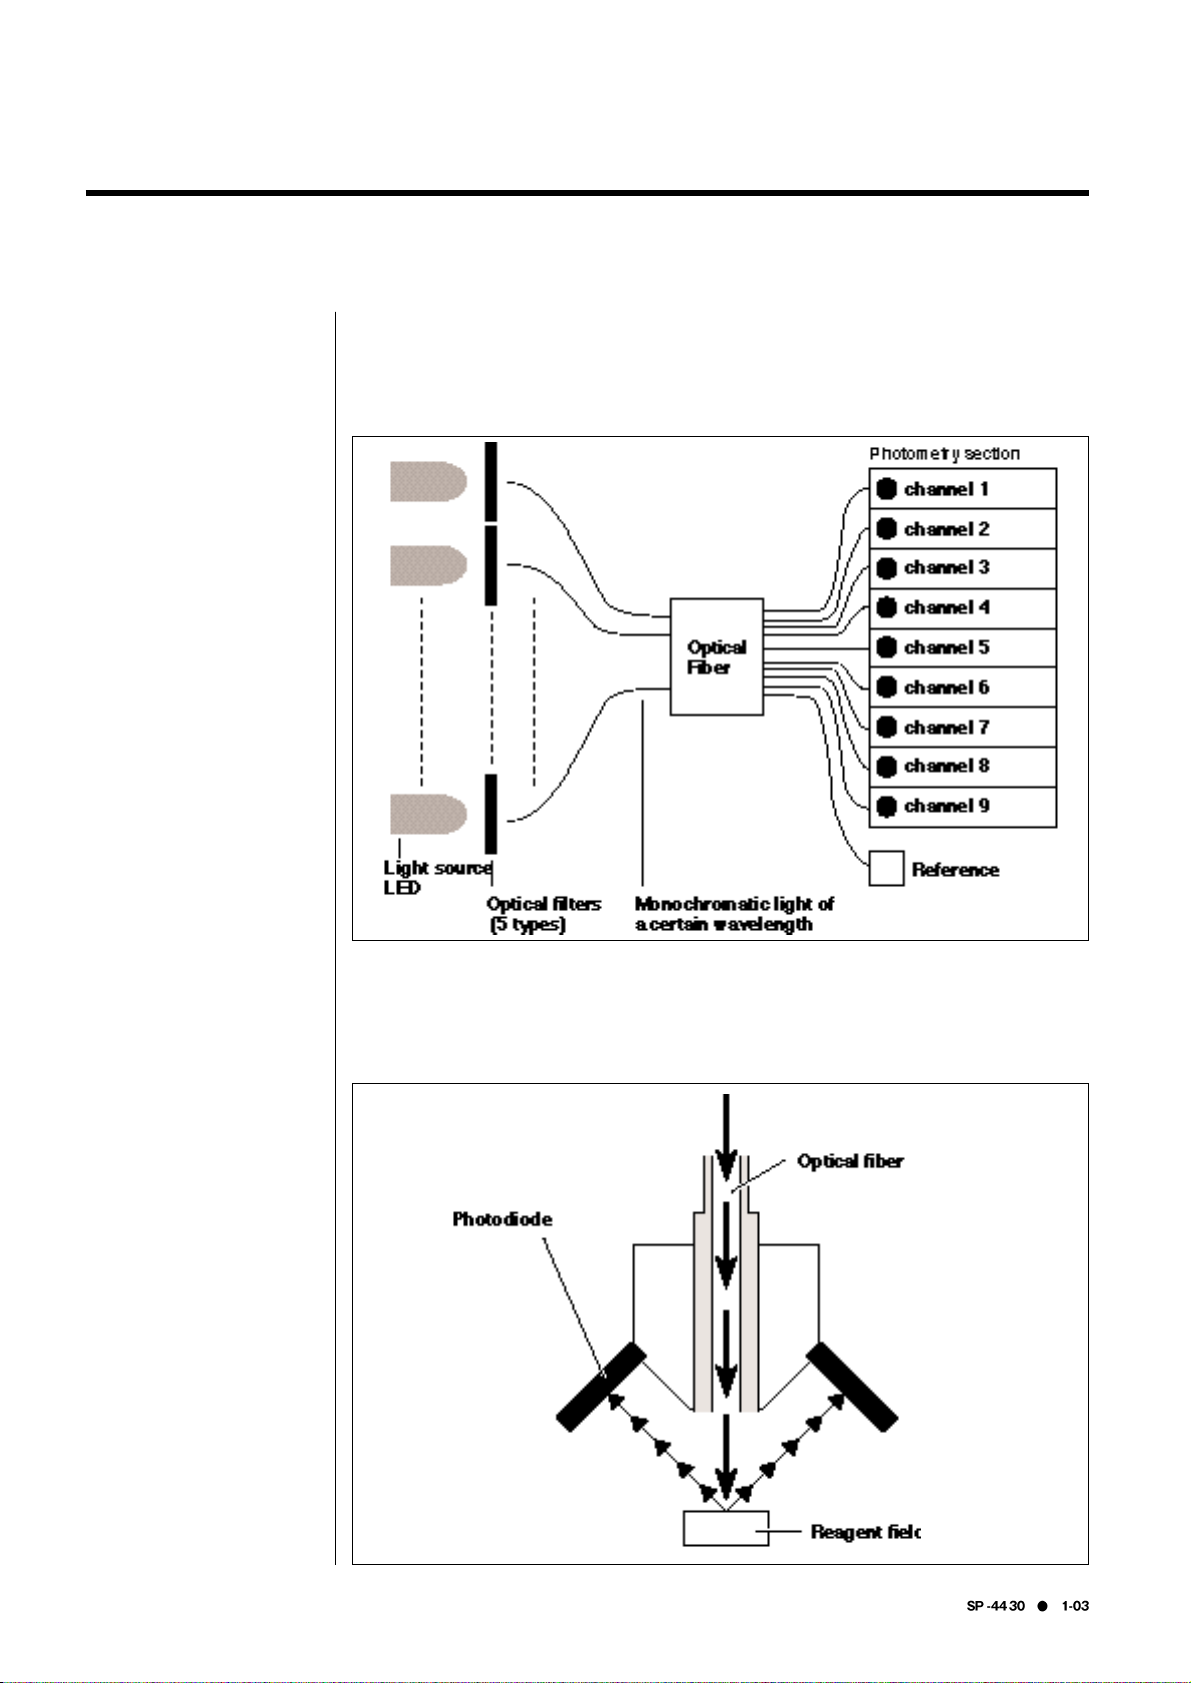
The light emitted from LED becomes monochromatic light of a certain wavelength after
passing through an optical fiber (Five different types of optical filters are provided, and the
optimum wavelength is selected for each test item). Monochromatic light is separated and
transmitted to the photometry section of each channel by ten optical fibers.
In each photometry section, the monochromatic light transmitted by the optical fibers is
irradiated on the reagent fields, which has a color reaction after sampling. Its reflected light
is read with 2 photodiodes, and the system calculates measurement results by end-point
assay (EPA) or reaction-rate assay (RRA).
1-1 SP
-
4430
Chapter 1 INTRODUCTION
1-1-2 Measurement principles
SPOTCHEM EZ SP-4430 OPERATING MANUALDOC.No.OM-28573 REV.6 03/02
1-1 SP
-
4430
Chapter 1 INTRODUCTION
1-1-3 Specifications
Sample
Measurement item
Measurement wavelength
Measurement principle
Measurement Range
Reagent Strip
Processing speed
Minimum sample volume
Sample consumption
Sample container
Simultaneous measurement
Reagent reaction temperature
Light source
Calibration method
Data storage volume
Display
Built-in Printer
External Output
Transmission Method
Transmission Rate
Measurement conditions
Power supply
Power input
Dimensions
Weight
Serum, Plasma, Whole blood (Only Hb)
General biochemical measurement items, 22 items
5 wavelengths (405, 550, 575, 610 and 820 nm)
Optical measurement of reflection intensity of
reagent color reaction
Set for sach measurement item
SPOTCHEMⅡReagent Strip
63 samples per hour
6
× the number of measurement items + 38μL:
serum, plasma
4
6μL(per 1 measurement item): serum, plasma
Whole blood: exclusive whole blood sample tube
(Orange cap)
Centrifuge tube
Serum, plasma: exclusive serum sample tube
(Blue cap)
3 Single Reagent Strips or 1 Multi Reagent Strip
Maximum of 9 test items of continuous
measurement using Single Reagent Strips and a
Multi Reagent Strip is available.
37 ℃
LED and Interference filter
Calibration by magnetic card (Reagent Card)
Calibration by Calibrator Kit
100 tests
20 digits
2 lines LCD
36-character thermal printer (58 mm width)
RS-232C interface
Single or Two-way Transmission
300, 600, 1200, 2400, 4800, 9600bps
Temperature: 10
30
Humidity: 20 80 % (Non-condensing)
AC100
120V, 220 240V
50/60Hz
AC adapter method
Max. 100VA
338 mm(W)
203 mm(D) 167 mm(H)
Approximately 5.4 kg
SPOTCHEM EZ SP-4430 OPERATING MANUAL
DOC.No.OM-28573 REV.6 03/02
1-2 Shipping Carton
Chapter 1 INTRODUCTION
1-2-1 Analyzer
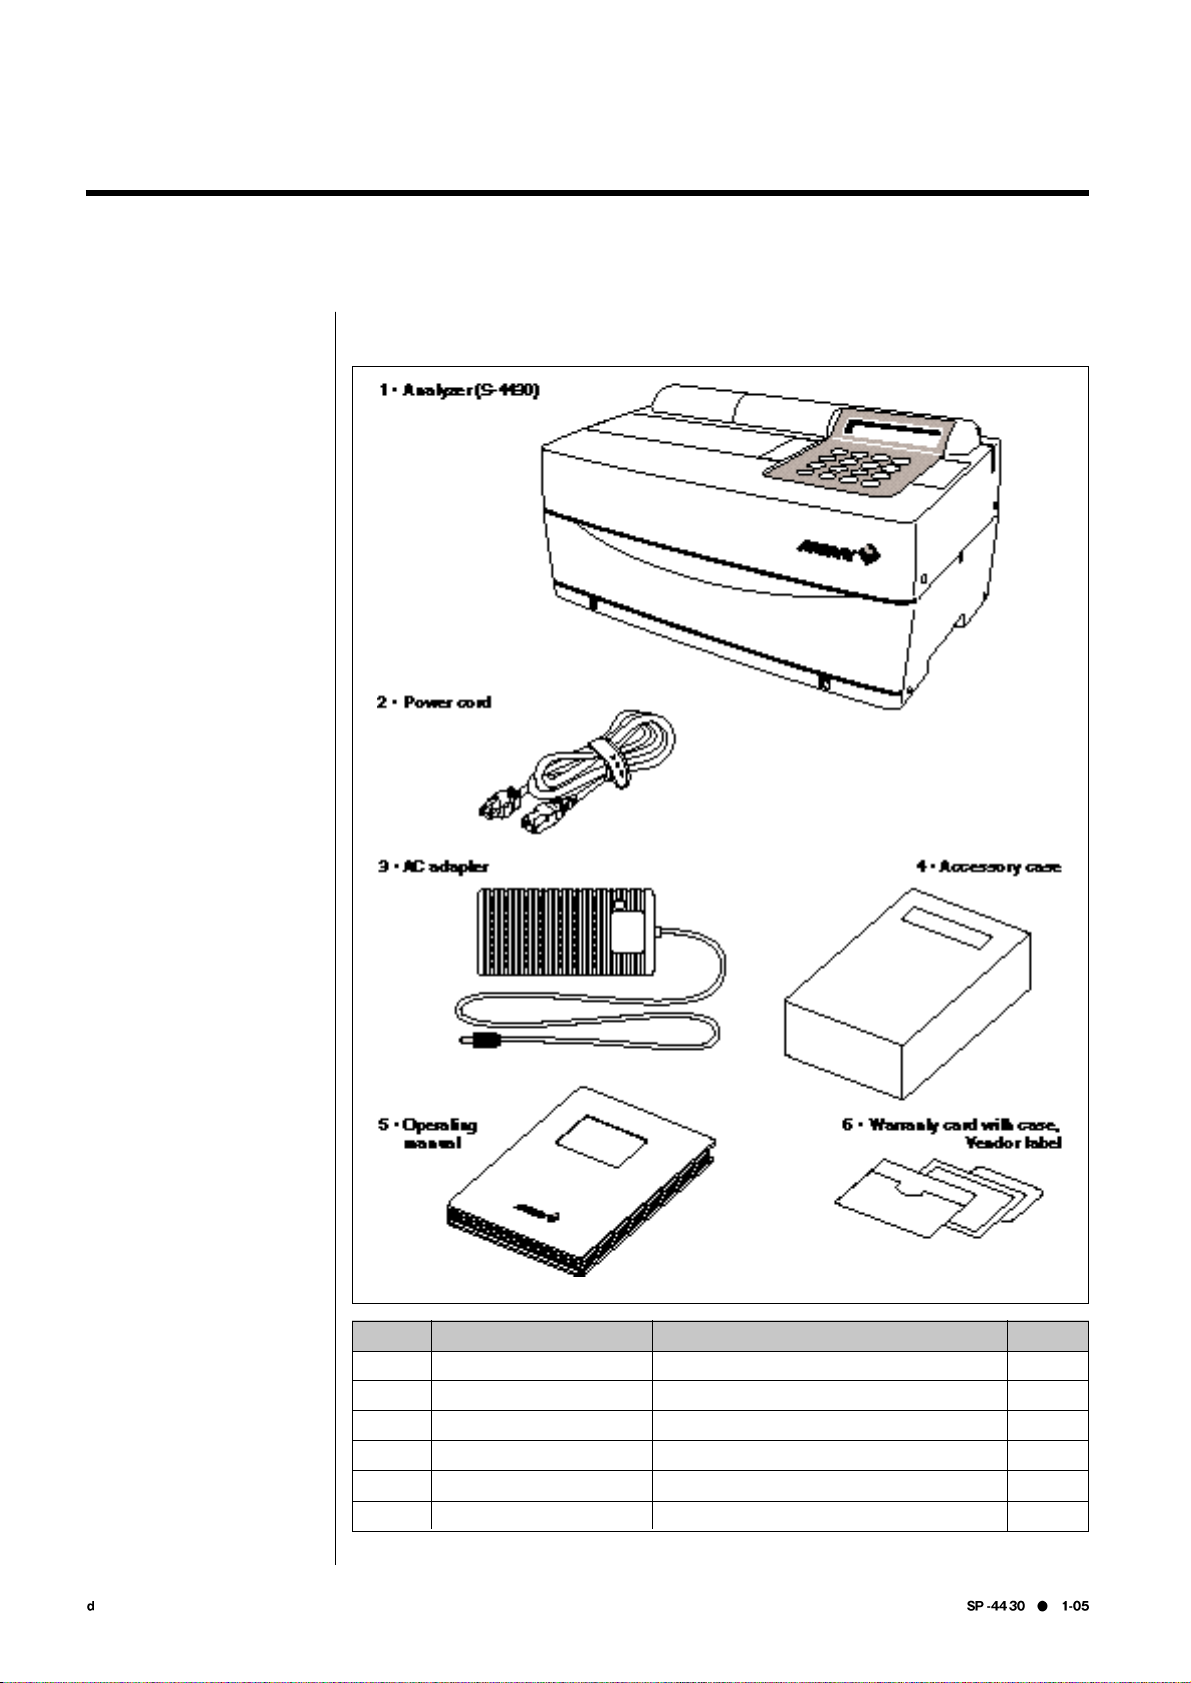
Open the package and confirm that all items are included.
Description
SP-4430
This book
Warranty card with case, Delivery label
NO.
1
2
3
4
5
6
Item
Analyzer
Power cord
AC adapter
Accessory case
Operating manual
Warranty card
Qty.
1
1
1
1
1
1set
SPOTCHEM EZ SP-4430 OPERATING MANUALDOC.No.OM-28573 REV.6 03/02
1-2
Chapter 1 INTRODUCTION
1-2-2 Accessories
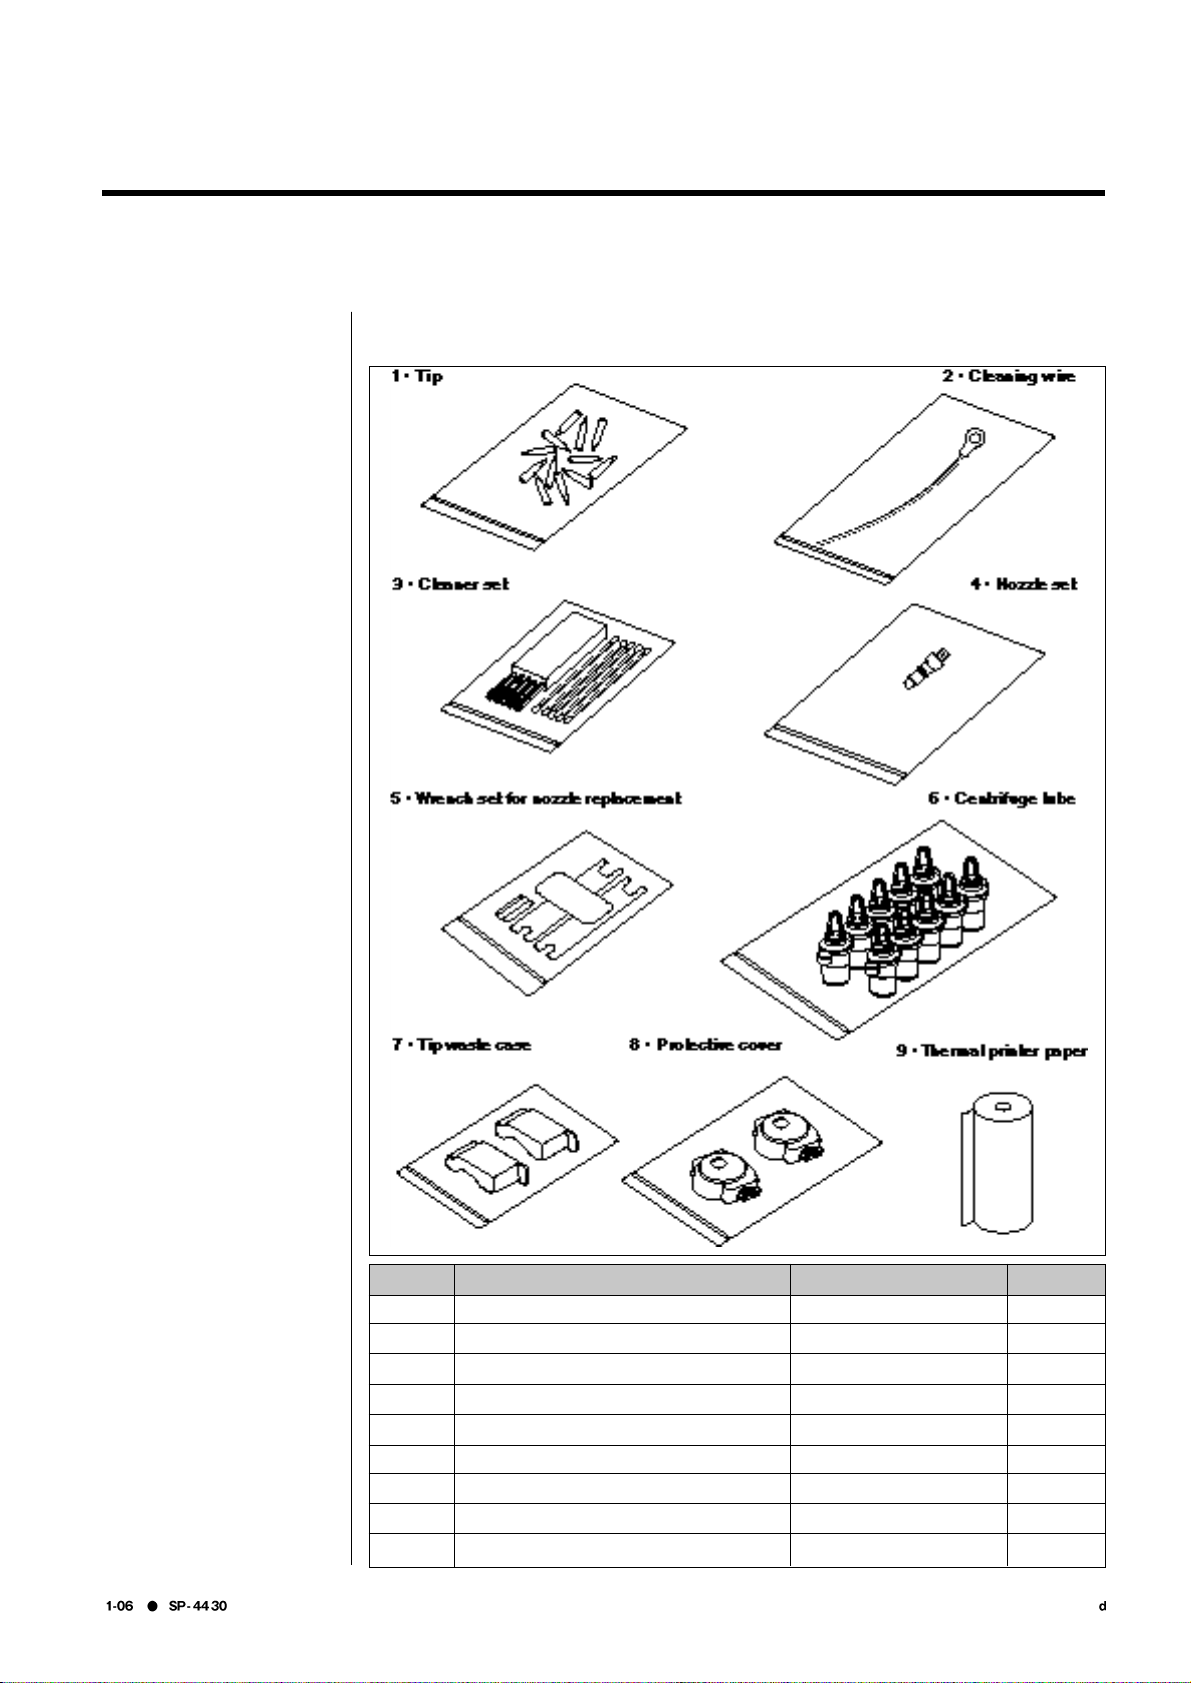
Description
10 tips
Nozzle cleaning
Brush, Cotton swab
Nozzle with O-ring
2 Wrench, Adapter
10 pieces
2 pieces
2 pieces
width 58 mm
NO.
1
2
3
4
5
6
7
8
9
Item
Tip
Cleaning wire
Cleaner set
Nozzle set (EZ)
Wrench set for nozzle replacement
Centrifuge tube
Tip waste case
Protective cover
Thermal printer paper
Qty.
1 Set
1 Set
1 Set
1 Set
1 Set
1 Set
1 Set
1 Set
1 Set
Open the package and confirm that all items are included.
SPOTCHEM EZ SP-4430 OPERATING MANUAL
DOC.No.OM-28573 REV.6 03/02
Chapter 1 INTRODUCTION
1-3 Parts Description and Function
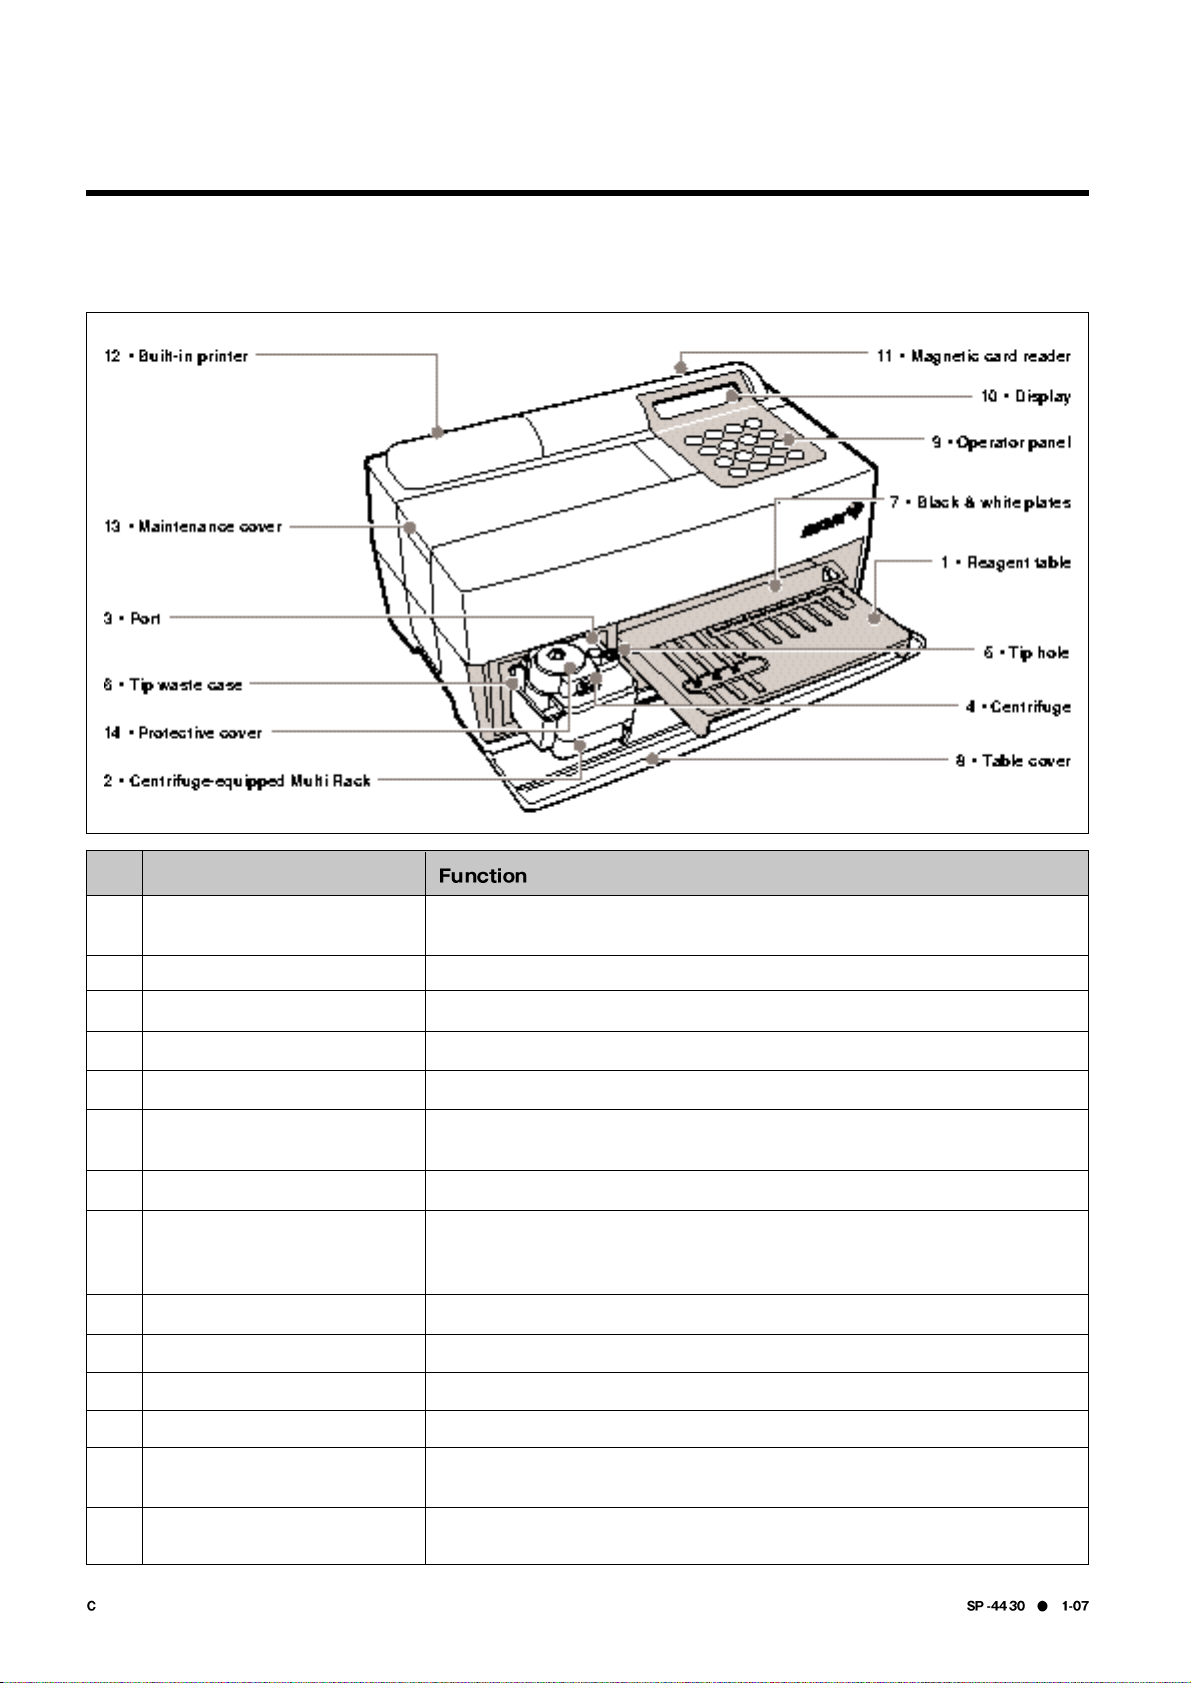
1-3-1 Front of the analyzer
For setting the Reagent Strip. The temperature is kept at 37℃ for the
reaction conditions of Reagent.
For setting the samples and tips. The centrifuge for 1 sample is built in.
For setting the samples.
For setting the whole blood samples that have not been centrifuged.
For setting tips.
The container for used tips automatically discarded after sampling.
Filled with 5 measurements.
The standard reflection plates used for measurement of reflectivity.
Prevents entering the external light.
Slide forward the Reagent Table and Centrifuge-equipped Multi Rack to
open.
For starting or stopping measurement and entering IDs.
Displays information such as operating state of the unit and error messages.
For inserting magnetic cards: Reagent Card and Calibration Cards
.
Thermal-type printer. Prints out measurement results and setting conditions.
Protects the Nozzle Driving Units. Also prevents the operator from contacting
the nozzle during measurement. There are top and side covers.
Prevents the operator from contacting the Centrifuge Tube.
Also protects spilling of samples.
NO.
1
2
3
4
5
6
7
8
9
10
11
12
13
14
Item
Reagent table
Centrifuge-equipped Multi Rack
Port
Centrifuge
Tip hole
Tip waste case
Black & white plates
Table cover
Operator panel
Display
Magnetic card reader
Built-in printer
Maintenance cover
Protective cover

SPOTCHEM EZ SP-4430 OPERATING MANUALDOC.No.OM-28573 REV.6 03/02
1-3
Chapter 1 INTRODUCTION
1-3-2 Operator panel
Function
Starts measurement. SelectYesfrom the Yes/No option.
Stops measurement. SelectNofrom the Yes/No option.
Cancels entry.
Feeds the built-in printer with paper while pressed.
Switches the page on each menu display.
Selects the menu number. Enter numerical values and ID.
Selects item, move cursor , switch the page on the display,
and enter minus sign and decimal point.
Determines the entry.
Check message to proceed to the operation.
Item
START
STOP
FEED
MENU
0~9 (ten key)
-/.(hyphen/period)
ENTER
SPOTCHEM EZ SP-4430 OPERATING MANUAL
DOC.No.OM-28573 REV.6 03/02
1-1 SP
-
4430
Chapter 1 INTRODUCTION
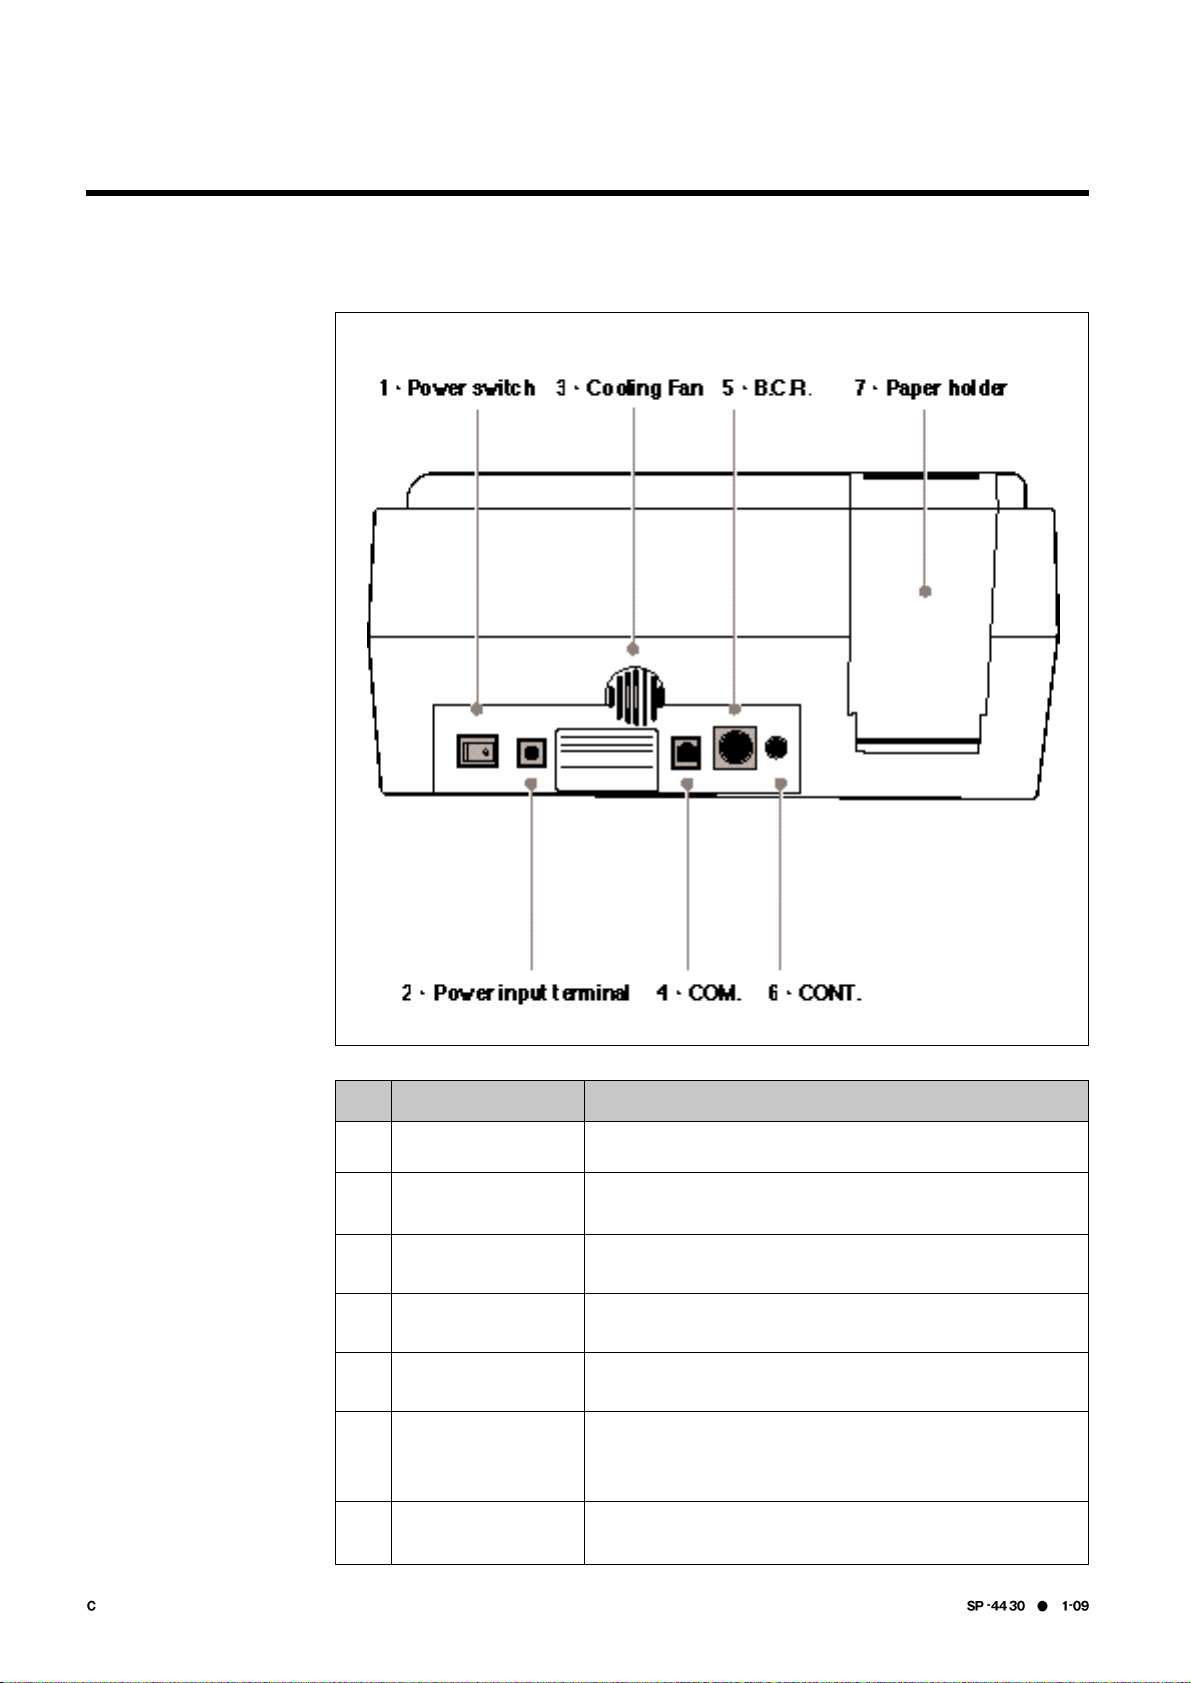
1-3-3 Rear of the analyzer
Function
For turning on and off the power supply to the analyzer.
For the supplied AC adapter.
For Ventilating heated air in the unit to prevent overheating.
For the cable of the optional external device.
Jack for the bar-code reader (option).
For adjusting screen contrast. Turning clockwise to make
the screen darker, counterclockwise makes it brighter.
For setting thermal printer paper.
Item
Power switch
Power input terminal
Cooling Fan
COM.
B.C.R.
CONT.
Paper holder
NO.
1
2
3
4
5
6
7
SPOTCHEM EZ SP-4430 OPERATING MANUALDOC.No.OM-28573 REV.6 03/02
1-4 Setting up the Analyzer
Chapter 1 INTRODUCTION
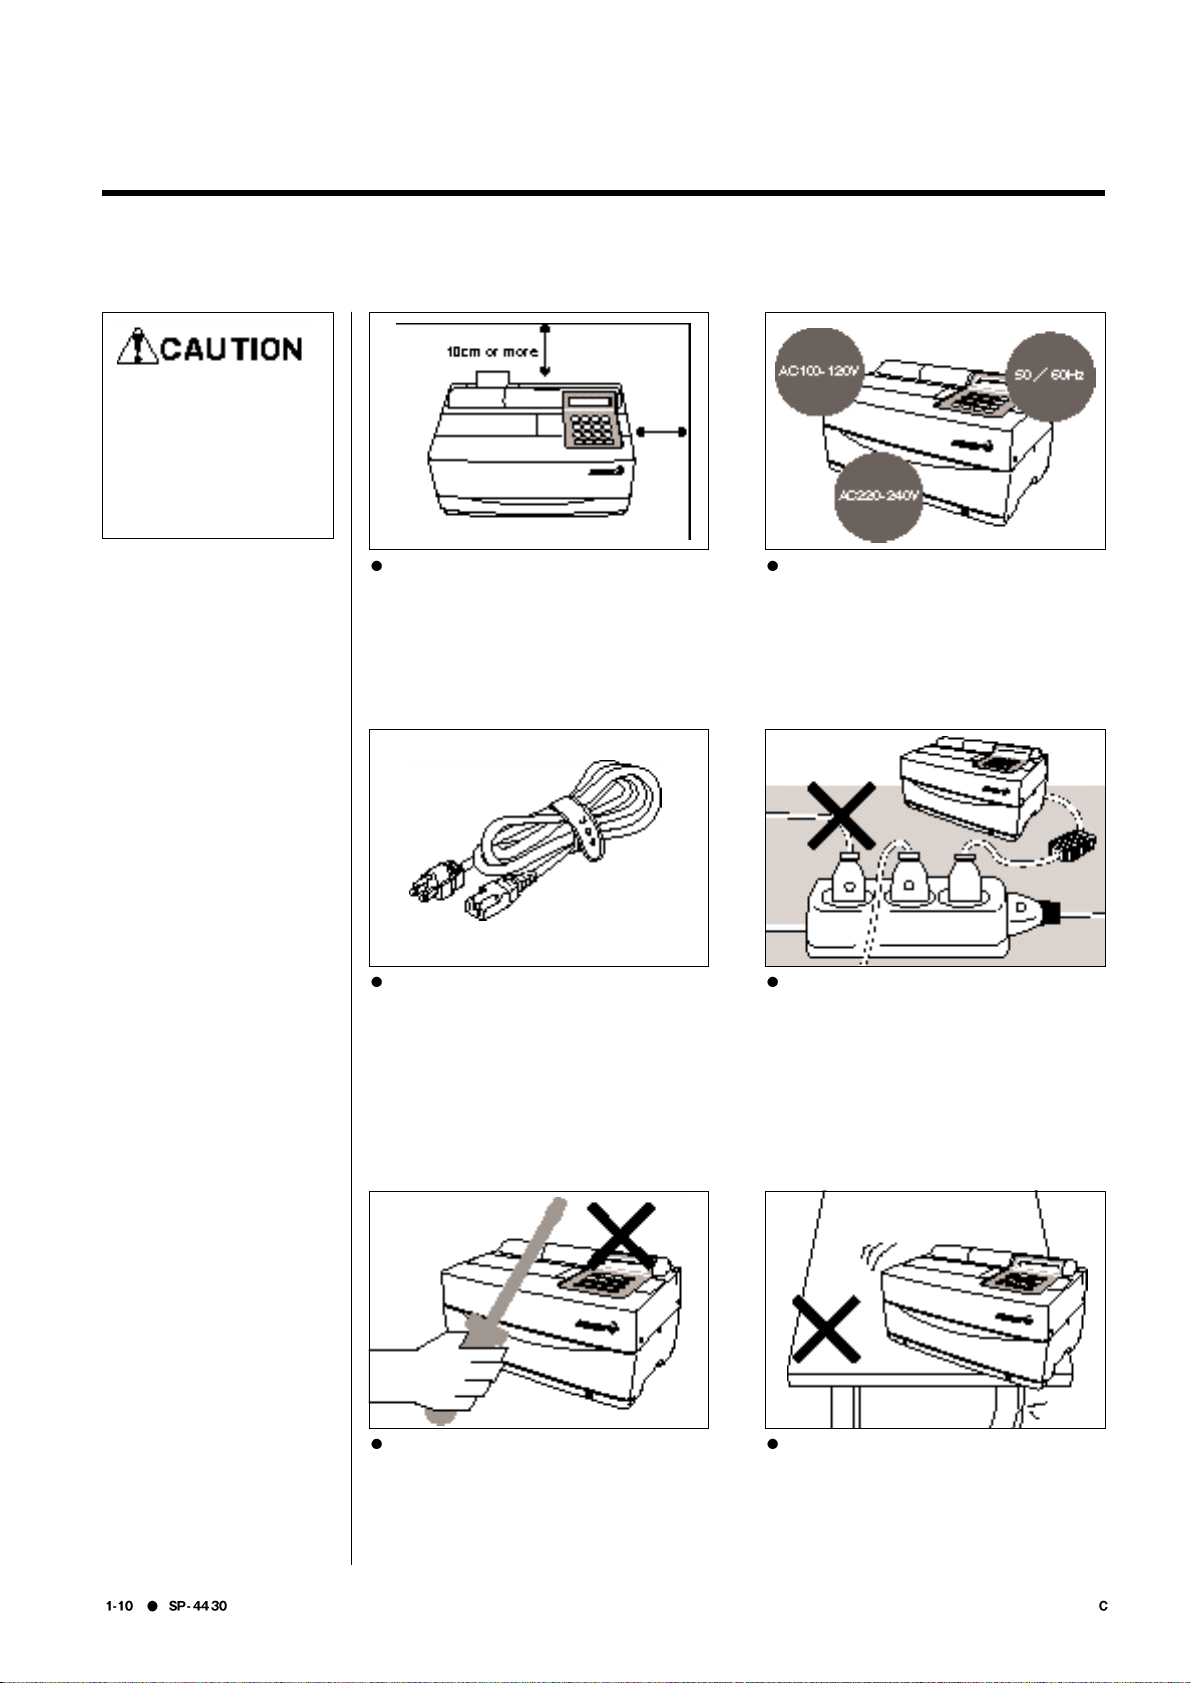
1-4-1 Cautions
Before setting up the
analyzer, read the
following notes and
always take proper
safety precautions.
Allow a space of 10 cm or more between
the rear of the analyzer and the wall.
Failure to do so may cause overheating.
Excessive load on the cable connection
may cause fire or incorrect measurement
results.
Operate the analyzer with power of the
correct voltage and frequency.
Otherwise fire or damage may result.
Do NOT unnecessarily disassemble or
modify the analyzer. Such actions may
invite danger of exposure to pathogenic
microbes, and cause fire or damage.
Place the analyzer on a stable and level
surface free of vibration. Failure to do so
may damage the analyzer, correct
measurement results may not be obtained,
and injury may result. Do NOT place the
analyzer where there is a risk of falling.
To avoid electric shock and/or fire, use
the attached power cord to connect with
a power outlet. For details, contact your
distributer.
Connect the power plug directly to an
outlet, not via an extension cord or
power tap. The power supply for the
analyzer is 100 VA. Before turning on the
power switch, make sure that the total
input of devices connected to a
receptacle of the same circuit doesn
’t
exceed 1500 VA (100V, 15A).
SPOTCHEM EZ SP-4430 OPERATING MANUAL
DOC.No.OM-28573 REV.6 03/02
1-1 SP
-
4430
Chapter 1 INTRODUCTION
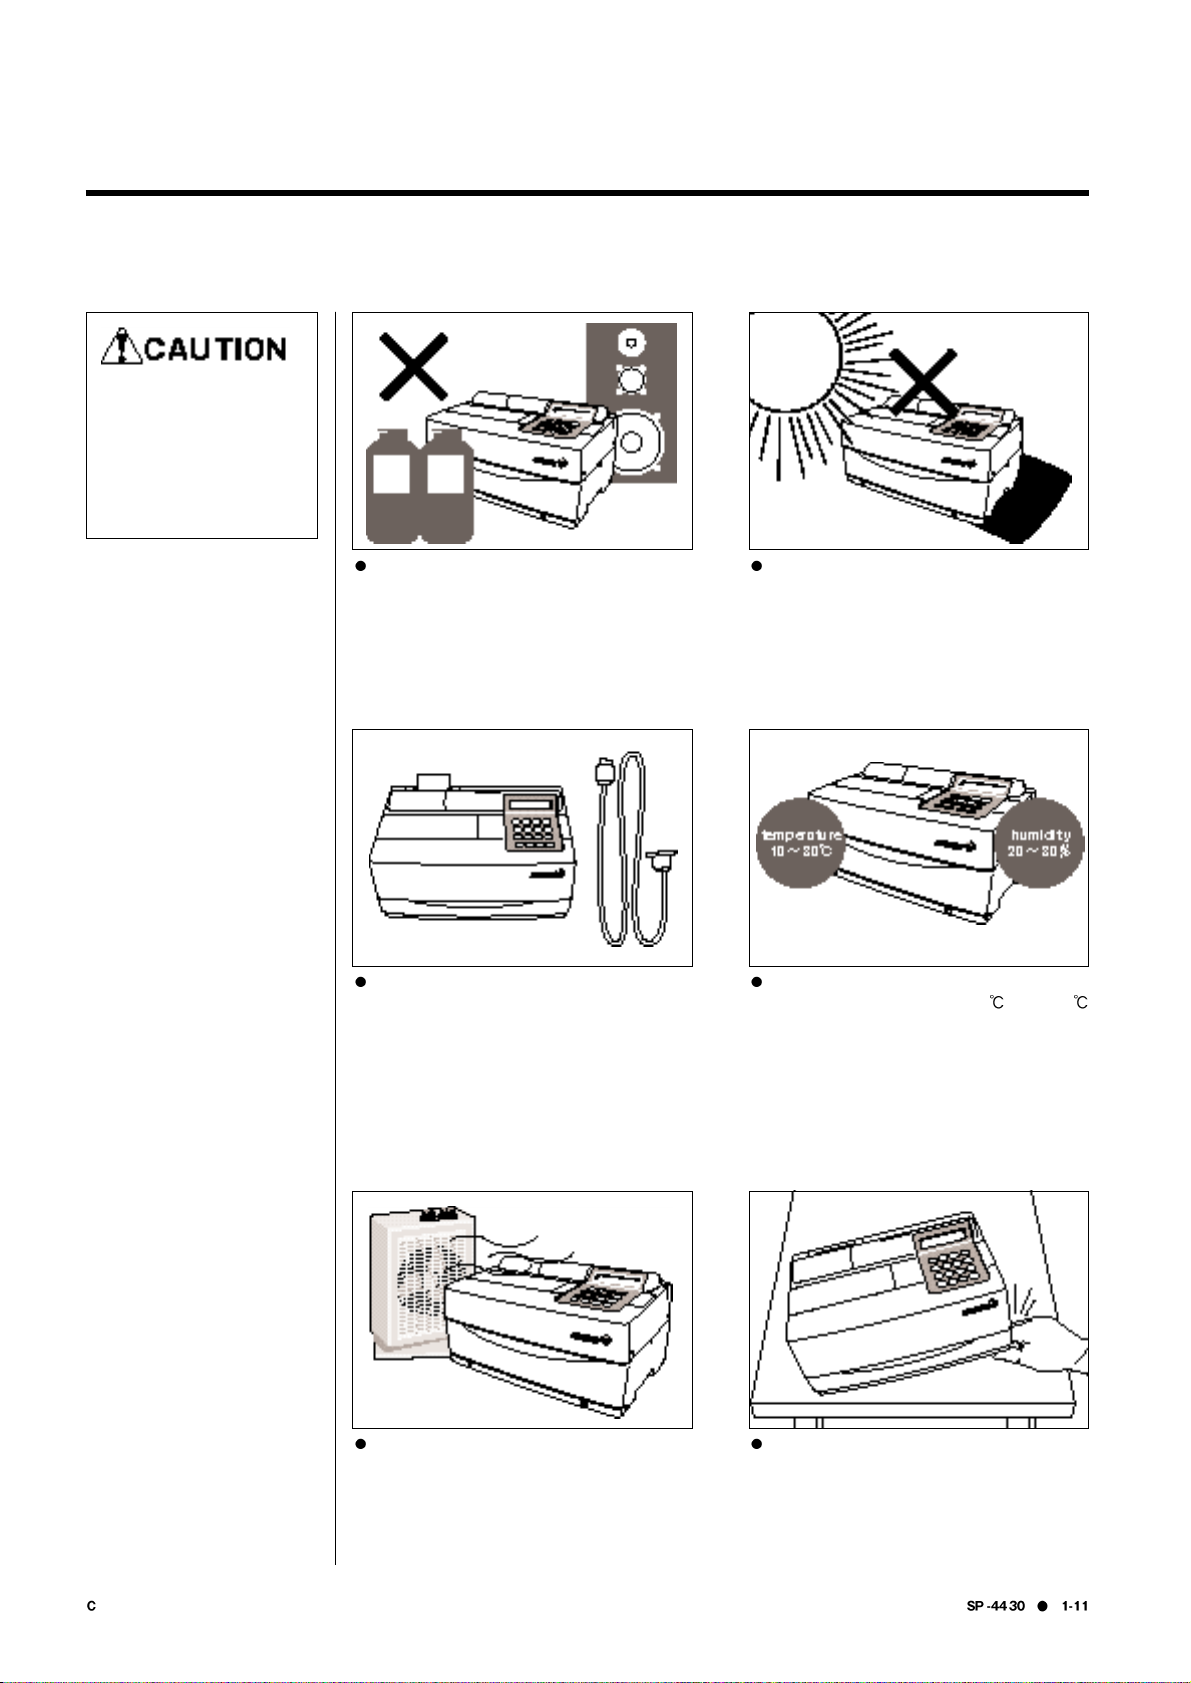
Before setting up the
analyzer, read the
following notes and
always take proper
safety precautions.
Do NOT set up the analyzer where
chemicals are stored nearby, or where
corrosive gases or electrical noise are
generated. They may damage the analyzer,
and malfunctions and/or injury may occur.
Correct measurement results may not be
obtained.
Avoid exposing the analyzer to direct
sunlight, condensation and wind.
Otherwise, correct measurement results
may not be obtained, and may cause
deformation or malfunction of the
analyzer.
To connect the analyzer to external
devices, be sure to use proper cables to
avoid electric shock and/or fire. For
details, contact your distributor.
Place the analyzer in a room at
temperatures between 10
and 30
with humidity between 20% and 80%.
Otherwise, correct measurement results
may not be obtained.
Make sure that the room is well ventilated when a large
amount of carbon dioxide is generated (when gas
stoves, oil heaters and instantaneous water heaters are
used in the room). This is because the pH of the
Reagent Strips, which use an alkaline reaction reagent,
decreases under the influence of carbon dioxide and
correct measurement data may not be obtained.
Be careful not to be put hands under the
analyzer.
SPOTCHEM EZ SP-4430 OPERATING MANUALDOC.No.OM-28573 REV.6 03/02
1-4
Chapter 1 INTRODUCTION
1-4-2
The parts in the analyzer are secured firmly in order to prevent scratches
and/or damage due to transportation. Remove the fixing tapes before
setting up the analyzer. Read 1-4-1 “Cautions on installation” carefully
before setting up the analyzer.
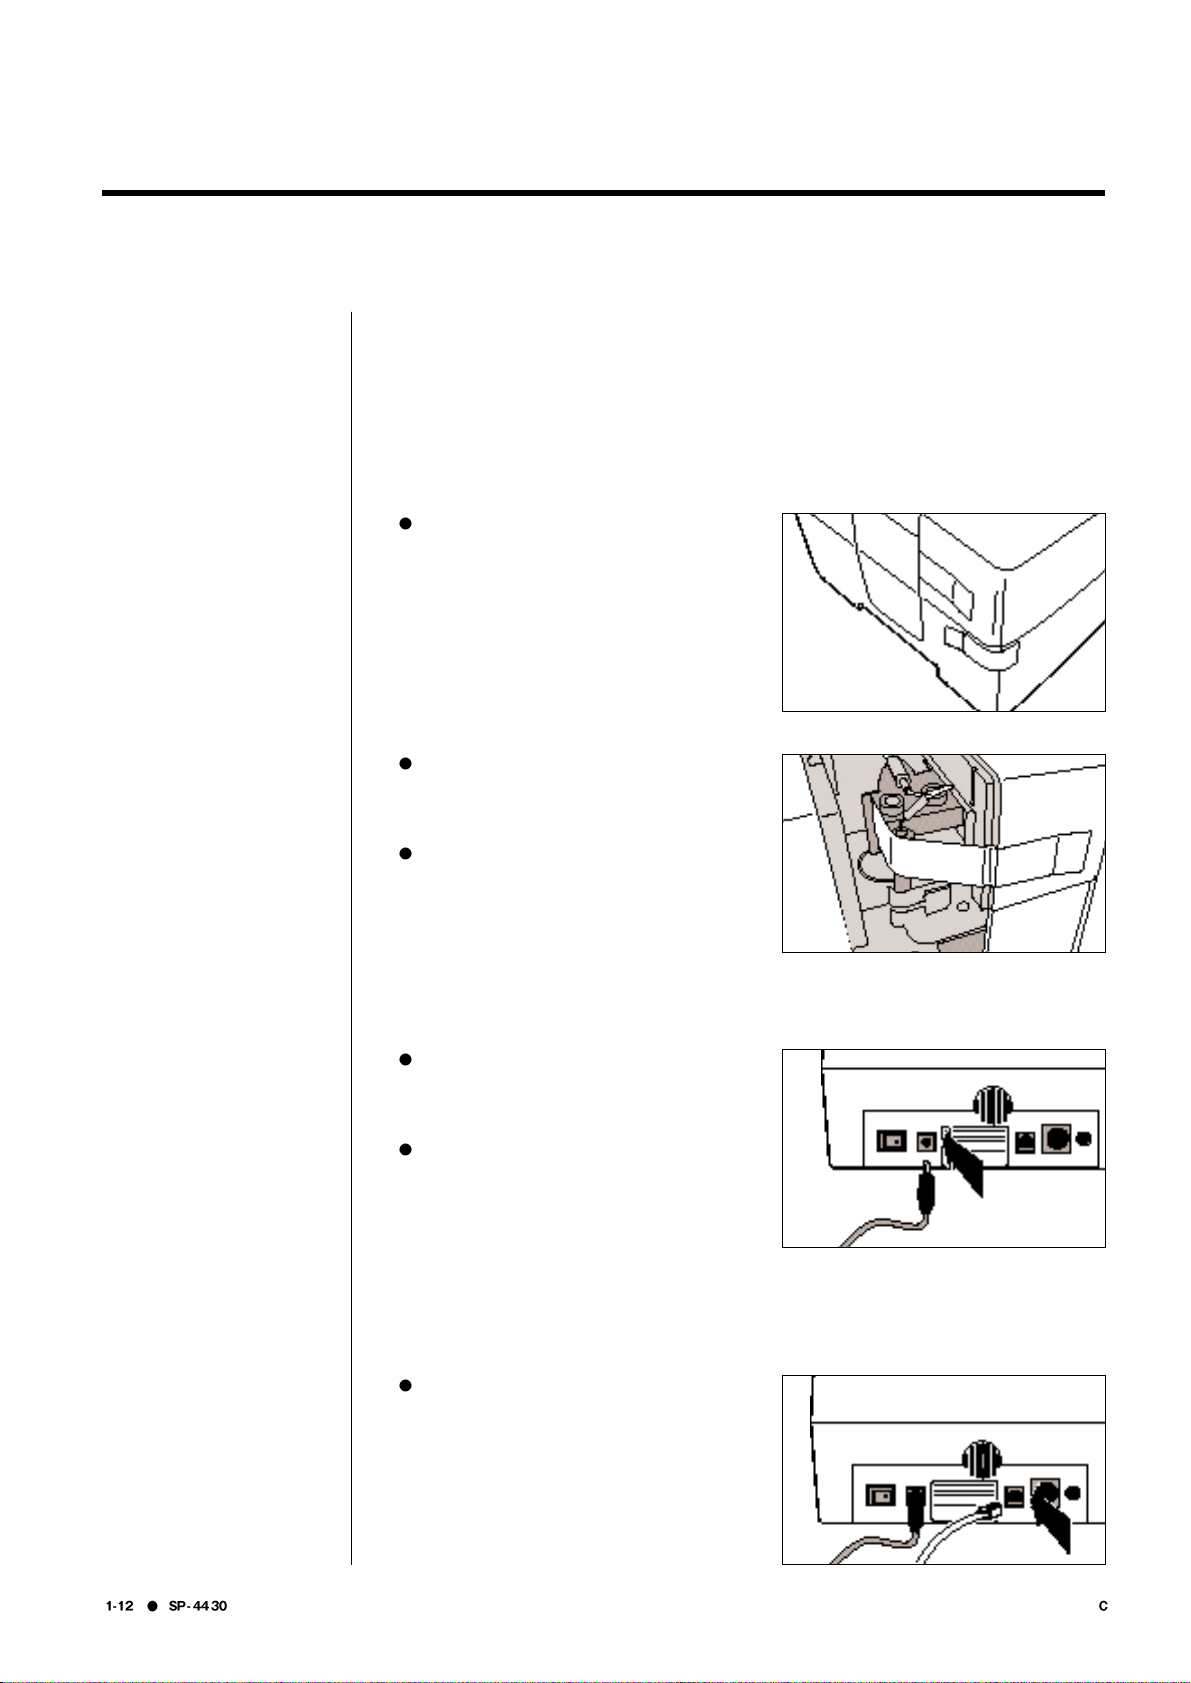
Setting up the analyzer
Remove the fixing tape.1.
Remove the tape fixing the table
cover.
Open the maintenance cover and
remove the tape fixing the nozzle.
Reattach the maintenance cover.
Connecting an external device (if necessary)3.
When using an external device,
connect the exclusive connecting
cable to COM on the rear panel of
the analyzer.
Connect the power cord.2.
Make sure that the power switch on
the rear of the analyzer is OFF.
Connect the AC adapter to the
receptacle on the rear panel of the
analyzer, and plug the other end of
the cord into the AC outlet.
SPOTCHEM EZ SP-4430 OPERATING MANUAL
DOC.No.OM-28573 REV.6 03/02
1-1 SP
-
4430
Chapter 1 INTRODUCTION
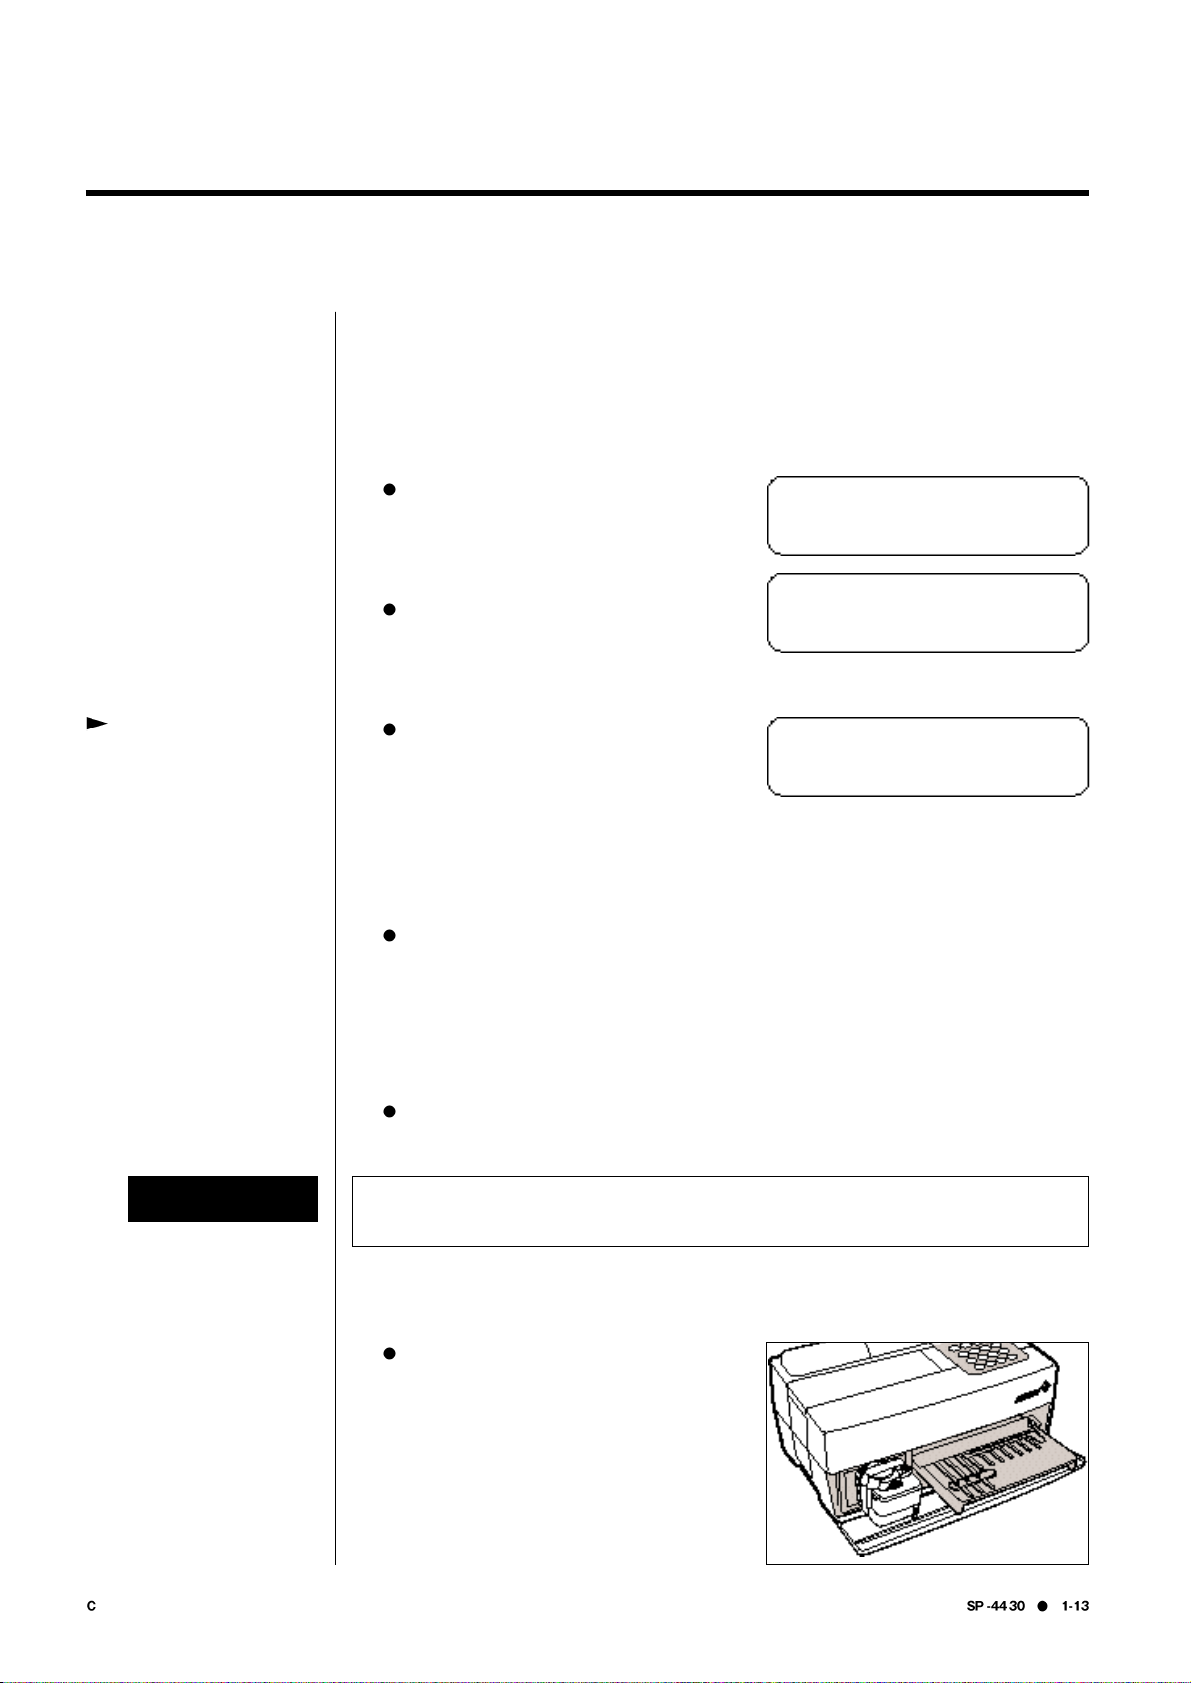
1-4-3
This section explains the way to load thermal printer paper, and set data
and time after turning on the power switch.
First operation after setting up
Turn on the power.1.
Turn on the power switch on the rear
panel of the analyzer.
“|” is displayed.
After the analyzer name and system
version are displayed, warm-up
starts.
About 10 minutes after (room
temperature at 25℃), warm-up is
completed and the MAIN MENU is
displayed as shown at right.
For error correction or
troubleshooting, “see Chapter
5 Troubleshooting”.
SPOTCHEM EZ
S Pー4430 V XXXX
Wa r m i n g u p
・・・
/
1.Measur e 2. Submenu
3 . C a l i b r a t e ( 1/1 )
Set the thermal printer paper.2.
Set the attached thermal printer
paper (See 4-3-1 “Thermal printer
paper replacement”).
If the date is not set correctly, correct measurement results may not be
obtained and an error may occur.
Confirm the time and date.3.
Set the date and time (see “3-6
Built-in Clock Adjustment”).
Remove the fixing tape on the protective cover.4.
Press [1] on the MAIN MENU.
The Table Cover opens and the
Reagent Table and Centrifugeequipped Multi Rack slide forward.
IMPORTANT
SPOTCHEM EZ SP-4430 OPERATING MANUALDOC.No.OM-28573 REV.6 03/02
1-4
Chapter 1 INTRODUCTION
1-4-4 Notes at transportation
Turn off the power.5.
When terminating the operation or
setting, turn off the power after
making sure that the MAIN MENU is
displayed.
1.Measur e 2. Submenu
3 . C a l i b r a t e ( 1/1 )
Remove the tape fixing the
protective cover.
Set the maintenance cover and the
tip waste case.
Press [STOP] to close the table
cover.
Cove r i s c l os i ng . /
Back to MENU(STOP)
Back to MEAS(ENTER)
Cove r i s c l os i ng .
Stop(STOP)
If no key entry is made within 3
minutes after the Table Cover is
opened, an alarm beeps and
the Table Cover is closed.
If [STOP] key is pressed while
the message “CANCEL” is
displayed, the Table Cover
remains open and the Standby
screen is restored.
After the Table Cover is closed,
a message shown at the right is
displayed.
To restore the MAIN MENU,
press [STOP] key.
When [ENTER] key is pressed,
the Table Cover opens and the
Standby screen is restored.
SPOTCHEM EZ SP-4430 OPERATING MANUAL
DOC.No.OM-28573 REV.6 03/02
1-4
Chapter 1 INTRODUCTION
1-4-4
When carrying the analyzer in cars, use an exclusive carrying case. The
carrying case is optional. Follow the following procedures to prevent
exposure to pathogenic microbes and damage to the analyzer.
Notes at transportation
Wear protective gloves to prevent exposure to pathogenic microbes.
Inspect the inside of the analyzer.1.
Press [1] on the MAIN MENU. The
Table Cover opens and the Reagent
Table and Centrifuge-equipped Multi
Rack slide forward.
The Standby screen is displayed.
Make sure that there are no used
Reagent Strips or samples. If any,
discard them.
When there are used tips in the Tip
Waste Case, discard them.
Press [STOP] to return to the MAIN
MENU and turn off the power
switch.
Placing analyzer into carrying case.2.
Place the analyzer, AC adapter and
power code in the carrying case.
S t a n d b y 2000ー06ー10
I D(1) I N FO(2)
1.Measur e 2. Submenu
3 . C a l i b r a t e ( 1/1 )
1.Measur e 2. Submenu
3 . C a l i b r a t e ( 1/1 )

SPOTCHEM EZ SP-4430 OPERATING MANUALDOC.No.OM-28573 REV.6 03/02


SPOTCHEM EZ SP-4430 OPERATING MANUAL
DOC.No.OM-28573 REV.6 03/02
Chapter 2
MEASUREMENT
2-1 Outline of Measurement
2-1-1 SPOTCHEMⅡ Reagent Strips
2-1-2 Normal measurement
2-1-3 Calibration
2-2 Cautions
2-2-1 Cautions
2-2-2 Handling samples
2-2-3 Handling Reagent Strips
2-2-4 Handling magnetic cards
2-2-5 Handling tips
2-2-6 Handling centrifuges
2-3 Preparation for Measurement
2-3-1 Preparation
2-3-2 Startup
2-3-3 Checks before measurement
2-3-4 Preparing samples
2-4 Measurement
2-4-1 Normal measurement
2-5 Calibration
2-5-1 Overview of calibration
2-5-2 Calibration by magnetic card
2-5-3 Calibration by calibrator kit
2-6 Interpreting measurement results
2-6-1 Printing normal measurement results
2-6-2 Printing calibration results
The normal measurement and two types of calibration can be
done with the SP-4430. This chapter describes the outline and
operating procedures of each measurement.
SPOTCHEM EZ SP-4430 OPERATING MANUALDOC.No.OM-28573 REV.6 03/02
2-1 Outline of Measurement
Chapter 2 MEASUREMENT
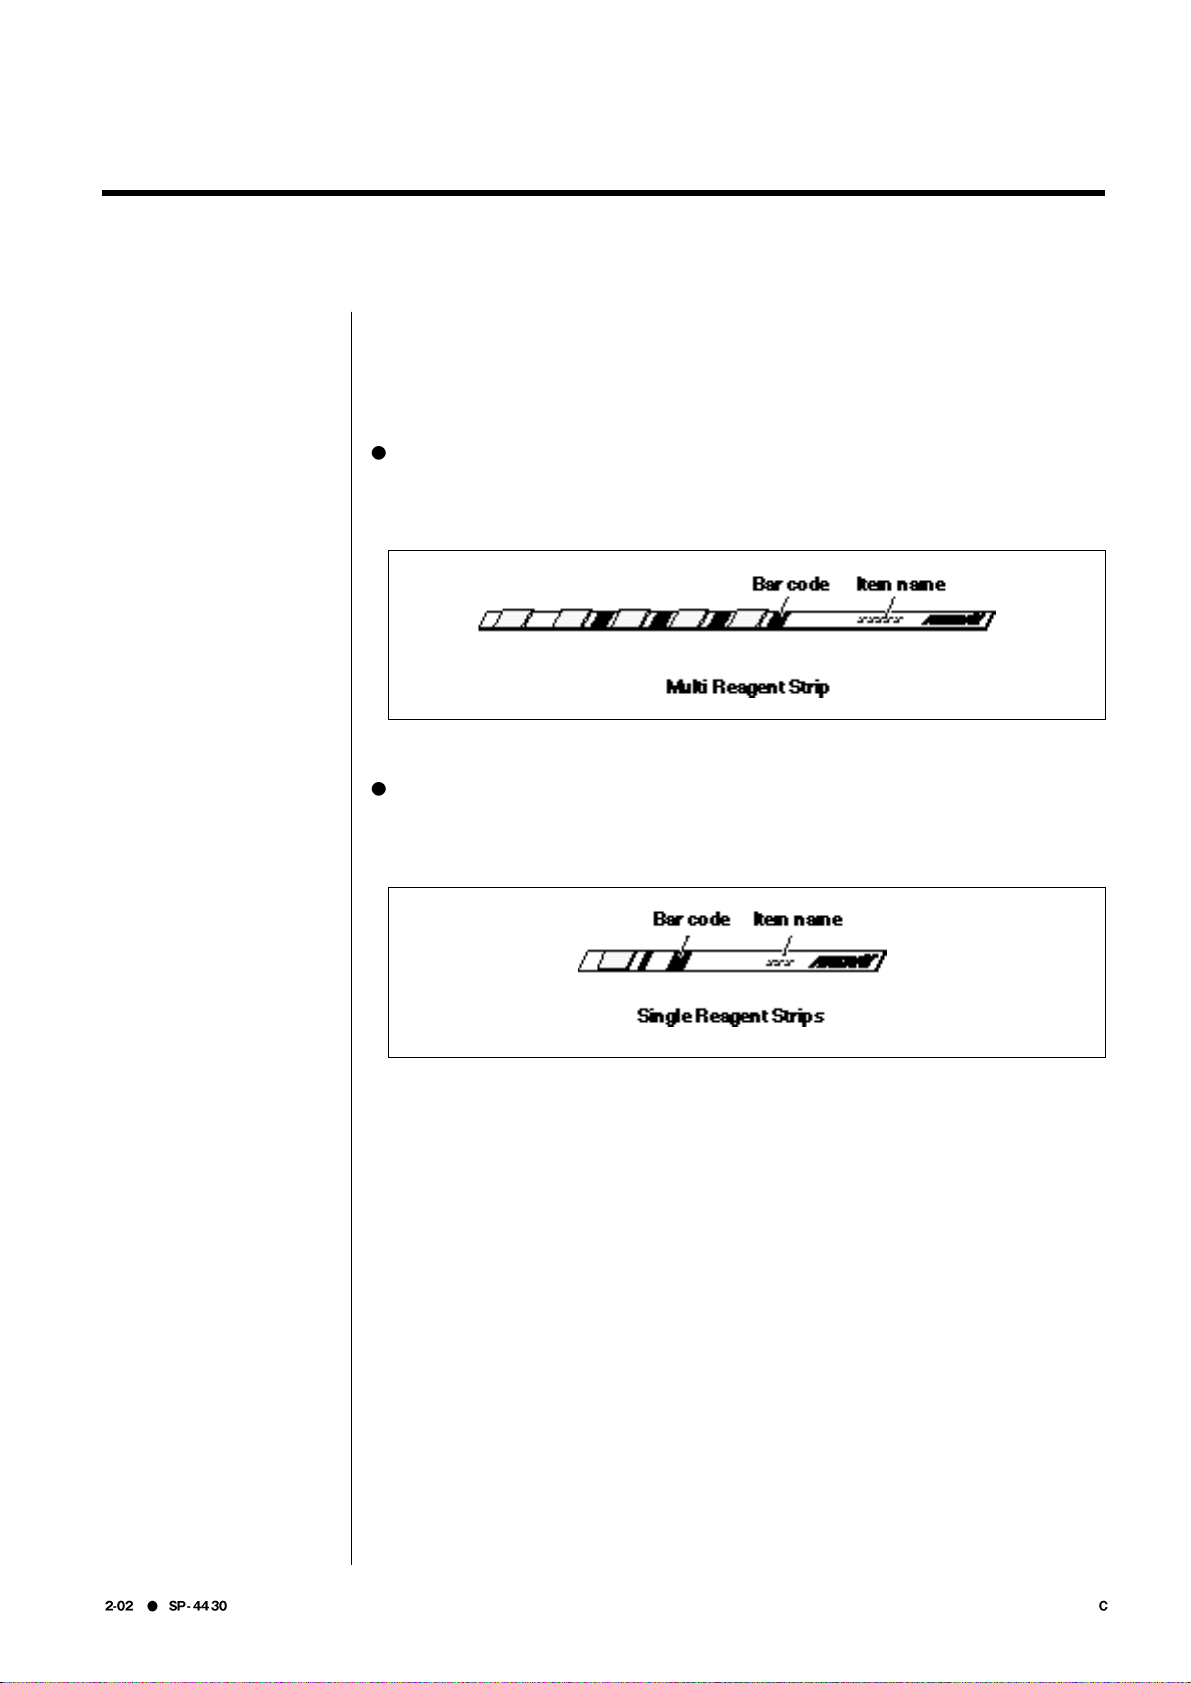
2-1-1
SPOTCHEMⅡ Reagent Strips (optional) must be used with this analyzer.
There are two types of SPOTCHEM Reagent Strips. Use the correct type
of strips for the measurement purpose.
Multi Reagent Strip
A Multi Reagent Strip has 5~6 reagent fields for analyzing various items including
normal screening, and liver or renal function screening.
Single Reagent Strip
A Single Reagent Strip has only one reagent field on it. Several different reagent items
of Single Reagent Strips can be measured for one sample.
SPOTCHEMⅡ Reagent Strips
SPOTCHEM EZ SP-4430 OPERATING MANUAL
DOC.No.OM-28573 REV.6 03/02
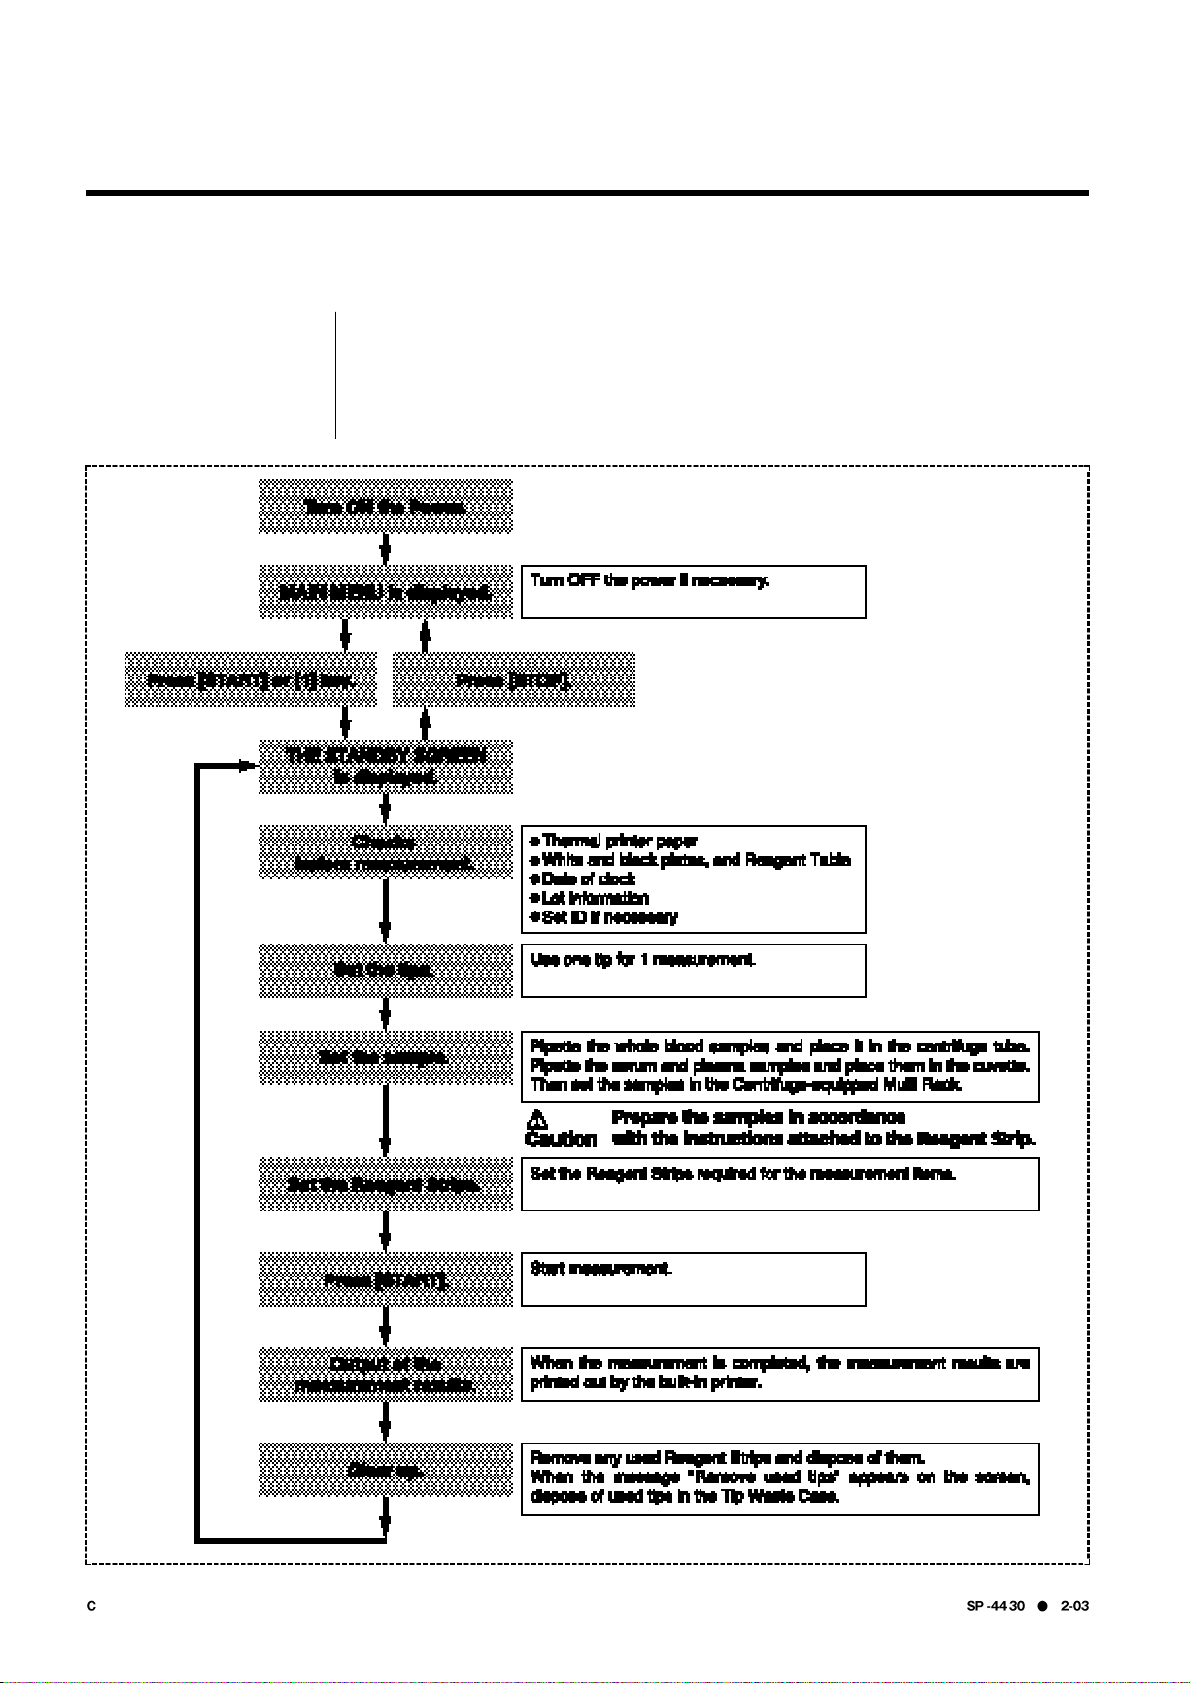
2-1-2
In normal measurement, more than one item can be measured at a time
for one sample. The Reagent Strip Table can hold three Single Reagent
Strips and one Multi Reagent Strip, so that simultaneous measurement of
up to nine items is available. The operating procedure of normal
measurement is described as shown below.
Normal measurement
Chapter 2 MEASUREMENT

SPOTCHEM EZ SP-4430 OPERATING MANUALDOC.No.OM-28573 REV.6 03/02
Chapter 2 MEASUREMENT
2-1-3 Calibration
This analyzer provides two types of calibration: Calibration by magnetic
card (Reagent Card) and Calibration by Calibrator. Calibration must be
performed for all fields of Reagent Strips (see “2-5-1 Outline of
calibration” for details).
For calibration by Calibrator, the following two types of Calibrator Kit and Magnetic Card
(Calibration Card) are used.
SPOTCHEM Calibrator Kit
For use with all items except Hemoglobin
SPOTCHEM Calibrator Hb Kit
For use with Hemoglobin
Each Calibrator Kit contains Low and High lyophilized serum and a Calibration Card. For
detailed procedures, see the package insert of the Calibrator Kit.

SPOTCHEM EZ SP-4430 OPERATING MANUAL
DOC.No.OM-28573 REV.6 03/02
Chapter 2 MEASUREMENT
The flowchart of calibration.

SPOTCHEM EZ SP-4430 OPERATING MANUALDOC.No.OM-28573 REV.6 03/02
2-2 Cautions
Chapter 2 MEASUREMENT
2-2-1 Cautions
Before turning ON the power, reconfirm
“1-4-1 Cautions” so that the analyzer is
always operated under proper
conditions.
The analyzer has a temperature control
function in order to yield correct
measurement results at the room
temperature of 10~30
. For more
accurate measurement, measurement at
the room temperature of 20~25
and at
humidity of 30~60% is recommended.
Do NOT put a container with samples
in it on the analyzer. If samples spill
on the device, it may damage.
Do NOT move the analyzer during
measurement. Such movement may
cause malfunction, resulting in
incorrect measurement results.
If there is anything wrong with the
analyzer, or in case of odor or smoke,
turn OFF the power immediately and
unplug. Otherwise the analyzer may
be damaged and cause fire.
If the analyzer is out of order, contact
your distributor for repair. Do NOT
attempt to repair or modify it by
yourself. It may damage the analyzer
or get injured.
Perform proper maintenance following
the instruction to ensure high
accuracy.
Do NOT place anything in front of the
Table Cover. It automatically opens
during operation.
Use SPOTCHEM Reagent Strips only
for the analyzer. The other types of
Reagent Strips are unacceptable.

SPOTCHEM EZ SP-4430 OPERATING MANUAL
DOC.No.OM-28573 REV.6 03/02
Chapter 2 MEASUREMENT
2-2-2 Handling samples
Handling samples slightly differs
depending on test items. Follow the
instructions on the package insert of
SPOTCHEM Reagent Strips.
Blood is used as a measurement sample
with this analyzer. Be aware that blood may
be contaminated with pathogenic microbes
that may cause infectious disease. Exercise
utmost care whenever handling blood.
Incorrect or imprecise procedures may
result in exposure to pathogenic microbes.
2-2-3 Handling Reagent Strips
Do NOT use expired Reagent Strips or
deteriorated strips of which the reagent
fields show any sign of discoloration or
deformation, even if they are before the
expiration date. Correct measurement
results may not be obtained.
Take Reagent Strips out of the refrigerator
20 minutes before measurement and allow
them to reach room temperature (10 to
30
). Otherwise, correct measurement
results may not be obtained.
Open a reagent strip package immediately
before use. If the opened reagent strip is
left for a while, it will absorb water from the
air or gather dust, which may result in
incorrect measurement results.
Do NOT touch the reagent field on the
strip with fingers. Sebum on the
reagent field may result in incorrect
measurement results.
When a new reagent strip box is
opened, perform calibration by magnetic
card using the supplied Reagent Card
(see 2-5-2).

SPOTCHEM EZ SP-4430 OPERATING MANUALDOC.No.OM-28573 REV.6 03/02
Chapter 2 MEASUREMENT
2-2-4 Handling magnetic cards
2-2-5 Handling tips
Do NOT place a magnetic card close
to a magnetic object (magnet, TV set,
etc.) Information on the magnetic card
may become unreadable.
Do NOT scratch the magnetic surface
(stripe). Information on the magnetic
card may become unreadable.
Do NOT use a magnetic card
(supplied
with Reagent Strips or Calibrator)
for
SP-4420 or SP-4430 with other devices.
The card may become jammed in the
device.
Do NOT touch the pointed end of a Tip
with bare hands. If it becomes soiled,
correct sampling may not be possible,
resulting in incorrect measurement
results.
Do NOT reuse a tip. Water-repellent
treatment is applied to each tip so that
the sample can be pipetted correctly.
If it is rinsed, the coating will come off
and correct measurement results may
not be obtained.

SPOTCHEM EZ SP-4430 OPERATING MANUAL
DOC.No.OM-28573 REV.6 03/02
Chapter 2 MEASUREMENT
2-2-6 Handling centrifuges
Pipette 250 to 270 whole blood
into the centrifuge tube. Insufficient
sample volume may result in incorrect
measurement results. Excessive volume
may cause blood to stain the cover.
Heparin is contained as an anticoagulant.
Close the cap tightly after setting a
sample, and invert it and use the sample
after removing the cap.
Remove air bubbles or skin on the
surface of the sample, if any. Otherwise
they may cause incorrect measurement
results.
Wipe out the sample attached to the
outside of centrifuge tube before placing
it to the centrifuge, otherwise it may
cause spattering the sample.
Samples with extremely high hematocrit
levels may yield incorrect measurement
results.
When it takes time before blood samples
collected are brought into the centrifuge,
the samples may begin to coagulate.
The samples, which show heavy
coagulation or deposition of fibrin, may
not be subjected to measurement.
A syringe containing heparin can be
used to prevent coagulation when it
takes time before the samples are
brought into the centrifuge, although the
machinecontains heparin.

SPOTCHEM EZ SP-4430 OPERATING MANUALDOC.No.OM-28573 REV.6 03/02
2-3
Preparation for Measurement
Chapter 2 MEASUREMENT
2-3-1
Prepare necessary instruments as described in the following table before
starting Normal Measurement, Calibration by Magnetic Card or Calibration
by Calibrator.
Preparation
IMPORTANT
Take the Reagent Strips out of the refrigerator
and leave them at room temperature (10
30 ) for 20 minutes.
Using Reagent Strips without allowing
them to reach room temperature may
result in incorrect measurement results.
IMPORTANT

SPOTCHEM EZ SP-4430 OPERATING MANUAL
DOC.No.OM-28573 REV.6 03/02
To obtain the appropriate
contrast on the screen, rotate
the contrast adjustment knob
(“CONT.”) on the rear of the
analyzer.
Chapter 2 MEASUREMENT
2-3-2 Startup
The operating procedures from turning ON the power to the MAIN MENU
are described below.
Turn ON the power.1.
Turn ON the power at the rear of the
analyzer. When the power is ON, “|”
is displayed
The name of the analyzer and the
system version (“VXXXX” shown at
the right) are displayed and warm-up
starts.
The screen appears during warm-up
as shown at the right, and initialization
and self-check of each function are
performed.
About 10 minutes after (when at
25
), warm-up is completed and the
MAIN MENU is displayed.
Warm-up time depends on the
room temperature.
SPOTCHEM EZ
S Pー4430 V XXXX
NOTE
Before turning ON the power, make sure that the maintenance cover is in
position. If light enters into the analyzer during initialization, an error will
occur.
Before turning ON the power, make sure that nothing is placed in front of
the Table Cover. The Table Cover opens during initialization. If there is an
obstruction, a problem may occur.
Wa r m i n g u p
・・・
/
1.Measur e 2. Submenu
3 . C a l i b r a t e ( 1/1 )

SPOTCHEM EZ SP-4430 OPERATING MANUALDOC.No.OM-28573 REV.6 03/02
Chapter 2 MEASUREMENT
2-3-3 Checks before measurement
Thermal printer paper.1.
If a red line appears on both sides of
the printer paper, replace it with a
new roll (see“4-3-1 Thermal printer
paper replacement”).
Reagent Table.2.
Check the Reagent Table and clean
it if necessary (see “4-2-1 Cleaning
the Reagent Table”).
Centrifuge-equipped Multi Rack.3.
Make sure that the Centrifugeequipped Multi Rack has no used
samples in it. If any, discard them.
Install the Tip Waste Case.
Check each part before performing Normal Measurement or Calibration.
Setting the parameters.4.
Set the parameters as necessary. If the same parameter settings are continuously
used, resetting is not necessary. See “Chapter 3 SUB MENU” for details.
Wear protective gloves to prevent exposure to pathogenic microbes.
Discard used samples, tips and protective gloves separately from general
waste according to the local regulations on biohazardous waste.
To check the present parameter settings, print them out (see “3-3-1 Printing
parameters”).
IMPORTANT

SPOTCHEM EZ SP-4430 OPERATING MANUAL
DOC.No.OM-28573 REV.6 03/02
Chapter 2 MEASUREMENT
2-3-4 Preparation of samples
Prepare samples as described below except for Hb and HDL-C, which
require different procedures (see pages 2-16 and 2-17 for sample
preparation for Hb and HDL-C). Test items may be added or changed in
the future. Read the package insert of SPOTCHEM Reagent Strips
carefully for details on handling samples.
The required volume of a serum or
plasma sample is“6x (number of
test items)+38
”.For example,
the required volume for 5 test
items is : 6 x 5 + 38
= 68 .
A Serum or Whole blood Sample
Tube has 2 lines marked on it for
100
and 500 .
Serum or plasma sample.
Prepare a Serum Sample Tube (blue cap).
Pipette serum or plasma. If
measurement is not performed
immediately, cap the tube to prevent
contamination or evaporation.
Whole blood.
Prepare a Whole blood Sample Tube
(orange cap).
Uncap the tube and pipette whole blood.
Cap the tube tightly.
Invert the sample 5 to 6 times (see
“Inverting a sample” on the next page).
The Whole blood Sample Tube
contains heparin as an
anticoagulant.
Wear protective gloves to prevent exposure to pathogenic microbes.
Remove any air bubbles or skin on the surface of the sample.
They may cause incorrect measurement results.
IMPORTANT

SPOTCHEM EZ SP-4430 OPERATING MANUALDOC.No.OM-28573 REV.6 03/02
To use a whole blood sample tube, prepare a centrifuge.
Chapter 2 MEASUREMENT
Place the samples in the centrifuge
taking rotor balance into consideration
(see the block below).
Centrifuge the samples for 3 minutes
or more. It is not necessary to remove
the supernatant from the centrifuged
samples. Uncap the tubes and place
them directly in the sample rack.
Inverting a sample to mix
Gently invert a sample tube.
In 3 seconds, invert the sample
again.
Wait for 3 seconds, and invert it
again.
Repeat the above procedure
several times.
Even if the sample stays at the
bottom after being inverted,
heparin is well mixed with the
sample. Do NOT shake the
tube vigorously.
1
2
3
4
Ensuring rotor balance
Place sample tubes
symmetrically against the rotation
axis as illustrated at right. For
centrifugation of 1 or 5 samples,
use a dummy tube filled with an
equal amount of water to make a
total of 2 or 6 sample tubes.
Remove any air bubbles or skin on the surface of the sample.
They may cause incorrect measurement results.
IMPORTANT
NOTE
When using an optionally available
centrifuge , carefully read the
operating manual of the centrifuge.

SPOTCHEM EZ SP-4430 OPERATING MANUAL
DOC.No.OM-28573 REV.6 03/02
Chapter 2 MEASUREMENT
Using a centrifuge
Prepare a centrifuge.
Uncap the tube and pipette 250
of
heparinized whole blood or plain blood into
the centrifuge tube.
The centrifuge tube includes Heparin as an
anticoagulant.
Close the cap tightly after setting a sample,
and invert it.
Use the sample after removing the cap.
Wipe out the sample attached to the outside
of centrifuge tube before placing it to the
centrifuge, otherwise it may spattering the
sample.
Place samples in the centrifuge ( see“ 2-4-1
Normal measurement”).
Remove any air bubbles or skin on the surface of
the sample. They may cause incorrect measurement
results.
Wipe out the sample attached to the outside of
centrifuge tube before placing it to the centrifuge,
otherwise it may cause spattering the sample .
IMPORTANT
A Centrifuge tube has 1 line
marked on it for 250
.
The samples may coagulate when it takes time
before the samples collected are brought into the
machine. Those showing heavy coagulation or
deposition of fibrin sometimes can not be measure.
A syringe containing heparin can be used to
prevent coagulation when it takes time before the
samples are brought into the centrifuge, although
the machine contains heparin.
IMPORTANT

SPOTCHEM EZ SP-4430 OPERATING MANUALDOC.No.OM-28573 REV.6 03/02
Chapter 2 MEASUREMENT
Measuring the Hb
When measuring Hb, dilute whole blood
samples 6 times with distilled water.
Prepare a Whole blood Sample Tube (orange
cap).
Uncap the tube and pipette the whole blood
sample into the tube.
Cap the tube tight.
Invert the sample several times ( see “2-14
Inverting a sample”).
Prepare a Serum Sample Tube(blue cap).
Pipette 200
of distilled water.
Pipette 40
of the prepared whole blood
sample into the above Serum Sample Tube.
Cap the tube tight.
Invert the sample several times again.
Remove any air bubbles or skin on the surface of
the
sample.
They may cause incorrect measurement
results.
IMPORTANT

SPOTCHEM EZ SP-4430 OPERATING MANUAL
DOC.No.OM-28573 REV.6 03/02
Prepare a Serum Sample Tube (blue cap).
Pipette 100
of serum or plasma.
Gently pipette 100
of HDL Separation
Reagent into the tube.
Cap the tube tight.
Invert the sample more than 10 times
following to
“ 2-14. Inverting a sample” and
leave the sample about 5 minutes.
Centrifuge the samples for 3 minutes, taking
rotor balance into consideration(see page 2-
14).
Check if the supernatant is impure or there
is any skin or not. Removing the
supernatant is not necessary. Uncap the
tube and place it directly in the sample rack.
Using HDL-C Kits
If HDL-C reagent(direct method)
is used for measurement, this
procedure is unnecessary.
Chapter 2 MEASUREMENT
Remove any air bubbles or skin on the surface of
the
sample.
They may cause incorrect measurement
results.
IMPORTANT

SPOTCHEM EZ SP-4430 OPERATING MANUALDOC.No.OM-28573 REV.6 03/02
2-4 Measurement
Chapter 2 MEASUREMENT
2-4-1 Normal measurement
This section describes the operating procedure of Normal Measurement.
In Normal Measurement, simultaneous measurement of up to nine items is
possible for one sample, using Single and Multi Reagent Strips.
Before measurement, make necessary preparation as instructed in “2-3
Preparation for Measurement”.
Display the Standby screen.1.
Press [1] key on the MAIN MENU.
The Table Cover opens and the
Reagent Strip Table and Centrifugeequipped Multi Rack slide forward.
The Standby screen is displayed as
shown at the right.
Check the time and date.2.
Make sure that the time and date on
the Standby screen is correct. If
not, set a correct time and date (see
“3-6 Built-in Clock Adjustment ”).
[START] key can be used
instead of [1] key.
S t a n d b y 2000ー06ー10
I D(1) I N FO(2)
1.Measur e 2. Submenu
3 . C a l i b r a t e ( 1/1 )
Wear protective gloves to prevent exposure to pathogenic microbes.
Discard used samples, tips and protective gloves separately from general
waste according to local regulations on biohazardous waste.
Be careful not to spill sample blood when uncapping the tube.
If a wrong date is set, correct measurement results may not be obtained.
Before measurement, make sure that the date is correct.
IMPORTANT

SPOTCHEM EZ SP-4430 OPERATING MANUAL
DOC.No.OM-28573 REV.6 03/02
Check the lot number of Reagent Strips.3.
Chapter 2 MEASUREMENT
Press [2] key on the Standby screen.
The Confirm screen is displayed,
which indicates information of
Reagent Strips stored in memory.
Check that the test items and lot
numbers of the Reagent Strips
match with those shown on the
screen (lot numbers are “XXXXXX” at
right). Lot number of a Reagent
Strip is printed on the rear side of
the aluminum foil package or on the
box.
To check numerous test items
at one time, print out the lot
numbers of all items.
Press [3] key on the Standby
screen to print out all the lot
numbers.
【 S ー01:G G T 】
( 1/30 )【XXXXXX CARD】
Press [hyphen (-)] key to check the
information of the reagent strip you
are using.
When confirmation is completed,
press [STOP] key. The Standby
screen is restored.
Besides [hyphen (-)] key, [0], [2],
[4], [5], [6], and [8] keys can be
used in selecting items.
[0] -> initially displayed item
[2] -> last item
[4] -> previous item
[6] -> next item
[8] -> first item
[5] -> first item of the Multi
Reagent Strip
If no key entry is made within 3
minutes after the Table Cover is
opened, an alarm beeps and
the Table Cover is closed.
If [STOP] key is pressed while
the message “CANCEL” is
displayed, the Table Cover
remains open and the Standby
screen is restored.
After the Table Cover is closed,
a message shown at the right is
displayed.
To restore the MAIN MENU,
press [STOP] key.
When [ENTER] key is pressed,
the Table Cover opens and the
Standby screen is restored.
Cove r i s c l os i ng .
Stop(STOP)
Back to MENU(STOP)
Back to MEAS(ENTER)
If the lot numbers of the Reagent Strips are different from those shown on
the screen, perform Calibration by magnetic card before measurement.
IMPORTANT
S t a n d b y 2000ー06ー10
I D(1) I N FO(2)

SPOTCHEM EZ SP-4430 OPERATING MANUALDOC.No.OM-28573 REV.6 03/02
The number of the previous
measurement No + 1 is displayed
as the initial number.
To perform measurement with
the number, press [ENTER] key
to confirm. Once the power is
turned off, the initial number
returns to 1.
The last entered ID is displayed.
To perform measurement with
the same ID as shown on the
screen, press [ENTER] key. If
the MAIN MENU is restored, the
previous ID is cleared.
To enter ID, use the numeric
keys and [-/.] key.
Example: To enter “EZ”
[3] [3] [3] [9] [9] [9] [9] [9]
Example: To enter “SP”
[7] [7] [7] [7] [7] [-] [7] [7]
The following 12 signs can be
entered by using [0] key.
’
To delete the last character, press
[MENU] key and [-/.] key
simultaneously.To restore the
initially shown ID, press [START]
key.
When the barcode reader
(optional) is used, manual entering
is not necessary.Read barcode is
automatically allocated as ID.
When the barcode reader is
used a message “BARCODE
AVAILABLE” is displayed.
Press [hyphen (-)] key on the
Standby screen to switch the
operation guidance at the lower
part of the screen.
If no key entry is made within 3
minutes after the Table Cover is
opened, an alarm beeps and
the Table Cover is closed.
If [STOP] key is pressed while
the message “CANCEL” is
displayed, the Table Cover
remains open and the Standby
screen is restored.
After the Table Cover is closed,
a message shown at the right is
displayed.To restore the MAIN
MENU, press [STOP] key.
When [ENTER] key is pressed,
the Table Cover opens and the
Standby screen is restored.
Set measurement No. or ID (if necessary).
ID of up to 13 characters can be set for each measurement. If ID setting is not
necessary, move on to procedure 6. Rack slides forward.
The Standby screen is displayed as shown at the right.
4.
Press [1] key on the Standby screen.
The measurement No. screen is
displayed.
Enter
measurement No..
Up to 4 characters can be entered
using numbers.
Press [ENTER] key.
The entered
measurement No.
is
stored in memory and the ID entering
screen
is displayed.
Enter ID. Up to 13 characters can be
entered using numbers, letters, and
symbols.
When the barcode reader is used, ID
is automatically read by the reader.
Press [ENTER] key.
The entered ID is stored in memory
and the Standby screen is restored.
Chapter 2 MEASUREMENT
S t a n d b y 2000ー06ー10
I D(1) I N FO(2)
No . <
ー
>
Cove r i s c l os i ng .
Stop(STOP)
Back to MENU(STOP)
Back to MEAS(ENTER)
ID<
ー
>

SPOTCHEM EZ SP-4430 OPERATING MANUAL
DOC.No.OM-28573 REV.6 03/02
Chapter 2 MEASUREMENT
Set the sample type (when necessary).
Sample type can be set for each measurement. When sample type is not
registered or measurement is made on the setting of basic type, skip the following
and proceed to the Step 6.
5.
Press [6] key on the Standby screen.
The Sample type selecting screen is
displayed.
Press [hyphen (-)] key to select the
sample type to measure.
Press [Enter] key while the selected
sample type is displayed.
The selected sample type is set as
the measurement sample type and
the Standby screen is restored
.
No set-up is available where
sample type is not registered.
The registration can be made on
the Parameter Menu.
The sample type set for basic
type is established as an initial
value. No setting is needed
when not changed.
Besides [hyphen (-)] key, [4],
and [6] keys can be used in
selecting sample
type
.
[4] -> previous sample type
[6] -> next sample type
Pressing [Start] key on the
Sample type selecting screen
starts measurement with the
displayed sample type without
returning to the Standby screen.
S t a n d b y 2000ー01ー19
I D(1) I N FO(2)
S t a n d b y 2000ー01ー19
Sample [ Man ]
S t a n d b y 2000ー01ー19
I D(1) I N FO(2)
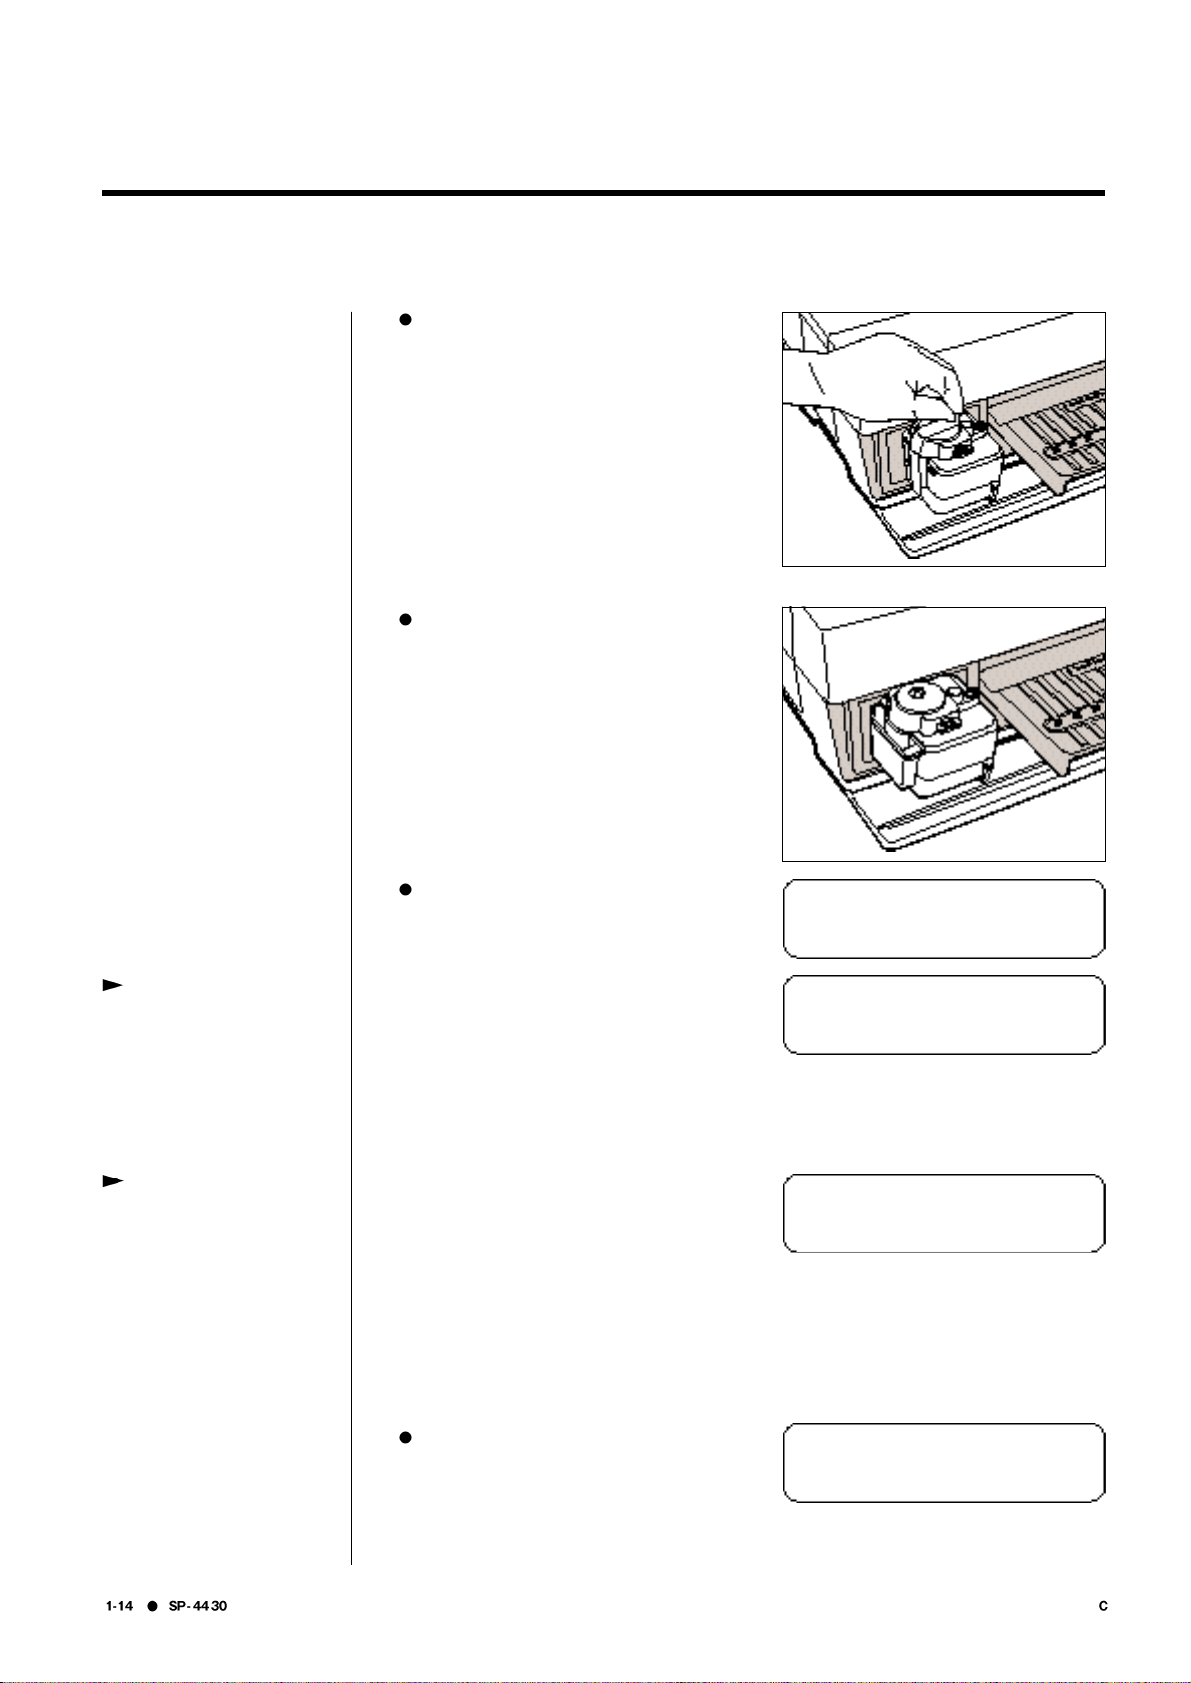
Set the Tip.6.
Place the Tip in the Tip hole of the
Centrifuge-equipped Multi Rack
using a pair of tweezers.
Make sure that the Tip Waste Case
is set in position.
Do NOT touch the pointed end of
the Tip with fingers. If it is soiled,
correct measurement results may
not be obtained.
IMPORTANT

SPOTCHEM EZ SP-4430 OPERATING MANUALDOC.No.OM-28573 REV.6 03/02
Chapter 2 MEASUREMENT
Set the samples.7.
Open the protective cover and place
the uncapped centrifuge tube in
position.
Close the cover.
Measurement of uncentrifuged whole blood.
NOTE
Make sure the sample tubes are
uncapped, otherwise it may
cause breakage of centrifuge
tube and the Nozzle.
Set a sample after removing the
cap.
Uncap sample tubes and place them
to the port of the multi-rack.
Measurement of serum or plasma, or centrifuged samples.
NOTE
Make sure the sample tubes are
uncapped, otherwise it may
cause breakage of the Nozzle.
NOTE
Make sure the protective cover is
closed properly.
If the protective cover remains
open, it may become troubled
and correct measurement results
may not be obtained.
NOTE
Make sure the protective cover is
closed properly.
If the protective cover remains
open, it may cause a trouble.

SPOTCHEM EZ SP-4430 OPERATING MANUAL
DOC.No.OM-28573 REV.6 03/02
Chapter 2 MEASUREMENT
Press [0] key on the Standby screen.
The Centrifuge selecting screen is
displayed.
[On] is always displayed at the
beginning.
To switch [On] and [Off] of
centrifuge, press [0] key on the
Centrifuge selecting screen.
Remeasurement (or additional measurement) with a centrifuge.
When measuring the once-measured sample with a centrifuge, such measurement can
be done at a reduced centrifugal time.
When performing remeasurement or additional measurement , sample
quantity may be short. Shortage of sample amount may lead to incorrect
results due to sucking of blood cells or trouble because of abnormal rotation
of centrifuge. Make sure that the remaining sample amount is enough, and
perform remeasurement or additional measurement.
IMPORTANT
To perform the measurement on the screen of [No centrifugation], be sure to
use the centrifuged sample. If uncentrifuged sample is used, correct
measurement result may not be obtained.
IMPORTANT
Every time when [0] key is
pressed on the Centrifugation
selecting screen, [On], and [Off]
are displayed alternately.
Set the Multi-type Reagent Strips.
Set the Reagent Strips.8.
Open the aluminum foil package
from the place written “
Open here
” until two-thirds of the Reagent
Strip is exposed.
In Normal Measurement, the following three settings are available.
Multi-type Reagent Strips and Single type Reagent Strip
Multi-type Reagent Strips only.
Single-type Reagent Strips only.
Choose one depending on the item to measure.
S t a n d b y 2000ー01ー19
I D(1) I N FO(2)
S t a n d b y 2000ー01ー19
CNTRFG=[ON ]

SPOTCHEM EZ SP-4430 OPERATING MANUALDOC.No.OM-28573 REV.6 03/02
Chapter 2 MEASUREMENT
Remove a Reagent Strip from the
aluminum foil package without
touching the reagent field with the
fingers.
Set the Single-type Reagent Strips.
Open the aluminum foil package of a
Reagent Strip by tearing straight
down from the V-shaped notch.
Place the Reagent Strips on the
Reagent Table by holding the right
side of the strip.
Be sure to insert the end of a
Reagent Strip into the groove of the
Reagent Table so that the Reagent
Strip stays firmly in place. If the
Reagent Strips are bent or placed
out of the groove, it may become
jammed or correct measurement
results may not be obtained.
IMPORTANT

SPOTCHEM EZ SP-4430 OPERATING MANUAL
DOC.No.OM-28573 REV.6 03/02
Chapter 2 MEASUREMENT
Remove the Reagent Strip from the
package without touching the
reagent field with fingers.
Insert Reagent Strips on the
Reagent Table as shown at right.
Start the measurement.9.
Press [START] key. The Reagent
Table and Centrifuge-equipped Multi
Rack slide backward and the Table
Cover is closed. The message
“Measuring
” is displayed.
After a while, approximate remaining
time is displayed.
The time displayed in [ ] changes at
every 30 seconds.
Me a s u r i n g
・・・
Stop(STOP)
To discontinue the measurement,
press [STOP] key to return to the
Standby screen.
Be sure to insert the end of a
Reagent Strip into the groove of the
Reagent Table so that the Reagent
Strip stays firmly in place. If the
Reagent Strips are bent or placed
out of the groove, it may become
jammed or correct measurement
results may not be obtained.
IMPORTANT
Me a s u r i n g
・・・
[ 3:00 ]
Stop(STOP)

SPOTCHEM EZ SP-4430 OPERATING MANUALDOC.No.OM-28573 REV.6 03/02
Me a s u r i n g
・・・
01:23
Stop(STOP)
Chapter 2 MEASUREMENT
As the measurement proceeds, the
display of approximate remaining
time changes to the ordinary time
indication.
The [ ] disappears and the time is
counted down by one second.
NOTE
Do NOT open the maintenance cover or the Table Cover during
measurement. It will cause an error.
To print another sheet, press [4]
key on the Standby screen.
End measurement.
10
.
When measurement is finished,
measurement results are printed out.
The Table Cover opens and the
Reagent Strip Table and the
Centrifuge-equipped Multi Rack
slide forward.
The Standby screen is restored.
Where measured results are not
printed due to lack of printer paper,
press [5] key on the Standby screen
to display the latest measurement
results.
Press [5] key again to return the
Standby screen.
Pr int ing
・・・
/
S t a n d b y 2000ー06ー10
I D(1) I N FO(2)
NOTE
Only measurement item and its result are displayed. Channel numbers, unit
symbols and others such as ▲▼ are not displayed. When the details are to
be confirmed, thermal printer paper is set for allowing the results to be
available in print. To check the detailed results, set printer paper and print
out the measurement result.
The measurement result is
repeatedly scrolled.
S t a n d b y 2000ー06ー10
T−Pro: 9 . 2 , Alb:

SPOTCHEM EZ SP-4430 OPERATING MANUAL
DOC.No.OM-28573 REV.6 03/02
Chapter 2 MEASUREMENT
Remove any used Reagent Strips
and discard them.
When the message “DISCARD TIPS”
is displayed, remove the Tip Waste
Case and discard used tips.
Reattach the Tip Waste Case.
To discontinue measurement, press
[STOP] key to return to the MAIN
MENU.
End measurement for the day.
11.
After finishing all measurement for
the day, perform daily maintenance
(see “4-2 Daily Maintenance”).
NOTE
The message “DISCARD TIPS” appears once every five measurements.
When the message is displayed, discard the tips. Otherwise, a trouble may
occur.
Remove used t i ps .
OK( ENT ER )

SPOTCHEM EZ SP-4430 OPERATING MANUALDOC.No.OM-28573 REV.6 03/02
2-5 Calibration
Chapter 2 MEASUREMENT
2-5-1 Overview of calibration
Calibration is necessary to maintain measurement accuracy.
Calibration reduces unfavorable effects of reagent pack that changes
with time, eliminates gaps among lots or facilities, and maintains
measurement accuracy to a certain level.
Basically, calibration should be performed using the SPOTCHEM
Calibrator Kit for each type of Reagent Strips, but it requires a lot of time
to do so for all types of Reagent Strips.
To eliminate such inconvenience, this analyzer is designed to be able to
perform calibration for different Reagent Strips by inserting magnetic
cards (Reagent Card) storing the lot information of each reagent strip.
There are 2 methods for calibration with SP-4430.
1
Calibration by magnetic card
2
Calibration by calibrator kit (using an exclusive calibrator lit)
1 calibration is performed by inserting a magnetic card (Reagent Card)
attached to each reagent strip into the magnetic-card reader.
2 calibration is performed using an exclusive calibrator. This calibration
should be performed every 6 months, when the Reagent Lot is changed
or the service representative considers that calibration is necessary. The
SPOTCHEM Calibrator Hb Kit is to be used for Hb items. The
SPOTCHEM Calibrator Kit is to be used for other items’ calibration.
There are two ways of calibration available, one is “1-Point Calibration”
using either Low or High Calibrator Solution and the other is “2-Point
Calibration” using both of Low and High solution. Make sure to perform
calibration according to the calibration conditions of each measurement
item by referring to “3-3-2 Entering parameters”.

SPOTCHEM EZ SP-4430 OPERATING MANUAL
DOC.No.OM-28573 REV.6 03/02
Insert a card.
(STOP)
Chapter 2 MEASUREMENT
2-5-2 Calibration by magnetic card
Set the calibration condition.2.
Press [3] key on the MAIN MENU.
The CALIBRATION MENU is
displayed.
By inserting “Reagent Card” attached to Single Reagent Strips or another
one attached to Multi Reagent Strips into a magnetic-card reader,
differences among lots and changes with time of reagent pack are
automatically calibrated.
“CARD” means calibration by
magnetic calibration card and
“Cal.” means calibration by
calibrator kit.
Set the calibration type as by magnetic card.1.
When changing the calibration type from calibration by calibrator kit (Cal.) to
calibration by magnetic card (CARD), change the setting “see 3-3-2 Enter
parameters”).
If the calibration type is already set as calibration by magnetic card, this operation
is not necessary.
1.CARD 2.Ca l .
3 . I n f o r m a t i o n ( 1/1 )
Press [STOP] key to stop the
calibration by magnetic card.
Insert Reagent Card3.
Press [1] key on the CALIBRATION
MENU.
Insert a strip of Reagent Card in the
magnetic reader and slide the strip
to the right.
There is no order for inserting
the stripes. Either stripe can be
inserted first.
For the lot number of “Reagent Card” for magnetic calibration, use the same
lot number as that of the reagent strip currently in use (Magnetic cards
attached to the Reagent Strips in use). Calibration can not be performed with
magnetic cards with different lot number or magnetic cards with different
Reagent Strips.
IMPORTANT
Requirements
Reagent Card
1.Measur e 2. Submenu
3 . C a l i b r a t e ( 1/1 )

SPOTCHEM EZ SP-4430 OPERATING MANUALDOC.No.OM-28573 REV.6 03/02
Chapter 2 MEASUREMENT
When the stripe is inserted, the
screen shown at the right is
displayed.
Insert the same stripe according the
message on the screen.
When the same stripe is inserted
twice, item number is displayed.
The inserted stripe number is
displayed with
on the lower right
screen.
Insert the remaining stripes twice
according to the message on the
screen.
When all stripes are inserted,
measurement item and lot numbers
are displayed.
About 2 seconds after, the Magnetic
card entry screen will be displayed.
Calibration by magnetic card is
completed.
Insert the same stripes twice to
read the stored information in
the magnetic cards.
End of calibration by magnetic card.4.
When the discontinuing the
calibration, press [STOP] key 3 times
to return to the MAIN MENU.
I n s e r t a c a r d . Sー01
Anot her s t r ipe ■2
I n s e r t a c a r d . Sー01
【GGT 】【XXXXXX】
Insert a card.
Th e s ame s t r i p e
1.Measur e 2. Submenu
3 . C a l i b r a t e ( 1/1 )

SPOTCHEM EZ SP-4430 OPERATING MANUAL
DOC.No.OM-28573 REV.6 03/02
Chapter 2 MEASUREMENT
2-5-3 Calibration by calibrator kit
Use the SPOTCHEM Calibrator Kit for calibration. For Hb items, use the
SPOTCHEM Calibrator Hb Kit.
Display the calibration menu.2.
Press [3] key on the MAIN MENU.
CALIBRATION MENU is displayed.
“CARD” means calibration by
magnetic calibration card and
“Cal.” means calibration by
calibrator kit.
Set the calibration type by calibrator kit.1.
When changing the calibration type from calibration by magnetic card (CARD) to
the calibration by calibrator kit (Cal.), change the setting by referring to “see 3-3-2
Enter parameters”).
If the calibration type is already set for calibrator kit, this operation is not necessary.
Prepare the reagent strip and calibrator.3.
Prepare the required amount of
Reagent Strips according to the
following table.
When performing the
calibration by calibrator kit
using Multi Reagent Strips,
calibration mode of each
measurement item (single item)
attached to Multi Reagent Strip
is used.
Wear protective gloves to prevent exposure to pathogenic microbes.
Discard used samples, tips and protective gloves separately from general
waste according to local regulations on biohazardous waste.
Be careful not to spill sample blood when uncapping the tube.
1.CARD 2.Ca l .
3 . I n f o r m a t i o n ( 1/1 )
1.Measur e 2. Submenu
3 . C a l i b r a t e ( 1/1 )

SPOTCHEM EZ SP-4430 OPERATING MANUALDOC.No.OM-28573 REV.6 03/02
To check the calibration mode and the
number of calibration times, press [3]
key on the CALIBRATION MENU to
display the
Calibration information
checking screen
. On this screen,
switch the items by pressing [hyphen
(-)] key to check calibration mode and
the number of calibration times.
Press [STOP] key to return to the
CALIBRATION MENU.
Prepare the required equipment and
calibrator (see “2-3-1 Preparation”).
Dissolve Low or High solution
according to the instructions on the
package insert included in the
calibrator kit.
Place 500
of Low and High
solution in the respective sample
tubes. Put the caps back on to
prevent evaporation or contamination
if calibration is not to be carried out
immediately.
【 S ー01:G G T 】
( 1/30 )【L&H N=3 】
Chapter 2 MEASUREMENT
Remove any air bubbles or skin on the surface of the calibrator, if any.
Failure to do so may result in obtaining incorrect measurement results.
IMPORTANT
1.CARD 2.Ca l .
3 . I n f o r m a t i o n ( 1/1 )

SPOTCHEM EZ SP-4430 OPERATING MANUAL
DOC.No.OM-28573 REV.6 03/02
Chapter 2 MEASUREMENT
To stop calibration, press
[STOP] key.
There is no order for inserting the
stripes. Any stripe can be inserted
first.
Insert calibration card.4.
Press [2] key on the CALIBRATION
MENU.
The Magnetic card entry screen is
displayed.
Insert the stripe of a calibration card
in the magnetic card reader and
slide the card to the right.
When the stripe is inserted, the
message shown on the right is
displayed.
Insert the same stripe again
according to the message on the
screen.
When the same stripes are inserted
twice, that stripe number is
displayed on the lower part of the
screen. The entered stripes are
displayed as
.
Insert the rest stripes twice
according to the message on the
screen. When all stripes are
inserted, lot number of the calibrator
is displayed.
After that, the Calibration standby
screen is displayed.
The Table Cover opens, and the
Reagent Table and the Centrifugeequipped Multi Rack slide forward.
The Calibration standby screen as
shown on the right is displayed.
Insert the same stripes twice to
surely read the stored information
in the calibration cards.
There is only one stripe for Hb,
this screen is not displayed.
If no key entry is made within 3
minutes after the Table Cover
opens, an alarm sounds and
the Table Cover closes.
If press [STOP] key is pressed
while
“CANCEL” is displayed,
the Standby screen is restored
without closing the Table
Cover.
After the Table Cover closes,
the message shown on the
right is displayed.
To go back to the MAIN MENU,
press [STOP] key.
To go back to the Standby
screen, press [ENTER] key.
Inseart a card.
Th e s ame s t r i p e .
Inseart a card. Cal.
A n o t h e r s t r i p e ■234
Standby
L
=0 H=0 N=?
Inseart a card. Cal.
【CALーCARD 】【XXXXXX】
Cove r i s c l os i ng .
Stop(STOP)
Insert a card.
Th e s ame s t r i p e
Back to MENU(STOP)
Back to CAL (ENTER)

SPOTCHEM EZ SP-4430 OPERATING MANUALDOC.No.OM-28573 REV.6 03/02
Chapter 2 MEASUREMENT
Set the Tip.5.
Set the tips in the tip hole of the
Centrifuge-equipped Multi Rack
using tweezers.
Make sure that the Tip Waste Case
is set in position.
When performing 1-point
calibration (High), proceed to
procedure 9.
Set the calibrator “Low”.6.
Remove the caps and set the
calibrator “Low” to the port of the
Centrifuge-equipped Multi Rack.
Set the Reagent Strips.7.
Calibration with Single-type Reagent Strips
Prepare Single-type Reagent Strips.
When performing 2-point calibration,
prepare twice as many Reagent
Strips as the number of times
calibration that will be performed.
For 1-point calibration, prepare the
same number of times calibration
that will be performed.
Do NOT touch the end of the Tip
with bear hands. If the tips are
soiled, correct sampling may not
be done and this will lead to
incorrect calibration results.
IMPORTANT
NOTE
Be sure to remove the caps before
calibration to avoid damage to the
nozzle.
Be sure to insert the tip of the strip in the groove of the reagent table so that
the Reagent Strip stays firmly in place. If the strip is placed out of the groove,
it may cause jam or correct measurement results may not be obtained.
IMPORTANT
NOTE
Make sure that the protective cover
is closed before the measurement.
If the protective cover remains
open, it may cause a trouble.

SPOTCHEM EZ SP-4430 OPERATING MANUAL
DOC.No.OM-28573 REV.6 03/02
Chapter 2 MEASUREMENT
Insert the Reagent Strips with the
same items, starting from the S1
channel on the Reagent Table.
If the number of calibration is set as
more than 3 for 2-point calibration,
calibration should be sperately
performed twice. In this case , set 3
Reagent Strips for the first
calibration.
(ex.: When the number of calibration
is 4, set 3 Reagent Strips for the first
calibration and 1 for the second .)
With Multi-type Reagent Strips,
1-point calibration cannot be
performed.
Calibration with Multi-type Reagent Strips
Prepare Multi-type Reagent Strips.
Prepare twice as many Multi-type
Reagent Strips as the number of the
times calibration that will be
performed.
Set the Strip on the Reagent Table
from the right hand side.

SPOTCHEM EZ SP-4430 OPERATING MANUALDOC.No.OM-28573 REV.6 03/02
Chapter 2 MEASUREMENT
Press [STOP] key to stop the
calibration, the Calibration
standby screen is restored.
Start measurement of the “Low” calibrator.8.
Me a s u r i n g
・・・
Stop(STOP)
Me a s u r i n g
・・・
01:23
Stop(STOP)
Standby TーPro
L=2 H
=0 N=2
Press [START] key. The Reagent Table
and Centrifuge equipped Multi Rack
move inside, and the Table Cover
closes. “Measuring…” is displayed.
Approximate remaining time is
displayed. The time displayed in [ ],
changes at every 30 seconds.
As the measurement proceeds, the
display of approximate remaining
time changes to the ordinary time
indication.
The [ ] disappears and
the time is counted down by one
second.
When “Low” calibration is completed,
the Table Cover opens, and the
Reagent Table and Centrifugeequipped Multi Rack move forward.
The Calibration standby screen is
displayed.
When the number of calibration is
more than 3, repeat the procedure
from 5 to 8.
The Calibration standby screen
displays the name of the Reagent Strip
being calibrated, the measured
number of Low and High (L, H) and the
calibration times (N).
The cursor blinks at L or H according
the calibrator (Low or High) to be
calibrated next. The examples of the
screen at the right shows the number
of times of calibration is 2, Low has
already measured twice and High will
be measured next.
Me a s u r i n g
・・・
[ 3:00 ]
Stop(STOP)

SPOTCHEM EZ SP-4430 OPERATING MANUAL
DOC.No.OM-28573 REV.6 03/02
Set the tip.9.
Set the tip by following procedure 5.
When performing 1-point
calibration for "Low" only,
proceed to procedure 13.
Chapter 2 MEASUREMENT
End the calibration.
13.
When calibration is completed, the
measurement results are printed.
The Table Cover opens, and the
Reagent Table and Centrifugeequipped Multi Rack slide forward.
The Calibration standby screen
is
restored.
Remove the used Reagent Strips
and samples, and discard them.
Press [STOP] key to stop
calibration.
The Calibration standby screen
is restored.
Set the “High” Calibrator.
10.
Set the “High” Calibrator by following procedure 6.
Set the Reagent Strips.
11.
Set the Reagent Strips by following procedure 7.
Measure the “High” Calibrator.
12.
Measure the “High” Calibrator by following procedure 8.
Pr int ing
・・・
/
Standby
L
=0 H=0 N=?

SPOTCHEM EZ SP-4430 OPERATING MANUALDOC.No.OM-28573 REV.6 03/02
Chapter 2 MEASUREMENT
When a message, “Remove used
tips.” is displayed, remove the Tip
Waste Case and discard used tips.
Set the Tip Waste Case again.
Remove used t i ps .
OK( ENT ER )
NOTE
The message, “Remove used tips.” is displayed every 5 measurements.
When this message is displayed, discard the used tips.
If measurement is continued, it may cause trouble.

SPOTCHEM EZ SP-4430 OPERATING MANUAL
DOC.No.OM-28573 REV.6 03/02
2-6
Interpreting measurement results
Chapter 2 MEASUREMENT
2-6-1 Printing normal measurement results
To print out the measurement results, Normal printing and Survey Mode
printing are available.
The Survey Mode has the following additional items to the print out of the
Normal mode.
These items are printed out when the Survey Mode is ON.
Measurement value which temperature conversion, unit conversion or
correlation correction is not applied.
Information on temperature conversion (temperature and temperature
conversion factor).
Information on unit conversion (unit and unit conversion factor).
Information on correlation correction (coefficient of correlation
correction).

SPOTCHEM EZ SP-4430 OPERATING MANUALDOC.No.OM-28573 REV.6 03/02
Chapter 2 MEASUREMENT
( 1 ) Normal printing
Version.
Measurement date and time : Date and time when [START] key is pressed.
Measurement number : The number is counted starting from 0001 (When the power is on.)
ID: Printed only when ID is set.
Name of the Multi Reagent Strip.
Lot Number of the Multi Reagent Strip.
Measurement results of the Multi Reagent Strip.
Lot Number of the Single Reagent Strip. Used for S1, S2 and S3 channels from the left.
Measurement results of the Single Reagent Strip.
Sample type : Printed only when set.
5~7 are printed only when the Multi Reagent Strip is measured.
8~9 are printed only when the Single Reagent Strip is measured.
<Details>
The temperature is printed when the temperature is set other than at 37
in the enzyme item.
(ex.: GGT)
“Over Max. Value” is printed when the measurement result is higher than the upper limit of the
measurement range. (ex.: UA)
“Under Min. Value” is printed when the measurement result is lower than the lower limit of the
measurement range. (ex.: LDH)
mark is printed when the measurement result is higher than the upper limit of the standard
range. (ex.: T-Pro)
mark is printed when the measurement result is lower than the lower limit of the standard
range. (ex.: Ca)
When prozone errors occur, the types of errors are printed. (ex.: Amy)
When the unit other than the conventional units is used or a coefficient of correlation
correction is entered
.is printed on the right of the first number of the measurement result.
(ex.: Alb)
1
2
3
4
5
6
7
8
9
10
When “Printing of measurement
results” is performed on the
Sub Menu, the results are
printed according to the
parameter settings of the
measurement. That is, if the
parameters are changed after
the measurement (temperature
or coefficient of correlation
correction), the data after the
measurement is printed out.

SPOTCHEM EZ SP-4430 OPERATING MANUAL
DOC.No.OM-28573 REV.6 03/02
Chapter 2 MEASUREMENT
( 2 ) Survey Mode printing (for 1 item)
Measurement value which temperature conversion, unit conversion or correlation
correction is not applied.
Temperature. Printed out as ….. for the items other than enzyme items.
Temperature conversion factor. Conversion factor when the standard temperature is
37
Unit.“mg” is the conventional unit, “SI” is SI unit and “User” is units set by users.
Unit conversion factor. Conversion factor when the conventional unit is standard.
Coefficient of correlation correction.
Coefficient set in the “Entering parameters” on the Sub Menu.
1
2
3
4
5
6
Generally, mg (conventional
unit) is used for unit. To
change the unit, contact your
distributor.

SPOTCHEM EZ SP-4430 OPERATING MANUALDOC.No.OM-28573 REV.6 03/02
Chapter 2 MEASUREMENT
2-6-2 Printing calibration results
The calibration results are printed when calibration by calibrator kit is
completed. The formats of the Single Reagent Strips and the Multi
Reagent Strips are slightly different.
Even when calibration errors (E 30 : Abnormal data) occur during the
calibration the calibration results are printed. In this case, Acal and Bcal
are printed as
(Calibration factors are not set up.).
( 1 ) Calibration Result of Single Reagent Strip
Version.
Calibration date: The date when [START] key was pressed for the first time.
From the left, name of Multi Reagent Strip, item symbol, lot number and expiry date.
Lot no. of the calibrator. Read by the calibration card.
Displayed value of calibrator. Read by the calibration card.
Measurement value when calibration is not performed.
Printed out for the number of calibration times.
Average measurement value when calibration is not performed.
Calibration factor.
Factor of linear expression, Y=Acal
•
X+Bcal to convert the value X of (7) to value Y of (5).
For the items when calibration mode is L, the H part is blank.
For the items when calibration mode is H, the L part is blank.
1
2
3
4
5
6
7
8

SPOTCHEM EZ SP-4430 OPERATING MANUAL
DOC.No.OM-28573 REV.6 03/02
Chapter 2 MEASUREMENT
( 2 ) Calibration Result of Multi Reagent Strip
From the left, name of Multi Reagent Strip, item symbol, lot number and expiry date .
From the left, item name and item symbol.
For the items when calibration mode is L, the H part is blank.
For the items when calibration mode is H, the L part is blank.
1
2

SPOTCHEM EZ SP-4430 OPERATING MANUALDOC.No.OM-28573 REV.6 03/02


SPOTCHEM EZ SP-4430 OPERATING MANUAL
DOC.No.OM-28573 REV.6 03/02
With the SUB MENU, auxiliary operations other than normal measurement
and calibration can be performed.
This chapter describes the SUB MENU functions and operating procedure.
Chapter 3
SUB MENU
3-1 Overview of SUB MENU
3-1-1 Composition of SUB MENU
3-2 Measurement Results Menu
3-2-1 Print measurement results
3-2-2 Transmit measurement results
3-2-3 Delete measurement results
3-3 Parameter Menu
3-3-1 Print parameters
3-3-2 Enter parameters
3-3-3 Initialize parameters
3-3-4 Enter sample type
3-3-5 Copy standard range setting
3-4 Maintenance
3-5 Mode Menu
3-6 Built-in Clock Adjustment

SPOTCHEM EZ SP-4430 OPERATING MANUALDOC.No.OM-28573 REV.6 03/02
3-1
Overview of SUB MENU
Chapter 3 SUB MENU
MAIN MENU
After the power is ON and warm-up is completed, the MAIN MENU is displayed.
In the MAIN MENU, normal measurement, calibration, and the SUB MENU are
available.
SUB MENU
The SUB MENU consists of 2 pages. Press [MENU] key or [hyphen (-)] key to switch
the SUB MENU pages alternately between SUB MENU 1/2 and SUB MENU 2/2.
In the SUB MENU, there are several functions to be set and they are arranged in
layers. This chapter partly describes the SUB MENU.
When [START] key is pressed
on any screen of SUB MENU,
the MAIN MENU is restored.
3-1-1 Composition of SUB MENU

SPOTCHEM EZ SP-4430 OPERATING MANUAL
DOC.No.OM-28573 REV.6 03/02
Chapter 3 SUB MENU

SPOTCHEM EZ SP-4430 OPERATING MANUALDOC.No.OM-28573 REV.6 03/02
3-2
Measurement Results Menu
Chapter 3 SUB MENU
3-2-1 Print measurement results
If [STOP] key is pressed during
operation, the previous screen
is restored.
In case of reprinting,
measurement results are printed
starting from the latest result.
Display setting screen.1.
Press [2] key on the MAIN MENU.
SUB MENU 1/2 is displayed.
Print measurement results stored in the memory (Max. 100 measurements).
The following three options for printing are available.
1. LATEST : The latest measurement result (one measurement).
2. ALL : All measurement results (Max. 100 measurements)
stored in the memory.
3. SEARCH : The measurement results searched by
the date range and/or ID.
Press [1] key.
The MEASUREMENT RESULTS
MENU is displayed.
Select measurement results to print.2.
Press [1] key.
The Measurement result selecting
screen is displayed.
Select the measurement results to print by using the numeric keys.
1. LATEST : the latest measurement result (1 measurement)
2. ALL : all measurement results
3. SEARCH: the searched measurement results by date and ID
When LATEST or ALL is selected.
Printing starts immediately.
After printing is completed, the Measurement result selecting screen is restored.
When SEARCH is selected.
The display proceeds to “step 3”.
If the selected measurement is
not found in the data, “No
matching data” is displayed as
shown on the right.
Press [ENTER] key to return to
the Measurement Results
selecting screen.
1. La tes t 2. ALL
3 . S e a r c h ( 1/1 )
No data matched.
OK( ENT ER )
1.Resu l t s 2. PARAM
3.Maintenance (1/2)
1.Measur e 2. Submenu
3 . C a l i b r a t e ( 1/1 )
1.Pr i nt 2.Send
3.Delete (1/1)

SPOTCHEM EZ SP-4430 OPERATING MANUAL
DOC.No.OM-28573 REV.6 03/02
Chapter 3 SUB MENU
If designation of the range of
measurement dates (the dates
of starting and finishing
measurements) is unnecessary,
press [ENTER] key twice to
proceed to the next setting
screen.
Be sure to enter correct dates
to avoid inconsistencies.
The 2-digit number of the
“year” section of the date
indicates the last 2 digits of
year and is interpreted as
follows:
00~89 -> 2000~2089
90~99 -> 1990~1999
See 3-09 page for information
on wildcards.
End printing.4.
Press [STOP] key three times to
return to the MAIN MENU.
Enter search condition.3.
Enter the dates of starting and
finishing measurements by sliding
the cursor using [hyphen (-)] key.
Press [ENTER] key. The ID entering
screen is displayed. Press [ENTER]
key when not searched by ID.
Enter an ID search pattern for the
sample(s) to print by using numbers,
alphabets, and symbols up to 13
characters.
Wildcards can be used to enter.
Press [ENTER] key.
The selected measurement results
are printed out.
When the printing is completed, the
Measurement result selecting screen
is restored.
If the selected measurement
result is not found in the data,
“No matching data” is
displayed as shown on the
right.
Press [ENTER] key to return to
the Measurement result
selecting screen.
Dat e <99ー01ー01> Y M D
t o <00ー12ー31>
ID<* >
Pr int ing・・( 4/15 )/
stop(STOP)
1. La tes t 2. ALL
3 . S e a r c h ( 1/1 )
No data matched.
OK( ENT ER )
1.Measur e 2. Submenu
3 . C a l i b r a t e ( 1/1 )

SPOTCHEM EZ SP-4430 OPERATING MANUALDOC.No.OM-28573 REV.6 03/02
Chapter 3 SUB MENU
3-2-2 Transmit measurement results
If [STOP] key is pressed during
operation, the previous screen
is restored.
In case of retransmission,
measurement results are
printed out starting from the
latest result.
Transmit measurement results (Max. 100 measurements) stored in the
memory.
The following three types for transmission are available.
1. LATEST : The latest measurement result (one measurement).
2. ALL : All measurement results (Max. 100 measurements)
stored in the memory.
3. SEARCH : The measurement results searched by
the date range and/or ID.
If the measurement result
selected is not found in the
data, “No matching data” is
displayed as shown on right.
Press [ENTER] key to return to
the Measurement result
selecting screen
.
Display setting screen.1.
Press [2] key on the MAIN MENU.
SUB MENU 1/2 is displayed.
Press [1] key.
The MEASUREMENT RESULTS
MENU is displayed.
Select measurement results to transmit.2.
Press [2] key.
The Select Results screen is
displayed.
Select the measurement results to transmit by using numeric keys.
1. LATEST : the latest measurement result (1 measurement)
2. ALL : all measurement results
3. SEARCH : the searched measurement results by date and ID
When LATEST or ALL is selected.
Retransmission starts immediately. After retransmission is completed, the
Measurement result selecting screen is restored.
When SEARCH is selected.
The display proceeds to “step 3”.
1. La tes t 2. ALL
3 . S e a r c h ( 1/1 )
No data matched.
OK( ENT ER )
1.Resu l t s 2. PARAM
3.Maintenance (1/2)
1.Measur e 2. Submenu
3 . C a l i b r a t e ( 1/1 )
1.Pr i nt 2.Send
3.Delete (1/1)

SPOTCHEM EZ SP-4430 OPERATING MANUAL
DOC.No.OM-28573 REV.6 03/02
Chapter 3 SUB MENU
End transmission.4.
Press [STOP] key three times to
return to the MAIN MENU.
Enter searching condition.3.
Enter the dates of starting and
finishing measurements by sliding
the cursor using [hyphen (-)] key.
Press [ENTER] key. The ID entering
screen is displayed. Press [ENTER]
key when not searching by ID.
Enter an ID searching pattern for the
sample(s) to print by using numbers,
alphabets, and symbols up to 13
characters.
Wildcards can be used to enter.
Press [ENTER] key.
The selected measurement results
are transmitted.
When the transmission is completed,
the Measurement result selecting
screen is restored.
If designation of the range of
measurement dates (the dates
of starting and finishing
measurements) is unnecessary,
press [ENTER] key twice to
proceed to the next setting
screen.
Be sure to enter correct dates
to avoid inconsistencies.
The 2-digit number of the
“year” section of the date
indicates the last 2 digits of
year and is interpreted as
follows:
00~89 -> 2000~2089
90~99 -> 1990~1999
See 3-09 page for information
on wildcards.
If the selected measurement
result is not found in the data,
“No matching data” is
displayed as shown on the
right.
Press [ENTER] key to return to
the Measurement result
selecting screen.
Dat e <99ー01ー01> Y M D
t o <00ー12ー31>
ID<* >
Send ing・・( 4/15 )/
stop(STOP)
1. La tes t 2. ALL
3 . S e a r c h ( 1/1 )
No data matched.
OK( ENT ER )
1.Measur e 2. Submenu
3 . C a l i b r a t e ( 1/1 )

SPOTCHEM EZ SP-4430 OPERATING MANUALDOC.No.OM-28573 REV.6 03/02
Chapter 3 SUB MENU
3-2-3 Delete measurement results
Display setting screen.1.
Press [2] key on the MAIN MENU.
SUB MENU1/2 is displayed.
Delete all the measurement results stored in memory.
Press [1] key.
The MEASUREMENT RESULTS
MENU is displayed.
Delete measurement results.2.
Press [3] key. The Password
entering screen is displayed.
Enter password “99”.
is displayed on the screen.
The Delete confirmation screen is
displayed.
Press [START] or [STOP].
If [START] key is pressed, the
measurement results are deleted
and the MEASUREMENT RESULTS
MENU is restored.
If [STOP] key is pressed, deletion is
canceled and the MEASUREMENT
RESULTS MENU is restored.
End Deletion.3.
Press [STOP] key three times to
return to the MAIN MENU.
Password < >
Cancel(STOP)
De l et e?
Yes(START) No(STOP)
1.Resu l t s 2. PARAM
3.Maintenance (1/2)
1.Measur e 2. Submenu
3 . C a l i b r a t e ( 1/1 )
1.Pr i nt 2.Send
3.Delete (1/1)
1.Pr i nt 2.Send
3.Delete (1/1)
1.Measur e 2. Submenu
3 . C a l i b r a t e ( 1/1 )

SPOTCHEM EZ SP-4430 OPERATING MANUAL
DOC.No.OM-28573 REV.6 03/02
Wildcards
Wildcards can be used for ID search. Wildcards have two types of characters,
“? ” and “
”, indicating a single or any number of characters.
“ ? ” indicates a single character.
“ ” indicates any number (including zero) of characters.
For instance, if “????” key is entered, 4-character IDs are retrieved. If “A
” is
entered, IDs starting with “A” are retrieved. The following table shows details.
Meaning
5-character ID ending with “M”
5-character ID starting with “AB” and ending with “YZ”
ID starting with “AB” and ending with “YZ”
ID including “PQR”
ID of 4 characters or more starting with “N”
Example 1
Example 2
Example 3
Example 4
Example 5
Searching Pattern
????M
AB?YZ
AB
YZ
PQR
N???
This function is upper/lower case sensitive.
The characters “?” key or “
” themselves cannot be searched for. (e.g. To search
IDs starting with [hyphen (-)] key by entering “?
”, the attempt will fail.)
A searching pattern with more than four asterisks (*) cannot be entered.
Chapter 3 SUB MENU

SPOTCHEM EZ SP-4430 OPERATING MANUALDOC.No.OM-28573 REV.6 03/02
3-3 Parameter Menu
Chapter 3 SUB MENU
3-3-1 Print parameters
Display setting screen.1.
Press [2] key on the MAIN MENU.
SUB MENU 1/2 is displayed.
Print the present parameter settings by each measurement item for
checking.
Press [2] key.
The PARAMETER MENU 1/2 is
displayed.
Print parameter settings.2.
Press [1] key.
The Measurement item selecting
screen is displayed.
Select measurement items to print
by pressing [hyphen (-)] key.
Press [ENTER] key.
Printing starts. After printing is
completed, the Measurement item
selecting screen is restored.
End Printing.3.
Press [STOP] key to return to the
MAIN MENU.
Besides [hyphen (-)] key, [0], [2],
[4], [5], [6], and [8] keys can be
used in selecting items.
[0] -> initially displayed item
[2] -> last item
[4] -> previous item
[6] -> next item
[8] -> first item
[5] -> first item of the Multi
Reagent Strip
If “ALL SINGLE” or “ALL MULTI”
is selected, parameter settings
of all the items for Single or Multi
Regent Strips are printed out
respectively.
To stop printing, press [STOP]
key. Printing stops and the
Measurement item selecting
screen is restored.
[ S ー01:G G T ]
( 1/30 )
1.Resu l t s 2. PARAM
3.Maintenance (1/2)
1.Measur e 2. Submenu
3 . C a l i b r a t e ( 1/1 )
1.Pr i nt 2. I nput
3.Initialyze (1/2)
1.Measur e 2. Submenu
3 . C a l i b r a t e ( 1/1 )

SPOTCHEM EZ SP-4430 OPERATING MANUAL
DOC.No.OM-28573 REV.6 03/02
Chapter 3 SUB MENU
Parameters can be printed by executing “Printing parameters”.
The formats are slightly different between Single Reagent Strips and
Multi Reagent Strips.
Version.
Printed date and time: The date and time when “printing of parameters” is executed.
From the left, item name, item symbol, lot number and expiry date.
Calibration type.
CARD means calibration by magnetic card and Cal. means calibration by calibrator kit.
Calibration factor
From the left, calibration mode (L&H, L, H), the number of calibration times, lot
number and calibration date.
Coefficient of system's difference correction(Coefficient to use in the measurement
calculates).
Temperature. Printed out as ….. for the items other than enzyme items.
Coefficient of correlation correction.
Coefficient set in the “Entering parameters” in the SUB MENU.
Measurement range. The lower limit and upper limit.
Standard range. The lower limit and upper limit.
Sample types. The lower limit and upper limit of standard range for each sample
types set. Printing is available only when sample type is set.
(1) Printing of single parameters
1
2
3
4
5
6
7
8
9
10
11
12
The lot number and calibration
date are printed only when
calibration by calibrator kit was
performed.
mark is not printed when the
upper limit of the standard
range is the same or higher
than the upper limit of the
measurement range.
mark is not printed when the
lower limit of the standard
range is the same or lower than
the lower limit of the
measurement range.

SPOTCHEM EZ SP-4430 OPERATING MANUALDOC.No.OM-28573 REV.6 03/02
Chapter 3 SUB MENU
(2) Printing of multi parameters
From the left, name of Multi Reagent Strip, item symbol, lot number and expiry
date.
Calibration type
CARD means calibration by magnetic card and Cal. means calibration by calibrator
kit.
Calibration factor.
Coefficient of system’s difference correction (Coefficient to use in the measurement
calculates).
1
2
3
4
The lot number and calibration
date are printed only when
calibration by calibrator kit was
performed.

SPOTCHEM EZ SP-4430 OPERATING MANUAL
DOC.No.OM-28573 REV.6 03/02
Chapter 3 SUB MENU
Set parameters (measurement conditions) for temperature, coefficient
of correlation correction, normal value range, and calibration
conditions. Regarding Multi-type Reagent Strips, setting of “calibration
conditions” only is possible. The other parameters conform to those
preset for Single Reagent Strips.
Temperature
This device consistently performs measurements under the condition of measurement
of 37
. It can also convert the measurement results to those measured at 30 or
25
and output the converted results. However, only enzyme values can be
converted.
Coefficient of correlation correction
This function allows your results obtained by this device to match the results by another
measurement method (reference method). Apply the regression equation Y = aX + b (X:
measurement result of the SP-4430, Y: the result obtained by the reference method.)
Enter coefficient values for a and b. For obtaining the coefficients of correlation
correction for a and b, contact your distributor.
Standard range
When the measurement results are printed, “ ” or “ ”, is added on data out of the
standard range.
When sample type is set, its corresponding standard range is applied.
Calibration Conditions
Set the type (calibrator or magnetic card) and the number of times of calibration for
each measurement item.
3-3-2 Enter parameters
If [STOP] key is pressed during
entry, the entry is canceled and
the cursor returns to the
previous “[ ]” or “< >”.
If the previous setting is not
necessary to change, press
[ENTER] key to proceed to next
“[ ]” or “< >”.
Display setting screen.1.
Press [2] key on the MAIN MENU.
SUB MENU 1/2 is displayed.
Press [2] key. The PARAMETER
MENU 1/2 is displayed.
Press [2] key and the Password
entering screen is displayed.
Enter password “99”.
Press [ENTER] key.
The Measurement item selecting
screen is displayed.
[ S ー01:G G T ]
( 1/30 )
1.Resu l t s 2. PARAM
3.Maintenance (1/2)
1.Measur e 2. Submenu
3 . C a l i b r a t e ( 1/1 )
1.Pr i nt 2. I nput
3.Initialyze (1/2)
Password < >
Cancel(STOP)
mark is not printed when the
upper limit of the standard
range is the same or higher
than the upper limit of the
measurement range.
mark is not printed when the
lower limit of the standard
range is the same or lower than
the lower limit of the
measurement range.

SPOTCHEM EZ SP-4430 OPERATING MANUALDOC.No.OM-28573 REV.6 03/02
Chapter 3 SUB MENU
Select measurement items.2.
Select measurement items for
parameters by pressing [hyphen (-)]
key.
Press [ENTER] key.
The Temperature setting screen is
displayed.
Set temperature.3.
Select the temperature from 37 ,
30
, and 25 by pressing [hyphen
(-)] key.
Note that items other than “enzyme”
have only one choice of 37
.
Press [ENTER] key.
The Coefficient factor setting screen
is displayed.
Set coefficient factor.4.
Enter the coefficient factor “a” by
using the numeric keys. Any number
from 0 to 10000 can be entered
.
Press [ENTER] key. The cursor
moves to the entry position for “b”.
Enter a coefficient factor “b” and
press [ENTER] key. Any number from
-10000 to 10000 can be entered.
Press [ENTER] key. The Calibration
conditions setting screen is
displayed.
Besides [hyphen (-)] key, [0], [2],
[4], [5], [6], and [8] keys can be
used in selecting items.
[0] -> initially displayed item
[2] -> last item
[4] -> previous item
[6] -> next item
[8] -> first item
[5] -> first item of the Multi
Reagent Strip
To enter minus signs and
decimal points , use [-/.] key.
If [-/.] key is pressed first, a
minus sign is entered. To enter
a decimal point, press [-/.] key
after any number is entered.
e.g.) To enter “-12”
Press [-/.] [1] [2]
e.g.) To enter “3.4”
Press [3] [-/.] [4]
e.g.) To enter “.5”
press [0] [-/.] [5].
If [-/.] [5] are pressed, the result
will be “-5”.
When the wrong key is pressed,
press the MENU key and [-/.]
key simultaneously to delete the
last entered character.
If [START] key is pressed, the
initially displayed value is
restored.
[ S ー01:G G T ]
( 1/30 )
Temperature [37]
Sー01
Cor r . a<_ 1 . 000>
Sー01 b< 0 . 000>
C o r r . a < 1 . 045>
Sー01 b< 0 . 000>
Temperature [30]
Sー01
Set calibration conditions.5.
Select “Cal.” or “CARD” by pressing
[hyphen (-)] key.
Cal.: Calibration by Calibrator
CARD: Calibration by magnetic card
Ca l . Type[CARD]
Sー01 N <2>

SPOTCHEM EZ SP-4430 OPERATING MANUAL
DOC.No.OM-28573 REV.6 03/02
Chapter 3 SUB MENU
Press [ENTER] key.
The cursor moves to the entry
position for the number of times of
calibration. Any number from 2 to 6
(times) can be entered.
Press [ENTER] key.
The Standard range setting screen is
displayed.
Set the standard range.6.
Enter the lower limit of the standard
range with the numeric keys.
Press [Enter] key.
The cursor moves to the entry
position for the upper limit value.
Enter the upper limit value with the
numeric keys.
Press [Enter] key.
The Entry check screen is displayed.
Ca l . Type[CARD]
Sー01 N <2
>
Norma l L<_ 10>
Sー01 H< 1500>
When sample type is not set
N o r m a l L < 10>
Sー01 H<_
1500>
Save?
Yes(START) No(STOP)
Enter the lower limit value of the
standard range for the sample
type1.
Press [Enter] key to move the cursor
to a place for the upper limit value.
Enter the upper limit value with the
numeric keys and press [Enter] key.
Similarly, set the standard range for
sample types 2 to 5.
The Entry check screen is displayed.
When sample type is set
Save?
Yes(START) No(STOP)
【 Man 】 L< 10>
Sー01 H<_
1500>
【 Man 】 L<_ 10>
Sー01 H< 1500>
On the standard range entering
screen, a sample type is
displayed.
When the sample type are set
only up to two, the standard
range entry for the sample
types 3 to 5 will be omitted.
mark is not printed when the
upper limit of the standard
range is the same or higher
than the upper limit of the
measurement range.
mark is not printed when the
lower limit of the standard
range is the same or lower than
the lower limit of the
measurement range.

SPOTCHEM EZ SP-4430 OPERATING MANUALDOC.No.OM-28573 REV.6 03/02
Chapter 3 SUB MENU
Store all the parameter settings.7.
Press [START] or [STOP].
If [START] key is pressed, the
parameter settings are saved and
the Measurement item selecting
screen is restored.
If [STOP] key is pressed, the setting
is canceled and Measurement item
selecting screen of procedure 1 is
restored.
End setting.8.
If the setting is finished, press
[STOP] key three times to return to
the MAIN MENU.
Wr i t i ng
・・・
/
[ S ー01:G G T ]
( 1/30 )
1.Measur e 2. Submenu
3 . C a l i b r a t e ( 1/1 )

SPOTCHEM EZ SP-4430 OPERATING MANUAL
DOC.No.OM-28573 REV.6 03/02
Chapter 3 SUB MENU
3-3-3 Initialize parameters
Display setting screen.1.
Press [2] key on the MAIN MENU.
SUB MENU 1/2 is displayed.
Press [2] key.
The PARAMETER MENU 1/2 is
displayed.
Press [3] key.
The Password entering screen is
displayed. Enter password “99”.
is displayed.
Press [ENTER] key.
The Measurement item selecting
screen is restored.
Initialize parameter settings to the factory setting values.
Initialize parameters.2.
Press [hyphen (-)] key to select a
measurement item to initialize.
Press [ENTER] key.
The Initialize confirmation screen is
displayed.
Press [START] key or [STOP] key.
If [START] key is pressed,
parameters are initialized and the
Measurement item selecting screen
is restored.
If [STOP] key is pressed, initialization
is canceled and the Measurement
item selecting screen is restored.
Besides [hyphen (-)] key, [0], [2],
[4], [5], [6], and [8] keys can be
used in selecting items.
[0] -> initially displayed item
[2] -> last item
[4] -> previous item
[6] -> next item
[8] -> first item
[5] -> first item of the Multi
Reagent Strip
If “ALL SINGLE” or “ALL MULTI”
is selected, parameter settings
of all the items for Single or Multi
Regent Strips are printed out
respectively.
[ Sー01:G G T ]
( 1/30 )
Initialize?
Yes(START) No(STOP)
1.Resu l t s 2. PARAM
3.Maintenance (1/2)
1.Measur e 2. Submenu
3 . C a l i b r a t e ( 1/1 )
1.Pr i nt 2. I nput
3.Initialize (1/2)
Password <_ >
Cancel(STOP)
[ Sー01:G G T ]
( 1/30 )

SPOTCHEM EZ SP-4430 OPERATING MANUALDOC.No.OM-28573 REV.6 03/02
The present parameter settings can be printed out ( See “3-3-1 Print Parameters” ).
Factory setting values
The following measurement conditions are pre-set upon shipment at the factory.
Refer to the table when setting parameters.
Chapter 3 SUB MENU
End Initialization.3.
If the initialization is finished, press
[STOP] key three times to return to
the MAIN MENU.
1.Measur e 2. Submenu
3 . C a l i b r a t e ( 1/1 )
25 , 30 , 37
a : 0 ~ 10000
b : -10000 ~ 10000
L : 0 ~ 10000
H : -10000 ~ 10000
type
Number of times
Setting item and range
Temperature
Coefficient of
correlation
Standard range
Calibration
Factory setting value
37
a : 1.0
b : 0.0
Measurement range
CARD
2
Calibration type Cal. or CARD
2 to 6 (times)

SPOTCHEM EZ SP-4430 OPERATING MANUAL
DOC.No.OM-28573 REV.6 03/02
Chapter 3 SUB MENU
3-3-4 Enter sample type
Display the screen.1.
Press [2] key on the MAIN MENU.
SUB MENU 1/2 is displayed.
Press [2] key.
The PARAMETER MENU 1/2 is
displayed.
Press [Menu] key or [-] key.
Press [4] key.
The Sample type 1 name entering
screen is displayed.
Enter sample types to measure.
The entered types are printed out with the measurement results.
Maximum 5 different types can be set.
Enter the sample type.2.
Maximum 5 letters can be entered
using numbers, letters, and symbols.
Press [Enter] key.
The Sample type 2 name entering
screen is displayed.
Similarly, enter the sample types 2
to 5.
When no sample type is set, press
[Enter] key, with the space kept
blank.
The numeric keys and [-/.] keys
can be used in selecting items.
For example, to entry
“
man
”
[6][6][2][2][2][2][6][6][6][6][6][6]
[0] key can be used to input
the following 12 symbols
which are
To delete the name, press [-]
key to make it blank. Press
[Enter] key.
1.Resu l t s 2. PARAM
3.Maintenance (1/2)
1.Measur e 2. Submenu
3 . C a l i b r a t e ( 1/1 )
1.Pr i nt 2. I nput
3.Initialize (1/2)
4 . Type 5 . Co p y
( 2/2 )
REF value 1 name
<_
>
REF value 1 name
<Man
>
REF value 2 name
<_
>

SPOTCHEM EZ SP-4430 OPERATING MANUALDOC.No.OM-28573 REV.6 03/02
Chapter 3 SUB MENU
3-3-4 Input of identifiers for sample classifications
Setting the sample type to use on the basic setting.
3.
In the end, set the sample type to
use on the basic setting.
The entered sample type is used as
the sample type unless a different
type is set at the time of
measurement.
Press [-] key to select sample type
to use as the basic setting, and
press [Enter] key.
The Entry check screen is displayed.
Saving the setting contents.4.
Press [Start] key or [Stop] key.
Pressing [Start] key saves the details
of the setting, and returns the screen
to the PARAMETER MENU 1/2.
If [Stop] key is pressed, the
PARAMETER MENU 1/2 is restored
without saving the setting contents.
REF value base type
<Man >
Save?
Yes(START) No(STOP)
End setting.5.
Press [STOP] key twice to return to
the MAIN MENU.
Wr i t i ng
・・・
/
1.Measur e 2. Submenu
3 . C a l i b r a t e ( 1/1 )
1.Pr i nt 2. I nput
3.Initialize (1/2)

SPOTCHEM EZ SP-4430 OPERATING MANUAL
DOC.No.OM-28573 REV.6 03/02
Chapter 3 SUB MENU
3-3-5 Copy standard range setting
Display setting screen.1.
Press [2] key on the MAIN MENU.
SUB MENU 1/2 is displayed.
Press [2] key.
The PARAMETER MENU 1/2 is
displayed.
Press [Menu] key or [-] key.
Press [5] key.
The Standard range setting copy
screen.
The cursor is in the sample type on
the original screen.
The standard range setting for a certain sample type can be copied in
all items to one for another sample type.
Copy is available only when two or more sample types are input.
Selecting the standard range on the original screen.2.
Press [-] key to select the sample
type for which the standard range is
set on the original screen.
Press [Enter] key.
The cursor moves to the sample
type on the duplicate screen.
1.Resu l t s 2. PARAM
3.Maintenance (1/2)
1.Measur e 2. Submenu
3 . C a l i b r a t e ( 1/1 )
1.Pr i nt 2. I nput
3.Initialize (1/2)
4 . Type 5 . Co p y
( 2/2 )
PRES SPC>>Next SPC
[
Man
][
Man
]
PRES SPC>>Next SPC
[
Man
][
Man
]

SPOTCHEM EZ SP-4430 OPERATING MANUALDOC.No.OM-28573 REV.6 03/02
Chapter 3 SUB MENU
3-3-4 Input of identifiers for sample classifications
Selecting the standard range of the duplicate screen.
3.
Press [-] key to select sample type
on the duplicate screen for which
the standard range setting is
required.
Press [Enter] key.
The Entry check screen is displayed.
Saving the setting contents.4.
Press [Start] key or [Stop] key.
Press [Start] key to copy and save the
standard range. The PARAMETER
MENU 1/2 is restored.
Press [Stop] key to return the screen
to the PARAMETER MENU 1/2,
without duplicating the standard
range.
Save?
Yes(START) No(STOP)
End setting.5.
Press [STOP] key twice to return to
the MAIN MENU.
Wr i t i ng
・・・
/
PRES SPC>>Next SPC
[
Man
][
Woman
]
1.Pr i nt 2. I nput
3.Initialize (1/2)
1.Measur e 2. Submenu
3 . C a l i b r a t e ( 1/1 )

SPOTCHEM EZ SP-4430 OPERATING MANUAL
DOC.No.OM-28573 REV.6 03/02
3-4 Maintenance
Chapter 3 SUB MENU
Proper maintenance is required to maintain the accuracy of the analyzer.
Select “Maintenance” on the SUB MENU to perform either daily
maintenance or periodical maintenance.
Preparation for the maintenance.1.
Press [2] key on the MAIN MENU.
SUB MENU1/2 is displayed.
Press [3] key .
The Table Cover opens, and the
Reagent Table and the Centrifugeequipped Multi rack slide forward.
When the message is displayed as
shown on the right, turn off the
power.
Perform maintenance.2.
Perform maintenance of each part.
( see “Chapter 4 MAINTENANCE” )
End maintenance.3.
Turn ON the power. Warm-up starts,
the Reagent Table and the
Centrifuge-equipped Multi rack slide
back to the original position, and the
Table Cover closes.
After the warm-up is completed,
MAIN MENU is restored.
1.Measur e 2. Submenu
3 . C a l i b r a t e ( 1/1 )
Ready .
Please turn off .
1.Resu l t s 2. PARAM
3.Maintenance (1/2)
1.Measur e 2. Submenu
3 . C a l i b r a t e ( 1/1 )

SPOTCHEM EZ SP-4430 OPERATING MANUALDOC.No.OM-28573 REV.6 03/02
3-5 Mode Menu
Chapter 3 SUB MENU
Display setting screen.1.
Press [2] key on the MAIN MENU.
SUB MENU1/2 is displayed.
Press [MENU] key or [-/.] key.
SUB MENU 2/2 is displayed.
Press [4] key.
The MODE MENU is displayed.
Press [1] key.
The Survey mode setting screen is
displayed.
Switch to the Survey Mode. When measurement is performed in the
Survey Mode, raw data as well as normal measurement results can be
printed out (see 2-6 “Interpreting measurement results” for details of
printouts).
The Survey Mode is canceled
automatically when the power is
turned off.
Switch to the Survey Mode.2.
Press [hyphen (-)] key.
Turn ON the Survey Mode.
Press [ENTER] key.
The message “Writing...” is
displayed and the MODE MENU is
restored.
End the Survey Mode.3.
If the setting is finished, press
[STOP] key three times to return to
the MAIN MENU.
1.Su rvey
( 1/1 )
Sur vey [OFF]
Wr i t i ng
・・・
/
Sur vey [ ON]
1.Resu l t s 2. PARAM
3.Maintenance (1/2)
1.Measur e 2. Submenu
3 . C a l i b r a t e ( 1/1 )
4.Mode 5.C l ock
( 2/2 )
1.Measur e 2. Submenu
3 . C a l i b r a t e ( 1/1 )

SPOTCHEM EZ SP-4430 OPERATING MANUAL
DOC.No.OM-28573 REV.6 03/02
Set the date and time.2.
Enter the present date by sliding the
cursor with [hyphen (-)] key.
Press [ENTER] key. The cursor
moves to the time entry position.
Enter the present time by sliding the
cursor with [hyphen (-)] key.
Press [ENTER] key. The set date
and time are stored, and the SUB
MENU 2/2 is restored.
If [STOP] key is pressed during
operation, the setting is
canceled and the SUB MENU
2/2 is restored.
If [START] key is pressed, the
initially displayed value is
restored.
If [STOP] key is pressed during
operation, the setting is
canceled and the date setting is
restored.
For the time settings, only the
hour and minute can be set.
The cursor does not move to the
second position.
End Setting.3.
Press [STOP] key to return to the
MAIN MENU.
Chapter 3 SUB MENU
3-6
Built-in Clock Adjustment
Set the Date and time of the built-in clock. Once the date and time are
set, resetting is not necessary. However, resetting may be necessary in a
long time of use.
Display setting screen.1.
Press [2] key on the MAIN MENU.
SUB MENU1/2 is displayed.
Dat e <00ー06ー01>Y M D
T i m e <12:34:00>
Password <_ >
Cancel(STOP)
D a t e <00ー06ー12>YMD
T i m e <12:34:00>
D a t e <00ー06ー12> Y M D
Time <1
2:34:00>
D a t e <00ー06ー12> Y M D
T i m e <12:5_
:00>
Press [MENU] key or [-/.] key.
SUB MENU 2/2 is displayed.
Press [5] key .
The Password entering screen is
displayed. Enter password “99”.
is displayed on the screen.
Press [ENTER] key.
The Clock adjustment screen is
displayed.
1.Resu l t s 2. PARAM
3.Maintenance (1/2)
1.Measur e 2. Submenu
3 . C a l i b r a t e ( 1/1 )
4.Mode 5.C l ock
( 2/2 )
4.Mode 5.C l ock
( 2/2 )
1.Measur e 2. Submenu
3 . C a l i b r a t e ( 1/1 )

SPOTCHEM EZ SP-4430 OPERATING MANUALDOC.No.OM-28573 REV.6 03/02


SPOTCHEM EZ SP-4430 OPERATING MANUAL DOC.No.OM-28573 REV.6 03/02
Proper maintenance is required to maintain satisfactory measurement.
This chapter describes maintenance and replacement of consumables.
Chapter 4
MAINTENANCE
4-1 Outline of Maintenance
4-1-1 Frequency of Maintenance
4-2 Daily Maintenance
4-2-1 Cleaning the Reagent Table
4-2-2 Cleaning the Tip Waste Case and Protective Cover
4-3 Periodic Maintenance
4-3-1 Replacement of Thermal Printer Paper
4-3-2 Cleaning the Optical Window
4-3-3 Cleaning the Nozzle
4-3-4 Replacement of Nozzle
 Loading...