

Page 1

User Manual Bluetooth Wrist Blood Pressure Display
Thank you for choosing an a-rival product. A good choice.
Just in case that you are facing any problems with your device,
please call our support/service hotline +49 (0)511 / 123 83 506,
send us an e-mail to support@first-servicecenter.de or visit us on http://a-rival.de/facebook/
The detailed manual is also available in German on our website: www.a-rival.de
Page 2

2
Table of Contents
Introduction
.................................................................................................................................................................................................. 4
General Description ........................................................................................................................................................................................................................ 4
Measurement Principle ................................................................................................................................................................................................................... 4
LCD Display
Signal
........................................................................................................................................................................................................................ 7
Components ................................................................................................................................................................................................................................... 8
Before you start ............................................................................................................................................................................................ 9
Power Supply and Charge
Power
................................................................................................................................................................................................. 9
Activate Your Devic e ................................................................................................................................................................................................................... 10
Setting Date and Time ................................................................................................................................................................................................................. 10
Measurement .............................................................................................................................................................................................. 12
Positioning the Cuff ...................................................................................................................................................................................................................... 12
Pair-up the Device with Your Smartphone or Tablet.................................................................................................................................................................... 13
Start Measurement ....................................................................................................................................................................................................................... 14
Data Management
....................................................................................................................................................................................... 16
Recall the Records ....................................................................................................................................................................................................................... 16
Delete the Records ....................................................................................................................................................................................................................... 17
Information for User ................................................................................................................................................................................... 18
Tips for Measurement .................................................................................................................................................................................................................. 18
Maintenance ................................................................................................................................................................................................................................. 19
About Blood Pressure
................................................................................................................................................................................ 20
What are systolic pressure and diastolic pressure? .................................................................................................................................................................... 20
What is the standard blood pressure classification? .................................................................................................................................................................... 20
Why my blood pressure is varies even in one day? .................................................................................................................................................................... 21
If the result is the same if measuring on the right wrist? .............................................................................................................................................................. 22
Troubleshooting
......................................................................................................................................................................................... 23
Specifications
............................................................................................................................................................................................. 24
Guarantee ................................................................................................................................................................................................... 26
Page 3

3
Please read this manual carefully before you use this unit, and keep it well for further checking.
Important info for the disposal of waste
(applicable in the countries of the European Union and other European countries with separate collection systems)
On the device , the packaging or accompanying manuals for the product, the symbol of the crossed out wheeled bin indicates
that this
product must not be disposed of with normal household waste!
They also contribute to the proper disposal of the unit to protect the environment and the health of those around you. It
helps protect natural resources, recycling of materials, reduce the consumption of raw materials! Disconnect electrical
waste from other waste and dispose it on with your local, free return system. For recycling information, please contact your
local Civic Office, your household waste disposal service, the shop where you purchased the product or the manufacturer.
Important info for disposal of batteries
(applicable in the countries of the European Union and other European countries with separate battery collection systems)
On the battery, the packaging or accompanying manuals for the product, the symbol of the crossed out wheeled
bin indicates that the batteries in this product should not be disposed of with normal household waste!
The chemical symbols for lead (Pb ) , mercury (Hg ) and Cd below the crossed out wheeled bin indicates
that the lead, mercury and cadmium content of the battery is higher than those laid down in the EC
Directive 2006/66 reference values. If batteries are not disposed of properly, they can cause harm to
human health or the environment.
They also contribute to the proper disposal of the battery / batteries to protect the environment and the health of those
around you. It helps protect natural resources, recycling of materials, reduce the consumption of raw materials! Separate
batteries from other waste and dispose of it please them through your local, free battery return system. For recycling
information, please contact your local Civic Office, your household waste disposal service, the shop where you purchased
the product or the manufacturer.
IMPORTANT:
the built-in battery in this product is
not
interchangeable. To do so, please contact the manufacturer.
Page 4

4
Introduction
General Description
Thank you for choosing an a-rival product. The device features body function measurement, not for medical purposes, and the result
storage.
This manual contains important safety and care information, and provides step by step instructions for using the product.
Please do read this user manual carefully and thoroughly before use.
FEATURES:
Systolic Blood Pressure
Diastolic Blood Pressure
Pulse Rate
Memory: Up to 60 pieces of records
Measurement Principle
This product uses the Oscillometric Measuring Method to detect blood pressure. Before every measurement, the unit establishes a “zero
point” equivalent to the atmospheric pressure. Then it starts inflating the cuff. Meanwhile, the unit detects pressure oscillation generated by
beat-to-beat pulsatile, which is used to deter- mine the systolic pressure and diastolic pressure as well as pulse rate.
The device also compares the longest and the shortest intervals of detected pulse wave to with the average value, and then calculates the
standard deviation. The device will light up a warning symbol when the calculated standard deviation is larger than or equal to 15.
Page 5
5
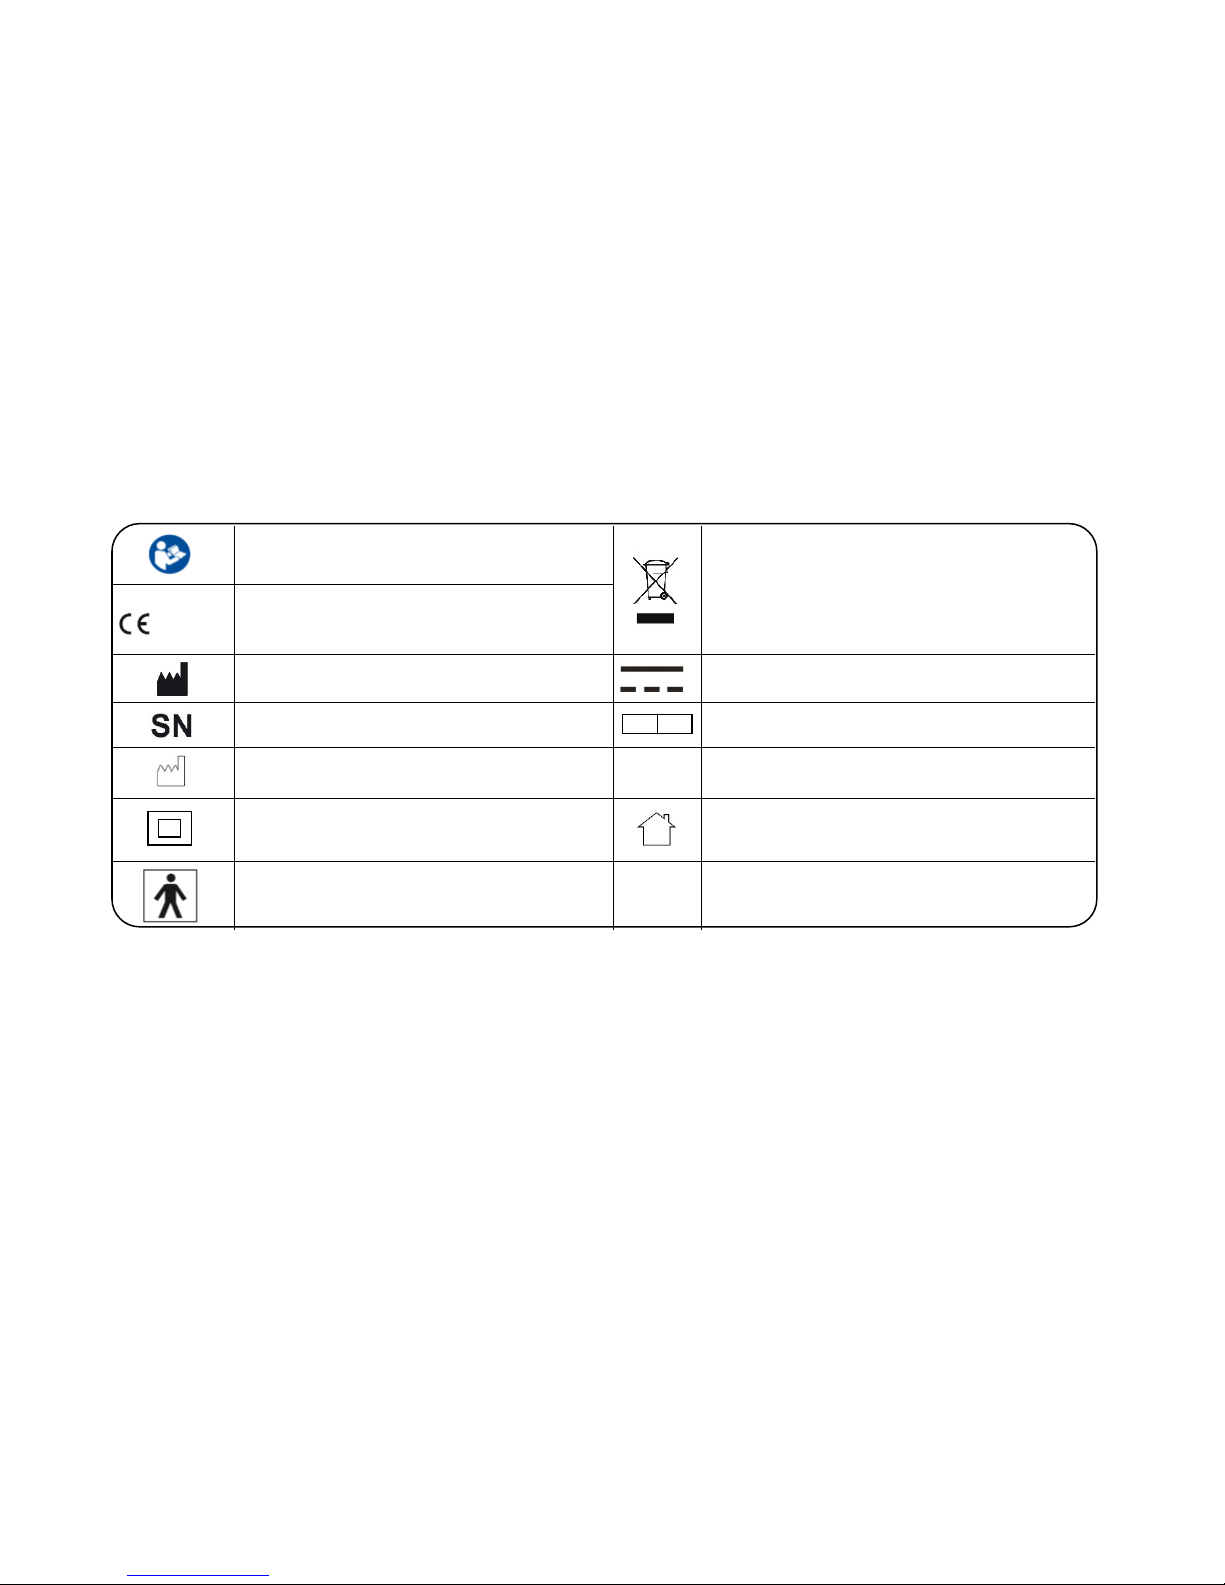
Safety information
The below signs might be in the user manual, labeling or other components. They are the requirement of standard and using.
Symbol for “THE OPERATION GUIDE MUST
BE READ”
Symbol for “ENVIRONMENT PROTECTION Waste electrical products should not be disposed
of with household waste. Please recycle where
facilities exist. Check with your local authority or
retailer for recycling advice.
0123
Symbol for “COMPLIES WITH
MDD 93/42/EEC REQUIREMENTS”
Symbol for “MANUFACTURER”
Symbol for “DIRECT CURRENT”
Symbol for “SERIAL NUMBER”
EC RE
Symbol for “Authorized Representative in the
European Community”
Symbol for “MANUFACTURE DATE” F1 T1A/250V Φ3.6*10CCC
Symbol for “ Class II Equipment ”
Symbol for indoor use only
Symbol for “TYPE BF APPLIED PARTS”
Indications for use
The a-rival HGBM01 is intended for use in measuring body functions of people with wrist circumference ranging from 13.5 cm to 21.5
cm (about 5-8.5 inches).
It is intended for home and indoor use and for adults only and
not
for diagnostic and/or therapeutic purposes.
Page 6

6
This product is NOT a medical device! Pregnant women, pre-eclamptic people and people with severe obesity don’t use the device.
If you need, please consult professional doctor.
It is not intended for use on extremities other than the wrist or for functions other than obtaining an indication of the blood pressure.
Please use the device under specified environment by user manual, otherwise the accuracy of the device will be influenced
Do not confuse self-monitoring with self-diagnosis. Please start or end medical treatment basing solely on physician’s treatment
advice.
If you are taking medication, consult your physician to determine the most appropriate time for
your measurement. Never change a
prescribed medication without your physician’s consent.
This unit is not suitable for continuous monitoring during medical emergencies. Otherwise, the wrist and fingers will become
anaesthetic, swollen, and even purple due to a lack of blood.
If the pressure of the cuff exceeds 40 kPa (300 mmHg), the unit will automatically deflate. If the cuff don’t deflate when its pressure
exceeds 40 kPa (300 mmHg), detach the cuff from the wrist and press the START/STOP button to stop inflation.
Do not use the device under the conditions of strong electromagnetic field that radiates interference signal or electrical fast transient/
burst signal.
The maximum temperature that the applied part can be achieved is 42.5 °C while the environmental temperature is 40°C
Please keep the unit out of reach of infants, children or pets, since inhalation or swallowing of small parts is dangerous or even fatal.
Be careful to strangulation due to cables and hoses, particularly due to excessive length.
The healthy adult is the intended operator. He obtains an indication of his blood pressure, can transmit data and charge battery
under normal circumstances and maintain the device to the user manual.
If you are allergic to dacron or plastic, please don’t use this device.
There is a PTC current limiter in the device, which specification is 8V and 0.5A. When the voltage and current exceed the limiting
value, the device will stop warning.
The device is not suitable for public use.
The adapter insulates the device from the main supply. Do not position the plug in a position where it is difficult to disconnect from
the supply mains.
CAUTION
Page 7

7
LCD Display Signal
SYMBOL DESCRIPTION EXPLANATION
SYS
.
Systolic Blood Pressure High blood pressure
DIA.
Diastolic Blood Pressure Low blood pressure
PUL
min
Pulse beat/minute
+ Lס
Low Battery Low battery and please charge the power.
mmHg Unit Measurement unit of blood pressure
Irregular Heartbeat Irregular Heartbeat Detector
Memory Recalling the history records
Time Hour:Minute (Month/Day/Year)
Grade The grade of the blood pressure
Heartbeat Heartbeat detection during the measurement
Memory Review
Page 8

8
Components
WHO BLOOD PRESSURE CLASSIFICATION
SYSTOLIC
DIASTOLIC
PULSE RATE
TIME
MEM/UP BUTTON START/STOP BUTTON
SET/DOWN BUTTON
CUFF
USB-Interface
Page 9

9
Before you start
Power Supply and Charge Power
1. The battery of the device is built-in rechargeable lithium-ion battery, the battery current is 420 mAh.
2. Please use the USB cable to charge the battery, just like the following picture:
Charging the power under following circumstances:
_________________________________________________________________________________________
• displays on the LCD
• The LCD display dims
• When powering on the device, the LCD doesn’t light up.
1. The battery of the device is built-in rechargeable lithium-ion battery, please do not disassemble it by the unauthorised maintenance personal.
2. Under the normal using, it can charge power about 300 times, if the battery cannot charge the power normally or the device cannot use normally,
please connect with the authorized maintenance personal. If measured three times per day, and the battery is fully charged, it can be used for
about 20 days.
3. Storage and use the device at the cool, dry and ventilated environment. Avoid to approach to the fire and the heat source, or it will cause the battery
explode.
4. During the process of charging, the device displays . When the charging is finished, please pull the plug in time.
5. When charging, shall not touch charging connector and the person simultaneously.
CAUTION
Page 10

10
Activate Your Device
When you get the a-rival HGBM01, the first thing you must do is to activate it. Please press and hold the SET button “E” to activate it, then it
will enter the setting mode.
Setting Date and Time
Please proceed to time setting before your initial use so as to ensure each piece of record are labled with a time stamp. (Year Range: 20122052; Time Format: 12 Hours)
1. When the monitor is OFF, press and hold “SET” button “E” for 3 seconds to
enter Time Setting Mode.
2. As pictured in the right, the blinking numeral representing [HOUR]. Press
“MEM” button “S” to change the numeral. Each press will increase the numeral
by one in a cycling manner.
3. Press “SET” button “E” again to confirm [HOUR]. Then the numeral
representing [MINUTE] blinks.
Page 11

11
4. Repeat step 2 and 3 to confirm [MINUTE].
5. Repeat step 2 and 3 to confirm [MONTH], [DAY], and [YEAR].
6. After confirming [YEAR], the LCD will display “DONE” and the
monitor will shut off.
Page 12

12
Measurement
Before you start measuring
Positioning the Cuff
1. Remove all accessories (watch, bracelet, etc) from your left wrist. If your physician has diagnosed you with poor circulation in your left
wrist, use your right wrist.
2. Roll or push up your sleeve to expose the skin.
3. Apply the cuff to your left wrist with your palm facing up.
4. Position the edge of the cuff about 1-2 cm.
5. Fasten the wrist cuff around your wrist, leaving no extra room between the cuff and your skin. If the cuff is too loose, the measurement
will not be accurate.
6. The middle of the cuff should be at the level of the heart; Before starting measurement, please sit comfortably with legs uncrossed, feet
flat on the floor, back and arm supported.
Resting for 5 minutes before measuring.
Wait at least 3 minutes between measurements.
This allows your blood circulation to recover.
For a meaningful comparison, try to measure under similar conditions.
For example, take daily measurements at approximately the same
time, on the same wrist, or as directed by a physician.
Page 13

13
Pair-up the Device with Your Smartphone or Tablet
1. Turn on Bluetooth and the “a-rival” app. Make sure both are ON when
pair-up is proceeding.
2. When the monitor is OFF, press and hold the START button to
start pair-up. The symbol and the symbol will be
shown on the LCD alternatively, indicating pair-up is
proceeding.
If SUCCEED
, symbol will be shown on the LCD.
If FAIL
, symbol will be shown on the LCD.
3. The monitor will shut off.
Page 14

14
Start Measurement
1. After correctly positioning the cuff, press START button to
turn on the device, and it will complete the measurement
process.
Adjust to zero.
Inflating and measuring. Display and save the measuring result.
Page 15

15
2. This device will proceed to data transmission after measurement
The Bluetooth symbol “bt” blinks on the LCD indicates data is
transmitting.
3. If the data is successfully transmitted, the LCD will then display
“ bt dONE ”.
If the data transmission fails, the LCD will display “bt Err”
instead.
4. Press STOP button to turn off the device. Otherwise it will power off.
START
STOP
Page 16

16
1. When using this device, please pay attention to the following situation which may interrupt blood flow and influence blood circulation of
the patient, thus cause harmful injury to the patient: too frequent and consecutive
multiple measurements; the application of the CUFF and itspressurization on any wrist where intravascular access or therapy, or an
arterio-venous (A-V) shunt, is present; Inflating the cuff on the wrist on the side of a mastectomy.
2. Do not apply the cuff over a wound, otherwise it can cause further injury.
3. Do not inflate the cuff on the same limb which other monitoring ME EQUIPMENT is applied around simultaneously, because this could
cause temporary loss of function of those simultaneously-used monitoring ME EQUIPMENT.
4. Using it in case to result in prolonged impairment of the circulation of the blood of the PATIENT.
5. Don’t link the connection tube, otherwise, the cuff pressure may continuously increase which can prevent blood flow and result in
harmful injury to the PATIENT; Sensitive people, including pregnant women pre- eclamptic patients, patients who implanted medical
electronic instruments and have atrial fibrillation (AF), premature ventricular beats and peripheral arterial disease (PAD), should avoid
using the unit whenever possible.
Data Management
Recall the Records
1. Press m emory button “S” to access the memory when the device is off. The
device will display the value of the latest reading first.
2. Press “MEM/UP” button “S” or “SET/DOWN” button “E” to rotate the history
records.
“MEM/UP” to go forward; “SET/DOWN” to go backward.
The most recent record (1) is shown first. Each new measurement is assigned to the first (1)
record. All other records are pushed back one digit (e.g., 2 becomes 3, and so on), and the last
record (60) is dropped from the list.
CAUTION
CAUTION
Page 17

17
Delete the Records
When you did not obtain the accurate measurement, you can clear all the measuring results by following below steps.
1.
Under Memory Recalling Mode, press and hold both the “MEM” button “S”
and the “SET” button “E” for 3 seconds.
2.
The LCD will display “dEL dONE”, indicating that memory clearing is
complete. And then it will shutdown.
Under Memory Recalling Mode, if you wish to give up clearing, press
“START/STOP” to turn off the device.
3. When there is no memory in the device if you press the “MEM” button “S” to
look up history, the LCD will display as pictured to the right.
CAUTION
Page 18

18
Information for User
Tips for Measurement
It can cause inaccuracy if the measurement is taken in the following circumstances.
Within 1 hour Immediate measurement
after dinner or drinking after tea, coffee, smoking
Within 20 minutes When talking
after taking a bath or moving your fingers
In a very cold environment When you want to discharge urine
Page 19

19
Maintenance
To obtain the best performance, please follow below instructions.
Put in a dry place and Avoid immersing it in the
water.
avoid the
sunshine
. Clean it with a dry cloth in
case
.
Avoid shaking and
collision.
Avoid dusty environment
and
unstable temperature
surrounding
.
Use the slightly damp
cloth
to remove the
dirt
. Avoid washing the
cuff
.
Page 20

20
1. Please make sure the unit functions safely and it is in proper working conditions before use. Don’t service or maintain while the device is in use.
2. If you have any problems with this device, such as setting up, maintaining or using, please contact with SERVICE PERSONNEL of a-rival. Don’t open or
repair the device by yourself.
3. Please report to a-rival if any unexpected operation or events occur.
4. Cleaning: Dust environment may affect the performance of the unit. Please use the soft cloth to remove the dirt of the device and cuff before and after
use.
5. Calibration: The manufacturer does not require such preventive inspections or calibration by other persons and will make available on request of circuit
diagrams, component part list, etc.
6. Disposal: Degraded sensors may result in inaccurate measurement while loosened electrodes may cause the device’s failure to power on. Please
dispose the equipment and detachable parts according to local guidelines.
About Blood Pressure
What are systolic pressure and diastolic pressure?
When ventricles contract and pump blood out of the heart, the blood
pressure reaches its maximum value in the cycle, which is called systolic
pressure. When the ventricles relax, the blood pressure reaches its
minimum value in the cycle, which is called diastolic pressure.
What is the standard blood pressure classification?
The blood pressure classification published by World Health
Organization (WHO) and International Society of Hypertension (ISH) in
1999 is as follows:
Only a physician can tell your normal BP range. Please contact a physician if
your measuring result falls out of the range. Kindly note that only a physician
could tell whether your blood pressure value has reached a dangerous point.
CAUTION
CAUTION
Page 21

21
Level
BloodPressure (mm Hg)
Optimal
Normal
High-normal
Mild
Moderate
Severe
SYS
<120
120-129
130-139
140-159
160-179
≥180
DIA
<80
80-84
85-89
90-99
100-109
≥110
Irregular Heartbeat Detector
This Blood Pressure Monitor is equipped with an intelligent function of Irregular Heartbeat (IHB) Detector. During each measurement, this
equipment records the heartbeat intervals and works out the standard deviation. If the calculated value is larger than or equal to 15, this
equipment will light up the IHB symbol on the screen when displaying the measuring result.
The appearance of the IHB icon indicates that a pulse irregularity consistent with an irregular heartbeat was detected during measurement.
Usually this is NOT a cause for concern. However, if the symbol appears often, we recommend you seek medical advice. Please note that the
device does not replace a cardiac examination, but serves to detect pulse irregularities at an early stage.
Why my blood pressure is varies even in one day?
1. Individual blood pressure varies every in one day, it also
affected by the way you tie your cuff and the position of
your measurement, so please take the measurement at the
same condition.
2. The varies of the pressure
is
greater if the person take
medicine
.
3. Waiting at least 3 minutes for another measurement.
CAUTION
Page 22

22
Why the blood pressure I get from the hospital is different from home?
The blood pressure is different even during 24 hour because of the weather, emotion, exercise etc, specially the “white coat” in hospital
which makes the results are higher than the ones at home.
If the result is the same if measuring on the right wrist?
It is ok for both wrists, but there will be some different results for different person, so suggest you measure the same wrist every time.
The attention need to pay when you measure you blood pressure at home:
If the cuff is tied properly,
If the cuff is too tight or too loose.
If the cuff is tied on the wrist.
If you feel anxious pressured.
You had better take deep breath 2-3 times before beginning.
Advice: adjust yourself for 4-5 minutes until you calm down.
Page 23

23
Troubleshooting
This section includes a list of error messages and frequently asked questions for problems you may encounter with your a-rival
HGBM01. If the products not operating as you think it should, check here before arranging for servicing.
PROBLEM SYMPTOM CHECK THIS REMEDY
No power
Display is dim or will not light up. Power is exhausted Charge the power
Low batteries
+ Lס Show on the display
Power is low. Charge the power
Error massage
shows
Data communication has failed
Make sure that phone’s Bluetooth is on or
within the distance range.
E 1 shows The cuff is not secure. Refasten the cuff and then measure again.
E 2 shows The cuff is very tight. Refasten the cuff and then measure again.
E 3 shows The pressure of the cuff is excess.
Relax for a moment and then measure again.
E 10 or
E 11 shows
The monitor detected motion while
measuring.
Movement can affect the measurement.
Relax for a moment and then measure again.
E 20 shows
The measurement process does not
detect the pulse signal.
Loosen the clothing on the arm and then
measure again.
E 21 shows Measure incorrectly. Relax for a moment and then measure again.
EExx shows on the display. A calibration error occurred
Retake the measurement. If the problem
persists, contact the retailer or our customer
service department for further assistance.
Refer to the warranty for contact information
and return instructions.
Page 24

24
Specifications
Power
supply
3.7V 420mAH Built-in rechargeable lithium-ion battery, 5V / 1A USB
Display
mode
Digital LCD V.A.46.5x36.5mm
Measurement
mode
Oscillographic testing mode
Measurement
range
Rated cuff pressure:
0kpa-40kpa (0mmHg-300mmHg) Measurement pressure: 5,3 kPa30,7kPa (40mmHg-230mmHg)
pulse value:(40-199)beat/minute
Accuracy
Pressure:
5°C – 40°C within±0.4kpa(3mmHg)
pulse value:±5%
Normal working
condition
Temperature:
5°C to 4
0°C Relative humidity
≤85%
Atmospheric pressure: 86kPa to 106kPa
Storage &
transportation condition
Temperature:-20°C to 60°C RH: 10% to 93% Atmospheric pressure: 50kPa to
106kPa
Measurement perimeter of the
wrist
About 13.5cm-21.5cm
Net
Weight
Approx.110g
External
dimensions
Approx.79.8×72.5×13.2mm
Attachment
USB cable, user manual
Mode of
operation
Continuous operation
Degree of
protection
Type BF applied part
Protection
against
ingress of water
IP22, It means the device could protected against solid foreign objects of
12.5mm and greater, and against vertically falling water drops when
ENCLOSURE tilted up to 15°
Software
version
V01
Device classification
Battery Powered Mode:
Internally Powered ME Equipment
AC Adaptor charged Mode: Class II ME Equipment
WARNING
: No modification of this equipment is allowed
Page 25

25
Risk management
ISO/EN 14971:2012 Medical devices — Application of risk management to medical devices
Labeling
ISO/EN 15223-1:2012 Medical devices. Symbols to be used with medical device labels, labelling and information to be supplied. General requirements
User manual
EN 1041: 2008 Medical equipment manufacturers to provide information
General Requirements
for Safety
EN 60601-1: 2006 Medical electrical equipment - Part 1: General requirements for basic safety and essential performance
IEC/EN 60601-1-11: 2010 Medical electrical equipment -- Part 1-11: General requirements for basic safety and essential performance - Collateral standard:
Requirements for medical electrical equipment and medical electrical systems used in
the home healthcare environment
IEC/EN 80601-2-30:2009 Medical electrical equipment - Part 2-30: Particular requirements for the basic safety and essential performance of automated
noninvasive sphygmomanometers
Electromagnetic
compatibility
IEC/EN 60601-1-2:2007 Medical electrical equipment - Part 1-2: General requirements for basic safety and essential performance - Collateral
standard:Electromagnetic compatibility - Requirements and tests
Performance
requirements
EN 1060-1:1995+A2:2009 Non-invasive blood pressure
Part 1: General requirements
EN 1060-3:1997+A2:2009 Non-invasive blood pressure Part 3: Supplementary requirements for electromechanical blood pressure measuring system
Clinical investigation
EN 1060-4: 2004 Automatic Blood Pressure Monitor overall system Interventional accuracy of the testing process
Usability
IEC/EN 60601-1-6: 2010 Medical electrical equipment -- Part 1-6: General requirements for basic safety and essential performance - Collateral Standard:
Usability
IEC/EN 62366: 2007 Medical devices - Application of usability engineering to medical devices
Software life-cycle
processes
IEC/EN 62304:2006+AC: 2008 Medical device software
- Software life cycle processes
Complied European Standards List
EMC Guidance
1. The Blood Pressure Monitor needs special precautions regarding EMC and needs to be installed and put into service
according to the EMC information provided in the ACCOMPANYING DOCUMENTS
2. Wireless communications equipment such as wireless home network devices, mobile phones, cordless telephones and their base
stations, walkie-talkies can affect this equipment and should be kept at least a distance d = 3,3 m away from the equipment.
(Note. As indicated in Table 6 of IEC 60601-1-2:2007 for ME EQUIPMENT, a typical cell phone with a maximum output power of 2
W yields d = 3,3 m at an IMMUNITY LEVEL of 3 V/m)
Page 26

26
Guarantee
Please keep the proof of purchase for this device for the entire duration of the guarantee period, as it must be produced in the event of any
claim.
You (as the end user) receive a
24-month
guarantee from the date of sale. The article has been manufactured using the most modern
production methods and subjected to strict quality controls.
In the event of any defects during the guarantee period please contact the dealer where you purchased it or the manufacturer.
Hotline: +49 (0)511 - 123 83 506 or: support@first-servicecenter.de
The guarantee does not cover damage caused by improper use or external influence (water, falling, sunlight, breakage or impact).
Declaration of Conformity
Hereby Baros GmbH declares, that the device HGBM01 is in compliance with the essential requirements and other relevant regulations of
Directive 1999/5/EC. The Declaration of Conformity can be found at: www.a-rival.de
User information/Contact
If your device has a defect or you have problems with it, please contact our Service & Support Centre.
If you need to send your device to us, please attend to the following points:
1. Use only the
original packaging
2. Add a
detailed error description
3. Add your
full name and address
and a copy of your purchase receipt
4. Stamp and send the package to us
(sufficient postage)
Address of our Service Center:
First Service Center, Kleine Düwelstr 21, DE-30171 Hannover/Germany
 Loading...