

Page 1

Instructions for use
WASHING MACHINE
GB
English,1
Română,13
ECO6D 1291
RO
BG
БЪЛГАРСКИ,25
Contents
Installation, 2-3
Unpacking and levelling
Connecting the electricity and water supplies
The first wash cycle
Technical data
Description of the washing machine, 4-5
Control panel
Display
Running a wash cycle, 6
Wash cycles and functions, 7
Table of wash cycles
Wash functions
Detergents and laundry, 8
Detergent dispenser drawer
Preparing the laundry
Special wash cycles
Load balancing system
Precautions and tips, 9
General safety
Disposal
Opening the porthole door manually
GB
Care and maintenance, 10
Cutting off the water or electricity supply
Cleaning the washing machine
Cleaning the detergent dispenser drawer
Caring for the door and drum of your appliance
Cleaning the pump
Checking the water inlet hose
Troubleshooting, 11
Service, 12
1
Page 2
Installation
GB
! This instruction manual should be kept in a safe place for
future reference. If the washing machine is sold, transferred
or moved, make sure that the instruction manual remains
with the machine so that the new owner is able to familiarise himself/herself with its operation and features.
! Read these instructions carefully: they contain vital infor-
mation relating to the safe installation and operation of the
appliance.
Unpacking and levelling
Unpacking
1. Remove the washing machine from its packaging.
2. Make sure that the washing machine has not been
damaged during the transportation process. If it has been
damaged, contact the retailer and do not proceed any
further with the installation process.
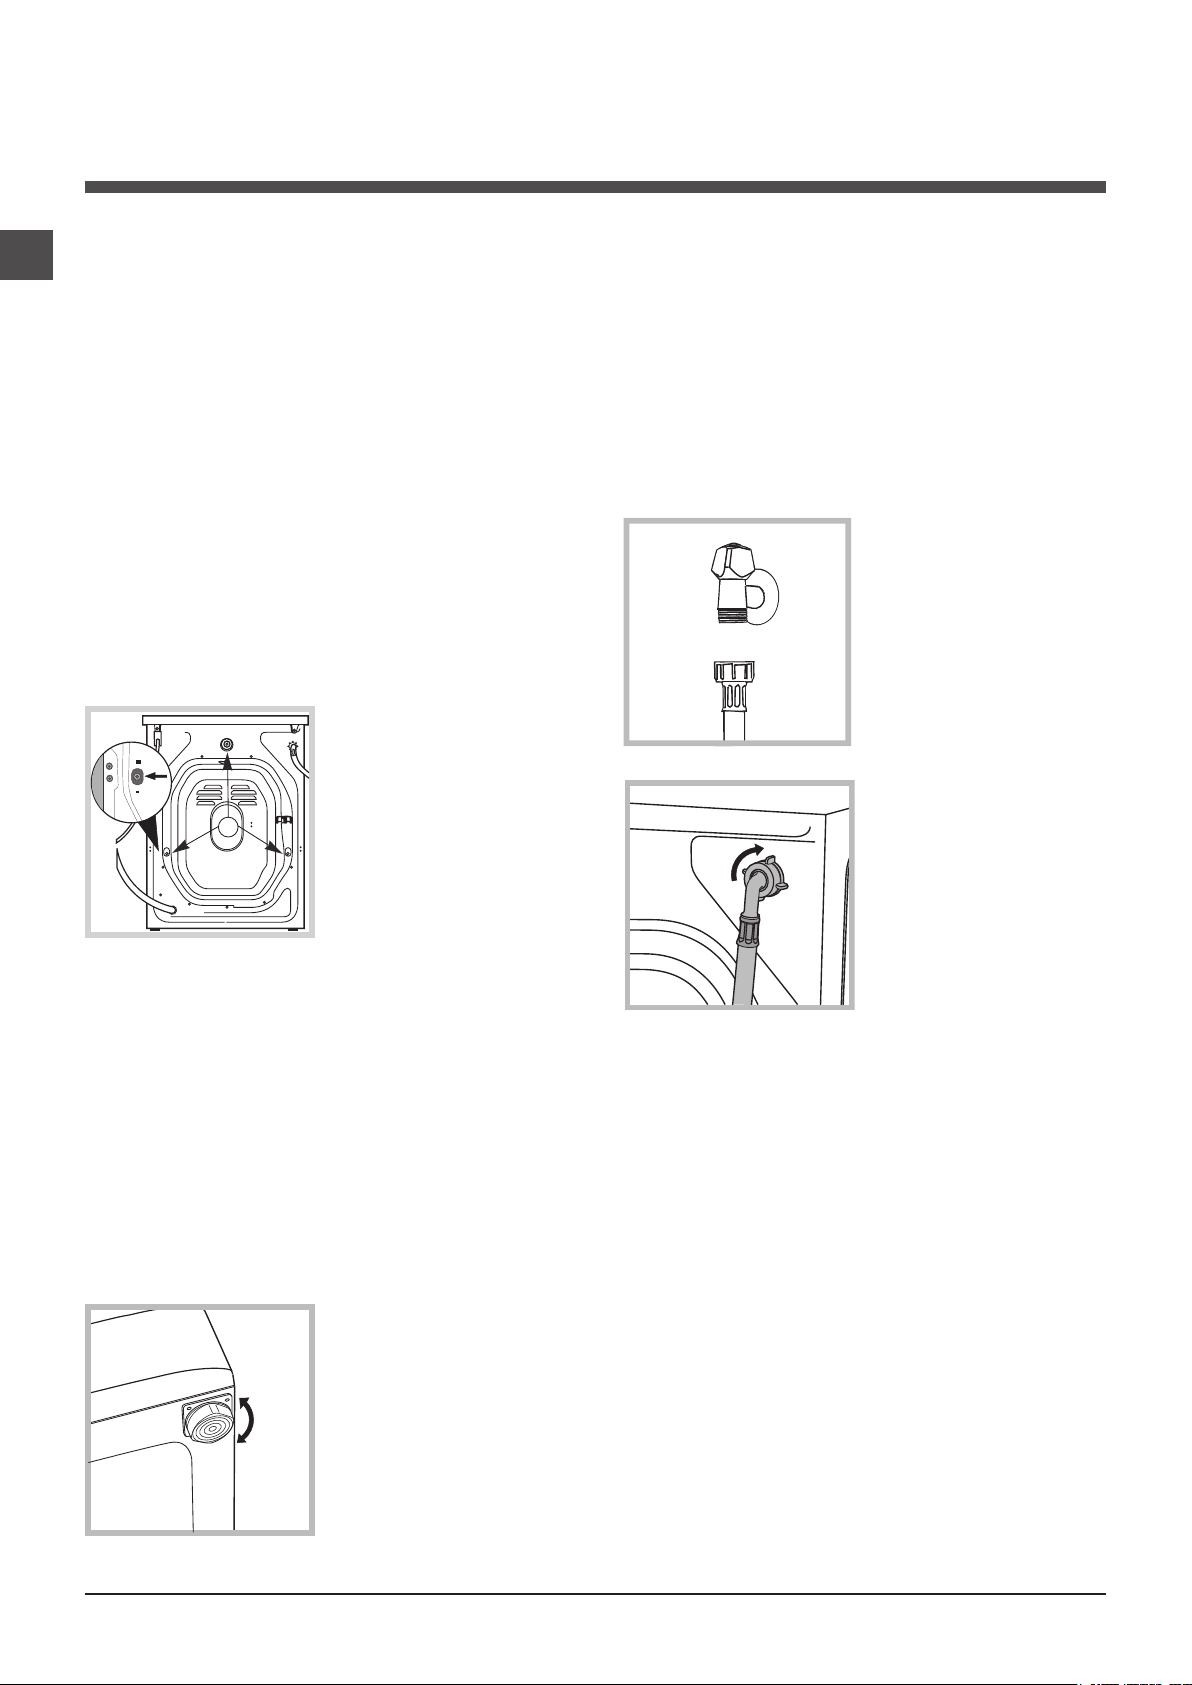
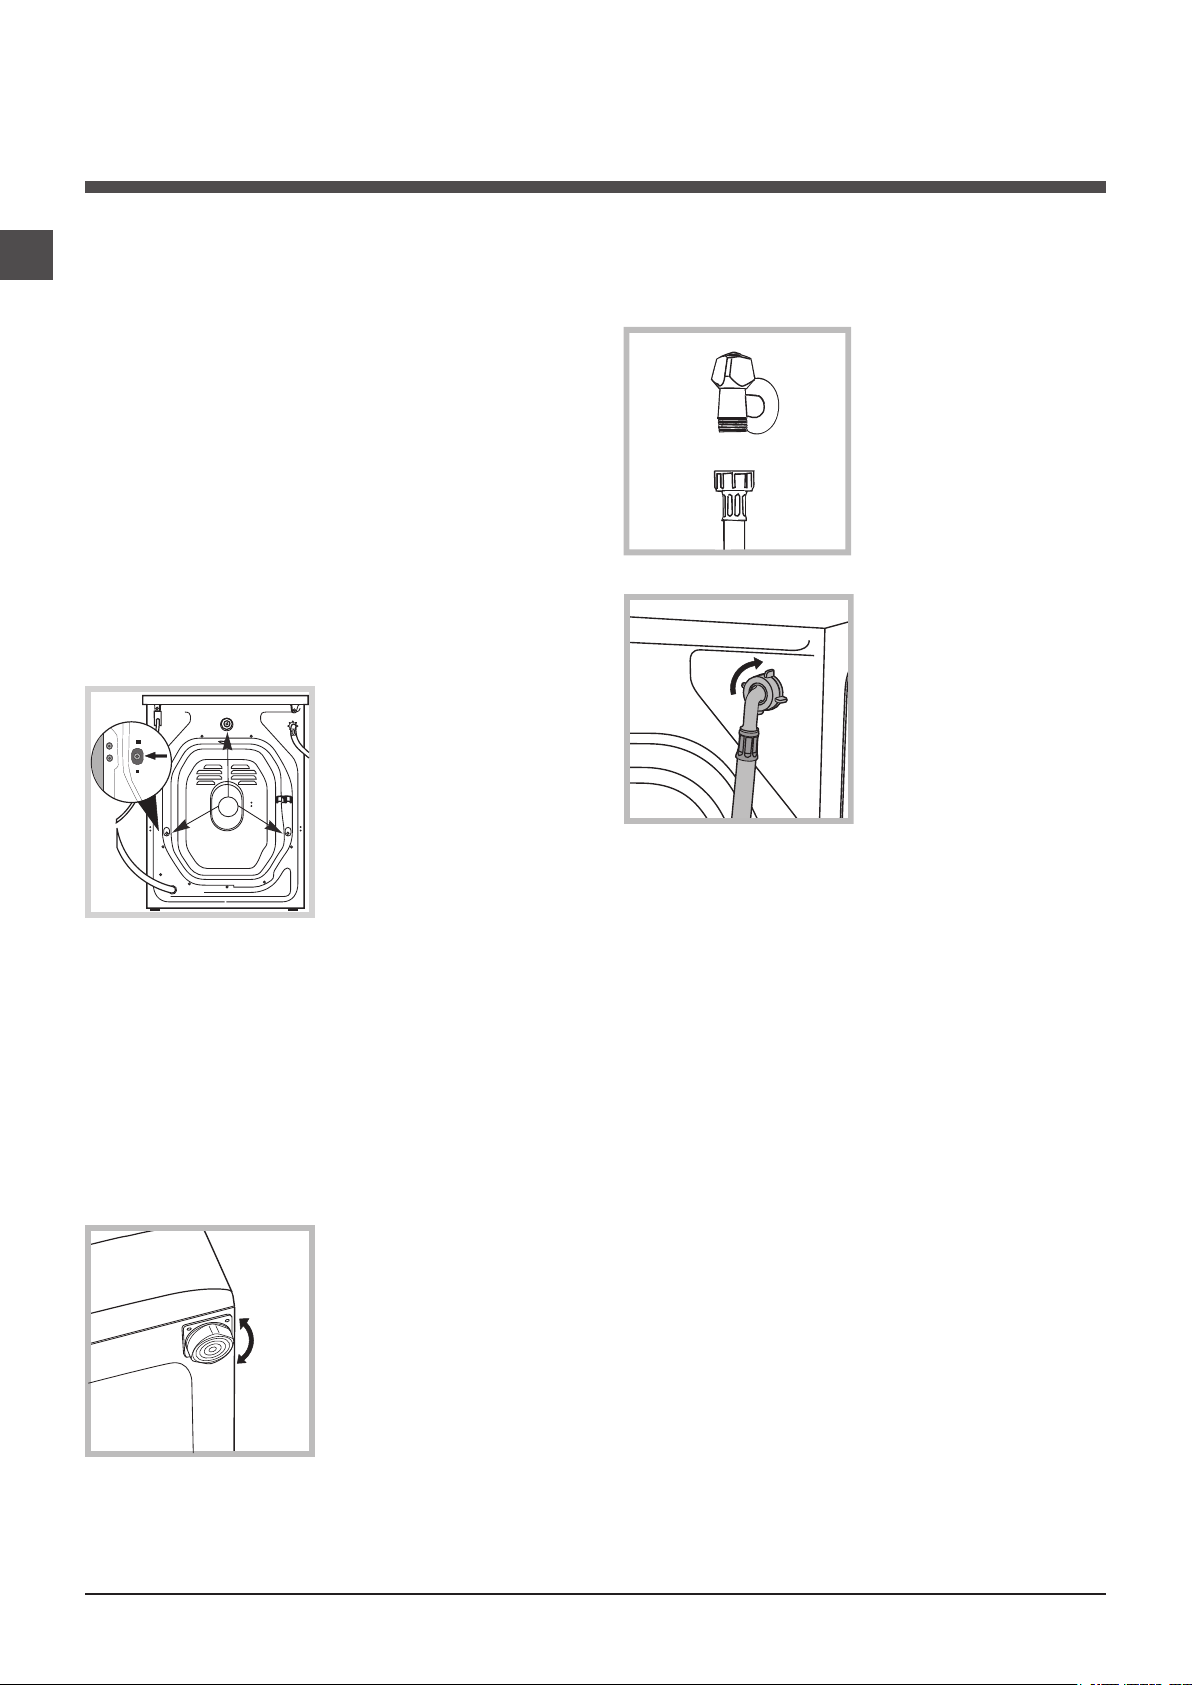
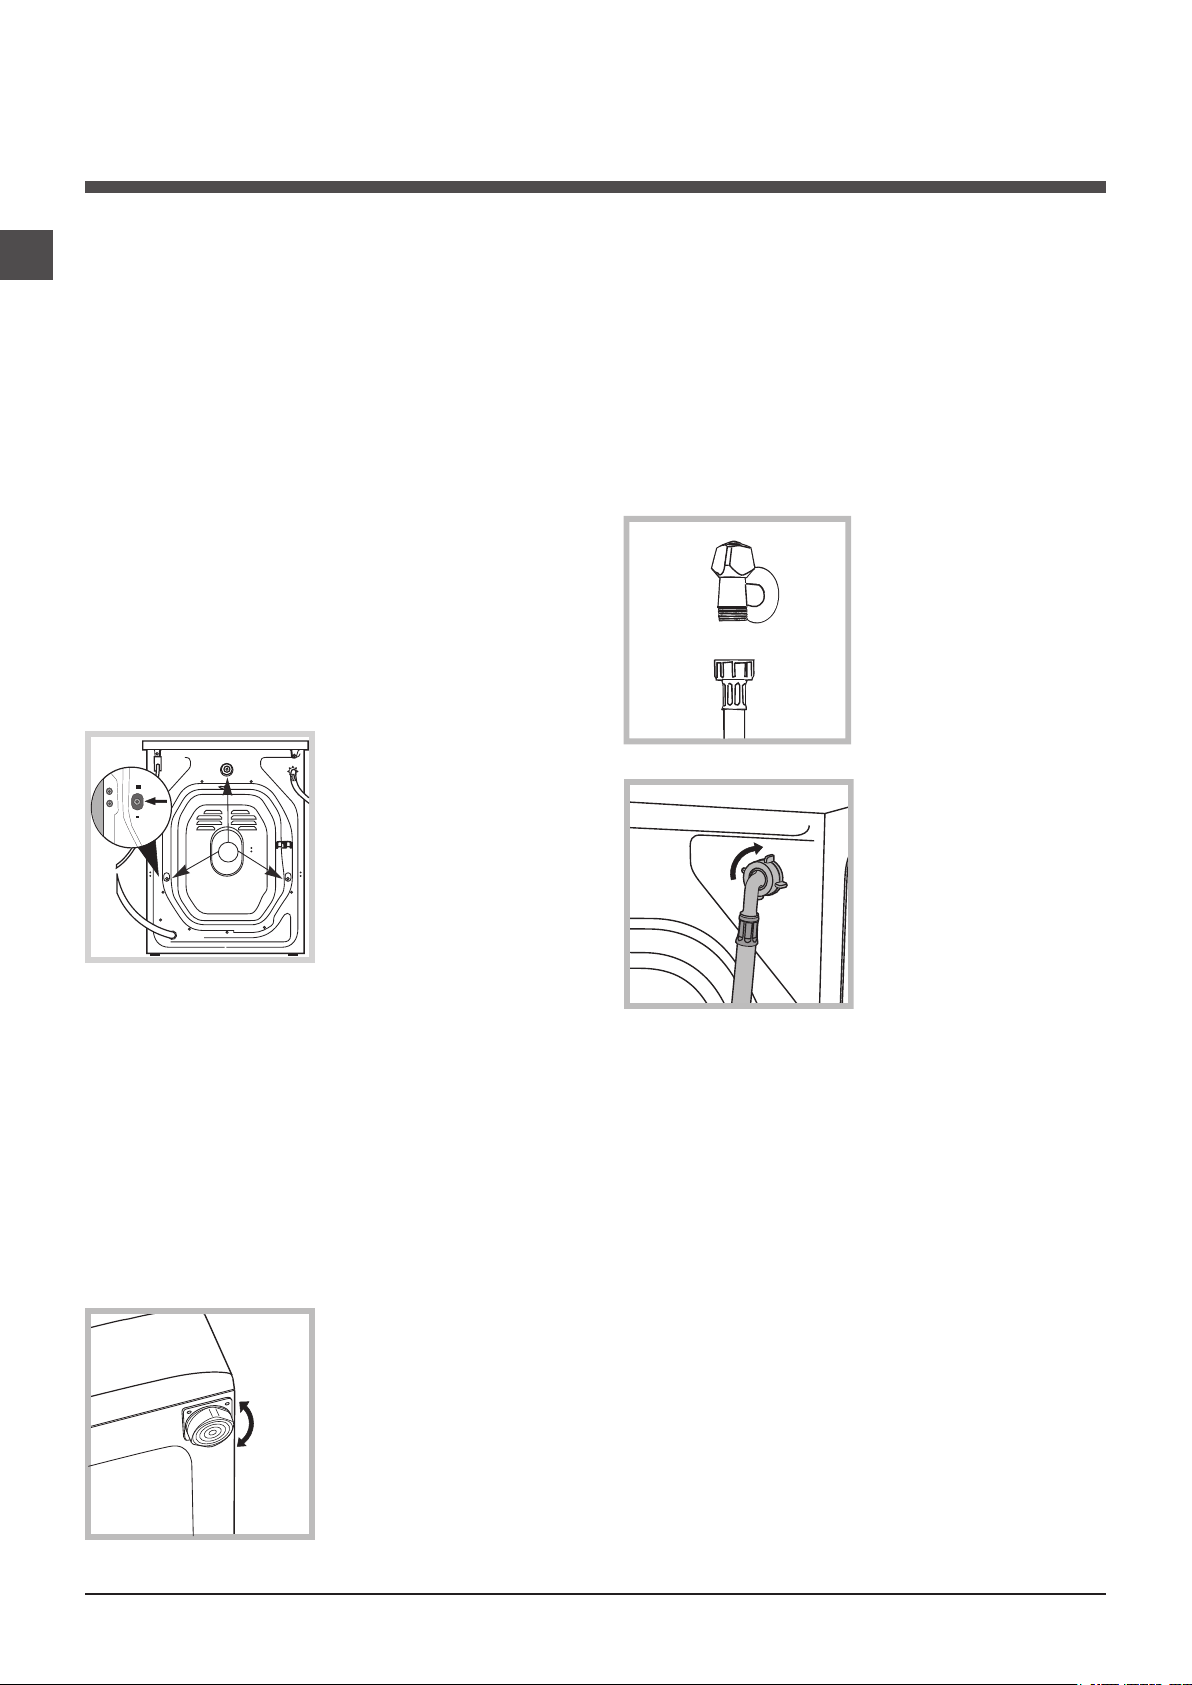
3. Remove the 3 protective
screws (used during transportation) and the rubber
washer with the corresponding spacer, located on the
rear part of the appliance
(see figure).
4. Close off the holes using the plastic plugs provided.
5. Keep all the parts in a safe place: you will need them
again if the washing machine needs to be moved to another location.
Levelling the machine correctly will provide it with stability,
help to avoid vibrations and excessive noise and prevent it
from shifting while it is operating. If it is placed on carpet or
a rug, adjust the feet in such a way as to allow a sufficient
ventilation space underneath the washing machine.
Connecting the electricity and water
supplies
Connecting the water inlet hose
1. Connect the supply pipe
by screwing it to a cold
water tab using a 3/4 gas
threaded connection (see
figure).
Before performing the connection, allow the water to
run freely until it is perfectly
clear.
2. Connect the inlet hose
to the washing machine by
screwing it onto the corresponding water inlet of the
appliance, which is situated on the top right-hand
side of the rear part of the
appliance (see figure).
3. Make sure that the hose is not folded over or bent.
! Packaging materials should not be used as toys for
children.
Levelling
1. Install the washing machine on a flat sturdy floor, without
resting it up against walls, furniture cabinets or anything
else.
2. If the floor is not perfectly
level, compensate for any
unevenness by tightening or
loosening the adjustable front
feet (see figure); the angle
of inclination, measured in
relation to the worktop, must
not exceed 2°.
2
! The water pressure at the tap must fall within the values
indicated in the Technical details table (see next page).
! If the inlet hose is not long enough, contact a specialised
shop or an authorised technician.
! Never use second-hand hoses.
! Use the ones supplied with the machine.
Page 3
65 - 100 cm
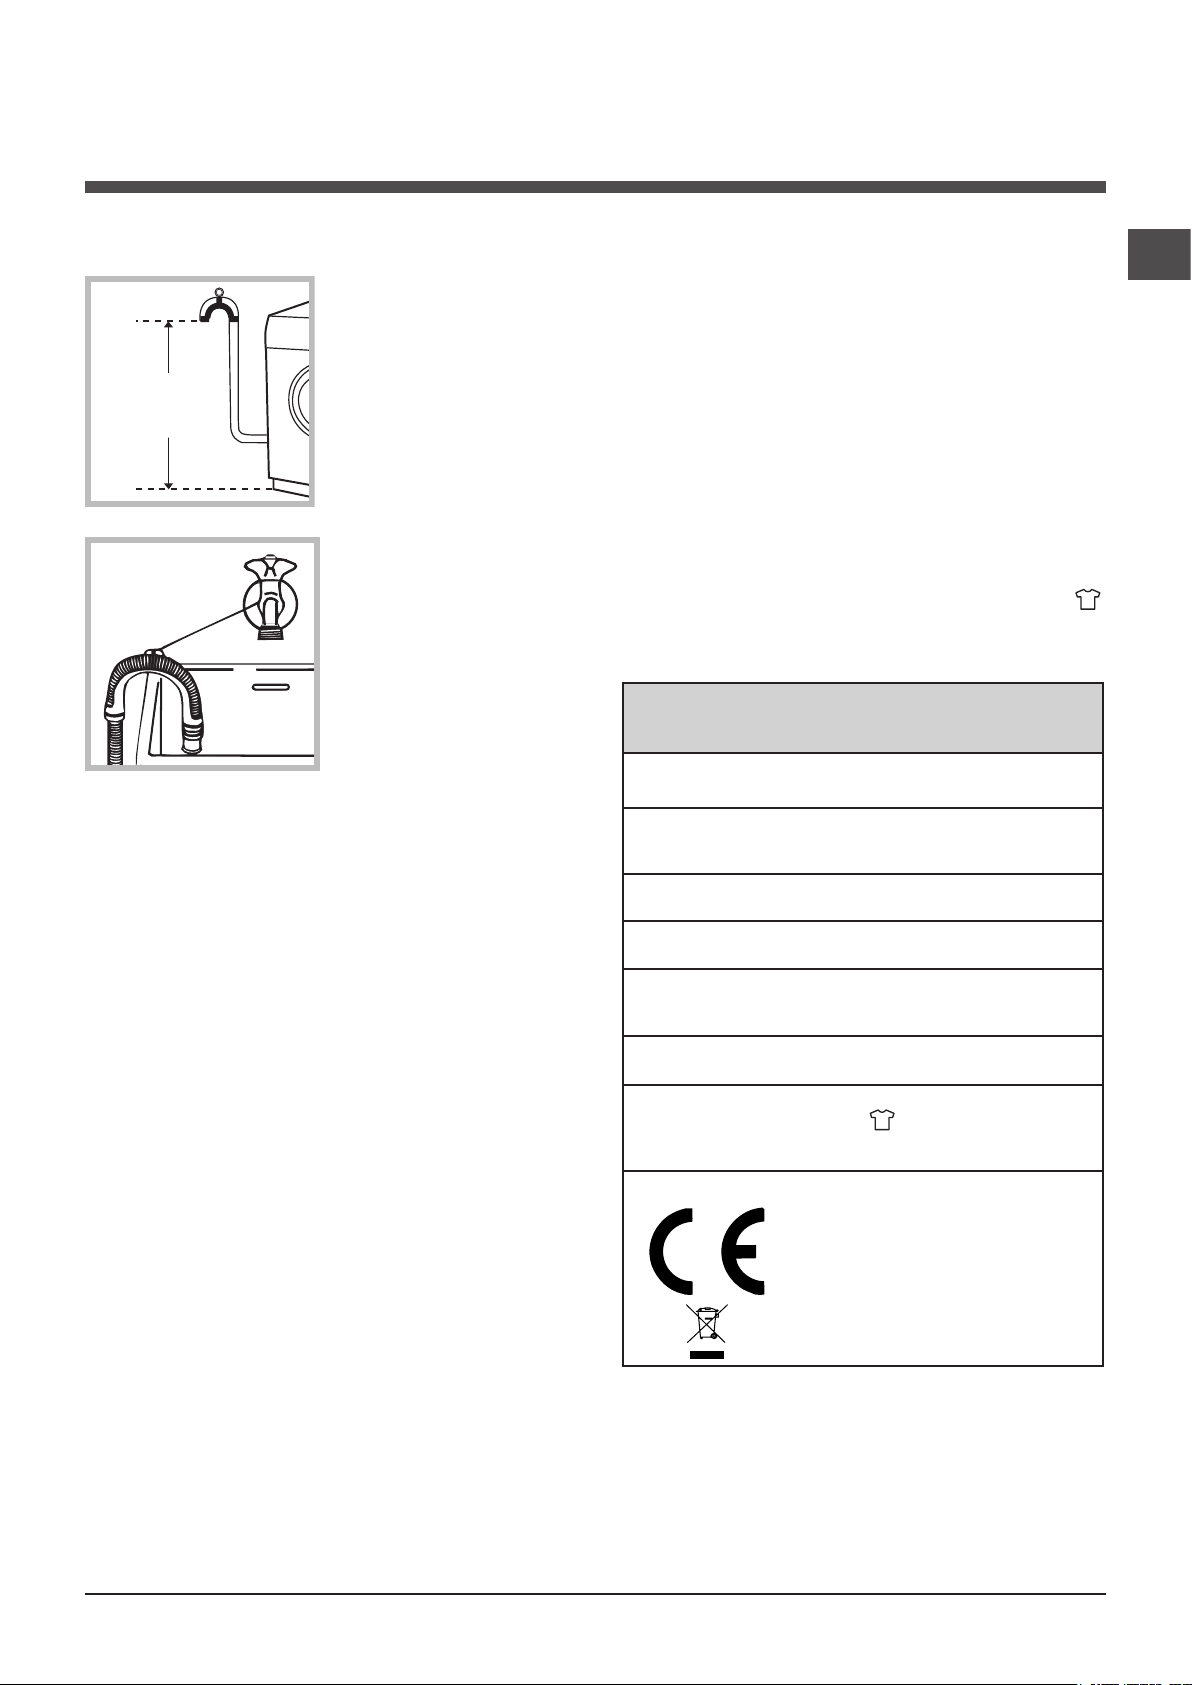
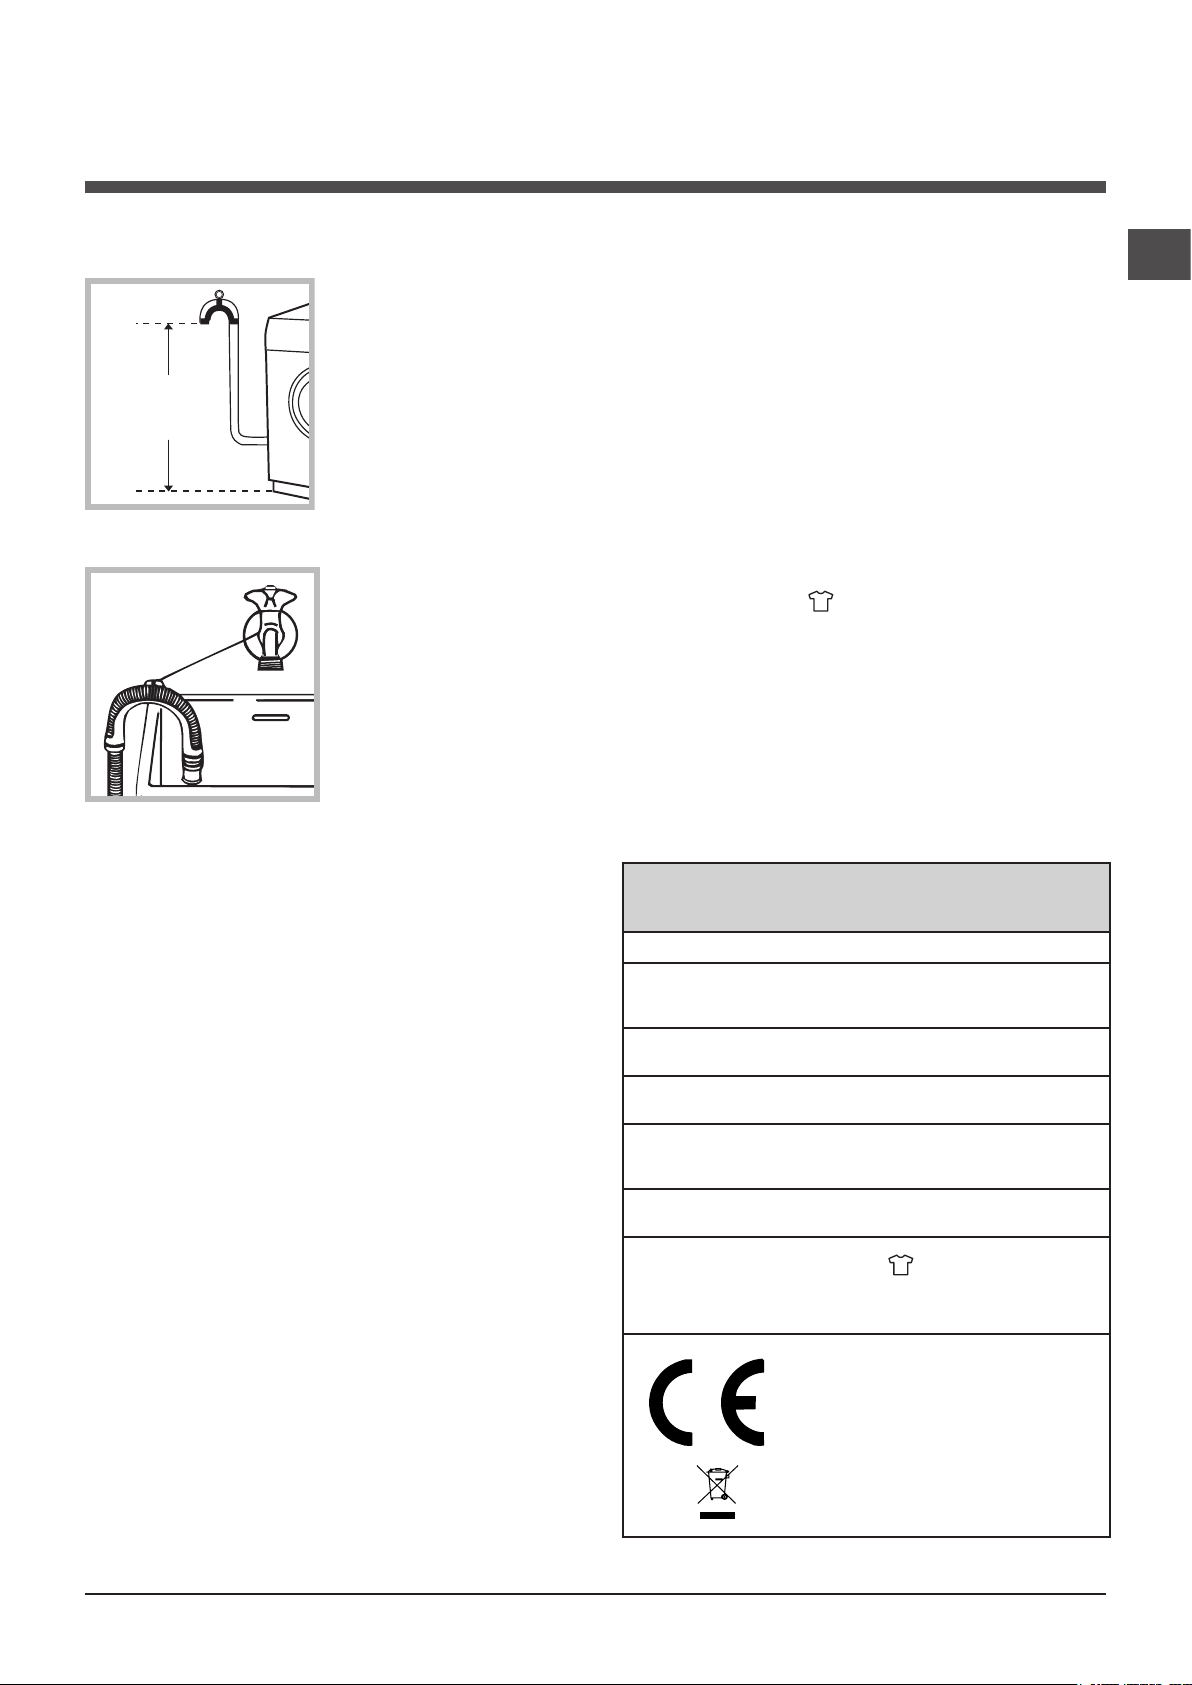
Connecting the drain hose
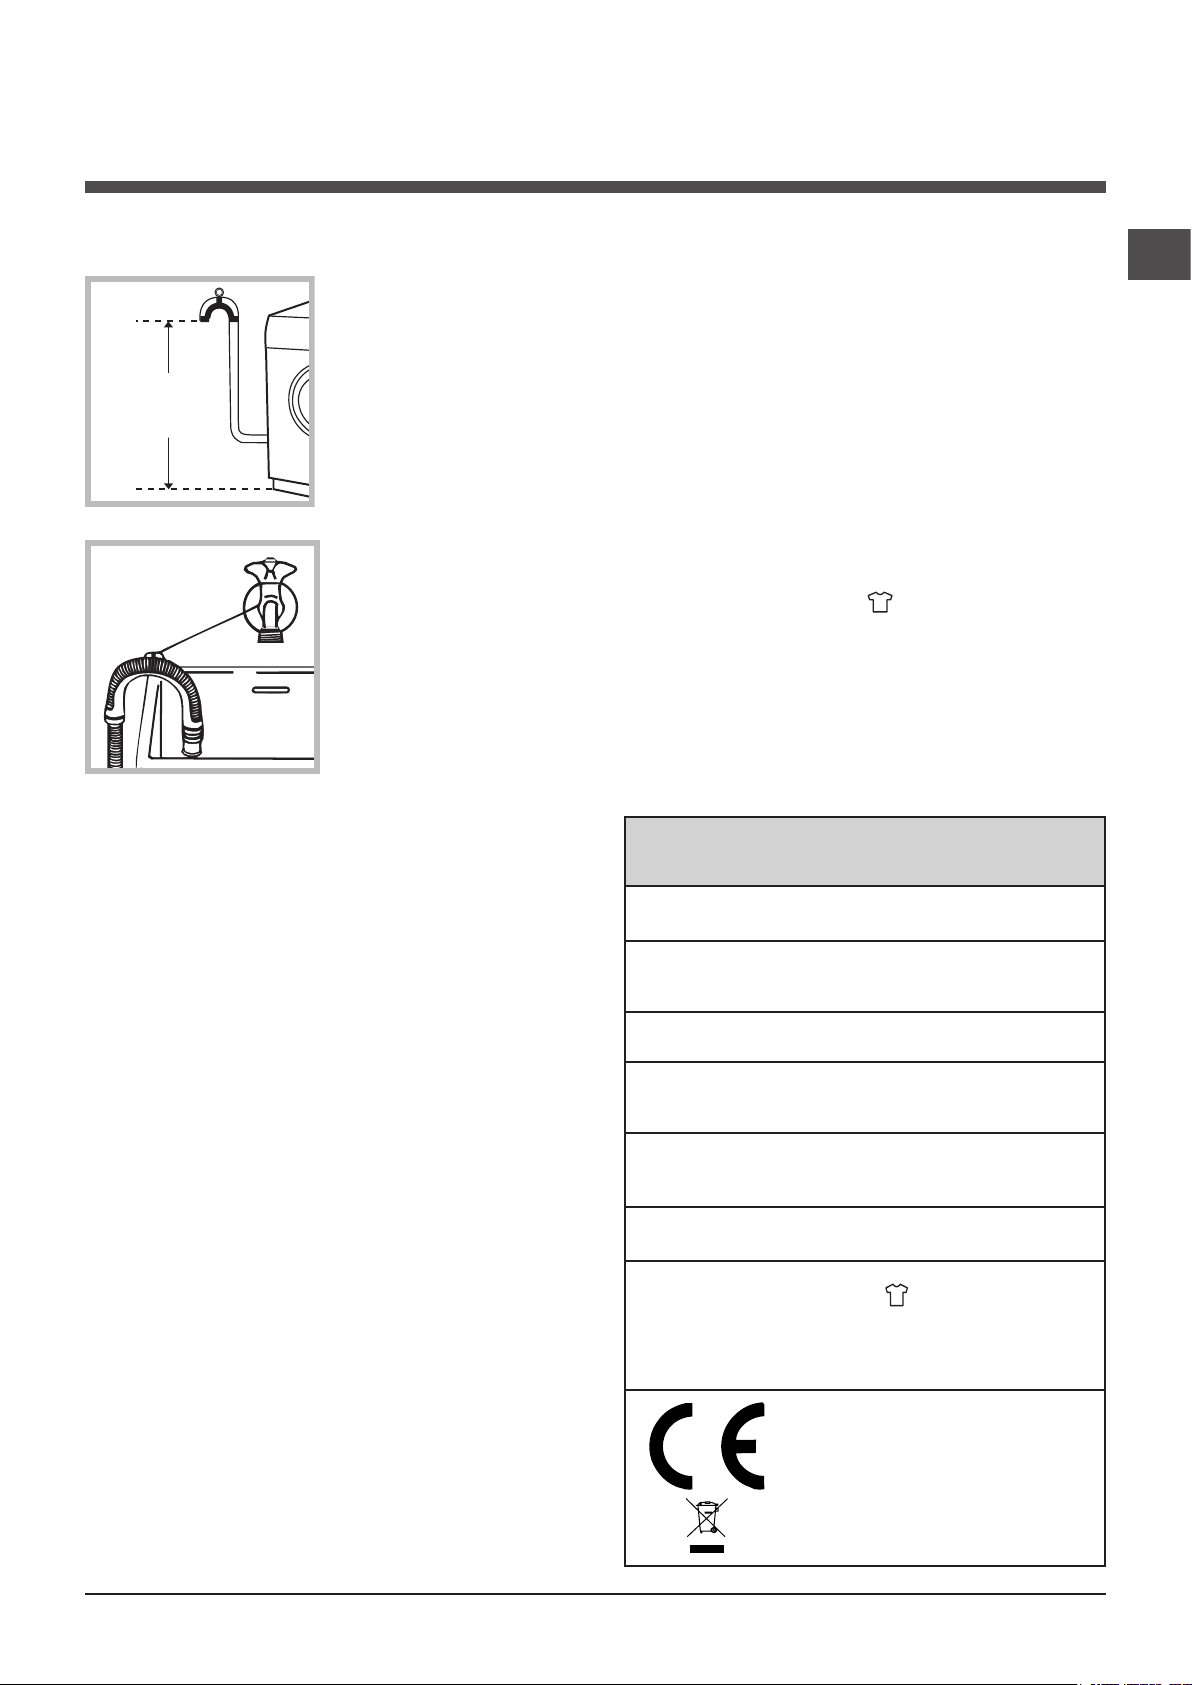
Connect the drain hose,
without bending it, to a drainage duct or a wall drain
located at a height between
65 and 100 cm from the
floor;
! Do not use extension cords or multiple sockets.
! The cable should not be bent or compressed.
! The power supply cable must only be replaced by autho-
rised technicians.
Warning! The company shall not be held responsible in the
event that these regulations are not respected.
The first wash cycle
GB
alternatively, rest it on
the side of a washbasin
or bathtub, fastening the
duct supplied to the tap
(see figure). The free end
of the hose should not be
underwater.
! We advise against the use of hose extensions; if it is
absolutely necessary, the extension must have the same
diameter as the original hose and must not exceed 150 cm
in length.
Electrical connections
Before plugging the appliance into the electricity socket,
make sure that:
• the socket is earthed and complies with all applicable
laws;
Once the appliance has been installed, and before you use
it for the first time, run a wash cycle with detergent and no
laundry, using the wash cycle .
Technical data
Model
Dimensions
Capacity
Electrical
connections
ECO6D 1291
width 59.5 cm
height 85 cm
depth 52,5 cm
from 1 to 6 kg
please refer to the technical data plate
fixed to the machine
• the socket is able to withstand the maximum power load
of the appliance as indicated in the Technical data table
(see opposite);
• the power supply voltage falls within the values indicated
in the Technical data table (see opposite);
• the socket is compatible with the plug of the washing
machine. If this is not the case, replace the socket or the
plug.
! The washing machine must not be installed outdoors,
even in covered areas. It is extremely dangerous to leave
the appliance exposed to rain, storms and other weather
conditions.
! When the washing machine has been installed, the elec-
tricity socket must be within easy reach.
Water connections
Spin speed
Energy rated
programmes
according to
regulation
2010/1061
maximum pressure 1 MPa (10 bar)
minimum pressure 0.05 MPa (0.5 bar)
drum capacity 46 litres
up to 1200 rotations per minute
programme
and 40° (By pressing the TEMPERATURE
button);
This appliance conforms to the following
EC Directives:
- 2004/108/EC (Electromagnetic Compatibility)
- 2006/95/EC (Low Voltage)
- 2002/96/EC
(90°); temperature 60°C
3
Page 4
Description of the washing
machine
GB
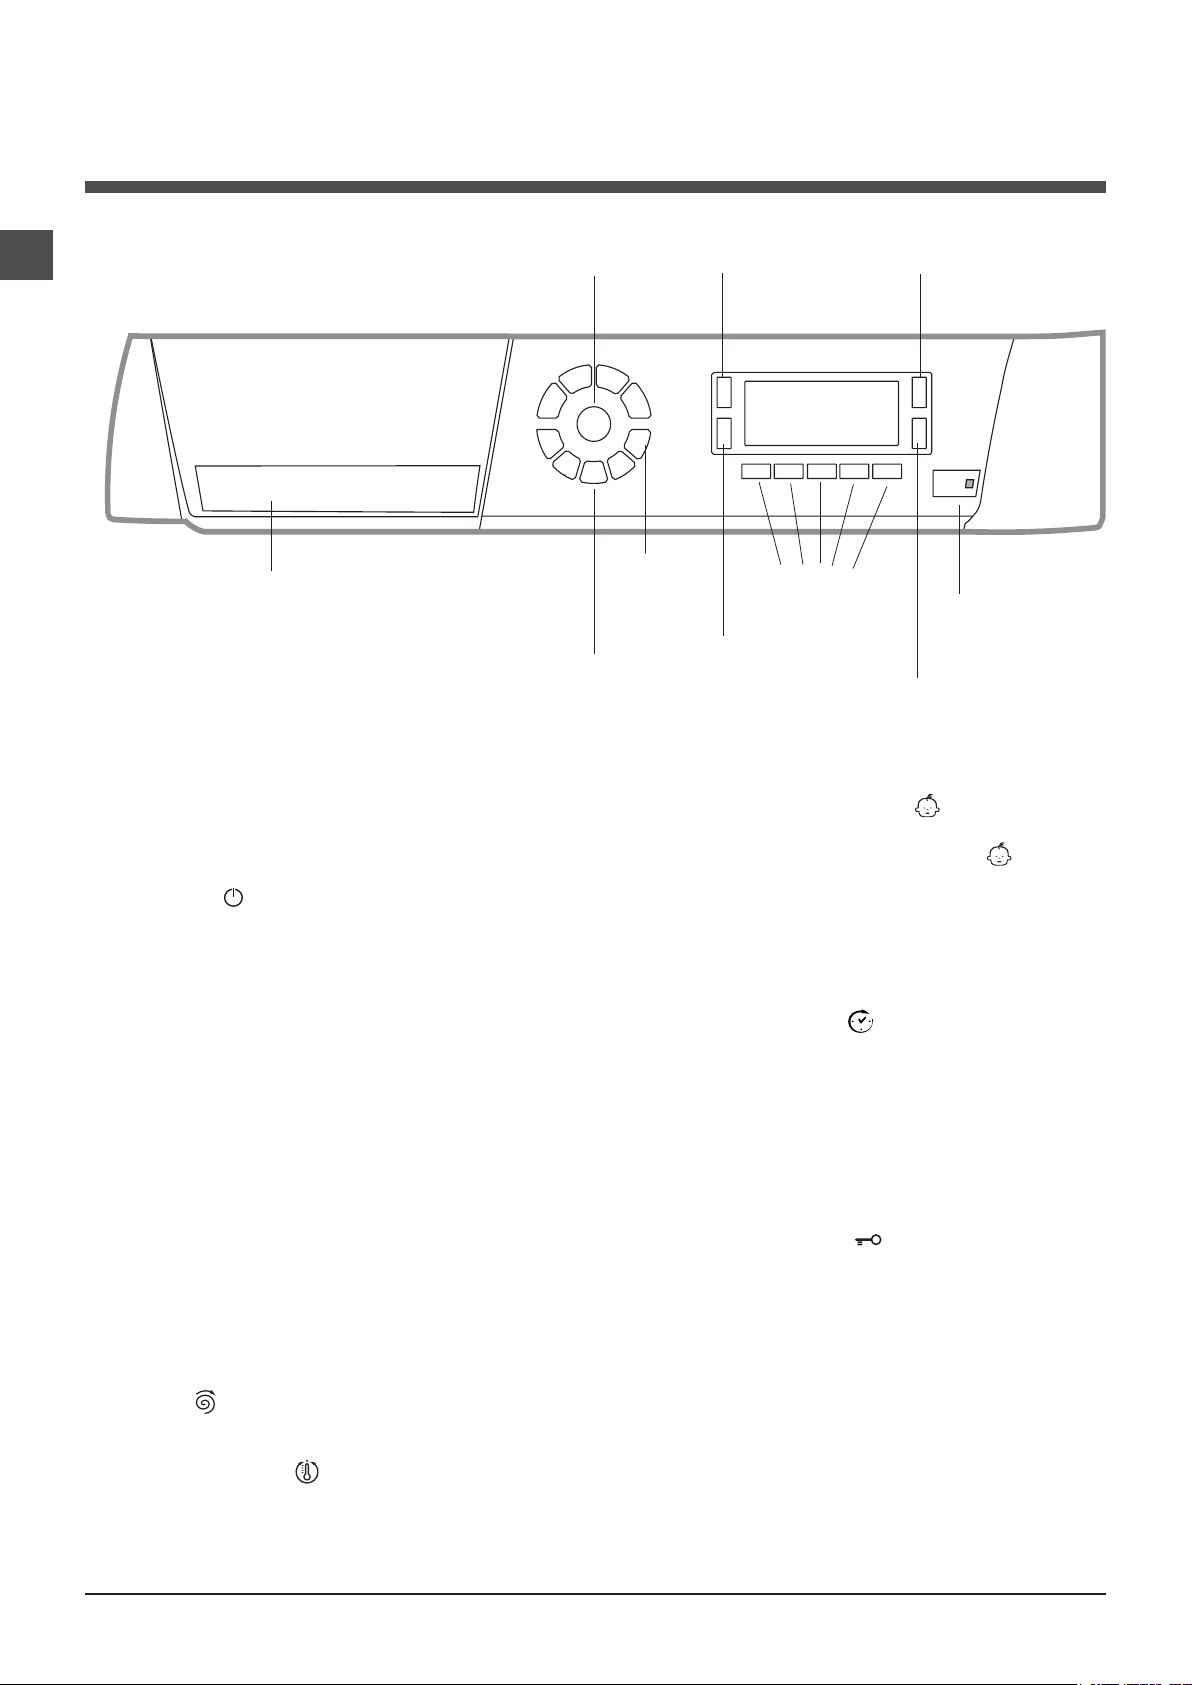
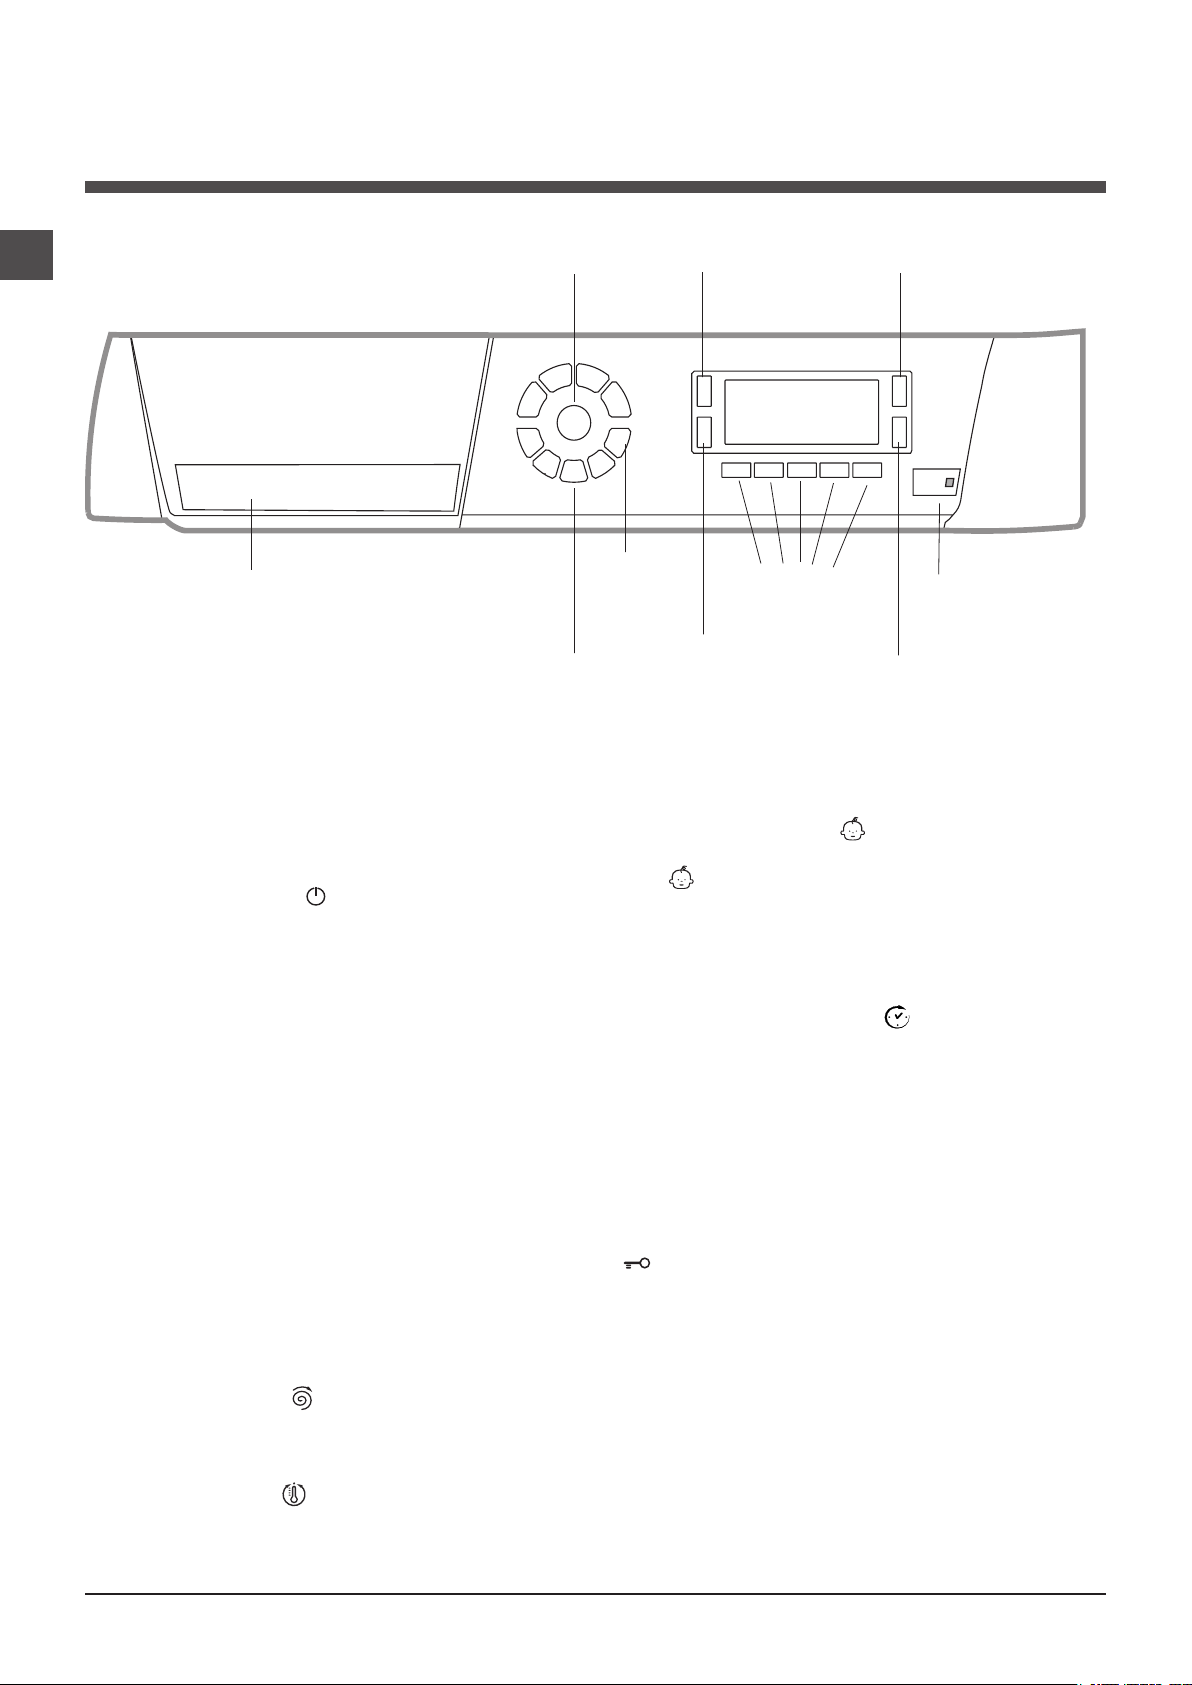
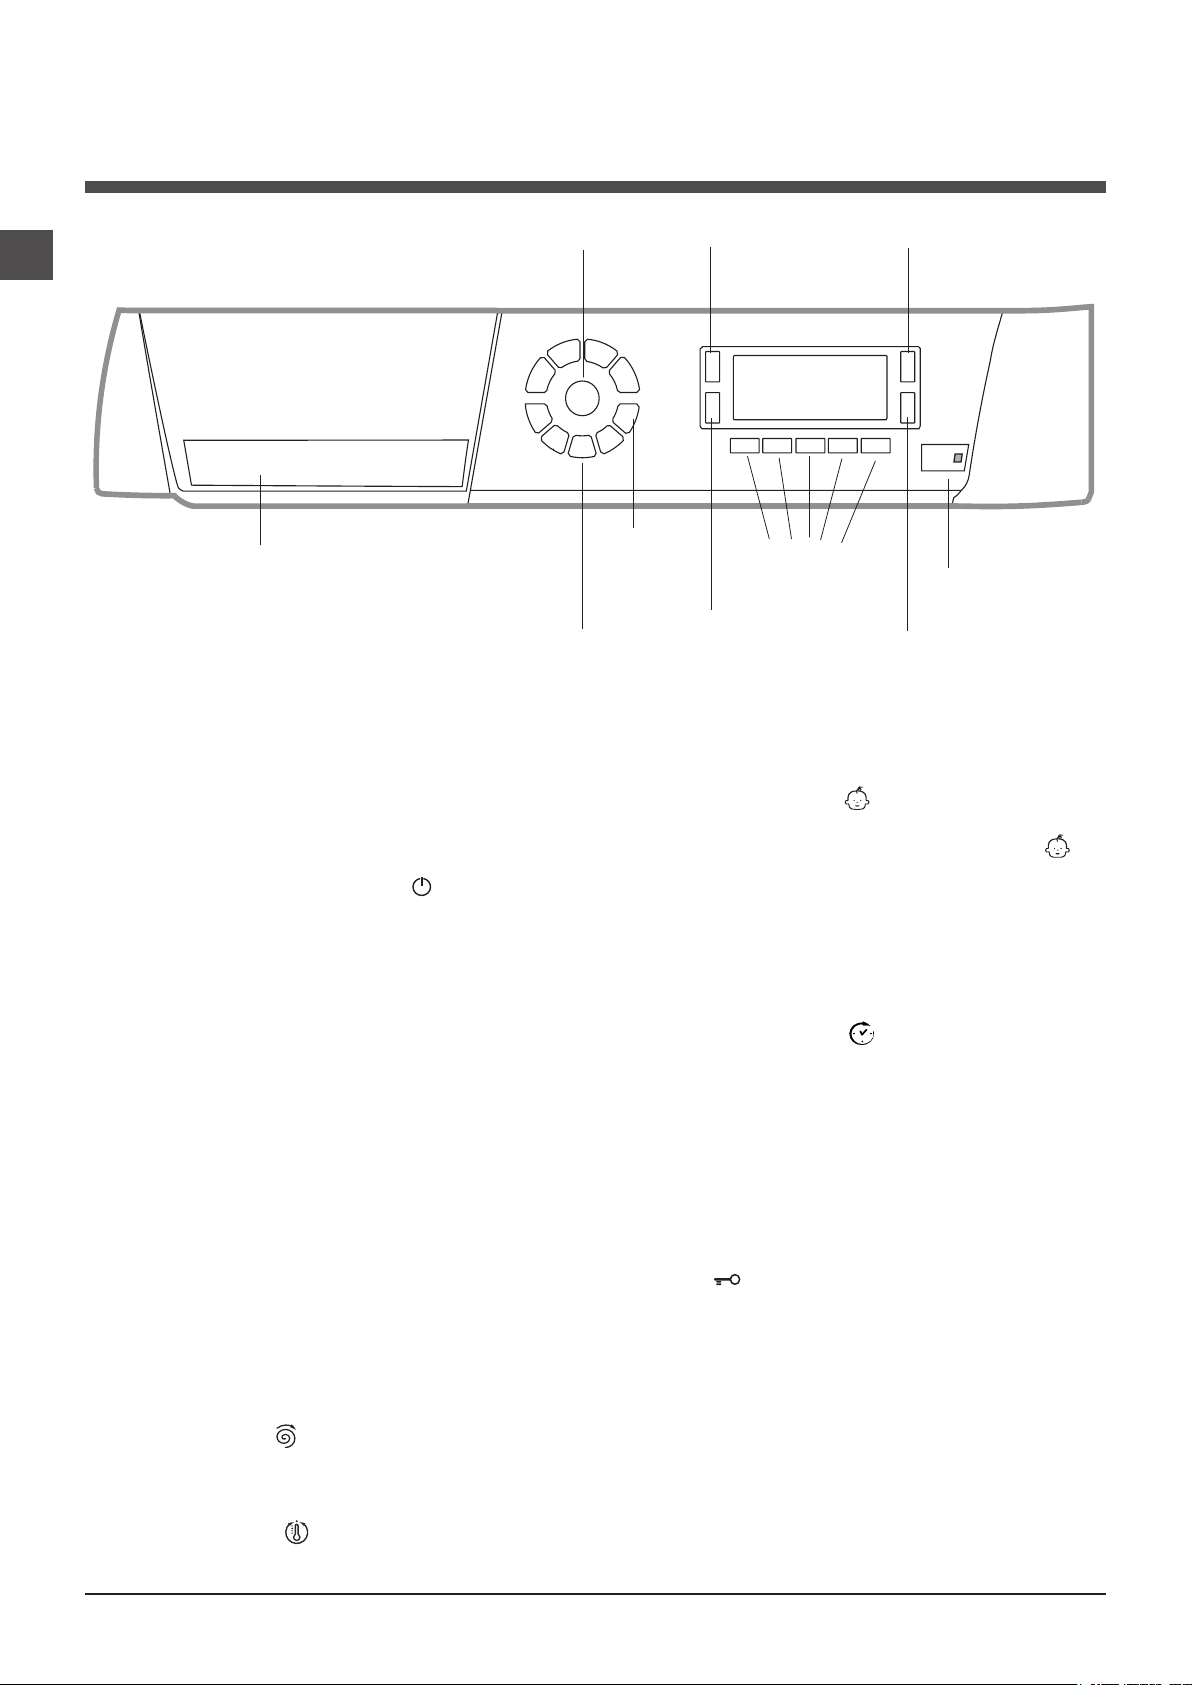
Control panel
ON/OFF
button
Detergent dispenser drawer
WASH
CYCLE
SELECTOR
Buttons
Detergent dispenser drawer: used to dispense
detergents and washing additives (see “Detergents and
laundry”).
ON/OFF button : press this briefly to switch the machine on or off. The START/PAUSE indicator light, which
flashes slowly in a green colour shows that the machine is
switched on. To switch off the washing machine during the
wash cycle, press and hold the button for approximately 2
seconds; if the button is pressed briefly or accidentally the
machine will not switch off. If the machine is switched off
during a wash cycle, this wash cycle will be cancelled.
CONTROL
PANEL
LOCK Button
DISPLAY
MEMORY
Button
DELAYED
START Button
CONTROL PANEL LOCK button : to activate
the control panel lock, press and hold the button for
approximately 2 seconds. When the symbol is
illuminated, the control panel is locked. This means it
is possible to prevent wash cycles from being modified
accidentally, especially where there are children in the
home. To deactivate the control panel lock, press and
hold the button for approximately 2 seconds.
DELAYED START button : press to set a delayed start
time for the selected wash cycle. The delay time will be
shown on the display.
FUNCTION
button s
SPIN SPEED
Button
START/PAUSE
button with
indicator light
TEMPERATURE
Button
WASH CYCLE SELECTOR buttons: used to set the
desired wash cycle (see “Table of wash cycles”).
MEMORY button: press and hold the button to store a
cycle with your own set of preferences in the memory of
the machine. To recall a previously stored cycle, press the
MEMORY button.
FUNCTION buttons: press the button to select the
desired function. The corresponding indicator light on the
display will switch on.
SPIN button : press to reduce or completely exclude
the spin cycle - the value is indicated on the display.
TEMPERATURE button : press to decrease the temperature: the value will be shown on the display.
4
START/PAUSE button with indicator light: when the gre-
en indicator light flashes slowly, press the button to start a
wash cycle. Once the cycle has begun the indicator light
will remain lit in a fixed manner. To pause the wash cycle,
press the button again; the indicator light will flash in an
orange colour. If the symbol is not illuminated, the door
may be opened. To start the wash cycle from the point at
which it was interrupted, press the button again.
Standby mode
This washing machine, in compliance with new energy saving regulations, is fitted with an automatic standby system
which is enabled after about 30 minutes if no activity is
detected. Press the ON-OFF button briefly and wait for the
machine to start up again.
Page 5
Display
GB
F
Z
B
A
C
F
L
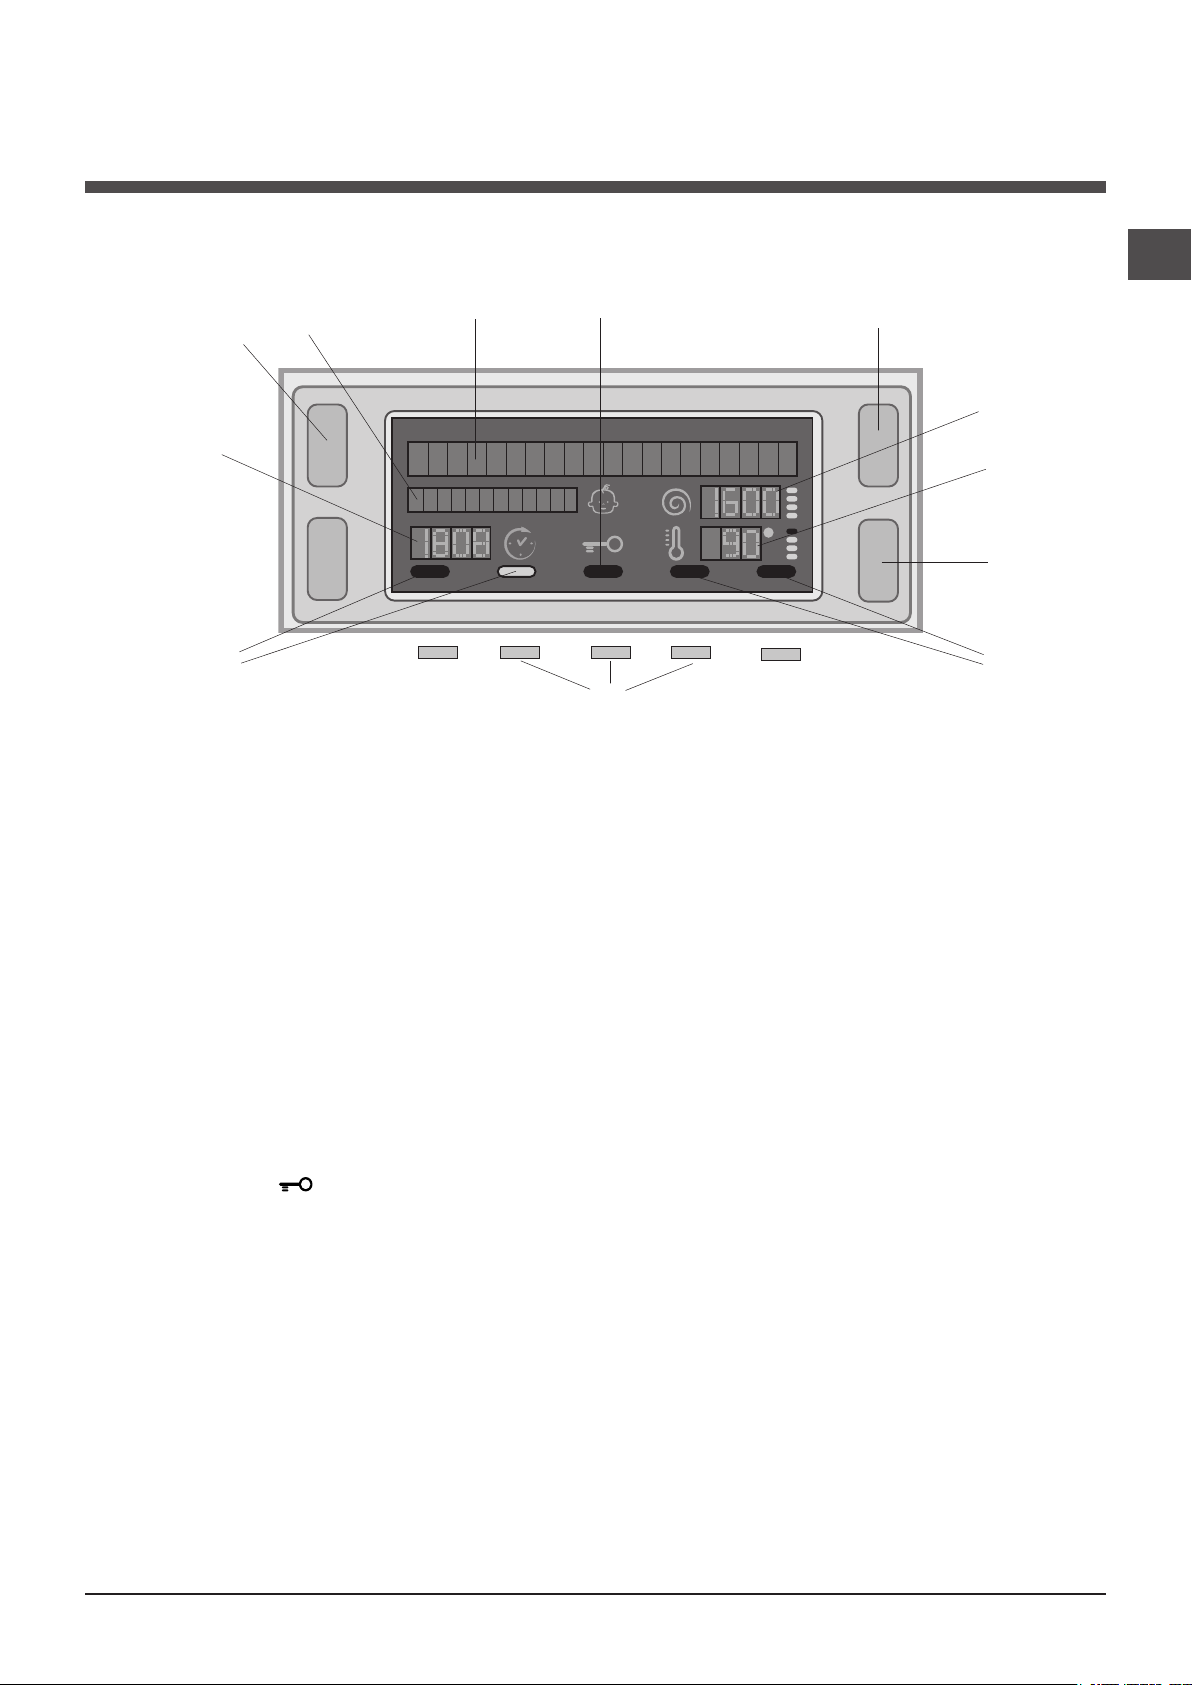
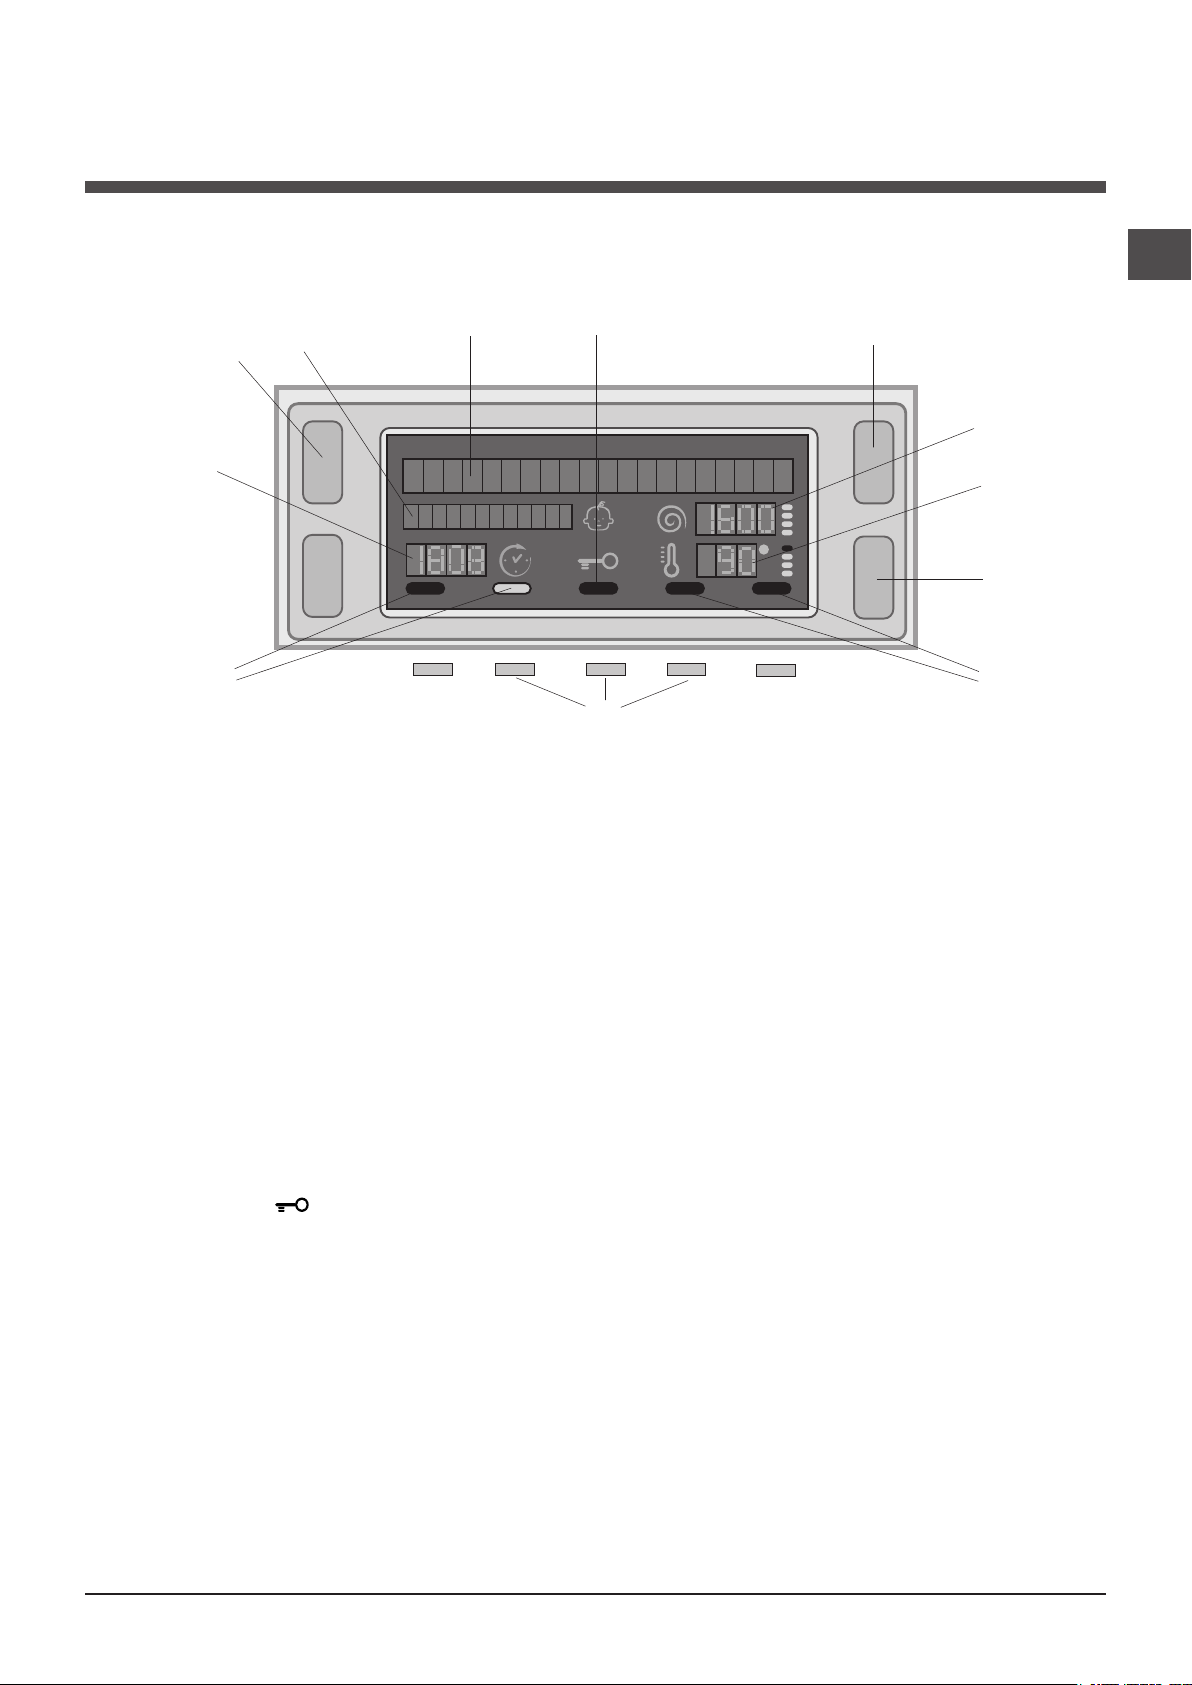
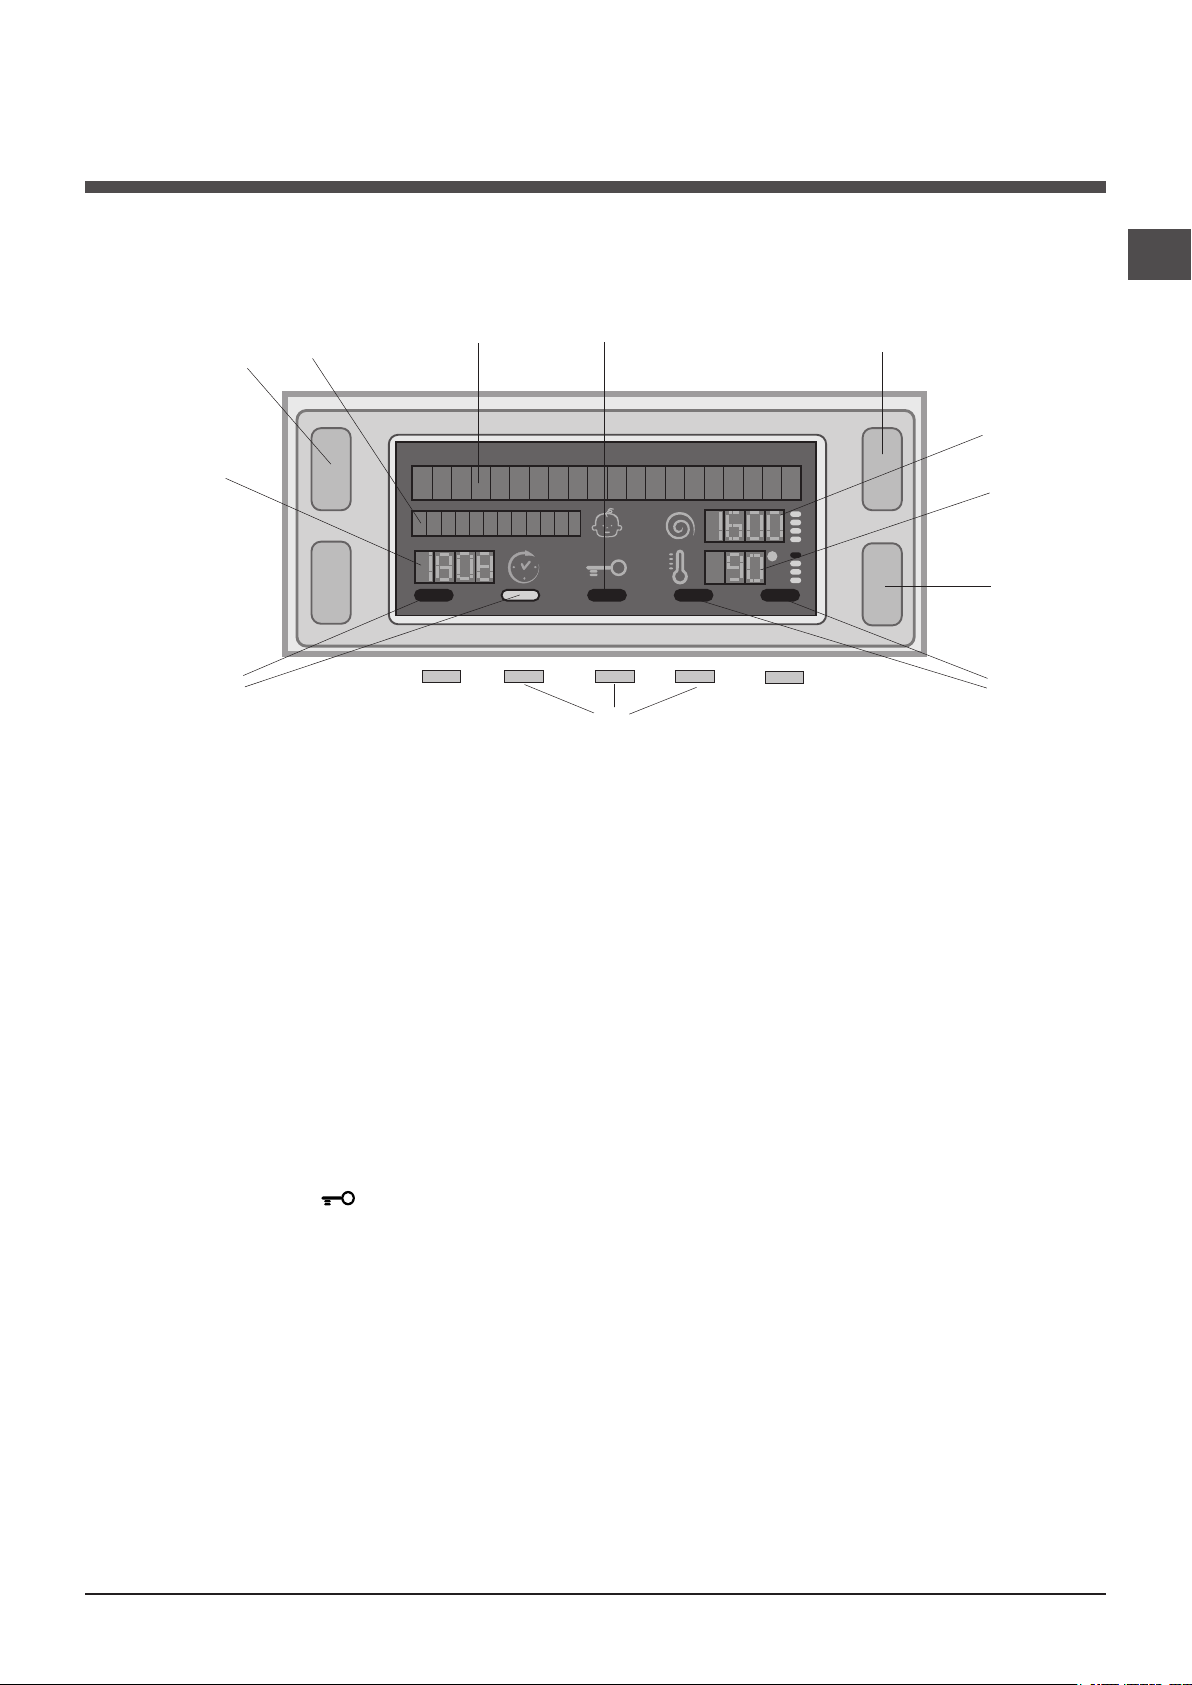
The display is useful when programming the machine and provides a great deal of information.
X
D
E
Y
F
The two upper strings A and B provide details of the wash cycle selected, the wash cycle phase in progress and all information relating to the progress status of the wash cycle.
String C shows the time remaining until the end of the wash cycle in progress and, if a DELAYED START has been set, the
time remaining until the start of the selected wash cycle.
String D shows the maximum spin speed value (this depends on the selected wash cycle); if the wash cycle does not include
a spin cycle, the string remains unused.
String E shows the maximum temperature value which may be selected (this depends on the wash cycle used); if the temperature of the wash cycle cannot be modified, the string remains unused.
Indicator lights F correspond to the functions and light up when the selected function is compatible with the set wash cycle.
Door locked symbol
If the symbol is lit, this indicates that the washing machine door is blocked to prevent it from being opened accidentally. To
prevent any damage from occurring, wait for the symbol to switch itself off before opening the appliance door.
N.B.: if the DELAYED START function has been activated, the door cannot be opened; pauses the machine by pressing the
START/PAUSE button if you wish to open it.
! The first time the machine is switched on, you will be asked to select the language and the display will automatically show
the language selection menu.
To select the desired language press the X and Y buttons; to confirm the selection press the Z button.
If you wish to change the selected language, simultaneously press and hold all the three buttons marked with an L in the
figure, until you hear a beep. Switch the machine on again; the language selection menu will be displayed.
5
Page 6
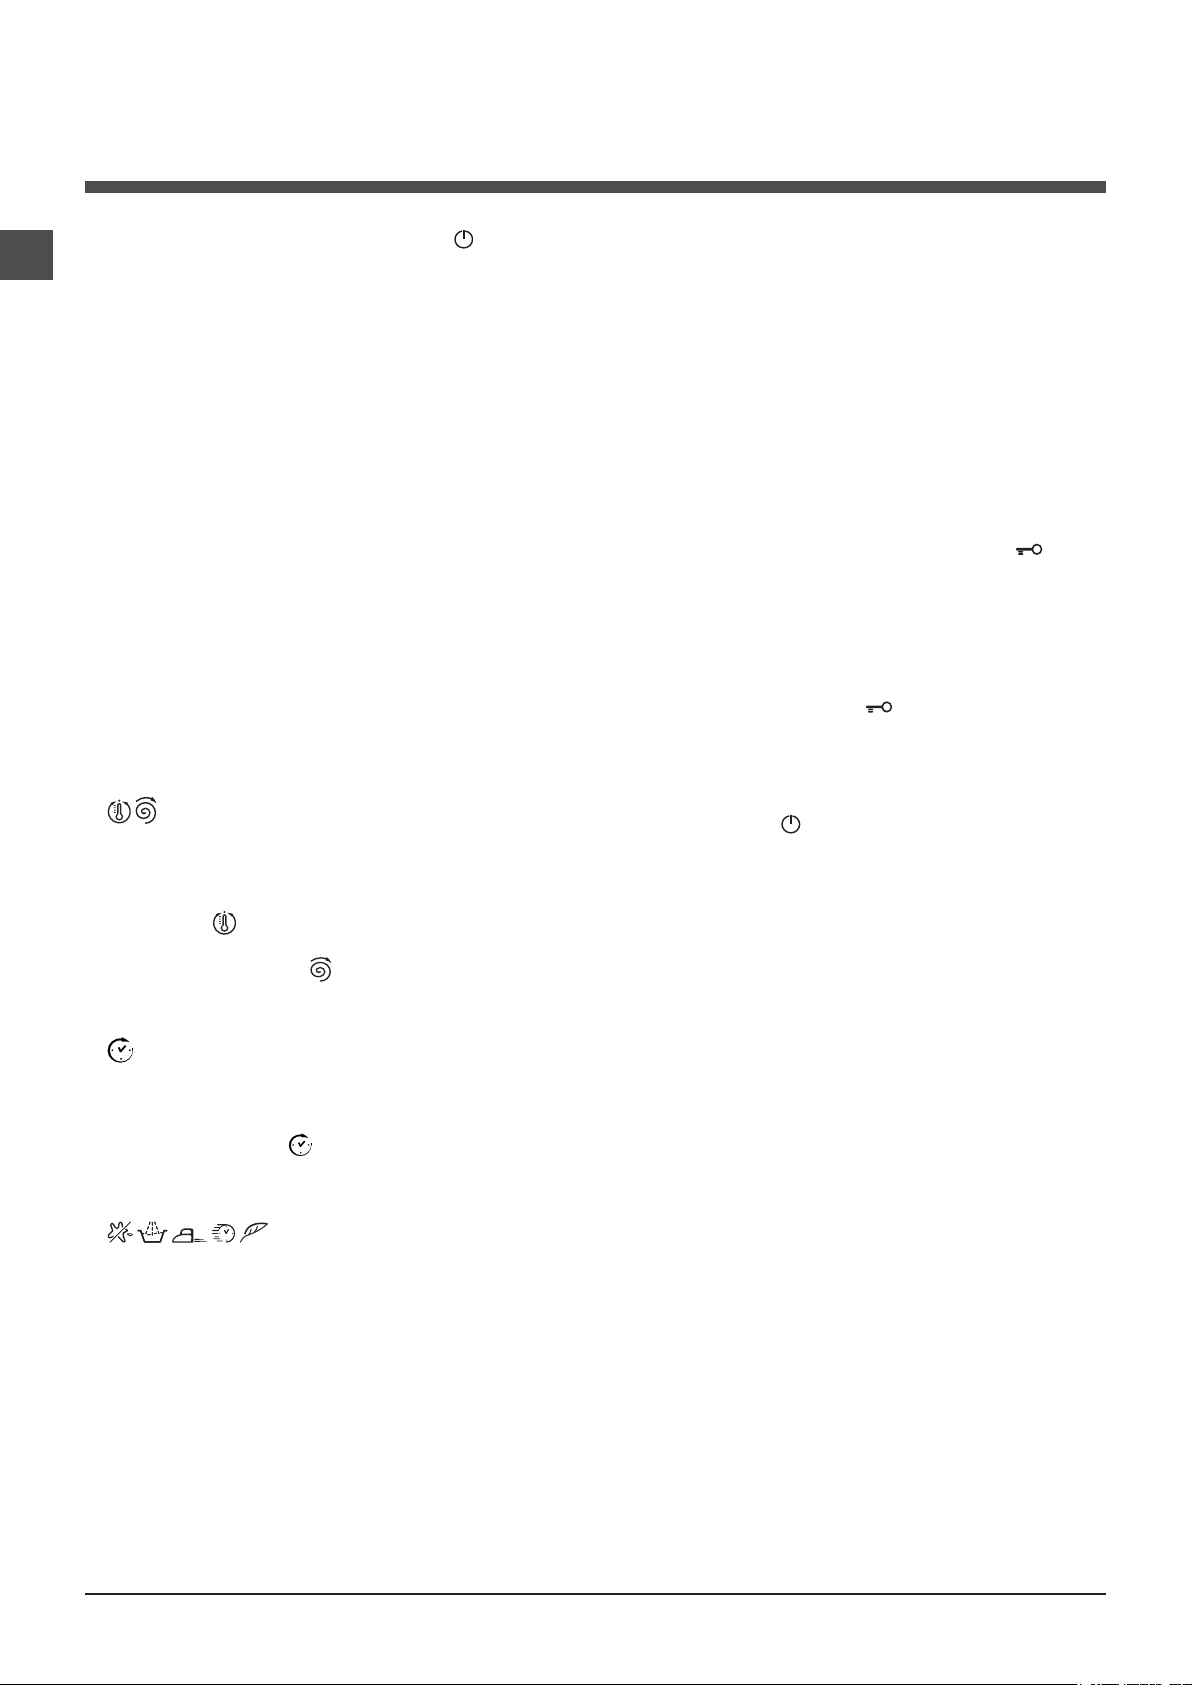
Running a wash cycle
GB
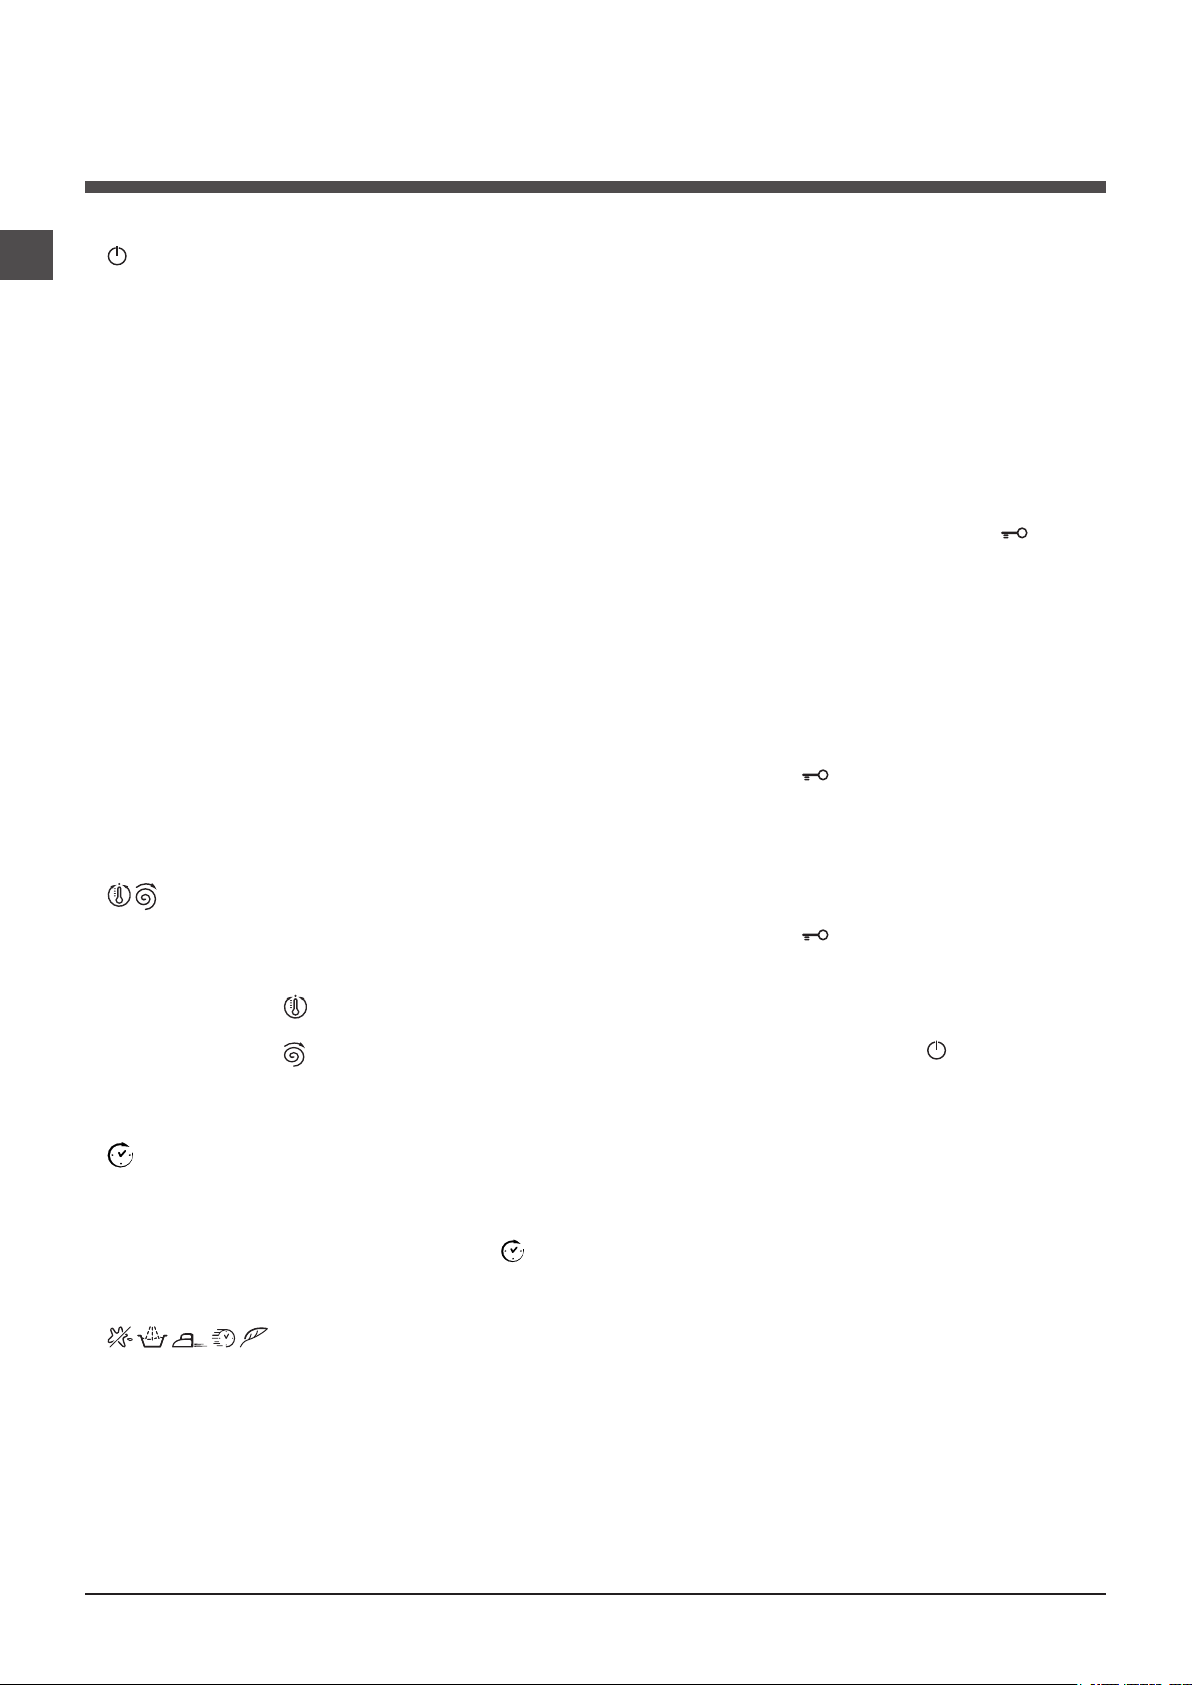
1. SWITCH THE MACHINE ON. Press the button; the
text WELCOME will appear on the display and the START/
PAUSE indicator light will flash slowly in a green colour.
2. LOAD THE LAUNDRY. Open the porthole door.
Load the laundry, making sure you do not exceed
the maximum load value indicated in the table of
programmes on the following page.
3. MEASURE OUT THE DETERGENT. Pull out the
detergent dispenser drawer and pour the detergent into
the relevant compartments as described in “Detergents
and laundry”.
4. CLOSE THE DOOR.
5. SELECT THE WASH CYCLE. Press one of the WASH
CYCLE SELECTOR buttons to select the required wash
cycle; the name of the wash cycle will appear on the
display. A temperature and spin speed is set for each
wash cycle; these may be adjusted. The duration of the
cycle will appear on the display.
6. CUSTOMISE THE WASH CYCLE. Use the relevant
buttons:
Modifying the temperature and/or spin
speed. The machine automatically selects the
maximum temperature and spin speed set for the
selected wash cycle; these values cannot therefore
be increased. The temperature can be decreased by
pressing the button, until the cold wash “OFF”
setting is reached. The spin speed may be progressively
reduced by pressing the button, until it is completely
excluded (the “OFF” setting). If these buttons are
pressed again, the maximum values are restored.
! The functions may affect the recommended load value
and/or the duration of the cycle.
7. START THE PROGRAMME. Press the START/PAUSE
button. The corresponding indicator light will become
green, remaining lit in a fixed manner, and the door will
be locked (the DOOR LOCKED symbol will be on). During
the wash cycle, the name of the phase in progress will
appear on the display. To change a wash cycle while it is in
progress, pause the washing machine using the START/
PAUSE button (the START/PAUSE indicator light will flash
slowly in an orange colour); then select the desired cycle
and press the START/PAUSE button again.
To open the door while a cycle is in progress, press the
START/PAUSE button; if the DOOR LOCKED symbol
is switched off the door may be opened. Press the START/
PAUSE button again to restart the wash cycle from the
point at which it was interrupted.
8. THE END OF THE WASH CYCLE. This will be
indicated by the text “END OF CYCLE” on the display;
when the DOOR LOCKED symbol switches off
the door may be opened. Open the door, unload the
laundry and switch off the machine.
! If you wish to cancel a cycle which has already begun,
press and hold the button. The cycle will be stopped
and the machine will switch off.
Setting a delayed start.
To set a delayed start for the selected programme,
press the corresponding button repeatedly until the
required delay period has been reached. When this
option is enabled, the symbol lights up on the
display. To remove the delayed start function press the
button until the text “OFF” appears on the display.
Modifying the cycle settings.
• Press the button to enable the function; the indicator
light corresponding to the button will switch on.
• Press the button again to disable the function; the
indicator light will switch off.
! If the selected function is not compatible with the
programmed wash cycle, the indicator light will flash
and the function will not be activated.
! If the selected function is not compatible with
another function which has been selected previously,
the indicator light corresponding to the first function
selected will flash and only the second function will
be activated; the indicator light corresponding to the
enabled function will remain lit.
6
Page 7
Wash cycles and functions
M
AX
1
3
2
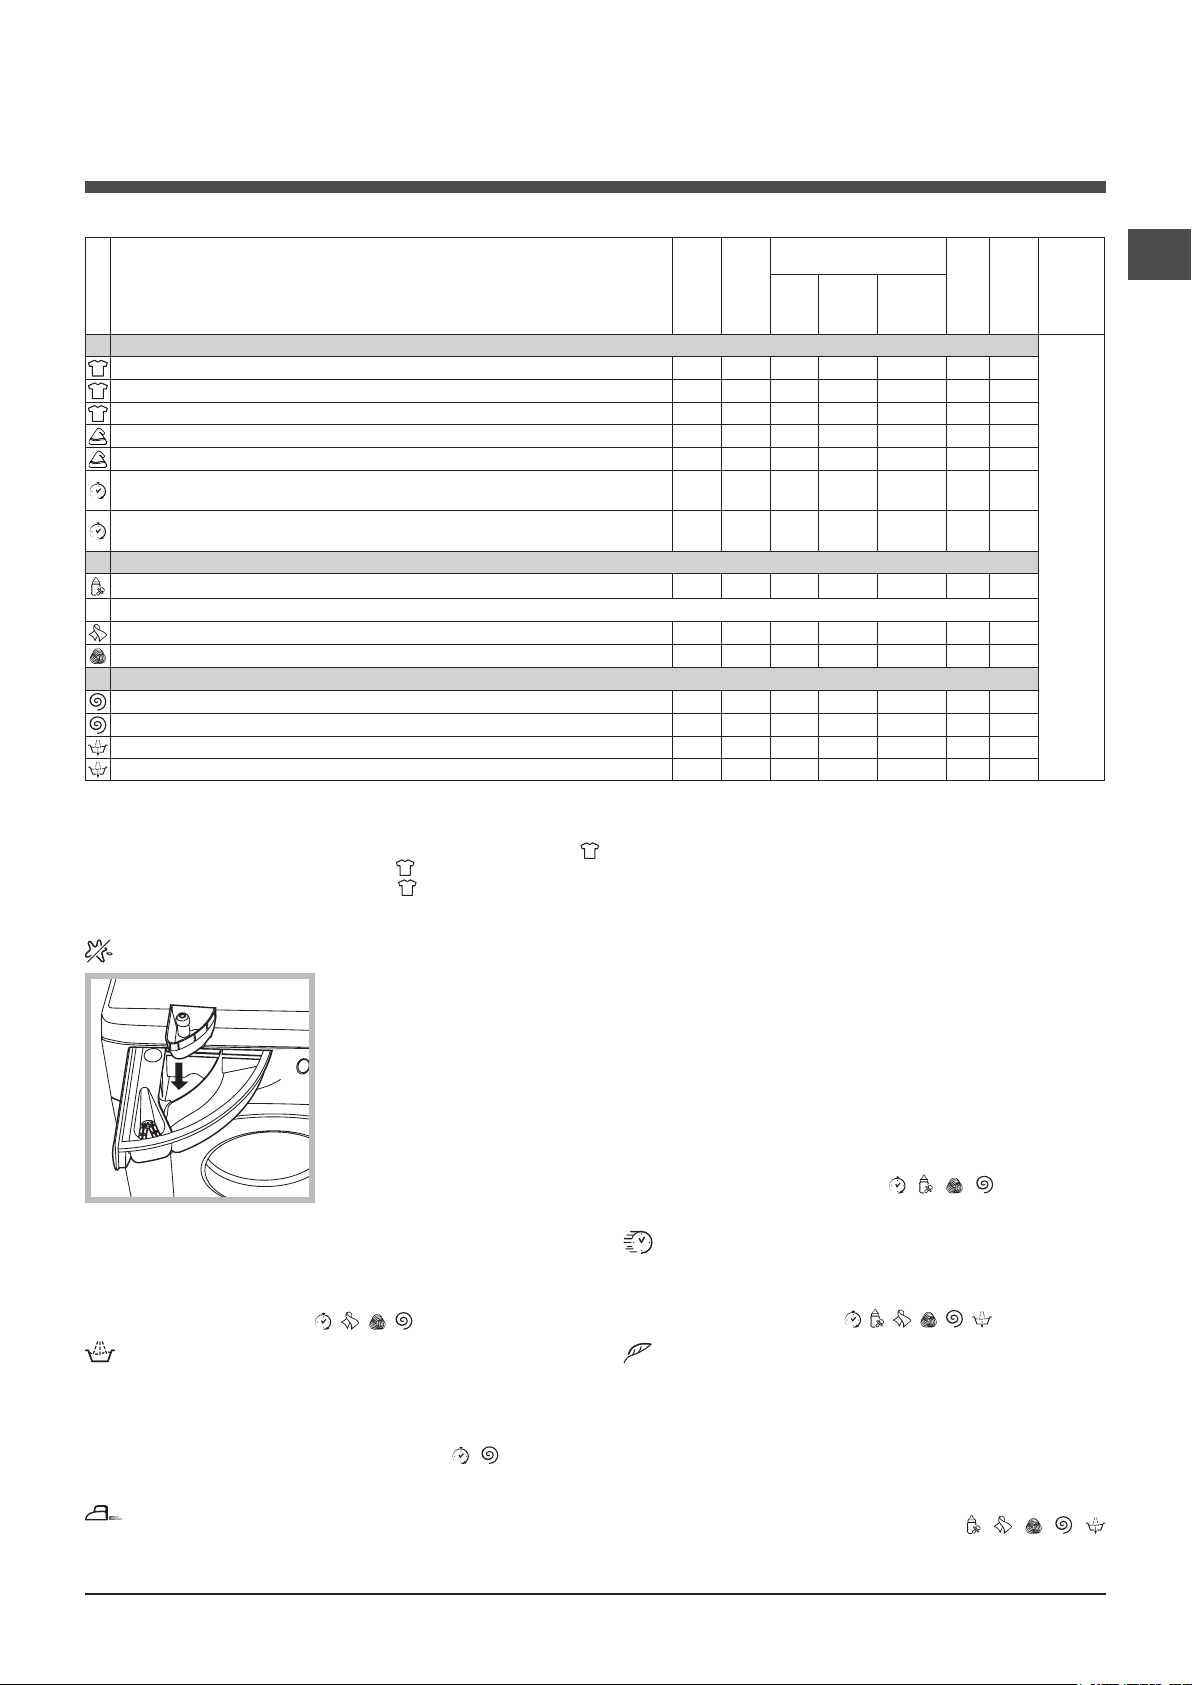
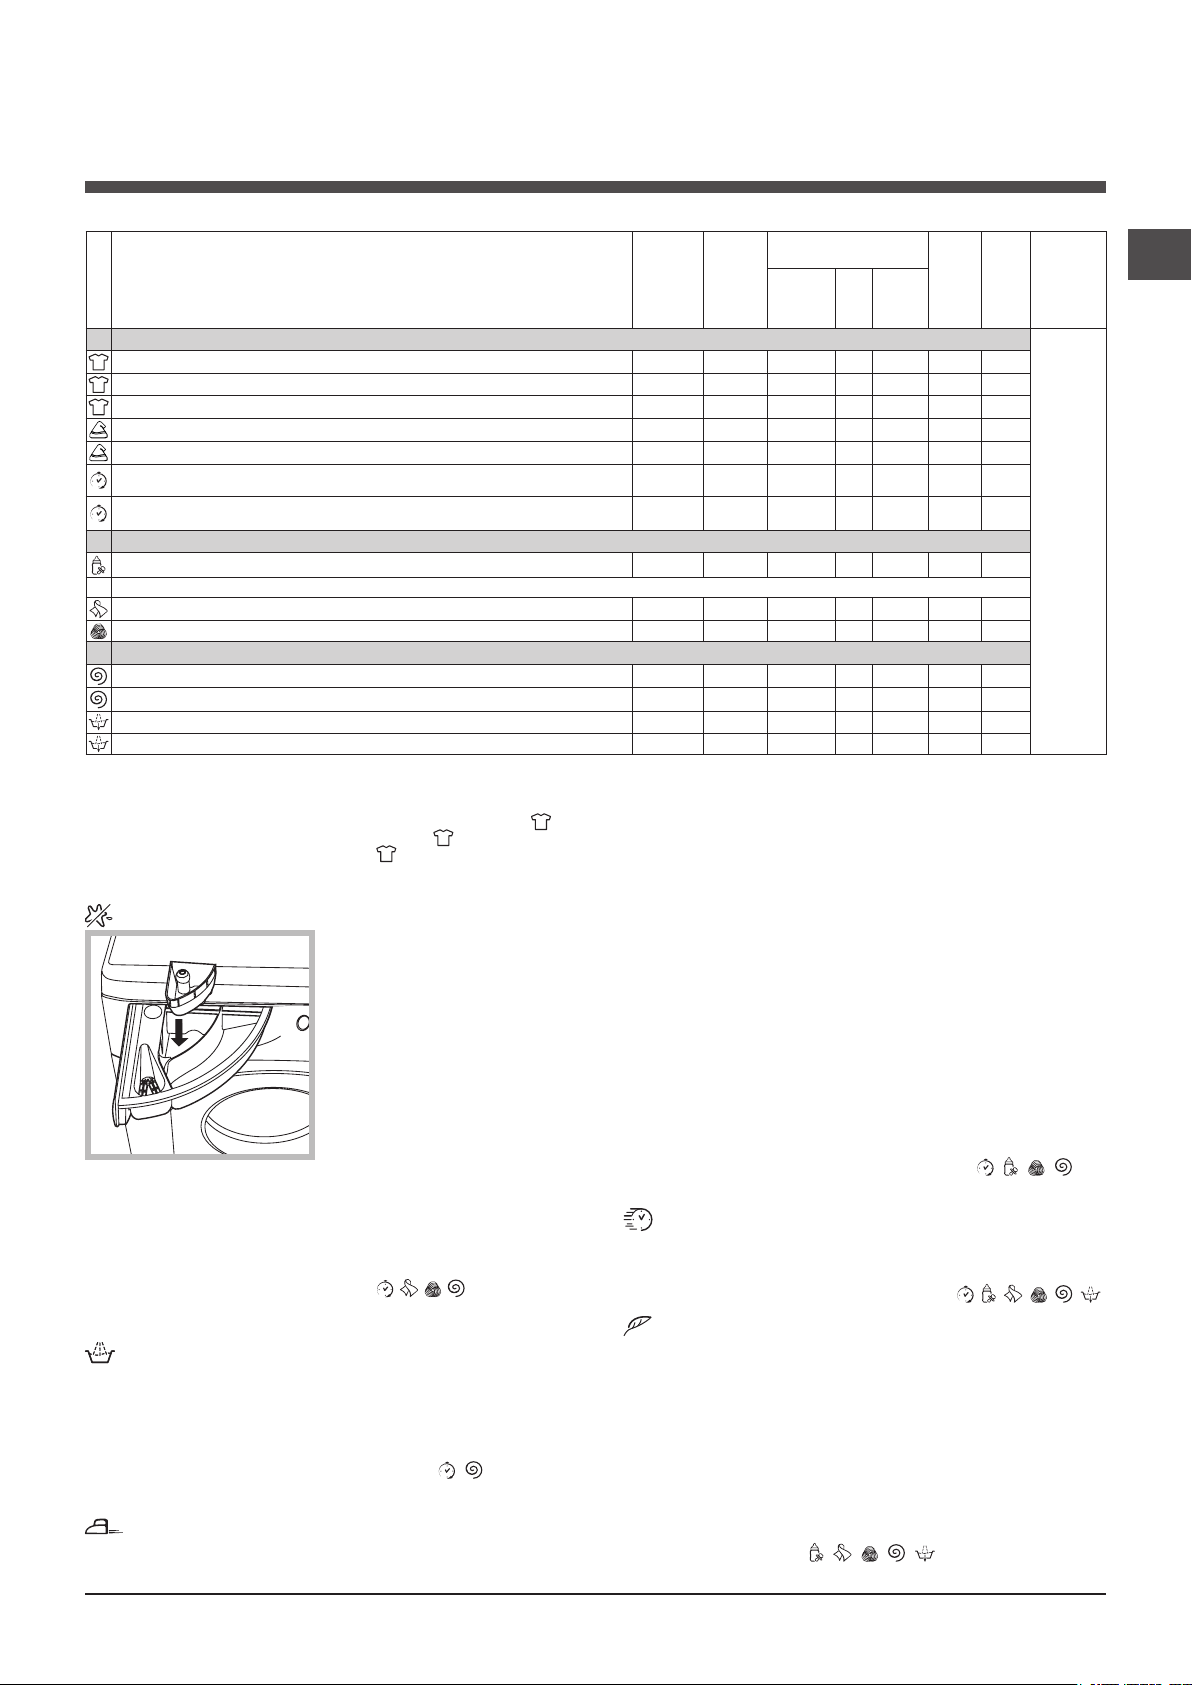
Table of wash cycles
Max.
Description of the wash cycle
��������� Wash cycles
Everyday wash cycles (Daily)
Cottons (1-2) : extremely soiled whites. 90° 1200
Cottons : heavily soiled whites and resistant colours. 60° 1200
Cottons (3): lightly soiled resistant colours. 40° 1200
Synthetics (1st press of the button): heavily soiled resistant colours. 60° 800
Synthetics (2nd press of the button): lightly soiled resistant colours. 40° 800
Mix 30' (1st press of the button): to refresh lightly soiled garments quickly
(not suitable for wool, silk and clothes which require washing by hand).
Mix 15' (2nd press of the button) : to refresh lightly soiled garments quickly
(not suitable for wool, silk and clothes which require washing by hand).
Special cycles / Memo
Baby cycle: heavily soiled delicate colours. 40° 800
Memory: allows for any wash cycle to be stored.
M
Silk/Curtains: for garments in silk and viscose, lingerie. 30° 0
Wool: for wool, cashmere, etc. 40° 800
Partial wash cycles
Fast Spin (1st press of the button) - 1200 - - - 6 Slow spin (2nd press of the button) - 800 - - - 2,5 Rinse (1st press of the button) - 1200 Pump out (2nd press of the button) - 0 - - - 6 -
The length of cycle shown on the display or in this booklet is an estimation only and is calculated assuming standard working conditions. The actual duration can vary according to factors such as water temperature and pressure, the amount of detergent used, the amount and type of load inserted, load balancing and any wash options selected.
For all Test Institutes:
(1) Test wash cycle in compliance with regulation 2010/1061: set wash cycle (90°C); temperature 60°C and 40°C
(2) Long wash cycle for cottons: set wash cycle (90°C); temperature 40°C
(3) Short wash cycle for cottons: set wash cycle (40°C)
(By pressing the TEMPERATURE button)
Max.
speed
temp.
(°C)
30° 800
30° 800
(rpm)
Detergents
Wash Bleach
Fabric
softener
-
-
-
-
(By pressing the TEMPERATURE button)
.
Max.
load
wash
(kg)
6 6
6 6
6 6
2,5 2,5
2,5 2,5
3 2,5
1,5 -
2 -
1 1,5 -
6 -
Eco
Cycle
duration
The duration of the wash cycles can be checked
on the display.
.
GB
Wash functions
Stain removal
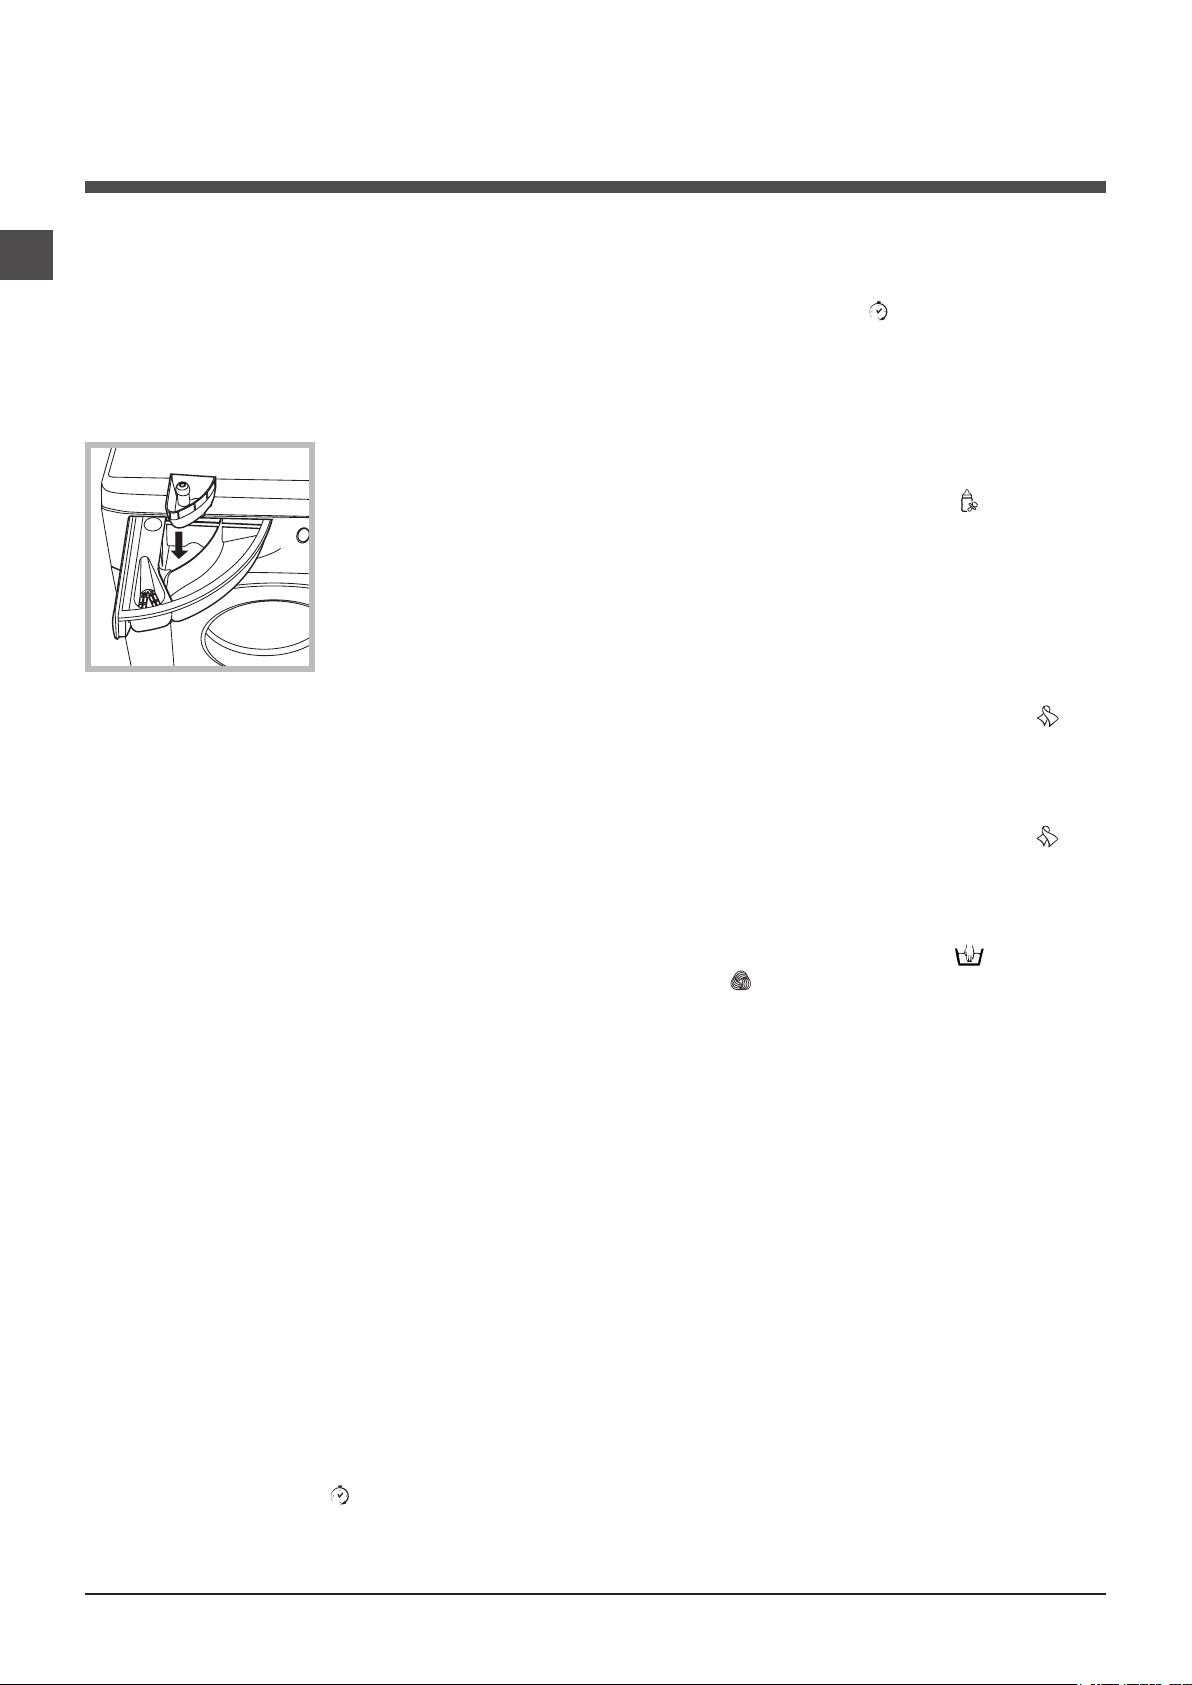
This function is particularly
usef u l for the remova l of
stubborn stains. Place extra
compartment 3 (supplied) into
compartment 1. When pouring
in the bleach, be careful not
to exceed the “max” level
marked on the central pivot
(see figure). To run the bleach
cycle on its own, pour the
bleach into extra compartment
3, set the “Rinse” programme and activate the “Stain removal”
programme. To bleach during a wash cycle, pour in the
detergent and any fabric softener you wish to use, set the
desired wash cycle and enable the “Stain removal” function.
! It cannot be used with the , , , , Pump out.
Extra rinse
By selecting this option, the efficiency of the rinse is increased
and optimal detergent removal is guaranteed. It is particularly
useful for sensitive skin.
! It cannot be used in conjunction with the , , “Pump
out” programmes.
Easy iron
By selecting this function, the wash and spin cycles will be
modified in order to reduce the formation of creases.
At the end of the cycle the washing machine will perform
slow rotations of the drum; the EASY IRON and START/
PAUSE indicator lights will flash (orange) and the text “END
OF CYCLE” will appear on the display. To end the cycle, press
the START/PAUSE button or the EASY IRON button. For the
Silk/Curtains cycle, the machine will end the cycle while
the laundry is soaking; the EASY IRON and START/PAUSE
indicator lights will flash (orange) and the text “STOP WITH
WATER” will appear on the display. To drain the water so
that the laundry may be removed, press the START/PAUSE
button or the EASY IRON button.
! It may not be used with the , , , , “Pump out”
programmes.
Fast wash
Reduces the duration of the wash cycle, while making it
possible to save water and electricity.
! It cannot be used with the , , , , , programmes.
Eco wash
The Eco Wash function saves energy by not heating the
water used to wash your laundry - an advantage both to the
environment and to your energy bill. Instead, intensified wash
action and water optimisation ensure great wash results in the
same average time of a standard cycle. For the best washing
results we recommend the usage of a liquid detergent.
! It cannot be used with the “Mix 15’”, , , , ,
programmes.
7
Page 8
Detergents and laundry
M
AX
1
3
2
GB
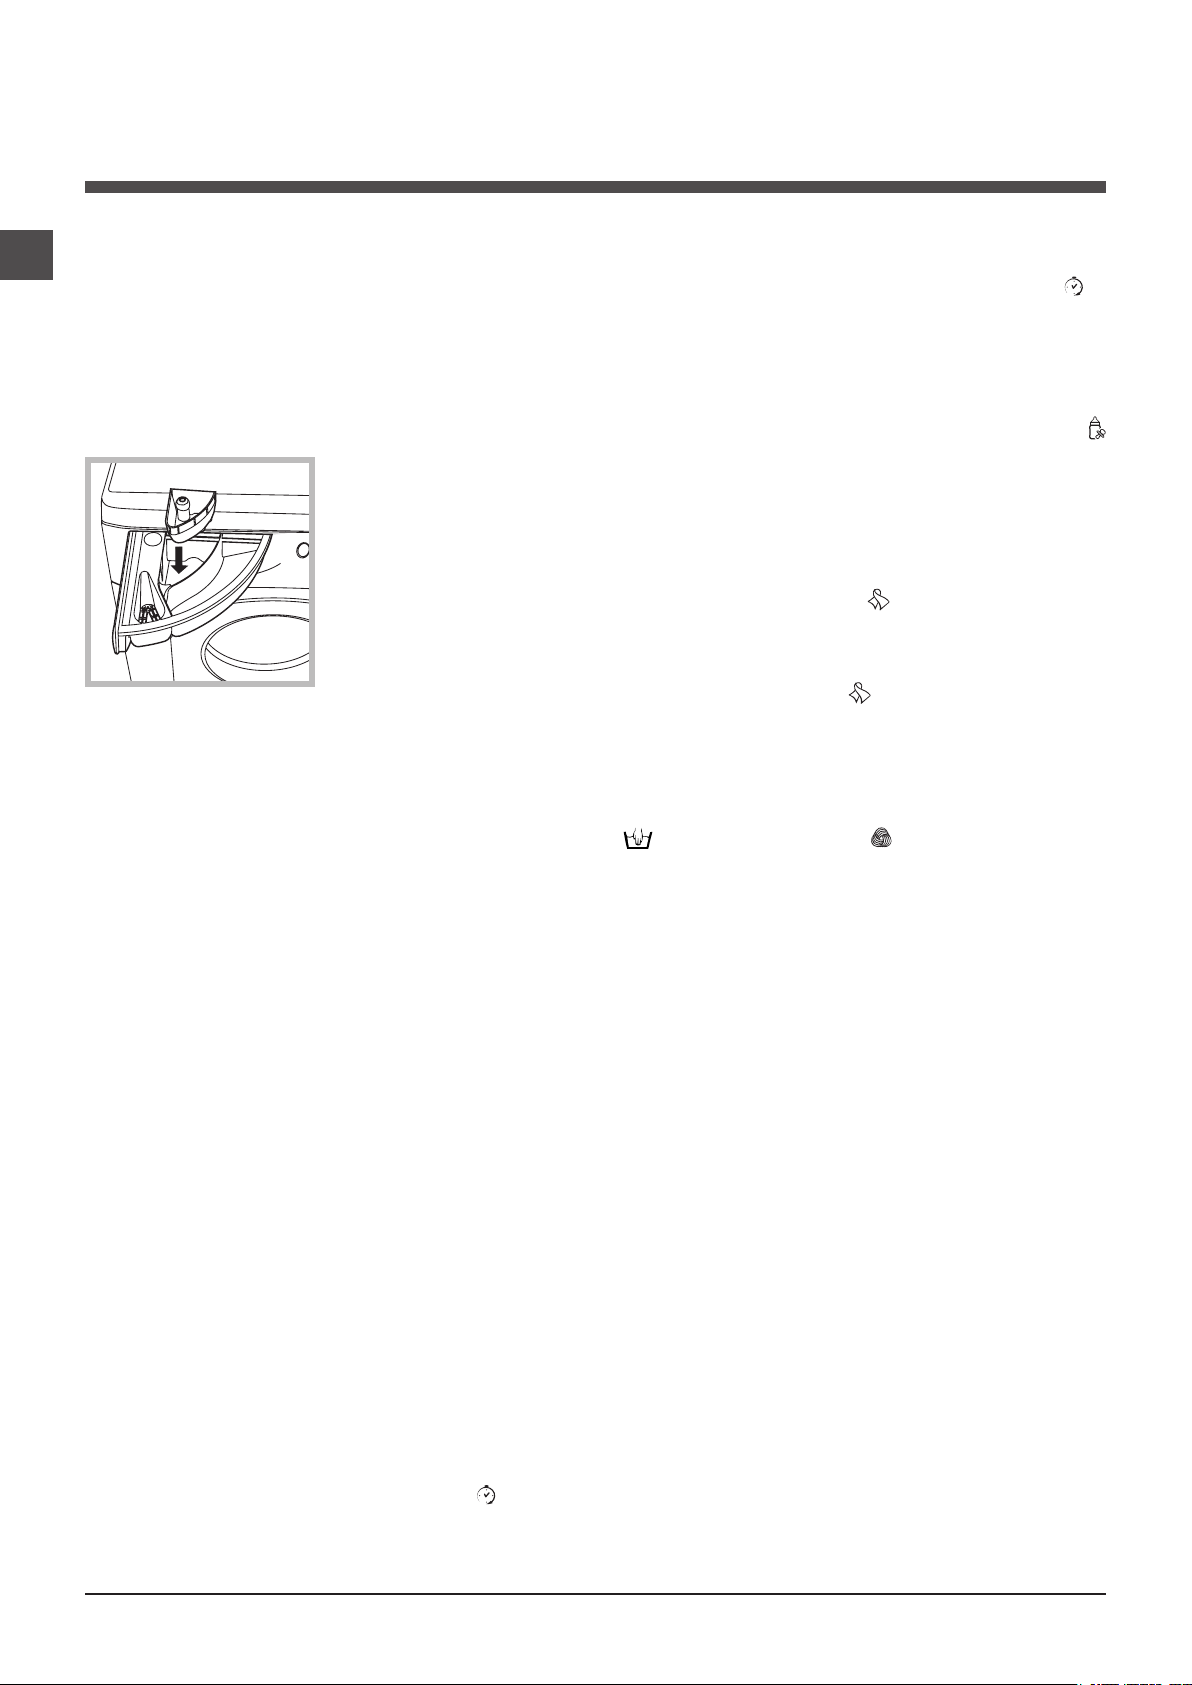
Detergent dispenser drawer
Good washing results also depend on the correct dose of
detergent: adding too much detergent will not necessarily result in a more efficient wash, and may in fact cause
build up on the inside of your appliance and contribute to
environmental pollution.
! Do not use hand washing detergents because these
create too much foam.
Open the detergent dispenser drawer and pour
in the detergent or washing
additive, as follows.
compartment 1: Detergent for the wash cycle
(powder or liquid)
Liquid detergent should only be poured in immediately
prior to the start of the wash cycle.
compartment 2: Additives (fabric softeners, etc.)
The fabric softener should not overflow the grid.
extra compartment 3: Bleach
Preparing the laundry
Mix 15’: this wash cycle was designed to wash lightly soiled
garments quickly: it lasts just 15 minutes and therefore saves
both energy and time. By selecting this wash cycle ( at
30°C), it is possible to wash different fabrics together (except
for wool and silk items), with a maximum load of 1.5 kg.
Baby cycle: this wash cycle can be used to remove the
soiling typically caused by babies, while ensuring that all
detergent is removed from nappies in order to prevent the
delicate skin of babies from suffering allergies. The cycle
has been designed to reduce the amount of bacteria by using
a greater quantity of water and optimising the effect of special
disinfecting additives added to the detergent.
At the end of the wash cycle, the machine will slowly rotate
the drum to prevent the formation of creases; to end the cycle
press the START/PAUSE button.
Silk: use special wash cycle to wash all silk garments.
We recommend the use of special detergent which has been
designed to wash delicate clothes.
Curtains: fold curtains and place them in a pillow case or
mesh bag. Use wash cycle .
Wool: is the only washing machine manufacturer to have
been awarded the prestigious Woolmark Platinum Care
endorsement (M.0508) by the Woolmark Company, which
means that all woollen garments may be washed in the
washing machine, even those which state “hand wash only”
on the label. Wash cycle therefore offers complete
peace of mind when washing woollen garments in the washing machine (max. load 1,5 kg) and guarantees optimal
performance.
• Divide the laundry according to:
- the type of fabric/the symbol on the label
- the colours: separate coloured garments from whites
• Empty all garment pockets and check the buttons.
• Do not exceed the listed values, which refer to the weight
of the laundry when dry:
Durable fabrics: max. 6 kg
Synthetic fabrics: max. 2,5 kg
Delicate fabrics: max. 2 kg
Wool: max. 1,5 kg
Silk: max. 1 kg
How much does your laundry weigh?
1 sheet 400-500 g
1 pillow case 150-200 g
1 tablecloth 400-500 g
1 bathrobe 900-1200 g
1 towel 150-250 g
Special wash cycles
Mix 30’: this wash cycle was designed to wash lightly soiled
garments quickly: it lasts just 30 minutes and therefore saves
both energy and time. By selecting this wash cycle ( at 30°C),
it is possible to wash different fabrics together (except for wool
and silk items), with a maximum load of 3 kg.
Load balancing system
Before every spin cycle, to avoid excessive vibrations and
to distribute the load in a uniform manner, the drum rotates
continuously at a speed which is slightly greater than the
washing rotation speed. If, after several attempts, the load
is not balanced correctly, the machine spins at a reduced
spin speed. If the load is excessively unbalanced, the
washing machine performs the distribution process instead
of spinning. To encourage improved load distribution and
balance, we recommend small and large garments are
mixed in the load.
8
Page 9
Precautions and tips
20
! This washing machine was designed and constructed in
accordance with international safety regulations. The following information is provided for safety reasons and must
therefore be read carefully.
General safety
• This appliance is not intended for use by persons (including
children) with reduced physical, sensory or mental capabilities, or lack of experience and knowledge, unless they
have been given supervision or instruction concerning use
of the appliance by a person responsible for their safety.
Children should be supervised to ensure that they do not
play with the appliance.
• This appliance was designed for domestic use only.
• Do not touch the machine when barefoot or with wet or
damp hands or feet.
• Do not pull on the power supply cable when unplugging the
appliance from the electricity socket. Hold the plug and pull.
• Do not open the detergent dispenser drawer while the
machine is in operation.
• Do not touch the drained water as it may reach extremely high temperatures.
• Never force the porthole door. This could damage the
safety lock mechanism designed to prevent accidental
opening.
• If the appliance breaks down, do not under any circumstances access the internal mechanisms in an attempt
to repair it yourself.
• Always keep children well away from the appliance while
it is operating.
• The door can become quite hot during the wash cycle.
• If the appliance has to be moved, work in a group of two
or three people and handle it with the utmost care. Never
try to do this alone, because the appliance is very heavy.
• Before loading laundry into the washing machine, make
sure the drum is empty.
Disposal
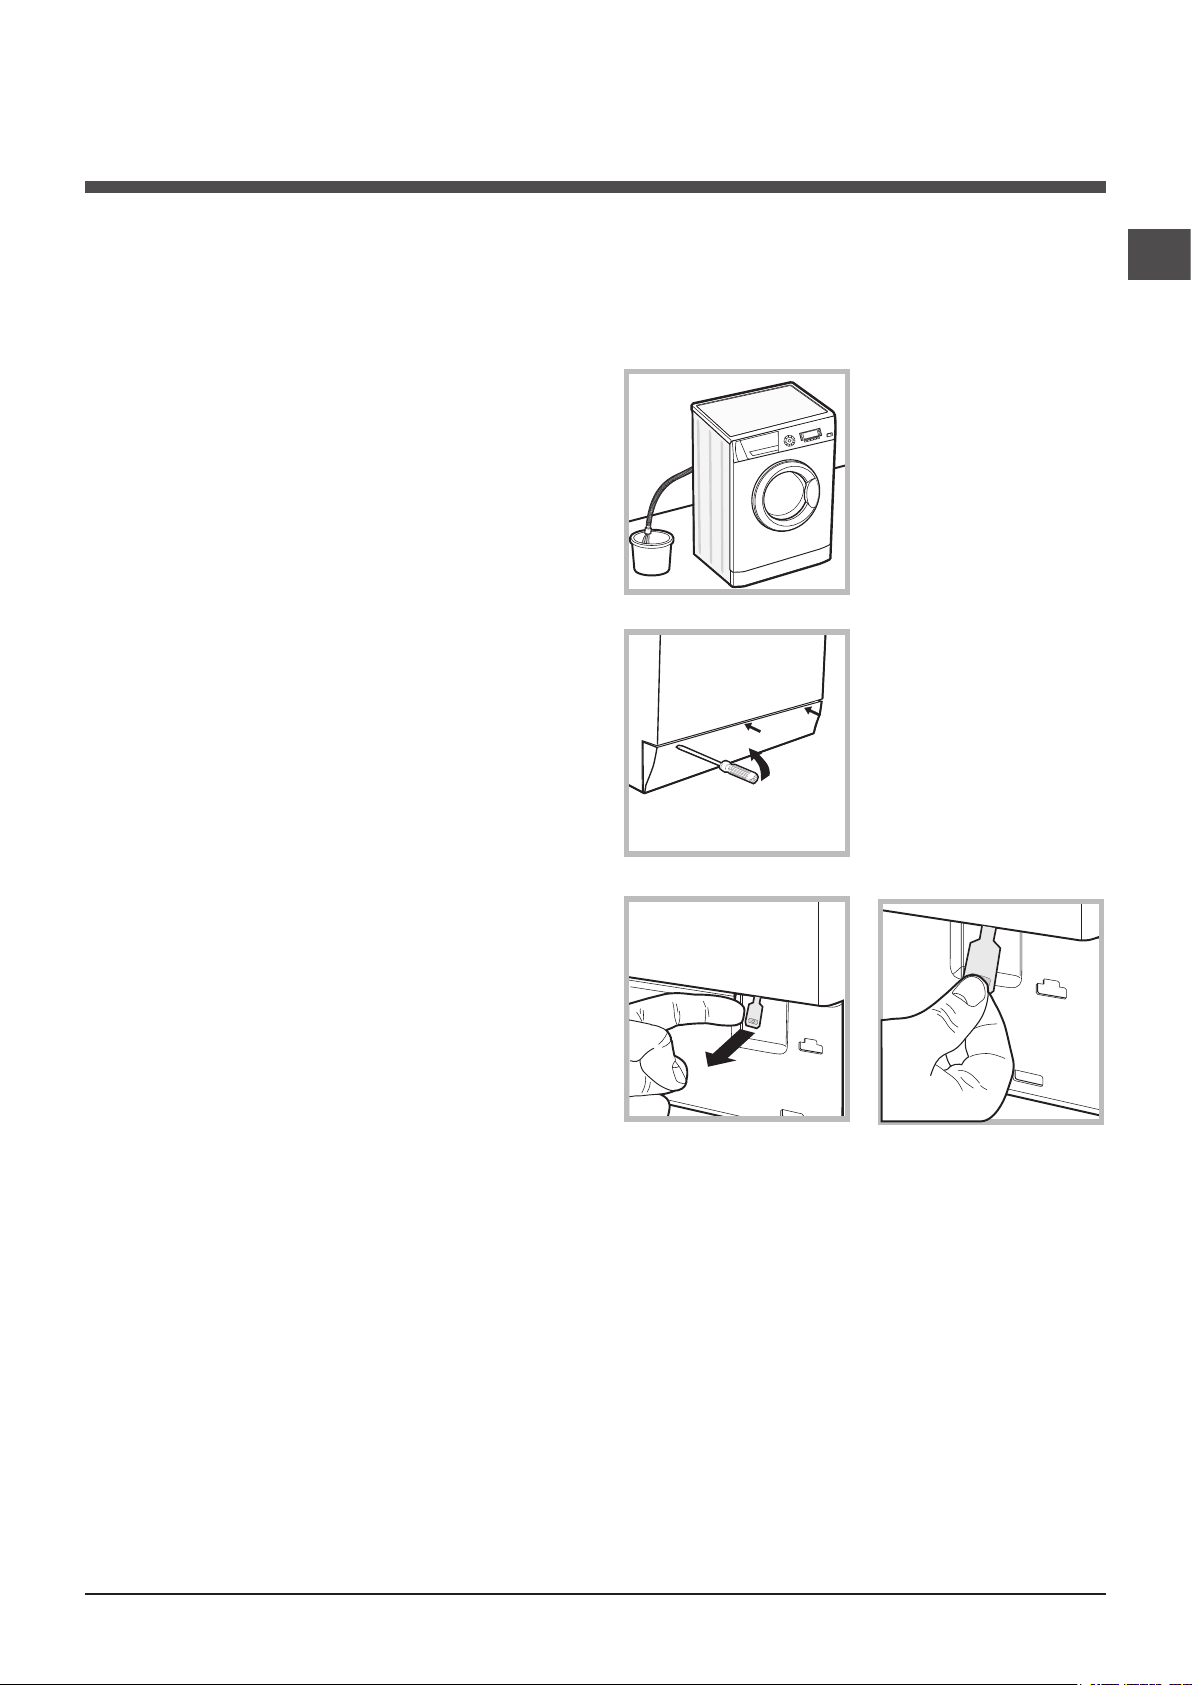
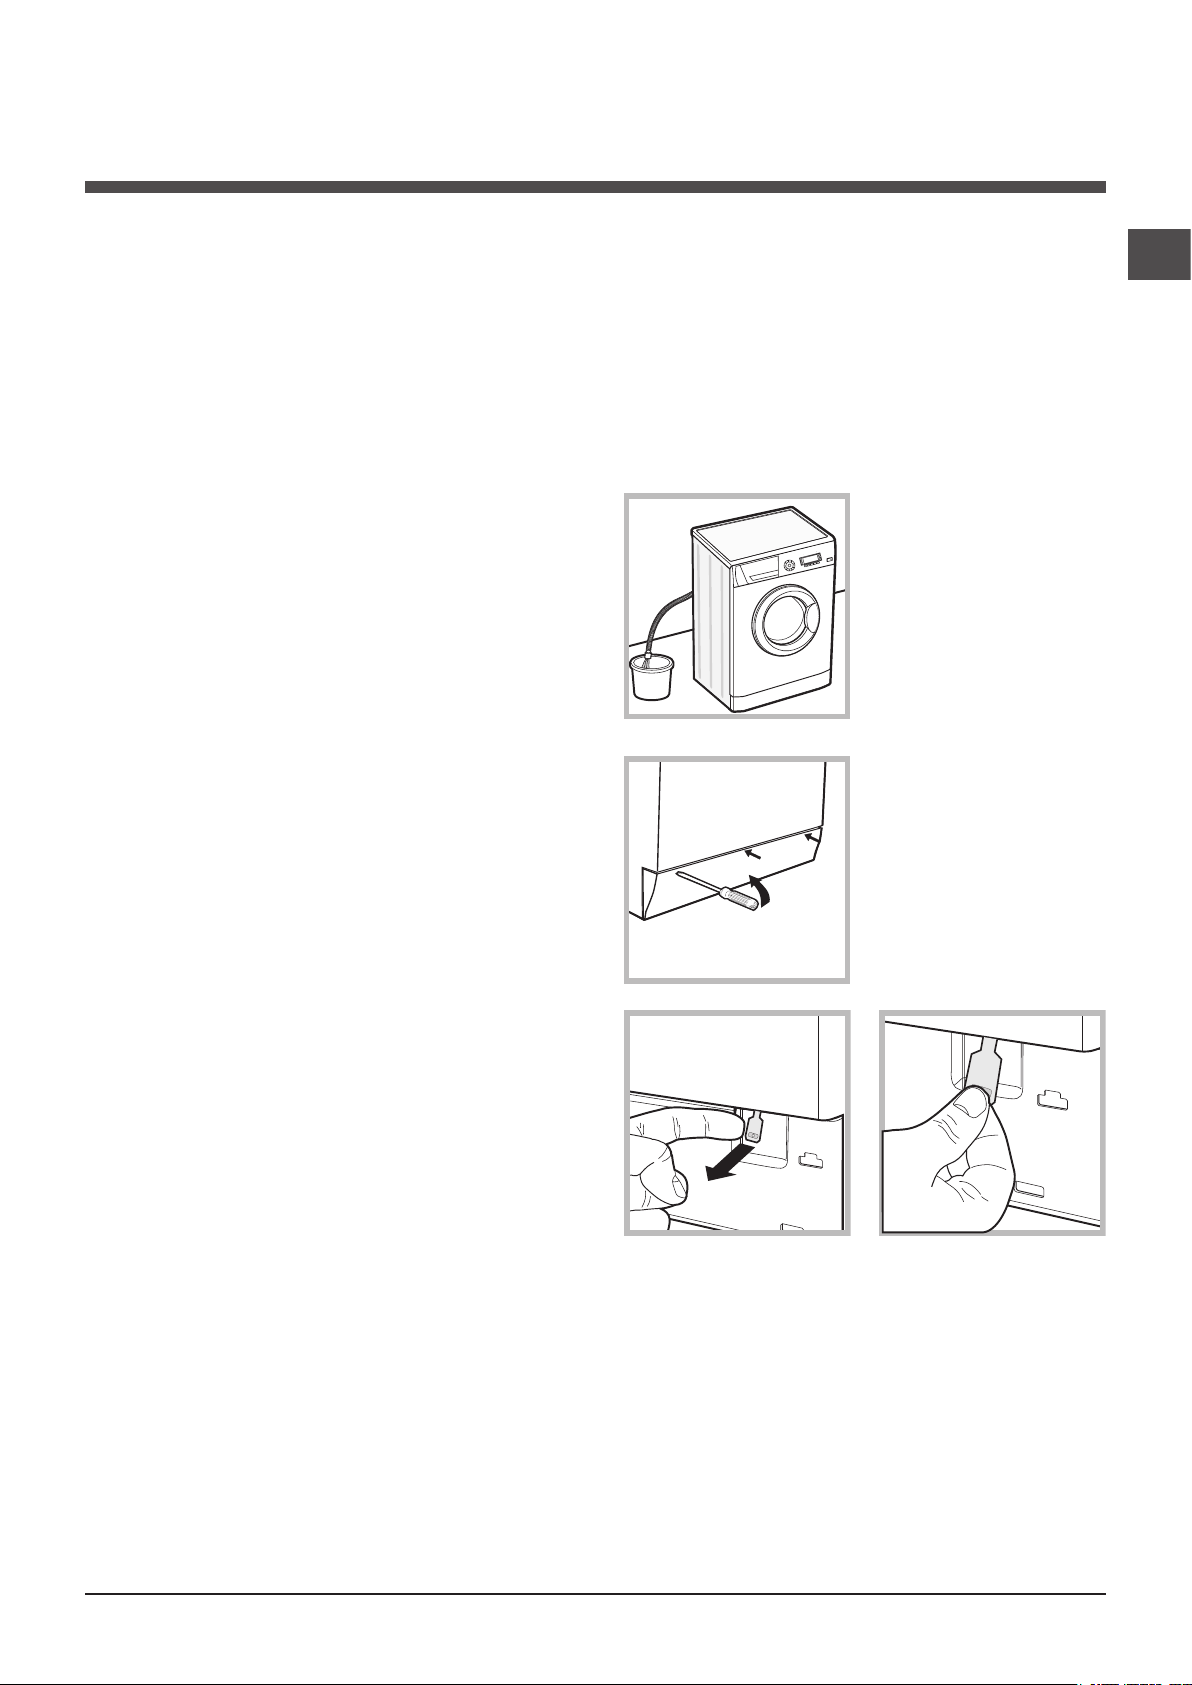
Opening the porthole door manually
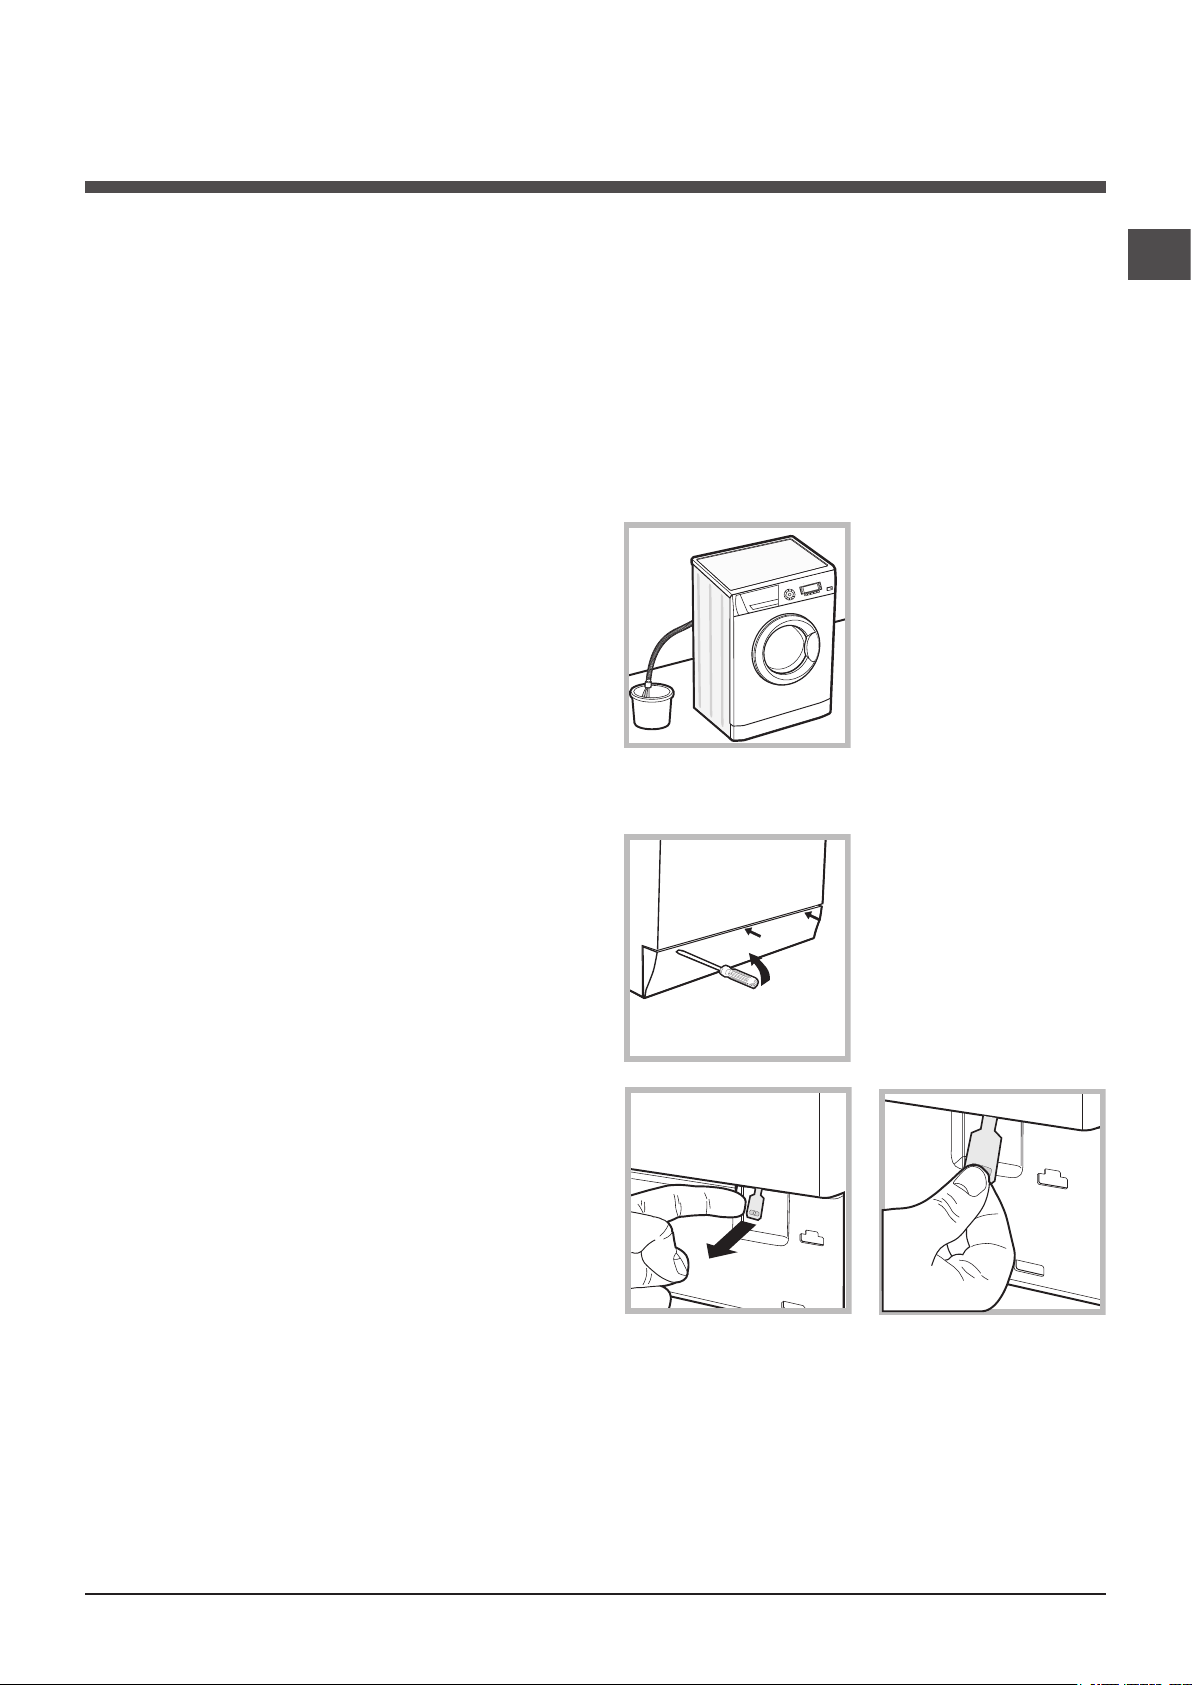
In the event that it is not possible to open the porthole
door due to a powercut, and if you wish to remove the
laundry, proceed as follows:
1. remove the plug from the
electrical socket.
2. make sure the water level
inside the machine is lower
than the door opening; if it
is not, remove excess water
using the drain hose, collecting it in a bucket as indicated
in the figure.
3. using a screwdriver, remove the cover panel on the lower front part of the washing
machine (see figure).
4. pull outwards using the tab as indicated in the figure,
until the plastic tie-rod is freed from its stop position; pull
downwards and open the door at the same time.
GB
• Disposing of the packaging materials: observe local regulations so that the packaging may be re-used.
• The European Directive 2002/96/EC on Waste Electrical
and Electronic Equipment, requires that ìold household
electrical appliances must not be disposed of in the normal
unsorted municipal waste stream. Old appliances must
be collected separately in order to optimise the recovery
and recycling of the materials they contain and reduce the
impact on human health and the environment. The crossed
out “wheeled bin” symbol on the product reminds you of
your obligation, that when you dispose of the appliance it
must be separately collected. Consumers should contact
their local authority or retailer for information concerning the
correct disposal of their old appliance.
5. reposition the panel, making sure the hooks are securely
in place before you push it onto the appliance.
9
Page 10
Care and maintenance
1
2
GB
Cutting off the water and electricity
supplies
• Turn off the water tap after every wash cycle. This will
limit wear on the hydraulic system inside the washing
machine and help to prevent leaks.
• Unplug the washing machine when cleaning it and during all maintenance work.
Cleaning the washing machine
The outer parts and rubber components of the appliance
can be cleaned using a soft cloth soaked in lukewarm
soapy water. Do not use solvents or abrasives.
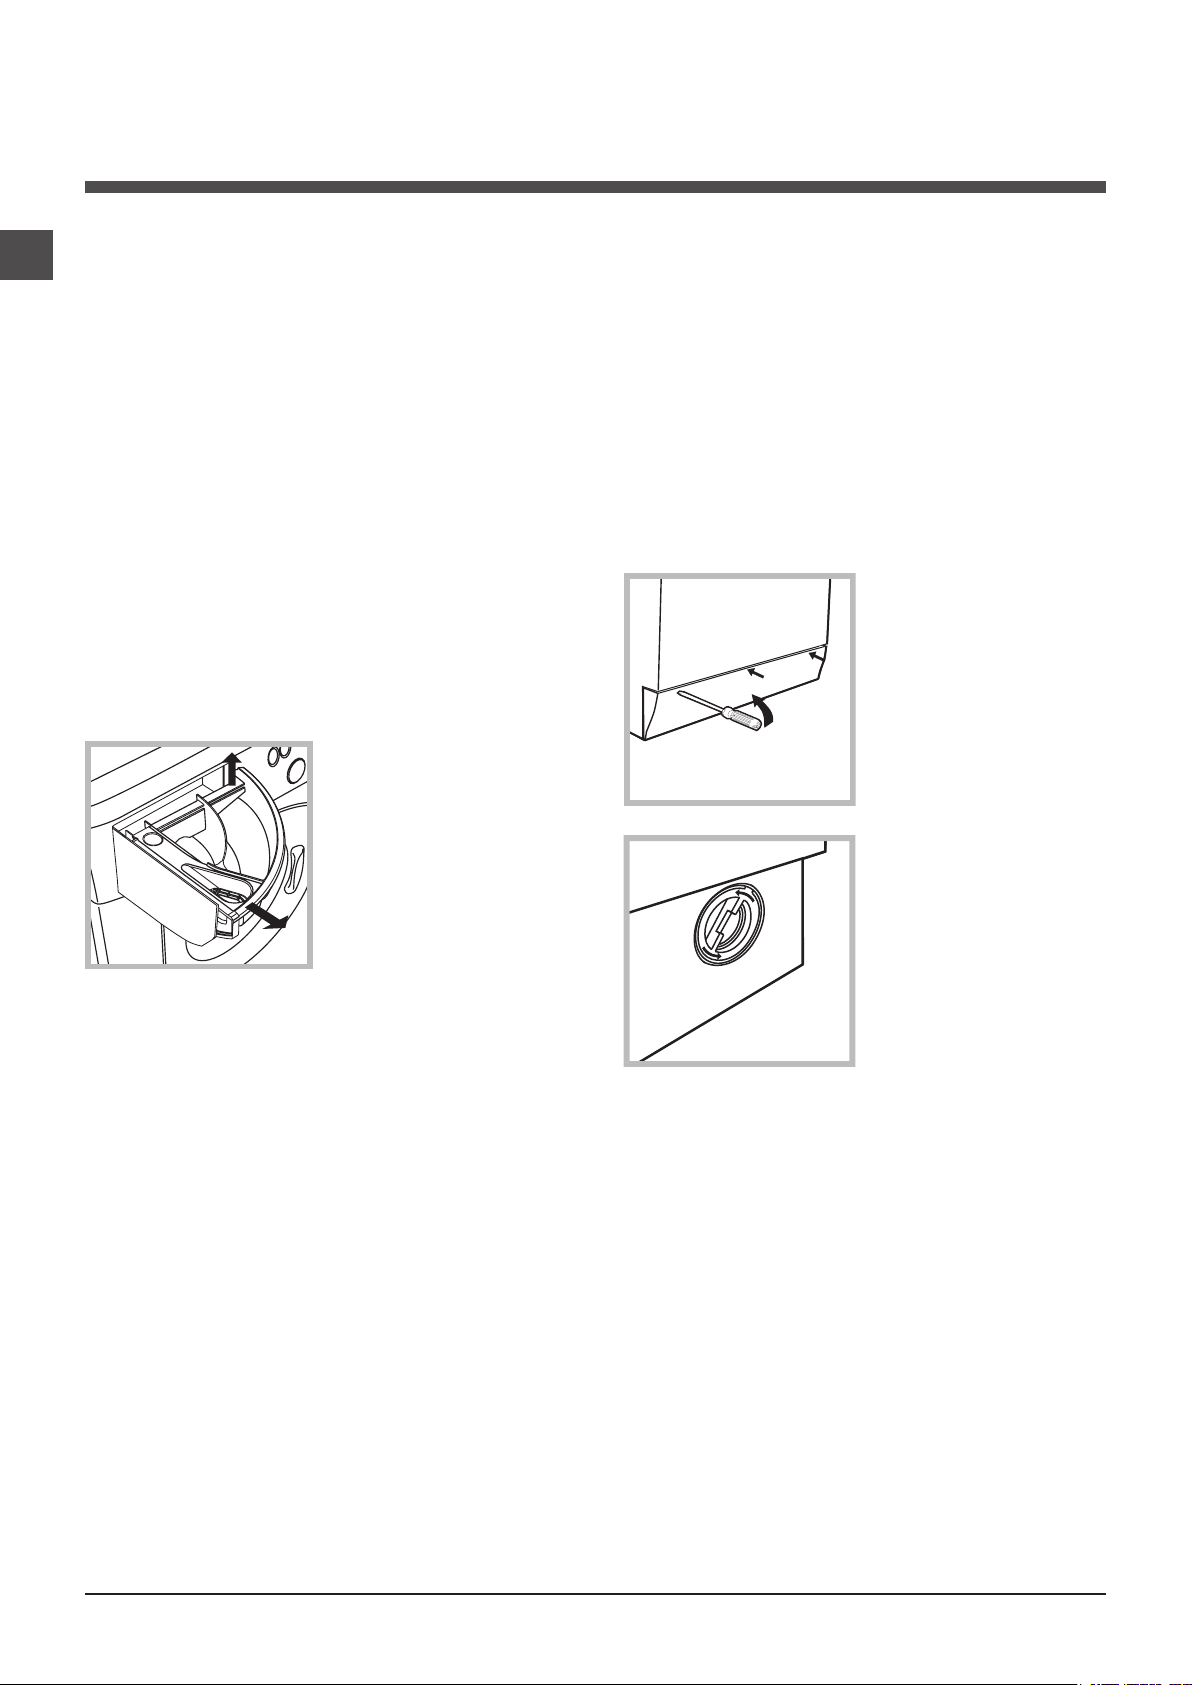
Cleaning the detergent dispenser drawer
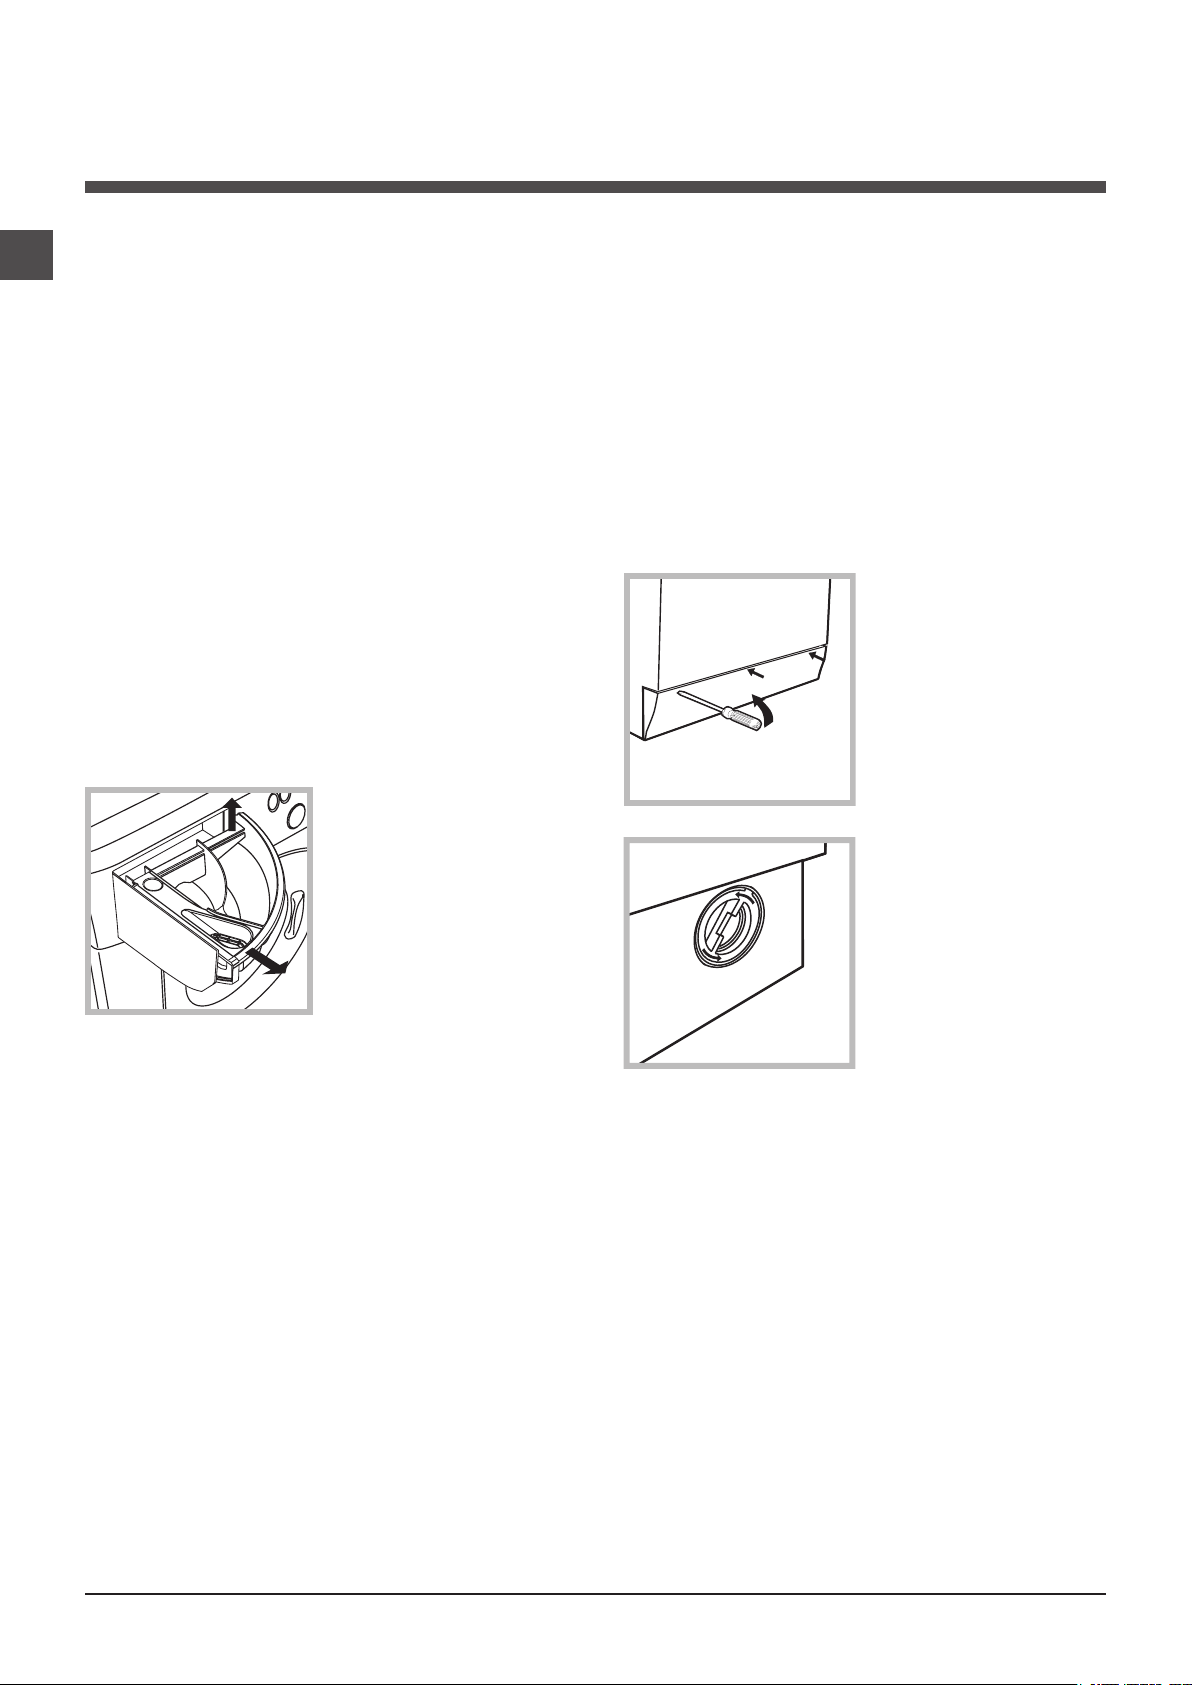
Remove the dispenser by
raising it and pulling it out
(see figure).
Wash it under running water; this operation should be
repeated frequently.
Cleaning the pump
The washing machine is fitted with a self-cleaning pump
which does not require any maintenance. Sometimes,
small items (such as coins or buttons) may fall into the prechamber which protects the pump, situated in its bottom
part.
! Make sure the wash cycle has finished and unplug the
appliance.
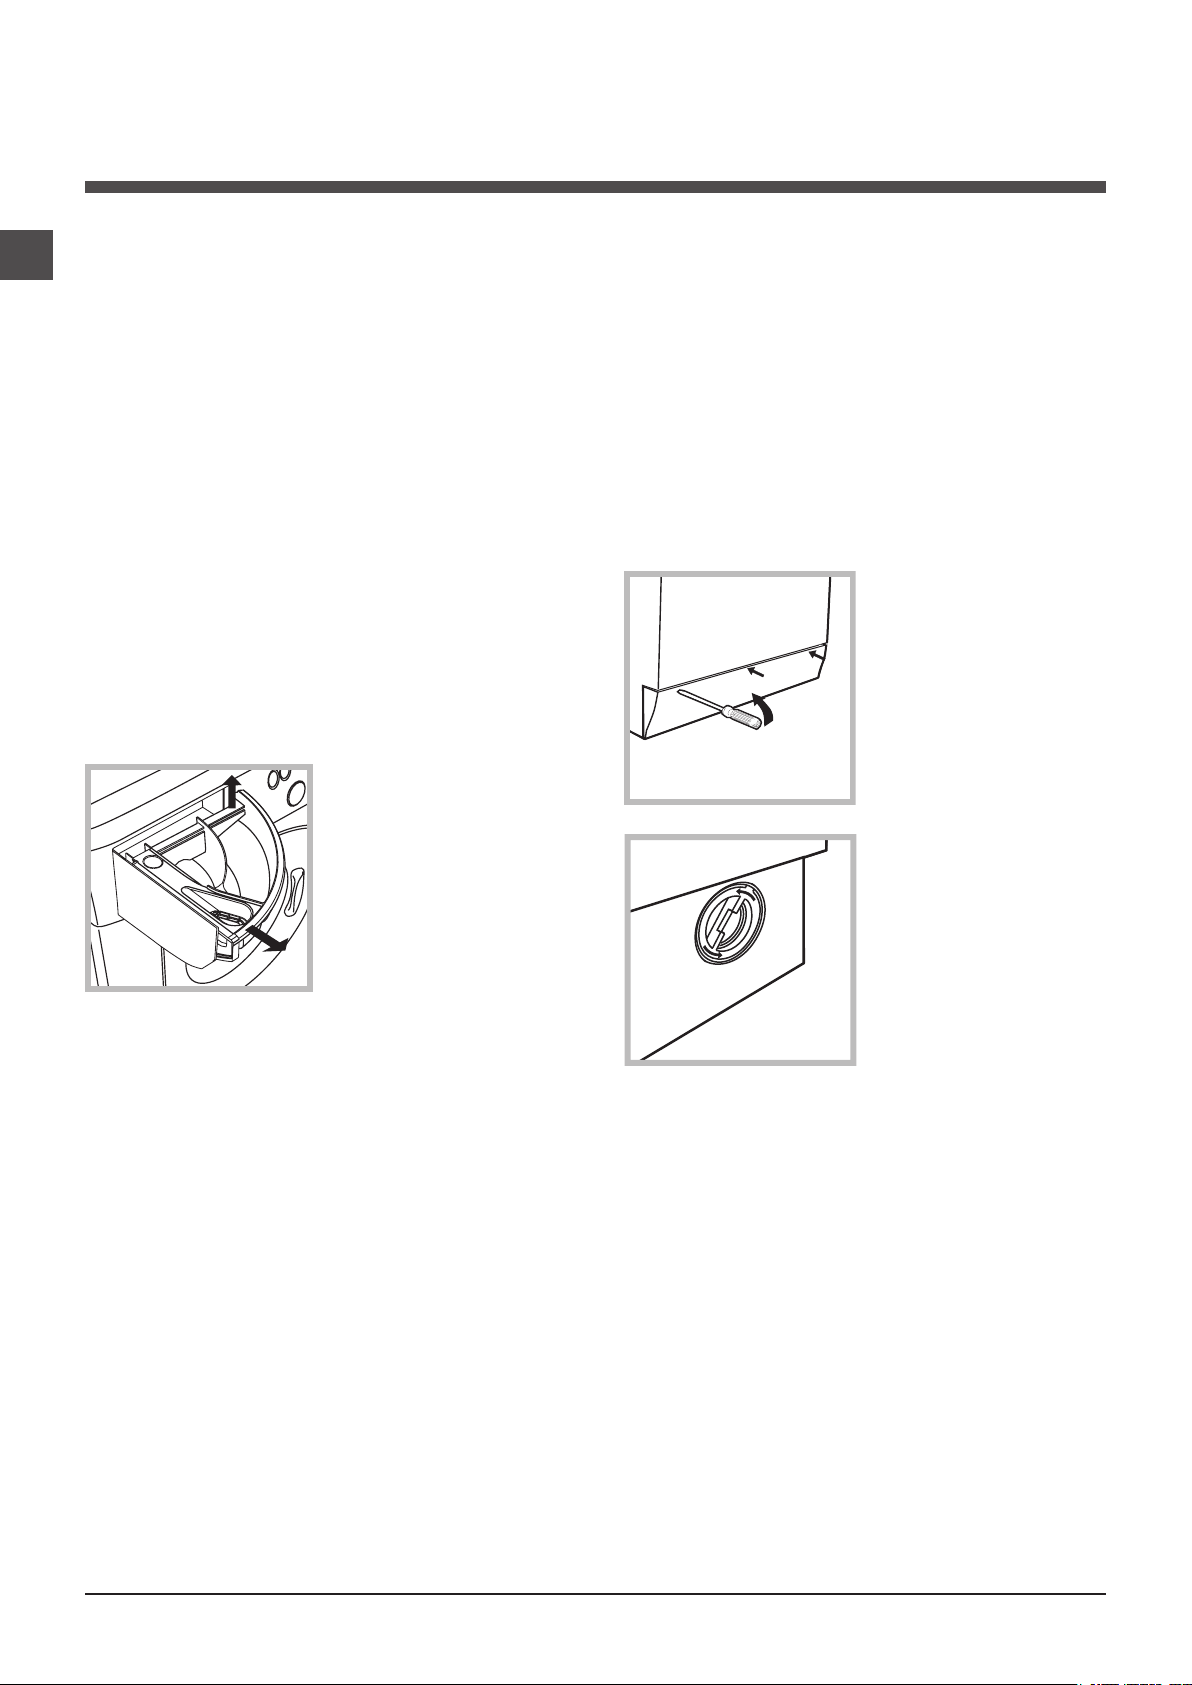
To access the pre-chamber:
1. using a screwdriver,
remove the cover panel
on the lower front part of
the washing machine (see
figure);
2. unscrew the lid by rotating it anti-clockwise (see
figure): a little water may
trickle out. This is perfectly
normal;
Caring for the door and drum of your
appliance
• Always leave the porthole door ajar in order to prevent
unpleasant odours from forming.
3. clean the inside thoroughly;
4. screw the lid back on;
5. reposition the panel, making sure the hooks are securely
in place before you push it onto the appliance.
Checking the water inlet hose
Check the inlet hose at least once a year. If there are any
cracks, it should be replaced immediately: during the wash
cycles, water pressure is very strong and a cracked hose
could easily split open.
! Never use second-hand hoses.
10
Page 11

Troubleshooting
Your washing machine could fail to work. Before contacting the Technical Assistance Centre (see “Assistance”), make sure
that the problem cannot be not solved easily using the following list.
Problem:
The washing machine does not
switch on.
The wash cycle does not start.
The washing machine does not
take in water (the text “NO WATER,
CHECK SUPPLY” appears on the
display).
The washing machine continuously
takes in and
drains water.
Possible causes / Solutions:
• The appliance is not plugged into the socket fully, or is not making contact.
• There is no power in the house.
• The washing machine door is not closed properly.
• The ON/OFF button has not been pressed.
• The START/PAUSE button has not been pressed.
• The water tap has not been opened.
• A delayed start has been set (see “Running a wash cycle”).
• The water inlet hose is not connected to the tap.
• The hose is bent.
• The water tap has not been opened.
• There is no water supply in the house.
• The pressure is too low.
• The START/PAUSE button has not been pressed.
• The drain hose is not fitted at a height between 65 and 100 cm from the floor
(see “Installation”).
• The free end of the hose is under water (see “Installation”).
• The wall drainage system is not fitted with a breather pipe.
If the problem persists even after these checks, turn off the water tap, switch
the appliance off and contact the Assistance Service. If the dwelling is on one of
the upper floors of a building, there may be problems relating to water drainage,
causing the washing machine to fill with water and drain continuously. Special
anti-draining valves are available in shops and help to avoid this inconvenience.
GB
The washing machine does not
drain or spin.
The washing machine vibrates a lot
during the spin cycle.
The washing machine leaks.
The machine is locked and the display
flashes, indicating an
error code (e.g. F-01, F-..).
There is too much foam.
• The wash cycle does not include draining: some wash cycles require the drain
phase to be started manually (see “Wash cycles and functions”).
• The EASY IRON function has been activated: To complete the wash cycle,
press the START/PAUSE button (see “Wash cycles and functions”).
• The drain hose is bent (see “Installation”).
• The drainage duct is clogged.
• The drum was not unlocked correctly during installation (see “Installation”).
• The washing machine is not level (see “Installation”).
• The washing machine is trapped between cabinets and walls (see “Installation”).
• The water inlet hose is not screwed on properly (see “Installation”).
• The detergent dispenser drawer is blocked (for cleaning instructions, see “Care
and maintenance”).
• The drain hose is not fixed properly (see “Installation”).
• Switch off the machine and unplug it, wait for approximately 1 minute and then
switch it back on again.
If the problem persists, contact the Technical Assistance Service.
• The detergent is not suitable for machine washing (it should display the text
“for washing machines” or “hand and machine wash”, or the like).
• Too much detergent was used.
11
Page 12

Service
GB
Before calling for Assistance:
• Check whether you can solve the problem alone (see “Troubleshooting”);
• Restart the programme to check whether the problem has been solved;
• If this is not the case, contact an authorised Technical Assistance Centre using the telephone number provided on the
guarantee certificate.
! Always request the assistance of authorised technicians.
Have the following information to hand:
• the type of problem;
• the appliance model (Mod.);
• the serial number (S/N).
This information can be found on the data plate applied to the rear of the washing machine, and can also be found on the
front of the appliance by opening the door.
12
Page 13

Instrucţiuni de folosire
MAŞINĂ DE SPĂLAT RUFE
RO
Română
ECO6D 1291
Sumar
Instalare, 14-15
Despachetare şi punere la nivel
Racorduri hidraulice şi electrice
Primul ciclu de spălare
Date tehnice
Descrierea maşinii de spălat, 16-17
Panoul de control
Display
Cum se desfăşoară un ciclu de spălare, 18
Programe şi funcţii, 19
Tabel de programe
Funcţii de spălare
Detergenţi şi rufe albe, 20
Compartimentul pentru detergenţi
Pregătirea rufelor
Programe optionale
Sistemul de echilibrare a încărcăturii
Precauţii şi sfaturi, 21
Norme de protecţie şi siguranţă generale
Aruncarea reziduurilor
Deschiderea manuală a uşii
RO
Întreţinere şi curăţare, 22
Întreruperea alimentării cu apă şi curent electric
Curăţarea maşinii de spălat
Curăţarea compartimentului pentru detergent
Îngrijirea uşii şi a tamburului
Curăţarea pompei
Controlarea furtunului de alimentare cu apă
Anomalii şi remedii, 23
Asistenţă, 24
13
Page 14
Instalare
RO
! Este important să păstraţi acest manual pentru a-l
putea consulta în orice moment. În caz de vânzare, de
cesiune sau de schimbare a locuinţei, acesta trebuie să
rămână împreună cu maşina de spălat pentru a informa
noul proprietar cu privire la funcţionare şi la respectivele
avertismente.
! Citiţi cu atenţie instrucţiunile: veţi găsi informaţii impor-
tante cu privire la instalare, la folosire şi la siguranţă.
Despachetare şi punere la nivel
Despachetare
1. Scoaterea din ambalaj a maşinii de spălat.
2. Controlaţi ca maşina de spălat să nu fost deteriorată
în timpul transportului. Dacă este deteriorată nu o
conectaţi şi luaţi legătura cu vânzătorul.
3. Scoateţi cele 3 şuruburi
de protecţie pentru transport şi cauciucul cu respectivul distanţier, situate
în partea posterioară
(a se vedea gura).
Racorduri hidraulice şi electrice
Racordarea furtunului de alimentare cu apă
1. Conectaţi furtunul de
alimentare, înşurubându-l
la un robinet de apă rece
cu gura letată de ľ gaz
(vezi gura).
Înainte de conectare, lăsaţi
apa să curgă până când nu
a devenit limpede.
2. Conectaţi tubul de
alimentare la maşina de
spălat, înşurubându-l la
sursa de apă respectivă,
amplasată în partea
posterioară, sus în dreapta
(a se vedea gura).
4. Închideţi oriciile cu dopurile din plastic aate în dotare.
5. Păstraţi toate piesele: pentru cazul în care maşina
de spălat va trebui să e transportată, piesele vor trebui
montante din nou.
! Ambalajele nu sunt jucării pentru copii!
Punere la nivel
1. Instalaţi maşina de spălat pe o suprafaţă plană şi
rigidă, fără a o sprijini de ziduri, mobilă sau altceva.
2. Dacă podeaua nu
este perfect orizontală,
compensaţi neregularităţile
deşurubând sau înşurubând
picioruşele anterioare (a
se vedea gura); unghiul
de înclinare, măsurat pe
planul de lucru, nu trebuie
să depăşească 2°.
O nivelare precisă conferă
stabilitate maşinii şi evită
vibraţii, zgomote şi deplasări pe timpul funcţionării. În
cazul mochetelor sau a unui covor, reglaţi picioruşele
astfel încât să menţineţi sub maşina de spălat un spaţiu
sucient pentru ventilare.
3. Fiţi atenţi ca furtunul să nu e nici pliat nici îndoit.
! Presiunea apei de la robinet trebuie să e cuprinsă
în valorile din tabelul Date tehnice (a se vedea pagina
alăturată).
! Dacă lungimea furtunului de alimentare nu este
sucientă, adresaţi-vă unui magazin specializat sau unui
instalator autorizat.
! Nu folosiţi niciodată tuburi folosite deja.
! Utilizaţi tuburile furnizate împreună cu maşina.
14
Page 15
65 - 100 cm
Conectarea furtunului de golire
Conectaţi furtunul de golire
- fără a-l îndoi - la cana-
lizare sau la racordul de
golire prevăzut pe perete,
la o înălţime de 65 - 100
cm de sol;
! Nu folosiţi prelungitoare şi prize multiple.
! Cablul nu trebuie să e îndoit sau comprimat.
! Cablul de alimentare trebuie să e înlocuit doar de
tehnicieni autorizaţi ai centrului de service ce apare scris
pe certicatul de garantie emis de producator.
Atenţie! Producătorul îşi declină orice responsabilitate în
cazul în care aceste norme nu se respectă.
RO
Sprijiniţi-l de marginea
căzii sau chiuvetei şi
racordaţi şina de ghidare
din dotare la robinet (a
se vedea gura). Capătul
liber al furtunului de golire
nu trebuie să rămână
cufundat în apă.
! Nu se recomandă folosirea furtunurilor prelungitoa-
re; dacă este indispensabil, acestea trebuie să aibă
acelaşi diametru ca şi furtunul original şi nu trebuie să
depăşească 150 cm lungime.
Racordarea electrică
Înainte de a introduce stecherul în priză, asiguraţi-vă ca:
• priza să e cu împământare şi conform prevederilor
legale;
• priza să poată suporta sarcina maximă de putere a
maşinii, indicată în tabelul Date Tehnice
(a se vedea alături);
Primul ciclu de spălare
După instalare, înainte de folosire, efectuaţi un ciclu de
spălare cu detergent şi fără rufe, selectând programul .
Date tehnice
Model
Dimensiuni
Capacitate
Legãturi electrice
Legãturi hidrice
Turaþia de centrifugare
Programe de control
în baza normei
2010/1061
ECO6D 1291
lãrgime: 59,5 cm
înãlþime: 85 cm
profunzime: 52,5 cm
De la 1 la 6 kg pentru spãlare
vezi eticheta cu caracteristicile tehnice, apli-
catã pe maºinã
presiune maximã: 1 MPa (10 bari)
presiune minimã: 0,05 MPa (0,5 bari)
capacitatea cuvei: 46 litri
pânã la 1200 de rotaþii pe minut
programul
40°C (Apãsaþi tasta TEMPERATURÃ).
(90°); temperatura 60°C şi
• tensiunea de alimentare să e cuprinsă în valorile indi-
cate în tabelul Date Tehnice (a se vedea alături);
• priza să e compatibilă cu stecherul maşinii de spălat.
În caz contrar înlocuiţi stecherul.
! Maşina de spălat nu trebuie instalată afară, nici chiar în
cazul în care spaţiul este adăpostit, deoarece este foarte
periculoasă expunerea maşinii la ploi şi furtuni.
! După instalarea maşinii de spălat, priza de curent tre-
buie să e uşor accesibilă.
Acest aparat este conform cu urmãtoarele
Directive Comunitare:e
- 2004/108/CE (Compatibilitate Electromagneticã)
- 2002/96/CE
- 2006/95/CE (Tensiuni Joase)
15
Page 16
Descrierea maşinii de spălat
RO
Panoul de control
Sertarul detergenţilor
PORNIRE/OPRIRE
Tastă
Taste
SELECTARE
PROGRAME
Tastă
MEMO
Tastă
PORNIRE
ÎNTÂRZIATĂ
Tastă
BLOCARE
TASTE
DISPLAY
Taste
FUNCŢII
Tastă
CENTRIFUGARE
Tastă cu led
START/PAUZĂ
Tastă
TEMPERATURĂ
Sertarul detergenţilor: pentru a introduce detergenţi sau
aditivi (a se vedea “Detergenţi şi rufe albe”).
Tastă PORNIRE/OPRIRE : apăsaţi scurt tasta pentru
a porni sau opri maşina de spălat. Indicatorul START/
PAUZĂ emite un semnal intermitent de culoare verde,
ceea ce vă conrmă pornirea maşinii. Pentru a opri
funcţionarea maşinii de spălat în timpul spălării, este necesar să ţineţi apăsată tasta circa 2 secunde; o apăsare
de scurtă durată sau accidentală nu va opri maşina.
Oprirea maşinii de spălat în timpul executării unui ciclu
va anula programul în curs de desfăşurare.
Taste SELECTARE PROGRAME: pentru a alege pro-
gramul dorit (a se vedea “Tabel de programe”).
Tastă MEMO: tţineţi apăsată tasta pentru a introduce în
memorie un ciclu personalizat după preferinţă. Pentru a
activa un ciclu memorat anterior, apăsaţi tasta MEMO.
Taste FUNCŢII: apăsaţi tasta pentru a alege funcţia
dorită. Pe display veţi observa aprinderea indicatorului
luminos.
Tastă CENTRIFUGARE : apăsaţi tasta pentru a reduce numărul de rotaţii sau a opri storcerea; numărul de
turaţii se poate vedea pe display.
Tastă TEMPERATURĂ : apăsaţi pentru a micşora
temperatura; valoarea va indicată pe display.
Tastă BLOCARE TASTE : pentru a bloca panoul de
comandă, ţineţi apăsată tasta timp de 2 secunde. Dacă
ledul corespunzător este aprins, atunci panoul de
comenzi este blocat. În acest fel, se evită modicarea
accidentală a unui program, în special de către copii.
Pentru a debloca panoul de comandă, ţineţi apăsată
tasta timp de 2 secunde.
Tastă PORNIRE ÎNTÂRZIATĂ : apăsaţi pentru a pro-
grama pornirea maşinii la o anumită oră. Întârzierea va
indicată pe display.
Tastă cu led START/PAUZĂ: când ledul verde emite
un semnal intermitent, apăsaţi tasta pentru a porni ciclul
de spălare. După activarea ciclului, ledul rămâne aprins.
Pentru a introduce o pauză în timpul spălării, apăsaţi
din nou tasta: ledul va emite o lumină intermitentă, de
culoare portocalie. După stingerea indicatorului luminos
, puteţi deschide uşa. Pentru a continua spălarea, de
unde a fost întreruptă, apăsaţi din nou tasta.
Modalitatea de stand by
Această maşină de spălat rufe, conform noilor norme
legate de economia de curent electric, este dotată cu
un sistem de oprire automat (stand-by) care intră în
funcţiune după 30 minute de neutilizare. Apăsaţi scurt
tasta PORNIRE/OPRIRE şi aşteptaţi repunerea în
funcţiune a maşinii.
16
Page 17
Display
RO
Z
B
A
F
X
D
C
E
Y
F
L
Ecranul este util pentru a programa maşina şi a furniza numeroase informaţii.
Pe cele două rânduri de sus, A şi B, apar programul de spălare ales, faza de spălare în curs de desfăşurare şi toate
indicaţiile cu privire la stadiul de avansare a programului.
Rândul C este dedicat timpului restant până la încheierea ciclului de spălare sau – dacă aţi programat pornirea maşinii la
o anumită oră (PORNIRE ÎNTÂRZIATĂ) – timpul restant până la iniţierea spălării.
Pe rândul D apare viteza maximă a storcătorului -admisă de maşină -în funcţie de programul ales; dacă programul nu
include o fază de centrifugare, atunci rândul este întunecat.
Pe rândul E apare temperatura maximă care poate selectată în funcţie de programul ales; dacă programul prevede
spălarea la rece, atunci rândul este întunecat.
Indicatoarele F se referă la funcţii şi se aprind când funcţia selectată este compatibilă cu programul ales.
Indicator Uşă blocată
Simbolul aprins indică faptul că uşa este blocată, pentru a împiedica deschiderea accidentală. Pentru a evita daune este
necesar să se aştepte ca simbolul să se stingă înainte de a deschide uşa.
N.B.: dacă funcţia PORNIRE ÎNTÂRZIATĂ este activă, uşa nu se poate deschide; pentru a o deschide, apăsaţi tasta
START/PAUZĂ pentru a întrerupe momentan programarea.
! La punerea în funcţiune a maşinii (prima dată) vi se va cere să selectaţi limba; ecranul va aşa direct meniul de alegere
limbă.
Pentru a alege limba dorită, apăsaţi tastele X şi Y iar pentru a conrma alegerea, apăsaţi tasta Z.
Dacă vreţi să schimbaţi limba, opriţi maşina, apăsaţi în acelaşi timp pe butoanele indicate în imagine cu reperul L până
când auziţi un semnal acustic, porniţi din nou maşina şi va aşat meniul de selectare a limbii.
17
Page 18
Cum se desfăşoară un ciclu de
spălare
RO
1. PUNEREA ÎN FUNCŢIUNE A MAŞINII. Apăsaţi tasta
; pe ecran va apărea mesajul BINE AŢI VENIT.
Indicatorul START/PAUZĂ va emite un semnal
intermitent de culoare verde.
2. INTRODUCEREA RUFELOR. Deschideţi uşa.
Introduceţi rufele în maşină, ind atenţi să nu depăşiţi
cantitatea indicată în tabelul de programe (vezi pagina
următoare).
3. DOZAREA DETERGENTULUI. Extrageţi sertarul şi
turnaţi detergent în compartimentele respective, după
indicaţiile din cap. „Detergenţi şi rufe albe”.
4. ÎNCHIDEŢI UŞA.
5. ALEGEREA PROGRAMULUI. Apăsaţi una din
tastele de SELECTARE PROGRAME pentru a alege
programul dorit; numele programului va aşat pe
ecran, împreună cu temperatura de spălare şi viteza
storcătorului, acestea din urmă putând modicate.
Pe ecran va apărea şi durata ciclului.
6. PERSONALIZAREA CICLULUI DE SPĂLARE.
Apăsaţi tastele respective.
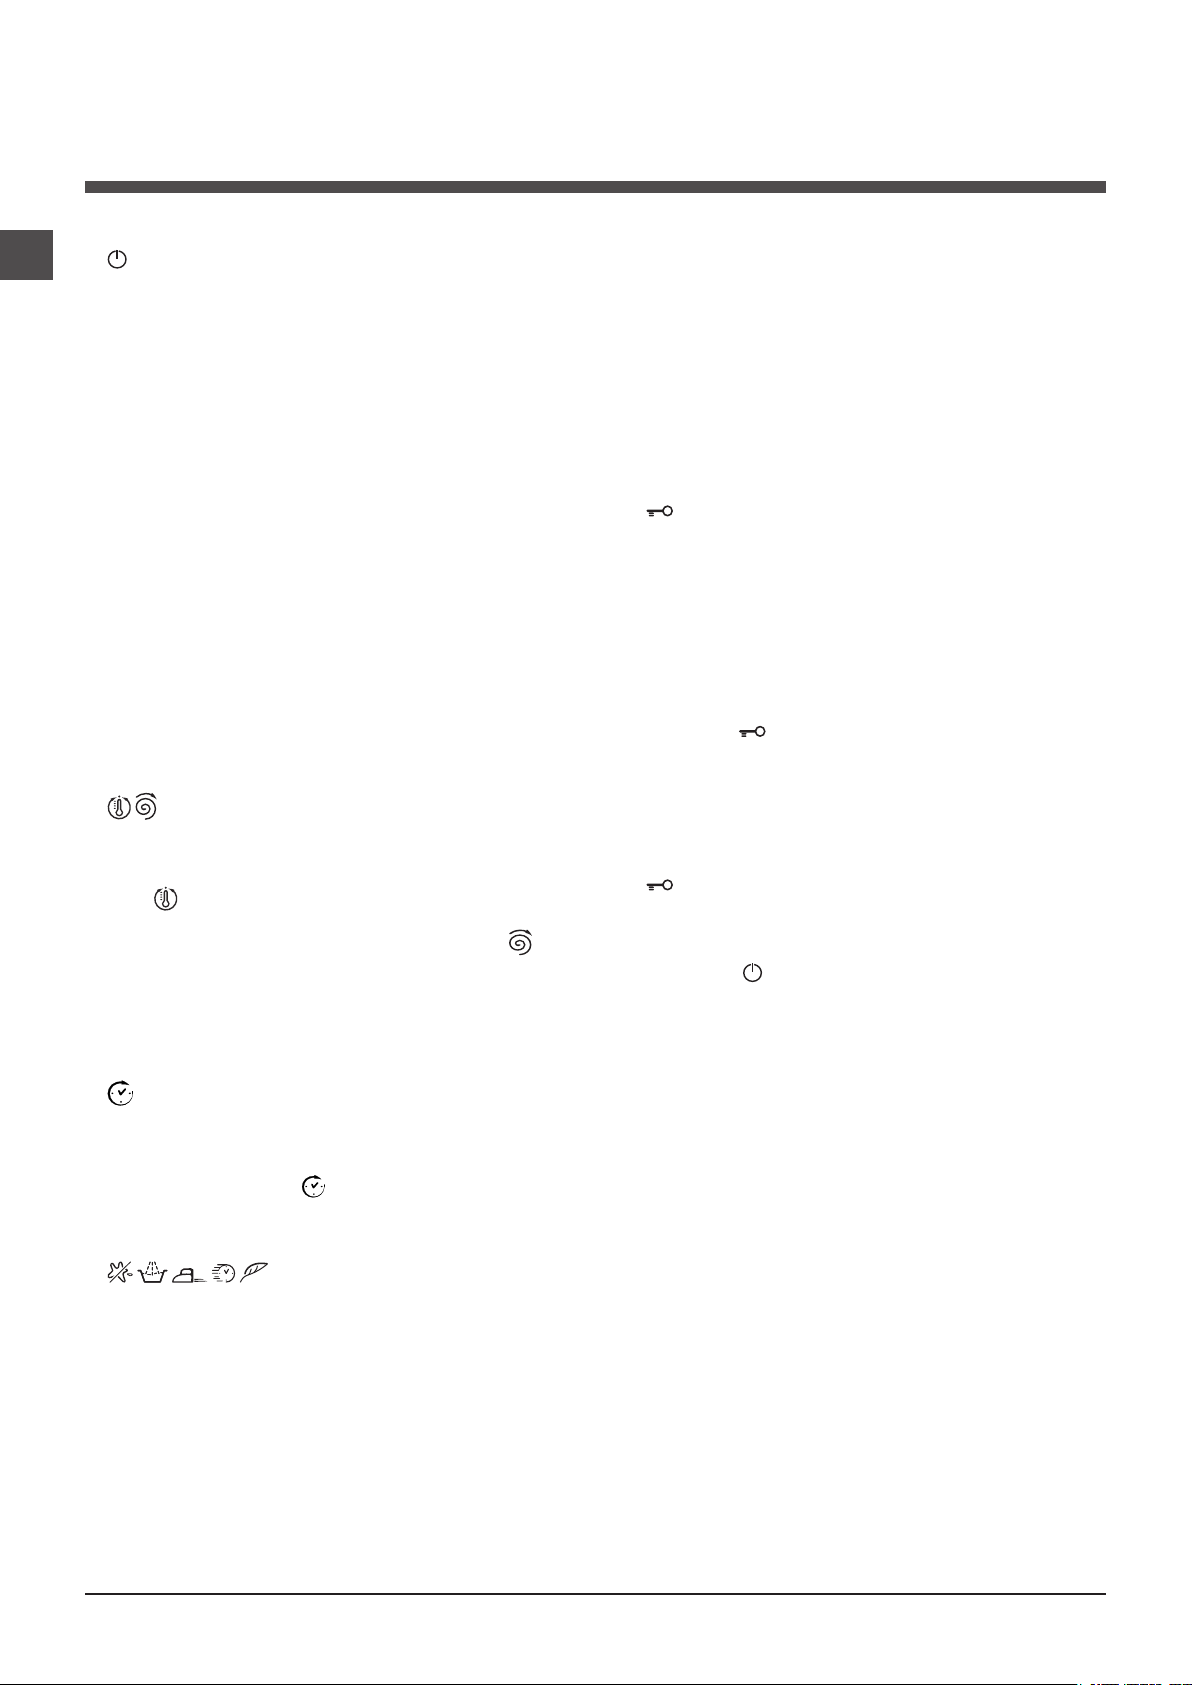
Modicare temperaturii şi/sau a vitezei de
stoarcere. Maşina selectează automat temperatura şi
viteza de stoarcere maxime, din cele prevăzute pentru
programul ales; aceste valori nu pot mărite. Apăsând
tasta se poate reduce progresiv temperatura până
la excluderea completă a încălzirii apei, “OFF”, care
corespunde cu spălarea la rece. Apăsând tasta
puteţi micşora treptat viteza de stoarcere, până la
zero, anulând complet centrifuga “OFF”. Din acest
moment, apăsarea ulterioară a tastelor va aduce
valorile de temperatură şi viteză de stoarcere la cele
maxime prevăzute.
! Dacă funcţia aleasă nu este compatibilă cu o funcţie
selectată anterior, indicatorul care corespunde primei
funcţii va emite un semnal intermitent iar indicatorul
celei de a doua se va aprinde: acest lucru înseamnă
că se va activa numai a doua funcţie (ultima aleasă).
! Cantitatea de rufe admisă precum şi durata ciclului
pot varia în funcţie de funcţia aleasă.
7. ACTIVAREA UNUI PROGRAM. Apăsaţi tasta START/
PAUZĂ. Indicatorul luminos se va aprinde (culoarea
verde) şi uşa se va bloca (simbolul UŞĂ BLOCATĂ
se va aprinde). În timpul spălării, pe ecran va
apărea numele fazei în curs de desfăşurare. Pentru
a modica un program în timpul executării unui ciclu,
apăsaţi tasta START/PAUZĂ pentru a întrerupe
momentan ciclul; indicatorul corespunzător tastei
START/PAUZĂ se va aprinde intermitent (culoarea
portocalie). Alegeţi noul ciclul dorit şi apăsaţi din nou
tasta START/PAUZĂ.
Pentru a deschide uşa în timpul executării unui ciclu,
apăsaţi tasta START/PAUZĂ; când simbolul UŞĂ
BLOCATĂ se stinge, puteţi deschide uşa. Apăsaţi
din nou tasta START/PAUZĂ pentru a relua programul
de unde era oprit.
8. TERMINAREA PROGRAMULUI. La încheierea
ciclului, pe ecran va apărea mesajul “SFÂRŞITUL
PROGRAMULUI”; când simbolul UŞĂ BLOCATĂ
se stinge, puteţi deschide uşa. Deschideţi uşa,
scoateţi rufele şi opriţi maşina de spălat.
! Dacă doriţi să anulaţi un ciclu deja demarat,ţineţi
apăsată tasta câteva secunde. Ciclul va înceta
denitiv iar maşina se va opri.
Congurarea pornirii întârziate.
Pentru a programa pornirea întârziată a maşinii,
apăsaţi tasta respectivă pentru a alege timpul de
întârziere dorit. Când opţiunea este activă, pe ecran
se va aprinde simbolul . Pentru a anula pornirea
întârziată, apăsaţi tasta până când pe ecran veţi
vedea mesajul OFF.
Modicarea caracteristicilor
unui ciclu.
• Apăsaţi tasta pentru a activa funcţia; ledul
corespunzător butonului se va aprinde.
• Apăsaţi din nou tasta pentru a dezactiva funcţia;
indicatorul luminos se va stinge.
! Dacă funcţia selectată nu este compatibilă cu
programul ales, ledul corespunzător se va aprinde
intermitent iar funcţia nu se va activa.
18
Page 19
Programe şi funcţii
M
AX
1
3
2
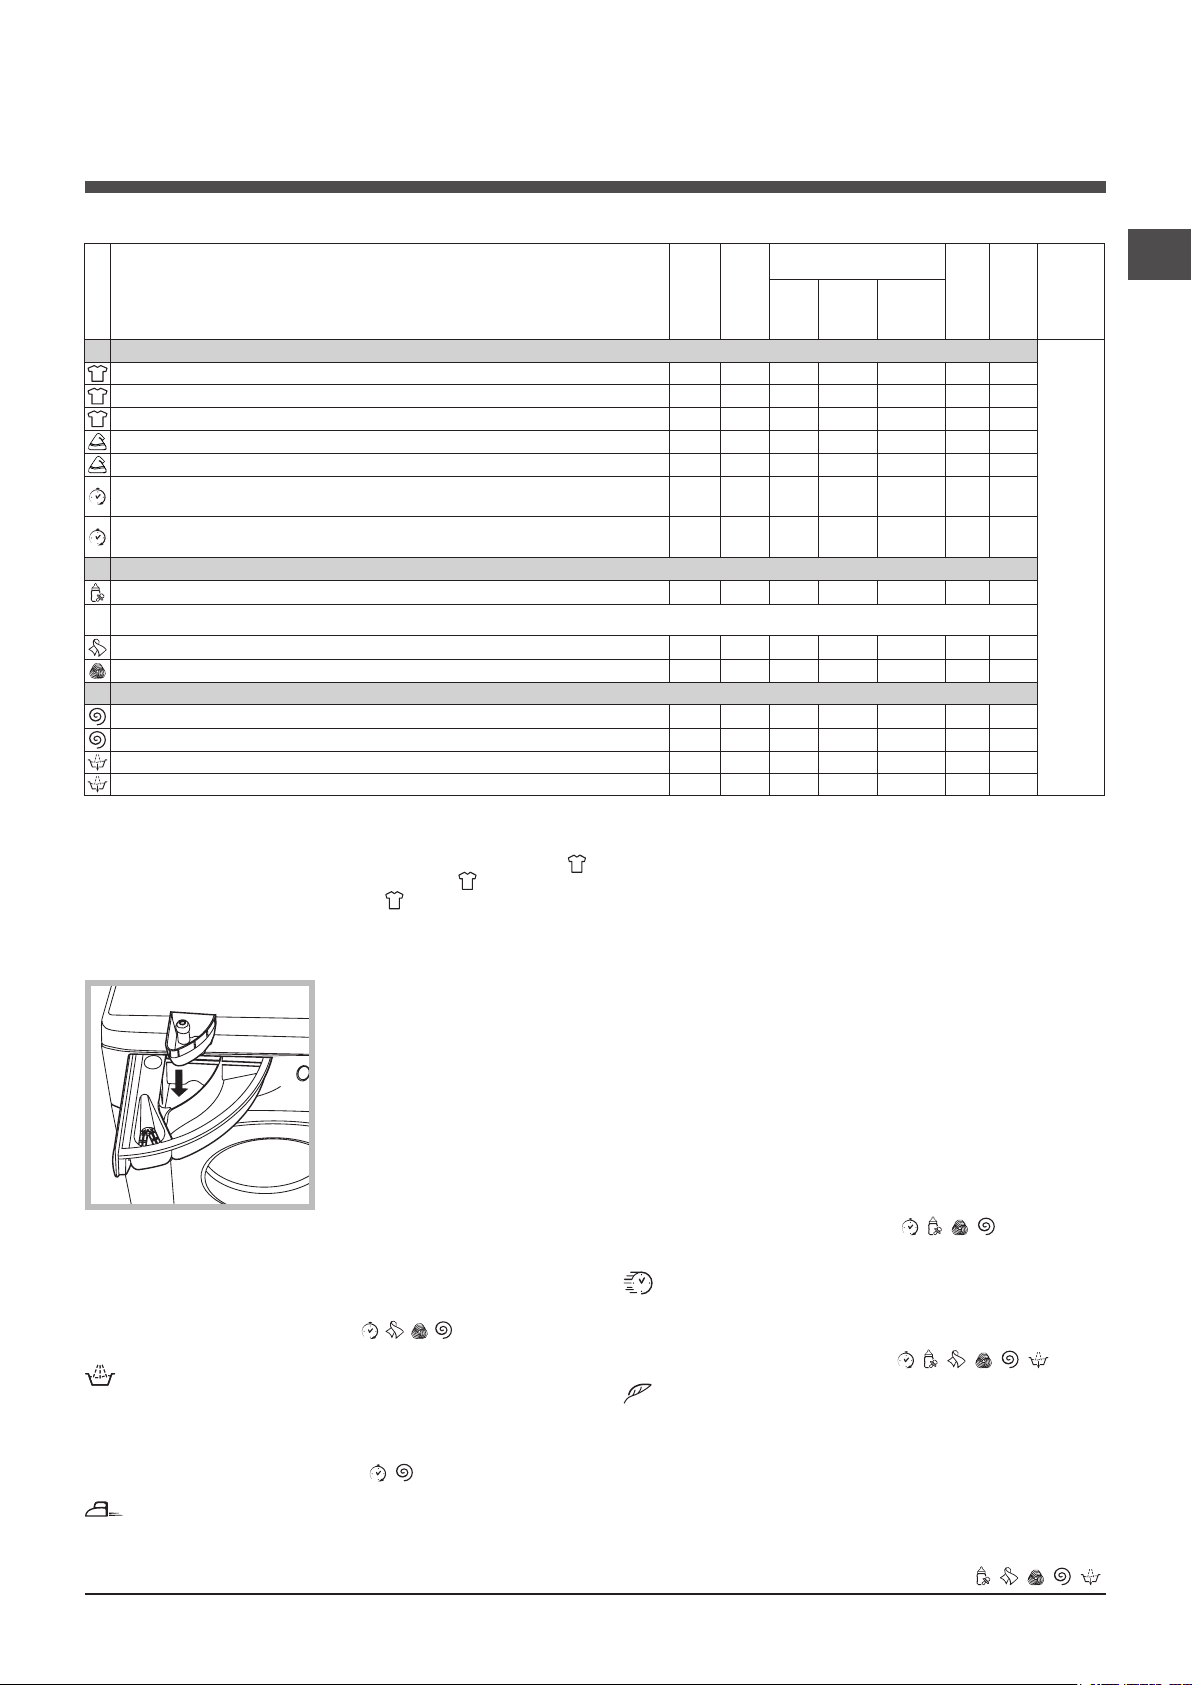
Tabel de programe
Viteza
max.
Descrierea Programului
Programe
Programe zilnice
Rufe albe bumbac (1-2): albe extrem de murdare (cearceafuri, feþe de masã, etc.).
Rufe albe bumbac: albe si colorate rezistente foarte murdare.
Rufe albe bumbac (3): colorate delicate putin murdare.
Sintetice rezistente (1-a apãsare a tastei): colorate rezistente foarte murdare.
Sintetice delicate (2-a apãsare a tastei): colorate rezistente putin murdare.
Mix 30' (1-a apãsare a tastei): pentru a spala rapid articolele putin murdare
(nu este indicat pentru lâna, matase si articole de spalat cu mâna).
Mix 15' (2-a apãsare a tastei): pentru a spala rapid articolele putin murdare
(nu este indicat pentru lâna, matase si articole de spalat cu mâna).
Programe Speciale / Memo
Ciclu Baby: colorate delicate foarte murdare.
Memo: permite memorarea oricãrui tip de spãlare.
M
Mãtase/Perdele: pentru articolele din matase, viscoza, lenjerie.
Lânã: pentru articole din lâna, casmir.
Programe parþiale
Centrifugare (1-a apãsare a tastei).
Centrifuga uºoarã (2-a apãsare a tastei).
Clãtire (1-a apãsare a tastei).
Evacuare (2-a apãsare a tastei).
Durata ciclului indicată pe display sau în carte este calculată în baza unor condiţii standard. Timpul efectiv poate varia în baza a numeroşi factori, precum temperatura şi presiunea apei la intrare,
temperatura mediului, cantitatea de detergent, cantitatea şi tipul încărcăturii, echilibrarea încărcăturii, opţiunile suplimentare selectate.
Pentru toate Instituţiile de Testare:
(1) Programul de control conform normei 2010/1061:
(2) Program pentru bumbac, prelungit: setaţi programul
(3) Program bumbac, rapid: setaţi programul 40°C.
setaţi programul
(90°C);
temperatura 40°C (Apăsaţi tasta TEMPERATURĂ).
(90°C);
Temp.
(rotaþii
max.
pe mi-
(°C)
nut)
90°
1200
60°
1200
40°
1200
60°
800
40°
800
30°
800
30°
800
40°
800
30°
0
40°
800
-
1200 - - - 6 -
-
800 - - - 2,5 -
-
1200 -
-
0 - - - 6 -
temperatura 60°C şi 40°C (Apăsaţi tasta TEMPERATURĂ).
Funcţii de spălare
Detergenþi
Pre-
spãla-reSpãlare
-
-
-
-
Balsam
rufe
Sar-
cina
Max.
(Kg)
6 6
6 6
6 6
2,5 2,5
2,5 2,5
3 2,5
1,5 -
2 -
1 1,5 -
6 -
Eco
Wash
Durata
ciclului
de spa-
lare
Puteþi vizualiza durata programelor de spãlare pe display.
RO
Antipată
Această funcţie este utilă
pentru a elimina petele rezistente. Introduceţi sertarul
adiţional 3, din dotare, în
sertarul 1. Când dozaţi decolorantul nu depăşiţi nivelul
„max” indicat pe pivotul central (a se vedea gura).Pentru a efectua numai ciclul de
decolorare, turnaţi decolo-
rantul în sertarul adiţional 3,
selectaţi programul “Clătire” şi activaţi funcţia “Antipată”.
Pentru a decolora rufele în timpul spălării, turnaţi detergentul şi aditivele, selectaţi programul dorit şi activaţi
funcţia “Antipată”.
! Nu poate activată cu programele , , , , şi “Evacuare”.
Extra Clătire
Selectând această opţiune, clătirea va mai ecientă, ceea
ce asigură eliminarea totală a detergentului din rufe. Este
recomandată cu precădere persoanelor cu pielea sensibilă.
! Nu se poate activa cu programele , şi Evacuare”.
Călcare Uşoară
Selectând această opţiune, spălarea şi centrifuga vor fi
modicate în mod oportun, pentru a reduce plierea rufelor.
La încheierea ciclului, maşina de spălat va efectua o rotaţie
lentă a coşului, indicatorul funcţiei CĂLCARE USOARA,
ca şi cel de START/PAUZĂ vor emite semnale intermitente
(portocalii) iar pe display va apărea mesajul “SFÂRŞITUL
PROGRAMULUI”. Pentru a termina ciclul, apăsaţi tasta
START/PAUZĂ sau tasta CĂLCARE USOARA. Pe programul
pentru MĂTASE maşina va încheia ciclul lăsând rufele la
înmuiat iar indicatoarele CĂLCARE USOARA şi cel de START/
PAUZĂ vor emite semnale intermitente (portocalii) în timp ce
pe display va aprăe mesajul “SIGURANŢĂ APĂ”. Pentru a
goli apa din maşină şi a scoate rufele, apăsaţi tasta START/
PAUZĂ sau tasta CĂLCARE USOARA.
! Nu se poate activa cu programele , , , şi
“Evacuare”.
Rapid
Pentru a reduce durata ciclului de spălare, garantând în
acelaşi timp o economie de apă şi energie.
! Nu poate activată pe programele , , , , , .
Eco Wash
Funcţia Eco Wash contribuie la economia de energie,
neîncălzind apa folosită pentru spălarea rufelor – un avantaj
atât pentru mediul înconjurător, cât şi pentru factura de curent
electric. Într-adevăr, acţiunea mai puternică şi consumul optimizat de apă garantează rezultate optime în aceeaşi durată
medie a unui ciclu standard. Pentru a obţine rezultate mai
bune ale spălării, se recomandă folosirea unui detergent lichid.
! Nu poate activată pe programele “Mix 15’”, , , , , .
19
Page 20
Detergenţi şi rufe albe
M
AX
1
3
2
RO
Compartimentul pentru detergenţi
Un rezultat bun la spălare depinde şi de dozarea corectă
a detergentului: excesul de detergent nu garantează o
spălare mai ecientă, ci contribuie la deteriorarea părţilor
interne ale maşinii de spălat şi la poluarea mediului
înconjurător.
! Nu introduceţi în maşină detergenţii pentru spălarea
manuală deoarece formează prea multă spumă.
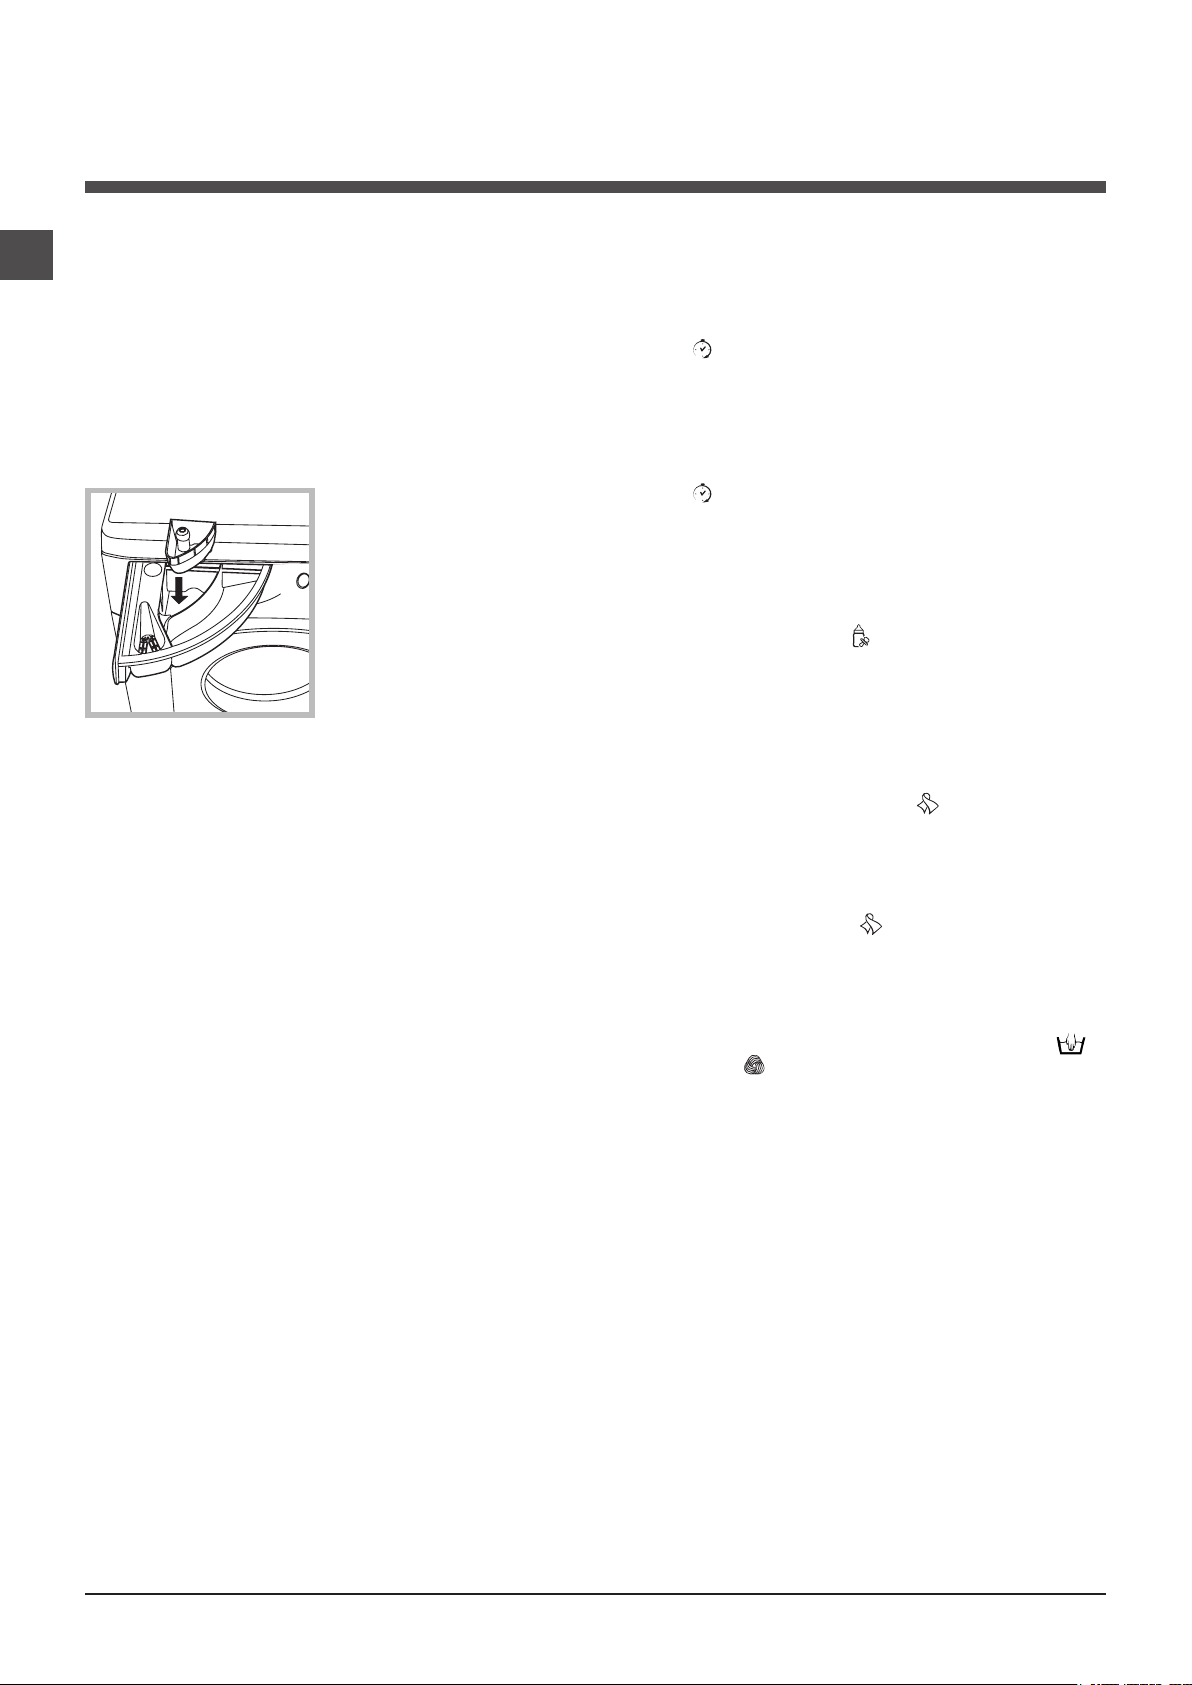
Deschideţi compartimentul pentru detergenţi şi
introduceţi detergentul
sau aditivul după cum
urmează:
compartiment 1: Detergent pentru spălare
(sub formă de praf sau lichid)
Detergentul lichid trebuie vărsat doar înainte de pornire.
compartiment 2: Aditivi
(soluţie de înmuiat, balsam rufe etc.)
Soluţia de înmuiat nu trebuie să iasă deasupra grătarului.
compartiment adiþional 3: Decolorant (Inãlbitor)
Pregătirea rufelor
• Sortaţi rufele în funcţie de:
- tipul de material / simbolul de pe etichetă.
- culori: separaţi rufele colorate de cele albe.
• Goliţi buzunarele şi controlaţi nasturii.
• Nu depăşiţi valorile indicate, referitoare la greutatea
rufelor uscate:
Ţesături rezistente: max 6 kg
Materiale sintetice: max 2,5 kg
Ţesături delicate: max 2 kg
Lână: max 1,5 kg
Mătase: max 1 kg
Cât cântăresc rufele?
1 cearceaf 400-500 g.
1 faţă de pernă 150-200 g.
1 faţă de masă 400-500 g.
1 halat de baie 900-1.200 g.
1 prosop 150-250 g.
Programe optionale
Mix 30’: a fost studiat pentru a spăla articolele foarte
puţin murdare, în mod rapid: durează doar 30 de minute
ceea ce economiseşte energie şi timp. Selectând programul ( la 30°C) este posibilă spălarea articolelor din
materiale diferite (excluse lâna şi mătasea) cu o greutate
maximă de 3 kg.
Mix 15’: a fost studiat pentru a spăla articolele foarte
puţin murdare, în mod rapid: durează doar 15 de minute
ceea ce economiseşte energie şi timp. Selectând programul ( la 30°C) este posibilă spălarea articolelor din
materiale diferite (excluse lâna şi mătasea) cu o greutate
maximă de 1,5 kg.
Ciclu Baby: programul îndepărtează ecient atât mizeria
care pătează în mod obişnuit hainele copiilor cât şi detergentul, în scopul de a evita apariţia unor alergii pe pielea
delicată a celor mici. Ciclul a fost conceput pentru a
diminua încărcarea bacteriană prin folosirea unei cantităţi
de apă mai mari şi prin optimizarea aditivilor speciali de
igienizare, adăugati la detergent.
La încheierea ciclului de spălare, maşina efectuează o
rotaţie lentă a cuvei, pentru a limita şifonarea; pentru a
termina ciclul, apăsaţi tasta START/PAUZĂ.
Mătase: utilizaţi programul special pentru spălarea
articolelor din mătase. Se recomandă folosirea unui
detergent special pentru articole delicate.
Perdele: vă recomandăm să le pliaţi şi să le introduceţi
în sacul din dotare (accesoriu optional, doar la unele
modele). Utilizaţi programul .
Lână: este unica maşină de spălat recunoscută de
Woolmark Company, care i-a acordat Woolmark Platinum Care (M.0508), ca garanţie a calităţii de spălare
cu maşina a tuturor articolelor de lână, inclusiv a celor
care au pe etichetă menţiunea „a se spăla manual” .
Cu programul puteţi deci spăla la maşină, în cea mai
mare siguranţă, toate articolele din lână (max. 1,5 kg) cu
garanţia de a obţine cele mai performante rezultate.
Sistemul de echilibrare a încărcăturii
Pentru a evita trepidaţiile excesive, înainte de stoarcere, cuva maşinii va distribui cantitatea de rufe în mod
uniform, centrifuga efectuând câteva rotaţii la o viteză
mai mare decât viteza de spălare. Dacă, după numeroase încercări, maşina nu reuşeşte să echilibreze
greutatea, stoarcerea rufelor se va face la o viteză mai
mică decât cea prevăzută în program. Dacă instabilitatea
este prea mare, maşina va distribui greutatea în locul
centrifugei. Pentru a favoriza o mai bună repartizare a
rufelor şi echilibrarea corectă a maşinii, se recomandă să
introduceţi în maşină atât articole mari cât şi mici.
20
Page 21
Precauţii şi sfaturi
20
! Maşina de spălat a fost proiectată şi construită conform
normelor internaţionale de protecţie. Aceste avertizări
sunt furnizate din motive de siguranţă şi trebuie să e
citite cu atenţie.
Norme de protecţie şi siguranţă generale
• Acest aparat a fost conceput exclusiv pentru utilizarea
în locuinţe unifamiliale.
• Aparatul nu trebuie utilizat de către persoane (inclusiv
copii) cu capacităţi zice, senzoriale sau mentale redu-
se şi cu experienţă sau cunoştinţe insuciente, excep-
tînd cazul în care această utilizare are loc sub suprave-
gherea sau instrucţiunile unei persoane responsabile
cu securitatea lor. Copiii trebuie supravegheaţi pentru a
vă asigura că nu se joacă cu aparatul.
• Nu atingeţi maşina când sunteţi desculţi sau cu mâinile
sau picioarele ude sau umede.
• Nu scoateţi stecherul din priză trăgând de cablu.
• Nu deschideţi compartimentul pentru detergent în timp
ce maşina se aă în funcţiune.
• Nu atingeţi apa golită din maşină: poate avea o
temperatură ridicată.
• Nu forţaţi în nici un caz uşa: s-ar putea deteriora
mecanismul de siguranţă care evită deschiderea
accidentală.
• În caz de defecţiune, nu umblaţi în nici un caz la meca-
nismele din interior şi nu încercaţi să o reparaţi singuri.
• Controlaţi mereu ca în apropierea maşinii aate în
funcţiune, să nu se ae copii.
• Pe durata spălării uşa se poate încălzi.
• Dacă trebuie să deplasaţi maşina, cereţi ajutor unei
alte (sau 2) persoane şi ţi foarte atenţi. Niciodată nu
deplasaţi maşina singuri deoarece aceasta este foarte
grea.
• Înainte de a introduce rufele, controlaţi cuva să e
goală.
Pentru informaţii suplimentare cu privire la scoaterea din uz
a electrocasnicelor, deţinătorii acestora pot apela la centrele
de colectare a deşeurilor sau la vânzătorii de la care au
achiziţionat produsele respective.
Deschiderea manuală a uşii
Dacă nu este posibil să deschideţi uşa din cauza întreruperii curentului electric şi doriţi totuşi să întindeţi rufele,
procedaţi după cum urmează:
1. scoateţi stecherul din
priză.
2. vericaţi ca nivelul de
apă din maşină să e sub
marginea uşii; în caz contrar,
scoateţi apa în exces cu
ajutorul furtunului de golire,
punând-o într-un vas, după
indicaţiile din gura.
3. scoateţi panoul de acoperire din partea din faţă a
maşinii de spălat folosind o
şurubelniţă
(a se vedea gura).
RO
Aruncarea reziduurilor
• Eliminarea ambalajelor: respectaţi normele locale, în
acest fel ambalajele vor putea utilizate din nou.
• Directiva Europeană 2002/96/CE cu privire la deşeurile care
provin de la aparatura electrică sau electronică prevede ca
aparatele electrocasnice să nu e colectate împreună cu
deşeurile urbane solide, obişnuite. Aparatele scoase din uz
trebuie să e colectate separat atât pentru a optimiza rata de
recuperare şi de reciclare a materialelor componente cât şi
pentru a evita pericolele care pot duce la dăunarea sănătăţii
omului sau poluarea mediului înconjurător. Simbolul tom-
beronului tăiat care apare pe toate produsele vă aminteşte
tocmai obligaţia de a le colecta separat.
4. utilizând dispozitivul indicat în gură, trageţi spre
dumneavoastră până când eliberaţi tirantul de plastic din
opritor; trageţi apoi în jos şi, în acelaşi timp, deschideţi
uşa.
5. montaţi din nou panoul vericând, înainte de a-l împinge spre maşină, de a introdus cârligele în oriciile
respective.
21
Page 22
Întreţinere şi curăţare
1
2
RO
Întreruperea alimentării cu apă şi curent
electric
• Închideţi robinetul de apă după ecare spălare. Se
limitează astfel uzura instalaţiei hidraulice a maşinii de
spălat şi se elimină pericolul scurgerilor.
• Scoateţi stecherul din priza de curent atunci când
curăţaţi maşina de spălat şi când se efectuează lucrări
de întreţinere.
Curăţarea maşinii de spălat
Partea externă şi părţile din cauciuc pot curăţate cu
o lavetă înmuiată în apă călduţă şi săpun. Nu folosiţi
solvenţi sau substanţe abrazive.
Curăţarea compartimentului pentru detergent
Trageti afara compatimentul ridicându-l si tragându-l
spre exterior (a se vedea
gura).
Spălaţi-l sub un jet de apă;
această operaţie trebuie
efectuată cât mai des
posibil.
Curăţarea pompei
Maşina de spălat este dotată cu o pompă de
autocurăţare care nu are nevoie de întreţinere. Se poate
întâmpla însă ca unele obiecte mici (monede, nasturi)
să cadă în anticamera care protejează pompa, situată în
partea inferioară a acesteia.
! Vericaţi ca ciclul de spălare să e încheiat şi scoateţi
stecherul din priză.
Pentru a avea acces la anticameră:
1. scoateţi panoul de acoperire din partea din faţă a
maşinii de spălat folosind
o şurubelniţă
(a se vedea gura);
2. deşurubaţi capacul
rotindu-l în sens invers
acelor de ceasornic (a se
vedea gura). Este normal
să iasă puţină apă;
Îngrijirea uşii şi a tamburului
• Lăsaţi mereu uşa întredeschisă pentru a evita forma-
rea de mirosuri neplăcute.
3. curăţaţi cu grijă interiorul;
4. înşurubaţi la loc capacul;
5. montaţi din nou panoul vericând, înainte de a-l împinge spre maşină, de a introdus cârligele în oriciile
respective.
Controlarea furtunului de alimentare cu apă
Controlaţi tubul de alimentare cel puţin o dată pe an.
Dacă prezintă crăpături sau suri trebuie înlocuit: pe parcursul spălărilor, presiunea puternică ar putea provoca
crăpături neaşteptate.
! Nu folosiţi niciodată tuburi folosite deja.
22
Page 23

Anomalii şi remedii
Se poate întâmpla ca maşina de spălat să nu funcţioneze. Înainte de a apela serviciul de Service (a se vedea
“Asistenţă”), vericaţi dacă nu este vorba de o problemă uşor de rezolvat:
Anomalii:
Maşina de spălat nu porneşte.
Ciclul de spălare nu porneşte.
Maşina de spălat nu se alimentează
cu apă (Pe display va apărea mesajul
“NU SE ALIMENTEAZĂ, DESCHIDEŢI
ROBINETUL”).
Maşina de spălat încarcă şi descarcă
apă continuu.
Cauze posibile / Rezolvare:
• Stecherul nu este introdus în priza de curent, sau nu face contact.
• Aveţi o pană de curent la domiciliu.
• Uşa nu este bine închisă.
• Tasta PORNIRE/OPRIRE nu a fost apăsată.
• Tasta START/PAUZĂ nu a fost apăsată.
• Robinetul de apă nu este deschis.
• A fost xată o întârziere de pornire (a se vedea “Cum se desfăşoară un ciclu
de spălare”).
• Furtunul de alimentare cu apă nu este racordat la robinet.
• Furtunul este îndoit.
• Robinetul de apă nu este deschis
• Apa la domiciliul dumneavoastră.
• Apa nu are presiune sucientă.
• Tasta START/PAUZĂ nu a fost apăsată.
• Furtunul de golire nu a fost instalat la o înălţime cuprinsă între 65 şi 100 cm
de pământ (a se vedea “Instalare”).
• Capătul furtunului de evacuare este cufundat în apă (a se vedea “Instalare”).
• Evacuarea din perete nu are răsuare pentru aer.
Dacă după aceste vericări problema nu se rezolvă, închideţi robinetul de apă, opriţi
maşina de spălat şi chemaţi Service-ul. Dacă locuinţa se aă la ultimele etaje ale unui
ediciu, este posibil să aibă loc fenomene de sifonare, motiv pentru care maşina de
spălat încarcă şi descarcă apă încontinuu. Pentru a elimina acest inconvenient, se
găsesc în comerţ supape anti-sifonare.
RO
Maşina de spălat nu se goleşte sau
nu stoarce.
Maşina de spălat vibrează foarte mult
în timpul stoarcerii.
Maşina de spălat pierde apă.
Maşina este blocată iar ecranul se va
aprinde intermitent semnalând un cod de
anomalie (de ex., F-01, F-..).
Se formează prea multă spumă.
• Programul nu prevede golirea apei: în cazul anumitor programe, este
necesară activarea manuală (a se vedea “Programe şi funcţii”).
• Funcţia CĂLCARE UŞOARĂ este activă: pentru a încheia programul,
apăsaţi tasta START/PAUZĂ (a se vedea “Programe şi funcţii”).
• Furtunul de golire este îndoit (a se vedea “Instalare”).
• Conducta de descărcare este înfundată.
• Cuva, în momentul instalării, nu a fost deblocată în mod corespunzător (a se
vedea “Instalare”).
• Maşina de spălat este în pantă (a se vedea “Instalare”).
• Maşina de spălat este prea aproape de pereţi şi mobilier (a se vedea “Instalare”).
• Furtunul de alimentare cu apă nu este bine înşurubat (a se vedea “Instalare”).
• Compartimentul de detergenţi este înfundat (pentru a-l curăţa a se vedea
“Întreţinere şi curăţare”).
• Furtunul de golire nu este bine xat (a se vedea “Instalare”).
• Opriţi maşina şi scoateţi stecherul din priză; aşteptaţi aproximativ 1 minut
înainte de a o reaprinde. Dacă nu obţineţi nici un rezultat, apelaţi Centrul de
service pentru asistenţă.
• Detergentul nu este compatibil cu maşina de spălat (trebuie să e scris
„pentru maşina de spălat”, „de mână sau în maşina de spălat”, sau ceva
asemănător).
• Dozajul a fost excesiv.
23
Page 24

Asistenţă
RO
Înainte de a lua legătura cu Service-ul:
• Vericaţi dacă puteţi rezolva singuri problema (a se vedea “Anomalii şi remedii”);
• Porniţi din nou programul pentru a controla dacă inconvenientul a fost eliminat;
• În caz negativ, luaţi legătura cu asistenţa tehnică autorizată la numărul telefonic indicat pe certicatul de garanţie.
! Nu apelaţi niciodată la persoane neautorizate.
Comunicaţi:
• tipul de anomalie;
• modelul maşinii (Mod.);
• numărul de serie (S/N).
Aceste informaţii sunt specicate pe plăcuţa cu date tehnice, lipită în partea din spate a maşinii de spălat precum şi în
partea anterioară, după ce deschideţi uşa.
24
Page 25

25
Page 26
26
Page 27
65 - 100 cm
минимално налягане 0,05 МРа (0,5 bar)
!
!
!
!
!
!
Технически данни
Модел ECO6D 1291
Размери
Вместимост От 1 до 6 кг за пране
Електрическо
захранване
Захранване с
вода
Скорост на
центрофугата
Програми
за проверка
съгласно норма
2010/1061
ширина 59,5 см
височина 85 см
дълбочина 52,5 см
Виж табелката с характеристиките,
поставена на машината
максимално налягане 1 МРа (10 bar)
обем на казана 46 литра
до 1200 оборота/минута
програма (90°); температура
60°C
(Натискайки бутон
ТЕМПЕРАТУРА).
Пералната машина съответства на
следните Европейски директиви:
- 2004/108/CE (за електромагнитна
съвместимост)
- 2006/95/CE (за ниско напрежение)
- 2002/96/CE
27
Page 28
28
Page 29
!
29
Page 30
!
!
!
!
30
Page 31
M
AX
1
3
2
M
Продължителността на цикъла, показана на дисплея или посочена в ръководството, е приблизително изчислена въз основа на стандартните условия. Реалното времетраене може да
варира в зависимост от множество фактори като температура и налягане на водата при пълнене, температура на въздуха в помещението, количество перилен препарат, количество,
вид и тегло на прането, допълнително избрани опции.
За всички институции, извършващи изпитания:
(1) Програма за проверка съгласно стандарт 2010/1061: задайте програма (90°C); температура 60°C и 40° C (Натискайки бутон ТЕМПЕРАТУРА).
(2) Продължителна програма за памук: задайте програма (90°C); температура 40° C (Натискайки бутон ТЕМПЕРАТУРА).
(3) Кратка програма за памук: задайте програма (40°C).
Срещу петна
Тази функция е полезна за
отстраняване на по-упорити
петна.Поставете приложената
допълнителна ваничка 3 в
отделение 1. При дозиране на
белината не надвишавайте
максималното ниво, показано
на централния палец (виж
фигурата). За да извършите
само избелване, сипете
избелващия препарат в
допълнителната ваничка 3, задайте програма “Изплакване”
и включете функцията “Срещу петна”. За да избелвате
по време на пране, изсипете перилния препарат и
допълнителните препарати, задайте желаната програма и
включете функцията “Срещу петна”.
! Не може да се активира с програми , , , , и
90° 1200
60° 1200
40° 1200
60° 800
40° 800
30° 800
30° 800
40° 800
30° 0
40° 800
!
!
- 1200 - - - 6 -
- 800 - - - 2,5 -
- 1200 -
- 0 - - - 6 -
“Изпомване”.
! ,
!
-
-
-
-
6 6
6 6
6 6
2,5 2,5
2,5 2,5
3 2,5
1,5 -
2 -
1 -
1,5 -
6 -
31
Page 32
M
AX
1
3
2
32
Page 33
20
!
33
Page 34
1
2
!
34
!
Page 35

35
Page 36

195091643.00
03/2011 - Xerox Fabriano
!
36
 Loading...