

Page 1
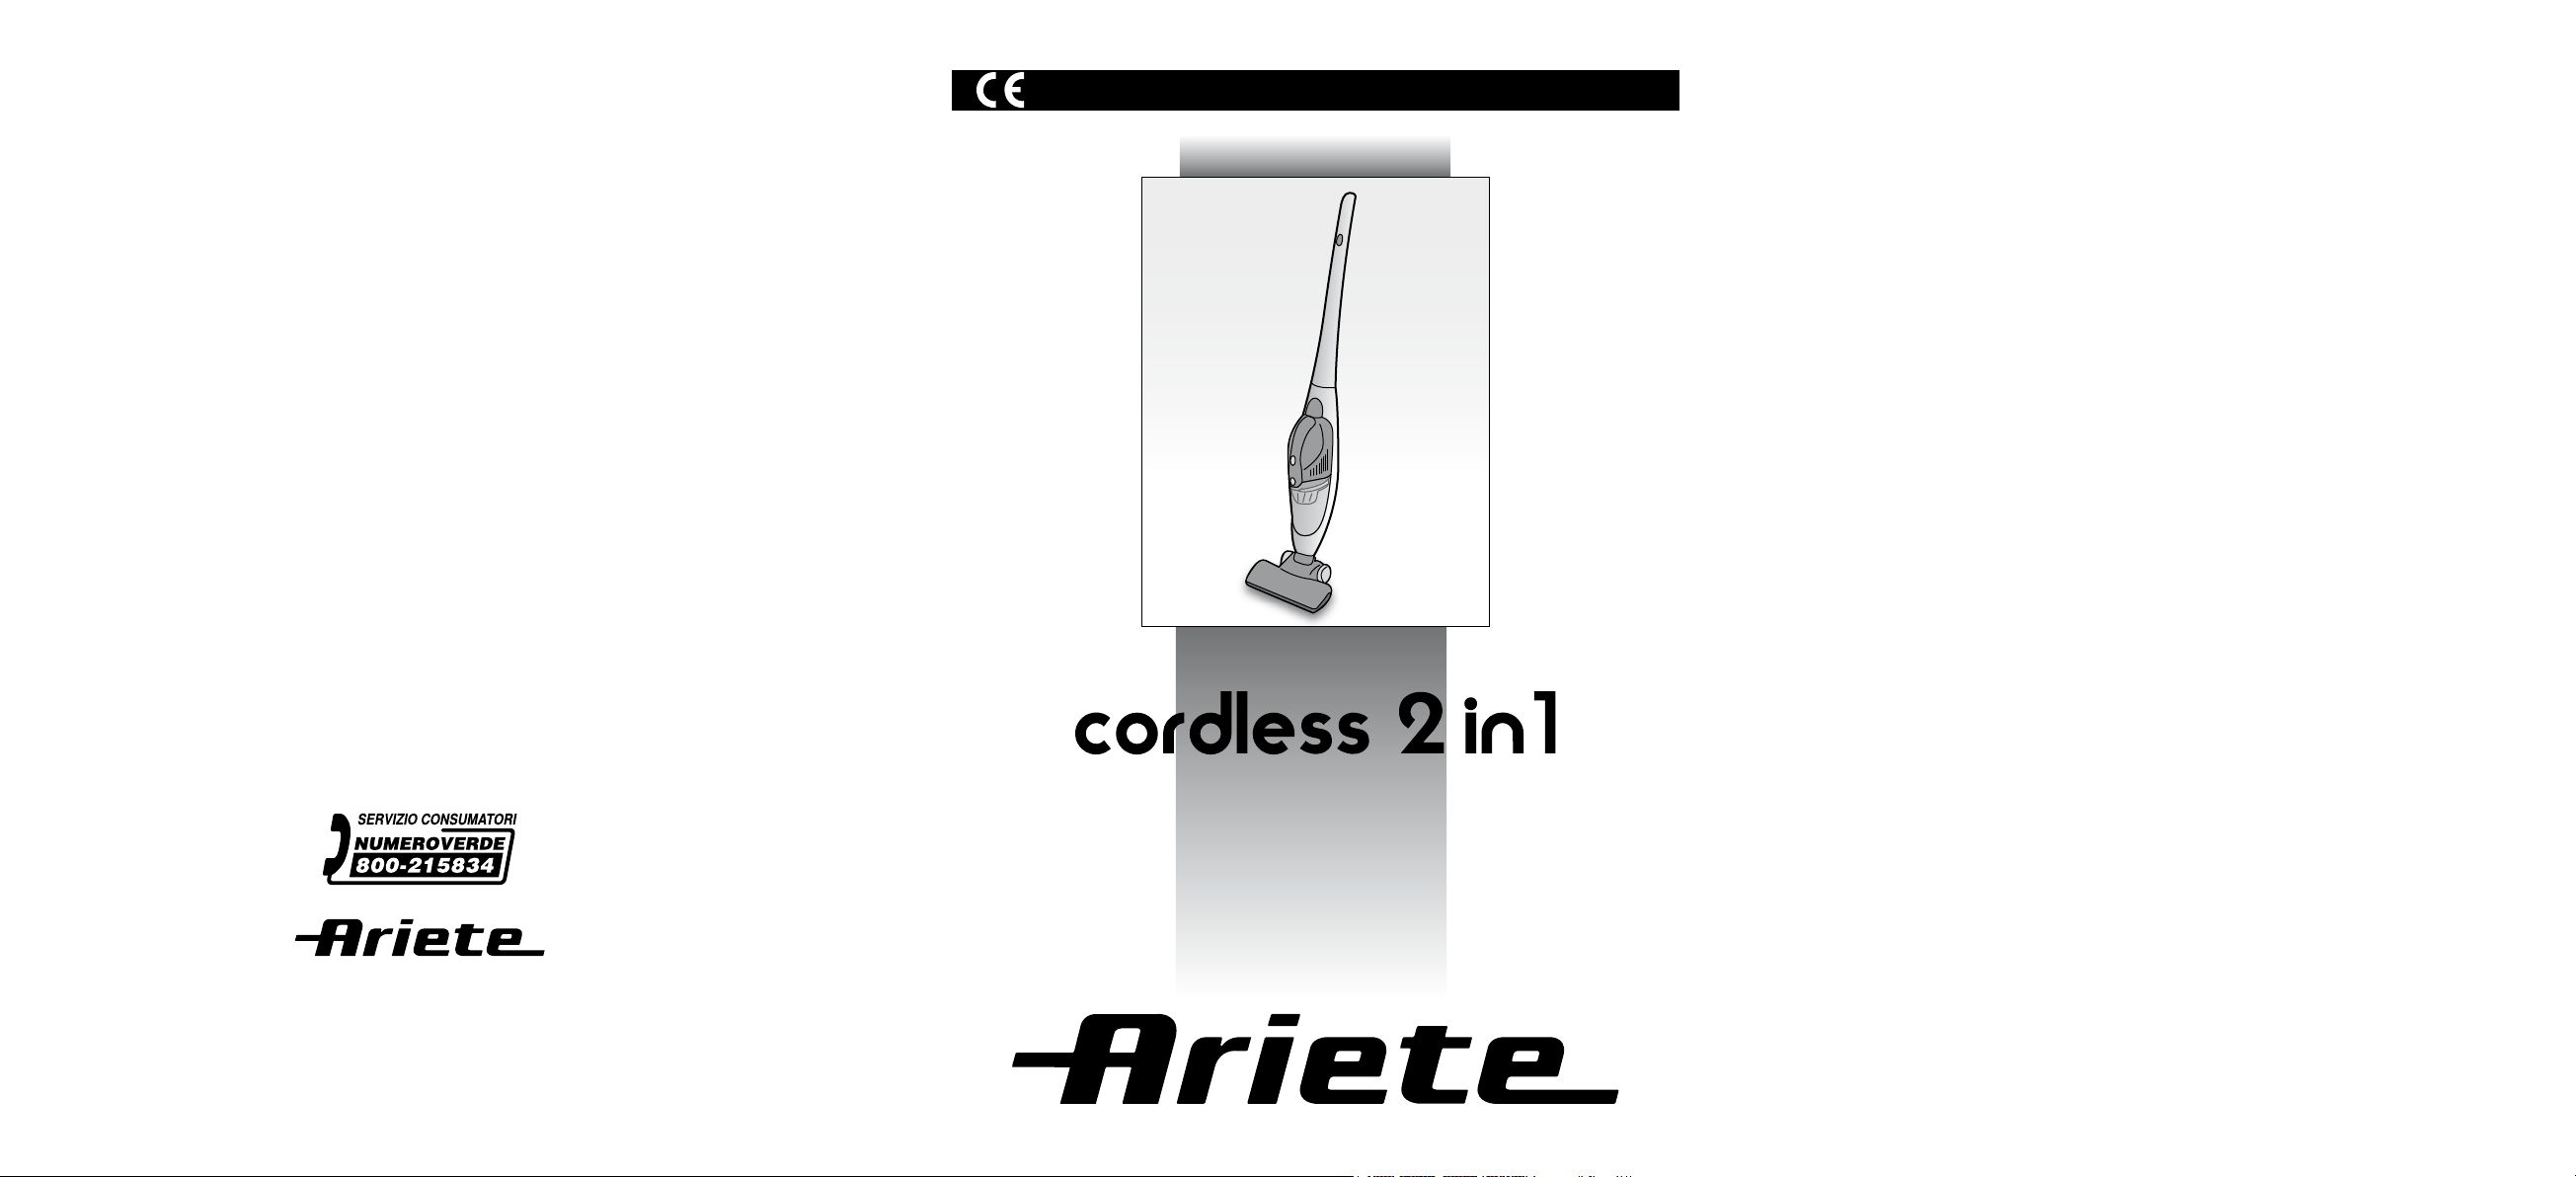
Mod. 2770
Cod. 5165106700 Rev. 1 del 05/05/2010
De’ Longhi Appliances Srl
Divisione Commerciale Ariete
Via San Quirico, 300
50013 Campi Bisenzio FI - Italy
E-Mail: info@ariete.net
Internet: www.ariete.net
825440
Page 2
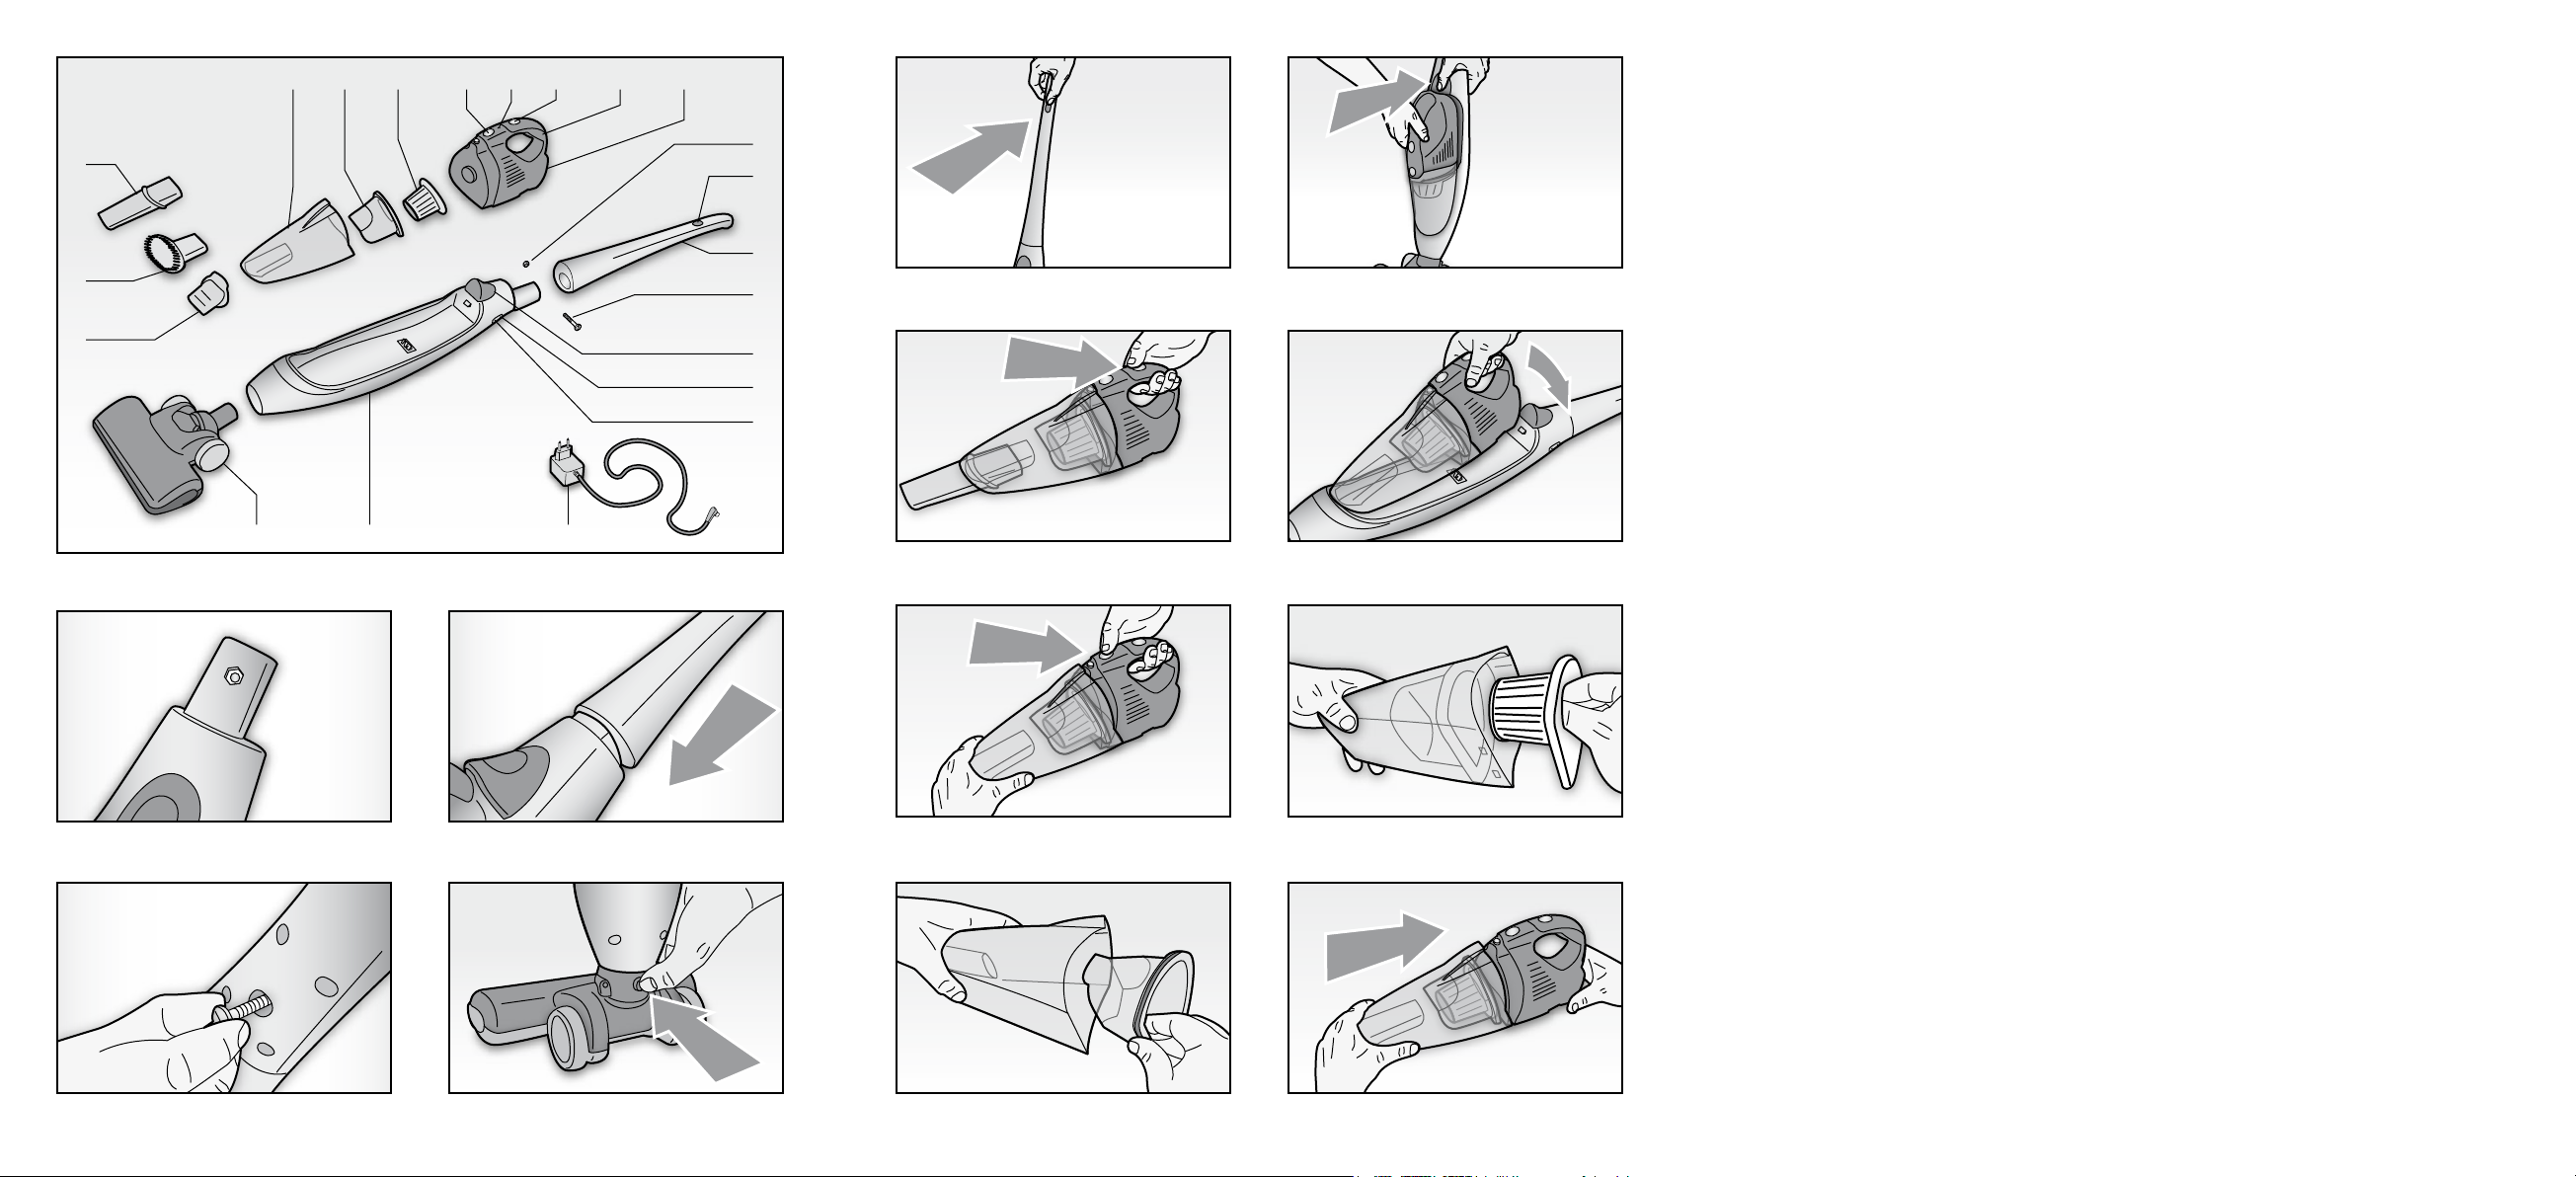
Fig. 1
Fig. 2 Fig. 3
Fig. 6 Fig. 7
Fig. 4 Fig. 5 Fig. 12 Fig. 13
Fig. 8 Fig. 9
Fig. 10 Fig. 11
A
U
I
T
B C D E F G H
M
O
P
Q
R
V
Z
L
N
S
Page 3
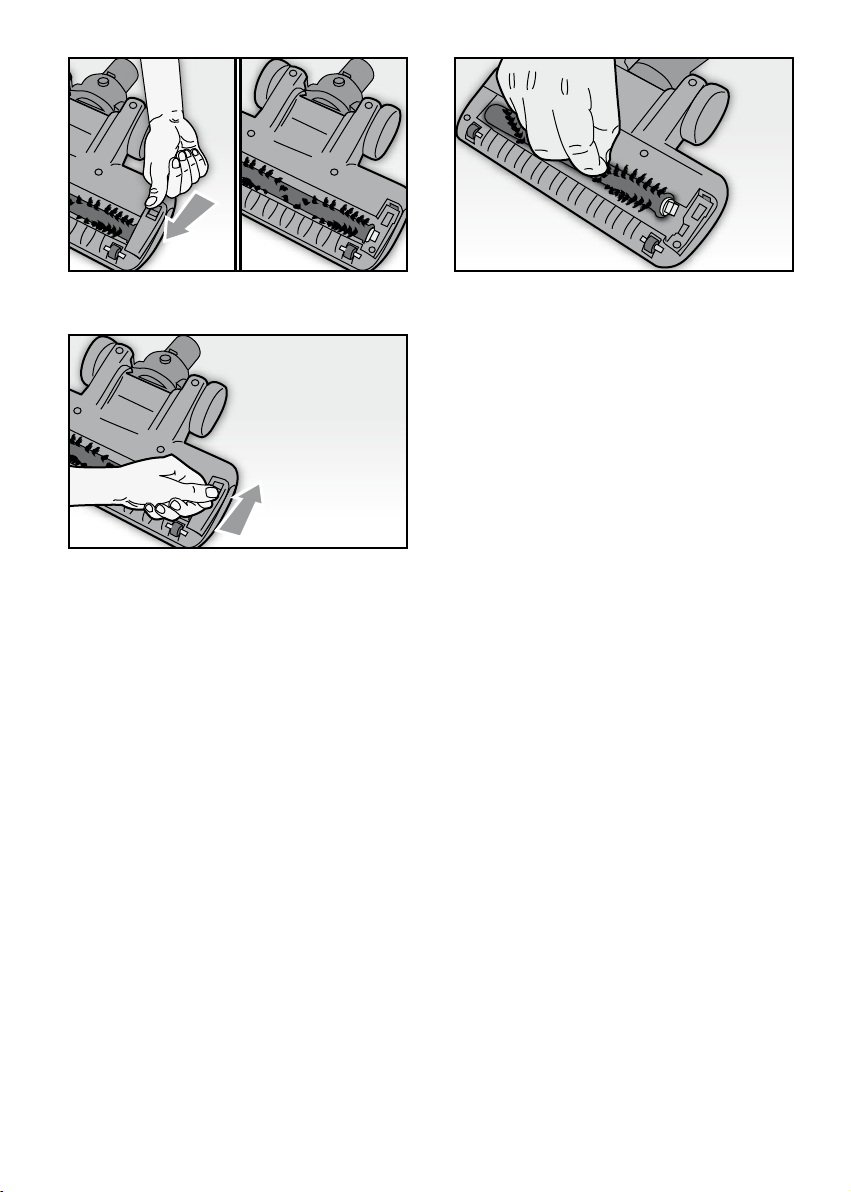
Fig. 14 Fig. 15
Fig. 16
- 1 -
Page 4

IT
- 2 -
AVVERTENZE IMPORTANTI
LEGGERE QUESTE ISTRUZIONI PRIMA DELL’USO.
Usando apparecchi elettrici è necessario prendere le opportune precauzioni, tra le quali:
1 Non mettere l’apparecchio sopra o vicino a fonti di calore.
2 Non usare l’apparecchio in prossimità di persone, nè alzarlo all’altezza di occhi, orecchie, ecc...
per evitare gravi infortuni.
3 Non lasciare l’apparecchio esposto ad agenti atmosferici (pioggia, sole, ecc...).
4 Fare attenzione che il cavo elettrico non venga a contatto con superfici calde.
5 Questo apparecchio non è adatto all’utilizzo da parte di persone (compresi i bambini) con capa-
cita fisiche, sensoriali o mentali ridotte. Gli utenti che manchino di esperienza e conoscenza
dell’apparecchio oppure ai quali non siano state date istruzioni relative all’utilizzo dell’apparec-
chio dovranno essere soggette alla supervisione da parte di una persona responsabile della loro
sicurezza.
6 E’ necessario vigilare sui bambini per assicurare che non giochino con l’apparecchio.
7 Non inserire alcun oggetto nelle aperture dell’apparecchio e evitare che oggetti ostruiscano il
flusso d’aria.
8 Mantenere le aperture libere da polvere, lanugine, capelli, ecc.
9 Non usare l’apparecchio senza filtro.
10 Non raccogliere oggetti molto caldi o che stanno fumando o bruciando come sigarette, fiammiferi
o cenere ancora calda.
11 Non raccogliere materiale infiammabile o combustibile (liquidi volatili, benzina, kerosene, ecc.)
né usare in presenza di grandi quantità d’acqua.
12 Non usare l’apparecchio in ambienti chiusi e con vapori emanati da vernici ad olio, o da solventi
o impermeabilizzanti da polvere infiammabile o altri vapori tossici o esplosivi.
13 Non raccogliere materiale tossico (candeggina, ammoniaca, sturalavandini, benzine, ecc.).
14 NON IMMERGERE MAI IL CORPO DEL PRODOTTO, LA SPINA ED IL CAVO ELETTRICO IN
ACQUA O ALTRI LIQUIDI, USARE UN PANNO UMIDO PER LA LORO PULIZIA.
15 SPEGNERE L’APPARECCHIO QUANDO L’UTILIZZO E’ TERMINATO E PRIMA DI INSERIRE O
TOGLIERE LE SINGOLE PARTI O PRIMA DI ESEGUIRE LA PULIZIA.
16 Prima di collegare l’alimentatore di ricarica alla rete di alimentazione, controllare che la tensione
indicata sulla targhetta corrisponda a quella della rete locale.
17 SCOLLEGARE L’ALIMENTATORE DI RICARICA QUANDO L’APPARECCHIO VIENE
UTILIZZATO.
18 L’apparecchio funziona con batterie ricaricabili al NiMH, pertanto alla fine della sua vita non deve
esser smaltito insieme ai rifiuti urbani.
Può essere consegnato presso gli appositi centri di raccolta differenziata predisposti dalle ammi-
nistrazioni comunali, oppure presso i rivenditori che forniscono questo servizio. Smaltire separata-
mente un elettrodomestico consente di evitare possibili conseguenze negative per l’ambiente e per
la salute derivanti da un suo smaltimento inadeguato e permette di recuperare i materiali di cui è
composto al fine di ottenere un importante risparmio di energia e di risorse.
Per rimarcare l’obbligo di smaltire separatamente gli elettrodomestici, sul prodotto è riportato il
marchio del contenitore di spazzatura mobile barrato. Non gettare mai gli accumulatori nel fuoco.
Page 5

IT
- 3 -
19 Per ottenere i migliori risultati, non caricate una batteria se la sua temperatura o la temperatura
ambiente è sotto i 5°C (40° F) o sopra i 40° C (105° F).
20 In caso di fuoriuscita di liquido dalla batteria, l’apparecchio non deve essere utilizzato ma portato
al più vicino Centro Assistenza per la sostituzione della batteria stessa.
21 Assicurarsi di avere sempre le mani ben asciutte prima di utilizzare o di regolare gli interruttori
posti sull’apparecchio o prima di toccare la spina e i collegamenti di alimentazione.
22 Per staccare la spina, afferrarla direttamente e staccarla dalla presa a parete. Non staccarla mai
tirandola per il cavo.
23 Non usare l’apparecchio se il cavo elettrico o la spina risultano danneggiati, o se l’apparecchio
stesso risulta difettoso; in questo caso portatelo al più vicino Centro di Assistenza Autorizzato.
24 Se il cavo di alimentazione è danneggiato, esso deve essere sostituito dal Costruttore o dal
suo servizio assistenza tecnica o comunque da una persona con qualifica similare, in modo da
prevenire ogni rischio.
25 L’apparecchio è concepito per il SOLO USO DOMESTICO e non deve essere adibito ad uso
commerciale o industriale.
26 Questo apparecchio è conforme alla direttiva 2006/95/EC e EMC 2004/108/EC.
27 Eventuali modifiche a questo prodotto, non espressamente autorizzate dal produttore, possono
comportare il decadimento della sicurezza e della garanzia del suo utilizzo da parte dell’utente.
28 Allorchè si decida di smaltire come rifiuto questo apparecchio, si raccomanda di renderlo inope-
rante tagliandone il cavo di alimentazione. Si raccomanda inoltre di rendere innocue quelle parti
dell’apparecchio suscettibili di costituire un pericolo, specialmente per i bambini che potrebbero
servirsi dell’apparecchio per i propri giochi.
29 Gli elementi dell’imballaggio non devono essere lasciati alla portata dei bambini in quanto poten-
ziali fonti di pericolo.
CONSERVARE QUESTE ISTRUZIONI
DESCRIZIONE DELL’APPARECCHIO (Fig. 1)
A Contenitore della polvere
B Supporto filtro
C Filtro
D Pulsante di sbloccaggio
E Spia batteria scarica
F Pulsante di accensione/spegnimento
(ON/OFF)
G Impugnatura
H Corpo motore
I Dado
L Pulsante di accensione/spegnimento
(ON/OFF)
M Manico superiore
N Vite
O Pulsante di sbloccaggio
P Spia di ricarica
Q Presa per alimentatore di ricarica
R Alimentatore di ricarica
S Corpo dell’apparecchio
T Spazzola per pavimenti
U Aspiratore detriti e piccole quantità d’acqua
V Spazzolino tondo
Z Aspiratore per fessure
Page 6

IT
- 4 -
Caratteristica della Scopa Elettrica è che può funzionare sia in modalità classica, solo esclusivamente con la spazzola per pavimenti (T), inclinando all’indietro il corpo dell’apparecchio nella tipica
posizione di utilizzo, sia estraendo la parte portatile, utilizzabile con l’aspiratore per piccole quantità
d’acqua (U), con lo spazzolino tondo (V) o con l’aspiratore fessure (Z) per una maggiore praticità
negli spazi stretti.
ASSEMBLAGGIO DELL’APPARECCHIO
Prima di procedere con l’utilizzo, è necessario assemblare il manico superiore (M) al corpo dell’apparecchio (S), operando come segue:
- inserire il dado (I) in dotazione nell’apposito alloggiamento presente sulla sommità del corpo
dell’apparecchio (S) (Fig. 2);
- assemblare il manico superiore (M) al corpo dell’apparecchio (S), premendolo con cautela fino a
battuta (Fig. 3);
- inserire la vite (N) in dotazione nell’apposito foro sul manico (M) e, con l’ausilio di un cacciavite,
bloccare quest’ultimo saldamente (Fig. 4).
ATTENZIONE: Prestare attenzione all’utilizzo del cacciavite onde evitare di ferirsi.
ATTENZIONE: Prima di procedere all’utilizzo, assicurarsi di aver correttamente assemblato l’appa-
recchio.
RICARICA DELLA BATTERIA
AVVERTENZA: Prima di utilizzare la scopa, caricare completamente la batteria.
ATTENZIONE: Caricare per almeno 24 ore per attivare la batteria prima del primo impiego, dopodi-
ché il tempo per una carica completa sarà di 16 ore.
ATTENZIONE: E’ normale che l’apparecchio si riscaldi durante la carica.
ATTENZIONE: Assicurarsi di non azionare l’apparecchio durante la carica.
- Con l’apparecchio assemblato, collegare la spina elettrica dell’alimentatore (R) ad una presa di
corrente e lo spinotto nel relativo attacco (Q) presente sul corpo dell’apparecchio (S).
La spia (P) si accenderà ad indicare che l’apparecchio si sta ricaricando; trascorse circa 16 ore la
ricarica sarà completata e la scopa è pronta per l’utilizzo.
AVVERTENZA: Si consiglia di scaricare completamente la batteria, prima di una nuova ricarica.
ACCESSORI
Spazzola per pavimenti (T)
Adatta per la pulizia di qualunque tipo di superficie.
Inserire la spazzola nel corpo dell’apparecchio (S), premendola leggermente fino ad udire uno scatto.
Per la rimozione, è sufficiente premere il relativo pulsante posto nella parte posteriore della spazzola
stessa ed estrarla verso l’esterno (Fig. 5).
Aspiratore (U) (Solo per Aspiratore Portatile)
Adatto per l’aspirazione di detriti grossolani e di piccole quantità d’acqua.
Spazzolino tondo (V) (Solo per Aspiratore Portatile)
Adatto per la pulizia di divani e tessuti.
Page 7

IT
- 5 -
Aspiratore fessure (Z) (Solo per Aspiratore Portatile)
Adatto per la pulizia di angoli, fessure od aree difficili da raggiungere.
ISTRUZIONI PER L’USO
ATTENZIONE: SPEGNERE L’APPARECCHIO QUANDO L’UTILIZZO E’ TERMINATO E PRIMA DI
INSERIRE O TOGLIERE LE SINGOLE PARTI O PRIMA DI ESEGUIRE LA PULIZIA.
ATTENZIONE: SCOLLEGARE L’ALIMENTATORE DI RICARICA QUANDO L’APPARECCHIO
VIENE UTILIZZATO.
- Con la ricarica della batteria effettuata e con la parte portatile correttamente assemblata nel corpo
dell’apparecchio (S), premere il pulsante di accensione (L) ed inclinare indietro il manico (M) nella
tipica posizione di utilizzo (Fig. 6).
- Pulire le superfici ampie spingendo con la spazzola (T) in avanti.
Ciò permette all’aspiratore di raccogliere i frammenti e lo sporco dal pavimento.
- Per la pulizia di angoli e piccole superfici, ruotare la scopa nella direzione opposta. I frammenti e
lo sporco possono così essere spostati per poi essere aspirati.
ATTENZIONE: spegnere subito la scopa qualora rimanga impigliato qualcosa all’interno della spazzola, come un pezzo di stoffa, le frange di un tappeto, ecc.
- Completata la pulizia, spegnere la scopa premendo ancora il pulsante di spegnimento (L).
Aspiratore Portatile
ATTENZIONE: SPEGNERE L’APPARECCHIO QUANDO L’UTILIZZO E’ TERMINATO E PRIMA DI
INSERIRE O TOGLIERE LE SINGOLE PARTI O PRIMA DI ESEGUIRE LA PULIZIA.
- Tenendo fermo il manico (M) del corpo dell’apparecchio (S), premere il pulsante di sbloccaggio (O)
ed estrarre l’aspiratore portatile (Fig. 7).
- All’estremità del contenitore della polvere (A), applicarvi l’accessori desiderato; premere il pulsante
di accensione (F) per mettere in funzione l’aspiratore portatile utilizzandolo mediante l’apposita
impugnatura (G) (Fig. 8).
La relativa spia (E) si accenderà a batteria scarica, e rimarrà accesa fino a definitivo esaurimento
della carica.
Reinserire l’aspiratore portatile nel corpo dell’apparecchio (S) e procedere con la ricarica come
descritto in precedenza.
- Per riposizionare l’aspiratore portatile nel corpo dell’apparecchio (S), rimuovere innanzitutto l’accessorio installato estraendolo verso l’esterno, quindi posizionare l’estremità del contenitore polvere (A) nella zona inferiore dell’apposito alloggiamento nel corpo dell’apparecchio (S) e spingere
indietro con cautela l’aspiratore portatile fino ad udire lo scatto che conferma il corretto inserimento
(Fig. 9).
ATTENZIONE: Assicurarsi di aver correttamente installato l’aspiratore portatile, prima di procedere
con un nuovo utilizzo in modalità classica o con la ricarica della batteria.
Page 8

IT
- 6 -
PULIZIA
ATTENZIONE: NON IMMERGERE MAI IL CORPO DEL PRODOTTO, LA SPINA ED IL CAVO
ELETTRICO IN ACQUA O ALTRI LIQUIDI, USARE UN PANNO UMIDO PER LA LORO PULIZIA.
ATTENZIONE: SPEGNERE L’APPARECCHIO QUANDO L’UTILIZZO E’ TERMINATO E PRIMA DI
INSERIRE O TOGLIERE LE SINGOLE PARTI O PRIMA DI ESEGUIRE LA PULIZIA.
- Pulire il corpo motore (H) ed il corpo dell’apparecchio (S) utilizzando esclusivamente un panno
umido con detergente neutro, se necessario.
Nel far questo non far entrare nessun tipo di liquido nell’aspirapolvere.
Non utilizzare mai sostanze pulenti di tipo forte (liquidi smacchianti, solventi) che potrebbero cor-
rodere la plastica.
Come svuotare il contenitore della polvere (A)
ATTENZIONE: Pulire il contenitore della polvere (A) ed il filtro (C) in tempo utile; la potenza d’aspirazione sarà ridotta se il contenitore è pieno od il filtro ostruito.
- Estrarre l’aspiratore portatile come descritto in precedenza.
- Premere il pulsante di sbloccaggio (D) ed estrarre il contenitore completo (Fig. 10).
- Estrarre verso l’esterno il filtro (C) (Fig. 11) e quindi il relativo supporto (B) (Fig. 12) e procedere
con la loro pulizia.
ATTENZIONE: Lavare il filtro (C) solo con acqua pulita senza usare saponi o detergenti.
- Quindi svuotare il contenitore della polvere (A) in un apposito sacchetto di plastica e, se necessario, lavarlo con acqua.
- Far asciugare bene tutti i componenti e procedere con il rimontaggio.
ATTENZIONE: Montare correttamente il supporto (B), il filtro (C), il contenitore della polvere (A)
prima di avviare l’apparecchio.
- Assemblare il contenitore completo al corpo motore (H) spingendolo fino ad udire lo scatto di
corretto inserimento (Fig. 13).
Come pulire la spazzola pavimenti (T)
ATTENZIONE: Effettuare la pulizia della spazzola pavimenti (T) solo dopo averla rimossa dall’apparecchio.
- Spingere in avanti la levetta di sbloccaggio ed estrarre il coperchietto in plastica (Fig. 14).
- Estrarre la spazzola rotante (Fig. 15), procedere con la pulizia e rimontarla correttamente.
- Rimontare il coperchietto in plastica spingendo indietro l’apposita levetta (Fig. 16).
Page 9
IT
- 7 -
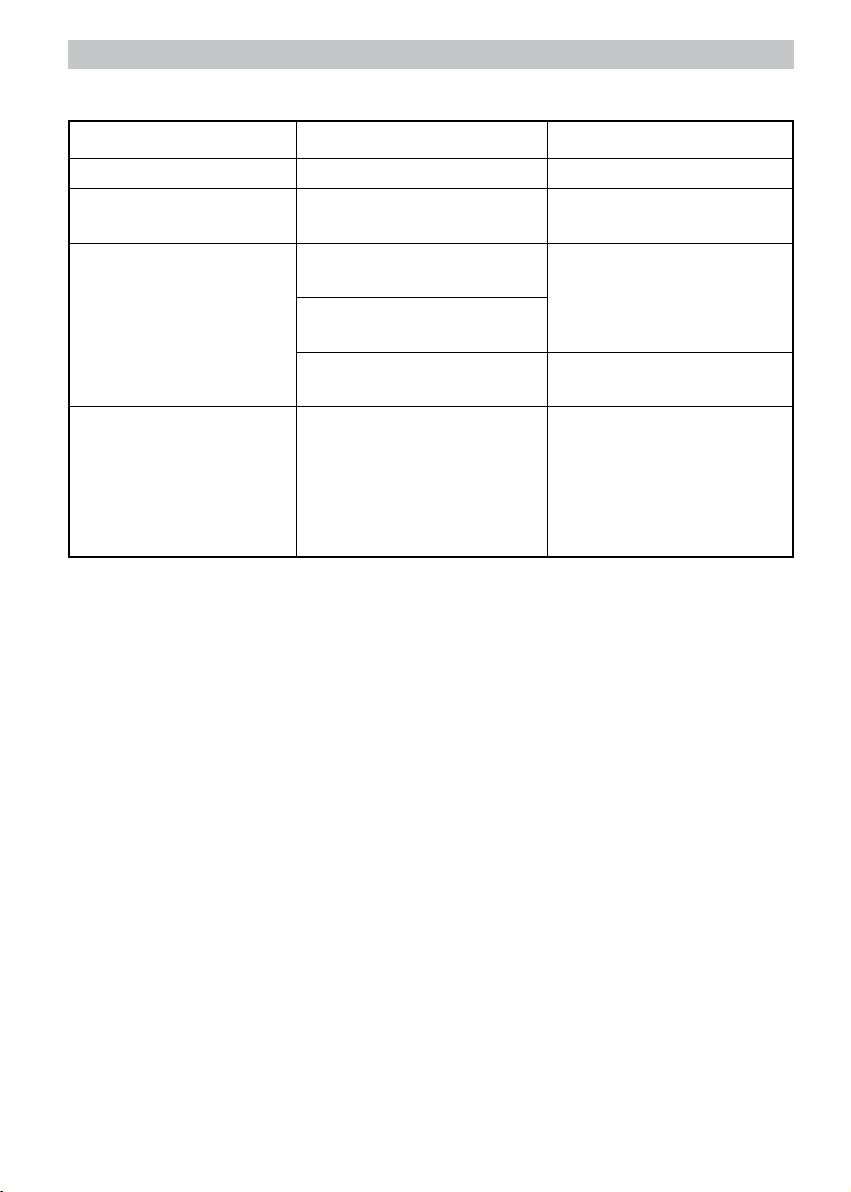
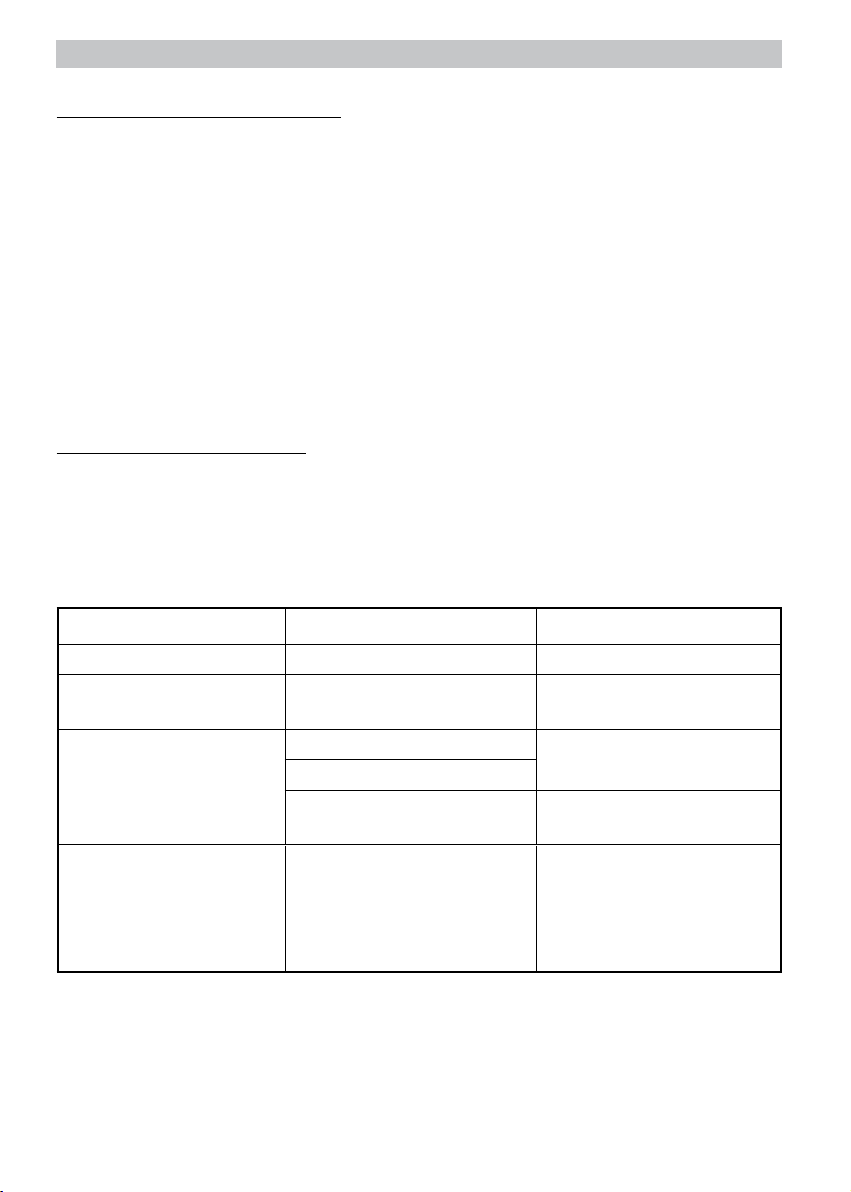
RICERCA GUASTI
Problema Possibile causa Soluzione
Il motore non funziona La batteria è scarica Caricare la batteria
La potenza di aspirazione
diventa debole
La spia dell’indicatore di carica è spenta
Il tempo di utilizzo della batteria diventa sempre più breve
Il contenitore della polvere è
pieno o il filtro è ostruito
Scollegamento dall’alimentazione elettrica
La spina del caricabatteria non è
ben inserita
C’è polvere tra il connettore elettrico del motore e la base
Se la batteria si carica completamente in 16 ore
Svuotare il contenitore della
polvere e pulire il filtro
Reinserire correttamente la
spina
Togliere la polvere
Se la batteria funziona solo
per 1-2 minuti dopo una carica
completa di 16 ore, è possibile
che sia esaurita. Bisogna semplicemente sostituirla con una
nuova.
Page 10

EN
- 8 -
IMPORTANT SAFEGUARDS
READ THESE INSTRUCTIONS BEFORE USE
The necessary precautions must be taken when using electrical appliances, and these include the
following:
1 Never place the appliance on or close to sources of heat.
2 Never use the appliance in proximity to people or lift to eye level, ear level, etc… as there is a
serious risk of accident.
3 Never leave the appliance exposed to the elements (rain, sun, etc....).
4 Make sure that the power cord does not come into contact with hot surfaces.
5 This appliance is not intended for use by persons (including children) with reduced physical,
sensory or mental capabilities, or lack of experience and knowledge, unless they have been
given supervision or instruction concerning use of the appliance by a person responsible for their
safety.
6 Children should be supervised to ensure that they do not play with the appliance.
7 Never insert any items in the openings of the appliance and do not allow items to obstruct air
flow.
8 Keep openings free from dust, fluff, hair, etc.
9 Never use the appliance without the filter.
10 Do not use to clean up hot items or any items that are giving off smoke or which are burning,
such as cigarettes, matches or hot ash.
11 Never pick up flammable or combustible materials (volatile fluids, petrol, kerosene, etc.) or use
where there are large amounts of water.
12 Never use the appliance in closed environments or where there might be fumes from oil-based
paints and varnishes or solvents, waterproofing treatments, flammable powders or other toxic or
explosive fumes.
13 Never pick up toxic materials (bleach, ammonia, drain cleaners, petrol, etc.).
14 NEVER PLACE THE APPLIANCE BODY, PLUG OR POWER CORD IN WATER OR OTHER
LIQUIDS; ALWAYS WIPE CLEAN WITH A DAMP CLOTH.
15 SWITCH OFF THE APPLIANCE AFTER USE AND BEFORE FITTING OR REMOVING SINGLE
PARTS AND BEFORE CLEANING.
16 Before plugging the charger into the mains power, make sure that the voltage on the rating plate
corresponds to the voltage of the mains system.
17 UNPLUG THE CHARGER WHILE THE APPLIANCE IS IN USE.
18 This appliance operates using NiMH rechargeable batteries and therefore, at the end of its use-
ful life, do not dispose of it in general household waste. Take it to a special municipal recycling
facility or to retailers offering this type of service. Separate disposal of a household appliance
makes it possible to prevent potentially negative effects on health and the environment as well
as to recover the material of which the appliance is made in order to achieve significant savings
in terms of energy and resources. The product is marked with a crossed out wheeled bin symbol
to show that it needs to be disposed of separately. Never throw batteries into fire..
19 For the best performance, never charge a battery if its temperature or the environment tempera-
ture is below 5°C (40° F) or above 40° C (105° F).
Page 11

EN
- 9 -
20 If any fluid should leak from the battery, do not use the appliance; take it to your nearest
Assistance Centre to have the battery replaced.
21 Always make sure that your hands are thoroughly dry before using or adjusting the switches on
the appliance, or before touching the power plug or power connections.
22 To unplug the appliance, grip the plug and remove it directly from the power socket. Never pull
the power cord to unplug the appliance.
23 Never use the appliance if the power cord or plug are damaged or if the appliance itself is faulty;
in this case, take it to your nearest Authorised Assistance Centre.
24 To prevent any risks, if the power cord is damaged, it must be replaced by the manufacturer, its
Technical Assistance Service or a similarly qualified person.
25 This appliance is designed for HOME USE ONLY and may not be used for commercial or indus-
trial purposes.
26 This appliance conforms to the 2006/95/EC and EMC 2004/108/EC directives.
27 Any changes to this product that have not been expressly authorised by the manufacturer may
lead to the user’s guarantee being rendered null and void.
28 In the event that you decide to dispose of the appliance, we advise you to make it inoperative
by cutting off the power cord. We also recommend that any parts that could be dangerous be
rendered harmless, especially for children, who may play with the appliance or its parts.
29 Packaging must never be left within the reach of children since it is potentially dangerous.
DO NOT THROW AWAY THESE INSTRUCTIONS
DESCRIPTION OF THE APPLIANCE (Fig. 1)
A Dust container
B Filter support
C Filter
D Release button
E Flat battery indicator light
F ON/OFF button
G Handgrip
H Power base
I Nut
L ON/OFF button
M Upper handle
The characteristic of this Stick Cleaner is that it can be used in standard mode, just with the floor
brush (T), angling the body of the appliance back into the typical user position or by removing the
handheld section, which can be used with the cleaner for small amounts of water (U), the round brush
(V) or the crevice nozzle (Z) for easier use in restricted spaces.
N Screw
O Release button
P Recharge indicator light
Q Charger power socket
R Battery charger
S Appliance body
T Floor brush
U Vacuum cleaner for dirt and small amounts
of water
V Round brush
Z Crevice nozzle
Page 12

EN
- 10 -
ASSEMBLY OF THE APPLIANCE
Before using the appliance it is necessary to assemble the upper handle (M) to the body of the appliance (S) by operating as follows:
- Insert the nut supplied (1) into the appropriate housing at the top of the appliance’s body (S) (Fig. 2).
- Assemble the upper handle (M) to the appliance’s body (S) pressing it home until it stops (Fig. 3).
- Insert the screw supplied (N) into the appropriate hole in the handle (M) and solidly block the
handle by using a screwdriver (Fig. 4).
ATTENTION: Be careful when using the screwdriver so as not injure yourself.
ATTENTION: Before utilising the appliance, make sure that the appliance has been correctly assem-
bled.
BATTERY CHARGING
IMPORTANT: Always charge the battery fully before using the Stick Cleaner.
IMPORTANT: Charge the battery for at least 24 hours to activate it before using the appliance for
the first time; after this time, a full charge will take 16 hours.
IMPORTANT: It is normal for the appliance to become hot while charging.
IMPORTANT: Never use the appliance while it is charging.
- Once the appliance is assembled, plug the charger (R) into the power mains and insert the lead
into the relevant socket (Q) on the appliance body (S).
The warning light (P) lights up to indicate that the appliance is recharging. After 16 hours the
recharge will be complete and the broom is then ready for use.
IMPORTANT: We recommend using up all of the battery power before charging again.
ATTACHMENTS
Floor brush (T)
Ideal for cleaning any type of surface.
Fit the brush into the appliance body (S), pressing it gently until it clicks into place. To remove the
brush, just press the release button on the back of the brush itself and pull the brush outwards (Fig.
5).
Vacuum Cleaner (U) (For Handheld Cleaner only)
This is used to clean up large-sized pieces of dirt and small amounts of water.
Round brush (V) (For Handheld Cleaner only)
Suitable for cleaning sofas and fabrics.
Crevice nozzle (Z) (For Handheld Cleaner only)
Ideal for cleaning in corners, crevices and areas that are hard to reach.
INSTRUCTIONS FOR USE
IMPORTANT: SWITCH OFF THE APPLIANCE AFTER USE AND BEFORE FITTING OR
REMOVING SINGLE PARTS AND BEFORE CLEANING.
IMPORTANT: UNPLUG THE CHARGER WHILE THE APPLIANCE IS IN USE.
Page 13

EN
- 11 -
- Once the battery has been recharged, make sure that the handheld cleaner is correctly fitted into
the appliance body (S), press the ON/OFF button (L) and move the handle back (M) into the typical
position for use (Fig. 6).
- Clean large surfaces by pushing the brush (T) forwards.
This allows the vacuum cleaner to pick up fragments and dirt from the floor.
- To clean small surfaces and in corners, turn the stick cleaner in the opposite direction to move the
dirt and fragments so that they can be picked up.
IMPORTANT: switch off the stick cleaner immediately should anything become entangled inside the
brush, such as a piece of fabric, the fringe on a rug, etc.
- After cleaning, switch off the stick cleaner by pressing the ON/OFF button (L) again.
Handheld Cleaner
IMPORTANT: SWITCH OFF THE APPLIANCE AFTER USE AND BEFORE FITTING OR
REMOVING SINGLE PARTS AND BEFORE CLEANING.
- Holding the handle (M) of the appliance body (S) firmly, press the release button (O) and remove
the handheld cleaner (Fig. 7).
- Fit the required attachment to the end of the dust container (A), press the ON/OFF button (F) to
start the handheld cleaner, holding it by the special handgrip (G) (Fig. 8).
The relevant indicator (E) switches on when the battery is running down and it stays lit until the
battery is completely flat.
Refit the handheld cleaner into the appliance body (S) and recharge the appliance as described
previously.
- To refit the handheld cleaner into the appliance body (S), first remove the attachment fitted to the
cleaner by pulling it outwards, then place the end of the dust container (A) in the bottom of the
special housing in the appliance body (S) carefully pushing the handheld cleaner back until you
hear it click into place (Fig. 9).
IMPORTANT: Make sure that the handheld cleaner has been correctly fitted before using the appliance in the standard way or recharging the battery.
CLEANING
IMPORTANT: NEVER PLACE THE APPLIANCE BODY, PLUG OR POWER CORD IN WATER OR
OTHER LIQUIDS; ALWAYS WIPE CLEAN WITH A DAMP CLOTH.
IMPORTANT: SWITCH OFF THE APPLIANCE AFTER USE AND BEFORE FITTING OR
REMOVING SINGLE PARTS AND BEFORE CLEANING.
- Only clean the power base (H) and appliance (S) with a damp cloth and some mild detergent, if
needed.
When cleaning the appliance, make sure that no type of liquid enters the cleaner.
Never use heavy-duty cleaning agents (stain removers or solvents) as they could corrode the
plastic.
Page 14
EN
How to empty the dust container (A)
IMPORTANT: Clean the dust container (A) and filter (C) in good time; suction power will be reduced
if the container is full or the filter is clogged.
- Remove the handheld cleaner, as described previously.
- Press the release button (D) and pull out the whole container (Fig. 10).
- Pull out the filter (C) (Fig. 11) and the relevant filter support (B) (Fig. 12) and clean them.
IMPORTANT: Only wash the filter (C) in clean water, without using soap or detergent.
- Empty the dust out from the container (A) and into a plastic bag; if necessary, rinse out the container.
- Dry all parts and then refit them.
IMPORTANT: Correctly fit the support (B), filter (C), and dust container (A) before switching on the
appliance.
- Fit the whole container to the power base (H), pushing it down until it clicks into place (Fig. 13).
How to clean the floor brush (T)
IMPORTANT: Only clean the floor brush (T) after removing it from the appliance.
- Push the release lever forwards and remove the plastic cover (Fig. 14).
- Take out the rotating brush (Fig. 15) and then clean it and refit it correctly.
- Fit the plastic cover in place, pushing back the special lever (Fig. 16).
TROUBLESHOOTING
Problem Possible reason Solution
The motor is not working Flat battery Recharge the battery
Suction power becomes
weak
The charge indicator light
doesn’t work
The battery use time is shorter and shorter
The dust container is full or the
filter is blocked
Power supply disconnected
Charger plug not firmly inserted
There is dust between the motor
electrode and the base
If the battery is fully charged
within 16 hours
Empty the dust container and
clean the filter
Plug back in firmly
Clean off the dust
If the battery can only work for
1-2 minutes after a full 16-hour
charge, it may be flat and simply needs replacing with a new
one.
- 12 -
Page 15

FR
INSTRUCTIONS IMPORTANTES
LIRE CES INSTRUCTIONS AVANT L’EMPLOI
Lors de l’utilisation d’appareils électriques, il est nécessaire de prendre les précautions suivantes:
1 Ne placez pas l’appareil au dessus ou près de sources de chaleur.
2 N’utilisez pas l’appareil près d’autres personnes, et ne le soulevez pas à la hauteur de vos yeux,
de vos oreilles, etc. afin d’éviter tout accident.
3 N’exposez jamais l’appareil aux agents atmosphériques externes (pluie, soleil, etc.).
4 Veillez à ce que le câble électrique n’entre jamais en contact avec des surfaces chaudes.
5 Cet appareil n’est pas indiqué pour l’utilisation de la part de personnes (y compris les enfants)
ayant des capacités physiques, sensorielles ou mentales réduites. Les utilisateurs n’ayant pas
l’expérience, une connaissance suffisante de l’appareil ou n’ayant pas reçu les instructions
relatives à l’appareil, devront faire l’objet d’un contrôle de supervision de la part d’une personne
responsable de leur sécurité.
6 Il est nécessaire de surveiller les enfants pour empêcher qu’ils ne jouent avec l’appareil.
7 N’introduisez aucun objet dans les ouvertures de l’appareil et évitez l’obstruction du flux d’air.
8 Nettoyez les ouvertures en éliminant la poussière, les cheveux et autres saletés.
9 L’appareil ne doit pas être utilisé sans filtre.
10 N’aspirez pas d’objets très chauds ou qui sont en train de brûler tels que les cigarettes, les
allumettes ou la cendre encore chaude.
11 N’aspirez pas de liquides inflammables ou combustibles (liquides volatiles, essence, kérosène,
etc.) et n’utilisez pas l’appareil en présence d’une quantité d’eau trop importante.
12 N’utilisez pas l’appareil dans des lieux fermés, en présence de vapeurs de peintures à l’huile,
de solvants, d’imperméabilisants ou en présence de poudres inflammables ou autres vapeurs
toxiques ou explosives.
13 N’aspirez pas de matériaux toxiques (eau de javel, ammoniaque, produits de débouchage,
essences, etc.).
14 NE PAS PLONGER LE CORPS DU PRODUIT, LA FICHE NI LE CABLE ELECTRIQUE DANS
L’EAU OU AUTRES LIQUIDES, ET UTILISER TOUJOURS UN CHIFFON HUMIDE POUR LES
NETTOYER.
15 ETEINDRE L’APPAREIL A LA FIN DE L’UTILISATION ET AVANT D’ASSEMBLER OU DE
DEMONTER LES COMPOSANTS DE L’APPAREIL OU AVANT DE PROCEDER A SON
NETTOYAGE.
16 Avant de brancher l’alimentateur de recharge au réseau électrique, contrôlez que le voltage
indiqué sur la plaquette corresponde à celui du réseau local.
17 DEBRANCHER L’ALIMENTATEUR DE RECHARGE QUAND L’APPAREIL EST UTILISE.
18 L’appareil fonctionne avec des piles rechargeables au NiMH, et il ne doit donc pas être éliminé
avec les déchets urbains au terme de sa durée de vie.
Il peut être remis auprès des centres de récolte différenciée prédisposés à cet effet par les
administrations communales, ou auprès des revendeurs qui fournissent ce service. Eliminer
un appareil électroménager séparément permet d’éviter d’éventuelles conséquences négatives
pour l’environnement et pour la santé dérivant d’une élimination inappropriée du produit et
permet de récupérer les matériaux dont ce dernier est composé afin d’obtenir une économie
- 13 -
Page 16

FR
- 14 -
importante d’énergie et de ressources.
Pour préciser l’obligation d’élimination séparée des appareils électroménagers, le produit porte
le symbole d’une poubelle mobile barrée. Ne jamais jeter les accumulateurs dans le feu.
19 Pour obtenir les meilleurs résultats possibles, ne chargez pas une pile si sa température ou si la
température ambiante est inférieure à 5°C (40° F) ou supérieure à 40° C (105° F).
20 Si la pile perd du liquide, l’appareil ne doit pas être utilisé mais apporté auprès du Centre de
service après-vente le plus proche pour la substitution de la pile.
21 Vérifier d’avoir toujours les mains sèches avant d’utiliser ou de régler les interrupteurs placés sur
l’appareil ou avant de manipuler la fiche et les connexions électriques.
22 Pour débrancher l’appareil, saisir directement la fiche en la débranchant de la prise murale. Ne
tirez jamais sur le câble d’alimentation.
23 N’utilisez pas l’appareil si le câble électrique ou la fiche sont endommagés, ou si l’appareil résulte
défectueux; dans ce cas, contactez le Centre d’Assistance Après-vente Autorisé le plus proche.
24 Si le câble d’alimentation est endommagé, il doit être remplacé par le Constructeur ou par son
service après-vente ou, dans tous les cas, par un technicien qualifié, de façon à éviter tout risque
de danger.
25 L’appareil a été conçu EXCLUSIVEMENT pour un USAGE DOMESTIQUE et il ne peut en aucun
cas être destiné à un usage commercial ou industriel.
26 Cet appareil est conforme à la directive 2006/95/EC et EMC 2004/108/EC.
27 Toute modification du produit, non autorisé expressément par le producteur, peut comporter la
réduction de la sécurité et la déchéance de la garantie.
28 Si vous décidez de vous défaire de cet appareil, il est fortement recommandé de le rendre inuti-
lisable en éliminant le câble d’alimentation électrique. Nous conseillons en outre d’exclure toute
partie de l’appareil pouvant constituer une source de danger, en particulier pour les enfants qui
peuvent se servir de l’appareil pour jouer.
29 Ne laissez pas les parties de l’emballage à la portée des enfants car elles constituent une source
potentielle de danger.
CONSERVEZ SOIGNEUSEMENT CES
INSTRUCTIONS
Page 17

FR
- 15 -
DESCRIPTION DE L’APPAREIL (Fig. 1)
A Récipient à poussière
B Support filtre
C Filtre
D Poussoir de déblocage
E Voyant batterie déchargée
F Poussoir de marche/arrêt (ON/OFF)
G Manche
H Corps moteur
I Ecrou
L Poussoir de marche/arrêt (ON/OFF)
M Manche supérieur
Une caractéristique du Balai Electrique est qu’il peut fonctionner soit selon la modalité classique,
seulement avec la brosse pour sols (T), en inclinant vers l’arrière le corps de l’appareil dans la
position typique d’utilisation, soit en extrayant la partie portative, utilisable avec l’aspirateur pour les
petites quantité d’eau (U), avec la petite brosse ronde (V) ou avec l’aspirateur pour fissures (Z) pour
une utilisation plus efficace dans les espaces réduits.
ASSEMBLAGE DE L’APPAREIL
Avant d’utiliser l’appareil, il est nécessaire d’assembler le manche supérieur (M) sur le corps de
l’appareil (S), en procédant comme suit:
- Introduire l’écrou (I) fourni en dotation dans le logement situé sur le sommet du corps de l’appareil
(S) (Fig. 2);
- assembler le manche supérieur (M) sur le corps de l’appareil (S), en le poussant délicatement
jusqu’au fond (Fig. 3);
- Introduire la vis (N) fournie en dotation dans le trou situé sur le manche (M) et, à l’aide d’un tournevis, bloquer correctement le manche (Fig. 4).
ATTENTION: Manipuler le tournevis avec grande attention pour ne pas se blesser.
ATTENTION: Vérifier l’assemblage correct de l’appareil avant de l’utiliser.
N Vis
O Poussoir de déblocage
P Voyant de recharge
Q Prise pour alimentateur de recharge
R Alimentateur de recharge
S Corps de l’appareil
T Brosse pour sols
U Aspirateur détritus et petites quantités d’eau
V Petite brosse ronde
Z Aspirateur pour fissures
RECHARGE DE LA PILE
NOTE: Avant d’utiliser le balai électrique, recharger entièrement la pile.
ATTENTION: Recharger la pile pendant au moins 24 heures avant sa première utilisation, après quoi
le temps pour une recharge complète sera de 16 heures.
ATTENTION: Il est normal que l’appareil se réchauffe pendant la recharge.
ATTENTION: N’actionnez jamais l’appareil pendant la recharge.
- Quand l’appareil est assemblé, brancher la fiche électrique de l’alimentateur (R) à une prise de
courant et la fiche de l’alimentateur dans la prise (Q) située sur le corps de l’appareil (S).
Le témoin lumineux (P) s’allume pour indiquer que l’appareil est sous recharge; au bout de 16
heures environ, la recharge est terminée et le balai électrique est prêt pour être utilisé.
NOTE: Il est conseillé de décharger entièrement la pile avant de la recharger.
Page 18

FR
- 16 -
ACCESSOIRES
Brosse pour sols (T)
Indiquée pour le nettoyage de tous les types de surface.
Assembler la brosse sur le corps de l’appareil (S), en exerçant une légère pression jusqu’au déclic.
Pour la retirer, il suffit d’appuyer sur le poussoir situé sur la partie arrière de la brosse et de l’extraire
vers l’extérieur (Fig. 5).
Aspirateur (U) (Seulement pour Aspirateur Portatif)
Indiqué pour aspirer les détritus grossiers et les petites quantités d’eau.
Petite brosse ronde (V) (Seulement pour Aspirateur Portatif)
Indiqué pour le nettoyage des canapés et des tissus.
Aspirateur pour fissures (Z) (Seulement pour Aspirateur Portatif)
Indiqué pour le nettoyage des angles, des fissures ou des zones difficilement accessibles.
INSTRUCTIONS D’EMPLOI
ATTENTION: ETEINDRE L’APPAREIL A LA FIN DE L’UTILISATION ET AVANT D’ASSEMBLER
OU DE DEMONTER LES COMPOSANTS DE L’APPAREIL OU AVANT DE PROCEDER A SON
NETTOYAGE.
ATTENTION: DEBRANCHER L’ALIMENTATEUR DE RECHARGE QUAND L’APPAREIL EST
UTILISE.
- Quand la pile a été rechargée et avec la partie portative correctement assemblée sur le corps de
l’appareil (S), appuyer sur le poussoir de mise en marche (L) et incliner le manche (M) vers l’arrière
dans la position typique d’utilisation (Fig. 6).
- Nettoyer les surfaces vastes en poussant la brosse (T) vers l’avant.
Cela permet à l’aspirateur d’aspirer les fragments et la saleté présents sur le sol.
- Pour le nettoyage des angles et des petites surfaces, tourner le balai dans la direction opposée.
Les fragments et la saleté peuvent ainsi être déplacés pour pouvoir être aspirés.
ATTENTION: éteignez immédiatement le balai si quelque chose reste emmêlé dans la brosse,
comme par exemple un morceau de tissu, es franges d’un tapis, etc.
- Au terme du nettoyage, éteindre le balai en appuyant à nouveau sur le poussoir de marche/arrêt
(L).
Aspirateur Portatif
ATTENTION: ETEINDRE L’APPAREIL A LA FIN DE L’UTILISATION ET AVANT D’ASSEMBLER
OU DE DEMONTER LES COMPOSANTS DE L’APPAREIL OU AVANT DE PROCEDER A SON
NETTOYAGE.
- En maintenant le manche (M) du corps de l’appareil (S) bloqué, appuyer sur le poussoir de déblocage (O) et extraire l’aspirateur portatif (Fig. 7).
- A l’extrémité du récipient à poussière (A), assembler l’accessoire désiré; appuyer sur le poussoir
de mise en marche (F) pour mettre l’aspirateur portatif en marche et utiliser ce dernier en le tenant
par son manche (G) (Fig. 8).
Page 19

FR
- 17 -
Le voyant lumineux relatif (E) s’allume quand la batterie est déchargée et reste allumé jusqu’à
épuisement total de la recharge.
Repositionner l’aspirateur portatif sur le corps de l’appareil (S) et recharger la pile selon les indi-
cations précédentes.
- Pour repositionner l’aspirateur portatif sur le corps de l’appareil (S), retirer avant tout l’accessoire
installé en le tirant vers l’extérieur, puis positionner l’extrémité du récipient à poussière (A) sur la
zone inférieure du logement présent sur le corps de l’appareil (S) et pousser vers l’arrière et avec
soin l’aspirateur portatif jusqu’au déclic qui confirme l’assemblage correct (Fig. 9).
ATTENTION: Vérifiez toujours que l’aspirateur portatif a été correctement installé avant d’utiliser à
nouveau l’appareil selon la modalité classique ou avec la recharge de la pile.
NETTOYAGE
ATTENTION: NE PAS PLONGER LE CORPS DU PRODUIT, LA FICHE NI LE CABLE ELECTRIQUE
DANS L’EAU OU AUTRES LIQUIDES, ET UTILISER TOUJOURS UN CHIFFON HUMIDE POUR
LES NETTOYER.
ATTENTION: ETEINDRE L’APPAREIL A LA FIN DE L’UTILISATION ET AVANT D’ASSEMBLER
OU DE DEMONTER LES COMPOSANTS DE L’APPAREIL OU AVANT DE PROCEDER A SON
NETTOYAGE.
- Nettoyer le corps moteur (H) et le corps de l’appareil (S) en employant un chiffon humide et avec
un produit de nettoyage neutre, si nécessaire.
Ne faites pénétrer aucun genre de liquide à l’intérieur de l’aspirateur durant ces opérations.
N’utilisez jamais de substances nettoyantes agressives (liquides détachants, solvants, etc.) qui
peuvent abîmer le plastique.
Comment vider le récipient à poussière (A)
ATTENTION: Nettoyez le récipient à poussière (A) et le filtre (C) en temps utile; la puissance d’aspiration sera réduite si le récipient est plein ou si le filtre est obstrué.
- Extraire l’aspirateur portatif comme décrit précédemment.
- Appuyer sur le poussoir de déblocage (D) et extraire le récipient complet (Fig. 10).
- Extraire le filtre (C) vers l’extérieur (Fig. 11) suivi de son support (B) (Fig. 12) puis procéder à leur
nettoyage.
ATTENTION: Lavez le filtre (C) seulement avec de l’eau propre sans utiliser de savon ou de produits
de nettoyage.
- Vider ensuite le récipient à poussière (A) dans un sac plastique et, si nécessaire, le laver avec de
l’eau.
- Faire essuyer correctement tous les composants puis procéder à leur remontage.
ATTENTION: Assemblez correctement le support (B), le filtre (C), le récipient à poussière (A) avant
de faire fonctionner l’appareil.
- Assembler le récipient complet sur le corps moteur (H) en le poussant jusqu’au déclic (Fig. 13).
Page 20

FR
Comment nettoyer la brosse pour sols (T)
ATTENTION: Nettoyez la brosse pour sols (T) toujours après l’avoir retirée de l’appareil.
- Pousser le levier de déblocage en avant et extraire le couvercle en plastique (Fig. 14).
- Extraire la brosse pivotante (Fig. 15), procéder à son nettoyage et la remonter correctement.
- Remonter le couvercle en plastique en poussant le levier en arrière (Fig. 16).
RECHERCHE PANNES DE FONCTIONNEMENT
Problème Cause possible Solution
Le moteur ne fonctionne pas La pile est déchargée Recharger la pile
La puissance d’aspiration
devient faible
Le voyant lumineux de
l’indicateur de recharge est
éteint
Le temps d’utilisation de la
pile devient toujours plus
court
Le récipient à poussière est plein
ou le filtre est obstrué
L’alimentation électrique n’est
pas branchée
La fiche du chargeur de batteries n’est pas branchée correctement
Présence de poussière entre le
connecteur électrique du moteur
et la base
Si la pile se recharge entièrement en 16 heures
Vider le récipient à poussière et
nettoyer le filtre
Brancher correctement la fiche
Eliminer la poussière
Si la pile fonctionne seulement
pendant 1-2 minutes après une
recharge complète de 16 heures, il est possible qu’elle soit
épuisée. Il faut donc simplement la remplacer avec une
nouvelle pile.
- 18 -
Page 21

DE
WICHTIGE HINWEISE
VOR GEBRAUCH BITTE DIESE ANLEITUNG LESEN
Beim Gebrauch von Elektrogeräten sind einige Vorsichtsmaßnahmen zu treffen:
1 Gerät nicht auf oder an Wärmequellen abstellen.
2 Verwenden Sie das Gerät nicht in der Nähe von Personen und bringen Sie es nie auf die Höhe
von Augen und Ohren, um schwere Unfälle zu vermeiden.
3 Gerät keinen Witterungseinflüssen (Regen, Sonne, usw.) aussetzen.
4 Das Stromkabel darf nicht mit heißen Flächen in Berührung kommen.
5 Dieses Gerät ist nicht für den Gebrauch durch Personen (einschließlich Kindern) geeignet, die
nicht im vollen Besitz ihrer körperlichen, sensoriellen und geistigen Fähigkeiten sind. Benutzer,
denen es an Erfahrung und Kenntnis des Geräts mangelt oder die nicht in die Verwendung
des Geräts eingewiesen wurden, müssen durch eine Person überwacht werden, die für ihre
Sicherheit verantwortlich ist.
6 Kinder müssen überwacht werden, um sicher zu stellen, dass sie nicht mit dem Gerät spielen.
7 Führen Sie keine Gegenstände in die Öffnungen des Geräts ein und achten Sie darauf, dass der
Luftdurchsatz nicht durch angesaugte Gegenstände behindert wird.
8 Halten Sie die Öffnungen frei von Staub, Fusseln, Haaren usw.
9 Benutzen Sie das Gerät nicht ohne Filter
10 Saugen Sie keine sehr heißen, rauchenden oder brennenden Gegenstände auf, wie beispiels-
weise Zigarettenstummel, Streichhölzer oder noch heiße Asche usw.
11 Saugen Sie kein entflammbares oder brennbares Material auf (flüchtige Flüssigkeiten, Benzin,
Kerosin usw.), und benutzen Sie das Gerät nicht bei größeren Wassermengen.
12 Verwenden Sie das Gerät nicht in geschlossenen Räumen, in denen die Dämpfe von Öl-Lacken,
Lösungs- oder Dichtmitteln, entflammbarer Staub oder sonstige giftige oder explosionsgefährde-
te Dämpfe vorhanden sind.
13 Saugen Sie kein giftiges Material auf (Chlorlauge, Ammoniak, Abflussreiniger, Benzin usw.)
14 DAS GEHÄUSE, DEN STECKER UND DAS STROMKABEL DES GERÄTS KEINESFALLS
IN WASSER ODER SONSTIGE FLÜSSIGKEITEN TAUCHEN. VERWENDEN SIE ZUR
REINIGUNG EIN FEUCHTES TUCH.
15 SCHALTEN SIE DAS GERÄT AUS, WENN SIE ES NICHT MEHR BRAUCHEN ODER BEVOR
SIE EINZELTEILE EINSETZEN ODER ENTFERNEN, BZW. BEVOR SIE ES REINIGEN.
16 Bevor Sie das Nachladegerät an das Stromnetz anschließen, kontrollieren Sie, ob die auf dem
Typenschild angegebene Spannung mit derjenigen des lokalen Stromnetzes übereinstimmt.
17 UNTERBRECHEN SIE DEN ANSCHLUSS DES NACHLADEGERÄTS BEVOR SIE DAS GERÄT
BENUTZEN.
18 Das Gerät funktioniert mit nachladbaren NiMH- Batterien und darf am Ende seiner Standzeit
nicht als Hausmüll entsorgt werden.
Das Gerät kann bei den von den Gemeinden angelegten differenzierten Müllsammelstellen
oder bei Händlern abgegeben werden, die diesen Service bieten. Die separate Entsorgung von
Haushaltsgeräten trägt dazu bei, schädliche Folgen für die Umgebung und für die Gesundheit
zu vermeiden, die sich aus unsachgemäßer Entsorgung ergeben könnten und gestattet die
Weiterverwendung der Materialien seiner Bestandteile, was eine bedeutende Einsparung an
- 19 -
Page 22

DE
- 20 -
Energie und Rohstoffen bedeutet.
Auf dem Produkt ist das Symbol der durchkreuzten Mülltonne angebracht, um auf die
Verpflichtung hinzuweisen, Haushaltsgeräte separat zu entsorgen. Werfen Sie Akkumulatoren
keinesfalls ins Feuer.
19 Um einwandfreie Ergebnisse zu erzielen, sollten Sie Batterien nie nachladen, wenn ihre
Temperatur bzw. die Umgebungstemperatur unter 5°C (40° F) bzw. über 40° C (105° F) liegt.
20 Sollte Batterieflüssigkeit austreten, darf das Gerät nicht benutzt werden, sondern muss zur
nächsten Kundendienststelle gebracht werden, um die Batterie austauschen zu lassen.
21 Vergewissern Sie sich immer, dass Ihre Hände trocken sind, bevor Sie die Schalter am Gerät
benutzen oder einstellen, oder bevor Sie den Stecker und die Versorgungsanschlüsse berühren.
22 Direkt am Stecker ziehen, um diesen aus der Wandsteckdose zu führen. Niemals am Kabel
ziehen.
23 Das Gerät nicht benutzen, falls das Stromkabel oder der Stecker beschädigt sein sollten oder
das Gerät selbst defekt ist. Es zur nächsten Vertrags-Kundendienststelle bringen.
24 Zur Gefahrenvorbeugung darf das eventuell beschädigte Stromkabel nur vom Hersteller oder
seiner Kundendienststelle, d.h. nur von einer ähnlich qualifizierten Person ausgewechselt werden.
25 Das Gerät ist AUSSCHLIEßLICH FÜR DEN HAUSGEBRAUCH und nicht für Handels- oder
Industriezwecke bestimmt.
26 Dieses Gerät ist konform mit den Richtlinien 2006/95/EC und EMC 2004/108/EC.
27 Eventuelle Abänderungen an diesem Produkt, die nicht ausdrücklich vom Hersteller genehmigt
wurden, können die Sicherheit und Garantie seines Einsatzes durch den Bediener aufheben.
28 Falls dieses Gerät entsorgt werden soll, ist sein Stromkabel abzuschneiden, so dass es nicht
mehr funktionstüchtig ist. Darüber hinaus sind all die Geräteteile unschädlich zu machen, die vor
allem für Kinder, die das Gerät als Spielzeug verwenden könnten, eine Gefahr darstellen.
29 Die Verpackungsteile nicht in Reichweite von Kindern lassen. Sie stellen eine potentielle Gefahr
dar.
ANLEITUNG AUFBEWAHREN
Page 23

DE
- 21 -
BESCHREIBUNG DES GERÄTS (Abb. 1)
A Staubbehälter
B Filterhalter
C Filter
D Ausrast- Taste
E Kontrolllampe für leere Batterie
F Ein-/ Ausschalttaste (ON/OFF)
G Griff
H Motorgehäuse
I Mutter
L Ein-/Ausschalttaste (ON/OFF)
M Oberer Griff
Ein Merkmal dieses Stabstaubsaugers ist die Betriebsmöglichkeit sowohl als klassischer Staubsauger
ausschließlich mit der Bodenbürste (T), wobei das Gerätegehäuse in die typische Betriebsstellung
nach hinten gekippt werden muss, als auch durch Abnehmen des tragbaren Teils und Verwendung
der Saugdüse für kleinere Wassermengen (U), der Rundbürste (V) oder der Schlitzdüse (Z). Dadurch
wird das Gerät in engen Bereichen handlicher.
ZUSAMMENBAU DES GERÄTS
Bevor das Gerät verwendet werden kann, muss der obere Griff (M) am Gehäuse (S) angebracht
werden. Dazu ist wie folgt vorzugehen:
- die mitgelieferte Mutter (I) in die entsprechende Öffnung oben am Gerätegehäuse (S) (Abb. 2)
einsetzen;
- den oberen Griff (M) am Gehäuse (S) anbringen und vorsichtig bis zum Anschlag drücken (Abb. 3);
- die mitgelieferte Schraube (N) in die zugehörige Öffnung am Griff (M) einsetzen und anziehen, bis
der Griff einwandfrei befestigt ist (Abb. 4).
ACHTUNG: Seien Sie beim Umgang mit dem Schraubenzieher vorsichtig, um sich nicht zu verletzen.
ACHTUNG: Bevor Sie das Gerät verwenden, vergewissern Sie sich, dass Sie es richtig zusammen
gebaut haben.
N Schraube
O Ausrast-Taste
P Nachlade- Kontrolllampe
Q Steckdose für Nachladegerät
R Nachladegerät
S Gehäuse des Geräts
T Bodenbürste
U Saugdüse für groben Schmutz und kleinere
Wassermengen
V Rundbürste
Z Schlitzdüse
NACHLADEN DER BATTERIE
WARNHINWEIS: Bevor Sie den Stabstaubsauger verwenden, muss die Batterie vollständig geladen werden.
ACHTUNG: Laden Sie die Batterie vor der ersten Verwendung des Geräts mindestens 24 Stunden,
um die Batterie zu aktivieren. Danach beträgt die Zeit für das komplette Nachladen 16 Stunden.
ACHTUNG: Es ist ganz normal, dass das Gerät während des Nachladens warm wird.
ACHTUNG: Achten Sie darauf, dass Sie das Gerät nicht einschalten, während es geladen wird.
- Bei zusammengesetztem Gerät den Stecker des Ladegeräts (R) in die Steckdose und den
Stiftstecker in die entsprechende Buchse (Q) am Gehäuse des Staubsaugers stecken (S).
Die Kontrolllampe (P) leuchtet auf. Das bedeutet, dass das Gerät aufgeladen wird. Der
Ladevorgang ist nach etwa 16 Stunden beendet. Dann ist der Staubsauger betriebsbereit.
WARNHINWEIS: Es empfiehlt sich, die Batterie vollständig zu verbrauchen, bevor sie wieder geladen wird.
Page 24

DE
- 22 -
ZUBEHÖR
Bodenbürste (T)
Für die Reinigung beliebiger Oberflächen geeignet.
Die Bürste in das Gehäuse des Staubsaugers (S) einsetzen und leicht drücken, bis das Einrasten
zu hören ist. Zum Entfernen der Bürste muss die entsprechende Taste an der Rückseite der Bürste
betätigt und dabei die Bürste nach außen gezogen werden (Abb. 5).
Saugdüse (U) (nur für tragbaren Sauger)
Für das Aufsaugen von grobem Schmutz und kleineren Wassermengen.
Rundbürste (V) (nur für tragbaren Sauger)
Geeignet für die Reinigung von Polstermöbeln und Geweben
Schlitzdüse (Z) (nur für tragbaren Sauger)
Geeignet für Ecken, Schlitze oder schlecht zu erreichende Stellen.
BETRIEBSANLEITUNG
ACHTUNG: SCHALTEN SIE DAS GERÄT AUS, WENN SIE ES NICHT MEHR BRAUCHEN ODER
BEVOR SIE EINZELTEILE EINSETZEN ODER ENTFERNEN, BZW. BEVOR SIE ES REINIGEN.
ACHTUNG: UNTERBRECHEN SIE DEN ANSCHLUSS DES NACHLADEGERÄTS BEVOR SIE
DAS GERÄT BENUTZEN.
- Nachdem die Batterie aufgeladen und der tragbare Teil richtig in das Gehäuse des Geräts (S)
eingesetzt wurde, betätigen Sie die Einschalt- Taste (L) und kippen Sie den Stiel in die typische
Betriebsstellung (Abb. 6).
- Reinigen Sie große Flächen, indem Sie die Bürste (T) vorwärts schieben.
Dadurch kann der Staubsauger Fremdkörper und Schmutz vom Boden aufnehmen.
- Zum Reinigen von Ecken und kleinen Flächen, drehen Sie den Staubsauger in die entgegen
gesetzte Richtung. Dadurch werden Schmutz und Fremdkörper zusammen geschoben und können dann aufgesaugt werden.
ACHTUNG: Schalten Sie das Gerät sofort aus, falls beispielsweise ein Stück Stoff oder die Fransen
eines Teppichs in der Bürste hängen bleiben.
- Wenn Sie mit dem Saugen fertig sind, schalten Sie das Gerät aus, indem Sie die Ausschalt-Taste
betätigen (L).
Tragbarer Staubsauger
ACHTUNG: SCHALTEN SIE DAS GERÄT AUS, WENN SIE ES NICHT MEHR BRAUCHEN ODER
BEVOR SIE EINZELTEILE EINSETZEN ODER ENTFERNEN, BZW. BEVOR SIE ES REINIGEN.
- Halten Sie den Stiel des Gehäuses (S) fest, drücken Sie die Ausrast- Taste (O) und entnehmen
Sie den tragbaren Staubsauger (Abb. 7).
- Bringen Sie am Ende des Staubbehälters (A) das gewünschte Zubehörteil an. Betätigen Sie die
Einschalttaste (F), um den tragbaren Sauger einzuschalten, und fassen Sie diesen an seinem Griff
(G) (Abb. 8). Die Kontrolllampe (E) leuchtet auf, wenn die Batterie leer ist, und bleibt eingeschaltet,
bis die Batterieladung vollständig verbraucht ist.
Page 25

DE
- 23 -
Setzen Sie den tragbaren Sauger wieder in das Gehäuse des Geräts ein (S) und laden Sie die
Batterie, wie vorstehend beschrieben.
- Um den tragbaren Sauger wieder in das Gerät (S) einsetzen zu können, muss zunächst das vorher
montierte Zubehörteil durch Abziehen nach außen entfernt werden. Danach muss das Ende des
Staubbehälters (A) in den unteren Bereich der Aufnahme am Gerät (S) eingesetzt und vorsichtig
gedrückt werden, bis das entsprechende Geräusch das korrekte Einrasten bestätigt (Abb. 9).
ACHTUNG: Vergewissern Sie sich, dass der tragbare Sauger richtig installiert wurde, bevor Sie das
Gerät normal benutzen oder die Batterie laden.
REINIGUNG
ACHTUNG: TAUCHEN SIE DAS GEHÄUSE DES GERÄTS, DEN STECKER UND DAS
STROMKABEL KEINESFALLS IN WASSER ODER SONSTIGE FLÜSSIGKEITEN. VERWENDEN
SIE ZUR REINIGUNG NUR EIN FEUCHTES TUCH.
ACHTUNG: SCHALTEN SIE DAS GERÄT AUS, WENN SIE ES NICHT MEHR BRAUCHEN ODER
BEVOR SIE EINZELTEILE EINSETZEN ODER ENTFERNEN, BZW. BEVOR SIE ES REINIGEN.
- Reinigen Sie das Motorgehäuse (H) und das Gehäuse des Geräts (S) ausschließlich mit einem
feuchten Tuch und neutralem Reinigungsmittel, falls erforderlich.
Achten Sie dabei darauf, dass keine Flüssigkeit in den Staubsauger eindringt.
Verwenden Sie keine starken Reinigungsmittel (Fleckenmittel, Lösungsmittel), da diese den
Kunststoff schädigen können.
Entleeren des Staubbehälters (A)
ACHTUNG: Reinigen Sie den Staubbehälter (A) und den Filter (C) rechtzeitig. Wenn der
Staubbehälter zu voll oder der Filter verstopft ist, reduziert sich die Saugleistung.
- Entnehmen Sie den tragbaren Sauger wie oben beschrieben.
- Betätigen Sie die Ausrast- Taste (D) und entnehmen Sie den Behälter komplett (Abb. 10).
- Ziehen Sie den Filter (C) (Abb. 11) und dessen Halterung (B) (Abb. 9) nach außen (Abb. 12) und
reinigen Sie beide.
ACHTUNG: Waschen Sie den Filter (C) nur mit reinem Wasser, ohne Seife oder Reinigungsmittel.
- Entleeren Sie den Staubbehälter (A) in einen geeigneten Kunststoffbeutel und reinigen Sie ihn mit
Wasser.
- Lassen Sie alle Teile gut trocknen, bevor Sie sie wieder einbauen.
ACHTUNG: Die Halterung (B), der Filter (C) und der Staubbehälter (A) müssen wieder korrekt montiert werden, bevor das Gerät eingeschaltet wird.
- Setzen Sie den kompletten Behälter in das Motorgehäuse (H) ein und drücken Sie ihn, bis Sie ihn
Einrasten hören (Abb. 13).
Reinigung der Bodenbürste (T)
ACHTUNG: Reinigen Sie die Bodenbürste (T) erst, nachdem Sie sie vom Gerät entfernt haben.
- Schieben Sie den Ausrasthebel nach vorn und ziehen Sie den Kunststoffdeckel heraus (Abb. 14).
-
Entnehmen Sie die drehbare Bürste (Abb.15), reinigen Sie sie und montieren Sie sie dann wieder richtig.
- Bringen Sie den Kunststoffdeckel wieder an, indem Sie den entsprechenden Hebel nach hinten
schieben (Abb. 16)
Page 26

DE
FEHLERSUCHE
Problem Mögliche Ursache Abhilfe
Motor läuft nicht Batterie leer Batterie laden
Saugleistung lässt nach Staubbehälter voll oder Filter
verstopft
Stromversorgung unterbrochen
Kontrolllampe der
Batterieladung ausgeschaltet
Laufzeit der Batterie wird
kürzer
Stecker des Batterieladegeräts
nicht richtig eingesteckt
Staub zwischen dem Stecker
des Motors und dem Sockel
Batterie entlädt sich vollständig
im Verlauf von 16 Stunden
Staubbehälter leeren und Filter
reinigen
Stecker richtig einstecken
Staub beseitigen
Wenn die Batterie nach
16 Stunden vollständigem
Aufladen nur 1-2 Minuten funktioniert, ist sie möglicherweise
verbraucht und muss in diesem
Fall gegen eine neue ausgetauscht werden.
- 24 -
Page 27

ES
ADVERTENCIAS IMPORTANTES
LEER ESTAS INSTRUCCIONES ANTES DEL EMPLEO
Cuando se usan aparatos eléctricos es necesario tomar algunas precauciones, entre las cuales:
1 No colocar el aparato sobre o en proximidad de fuentes de calor.
2 No usar el aparato cerca de personas, ni levantarlo a la altura de los ojos, orejas, etc. para evitar
graves accidentes.
3 No dejar el aparato expuesto a agentes atmosféricos (lluvia, sol, etc.).
4 Controlar que el cable eléctrico no toque superficies calientes.
5 Este aparato no es adecuado para ser empleado por personas (includos los niños) con capa-
cidades físicas, sensoriales o mentales reducidas. Los usuarios que no tengan la experiencia
y conocimiento del aparato o bien a aquellos a los que no se les haya dado las instrucciones
referentes al empleo del aparato tendrán que estar sometidos a la supervisión por parte de una
persona responsable de su seguridad.
6 Es necesario vigilar a los niños para asegurarse de que no jueguen con el aparato.
7 No introducir ningún objeto en las aberturas del aparato y evitar que los objetos obstruyan el flujo
de aire.
8 Mantener las aberturas limpias de polvo, pelusa, pelos, etc.
9 No usar el aparato sin filtro.
10 No recoger objetos muy calientes o que produzcan humo o estén quemándose como cigarrillos,
cerillas o ceniza todavía caliente.
11 No recoger material inflamable o combustible (líquidos volátiles, gasolina, queroseno, etc.) ni
usarla en presencia de grandes cantidades de agua.
12 No usar el aparato en ambientes cerrados y con vapores emanados por pinturas a óleo, o por
disolventes o impermeabilizantes de polvo inflamables u otros vapores tóxicos o explosivos.
13 No recoger material tóxico (lejía, amoníaco, desembozadores de lavabo, gasolinas, etc.).
14 NO SUMERGIR NUNCA EL CUERPO DEL PRODUCTO, EL ENCHUFE Y EL CABLE
ELÉCTRICO EN EL AGUA O EN OTROS LÍQUIDOS, USAR UN PAÑO HÚMEDO PARA
LIMPIARLOS.
15 APAGAR EL APARATO CUANDO EL EMPLEO SE HAYA ACABADO Y ANTES DE CONECTAR
O QUITAR CADA UNA DE LAS PARTES O ANTES DE EFECTUAR LA LIMPIEZA.
16 Antes de conectar el alimentador de recarga a la red de alimentación, controlar que la tensión
indicada en la placa corresponda a aquella de la red local.
17 DESCONECTAR EL ALIMENTADOR DE RECARGA CUANDO EL APARATO ES UTILIZADO.
18 El aparato funciona con baterías recargables al NiMH, por lo tanto al final de la duración no se
tienen que eliminar junto a los restos de basura.
Se pueden entregar a los correspondientes centros de recogida diferenciada preparados por
las administraciones municipales, o bien en los establecimientos que ofrecen este servicio.
Eliminar por separado un electrodoméstico permite evitar posibles consecuencias negativas
para el ambiente y para la salud derivadas de una eliminación inadecuada y permite recuperar
los materiales de los que está compuesto con el fin de obtener un importante ahorro de energía
y de recursos.
Para subrayar la obligación de eliminar por separado los electrodomésticos, en el producto está
- 25 -
Page 28

ES
- 26 -
indicada la marca del contenedor de basura móvil tachado. No tirar nunca los acumuladores al
fuego.
19 Para obtener los mejores resultados, no cargar una batería si su temperatura o la temperatura
ambiente está por debajo de los 5°C (40° F) o por encima de los 40° C (105° F).
20 En caso de derrame del líquido de la batería, el aparato no se tiene que utilizar si no que hay
que llevarlo al Centro Asistencia más cercano para la sustitución de la misma batería.
21 Asegurarse de tener siempre las manos bien secas antes de utilizar o de regular los interruptores
situados en el aparato o antes de tocar el enchufe y las conexiones de alimentación.
22 Para desenchufar, coger directamente el enchufe y desconectarlo de la toma de la pared. No
desenchufar estirando del cable.
23 No usar el aparato si el cable eléctrico o el enchufe estuvieran dañados, o si el mismo aparato
fuera defectuoso; en este caso llevarlo al Centro de Asistencia Autorizado más cercano.
24 Si el cable de alimentación está dañado tiene que ser sustituido por el Fabricante o por su
servicio asistencia técnica o en todo caso por una persona con calificación similar, para prevenir
cualquier riesgo.
25 El aparato ha sido proyectado SÓLO PARA EMPLEO DOMÉSTICO y no tiene que ser destinado
a uso comercial o industrial.
26 Este aparato cumple la directiva 2006/95/EC y EMC 2004/108/EC.
27 Eventuales modificaciones a este producto, no autorizadas expresamente por el fabricante
pueden comportar el vencimiento de la seguridad y de la garantía de su empleo por parte del
usuario.
28 Cuando decida deshacerse de este aparato, aconsejamos inhabilitarlo cortando el cable de
alimentación. Se recomienda además hacer inocuas aquellas partes del aparato que pudieran
constituir un peligro, especialmente para los niños que podrían utilizar el aparato para sus jue-
gos.
29 Los elementos del embalaje no se tienen que dejar al alcance de los niños ya que constituyen
fuentes potenciales de peligro.
GUARDAR ESTAS INSTRUCCIONES
Page 29

ES
- 27 -
DESCRIPCIÓN DEL APARATO (Fig. 1)
A Recipiente para el polvo
B Soporte filtro
C Filtro
D Botón de desbloqueo
E Luz indicadora batería descargada
F Botón de encendido/apagado (ON/OFF)
G Mango
H Cuerpo motor
I Tuerca
L Botón de encendido/apagado (ON/OFF)
M Mango superior
Característica de la Escoba Eléctrica es que puede funcionar ya sea en modo clásico, sólo exclusivamente con el cepillo para pavimentos (T), inclinando hacia atrás el cuerpo del aparato en la típica
posición de empleo, ya sea extrayendo la parte portátil, que se puede utilizar con el aspirador para
pequeñas cantidades de agua (U), con el cepillo redondo (V) o con el aspirador hendiduras (Z) para
una mayor practicidad en los espacios estrechos.
ENSAMBLAJE DEL APARATO
Antes de empezar a usarlo, hay que acoplar el mango superior (M) al cuerpo del aparato (S), de la
siguiente manera:
- introducir la tuerca (I) en dotación en el correspondiente alojamiento presente en la parte superior
del cuerpo del aparato (S) (Fig. 2);
- ensamblar el mango superior (M) al cuerpo del aparato (S), presionando con cuidado hasta el tope
(Fig. 3);
- introducir el tornillo (N) en dotación en el correspondiente orificio en el mango (M) y con la ayuda
de un destornillador, bloquear éste último fuertemente (Fig. 4).
ATENCIÓN: Prestar atención al empleo del destornillador para evitar herirse.
ATENCIÓN: Antes de utilizarlo, asegurarse de haber ensamblado correctamente el aparato.
N Tornillo
O Botón de desbloqueo
P Luz indicadora de recarga
Q Toma para alimentador de recarga
R Alimentador de recarga
S Cuerpo del aparato
T Cepillo para pavimentos
U Aspirador detritos y pequeñas cantidades de
agua
V Cepillo redondo
Z Aspirador para hendiduras
RECARGA DE LA BATERÍA
ADVERTENCIA: Antes de utilizar la escoba, cargar completamente la batería.
ATENCIÓN: Cargar durante al menos 24 horas para activar la batería antes del primer empleo,
después el tiempo para una recarga completa será 16 horas.
ATENCIÓN: Es normal que el aparato se caliente durante la carga.
ATENCIÓN: Asegurarse de no accionar el aparato durante la carga.
- Con el aparato montado, conectar el enchufe eléctrico del alimentador (R) a una toma de corriente
y la espiga en la correspondiente conexión (Q) presente en el cuerpo del aparato (S).
La luz indicadora (P) se encenderá para señalar que el aparato se está recargando; transcurridas
aproximadamente 16 horas la recarga se habrá completado y la escoba estará lista para ser
usada.
ADVERTENCIA: Se aconseja descargar completamente la batería, antes de una nueva recarga.
Page 30

ES
- 28 -
ACCESORIOS
Cepillo para pavimentos (T)
Adecuado para limpieza de cualquier tipo de superficie.
Aplicar el cepillo en el cuerpo del aparato (S), presionando ligeramente hasta oír un “clic”. Para
desmontarlo, sólo hay que apretar el correspondiente botón situado en la parte trasera del mismo
cepillo y extraerlo hacia el exterior (Fig. 5).
Aspiradora (U) (Sólo para Aspiradora Portátil)
Adecuado para la aspiración de detritos gruesos y pequeñas cantidades de agua.
Cepillo redondo (V) (Sólo para Aspiradora Portátil)
Adecuado para la limpieza de sofás y tejidos.
Aspiradora hendiduras (Z) (Sólo para Aspiradora Portátil)
Adecuado para la limpieza de esquinas, hendiduras o zonas difíciles de alcanzar.
INSTRUCCIONES DE EMPLEO
ATENCIÓN: APAGAR EL APARATO CUANDO HAYAMOS ACABADO DE USARLO Y ANTES
DE MONTAR O DESMONTAR CADA UNA DE LAS PARTES O ANTES DE EFECTUAR LA
LIMPIEZA.
ATENCIÓN: DESCONECTAR EL ALIMENTADOR DE RECARGA CUANDO EL APARATO ES
UTILIZADO.
- Con la recarga de la batería efectuada y con la parte portátil correctamente ensamblada en el
cuerpo del aparato (S), apretar el botón de encendido (L) e inclinar hacia atrás el mango (M) en
la típica posición de empleo (Fig. 6).
- Limpiar las superficies amplias empujando con el cepillo (T) hacia delante.
Esto permite a la aspiradora recoger los fragmentos y la suciedad del pavimento.
- Para la limpieza de esquinas y pequeñas superficies, dar la vuelta a la escoba en la dirección
opuesta. Los fragmentos y la suciedad pueden de este modo ser desplazados para después ser
aspirados.
ATENCIÓN: apagar enseguida la escoba si se quedara algo atrapado dentro del cepillo, como un
trozo de tela, los flecos de una alfombra, etc.
- Completada la limpieza, apagar la escoba apretando otra vez el botón de apagado (L).
Aspiradora Portátil
ATENCIÓN: APAGAR EL APARATO CUANDO HAYAMOS ACABADO DE USARLO Y ANTES
DE MONTAR O DESMONTAR CADA UNA DE LAS PARTES O ANTES DE EFECTUAR LA
LIMPIEZA.
- Teniendo firme el mango (M) del cuerpo del aparato (S), apretar el botón de desbloqueo (O) y
extraer la aspiradora portátil (Fig. 7).
- En la extremidad del recipiente del polvo (A), aplicar el accesorio deseado; apretar el botón de
encendido (F) para poner en funcionamiento la aspiradora portátil utilizándola mediante el correspondiente mango (G) (Fig. 8).
Page 31

ES
- 29 -
La correspondiente luz indicadora (E) se encenderá con batería descargada, y permanecerá
encendida hasta un definitivo agotamiento de la carga.
Volver a colocar la aspiradora portátil en el cuerpo del aparato (S) y recargar como se describe
precedentemente.
- Para volver a colocar la aspiradora portátil en el cuerpo del aparato (S), quitar antes de nada
el accesorio instalado extrayéndolo hacia fuera, entonces colocar la extremidad del recipiente
del polvo (A) en la zona inferior del correspondiente alojamiento en el cuerpo del aparato (S) y
empujar hacia atrás con cautela la aspiradora portátil hasta que se oiga el “clic” que confirma la
correcta aplicación (Fig. 9).
ATENCIÓN: Asegurarse de haber correctamente instalado la aspiradora portátil, antes de usarla de
nuevo en modo clásico o con la recarga de la batería.
LIMPIEZA
ATENCIÓN: NON SUMERGIR NUNCA EL CUERPO DEL PRODUCTO, EL ENCHUFE Y EL
CABLE ELÉCTRICO EN EL AGUA U OTROS LÍQUIDOS, USAR UN PAÑO HÚMEDO PARA
LIMPIARLOS.
ATENCIÓN: APAGAR EL APARATO CUANDO HAYAMOS ACABADO DE USARLA Y ANTES
DE MONTAR O DESMONTAR CADA UNA DE LAS PARTES O ANTES DE EFECTUAR LA
LIMPIEZA.
- Limpiar el cuerpo motor (H) y el cuerpo del aparato (S) utilizando exclusivamente un paño húmedo
con detergente neutro, si es necesario.
Cuando hagamos esto no hay que dejar que entre ningún tipo de líquido en la aspiradora.
No utilizar nunca sustancias de limpieza de tipo fuerte (líquidos para manchas, disolventes) que
podrían corroer el plástico.
Cómo vaciar el recipiente del polvo (A)
ATENCIÓN: limpiar el recipiente del polvo (A) y el filtro (C) en tiempo útil; la potencia de aspiración
será reducida si el recipiente está lleno o el filtro obstruido.
- Extraer la aspiradora portátil como se describe precedentemente.
- Apretar el botón de desbloqueo (D) y extraer el recipiente completo (Fig. 10).
- Extraer hacia fuera el filtro (C) (Fig. 11) y después el correspondiente soporte (B) (Fig. 12) y limpiar.
ATENCIÓN: Lavar el filtro (C) sólo con agua limpia y sin usar jabones o detergentes.
- Después vaciar el recipiente del polvo (A) en una bolsa de plástico idónea y si es necesario lavarlo
con agua.
- Dejar secar bien todos los componentes y volver a montar.
ATENCIÓN: Montar correctamente el soporte (B), el filtro (C), el recipiente del polvo (A) antes de
poner en marcha el aparato.
- Ensamblar el recipiente completo al cuerpo motor (H) empujando hasta oír el “clic” de correcto
montaje (Fig. 13).
Page 32

ES
Como limpiar el cepillo pavimentos (T)
ATENCIÓN: Efectuar la limpieza del cepillo pavimentos (T) sólo después de haberlo quitado del
aparato.
- Empujar hacia delante la pestaña de desbloqueo y extraer la tapa de plástico (Fig. 14).
- Extraer el cepillo rotatorio (Fig. 15), limpiarlo y volver a montarlo correctamente.
- Volver a montar la tapa de plástico empujando hacia atrás la correspondiente pestaña (Fig. 16).
LOCALIZACIÓN AVERÍAS
Problema Posible causa Solución
El motor no funciona La batería está descargada Cargar la batería
La potencia de aspiración
es débil
La luz indicadora del indicador de carga está apagada
El tiempo de empleo de la
batería es cada vez más
breve
El recipiente del polvo está lleno
o el filtro está obstruido
Desconexión de la alimentación
eléctrica
El enchufe del cargador de batería no está bien conectado
Hay polvo entre el conector eléctrico del motor y la base
Si la batería se carga completamente en 16 horas
Vaciar el recipiente del polvo y
limpiar el filtro
Volver a conectar correctamente el enchufe
Quitar el polvo
Si la batería funciona sólo
durante 1-2 minutos después
de una carga completa de 16
horas, es posible que esté
agotada. Hay simplemente que
sustituirla con una nueva.
- 30 -
Page 33

PT
ADVERTÊNCIAS IMPORTANTES
LEIA ESTAS INSTRUÇÕES ANTES DE USAR O APARELHO
Ao utilizar aparelhos eléctricos, é necessário tomar as devidas precauções, entre as quais:
1 Não colocar o aparelho sobre ou perto de fontes de calor.
2 Não aproxime a vassoura das pessoas, muito menos dos olhos, orelhas, etc., para evitar graves
acidentes.
3 Não deixe o aparelho exposto aos agentes atmosféricos (chuva, sol, etc.).
4 Preste atenção para que o cabo eléctrico não entre em contacto com superfícies quentes.
5 Este aparelho não está indicado para ser utilizado por pessoas (inclusive crianças) com redu-
zidas capacidades físicas, sensoriais ou mentais. Os utilizadores que não tenham adequada
experiência e conhecimento do aparelho ou que não receberam as instruções sobre a sua
utilização devem ser vigiados por uma pessoa responsável pela sua segurança.
6 É necessário vigiar as crianças para assegurar que não brinquem com o aparelho.
7 Não insira nenhum objecto nas aberturas da vassoura e evite que objectos obstruam o fluxo de
ar.
8 Mantenha as aberturas limpas de pó, cotão, cabelos, etc.
9 Não use a vassoura sem o filtro.
10
Não varra objectos muito quentes ou em brasa como cigarros, fósforos e cinzas ainda quentes.
11 Não varra material inflamável ou combustível (líquidos voláteis, gasolina, querosene, etc.) nem
grandes quantidades de água.
12 Não use a vassoura em ambientes fechados e na presença de vapores emanados de tintas
a óleo ou de solventes ou impermeabilizantes de pó inflamável ou outros vapores tóxicos ou
explosivos.
13 Não varra material tóxico (lixívia, amoníaco, desentupidor de canos, gasolina, etc.).
14 NUNCA PASSE O CORPO DO APARELHO, A FICHA E O CABO ELÉCTRICO POR ÁGUA OU
OUTROS LÍQUIDOS, USE UM PANO HÚMIDO PARA A LIMPEZA DESTAS PARTES.
15 DESLIGUE A VASSOURA APÓS O USO E ANTES DE MONTAR/DESMONTAR OS
COMPONENTES E DE EFECTUAR A LIMPEZA.
16 Antes de ligar o carregador à tomada, verifique se a voltagem indicada na placa corresponde à
da sua rede eléctrica.
17 DESLIGUE O CARREGADOR QUANDO USAR A VASSOURA.
18 Este aparelho funciona com baterias recarregáveis NiMH, portanto, no fim da sua vida útil, NÃO
deve ser eliminado juntamente com os resíduos urbanos. Pode ser depositado num centro de
recolha diferenciada predisposto pelas autoridades locais ou entregue a um revendedor que
fornece este serviço.
Eliminar separadamente um electrodoméstico permite evitar possíveis consequências negativas
ao ambiente e à saúde pública resultantes de uma eliminação inadequada, e permite também
recuperar os materiais de que é composto a fim de obter uma importante poupança de energia
e de recursos.
Para assinalar a obrigação de eliminar separadamente os electrodomésticos, o aparelho apre-
senta o símbolo de um contentor de lixo marcado com uma cruz por cima. Não deposite os
acumuladores no fogo.
- 31 -
Page 34

PT
- 32 -
19 Para obter os melhores resultados, não carregue a bateria se a temperatura da bateria ou a
temperatura ambiente estiverem abaixo de 5°C (40° F) ou acima de 40° C (105° F).
20 Em caso de perda de líquido da bateria, não use o aparelho, leve-o ao Centro de Assistência
mais próximo para trocar a bateria.
21 Assegure-se de estar sempre com as mãos bem secas antes de utilizar o aparelho, regular os
interruptores e antes de ligar a ficha na tomada e efectuar as ligações de alimentação.
22 Para retirar a ficha da tomada, segure directamente na ficha e nunca a puxe pelo cabo.
23 Não use o aparelho se o cabo eléctrico ou a ficha estiverem danificados ou se o próprio aparelho
estiver defeituoso; neste caso, leve-o até o Centro de Assistência Autorizado mais próximo.
24 Se o cabo de alimentação estiver danificado, deverá ser substituído pelo Fabricante, pelo servi-
ço de assistência técnica ou, de qualquer forma, por uma pessoa com qualificação similar, para
evitar qualquer risco.
25 O aparelho foi concebido SOMENTE PARA USO DOMÉSTICO e não deve ser utilizado para fins
comerciais ou industriais.
26 Este aparelho está em conformidade com a directiva 2006/95/EC e EMC 2004/108/EC.
27 Eventuais modificações deste produto não expressamente autorizadas pelo fabricante podem
comportar a perda da segurança e da garantia do seu uso pelo utilizador.
28 Caso decida descartar o aparelho como lixo, recomendamos que o deixe inoperante cortando
o cabo de alimentação. Recomendamos também que torne inócuas as partes do aparelho que
possam representar perigo, especialmente para as crianças que podem utilizar o aparelho como
um brinquedo.
29 Os elementos da embalagem não devem ser deixados ao alcance de crianças pois são poten-
ciais fontes de perigo.
GUARDE ESTAS INSTRUÇÕES
Page 35

PT
- 33 -
DESCRIÇÃO DO APARELHO (Fig. 1)
A Depósito de pó
B Suporte do filtro
C Filtro
D Botão de desbloqueio
E Led de bateria descarregada
F Botão de ligação/desligação (ON/OFF)
G Pega
H Corpo do motor
I Porca
L Botão de ligação/desligação (ON/OFF)
M Cabo superior
A característica da vassoura eléctrica é que pode funcionar tanto na modalidade clássica, apenas
com a escova para pavimentos (T), inclinando para trás o corpo da vassoura na típica posição de
uso, ou como um aspirador, utilizando o bocal para pequenas quantidades de água (U), a escovinha
circular (V) ou o bocal de fendas (Z), permitindo uma maior limpeza.
MONTAGEM DO APARELHO
Antes de começar a usar a vassoura, é preciso montar o cabo superior (M) no corpo do aparelho
(S) da seguinte maneira:
- insira a porca (I) de série no respectivo alojamento presente na extremidade do corpo do aparelho
(S) (Fig. 2);
- monte o cabo superior (M) no corpo do aparelho (S) até ao fundo (Fig. 3);
- insira o parafuso (N) de série no furo presente no cabo (M) e, com a ajuda de uma chave de fenda,
aperte bem o parafuso (Fig. 4).
ATENÇÃO: Ao manusear a chave de fenda tenha cuidado para não se ferir.
ATENÇÃO: Antes de começar a usar a vassoura, verifique se ela está bem montada.
N Parafuso
O Botão de desbloqueio
P Led de recarga
Q Tomada para o carregador
R Carregador
S Corpo do aparelho
T Escova para pavimentos
U Bocal de detritos e pequenas quantidades
de água
V Escovinha circular
Z Bocal de fendas
RECARGA DA BATERIA
ADVERTÊNCIA: Antes de usar a vassoura, carregue completamente a bateria.
ATENÇÃO: Carregue pelo menos 24 horas para activar a bateria antes da primeira utilização, pos-
teriormente o tempo para uma recarga completa será de 16 horas.
ATENÇÃO: É normal que a vassoura aqueça durante a recarga.
ATENÇÃO: Não accione a vassoura durante a recarga.
- Com a vassoura montada, ligue o carregador (R) à tomada de parede e à tomada (Q) do
aparelho (S).
O led (P) acende-se para indicar que o aparelho está a ser recarregado; a recarga completa leva
cerca de 16 horas, depois disso a vassoura estará pronta para o uso.
ADVERTÊNCIA: Aconselha-se descarregar completamente a bateria antes de recarregá-la.
Page 36

PT
- 34 -
ACESSÓRIOS
Escova para pavimentos (T)
Indicada para varrer qualquer tipo de superfície.
Monte a escova no corpo do aparelho (S) até ouvir o clique de encaixe. Para desmontá-la, carregue
no botão posto na parte traseira da escova (Fig. 5).
Bocal (U) (Só para o aspirador portátil)
Indicado para aspirar detritos e pequenas quantidades de água.
Escovinha circular (V) (Só para o aspirador portátil)
Indicada para aspirar sofás e tecidos.
Bocal de fendas (Z) (Só para o aspirador portátil)
Indicado para aspirar cantos, fendas ou zonas de difícil acesso.
MODO DE USO
ATENÇÃO: DESLIGUE A VASSOURA APÓS O USO E ANTES DE MONTAR/DESMONTAR OS
COMPONENTES E DE EFECTUAR A LIMPEZA.
ATENÇÃO: DESLIGUE O CARREGADOR QUANDO USAR A VASSOURA.
- Com a bateria recarregada e com a parte portátil correctamente montada no corpo do aparelho
(S), carregue no botão de ligação (L) e incline para trás a pega (M) na posição de uso (Fig. 6).
- Varra as superfícies amplas empurrando a escova (T) para frente. Isto permite ao aspirador recolher os fragmentos e a sujidade do pavimento.
- Para a limpeza dos cantos e das pequenas superfícies, rode a vassoura na direcção contrária. Os
fragmentos e a sujidade são assim deslocados e depois aspirados.
ATENÇÃO: desligue imediatamente a vassoura no caso de algum objecto impedir o fluxo de ar,
como um pedaço de tecido, as franjas do tapete, etc.
- Após o uso, desligue a vassoura carregando no botão de desligação (L).
Aspirador Portátil
ATENÇÃO: DESLIGUE A VASSOURA APÓS O USO E ANTES DE MONTAR/DESMONTAR OS
COMPONENTES E DE EFECTUAR A LIMPEZA.
- Segurando firme na pega (M) do corpo do aparelho (S), carregue no botão de desbloqueio (O) e
retire o aspirador portátil (Fig. 7).
- Na extremidade do depósito de pó (A), monte o acessório desejado; carregue no botão de ligação
(F) para ligar o aspirador portátil e aspire segurando na pega (G) (Fig. 8). O led (E) acende-se
quando a bateria estiver descarregada e ficará aceso até à completa descarga.
Reponha o aspirador portátil no corpo do aparelho (S) e proceda à recarga da bateria, como
descrito anteriormente.
- Para repor o aspirador portátil no corpo do aparelho (S), retire o acessório da extremidade do
depósito puxando-o para fora; insira a extremidade do depósito de pó (A) na zona inferior do
alojamento no corpo do aparelho (S) e abaixe com cuidado o aspirador portátil até ouvir o clique
de encaixe (Fig. 9).
Page 37

PT
- 35 -
ATENÇÃO: Verifique se o aspirador portátil está bem encaixado antes de usar a vassoura no modo
clássico ou quando for recarregar a bateria.
LIMPEZA
ATENÇÃO: NÃO MERGULHE O CORPO DO APARELHO, A FICHA E O CABO ELÉCTRICO EM
ÁGUA OU OUTROS LÍQUIDOS. USE UM PANO HÚMIDO PARA A LIMPEZA.
ATENÇÃO: DESLIGUE A VASSOURA APÓS O USO E ANTES DE MONTAR/DESMONTAR OS
COMPONENTES E DE EFECTUAR A LIMPEZA.
- Limpe o corpo do motor (H) e o corpo do aparelho (S) usando apenas um pano húmido com detergente neutro, se necessário. Cuidado para não deixar entrar nenhum tipo de líquido no aspirador
portátil.
Não use produtos de limpeza agressivos (removedores, solventes) que podem corroer o plásti-
co.
Como esvaziar o depósito de pó (A)
ATENÇÃO: Lave o depósito de pó (A) e o filtro (C) quando necessário; a potência de aspiração fica
reduzida se o depósito estiver cheio ou o filtro estiver obstruído.
- Retire o aspirador portátil como descrito acima.
- Carregue no botão de desbloqueio (D) e retire o depósito (Fig. 10).
- Retire o filtro (C) (Fig. 11) e o suporte (B) (Fig. 12) e proceda à limpeza.
ATENÇÃO: Lave o filtro (C) apenas com água limpa sem usar detergente.
- Esvazie o depósito de pó (A) num saco de plástico e, se necessário, lave-o com água.
- Deixe secar bem todos os componentes antes de remontá-los.
ATENÇÃO: Monte correctamente o suporte (B), o filtro (C), o depósito de pó (A) antes de usar a
vassoura.
- Monte o depósito completo no corpo do motor (H) abaixando-o até ouvir o clique de encaixe (Fig.
13).
Como limpar a escova para pavimentos (T)
ATENÇÃO: Limpe a escova para pavimentos (T) somente depois de desmontada da vassoura.
- Empurre a alavanca de desbloqueio para frente e retire a tampa de plástico (Fig. 14).
- Retire a escova giratória (Fig. 15), limpe-a e volte a montá-la correctamente.
- Reponha a tampa de plástico empurrando a alavanca para trás (Fig. 16).
Page 38

PT
PROBLEMAS E SOLUÇÕES
Problema Possível causa Solução
O motor não funciona A bateria está descarregada Carregue a bateria
A potência de aspiração é
fraca
A luz (led) indicadora de
carga está apagada
O tempo de uso da bateria torna-se cada vez mais
curto
O depósito de pó está cheio ou
o filtro está obstruído
Alimentação eléctrica desligada
A ficha do carregador está mal
inserida
Presença de pó entre o conector
eléctrico do motor e a base
Carga incompleta da bateria Se a bateria funciona somente
Esvazie o depósito de pó e
limpe o filtro
Insira correctamente a ficha
Remova o pó
por 1-2 minutos depois de uma
recarga completa de 16 horas,
pode estar esgotada. Basta
substitui-la por outra nova.
- 36 -
Page 39

NL
BELANGRIJKE AANWIJZINGEN
VÓÓR HET GEBRUIK DEZE AANWIJZINGEN LEZEN
Bij het gebruik van elektrische apparaten moeten altijd de juiste voorzorgsmaatregelen worden
genomen, waaronder:
1 Zet het apparaat niet op of in de buurt van warmtebronnen.
2 Gebruik het apparaat niet in de buurt van personen, hef het niet op in de buurt van de ogen,de
oren, enz. Ter voorkoming van ernstige ongelukken.
3 Stel het apparaat niet bloot aan weersomstandigheden (regen, zon enz.).
4 Pas op dat de elektriciteitskabel niet in contact komt met de warme oppervlaktes.
5 Dit apparaat is niet geschikt om gebruikt te worden door personen (en kinderen) met beperkte
fysieke, sensorische en mentale capaciteiten. De gebruikers van het apparaat die niet over de
nodige ervaring of kennis beschikken over het apparaat of die de gebruikshandleiding niet heb-
ben gelezen moeten altijd gecontroleerd worden door een persoon die verantwoordelijk is voor
hun veiligheid.
6 U moet oppassen dat kinderen niet met het apparaat gaan spelen.
7 Geen voorwerpen in de openingen van het apparaat steken en voorkom dat voorwerpen de
luchtstroom verstoppen.
8 Houd de openingen vrij van stof, wolpluizen, haren en dergelijke.
9 Gebruik het apparaat niet zonder filter.
10 Geen hete voorwerpen opzuigen of voorwerpen die roken of branden zoals sigaretten, lucifers of
warme as.
11 Geen ontvlambaar of verbrandingsmateriaal opzuigen (verdampende vloeistoffen, benzine, kero-
sine, enz) en het apparaat niet gebruiken in de buurt van explosieve vloeistoffen of gassen.
12 Gebruik het apparaat niet in gesloten ruimtes in aanwezigheid van dampen die voortkomen uit
olieverf, of door oplosmiddelen of impregnerende stoffen die ontvlambaar zijn of andere giftige
of explosieve stoffen.
13 Nooit giftig materiaal opzuigen (bleekmiddel, amoniak, ontstoppingsmiddel, benzine, enz.).
14 DE BASIS VAN HET APPARAAT, DE STEKKER HET ELEKTRICITEITSSNOER NOOIT ONDER
WATER OF ANDERE VLOEISTOFFEN ZETTEN, GEBRUIK EEN VOCHTIGE DOEK OM ZE TE
REINIGEN.
15 ZET HET APPARAAT UIT ALS U KLAAR BENT MET ZUIGEN EN VOORDAT DE LOSSE
ONDERDELEN WORDEN GEMONTEERD OF WORDEN LOSGEHAALD EN VOORDAT HET
APPARAAT WORDT GEREINIGD.
16 Voordat het stroomvoorzieningstoestel wordt aangesloten, controleer of het elektrische voltage
van het apparaat overeenkomt met de voltage van uw stroomnet.
17 TREK DE STEKKER VAN HET STROOMVOORZIENINGSTOESTEL VOOR HET OPLADEN
UIT HET STOPCONTACT ALS HET APPARAAT NIET WORDT GEBRUIKT.
18 Het apparaat werkt op oplaadbare batterijen met NiMH, die na hun levensduur niet weggegooid
mogen worden samen met het normale huisvuil.
Ze kunnen ingeleverd worden bij de speciale gescheiden vuilverwerkingscentra’s die door de
gemeente ter beschikking worden gesteld, of bij het verkooppunt die deze service verleent. Het
afzonderlijk verwerken van huishoudelijke apparaten verminderd de negatieve consequenties
- 37 -
Page 40

NL
- 38 -
voor het milieu en gezondheid die voor kunnen komen als het apparaat niet op de juiste wijze
wordt verwerkt en het is tevens mogelijk om enkele materiale nweer te gebruiken hetgeen een
aanzienlijke energie en bronnenbesparing oplevert.
Om aan te geven dat het verplicht is om de huishoudelijke apparaten afzonderlijk als afval te
verwerken is een label aangebracht met een doorgesteepte vuilnisemmer. De batterijen nooit in
het vuur werpen.Om betere resultaten te krijgen.
19 Om betere resultaten te krijgen laad de batterijen niet op als de temperatuur van de batterijen of
de buitentemperatuur lager is dan 5°C (40° F) of hoger is dan 40° C (105° F).
20 Als er vloeistof uit de batterijen is gekomen mag het apparaat niet gebruikt worden en moet het
naar een Assistenteicentrum in de buurt worden gebracht voor het vervangen van de batterijen.
21 Droog altijd goed de handen af voordat de schakelaars op het apparaat worden gebruikt of
geregeld en voordat de stekker of de elektrische verbindingen worden aangeraakt.
22 Om de stekker uit het stopcontact te halen, pak de stekker vast en trek hem uit het stopcontact.
Nooit de stekker eruit trekken door aan het snoer te trekken.
23 Gebruik het apparaat niet als de stekker of de elektriciteitskabel beschadigd zijn, of als het appa-
raat zelf defect is; breng het in dit geval naar een in de buurt liggend Geautoriseerd Assistentie
Centrum.
24 Als de voedingskabel beschadigd is moet ze worden vervangen door de Constructeur of door zijn
technische assistentieservice of in ieder geval door een persoon die over dezelfde kwalificaties
beschikt zodat ieder risico wordt voorkomen.
25 Het apparaat is alleen bedoeld voor HUISHOUDELIJK GEBRUIK en is dus niet geschikt voor
commercieel of industrieel gebruik.
26 Dit apparaat is in overeenkomst met de normen 2006/95/EC e EMC 2004/108/EC.
27 Eventuele veranderingen van dit product, die niet nadrukkelijk door de producent zijn goedge-
keurd, kunnen de veiligheid van de gebruiker in gevaar brengen, tevens vervalt de gebruiksga-
rantie.
28 Wanneer men het apparaat als afval wil verwerken moet het onbruikbaar gemaakt worden
door de voedingskabel er af te knippen. Bovendien wordt het aanbevolen om alle gevaarlijke
onderdelen van het apparaat te verwijderen, vooral voor kinderen die het apparaat kunnen gaan
gebruiken als speelgoed.
29 Houdt de verpakkingselementen buiten bereik van kinderen omdat ze een gevarenbron kunnen
zijn.
DEZE AANWIJZINGEN BEWAREN
Page 41

NL
- 39 -
BESCHRIJVING VAN HET APPARAAT (Fig. 1)
A Stofbak
B Filterhouder
C Filter
D Knop loskoppelen
E Verklikker batterijen leeg
F Knop aanzetten/ uitzetten (ON/OFF)
G Handvat
H Motorbasis
I Moer
L Knop aanzetten/ uitzetten (ON/OFF)
M Bovenste handvat
Kenmerkend voor de Elektrische Stofzuiger is dat ze kan werken op de klassieke wijze, alleen met
de vloerborstel (T) door de motorbasis van het apparaat naar achteren te hellen in de normale
gebruikspositie en door het draagbare gedeelte eruit te trekken en te gebruiken voor het opzuigen
van kleine hoeveelheden water (U) met het ronde borsteltje (V), of met de zuigkop voor gleuven (Z)
om handiger in smalle ruimtes gebruikt te worden.
SAMENSTELLEN VAN HET APPARAAT
Voordat het apparaat gebruikt kan worden moet het bovenste handvat (M) aan de basis (S) bevestigd worden zoals hieronder wordt beschreven:
- Steek de bijgeleverde moer (I) op de behuizing aan de bovenkant van de basis van het apparaat
(S) (Fig. 2);
- Bevestig het bovenste handvat (M) aan de basis van het apparaat (S), door het voorzichtig tot aan
de aanslag te drukken (Fig. 3);
- Steek de bijgeleverde schoef (N) in de speciale opening op het handvat (M) en draai de schroef
goed vast met behulp van een schroevendraaier (Fig. 4).
PAS OP: Pas op dat u zich bij het gebruik van de schroevendraaier niet verwond.
PAS OP: Voordat het apparaat wordt gebruikt controleer of alles goed is samengesteld.
N Schroeven
O Knop loskoppelen
P Verklikker opladen
Q Contact stroomvoorzieningstoestel opladen
R Stroomvoorzieningstoestel opladen
S Motorbasis
T Vloerborstel
U Zuigkop afval en kleine hoeveelheden
vloeistof
V Rond borsteltje
Z Zuigkop voor gleuven
OPLADEN VAN DE BATTERIJ
WAARSCHUWING: Voordat de stofzuiger wordt gebruikt moet de batterij helemaal opgeladen worden.
PAS OP: Laad de batterij ten minste 24 uur op voordat het apparaat voor de eerste keer wordt
gebruikt, daarna bedraagt de tijd voor het opladen 16 uur.
PAS OP: Het is normaal dat het apparaat warm wordt tijdens het opladen.
PAS OP: Let op dat het apparaat niet in werking wordt gezet tijdens het opladen.
- Als het apparaat samengesteld is, verbind de stekker van het stroomvoorzieningstoestel (R), aan
een stopcontact en het stekkertje in het contact (Q) op de motorbasis (S).
De verklikker (P) gaat branden en geeft aan dat het apparaat wordt opgeladen; na ongeveer 16
uur is het apparaat helemaal opgeladen en is de stofzuiger klaar voor gebruik .
WAARSCHUWING: Het wordt aangeraden om de batterij helemaal leeg te laten lopen voordat ze
opnieuw wordt opgeladen.
Page 42

NL
- 40 -
ACCESSOIRES
Vloerborstel (T)
Geschikt voor het reinigen van alle soorten oppervlaktes.
Steek de borstel op de basis van het apparaat (S), door er zacht op te drukken totdat u een klik hoort.
Voor het verwijderen hoeft u slechts op de speciale knop te drukken die op de borstel zelf is geplaatst
en hem naar buiten te trekken. (Fig. 5).
Zuigkkop (U) (Alleen voor Draagbare stofzuiger)
Geschikt voor het opzuigen van grof vuil en kleine hoeveelheden water.
Rond borsteltje (V) (Alleen voor Draagbare stofzuiger)
Geschikt voor het reinigen van banken en stoffen.
Zuigkop voor gleuven (Z) (Alleen voor Draagbare stofzuiger)
Geschik voor het reinigen van hoeken, gleuven of moeilijk bereikbare plaatsen.
GEBRUIKSAANWIJZINGEN
PAS OP: ZET HET APPARAAT UIT ALS U KLAAR BENT MET ZUIGEN EN VOORDAT DE LOSSE
ONDERDELEN WORDEN GEMONTEERD OF WORDEN LOSGEHAALD EN VOORDAT HET
APPARAAT WORDT GEREINIGD.
PAS OP: HAAL HET STROOMVOORZIENINGSTOESTEL VOOR HET OPLADEN LOS ALS HET
APPARAAT WORDT GEBRUIKT.
- Nadat de batterij is opgeladen en het draagbare gedeelte goed op de basis van het apparaat
(S) is gemonteerd, druk op de knop voor het aanzetten (L) en hel het handvat (M) in de normale
gebruikspositie (Fig. 6).
- Reinig de grote oppervlaktes door de borstel (T) naar voren en naar achteren te bewegen.
Hierdoor kan de stofzuiger de voorwerpen en het vuil van de vloer opzuigen.
- Voor het reinigen van hoeken en kleine oppervlaktes, draai de stofzuiger in de tegengestelde
positie. Het vuil kan op deze manier verplaatst worden om het vervolgens op te zuigen.
PAS OP: Zet de stofzuiger onmiddelijk uit als er iets in de borstel komt, zoals een stuk stof, een
tapijtfranjes, enz.
- Na het reinigen zet de stofzuiger uit door nogmaals op de knop voor het aanzetten/ uitzetten te
drukken (L).
DRAAGBARE STOFZUIGER
PAS OP: ZET HET APPARAAT UIT ALS U KLAAR BENT MET ZUIGEN EN VOORDAT DE LOSSE
ONDERDELEN WORDEN GEMONTEERD OF WORDEN LOSGEHAALD EN VOORDAT HET
APPARAAT WORDT GEREINIGD.
- Hodt het handvat (M) van de basis van het apparaat (S) stil druk op de knop voor het loskoppelen
(O) en trek de draagbare stofzuiger eruit. (Fig. 7).
- Plaats aan het uiteinde van de stofbak (A), het gewenste accessoire: druk op de knop voor het
aanzetten (F) waardoor de draagbare stofzuiger in werking treed en vervolgens gebruikt kan
worden met het speciale handvat. (G) (Fig. 8).
Page 43

NL
- 41 -
De speciale verklikker (E) gaat branden als de batterij leeg is en blijft aanstaan totdat de batterij
helemaal leeg is.
Steek de draagbare stofzuiger weer op de basis van het apparaat (S) en laad het op zoals hiervoor
wordt beschreven.
- Om de draagbare stofzuiger weer op de basis van het apparaat (S) te monteren, verwijder eerste
het accessoire dat geinstalleerd is door het naar buiten te trekken en plaats vervolgens heit uiteinde van de stofbak (A) op de onderkant van de speciale behuizing op de basis van het apparaat
(S) en druk hem zacht naar achteren tot dat u een klik hoort die bevestigd dat de draagbare
stofzuiger goed gemonteerd is (Fig. 9).
PAS OP: Controleer of de draagbare stofzuiger goed gemonteerd is voordat de stofzuiger weer op
de klassieke manier wordt gebruikt of de batterij wordt opgeladen.
REINIGEN
PAS OP: DE BASIS VAN HET PRODUCT, DE STEKKER EN HET ELEKTRICITEITSNOER NOOIT
ONDER WATER OF ANDERE VLOEISTOFFEN DOMPELEN, GEBRUIK EEN VOCHTIGE DOEK
VOOR HET REINIGEN.
PAS OP: ZET HET APPARAAT UIT ALS U KLAAR BENT MET ZUIGEN EN VOORDAT DE LOSSE
ONDERDELEN WORDEN GEMONTEERD OF WORDEN LOSGEHAALD EN VOORDAT HET
APPARAAT WORDT GEREINIGD.
- Reinig de motorbasis (H) en de basis van het apparaat (S) alleen met een vochtige doek en indien
noodzakelijk met een neutraal reinigingsmiddel.
Gedurende deze handelingen mag er absoluut geen water in de stofzuiger terecht komen.
Nooit agressieve reinigingsmiddelen gebruiken (ontvlekkende vloeistoffen, oplosmiddelen) die het
plastic kunnen beschadigen.
Leegmaken van de stofbak (A)
PAS OP: Haal het stof regelmatig uit de stofbak (A) en het filger (C); de zuigkracht van de stofzuiger
verminderd als de stofbak vol is of het filter verstopt is.
- Trek de draagbare stofzuiger naar buiten zoals hiervoor wordt beschreven.
- Druk op de knop voor het loskoppelen (D) en trek de stofbak er helemaal uit (Fig. 10).
- trek het filter naar buiten (C) (Fig. 11) en vervolgens de bibehorende behuizing (B) (Fig. 12) en
reinig alles.
PAS OP: Reinig het filger (C) alleen met schoon water zonder reinigingsmiddelen te gebruiken.
- Maak de stofbak leeg (A) in een speciale plastic zak en, indien noodakelijk, reinig de bak met
water .
- Laat alle onderdelen goed opdrogen voordat ze weer gemonteerd worden.
PAS OP: Monteer het onderdeel (B), het filter (C), en de stofbak (A) op de juiste manier voordat het
apparaat weer wordt aangezet.
- Monteetr de complete stofbak op de basis van het apparaat (H) en druk hem zacht naar achteren
tot dat u een klik hoort die bevestigd dat hij goed gemonteerd is (Fig. 13).
Page 44

NL
Reinigen van de vloerborstel (T)
PAS OP: Reinig de vloerborstel (T) alleen nadat hij van het apparaat is losgehaald.
- Druk de blokkeringshendeltje naar voren en trek het plastic dekseltje eraf (Fig. 14).
- Trek de draaiende borstel eruit (Fig. 15), reinig de borstel en monteer alles weer.
- Monteer het plastic dekseltje weer door het speciale hendeltje naar achteren te drukken (Fig.
16).
STORINGEN ZOEKEN
Probleem Mogelijke oorzaak Oplossing
De motor werkt niet De batterij is leeg Laad de batterij op
Ze zuigkracht van de stofzui-
ger wordt zwak
De verklikker voor het opladen is uit
De gebruikstijd van de batterijen wordt steeds korter
De stofbak is vol of het filter is
verstopt
Niet aangesloten aan het
stroomnet
De stekker van het oplaadtoestel is niet goed in het stocontact
gestoken
Er is stof aanwezig tussen de
elektrische verbinding tussen de
motor en de basis
Als het opladen uitgevoerd wordt
in 16 uur
Maak de stofbak leeg en reinig
het filter
Steek de stekker goed in het
stopcontact
Verwijder het stof
Als de batterij slechts 1-2 minuten werkt als ze 16 is opgeladen
kan het zijn dat ze uitgewerkt is.
Moet vervangen worden moet
een nieuwe.
- 42 -
Page 45

EL
ΣΗΜΑΝΤΙΚΕΣ ΠΡΟΕΙΔΟΠΟΙΗΣΕΙΣ
ΔΙΑΒΑΣΤΕ ΑΥΤΕΣ ΤΙΣ ΟΔΗΓΙΕΣ ΠΡΙΝ ΤΗ ΧΡΗΣΗ
Όταν χρησιμοποιείτε ηλεκτρικές συσκευές είναι αναγκαίο να λαμβάνετε τις κατάλληλες προφυλάξεις, μεταξύ των οποίων:
1 Μην τοποθετείτε την συσκευή κοντά ή επάνω σε πηγές θερμότητας.
2 Μη χρησιμοποιείτε τη συσκευή κοντά σε άτομα, ούτε να τη σηκώνετε στο ύψος των ματιών,
αυτιών, κλπ..προς αποφυγήν σοβαρών ατυχημάτων.
3 Μην αφήνετε την συσκευή εκτεθειμένη σε ατμοσφαιρικούς παράγοντες (βροχή, ήλιο κλπ).
4 Προσέξτε ώστε το καλώδιο να μην έλθει σε επαφή με θερμές επιφάνειες.
5 Αυτή η συσκευή δεν πρέπει να χρησιμοποιείται από πρόσωπα (συμπεριλαμβανομένων των
παιδιών) με μειωμένες φυσικές, αισθητήριες ή νοητικές ικανότητες. Οι χρήστες που δεν έχουν
εμπειρία και γνώση της συσκευής ή που δεν τους έχουν δοθεί οδηγίες σχετικά με τη χρήση της
συσκευής, θα πρέπει να επιβλέπονται από ένα πρόσωπο υπεύθυνο για την ασφάλειά τους.
6 Είναι αναγκαία η επιτήρηση των παιδιών για να βεβαιωθείτε ότι δεν παίζουν με τη συσκευή.
7 Μην εισάγετε κανένα αντικείμενο στα ανοίγματα της συσκευής και αποφύγετε διάφορα αντικεί-
μενα να εμποδίζουν τη ροή του αέρα.
8 Διατηρήστε τα ανοίγματα ελεύθερα από σκόνη, χνούδια, τρίχες, κλπ.
9 Μη χρησιμοποιείτε τη συσκευή χωρίς φίλτρο.
10 Μην περισυλλέγετε αντικείμενα πολύ ζεστά ή που αχνίζουν ή καίγονται όπως τσιγάρα, σπίρτα
ή ακόμα ζεστή στάχτη.
11 Μην περισυλλέγετε εύφλεκτα υλικά ή καύσιμα (πτητικά υγρά, βενζίνη, κηροζίνη, κλπ.) και μη
χρησιμοποιείτε σε παρουσία μεγάλων ποσοτήτων νερού.
12 Μη χρησιμοποιείτε τη συσκευή σε κλειστούς χώρους και σε παρουσία ατμών που εκπέμπονται
από ελαιοχρώματα, ή από διαλύτες ή στεγανωτικά από εύφλεκτες σκόνες ή άλλους τοξικούς ή
εκρηκτικούς ατμούς.
13 Μην περισυλλέγετε τοξικά υλικά (χλώρια, αμμωνία, αποφρακτικά αποχετεύσεων, βενζίνες,
κλπ.).
14 ΜΗ ΒΥΘΙΖΕΤΕ ΠΟΤΕ ΤΟ ΣΩΜΑ ΤΟΥ ΠΡΟΪΟΝΤΟΣ, ΤΟ ΡΕΥΜΑΤΟΛΗΠΤΗ ΚΑΙ ΤΟ ΗΛΕΚΤΡΙΚΟ
ΚΑΛΩΔΙΟ ΣΕ ΝΕΡΟ Η΄ ΑΛΛΑ ΥΓΡΑ, ΧΡΗΣΙΜΟΠΟΙΕΙΤΕ ΕΝΑ ΥΓΡΟ ΠΑΝΙ ΓΙΑ ΤΟΝ ΚΑΘΑΡΙΣΜΟ
ΤΟΥΣ.
15 ΣΒΗΣΤΕ ΤΗ ΣΥΣΚΕΥΗ ΟΤΑΝ ΤΕΛΕΙΩΣΕΤΕ ΜΕ ΤΗ ΧΡΗΣΗ ΚΑΙ ΠΡΙΝ ΤΟΠΟΘΕΤΗΣΕΤΕ Η΄
ΑΦΑΙΡΕΣΕΤΕ ΤΑ ΜΕΜΟΝΩΜΕΝΑ ΜΕΡΗ Η΄ ΠΡΙΝ ΤΗΝ ΚΑΘΑΡΙΣΕΤΕ.
16 Πριν συνδέσετε το τροφοδοτικό επαναφόρτισης στο δίκτυο τροφοδοσίας, ελέγξτε ότι η τάση που
αναγράφεται στη συσκευή αντιστοιχεί σε εκείνη του τοπικού δικτύου.
17 ΑΠΟΣΥΝΔΕΣΤΕ ΤΟ ΤΡΟΦΟΔΟΤΙΚΟ ΕΠΑΝΑΦΟΡΤΙΣΗΣ ΟΤΑΝ ΧΡΗΣΙΜΟΠΟΙΕΙΤΕ ΤΗ
ΣΥΣΚΕΥΗ.
18 Η συσκευή λειτουργεί με επαναφορτιζόμενες μπαταρίες NiΜΗ και ως εκ τούτου, στο τέλος της
χρήσιμης ηλικίας της, δεν πρέπει να αποκομισθεί μαζί με τα αστικά απορρίματα.
Μπορείτε να την παραδώσετε στα ειδικά κέντρα διαφορικής περισυλλογής που έχουν εγκατα-
στήσει οι Δημοτικές Αρχές ή στους αντιπροσώπους που προσφέρουν αυτήν την εξυπηρέτηση.
Η χωριστή απόσυρση μιάς ηλεκτρικής συσκευής επιτρέπει την αποφυγή πιθανών αρνητικών
επιπτώσεων στο περιβάλλον και την υγεία, που προκύπτουν από μια ακατάλληλη απόσυρση
- 43 -
Page 46

EL
- 44 -
και επιτρέπει την ανακύκλωση των υλικών με τα οποία έχει κατασκευασθεί, προκειμένου να
επιτευχθεί μία σημαντική εξοικονόμηση ενέργειας και πρώτων υλών. Για να υπογραμμισθεί η
υποχρέωση της διαφορικής απόσυρσης των ηλεκτρικών συσκευών, στο προϊόν, αναγράφεται
το σήμα του δοχείου απορριμάτων διαγεγραμμένο. Μην πετάτε ποτέ τους συσσωρευτές στη
φωτιά.
19 Για να έχετε καλύτερα αποτελέσματα, μην επαναφορτίζετε μια μπαταρία αν η θερμοκρασία της ή η
θερμοκρασία περιβάλλοντος είναι κάτω από τους 5° C (40° F) ή πάνω από τους 40° C (105° F).
20 Σε περίπτωση διαρροής υγρών από τη μπαταρία, η συσκευή δεν πρέπει να χρησιμοποιηθεί
αλλά να μεταφερθεί στο πλησιέστερο Κέντρο Τεχνικής Εξυπηρέτησης για την αντικατάσταση
της ίδιας της μπαταρίας.
21 Βεβαιωθείτε ότι τα χέρια σας είναι πάντα καλά στεγνά πριν χρησιμοποιήσετε ή ρυθμίσετε τους
διακόπτες που βρίσκονται στη συσκευή ή πριν αγγίξετε το ρευματολήπτη και τις συνδέσεις
τροφοδοσίας.
22 Γιά την αποσύνδεση του ρευματολήπτη, κρατήστε τον καλά και αποσπάστε τον από την πρίζα
τοίχου. Μην τον αποσπάτε ποτέ τραβώντας τον από το καλώδιο.
23 Μην χρησιμοποιείτε την συσκευή αν το ηλεκτρικό καλώδιο ή ο ρευματολήπτης έχουν υποστεί
ζημιά, ή η ίδια η συσκευή είναι ελαττωματική. Σ’ αυτή τη περίπτωση πηγαίνετέ την στο πιό
κοντινό Εξουσιοδοτημένο Τεχνικό Κέντρο.
24 Εάν το καλώδιο τροφοδοσίας έχει υποστεί ζημιά, πρέπει να αντικατασταθεί από τον κατασκευα-
στή ή από την υπηρεσία τεχνικής εξυπηρέτησης ή εν τέλει από εξειδικευμένο άτομο κατά τρόπον
ώστε να αποφευχθεί κάθε κίνδυνος.
25 Η συσκευή έχει επινοηθεί ΑΠΟΚΛΕΙΣΤΙΚΑ ΓΙΑ ΟΙΚΙΑΚΗ ΧΡΗΣΗ και δεν πρέπει να προορισθεί
γιά εμπορική ή βιομηχανική χρήση.
26 Αυτή η συσκευή είναι σύμφωνη με την οδηγία 2006/95/EC και ΕΜC 2004/108/EC.
27 Πιθανές μετατροπές στο παρόν προϊόν που δεν έχουν κατηγορηματικά εξουσιοδοτηθεί από τον
κατασκευαστή, μπορεί να προκαλέσουν άρση της ασφάλειας και της εγγύησης της χρήσης της
από τον χρήστη.
28 Όταν αποφασίσετε να αποσύρετε ως απόρριμα την παρούσα συσκευή, συνιστάται να την
καταστήσετε αδρανή, κόβοντας το καλώδιο τροφοδοσίας. Συνιστάται επίσης να καταστήσετε
αβλαβή εκείνα τα μέρη της συσκευής που είναι επιδεκτικά να αποτελέσουν κίνδυνο, ειδικά γιά
τα παιδιά που θα μπορούσαν να χρησιμοποιήσουν την συσκευή στα παιγνίδια τους.
29 Τα στοιχεία της συσκευασίας δεν πρέπει να τα αφήνετε σε μέρη προσιτά στα παιδιά λόγω του
ότι είναι πιθανές πηγές κινδύνου.
ΦΥΛΑΞΤΕ ΑΥΤΕΣ ΤΙΣ ΟΔΗΓΙΕΣ
Page 47

EL
- 45 -
ΠΕΡΙΓΡΑΦΗ ΤΗΣ ΣΥΣΚΕΥΗΣ (Εικ. 1)
A Δοχείο σκόνης
B Βάση φίλτρου
C Φίλτρο
D Πλήκτρο απελευθέρωσης
E Ενδεικτική λυχνία εκφορτισμένης μπαταρί-
ας
F Πλήκτρο λειτουργίας/παύσης (ΟΝ/ΟFF)
G Χειρολαβή
H Σώμα κινητήρα
I Μπουλόνι
L Πλήκτρο λειτουργίας/παύσης (ΟΝ/ΟFF)
M Επάνω χειρολαβή
Χαρακτηριστικό της Ηλεκτρικής Σκούπας είναι ότι μπορεί να λειτουργήσει τόσο κατά τον κλασικό
τρόπο, αποκλειστικά μόνο με τη βούρτσα για δάπεδα (T), κλίνοντας προς τα πίσω το σώμα της
συσκευής στη χαρακτηριστική θέση χρησιμοποίησης, όσο και βγάζοντας το σκουπάκι, που μπορεί
να χρησιμοποιηθεί με τον απορροφητή για μικρές ποσότητες νερού (U), με το στρογγυλό βουρτσάκι
(V) ή με τον απορροφητή (Z) για μεγαλύτερη ευκολία στους περιορισμένους χώρους.
ΣΥΝΑΡΜΟΛΟΓΗΣΗ ΤΗΣ ΣΥΣΚΕΥΗΣ
Πριν προχωρήσετε στη χρήση, είναι αναγκαίο να συναρμολογήσετε την επάνω χειρολαβή (Μ) στο
σώμα της συσκευής (S), κάνοντας τα ακόλουθα:
- τοποθετήστε το μπουλόνι (Ι) που σας χορηγείται στην ειδική θέση που βρίσκεται στην κορυφή
του σώματος της συσκευής (S) (Εικ. 2),
- συναρμολογήστε την επάνω χειρολαβή (Μ) στο σώμα της συσκευής (S), πιέζοντάς την με
προσοχή μέχρι τέλους (Εικ. 3),
- τοποθετήστε τη βίδα (Ν) που σας χορηγείται στην ειδική οπή στη χειρολαβή (Μ) και, με τη
βοήθεια ενός κατσαβιδιού, μπλοκάρετέ την σταθερά (Εικ. 4).
ΠΡΟΣΟΧΗ: Προσέξτε στη χρήση του κατσαβιδιού ώστε να μην τραυματιστείτε.
ΠΡΟΣΟΧΗ: Πριν προχωρήστε στη χρήση, βεβαιωθείτε ότι έχετε συναρμολογήσει σωστά τη συσκευή
N Βίδα
O Πλήκτρο απελευθέρωσης
P Ενδεικτική λυχνία επαναφόρτισης
Q Πρίζα για τροφοδοτικό επαναφόρτισης
R Τροφοδοτικό επαναφόρτισης
S Σώμα συσκευής
T Βούρτσα για δάπεδα
U Απορροφητής θρυμμάτων και μικρών ποσο-
τήτων νερού
V Στρογγυλό βουρτσάκι
Z Απορροφητής για σχισμές
.
ΕΠΑΝΑΦΟΡΤΙΣΗ ΤΗΣ ΜΠΑΤΑΡΙΑΣ
ΠΡΟΕΙΔΟΠΟΙΗΣΗ: Πριν χρησιμοποιήσετε τη σκούπα, φορτίστε πλήρως τη μπαταρία.
ΠΡΟΣΟΧΗ: Φορτίστε για τουλάχιστον 24 ώρες για να ενεργοποιήσετε τη μπαταρία πριν την πρώτη
χρήση. Στη συνέχεια, ο απαιτούμενος χρόνος για μια πλήρη επαναφόρτιση θα είναι 16 ώρες.
ΠΡΟΣΟΧΗ: Είναι φυσιολογικό να θερμαίνεται η συσκευή κατά τη φόρτιση.
ΠΡΟΣΟΧΗ: Σιγουρευτείτε ότι δεν θα ενεργοποιήσετε τη συσκευή κατά τη φόρτιση.
- Με τη συσκευή συναρμολογημένη, συνδέστε το ρευματολήπτη του τροφοδοτικού (R) σε μια πρίζα
ρεύματος και το βύσμα στη σχετική σύνδεση (Q) που βρίσκεται στο σώμα της συσκευής (S).
Η ενδεικτική λυχνία (Ρ) θα ανάψει προς ένδειξη του ότι η συσκευή επαναφορτίζεται. Αφού
παρέλθουν 16 ώρες περίπου, θα έχει περατωθεί η επαναφόρτιση και η σκούπα θα είναι έτοιμη
για χρήση.
Page 48

EL
- 46 -
ΠΡΟΕΙΔΟΠΟΙΗΣΗ: Συνιστάται να εκφορτίζετε εντελώς τη μπαταρία, πριν από μια νέα επαναφόρτιση.
ΕΞΑΡΤΗΜΑΤΑ
Βούρτσα για δάπεδα (T)
Κατάλληλη για τον καθαρισμό οποιουδήποτε είδους επιφάνειας.
Τοποθετήστε τη βούρτσα στο σώμα της συσκευής (S), πιέζοντάς την ελαφρά μέχρι να ακουστεί ένα
κλικ. Για να την βγάλετε, αρκεί να πιέσετε το σχετικό πλήκτρο που βρίσκεται στο πίσω μέρος της
ίδιας της βούρτσας και να την τραβήξετε προς τα έξω (Εικ. 5).
Απορροφητής (U) (Μόνο για το Σκουπάκι)
Κατάλληλος για την απορρόφηση χοντρών θρυμμάτων και μικρές ποσότητες νερού.
Στρογγυλό βουρτσάκι (V) (Μόνο για το Σκουπάκι)
Κατάλληλο για τον καθαρισμό καναπέδων και υφασμάτων.
Απορροφητής σχισμών (Z) (Μόνο για το Σκουπάκι)
Κατάλληλο για τον καθαρισμό γωνιών, σχισμών ή δυσπρόσιτων μερών.
ΟΔΗΓΙΕΣ ΧΡΗΣΗΣ
ΠΡΟΣΟΧΗ: ΣΒΗΣΤΕ ΤΗ ΣΥΣΚΕΥΗ ΟΤΑΝ ΤΕΛΕΙΩΣΕΤΕ ΜΕ ΤΗ ΧΡΗΣΗ ΚΑΙ ΠΡΙΝ ΤΟΠΟΘΕΤΗΣΕΤΕ
Η΄ ΑΦΑΙΡΕΣΕΤΕ ΤΑ ΜΕΜΟΝΩΜΕΝΑ ΜΕΡΗ Η΄ ΠΡΙΝ ΤΗΝ ΚΑΘΑΡΙΣΕΤΕ.
ΠΡΟΣΟΧΗ: ΑΠΟΣΥΝΔΕΣΤΕ ΤΟ ΤΡΟΦΟΔΟΤΙΚΟ ΕΠΑΝΑΦΟΡΤΙΣΗΣ ΟΤΑΝ ΧΡΗΣΙΜΟΠΟΙΕΙΤΕ
ΤΗ ΣΥΣΚΕΥΗ.
- Αφού πραγματοποιήσετε την επαναφόρτιση και αφού συναρμολογήσετε σωστά το σκουπάκι στο
σώμα της συσκευής (S), πιέστε το πλήκτρο λειτουργίας (L) και κλίνατε προς τα πίσω τη χειρολαβή (M) στη χαρακτηριστική θέση χρησιμοποίησης (Εικ. 6).
- Καθαρίστε τις ευρείες επιφάνειες σπρώχνοντας με τη βούρτσα (T) προς τα εμπρός.
Αυτό επιτρέπει στον απορροφητή να συλλέξει τα κομμάτια και τους ρύπους από το δάπεδο.
- Για τον καθαρισμό γωνιών και μικρών επιφανειών, στρέψατε στη σκούπα στην αντίθετη κατεύθυνση. Τα κομμάτια και οι ρύποι μπορούν έτσι να μετατοπιστούν και να απορροφηθούν στη
συνέχεια.
ΠΡΟΣΟΧΗ: σβήστε αμέσως τη σκούπα αν μπερδευτεί κάτι στο εσωτερικό της βούρτσας, όπως ένα
κομμάτι υφάσματος, τα κρόσια χαλιών, κλπ.
- Αφού τελειώσετε με τον καθαρισμό, σβήστε τη σκούπα πιέζοντας πάλι το πλήκτρο λειτουργίας (L).
Σκουπάκι
ΠΡΟΣΟΧΗ: ΣΒΗΣΤΕ ΤΗ ΣΥΣΚΕΥΗ ΟΤΑΝ ΤΕΛΕΙΩΣΕΤΕ ΜΕ ΤΗ ΧΡΗΣΗ ΚΑΙ ΠΡΙΝ ΤΟΠΟΘΕΤΗΣΕΤΕ
Η΄ ΑΦΑΙΡΕΣΕΤΕ ΤΑ ΜΕΜΟΝΩΜΕΝΑ ΜΕΡΗ Η΄ ΠΡΙΝ ΤΗΝ ΚΑΘΑΡΙΣΕΤΕ.
- Κρατώντας ακίνητη τη χειρολαβή (M) του σώματος της συσκευής (S), πιέστε το πλήκτρο απελευθέρωσης (O) και βγάλτε το σκουπάκι (Εικ. 7).
- Εφαρμόστε το επιθυμητό εξάρτημα στο άκρο του δοχείου της σκόνης (Α). Πιέστε το πλήκτρο
λειτουργίας (F) για να θέσετε σε λειτουργία το σκουπάκι χρησιμοποιώντας το μέσω της ειδικής
Page 49

EL
- 47 -
χειρολαβής (G) (Εικ. 8).
Η σχετική ενδεικτική λυχνία (Ε) θα ανάψει όταν εκφορτιστεί η μπαταρία και θα παραμείνει αναμ-
μένη μέχρι την πλήρη εκφόρτιση.
Επανατοποθετήστε το σκουπάκι στο σώμα της συσκευής (S) και προχωρήστε στην επαναφόρτι-
ση όπως αναφέρθη προηγουμένως.
- Για να επανατοποθετήστε το σκουπάκι στο σώμα της συσκευής (S), αφαιρέστε πρώτ’ απ’ όλα το
εξάρτημα που έχετε εγκαταστήσει βγάζοντάς το προς τα έξω, στη συνέχεια τοποθετήστε το άκρο
του δοχείου σκόνης (Α) στην κάτω περιοχή του ειδικού διαμερίσματος στο σώμα της συσκευής
(S) και σπρώξτε προς τα πίσω με προσοχή το σκουπάκι μέχρι να ακούσετε το κλικ που επιβεβαιώνει τη σωστή τοποθέτηση (Εικ. 9).
ΠΡΟΣΟΧΗ: Βεβαιωθείτε ότι έχετε εγκαταστήσει σωστά το σκουπάκι, πριν προχωρήσετε σε μια νέα
χρήση με κλασικό τρόπο ή στην επαναφόρτιση της μπαταρίας.
ΚΑΘΑΡΙΣΜΟΣ
ΠΡΟΣΟΧΗ: ΜΗ ΒΥΘΙΖΕΤΕ ΠΟΤΕ ΤΟ ΣΩΜΑ ΤΟΥ ΠΡΟΪΟΝΤΟΣ, ΤΟ ΡΕΥΜΑΤΟΛΗΠΤΗ ΚΑΙ ΤΟ
ΗΛΕΚΤΡΙΚΟ ΚΑΛΩΔΙΟ ΣΕ ΝΕΡΟ Ή ΑΛΛΑ ΥΓΡΑ, ΧΡΗΣΙΜΟΠΟΙΕΙΤΕ ΕΝΑ ΥΓΡΟ ΠΑΝΙ ΓΙΑ ΤΟΝ
ΚΑΘΑΡΙΣΜΟ ΤΟΥΣ.
ΠΡΟΣΟΧΗ: ΣΒΗΣΤΕ ΤΗ ΣΥΣΚΕΥΗ ΟΤΑΝ ΤΕΛΕΙΩΣΕΤΕ ΜΕ ΤΗ ΧΡΗΣΗ ΚΑΙ ΠΡΙΝ ΤΟΠΟΘΕΤΗΣΕΤΕ
Ή ΑΦΑΙΡΕΣΕΤΕ ΤΑ ΔΙΑΦΟΡΑ ΜΕΡΗ Ή ΠΡΙΝ ΠΡΟΧΩΡΗΣΕΤΕ ΣΤΟΝ ΚΑΘΑΡΙΣΜΟ ΤΗΣ.
- ΚαΘαρίστε το σώμα κινητήρα (Η) και το σώμα συσκευής (S) χρησιμοποιώντας αποκλειστικά ένα
υγρό πανί με ουδέτερο απορρυπαντικό, αν είναι αναγκαίο.
Καθαρίζοντάς την, προσέξτε να μην εισέλθει κανένα είδος υγρού στη σκούπα.
Μη χρησιμοποιείτε ποτέ σκληρές καθαριστικές ουσίες ( υγρά για κηλίδες, διαλύτες) που μπορούν
να διαβρώσουν το πλαστικό.
Πώς να αδειάσετε το δοχείο της σκόνης (Α)
ΠΡΟΣΟΧΗ: Καθαρίζετε το δοχείο της σκόνης (Α) και το φίλτρο (C) έγκαιρα. Η ισχύς απορρόφησης
θα είνα μειωμένη αν το δοχείο είναι γεμάτο ή το φίλτρο φραγμένο.
- Βγάλτε το σκουπάκι όπως αναφέρθη προηγουμένως.
- Πιέστε το πλήκτρο απελευθέρωσης (D) και βγάλτε όλο το δοχείο (Εικ. 10).
- Βγάλτε προς τα έξω το φίλτρο (C) (Εικ. 11) και στη συνέχεια τη σχετική βάση (Β) (Εικ. 12) και
προχωρήστε στον καθαρισμό τους.
ΠΡΟΣΟΧΗ: Πλένετε το φίλτρο (C) αποκλειστικά με καθαρό νερό χωρίς να χρησιμοποιείτε σαπούνια
ή απορρυπαντικά.
- Στη συνέχεια αδειάστε το δοχείο σκόνης (Α) σε μια ειδική πλαστική σακούλα και, αν είναι αναγκαίο, πλύνετέ το με νερό.
- Στεγνώστε καλά όλα τα μέρη και προχωρήστε στην επανασυναρμολόγηση.
ΠΡΟΣΟΧΗ: Συναρμολογήστε σωστά τη βάση (Β), το φίλτρο (C), το δοχείο σκόνης (Α) πριν θέσετε
σε λειτουργία τη συσκευή.
- Τοποθετήστε το πλήρες δοχείο στο σώμα κινητήρα (Η) πιέζοντάς το μέχρι να ακούσετε το κλικ της
σωστής τοποθέτησης (Εικ. 13).
Page 50

EL
Πώς να καθαρίσετε τη βούρτσα δαπέδων (T)
ΠΡΟΣΟΧΗ: Καθαρίστε τη βούρτσα δαπέδων (T) μόνον αφού την αφαιρέσετε από τη συσκευή.
- Πιέστε προς τα εμπρός το μοχλό απελευθέρωσης και βγάλτε το μικρό πλαστικό καπάκι
(Εικ. 14).
- Βγάλτε την περιστρεφόμενη βούρτσα (Εικ. 15), προχωρήστε στον καθαρισμό και τοποθετήστε την πάλι σωστά.
- Συναρμολογήστε πάλι το μικρό πλαστικό καπάκι πιέζοντας προς τα πίσω τον ειδικό μοχλό
(Εικ. 16).
ΑΝΑΖΗΤΗΣΗ ΒΛΑΒΩΝ
Πρόβλημα Πιθανή αιτία Λύση
Ο κινητήρας δεν λειτουργεί Η μπαταρία είναι εκφορτισμένη Επαναφορτίστε τη μπαταρία
Η ισχύς απορρόφησης εξα-
σθενεί
Η λυχνία ένδειξης φόρτισης
είναι σβησμένη
Ο χρόνος χρησιμοποίησης
της μπαταρίας γίνεται όλο
και περισσότερο σύντομος
Το δοχείο σκόνης είναι γεμάτο ή
το φίλτρο είναι φραγμένο
Αποσύνδεση της ηλεκτρικής
τροφοδοσίας
Ο ρευματολήπτης του φορτιστή
μπαταρίας δεν είναι καλά συνδεμένος
Υπάρχει σκόνη μεταξύ της ηλεκτρικής συνδέσης του κινητήρα
και της βάσης
Αν η μπαταρία φορτίζεται εντελώς σε 16 ώρες
Αδειάστε το δοχείο σκόνης και
καθαρίστε το φίλτρο
Επανασυνδέστε σωστά το ρευματολήπτη
Αφαιρέστε τη σκόνη
Αν η μπαταρία λειτουργεί μόνο
για 1-2 λεπτά μετά από μια
πλήρη φόρτιση 16 ωρών, είναι
πιθανόν να έχει εξαντληθεί.
Πρέπει απλά να αντικατασταθεί με μια καινούργια.
- 48 -
Page 51

RU
ПРАВИЛА ПОЛЬЗОВАНИЯ
ПЕРЕД НАЧАЛОМ РАБОТЫ НЕОБХОДИМО ПРОЧИТАТЬ ИНСТРУКЦИЮ.
Используя электрические приборы необходимо выполнять следующие меры предосторожности:
1 Не ставьте прибор вблизи источников отопления или на их поверхности.
2 Не использовать оборудование в непосредственной близости от людей, не поднимать его
на высоту глаз, ушей и т.д., во избежание серьезных травм.
3 Не оставляйте прибор под воздействием атмосферных явлений (дождя, солнца и т.д.).
4 Электрический провод не должен касаться горячих поверхностей.
5 Этот прибор не должен использоваться лицами (включая детей), имеющими физические
или умственные недостатки. Пользователи, которые не имеют опыта работы с этим при-
бором и которым не были даны инструкции относительно его использования, могут выпол-
нять действия только под строгим контролем лица, ответственного за их безопасность.
6 Необходимо следить за детьми и не разрешать им играть с этим прибором.
7 Не вставлять никаких предметов в отверстия устройства и не блокировать проход возду-
ха.
8 Прочищать отверстия от пыли, ворса, волос и т.д
9 Не использовать прибор без фильтра.
10 Не собирать слишком горячие, дымящиеся или горящие предметы, например, сигареты,
спички или еще горячий пепел.
11 Не собирать легковоспламеняющиеся или горючие материалы (летучие жидкости, бензин,
керосин и т.д.) и не использовать прибор в присутствии большого количества воды.
12 Не использовать устройство в закрытых помещениях в присутствии паров красок на
масляной основе, растворителей, гидроизоляторов от легковоспламеняющейся пыли или
других взрывоопасных или токсичных паров.
13 Не собирать токсичных веществ (отбеливатели, аммиак, средство для прочистки труб,
бензин, и т.д.).
14 НИКОГДА НЕ ПОГРУЖАТЬ КОРПУС МОТОРА, ЭЛЕКТРИЧЕСКУЮ ВИЛКУ И ПРОВОД В
ВОДУ ИЛИ ДРУГИЕ ЖИДКОСТИ. ДЛЯ ИХ ОЧИСТКИ ИСПОЛЬЗОВАТЬ ТОЛЬКО ВЛАЖНУЮ
ТКАНЬ.
15 ВЫКЛЮЧАТЬ ПРИБОР ПОСЛЕ ИСПОЛЬЗОВАНИЯ, ПЕРЕД УСТАНОВКОЙ ИЛИ
УДАЛЕНИЕМ ОТДЕЛЬНЫХ ЧАСТЕЙ ИЛИ ДО УБОРКИ.
16 Перед подключением подзарядочного устройства к сети электропитания убедитесь, что
напряжение указанное на этикетке, соответствует напряжению в локальной сети.
17 ОТСОЕДИНИТЕ ПОДЗАРЯДОЧНОЕ УСТРОЙСТВО ВО ВРЕМЯ ИСПОЛЬЗОВАНИИ
ПРИБОРА.
18 Устройство работает на никель-металлогидридные аккумуляторных батареях, поэтому по
окончании срока службы нельзя утилизировать их вместе с бытовыми отходами.
Батарейки подлежат отправке в специализированные центры для дифференцированного
сбора, организованные муниципалитетами, или розничным торговцам, которые предо-
ставляют эту услугу. Раздельная утилизация отслуживших бытовых приборов позволяет
избежать возможных негативных последствий для окружающей среды и здоровья чело-
- 49 -
Page 52

RU
- 50 -
века, обусловленных неправильным удалением, и позволяет рекуперировать материалы
изготовления в целях получения значительной экономии энергии и ресурсов.
Для того, чтобы подчеркнуть необходимость раздельной утилизации электробытовых при-
боров, на приборе имеется этикетка с перечеркнутым изображением мусорного контейнера. Не бросать батарейки в огонь.
19 В целях достижения наилучших результатов не производить подзарядку батареи, если ее
температура или температура окружающего воздуха ниже + 5°С (40°F) или выше 40°C
(105°F).
20 В случае утечки жидкости из аккумулятора устройство не должно использоваться, отпра-
вить прибор в ближайший сервисный центр для замены батареи.
21 Необходимо тщательно высушить руки, прежде чем нажимать и регулировать кнопки при-
бора и дотрагиваться до вилки провода и электрических деталей.
22 При отсоединении от электрической розетки браться руками непосредственно за штеп-
сель. Никогда не тянуть за провод для того, чтобы вытащить его.
23 Не используйте прибор в случае, если электрический провод или вилка повреждены, или
же сам прибор испорчен. В этом случае обратитесь в ближайший Специализированный
Сервисный Центр.
24 Если электрический провод повреждён, он должен быть заменён Производителем или его
Сервисным Центром, или же другим лицом, имеющим должную квалификацию, во избежание любого типа риска.
25 Прибор предназначен ТОЛЬКО ДЛЯ БЫТОВОГО ИСПОЛЬЗОВАНИЯ и не должен исполь-
зоваться в производственных или коммерческих целях.
26 Этот прибор соответствует директиве 2006/95/EC и EMC 2004/108/EC.
27 Вносимые изменения в прибор, если они чётко не указаны производителем, могут при-
вести к потере безопасности и гарантии его эксплуатации со стороны потребителя.
28 В случае если Вы решили выбросить этот прибор, рекомендуется перерезать электриче-
ский провод для невозможности его дальнейшего использования. Рекомендуется также
обезвредить те части прибора, которые могут представлять опасность, в случае их исполь-
зования детьми для своих игр.
29 Составные части упаковки не должны оставляться в местах, доступных для детей, так как
они могут представлять источник опасности.
СОХРАНИТЬ ИНСТРУКЦИЮ
Page 53

RU
- 51 -
ОПИСАНИЕ ПРИБОРА (Рис. 1)
A Контейнер для сбора пыли
B Держатель фильтра
C Фильтр
D Спусковая кнопка
E Индикатор разряженной батареи
F Кнопка включения/выключения (ON /
OFF)
G Ручка
H Корпус мотора
I Шайба
L Кнопка включения/выключения (ON/OFF)
M Верхняя ручка
Особенностью электрической метлы является то, что она может работать как в классическом
режиме, только со щеткой для пола (T), посредством наклона корпуса прибор назад в типичное рабочее положение, либо сняв переносную часть, применяемую для сбора небольших
количеств воды (U), с круглой щеткой (V) или щелевой насадкой (Z) для дополнительного
удобства в условиях ограниченного пространства.
СБОРКА ПРИБОРА
Прежде чем приступать к работе, необходимо присоединить верхнюю ручку (М) к корпусу прибора (S). Для этого действовать следующим образом:
- поместить прилагающуюся шайбу (I) в отверстие, которое находится на корпусе прибора (S)
(Рис. 2);
- присоединить верхнюю ручку (М) к корпусу прибора (S); для этого осторожно нажать на неё
до упора (Рис. 3);
- вставить прилагающийся шуруп (N) в отверстие, находящееся на ручке (М), и крепко
завинтить его при помощи отвёртки (Рис. 4).
ВНИМАНИЕ: Осторожно пользоваться отвёрткой, чтобы не пораниться.
ВНИМАНИЕ: Прежде чем приступать к работе с прибором, убедиться в правильности его сборки.
N Шуруп
O Спусковая кнопка
P Индикатор состояния зарядки
Q Разъем питания для подзарядки
R Адаптер зарядки
S Корпус прибора
T Щетка для пола
U Насадка для сбора мусора и небольших
количеств воды
V Круглая щетка
Z Щелевая насадка
ПОДЗАРЯДКА АККУМУЛЯТОРА
ПРЕДУПРЕЖДЕНИЕ: Перед использованием метлы полностью зарядить аккумулятор.
ВНИМАНИЕ: Заряжать аккумулятор в течение не менее 24 часов перед первым использова-
нием, для полной подзарядки требуются 16 часов.
ВНИМАНИЕ: Во время подзарядки блок может нагреваться.
ВНИМАНИЕ: Убедитесь, что прибор во время подзарядки отключен.
- Собрать прибор, вставить вилку адаптера (R) в розетку, штекер в соответствующее гнездо
(Q) на корпусе приборе (S). При этом загорится световой индикатор (Р), указывая на то, что
прибор находится на подзарядке. Заряд будет длиться приблизительно 16 часов, после
чего метлой можно пользоваться.
ПРЕДУПРЕЖДЕНИЕ: Аккумулятор должен быть полностью разряжен перед новой зарядкой.
Page 54

RU
- 52 -
АКСЕССУАРЫ
Щетка для пола (T)
Подходит для очистки любых типов поверхности.
Установить щетку на корпус (S), осторожно нажав до щелчка. Для удаления, достаточно
нажать на соответствующую кнопку на задней стороне щетки и вытащить ее (Рис. 5).
Насадка -аспиратор (U) (только для портативного пылесоса)
Подходит для отсасывания грубого мусора и небольших количеств воды.
Круглая щетка (V) (только для портативного пылесоса)
Подходит для чистки диванов и тканей.
Щелевая насадка (Z) (только для портативного пылесоса)
Подходит для очистки углов, трещин или труднодоступных мест.
ИНСТРУКЦИЯ ПО ИСПОЛЬЗОВАНИЮ
ВНИМАНИЕ: ВЫКЛЮЧИТЬ ПРИБОР ПОСЛЕ ИСПОЛЬЗОВАНИЯ И ПЕРЕД УСТАНОВКОЙ
ИЛИ УДАЛЕНИЕМ ОТДЕЛЬНЫХ ЧАСТЕЙ ИЛИ ДО УБОРКИ.
ВНИМАНИЕ: ОТКЛЮЧАТЬ ПОДЗАРЯДОЧНОЕ УСТРОЙСТВО ВО ВРЕМЯ ИСПОЛЬЗОВАНИЯ
ПРИБОРА.
- После подзарядки аккумулятора и правильной монтировки портативного пылесоса в корпус
прибора (S) нажать пусковую кнопку (L) и наклонить назад рукоятку в положение использования (Рис. 6).
- Очищать большие поверхности продвигая щетку (T) вперед.
Это позволяет насадке-аспиратору собирать с пола мусор и грязь.
- Для очистки углов и небольших поверхностей поворачивать метлу в противоположном
направлении. Фрагменты и грязь смещаются и затем всасываются насадкой.
ВНИМАНИЕ: если в щетке застрял какой-либо предмет (кусок ткани, бахрома ковра и т.д.),
немедленно выключить прибор.
- По окончании уборки выключите метлу, нажав на кнопку отключения (L).
Портативный пылесос
ВНИМАНИЕ: ВЫКЛЮЧИТЬ ПРИБОР ПОСЛЕ ИСПОЛЬЗОВАНИЯ И ПЕРЕД УСТАНОВКОЙ
ИЛИ УДАЛЕНИЕМ ОТДЕЛЬНЫХ ЧАСТЕЙ ИЛИ ДО УБОРКИ.
- Крепко возьмитесь за ручку корпуса прибора (S), нажмите спусковую кнопку (O) и выньте
портативный пылесос (Рис. 7).
- Установите в торце контейнера для пыли (А) нужную насадку; нажмите пусковую кнопку (F),
включите портативный пылесос и начните уборку, держа его за ручку (G) (Рис. 8).
Если аккумулятор разряжен, загорится светодиодный индикатор (E), который будет гореть
до полной разрядки батареи.
Установить портативный пылесос в корпус прибора (S) и приступить к подзарядке, как опи-
сано выше.
- Чтобы установить портативный пылесос в корпус прибора (S), сначала нужно снять установ-
Page 55

RU
- 53 -
ленную ранее насадку, потянув ее кнаружи, затем позиционировать торец контейнера для
пыли (А) чуть ниже соответствующего гнезда в корпусе прибора (S) и осторожно надавить на
портативный пылесос, до щелчка, который показывает на правильную установку (Рис. 9).
ВНИМАНИЕ: Убедитесь, что вы правильно установили портативный пылесос, прежде чем
приступить к новому использованию в классическом режиме или к подзарядке аккумулятора.
ЧИСТКА
ВНИМАНИЕ: НИКОГДА НЕ ПОГРУЖАТЬ КОРПУС МОТОРА, ЭЛЕКТРИЧЕСКУЮ ВИЛКУ И
ПРОВОД В ВОДУ ИЛИ ДРУГИЕ ЖИДКОСТИ. ДЛЯ ИХ ОЧИСТКИ ИСПОЛЬЗОВАТЬ ТОЛЬКО
ВЛАЖНУЮ ТКАНЬ.
ВНИМАНИЕ: ВЫКЛЮЧИТЬ ПРИБОР ПОСЛЕ ИСПОЛЬЗОВАНИЯ И ПЕРЕД УСТАНОВКОЙ
ИЛИ УДАЛЕНИЕМ ОТДЕЛЬНЫХ ЧАСТЕЙ ИЛИ ДО УБОРКИ.
- Очистите корпус двигателя (H) и корпус прибора (S), используя только влажную тряпку с
мягким моющим средством, если это необходимо.
При этом не допускать попадания в пылесос жидкостей.
Никогда не используйте сильные чистящие средства типа (жидкие пятновыводители, рас-
творители), способные разъедать пластик.
Как опорожнить контейнер для сбора пыли (A)
ВНИМАНИЕ: Регулярно очищать контейнер для сбора пыли (А) и фильтр (C); мощность всасывания уменьшится, если контейнер переполнен или засорен фильтр.
- Вынуть переносный пылесос, как описано выше.
- Нажать спусковую кнопку (D) и вынуть контейнер (Рис. 10).
- Вытащить фильтр (C), потянув кнаруже (Рис. 11), соответствующий держатель (B) (Рис. 12)
и приступить к чистке.
ВНИМАНИЕ: Промывать фильтр (с) только чистой водой без использования мыла и моющих
средств.
- Опорожнить контейнер для сбора пыли (А) в пластиковый мешок и, если необходимо, про-
мыть его водой.
- Хорошо вытереть все части и приступить к сборке.
ВНИМАНИЕ: Правильно монтировать держатель (B), фильтр (C), контейнер для сбора пыли
(А), прежде чем включать прибор.
- Установить контейнер на корпус двигателя (H), надавив на него до щелчка (Рис. 13).
Как чистить щетку для пола (T)
ВНИМАНИЕ: Чистить щетку для пола (T) только после того, как она снята с прибора.
- Нажать на рычажок разблокировки и снять пластиковую крышку (Рис. 14).
- Вынуть вращающуюся щетку (Рис. 15), осуществить чистку и установить щетку на место.
- Установить на место пластиковую крышку, нажав на соответствующий рычажок (Рис. 16).
Page 56

RU
ПОИСК НЕИСПРАВНОСТЕЙ
Проблема Возможная причина Решение
Двигатель не работает Аккумулятор разряжен Зарядить аккумулятор
Всасывающая сила ослаб-
ла
Индикатор зарядки не
горит
Продолжительность срока
службы аккумулятора становится короче
Контейнер для сбора пыли
переполнен или засорен
фильтр
Прибор отсоединен от сети
Вилка подзарядного устрой-
ства установлена неправильно
Пыль между электрическим
разъемом двигателя и базой
Если аккумулятор подзаряжи-
вается полностью в течение
16 часов
Опорожнить контейнер для
сбора пыли и прочистить
фильтр
Правильно установить вилку
Удалить пыль
Если аккумулятор работает
только в течение 1-2 минут
после полной подзарядки в
16 часов, возможно, что он
изношен. Достаточно произвести замену.
- 54 -
Page 57

 Loading...