

Page 1

MOD.2732
Cod. 5185101200 REV. 0 del 24/05/2011
636104
SERVIZIO CONSUMATORI
NUMERO VERDE
800-215834
De’ Longhi Appliances Srl
Divisione Commerciale Ariete
Via San Quirico, 300
50013 Campi Bisenzio FI - Italy
E-Mail: info@ariete.net
Internet: www.ariete.net
Page 2
C
B
D
S
E
X
F
U
R
A
Fig. 1
T
H
L
V
I
M
G
N O
Y
P
Q
Fig. 4 Fig. 5
Fig. 6 Fig. 7
Fig. 8 Fig. 9
Fig. 2 Fig. 3
Fig. 10 Fig. 11
Page 3
IT
A PROPOSITO DI QUESTO MANUALE
Anche se gli apparecchi sono stati realizzati in conformità con le specifi che Normative europee vigenti
e sono pertanto protetti in tutte le parti potenzialmente pericolose, leggete con attenzione queste avvertenze e usate l’apparecchio solo per l’uso cui è stato destinato per evitare infortuni e danni. Tenete a
portata di mano questo libretto per future consultazioni.
Qualora vogliate cedere questo apparecchio ad altre persone ricordatevi di includere anche queste
istruzioni.
Le informazioni riportate in questo manuale sono marcate dai seguenti simboli che indicano:
Pericolo per i bambini
Pericolo dovuto a elettricità
Pericolo di danni derivanti da altre cause
Attenzione - danni materiali
USO PREVISTO
Questo apparecchio dovrà essere destinato solo all’uso per il quale è stato espressamente concepito e
cioè per l’aspirazione delle polveri delle superfi ci domestiche. Ogni altro uso è da considerarsi improprio
e quindi pericoloso. Il costruttore non può essere considerato responsabile per eventuali danni derivati
da usi impropri, erronei ed irragionevoli.
AVVERTENZE DI SICUREZZA
LEGGERE ATTENTAMENTE LE ISTRUZIONI PRIMA DELL’USO.
• L’apparecchio è destinato solo ad uso domestico e non deve essere adibito ad uso commerciale o
industriale.
• Non si assumono responsabilità per uso errato o per impieghi diversi da quelli previsti dal presente
libretto.
• Si consiglia di conservare gli imballi originali, poiché l’assistenza gratuita non è prevista per i guasti
causati da imballo non adeguato del prodotto al momento della spedizione ad un Centro di Assistenza
autorizzato.
• L’apparecchio è conforme alla Direttiva 2006/95/CE e alla Direttiva EMC 2004/108/CE.
PERICOLO PER I BAMBINI
• Questo apparecchio non deve essere utilizzato da persone (compresi i bambini) con capacità fi siche,
sensoriali o mentali ridotte; da persone che manchino di esperienza e conoscenza dell’apparecchio,
a meno che siano attentamente sorvegliate o ben istruite relativamente all’utilizzo dell’apparecchio
stesso da parte di una persona responsabile della loro sicurezza.
• Assicurarsi che i bambini non giochino con l’apparecchio.
• Gli elementi dell’imballaggio non devono essere lasciati alla portata dei bambini in quanto potenziali
fonti di pericolo.
• Allorché si decida di smaltire come rifi uto questo apparecchio, si raccomanda di renderlo inoperante
tagliandone il cavo di alimentazione. Si raccomanda inoltre di rendere innocue quelle parti dell’apparecchio suscettibili di costituire un pericolo, specialmente per i bambini che potrebbero servirsi
dell’apparecchio per i propri giochi.
1
Page 4
IT
PERICOLO DOVUTO A ELETTRICITÀ
• Prima di collegare l’apparecchio alla rete di alimentazione controllare che la tensione indicata sulla
targhetta posta al di sotto della macchina corrisponda a quella della rete locale.
• Collegare l’apparecchio esclusivamente ad una presa di corrente elettrica alternata.
• L’uso di prolunghe elettriche non autorizzate dal fabbricante dell’apparecchio può provocare danni e
incidenti.
• Se il cavo di alimentazione è danneggiato, esso deve essere sostituito dal costruttore o dal suo servizio Assistenza Tecnica o comunque da una persona con qualifi ca similare, in modo da prevenire
ogni rischio.
• Non aspirare mai su superfi ci bagnate: può generarsi un cortocircuito!
• Non aspirare mai liquidi.
• Non toccare l’apparecchio con mani e piedi bagnati o umidi.
• Non usare l’apparecchio a piedi nudi.
• Togliere la spina dalla presa prima di ogni intervento di pulizia o di manutenzione.
• NON IMMERGERE L’APPARECCHIO IN ACQUA O ALTRI LIQUIDI.
• Assicurarsi che il cavo non sia in contatto con superfi ci calde o taglienti.
• Scollegare il cavo di alimentazione dalla presa di corrente dopo ogni uso.
• In caso di guasti, difetti o sospetto difetto dopo una caduta, staccare subito la spina dalla presa di
corrente. LE RIPARAZIONI POSSONO ESSERE EFFETTUATE ESCLUSIVAMENTE DAI CENTRI DI
ASSISTENZA AUTORIZZATI.
PERICOLO DI DANNI DERIVANTI DA ALTRE CAUSE
• Non aspirare cenere calda, pezzi grossi di vetro, calcinacci, oggetti appuntiti o taglienti e liquidi.
• Per evitare surriscaldamenti pericolosi si raccomanda di svolgere in tutta la sua lunghezza il cavo di
alimentazione e di staccare la spina dalla rete di alimentazione elettrica quando l’apparecchio non è
utilizzato.
• L’apparecchio non deve essere usato senza sacchetto, senza fi ltro motore, oppure qualora il sacchet-
to o il fi ltro siano rotti o danneggiati.
• Non lasciare esposto l’apparecchio ad agenti atmosferici (pioggia, sole, etc.).
• Non tenere l’apparecchio in prossimità di fonti di calore (es. termosifone)
• Staccare sempre la spina prima di effettuare la pulizia dell’apparecchio o il cambio dei fi ltri.
ATTENZIONE - DANNI MATERIALI.
• Non disinserire mai la spina dalla presa di corrente tirando il cavo di alimentazione.
• Non mettere mai in funzione l’apparecchio difettoso
• Avviare sempre l’apparecchio con il regolatore di potenza nella posizione di minimo.
• Il prodotto non va alimentato attraverso timer esterni o con impianti separati comandati a distanza.
• Una volta riposto l’apparecchio, assicurarsi che non sia a contatto con superfi ci calde e taglienti.
• CONSERVARE SEMPRE QUESTE ISTRUZIONI.
2
Page 5
IT
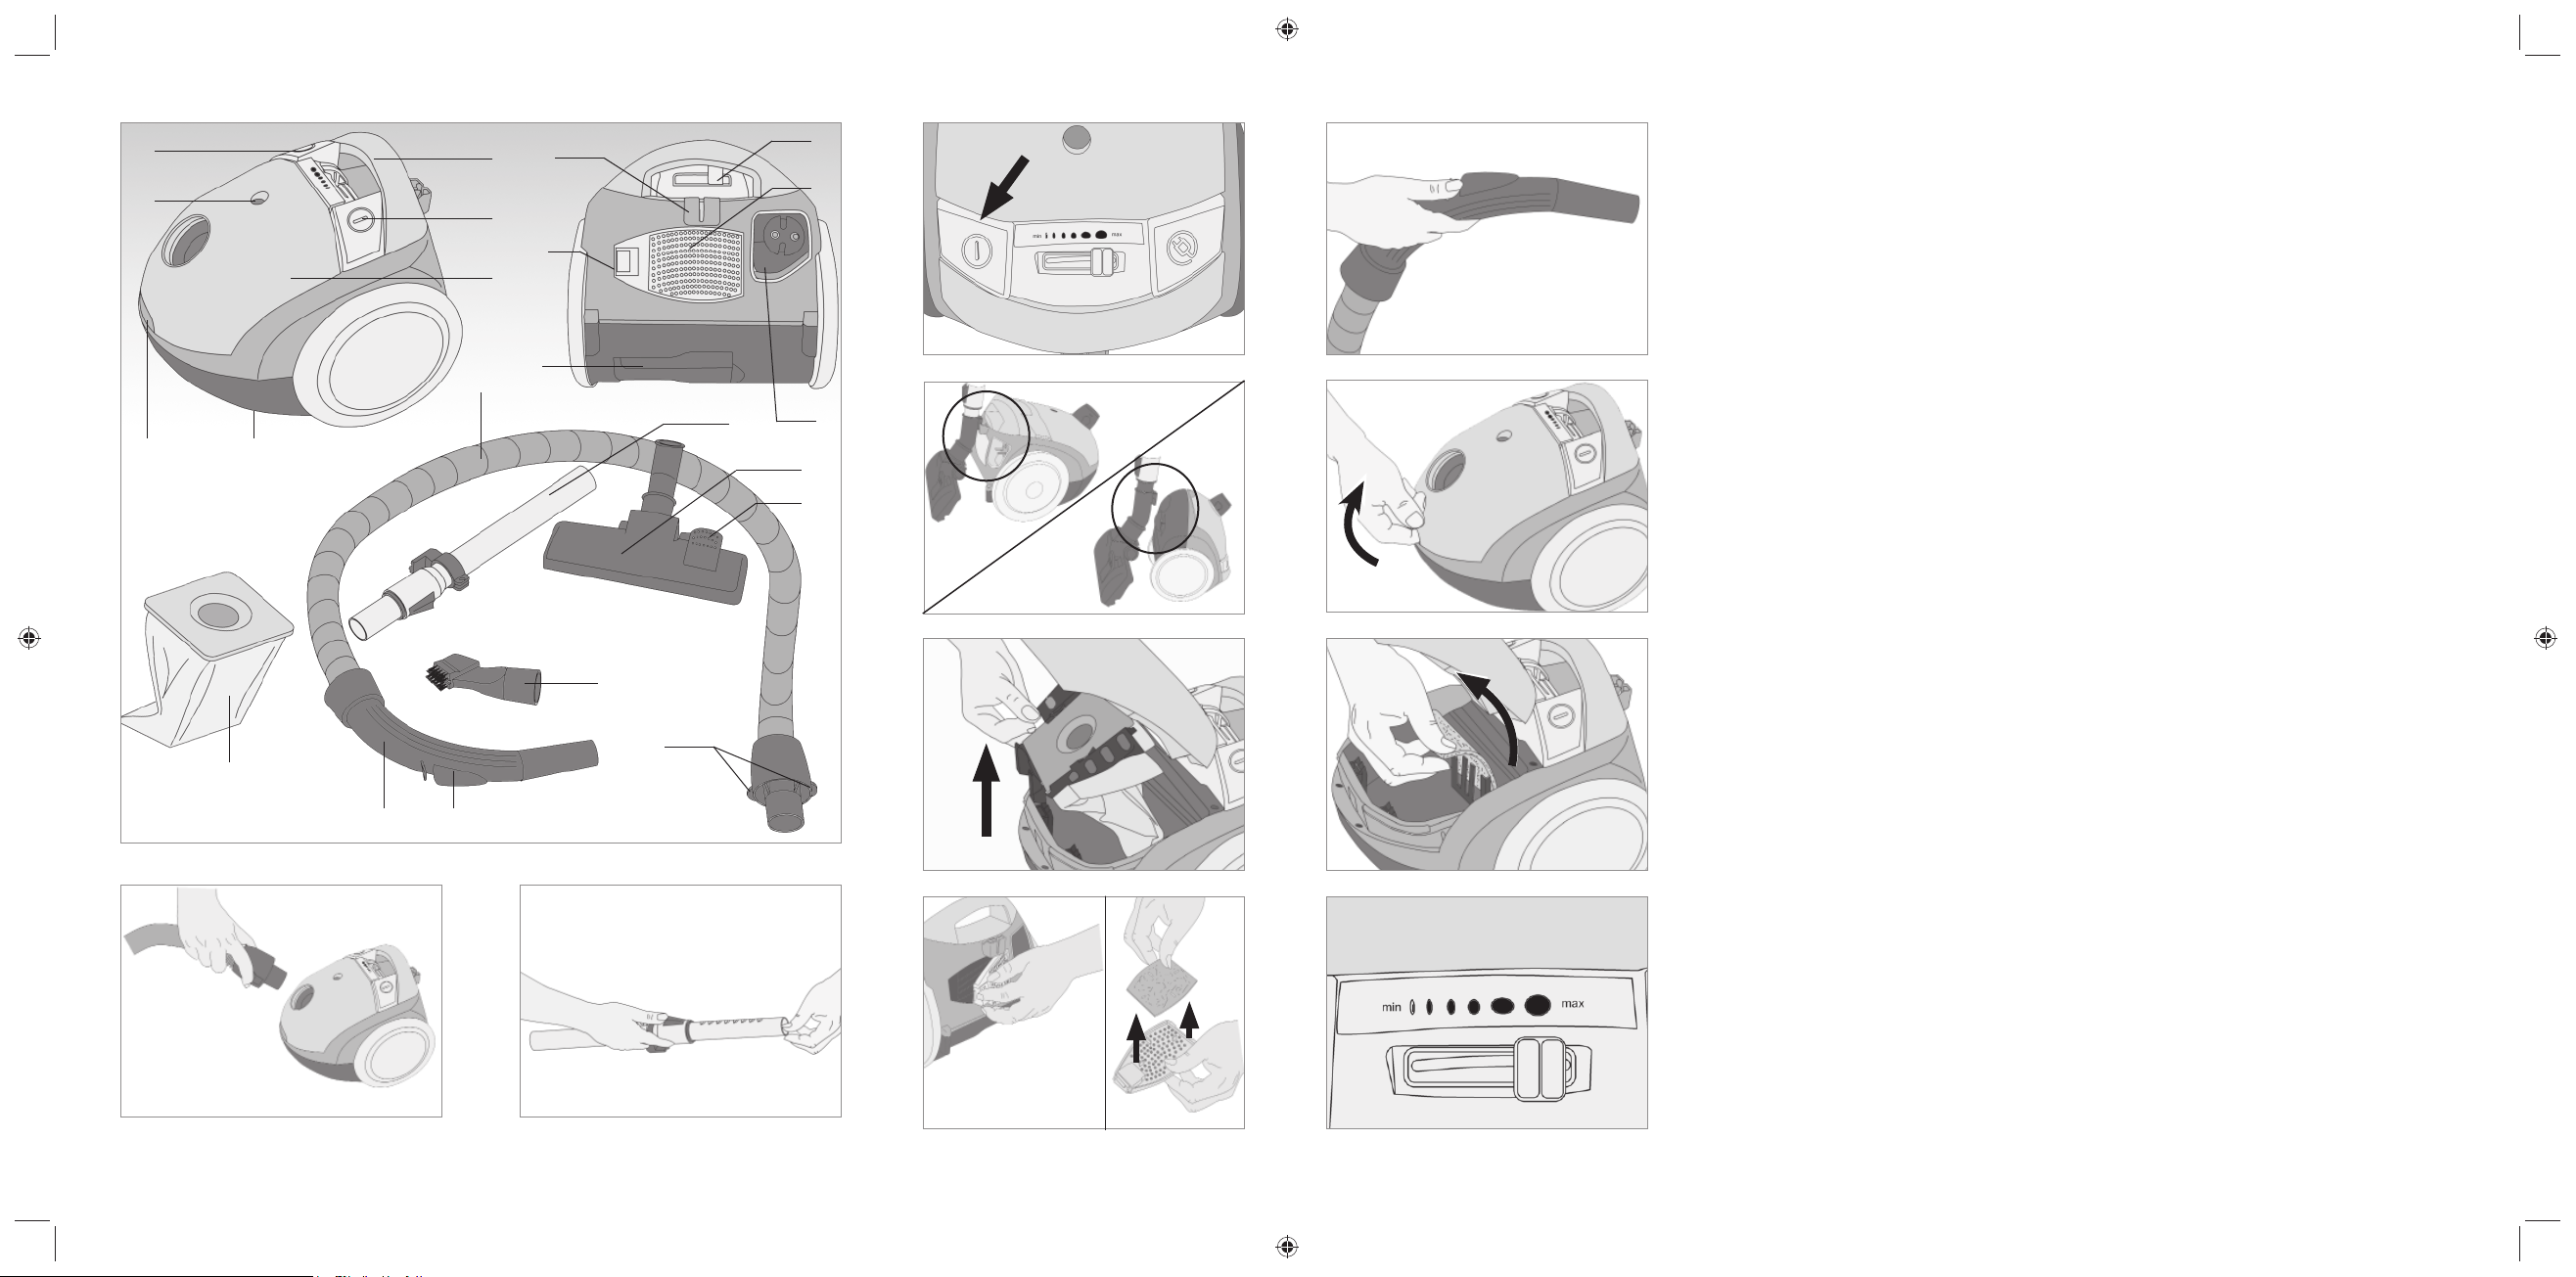
DESCRIZIONE DELL’APPARECCHIO
A) Levetta di apertura comparto sacchetto polvere
B) Spia sacchetto pieno
C) Pulsante riavvolgimento cavo
D) Impugnatura per trasporto
E) Pulsante accensione On/Off
F) Comparto sacchetto polvere
G) Sacchetto in carta
H) Tubo fl essibile
I) Accessorio per fessure con spazzolino
L) Tubo telescopico
M) Pulsanti di sblocco tubo fl essibile
N) Impugnatura
O) Controllo aspirazione regolatore di suzione
P) Spazzola pavimenti
Q) Selettore pavimenti duri/tappeti
R) Comparto fi ltro di scarico
S) Gancio posteriore attacco tubo telescopico
T) Vano per accessorio di aspirazione
U) Regolatore potenza di aspirazione
V) Gancio inferiore attacco tubo telescopico
X) Levetta apertura vano fi ltro
Y) Cavo elettrico estraibile
ISTRUZIONI PER L’USO
AL PRIMO UTILIZZO:
ASSEMBLAGGIO DELL’ASPIRAPOLVERE
Inserire il tubo fl essibile nella sede di aspirazione premendolo con cautela fi no al blocco. Per ri-muoverlo
è necessario premere contemporaneamente i due pulsanti di sblocco (M) ed estrarlo (FIG. 2).
Attenzione !
Prima di installare o rimuovere gli accessori, assicurarsi sempre che sia stata disinserita la spina
dell’aspirapolvere dalla presa.
ACCESSORI
Tubo telescopico (L)
Inserire il tubo telescopico sull’impugnatura e installare successivamente l’accessorio aspi-ratore per
fessure con spazzolino (I). Una volta inserito l’accessorio, è possibile estendere il tubo tele-scopico
agendo sulla relativa leva a scatto (FIG. 3) fi no alla lunghezza desiderata. Rilasciare la leva per fi ssarne
la lunghezza desiderata.
Spazzola per pavimenti (P)
Adatta alla pulizia sia di zone ampie sia di angoli diffi cili da raggiungere.
Per pulire i tappeti ed i pavimenti duri si consiglia di non utilizzare la spazzola. Per sollevare la spazzola
premere la leva interruttore contrassegnata con il simbolo del tappeto.
Per una migliore pulizia e conservazione dei pavimenti lisci, come il PVC, il parquet o le mattonelle, è
preferibile l’uso della spazzola. Per estrarre la spazzola occorre premere la leva selettore (Q) contrassegnata con il simbolo pavimenti lisci.
Aspiratore per fessure con spazzolino (I)
Adatto per aspirare fra le pieghe dei tessuti, giunture, angoli o nicchie che non possono essere raggiunte dall’aspiratore per pavimenti. Questo accessorio può essere applicato anche direttamente sull’impugnatura (N).
3
Page 6
IT
UTILIZZO DELL’APPARECCHIO
Attenzione !
Prima di usare l’aspirapolvere, rimuovere gli oggetti grandi o appuntiti dal pavimento, per evitare
ogni possibile danno all’aspirapolvere stesso.Prima di utilizzare questo apparecchio innanzitutto
estrarre il cavo in tutta la sua lunghezza e inserire la spina. Per accendere l’apparecchio premere
l’interruttore On/Off posto sull’aspirapolvere (FIG. 4).
Importante
In qualche caso all’accensione è possibile udire un sibilo: non si tratta di un difetto e con l’utilizzo
si esaurirà.
CONTROLLO FLUSSO DI ASPIRAZIONE
La fessura dell’aria secondaria (O) si trova sull’impugnatura e viene utilizzata per regolare la forza
d’aspirazione (FIG. 5)
Maggiore è l’apertura della fessura, minore è la forza d’aspirazione e viceversa.
Per aprire la fessura, è necessario sospingere la leva verso il basso, per chiuderla verso l’alto. La regolazione della fessura è funzionale al tipo di superfi cie:
Forza minima per tende e materiali delicati.
Forza media per cuscini, materassi, tappeti.
Forza massima per pavimenti in mattonelle, legno o altro materiale robusto molto sporco.
CONTROLLO POTENZA MOTORE
E’ possibile regolare la potenza di aspirazione utilizzando il cursore scorrevole (FIG. 11). Raccomandiamo di utilizzare una potenza minima per i materiali delicati.
Selezionare, quindi, una potenza media per materassi, mobili rivestiti in tappezzeria e tappeti.
Selezionare una potenza massima per pavimenti in mattonelle, legno o altro materiale robusto.
Attenzione !
Spegnere immediatamente l’aspirapolvere qualora i bocchettoni dell’aria, le spazzole o il tubo
telescopico risultino occlusi. Prima di accendere nuovamente l’aspirapolvere rimuovere ciò che
ha causato l’occlusione.
DOPO AVER USATO L’ASPIRAPOLVERE
Terminato l’utilizzo spegnere l’apparecchio premendo il pulsante accensione (E), disinserire la spina
dalla presa e riavvolgere il cavo tenendo premuto il pulsante di avvolgimento (C) sull’apparecchio. Il
cavo si avvolgerà all’interno del contenitore.
E’ possibile inoltre utilizzare il gancio posteriore (S) e inferiore (V) per poter inserire il tubo telescoppico
e riporre l’apparecchio insieme al suo accessorio in maniera da occupare il minimo spazio possibile
(FIG. 6).
Attenzione !
Durante il riavvolgimento, direzionare il cavo con una mano in modo da evitare di ferirsi e fare
molta attenzione in presenza di bambini o animali domestici.
PULIZIA E MANUTENZIONE
Attenzione !
Prima di effettuare qualsiasi operazione di pulizia e manutenzione, spegnere l’apparecchio e
scollegare la spina di alimentazione dalla presa di corrente.
SOSTITUZIONE DEL SACCHETTO PER LA POLVERE
Quando la spia sacchetto pieno (B) diventa rossa, il sacchetto ha bisogno di essere cambiato.
• Sollevare il comparto sacchetto spingendo verso l’alto l’apposito alloggiamento sacchetti(FIG. 7).
• Estrarre il supporto sacchetto (FIG. 8), prestando attenzione a non forzarlo, una volta estratto il supporto, fare scivolare la parte di cartone rigida del sacchetto nelle apposite guide e gettarlo nel bidone
della spazzatura.
4
Page 7
IT
• Mettere un nuovo sacchetto facendolo scivolare con la parte di cartone rigida nelle apposite guide,
riporre il supporto nella sede interna.
• Chiudere il coperchio del comparto polvere.
PULIZIA/SOSTITUZIONE DEL FILTRO PRE-MOTORE
Il fi ltro pre-motore dovrebbe essere pulito regolarmente e sostituito ogni 6, 9 mesi a seconda dell’uso.
• Rimuovere il supporto del sacchetto (FIG. 8).
• Rimuovere il fi ltro (FIG.9) e scuoterlo con vigore per pulirlo. Se è molto sporco, lavarlo con acqua
tiepida saponata, risciacquarlo bene e farlo asciugare naturalmente.
Importante
NON farlo asciugare artifi cialmente. Per le sostituzioni fi ltri, contattare un Centro Assistenza.
• Reinserire il fi ltro nella sua sede assicurandosi che la superfi cie ruvida del fi ltro sia visibile.
• Infi ne, ricollocare il sacchetto per la polvere e assicurarsi che il comparto fi ltro sia ben a posto prima
dell’uso.
PULIZIA/SOSTITUZIONE DEL FILTRO DI USCITA
Il fi ltro di uscita dovrebbe essere pulito regolarmente e sostituito ogni 6, 9 mesi, a seconda dell’uso.
• Rimuovere il coperchio del fi ltro di scarico agendo sull’apposita levetta (FIG. 10).
• Estrarre il fi ltro sollevandolo e agitarlo vigorosamente per pulirlo. Se il fi ltro è molto sporco lavarlo con
acqua tiepida saponata e farlo asciugare naturalmente.
Importante
NON farlo asciugare artifi cialmente. Per le sostituzioni fi ltri, contattare un Centro Assistenza.
• Rimettere il fi ltro nella sua sede e chiudere lo sportellino, assicurandosi prima che la superfi cie ruvida
del fi ltro sia visibile e che il portafi ltro sia ben a posto prima dell’uso.
RICERCA GUASTI
BLOCCO TERMICO
L’aspirapolvere è dotato di un dispositivo di blocco termico che lo protegge in caso di surriscaldamento
del motore. Se l’aspirapolvere si arresta improvvisamente da solo, seguire questa procedura:
• Spegnere l’aspirapolvere e disinserire la spina dalla presa.
• Cercare l’origine del surriscaldamento (tubo di aspirazione intasato, fi ltro sporco, ecc..)
• Pulire il tubo, svuotare il contenitore della polvere e pulire i fi ltri se necessario.
• Attendere per circa 30-40 minuti affi nché il motore si raffreddi.
• Dopo 30-40 minuti, inserire la spina nella presa e accendere l’aspirapolvere.L’aspirapolvere ora dovrebbe funzionare.
• Se non funziona ancora, attendere per altri 20 minuti e poi provare di nuovo.
• Se continua a non funzionare, contattare un Centro Assistenza.
5
Page 8

EN
ABOUT THIS MANUAL
Even if appliances are made in conformity with specifi c European standards currently in force and the-
refore, with all potentially hazardous parts protected, you must read these warnings with care and use
the appliance only as originally intended by the manufacturer, in order to prevent damage or accidents.
Keep this booklet handy for future reference.
If you wish to give this appliance to other people, remember to provide them with these instructions.
The information in this manual is marked with the following symbols, which mean:
Hazard for children.
Electrical hazard
Risk of damage from other causes.
Important – material damage.
INTENDED USE
This appliance has been designed for use in the home only and therefore, it must not be considered as
suitable for industrial or professional use. Any other use of the appliance not envisaged by the manufacturer will free this latter of any liability for damage of any kind, arising from improper use of the appliance.
Improper use will also render any form of warranty null and void.
SAFETY WARNINGS
READ THESE INSTRUCTIONS CAREFULLY BEFORE USE.
• This appliance is for home use only and must not be used for business or industrial purposes.
• The manufacturer cannot accept any liability for incorrect use or for uses other than as stated in this
handbook.
• We recommend that you keep the original packaging, as free after-sales assistance is not envisaged
for problems caused by unsuitable packaging when sending the appliance to an authorised Assistance
Centre.
• The appliance conforms to Directive 2006/95/EC and to Directive EMC 2004/108/EC.
HAZARD FOR CHILDREN
• This appliance must not be used by people (including children) with reduced physical, sensory or mental capabilities, or by people with no experience or familiarity with the appliance itself, unless suitably
supervised or well instructed as to appliance use by a person responsible for their safety.
• Do not allow children to play with the appliance.
• Packaging must not be left within reach of children as it is a potential source of danger.
• If you should decide to dispose of this appliance, we recommend that you make it inoperative by cutting the power cord. It is also advisable to make safe those parts of the appliance that might represent
a hazard, especially to children, who may try to use the appliance as a plaything.
6
Page 9
EN
ELECTRICAL HAZARD
• Before connecting the appliance to the mains power, make sure that the voltage on the plate underneath the appliance is the same as the mains voltage in the premises.
• Only connect the appliance to an AC power socket.
• The use of extension leads not recommended by the manufacturer may cause damage or accidents.
• If the power cord is damaged, it must be replaced either by the manufacturer or by a Technical Assistance Centre or similarly qualifi ed person, so as to prevent any risk.
• Never place energised parts in contact with water: danger of short circuits!
• Never use to clean up liquids.
• Never touch the appliance with wet hands or feet.
• Never use the appliance with bare feet.
• Unplug the appliance from the mains power before carrying out any cleaning or maintenance.
• NEVER PLACE THE APPLIANCE IN WATER OR OTHER LIQUIDS.
• Make sure that the power cord is not in contact with hot or sharp surfaces.
• Unplug the power cord after every use.
• In case of breakdowns, failures or suspected faults after a fall or being dropped, unplug the appliance
from the mains immediately. Never use a faulty appliance.
• REPAIRS MAY ONLY BE CARRIED OUT BY AN AUTHORISED ASSISTANCE CENTRE.
RISK OF DAMAGE DUE TO OTHER CAUSES
• Do not use to clean up hot ash, large pieces of glass, plaster or cement, sharp or pointed objects or
liquids
• To avoid dangerous overheating, we recommend unwinding the whole length of the power cord and
to unplug the appliance when it is not in use.
• The appliance must not be used without a bag or motor fi lter, or if the bag or fi lter are damaged or
broken.
• Do not leave the appliance exposed to the elements (rain, sunlight, etc.).
• Do not store the appliance close to sources of heat (e.g. radiator).
• Always unplug the appliance before cleaning it or changing the fi lters.
IMPORTANT – MATERIAL DAMAGE
• Never unplug the appliance by pulling on the power cord.
• Never use the appliance if faulty.
• Always start the appliance with the power set to minimum.
• Never use external timers or separate, remote controlled devices to power the appliance.
• When putting away the appliance, make sure that it is not in contact with hot or sharp surfaces.
• PLEASE KEEP THESE INSTRUCTIONS IN A SAFE PLACE.
7
Page 10
EN
DESCRIPTION OF THE APPLIANCE
A) Lever to open the dust bag compartment
B) Bag full indicator
C) Cord rewind button
D) Carry handle
E) On/Off button
F) Dust bag compartment
G) Paper bag
H) Flexible hose
I) Crevice nozzle with brush
L) Telescopic tube
M) Hose release buttons
N) Handgrip
O) Suction adjustment control
P) Floor brush
Q) Hard fl oor/carpet selector
R) Exhaust fi lter compartment
S) Rear hook for telescopic tube attachment
T) Compartment for cleaner attachments
U) Suction power adjustment
V) Bottom hook for telescopic tube attachment
X) Filter compartment opening lever
Y) Pull-out power cord
INSTRUCTIONS FOR USE
USING FOR THE FIRST TIME:
VACCUM CLEANER ASSEMBLY
Insert the hose into the suction inlet, pressing it gently until it clicks into place. To remove the hose,
press both release buttons (M) at the same time and simply pull it out (FIG. 2).
Important note!
Before fi tting or removing attachments, always make sure that the vacuum cleaner is unplugged
from the mains power.
ATTACHMENTSI
Telescopic tube (L)
Insert the telescopic tube into the handgrip and then fi t the crevice nozzle with brush (I). Once an attach-
ment is fi tted, it is possible to extend the tube using the lever (FIG. 3) to the required length. Release the
lever to fasten the tube at the required length.
Floor brush (P)
This is good for large areas and also for those corners that are diffi cult to reach. When cleaning carpets,
rugs and hard fl ooring, it is advisable not to use the brush. To raise the brush, press the selector marked
with the carpet symbol .
For better cleaning and care of smooth fl ooring, such as PVC, parquet or tiles, it is better to use the
brush. To extract the brush, press the selector (Q) marked with the smooth fl oor symbol .
Crevice nozzle with brush (I)
Use to clean between the folds of fabric, joints, corners or hard-to-access areas that cannot be reached
with the fl oor attachment. This attachment can also be fi tted directly to the handgrip (N).
8
Page 11
EN
USING THE APPLIANCE
Important note!
Before using the vacuum cleaner, remove any large or sharp objects from the fl oor to avoid cau-
sing damage to the appliance. Before use, wind out the cord for its whole length and plug in the
appliance. To switch on the appliance, press the On/Off switch on the cleaner (FIG. 4).
Important
In some cases, it is possible for a whistling sound to be heard when the appliance is switched on:
this is not a fault and it will disappear with use.
SUCTION FLOW CONTROL
The secondary air opening (O) is on the handgrip and it is used to adjust suction strength (FIG. 5). The
larger the opening, the less the suction power and vice versa. To open the suction opening, push the
lever downwards and upwards to close it. The opening should be adjusted according to surface type:
Minimum power for curtains and delicate materials.
Medium power for cushions, mattresses and carpets.
Maximum power for tiled or wooden fl ooring or other hardy materials with a good deal of dirt.
MOTOR POWER CONTROL
It is possible to adjust the suction power using the slider (FIG. 11). We recommend using minimum power for delicate materials. Select the medium setting for mattresses, upholstered furniture and carpets
or rugs.
Select the maximum power setting for tiled or wooden fl ooring or other hardy materials with a good deal
of dirt.
Important note!
Switch off the vacuum cleaner immediately if the air openings, brushes or telescopic tube become
clogged or blocked. Remove the blockage before switching on the vacuum cleaner again.
AFTER USING THE VACUUM CLEANERT
After use, switch off the appliance by holding down the On/Off button (E); unplug the appliance and
rewind the power cord by holding down the cord rewind button (C) on the appliance. The cord will be
rewound inside the container.
It is possible to use the rear (S) and bottom (V) hooks to insert the telescopic tube and store the appliance together with its attachment so as to take up as little room as possible (FIG. 6).
Important note!
While rewinding the cord, guide it with one hand to as not to hurt yourself and take great care if
there are children or pets in the vicinity.
CLEANING AND MAINTENANCE
Important note!
Before carrying out any cleaning or maintenance operation, switch off and unplug the appliance
from the mains
DUST BAG REPLACEMENT
When the bag full indicator (B) turns red, the bag needs changing.
• Lift out the bag compartment, pushing the bag housing upwards (FIG. 7).
• Take out the bag support (FIG. 8), taking care not to force it and once the support is out, slide the stiff
cardboard part of the bag into out of the guides and throw away the bag.
• Fit a new bag, sliding the stiff card into the guides, then place the support inside the housing.
• Close the lid of the compartment.
9
Page 12

EN
PRE-MOTOR FILTER CLEANING/REPLACEMENT
The pre-motor fi lter needs to be cleaned regularly and replaced every 6- 9 months, according to use.
• Remove the bag support (FIG. 8).
• Remove the fi lter (FIG.9) and shake it vigorously to clean it. If it is very dirty, wash it with lukewarm
soapy water; rinse it well and leave to dry naturally.
Important
DO NOT dry the fi lter using artifi cial means. To replace the fi lter, contact your Assistance Centre.
• Refi t the fi lter in its housing, making sure that the rough surface of the fi lter is visible.
• Then refi t the dust bag and make sure that the fi lter compartment is in place before use.
EXHAUST FILTER CLEANING/REPLACEMENT
The outlet fi lter needs to be cleaned regularly and replaced every 6- 9 months, according to use.
• Remove the cover of the exhaust fi lter, using the lever (FIG. 10).
• Lift out the fi lter and shake it vigorously to clean it. If the fi lter is very dirty, wash it with lukewarm soapy
water; rinse it well and leave to dry naturally.
Important
DO NOT dry the fi lter using artifi cial means. To replace the fi lter, contact your Assistance Centre
• Refi t the fi lter in its housing, making sure that the rough surface of the fi lter is visible and that the fi lter
holder is in place correctly before using.
TROUBLESHOOTING
THERMAL CUT OUT
The vacuum cleaner is equipped with a thermal cut-out device to protect it if the motor should overheat.
If the vacuum cleaner should suddenly stop on its own, proceed as follows:
• Switch off and unplug the vacuum cleaner.
• Look for the cause of the overheating (suction tube clogged, dirty fi lter, etc.).
• Clean the tube, empty the dust container and clean the fi lters if necessary.
• Wait about 30-40 minutes to give the motor time to cool down.
• After 30-40 minutes, plug the appliance into the mains power and switch it on. The vacuum cleaner
should work now.
• If it continues not to work, wait a further 20 minutes and then try again.
• If the appliance still does not work, contact your nearest Assistance Centre.
10
Page 13

FR
A PROPOS DE CE MANUEL
Bien que si les appareils aient été réalisés conformément aux Normes spécifi ques européennes en
vigueur et que tous leurs composants potentiellement dangereux soient par conséquent protégés, il est
indispensable de lire attentivement ces instructions et d’utiliser l’appareil exclusivement pour l’usage
auquel il a été destiné afi n d’éviter tout accident et dommage. Gardez cette notice à portée de la main
pour toute future consultation.
Si vous décidez de céder cet appareil à d’autres personnes, n’oubliez pas d’inclure aussi ces instructions.
Les informations reportées dans ce manuel sont accompagnées des symboles suivants, qui indiquent:
Danger pour les enfants
Danger dû à la présence d’électricité
Danger de dommages dérivant d’autres causes
Attention – dommages matériaux
USAGE PREVU
Cet appareil a été conçu exclusivement pour un usage privé et tout usage industriel ou professionnel
sera donc considéré inapproprié. Toute autre utilisation de la machine n’est pas prévue par le Fabriquant qui n’assume aucune responsabilité face aux éventuels dommages, de quelque nature que ce
soit, dérivant d’un usage impropre de la machine. L’usage impropre détermine en outre l’annulation de
toute forme de garantie.
PRESCRIPTIONS DE SECURITE
LIRE ATTENTIVEMENT LES INSTRUCTIONS AVANT L’EMPLOI
• Cet appareil est réservé exclusivement à un usage domestique et il ne doit pas être destiné à des
usages commerciaux ou industriels.
• Nous n’assumons aucune responsabilité face à un usage erroné ou à des emplois différents de ceux
prévus dans ce manuel.
• Nous conseillons de conserver les emballages originaux car l’assistance gratuite n’est pas prévue
pour les dommages provoqués par un emballage non approprié du produit au moment de son envoi
au centre de service après-vente autorisé.
• Cet appareil est conforme à la Directive 2006/95/CE et à la Directive EMC 2004/108/CE.
DANGER POUR LES ENFANTS
• Cet appareil ne doit pas être utilisé par des personnes (y compris les enfants) présentant des capacités physiques, sensorielles ou mentales réduites; par des personnes manquant d’expérience et de
connaissance du produit, à moins qu’elles ne soient attentivement surveillées et correctement instruites sur l’utilisation de l’appareil de la part d’une personne responsable de leur sécurité.
• Vérifi ez que les enfants ne jouent pas avec l’appareil.
• Les éléments de l’emballage ne doivent pas être laissés à la portée des enfants car ils représentent
une source potentielle de danger.
• Si vous décidez de vous débarrassez de cet appareil, il est recommandé de le rendre inutilisable
en coupant le cordon d’alimentation électrique. Il est recommandé d’autre part d’exclure les parties
pouvant représenter un danger, spécialement pour les enfants qui pourraient de servir de l’appareil
pour leurs jeux.
11
Page 14
FR
DANGER DU A LA PRESENCE D’ELECTRICITE
• Avant de brancher l’appareil au réseau d’alimentation électrique, contrôler que le voltage indiqué sur
la plaquette située sous la machine corresponde à celui du réseau local.
• Brancher l’appareil uniquement à une prise de courant électrique alterné.
• L’usage de rallonges électriques non autorisées par le fabriquant de l’appareil peut provoquer des
dommages et des accidents.
• Si le cordon électrique est endommagé, il doit être remplacé par le constructeur ou par le service
après-vente ou, dans tous les cas, par une personne qualifi ée, de façon à prévenir tout risque de
danger.
• Ne jamais mettre les parties sous tension électrique en contact avec de l’eau car cela peut provoquer
des courts-circuits!
• Ne jamais aspirer de liquides.
• Ne pas toucher l’appareil avec les mains et les pieds mouillés ou humides..
• Ne pas utiliser l’appareil avec les pieds nus.
• Débrancher la fi che de la prise de courant avant toute intervention de nettoyage ou d’entretien de la
machine.
• NE PAS PLONGER L’APPAREIL SOUS L’EAU OU AUTRES LIQUIDES.
• Vérifi er que le cordon ne soit pas en contact avec les surfaces chaudes ou coupantes.
• Débrancher le cordon d’alimentation de la prise de courant à la fi n de chaque utilisation.
• En cas de pannes de fonctionnement, de défauts ou de suspect de dommages après une chute,
débrancher immédiatement la fi che de la prise de courant. Ne jamais mettre en marche un appareil
défectueux. LES REPARATIONS DOIVENT ETRE EFFECTUEES EXCLUSIVEMENT PAR LES CENTRES DE SERVICE APRES-VENTE AUTORISES.
DANGER DE DOMMAGES DERIVANT D’AUTRES CAUSES
• Ne pas aspirer la cendre chaude, les gros morceaux de verre, les débris, les objets pointus ou coupants ni les liquides.
• Pour éviter la surchauffe dangereuse de l’appareil, il est recommandé de dérouler le cordon sur toute
sa longueur et de débrancher la fi che de la prise de courant quand l’appareil n’est pas utilisé.
• L’appareil ne doit pas être utilisé sans sac, sans fi ltre moteur ou si le sac ou le fi ltre sont cassés ou
endommagés.
• Ne pas exposer l’appareil aux agents atmosphériques (pluie, soleil, etc.).
• Ne jamais laisser l’appareil près des sources de chaleur (ex. radiateurs)
• Débrancher toujours la fi che avant de nettoyer l’appareil ou de remplacer les fi ltres.
ATTENTION – DOMMAGES MATERIAUX
• Ne jamais débrancher la fi che de la prise de courant en tirant sur le cordon d’alimentation.
• Ne jamais mettre en marche l’appareil s’il est défectueux
• Faire toujours démarrer l’appareil avec le régulateur de puissance sur la position de minimum.
• Le produit ne doit jamais être alimenté à travers des minuteries externes ou avec des installations
séparées et commandées à distance.
• Au moment du rangement de l’appareil, vérifi er qu’il ne soit pas en contact avec des surfaces chaudes
ou coupantes.
• CONSERVER TOUJOURS CES INSTRUCTIONS.
12
Page 15

FR
DESCRIPTION DE L’APPAREIL
A) Levier d’ouverture logement sac à poussière
B) Voyant lumineux de trop plein du sac à poussière
C) Poussoir d’enroulement du cordon
D) Manche pour transport
E) Poussoir marche-arrêt On/Off
F) Logement sac à poussière
G) Sac en papier
H) Tube fl exible
I) Accessoire pour fi ssures avec goupillon
L) Tube télescopique
M) Poussoirs de déblocage du tube fl exible
N) Manche
O) Contrôle aspiration régulateur d’aspiration
P) Brosse sols
Q) Sélecteur sols durs/tapis
R) Logement fi ltre d’évacuation
S) Crochet arrière prise tube télescopique
T) Logement pour accessoire d’aspiration
U) Régulateur puissance d’aspiration
V) Crochet inférieur prise tube télescopique
X) Levier ouverture logement fi ltre
Y) Cordon électrique amovible
MODE D’EMPLOI
PREMIERE UTILISATION:
ASSEMBLAGE DE L’ASPIRATEUR
Introduire le tube fl exible dans le logement d’aspiration en le poussant jusqu’à ce qu’il se bloque. Pour
le retirer, il est nécessaire d’appuyer simultanément sur les deux poussoirs de déblocage (M) et de
l’extraire (FIG. 2).
Attention !
Avant d’installer ou de retirer les accessoires, vérifi er toujours que la fi che de l’aspirateur soit
débranchée de la prise de courant.
ACCESSOIRES
Tube télescopique (L)
Assembler le tube télescopique sur le manche puis installer l’accessoire aspirateur pour fi ssures avec
goupillon (I). Après avoir assemblé l’accessoire, il est possible de rallonger le tube télescopique en agissant sur le levier à déclic (FIG. 3) jusqu’à la longueur désirée. Relâcher le levier pour fi xer la longueur
désirée.
Brosse pour sols (P)
Indiquée pour le nettoyage des zones vastes ainsi que des angles diffi ciles à atteindre. Pour nettoyer
les tapis et les sols durs, il est conseillé de ne pas utiliser la brosse. Pour soulever la brosse, appuyer
sur le levier interrupteur portant le symbole du tapis .
Pour un meilleur nettoyage et une meilleure conservation des sols lisses, tels que le PVC, le parquet
ou le carrelage, il est préférable d’utiliser la brosse. Pour extraire la brosse, il faut appuyer sur le levier
sélecteur (Q) portant le symbole des sols lisses .
Aspirateur pour fi ssures avec goupillon (I)
Indiqué pour aspirer entre les plis des tissus et dans les angles ou dans les niches qui peuvent être
atteintes par l’aspirateur pour sols. Cet accessoire peut être appliqué aussi directement sur le manche
(N).
13
Page 16

FR
UTILISATION DE L’APPAREIL
Attention !
Avant d’utiliser l’aspirateur, enlever tous les objets grands ou pointus présents sur le sol pour
éviter d’endommager l’aspirateur. Avant d’utiliser cet appareil, extraire avant tout le cordon sur
toute sa longueur et brancher la fi che dans la prise de courant. Pour mettre l’appareil en marche,
appuyer sur l’interrupteur On/Off situé sur l’aspirateur (FIG. 4).
Important
Il est possible, dans certains cas, d’entendre un siffl ement au moment de la mise en marche
de l’appareil: il ne s’agit pas d’un défaut et ce phénomène disparaîtra dans le temps en utilisant
l’aspirateur.
CONTROLE DU FLUX D’ASPIRATION
La fi ssure de l’air secondaire (O) se trouve sur le manche et elle sert à régler la force d’aspiration (FIG.
5). Plus elle est ouverte et plus la force d’aspiration est réduite et vice versa. Pour ouvrir la fi ssure, il est
nécessaire de pousser le levier vers le bas, alors que pour la fermer, il faut le pousser vers le haut. Le
réglage de la fi ssure dépend du type de surface à aspirer:
Force minimum pour rideaux et matériaux délicats.
Force moyenne pour coussins, matelas et tapis.
Force maximum pour sols en carrelage, en bois ou autre matériau robuste et très sale.
CONTROLE DE LA PUISSANCE DU MOTEUR
Il est possible de régler la puissance d’aspiration en utilisant le curseur coulissant (FIG. 11). Nous conseillons d’utiliser une puissance minimum pour les matériaux délicats, une moyenne pour les matelas,
les meubles revêtus de tapisserie et les tapis et une puissance maximum pour sols en carrelage, en
bois ou autre matériau robuste..
Attention !
Eteindre immédiatement l’aspirateur si les bouches d’aération de l’air, les brosses ou le tube télescopique sont obstrués. Avant de rallumer l’appareil, éliminer la cause de l’obstruction.
APRES AVOIR UTILISE L’ASPIRATEUR
Une fois l’utilisation terminée, éteindre l’appareil en appuyant sur le poussoir de marche-arrêt (E),
débrancher la fi che de la prise de courant et enrouler le cordon en appuyant sur le poussoir d’enroule-
ment (C). Le cordon s’enroule à l’intérieur du logement.
Il est possible en outre d’utiliser le crochet arrière (S) et inférieur (V) pour introduire le tube télescopique
et ranger l’appareil avec son accessoire de façon à occuper le moins de place possible (FIG. 6).
Attention !
Pendant l’enroulement du cordon, accompagner le cordon d’une main pour éviter de se blesser
et faire très attention en présence d’enfants ou d’animaux domestiques.
NETTOYAGE ET ENTRETIEN
Attention!
Avant toute opération de nettoyage et d’entretien, éteindre l’appareil et débrancher la fi che d’ali-
mentation de la prise de courant.
REMPLACEMENT DU SAC A POUSSIERE
Quand le voyant lumineux de trop plein (B) devient rouge, le sac à poussière doit être remplacé.
• Soulever le compartiment contenant le sac en poussant vers le haut le logement du sac à poussière
(FIG. 7).
• Extraire le support du sac (FIG. 8), en faisant attention à ne pas trop forcer, puis faire glisser la partie
en carton rigide le long des glissières pour jeter le sac.
14
Page 17

FR
• Mettre un sac neuf en faisant glisser sa partie en carton rigide dans les glissières, puis remettre le
support dans son siège interne.
• Refermer le couvercle du compartiment à poussière.
NETTOYAGE/SUBSTITUTION DU FILTRE PRE-MOTEUR
Le fi ltre pré-moteur devrait être nettoyé régulièrement et remplacé tous les 6/9 mois selon l’emploi de
l’aspirateur.
• Retirer le support du sac à poussière (FIG. 8).
• Retirer le fi ltre (FIG. 9) et le secouer énergiquement pour le nettoyer. S’il est très sale, le laver avec de
l’eau tiède savonneuse, le rincer correctement et le laisser sécher naturellement
Important
NE PAS essuyer le fi ltre artifi ciellement. Pour la substitution des fi ltres, contacter un Centre de
Service après-vente.
• Remettre le fi ltre à sa place en s’assurant que la surface rugueuse du fi ltre soit visible.
• Enfi n, remettre le sac à poussière dans son logement et vérifi er que le fi ltre soit bien en place avant
d’utiliser l’appareil.
NETTOYAGE/SUBSTITUTION DU FILTRE D’EVACUATION DE L’AIR
Le fi ltre d’évacuation de l’air devrait être nettoyé régulièrement et remplacé tous les 6/9 mois, selon
l’emploi de l’aspirateur.
• Retirer le couvercle du fi ltre d’évacuation en agissant sur le levier (FIG. 10).
• Extraire le fi ltre en le soulevant et l’agiter énergiquement pour le nettoyer. Si le fi ltre est très sale, le
laver avec de l’eau tiède et savonneuse puis el faire sécher naturellement.
Important
NE PAS essuyer le fi ltre artifi ciellement. Pour la substitution des fi ltres, contacter un Centre de
Service après-vente.
• Remettre le fi ltre à sa place et refermer le portillon, en vérifi ant que la surface rugueuse du fi ltre soit
visible et que le porte-fi ltre soit positionné correctement avant d’utiliser l’appareil.
RECHERCHE DES PANNES DE FONCTIONNEMENT
BLOCAGE THERMIQUE
L’aspirateur est muni d’un dispositif de blocage thermique qui le protège en cas de surchauffe du moteur. Si l’aspirateur s’arrête subitement tout seul, suivre la procédure suivante:
• Eteindre l’aspirateur et débrancher la fi che de la prise de courant.
• Chercher l’origine de la surchauffe (tube d’aspiration obstrué, fi ltre sale, etc.)
• Nettoyer le tube, vider le compartiment à poussière et nettoyer les fi ltres si nécessaire.
• Attendre environ 30-40 minutes que le moteur refroidisse.
• Après 30-40 minutes, brancher la fi che dans la prise de courant et allumer l’aspirateur. L’aspirateur
devrait alors fonctionner.
• S’il ne fonctionne pas encore, attendre 20 minutes puis essayer à nouveau.
• S’il ne fonctionne toujours pas, contacter un Centre de Service après-vente.
15
Page 18

DE
ZU DIESER ANLEITUNG
Obwohl dieses Gerät in Konformität mit einschlägigen europäischen Normen realisiert wurde und daher
alle potentiell gefährlichen Teile geschützt sind, sollten diese Hinweise aufmerksam gelesen werden.
Um Unfälle und Schäden zu vermeiden, darf das Gerät nur zu dem Zweck verwendet werden ,für den es
bestimmt ist. Halten Sie diese Anleitung griffbereit, um es bei Bedarf nachschlagen zu können.
Sollten Sie dieses Gerät an Dritte weitergeben, vergessen Sie nicht, auch diese Anleitung beizufügen.
Die in dieser Anleitung enthaltenen Informationen sind mit Symbolen markiert, die folgende Bedeutung
haben:
Gefahr für Kinder
Gefahr durch elektrischen Strom
Gefahr von Schäden durch andere Ursachen
Achtung, Sachschäden
BESTIMMUNGSGEMÄSSE VERWENDUNG
Dieses Gerät ist ausschließlich für den privaten Gebrauch konzipiert und ist daher für industrielle oder
professionelle Zwecke nicht geeignet. Jede andere Art der Verwendung ist vom Hersteller nicht vorgesehen, der daher keinerlei Haftung für Schäden jeglicher Art übernimmt, die durch unsachgemäßen
Einsatz des Geräts zustande kommen. Unsachgemäße Verwendung führt außerdem zum Verfall jeder
Art von Garantieleistung.
SICHERHEITSHINWEISE
LESEN SIE BITTE AUFMERKSAM DIESE ANLEITUNG, BEVOR SIE DAS GERÄT BENUTZEN.
• Das Gerät ist ausschließlich der den häuslichen Gebrauch bestimmt und darf nicht zu kommerziellen
oder industriellen Zwecken verwendet werden
• Für falsche Verwendung oder von dem in dieser Anleitung beschriebenen abweichenden Einsatz wird
keinerlei Haftung geleistet.
• Es empfi ehlt sich, die Originalverpackung aufzubewahren, denn für Schäden, die durch unsa-
chgemäße Verpackung beim Versand des Produkts an eine zugelassene Kundendienststelle zustande kommen, kein kostenloser Kundendienst geleistet wird.
• Dieses Gerät ist konform mit der Richtlinie 2006/95/EG und mit der EMV-Richtlinie 2004/108/EG.
GEFAHR FÜR KINDER
• Dieses Gerät darf nicht von Personen (einschließlich Kindern) benutzt werden, die nicht im vollen Besitz ihrer körperlichen, sensoriellen oder geistigen Fähigkeiten sind oder denen es an Erfahrung und
Kenntnis des Geräts mangelt, sofern sie nicht sorgfältig überwacht oder in die Verwendung des Geräts
durch eine Person eingewiesen werden, die für ihre Sicherheit verantwortlich ist.
• Sicher stellen, dass Kinder nicht mit diesem Gerät spielen.
• Die Verpackungselemente dürfen nicht in Reichweite von Kindern gelassen werden, da sie eine mögliche Gefahrenquelle darstellen.
• Wenn das Gerät als Abfall entsorgt werden soll, muss es durch Abschneiden des Versorgungskabels
betriebsunfähig gemacht werden. Außerdem sollten die Teile des Geräts unschädlich gemacht werden, die eine Gefahr darstellen könnten, speziell wenn Kinder damit spielen.
16
Page 19

DE
GEFAHR DURCH ELEKTRISCHEN STROM
• Bevor das Gerät an das Stromnetz angeschlossen wird, muss überprüft werden, dass die auf dem
Typenschild angegebene Spannung mit der des lokalen Stromnetzes übereinstimmt.
• Das Gerät ausschließlich an eine Wechselstromsteckdose anschließen.
• Die Verwendung von Verlängerungskabeln, die nicht vom Hersteller des Geräts zugelassen sind,
kann zu Schäden und Unfällen führen.
• Wenn das Versorgungskabel beschädigt ist, muss es vom Hersteller oder dessen Kundendienst bzw.
durch ein Person mit vergleichbarer Qualifi kation ausgetauscht werden, um jedem Risiko aus dem
Weg zu gehen.
• Nicht auf nassen Flächen saugen: es besteht die Gefahr eines Kurzschlusses!
• Keinesfalls Flüssigkeiten aufsaugen.
• Berühren Sie das Gerät nicht, wenn Sie nasse Hände oder Füße haben.
• Betreiben Sie das Gerät nicht barfuß.
• Ziehen Sie vor Reinigungs- oder Instandhaltungsarbeiten immer den Stecker aus der Steckdose.
• DAS GERÄT KEINESFALLS IN WASSER ODER SONSTIGE FLÜSSIGKEITEN TAUCHEN.
• Sicherstellen, dass das Gerät nicht mit heißen oder scharfkantigen Flächen in Berührung kommt.
• Den Stecker nach jedem Gebrauch aus der Steckdose ziehen.
• Ein defektes Gerät darf nicht in Betrieb gesetzt werden. REPARATUREN DÜRFEN AUSSCHLIESSLICH
VON DEN ZUGELASSENEN KUNDEDIENSTSTELLEN AUSGEFÜHRT WERDEN.
GEFAHR VON SCHÄDEN DURCH ANDERE URSACHEN
• Keine heiße Asche, größere Glasscherben, Schutt, spitze oder scharfkantige Gegenstände oder Flüssigkeiten aufsaugen.
• Um gefährliche Überhitzungen zu vermeiden, sollte das Kabel in seiner gesamten Länge ausgerollt
und der Stecker aus der Steckdose gezogen werden, wenn das Gerät nicht gebraucht wird.
• Das Gerät darf nicht ohne bzw. mit gerissenem oder beschädigtem Staubbeutel oder Motorfi lter be-
trieben werden.
• Das Gerät darf keinen Wettereinfl üssen ausgesetzt werden (Regen, Sonne usw. ).
• Stellen Sie das Gerät nicht in die Nähe von Hitzequellen (z.B. Heizkörper).
• Ziehen Sie immer den Stecker aus der Steckdose, bevor Sie das Gerät reinigen oder die Filter wechseln.
WARNUNG VOR VERBRENNUNGEN.
• Den Stecker keinesfalls am Kabel aus der Steckdose ziehen.
• Setzen Sie das Gerät nicht in Betrieb, wenn es defekt ist
• Beim Einschalten des Geräts muss der Leistungsregler immer auf Minimum stehen.
• Das Gerät darf nicht über externe Timer oder ferngesteuerte Anlagen gespeist werden.
• Nach dem Wegräumen des Geräts muss sicher gestellt werden, dass es nicht mit heißen oder
scharfkantigen Flächen in Berührung kommt.
• BEWAHREN SIE DIESE ANLEITUNG AUF.
17
Page 20

DE
BESCHREIBUNG DES GERÄTS
A) Hebel zum Öffnen des Staubbeutelfachs
B) Kontrolllampe für vollen Staubbeutel
C) Kabel- Aufrolltaste
D) Traggriff
E) Ein-/Ausschalttaste
F) Staubbeutelfach
G) Papierbeutel
H) Schlauch
I) Schlitzdüse mit Bürste
L) Teleskoprohr
M) Taste zum Ausrasten des Schlauchs
N) Griff
O) Saugstärkenregler
P) Fußbodenbürste
Q) Umschalter glatte Böden/Teppiche
R) Fach Ausgangsfi lter
S) Rückseitiger Haken für Teleskoprohr
T) Fach für Saugaufsätze
U) Saugleistungsregler
V) Unterseitiger Haken für Teleskoprohr
X) Hebel zum Öffnen des Filterfachs
Y) Ausziehbares Stromkabel
BETRIEBSANLEITUNG
ERSTMALIGE VERWENDUNG:
ZUSAMMENBAU DES STAUBSAUGERS
Die Gummimanschette in die Saugöffnung einführen und vorsichtig drücken, bis sie eingerastet ist. Zum
Lösen der Manschette müssen die beiden Entriegelungstasten gleichzeitig gedrückt und die Manschette (M) herausgezogen werden (ABB. 2).
Achtung!
Bevor Zubehörteile angebracht oder entfernt werden, immer sicher stellen, dass der Stecker des
Staubsaugers aus der Steckdose gezogen wurde.
ZUBEHÖR
Teleskoprohr (L)
Das Teleskoprohr in den Griff einstecken und dann die Schlitzdüse mit Bürste (I) anbringen. Nachdem
das Zubehörteil angebracht wurde, kann nach Drücken der entsprechenden Rasttaste das Teleskoprohr
(ABB: 3) auf die gewünschte Länge ausgezogen werden. Die Rasttaste loslassen, wenn die gewünschte Länge erreicht ist.
Fußbodenbürste (P)
Eignet sich für die Reinigung sowohl größerer Flächen als auch schwer zu erreichender Ecken Zur
Reinigung von Teppichen und glatten Böden ist von der Verwendung der Bürste abzuraten. Zum Einfahren der Bürste, den mit dem Symbol eines Teppichs gekennzeichneten Schalter betätigen .
Um eine bessere Reinigung und Instandhaltung glatter Böden wie PVC, Parkett oder Fliesen zu erzielen, empfi ehlt sich die Verwendung der Bürste. Zum Ausrasten der Bürste, den mit dem Symbol für
glatte Böden gekennzeichneten Schalter (Q) betätigen .
Schlitzdüse mit Bürste (I)
Eignet sich für das Saugen in Gewebefalten, Verbindungsstellen, Ecken oder Nischen, die mit der
Fußbodenbürste nicht erreichbar sind. Dieses Zubehörteil kann auch direkt am Griff (N) angebracht
werden.
18
Page 21

DE
VERWENDUNG DES GERÄTS
Achtung!
Bevor Sie mit dem Saugen beginnen, beseitigen Sie größere oder spitze Gegenstände, um
Schäden am Staubsauger zu vermeiden Vor der Verwendung des Geräts muss zunächst das
Kabel in seiner gesamten Länge ausgerollt und der Stecker in die Steckdose gesteckt werden.
Zum Einschalten des Geräts ist der Ein-/Ausschalter am Staubsauger zu betätigen (ABB. 4).
Wichtig
In manchen Fällen ist beim Einschalten ein Zischen zu hören: das ist keine Funktionsstörung und
gibt sich bei der Verwendung von selbst.
EINSTELLUNG DER SAUGSTÄRKE
Der Sekundär-Luftschlitz (O) am Griff dient zur Regelung der Saugleistung (ABB. 5) Je weiter dieser
Schlitz geöffnet wird, desto geringer wird die Saugleistung und umgekehrt. Zum Öffnen des Schlitzes
muss der zugehörige Hebel nach unten, zum Schließen nach oben gedrückt werden. Die Einstellung
dieses Schlitzes ist von der Art der abzusaugenden Oberfl äche abhängig:
Minimale Saugleistung bei Gardinen und anderen, empfi ndlichen Materialien.
Mittlere Saugleistung bei Kissen, Matratzen, Teppichen.
Maximale Saugleistung bei Fliesen- und Holzböden oder bei anderen robusten, stark verschmutzten
Materialien.
EINSTELLUNG DER MOTORLEISTUNG
Die Saugstärke kann anhand des Schiebers (ABB. 11) eingestellt werden. Es empfi ehlt sich, bei
empfi ndlichem Material eine niedrige Saugstärke einzustellen. Für Matratzen, Polstermöbel und Teppi-
che empfi ehlt sich eine mittlere Saugstärke.
Maximale Saugleistung bei Fliesen- und Holzböden oder bei anderen robusten, stark verschmutzten
Materialien einstellen.
Achtung!
Schalten Sie den Staubsauger sofort aus, wenn die Luftstutzen, die Bürste oder das Teleskoprohr
verstopft ist. Bevor der Staubsauger wieder eingeschaltet wird, muss der Gegenstand beseitigt
werden, der das Verstopfen bewirkt hat.
NACH DEM GEBRAUCH DES STAUBSAUGERS
Wenn der Staubsauger nicht mehr gebraucht wird, schalten Sie ihn durch Betätigen des Pedalschalters
(E) ab, ziehen Sie den Stecker aus der Dose und rollen Sie das Kabel auf, indem Sie das Pedal (C) am
Gerät gedrückt halten. Das Kabel wird dadurch im Inneren des Gehäuses aufgerollt.
Darüber hinaus können der rückseitige (S) und der unterseitige Haken zum Verstauen des Teleskoprohrs und zum Wegräumen des Zubehörteils verwendet werden, um so wenig Platz wie möglich in
Anspruch zu nehmen (ABB. 6).
Achtung!
Begleiten Sie das Kabel während des Aufrollens mit einer Hand, um Verletzungen zu vermeiden,
und achten Sie besonders auf in der Nähe befi ndliche Kinder oder Haustiere.
REINIGUNG UND INSTANDHALTUNG
Achtung!
Begleiten Sie das Kabel während des Aufrollens mit einer Hand, um Verletzungen zu vermeiden,
und achten Sie besonders auf in der Nähe befi ndliche Kinder oder Haustiere.
AUSTAUSCH DES STAUBBEUTELS
Wenn die Kontrolllampe (B) rot leuchtet muss der Staubbeutel gewechselt werden.
• Dazu das Beutelfach herausheben und die Beutelaufnahme nach oben drücken (ABB. 7).
• Den Beutel herausnehmen (ABB. 8), wobei darauf geachtet werden muss, dass er nicht zerrissen
wird. Dazu den starren Kartonteil durch die Führungen schieben und den Beutel dann in den Müll
werfen.
19
Page 22

DE
• Den starren Kartonteil des neuen Beutels in die Führungen einschieben und dann den Behälter wieder in seine Aufnahme zurück drücken.
• Den Deckel des Staubbeutelfachs schließen.
REINIGUNG/AUSTAUSCH DES VORFILTERS DES MOTORS
Der Vorfi lter des Motors sollte in regelmäßigen Abständen gereinigt und je nach Häufi gkeit des Gebrau-
chs alle 6 bis 9 Monate gewechselt werden.
• Die Halterung des Beutels entfernen (ABB. 8).
• Den Filter (ABB. 9) herausnehmen und kräftig schütteln, um ihn zu reinigen. Wenn der Filter stark
verschmutzt ist, kann er mit lauwarmem Seifenwasser gesäubert werden. Dann gründlich nachspülen
und an der Luft trocknen lassen.
Wichtig
NICHT künstlich trocknen. Zum Austausch der Filter setzen Sie sich mit einem Kundendienstzentrum in Verbindung.
• Den Filter wieder in seine Aufnahme einsetzen und dabei darauf achten, dass die raue Seite des
Filters sichtbar ist.
• Abschließend den Staubbeutel wieder einsetzen und vor dem Gebrauch sicher stellen, dass der Filter
richtig angebracht wurde.
REINIGUNG/AUSTAUSCH DES AUSGANGSFILTERS
Der Ausgangsfi lter sollte in regelmäßigen Abständen gereinigt und je nach Häufi gkeit des Gebrauchs
alle 6 bis 9 Monate gewechselt werden.
• Den Deckel des Ausgangsfi lters durch Betätigen des zugehörigen Hebels entfernen (ABB. 10).
• Den Filter herausnehmen und kräftig schütteln, um ihn zu reinigen. Wenn der Filter stark verschmutzt
ist, kann er mit lauwarmem Seifenwasser gesäubert werden. Dann an der Luft trocknen lassen.
Wichtig
NICHT künstlich trocknen. Zum Austausch der Filter setzen Sie sich mit einem Kundendienstzentrum in Verbindung.
• Den Filter wieder in seine Aufnahme einsetzen und dabei darauf achten, dass die raue Seite des
Filters sichtbar ist. Vor Gebrauch sicher stellen, dass der Filterhalter wieder richtig angebracht wurde.
FEHLERSUCHE
THERMOSCHUTZSCHALTER
Dieser Staubsauger ist mit einem Thermoschalter ausgestattet, der den Motor vor Überhitzung schützt.
Wenn der Staubsauger sich plötzlich von selbst abschaltet, gehen Sie wie folgt vor:
• Den Staubsauger abschalten und den Stecker aus der Steckdose ziehen.
• Die Ursache des Heißlaufens feststellen (verstopfter Saugschlauch, verschmutzter Filter usw. )
• Falls notwendig, den Saugschlauch reinigen, den Staubbehälter entleeren und die Filter säubern.
• Etwa 30-40 Minuten abwarten, bis der Motor sich wieder abgekühlt hat.
20
Page 23

ES
A PROPÓSITO DE ESTE MANUAL
Aunque los aparatos hayan sido fabricados bajo las específi cas Normativas europeas vigentes y por lo
tanto están protegidos en todas las partes potencialmente peligrosas, leer con atención estas advertencias y usar el aparato sólo para el uso para el cual se ha destinado para evitar accidentes y daños.
Mantener al alcance de la mano este manual para futuras consultas.
Si se quisiera ceder este aparato a otras personas hay que recordar incluir también estas instrucciones.
Las informaciones recogidas en este manual están marcadas por los siguientes símbolos que indican:
Peligro para los niños
Peligro debido a electricidad
Peligro por daños derivados por otras causas
Atención – daños materiales
USO PREVISTO
Este aparato ha sido creado sólo para un uso privado y por lo tanto se considera inadecuado el uso con
fi nes industriales o profesionales. Cualquier otro empleo de la máquina no está previsto por el Fabricante que no se hace responsable por daños de cualquier naturaleza, generados por un uso incorrecto
de la misma máquina. El uso incorrecto determina además la anulación de cualquier forma de garantía.
ADVERTENCIAS DE SEGURIDAD
LEER ATENTAMENTE LAS INSTRUCCIONES ANTES DEL USO.
• El aparato está destinado sólo a uso doméstico y no se le puede dar un uso comercial o industrial.
• No se asume responsabilidad por uso erróneo o por empleos diferentes de aquellos previstos por el
presente manual.
• Se aconseja conservar el embalaje original, ya que la asistencia gratuita no está prevista para las
averías causadas por embalaje inadecuado del producto en el momento del envío a un Centro de
Asistencia Autorizado.
• El aparato cumple la Directiva 2006/95/CE y al Directiva EMC 2004/108/CE.
PELIGRO PARA LOS NIÑOS
• Este aparato no lo tienen que usar personas (incluidos los niños) con capacidades físicas, sensoriales
o mentales reducidas; por personas que no tengan experiencia y conocimiento del aparato, a no ser
que estén atentamente vigiladas o bien instruidas relativamente al uso del mismo aparato por parte
de una persona responsable de su seguridad.
• Asegurarse de que los niños no jueguen con el aparato.
• Los elementos del embalaje no se tienen que dejar al alcance de los niños ya que son potenciales
fuentes de peligro.
• Si se decidiera eliminar el aparato como un residuo, se aconseja hacerlo inutilizable cortando el cable
de alimentación. Se aconseja además inutilizar aquellas partes del aparato que puedan constituir un
peligro, especialmente para los niños que podrían usar el aparato para jugar.
21
Page 24

ES
PELIGRO DEBIDO A ELECTRICIDAD
• Antes de conectar el aparato a la red de alimentación controlar que la tensión indicada en la placa
situada debajo de la máquina corresponda a aquella de la red local.
• Conectar el aparato exclusivamente a una toma de corriente eléctrica alterna.
• El uso de extensiones eléctricas no autorizadas por el fabricante del aparato puede provocar daños
y accidentes.
• Si el cable de alimentación estuviera dañado, se tiene que sustituir por el fabricante o por el servicio
de Asistencia Técnica o de todas formas por una persona con cualifi cación similar, para prevenir
cualquier riesgo.
• No aspirar nunca en superfi cies mojadas: ¡puede producirse un cortocircuito!
• No aspirar nunca líquidos.
• No tocar el aparato con manos y pies mojados o húmedos.
• No usar el aparato con los pies descalzos.
• Quitar el enchufe de la toma antes de cada intervención de limpieza o de mantenimiento.
• NO SUMERGIR EL APARATO EN EL AGUA U OTROS LÍQUIDOS.
• Asegurarse de que el cable no entre en contacto con superfi cies calientes o cortantes.
• Desconectar el cable de alimentación de la toma de corriente después de cada uso.
• En caso de averías, defectos o potencial defecto después de una caída, desenchufar enseguida de la
toma de corriente. No poner nunca en funcionamiento el aparato defectuoso. LAS REPARACIONES
SE PUEDEN EFECTUAR EXCLUSIVAMENTE POR CENTROS DE ASISTENCIA AUTORIZADOS.
PELIGRO DE DAÑOS DERIVADOS DE OTRAS CAUSAS
• No aspirar ceniza caliente, trozos grandes de cristal, escombros, objetos puntiagudos o cortantes y
líquidos.
• Para evitar sobrecalentamientos peligrosos se recomienda desenrollar completamente el cable de
alimentación y desconectar el enchufe de la red de alimentación eléctrica cuando el aparato no se
utiliza.
• El aparato no se tiene que usar sin la bolsa, sin el fi ltro del motor, o bien si la bolsa o el fi ltro están
rotos o dañados.
• No dejar expuesto el aparato a los agentes atmosféricos (lluvia, sol, etc.).
• No dejar el aparato cerca de fuentes de calor (ej. radiador)
• Desconectar siempre el enchufe antes de efectuar la limpieza del aparato o el cambio de los fi ltros.
ATENCIÓN- DAÑOS MATERIALES.
• No desconectar nunca el enchufe de la toma de corriente estirando el cable de alimentación.
• No poner nunca en funcionamiento el aparato defectuoso
• Poner siempre en marcha el aparato con el regulador de potencia en la posición de mínimo.
• El producto no hay que alimentarlo a través de temporizadores externos o con sistemas separados
controlados a distancia.
• Una vez guardado el aparato, asegurarse de que no entre en contacto con superfi cies calientes y
cortantes.
• CONSERVAR SIEMPRE ESTAS INSTRUCCIONES.
22
Page 25

ES
DESCRIPCIÓN DEL APARATO
A) Palanca de abertura compartimento de la bolsa para el polvo
B) Luz indicadora de bolsa llena
C) Pulsador para enrollar el cable
D) Mango para el transporte
E) Pulsador de encendido On/Off
F) Compartimento para la bolsa del polvo
G) Bolsa de papel
H) Tubo fl exible
I) Accesorio para ranuras con cepillo
L) Tubo telescópico
M) Pulsadores de desbloqueo del tubo fl exible
N) Mango
O) Control de aspiración regulador de succión
P) Cepillo para pavimentos
Q) Selector para pavimentos duros/alfombras
R) Compartimento fi ltro de evacuación
S) Gancho trasero de empalme tubo telescópico
T) Alojamiento para accesorios de aspiración
U) Regulador de la potencia de aspiración
V) Gancho inferior de empalme del tubo telescópico
X) Palanca abertura compartimento fi ltro
Y) Cable eléctrico extraíble
INSTRUCCIONES DE USO
CON EL PRIMER EMPLEO:
ENSAMBLAJE DE LA ASPIRADORA
Introducir el tubo fl exible en el alojamiento de aspiración apretando con cuidado hasta que se bloquee.
Para quitarlo hay que apretar contemporáneamente los dos pulsadores de desbloqueo (M) y extraerlo
(FIG. 2).
¡Atención!
Antes de montar o desmontar los accesorios, asegurarse siempre de haber desconectado el
enchufe de la aspiradora de la toma.
ACCESORIOS
Tubo extensible (L)
Acoplar el tubo extensible al mango e instalar sucesivamente el accesorio aspirador para ranuras con
cepillo (I). Una vez acoplado el accesorio, se puede alargar el tubo extensible con la correspondiente
palanca a disparo (FIG. 3) hasta la longitud deseada. Soltar la palanca para fi jar la longitud deseada.
Cepillo para pavimentos (P)
Adecuado para la limpieza ya sea de zonas amplias que rincones difíciles de alcanzar. Para limpiar las
alfombras y los suelos duros se aconseja no usar el cepillo. Para elevar el cepillo apretar la palanca del
interruptor marcada con el símbolo de la alfombra .
Para una mejor limpieza y conservación de los suelos, como el PVC, el parqué o las baldosas, es preferible usar el cepillo. Para extraer el cepillo hay que apretar la palanca del selector (Q) marcada con el
símbolo suelos lisos .
Aspirador para ranuras con cepillo (I)
Adecuado para aspirar entre los pliegues de los tejidos, juntas, rincones o concavidades que no se
pueden alcanzar con la aspiradora para suelos. Este accesorio se puede aplicar también directamente
al mango (N).
23
Page 26

ES
USO DEL APARATO
¡Atención!
Antes de usar la aspiradora, eliminar los objetos grandes o puntiagudos del suelo, para evitar
cualquier posible daño a la aspiradora. Antes de usar este aparato antes que nada extraer el
cable completamente y conectar el enchufe. Para encender el aparato apretar el interruptor On/
Off en la aspiradora (FIG. 4).
Importante
En algún caso cuando se enciende se puede oír un silbido: no se trata de un defecto y usándola
desaparecerá.
CONTROL FLUJO DE ASPIRACIÓN
La ranura del aire secundaria (O) se encuentra en el mango y si se usa para regular la fuerza de aspiración (FIG. 5). Mayor es la abertura de la ranura, menor es la fuerza de aspiración y viceversa. Para
abrir la ranura, hay que presionar la palanca hacia bajo, para cerrarla hacia arriba. La regulación de la
ranura es funcional al tipo de superfi cie:
Fuerza mínima para cortinas y materiales delicados.
Fuerza media para almohadones, colchones, alfombras.
Fuerza máxima para suelos de baldosas, madera u otro material robusto muy sucio.
CONTROL POTENCIA MOTOR
Se puede regular la potencia de aspiración utilizando el cursor corredizo (FIG. 11). Se aconseja usar
una potencia mínima para los materiales delicados. Seleccionar, por lo tanto, una potencia media para
colchones, muebles revestidos con tapicería y alfombras.
Seleccionar una potencia máxima para suelos de baldosas, madera u otro material robusto.
¡Atención!
Apagar inmediatamente la aspiradora si las boquillas del aire, los cepillos o el tubo extensible
estuvieran obturados. Antes de encender de nuevo la aspiradora eliminar aquello que ha causado la obturación.
DESPUÉS DE HABER USADO LA ASPIRADORA
Cuando se termina de usar hay que apagar el aparato apretando el pulsador de encendido (E), desconectar el enchufe de la toma y rebobinar el cable manteniendo apretado el pulsador de rebobinado (C)
del aparato. El cable se rebobinará dentro del contenedor.
Se puede además utilizar el gancho trasero (S) e inferior (V) para poder introducir el tubo extensible y
guardar el aparato junto a su accesorio de manera que ocupe el mínimo espacio posible (FIG. 6).
¡Atención!
Durante el rebobinado, orientar el cable con una mano para evitar herirse y poner mucha atención en presencia de niños o animales domésticos.
LIMPIEZA Y MANTENIMIENTO
¡Atención!
Antes de efectuar cualquier operación de limpieza y mantenimiento, apagar el aparato y desconectar el enchufe de alimentación de la toma de corriente.
SUSTITUCIÓN DE LA BOLSA PARA EL POLVO
Cuando la luz indicadora de bolsa llena (B) se pone roja, la bolsa se tiene que cambiar.
• Levantar el compartimento de la bolsa empujando hacia arriba el correspondiente alojamiento para
las bolsas (FIG. 7).
• Extraer el soporte de la bolsa (FIG. 8), prestando atención a no forzarlo, una vez extraído el soporte,
deslizar la parte de cartón rígida de la bolsa en las correspondientes guías y tirarlo al cubo de la
basura.
24
Page 27

ES
• Poner una nueva bolsa deslizándola con la parte de cartón rígida en las correspondientes guías,
poner el soporte en el alojamiento interno.
• Cerrar la tapa del compartimento del polvo.
LIMPIEZA/SUSTITUCIÓN DEL FILTRO PRE-MOTOR
El fi ltro pre-motor se tendría que limpiar regularmente y sustituir cada 6, 9 meses según el uso.
• Quitar el soporte de la bolsa (FIG. 8).
• Quitar el fi ltro (FIG.9) y sacudirlo con vigor para limpiarlo. Si está muy sucio, lavarlo con agua tibia
enjabonada, enjuagarlo bien y secarlo naturalmente.
Importante
NO secarlo artifi cialmente. Para la sustitución de los fi ltros, ponerse en contacto con un Centro
de Asistencia.
• Volver a colocar el fi ltro en su lugar asegurándose de que la superfi cie rugosa del fi ltro sea visible.
• Para acabar, volver a colocar la bolsa para el polvo y asegurarse de que el compartimento fi ltro esté
bien colocado antes del uso.
LIMPIEZA/SUSTITUCIÓN DEL FILTRO DE SALIDA
El fi ltro de salida se tendría que limpiar regularmente y sustituir cada 6, 9 meses, según el uso.
• Quitar la tapa del fi ltro de evacuación mediante la correspondiente palanca (FIG. 10).
• Extraer el fi ltro levantándolo y agitarlo vigorosamente para limpiarlo. Si el fi ltro está muy sucio lavarlo
con agua tibia enjabonada y dejarlo secar naturalmente.
Importante
NO secarlo artifi cialmente. Para la sustitución de los fi ltros, ponerse en contacto con un Centro
de Asistencia.
• Volver a colocar el fi ltro en su lugar y cerrar la puertecilla, asegurándose antes de que la superfi cie
rugosa del fi ltro sea visible y que el porta-fi ltro esté bien colocado antes del uso.
LOCALIZACIÓN AVERÍAS
BLOQUEO TÉRMICO
La aspiradora cuenta con un dispositivo de bloqueo térmico que lo protege en caso de sobrecalentamiento del motor. Si la aspiradora se detiene repentinamente, seguir este procedimiento:
• Apagar la aspiradora y desconectar el enchufe de la toma.
• Localizar el origen del sobrecalentamiento (tubo de aspiración obturado, fi ltro sucio, etc.)
• Limpiar el tubo, vaciar el recipiente del polvo y limpiar los fi ltros si es necesario.
• Esperar aproximadamente 30-40 minutos para que el motor se enfríe.
• Después de 30-40 minutos, conectar el enchufe en la toma y encender la aspiradora. La aspiradora
ahora tendría que funcionar.
• Si no funciona todavía, esperar otros 20 minutos y después probar de nuevo.
• Si continua sin funcionar, ponerse en contacto con un Centro de Asistencia.
25
Page 28

PT
A PROPÓSITO DESTE MANUAL
Embora os aparelhos tenham sido fabricados em conformidade com os requisitos das normas europeias vigentes, estando portanto protegidos em todas as partes potencialmente perigosas, é preciso ler
com atenção as advertências descritas neste manual e utilizar o aparelho somente para a fi nalidade
para a qual foi concebido a fi m de evitar acidentes e danos. Tenha sempre à mão este manual de modo
a poder consultá-lo sempre que precisar.
No caso de oferecer ou vender este aparelho a uma outra pessoa, não se esqueça de entregar o presente manual de instruções.
As informações reportadas neste manual estão marcadas pelos seguintes símbolos, que indicam:
Perigo para as crianças
Perigo elétrico
Perigo de lesões ou danos derivados de outras causas
Atenção - danos materiais
UTILIZAÇÃO PREVISTA
Este aparelho foi concebido exclusivamente para a utilização doméstica, sendo inadequado para fi -
nalidades industriais ou profi ssionais. O Fabricante declina toda e qualquer responsabilidade no caso
de utilização não prevista e não conforme do aparelho. A utilização imprópria do aparelho determina
inclusive a perda do direito à garantia.
ADVERTÊNCIAS SOBRE A SEGURANÇA
LEIA ATENTAMENTE AS INSTRUÇÕES ANTES DE UTILIZAR O APARELHO.
• Aparelho destina-se exclusivamente à utilização doméstica e não deve ser utilizado para fi ns co-
merciais ou industriais.
• Fabricante declina toda e qualquer responsabilidade no caso de utilização do aparelho incorreta,
imprópria ou diferente das previstas e descritas no presente manual.
• Aconselhamos que guarde a embalagem original uma vez que a assistência gratuita não está prevista
para danos causados por embalagens inadequadas ao enviar ou levar o aparelho a um Centro de
Assistência autorizado.
• Aparelho está em conformidade com a Diretiva 2006/95/CE (Aparelhos de Baixa Tensão) e a Diretiva
EMC 2004/108/CE (Compatibilidade Eletromagnética).
PERIGO PARA AS CRIANÇAS
• Este aparelho não deve ser utilizado por pessoas (incluindo as crianças) com capacidades físicas,
sensoriais ou mentais reduzidas; por pessoas sem experiência ou sem conhecimento sobre o modo
de utilização do aparelho, a não ser que sejam atentamente vigiadas ou bem instruídas sobre a utilização do aparelho por parte de um responsável pela sua segurança.
• Não deixe as crianças brincarem com o aparelho.
• Os componentes da embalagem não devem ser deixados ao alcance das crianças porque são potenciais fontes de perigo.
• Quando decidir eliminar o aparelho no seu fi m de vida útil, corte o cabo de alimentação de modo a
torná-lo inoperante. Recomendamos ainda que torne inócuas as partes do aparelho que constituem
fonte de perigo, sobretudo para as crianças que poderiam utilizá-las como brinquedo.
26
Page 29

PT
PERIGO ELÉTRICO
• Antes de ligar o aparelho à rede de alimentação elétrica, verifi que se a tensão indicada na placa posta
debaixo do aparelho corresponde à da rede local.
• Ligue o aparelho exclusivamente a uma tomada de corrente elétrica alternada.
• A utilização de extensões elétricas não autorizadas pelo Fabricante do aparelho pode provocar danos
e acidentes.
• Se o cabo de alimentação estiver danifi cado, deverá ser substituído pelo Fabricante ou pelo seu
serviço de Assistência Técnica ou então por uma pessoa com qualifi cação semelhante de modo a
prevenir qualquer risco.
• Não aspire superfícies molhadas: pode dar origem a um curto-circuito!
• Não aspire líquidos.
• Não toque no aparelho com as mãos ou os pés molhados ou húmidos.
• Não utilize o aparelho com os pés descalços.
• Retire a fi cha da tomada antes de iniciar uma operação de limpeza ou de manutenção.
• NÃO MERGULHE O APARELHO EM ÁGUA OU EM QUALQUER OUTRO LÍQUIDO.
• Assegure-se de que o cabo elétrico não entre em contato com alguma superfície quente ou cortante.
• Desligue o cabo de alimentação da tomada de corrente no fi m de cada utilização.
• Em caso de mau funcionamento, avaria, defeito ou suspeita de defeito após uma queda do aparelho, retire imediatamente a fi cha da tomada de corrente. Nunca coloque o aparelho para funcionar
se apresentar algum defeito. AS REPARAÇÕES SÓ PODEM SER FEITAS PELOS CENTROS DE
ASSISTÊNCIA AUTORIZADOS.
PERIGO DE LESÕES E DANOS DERIVADOS DE OUTRAS CAUSAS
• Não aspire cinzas quentes, cacos de vidro grandes, entulhos, objetos pontiagudos ou cortantes e
líquidos.
• Para evitar sobreaquecimentos perigosos, recomenda-se desenrolar completamente o cabo de alimentação antes da utilização e retirar a fi cha da tomada quando o aparelho não é utilizado.
• O aparelho não deve ser utilizado sem saco ou sem fi ltro ou com saco ou fi ltro danifi cados.
• Não deixe o aparelho exposto aos agentes atmosféricos (chuva, sol, etc...).
• Não deixe o aparelho nas proximidades de fontes de calor (ex. radiador)
• Retire sempre a fi cha da tomada antes de iniciar a limpeza do aparelho ou a troca dos fi ltros.
ATENÇÃO - DANOS MATERIAIS
• Não retire a fi cha da tomada puxando o cabo de alimentação.
• Não coloque o aparelho para funcionar se apresentar algum defeito.
• Ligue o aparelho com o regulador de potência no mínimo.
• O aparelho não deve ser alimentado com temporizador externo ou com sistemas separados controlados à distância.
• Guarde o aparelho longe de fontes de calor ou de superfícies quentes ou cortantes.
• GUARDE ESTAS INSTRUÇÕES.
27
Page 30

PT
DESCRIÇÃO DO APARELHO
A) Alavanca de abertura do compartimento do saco de pó
B) Luz indicadora de saco cheio
C) Botão de enrolamento do cabo
D) Pega de transporte
E) Botão de ligar/desligar (On/Off)
F) Compartimento do saco de pó
G) Saco de papel
H) Tubo fl exível ou mangueira de aspiração
I) Bocal de fendas com escova
L) Tubo telescópico
M) Botões de desbloqueio do tubo fl exível
N) Pega
O) Regulador do fl uxo de ar
P) Bocal de pavimentos/alcatifas
Q) Seletor pavimento liso/alcatifa
R) Compartimento do fi ltro de descarga
S) Gancho traseiro de engate do tubo telescópico
T) Vão para o acessório de aspiração
U) Regulador da potência de aspiração
V) Gancho inferior de engate do tubo telescópico
X) Alavanca de abertura do compartimento do fi ltro
Y) Cabo elétrico extraível
INSTRUÇÕES DE UTILIZAÇÃO
PRIMEIRA UTILIZAÇÃO:
MONTAGEM DO ASPIRADOR
Encaixe o tubo fl exível (mangueira) de aspiração no corpo do aparelho. Para desencaixá-lo, pressione
ao mesmo tempo os dois botões de desbloqueio (M) e puxe-o (FIG. 2).
Atenção !
Antes de montar ou desmontar os acessórios, verifi que se a fi cha está desligada da tomada.
ACESSÓRIOS
Tubo telescópico (L)
Encaixe o tubo telescópico na pega e monte o acessório de aspiração desejado. Depois de ter montado
o acessório, é possível prolongar o tubo telescópico pressionando a respectiva alavanca (FIG. 3) até
obter o comprimento desejado. Solte a alavanca para fi xar o comprimento desejado.
Bocal de pavimentos/alcatifas (P)
Indicado para aspirar tanto zonas amplas como cantos de difícil acesso.
Para aspirar alcatifas, tapetes e pavimentos duros ou resistentes, aconselha-se não utilizar a escova.
Para recolher a escova, carregue no seletor (Q) sobre o símbolo do tapete .
Para uma melhor limpeza e conservação dos pavimentos lisos e delicados, como PVC, parquet ou
tijoleiras, utilize de preferência a escova para não riscá-los. Para extrair a escova, carregue no seletor
(Q) sobre o símbolo de pavimento liso .
Bocal de fendas com escova (I)
Indicado para aspirar zonas estreitas, cantos, juntas, ranhuras e reentrâncias que não se consegue
aspirar com o bocal de pavimentos. O bocal de fendas pode ser encaixado diretamente na pega (N).
28
Page 31

PT
UTILIZAÇÃO DO APARELHO
Atenção !
Antes de utilizar o aspirador, remova os objetos grandes ou pontiagudos da superfície a aspirar
de maneira a evitar qualquer tipo de dano no aparelho. Antes de utilizar o aspirador, puxe todo
o comprimento do cabo e insira a fi cha na tomada. Para ligar o aspirador, pressione o botão On/
Off (FIG. 4).
Importante
Pode acontecer que ao ligar, o aspirador emita um assobio: não é um defeito e o ruído desaparecerá com a utilização.
REGULAÇÃO DO FLUXO DE AR
A fenda de saída do ar secundária (O) encontra-se na pega e é utilizada para regular manualmente a
força de aspiração (FIG. 5). Quanto mais aberta, menor a força de aspiração e vice-versa. Para abrir a
fenda, carregue na alavanca para baixo; para fechar, carregue na alavanca para cima. A regulação do
fl uxo de ar ou da força de aspiração depende do tipo de superfície:
Força mínima (fenda completamente aberta) para cortinados e materiais delicados.
Força média (fenda aberta pela metade) para almofadas, colchões e tapetes.
Força máxima (fenda completamente fechada) para pavimentos de tijoleira, madeira ou outro material
resistente muito sujo.
REGULAÇÃO DA POTÊNCIA DO MOTOR
É possível regular a potência de aspiração pelo cursor deslizante (FIG. 11). A potência mínima é indicada para os materiais delicados. A potência média é indicada para colchões, tapetes e estofados. A
potência máxima é indicada para pavimentos duros ou outro material resistente.
Atenção !
Desligue imediatamente o aspirador no caso de obstrução nos bocais de aspiração ou nos tubos.
Antes de voltar a ligar o aspirador, remova a causa da obstrução.
NO FIM DE CADA UTILIZAÇÃO
Depois de ter terminado de utilizar o aspirador, desligue o aparelho pelo botão de ligar/desligar (E),
retire a fi cha da tomada e carregue no botão de enrolamento do cabo (C). O cabo é recolhido automa-
ticamente e enrolado no interior do aparelho.
É possível ainda utilizar o gancho traseiro (S) e inferior (V) para poder encaixar o tubo telescópico e
arrumar o aparelho juntamente com o acessório de modo a ocupar o mínimo espaço possível (FIG. 6).
Atenção !
Durante a recolha do cabo, acompanhe o cabo com uma mão a fi m de evitar ferimentos e preste
muita atenção sobretudo na presença de crianças ou animais domésticos.
LIMPEZA E MANUTENÇÃO
Atenção !
Antes de efetuar qualquer operação de limpeza e manutenção, desligue o aparelho e retire a
fi cha da tomada.
SUBSTITUIÇÃO DO SACO DE PÓ
Quando a luz indicadora de saco cheio (B) estiver vermelha, o saco precisa de ser trocado.
• Abra o compartimento do saco (FIG. 7).
• Extraia o suporte do saco (FIG. 8) sem forçar e puxe a parte rígida do cartão deslizando-a pelas guias
de suporte apropriadas: deite o saco no lixo.
• Monte o novo saco inserindo a parte rígida de cartão nas guias de suporte apropriadas e reponha o
suporte do saco no seu alojamento.
• Feche o compartimento do saco de pó.
29
Page 32

PT
LIMPEZA/SUBSTITUIÇÃO DO FILTRO PRÉ-MOTOR
Convém limpar o fi ltro pré-motor regularmente e substitui-lo a cada 6, 9 meses dependendo da frequên-
cia de utilização.
• Extraia o suporte do saco de pó (FIG. 8).
• Retire o fi ltro (FIG.9) e sacuda-o com força para limpá-lo. Se estiver muito sujo, lave-o com água
morna e sabão, enxágue bem e deixe-o secar naturalmente.
Importante
NÃO seque o fi ltro com secador. Para a substituição dos fi ltros, dirija-se a um Centro de Assi-
stência.
• Reponha o fi ltro no seu alojamento, com a parte áspera visível.
• Por fi m, reponha o suporte do saco de pó e feche bem o compartimento.
LIMPEZA/SUBSTITUIÇÃO DO FILTRO DE SAÍDA
Convém limpar o fi ltro de saída regularmente e substitui-lo a cada 6, 9 meses dependendo da frequên-
cia de utilização.
• Abra a tampa do fi ltro de descarga agindo na alavanca (FIG. 10).
• Retire o fi ltro e sacuda-o com força para limpá-lo. Se estiver muito sujo, lave-o com água morna e
sabão, enxágue bem e deixe-o secar naturalmente.
Importante
NÃO seque o fi ltro com secador. Para a substituição dos fi ltros, dirija-se a um Centro de Assi-
stência.
• Reponha o fi ltro no seu alojamento e feche a tampa, verifi cando antes se a superfície áspera está
visível e se o porta-fi ltro está bem colocado.
PROBLEMAS E SOLUÇÕES
BLOQUEIO TÉRMICO
Aspirador está equipado com um dispositivo de bloqueio térmico de proteção no caso de sobreaquecimento do motor. Se o aspirador parar de funcionar de repente, siga o seguinte procedimento:
• Desligue o aspirador e retire a fi cha da tomada.
• Procure saber a origem do sobreaquecimento (tubo de aspiração obstruído, fi ltro sujo, etc..)
• Limpe o tubo, esvazie ou troque o saco de pó e limpe os fi ltros, se necessário.
• Espere cerca de 30-40 minutos para o motor arrefecer.
• Após 30-40 minutos, insira a fi cha na tomada e ligue o aspirador. O aspirador deveria voltar a fun-
cionar.
• Se não funcionar, espere mais 20 minutos e tente novamente.
• Se o problema continuar, dirija-se a um Centro de Assistência.
30
Page 33

EL
ΣΧΕΤΙΚΑ ΜΕ ΤΟ ΠΑΡΟΝ ΕΓΧΕΙΡΙΔΙΟ
Μολονότι οι συσκευές είναι κατασκευασμένες σύμφωνα με τις συγκεκριμένες ισχύουσες Ευρωπαϊκές
Οδηγίες και ως εκ τούτου είναι προστατευμένα όλα τα εν δυνάμει επικίνδυνα μέρη τους, διαβάστε
με προσοχή αυτές τις προειδοποιήσεις και χρησιμοποιείτε τη συσκευή μόνο για τη χρήση την οποία
προορίζεται προς αποφυγήν ατυχημάτων και βλαβών. Έχετε πάντα διαθέσιμο το
μελλοντικές χρήσεις.
Στην περίπτωση που παραχωρήσετε την παρούσα συσκευή σε άλλα πρόσωπα, θυμηθείτε να
εσωκλείσετε και τις παρούσες οδηγίες.
Οι πληροφορίες που αναφέρονται στο παρόν εγχειρίδιο είναι σημειωμένες με τα ακόλουθα σύμβολα
που δείχνουν:
Κίνδυνος για τα παιδιά
Κίνδυνος οφειλόμενος στον ηλεκτρισμό
Κίνδυνος βλαβών που απορρέει από άλλες αιτίες
Προσοχή – υλικές βλάβες
ΠΡΟΒΛΕΠΟΜΕΝΗ ΧΡΗΣΗ
Η παρούσα συσκευή έχει επινοηθεί αποκλειστικά για ιδιωτική χρήση και κατά συνέπεια είναι ακατάλληλη
η χρήση για βιομηχανικούς ή επαγγελματικούς σκοπούς. Οποιαδήποτε άλλη χρήση της μηχανής δεν
προβλέπεται από τον Κατασκευαστή και αποποιείται κάθε ευθύνης για βλάβες οποιασδήποτε φύσης,
που προξενήθηκαν από ακατάλληλη χρήση της ίδιας της συσκευής. Η ακατάλληλη χρήση, προκαλεί εξ
άλλου την ακύρωση κάθε είδους εγγύησης.
ΠΡΟΕΙΔΟΠΟΙΗΣΕΙΣ ΑΣΦΑΛΕΙΑΣ
ΔΙΑΒΑΣΤΕ ΠΡΟΣΕΚΤΙΚΑ ΤΙΣ ΟΔΗΓΙΕΣ ΠΡΙΝ ΤΗ ΧΡΗΣΗ.
παρόν εγχειρίδιο για
• Η συσκευή προορίζεται για αποκλειστική οικιακή χρήση και δεν πρέπει να χρησιμοποιείται για
εμπορική ή βιομηχανική χρήση.
• Δεν αναλαμβάνονται ευθύνες για λανθασμένη χρήση ή για διαφορετικές χρήσεις από αυτές που
προβλέπονται στο παρόν εγχειρίδιο.
• Συνιστάται η φύλαξη των αυθεντικών συσκευασιών, γιατί δεν προβλέπεται δωρεάν τεχνική υποστήριξη
για βλάβες που προκλήθησαν από μη κατάλληλη συσκευασία του προϊόντος τη στιγμή της αποστολής
σε ένα Εξουσιοδοτημένο Τεχνικό Κέντρο.
• Η συσκευή είναι σύμφωνη με την Οδηγία 2006/95/ΕΚ και την Οδηγία EMC 2004/108/EΚ.
ΚΙΝΔΥΝΟΣ ΓΙΑ ΤΑ ΠΑΙΔΙΑ
• Αυτή η συσκευή δεν πρέπει να χρησιμοποιείται από άτομα (συμπεριλαμβανομένων των παιδιών) με
μειωμένες φυσικές, αισθητήριες ή νοητικές ικανότητες. Από άτομα που δεν έχουν εμπειρία και γνώση
της συσκευής, εκτός κι αν επιβλέπονται προσεκτικά ή τους έχουν δοθεί οδηγίες σχετικά με τη χρήση
της συσκευής από ένα άτομο υπεύθυνο για την ασφάλειά τους.
• Βεβαιωθείτε ότι τα παιδιά δεν παίζουν με τη συσκευή.
• Τα μέρη της συσκευασίας δεν πρέπει να αφήνονται στην πρόσβαση των παιδιών καθ’ όσον αποτελούν
πιθανές πηγές κινδύνου.
• Όταν αποφασίσετε να αποσύρετε ως απόρριμμα το προϊόν, συνιστάται να το καταστήστε αδρανές,
κόβοντας το καλώδιο τροφοδοσίας. Συνιστάται επίσης να καταστήσετε αβλαβή εκείνα τα μέρη της
συσκευής που είναι επιδεκτικά να αποτελέσουν κίνδυνο, ειδικά για τα παιδιά που θα μπορούσαν να
χρησιμοποιήσουν την συσκευή στα παιγνίδια τους.
31
Page 34

EL
ΚΙΝΔΥΝΟΣ ΟΦΕΙΛΟΜΕΝΟΣ ΣΤΟΝ ΗΛΕΚΤΡΙΣΜΟ
• Πριν συνδέσετε τη συσκευή στο δίκτυο τροφοδοσίας, ελέγξτε ότι η αναγραφόμενη τάση στην πινακίδα
που βρίσκεται κάτω από τη μηχανή, αντιστοιχεί σε εκείνη του τοπικού δικτύου.
• Συνδέστε τη συσκευή αποκλειστικά σε μια πρίζα εναλλασσομένου ρεύματος.
• Η χρήση μη εξουσιοδοτημένων από τον κατασκευαστή της συσκευής ηλεκτρικών προεκτάσεων
μπορεί να προκαλέσει ζημιές και ατυχήματα.
• Εάν το καλώδιο τροφοδοσίας έχει υποστεί ζημιά, πρέπει να αντικατασταθεί από τον κατασκευαστή ή
από την υπηρεσία τεχνικής εξυπηρέτησης ή εν τέλει από εξειδικευμένο άτομο κατά τρόπον ώστε να
αποφευχθεί κάθε κίνδυνος.
• Μην απορροφάτε ποτέ σε υγρές επιφάνειες. Μπορεί να προκληθεί βραχυκύκλωμα.
• Μην απορροφάτε ποτέ υγρά.
• Μην αγγίζετε τη συσκευή με βρεγμένα ή υγρά πόδια και χέρια.
• Μη χρησιμοποιείτε τη συσκευή ξυπόλητοι.
• Αποσυνδέετε πάντα το ρευματολήπτη από την πρίζα πριν τον καθαρισμό της συσκευής ή τη
συντήρηση.
• ΜΗ ΒΥΘΙΖΕΤΕ ΤΗ ΣΥΣΚΕΥΗ ΣΕ ΝΕΡΟ Ή ΑΛΛΑ ΥΓΡΑ.
• Βεβαιωθείτε ότι το καλώδιο δεν βρίσκεται σε επαφή με θερμές ή αιχμηρές επιφάνειες.
• Αποσυνδέστε το καλώδιο τροφοδοσίας από την πρίζα του ρεύματος μετά από κάθε χρήση.
• Σε περίπτωση βλαβών, ελαττωμάτων ή υποψιών βλαβών μετά από πτώση, αποσυνδέστε αμέσως
το ρευματολήπτη από την πρίζα του ρεύματος. Μη θέτετε ποτέ σε λειτουργία μια ελαττωματική
συσκευή. ΟΙ ΕΠΙΣΚΕΥΕΣ ΜΠΟΡΟΥΝ ΝΑ ΠΡΑΓΜΑΤΟΠΟΙΗΘΟΥΝ ΑΠΟΚΛΕΙΣΤΙΚΑ ΑΠΟ ΤΑ
ΕΞΟΥΣΙΟΔΟΤΗΜΕΝΑ ΤΕΧΝΙΚΑ ΚΕΝΤΡΑ.
ΚΙΝΔΥΝΟΣ ΒΛΑΒΩΝ ΠΟΥ ΑΠΟΡΡΕΕΙ ΑΠΟ ΑΛΛΕΣ ΑΙΤΙΕΣ
• Μην απορροφάτε ζεστές στάχτες, μεγάλα κομμάτια γυαλιών, μπάζα, αιχμηρά και κοφτερά αντικείμενα
και υγρά.
• Προς αποφυγήν επικίνδυνων υπερθερμάνσεων συνιστάται το πλήρες ξεδίπλωμα όλου του μήκους του
καλωδίου τροφοδοσίας και η αποσύνδεση του ρευματολήπτη από το ηλεκτρικό δίκτυο τροφοδοσίας
όταν δεν χρησιμοποιείτε τη συσκευή.
• Η συσκευή δεν πρέπει να χρησιμοποιείται χωρίς σακούλα, χωρίς φίλτρο μοτέρ, ή εάν η σακούλα ή το
φίλτρο είναι σχισμένα ή έχουν υποστεί βλάβη.
• Μην αφήνετε εκτεθειμένη τη συσκευή στους ατμοσφαιρικούς παράγοντες (βροχή, ήλιο κλπ).
• Μην τοποθετείτε τη συσκευή κοντά σε πηγές θερμότητας (πχ καλοριφέρ).
• Αποσυνδέετε πάντα το ρευματολήπτη πριν πραγματοποιήσετε τον καθαρισμό της συσκευής ή την
αλλαγή των φίλτρων
ΠΡΟΕΙΔΟΠΟΙΗΣΗ ΣΧΕΤΙΚΑ ΜΕ ΕΓΚΑΥΜΑΤΑ
• Μην τραβάτε ποτέ το καλώδιο τροφοδοσίας για να το αποσυνδέσετε από την πρίζα του ρεύματος.
• Μη θέτετε ποτέ σε λειτουργία μια ελαττωματική συσκευή.
• Θέτετε πάντα σε εκκίνηση τη συσκευή με το ρυθμιστή ισχύος στο ελάχιστο.
• Το προϊόν δεν πρέπει να τροφοδοτείται μέσω εξωτερικών χρονοδιακοπτών ή με χωριστά συστήματα
τηλεχειρισμού.
• Αφού φυλάξετε τη συσκευή, βεβαιωθείτε ότι δεν βρίσκεται σε επαφή με θερμές και κοφτερές επιφάνειες.
• ΦΥΛΑΞΤΕ ΠΑΝΤΑ ΤΙΣ ΠΑΡΟΥΣΕΣ ΟΔΗΓΙΕΣ.
32
Page 35

ΠΕΡΙΓΡΑΦΗ ΤΗΣ ΣΥΣΚΕΥΗΣ
A) Μοχλός ανοίγματος διαμερίσματος σάκου σκόνης
B) Ενδεικτική λυχνία γεμάτου σάκου
C) Πλήκτρο τυλίγματος καλωδίου
D) Χειρολαβή μεταφοράς
E) Πλήκτρο λειτουργίας On/Off
F) Διαμέρισμα σάκου σκόνης
G) Χάρτινος σάκος
H) Εύκαμπτος σωλήνας
I) Εξάρτημα για σχισμές με βουρτσάκι
L) Τηλεσκοπικός σωλήνας
M) Πλήκτρα απεμπλοκής εύκαμπτου σωλήνα
N) Χειρολαβή
O)Έλεγχος απορρόφησης ρυθμιστής αναρρόφησης
P) Βούρτσα δαπέδων
Q) Επιλογέας σκληρών δαπέδων/χαλιών
R) Διαμέρισμα φίλτρου εκκένωσης
S) Οπίσθιο άγκιστρο στερέωσης τηλεσκοπικού σωλήνα
T) Χώρος για εξάρτημα απορρόφησης
U) Ρυθμιστής ισχύος απορρόφησης
V) Κάτω άγκιστρο στερέωσης τηλεσκοπικού σωλήνα
X) Μοχλός ανοίγματος διαμερίσματος φίλτρου
Y) Αυτόματο τύλιγμα ηλεκτρικού καλωδίου
ΟΔΗΓΙΕΣ ΧΡΗΣΗΣ
EL
ΚΑΤΑ ΤΗΝ ΠΡΩΤΗ ΧΡΗΣΗ:
ΣΥΝΑΡΜΟΛΟΓΗΣΗ ΤΗΣ ΗΛΕΚΤΡΙΚΗΣ ΣΚΟΥΠΑΣ
Βάλτε τον εύκαμπτο σωλήνα στη θέση απορρόφησης πιέζοντάς τον προσεκτικά μέχρι το μπλοκάρισμα.
Για να τον αφαιρέσετε πρέπει να πιέσετε ταυτόχρονα τα δύο πλήκτρα απεμπλοκής (Μ) και να τον
βγάλετε (ΕΙΚ. 2).
Προσοχή!
Πριν τοποθετήσετε ή αφαιρέσετε τα εξαρτήματα, βεβαιωθείτε πάντα ότι έχετε αποσυνδέσει το
ρευματολήπτη της ηλεκτρικής σκούπας από την πρίζα.
ΕΞΑΡΤΗΜΑΤΑ
Τηλεσκοπικός σωλήνας (L)
Τοποθετήστε τον τηλεσκοπικό σωλήνα στη χειρολαβή και τοποθετήστε στη συνέχεια το εξάρτημα
απορρόφησης για σχισμές με βουρτσάκι (Ι). Αφού τοποθετήσετε το εξάρτημα, μπορείτε να επεκτείνετε
τον τηλεσκοπικό σωλήνα δρώντας στο σχετικό μοχλό με κλικ (ΕΙΚ.3) μέχρι το επιθυμητό μήκος. Αφήστε
το μοχλό για να στερεώσετε στο επιθυμητό μήκος.
Βούρτσα για δάπεδα (P)
Κατάλληλη για τον καθαρισμό τόσο των ευρέων επιφανειών, όσο και των δύσκολων δυσπρόσβατων
γωνιών. Για τον καθαρισμό των χαλιών και των σκληρών δαπέδων, συνιστάται να μη χρησιμοποιείτε τη
βούρτσα. Για να ανασηκώσετε τη βούρτσα, πιέστε το μοχλό διακόπτη που διακρίνεται με το σύμβολο
του χαλιού .
Για έναν καλύτερο καθαρισμό και συντήρηση των λείων δαπέδων, όπως το PVC, το παρκέτο ή τα
πλακάκια, είναι προτιμητέα η χρήση της βούρτσας. Για να βγάλετε τη βούρτσα, πρέπει να πιέσετε το
μοχλό επιλογέα (Q) που διακρίνεται με το σύμβολο λείων δαπέδων .
33
Page 36

EL
Απορροφητής σχισμών με βουρτσάκι (Ι)
Κατάλληλος για την απορρόφηση ανάμεσα στις πτυχές των υφασμάτων, ενώσεις, γωνίες ή εσοχές που
δεν μπορεί να φτάσει ο απορροφητής για δάπεδα. Αυτό το εξάρτημα μπορεί να εφαρμοστεί και κατ’
ευθείαν στη χειρολαβή (Ν).
ΧΡΗΣΗ ΤΗΣ ΣΥΣΚΕΥΗΣ
Προσοχή!
Πριν χρησιμοποιήσετε την ηλεκτρική σκούπα, απομακρύνετε τα μεγάλα και αιχμηρά αντικείμενα
από το δάπεδο, προς αποφυγήν κάθε πιθανής ζημιάς στην ίδια την ηλεκτρική σκούπα. Πριν
χρησιμοποιήσετε την παρούσα συσκευή, πρώτα απ’ όλα, ξετυλίξτε όλο το μήκος του καλωδίου
και συνδέστε το ρευματολήπτη. Για να ενεργοποιήσετε τη συσκευή, πιέστε το διακόπτη On/Off
που βρίσκεται στην ηλεκτρική σκούπα (ΕΙΚ. 4).
Σημαντικό
Σε κάποια περίπτωση, κατά την εκκίνηση, μπορεί να ακουστεί ένα σφύριγμα. Δεν πρόκειται για
ελάττωμα και με τη χρήση θα εξαφανιστεί..
ΕΛΕΓΧΟΣ ΡΟΗΣ ΑΠΟΡΡΟΦΗΣΗΣ
Η σχισμή δευτερεύοντος αέρα (Ο) βρίσκεται στη λαβή και χρησιμοποιείται για τη ρύθμιση της δύναμης
απορρόφησης (ΕΙΚ. 5). Όσο μεγαλύτερο είναι το άνοιγμα της σχισμής, τόσο μικρότερη είναι η ισχύς
απορρόφησης και αντίστροφα. Για να ανοίξετε τη σχισμή, πρέπει να την σπρώξετε το μοχλό προς
τα κάτω, για να την κλείσετε, προς τα πάνω. Η ρύθμιση της σχισμής είναι συνάρτηση του είδους της
επιφάνειας:
Ελάχιστη δύναμη για κουρτίνες και ευαίσθητα υλικά.
Μέση δύναμη για μαξιλάρια, στρώματα, χαλιά.
Μέγιστη δύναμη για πατώματα από πλακάκια, ξύλο ή άλλο στέρεο υλικό πολύ βρώμικα.
ΕΛΕΓΧΟΣ ΙΣΧΥΟΣ ΚΙΝΗΤΗΡΑ
Μπορείτε να ρυθμίσετε την ισχύ απορρόφησης χρησιμοποιώντας το συρόμενο δρομέα (ΕΙΚ. 11).
Συνιστάται η χρήση της ελάχιστης ισχύος για τα ευαίσθητα υλικά. Επιλέξτε, επομένως, μια μέση ισχύ για
στρώματα, έπιπλα με επένδυση ταπετσαρίας και χαλιά.
Επιλέξτε τη μέγιστη ισχύ για πατώματα από πλακάκια, ξύλο ή άλλο στέρεο υλικό.
Προσοχή !
Σβήστε αμέσως την ηλεκτρική σκούπα στην περίπτωση που τα στόμια του αέρα, οι βούρτσες ή
ο τηλεσκοπικός σωλήνας φραγούν. Πριν θέσετε και πάλι σε λειτουργία την ηλεκτρική σκούπα,
απομακρύνετε ό,τι προκάλεσε την έμφραξη.
ΜΕΤΑ ΤΗ ΧΡΗΣΗ ΤΗΣ ΗΛΕΚΤΡΙΚΗΣ ΣΚΟΥΠΑΣ
Όταν τελειώσετε με τη χρήση, σβήστε τη συσκευή πιέζοντας το διακόπτη λειτουργίας (Ε), αποσυνδέστε
το ρευματολήπτη από την πρίζα και τυλίξτε το καλώδιο κρατώντας πιεσμένο το πλήκτρο περιέλιξης (C)
στη συσκευή. Το καλώδιο θα τυλιχθεί στο εσωτερικό της συσκευής.
Μπορείτε επίσης να χρησιμοποιήσετε το οπίσθιο άγκιστρο (S) και το κάτω (V) για να μπορέσετε να βάλετε
τον τηλεσκοπικό σωλήνα και να φυλάξετε τη συσκευή μαζί με το εξάρτημά του ώστε να καταλαμβάνει το
δυνατόν λιγότερο χώρο (ΕΙΚ. 6).
Προσοχή !
Κατά την περιέλιξη, κατευθύνετε το καλώδιο με το ένα χέρι ώστε να αποφύγετε τον τραυματισμό
σας και προσέξτε ιδιαίτερα αν είναι παρόντα παιδιά ή κατοικίδια ζώα.
ΚΑΘΑΡΙΣΜΟΣ ΚΑΙ ΣΥΝΤΗΡΗΣΗ
Προσοχή !
Πριν πραγματοποιήσετε οποιαδήποτε ενέργεια καθαρισμού και συντήρησης, σβήστε τη συσκευή
και αποσυνδέστε το ρευματολήπτη τροφοδοσίας από την πρίζα του ρεύματος.
34
Page 37

EL
ΑΝΤΙΚΑΤΑΣΤΑΣΗ ΣΑΚΟΥ ΣΚΟΝΗΣ
Όταν η ενδεικτική λυχνία γεμάτου σάκου (Β) γίνει κόκκινη, ο σάκος θα πρέπει να αντικατασταθεί.
• Σηκώστε το διαμέρισμα σάκου σπρώχνωντας προς τα επάνω τον ειδικό χώρο του σάκου (ΕΙΚ.7).
• Αφαιρέστε τη βάση του σάκου (ΕΙΚ. 8), προσέχοντας να μην την πιέσετε πολύ. Αφού βγάλετε τη βάση,
σύρατε το μέρος από σκληρό χαρτόνι του σάκου στους ειδικούς οδηγούς και πετάξτε τον στον κάδο
απορριμάτων.
• Τοποθετήστε ένα νέο σάκο κάνοντας τον να εισχωρήσει με το μέρος από σκληρό χαρτόνι στους
ειδικούς οδηγούς, βάζοντας τη βάση στο εσωτερικό διαμέρισμα.
• Κλείστε το καπάκι του διαμερίσματος σκόνης.
ΚΑΘΑΡΙΣΜΟΣ/ΑΝΤΙΚΑΤΑΣΤΑΣΗ ΦΙΛΤΡΟΥ ΠΡΟ-ΚΙΝΗΤΗΡΑ
Το φίλτρο προ-κινητήρα πρέπει να καθαρίζεται κανονικά και να αντικαθίσταται κάθε 6 έως 9 μήνες,
ανάλογα με τη χρήση.
• Αφαιρέστε τη βάση του σάκου (ΕΙΚ. 8).
• Αφαιρέστε το φίλτρο (ΕΙΚ. 9) και τινάξτε το δυνατά για να το καθαρίσετε. Αν είναι πολύ βρώμικο,
πλύνετέ το με χλιαρό νερό και σαπούνι και ξεπλύνετέ το καλά και αφήστε το να στεγνώσει φυσιολογικά.
Σημαντικό
ΜΗΝ το στεγνώσετε τεχνητά. Για την αντικατάσταση των φίλτρων, απευθυνθείτε σε ένα Κέντρο
Τεχνικής Εξυπηρέτησης.
• Ξαναβάλτε το φίλτρο στην έδρα του αφού βεβαιωθείτε ότι η τραχεία επιφάνεια του φίλτρου είναι
ορατή.
• Τέλο ς , επανατοποθετήστε το σάκο σκόνης και βεβαιωθείτε ότι το φίλτρο είναι κανονικά στη θέση του
πριν τη χρήση.
ΚΑΘΑΡΙΣΜΟΣ/ΑΝΤΙΚΑΤΑΣΤΑΣΗ ΤΟΥ ΦΙΛΤΡΟΥ ΕΞΟΔΟΥ
Το φίλτρο εξόδου πρέπει να καθαρίζεται κανονικά και να αντικαθίσταται κάθε 6 έως 9 μήνες, ανάλογα
με τη χρήση.
• Αφαιρέστε το καπάκι του φίλτρου εξόδου δρώντας στον ειδικό μοχλό (ΕΙΚ.10).
• Βγάλτε το φίλτρο σηκώνοντάς το και τινάξτε το δυνατά για να το καθαρίσετε. Αν το φίλτρο είναι πολύ
βρώμικο, πλύνετέ το με χλιαρό νερό και σαπούνι και αφήστε το να στεγνώσει φυσιολογικά.
Σημαντικό
ΜΗΝ το στεγνώσετε τεχνητά. Για την αντικατάσταση των φίλτρων, απευθυνθείτε σε ένα Κέντρο
Τεχνικής Εξυπηρέτησης.
• Ξαναβάλτε το φίλτρο στην έδρα του και κλείστε τη θυρίδα, αφού βεβαιωθείτε προηγουμένως ότι η
τραχεία επιφάνεια του φίλτρου είναι ορατή και ότι η θήκη φίλτρου είναι κανονικά στη θέση της πριν τη
χρήση.
ΑΝΑΖΗΤΗΣΗ ΒΛΑΒΩΝ
ΘΕΡΜΙΚΗ ΔΙΑΚΟΠΗ
Η ηλεκτρική σκούπα είναι εφοδιασμένη με ένα εξάρτημα θερμικής διακοπής που την προστατεύει σε
περίπτωση υπερθέρμανσης του κινητήρα. Αν η συσκευή διακόψει απότομα μόνη της τη λειτουργία της,
ακολουθήστε την παρακάτω διαδικασία:
• Σβήστε την ηλεκτρική σκούπα και αποσυνδέστε το ρευματολήπτη από την πρίζα.
• Αναζητήστε την αιτία της υπερθέρμανσης (βουλωμένος σωλήνας απορρόφησης, βρώμικο φίλτρο,
κλπ.).
• Καθαρίστε το σωλήνα, αδειάστε το σάκο της σκόνης και καθαρίστε τα φίλτρα αν είναι αναγκαίο.
• Περιμένετε 30-40 λεπτά περίπου έως ότου κρυώσει ο κινητήρας.
• Μετά από 30–40 λεπτά, συνδέστε το ρευματολήπτη στην πρίζα και ανάψτε τη σκούπα. Η συσκευή
τώρα θα πρέπει να λειτουργεί.
• Αν δεν λειτουργεί ακόμα, περιμένετε άλλα 20 λεπτά και προσπαθήστε και πάλι.
• Αν δεν λειτουργεί ούτε τώρα, απευθυνθείτε σε ένα Κέντρο Τεχνικής Εξυπηρέτησης.
35
Page 38

RU
О ДАННОМ РУКОВОДСТВЕ
Несмотря на то, что приборы производятся в соответствии со спецификациями и действующими
европейскими нормами, и поэтому защищены во всех потенциально опасных частях, внимательно
ознакомьтесь с предупреждениями и используйте прибор только для целей, для которых он
предназначен, во избежание аварий и повреждений. Храните это руководство под рукой для
дальнейшего использования.
Если вы
Информация, содержащаяся в данном руководстве, помечена следующими символами, которые
указывают:
Опасность для детей
Осторожно, электричество
Опасность, возникающая по другим причинам
Предупреждение об ожогах
Внимание - материальный ущерб
ПРЕДУСМОТРЕННОЕ ИСПОЛЬЗОВАНИЕ
Это устройство предназначено только для частного использования и, следовательно,
непригодно для промышленного или профессионального использования. Любое другое
использование прибора не предусмотрено заводом-изготовителем, который снимает с себя
всякую ответственность за ущерб любого рода, вызванный непредусмотренным, неправильным
и неразумным использованием прибора.
ПРЕДУПРЕЖДЕНИЯ ПО БЕЗОПАСНОСТИ
хотите продать прибор другим людям, не забудьте приложить данное руководство.
ВНИМАТЕЛЬНО ПРОЧИТАЙТЕ ИНСТРУКЦИИ ПЕРЕД ИСПОЛЬЗОВАНИЕМ.
• Устройство предназначено для внутреннего использования и не должно использоваться в
коммерческих или промышленных целях.
• Мы не несем ответственности за неправомерное использование или любое использование,
кроме случаев, предусмотренных в этой брошюре.
• Рекомендуется сохранить оригинальную коробку, потому что бесплантый ремонт невозможен
в случае повреждений, вызванных неадеквантной упаковкой продукта в момент отправки в
авторизованный сервисный центр.
• Прибор соответствует требованиям Директивы 2006/95/EC и Директивы EMC 2004/108/EC.
ОПАСНОСТЬ ДЛЯ ДЕТЕЙ
• Этот прибор может использоваться лицами (включая детей) с ограниченными физическими,
сенсорными или умственными способностями; лицами, не имеюшими опыта и знаний в
применении прибора, исключительно под строгим надзором или при условии тщательного
инструктажа в отношении использования прибора со стороны лица, ответственного за их
безопасность.
• Следите, чтобы дети не играли с прибором.
• Упаковка должна храниться в недоступном для детей месте, так как является потенциальным
источником опасности.
• В случае необходимости слома прибора нужно перерезать шнур питания, чтобы полностью
вывести прибор из употребления. Рекомендуется также снять некоторые компоненты, которые
могут представлять опасность, особенно для детей.
36
Page 39

RU
ОСТОРОЖНО, ЭЛЕКТРИЧЕСТВО
• Перед подключением к электросети проверить, что указанное на табличке, установленной на
дне прибора, напряжение соответствует локальной сети.
• Подключите устройство к розетке переменного тока.
• Использование удлинителей, не авторизованных изготовителем, может привести к повреждению
прибора или аварии.
• Если шнур питания поврежден, он должен быть заменен производителем или его сервисным
агентом или квалифицированным специалистом, чтобы избежать любого риска.
• Никогда не использовать прибором на мокрой поверхности: это может вызвать короткое
замыкание!
• Не всасывать жидкости.
• Не прикасайтесь к прибору мокрыми или влажными руками.
• Не работать на приоре босиком.
• Вынуть вилку из розетки перед началом чистки или технического обслуживания.
• НЕ ПОГРУЖАЙТЕ ПРИБОР В ВОДУ ИЛИ ДРУГИЕ ЖИДКОСТИ.
• Убедитесь, что шнур не контактирует с горячими или острыми поверхностями.
• Отсоединять кабель питания от розетки после каждого использования
В случае неисправности, дефектов или подозреваемых дефектов в случае падения немедленно
выньте вилку из розетки. Никогда не используйте неисправный прибор. РЕМОНТ МОЖЕТ
ОСУЩЕСТВЛЯТЬСЯ ТОЛЬКО В УПОЛНОМОЧЕННЫХ СЕРВИСНЫХ ЦЕНТРАХ.
ОПАСНОСТЬ, ВОЗНИКАЮЩАЯ ПО ДРУГИМ ПРИЧИНАМ
• Не всасывать горячий пепел, крупные куски стекла, строительный мусор, острые предметы и
жидкости.
• Для предотвращения опасного перегрева рекомендуется разматывать шнур в всей длине и
отсоединять его от сети, когда прибор не используется.
• Нельзя использовать прибор без пакета, без фильтра двигателя или если пакет или фильтр
порваны или повреждены.
• Не подвергайте прибор воздействию погодных условий (дождь, солнце и т.д.)..
• Не хранить прибор вблизи источников тепла (например, радиатор)
• Всегда вынимайте вилку из розетки перед чисткой или заменой фильтров
ВНИМАНИЕ – МАТЕРИАЛЬНЫЙ УЩЕРБ
• Никогда не вынимайте вилку из розетки, потянув за шнур питания.
• Никогда не используйте поврежденный прибор
• Всегда запускать прибор через регулятор мощности, установленный на минимальное значение.
• Продукт не рассчитан на питание через внешний таймер или с раздельными устройствами с
дистанционным управлением.
• При установке приора на хранение убедитесь, что он не находится в контакте с горячими и
острыми поверхностями.
• СОХРАНИТЕ ЭТИ ИНСТРУКЦИИ
37
Page 40

RU
ОПИСАНИЕ ПРИБОРА
А) Рычажок открытия отсека пылесборника
В) Индикатор полного пакета
C) Кнопка сматывания шнура
D) Ручка для транспортировки
E) Кнопка включения / выключения
F) Отсек пылесборника
Г) Бумажный пакет
H) Шланг
I) Насадка для щелей со щеткой
L) Телескопическая труба
M) Кнопки разблокировки шланга
N) Рукоятка
O) Регулятор всасывания
P) Щетка для пола
Q) Переключатель твердый пол / ковер
R) Отсек для выходного фильтра
S) Крюк для крепления
T) Отделение для аксессуаров
U) Регулятор мощности всасывания
V) Нижний крюк для крнпежа телескопической трубы
X) Рычажок для открытия отсека фильтра
Y) Выдвижной силовой шнур
ИНСТРУКЦИЯ ПО ПРИМЕНЕНИЮ
ПРИ ПЕРВОМ ИСПОЛЬЗОВАНИИ:
СБОРКА ПЫЛЕСОСА
Вставьте всасывающий шланг в патрубок, осторожно нажав на него до блокировки. Чтоы вынуть
шланг, нажать две разлокировочные кнопки (М) и вынуть (рис. 2).
телескопической трубы
Внимание!
Перед установкой или снятием насадок всегда проверяйте, что вилка пылесоса вынута
розетки.
НАСАДКИ
Телескопическая труба (L)
Вставьте телескопическую трубу на рукоятку, а затем установить насалку для щелей со щеткой
(I). После установки насадки можно раздвинуть телескопическую трубу до нужной длины,
задействовав рычажную защелку (рис. 3). Отпустите рычажок и зафиксируйте трубу на желаемой
длине.
Щетка для пола (Р)
Подходит для очистки больших площадей трудно достижимых углов. Для чистки ковров и
твердых полов вы не должны использовать щетку. Чтобы поднять щетку, нажмите на рычагпереключатель, обозначенный символом «ковер» .
Для лучшей очистки и ухода за гладкими полами, такими как ПВХ, паркет или кафель, желательно
использовать щетку. Чтобы задвинуть щетку, нажмите рычаг переключателя (Q), обозначенный
символом «гладкий пол» .
Насадка для щелей со щеткой (I)
Подходит для чистки труднодоступных для насадки для пола складок ткани, стыков, углов или
ниш. Этот аксессуар устанавливается непосредственно на рукоятку (N).
38
Page 41

ИСПОЛЬЗОВАНИЕ ПРИБОРА
Внимание!
Перед использованием пылесоса удалить крупные или острые предметы с пола, чтобы
избежать повреждения ущерба пылесоса. Перед использованием этого продукта сначала
размотать шнур по всей длине и вставить вилку. Включить прибор нажатием переключателя
Вкл / Выкл на пылесосе (рис. 4).
RU
Важно
В некоторых случаях при включении можно слышать шипящий звук: это не дефект,
пройдет по мере использования.
ПРОВЕРКА ПОТОКА ВСАСЫВАНИЯ
Второстепенный патрубок воздуха (O) расположен на рукоятке и используется для регулировки
силы всасывания (рис. 5). Чем больше апертура щели, тем ниже сила всасывания и наоборот.
Чтобы открыть щель, нажать на рычаг вниз, чтобы закрыть - вверх. Регулировка апертуры щели
зависит от типа поверхности:
Минимальная сила для штор и деликатных материалов.
Средняя сила для подушек, матрасов и ковров.
Максимальная сила для очень загрязненных полов из кафеля, дерева или другого прочного
материала.
ПРОВЕРКА МОЩНОСТИ ДВИГАТЕЛЯ
Регулировка мощности всасывания осуществляется с помощью ползунка (рис. 11). Мы
рекомендуем использовать низкое значение для деликатных тканей. Выберите среднюю
мощность для матрасов, мягкой обивки мебели и ковров.
Выберите максимальную мощность для плитки, дерева или другого прочного материала.
Внимание!
Немедленно выключите пылесос при засорении воздушных патрубков, щеток или
телескопической трубы. Перед включением пылесоса устранить засорение.
ПОСЛЕ ИСПОЛЬЗОВАНИЯ ПЫЛЕСОСА
После использования выключить прибор нажатием на кнопку включения (E), вынуть вилку из
розетки и намотать шнур, нажав на кнопку перемотки (С) на приборе. Шнур смотается внутри
отсека.
Можно также использовать задний (S) и нижний (V) крюк, чтобы вставить телескопическую трубу
и сложить прибор вместе с насадкой так, чтобы он занимал минимальное пространство (рис. 6).
который
Внимание!
Во время намотки направлять шнур рукой с тем, чтобы избежать травм, будьте осторожны
в присутствии детей и домашних животных.
ЧИСТКА И УХОД
Внимание!
Перед чисткой или обслуживанием отключите питание и выньте вилку из розетки.
ЗАМЕНА ПАКЕТОВ ДЛЯ СБОРА ПЫЛИ
Когда индикатор полного пакета (B) становится красным, следует заменить пакет.
• Поднять отсек для пакета, толкнув вверх паз для пакетов (рис. 7).
• Вынуть держатель, а затем осторожно вынуть пакет (рис. 8), вынуть картонную часть пакета из
пазов и выбросить пакет в мусорное ведро.
39
Page 42

RU
• Установить новый пакет, вставив картонку в пазы, установить держатель на место.
• Закрыть крышку отсека пыли.
ЧИСТКА / ЗАМЕНА ФИЛЬТРА ДВИГАТЕЛЯ
Пред- фильтр двигателя следует регулярно чистить и менять каждые 6 - 9 месяцев, в зависимости
от условий эксплуатации.
• Вынуть держатель пакета (рис. 8).
• Вынуть фильтр (рис. 9) и энергично встряхнуть. Если фильтр очень грязный, вымойте его в
теплой воде с мылом, тщательно прополощите и дайте ему высохнуть естественным образом.
Важно
НЕ сушите фильтр искусственно. В отношении замены фильтров обратитесь в сервисный
центр.
• Установите фильтр на место убедившись, что шероховатая поверхность фильтра видна.
• И, наконец, установите на место пылесборник.
ЧИСТКА / ЗАМЕНА ВЫХОДНОГО ФИЛЬТРА
Выходной фильтр следует регулярно чистить и менять каждые 6- 9 месяцев в зависимости от
условий эксплуатации.
• Снять крышку выходного фильтра, повернув рычажок (рис. 10).
• Вынуть фильтр и энергично встряхнуть. Если фильтр очень грязный, вымойте его в теплой воде
с мылом и дайте ему высохнуть естественным образом.
Важно
НЕ сушите фильтр искусственно. В отношении замены фильтров обратитесь в сервисный
центр.
• Установите фильтр на место и закройте створку, убедившись сначала, что шероховатая
поверхность фильтра видна и держатель фильтра на месте.
УСТРАНЕНИЕ НЕИСПРАВНОСТЕЙ
ПЕРЕГРЕВ
Пылесос оснащен устройством тепловой блокировки, которое защищает его в случае перегрева
двигателя. Если пылесос внезапно останавливается сам по себе, выполните следующие
действия:
• Выключите пылесос и выньте вилку из розетки.
• Найти причину перегрева (труба всасывания засорена, грязные фильтры, и т.д. )
• Прочистить трубу, опорожнить отсек для сбора пыли и прочистить фильтры, если это необходимо.
• Подождите 30-40 минут, пока двигатель не остынет.
• По прошествии 30-40 минут вставить вилку в розетку и включить пылесос. Пылесос должен
заработать.
• Если пылесос не работает, через 20 минут повторите попытку.
• Если пылесос все же не работает, обратитесь в сервисный центр
40
Page 43

ϪϠΟ Ϧϣ λ˵ϤϢ ϱάϟ ϝΎϤόΘγϻ ϝΎΠϤϟ ϭϓϘ˱Ύ ςϘϓ ίΎϬΠϟ ϡΪΨΘγϭ ΔϳΎϨόΑ ΕήϳάΤΘϟ ϩάϩ Γ˯ήϘΑ ϢϘϓ ˬΔϴϤΤϣ ΕΎΑ.
ΕΎϤϴϠόΘϟ ϩάϩ ϳπ˱Ύ ϞϤθΗ ϥ ήάΘϓ ˬϦϳήΧ ιΎΨη ϰϟ· ίΎϬΠϟ άϩ ϊϴΑ ϲϓ ΐϏήΗ ΖϨ Ϋ· .
ωϮϧ ϱ ΔϴϟϮΌδϣ Δϳ ϞϤΤΘΗ ϻ ϟϤ˵μϨόΔ Δήθϟ
ϲϋΎϨμϟ ϭ ϱέΎΠΘϟ ϡΪΨΘγϼϟ βϴϟϭ ςϘϓ ϲϟΰϨϤϟ ϡΪΨΘγϼϟ ΞΘϨϤϟ άϩ ϊϴϨμΗ ϢΗ.
ϗ˶ΒϞ Ϧϣ Ϫδϔϧ ίΎϬΠϟ ϡΪΨΘγΎΑ ϖϠόΘϳ ΎϤϴϓ ΟϴΪ˱ ϢϬϤϴϠόΗ ϢΘ
ϢϬΒόϟ ϲϓ ίΎϬΠϟ ϥϮϠϤόΘδϳ Ϊϗ Ϧϳάϟ ϝΎϔσϷ ϞΟ Ϧϣ ιΎΧ ϪΟϮΑϭ ˬΓέΎο ήϴϏ Χτή˱ ϞΜϤΗ Ϊϗ ϲΘϟ ίΎϬΠϟ ˯ΰΟ.
ϰϟ· ήϴθΗ ϲΘϟ ΔϴϻΘϟ ίϮϣήϻΑ ΓΰϴϤϣ ϞϴϟΪϟ άϩ ϲϓ ΓΩέϮϟ ΕΎϣϮϠόϤϟ:
AR
ϥΏ˵ϞϴϟΪϟ άϩ Ϧϋ ΓΫ
ΖϧΎ ϥ·ϭ
ΔϴϠΒϘΘδϤϟ ΕέΎθΘγϼϟ Ϊϴϟ ϝϭΎϨΘϣ ϲϓ ΐϴΘϜϟ άϩ.
ϝΎϔσϷΎΑ ΔϘϠόΘϣ έΎτΧ
˵Χήϯ ΏΎΒγ Ϧϋ
. ϱ
Η Ϣϟ Ύϣ ˬίΎϬΠϻΑ ΔϓήόϤϟϭ ΓήΒΨϟ ΪϘΘϔΗ ϭ ΔϳΎϨόΑ ϢϬΘΒϗήϣ ϢΘϳ
ΔϤΟΎϧ έήο ήτΧ
ϪϴϠϋ ιϮμϨϤϟ ϡΪΨΘγϻ
Δϣϼδϟ ΕήϳάΤΗ
ΕΎϤϴϠόΘϟ ϩάϩ ήϗ ΔϳΎϨόΑ ϡΪΨΘγϻ ϞΒϗ.
ΰήϤϟ Ϫϻγέ·ϲϨϔϟ ϢϋΪϟ ϟϤ˵ΪϤΘό.
ϝΎϔσϷΎΑ ΔϘϠόΘϣ έΎτΧ
ϰΘΣ ϥ·ϭ
ΟΎϧ έΎτΧ˯ΎΑήϬϜϟ Ϧϋ ΔϤ
ϪϴΒϨΗ– ΔϳΩΎϣ έήο
ϥ· ίΎϬΠϟ άϩ ϣΨμμ˱Ύ ϱάϟ νήϐϠϟ ςϘϓλ˵Ϩϊ
Ϛϟάϟ ϒϻΨϣ ϲϻΘϻΑϭ ϴΤλ ήϴϏ ϡΪΨΘγ τΧ ϞϜθϳ˱ή.
γϻ ˬϴΤμϟ ήϴϏ ϡΪΨΘϝϮϘόϣ ήϴϏ ϭ ΊσΎΧ.
ϢΘϳ ϻϟ ΔϴϟϮΌδϣ Δϳ ϞϤΤΗϼϟϜ˵Θϴΐ άϩ ϲϓ ΎϬϴϠϋ ιϮμϨϤϟ ϚϠΗ Ϧϋ ϟϤ˵ΨΘϠϔΔ ΕΎϣΪΨΘγϻ ϭ ΊσΎΨϟ ϡΪΨΘγ.
ΔϴϧΎΠϤϟ ΔϣΪΨϟ ϥ ΎϤΑ ˬΔϴϠλϷ ϒϴϠϐΘϟ ΩϮϣ ϰϠϋ υΎϔΤϻΑ ϲλϮϧ
ΔϴΑϭέϭϷ ΕΎϬϴΟϮΘϠϟ ϖΑΎτϣ ίΎϬΠϟ άϩ2006/95/CE ϭEMC 2004/108/CE.
ΓΩϭΪΤϣ ΔϴϠϘϋ ϭ Σ˶δϴΔ ϭ ΔϳΪδΟ ΕέΪϗ ϱϭΫ ιΎΨη ϗ˶ΒϞ Ϧϣ ίΎϬΠϟ άϩ ϳ˵δΘΨΪϡ ϻ ΐΠϳ) ϚϟΫ ϲϓ ΎϤΑ(˭ ϭ
ϢϬΘϣϼγ.
ίΎϬΠϻΑ ϝΎϔσϷ ΚΒϋ ϡΪϋ Ϧϣ Ϊ΄Η.
ήτΨϠϟ ϼϤΘΤϣ ϣμΪέ˱ ϞΜϤΗ ΎϬϧ ΚϴΣ ϝΎϔσϷ Ϊϳ ϝϭΎϨΘϣ ϲϓ ϒϴϠϐΘϟ ΩϮϣ ϙήΗ ΐΠϳ ϻ.
ϔϧ ϪϔλϮΑ ΞΘϨϤϟ άϩ Ϧϣ κϠΨΘϟ Εέήϗ Ϋ·ϪΑ ιΎΨϟ ΔϳάϐΘϟ ϞΑΎ ϊτϘΑ ϞϴϐθΘϠϟ ϻλ ήϴϏ ϪϠόΠΑ ϳ˵Ϩμ ˬΕΎϳΎ. ϞόΠΑ ϳπ˱Ύ ϳ˵Ϩμ ΎϤ
41
Page 44

AR
˯ΎΑήϬϜϟ Ϧϋ ΔϤΟΎϧ έΎτΧ
Πϟ ϥ Ϧϣ Ϊ΄Η ΔϳάϐΘϟ ΔϜΒθΑ ίΎϬΠϟ ϞϴλϮΗ ϞΒϗ ϰϠϋ Ϫϴϟ· ϟϤ˵θΎέ ΪϬΕΎϧΎϴΒϟ ΔΣϮϟ ϚϟΫ ϳ˵τΎΑϖ ΔϨϴΎϤϟ Ϟϔγ ΔϋϮοϮϤϟ ΔϘλϼϟ
ΔϴϠΤϤϟ ΔϜΒθϻΑ.
ςϘϓ ΏϭΎϨΘϣ ϲΎΑήϬ έΎϴΗ άΧ΄ϤΑ ίΎϬΠϟ ϞϴλϮΘΑ Ϣϗ.
ήϴϏ ΔϴΎΑήϬ ΕϻϮτϣ ϝΎϤόΘγΓΪϤΘόϣ ίΎϬΠϠϟ ΔόϨμϤϟ Δήθϟ ϞΒϗ ϦϣΪϗ ϖήΣϭ έήο ΐΒδϳ.
Ύ ϲϓ ϒϠΗ ΩϮΟϭ ΔϻΣ ϲϓΔϳάϐΘϟ ϞΑˬ ϭ ΔτγϮΑ ϪϟΪΒΘγ ΐΠϳ Γ Δ ϭ
ήτΧ ϱ ϱΩΎϔΘϟ ϚϟΫϭ ϣ˵θΎΑϪˬ Ϟϴϩ΄ΘΑ κΨη ΔτγϮΑ ϝΎΣ ϱ ϰϠϋ .
ίΎϬΠϟ ϡΪΨΘδΗ ϻ ΔΑήΗϷ ςϔθϟ ϟϤ˵ΒϠϠΔ τγϷ ϰϠϋ ΑΪ˱ :ϬήΑΎϴ˱Ύ ϣΎγ˱Ύ ΪϟϮΘϳ ϥ ϟϤ˵ϤϜϦ Ϧϣ!
ϞϮδϟ ςϔθϟ ΑΪ˱ ίΎϬΠϟ ϡΪΨΘδΗ ϻ.
ΔΒσέ ϭ ΔϠΘΒϣ ϞΟέ ϭ ϱΪϳ΄Α ίΎϬΠϟ βϤϠΗ ϻ.
ΔϳέΎϋ ϞΟέ΄Α ίΎϬΠϟ ϡΪΨΘδΗ ϻ.
ΔϧΎϴλ ϭ ϒϴψϨΗ ΔϴϠϤϋ ϱ΄Α ϡΎϴϘϟ ϞΒϗ ϲΎΑήϬϜϟ έΎϴΘϟ άΧ΄ϣ Ϧϣ βΑΎϘϟ Ϟμϓ.
˵Χήϯ ϞϮγ ϲϓ ϭ ˯ΎϤϟ ϲϓ ίΎϬΠϟ ήϤϐΑ ϢϘΗ ϻ.
ΔϳάϐΘϟ ϞΑΎ ϥ Ϧϣ Ϊ΄Η ΓΩΎΣ ϭ ΔϨΧΎγ τγ ϊϣ βϣϼΘϣ ήϴϏ
ϡΪΨΘγ Ϟ ΪόΑ ϲΎΑήϬϜϟ έΎϴΘϟ άΧ΄ϣ Ϧϣ βΑΎϘϟ ϞμϔΑ Ϣϗ.
ϓϮέ˱ Ϟμϓ Ϧ.
ίΎϬΠϟ ρϮϘγ ΪόΑ ΐϴϋ ΪΟϮΗ ϲϓ ϩΎΒΘη ϭ ΏϮϴϋ ϭ ϝΎτϋ ΩϮΟϭ ΔϻΣ ϲϓˬ
˵Χήϯ ΏΎΒγ Ϧϋ ΔϤΟΎϧ έήο ήτΧ
ϠϤϋ ˯ήΟ·ϔϟ ϢϋΪϟ ΰήϣ ϯΪϟ ςϘϓ ϴϠμΘϟ ΕΎϴϲϨ ϟϤ˵όΘϤΪΓ.
ˬΓήϴΒϜϟ ΝΎΟΰϟ ϊτϗ ˬϦΧΎδϟ ΩΎϣήϟ ςϔθΑ ϢϘΗ ϻϡΪϬϟ ΩϮϣϟϤ˵ ˯ΎϴηϷϭ ˬϞϮδϟϭ ΓΩΎΤϟ ϭ ΔΒΑΪ.
ϳ˵Ϩ ΓέήΣ ΔΟέΩ ΓΩΎϳί ΐϨΠΘϟ
ϞμϔΑΔϳάϐΘϟ ΔϜΒη Ϧϋ βΑΎϘϟ ϴΎΑήϬϜϟΔ ίΎϬΠϟ ϡΪΨΘγ ϡΪϋ ΔϻΣ ϲϓ.
βϴ ϥϭΪΑ ίΎϬΠϟ ϡΪΨΘγ ΐΠϳ ϻ ΔΑήΗϷ ϊϤΟ ήΘϠϓ ˬ ΔϻΣ ϲϓ ϭ ˬϙήΤϤϟ ϭ ϊτϗ ϒϠΗ βϴΔΑήΗϷ ϊϤΟ ήΘϠϔϟ ϭ.
ΔϳϮΠϟ ϞϣϮόϠϟ ϣόήο˱Ύ ίΎϬΠϟ ϙήΘΗ ϻ)έΎτϣϷ- βϤθϟ- ·Φϟ.(
ΏήϘϻΑ ίΎϬΠϟ ϊπΗ ϻ ΓέήΤϟ έΩΎμϣ Ϧϣ)ϝΎΜϤϟ ϞϴΒγ ϰϠϋ ΔϳΰήϤϟ ΔΌϓΪΘϟ ΕΎϜΒη.(
ήΗϼϔϟ ϞϳΪΒΗ ΔϴϠϤόΑ ϭ ίΎϬΠϟ ϒϴψϨΗ ΔϴϠϤόΑ ϡΎϴϘϟ ϞΒϗ βΑΎϘϟ ϞμϔΑ ΩϤ˱Ύ Ϣϗ.
ϪϴΒϨΗ– ΔϳΩΎϣ έήο
ΔϳάϐΘϟ ϞΑΎ Ϊη ϖϳήσ Ϧϋ ϲΎΑήϬϜϟ έΎϴΘϟ άΧ΄ϣ Ϧϣ ΑΪ˱ βΑΎϘϟ ϞμϔΗ ϻ.
ίΎϬΠϟ ϞϴϐθΘΑ ΑΪ˱ ϢϘΗ ϻ ϒϻΘϟ.
ϞϴϐθΘΑ Ϣϗ ίΎϬΠϟ ΩϤ˱ΎίΎϬΠϟ ΓέΪϗ ϢψϨϣ ςΒο Ϧϣ Ϊ΄Θϟ ΪόΑ Ϫϟ ΓέΪϗ Ϟϗ ϰϠϋ.
ΔϳάϐΗ ΐΠϳ ϻίΎϬΠϟ ΪόΑ Ϧϋ ϢϜΤΘϠϟ ΔϠϘΘδϣ ΔϤψϧ ϭ ϲΟέΎΧ ΖϗΆϣ ϝϼΧ Ϧϣ.
ίΎϬΠϟ ϊοϭ ΪόΑ Ϊ΄Η ϪόοϮϣ ϲϓ Ϫϧ Ϧϣ ΓΩΎΣϭ ΔϨΧΎγ τγ ϊϣ βϣϼΘϣ ήϴϏ.
ΕΎϤϴϠόΘϟ ϩάϬΑ ΎϤΩ φϔΘΣ.
42
Page 45

ϡΪΨΘγ ϡΪόΑ ϳ˵Ϩμ
ˬΔΠδϧϷ ΎϳΎϨΛ ϦϴΑ Ύϣ Ϧϣ
AR
ϒλϭίΎϬΠϟ
Γήϴϐλ ΓΎηήϔΑ
ϡΪΨΘγϻ ΕΎϤϴϠόΗ
Γήϣ ϝϭϷ ϡΪΨΘγϻ ΪϨϋ:
ΔδϨϜϤϟ ΐϴήΗ
ϊϣ ςϔθϻΑ . ϱέί
Ϟμϓ ϢΗ Ϫϧ Ϧϣ ΩϤ˱Ύ Ϊ΄Η ˬΕΎϘΤϠϤϟ Ϛϓ ϭ ΐϴήΗ ϞΒϗ βΑΎϗ ϲΎΑήϬϜϟ έΎϴΘϟ άΧ΄ϣ Ϧϋ ΔδϨϜϤϟ.
ϟ
ΐέ ϢΛ ξΒϘϤϟ ϲϓ ϲΑϮϜδϠΘϟ ΏϮΒϧϷ ΐϴήΘΑ Ϣϗ Α )I .(
ΔόγϮϟ ΕΎΣΎδϤϟ ˯Ϯγ ϒϴψϨΘϟ ΔΒγΎϨϣΎϬϴϟ· ϝϮλϮϟ ΐόμϳ ϲΘϟ ϥΎέϷ ˯Ϯγ .
Ϧϣ ΔϋϮϨμϤϟ ϚϠΘ ΔϤϋΎϨϟ ΕΎϴοέϷPVC ˬϴΒθΨϟ ΕΎϴοέϷ Δ " " ϭ . έί
ϲϓ ϥήϤϟ ΏϮΒϧϷ ϞΧΩιΎΨϟ ϥΎϜϤϟ
ϲΑϮϜδϴϠΘϟ ΏϮΒϧϷ (L)
Δϻσ· ˬϖΤϠϤϟ ΐϴήΗ ωέΫ ) 3 ( .
ΏϮϠτϤϟ ϝϮτϟ ΖϴΒΜΘϟ ωέάϟ.
ΕΎϴοέϷ ΓΎηήϓ )P(
ςϔθϟ ΐγΎϨϣ ϖΤϠϤϟ άϩ ϥ·ΔΑήΗϷ Ϥϳ ϻ
ΕΎϴοέϷΎΑ ιΎΨϟ ςϔθϟ ϖΤϠϣ . ξΒϘϤϟ ϰϠϋ ϣΒΎηή˱Γ ϖΤϠϤϟ άϩ ΐϴήΗ ϦϜϤϤϟ Ϧϣ)N(
ϢψϨϣ
ΕΎϘΤϠϤϟ
. .
A. ΔϳϭΎΣ Θϔϟ Γήϴϐλ Δόϓέ βϴ ϊϤΟ ΔΑήΗϷ
B. βϴ ˯ϼΘϣ ήηΆϣ ϊϤΟΔΑήΗϷ
C. έί ΓΩΎϋ·ΔϳάϐΘϟ ϞΑΎ ϒϟ
D. ίΎϬΠϟ ϞϘϨϟ ξΒϘϣ
E. έί ϞϴϐθΘϟOn/Off
F. ΔϳϭΎΣ βϴ ϊϤΟ ΔΑήΗϷ
G. ϲϗέϭ βϴ
H. ϥήϣ ΏϮΒϧ
I. ϖΤϠϣϔϠϟΩϭΰϣ ΔϘϴπϟ ΕΎΤΘ
L . ΏϮΒϧϲΑϮϜδϴϠΗ
M . έίϱ ϧϷ ΘϓϥήϤϟ ΏϮΒ
N . ξΒϘϣ
O . έί ςϔθϟ ϲϓ ϢϜΤΘϟϭιΎμΘϣϻ ϢψϨϣ
P .ΕΎϴοέϷ ΓΎηήϓ
Q . έΎϴΘΧ έίΔΒϠλ ΕΎϴοέϷ/ΩΎΠγ
R .ώϳήϔΘϟ ήΘϠϓ ΔϳϭΎΣ
S .ϲΑϮϜδϴϠΘϟ ΏϮΒϧϷ ΖϴΒΜΘϟ ΔϴϔϠΧ ΖϴΒΜΗ ΓΪΣϭ
T .ςϔθϟ ΕϼϤϜϣ ϞϤΤϟ ΏήΟ
U .ςϔθϟ ΓέΪϗ
V . ΏϮΒϧϷ ΖϴΒΜΘϟ ΔϴϠϔγ ΖϴΒΜΗ ΓΪΣϭϲΑϮϜδϴϠΘϟ
X . ΔόϓέήΘϠϔϟ ΏήΟ Θϔϟ Γήϴϐλ
Y . ϲΎΑήϬ ϞΑΎϚϔϠϟ ϞΑΎϗ
)M ( βϔϧ ϲϓΝέΎΨϟ ϰϟ· ϪΒΤγϭ ˬΖϗϮϟ ) Ϣϗέ ϞϜθϟ2(.
ϪϴΒϨΗ!
)Q( ΔϤϋΎϨϟ ΕΎϴοέϷ ΰϣέ ϞϤΤϳ ϱάϟ.
ϟϖΤϠϤ ΎΑ ιΎΨϟ ΔϘϴπϟ ΕΎΤΘϔϟΩϭΰϤϟ Γήϴϐλ ΓΎηήϔΑI)(
43
Page 46

AR
ϊ
ίΎϬΠϟ ϝΎϤόΘγ Δϴϔϴ
έί
ΔϓΎ Ϧϣ ΔϴοέϷ ˯ϼΧ· ΐΠϳ ϭ ϥ ϱ
ΔδϨϜϤϟ ϢδΟ ϰϠϋ ΩϮΟϮϤϟ) Ϣϗήϟ ϞϜθϟ4.(
ϦϜϤϤϟ Ϧϣ ΕϻΎΤϟ ξόΑ ϲϓ ΕϮλ ωΎϤγήϴϔμϻΑ ϪϴΒη : ϻ ΕϮμϟ άϩ ϞΜϤϳ ϞΑ ίΎϬΠϟ ϲϓ ΐϴϋίΎϬΠϟ ϡΪΨΘγΎΑ ϲϔΘΨϴγ Ύϣ ϥΎϋήγ.
ςϔθϟ ϖϓΪΗ έΎΒΘΧ
ΔΤΘϓ ΪΟϮΗ)O ( ϟ ) 5 .( ΕΩί
ϴΤλ βϜόϟϭ . ˬΔΤΘϔϟ Θϔϟ ΐΠϳ ωέάϟ ϪϴΟϮΗ ΐΠϳ ΎϬϘϠϐϟ ˬϞϔγ ΔϴΣΎϧϰϟ· ωέάϟ ϪϴΟϮΗ ϰϠϋ .τγϷ ωϮϨϟ ϭϓϘ˱Ύ ΔΤΘϔϟ ςΒο ΪϤΘόϳ:
ϭ ΔϴΒθΨϟ ΕΎϴοέϷ ˬϚϴϣήϴδϟ ΕΎϴοέϸϟ ΓϮϗ ϰμϗ Ϧϣ ϟϤ˵μϨόΔ ϯήΧ
ϙήΤϤϟ ΓέΪϗ έΎΒΘΧ
ΩΎΠδϟϭ ΪΠϨϤϟ ΙΎΛϷ ˬΐΗήϤϟ ϒϴψϨΘϟ ΔτγϮΘϣ.
ΔϴΎΑήϬϜϟ ΔδϨϜϤϟ ϡΪΨΘγ ΪόΑ
ίΎϬΠϟ ΄ϔσ )E(ˬ ˬϲΎ
ϡΪΨΘγ ϦϜϤϤϟ Ϧϣ ˬϚϟΫ ϰϠϋ ϋϼϭ˱Γ ΔϴϔϠΨϟ ΖϴΒΜΘϟ ΓΪΣϭ)S (ΔϴϠϔδϟϭ )V (
˯ϼΘϣ ήηΆϣ Βμϳ ΎϣΪϨϋ ϊϤΟ βϴΔΑήΗϷ )B ( ήϴϴϐΗ ΐΠϳ ˬϥϮϠϟ ήϤΣ ϊϤΟ βϴΔΑήΗϷ.
έΪϗ ϰμϗ ήΘΧ ϭ ΔϴΒθΨϟ ΕΎϴοέϷ ˬϚϴϣήϴδϟ ΕΎϴοέϸϟ Γ Ϧϣ ϟϤ˵μϨόΔ ϯήΧ ΓΩΎϣ ϱΔΒϠλ.
ΚϴΤΑ ϪΗΎϘΤϠϣ ΔϨϜϤϣ ΔΣΎδϣ Ϟϗ Ϟϐθϳ) Ϣϗέ ϞϜθϟ6.(
ΔϧΎϴμϟϭ ϒϴψϨΘϟ
ΔϴϠϤϋ ϱ΄Α ϡΎϴϘϟ ϞΒϗ ΔϧΎϴλϭ ϒϴψϨΗˬ άϐΘϟ βΑΎϗ Ϟμϓϭ ίΎϬΠϟ ˯ΎϔσΈΑ ϢϗϲΎΑήϬϜϟ έΎϴΘϟ άΧ΄ϣ Ϧϣ ΔϴΎΑήϬϜϟ Δϳ.
ςϐο ίΎϬΠϟ ϞϴϐθΘϟOn/Off
ΓΩΎϣ ϱϭ ΔΒϠλΔϳΎϐϠϟ ΔΨδΘϣ.
.
ΏϮΒϧϷ . ϯΩ
ΏϮΒϧϷ ϝΎΧΩ· ϦϜϤϳ ϰΘΣ
ϪϴΒϨΗ!
ϡΎϴϘϟ ϞΒϗϝΎϤόΘγΎΑ ίΎϬΠϟˬ
Ϫδϔϧ. ϡΪΨΘγ ϞΒϗ άϩ ΔϳάϐΘϟ ϞΑΎ ϭϟ˱Ύ ΝήΧ ίΎϬΠϟϪϟϮσ ϞϣΎϜΑ βΑΎϘϟ ϞϴλϮΘΑ Ϣϗϭ .
ϡΎϩ
ϰϧΩϟ ΓϮϗ ϒϴψϨΘϟΔϘϴϗήϟ ˯ΎϴηϷϭ ήΎΘδ.
ΔτγϮΘϣ ΓϮϗΎΠδϟϭ ˬΐΗήϤϟ ˬΪΎγϮϠϟΩ.
ϦϜϤϤϟ ϦϣςΒο ΓέΪϗ ϙήΤΘϤϟ ήηΆϤϟ ϡΪΨΘγΎΑ ςϔθϟ) Ϣϗέ ϞϜθϟ11 .(
ϪϴΒϨΗ!
ΔδϨϜϤϟ ΄ϔσ ϭ ΓΎηήϔϟ ˬ˯ϮϬϟ ΕΎϩϮϓ ΩΪδϧ ΔϻΣ ϲϓ έϮϔϟ ϰϠϋ
ΔδϨϜϤϟ.
ϰϠϋ ςϐπϻΑ έί ϒϟϞΑΎ ΔϳάϐΘϟ )C (ίΎϬΠϟ ϰϠϋ ΩϮΟϮϤϟ .ϪϨϳΰΨΗ ΓΪΣϭ ϞΧΩ ϞΑΎϜϟ ϒϟ ϢΘϳ ϑϮγ .
ϪϴΒϨΗ!
˯ΎϨΛΓΩΎϋ· ΔΑΎλϹ ήτΧ ΐϨΠΘϟ ϚϳΪϳ ϯΪΣΈΑ ϪϬϴΟϮΘΑ Ϣϗ ˬΔϳάϐΘϟ ϞΑΎ ϒϟΪη ϰΧϮΗϭ έάΤϟ ΪϨϋΗϮΟΔϔϴϟ ΕΎϧϮϴΣ ϭ ϝΎϔσ Ϊ.
ϪϴΒϨΗ !
ήϴϴϐΗ ϊϤΟ βϴΔΑήΗϷ
ϊϓέ ΔϳϭΎΣ ϊϤΟ βϴ ΔΑήΗϷϊϓΪϟ ϊϣ ϰϠϋϷ κμΨϤϟ βϴϜϟ ΐϴήΗ ϥΎϜϣ) Ϣϗέ ϞϜθϟ7.(
βϴϜϟ ΔϣΎϋΩ Ϛϓ) Ϣϗέ ϞϜθϟ8(ϣ ˬΗ ϻ έάΤϟ ϲΧϮΗ ϊΎϬϠμϔ Ϛϓ ΪϨϋ ˬΓϮϘΑ
ΔϣΎϤϘϟ ϕϭΪϨλ ϲϓ ϪΎϘϹΑ Ϣϗϭ ˬΔμμΨϤϟ ΕέΎδϤϟ ϲϓ.
ϝϼΧ Ϧϣ ϖϟΰϨϳ ϪϠόΟϭ ΪϳΪΟ βϴ ϊο ˬ
ϬϧΎϜϣίΎϬΠϟ ϞΧΩ Ύ.
ϤΟΔΑήΗϷ.
ΔϳϭΎΣ ˯ΎτϏ ϖϠϏ
44
Page 47

AR
ϊ
ϙήΤϤϟ ήΘϠϓ ήϴϴϐΗϭ ϒϴψϨΗ
Ϟ ϩήϴϴϐΗϭ ΔϤψΘϨϣ ΔϔμΑ ϙήΤϤϟ ήΘϠϓ ϒϴψϨΗ ϢΘϳ ϥ ΐΠϳ6 ˬ9 ϡΪΨΘγϻ ΐδΣ ήϬη.
ΪϨϋ ΎϬϠϤϋ . Ϋ·
ΝϭήΨϟ ήΘϠϓ ήϴϴϐΗϭ ϒϴψϨΗ
ίΎϬΠϟ ϞϤϋ ϒϗϮΗΓέήΤϟ ωΎϔΗέ ΐΒδΑ
ίΎϬΠΑ ΔδϨϜϤϟ ΪϳϭΰΗ ϢΗϑΎϘϳϹ
ΕϮτΨϟ ϩάϩ ϊΒΗ ˬΓ΄Πϓ ΎϩΩήϔϤΑ ϞϤόϟ :
ϲόϴΒσ ϞϜθΑ.
ϲόϴΒσ.
ϝΎτϋϷ ΔΠϻόϣ
ΐΠϳ ϢΘϳ ϥΔϤψΘϨϣ ΔϔμΑ ϙήΤϤϟ ήΘϠϓ ϒϴψϨΗ Ϟ ϩήϴϴϐΗϭ6 ˬ9 ϡΪΨΘγϻ ΐδΣ ήϬη.
ϊϤΟ βϴ ΔϣΎϋΩ ϚϓΔΑήΗϷ ) Ϣϗέ ϞϜθϟ8(
ήΘϠϔϟ Ϛϓ) Ϣϗέ ϞϜθϟ9 (ϭϪϔϴψϨΗ ϢΘϳ ϰΘΣ ΓϮϘΑ ϪΟέ . ˬΔϳΎϐϠϟ ΦδΘϣ ϥΎ Ϋ· ϪϠδϐΑ Ϣϗ
ϡΎϩ
ϻ
ΔϴϋΎϨλ ϕήτΑ ϪϔϴϔΠΘΑ ϢϘΗ . ϝΎμΗϻΎΑ Ϣϗ ˬήΘϠϔϟ ήϴϴϐΘϟΔϣΪΨΑ ϲϨϔϟ ϢϋΪϟ.
ήΘϠϔϟ τγ ϥ Ϧϣ Ϊ΄Ηϭ ϪϧΎϜϣ ϲϓ ήΘϠϔϟ ΐϴήΗ Ϊϋϲήϣ ϦθΨϟ.
ϊϤΟ βϴ ϊοϭ Ϊϋ ˬΔϳΎϬϨϟ ϲϓΔΑήΗϷ ϭΎΣ ϥ Ϧϣ Ϊ΄ΗϭΔϋϮοϮϣ ήΘϠϔϟ Δϳ ΟϴΪ˱ ϡΪΨΘγϻ ϞΒϗ ΎϬϧΎϜϣ ϲϓ.
Ϛϓ ΔλΎΨϟ Γήϴϐμϟ Δόϓήϟ ϡΪΨΘγΎΑ ώϳήϔΘϟ ήΘϠϓ ˯ΎτϏ) Ϣϗέ ϞϜθϟ10.(
ϢΘϴϟ ΓϮϘΑ ϪΟέϭ ϪΟήΨΗ ϰΘΣ ήΘϠϔϟ ϊϓέϪϔϴψϨΗ . ˬϥϮΑΎλϭ ήΗΎϓ ˯ΎϤΑ ϪϠδϐΑ Ϣϗ ˬΔϳΎϐϠϟ ΦδΘϣ ϥΎ Ϋ·
ϡΎϩ
ϻ
ΔϴϋΎϨλ ϕήτΑ ϪϔϴϔΠΘΑ ϢϘΗ . ϝΎμΗϻΎΑ Ϣϗ ˬήΘϠϔϟ ήϴϴϐΘϟΔϣΪΨΑ ϲϨϔϟ ϢϋΪϟ.
ήΘϠϔϟ τγ ϥ Ϧϣ Ϊ΄Η ˬΏΎΒϟ ϖϠϏϭ ϪϧΎϜϣ ϲϓ ήΘϠϔϟ ΐϴήΗ Ϊϋϟ ϞϣΎΣ ϥϭ ϲήϣ ϦθΨϟ ήΘϠϔϡΪΨΘγϻ ϞΒϗ ϪϧΎϜϣ ϲϓ ΟϴΪ˱ ωϮοϮϣ.
έΎϴΘϟ άΧ΄ϣ Ϧϋ βΑΎϘϟ Ϟμϓϭ ΔδϨϜϤϟ ΄ϔσ.
ΔσήϔϤϟ ΔϧϮΨδϟ Ϟλ Ϧϋ ΚΤΑ)ςϔθϟ ΏϮΒϧ ΩΪδϧ ˬΦδΘϣ ήΘϠϔϟ ˬϩήϴϏϭ(
ήϣϷ ϡΰϟ Ϋ· ήΘϠϔϟ ϒϴψϨΗϭ ΔΑήΗϷ ΔϳϭΎΣ ώϳήϔΗϭ ˬΏϮΒϧϷ ϒϴψϨΘΑ Ϣϗ.
ϲϟϮΣ ήψΘϧ30-40 ϙήΤϤϟ ΩήΒϳ ϰΘΣ ΔϘϴϗΩ.
ΪόΑ30-40 ΄ϣ ϲϓ βΑΎϘϟ ϞΧΩ ˬΔϘϴϗΩΔδϨϜϤϟ ϞϴϐθΘΑ Ϣϗϭ έΎϴΘϟ άΧ .ϥϵ ΔδϨϜϤϟ ϞϤόΗ ϥ ΐΠϳ.
ήψΘϧ ˬϞϤόΗ Ϣϟ Ϋ·20 ϯήΧ Γήϣ ϝϭΎΣ ϢΛ ϯήΧ ΔϘϴϗΩ.
ϞμΗ ˬϞϤόΗ ϻ ϝΰΗ ϻ Ϋ·ΔϣΪΨΑ ϲϨϔϟ ϢϋΪϟ .
45
Page 48

46
 Loading...