

Page 1
INSTALLATION INSTRUCTIONS
09-ON DODGE RAM
PART # TB45-5005 / 45-5005
PARTS LIST:
Qty Description Qty Description
1 Bull Bar 10 12mm Lock Washers
Upper Frame Mounting Brackets (for trucks
2
without tow hooks only)
1 Driver/Left Lower Frame Mounting Bracket 2 10-1.5mm x 35mm Hex Bolts
1 Passenger/Right Lower Frame Mounting Bracket 2 10mm Lock Washers
1 Driver/Left Support Bracket 4 10mm x 30mm OD x 3mm Flat Washers
1 Passenger/Right Support Bracket 2 10-1.5mm Hex Nuts
12-1.5mm x 30mm Fine Thread Hex Bolt (for
2
trucks without tow hooks only)
4 12-1.75mm x 35mm Hex Bolts 4 6mm x 12mm OD x 1.4mm Flat Washers S/S
14 12mm x 30.1mm OD x 3.1mm Flat Washers 2 6mm Nylock Hex Nut S/S
8 12-1.75mm Hex Nuts
2 6mm x 20mm Button Head Allen Bolt S/S
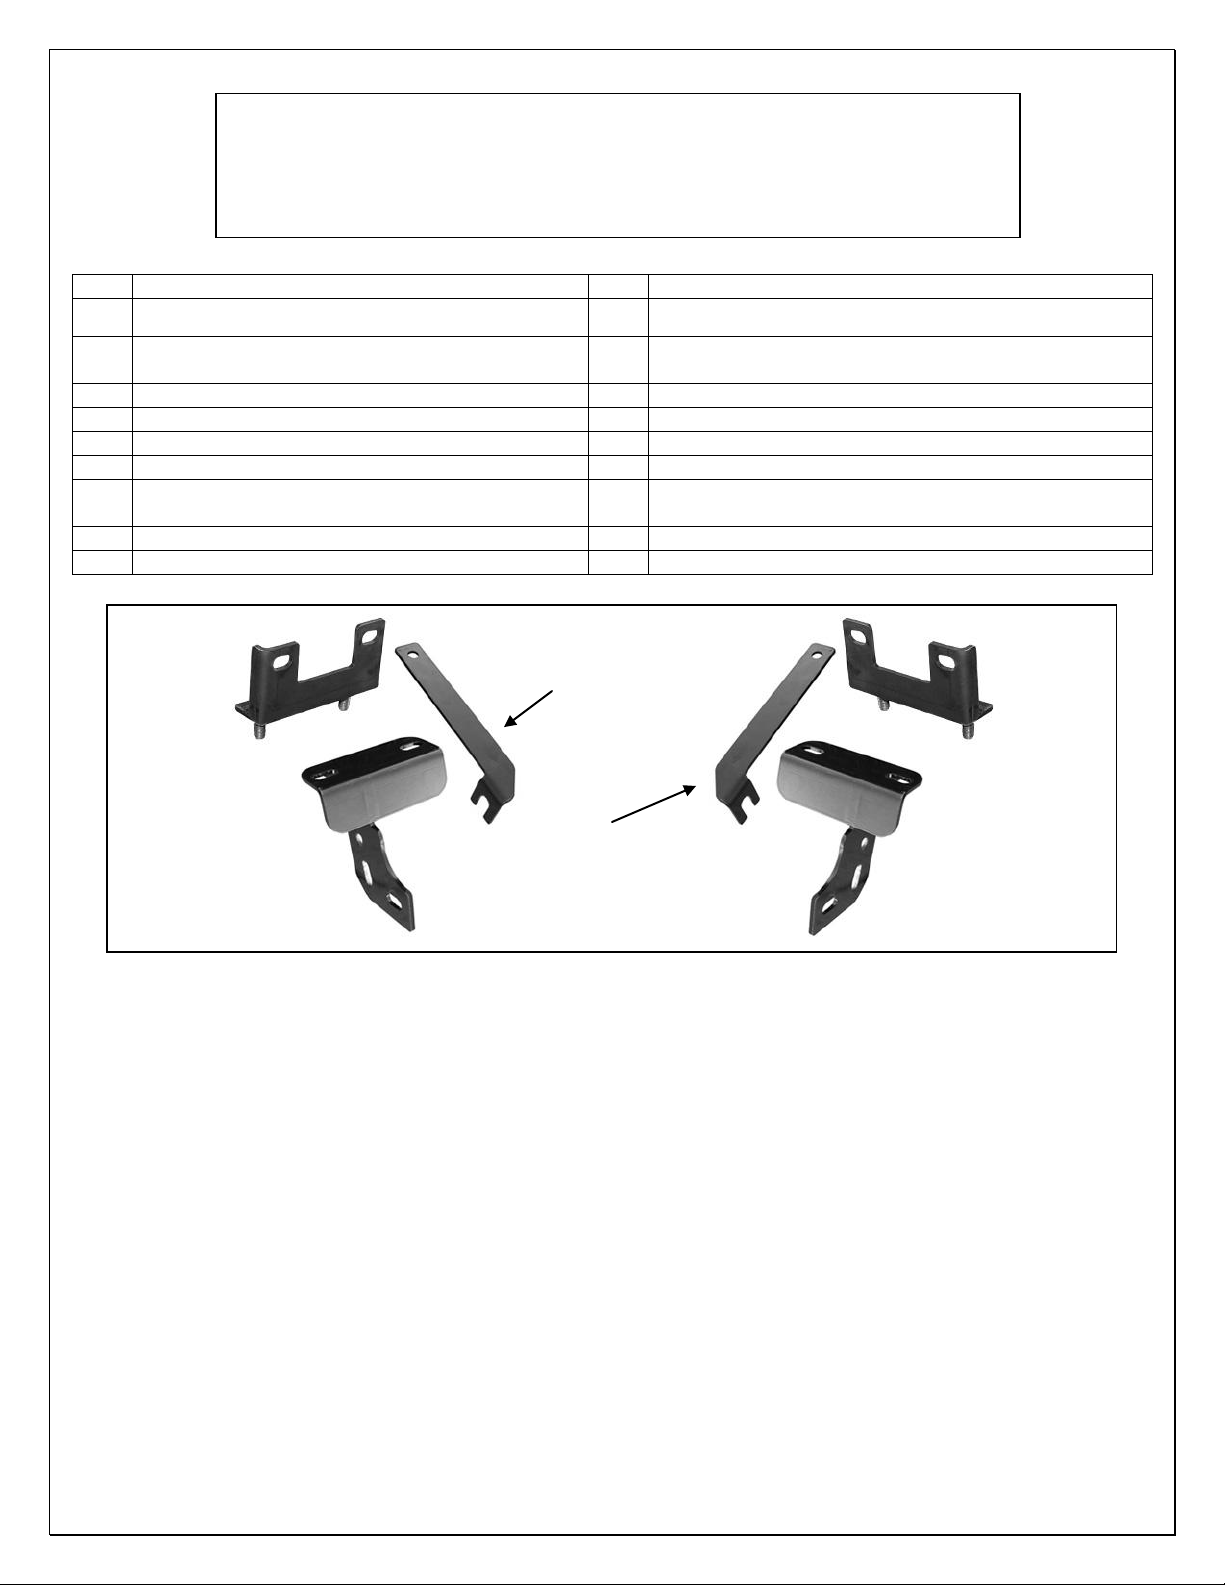
Upper Frame
Bracket (use
without tow
hooks only)
Mounting
on trucks
Passenger Side
Support Bracket
(see note below)
Upper Frame
Mounting
Bracket (use
on trucks
without tow
hooks only)
Passenger Side
Lower Frame
Mounting Bracket
Driver Side Support Bracket
(Support Brackets shown in non-
tow hook direction. Reverse
direction for tow hook equipped
vehicles)
Driver Side Lower
Frame Mounting
PROCEDURE:
1. REMOVE CONTENTS FROM BOX. VERIFY ALL PARTS ARE PRESENT. READ
INSTRUCTIONS CAREFULLY BEFORE STARTING INSTALLATION. CUTTING IS REQUIRED.
ASSISTANCE IS RECOMMENDED.
2. Starting at the underside of the front bumper, carefully remove the plastic splash guard. NOTE:
Depending on the model of truck, the splash guard may be attached to the bottom of the truck with
hex bolts. There are also several two-piece plastic push-in clips across the back, behind the
bumper cover holding the splash guard up to the cover, (Figure 1A). First, locate the clips behind
the bumper cover. Pry the center pin of the clip up with a small flat blade screwdriver and remove
the entire clip, (Figure 1B). The splash guard may also be attached with rivets or hex bolts at the
corners of the bumper cover. If the guard is fastened with rivets, once all of the other hardware
has been removed, hold the bumper cover in place and firmly pull the splash guard from the rivet.
Remove the rivet from the bumper cover and move the splash guard to a clean stable work area.
Pay close attention to the type and location of all factory hardware for reinstallation.
3. From underneath the front of the vehicle, determine if the truck is equipped with or without tow
hooks.
Page 1 of 5
Page 2

For models without tow hooks:
A. Select one of the Upper Frame Brackets and the driver side Lower Frame Mounting Bracket.
Bolt the two together with (2) 12mm Flat Washers, (2) 12mm Lock Washers and (2) 12mm Hex
Nuts. NOTE: On some vehicles, it may be easier to assemble the two-piece bracket on the
vehicle, (Figure 3). Snug the hardware but do not tighten at this time.
B. Remove the hex nuts on the two lower factory bumper bolts, (Figure 2A). Insert the
assembled Mounting Bracket up from behind the bumper and align the holes in the Mounting
Bracket with the bumper bolts. Attach the Bracket to the bumper bolts using the factory hex nuts
and tighten this hardware only.
For models with tow hooks:
A. Remove the (2) hex nuts holding the front of the tow hook to the back of the bumper.
Select the driver side Lower Mounting Bracket and hang it from the tow hook mounting studs,
(Figure 2B). Attach the Lower Mounting Bracket to the two studs using the factory Hex Nuts.
Snug the hardware but do not tighten at this time.
4. Repeat step 3 for the passenger side bracket installation.
5. With help, position the Bull Bar on the inside of the Mounting Brackets. Use the included (4) 12-
1.75mm x 35mm Hex Head Bolts, (4) 12mm Lock Washers, (8) 12mm Flat Washers, and (4) 12-
1.75mm Hex Nuts to attach the Bull Bar to the Mounting Brackets, (Figure 3). Snug but do not
tighten hardware.
6. Stand back from the vehicle and check to see that the Bull Bar is centered and level on the vehicle
and adjust as necessary. Tighten only the hardware securing the Mounting Brackets to the truck.
Do not tighten the hardware on the Bull Bar. Remove the Bull Bar.
7. Hold the splash guard up to the bumper cover and align it with the mounting points. Mark the
location of the Mounting Brackets onto the back of the splash guard, (Figure 4). Measure the
Brackets and the location of the mounting points before cutting to double check the location
marked to cut, (Figure 5). Cut an approximately 1/2" wide by 4" long slot in the splash guard as
pictured in Figure 6. NOTE: The size of the slot is an estimate only and may vary due to different
factory designs of splash guards and front bumper covers. Also, additional cutting may be
required to clear the Support Bracket on vehicles equipped with tow hooks. Hold the Support
Bracket in location to check for clearance and cut as required. IMPORTANT: To maintain the
integrity of the splash guard, do not cut the slot any larger than necessary. It is recommended to
make several small cuts and check the fit often for a clean installation.
8. Once the final cuts have been made, reinstall the splash guard using the factory hardware. Use
the included (2) 6mm x 20mm Allen Bolts, (4) 6mm Flat Washers and (2) 6mm Hex Nuts to
replace the rivets if required, (Figure 7).
9. Install the Support Brackets.
A. For vehicles without tow hooks. Install the driver side Support Bracket with the slotted side
toward the front of the truck. Bolt the Bracket to the inside of the Lower Mount using the round
hole above the two slotted holes in the Bracket. Use the included (1) 10mm x 35mm Hex Bolt, (2)
10mm Flat Washers, (1) 10mm Lock Washer and (1) 10mm Hex Nut, (Figure 8A). Attach the rear
of the Support Bracket to the frame with (1) 12-1.5mm x 30mm Fine Thread Hex Bolt, (1) 12mm
Flat Washer and (1) 12mm Lock Washer. IMPORTANT: The hole in the bottom of the frame is
fine thread. Only use the 12-1.5mm x 30mm Hex Bolt provided in the hardware kit. Repeat this
step for the passenger side Support Bracket. Snug but do not tighten all hardware at this time.
B. For vehicles with tow hooks. Install the driver side Support Bracket with the round hole
toward the front of the truck and the slotted hole to the rear. Bolt the slotted end of the Support
Bracket to the rear mounting bolt for the tow hook. Loosen the factory hex bolt and insert the
slotted end of the Support Bracket under the head of the factory bolt, (Figure 8B).
Do not bolt the front of the Support Bracket to the inside of the Lower Mounting Bracket at this
time. Repeat this step for the passenger side Support Bracket. Snug but do not tighten all
hardware at this time.
Page 2 of 5
Page 3

10. Reinstall the Bull Bar described in Step # 5, (Figure 9). NOTE: For models with tow hooks-
bumper
Attach the front of the Support Bracket to the rear oval hole in the Lower Mounting Bracket for the
Bull Bar using the same 12mm x 35mm Hex Bolts securing the Bull Bar.
11. Level and adjust the Bull Bar and tighten all hardware.
12. Do periodic inspections to the installation to make sure that all hardware is secure and tight.
To protect your investment, wax this product after installing. Regular waxing is recommended to
add a protective layer over the finish. Do not use any type of polish or wax that may contain abrasives
that could damage the finish.
For stainless steel: Aluminum polish may be used to polish small scratches and scuffs on the finish.
Mild soap may be used also to clean the Bull Bar.
For gloss black finishes: Mild soap may be used to clean the Bull Bar.
Driver Side Installation Pictured
Pry up the center pin on the clip to remove the
complete fastener. If the center pin comes out,
remove the housing then push the pin back into
the housing as per Fig 1B to reinstall.
Pin
Fig 1B
Housing
Fig 1A
Viewed from behind the
center of the
Front
Front
(Fig 2A) Driver side mounting locations viewed from
behind the bumper (non tow hook equipped models)
(Fig 2B) Driver side mounting locations viewed from
behind the bumper (tow hook equipped models)
Page 3 of 5
Page 4

IMPORTANT: On trucks without tow
hooks, use only the supplied
12-1.5mm x 30mm Fine Thread Hex Bolt
12mm Flat Washer
12mm Lock Washer
Fig 3
Hold the splash guard up to the brackets
and mark location for cutting to clear
brackets. Cut only what is needed to
insert bracket through the splash guard.
Fig 5
Cut only what is needed to insert bracket
through the splash guard. Do not cut
through the front edge of the splash guard
Driver Side Installation Pictured
Upper Frame Mounting
Bracket installation
Lower Frame Mounting
Bracket installation
Fig 4
Measure from the mounting point
for the splash guard to the
bracket on the driver and
passenger sides. Use this
measurement as a reference point
to check location before cutting
the 1/2" wide x 4" long slot
Installation pictured
without the splash
guard for illustration
Hole for mounting bolt
Fig 6
Page 4 of 5
Page 5

position
Fig 7
Driver Side Installation Pictured
If required, replace the
rivet with the supplied:
6mm x 20mm Button
Head Allen Bolts
6mm Flat Washers
6mm Nylock Hex Nuts
Front
(1) 10mm x 35mm Hex Bolt
(2) 10mm Flat Washers
(1) 10mm Lock Washer
(Fig 8A) Driver side Support
Bracket in "no Tow Hook" position
Front
(Fig 8B) Driver
side Support
Bracket in "with
Tow Hook"
Installation pictured
without the splash
guard for illustration
12mm x 35mm Hex Bolt
(2) 12mm Flat Washers
12mm Lock Washers
12mm Hex Nuts
(also bolts the Bull Bar to
the Mounting Bracket)
Fig 9
(2) 12mm x 35mm Hex Bolts
(4) 12mm Flat Washers
(2) 12mm Lock Washers
(2) 12mm Hex Nuts
Installation Complete
Page 5 of 5
 Loading...