

Page 1
1
Grille Guard
8
12mm lock washers
1
Driver/Left Mounting Bracket
2
10mm x 30mm Button Head Bolts
1
Passenger/Right Mounti ng Brac ket
4
10mm x 27mm OD x 3mm Large Flat Washers
1
Driver/Left Top Bracket
4
10mm Hex Nuts
1
Passenger/Right Top Bracket
4
10mm lock washers
2
10mm x 30mm “T” Bolts
2
8mm Clip Nuts
2
12mm x 120mm Hex Bolts
2
8mm Flat washers
6
12mm x 35mm Hex Bolts
2
8mm Button head bolts
16
12mm x 32mm OD x 3mm Flat Washers
1
Support flange
8
12mm Hex Nut
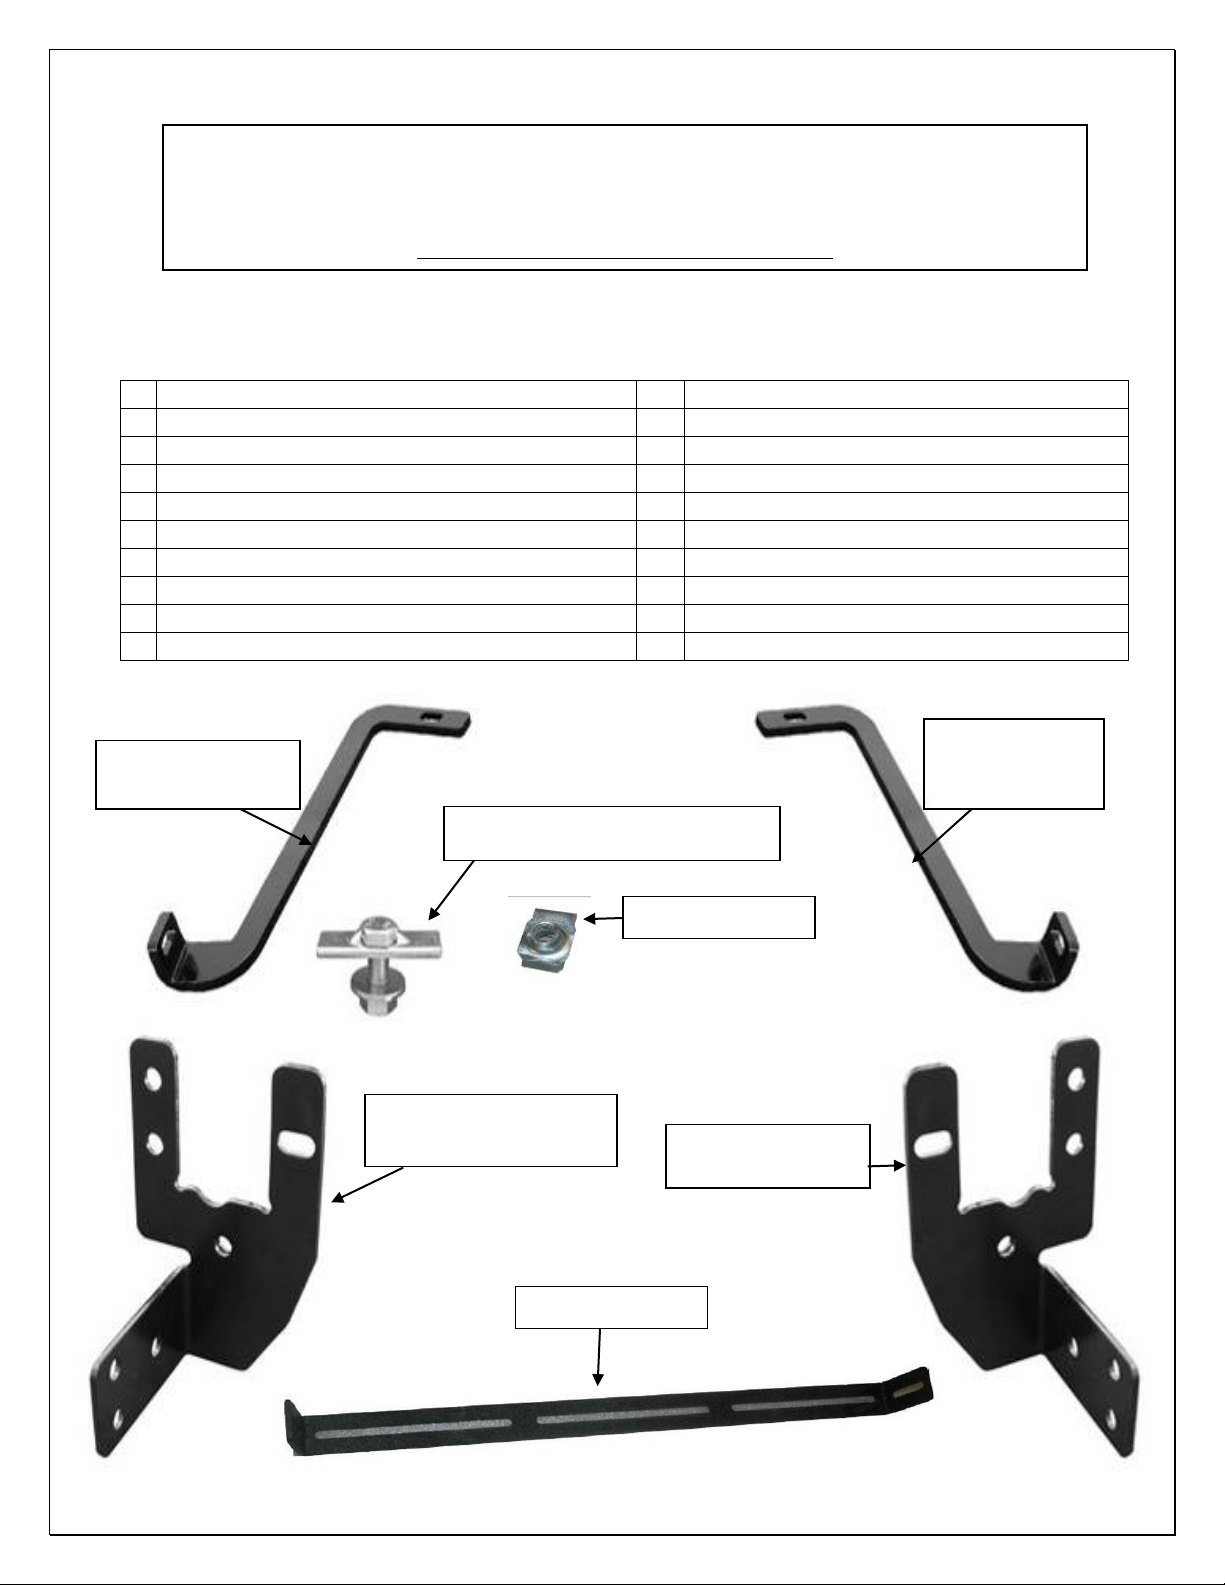
Passenger/Right Side
Driver/Left Side
Passenger/Right
Driver/Left Side
(2) 10mm x 30mm T-Bolt Plates
(pictured with hardware)
INSTALLATIO N IN S T R UCTIONS
(Skid Plate Must be removed- If Equipped)
(2) 8mm Nut Clips
Support Flange
PARTS LIST:
2005-2013 TACOMA GRIL GUARD
PART# 2054 / 2054-2
Side Top Bracket
Top Bracket
Mounting Bracket
Mounting Bracket
Page 1 of 5 09/25/13
Page 2

PROCEDURE:
1. REMOVE CONTENTS FROM BOX. VERIFY ALL PARTS ARE PRESENT. READ INSTRUCTIO NS
CAREFULLY BEFORE STARTING INSTALLATION. DO NOT ATTEMPT INSTALLATION ALONE;
PERSONAL INJURY OR DAMAGE TO THE TRUCK MAY RESULT.
2. Start by Selecting your LED light (Sold Separately) mounting hardware & brackets, you will need to
first attached the hardware to the support flange, (Example of LED light attached Fig 1) NOTE: if you
have your own LED light, LED Manufactures will have similar but different mounting styles or
brackets, once you determine you mounting options attach it to the support flange as seen in
(Fig1)
3. With the LED light attached to the support flange select the (2) 8mm nut clips place each nut clip into
the slotted holes on either side of the support flange, as seen in (Fig 2) with the support flange prepare
you will need to lay the grill guard face down to install the support flange NOTE: (it is recommended to
lay out some of the cardboard your grill guard came in or a blanket to protect the grill guard finish).
place the grill guard face down with this done place the support flange with the LED attached into the
Center flange attach each side of the support flange to the upright plates of the grill guard with (2) 8mm
flat washers, & (2) 8mm button head bolts as seen in (Fig 3) Snug but do not tighten at this time.
4. Next starting on the driver/left side, remove the (3) factory nuts securing the bumper support to the end
of the frame channel, (Fig 4 - 6).Note: If vehicle is equipped with factory skid shield you will need to
remove it, this will not be re-installed.
5. Line-up the (3) upper holes in the driver/left side Frame Mounting Bracket with the threaded studs in the
end of the frame channel. Bolt the Bracket to the studs using the existing nuts removed in Step 4, (Fig
4 - 6). Insert (1) 12mm x 120mm Hex Bolt with (1) 12mm Flat Washer through the lower mounting hole
in the bracket and into the end of the frame channel. Use the included (1) 12mm Flat Washer and (1)
12mm Nylon Lock Nut to secure the Bracket to the lower mounting hole, (Fig 4 & 6). Tighten hardware
at this time.
6. Repeat Steps 4 - 5 for passenger/right side Frame Mounting Bracket installation.
7. Open the hood on the vehicle. Locate the factory hole on each side of the bottom of the radiator
support cross member behind the grille insert, (passenger/right side pictured-Fig 7). Select (1) 10mm
Bolt Plate. Insert the Bolt Plate through the back of the cross member and down through the hole in the
bottom of the cross member, (Fig 7 - 10).
8. Slide the driver/left side Top Bracket through the plastic grille opening and attach it to the previously
inserted Bolt Plate using the included (1) 10mm Flat Washer and (1) 10mm Nylon Lock Nut, (Fig 7). Do
not tighten hardware. Repeat this Step for remaining Top Br acket installation.
9. With assistance, position the Grille Guard onto the inside of the Mounting Brackets. Use the included
(6) 12mm x 35mm Hex Bolts, (12) 12mm Flat Washers and (6) 12mm Nylon Lock Nuts to attach the
Grille Guard to the Mount ing Brack ets, (Fig 5 & 6).
10. Line up the mounting hole in the passenger side Top Bracket with the corresponding hole in the upright
on the Grille Guard. Bolt the Top Bracket to the Grille Guard with the included 10mm x 30mm Button
Head Bolt, (1) 10mm Flat Washer and 10mm Nylon Lock Nut, (Fig 10). Do not tighten hardware at this
time. Repeat this Step to bolt the driver side Top Bracket to the Grille Guard.
11. Align the Grille Guard properly and tighten all hardware.
12. Do periodic inspections to the installation to make sure that all hardware is secure and tight.
Page 2 of 5 09/25/13
Page 3

Fig 1
LED light attached to support flange.
8mm nut clip
Fig 2
Support flange
8mm nut clip
Secure support flange into
Fig 3
To protect your investment, wax this product after installing. Regular waxing is recommended to add a
protective layer over the finish. Do not use any type of polish or wax that may contain abrasives that could
damage the finish.
For black finishes: Mild soap may be used to clean the Grille Guard.
attached (1) per side
center flange with
(1) 8mm Button head bolt
(1) 8mm Flat Washers
(1) 8mm Lock washer
NOTE:
but different mounting styles or brackets,
once you determine you mounting options
attach it to the support flange as seen.
LED Manufactures will have similar
Page 3 of 5 09/25/13
Page 4

Front
Front
12mm x 120 Hex Bolts
12mm Flat Washer
(3) 12mm x 35mm Hex Bolts
Existing (3) threaded
Driver Side Installation Pictured
Fig 4
Fig 5
Fig 6
Factory hex nuts bolting driver
(3) 12mm x 35mm Hex Bolts
(1)12mm x 120 mm Hex Bolts
side Frame Bracket to end of
frame channel
Page 4 of 5 09/25/13
12mm Flat Washer
(6) 12mm Flat Washers
(3) 12mm Nylon Lock Nuts
studs
12mm Nylon Lock
Nut
(6) 12mm Flat Washers
(3) 12mm Nylon Lock Nuts
(2)12mm Flat Washers
(1)12mm Nylon Lock Nut
Page 5

Front
Front
Front
Insert T-Bolt Plate from behind and
through hole in bottom of cross member
Driver side Top Bracket
installation pictured from below
Passenger side Top Bracket
installation pictured from below
Passenger side Top Bracket
installation through grille opening
Bolt the Top Bracket to the Grille Guard
10mm Nylon Lock Nut
Bottom of cross member in front of
10mm T-Bolt Plate
10mm Nylon Lock Nut
T-Bolt Plate
w/hardware
NOTE: It is not necessary but it may be easier
Fig 7
Fig 8
Fig 10
Fig 9
Installation Complete
radiator. Passenger side pictured from
below without skid plate
10mm Flat Washer
10mm x 27mm Large
Flat Washer
Page 5 of 5 09/25/13
to bolt the Top Brackets to the horizontal
cross member in front of the radiator after the
factory skid plate has been removed
10mm x 30mm Button Head Bolt
10mm Flat Washer
 Loading...