

Page 1
INSTALLATION INSTRUCTIONS
p
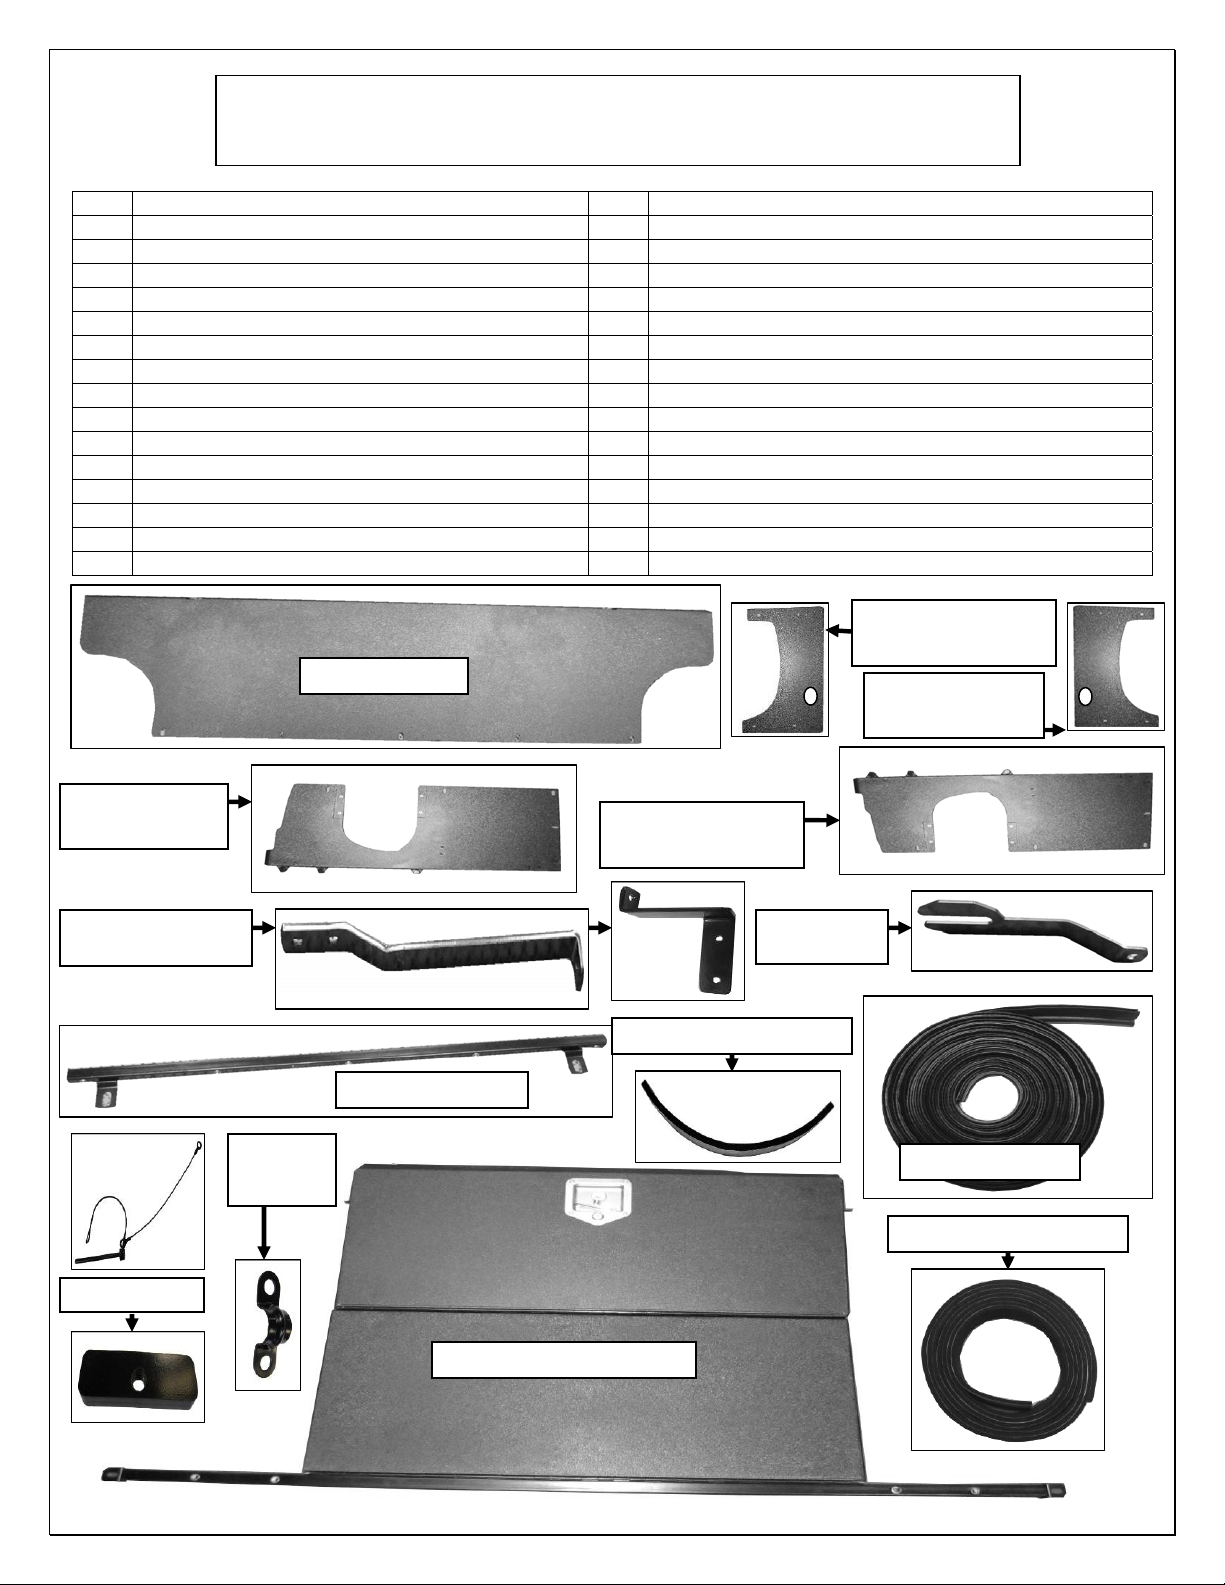
2011-13 JK 4 DR SECURITY CARGO LID PART # ALC25001
PARTS LIST:
Qty Description Qty Description
1 Cargo Center section lid with keys 12 Philips machine screws
1 Passengers/right side plate 8 4mm x 10mm Button head bolts
1 Drivers/left side plate 8 4mm Lock washers
1 Passengers/right side insert plate 8 4mm Flat washers
1 Drivers/left side insert plate 21 8mm x 25mm Hex bolts
1 Back Seat plate 27 8mm Flat washers
1 Bottom cross bar 27 8mm Lock washers
2 Tube Pins with cables 6 Tie Downs brackets
1 Rubber Trim strip 6 8mm Nut Tabs
1 Foam Tape 50mm wide x 6.5mm thick 6 8mm x 35mm Button Head bolts
1 Foam Tape 25mm wide x 3mm thick 2 6mm x 20mm Hex bolts
1 Drivers/left bracket 4 6mm Flat washers
1 Passengers/right rear brackets A & B 2 6mm Lock washers
2 Hex keys (1) 4mm & (1) 8mm 2 6mm Hex Nut
6 8mm x 60mm Button Head bolts
Back seat plate
Passengers / right
Side Insert Plate
Side Insert Plate
Driver / Left
Side Plate
Passengers / right
Side Plate
Passengers / right
Rear brackets
Bracket
A
Bracket
B
Driver / Left
Bracket
Foam tape 50mm wide
Bottom cross tube
Tube Pin
Tie
down
8mm Nut tab
Cargo Center section Lid
Driver / Left
Rubber trim stri
Foam tape 25mm wide
Page 1 of 6
Page 2

PROCEDURE:
1. REMOVE CONTENTS FROM BOX. VERIFY ALL PARTS ARE PRESENT. READ
INSTRUCTIONS CAREFULLY BEFORE STARTING INSTALLATION.
2. Start by Referring to owner’s manual for removal of the hard top or soft top pending on which you
have.
3. With the roof removed, fold the rear seat forward and down locate and remove the (2) 18mm
factory nuts as seen in (Fig 1) with the nuts removed select the Bottom cross bar and secure it
with the (2) 18mm factory nuts with the nut inserts facing forward, Snug but do not tighten
hardware.
4. Next select the Back seat plate and secure it to the bottom cross bar with the (5) 8mm x 25mm
Hex bolts (5) 8mm Flat washers & (5) 8mm Lock washers, as seen in (Fig 2) Snug but do not
tighten hardware.
5. Staring on the Driver/left side select the 50mm wide Foam tape trim it to approx 115mm in length
apply the tape to the body lip in the front where the Roof sits just behind the rear door, followed by
the 25mm wide foam tape and following down to the end where the factory rubber is near the rear
of vehicle, as seen in (Fig 3)
6. With the foam tape in place select the Cargo Center section lid notice the top tube is attached to
lid, with help place the lid in place on top of the back seat plate and attach the top tube to the back
seat plate with the (4) 8mm x 25mm Hex bolts (4) 8mm Flat washers & (4) 8mm Lock washers, as
seen in (Fig 4 & 4A) Snug but do not tighten hardware.
Now that the center section lid is attached to the back seat plate lift the lid section over to sit on
7.
the back seat out of the way as seen in (Fig 5). Select the Drivers / left side plate and secure it to
the upper cross bar top with (2) 8mm x 35mm Button Head bolts (2) 8mm Flat washers & (2) 8mm
lock washers, as seen in (Fig 6) Snug but do not tighten hardware. Secure the bottom of the side
plate with (3) 8mm x 25mm Hex bolt (3) 8mm Flat washer & (3) 8mm Lock washer, as seen in
(Fig 7) Snug but do not tighten hardware.
With the rear door fully opened mark the latch plate position before loosening the locking latch
8.
Repeat this step for Passengers / right side plate.
plate (do not remove only loosen) as seen in (Fig 8) with the latch plate loosened Select the
Drivers / left rear bracket & slide the Drivers / left rear bracket in between the gasket and the latch
plate Snug but do not tighten hardware. As seen in (Fig 8A) secure the top of the bracket to the
side plate with (1) 8mm x 25mm Hex bolt (1) 8mm Flat washer & (1) 8mm lock washer, seen in
(Fig 8B) Snug but do not tighten hardware.
Remove Hex bolt for the hold down tab, Select the Passengers / right side bracket (A) secure the
9.
bracket with the hold down fastener and tab Snug but do not tighten hardware. As seen in (Fig 9)
attach the passengers rear bracket (B) to the side plate with (1) 8mm x 25mm Hex bolt (1) 8mm
Flat washer & (1) 8mm lock washer, Snug but do not tighten hardware.
2) 6mm x 20mm Hex bolt, (4) 6mm Flat washer, (2) 6mm lock washer & (2) 6mm Hex nuts as
(
seen in (Fig 9A) Snug but do not tighten hardware.
Attach brackets A & B with
10. With the Side plate installed attach the side plate inserts with the (4) 4mm x 20mm button head
bolt (4) 4mm Flat washer & (4) 4mm lock washer, seen in (Fig 10) place the rubber strip around
the opening of the plates seen in (Fig10A) trim to length as needed.
Page 2 of 6
Page 3

r
A
p
r
r
11. Begin to place the hardtop or soft top back into place Notice if using a soft top you will need to
place the (3) 8mm nut tabs per side just under the lip in which the roof sits on to secure it down,
with the top in place begin to close the Cargo lid slowly you will need to adjust the lid as you close
it (notice it may be necessary to tap the side plates for a better fitment as seen in (Fig 11 through
11A drivers side shown) once aligned begin to bolt down the roof with the (6) 8mm x 60mm
Button head bolts (6) 8mm Flat washers & (6) 8mm lock washers as seen in (Fig 12) (notice if not
placing the roof back on use the (6) 8mm x 25mm Hex bolt (6) 8mm Flat washer & (6) 8mm lock
washer to secure the cargo side plates in place).
12. With the roof now in place & secured begin to tighten all hardware for the Cargo lid, top tube, back
seat plate & side plates once done, Adjust the rear door’s locking latch plate making sure the door
is aligned before closing the door as seen in (Fig 13) tighten all remaining hardware.
13. Select the tie down brackets and secure them to the side plates with (2) Philips machine screws
per bracket as seen in (Fig 14)
14. Select the Tube pins then locate the holes as seen in (Fig 15 Passenger side shown) and place
the Pins through the holes in the tubes locking the middle section of the cargo lid down repeat for
Driver side.
15. Do periodic inspections to the installation to make sure that all hardware is secure and tight.
Fig 1
Fig 2
Back seat plate
ttached with 8mm hardw are
Remove 18mm bolts
for bottom cross ba
18mm bolts for
bottom cross ba
Fig 3
Fig 4
Place100mm
wide Foam
strip here
Cargo
Lid
50mm wide
Foam stri
Factory
rubbe
Back seat plate
Page 3 of 6
Page 4

r
A
Fig 4A Fig 5
Attached with 8mm hardware
Back seat plate
Fig 6
Fig 7
Attached with 8mm button
head bolts& ha
dware
Cargo
Lid
Driver side plate
Back seat plate
Fig 8
Fig 8A
Locking Latch plate
Cargo
Lid
Cargo
Lid
Driver side plate
Back seat plate
ttached with 8mm hardw are
Driver side
bracket
Page 4 of 6
Page 5

p
A
Fig 9 Fig 8B
Attached
with 8mm
hardware
Driver side plate
Back seat plate
Driver side
bracket
Fig 9A Fig 10
Passenger side
bracket B
Passenger side
late
Attached
with 6mm
hardware
Passenger side
bracket A
Fig 10A
Fig 11
Rubber Strip
trim as needed
Passenger side
bracket A
Attached
with 8mm
hardware
Passenger side
shown
ttached
with 4mm
hardware
Driver side shown
Tap to align
Page 5 of 6
Page 6

Fig 11A
Driver side shown
Tap to align
Fig 12
Driver side shown
Secure roof with
8mm x 60mm
Button head bolts
Fig 13
Locking Latch plate
Make sure to realign
Fig 14
Driver side shown
Tie down shown
Tube Pin placed
through hole
Tube pin locked
Page 6 of 6
 Loading...