

Page 1
INSTALLATION INSTRUCTIONS
2-1/2” SPORT BAR
2014-15 NISSAN ROGUE
EXCLUDES 2014 “SELECT” MODEL
PART # 9505
Page 2
2-1/2” SPORT BAR
p
2014-15 NISSAN ROGUE
EXCLUDES 2014 “SELECT” MODEL
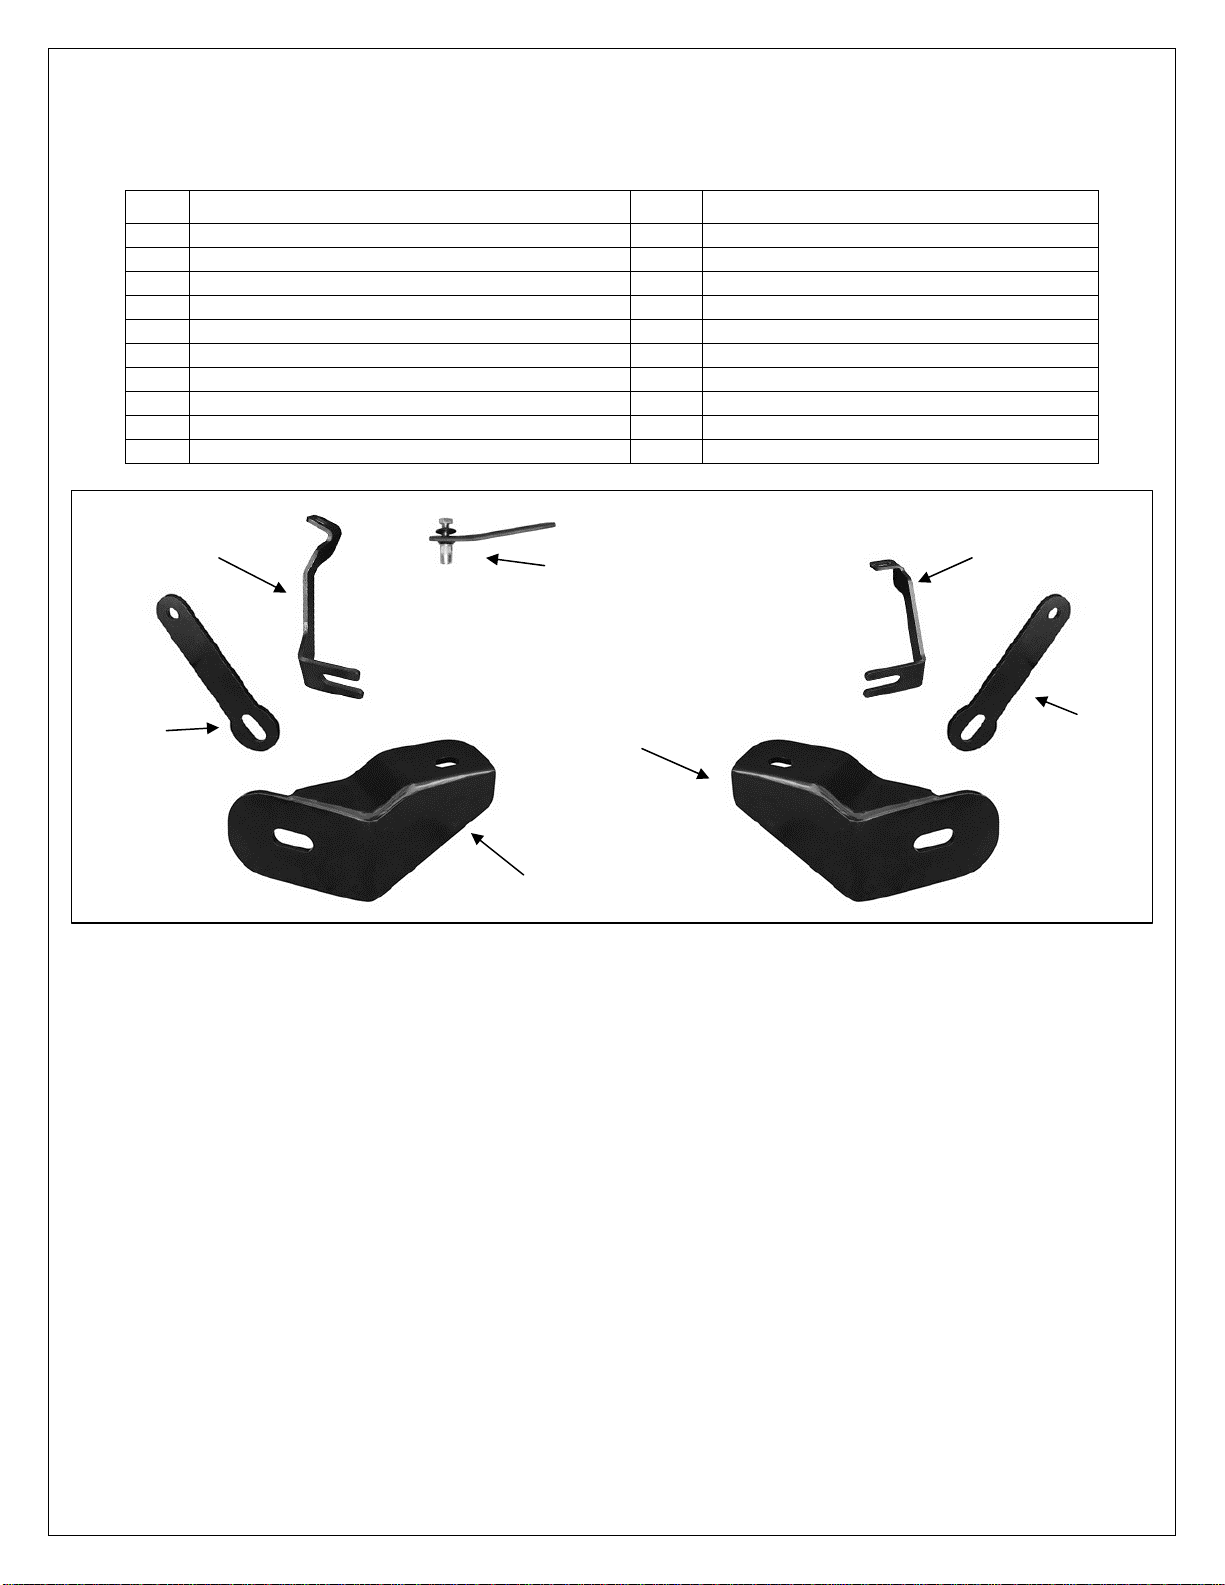
PARTS LIST:
Qty Description Qty Description
1 2.5” Nudge Bar 2 10mm Threaded Inserts
1 Driver/Left Frame Mounting Bracket 1 10mm Insert Tool
1 Passenger/Right Frame Mounting Bracket 3 10-1.5 x 35mm Hex Bolts
1 Driver/Left Support Bracket 2 10mm x 30mm OD x 2.5mm Flat Washers
1 Passenger/Right Support Bracket 2 10mm Lock Washers
2 Flat Support Brackets 2 8-1.25 x 35mm Hex Bolt
2 3/8” Special Self Tapping Bolts 4 8mm x 28mm OD x 3mm Flat Washers
2 12-1.75 x 50mm Hex Bolts 2 8mm Lock Washers
2 12mm x 30mm OD x 3mm Flat Washers 2 8mm Hex Nuts
2 12mm Lock Washers
Passenger/Right
Support Bracket
10mm Threaded Insert
ictured with Insert Tool
Driver/Left
Support Bracket
Flat Support
Bracket
Driver/Left
Frame Bracket
Flat Support
Bracket
Passenger/Right
Frame Bracket
PROCEDURE:
1. REMOVE CONTENTS FROM BOX. VERIFY ALL PARTS ARE PRESENT. READ
INSTRUCTIONS CAREFULLY BEFORE STARTING INSTALLATION. CUTTING IS
REQUIRED.
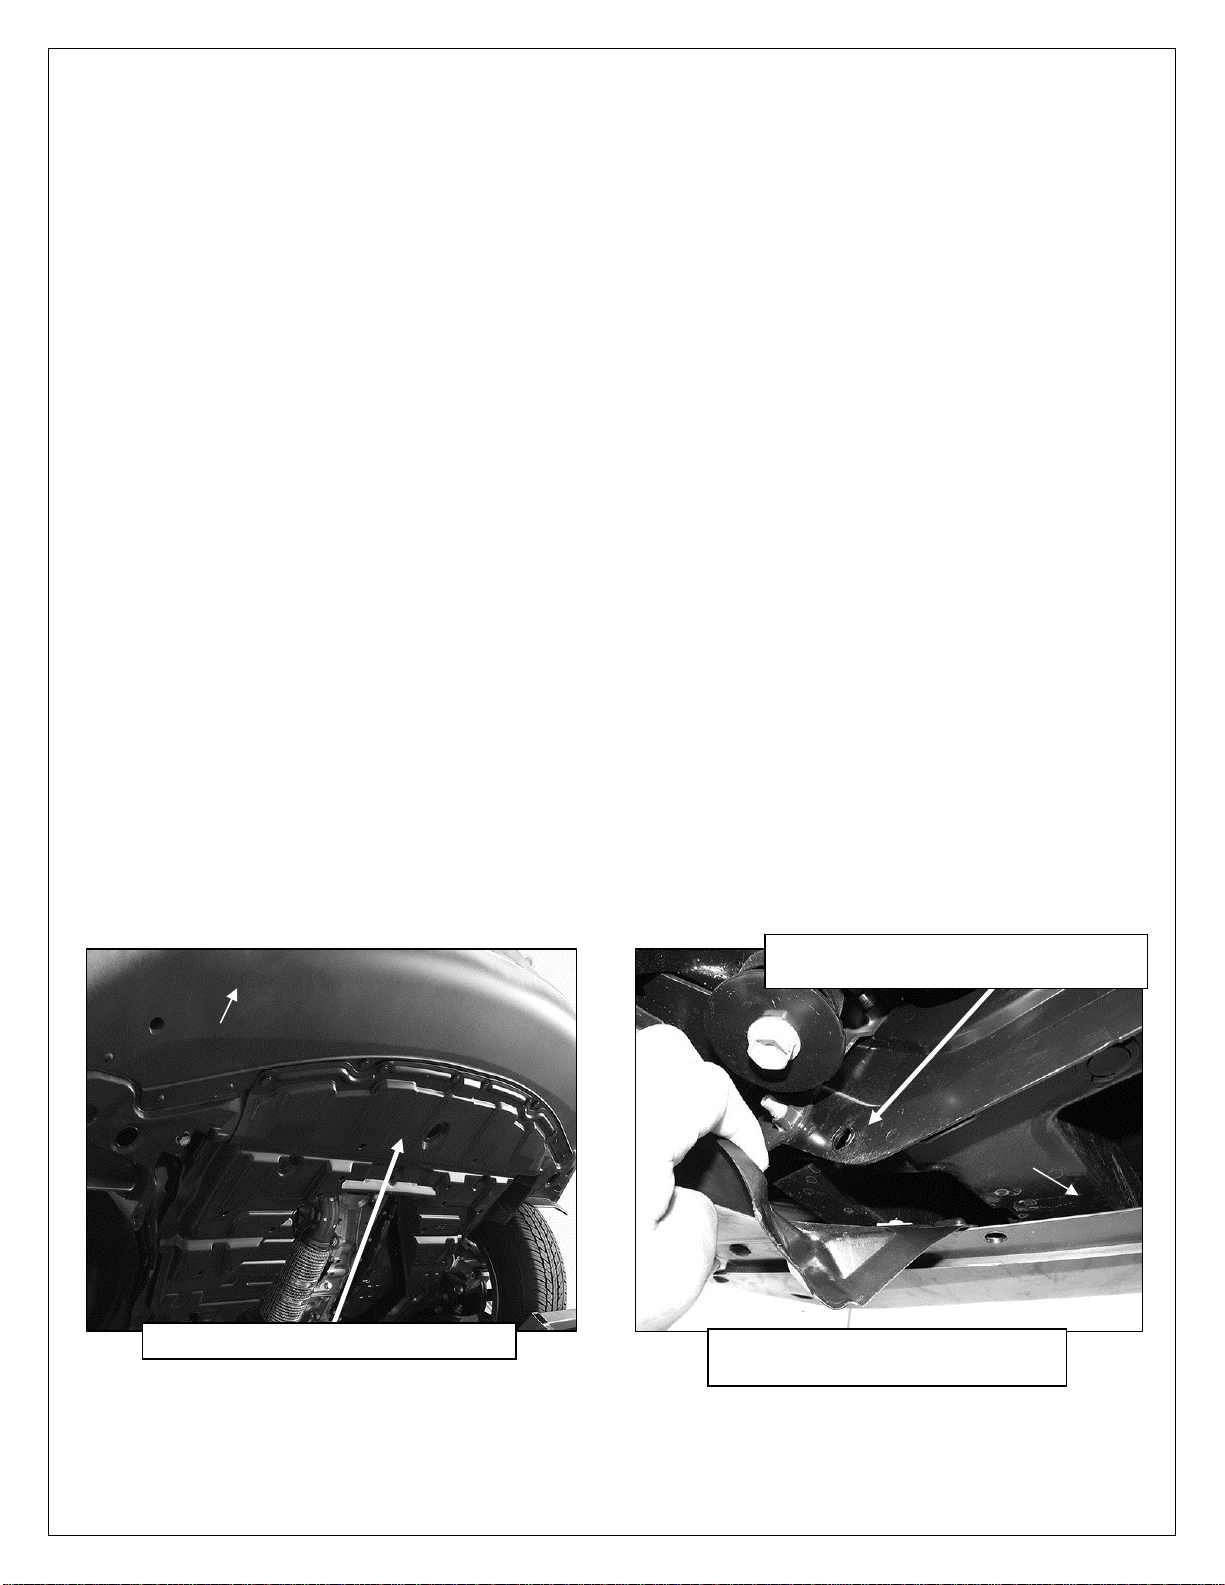
2. Start installation from under the front of the vehicle and remove the plastic splash guard,
(Figure 1). Pay close attention to the type and location of all factory hardware for reinstallation.
3. Locate the factory hole in the cross member under the radiator, (Figure 2). Select (1) Flat
Support Bracket, (Figure 3). Bolt the smaller end of the Support Bracket to the back of the
cross member with (1) 8mm x 35mm Hex Bolt, (2) 8mm Flat Washers, (1) 8mm Lock Washer
and (1) 8mm Hex Nut, (Figure 4). Leave hardware loose at this time.
4. Select the driver side Frame Mounting Bracket, (Figure 5). Hold the Bracket up in position
against the bottom of the frame cross member to help determine correct factory hole to use
next, (Figures 6 & 7). Line up the mounting hole in the Bracket with the hole in the cross
member. Attach the Bracket to the cross member with (1) 3/8” Self Tapping Flange Bolt,
(Figure 7). Do not fully tighten Bolt at this time.
5. Repeat Steps 3 & 4 to install the passenger side Flat Support Bracket and Frame Bracket,
(Figures 8—10).
Page 1 of 6 6/9/14
(DP)
Page 3
2-1/2” SPORT BAR
2014-15 NISSAN ROGUE
EXCLUDES 2014 “SELECT” MODEL
6. Next, select the driver side Bent Support Bracket, (Figure 11). Hold the Bracket up in position
to help locate the correct factory hole to attach it to, (see Figures 7, 13A & 14). Select (1)
10mm Threaded Insert, (1) 10mm Hex Bolt, (1) 10mm Flat Washer and (1) 10mm Insert Tool.
Assemble the Tool at pictured in Figure 12, Push the Tool and Insert assembly into the factory
hole. NOTE: If Insert fits too tight, lightly tap it into place with a small hammer.
7. Firmly hold the handle on the Tool and tighten the hex bolt in the Insert until it is fully collapsed
and locked in place, (Figures 13A & 13B). NOTE: Do not over tighten the Insert or a pull out
may occur. Once Insert is collapsed, remove the hex bolt and tool from the Insert.
8. Attach the Support Bracket to the Threaded Insert with (1) 10mm Hex Bolt, (1) 10mm Lock
Washer and (1) 10mm Flat Washer, (Figure 14). Do not fully tighten hardware at this time.
9. Repeat Steps 6—8 to install the passenger side Bent Support Bracket, (Figures 10, 15—17).
10. With assistance, position the Sport Bar up to the Mounting Brackets. Attach the Sport Bar to
the Brackets with (2) 12mm x 50mm Hex Bolts, (2) 12mm Lock Washers and (2) 12mm Flat
Washers, (Figure 18). Snug but do not tighten hardware.
11. Adjust and align the Sport Bar properly and tighten all hardware. Do not over-tighten 3/8” Self
Tapping Flange Bolts, (Figures 7 & 10).
12. Hold the plastic splash guard up against the bottom of the vehicle. Mark the Bracket location
onto the back of the splash guard, (Figure 19A). Cut out the marked area on both sides of the
plastic cover with a sharp knife or hacksaw blade, (Figure 19B). IMPORTANT: Cut as little
from the splash guard as possible for best results. Re-install the splash guard using the factory
fasteners.
13. Do periodic inspections to the installation to make sure that all hardware is secure and tight.
To protect your investment, wax this product after installing. Regular waxing is recommended to add a protective layer
over the finish. Do not use any type of polish or wax that may contain abrasives that could damage the finish.
For stainless steel: Aluminum polish may be used to polish small scratches and scuffs on the finish. Mild soap may be
used also to clean the Sport Bar.
For gloss black finishes: Mild soap may be used to clean the Sport Bar.
Driver Side Installation Pictured
Locate the factory hole in the bottomcorner of the radiator support
Front
Front
(Fig 1) Remove plastic splash guard
(Fig 2) Back of driver side mounting
location pictured from below
Page 2 of 6 6/9/14
(DP)
Page 4

(Fig 3) Flat Support Bracket
Front
(Fig 5) Driver side Frame Bracket
Use factory hole for
Threaded Insert to
install Support Bracket
Special 3/8” Self
Tapping Flange Bolt
Front
(Fig 7) Driver side Frame and Flat Bracket installed
2-1/2” SPORT BAR
2014-15 NISSAN ROGUE
EXCLUDES 2014 “SELECT” MODEL
8mm x 35mm Hex Bolt
(2) 8mm Flat Washers
8mm Lock Washer
8mm Hex Nut
Front
(Fig 4) Driver side mounting location for
Support Bracket pictured from below
Front
(Fig 6) Driver side Frame Bracket mounting location
Use 12mm Hex Bolt
to temporarily line up
Brackets before final
assembly
Page 3 of 6 6/9/14
(DP)
Page 5

(Fig 8) Passenger Side Frame Bracket
Special 3/8” Self
Tapping Flange Bolt
Front
(Fig 10) Passenger Frame and Flat Bracket installed
10mm Hex Bolt
10mm Flat Washer
Insert Tool
10mm Threaded
Insert
Fig 12
2-1/2” SPORT BAR
2014-15 NISSAN ROGUE
EXCLUDES 2014 “SELECT” MODEL
Front
(Fig 9) Passenger Frame Bracket mounting location
Use factory hole for
Threaded Insert to
install Support Bracket
Front
(Fig 11) Driver side Support Bracket
Page 4 of 6 6/9/14
(DP)
Page 6

y
Driver Side 10mm
Threaded Insert
installed for
Support Bracket
Fig 13A
Front
10mm Hex Bolt
10mm Lock Washer
10mm Flat Washer
Use 12mm Hex Bolt
to temporarily line up
Brackets before final
assembly
Front
Fig 14
Front
(Fig 16) Passenger side Insert installed
2-1/2” SPORT BAR
2014-15 NISSAN ROGUE
EXCLUDES 2014 “SELECT” MODEL
(Fig 13B) Insert
full
installed
Front
(Fig 15) Passenger
side Support Bracket
Page 5 of 6 6/9/14
(DP)
Page 7

(Fig 17) Passenger side Support Bracket installed
Front
2-1/2” SPORT BAR
2014-15 NISSAN ROGUE
EXCLUDES 2014 “SELECT” MODEL
10mm Hex Bolt
10mm Lock Washer
10mm Flat Washer
12mm Hex Bolt
12mm Lock Washer
12mm Flat Washer
Front
Front
(Fig 19A) Hold plastic cover up to bottom of brackets.
Mark location of brackets onto inside of cover
Complete Installation
(Fig 18) Driver side installation pictured
Front
(Fig 19B) Cut as little out of the cover as possible to
clear Brackets. Cut out sections illustrated above for
example only. Actual cuts may be different
Page 6 of 6 6/9/14
(DP)
 Loading...