

Page 1

INSTALLATION INSTRUCTIONS
SPORT BAR
2014 KIA SORENTO/2013-14 HYUNDAI SANTA FE
Page 2
SPORT BAR
2014 KIA SORENTO/2013-14 HYUNDAI SANTA FE
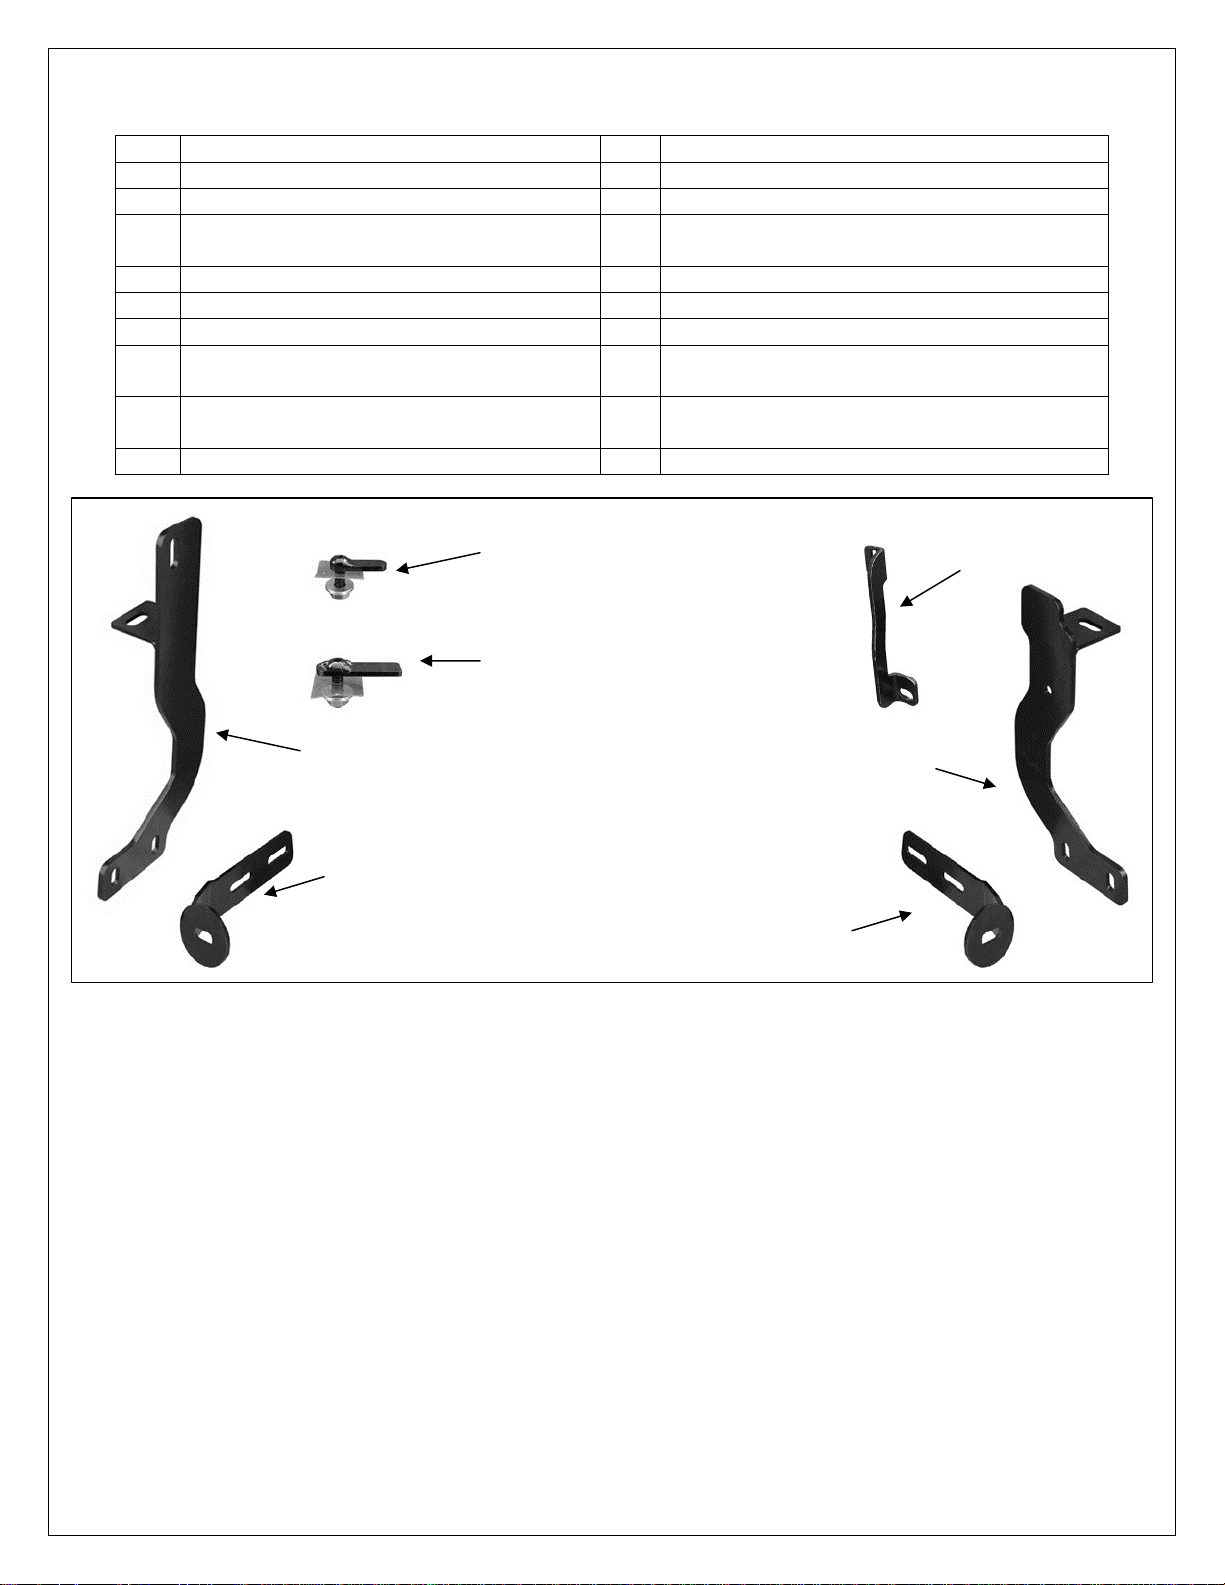
PARTS LIST:
Qty Description Qty Description
1 Sport Bar 2 12-1.75mm x 50mm Hex Bolts
1 Driver/Left Frame Mounting Bracket 2 12mm x 32mm x 3mm Flat Washers
Passenger/Right Frame Mounting
1
Bracket
2 12mm Lock Washers
1 Driver/Left Support Bracket 5 10-1.5mm x 30mm Hex Bolts
1 Driver/Left Tube Mounting Bracket 13 10mm x 27mm x 3mm LRG Flat Washers
1 Passenger/Right Tube Mounting Bracket 1 10mm x 24mm x 2.2mm STD Flat Washer
10mm x 35mm Small Button Head Bolt
2
Plates (16mm x 50mm)
10mm x 35mm Large Button Head Bolt
2
Plates (18mm x 67mm)
7 10mm Lock Washers
2 10mm Locking Serrated Flange Nuts
4 10mm Plastic Retainers 7 10mm Hex Nuts
(2) 10mm Small Bolt Plates
Driver/Left
Support Bracket
(2) 10mm Large Bolt Plates
Passenger/Right Frame
Mounting Bracket
Driver/Left Frame
Mounting Bracket
Passenger/Right Sport Bar
Mounting Bracket
Driver/Left Sport Bar
Mounting Bracket
PROCEDURE:
1. REMOVE CONTENTS FROM BOX. VERIFY ALL PARTS ARE PRESENT. READ INSTRUCTIONS
CAREFULLY BEFORE STARTING INSTALLATION. ASSISTANCE IS RECOMMENDED. CUTTING
IS REQUIRED.
2. Starting under the front of the vehicle, remove the large plastic splash guard, (Figure 10). NOTE: Pay
close attention to the size, type and location of all factory hardware for reinstallation.
3. Locate the mounting area at the front of the frame channel on the driver side, (Figure 1). Remove the
rubber plugs on the bottom and inner side of the frame channel. NOTE: It may be easier to access the
side of the frame from above, (Figure 5B). Open the hood and locate the mounting hole in the side of
the frame channel.
4. Select (1) 10mm Small Bolt Plate and (1) 10mm Plastic Retainer, (Figure 2A). Partially thread the
Retainer onto the Bolt Plate. IMPORTANT: The Plastic Retainer is designed to prevent the Bolt Plate
from falling into the frame channel and to aid in mounting the Bracket. Insert the Small Bolt Plate into
the hole in the side of the frame, (Figure 2C). Thread the Plastic Retainer all the way down until it is
against the frame.
5. Repeat Step 4 to install the Large Bolt Plate, (Figure 2B), in the hole in the bottom of the frame
channel, (Figure 2C).
Page 1 of 5 7/3/13 (DP)
Page 3

SPORT BAR
2014 KIA SORENTO/2013-14 HYUNDAI SANTA FE
6. Select the driver side Frame Mounting Bracket. Slide the Bracket up and onto the Large Bolt Plate in
the bottom of the frame channel, (Figure 3). Secure the Bracket to the Bolt Plate with (1) 10mm x
27mm Large Flat Washer, (1) 10mm Lock Washer and (1) 10mm Hex Nut. Do not tighten hardware.
7. Next, select the driver side Support Bracket, (Figure 4). Attach the top of the Support Bracket, (vertical
slot), to the 10mm Small Bolt Plate in the side of the frame channel with (1) 10mm x 24mm STD Flat
Washer and (1) 10mm Locking Flange Nut, (Figures 5A & 5B). Line up the horizontal slot in the lower
end of the Support Bracket with the hole in the Mounting Bracket. Bolt the Support Bracket to the inside
of the Mounting Bracket with (1) 10mm x 30mm Hex Bolt, (2) 10mm Large Flat Washers, (1) 10mm
Lock Washer and (1) 10mm Hex Nut, (Figure 5A). Do not fully tighten hardware at this time.
8. Select the driver side Tube Mounting Bracket, (Figure 6). Bolt the Bracket to the inside of the Frame
Bracket with (2) 10mm x 30mm Hex Bolts, (4) 10mm Large Flat Washers, (2) 10mm Lock Washers and
(2) 10mm Hex Nuts. Leave hardware loose at this time.
9. Move over to the passenger side of the vehicle and locate the mounting area as described in Step 3.
Remove the rubber plugs in the bottom and inner side of the frame channel. Select (1) Small Bolt Plate
and Plastic Retainer, (Figure 2A). Insert the Bolt Plate into the hole in the side of the frame. Thread the
Plastic Retainer all the way down until it is against the frame as described in Step 3, (Figure 7A).
Repeat Steps 4 & 5 to install the 10mm Large Bolt Plate in the bottom of the frame channel, (Figure
2B & 7B).
10. Select the passenger side Frame Bracket. Insert the Bracket up and over the Large Bolt Plate first then
onto the Small Bolt Plate in the side of the frame, (Figure 7A). Secure the Bracket to the Small Bolt
Plate with (1) 10mm x 27mm Large Flat Washer and (1) 10mm Locking Flange Nut. Attach the Bracket
to the Large Bolt Plate in the bottom of the frame channel with (1) 10mm x 27mm Large Flat Washer,
(1) 10mm Lock Washer and (1) 10mm Hex Nut, (Figure 7B). Snug but do not fully tighten hardware.
11. Repeat Step 8 to install the passenger side Tube Mounting Bracket, (Figure 8).
12. With assistance, hold the Sport Bar up to the Mounting Brackets. Attach the Sport Bar to the Brackets
using the included (2) 12mm x 50mm Hex Bolts, (2) 12mm Lock Washers and (2) 12mm Flat Washers,
(Figure 11).
13. Level and adjust the Sport Bar and tighten the Frame Mounting Bracket to vehicle hardware only.
IMPORTANT: Tighten the (2) 10mm Hex Nuts on the bolt plates in the bottom of the frame channel
first, and then tighten the (2) 10mm Hex Nuts securing the Brackets to the side of the frame channel.
Next, tighten the (2) 12mm Hex Bolts securing the Sport Bar to the Tube Brackets, (Figures 6 & 8).
Temporarily remove the Sport Bar with the Tube Brackets attached.
14. Hold the plastic splash guard up in position against the (2) Frame Brackets, (Figure 9). Use a marker
or removable tape to mark the location of the Frame Brackets onto the inside of the splash guard,
(Figure 10). Cut slots in the splash guard to clear the Brackets. IMPORTANT: Start with small slots and
gradually enlarge the size for best fit. Do not cut through the front edge of the splash guard. Do not
remove the mounting locations from the cover. Only cut slots big enough to clear the Frame Brackets.
Once the cover clears the Brackets, reinstall the cover with the factory hardware removed in Step 2.
15. Reinstall the Sport Bar, align and adjust as required and fully tighten all hardware.
16. Do periodic inspections to the installation to make sure that all hardware is secure and tight.
To protect your investment, wax this product after installing. Regular waxing is recommended to add a
protective layer over the finish. Do not use any type of polish or wax that may contain abrasives that could
damage the finish.
For stainless steel: Aluminum polish may be used to polish small scratches and scuffs on the finish. Mild
soap may be used also to clean the Sport Bar.
For gloss black finishes: Mild soap may be used to clean the Sport Bar.
Page 2 of 5 7/3/13 (DP)
Page 4

plug
p
Locate and
remove
s
Front
(Fig 1) Driver side mounting
location
ictured from below
Attach the driver side Frame
Bracket to Large Bolt Plate with:
10mm Large Flat Washer
10mm Lock Washer
10mm Hex Nut
Front
(Fig 3) Driver side Frame
Bracket pictured from below
SPORT BAR
2014 KIA SORENTO/2013-14 HYUNDAI SANTA FE
(Fig 2A) Small Bolt Plate
installs in side of frame
Front
Fig 2C
(Fig 2B) Large Bolt Plate
installs in bottom of frame
Top
(Fig 4) Driver side
Support Bracket
Bottom
Page 3 of 5 7/3/13 (DP)
Page 5

2014 KIA SORENTO/2013-14 HYUNDAI SANTA FE
10mm x 30mm Hex Bolt
(2) 10mm Large Flat Washers
10mm Lock Washer
10mm Hex Nut
10mm Small Flat Washer
10mm Lock Flange Nut
Front
Front
(Fig 5A) Driver side Support Bracket.
NOTE: Only required for driver side
Front
(Fig 5B) Driver Support Bracket pictured from above
(2) 10mm x 30mm Hex Bolts
(4) 10mm Large Flat Washers
(2) 10mm Lock Washers
(2) 10mm Hex Nuts
10mm Small Flat Washer
10mm Lock Flange Nut
Fig 6
Front
(Fig 7A) Top of passenger side Frame
Bracket and Bolt Plate pictured from above
(Fig 7B) Bottom of passenger Frame Bracket
attached to Large Bolt Plate pictured from below
10mm Large Flat Washer
10mm Lock Washer
10mm Hex Nut
SPORT BAR
Front
Page 4 of 5 7/3/13 (DP)
Page 6

Front
(Fig 8) Passenger side Frame Bracket and Tube Bracket
Front
IMPORTANT: Do not cut
off the mounting points
Fig 10
Complete Installation
SPORT BAR
2014 KIA SORENTO/2013-14 HYUNDAI SANTA FE
(2) 10mm x 30mm Hex Bolts
(4) 10mm Large Flat Washers
(2) 10mm Lock Washers
(2) 10mm Hex Nuts
Fig 9
Hold the plastic splash guard up in position
against the bottom of the Brackets. Mark the
location of the Frame Brackets only onto the
inside of the plastic cover. Remove the Sport
Bar. Carefully use a sharp knife or hacksaw
blade to cut the slots. IMPORTANT: Do not
cut the mounting points off of the cover
Front
Fig 11
12mm x 50mm Hex Bolt
12mm Lock Washer
12mm Flat Washer
Page 5 of 5 7/3/13 (DP)
 Loading...