

Page 1
r
r
/
r
/
r
/
INSTALLATION INSTRUCTIONS
502702/502702-2
PARTS LIST:
Qty Description Qty Description
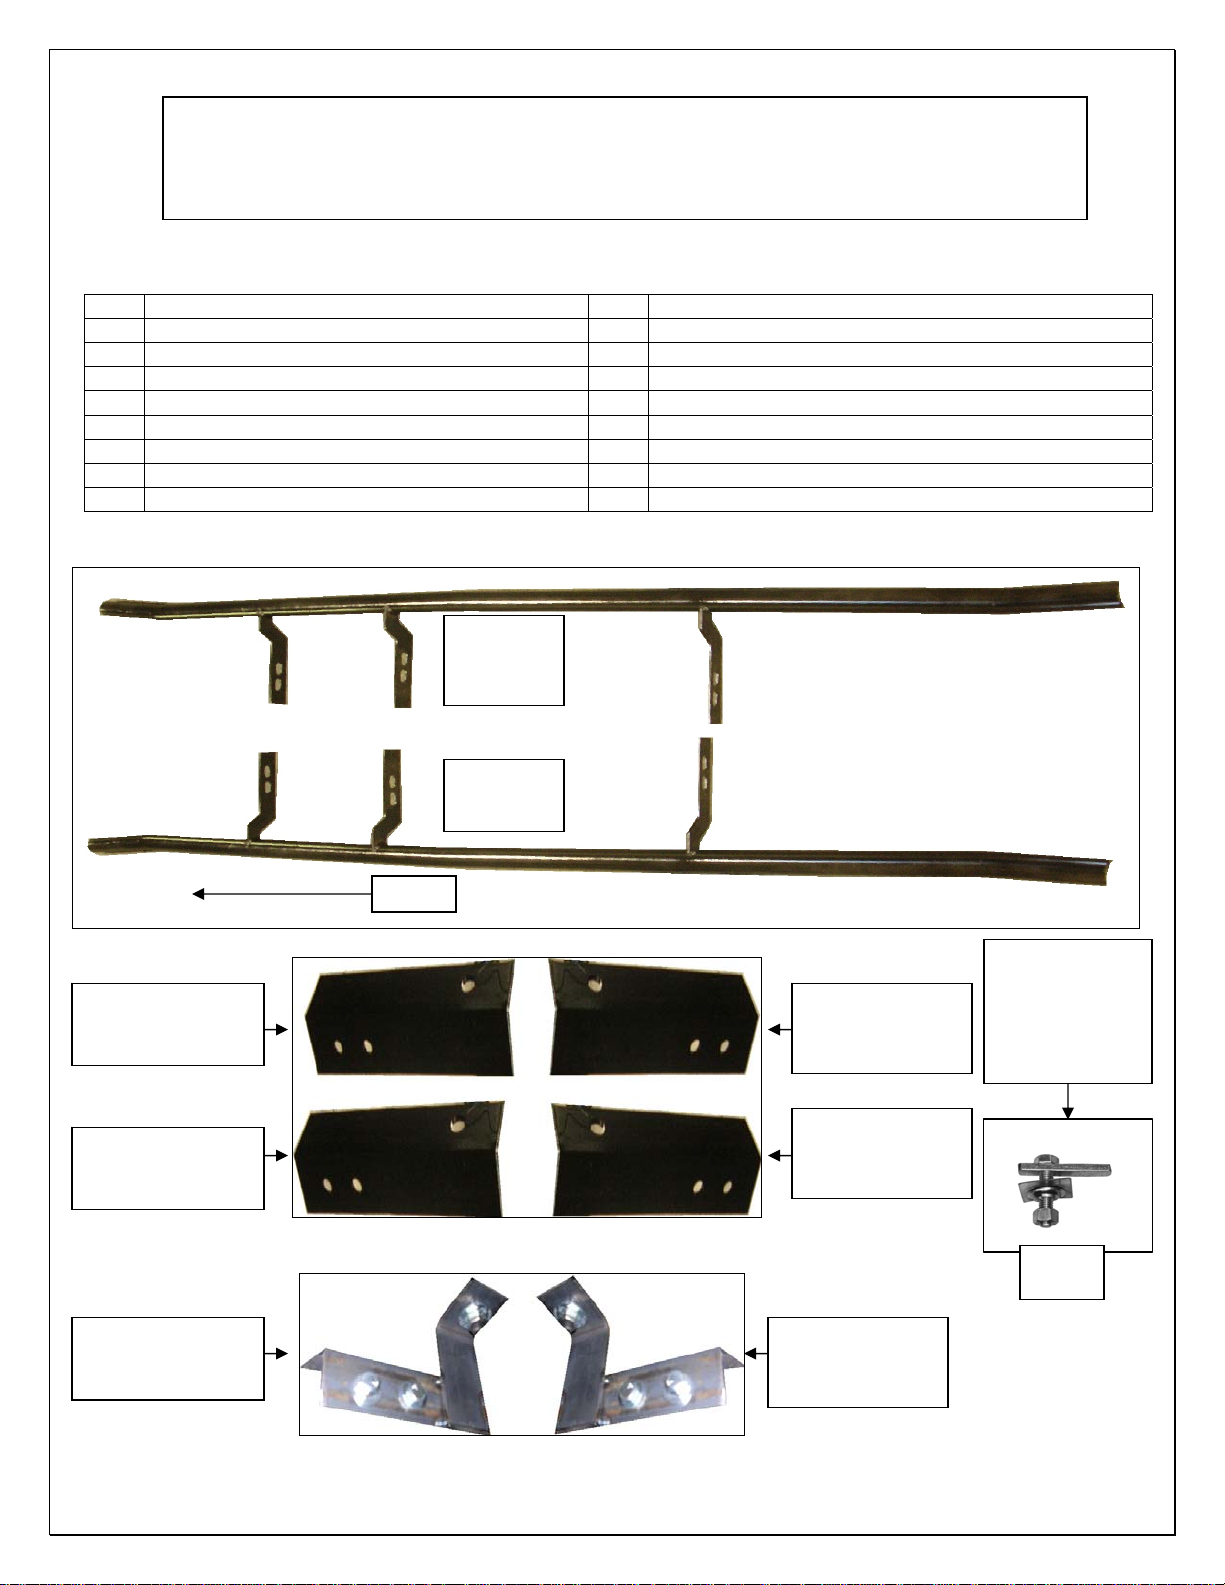
1 Driver/Left Side Rail 6 10mm Hex Nuts
1 Passenger/Right Side Rail 6 10mm Lock Washers
1 Driver/Left Front Mounting Bracket 6 10mm Flat Washers
1 Passenger/Right Front Mounting Bracket 6 10mm x 25mm Bolt Plate
1 Driver/Left Middle Mounting Bracket 24 8mm Flat Washer
1 Passenger/Right Middle Mounting Bracket 12 8mm Hex Nuts with lock Washer
1 Driver/Left Rear Mounting Bracket 12 8mm x 20mm Bolt
1 Passenger/Right Rear Mounting Bracket 6 Plastic Retainers
07-2009 MINI COOPER / S MODEL
Passenge
Right Side
Rail
Driver Left
Side Rail
Front
Drive
Left
Side front
mounting bracket
Drive
Left
Side middle
mounting bracket
Passenger/Right
Side front
mounting bracket
Passenger/Right
Side middle
mounting bracket
Drive
Left
Side rear
mounting bracket
Passenger/Right
Side rear
mounting bracket
10mm x 25mm
Bolt Plate
(pictured with
Plastic Retainer
installed for
example)
Fig 1A
Page 1 of 3 10/28/2009)
Page 2

PROCEDURE:
1. REMOVE CONTENTS FROM BOX. VERIFY ALL PARTS ARE PRESENT. READ
INSTRUCTIONS CAREFULLY BEFORE STARTING INSTALLATION.
2. Partially thread a Plastic Retainer onto each of the threaded ends of a Bolt Plate, (Fig 1A)
3. Once you have assembled the Plastic Retainer onto the Bolt Plates, Staring with the
Driver/Left side, insert the Bolt Plate into each of the factory round holes (Figure 1). Once the
Bolt Plates are inserted, hold the Bolt end with one hand and tighten the Plastic Retainer with
your other hand. NOTE: Tighten the Plastic Retainer until it reaches the floor panel.
4. Select the Driver/Left side front and middle Mounting Brackets. Position the Mounting Brackets
onto the installed Bolt Plates. Secure each with (1) 10mm Flat Washers, (1) 10mm Lock
Washers and (1) 10mm Hex Nuts, (Figure 2). Snug but do not tighten hardware at this time.
5. Remove the rubber plug located on the Driver side/Left rear floor board (Fig 3) Next, partially
thread a Plastic Retainer onto the threaded end of a Bolt Plate, once you have assembled the
Plastic Retainer onto the Bolt Plate; insert the Bolt Plate into the factory round hole Once the
Bolt tab is inserted, hold the Bolt end with one hand and tighten the Plastic Retainer with your
other hand. NOTE: Tighten the Plastic Retainer until it reaches the floor board.
6. Select the Driver/Left side rear Mounting Bracket. Position the Mounting Bracket onto the
installed Bolt Plate. Secure it with (1) 10mm Flat Washer, (1) 10mm Lock Washer and (1)
10mm Hex Nut, (Figure 4). Snug but do not tighten hardware at this time.
7. Next, select the Driver/Left side Rail and fasten it to the Mounting Bracket with the included
hardware, (6) 8mm Hex Head Bolt, (6) Hex Nuts lock washers, and (12) 8mm Flat Washer,
(Figure 2 & 4) Shows side rail installed to brackets.
8. Level and align Side rail properly; then tighten all hardware at this time.
9. Repeat steps 3-8 for Passenger Side Rail.
10. Do periodic inspections to the installation to make sure all hardware is secure and tight.
To protect your investment, wax this product after installing. Regular waxing is recommended to
add a protective layer over the finish. Do not use any type of polish or wax that may contain abrasives
that could damage the finish.
For stainless steel: Aluminum polish may be used to polish small scratches and scuffs on the finish.
Mild soap may be used also to clean the Sidebar.
For gloss black finishes: Mild soap may be used to clean the Sidebar.
Page 2 of 3 10/28/2009)
Page 3

r
/
r
/
DRIVER/LEFT SIDE INSTALLATION PICTURED
Fig 1
Fig 3
Fig 2
Fig 1A
Front
Fig 4
(2) 8mm Hex Bolt
(2) 8mm Lock Washer
(4) 8mm Flat washer
(2) 8mm Hex Nut
Front
(2) 8mm Hex Bolt
(2) 8mm Lock Washer
(4) 8mm Flat washer
(2) 8mm Hex Nut
Drive
Left
Side middle
mounting bracket
Drive
Left
Side front
mounting bracket
Driver/Left
Side location
of plug
(2) 8mm Hex Bolt
(2) 8mm Lock Washer
(4) 8mm Flat washer
(2) 8mm Hex Nut
(1) 10mm Lock Washer
(1) 10mm Flat washer
(1) 10mm Hex Nut
Fig 1A
Page 3 of 3 10/28/2009)
 Loading...