

Aries Automotive 365019-2 User Manual
A
INSTALLATION INSTRUCTIONS
365019 / 365019-2
2010 DODGE RAM CREW CAB 2500/3500
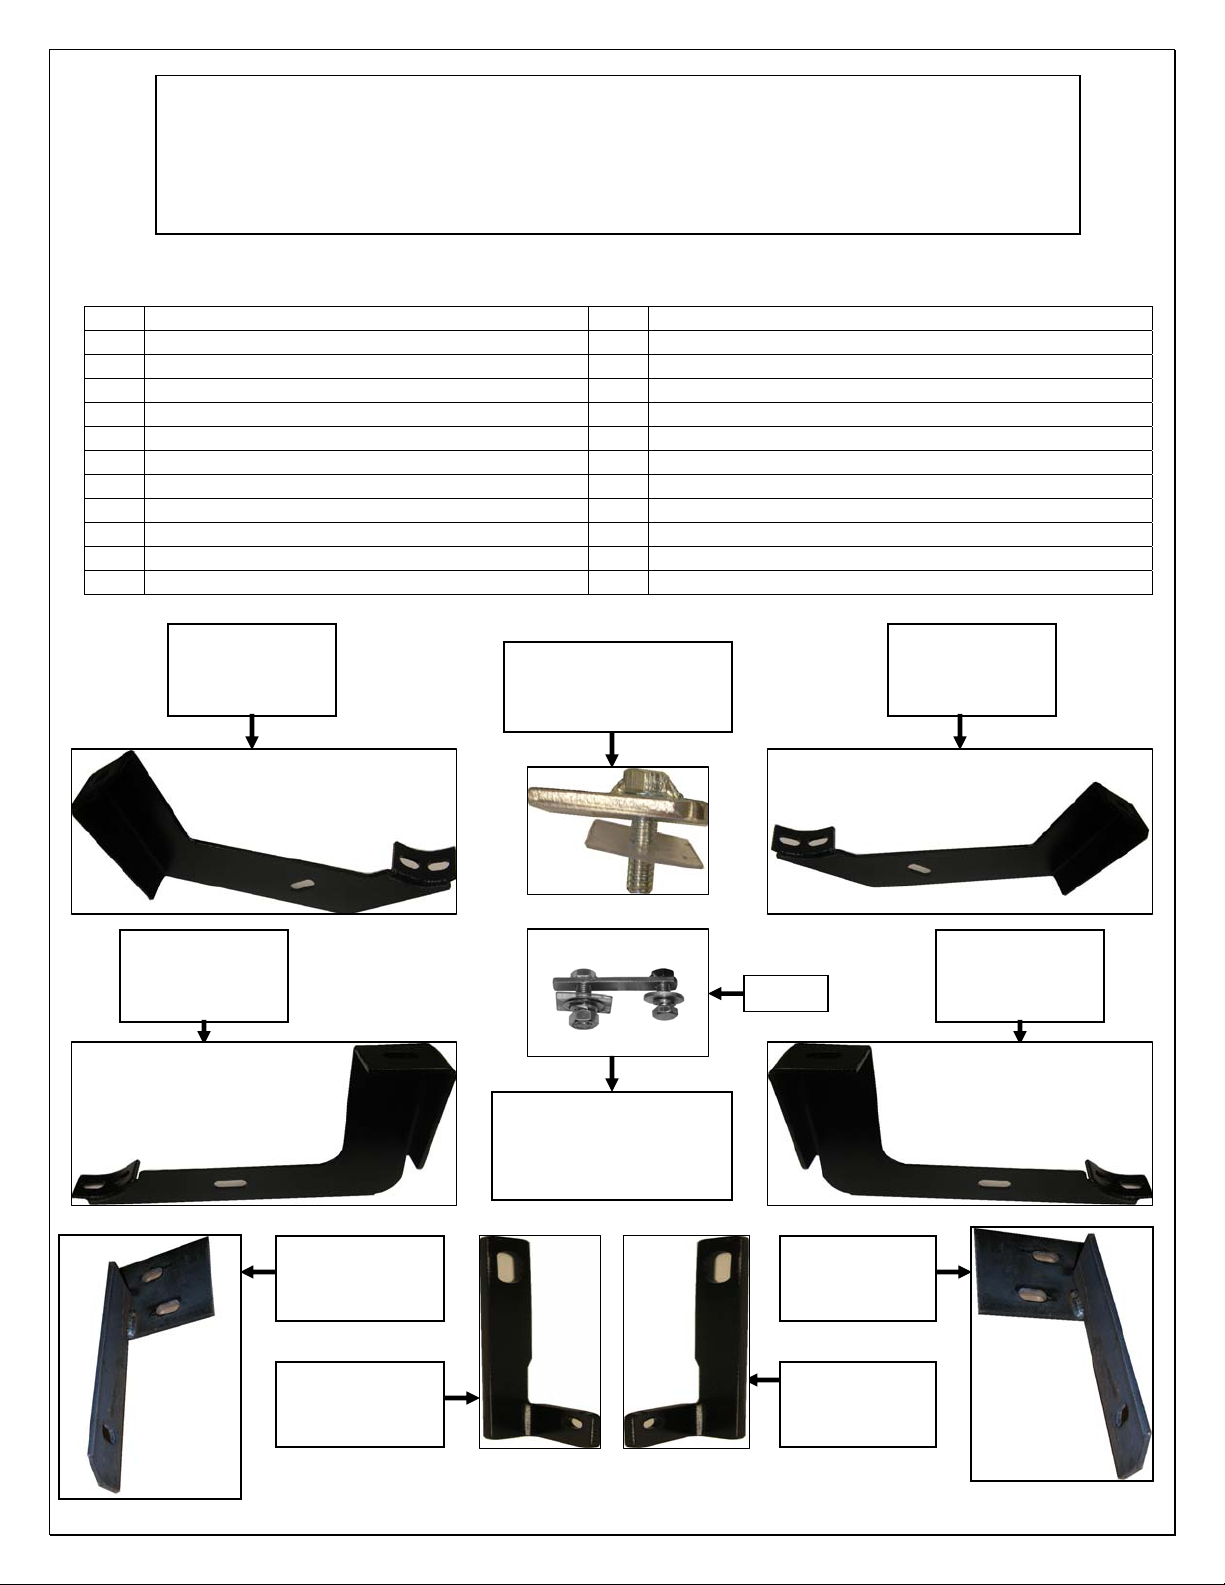
PARTS LIST:
Qty Description Qty Description
1 Driver/Left Side Bar 4 Plastic Square Retainer
1 Passenger/Right Side Bar 2 12mm x 120mm Hex Bolt
1 Driver/Left Front Mounting Bracket 2 12mm x 150mm Hex bolt
1 Passenger/Right Front Mounting Bracket 4 12mm x 44 OD Flat Washer
1 Driver/Left Rear Mounting Bracket 4 12mm Lock Washer
1 Passenger/ Rear Mounting Brace Bracket 14 10mm x 30mm OD Flat Washer
1 Driver/Left Front Brace Bracket 14 10mm Lock Washer
1 Passenger/ Front Brace Bracket 2 10mm x 35mm Bolt Plate
1 Driver/Left Rear Brace Bracket 8 10mm Hex Nut
1 Passenger/ Rear Brace Bracket 14 10mm x 35mm Hex Bolt
2 10mm x 35mm Bolt & Nut Plate 8 10mm x 24 OD Flat Washer
Passenger/Right
side Rear
Mounting Bracket
10mm x 35mm Bolt Plate
(with Plastic retainer
installed)
Passenger/Right
side Front
Mounting Bracket
Part 1
10mm x 35mm Bolt/10mm
Nut Plate (pictured with
Plastic Retainer installed
for example)
Passenger/Right
side Rear Brace
Bracket
Driver/Left side
Rear Brace
Bracket
Passenger/Right
side Front Brace
Bracket
Driver/Left side
Front Brace
Bracket
Driver/Left side
Rear
Mounting Bracket
Driver/Left side
Front
Mounting Bracket
Page 1 of 5 1/26/2010

PROCEDURE:
1. REMOVE CONTENTS FROM BOX. VERIFY ALL PARTS ARE PRESENT. READ
INSTRUCTIONS CAREFULLY BEFORE STARTING INSTALLATION.
Note: Included in this mount kit there is extra hardware, which is used for different
models and years. Please review Instructions for the list of hardware needed for your
vehicle.
2. Starting at the Passenger/Right side-front of the vehicle, remove the tape covering the factory
oval holes in the passenger side inner panel located by the front tire. (Fig1) shows location of
hole.
3. Next, from the parts list above partially thread a Plastic Retainer onto the threaded end of a
Bolt Plate.
4. Once you have assembled the Plastic Retainer onto the Bolt Plate, insert the Bolt Plate into
the factory oval hole. Once the Bolt Plate is inserted, hold the Bolt end with one hand and
tighten the Plastic Retainer with your other hand. NOTE: Tighten the Plastic Retainer until it
reaches the side panel, (Part 1A). Shows Bolt Plate installed with plastic retainer.
5. From the parts list above, select the Passenger/Right side front brace bracket. Position the
brace bracket onto the installed Bolt Plate. Secure it with (1) 10mm x 30 OD flat washers, (1)
10mm lock washers and (1) 10mm Hex Nuts, (Fig 2). Shows brace bracket installed with
hardware. Snug but do not tighten hardware.
6. Starting at the Passenger/Right side-front of the vehicle, remove the front factory body bolt &
washer. (not re-used) (Fig 3), Shows location of body bolt & washer to be removed. From the
parts list above select the Passenger/Right side front mounting bracket and secure it with (1)
12mm x 120mm Hex Bolt, (1) 12mm x 44 OD Flat Washer, (1) 12mm Lock Washers, Secure
front brace bracket, to the installed front mounting bracket with (1) 10mm x 35mm hex bolt, (2)
10mm x 30 OD flat washers, (1) 10mm lock washers and (1) 10mm Hex Nuts, (Fig 4) shows
mounting bracket attached . Snug but do not tighten hardware at this time.
7. Moving to the passenger side rear of the vehicle, remove the tape covering the factory oval
hole in the inner body panel as seen in (Fig 5). Thread a Plastic Retainer onto the threaded
end of a Bolt and Nut Plate, (Part 1A). Insert the Bolt and Nut Plate into the factory hole. Once
the Bolt and Nut Plate is inserted, hold the Bolt end with one hand and tighten the Plastic
Retainer with your other hand, (Fig 5A). NOTE: Tighten the Plastic Retainer until it reaches
the side panel.
8. Select the passenger side rear Brace Bracket. Position the Brace Bracket onto the installed
Bolt and Nut Plate. Secure it with (1) 10mm Flat Washer, (1) 10mm Lock Washer and (1)
10mm Hex Nut, (Fig 6). Do not tighten at this time. Rotate the Bolt and Nut plate until the Nut
end lines up with the remaining hole in the Mounting Bracket and body. Thread (1) 10mm x
35mm Hex Bolt, (1) 10mm Flat Washer and (1) 10mm Lock Washer into the threaded nut.
Snug but do not tighten hardware at this time.
Page 2 of 5 1/26/2010
 Loading...