

Page 1
INSTALLATION INSTRUCTIONS
2505/2505-2
98-2007 SMART CAR
PARTS LIST:
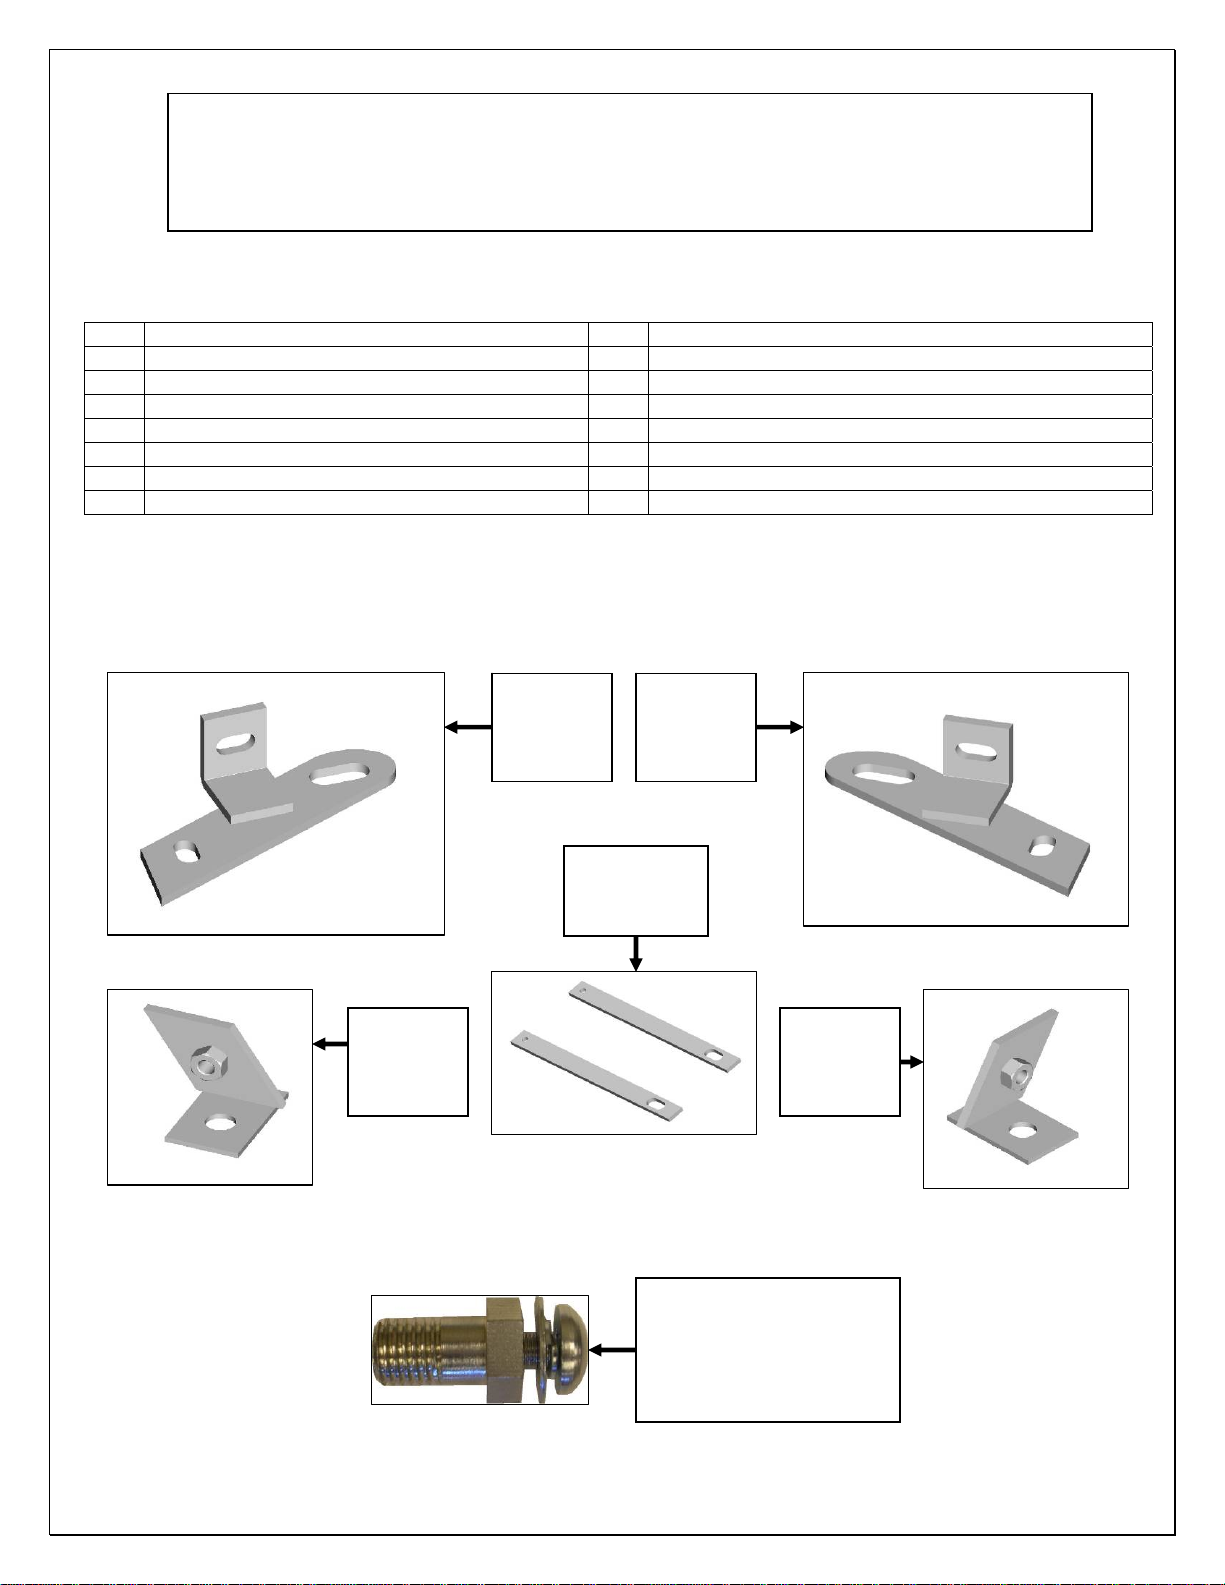
Qty Description Qty Description
1 Sport Bar 1 8mm x 30mm Bolt (Mate)
1 Driver/Left Lower Mount Bracket A 1 8mm Flat Washers
1 Passenger/Right Lower Mount Bracket B 4 10mm Nuts
1 Driver/Left Lower Mount Bracket A1 6 10mm x 30mm Bolts
1 Passenger/Right Lower Mount Bracket B1 12 10mm Flat Washers
2 Passenger & Driver Upper Support Straps 6 10mm Lock Washers
1 21mm x Tow Thread Bolt
Driver/Left
Side
Mounting
Bracket A1
Passenger/
Right Side
Mounting
Bracket B1
Passenger &
Driver Side
Support Strap
Driver/Left
Side
Mounting
Bracket A
Passenger/
Right Side
Mounting
Bracket B
21mm Tow Threaded Bolt
(pictured with 8mm flat
washer, 8mm lock washer &
8mm Bolt mate
Installed for example)
Page 1 of 4 5/5/2010)
Page 2

PROCEDURE:
1. REMOVE CONTENTS FROM BOX. VERIFY ALL PARTS ARE PRESENT. READ
INSTRUCTIONS CAREFULLY BEFORE STARTING INSTALLATION.
2. Located just under the front of the car is the plastic skid shield, you will need drop the front of
the skid shield down, to install the Mounting brackets.
3. To do this there are (2) upper bolts (1) per side, remove both sides (Fig 1) shows location of
Driver/Left side bolt located in the inner wheel well. Once removed, with a flat screw driver
begin to pop the plastic two lower tabs where the skid shield attaches to the front lower portion
of the bumper (Fig 1A) shows location plastic tabs carefully pull skid shield down allowing you
access to the sway bar nuts to install lower mounting brackets.
4. With the skid shield lowered you need to remove the nuts securing the cars sway bar (Fig 2)
shows location of nuts to be removed, Select the Driver/Left side mounting bracket A from the
list of parts above, place the Driver/Left side mounting bracket A over the bolt end followed by
the factory nut, snug but do not tighten hardware. Repeat for Passenger/Right side.
5. Once brackets are attached lift the skid shield up to where it makes contact to the bottom of
the mounting bracket, and mark area, with a utility knife, cut a small rectangle hole in the
plastic to allow brackets to fit threw the skid shield, Being careful not to cut the sides of the
plastic skid shield, (Fig 2A) Shows cut in plastic skid shield. Remove brackets A1 & B1.
6. With the holes cut and the brackets removed, lift the skid shield up and back to its factory
location and reattach the mounting brackets A1 & B1 tighten brackets (Fig 3) shows
Passenger & Driver side brackets reattached. Push the lower skid shield front tabs back into
place and secure both the upper support strap and the upper skid shield with the factory bolts
and tighten. (Fig 4) shows Driver/left side attached. (Repeat for Passenger/right side).
7. Select the Driver/left side mounting bracket A from the list of parts above, attach to Driver/left
side mounting bracket A1 with (1) 10mm bolt (1) 10mm flat washer and (1) 10mm lock washer.
(Repeat for Passenger/Right Side). (Figure 5) Shows Driver/left side mounting brackets
attached.
8. Install the upper support strap to the mount bracket with (1) 10mm Hex bolt, (2) 10mm Flat
washers (1) 10mm lock washer and (1) 10mm Nuts per side,(Fig 5A) shows support strap
attached to Driver/Left side. (Repeat for Passenger/Right side).
9. On the front of Bumper (Passenger/Right side) with a flat screw driver begin to pop the plastic
cap, exposing the Tow Hook threads, Select the Tow threaded bolt from the list of parts above
place the thread bolt into the hole and tighten, remove the small 8mm bolt mate and washers if
attached.
10. You can now attach the Sport bar to the lower mounting brackets, and secure with (2) 10mm
bolts, (4) 10mm flat washers, (2) 10mm lock washers and (2) 10mm nuts, (Fig 6). Snug but do
not tighten hardware. Once done place (2) 10mm flat washer in-between the tow hook bolt and
the front upper bracket welded to the front sport bar secure top bracket with the (1) 8mm bolt
mate (1) 8mm flat washer, Snug but do not tighten hardware.
Page 2 of 4 5/5/2010)
Page 3

11. Level and align Sport Bar properly; then tighten all hardware at this time. (Fig 7) shows install
completed
12. Do periodic inspections to the installation to make sure all hardware is secure and tight.
To protect your investment, wax this product after installing. Regular waxing is recommended to
add a protective layer over the finish. Do not use any type of polish or wax that may contain abrasives
that could damage the finish.
For stainless steel: Aluminum polish may be used to polish small scratches and scuffs on the finish.
Mild soap may be used also to clean the Sidebar.
For gloss black finishes: Mild soap may be used to clean the Sidebar.
Skid Shield removal shown from Driver/Left side
Fig 1
Fig 1A
Front
Remove bolt, 1 per side
Plastic two lower tabs
Fig 2
Remove nuts
Fig 2A
Area to cut for
bracket to slip threw
Passenger/Right side
shown
Page 3 of 4 5/5/2010)
Page 4

Fig 3
A1 & B1 brackets attached
to sway bar
Passenger/right
Driver/left
Fig 5
Driver/left side
Mounting
bracket A
attached to
mount bracket
A1
Fig 6
Fig 4
Driver/Left Side Upper
Support strap attached
Fig 5A
Driver/Left Side Upper
Support strap attached to
mount bracket
Fig 7
Tow thread
bolt
Page 4 of 4 5/5/2010)
 Loading...