

Aries Automotive 2067-2 User Manual

O
L
Y
Y
T
R
N
Q
7
T
INSTALLATI
GRI
07-14 TO
08-14 TO
PART
N INS
LE GUA
OTA TU
OTA SE
# 2067/206
RUC
D
DRA
UOIA
-2
IONS
P
A
O
a
O
1
2
3
e
e
s
e
s
e
s
.
m
m
T
m
h
r
r
E
U
R
t
3
e
h
m
r
P
T
M
F
a
T
a
T
m
D
h
u
o
g
g
T
O
E
h
8
r
o
e
e
R
B
a
n
a
t
t
G
B
I
D
.
h
o
r
B
p
o
t
h
B
t
Y
L
E
M
b
1WasDr
c
(B(
(
m
1
S4 12 14 84 84 84 14 12 6
o
e
m
C
T
M
W
E
o
a
e
e
a
c
u
i
a
y
s
L
m
y
2
a
m
c
c
m
a
s
a
R
F
a
o
f
t
c
s
u
T
R
s
o
F
A
i
o
e
"
E
V
e
F
m
g
F
e
r
G
e
a
a
U
O
R
e
b
e
D
A
P
RTS LIST:
Passenge
Top Brack
IMP
RTANT:
08-1
4 Sequoia
sed and t
rele
that
all hardwa
of H
ood," befo
PR
CEDURE:
. REMOV
. Start ins
. Locate t
1 Grill
1 Driv
1 Pas
1 Driv
1 Pas
1 Driv
1 Pas
4 12-1
4 12m
4 12m
CAREF
SENSO
CRUISE
07-1
abov
2014
front bu
Guard
r/left Frame
enger/right
r/left Top Fr
enger/right
r/left Top Br
enger/right
75mm x 35
x 32mm O
Lock Was
/Right
et
assenger/
op Frame
he Grille G
odels. To
e upper b
e is fully ti
e installin
CONTEN
LLY BEF
S. NOT R
CONTROL
allation at t
Tundra, 0
or below f
Tundra m
e passeng
per and th
ounting Br
rame Mounti
me Bracket
op Frame Br
cket
op Bracket
m Hex Bolts
x 3mm Fla
ers
ight
racket
Pa
M
ard is des
tilt the Gril
lts on both
htened af
the Grille
S FROM
RE START
COMMEN
SYSTEMS
e front of t
-14 Sequ
ont bumpe
dels: Top
r side bum
radiator or
cket
g Bracket
cket
Washers
(4)
M
ssenger/Rig
unting Bra
(4) 12m
igned to til
le Guard, t
Mounting
er closing
uard.
OX. VERIF
NG INSTA
ED FOR V
CUTTING
e vehicle.
ia models:
depending
rackets mu
er bracket
from below
2
2) 10mm Q
olts with P
4) 10mm Fl
2) 10mm N
0mm Plasti
hers
iver/Left Fr
ounting Bra
ht Frame
ket
Plastic Wa
forward t
e Quick R
rackets
he hood.
ALL PAR
LATION.
HICLES
AY BE R
Open the h
on model,
st be install
olted to th
the bumper
0mm Cam
pecial Pivot
0mm x 24m
0-1.5mm N
-1.25mm x
mm Lock W
mm x 22m
2mm Plasti
0mm Plasti
00mm x 50
ick Release
vot Washer
t Washers
lon Lock N
c
me
ket
hers
clear the
lease Bolt
ay need to
arefully re
S ARE P
AY INTER
ITH OPTIO
QUIRED.
od. Top Br
ccessories
d from bel
end of the
above the
07-14 TOYO
ever Quick
Washer
OD x 2.2m
lon Lock Nut
5mm Hex B
shers
OD x 2mm
Washers
Washers
m x 1.0mm
ts
Driver/L
Frame B
ttached gr
on the T
be loosen
d Page 8,
ESENT. R
ERE WITH
NAL "ACTI
ckets can
and year, (
w front bu
rame throu
ow hook, (
A TUNDRA, 0
elease Bolts
m Flat Wash
lts
lat Washers
dhesive Fo
Driver/L
Bracket
ft Top
acket
lle on 2007
p Brackets
d slightly.
Opening
AD INSTR
FRONT M
E" LASE
ither be ins
igure 1A &
per, (Figur
h the gap
igure 1B). I
RILLE GUAR
8-14 SEQUOI
with
rs
m Strips
ft Top
-13 Tundra
must be
Make sure
nd Closing
CTIONS
UNTED
GUIDED
talled from
1B).
1B).
etween the
f installing
Pa
ge 1 of 8
5/1
9/14 Rev1 (D
)

GRILLE GUARD
07-14 TOYOTA TUNDRA, 08-14 SEQUOIA
from below, remove the hardware attaching the bumper cover to the cross member to access the end
of the frame and bracket, (Figure 2).
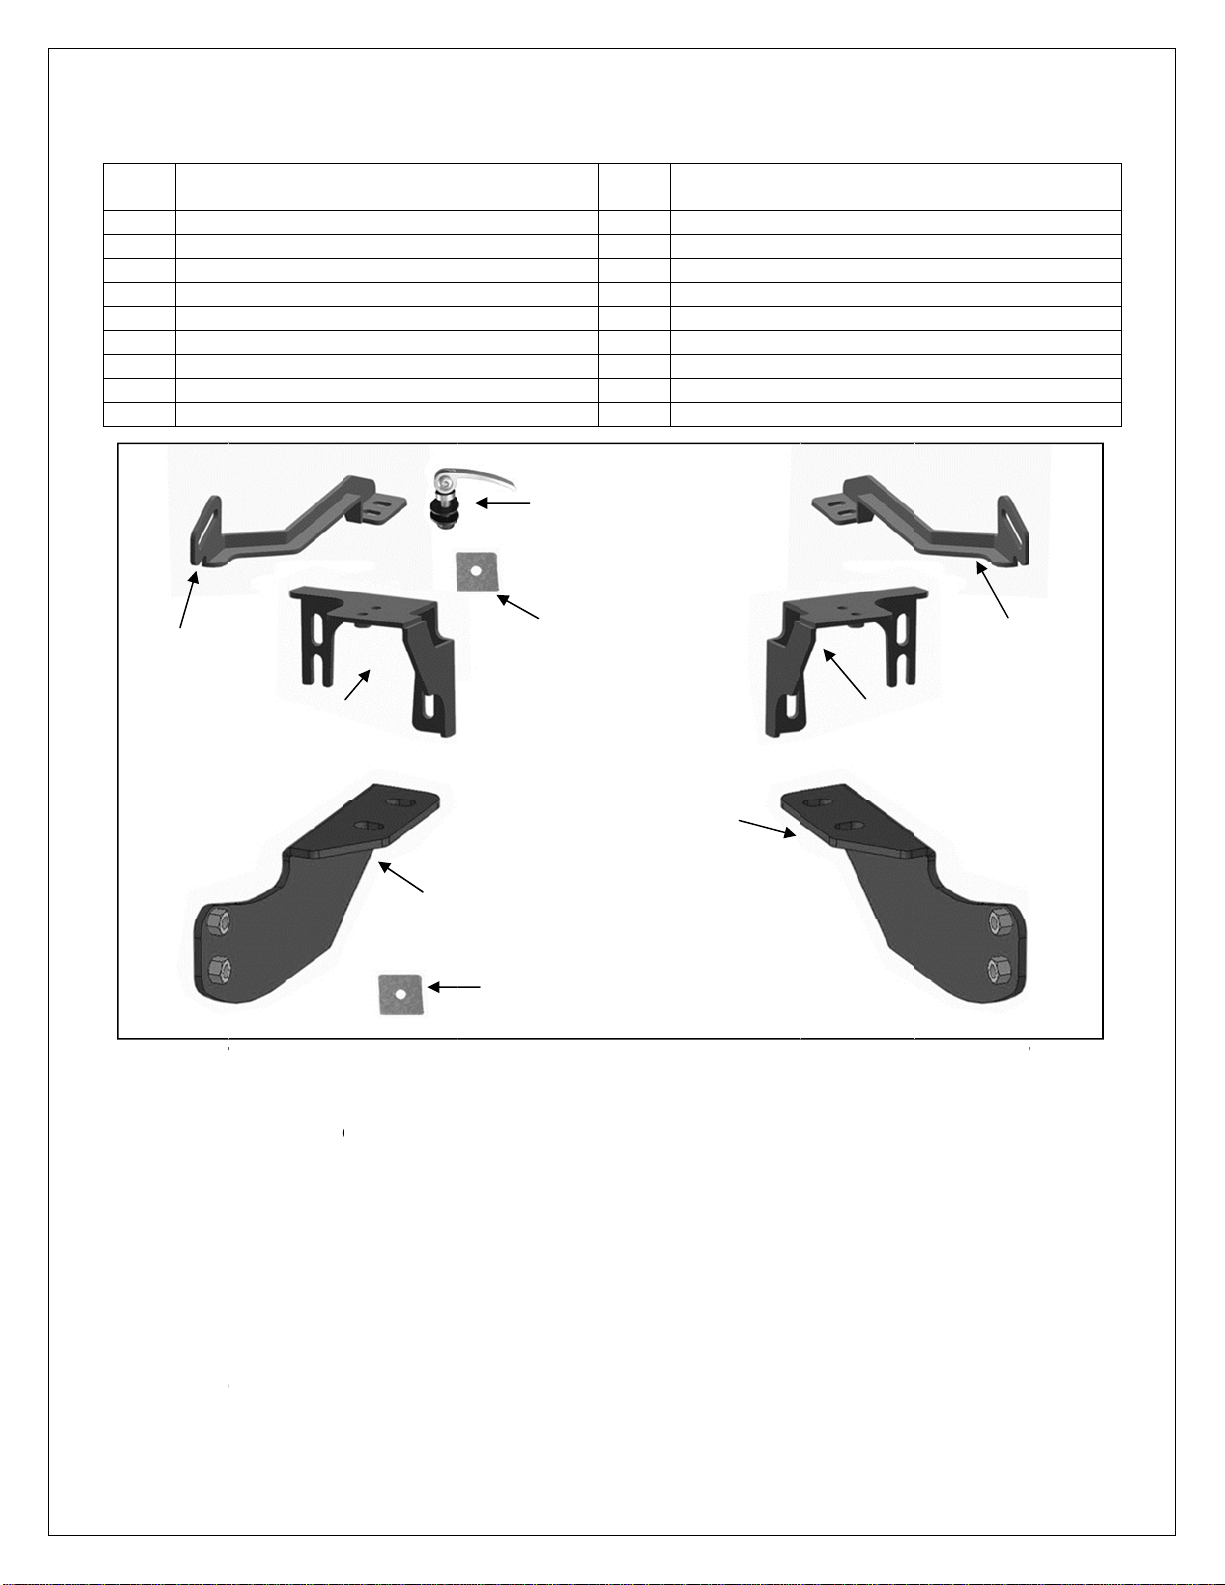
4. Select the passenger side Top Frame Bracket, (Figure 3A). Remove the top (2) factory hex nuts on the
outside and the single hex nut on the inside attaching the factory bumper bracket to the end of the
frame on the passenger side, (Figure 3B).
5. Slide the U-shaped Bracket over the top of the bumper bracket, down and over the (3) threaded studs,
(Figure 4). If installing from below, carefully pull the bottom of the bumper cover outward and slide the
Bracket up and in position. Use the factory hex nuts to attach the Top Bracket to the bumper bracket.
Snug but do not fully tighten the (3) hex nuts at this time.
6. Repeat Steps 3—5 to install the driver side Top Frame Bracket. IMPORTANT: Installation will require
removal or cutting of plastic air deflector, if equipped, attached to the back of the lower grille, (Figures
5A & 5B). NOTE: Depending year and model, it may be necessary or easier to remove bumper cover
to remove the air deflector from back of lower grille insert.
7. From under the front of the vehicle, remove the (2) factory tow hooks and set aside, (Figures 6 & 7).
Select the passenger side Frame Mounting Bracket, (Figure 8A).
Vehicles with small tow hook: Line up the holes in the tow hook with the slots in the Bracket. Bolt
the tow hook and Bracket to the bottom of the frame using the factory tow hook bolts, (Figure 8B).
Vehicles with large tow hooks: Bolt the passenger/right side Frame Mounting Bracket directly to
the bottom of the frame with the two factory hex bolts. NOTE: Large tow hook cannot be reinstalled,
(Figure 7).
8. Repeat Step 7 to install the driver/left side Frame Mounting Bracket. Leave hardware loose at this time.
9. Select the passenger side Top Bracket, (Figure 9A). Apply the included Adhesive Backed Foam Tape
to the Bracket as needed to protect the grille opening from contact with the Bracket.
10. Slide the Top Bracket in through the opening in the bumper, (Figure 9B). Line up the (2) holes in the
Bracket with the previously installed Frame Bracket, (Figure 10A). Bolt the Top Bracket to the top of
the Frame Bracket with (2) 8mm Hex Bolts, (2) 8mm Lock Washers and (2) 8mm Flat Washers, (Figure
10B). Leave hardware loose at this time.
11. Repeat Steps 9 & 10 to install the driver side Top Bracket.
12. With assistance, place the Grille Guard face down on a clean surface in front of the vehicle. Position
the mounting tabs on the Grille Guard up to the outside of the passenger side Frame Mounting Bracket.
Line up the lower hole in the Bracket with the lower hole in the Grille Guard.
13. Insert (1) 12mm Plastic Washer between the Mounting Bracket and the Grille Guard. Line up the Grille
Guard, Washer and Bracket and bolt together with the included (1) 12mm x 35mm Hex Bolt, (1) 12mm
Lock Washer and (1) 12mm Flat Washer, (Figure 11).
14. Repeat Steps 12—13 to attach the driver side mounting tab to the Bracket. Leave hardware loose.
15. Use the (2) previously installed 12mm Hex Bolts as a hinge. With assistance, carefully rotate the Grille
Guard up to the vehicle, (Figure 11). Line up the two remaining holes in the Mounting Brackets with the
holes in the Grille Guard. Repeat
Steps 13 & 14 to attach the Grille Guard to the Brackets, (Figure 12).
Snug but do not tighten hardware at this time.
16. Next, move to the passenger side Top Bracket installed in Steps 9 & 10. Line up the long slot in the
Top Bracket with the slot in the Grille Guard upright, (Figure 13). Insert (1) 10mm Quick Release Bolt
with Pivot Washer and (1) 10mm Flat Washer through the Grille Guard. Thread (1) 10mm Plastic
Washer part way onto the threads. Slide the Top Bracket over the Quick Release. Thread (1) 10mm
Plastic Washer, (to protect the finish on the Top Bracket), (1) 10mm Flat Washer and (1) 10mm Nylon
Lock Nut, (Figure 13), onto the Quick Release. Do not fully tighten hardware at this time.
17. Repeat Step 16 to attach the driver side Top Bracket to the Grille Guard.
18. Release/loosen the levers on the Quick Release Bolts, (Figure 13), and pull the Grille Guard away from
the vehicle to the "open" position, (Figure 15). NOTE: It may be necessary to slightly loosen the top (2)
12mm Hex Bolts on the Frame Mounting Brackets to move the Grille Guard, (Figure 16). Center and
level the Grille Guard and tighten all hardware including the Frame Mounting Brackets.
19. Adjust the Quick Release Bolt clamping pressure by loosening or tightening the 10mm Nylon Lock
Nuts. See Steps 23—27 for more information. NOTE: Tilt feature only required on 07-13 Tundra and
08-14 Sequoia models. 2014 Tundra model installation can skip to Step 21.
Page 2 of 8 5/19/14 Rev1 (DP)
 Loading...