

Aries Automotive 204037 User Manual
1973-87 Chevrolet and GMC
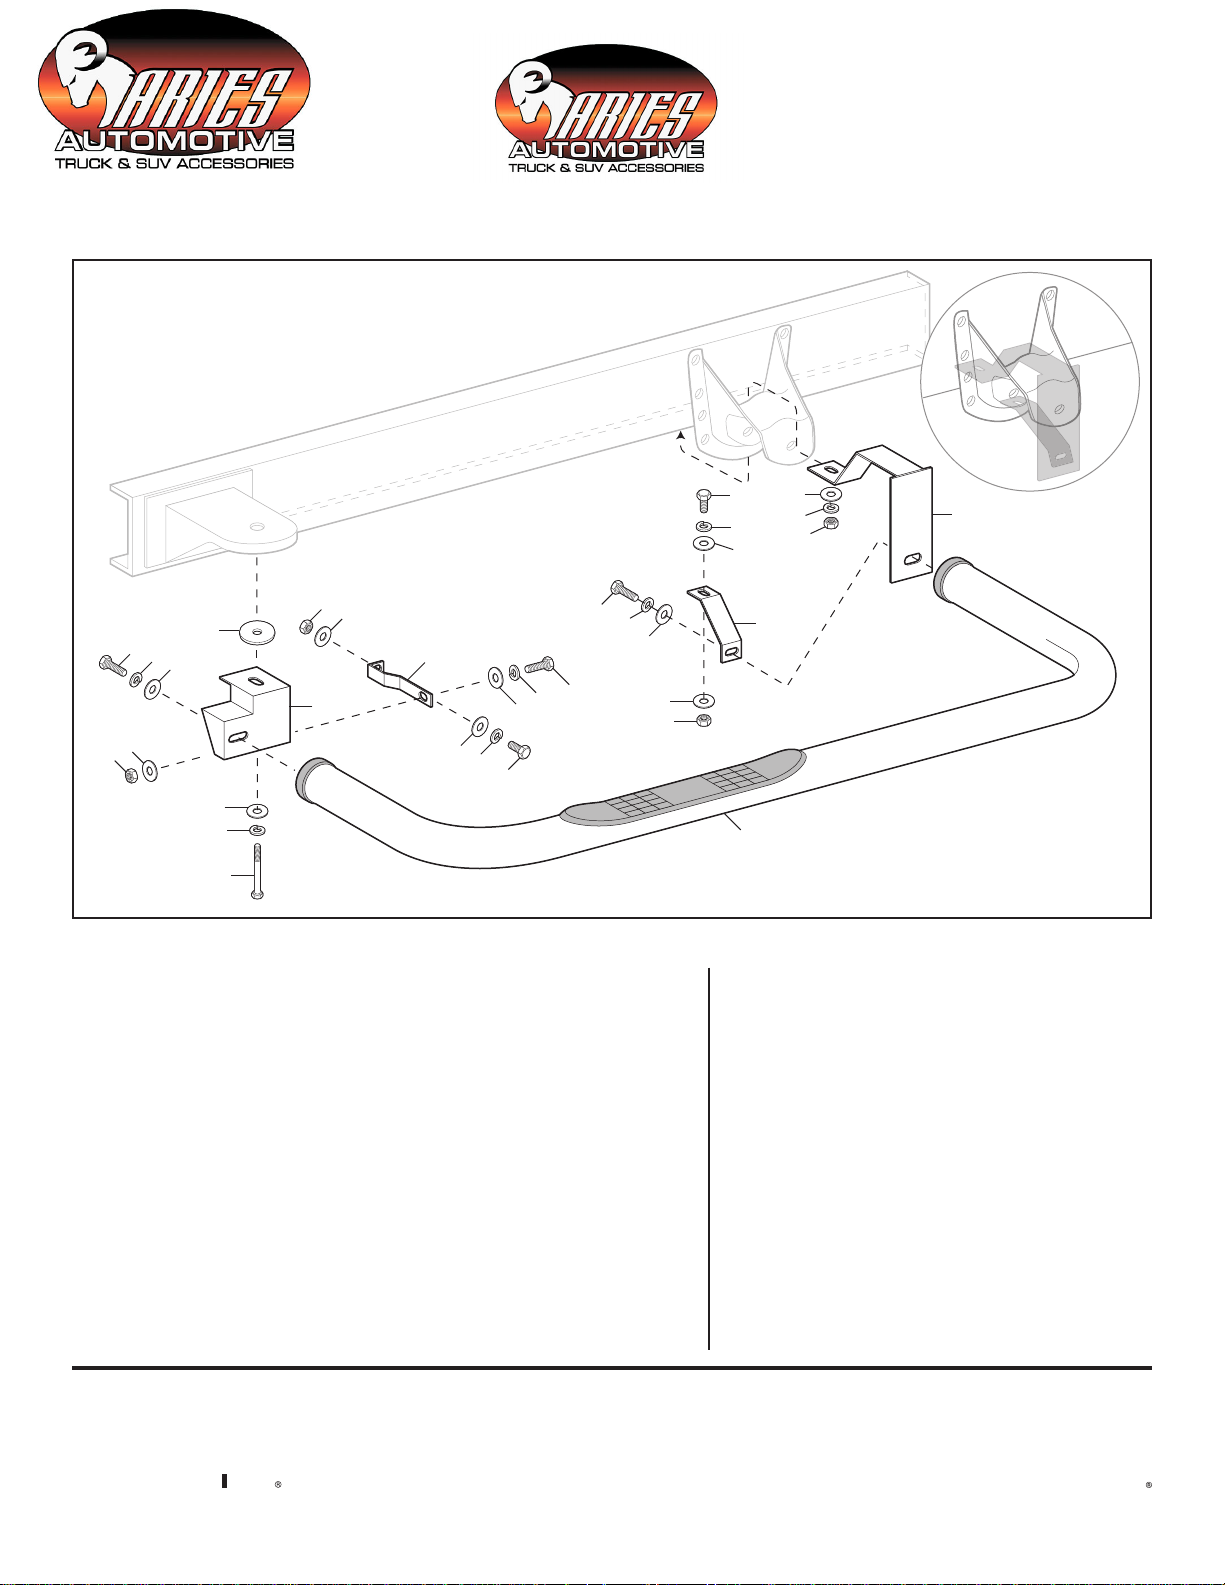
Shortbed Trucks
Assembly
6
9
19
7
18
11
8
12
Part #204037
➔
Front
11
12
3
2
12
13
10
12
13
10
Part
#204038
1973-87 Chevrolet and GMC
Longbed Trucks
7
14
18
18
17
7
8
9
19
7
17
5
1
4
15/16
ILL# Content List: (Qty)
1. LH Step Bar (1)
RH Step Bar (1)
2. LH front step bar mounting bracket (1)
RH front step bar mounting bracket (1)
3. Front support brackets (2)
4. Rear step bar mounting brackets (2)
5. Rear support brackets (2)
6. 3/16" thick spacer washers (2)
7. 1/2"atwashers (8)
8. 12mm x 1.75 x 50mm step bar mounting bolts (4)
9. 12mm lock washers (4)
Driver's Side
ILL# Content List: (Qty)
10. 3/8 x 1-1/4" hex head bolts (4)
11. 3/8" hex nuts (4)
12. 3/8"atwashers (8)
13. 3/8" lock washers (4)
14. 1/2 x 2" hex head bolts (2)
15. 1/2 x 3-1/2" hex head bolts (2)
16. 1/2 x 5" hex head bolts (2)
17. 1/2" hex nuts (4)
18. 1/2" lock washers (6)
19. 12mmatwashers (4)
Reprinted from manufacturer and distributor information.

Part #204038
Step Bar
(continued)
Installation Instructions
(continued)
Instructions:
Read instructions completely before proceeding with installation.1.
Remove the front cab mount bolt. Depending on its condition, you may be able to reuse your existing 2.
bolt. 1973-80 models will use the 1/2 x 5" bolts, while 1981-87 models will use the 1/2 x 3-1/2" bolts.
Install the front step bar mounting bracket to the front cab mount bolt. Install flat washer and hand
tighten.
Remove the nut from the rear body hold down bolt. The nut is positioned on the lower edge of the 3.
frame rail directly behind the front spring hanger on the rear suspension. Insert the rear step bar
mounting bracket through the gap between the front spring hanger and the frame. Position the bracket
so that the rear body hold down bolt goes through the hole in the mounting bracket. Install flat washer,
lock washer, 1/2" hex nut and hand tighten.
Install step bar to front and rear brackets using the 12mm x 1.75 x 50mm bolts, lock washers and flat 4.
washers. With the bar bolted to front and rear brackets, check for proper clearance between step bar
and rocker panel. If additional clearance is necessary, use the 3/16" spacer washers, as required,
between the flat washer on the bottom side of the cab bushing and the front step bar mounting
brackets.
With proper clearance established, the front support bracket can be installed. Position the front 5.
support bracket inside of the step bar mounting bracket. The 90° end of the support bracket installs
to the frame rail with the closed end facing towards the front of the vehicle. When positioned correctly
the support bracket mounting hole lines up with an existing slotted hole in vehicle frame. Install
support bracket to the step bar mounting bracket and to the frame using the 3/8 x 1-1/4" hex head
bolts and corresponding lock washers, flat washers and hex nuts.
Installation of the rear support bracket will require drilling one 1/2" mounting hole per side in the lower 6.
inside edge of the front spring hanger. Remove the rear step bar mounting bolt and position rear
support bracket so that it spans from the step bar mounting hole to the lower edge of the front spring
hanger. Install step bar mounting bolt and hand tighten. Mark location on spring hanger for mounting
hole to be drilled. Drill hole and then use the 1/2 x 2" hex head bolt, lock washer, flat washer and hex
nut to secure the rear bracket to the spring hanger.
Check alignment of step bar. Make any final adjustments and then tighten all bolts.7.
Repeat procedure for the opposite side.8.
Check fasteners periodically. Re-tighten as necessary.9.
 Loading...